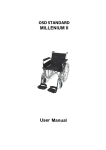
1
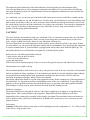
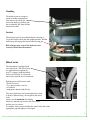
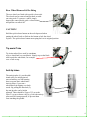
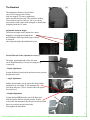
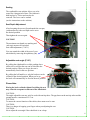
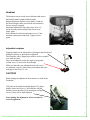
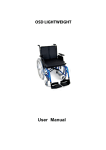
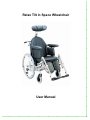
Relax Tilt in Space Wheelchair
User Manual
The engineering and construction of this wheelchair have been designed to provide maximum safety.
Users may put themselves at risk by improperly using their wheelchairs. For your own safety, the following
rules must absolutely be observed. Unprofessional or erroneous adaptation or adjustment work could increase
the risk of accidents.
As a wheelchair user, you are also part of the daily traffic on the streets and we would like to remind you that
you are thus also subject to any and all traffic laws. For this reason, you should always wear light clothing in the
dark as much as possible, so that you can be seen more easily and make sure that the reflectors are not covered.
Be careful during your first ride in this wheelchair. Get to know your wheelchair. Test what effect changing the
centre of gravity would have on the behaviour of your wheelchair. Practice using your wheelchair on level
ground, as well as going uphill and downhill.
CAUTION!
The wheel locks are not intended to brake your wheelchair. They are only there to ensure that your wheelchair
does not begin rolling unintentionally. When you stop on uneven ground, you should always use the wheel
locks. Always set both wheel locks, otherwise your wheelchair could tip over.
The wheel locks have not been designed to be used as brakes. Always make use of lifts or use ramps. If these
are not available, you can reach your destination with the aid of two attendants. They should grip the wheelchair
at securely mounted parts. If your wheelchair is equipped with anti-tip tubes, these should be pulled up. The
wheelchair should never be lifted with an occupant in it, it should only be pushed.
Before each use, the following should be checked:
• quick-release axles on the rear wheels
• Velcro on seats and backrests
• tyres and wheel locks
Wheel locks will not function properly if tyres are worn or the gap between tyres and wheel locks is too large.
The maximum user weight is 140 kg.
The wheelchair should be used exclusively to convey one person at a time in the seat. Any other use beyond this
limit is in violation of safety regulations. It is advised that users should not sit in the wheelchair while riding in
any and all means of transportation! Only permanently installed seats and seat belts will offer sufficient
protection in hazardous situations. When vehicles are in motion,
unoccupied wheelchairs should be secured using appropriate means. Before changing any of the adjustments of
this wheelchair, it is important to read the corresponding section of the user’s instructions. It is possible that
potholes or uneven ground could cause this wheelchair to tip over, especially when riding uphill or downhill.
When riding over a step or up an incline forwards, the body should be leaning forward.
Definition of purpose:
The manual wheelchair is designed for all users, who require a high degree of support to sit upright for any
length of time. This is made possible by the ergonomic, shaped backrests/back padding as well as the
adjustability of the seating unit (seat angle, backrest angle, seat depth).The wheelchair can be used indoors as
well as outdoors on dry, relatively smooth surfaces. It should not be used in heavy rain, or on snow-covered,
slippery surfaces.
Safety notes
Attention: Wheelchair surfaces, frame parts as well as padding can reach a temperature of > 41°, if they are left
in the sun for a long period of time.
2
Handling
The backrest can be swung forwards to enable transportation.
First remove the safety pin.
Secure the backrest so that it cannot accidentally fall, then fold the
backrest forwards.
Caution!
The backrest must be secured/held before releasing it.
To get the backrest back into the upright position, fold the
backrest up and engage the bracket and securing pin.
Risk of injury may occur if the backrest is not
correctly clicked into the bracket!
Wheel locks
The wheelchair is equipped with
two wheel locks. The wheel locks
are applied directly against the
tyres. To engage, push both wheel
lock levers forward. To release the
wheel locks, pull the levers backwards.
Braking power will decrease with:
• Worn tyre tread
• Tyre pressure that is too low
• wet wheels
• improperly adjusted wheel locks
The wheel locks have not been designed to be used
as brakes. When moving, do not operate the wheel
locks.
Always use the handrims for braking.
Make sure that the gap between the wheel locks
and the tyres are correct.
To readjust, loosen screws holding the wheel locks and set the
appropriate gap and tighten screws again.
3
Rear Wheel Removal & Re-fitting
The rear wheels are fitted with a quick-release axle.
The wheels can be removed and put back on without using tools. To remove a wheel, simply
depress the centre (black) quick- release button
and pull the rear wheel off.
CAUTION!
Hold the quick-release button on the axle depressed when
putting the wheel back on. Release the button to lock the wheel
in place. The quick-release button must spring back to its original position.
Tip assist Tube
(1)
Tip Assist tubes (1) are used by attendants
to tip a wheelchair over an obstacle. Simply step on the black
tube to push the wheelchair, for example,
over a curb or step.
Anti-tip tubes
The anti-tip tubes (1) provide additional safety for inexperienced
users when they are still learning
how to operate their wheelchairs.
Anti-tip tubes (1) prevent a
wheelchair from tipping over backwards. By pulling the interlock (2),
the anti-tip tube can be height
adjusted. There should be a gap of 2,5 cm to the
floor. To go up or down a step (e.g. kerb) the anti-tip
tubes must be swung upwards, to prevent them
from touching the ground.
(2)
(1)
4
The Backrest
(1)
The upholstered backrest (1) will allow
you to sit for long periods of time,
with side support. To remove upholstery
pull it upwards and forwards. The cushion is held by
Velcro and can also be removed. The cover can be
wiped with a cloth soaked with detergent or disinfectant
complying with the CE mark.
Adjustable backrest height.
The backrest height can be adjusted to various
heights by releasing the 4 hand knobs
and sliding the black rigid backing up or down
as required.
Once adjusted tighten the hand knob screws.
Lateral/Thoracic Pads (Optional Accessory)
The angle, depth and height of the side pads
can be adjusted and they can also be swung-away
or removed.
• Depth adjustment:
Loosen the knob (1) and put the pad into its new position
& tighten the knob.
• Angle adjustment:
Pull the pad upwards, put the pad at the desired angle
and then let go of it again. It will automatically
click/drop into place. This is will also allow the pad to
be swing away.
• Height adjustment:
Loosen the knob (2) from the rear of the Back and
slide the bracket into the desired position. If there
is not sufficient adjustment (1), the pad can also be fitted
into a new position on the bracket (A).
Then tighten the hand knob.
2
5
Seating
The comfortable seat cushion allows you to be
seated for a long period of time. The cushion is
held in place by Velcro and can also be
removed. The cover can be washed
(see the instructions on the cushion).
Seat Depth Adjustment
After loosening the screws (1) underneath the seat pan,
(with an allen key) the seat depth can be set to
the desired position.
Then tighten the screws again.
CAUTION!
A
A
The maximum seat depth (see marking and
end stop) must not be exceeded.
Seat width adjustment (7.105.1)
You can extend the width of the seat of your
wheelchair by removing the upholstery (A).
Adjustable seat angle (2°-20°)
By pulling the right hand lever while pushing down
on the silver cross bar the seat can be tilted into the
desired position. When you let go, the seat is
automatically fixed in the new position.
By pulling the left hand lever, only the backrest can be
reclined to the desired position. When you let go,
the back will automatically be fixed in the new position.
Please Note:
Having the back reclined without first tilting the seat
may cause the occupant to slide out of the wheelchair.
CAUTION:
The angle-adjustable seat may only be used with anti-tip tubes. The gap between the anti-tip tubes and the
ground must be a maximum of 2.5 cm.
CAUTION:
To ensure the correct function of the cables, these must never be taut.
CAUTION:
There is a danger of trapping your fingers when you adjusting the seat.
CAUTION:
Never adjust the seat angle if the wheelchair is on a slope.
6
Headrest
The headrest can be raised, moved sideward and moved
horizontally both forwards and backwards.
Height adjustment: Pull the release knob (1) and set
the desired height. Make sure that the release knob is
always correctly engaged.
Horizontal adjustment: Open the release lever (2),
set the desired position and pull the release lever
firmly again.
Side adjustment: After loosening the screws (3) the
headrest can be pushed sideways. Tighten screws
again.
Adjustable footplates
Footplate length can be adjusted by releasing the hand knob and
sliding the post up or down then re-tightened.
The footplates can be flipped up to make it easier to transfer
to or from the chair.
They can be adjusted to alter the angle to the ground.
Loosen screw (1) and set the desired angle.
Make sure that after any adjustment work, all screws
are tightened correctly. Ensure that you maintain the minimum gap to the floor (2.5 cm).
1
CAUTION!
While making the adjustment, there must be no load on the
footboard!
Calf pads can be height and depth adjusted. To adjust
height, release the screws (1) and slide the calf pad
into the relevant position. By removing the calf pad
screw (2) they can be depth adjusted.
After making the adjustment, all screws must be
correctly tightened.
1
2
7
Height-adjustable Armrest & Sideguard
The armrest can be height adjusted or removed as follows.
Push the silver button (1) and adjust the armrest (2)
to the desired height. Always check that the armrests
are correctly engaged.
You can set the armrest depth after loosening
the hand knob (3). Afterwards, tighten the hand knob.
CAUTION!
Do not use the side guards or the armrests to lift or
carry the wheelchair.
USE AND TRANSPORT
How to fold the wheelchair
- Fold the back down (see pg.3)
- Remove Elevating legrests (see pg.7)
- (Remove rear wheels if more space is required - see Pg.4)
How to open the wheelchair
- Reverse the above procedure.
Car/taxi
Place the wheelchair in the boot of the car. Should this not be possible, place the wheelchair between the rear
and the front seats in a stable position to prevent it from sliding down or tipping over. If possible, block the
wheelchair in place by using the car seat belt.
Minibus
The user must take a seat in one of the minibus seats, while the wheelchair must be blocked in such a way that
it cannot tip over or slide. Should the minibus be provided with a special space for wheelchairs users, follow the
instructions below:
For the user's safety, verify that the space on the minibus is equipped with a three point safety belt
and a headrest (the wheelchair headrest is not enough). The wheelchair must be fixed from the sides, not
from the wheels. The fixing belts should be angled between 0° and 30°.In case of sudden braking, the
wheelchair belt (if available) will not guarantee the user's safety nor prevent the user from being thrust forward.
Wheelchair Driving Instructions
A correct weight distribution will affect the wheelchair performance. The most important factors to take into
consideration when adjusting a wheelchair are the user's body shape and weight, the correct posture of the user
and the correct position of the rear wheels. The more weight is applied to the rear wheels, the easier it will be
for the user to drive the wheelchair. The more weight is applied to the front castors, the more difficult it will be
for the user to drive the wheelchair. If the user is assisted by an attendant, make sure to always put the brakes on
before leaving the user alone.
Parking:
Increase the contact area of the wheelchair by reversing 10 cm with the wheelchair to
make sure both castors are facing forward.
8
Climbing over a pavement
Climbing a pavement forward:
Note: this technique is recommended only for expert wheelchair users.
- Bring the wheelchair close to the pavement curb.
- Balance the wheelchair on the rear wheels in such a way to raise the castors and go over the curb. Push the
rear wheels while leaning your body forward.
Climbing forward with an attendant's help:
- The attendant must tilt the wheelchair backwards, using also the tilt-lever, to slightly raise the castors
over the pavement curb.
- Hold the push handles tightly while the rear wheels climb over the curb.
Climbing a pavement backwards:
Note: this technique should be used only if the pavement is low. It is necessary to take into consideration
also the footrests height.
- Turn the wheelchair with the rear part facing the pavement curb.
- Push the rear wheels while leaning your body forward.
Climbing backwards with an attendant's help
- The attendant must pull the wheelchair back until it touches the pavement curb.
- Then tilt the wheelchair backwards, using also the tilt-lever, to raise the castors off the ground.
- Finally pull the wheelchair up and pull it back. Make sure that all four wheels have climbed over the obstacle,
before “lowering” the wheelchair.
Getting off a pavement
Getting off a pavement facing forward:
Note: this technique is recommended only for expert wheelchair users.
- Bring the wheelchair close to the pavement curb.
- Balance the wheelchair on the rear wheels in such a way to slightly raise the castors.
- Get slowly off the pavement and then “lower” the castors on the ground.
Getting off forward with an attendant's help:
- The attendant must tilt the wheelchair backwards, using also the tilt-lever, to raise the castors off the ground.
- Get off the pavement very slowly and then “lower” the castors on the ground.
Getting off a pavement facing backwards:
Note: this technique is NOT recommended when the curb is higher than 10 cm.
- Pull back the wheelchair to the pavement curb.
- Pull back slowly and at the same time lean your body forward.
Pay the utmost attention while carrying out this operation to avoid the risk of tipping over.
Getting off backwards with an attendant's help:
- Reverse the wheelchair to the pavement curb.
- Get slowly off the pavement and reverse slowly until the castors have cleared the obstacle.
- “Lower” all the wheels on the ground.
9
Slopes
Make sure to follow the instructions below, when going up or down a slope, to avoid the risk of tipping over.
Do not change direction while driving up/down a slope. Push the wheelchair in a straight line when going both
uphill or downhill. If you are in doubt when approaching a gradient, ask someone to help you rather than
running unnecessary risks.
Going uphill: lean your body forward to balance the centre of gravity.
Going downhill: lean your body backwards to balance the centre of gravity.
Use the handrims to adjust the speed, do not use the brakes.
Stairs – Going Up:
Always ask someone to help you.
Never use escalators, neither on your own nor with an attendant.
Going up the stairs facing backwards with an attendant's help
- Pull the wheelchair back to the first step.
- Tilt the wheelchair backwards on the rear wheels, also using the tilt-lever.
- Slowly pull the wheelchair up each step, one step at a time, balancing it on the rear wheels.
- After the last step, pull the wheelchair back and make sure the castors have cleared the obstacle before
“lowering” all four wheels on the ground. If the wheelchair user is assisted by two people, one person can be of
help by lifting the wheelchair from the fixed legrests or by removing the legrests and lifting the wheelchair up
from the frame. The attendants are recommended to carry out these operations by using their leg strength and
avoiding bending or putting pressure on their backs.
Stairs – Going Down:
Always ask someone to help you.
Never use escalators, neither on your own nor with an attendant.
Going down the stairs facing forward with an attendant's help
- Push the wheelchair up to the first step.
- Tilt the wheelchair backwards on the rear wheels, also using the tilt-lever.
- Go down each step very slowly, keeping the wheelchair balanced on the rear wheels.
- After the last step, “lower” all four wheels on the ground. If the wheelchair user is assisted by two people, one
person can be of help by lifting the wheelchair from the lockable legrests or, should these not be available, by
removing the legrests and lifting the wheelchair up from the frame. The attendants are recommended to carry
out these operations by using their leg strength and avoiding bending or putting pressure on their backs.
Transfers
The transfer techniques should be practised by the wheelchair user under the guidance of qualified
professionals. Following are some important recommendations.
Transferring from the wheelchair to the bed:
With or without attendant, end user facing forward.
Before the transfer:
- Bring the wheelchair close to the bed and push the wheelchair 5-10 cm back to make sure both castors are
facing forward.
- Lock the brakes, lift the armrest/side guard up and swing away or remove the legrest which are on the side
close to the bed.
Transferring from the bed to the wheelchair:
With or without attendant, end user facing forward.
Before the transfer:
- Bring the wheelchair close to the bed and push the wheelchair
5-10 cm back to make sure both castors are facing forward.
10
- Lock the brakes and lift the legrests up.
Do not step on the footplates, as the wheelchair might tip over.
The attendants are recommended to carry out this operation by using their leg strength and avoiding bending or
putting pressure on their backs.
Troubleshooting
Wheelchair pulls to one side:
• Check tyre condition
• Check to make sure that the wheel turns easily (bearings, axle)
• Check angles of castors
• Check to make sure both castors are making proper contact with the ground.
Castors begin to wobble:
• Check angles of castors
• Check to make sure all bolts are secure; tighten if necessary
• Check to make sure both castors are making proper contact with the ground.
Wheelchair squeaks and rattles:
• Check to make sure all bolts are secure; tighten if necessary
• Apply small amount of oil to moving parts
REPAIRS AND SERVICE
For all repairs and service to the wheelchair please contact Aidacare on 1300 133 120 to find
your closest store.
REPLACEMENT PARTS
Aidacare stock replacement parts for the Relax Wheelchair. All replacement of parts should be done by
Aidacare repairs service or a qualified technician.
AUTHORISED SERVICE FACILITIES
Aidacare
Aidacare
45 Tinning Street,
347 Urana Road,
Brunswick, VIC 3057
Lavington, NSW 2641
(03) 9384 1242
(02) 6040 3444
Aidacare
Unit 3, 47 Learoyd Rd
Algester, QLD 4115
(07) 3272 6900
Aidacare
664 South Road,
Glandore SA 5037
(08) 8293 1255
Aidacare
4 Noonan Place
Ingleburn NSW 2565
(02) 9618 5000
Aidacare
18 Mertonvale Circuit
Kingston TAS 7051
(03) 6229 4733
Distributed by:
11