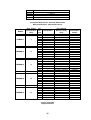
1
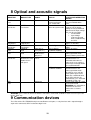
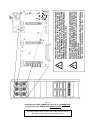
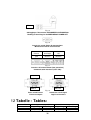
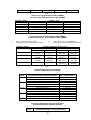
V81358A
USER MANUAL - EN -
www.metasystem.it
Table of contents
1
SAFETY ........................................................................................................................................................4
1.1
SAFETY NOTES .......................................................................................................................................................5
2 GENERAL INFO...........................................................................................................................................5
2.1
WARRANTY ...........................................................................................................................................................5
2.2
WARRANTY EXTENSION AND MAINTENANCE CONTRACTS .....................................................................................5
3 INSTALLATION OF UPS TRIMOD..............................................................................................................6
3.1
INTRODUCTION ......................................................................................................................................................6
3.2
DELIVERY OF THE UPS..........................................................................................................................................6
3.3
STORAGE ...............................................................................................................................................................6
3.3.1
UPS...............................................................................................................................................................6
3.3.2
Batteries........................................................................................................................................................6
3.4
UNPACKING ...........................................................................................................................................................7
3.5
POSITIONING..........................................................................................................................................................7
3.6
ELECTRICAL CONNECTIONS ...................................................................................................................................7
3.6.1
Preparation for the electrical connections ...................................................................................................8
3.6.2
Protections of the electrical system ..............................................................................................................8
3.6.3
Earth connection...........................................................................................................................................8
3.6.4
Connection to the electricity main ................................................................................................................8
3.6.5
Load connection............................................................................................................................................8
3.6.6
Emergency Power Off (Remote Emrgency Block) ........................................................................................9
3.6.7
Installation of a TRIMOD BATTERY unit ....................................................................................................9
3.7
CONFIGURATION OF UPS TRIMOD......................................................................................................................9
3.7.1
Input configuration .......................................................................................................................................9
3.7.2
Output configuration.....................................................................................................................................9
4 SETTING THE UPS TRIMOD AT WORK ..................................................................................................11
4.1
INTRODUCTION ....................................................................................................................................................11
4.2
HOW TO PREPARE FOR POWERING ........................................................................................................................11
4.3
HOW TO START THE UPS TRIMOD ....................................................................................................................11
5 MAINTENANCE FOR UPS TRIMOD .........................................................................................................12
5.1
INTRODUCTION ....................................................................................................................................................12
5.2
USER’S RESPONSIBILITY ......................................................................................................................................12
5.3
ROUTINE MAINTENANCE .....................................................................................................................................12
5.4
PREPARATION OF THE UPS FOR MAINTENANCE ...................................................................................................12
5.5
ADDITION OR REPLACEMENT OF A POWER MODULE OR BATTERY RACK ..............................................................12
5.5.1
UPS TRIMOD power module .....................................................................................................................12
5.5.2
USP TRIMOD Battery Racks......................................................................................................................13
6 HOW TO TURN OFF UPS TRIMOD ..........................................................................................................13
6.1
INTRODUCTION ....................................................................................................................................................13
6.2
HOW TO TURN OFF UPS TRIMOD ......................................................................................................................13
7 FUNCTIONS OF THE CONTROL PANEL.................................................................................................14
7.1
“SERVICE MODE” FUNCTION ...............................................................................................................................14
7.2
MAIN MENU AND SUB-MENUS ..............................................................................................................................14
7.2.1
UPS Status:.................................................................................................................................................15
7.2.2
Config. UPS ................................................................................................................................................16
7.2.3
Power Modules:..........................................................................................................................................17
7.2.4
Tools ...........................................................................................................................................................18
8 OPTICAL AND ACOUSTIC SIGNALS ......................................................................................................20
9 COMMUNICATION DEVICES....................................................................................................................20
9.1
RS232 SERIAL PORTS...........................................................................................................................................21
9.2
RELAY INTERFACE ...............................................................................................................................................21
9.3
INTERFACE AT LOGIC LEVELS ..............................................................................................................................21
10
TECHNICAL SPECIFICATIONS ............................................................................................................22
11
FIGURE - ILLUSTRATIONS: .................................................................................................................24
12
TABELLE - TABLES: .............................................................................................................................36
2
Council Directives applied:
73/23/EEC amended with directives 93/68/EEC
89/336/EEC amended with directives 92/31/EEC
93/68/EEC
Standards to which conformity is declared: EN 62040-1-1, EN 50091-2, EN 62040-3
Manufacturer:
Meta System S.p.A.
Address:
Via Majakovskij, 10/b Reggio Emilia, Italy
Type of equipment:
UPS
Models:
TRIMOD 8
TRIMOD 10
TRIMOD 16
TRIMOD 20
TRIMOD 30
TRIMOD BATTERY
Year in which trademark was affixed:
2006
The device was tested in the typical installation configuration and with peripherals conforming to the
aforementioned directives.
I, the undersigned, hereby declare that the device defined above meets the requirements of the specified
directives.
Reggio Emilia, 08/02/06
Dr. Cesare Lasagni (engineer)
Technical Manager
3
1 Safety
Before the UPS is installed or started, the user must make sure that the
competent technical personnel have carefully read and complied with the
instructions in this manual. Keep the manual together with the UPS for
future consultation when required.
Do not start or operate the system before it has been set at work by a trained
and authorized technician.
Maintenance work must only be carried out by qualified personnel. Never
attempt to service the UPS without this assistance.
There is a risk of exposure to dangerous voltage when the covers of the UPS
are opened or closed.
If you have any doubts about this UPS, please contact:
Meta System S.p.A., Italy
Tel. 800 005 088
Email: [email protected]
MetaSystem S.p.A. declines all liability for incorrect use or tampering with
the UPS.
Make sure that the earthing circuit has been correctly made before
connecting to the electricity main.
The UPS may cause radio disturbance in a domestic environment. In this
sort of environment, it may be necessary for the user to take additional
measures.
MetaSystem S.p.A. has taken all the possible precautions in order to compile
an accurate, complete and easily understood manual and thus declines all
liability for direct, indirect or accidental damages to persons or property
deriving from any incorrect interpretation or undesired error in this manual.
This manual cannot be copied or duplicated without the prior written
consent of MetaSystem S.p.A..
4
1.1 Safety notes
•
Make sure that the panel to which the UPS is connected is safely connected to the earthing circuit
and possess adequate protection, as required by the standards.
•
The mains power supply panel or the disconnecting device must be installed near the UPS and must
be easily accessible.
•
WARNING: The UPSs of the UPS TRIMOD family DO NOT have a Back Feed Protection circuit,
thus:
1. UPS TRIMOD devices must only be installed in the fixed mode with an automatic
magnetothermic breaker on the supply side (consult tab. 4-5 for further information). Connection
of the device to the electricity main with a conventional plug is not allowed.
2. A warning label must be affixed to all the mains power disconnectors installed far from the UPS
area so as to inform the assistance personnel that the circuit is connected to an UPS. The label
must bear the following text or an equivalent one:
INSULATE THE UPS (UPS) BEFORE WORKING ON THIS CIRCUIT
2 General info
Congratulations on having purchased one of Meta System’s UPS TRIMOD products.
Thanks to an UPS TRIMOD, your critical equipment will be protected by an UPS that will remain reliable for
years to come. Meta System S.p.A. is situated in Italy and is specialized in designing and manufacturing
UPSs. The UPS TRIMOD UPS is unique, modular and belongs to the latest generation of threephase UPSs
in the medium power range. Highly reliable, with a low running cost and excellent electrical performances:
these are only some of the salient features of this innovative device. Moreover, the planning and
manufacturing criteria and methods used by Meta System S.p.A. comply with the strictest quality standards.
2.1 Warranty
UPS TRIMOD is covered by a warranty that guarantees the materials of the UPS and its components are free
from defects for a period of 12 months. Do not return anything without prior authorization from Meta System
S.p.A. Meta System S.p.A. will provide further instructions as how to proceed. This warranty becomes void
unless the UPS is set at work by a correctly trained technician. This warranty does not cover damage or loss
due to: incorrect use, misuse, negligence, carelessness, unauthorized repairs or modifications, incorrect
installation, inadequate environment, accident, Force Majeure or inappropriate applications, adverse weather
conditions. etc. If, during the warranty period, the UPS fails to conform to the aforementioned matters, Meta
System S.p.A. will repair or replace the device (or relative components) at its own discretion. All the repaired
or replaced items will remain the property of Meta System S.p.A. Meta System is not responsible for costs
such as: loss of profit or turnover, loss of equipment, loss of data or software, complaints from third parties or
other. As a general policy, Meta System S.p.A. does not recommend its products for use in life-supporting
equipment for which it is possible and reasonable to forecast that faults or bad operation of the product itself
may cause the life-supporting device to operate in a faulty way or significantly impair its safety or efficacy.
Meta System S.p.A. does not recommend the use of its products for direct care of the sick. Meta System
S.p.A. does not intentionally sell its products for such uses unless it receives written confirmation that the
risks of injuries or damage have been minimized, that the customer assumes full responsibility for such risks
and that Meta System S.p.A.'
s liability is adequately protected in such circumstances. The UPS can contain
batteries that must be recharged for at least 24 hours every 6 months in order to prevent them from
completely discharging. Batteries that have completely discharged for any reason are not covered by the
warranty.
2.2 Warranty extension and maintenance contracts
The standard warranty can be reinforced with a warranty extension contract (maintenance contract) in order
to protect the UPS. Please contact the Assistance Center of Meta System S.p.A, for further details. Upon
payment of a fee, the customer can subscribe to a technical assistance service which provides optimum
maintenance for the UPS once the warranty period has terminated.
5
3 Installation of UPS TRIMOD
3.1 Introduction
This chapter contains everything you need to know to unpack, handle, position, hook up and install the UPS
TRIMOD UPS.
• The operations described in this section must all be carried out by authorized technicians or
qualified personnel.
• Meta System S.p.A. declines all liability for damages to persons or property caused by wiring,
operations or activities that are incorrect as they have not been carried out according to the
instrutions in this manual.
3.2 Delivery of the UPS
As soon as the UPS arrives, carefully examine the packing and the product to find out whether they have
been damaged in any way. Take particular care to make sure that the “Shock Watch” indicator on the external
label is undamaged.
If damage is discovered or suspected, immediately notify:
• the haulage contractor
• The Technical Assistance Center of Meta System S.p.A..
Make sure that the product received corresponds to the materials indicated in the delivery documents. UPS
TRIMOD is packed to protect it from impact and damage from adverse storage and weather conditions. To
protect it still further, it is wrapped in transparent film.
Check the contents of the pack.
• 1 (one) UPS TRIMOD UPS;
• 1 (one) packet of accessories containing accessories and screws to install the product in the correct
way;
• 1 (one) panel to close the front part;
• 2 (two) plinths for closing the sides;
• user manual;
• international warranty.
Make sure that the technical specifications of the UPS TRIMOD, given on the label affixed to the internal
panel of the door of the UPS correspond to the product you have purchased, which is described in the
delivery documents.
3.3 Storage
3.3.1 UPS
If the UPS must be stored before it is installed, it must be kept, with or without its packing, in a clean, dry, cool
place at an ambient temperature between -10°C and +50°C and less than 90% humidity (non-condensing).
3.3.2 Batteries
The standard batteries of the UPS TRIMOD are the sealed lead-acid type. They are maintenance-free and
are installed internally.
It is important to store the batteries without recharging them for no longer than 6 months at 20°C, or 3 months
at 30°C or 2 months at 35°C.
WARNING: the sealed batteries must never be stored if they are partially or completely discharged.
To charge the batteries before and after storage, just connect the incoming power supply to the UPS (see
section 3.6 for the correct wiring), insert the mains fuses (F L1, F L2 and F L3), those of the battery (F B+ and
F B-) and the connecting plate into the neutral isolator then close the isolators themselves. By detecting
incoming voltage, the system automatically proposes a battery charging cycle. Recharging starts
6
automatically after 1 minute and the remaining cycle time appears on the display. Press “ESC” to interrupt the
recharging cycle at any time.
If the UPS is consigned without batteries, Meta System S.p.A. declines all liability for any damage or faulty
operation the product may sustain through incorrect wiring of the batteries.
3.4 Unpacking
Comply with the direction shown by the “ARROW” on the box when removing the packing materials.
Proceed as described below to remove the UPS from its packaging:
1. cut the wrapping and open the pack;
2. remove the upper protection;
3. remove the four corner guards;
4. remove the packing container by pulling it upwards;
5. remove the pallet from the UPS;
6. examine the UPS to make sure that it has not been damaged; Immediately inform the haulage
contractor and the supplier if evident damage is discovered.
Keep the packing materials for use if the UPS needs to be shipped in the future.
3.5 Positioning
UPS TRIMOD is a compact UPS that can be easily transported to its final destination. All the UPS TRIMOD
components can be accessed from the front or rear sides, making this UPS easy to service.
The UPS must be set in a position that complies with the following conditions:
• humidity and temperature within the prescribed limits;
• compliance with the fire protection standards;
• the wiring must be easy to make;
• accessibility from the front for assistance or periodical servicing;
• the required air flow must be guaranteed for cooling purposes;
• the capacity of the air conditioning system must be sufficient;
• there must be no corrosive/explosive gas or dust in the environment;
• the site must be free from vibrations;
• the space at the rear and side must be sized to allow adequate cooling (fig. 1 and 2);
• access from the front and rear for assistance and maintenance must be guaranteed.
Moreover, the average life of the batteries is strongly influenced by the operating ambient temperature.
Installation of the UPS in a place where the temperature ranges between +18°C and +23°C will ensure a long
battery life.
3.6 Electrical connections
After having removed the UPS from its wrapping and conveyed it to its definite site, the authorized technician
may begin the wiring.
1. The operations described in this manual must all be carried out by authorized technicians or
qualified personnel.
2. Do not operate in the presence of water or humidity.
3. There is a risk of exposure to dangerous voltage when the panels of the UPS are opened or
removed!
4. To safeguard the personnel when the UPS is installed, make sure that the connections are made
in the following conditions:
• there must be no mains power present;
• the loads must be off and disconnected;
• the UPS TRIMOD UPS must be off and without electricity.
All the electrical connections are made by working on the panel and on the terminal board of the distribution
box in the lower inside part of the front door. To access the distribution terminal board, unscrew the screws
that hold the box in place and remove it.
7
3.6.1 Preparation for the electrical connections
Before beginning to connect the UPS, make sure that:
• the mains voltage (volts on the input) and frequency correspond to the values given in the data plate
of the UPS;
• the earthing circuit has been made in compliance with the prescribed IEC standards (International
Electronic Commission) or local regulations;
• the electrical system leading into the UPS is equipped with the necessary protections.
3.6.2 Protections of the electrical system
To ensure that the UPS and its accessories function correctly, the electrical system must be adequately
protected. Typically, automatic differential and magnetothermic breakers (see tab. 4) are connected between
the mains power source and the UPS so as to provide additional protection if overloads or short-circuits
occur.
3.6.3 Earth connection
Connect the earth cable from the low voltage distribution panel to the “EARTH” terminal indicated in fig. 8-13.
3.6.4 Connection to the electricity main
Before connecting the incoming power cables, make sure that servicing bypass S1 is open in the OFF
position and arrange the fuses and connection jumpers on the terminal board to suit the required input-output
configuration, as shown in fig. 8-18 and tab. 1-5.
WARNING: The default configuration for the UPS TRIMOD UPSs distributed by Meta System
S.p.A. has a THREEPHASE INPUT and THREEPHASE OUTPUT. If this type of distribution is
used, the fuses and connection jumpers will be already sized and positioned in the correct
way.
Connect the power cable from the low voltage distribution panel to the terminals of the UPS, as illustrated in
fig. 8-18, keeping the phase rotation clockwise.
WARNING: The neutral wire on the input must ALWAYS be connected! The UPS could be
seriously damaged once powered by the electricity main unless the neutral is connected.
Consult tab. 1-5 for the recommended sections of the input cables and the values of the fuses.
3.6.5 Load connection
Before beginning to connect the loads, make sure that the rated output of the UPS (OUTPUT POWER)
indicated on the data plate is the same as the total sum of the powers of the loads or more.
Proceed as illustrated in fig. 8-18 in order to wire the UPS in the correct way.
The declared values of the output power cables must comply with the sections of the cables indicated in tab.
1-5.
Remember to supply a separate distribution panel for the load. It is advisable to use automatic breakers or
isolators that conform to IEC standards to protect the electric panel’s output lines.
The following values must be indicated in the output distribution panel:
• maximum rated power of the total load;
• maximum rated power of the load at the load sockets;
• if a common distribution panel is used (sockets for the mains voltage and UPS), make sure that each
socket bears an indication as to the voltage applied (“Mains” or “UPS”).
WARNING: If the UPS is used with a single-phase output (available in all units in the UPS TRIMOD
family with the exception of the TRIMOD 30 model) a connector supplied in the accessory packet
must be inserted in all the Back Panel boards. The Back Panel boards are situated inside the
machine, behind the power modules. The TRIMOD 8 and 10 models only have one Back Panel board
while there are two in the TRIMOD 16 and 20 models. To access the Back Panel boards and insert
8
the connector, just remove 3 power modules from the same level and refer to fig. 14. The connector
must be inserted into the position marked EC 15 on the board print.
WARNING: If the single-phase input and threephase output configuration is used for the TRIMOD 8,
10, 16 and 20 models, manual bypass S1 MUST NOT be activated for any reason whatsoever. In this
case, it is advisable to block the relative breaker in the “OFF” position. For greater safety, the bypass
can be completely deactivated by cutting the brown wire that connects bypass breaker S1 to the
MAINS INPUT fuse holder isolator and to adequately insilate it. The wire that connects terminal N° 8
(fig. 8-12) to the phase fuse holder isolator MUST remain connected.
3.6.6 Emergency Power Off (Remote Emrgency Block)
In compliance with the pertinent standards, the UPS is equipped with an emergency block that uses a
normally closed contact which is opened in order to activate the block itself. The E.P.O. terminals are situated
on the right-hand side of the terminal board in the distribution box (see fig. 8-18 for their locations).
Comply with the instructions below to connect the emergency block in the correct way:
• Use a cable with double insulation;
• Connect the cables as shown in fig. 15.
3.6.7 Installation of a TRIMOD BATTERY unit
An external battery unit can be installed to increase the autonomy of the UPS.
Two TRIMOD BATTERY external battery units are available:
• A modular model, comprising a cabinet with an internal structure that uses battery racks for up to 80
batteries (16 racks) of the 12V 7.2Ah or 12V 9Ah type (see fig. 6);
• An economic non-modular model with a shelf architecture where the batteries are placed. It is able to
house 60 or 120 batteries of the 12V 7.2Ah or 12V 9Ah type.
A TRIMOD BATTERY unit can be connected to several UPS TRIMOD units.
• The operations described in this section must all be carried out by authorized technicians or
qualified personnel.
• Meta System S.p.A. declines all liability for damages to persons or property caused by wiring,
operations or activities that are incorrect as they have not been carried out according to the
instrutions in this manual.
• There is a risk of exposure to dangerous voltage when the panels of the UPS TRIMOD UPS or
TRIMOD BATTERY unit are opened or removed!
• To safeguard the personnel when the BATTERY TRIMOD unit is installed, make sure that the
connections are made in the following conditions:
1. there must be no mains power present;
2. the loads must be off and disconnected;
3. the UPS TRIMOD UPS must be off and without electricity. All fuse holder isolators in the
UPS TRIMOD and TRIMOD BATTERY must be open.
• Work through the steps illustrated in chapters 5-6 to make sure that the UPS TRIMOD fully stops
if a TRIMOD BATTERY must be added in an already existing installation.
Fig. 7 shows how the TRIMOD BATTERY is connected to the UPS TRIMOD UPS, as described below:
1. connect the earth wire of the UPS and the external battery cabinet;
2. use the wiring supplied with the TRIMOD BATTERY to connect the positive and negative terminals of
the UPS TRIMOD to those of the TRIMOD BATTERY.
3.7 Configuration of UPS TRIMOD
3.7.1 Input configuration
UPS TRIMOD automatically recognizes the voltage, frequency and the number of phases on the input. The
input configuration is therefore fully automatic and no operations are required from the installer.
3.7.2 Output configuration
UPS TRIMOD can be configured on the output as a single-phase or threephase system.
If it is configured as a threephase output, the type of load powered can also be defined in the following way:
9
•
•
Single-phase load: this setup is useful if three independent single-phase lines have been created at
the output of the UPS in order to power different loads. In this case, the three outputs are controlled
by the UPS in a completely independent way from each other. For example, if an excessive load is
applied to one of the three output lines, the bypass only activates on the overloaded line, while the
power remains stable on the other two.
Threephase load: this is the default setting of the UPS TRIMOD and is normally used if the loads
applied to the output of the UPS operate with threephase power (e.g. threephase electric motors) or if
there are mixed threephase and single-phase loads. In this case, the three outputs are controlled by
the UPS in an equivalent way. For example, if an excessive load is applied to one of the three lines,
all three of the output lines breaker to the bypass status.
Comply with the instructions given in section 4.3 to correctly select the output configuration of the system via
the display.
10
4 Setting the UPS TRIMOD at work
4.1 Introduction
This chapter contains everything you need to know to correctly set the UPS TRIMOD UPS at work.
• The operations described in this section must all be carried out by authorized technicians or
qualified personnel.
• Meta System S.p.A. declines all liability for damages to persons or property caused by wiring,
operations or activities that are incorrect as they have not been carried out according to the
instructions in this manual.
4.2 How to prepare for powering
1.
2.
3.
4.
5.
6.
Make sure that the fuse holder isolators for powering the UPS in the distribution box (F L1, F L2 and
F L3) are open.
Make sure that the fuse holder isolators of the batteries of the UPS ( F B+ and F B-) and those in the
TRIMOD BATTERY units (if installed) are open;
Make sure that the input and output wiring has been made correctly and check the phase rotation on
the input;
Check to make sure that the phase and line voltage values are correct;
Make sure that maintenance bypass breaker S1 is in the OFF position;
Make sure that output breaker S2 is in the OFF position;
4.3 How to start the UPS TRIMOD
1.
2.
3.
Fit the fuses for powering the UPS into the distribution panel (F L1, F L2 and F L3), then fit the
connecting plate into the neutral isolator and shut the isolators;
Insert the fuses of the batteries (F B+ and F B-) and those in the cabinets of the TRIMOD BATTERY
units (if installed) and close the corresponding isolators;
WARNING: the output configuration MUST be selected (Single-phase / Threephase 120° / Three
independent phases) before the product is powered. Proceed as described below:
• With the unit off, press the “ENTER” key to access the Service Mode (consult section 7.1 for
further information);
• Follow the pathway: Config. UPS
Output
Config. Inverter
Single-phase / Threephase
120° / Three independent phases
Incorrect connections or output configuration setups can cause damage to persons or
property.
4.
5.
6.
7.
8.
Power the UPS by means of the dedicated breaker;
• WARNING: by detecting incoming voltage, the system automatically proposes a battery
charging cycle. Press “ESC” to continue powering the UPS TRIMOD.
Press “ENTER” to power the UPS;
Wait until the status indicator on the display turns green;
Make sure that the output voltage and frequency values correspond to the requirements of the load
applied. Enter the required values if this is not the case (consult sect. 7.2.2);
Shut output breaker S2 in the UPS.
THE LOAD IS NOW PROTECTED BY THE UPS TRIMOD UPS
WARNING: if the battery unit must be tested, disconnect the mains voltage by means of the
breaker on the supply side of the UPS and NOT by means of the input fuse holder isolators in the
distribution box.
11
V81358A
5 Maintenance for UPS TRIMOD
5.1 Introduction
This chapter contains everything you need to know to correctly service the UPS TRIMOD UPS.
• The operations described in this section must all be carried out by authorized technicians or
qualified personnel.
• Meta System S.p.A. declines all liability for damages to persons or property caused by
operations or activities that are incorrect as they have not been carried out according to the
instructions in this manual.
To ensure that the UPS TRIMOD operates in the best possible way and that it continues to efficaciously
protect the connected load, remember to check the batteries every six months after the product’s first year of
life by means of the battery calibration function (see sect. 7.2.4).
5.2 User’s responsibility
The UPS does not contain parts that require routine maintenance by the end user.
The only servicing operation the user must carry out is to periodically check to make sure that there are no
alarm messages on the display and that both the fans in each power module function correctly. If they fail to
operate correctly, immediately contact the assistance center of Meta System S.p.A. on the toll-free phone
number.
5.3 Routine Maintenance
To ensure that the UPS functions correctly, it is essential to subject it to periodical maintenance inspections
so as to ensure long-life and fade-free reliability from the unit.
These preventive maintenance inspections involve operations inside the unit where there are dangerous live
parts. Only trained maintenance technicians authorized by Meta System S.p.A. and familiar with all the
possible danger zones in the unit may carry out these operations.
The maintenance technician must check the following items during a preventive maintenance inspection:
• The absence of alarms;
• The list of memorized events;
• Operation of the static and maintenance bypasses;
• Soundness of the electrical installation;
• The cooling air flow;
• The condition of the batteries;
• The characteristics of the load applied;
• The conditions of the place/environment.
5.4 Preparation of the UPS for maintenance
1.
2.
3.
4.
5.
6.
7.
Open the door of the UPS TRIMOD;
Enable UPS operation in the forced bypass mode via the display. To do this, proceed in the following
way:
• Follow the pathway: Config. UPS
Bypass
Forced Mode.
Shut maintenance bypass breaker S1 (the load is now powered directly by the main);
Turn off the unit by pressing the “ON/OFF” button on the control panel;
Open output breaker S2;
Open the mains isolators (F L1, F L2 and F L3);
Open the battery isolators ( F B+ and F B-) of the unit and the TRIMOD BATTERY units (if installed);
5.5 Addition or replacement of a power module or battery rack
5.5.1 UPS TRIMOD power module
1.
2.
3.
Remove the faulty power module, if present;
Fit the new power module into one of the available slots;
Fix the power module to the unit'
s frame using the 2 screws supplied;
4.
5.
6.
7.
8.
Close the mains isolators (F L1, F L2 and F L3) and battery isolators (F B+ and F B-);
Close output breaker S2;
Power the unit by pressing the “ON/OFF” button on the control panel and wait until the status
indicator turns green;
Open bypass breaker S1 (the On-line operating mode automatically activates);
Close the door of the UPS.
5.5.2 USP TRIMOD Battery Racks
1.
2.
3.
4.
5.
6.
7.
8.
Remove the 4 old racks, if present;
Fit the 4 battery racks into the 4 available slots beginning with the bottom one;
Fix the racks to the unit'
s frame one by one, using the 2 screws supplied;
Close the mains isolators (F L1, F L2 and F L3) and battery isolators (F B+ and F B-);
Close output breaker S2;
Power the unit by pressing the “ON/OFF” button on the control panel and wait until the status
indicator turns green;
Open bypass breaker S1 (the On-line operating mode automatically activates);
Close the door of the UPS.
WARNING: the battery racks MUST always and only be added in multiples of 4 units!
6 How to turn off UPS TRIMOD
6.1 Introduction
•
•
The operations described in this section must all be carried out by authorized technicians or
qualified personnel.
Meta System S.p.A. declines all liability for damages to persons or property caused by
operations or activities that are incorrect as they have not been carried out according to the
instructions in this manual.
WARNING: the power-off procedure described in this section must only be applied if the load connected to
the UPS is off or does not need to be powered by the UPS itself.
6.2 How to turn off UPS TRIMOD
1.
2.
3.
4.
5.
Make sure that the loads do not need to be powered by the UPS;
Keep the “ON/OFF” button on the control panel of the UPS depressed;
Open output breaker S2;
Open the mains isolators (F L1, F L2 and F L3);
Open the battery isolators ( F B+ and F B-) of the unit and the TRIMOD BATTERY units (if installed);
Carefully read the storage instructions described in section 3.3 if the UPS is to remain off for a long period of
time.
THE UPS TRIMOD UPS IS NOW WITHOUT VOLTAGE.
13
7 Functions of the control panel
The control panel is situated in the front part of the unit and comprises an LCD display, a status indicator and
a keyboard.
The machine can be continuously monitored and completely setup from the front panel, by means of the
following menus:
• UPS Status: allows the functional status of the machine to be analyzed;
• Config. UPS: allows all the functions of the UPS to be configured;
• Power Modules: allow the statuses of the individual power modules to be analyzed;
• Tools: used to subject the UPS to a series of functional tests.
The menus of the UPS are accessed by means of the keys on the front panel.
KEY
DESCRIPTION
Quits a function without modifying it
switches from a lower menu level to a higher one
Quits the main menu and goes back to displaying the status
Silences the buzzer
Selects the previous function
Increases a value within a function
Selects a new item within a function (e.g. from DISABLED to ENABLED)
Scrolls menus that contain more than 4 lines
Selects the next function
Decreases a value within a function
Selects a new item within a function (e.g. from ENABLED to DISABLED)
Scrolls menus that contain more than 4 lines
Confirms a value
Accesses an item in the menu
switches from a higher menu level to a lower one
7.1 “Service Mode” function
Even when it is off, the UPS TRIMOD allows all the settings and programming described below to be carried
out: press “ENTER” and the UPS will access the “Service Mode”, allowing the user to access the menu on the
display. Press “ON/OFF” to quit this mode, otherwise the UPS will automatically quit this function and switch
off if it fails to receive manual or serial commands within 1 min.
7.2 Main menu and sub-menus
The main mask will appear on the display at the end of the powering procedure (example):
Press “ENTER” to access the main menu, which contains the following items:
• UPS Status:
• Config. UPS:
• Power Modules:
• Tools:
Use “ENTER” to select one of the items listed above and access the relative sub-menu, shown in the table
below. The items in this sub-menu are selected with the same key.
UPS
Status:
Config. UPS:
Power Modules:
14
Tools:
UPS Info
Output
Input
Batteries
Misc.
Options
PM Status
Output
PM SW upgrade (*)
Input
Single PM SW upgrade
Bypass
(*)
Batteries
Clock adjustment
Operator Panel
(*) Only available in the “Service Mode”
Signal Test
LCD Display Test
Battery Cycle
Batt.Calibration
The machine therefore possesses a tree structure with menus and relative sub-menus, the functions of which
are described in the following sections.
7.2.1 UPS Status:
UPS Info
TRIMOD mod
POut max
SW Vers.
PM SW Vers.
S/N
Output
X
Power
Appar. Power
V eff.
I eff.
Peak I Val.
Frequency
Peak fact. I
Power Factor
Max Power
Power
Input
X
Power
Appar. Power
V eff.
V eff. byp
Model of the instrument
Maximum active power that can be supplied [W]
Version of the firmware in the machine
Version of the firmware in the power modules
Serial number of the machine
Active power supplied by the UPS on phase X [W]
Apparent power supplied on the output by the UPS on phase X [VA]
R.m.s. voltage supplied on the output by the UPS on phase X [V RMS]
R.m.s. current supplied on the output by the UPS on phase X [A RMS]
Peak current supplied on the output by the UPS on phase X [A]
Frequency of the voltage sinusoid on the output on phase X [Hz]
Peak factor on phase X
Power factor of the load connected to the UPS on phase X
Maximum active power supplied by the UPS on phase X [W]
Maximum active power supplied by the UPS on phase X, expressed in
percentage form [0-100%]
Max. App.Power
Maximum apparent power supplied by the UPS on phase X [W]
Appar. Power
Maximum apparent power supplied by the UPS on phase X, expressed
in percentage form [0-100%]
Note: press ”ENTER” to change the value of X and thus change the phase whose data are given below
Power absorbed by the UPS from the main on phase X [W]
Apparent power absorbed by the UPS from the main on phase X [VA]
R.m.s. voltage on the UPS input on phase X [V RMS]
R.m.s. voltage on the UPS input by the UPS on phase X, for the bypass
line [V RMS]
I eff.
R.m.s. current absorbed by the UPS from the main on phase X [A RMS]
Peak I Val.
Peak current absorbed by the UPS from the main on phase X [A]
Frequency
Frequency of the voltage sinusoid on the UPS input on phase X [Hz]
Peak fact. I
Peak factor applied by the UPS from the main on phase X
Power Factor
Power factor applied by the UPS from the main on phase X
Note: press ”ENTER” to change the value of X and thus change the phase whose data are given below
Batteries
Misc.
Voltage
Current
Residual capacity
Charge Status
Total autonomy
Resid. autonomy
N° discharges
Use
Cal.
Voltage measured at the ends of the batteries [V]
Current delivered by the batteries (negative if the batteries are charging)
[A]
Battery charge status, expressed in percentage form [0-100%]
Operating status of the battery charge
Total autonomy that the UPS would have with fully charged batteries
Residual autonomy of the UPS
Total number of complete battery discharges
Total number of hours in which the UPS has operated by batteries
Date and time at which the last calibration was carried out
Internal temp.
Temperature inside the UPS [°C]
15
Pos. HW Bus
Neg. HW Bus
7.2.2 Config. UPS
Options
Battery powering
Re-powering
Output
Positive voltage on DC BUS [V]
Negative voltage on DC BUS [V]
If enabled, allows the UPS to be powered in the absence of an
electricity main
If enabled, the UPS can be re-powered automatically
Voltage
Frequency
Enters the output voltage value [V]
Enters the output frequency value [Hz]
• Nominal value: allows the output frequency value to be entered
(50 or 60 [Hz]) regardless of the frequency of the powering
voltage
• Automatic select.: if enabled, the UPS measures the frequency
of the input voltage and synchronizes the output to the same
value. If disabled, the UPS uses the Nominal Value as a setting
Config. Inverter (*) Enters the output configuration and the applied load
• Single-phase: a single single-phase output
• Threephase 120°: threephase output suitable for powering
threephase loads (e.g. a motor)
• Independent three phases: three independent single-phase
output lines
(*) Only available in the “Service Mode”
CAUTION: Refer to the instructions in sect. 4.3 on page 11 in order to correctly setup the ‘Config. Inverter’
parameter. 11.
Input
PLL enabling
Extended PLL
range
If enabled, the UPS synchronizes the output sinusoid with that of the
input If disabled, the output voltage is not synchronized
with the input and this is signalled by a flash from the status indicator
(green)
If enabled, the UPS synchronizes the output sinusoid with the input for
±14% frequency variations in relation to the nominal value. If disabled,
the UPS synchronizes for ±2% frequency variations.
Note: the PLL function ensures that the unit’s output frequency synchronizes with that of the input, thus
ensuring that the passage through zero occurs at the same instant. If activated, input-output synchronizing is
guaranteed even if the bypass intervenes (e.g. owing to an overload).
WARNING: if the PLL function is disabled, the automatic bypass function will also be disabled in the forced
mode. The UPS switches off in the case of a lengthy overload (consult ‘Tolerated overload’ in Chap. 10).
Bypass
Enab. Bypass
Static bypass
Forced Mode
DIP peed
Starting with
Bypass
If enabled, the UPS controls bypass activation in the automatic mode. If
disabled, the UPS will never commutate to the bypass mode and thus,
the UPS will switch off in the event of a lengthy overload (consult
‘Tolerated overload’ in Chap. 10) or a fault.
If enabled, the static bypass will also be activated when the bypass
closes (in addition to the electromechanical one).
If enabled, the UPS activates the bypass in the permanent mode.
Allows the automatic activation sensitivity of the bypass to be changed
(forced mode disabled)
• SLOW: loads not sensitive to voltage drops or tiny interruptions,
but which cause frequent surges.
• STANDARD: normal uses.
• FAST: loads sensitive to tiny interruptions
If enabled, when powered by the electricity main, the first power the
UPS supplies to the load occurs via bypass. If disabled, the load surge
will be provided by the Inverter, as in battery powering.
16
Batteries
Threshold values
Clock
adjustment
10/07/06-19:25:06 “ENTER”: selects the value to edit
Monday
“ARROWS”: increase/decrease the selected value
Operator
Panel
Language
Keyboard Beep
Display
backlighting
End Aut
Setting for the time at which the end of battery
warning
autonomy warning starts [min]
Battery charger
Charge in
If enabled, the batteries will be charged when the UPS
Standby
is off
Total KB
Enters the total number of KB installed (1 KB = 4 battery racks)
Necessary, to ensure that the UPS provides correct autonomy values
depending on the load applied
Capacity (*)
Enters the capacity value of the batteries in the UPS [Ah]
(*) Only available in the “Service Mode”
Selects the language on the display
Enables/disables the buzzer signal when the keys are pressed
Selects the backlighting option for the display
• Fixed: always lighted
• Timed: the lighting goes out after the keyboard has remained
inactive for a few seconds
• Disabled: lighting always off
Display Contrast
Selects the display contrast
Change password Enters a password that blocks access to the UPS settings
7.2.3 Power Modules:
PM Status
PM Info
X Mod
SW Vers.
HW Vers.
S/N
VA Max
W Max
Icgh Max
Measurements
Input
Output
Model of power module X
Version of the firmware in power module X
Hardware version of power module X
Serial number of power module X
Maximum apparent power that power module X can
provide [VA]
Maximum active power that power module X can
provide [W]
Maximum current that the battery charger of power
module X can provide [A]
X Power
Power absorbed from the mains supply
by power module X [W]
Appar. Power Apparent power absorbed from the
mains supply by power module X [VA]
V eff.
R.m.s. voltage on the input of power
module X [V RMS]
V eff.byp
R.m.s. voltage on the input to power
module X for the bypass line [V RMS]
I eff.
R.m.s. current absorbed by power
module X from the main [A RMS]
Peak I Val.
Peak current absorbed by power
module X from the main [A]
Frequency
Frequency of the voltage sinusoid on
the input to power module X [Hz]
Peak factor
Peak factor applied by power module X
to the main
Power factor
Power factor applied by power module
X to the main
X Power
Active power provided by power
module X [W]
Appar. Power Apparent power supplied on the output
by power module X [VA]
V eff.
R.m.s. voltage supplied on the output
by power module X [V RMS]
17
I eff.
Battery
Misc.
R.m.s. current supplied on the output
by power module X [A RMS]
Peak I Val.
Peak current supplied on the output by
power module X [A]
Frequency
Frequency of the voltage sinusoid on
the output from power module X [Hz]
Peak factor
Peak factor of the output current of
power module X
Power factor
Power factor on the output to power
module X
Max. Power
Maximum active power that power
module X can provide [W]
Power
Maximum active power that power
module X can provide, expressed in
percentage form [0-100%]
Max.
Maximum apparent power that power
App.Power
module X can provide [W]
Appar. Power Maximum apparent power that power
module X can provide, expressed in
percentage form [0-100%]
X Voltage
Voltage measured at the ends of the
batteries by power module X [V]
Current
Current that power module X requires
from the batteries (negative if the
batteries are charging) [A]
X INV diss.temp Temperature of the INV dissipator of
power module X [°C]
BST
Temperature of the BST dissipator of
diss.temp
power module X [°C]
Fan speed
Fan speed expressed in percentage of
power module X [0-100%]
Pos. HV Bus
Voltage on positive DC BUS of power
module X [V]
Neg. HV Bus Voltage on negative DC BUS of power
module X [V]
Note: press “ENTER” to change the value of X and thus change the power module whose data are read
PM SW
Upgrade
Allows the software in all the power modules in the UPS to be automatically upgraded in the
sequential ode. Press “ENTER” to begin the procedure. If upgrading is not necessary, the
message “PM SW versions upgraded!” will appear on the display. Press “ESC” to quit the
mask.
Single PM SW Allows the software in the individual power module to be upgraded. Use the “ARROW” keys
upgrade
to select the module that needs to be upgraded (‘PM00’ means the module at the top left,
moving up until the last on the bottom right). Press “ENTER” to display a comparative mask
between the software currently in the selected module and the software about to be entered.
Press “ENTER” to begin the upgrading procedure. The message “PM SW version
upgraded!” will appear on the display once the upgrading process has terminated. Press
“ESC” to quit the mask.
7.2.4 Tools
SIGNAL TEST Tests the indicator lights. Press “ENTER” to test the signals given by the status indicator
(green, orange and red) and the buzzer
LCD DISPLAY Tests the alphanumerical display. Press “ENTER” to display all the characters available on
TEST
the alphanumerical display.
18
BATT.CALIBR Calibrates the batteries, measuring the discharge curve. If the batteries are changed, it is
ATION
advisable to carry out this cycle to allow the UPS to provide precise information about the
charge status.
19
8 Optical and acoustic signals
STATUS
INDICATOR
POWER
MODULE LED
GREEN
fixed
ACOUSTIC
SIGNAL
MESSAGE ON
DISPLAY
-
UPS via Mains
IN xxxV/yyyV/zzzV
OUT xxxV/x.xkW
UPS via Mains
Mains not synch.xx.xHz
DESCRIPTION OF UPS
STATUS AND OPERATING
ADVICE
Normal operation with mains
present and load within
limits
The UPS signals that the
frequency of the output
voltage is not synchronized
with that of the input voltage.
This can be caused by:
• PLL disabled
• Input voltage
frequency beyond
limits established by
the UPS
The UPS signals that the
bypass is unusable
Operation in the bypass
mode
Battery operation
GREEN
Fast flashes
GREEN
Fast flashes
-
GREEN
Long flashes
ORANGE
Fast flashes
ORANGE
fixed
ORANGE
fixed
GREEN
Long flashes
ORANGE
Fast flashes
ORANGE
fixed
ORANGE
fixed
-
-
-
UPS via Bypass
RED
Fast flashes
RED
Short flashes and
double flashes
with pause
Short flashes
(every 20 sec.)
Short flashes and
double flashes
with pause
Fast
flashes
UPS via battery
NO MAINS POWER
AUTONOMY RESERVE Autonomy reserve. In
battery operation mode
Incorrect battery connection
OVERLOAD
The UPS signals an
overload status. It is
advisable to disconnect
some of the users until the
power input is brought within
the established limits.
OVERLOAD
The UPS signals an
NO MAINS POWER
overload status in the
battery operation mode.
Disconnect users until the
load'
s power input returns
within the established limits
or the UPS switches off
automatically (see '
Tolerated
Overload'in chap. 10).
UPS in error status or a fault
has been detected
WARNING: it is advisable to
switch off the unit and
contact the assistance
center
RED
fixed
Continuous
WARNING: press “ESC” to silence the buzzer. This latter is silenced or enabled on each successive pressure
on the “ESC” key.
9 Communication devices
The UPSs of the UPS TRIMOD family have two RS232 serial ports, 1 relay interface and 1 output through a
9-pin make connected, SELV insulated at logic levels.
20
9.1 RS232 serial ports
The first of the two RS232 serial ports that equip the UPS is called “maintenance interface” and is positioned
at the top, behind the front door. It is exclusively dedicated to diagnostic functions and the machine’s firmware
upgrades.
The second, called “user interface” is installed at the top rear of the UPS (see fig. 17). Thanks to it, a series of
data concerning the way the UPS operates can be accessed via a computer or a dedicated network board,
and unmanned power-off of the operating system can be controlled.
9.2 Relay interface
The contacts of the relay interface are programmed by default as Normally Open (NO), but can be configured
as Normally Closed (NC) via the display of the UPS.
The technical features of the interface relay’s contacts are as follows:
•
•
IMAX = 5A
VMAX = 250VAC - 30VDC
The following signals are available by means of this interface (see fig. 17 for the numbers of the contacts).
Pin
1 -2
3-4
5-6
7-8
Function
Battery operation
Autonomy Reserve
Generic Alarm
Overload
9.3 Interface at logic levels
The interface at logic levels is available on male connector DB9. It allows the UPS to be connected to a
remote system so as to monitor its operating status and provides the following signals:
•
•
•
•
Mains/battery operation;
UPS fault:
Overload;
Autonomy reserve.
The functions of the interface pins are (see fig. 18):
•
•
•
•
•
•
Pin 1: ON/OFF input (Maximum voltage +15V, equivalent to the “ON/OFF” key on the panel);
Pin 5: GND (common contact);
Pin 6: UPS fault output (Open Collector - active low);
Pin 7: UPS in autonomy reserve output (Open Collector - active low);
Pin 8: GND (common contact);
Pin 9: Battery operated UPS output (Open Collector - active low);
21
10 Technical specifications
TRIMOD 8
Rated power
Active power
Technology
IN/OUT configuration
UPS architecture
INPUT
Maximum current
(ThreephaseThreephase)
Maximum current
(Threephase-Singlephase)
Maximum current
(Single-phaseThreephase)
Maximum current
(Single-phase-Singlephase)
Input voltage
TRIMOD 10 TRIMOD 16
Maximum current
(ThreephaseThreephase)
Maximum current
(Threephase-Singlephase)
Maximum current
(Single-phaseThreephase)
Maximum current
(Single-phase-Singlephase)
Output voltage
Static tolerance of
output voltage:
Output frequency
Wave shape
Mains efficiency
(AC/AC on line)
TRIMOD 30
8 kVA
6.4 kW
10 kVA
16 kVA
20 kVA
30 kVA
8 kW
12.8 kW
16 kW
24 kW
On line double conversion VFI
Mono / Mono - Mono / Tri - Tri /Tri - Tri / Mono
Tri / Tri
(can be configured by user)
Modular, Expendable, Redundant N+X with 2700 VA / 3400 VA
power modules housed in a single cabinet
TRIMOD 8
TRIMOD 10 TRIMOD 16
TRIMOD 20
TRIMOD 30
14.8 A
18.5 A
29.6 A
37 A
55.5 A
14.8 A
18.5 A
29.6 A
37 A
-
44.4 A
55.5 A
88.8 A
111 A
-
44.4 A
55.5 A
88.8 A
111 A
-
230 V +15% -20% / 400 V +15% -20%
(Neutral line is essential)
THD input current
Power factor on the
input
Input frequency
OUTPUT
TRIMOD 20
3%
400 V
+15%-20%
(Neutral line is
essential)
> 0,99
50 Hz / 60 Hz
TRIMOD 8
TRIMOD 10 TRIMOD 16
TRIMOD 20
TRIMOD 30
11.59 A
14.49 A
23.19 A
28.99 A
43.48 A
34.78 A
43.48 A
69.57 A
86.96 A
-
11.59 A
14.49 A
23.19 A
28.99 A
-
34.78 A
43.48 A
69.57 A
86.96 A
-
230 V ± 1% (Single-phase)
400 V ± 1% (Threephase)
± 1%
50 Hz / 60 Hz synchronized
Sinusoidal
94% to 100% of the load
22
400 V ± 1%
(Threephase)
Mains efficiency
(AC/AC eco mode)
Tolerated overload
BATTERIES
Type of batteries
Autonomy
at 80% of the load
Autonomy
at 100% of the load
ACCESSORIES
Bypass
Signals and alarms
Communication ports
Software
Protections
IN/OUT mains
connection
MECHANICAL
SPECIFICATIONS
Net weight
(without batteries)
Dimensions (L x H x
D)
Power modules
installed
ENVIRONMENTAL
CONDITINS
98%
150% for 30 s
TRIMOD 8
Norms
Standard warranty
TRIMOD 20
TRIMOD 30
12V 7.2Ah or 12V 9Ah maintenance-free sealed lead batteries
See tab. 5 (Long autonomies)
See tab. 5 (Long autonomies)
TRIMOD 8
TRIMOD 10 TRIMOD 16
TRIMOD 20
TRIMOD 30
Automatic (static and electromechanical)
Manual (for maintenance)
Large alphanumerical display with 4 lines, multicolored status indicator,
buzzer
Two RS 232 ports, 1 relay interface, 1 contact port
Can be downloaded free of charge from the web site www.metasystem.it
Electronic against overloads, short-circuits and excessive battery
discharging. Functions blocks if autonomy ends. Powering surge limier.
E.P.O. contact (total shutdown in an emergency)
Terminal board
TRIMOD 8
TRIMOD 10 TRIMOD 16
110 kg
TRIMOD 20
130 kg
3
TRIMOD 8
TRIMOD 30
(154 + 70) kg
2 x (414 x 1345
x 628) mm
414 x 1345 x 628 mm
Operating
temperature
Relative humidity
Noise level at 1 m
STANDARDS
TRIMOD 10 TRIMOD 16
6
TRIMOD 10 TRIMOD 16
9
TRIMOD 20
TRIMOD 30
0°C to 40°C
20% to 80% non-condensing
42 to 46 dBA
TRIMOD 8
TRIMOD 10 TRIMOD 16
TRIMOD 20
EN 62040-1-1, EN 50091-2, EN 62040-3
1 year with On Site batteries included formula.
Interventions provided in the installation site.
23
TRIMOD 30
11 Figure - Illustrations:
Distanza minima [mm]
Minimum distance [mm]
Distanza minima [mm]
Minimum distance [mm]
X
100
Y
200
100
200
Fig. 1
Distanze raccomandate per l’UPS
UPS space recommendation
Fig. 2
Distanze raccomandate UPS TRIMOD + TRIMOD BATTERY
UPS TRIMOD + TRIMOD BATTERY space recommendation
24
Fig. 3
UPS TRIMOD 8/10
25
Fig. 4
UPS TRIMOD 16/20
Fig. 5
UPS TRIMOD 30
26
Fig. 6
UPS TRIMOD BATTERY
27
Fig. 7
CONNESSIONE UPS TRIMOD - TRIMOD BATTERY
CONNECTION UPS TRIMOD - TRIMOD BATTERY
28
Fig. 8
29
Fig. 9
30
Fig. 10
31
Fig. 11
32
Fig. 12
33
Fig. 13
34
Fig. 14
Collegamento di UPS TRIMOD con carico in uscita MONOFASE
Connection of UPS TRIMOD with SINGLE PHASE output load
Interruttore Blocco di Emergenza (NC = Normalmente Chiuso)
Emergency Power Off35
(NC = Normally Closed)
E.P.O.
Fig. 15
Cablaggio per l’interruttore SPEGNIMENTO AUTOMATICO
Drawing of the wiring for the EMERGENCY POWER OFF
Fig. 16
Interfaccia seriale RS232 di manutenzione
Maintenance RS232 serial interface
Porta seriale
RS 232
RS 232 serial
port
Interfaccia a
livelli logici
Logic level
interface
Interfaccia a
relè
Dry contact
interface
Fig. 17
Interfacce di comunicazione (lato posteriore)
Communication interfaces (back side)
54321
9876
9876
54321
Fig. 18
Porta seriale RS 232
RS 232 serial port
Interfaccia a livelli logici
Logic level interface
12 Tabelle - Tables:
Potenza - Power
8 / 10 kVA
16 / 20 kVA
Cavo Ingresso - Input Cable
Single Phase
Three Phase
2
2
3 x (10 mm )
5 x (4 mm )
2
2
3 x (25 mm )
5 x (10 mm )
36
Cavo Uscita - Output Cable
Single Phase
Three Phase
2
2
3 x (10 mm )
5 x (4 mm )
2
2
3 x (25 mm )
5 x (10 mm )
30 kVA
-
2
5 x (16 mm )
2
-
5 x (16 mm )
Tab. 1
Sezioni cavi raccomandate per UPS TRIMOD
Recommended Cable Sections for UPS TRIMOD
Potenza - Power
8 / 10 kVA (*)
8 / 10 kVA (**)
16 / 20 kVA (*)
16 / 20 kVA (**)
30 kVA
F L1
20A 500V gG (14 x 51)
50A 500V gG (14 x 51)
40A 500V gG (22 x 58)
100A 500V gG (22 x 58)
50A 500V gG (22 x 58)
Fusibile - Fuse
F L2
20A 500V gG (14 x 51)
20A 500V gG (14 x 51)
40A 500V gG (22 x 58)
40A 500V gG (22 x 58)
50A 500V gG (22 x 58)
F L3
20A 500V gG (14 x 51)
20A 500V gG (14 x 51)
40A 500V gG (22 x 58)
40A 500V gG (22 x 58)
50A 500V gG (22 x 58)
Tab. 2
Valori fusibili fase raccomandati per UPS TRIMOD
Recommended Phase Fuse Ratings for UPS TRIMOD
(*)
Ingresso Trifase / Uscita Trifase
Three phase Input / Three phase Output
Potenza - Power
8 / 10 kVA
16 / 20 kVA
30 kVA
TRIMOD BATTERY
(**)
Ingresso Trifase / Uscita Monofase
Three phase Input / Single phase Output
Fusibile di batteria - Battery fuse
UPS TRIMOD
TRIMOD BATTERY
F B+
F BF B+
F B50A 500V aR
50A 500V aR
25A 500V aR
25A 500V aR
(14 x 51)
(14 x 51)
(22 x 58)
(22 x 58)
100A 500V aR
100A 500V aR
50A 500V aR
50A 500V aR
(22 x 58)
(22 x 58)
(22 x 58)
(22 x 58)
80A 500V aR
80A 500V aR
80A 500V aR
80A 500V aR
(22 x 58)
(22 x 58)
(22 x 58)
(22 x 58)
80A 500V aR
80A 500V aR
(22 x 58)
(22 x 58)
Tab. 3
Valori fusibili batteria raccomandati
Recommended Battery Fuse Ratings
Potenza Interruttore Automatico Ingresso Consigliato Fasi Ingresso / Uscita
Power
Recommended Input Automatic Breaker
Input /Output Phases
8 kVA
16A (3P+N) curva C
3 /3
50A (3P+N) curva C
3 /1
50A (1P+N) curva C
1 /1-3
10 kVA
20A (3P+N) curva C
3 /3
63A (3P+N) curva C
3 /1
63A (1P+N) curva C
1 /1-3
16 kVA
32A (3P+N) curva C
3 /3
100A (3P+N) curva C
3 /1
100A (1P+N) curva C
1 /1-3
20 kVA
40A (3P+N) curva C
3 /3
100A (3P+N) curva C
3 /1
100A (1P+N) curva C
1 /1-3
30 kVA
63A (3P+N) curva C
3 /3
Tab. 4
Interruttore Automatico Ingresso Consigliato
Recommended Input Automatic Breaker
Potenza Interruttore Differenziale - Corrente Differenziale
Power
Differential Breaker - Differential Current
37
8 kVA
10 kVA
16 kVA
20 kVA
30 kVA
>= 300 mA
>= 300 mA
>= 300 mA
>= 300 mA
>= 300 mA
Tab. 5
Interruttore Differenziale - Corrente Differenziale
Differential Breaker - Differential Current
Models
Modelli
TRIMOD 8
TRIMOD 10
TRIMOD 16
TRIMOD 20
TRIMOD 30
Nom. Power
Potenza Nom.
(kVA)
Aut.
80%
min
Total Cabinet
Size (WxHxD)
Misure (Lxhxp)
(mm)
Part Number
Codice
8
10
15
20
30
45
60
1
1
1
1
1
2
(414X1345X618)
(414X1345X618)
(414X1345X618)
(414X1345X618)
(414X1345X618)
2X(14X1345X618)
P45010A
P45010B
P45010C
P45010D
P45010E
P45010F
10
8
15
25
35
45
60
1
1
1
1
2
2
(414X1345X618)
(414X1345X618)
(414X1345X618)
(414X1345X618)
2X(414X1345X618)
2X(414X1345X618)
P45020A
P45020B
P45020C
P45020D
P45020E
P45020F
16
10
15
20
33
40
53
75
1
1
2
2
2
3
3
(414X1345X618)
(414X1345X618)
2X(414X 1345X621)
2X(414X 1345X621)
2X(414X 1345X621)
3X(414X 1345X621)
3X(414X 1345X621)
P45030A
P45030B
P45030C
P45030D
P45030E
P45030F
P45030G
20
6
9
15
25
35
45
60
1
2
2
2
2
3
3
(414X1345X618)
2X(414X1345X618)
2X(414X 1345X621)
2X(414X 1345X621)
2X(414X 1345X621)
3X(414X 1345X621)
3X(414X 1345X621)
P45040A
P45040B
P45040C
P45040D
P45040E
P45040F
P45040G
30
9
15
25
35
45
60
80
2
2
3
3
4
4
4
2X(414X 1345X621)
2X(414X 1345X621)
3X(414X 1345X621)
3X(414X 1345X621)
4X(414X 1345X621)
4X(414X 1345X621)
4X(414X 1345X621)
P45050A
P45050B
P45050C
P45050D
P45050E
P45050F
P45050G
Tab. 6
Lunghe autonomie
Long Autonomies
38
39