1
Armoire
i
vin.
Wine Preservation Technology
USER MANUAL
V4O.IC2ESS
The information
WARNING
-
in this document is
-
modifrcation without any
pior
suDlecf to
notice.
VINTEC offers no guarantee for our wine cellar if it is
being used for any purpose other than that for which it
was specifically designed. VINTEC cannot be held
responsible for any error in this manual. VINTEC is not
responsible or liable for any spoilage or damage to wines
or any other contents incidental or consequential to
possible defects of the wine cellar. Warranty applies t0
the wine cellar only and not to the content of the wine
ceilar.
is not intended for use by persons
(including children) with reduced physical, sensory or
This appliance
mental capabilities, or lack of experience and knowledge,
unless they have been given supervision or instruction
concerning use ofthe appliance by a person responsible
for their safety.
Children should be supervised to ensure that they do not
play with the appliance.
This unit uses a small quantity of R600A (iso-butane)
flammable refrigerant in it's sealed system
-
28grams.
.
.
.
.
.
.
This appliance contains a small quantity of
R600A refrigerant which is environmentally
friendly, but flammable. lt does not damage
the ozone iayer, nor does it increase the
greenhouse effect.
During transportation and installation, ensure
that the tubing of the refrigerant circuit is not
damaged.
Avoid using
be
considered when disposing of this appliance. Please
ensure the appliance is taken to a recycle center for safe
recycling. DO NOT dispose of the appliance in land flll
as the insulation and refrigerant gas contained in these
appliances are flammable.
door open to clear any-residual odors,
BEFORE LOADING & PLUGGING
IN THE WINE CELLAR
IMPORTANT: Place you wine cabinet in a location which
is strong enough to support the weight of the fully loaded
or
manipulating sharp objects
nearby the appliances.
Leaking refrigerant
can ignite and
KG.
may
damage the eyes.
In the event any damage does occur, avoid
exposure to open fires and any device which
creates a spark. Disconnect the appliance
from the mains power.
Thoroughly ventilate the room in which the
aDDliance is located for several minutes.
Notify Customer Seruice for necessary action
packaging & clean the interior of the appliance before
first use, using a solution of bicarbonate of soda & warm
water & then thoroughly dry the interior.
The unit may have residual odors at first, they will
disaoDear as the unit cools.
Recommendations: Refer to installation instructions
The location you have selected for your wine cellar
-
should:
be well away from any heat source and direct
sunlight;
not be too damp (laundry, pantry, bathroom etc.);
have a flat surtace,
have a standard and reliable electricity supply
(standard socket to country standards, lanked t0 the
ground), it is NOT recommended to use a multisocket or extension lead.
have a surge protectorfitted to the electrical outlet
away from the microwave. Certajn microwave
ovens do not have wave interference shield. When
placed within a 1 meter vicinity of the wine cabinet,
they may affect the operation ofthe wine cabinet.
and advice.
The room for installing the appliance must be
at least l cubic metre per I grams of
refrigerant. The refrigerant quantity contained
in this appliance is listed above in grams; it is
The wine cellar should be Dlaced where the ambient
temperature is between 1ooc to 350c. lf the ambient
also noted on the Ratino Plate
temperature
of
the
aDDliance.
It is hazardous for anyone other than an Authorised
Service Person to carry out servicing or repairs to
this appliance. In Queensland the authorized person
must hold a Gas Work Authorisation for
hydrocarbon refrigerants, before carrying out
servicing or repairs which involve the removal of
GROUNDING INSTRUCTIONS
The wine cellar must be grounded in case of an electrical
short circuit. Grounding reduces the risk of electrical
shock. The wine cellar is equipped with a power cord
having a grounding wire and plug. The wine cellar plug
must be plugged into a properly affixed and grounded
electrical outlet.
Note:
/n /ocaflons where there is frequent lightning, it is
advisable to use surge protectors.
lmproper use of the grounding plug can result in the risk
Allow 24 hours before switching on the wine cellar.
During this time we recommend that you leave the
It is recommended that you remove all internal & external
For your safety observe the following recommendations.
.
The environment and personal safety must
cabinet. The structure supporting the V4o-lc2Ess
must be able to sustain a minimum weight of 105
R6()OA WARNINGS
.
WARNING: Keep ventilation openings, in the appliance
enclosure or in the built-in structure, clear of obstruction.
WARNING: Do not use mechanical devices or other
means to accelerate the defrosting process, other than
those recommended by the manufacturer.
- WARNING: Do not damage the refrigerant circuit.
Notes:
of electric shock. Consult a qualified electrician or
servace person if the grounding instructions are not
completely understood.
lf the supply cord is damaged, it must be replaced by a
qualified person in order to avoid electrical hazard.
INSTALLING YOUR WINE
CELLAR
UnDack and remove all of the orotection and adhesive
strips from the packaging around and inside the wine
ceilar..
1. Carefully remove the door seal on the side you wish
2.
cellar to its final location. The wine cellar should be
installed in a suitable place where the compressor will
not be subject to physical contact.
Leveling your wine cellar: Wne cellar must be leveled
BEFORE loading your wines. To level the unit, adjust the
front leveling legs at the bottom of the unit.
PLINTH VENT
Compressor run appliances require proper ventilation for
proper and longer usage. This unit is designed to be built
"in column" and has very specific ventilation
requirements which are shown in the following diagrams.
The warranty will
void
these installation
requirements are not met.
in
be
if
A plinth vent ofAT LEAST 200 so cm is recommended to
allow for sufficient ventilation. lf ventilation intake is
provided elsewhere,
the plinth vent may not
be
necessary.
-
to
Failure
follow the instructions
regarding installation & ventilation will void the warranty.
IMPORTANT
To ensure correct function of the unit, air vents must
is
IMPORTANT: Do not overtighten the screws & do not
use power tools to install the handle.
The wane cellar must be positioned such that the plug is
accessible. Release the power cord. l\4ove your wine
never be blocked or covered.
or
above
below this range, the
performance of the unit may be affected. Placing your
unit in extreme cold or hot conditions may cause interior
to fluctuate. The ideal range of
temperature may not be reached. (See Climate Class at
the end ofthis manual)
temperatures
covers.
cODE: V40lC2ESS
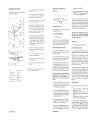
TO INSTALL THE HANDLE:
CODE: V40-lC2ESS
to install the handle.
Insert the screw from the inside of the door frame &
it into the handle, using the screws, lock
washers & flat washers provided.
Replace the door seal.
screw
3.
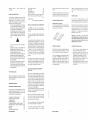
REVERSING THE DOOR
1. Remove the stop mechanism (12) by unscrewing
It is possible to reverse the door on this unit, if required.
To do so, follow the steps below:
screws (11) & ('13).
CELLAR
-*.o
\*'.,--rO
*f
n@-
rlr
.
3.
Remove the door carefully & place it on a padded
surface to avoid risk of damage.
4.
Unscrew the four upper hinge plate screws on the
right hand side & the blanking screws on the upper
lefi hand side. Remove the right upper hinge plate.
Fit the left upper plate, supplied with the
instructions, using the four hinge plate screws, and
then flt the blanking screws on the right.
5.
l-----@
6.
Unscrew the four lower hinge plate screws on the
right hand side & the blanking screws on the lower
left hand side. Remove the right lower hinge plate
& rotate the hinge plate l 80 degree. Refit the lower
hinge plale on the lower left hand side using the
four hinge plate screws, and then fit the blanking
screws on the right.
tr tr flE'a
M
E
TO SWITCH POWER ON /OFF
+
Press & hold the Light
& Temperature
simultaneously for 5 seconds.
8
running for a few hours everything will stabilize.
set buttons
TO CHANGE THE TEMPERATURE
tmportant: lf the unit is unplugged, power is lost, or
turned ott, wait 3 to 5 minutes betore restarting the
uniL The wine cellar witt not start if you attempt to
Ootamal temDerature selection
restart betorc this time delay,
Whilst all styles of wines are best stored at temperatures
between 12 & 14oC, your wine can also be held at
correct drinking temperature, for red wine this is between
15 & 20oC, & for white wine between 08 & 1 3"C.
@Lower Hinge Pin
@screws
@cabinet
@Top Hinge Pin
@Righl Top Hinge Plate
@Glass Door
Oscrews
@Left Top Hinge Plale
Gscrew
@Lower Hinge Plale
@Bofiom Brackel
Ostop Mechanism
r
Press the light button to switch the light on or off.
SETTING THE TEMPERATURE CONTROL
DYNAMIC CLIMATE/SILENT MODE
The wine cellar has two temperature zones: The preset
temperature (Factory setting) for the upper zone is 100C
To reach the desired temperature settings and proper
hinge
& for the lower zone is 1 6oC.
8.
Reinstall the stop mechanism on the opposite side
using screws (1 '1) & ('13).
9.
Move the door supporter to the opposite designated
position.
Note: Keep the spare upper hinge plate should you need
to reverse the door again in the future.
climate, VINTEC wine cellars, uses the Dynamic cooling
mooe
relative
This Dynamic Cooling mode enables the
To view the set temperature in either zone, touch the up
or down mark at any time & the set temperature will
temporarily flash in the LED display for 5 seconds.
The temperature settings of LOWER ZONE and UPPER
ZONE are adjustable with the range 6"-22'C142L72'F.
It is recommended to set the LOWER ZONE between 13
to 22oC | 55-72oF, which is ideal for storing white and red
wines and set the UPPER ZONE between 6 to 13oC | 4255"F which is ideal for storing sparkling and white wines.
NOTE: The temperature set for the LOWER ZONE
must always be equal or higher than that in the
UPPER ZONE. For optimal performance, the set
temperature of the two zones should differ by at
least 4'C,
.
.
OPERATING NOISES
UPPER ZONE
time:
andl
for LOWER ZONE.
be
The following noises are normal and occur from time to
-
When pressing the temperature B mark for the first
original
-
Gurgling sound, caused by the refrigerant flowing
through the appliance's coils,
Crackingipopping sounds, resulting
from
the
contraction and expansion of the refrigerant gas to
-
Droduce cold.
Fan operating sound, to circulate the air within the
wine cellar under The Dynamic climate mode.
Press the temoeratureSmark once. The LEFT LED
indicator for UPPER ZONE will flash. Press the UP or
DOWN marks to set the desired temperature.
.
to
In the Dynamic Cooling mode, the interior fan will cycle
on and off to circulate the inside air, creating noises. lt is
possible to switch off the Dynamic Climate mode by
touching and holding the UP mark for at least 5 seconds.
Three beeps will sound and the unit will then work in a
Silent mode. Re instate and switch on the Dynamic
Cooling mode, by touching and holding the LOWER
mark for at least 5 seconds until vou hear the three
Press the temperature B mark to set the internal
temperature for each zone. The degrees indicators
will appear in the display window marked 6 for
temperature sets previously (The preset temperature
at the factory for UPPER ZONE is 1ooc / 50"F and for
LoWER ZONE is 16"C / 60"F).
o
humidity inside the unit and the temperature
distributed evenly around the interior so you can store all
your wine under excellent conditions. lf you would like to
use the unit to store wine for a long term, the dynamic
cooling mode is a must, as it recreates the continuous
proper climate for wine storage
beeps again.
time, the LED readouts will show the
CODE: V40-lc2ESS
INTERNAL LIGHT
lower hinge pins.
plate screws & then tighten securely.
ODecoration PIug
Note: When you use the wine cellar for the flrst time (or
restart the wine cellar after having it shut off for a long
time), there will be a few degrees, variance between the
temperature you have selected and the one indicated on
the LED readout. This is normal and it is due to the
length of the activation time. Once the wine cellar is
Rotate the door 180 degree and then relocate it on
the upper & lower hinge plates. Reflt both upper &
7. To level the door, adjust the upper & lower
@Screw
oF if you touch
1 'C or I
the UP mark once, or the temperature will decrease
'1
"C or 1"F if you touch the DOWN mark once.
The temperature will increase
2. Wth the door closed, remove the upper hinge pin
cover, and then the upper & lower hinge pins.
Support the door to prevent it from falling.
'fA
temperature for the LOWER ZONE.
TURNING ON YOUR WINE
When pressing the temperature 0 mark again, the
RIGHT LED indicator for LOWER ZONE will flash.
Press the UP or DOWN marks to set the desired
CODE: V40lC2EsS
An individual's perceplon of noise is directly linked to the
environment in which the wine cellar is located, as well
the specifrc type of models. VINTEC wine cellars arc in
line with intemational standards for such appliance.
VINTEC wiil always do ils ufmosf fo safisfy ,ts custome|s
but will not retake possesslon of the goods due to
complaints based
on normal
operating ,oise
occurrences.
White Vintage Chardonnay
l4"c
'16"C
Red Pinot Noir
16"C
Red Grenache,
18"C
Red Vintage Pinot
Cabernet & l\4erlot: French, Australian, New Zealand
Chilean, ltalian, Spanish, Californian, Argentine an...
through the cellar by means of a fan/fans and the hollow
snetves.
Syrah
Noir
LOADING YOUR WINE CELLAR
You may load your wine bottles in single or double rows
while taking note of the following: if you do not have
enough bottles to fill your wine cellar, it is better to
distribute the load throughout the wine cellar so as to
avoid "all on top" or "all below" type loads.
Do remove or relocate adjustable wooden shelves
to accommodate larger type of bottles or increase
the capacity of the cellar by stacking the bottles up
when necessary. (See removing shelves)
Keep small gaps between the walls and the bottles
to allow air circulation. Like an underground cellar
air circulation is imDortant to Drevent mould and for
better homogeneous temperature within the
cellar.
-
a
votd.
Notes: Di.//,rg the retigerating cycle, heat is given off
and dispersed through the external suiaces of the wine
cellar. Avoid touching the sutfaces duing trose cycles.
20"c
Vintage Bordeaux ...
Room temperature not exceeding 20oC
ADJUSTABLE WOODEN SHELVES
-
Do not over load your wine cellar to facilitate air
circulation
Do not stack more than '1.5 rows of standard 0.751
bottles Der shelves to facilitate air circulation
Avoid obstructing the internal fans (located inside
on the back panel of the wine cellar).
Do not try to slide the shelves outwards beyond the
fixed position to prevent the bottles from falling.
Do not pull out more than one loaded shelf at a time
as this may cause the wine cellar to tilt foMard if
-
not properly installed.
Do not cover the wooden shelves with alloy foil or
other materials, as it will obstruct air circulation.
Do not move your wine cellar while it is loaded with
wines. This might distort the body of the wine cellar
and cause back injury.
Your VINTEC wine cellar has been designed to
I
To remove any of the shelves from the railing, move the
shelf to the position where the notch on the shelf is under
the plastic post , then lifr to release.
guarantee optimum conditions for storing and/or serving
your wines.
Fine wines require long and gentle developments and
need specific conditions in which to reach their full
All wines mature at the same temoerature. which is a
constant temperature set between 12"C to 14"C. Only
the temperature of "d6gustation" (wine appreciation)
varies according to the type ofwines (see "Wine Serving
Temperature Chart" above). This being said and as it is
for natural cellars used by wine producers for long period
of storage, it is not the exact temperature that is
important, but its consistency. ln other words, as long as
the temperature of your wine cellar is constant (between
12"C to 14"C) your wines will be stored in perfect
conditions.
OPERATION ANOMALIES
Ensure'that there is power to the electrical supply plug
by connecting another electrical appliance to it. Check
fuse, if any. Make sure that the door is closed propedy.
lf your wine cellar appears to be malfunctioning, unplug it
Any
intervention on the cold circuit should be performed by a
refrigeration technician who should carry out an
inspection of the circuit sealed system. Similarly, any
intervention on the electrical circuit should be oerformed
bv a oualified electrician.
and contact your VINTEC'S afier sales service.
Not all wines will improve over the years. Some should
be consumed at an early stage (2 to 3 years) while
others have tremendous ageing capability (50 and over).
All wines have a peak in maturity. Do check with your
wine merchant to get the relevant information.
HYGROMETRY/
TYPES OF REGULATION
temperature stabilizing.
TEMPERATURE SETTINGS
All wines mature at the same temperature, which is a
constant temperature set between 12oc to 14oc. The
below chart is an indicative temperature chart to indicate
the best temperature for drinking purposes.
Champagne NV, sparkling, Spumante
Dry Vvhite Semillon, Sauvignon Blanc
Champagne Viniage
Drv White Chardonnav
Dry White Gewurztraminer, Riesling, Pinot grigio
Sweet Vvhite Sauternes. Barsac, Montbazillac, lce
Late Harvest
Beau.iolais
Sweet Vvhite Vintage:
CODE: V40lC2ESS
Sauternes...
Your wine cellar is designed with "Auto-cycle" defrost
system. During "Off-cycle" the refrigerated surfaces of
the wine cellar defrost automatically. Defrost water from
the wine cellar storage compartment drains automatically
and part of it goes into a drainage container, which is
located at the back of the wine cellar next to the
compressor. The heat is transferred from the compressor
and evaporates any condensation that has collected in
the pan. Part of the remaining water is collected within
WINE SERVING TEMPEMTURE CHART
6"C
8"C
10"c
100c
'100c
Wne
10"c
13"C
14oC
In the event of a power interruption, all previous
temperature settings are automatically erased and it will
revert to a preset temperature setting. (see preset chart)
l\4ost power failures are corrected within a short period of
time. An hour or two's loss of power will not affect your
wine cellar's temperatures. To avoid sudden change of
temperature while the power is off, you should avoid
opening the door. For longer period of power failure, do
take steps to protect your wine.
lrrespective of the cause, if you notice either
abnormal temperature or humidity levels inside your
wine cellar, be reassured that only long and frequent
exposure to these abnormal conditions can cause a
detrimental etfect on your wines.
potential.
DEFROSTING/CONDENSATION/
VENTILATION
Please note that depending on the loading and settings
chosen it takes 24hours for the wine cellar to see the
POWER FAILURES
Adjusting/removing the shelves
IMPORTANT INFORMATION ABOUT TEMPERATURE
.A.
r
Notes I Any intervention peiormed by a non-technician
will lead to the warranty being considered as null and
the wine cellar for humidity purposes.
This system enables the creation of the correct humidity
level inside your wine cellar required by the natural cork
to maintain a long lasting seal.
Notes: fhe watet collected by condensation, is therefore
rccycled. Under extremely dry environnental conditions,
you may have to add some water into the watel
container provided with your wine cellar.
All units are equipped with a three layer glazed glass
door to minimize condensation on the glass door.
The wine cellar is not totally sealed: fresh air admission
is permitted through the drainpipe. Air is circulated
CODE: V40JC2ESS
CLEANING YOUR WINE CELLAR
.
Turn off the power, unplug the appliance, and
.
Wash the inside surfaces with a warm water and
baking soda solution. The solution should be about
2 tablespoons of baking soda to a pint of water.
'
.
Wash the shelves with a mild detergent solution.
Remove excess water out of the sponge or cloth
when cleaning any area of the controls.
Wash the outside cabinet with warm water and mild
.
remove all items including shelves and rack.
liquid detergent. Rinse well and wipe dry with a
clean soft cloth.
TROUBLESHOOTING GUIDE
R600a
Technical data
Common problems may easily be solved, saving you the cost of a possible service call. Please read carefully the instruction
manual and revert to troubleshooting guide chart.
v40-tc2Ess
Models
40
CaDacitv 750m1 Bottles
PROBLEM
POSSIBLE CAUSE
26gm
Gas charqe quantitv
VMne cellar does not operate.
Wne cellar is not cold enough.
Turns on and off frequently
Not plugged in.
The appliance is turned off.
The circuit breaker trioDed or the fuse is broken
Check the temperature control setting.
External environment may require a higher setting
The door is opened too ofren.
The door is not closed completely.
The door qasket does not seal properlv.
'1
Net caoacitv
Pre-set temp in deqrees
Adiustable temD in deorees
Upper
Lower
1
1
0"C
6"C
6to22
100 in watts
Power Input
The ro0m temperature is hotter than normaL
20 in litres
YeS
Heater(o)
A large amount of contents has been added to the Wne cellar.
The light does not work
Vibrations.
The Wne cellar seems to make too
much noise.
The door will not close properly.
The door is oDened too ofren.
The door is not closed completely.
The temperature conkol is not set correctly.
The door qasket does not seal properlv.
Not plugged in.
The circuit breaker tripped or a blown fuse.
The bulb is out of order.
The lioht button is "OFF".
Check to assure that the Wne cellar is level
The rattling noise may come from the flow of the refrigerant, which is
normal.
As each cycle ends, you may hear gurgling sounds caused by the flow
of refrigerant in your Wne cellar.
Contraction and expansion ofthe inside walls may cause popping and
crackling noises.
The Wine cellar is not level.
The Wine cellar is not level.
The door was reversed and not properly installed.
The gasket is faulty. ( magnet or rubber is spoiled)
The shelves are out of Dosition.
Freestandino or Builfin
No.
of wooden shelf:
{'l
Bui|rin
6
Ambient temo in deorees
'10-35.C
Net dim in mm WXDXH
592x600x884
Gross dim in mm VIIXDXH('?)
650x650x940
Net weioht in Ko
46
Gross weioht in Ko
50
(0)
Units with no heater will not raise its internal
temperature if the ambient temperature where
the unit is located is lower than the set
temperature.
(1)
Sublect to changes accordingly to the
various references and models modifications.
(2)Based
on carton box packing
dimensions/weight
Standard features:
ComDressor operated: R600a
- Available in rated voltage/frequency (as per c0untry'
requirements):
1 00V/50/60H2 22oV 150160H2.1 1 5V l50Hz
) defrost
-Humiditv:6504 RH +/-10% RH
- Black outer and inner flnish
- lnternal lioht
- Adiustable feet x 4
- Double olass dool
" Stainlesssteel flnish d00rframe for"ss models
CODE: V40-lC2ESs