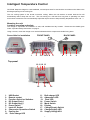
1
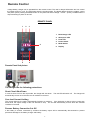
LVD EMC SAA
Digital Battery Charger
& Power Supply
DC12V50AMP
User Manual
0
Contents
Important Safety Precautions………………………………………....2
Description, Features and Warranty………………………………….3
Remote Control…………………………………………….………...…4
Intelligent Temperature Control……………………………..…….…..5
Panel Operation..……………………………………….….………..….6
Operating the unit as charger…………………………….……….....7-10
Operating as a power supply…………………………….….…....… 11-14
1
Important Safety Precautions
Hazardous conditions may result of the charger is not installed or operated correctly.
Please read the following instructions to prevent personal injury or damage to the charger.
Battery Related
•
To reduce the risk of battery explosion, follow these instructions and those marked on the battery.
•
Do not install near flammable or explosive objects.
•
Removal of the top lid (cover) or rear panel at will void warranty.
•
Charge only Lead Acid type of batteries (Flooded / Absorbed Glass Mat (AGM) / Gel Cell).
Do not charge other types of batteries like Nickel Cadmium (NiCad), Nickel-Metal Hydride (Hi-MH), Dry-Cell etc.
Other types of batteries might burst causing personal injury.
•
Working in the vicinity of Lead Acid batteries is dangerous. Batteries generate Explosive gases during
normal operation. Take necessary safety precautions when installing the charger near a battery manufacturer.
•
Never smoke or allow an open spark or flame in the vicinity of the battery or engine.
•
Never charge a frozen battery.
•
Never place the charger directly above or below the battery being charged; gases or fluids from the battery will
corrode and damage the charger. Locate the charger far away from the battery as DC cables permit. Install in a
well ventilated, cool, dry place.
Charger Related
•
The charger must not be operated in a damp or wet environment. When mounting in a boat, make sure it is
subjected to bilge water splash
•
Installation and wiring must comply with the local and the national electrical codes.
•
Install in a well ventilated, cool, dry place.
•
Do not block the ventilation openings / openings for the cooling fan. There should be at least 15cm clearance all
around the unit.
•
Do not operate the charger in a closed-in area or restrict ventilation in any way.
•
It is recommended that installation and wiring be done by a certified electrician.
•
Incorrect installation on a boat may lead to corrosion of the boat.
must be carried by a boat electrician.
•
Disconnect the AC input power to the charger before connecting / disconnecting the batteries or other DC loads or
when working on the charger.
•
Disconnect the AC input power before changing settings of the Function Selection Switches.
•
The chassis of the charger is connected to the earth ground pin of the power cord plug. Ensure that the earth
ground pin of AC receptacle feeding the charger is connected to earth ground.
•
Do not use an adapter. If a grounding type of receptacle is not available, do not use this charger until the proper
outlet is installed by a qualified electrician.
•
Do not operate the charger if the power cord is damaged.
2
It is recommended that installation on the boat
Description
Charger:
This DC12V50AMP charger is used for charging lead acid batteries (AGM or GEL batteries). The DC12V50AMP
charger can charge 12V batteries and range from 100AH to 500AH. The DC12V50AMP battery charger connects
to an Alternating Current (AC) power of 230V/50Hz (Preset) or 115V at a frequency of 47 ~ 63Hz.
Power Supply:
The DC12V50AMP power supply adopts PWM (Pulse Width Modulation) control, the output voltage ripple voltage
stability of small DC power, it can provide the power to industrial DC instruments, electrical appliances, and
household DC electric power.
Features
•
State of the art switch mode technology is used for very high efficiency, light weight and quiet operation.
•
Fitted with the intelligent 4 stage charging mode---pulse ~ bulk ~ absorption ~ float charge. Enables the charger to
charge most types of batteries and avoids them being overcharged.
•
Fitted with current and voltage detection control to improve the efficiency of charging and to precisely control the
charging current and voltage to prevent over-charge of the battery.
•
Digital display is easily displays the current, voltage and output parameters.
•
Fitted with a 4 LED charging indicator a charging curve will be displayed for intuitive understanding of the charging
states.
•
Intelligent temperature protection: when the ambient air temperature is too high or when the charger has
overheated, the charger will self-adjust the charging current to protect the battery and the charger.
•
Battery reverse polarity protection: if the battery is reverse connected by accident the battery output will be
automatically disconnected to prevent permanent damage to the battery charger and battery
•
Output short-circuit protection: when the chargers outputs are shorted, the current will be controlled down to zero to
prevent damage to the battery and the unit.
•
Output over-current protection: when the output is overloaded, the charger will automatically limit the power output.
•
User selectable AC input voltage--- 230V, 50Hz (Pre-set) or 115V 60Hz
Warranty
We warrant this product against defects in initial PCB, components and any manufacturing defects for one
full year from date of purchase and will repair or replace any defective power inverter. This warranty is
issued only at the time of original purchase; it is non-transferable. Damage caused by accident, misuse,
do-it-yourself repairs, sand, oil or water is not covered by this warranty. This is only warranty and the
company makes no other warranties, express or implied, including warranties of merchant ability and
fitness for a particular purpose.
3
Remote Control
4-stage battery charger can be operated from the remote control. The user is relayed information and can control
the output power on or off. The LED lights show the charging stage. The digital display shows the voltage, current
and power (when pressing the MODE button on the panel will shown voltage - current – power), POWER button is
output switching to power on and off.
REMOTE PANEL
1
2
3
1. Bulk Charge LED
2. Absorption LED
3. Float LED
4. Power Switch
5. Mode Switch
6
4
6. Display
5
Remote Panel link picture
The charger has the following protections:
Short Circuit Shut Down
In case of short circuit on the output side, the charger will shut down. The red LED will switch off. The charger will
automatically recover once the short circuit condition is removed.
Over load Current Limiting
The current drawn by the load is automatically limited to a maximum. If the load tries to draw a higher current than
these limits, the output voltage of the unit will start to drop. The unit will automatically recover when the overload
condition is removed.
Reverse Battery Connection Cut Off
If the battery is reverse connected by accident the battery output will be automatically disconnected to prevent
permanent damage to the battery charger and battery
4
Intelligent Temperature Control
CAUTION: Keep the charger in a well ventilated, cool and open area. Do not block the vent holes on the sides or the
discharge openings of the cooling fan.
The unit cooling system is fan forced convection cooling. When the unit reaches a certain load the fan will
automatically start to keep the unit cool. The unit running on a full load for a long time or operating in a warm
environment causes the unit to automatically adjust the output current to keep the body temperature at 55 ~ 65 ° c
Mounting the unit:
Location, mounting and safety
The charger is required to be installed in a safe, well ventilated and dry location. Please see the details given
under “Important Safety Instructions” on page 2.
Using 4 screws, mount the charger on a vertical bulkhead with the output terminal side facing down.
FRONT PANEL
Screw Hole for installation
1
2
BACK PANEL
3 17 18 19 4
5
6
Top panel
10 11 12 13
14
1.
2.
3.
4.
5.
6.
7.
8.
9.
10.
USB Socket
Remote socket
Function Selection Switches
DC Output Pos(+)
DC Output Neg(-)
Power Switch
Input AC Socket
Conversion Operations Switch
Cooling fan
Pulse charge LED
15
11.
12.
13.
14.
15.
16.
17.
18.
19.
16
Bulk charge LED
Absorption LED
Float LED
Power Switch
Mode Switch
Display
Charge/Supply Switch
Charge/Supply LED
Supply Voltage.ADJ
5
7
8
9
Panel Operation Description:
1. USB Socket: Output Max. with DC5V 500mA
2. Remote Control Socket: Connected with wire remote controller to control the unit from a
distance and to read the working status
3. Function Selection Switches:
4. DC Output Pos(+): Connected to the battery Positive Pole
5. DC Output Neg(-): Connected to the battery negative Pole
6. Power Switch: To turn power on and off
7. Input AC Socket: Connected to AC Voltage
8. Conversion Operations Switch:Input Switch for AC230V (Preset) / AC115V
9. Cooling fan: Cooling down the temperature of the unit
10. Pulse charge LED
11. Bulk charge LED
12. Absorption LED
13. Float LED
14. Power Switch: Panel Switch to turn power on or off
15. Mode Switch: selects between the output voltage, current, and power factor
16. Display: Displays the output voltage, current and power factor
17. Charge/Supply Switch:Used to select between charger and power supply mode.
18. Charge/Supply LED: Indicator light for selected of charger or power supply (Green – charger
mode / Red – power supply mode)
19. Supply Voltage.ADJ: Used in power supply mode, the output voltage regulator, can be
adjusted by the regulator to change the output voltage range from 9V ~ 14V.
6
Operating the unit as a charger
Charging Stages
•
NOTE- VOLTAGE READINGS ON NO LOAD
FOUR STAGE CHARGING CURVE CHART
Absorption
Float
Bulk
Pulse
Voltage(V)
Current(A)
Four Stage Charger Descriptions:
STAGE 1- PULSE CHARGE
(This feature is switched off, consult page 6 for function selection switch settings to change)
There are 5 minutes rated voltage pulse charging. This will help the battery life and dispel some of the
vulcanization curing of the plates and reduce the battery internal resistance and shorten the charging time.
STAGE 2-CONSTANT CURRENT OR BULK CHARGE STAGE
When the battery is low, it will try to draw larger charging current. The charger senses the current draw and limits
this to the maximum permissible value. Bulk charging takes place at this constant current. In this condition of
constant current, the voltage measured at the charger or battery terminals will be the battery’s own voltage. The
constant current injected into the battery starts restoring the battery capacity and its voltage starts rising. When this
voltage approaches the threshold of battery ”gassing” , termed “Boost or Absorption Voltage”, the charger
automatically switches over to Stage 2-“Boost or Absorption Stage”. The value of this voltage depends upon the
type of battery being charged (See Function Selection Switch Settings). By this time, approximately 80% of the
battery capacity will normally have been restored (Note: The percentage capacity restored till the point the
battery reaches the boost or absorption voltage is inversely proportional to the value of the bulk charge
current.)
STAGE 3-CONSTANT VOLTAGE BOOST OR ABSORPTION STAGE
As explained above, when the battery voltage approaches the point where battery “gassing” can begin, the charger
automatically switches over to the “Boost or Absorption Stage”. The charger applies a constant voltage whose value
depends upon the type of battery selected (See Function Selection Switch Settings). This controlled overcharge
restores the balance 20% of the capacity in a minimum amount of time. As the capacity is fully restored, the charging
current starts reducing. When the current reduces below the preset threshold, the charger automatically switches to
the “Float or Maintenance Stage”.
STAGE 4- FLOAT CHARGE
As explained above, per the charging current drops below the preset threshold it signals that the battery is 100%
charged, in this: “Float or Maintenance Charging Stage”, this helps in maintaining 100% capacity of the battery and
also compensates for self-discharge. The battery can remain connected in this stage indefinitely without the risk of
overcharging or excessive loss of electrolyte.
7
Cables Specification
To avoid polarity errors and possible damage, never use wires of only one color.
wire(s) for positive (+) connection(s) and black (-) for negative connection(s)
Use red insulated
The specification of DC output cables for various chargers models were as followings:
MODEL
Specification
Dimensions(MM)
DC12V50AMP
8AWG
1600
PREPARING THE CHARGER FOR OPERATION
Selecting AC input voltage
The unit is preset to operate on AC input voltage 230V AC/50Hz for use in Australia. If you want to
change the existing AC input voltage to 115V AC/60Hz, please use the switch on the Rear panel (Please
see the below picture).
Warning- Please confirm and check carefully before selecting the input power voltage 115V or 230V
correctly when switching to ensure the power source matches.
Function Selection
Switch Panel
Rear panel Switch 115V or 230V
S1 S2
S3
S4
4. Function selection switch settings for battery type and charging stages
BATTERY TYPE
ABSORPTION
BULK
ABSORPTION
FLOAT
LIMITATION
PULSE
S1
S2
S3
S4
SW
Wet
4hr (time)
13.8V
14.4V*
13.8V*
YES
ON
OFF
ON
OFF
Flooded/AGM
Disabled
13.8V
14.2V
13.8V*
OFF
OFF
ON
OFF
ON
Disabled
Disabled
Disabled
13.8V
YES
OFF
OFF
OFF
OFF
Wet/
Gel
Cell/
Flooded AGM*
Operation:
The digital display on the panel shows the charging voltage, charging current and power output.
The LED lights show the charging stages. When the charger is connected the LED will display the
current battery charging voltage, current, the power factor (to view press the MODE button on the
panel), the charger goes into the normal operation of the state.
8
Charging of an installed Battery
Follow these steps when the battery is installed in a vehicle. A spark near a battery may cause
battery explosion. For safety and to reduce the risk of spark near the battery:
1. Position AC and DC cords to reduce risk of damage by hood, door or moving engine parts
2. Stay clear of fan blades, belts, pulleys and other parts that can cause injury to persons
3. Check the polarity of the battery posts. A positive (Pos, P, +) battery post usually has a larger
diameter than a Negative (Neg. N, -) post.
4. Determine which post of the battery is grounded (Connected) to the chassis (Engine Block). If
the negative post is grounded to the Engine Block (As in most vehicles), see sub paragraph 5.
If the positive post is grounded, see sub paragraph 6.
5. For a negative grounded vehicle, connect the positive (red) DC cable from the charger to the
positive of the battery post. Connect the negative (black) DC cable from the charger to a
section of heavy gauge metal part of the frame or engine block which is away from battery. Do
not connect to carburetor, fuel lines or sheet metal body parts.
6. For a positive grounded vehicle, connect the negative (black) DC cable from the charger to the
negative of the battery post. Connect the positive (red) DC cable from the charger to a section
of heavy gauge metal part of the frame or engine block which is away from battery. Do not
connect to carburetor, fuel lines or sheet metal body parts.
7. Connect the charger AC power cord to the AC outlet
8. When disconnecting the charger, turn switches to off, disconnect AC power cord, remove
connection from the vehicle chassis and then remove connection from the battery terminal.
TROUBLE SHOOTING
Status
Cause
Solution
Battery has been fully charged
DC Output to battery cable is not
LED lights do not change the well connected
state, the display does not
shown charging current,
DC output cable may be connected
voltage is normal
polarity reversed
No need to charge
Check the battery cable is connected firm
and tightly.
Red Cable connect to A positive (Pos, P, +) ,
Black Cable connect to A Negative (Neg, N, -)
battery maybe damaged and maybe Please change a new battery
caused short-circuit
AC input cable maybe damaged
No signal when power is on AC Input voltage is not normal
Change a new cable with safety standard
Check the unit is set for the correct AC mains
voltage with ammeter to meet the correct
voltage range.
Select incorrect input voltage
Call Technical Support
Not yet reach to the current to start
the fan
To save power, unit at small current won’t
start. Fan starts when the current reach to
the current value set in the device
Fan does not operate
Fan has been operated in long period of time
caused shorten the usage life.
Fan Defected
Maintenance and Caring
9
Unit requires minimal maintenance and caring if the unit is used within guidelines, Ensure that unit is free of
dirt and dust on the casing and only clean by using damp cloth.
Digital battery charger specifications
Input
Output
Protection
Indication
Temperature
Dimensions
Model
Voltage
Frequency
Current
Wattage
Bulk
Absorption Charge
Float Charge
Pulse charge
Absorption Limitation
Remote
Battery reverse
Short-circuit
Overload
Cooling fan
Temperature
LED (4)
Display number
Operating Range
Length x Width
Height
Weight
DC12V50AMP
200~240V AC
47~63Hz
12V/50A
12V/720W
13.8V±0.2V
14.4V/14.8V±0.2V
13.8V±0.2V
Yes
4 hours
Yes
Yes
Yes
Yes
Yes
Yes
Green: floating / Yellow: absorption /
Orange: bulk / Red: pulse
4 Digit number Voltage / Current / Wattage
-20 Degree C ~ 50 Degree C
x
300*200*88mm
3.1kgs
10
Operating As a Power Supply
The Power Supply has the following protections:
Short Circuit Shut Down
In case of short circuit on the output side, the Power Supply will automatically recover once the short
circuit condition is removed.
Over load Current Limiting
The current drawn by the load is automatically limited to maximum. If the loaded tries to draw a higher
current than these limits, the output voltage of the unit will start to drop. The unit will automatically
recover when the overload condition is removed.
Intelligent Temperature Control
CAUTION- Keep the Power Supply in a well ventilated, cool and open area. Do not block the vent holes
on the sides or the discharge openings of the cooling fan.
The unit cooling system is fan forced convection cooling. When the unit reaches a certain load the
fan will automatically start to keep the unit cool. The unit running on a full load for a long time or
operating in a warm environment causes the unit to automatically adjust the output current to
keep the body temperature at 55 ~ 65 ° c
Operation
1.
Choose the appropriate DC power wire according to the type of output current, please refer to
“The output DC cable selection form” (Page 7). If using with unsuitable power wire, it could
cause the output voltage unstable, overheat and the security problem.
2.
The digital display on the unit lid demonstrates the output voltage, electric current and the power
rate. Pressing the MODE key to show the voltage, the electric current and the power.
3.
To adjust the output of voltage, adjusts V on the front panel and through the ADJ hole of VR to
obtain the voltage value which the user needs, the scope of DC12V50AMP output voltage can be
Adjusted range is from 30%~10%, please refer “Specification form” (Page 10 or 11) in detail.
4.
To adjust the output of current, adjusts A on the front panel and through the ADJ hole of VR to
obtain the magnitude of current which the user needs, the scope of DC12V50AMP output voltage
can be adjusted range is from 0~100%, please refer “Specification form”(Page 10 or 11) in
detail.
5.
To connect to the DC line, and the output line certainly must connect tightly to the post, if the post
has not been able to connect tightly, it would cause the output voltage unstable and cause
overheat. It would also cause the security problem.
6.
The USB output on the front panel can output DC 5V 500MA power, and can be used for
products such as mobile phone, MP3, MP4 etc.
7.
When as battery charger used, DC12V50AMP can be only provide constant voltage to charge.
For example, if it is for 12V battery charge and you can adjust the output voltage to 13.8V
(according to ambient air temperature).
11
Panel Operations
Front panel
12
34 5
Rear panel
6
7
8
9
10
Top Panel
11
1. USB Socket:
12
13
Output DC5V 500MA
2. Wired Remote socket: Through 8 core cable long distance control the machine
3. VR V.ADJ:
Output voltage regulating VR
4. VR A. ADJ:
Output current regulating VR
5. DC Output Pos.(+):
Positive output terminals
6. DC Output Neg.(-):
Negative output terminals
7. Power Switch:
The AC power switch
8. Input Switch:
Input AC Switch with safety box
9. 230V or 115V switch:
AC voltage selectable switch (Preset to AC230V)
10. Cooling fan:
Eliminate the heat from the machine
11. Panel Power Switch: Through the switch on the panel to control the output
12. Display mode switch: Press the button switch on the digital display panel to show output voltage, current,
and power
13. Digital display screens:
Display voltage, current, power numerical
12
Cables
To avoid polarity errors and possible damage, never use wires of only one color.
wire(s) for positive connection(s) and black for negative connection(s)
Use red insulated
The output DC Cable selection form
Wire
Gauge
20
18
16
14
12
10
8
Cable Cross
Section
(mm2)
0.517
0.823
1.309
2.081
3.309
5.262
8.368
Each 1A loss voltage
mV/m
A)Suggestion of the maximum current
UL1015(600V 105Ԩ)
37.6
22.8
14.9
9.5
6
3.8
2
4.0~5.0
6.0~7.0
8.0~9.0
12.0~13.0
22.0~24.0
35.0~38.0
55.0~60.0
Operations
1.Notice
1.1 AC output
The scope of AC output please refer to “the specification form”
Caution- In order to avoid the electric shock, the protection of the power line must receive the earth.
Before using you have to make sure the AC voltage is 230V (Preset) or 115V.
voltage will damage the unit and any devices connected to it.
Selecting the wrong
1.2 Unit Installation
The unit must be securely fastened in a well ventilated and dry place. In order to guarantee the
machine
service life and security, please do not operate in an environment above 40℃temperature
With four screws help, locks the machine with output nearby the terminal in the vertical
bulkhead under the surface.
Screw Hole for installation
13
Trouble Shooting
Problems and Symptoms
Cause
Solution
There is no signal after power on AC input cable maybe damaged
the Power Supply
Change a new cable with safety standard
Check the unit is set for the correct AC mains voltage
with ammeter to meet the correct voltage range.
AC Input voltage is not normal
The mistaken of choosing the input
voltage and noisy sound coming
out from the machine
Output is normal ,but the output The output DC of appliances
voltage change to 0V after
positive and negative maybe
connecting with the DC
shortage
appliances
With overload protection, DC
power using electrical appliances
greatly across the Power Supply
Not yet reach to the current to start
Fan does not operate
the fan
Machinery has been damaged, please ask for
maintenance
Check whether there is a short circuit of DC electrical,
repair the DC appliances
Reduce the power of DC appliances or replace a
larger output Power Supply
To save power, fan at small current won’t start. Fan
starts when the current reach to the current value set
in the device
Fan has been operated in long period of time caused
shorten the usage life.
Fan Defected
Clean and Protect
As long as maintain the machines for normal use, required maintenance and repair are very rare, only to
wipe off the dirt or dust by using damp cloth to clean the surface of the machine. Do not spray cleaning
liquid directly to the machine to prevent leakage of the internal damage to the machine.
Specifications
AC/DC Switching Power Supply
DC12V50AMP
Input
Voltage
AC230V or 115V
Frequency
27~63Hz
Current
12V/50A
Rating Wattage
12V/690W
Voltage
13.8V±0.2V,
Voltage adjust
12V/9~15V,
Current Adjust
12V/0~50A
USB Output
Output
DC 5V±5% 500mA
Efficiency
>90%(at full load)
Short-circuit
Yes
Overload
Yes
Cooling fan
Yes
Protection
Temperature
Yes
Indication
Display number
4 Digit number Voltage / Current / Wattage
Operating temperature range
-20 Degrees ~ 50 Degrees
Dimensions
Dimensions
325*200*88mm
Weight
3.1kg
14