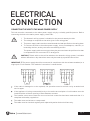
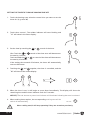
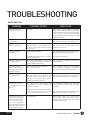
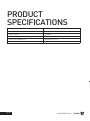
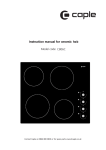
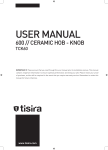
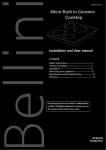
1
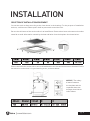
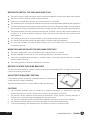
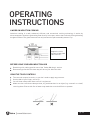
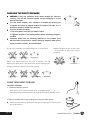
User manual
600 // Induction Hob - TOUCH
TIT60
IMPORTANT // Please ensure that you read through this user manual prior to installation and use. This manual
contains important information to ensure optimal performance and keep you safe. Please retain your proof
of purchase, as this will be required in the event that you require warranty service. Remember to retain this
manual for future reference.
tisira | www.tisira.com
www.tisira.com
pg 1
HELLO
CONGRATULATIONS ON THE SELECTION OF THIS TISIRA APPLIANCE. TISIRA
APPLIANCES HAVE BEEN SPECIFICALLY DESIGNED FOR AUSTRALIAN AND
NEW ZEALAND KITCHENS.
Please read through this user manual carefully as it contains information that
will ensure that your appliance is installed correctly, important operating & care
instructions and also some advice of what you need to do if this appliance is not
performing as intended.
pg 2
www.tisira.com | tisira
CONTENTS
HELLO2
CONTENTS3
WARNING & SAFETY INFORMATION
4
product overview
6
ELECTRICAL connection
7-8
Installation9-10
OPERATING INSTRUCTIONS MAINTAINING YOUR COOKTOP
11-18
19
Troubleshooting20-21
producT SpecificationS
22
warranty terms & Conditions
23
CONTACT DETAILS
24
tisira | www.tisira.com
pg 3
WARNING &
SAFETY
INFORMATION
Installation
This appliance is to be properly installed and
earthed only by a suitably qualified person.
Electrical Shock Hazard
This appliance should be connected to a circuit
which incorporates an isolating switch providing
full disconnection from the power supply.
Disconnect the appliance from the mains
electricity supply before carrying out any
work or maintenance on it.
Connection to a good earth wiring system is
essential and mandatory.
Alterations to the domestic wiring system
must only be made by a qualified electrician.
Failure to follow this advice may result in
electrical shock or death.
Operation and maintenance
Electrical Shock Hazard
Take care - panel edges are sharp.
Do not cook on a broken or cracked cooktop.
If the cooktop surface should break or crack,
switch the appliance off immediately at
the mains power supply (wall switch) and
contact a qualified technician.
Failure to use caution could result in injury
or cuts.
Switch the cooktop off at the wall before
cleaning or maintenance.
Cut Hazard
Important safety instructions
Read these instructions carefully before
installing or using this appliance.
No combustible material or products should
be placed on this appliance at any time.
Please make this information available to
the person responsible for installing the
appliance as it could reduce your installation
costs.
In order to avoid a hazard, this appliance must
be installed according to these instructions
for installation.
pg 4
Failure to install the appliance correctly could
invalidate any warranty or liability claims.
Failure to follow this advice may result in
electrical shock or death.
Health Hazard
This appliance complies with electromagnetic safety standards.
However, persons with cardiac pacemakers
or other electrical implants (such as insulin
pumps) must consult with their doctor or
implant manufacturer before using this
appliance to make sure that their implants will
not be affected by the electromagnetic field.
Failure to follow this advice may result in
death.
www.tisira.com | tisira
Hot Surface Hazard
During use, accessible parts of this appliance
will become hot enough to cause burns.
Do not let your body, clothing or any item
other than suitable cookware contact the
ceramic glass until the surface is cool.
Never leave metal objects (such as kitchen
utensils) or empty pans on the cooktop as
they can become hot very quickly.
Beware // magnetisable metal objects worn
on the body may become hot in the vicinity of
the cooktop. Gold or silver jewellery will not
be affected.
Keep children away.
Handles of saucepans may be hot to touch.
Check saucepan handles do not overhang
other cooking zones that are on. Keep
handles out of reach of children.
Failure to follow this advice could result in
burns and scalds.
Cut Hazard
The razor-sharp blade of a cooktop scraper
is exposed when the safety cover is retracted.
Use with extreme care and always store
safely and out of reach of children.
Failure to use caution could result in injury
or cuts.
Important safety instructions
Never leave the appliance unattended when
in use. Boilover causes smoking and greasy
spillovers that may ignite.
Do not place or leave any magnetisable
objects (e.g. credit cards, memory cards)
or electronic devices (e.g. computers, MP3
players) near the appliance, as they may be
affected by its electromagnetic field.
Never use your appliance as a work or
storage surface.
Never leave any objects or utensils on the
appliance.
Never use your appliance for warming or
heating the room.
tisira | www.tisira.com
After use, always turn off the cooking zones
and the cooktop as described in this manual
(i.e. by using the touch controls). Do not rely
on the pan detection feature to turn off the
cooking zones when you remove the pans.
Do not allow children to play with the
appliance or sit, stand, or climb on it.
Do not store items of interest to children in
cabinets above the appliance. Children climbing
on the cooktop could be seriously injured.
Do not leave children alone or unattended in
the area where the appliance is in use.
Children or persons with a disability which
limits their ability to use the appliance should
have a responsible and competent person
to instruct them in its use. The instructor
should be satisfied that they can use the
appliance without danger to themselves or
their surroundings.
Do not repair or replace any part of the
appliance unless specifically recommended
in the manual. All other servicing should be
done by a qualified technician.
Do not use a steam cleaner to clean your
cooktop.
Do not place or drop heavy objects on your
cooktop.
Do not stand on your cooktop.
Do not use pans with jagged edges or drag
pans across the ceramic glass surface as
this can scratch the glass.
Do not use scourers or any other harsh
abrasive cleaning agents to clean your
cooktop, as these can scratch the ceramic
glass.
If the power supply cable is damaged, it must
only be replaced by a qualified technician.
Do not operate your cooktop by means of an
external timer or separate remote-control
system.
This appliance is intended to be used in
domestic households only .
pg 5
product overview
pg 6
www.tisira.com | tisira
ELECTRICAL
connection
Connecting the hob to the mains power supply
This hob must be connected to the mains power supply only by a suitably qualified person. Before
connecting the hob to the mains power supply, check that:
1. The domestic wiring system is suitable for the power drawn by the hob.
2. The voltage corresponds to the value given in the rating plate
3. The power supply cable sections can withstand the load specified on the rating plate.
4. To connect the hob to the mains power supply, do not use adapters, reducers, or
branching devices, as they can cause overheating and fire.
The power supply cable must not touch any hot parts and must be positioned so that
its temperature will not exceed 75°C at any point.
Caution // Check with an electrician whether the domestic wiring system is suitable
without alterations. Any alterations must only be made by a qualified electrician.
IMPORTANT // The power supply should be connected in compliance with the relevant standard,or a
single-pole circuit breaker. The method of connection is shown below:
If the cable is damaged or to be replaced, the operation must be carried out by an authorised
service agent.
If the appliance is being connected directly to the mains an omnipolar circuit-breaker must be
installed with a minimum opening of 3mm between contacts.
The installer must ensure that the correct electrical connection has been made and that it is
compliant with safety regulations.
The cable must not be bent or compressed.
The cable must be checked regularly and replaced by authorised technicians only.
tisira | www.tisira.com
pg 7
ELECTRICAL
connection
CAUTION // Your safety is important to us. Please read this information before using your cooktop.
Important safety instructions
Read these instructions carefully before installing or using this appliance.
No combustible material or products should be placed on this appliance at any time.
Please make this information available to the person responsible for installing the appliance as
it could reduce your installation costs.
In order to avoid a hazard, this appliance must be installed according to these instructions for
installation.
This appliance is to be properly installed and earthed only by a suitably qualified person.
This appliance should be connected to a circuit which incorporates an isolating switch providing
full disconnection from the power supply.
Failure to install the appliance correctly could invalidate any warranty or liability claims.
pg 8
www.tisira.com | tisira
Installation
Selection of installation equipment
Cut out the work surface according to the sizes shown in the drawing. For the purpose of installation
and use, a minimum of 50mm space shall be preserved around the hole.
Be sure the thickness of the work surface is at least 30mm. Please select heat-resistant work surface
material to avoid deformation caused by the heat radiation from the hotplate. As shown below:
Ensure the Induction cooker hob is well ventilated and the air inlet and outlet are not blocked. Ensure
the Induction cooker hob is in good working order, as shown below:
NOTICE // The safety
distance between
the hotplate and the
cupboard above the
hotplate should be at
least 760mm.
tisira | www.tisira.com
pg 9
Installation
Before you install the hob, make sure that
The work surface is square and level, and no structural members interfere with space requirements
The work surface is made of a heat-resistant material
If the hob is installed above an oven, the oven has a built-in cooling fan
The installation will comply with all clearance requirements and applicable standards and regulations
A suitable isolating switch providing full disconnection from the mains power supply is incorporated in
the permanent wiring, mounted and positioned to comply with the local wiring rules and regulations.
The isolating switch must be of an approved type and provide a 3 mm air gap contact separation in
all poles (or in all active [phase] conductors if the local wiring rules allow for this variation of the
requirements)
The isolating switch will be easily accessible to the customer with the hob installed
You consult local building authorities and by-laws if in doubt regarding installation
You use heat-resistant and easy-to-clean finishes (such as ceramic tiles) for the wall surfaces
surrounding the hob.
When you have installed the hob, make sure that
The power supply cable is not accessible through cupboard doors or drawers
There is adequate flow of fresh air from outside the cabinetry to the base of the hob
If the hob is installed above a drawer or cupboard space, a thermal protection barrier is installed
below the base of the hob
The isolating switch is easily accessible by the customer
Before locating the fixing brackets
The unit should be placed on a stable, smooth surface (use the packaging). Do not apply force onto the
controls protruding from the hob.
Adjusting the bracket position
Fix the hob to the work surface by screwing 2 brackets on the bottom
of hob (see picture) after installation.
Adjust the bracket position to suit for different table top thickness.
Cautions
1. The induction hotplate must be installed by qualified personnel or technicians. We have
professionals at your service. Please never conduct the operation by yourself.
2. The hob will not be installed directly above a dishwasher, fridge, freezer, washing machine or
clothes dryer, as the humidity may damage the hob electronics
3. The induction hotplate shall be installed with adequate ventilation to ensure its reliability.
4. The wall and induced heating zone above the table surface shall withstand heat.
5. To avoid any damage, the sandwich layer and adhesive must be resistant to heat.
pg 10
www.tisira.com | tisira
OPERATING
INSTRUCTIONS
A Word on Induction Cooking
Induction cooking is a safe, advanced, efficient, and economical cooking technology. It works by
electromagnetic vibrations generating heat directly in the pan, rather than indirectly through heating
the glass surface. The glass becomes hot only because the pan eventually warms it up.
iron pot
magnetic circuit
ceramic glass plate
induction coil
Before using your New Induction Hob
Read this guide, taking special note of the ‘Safety Warnings’ section.
Remove any protective film that may still be on your Induction hob.
Using the Touch Controls
The controls respond to touch, so you don’t need to apply any pressure.
Use the ball of your finger, not its tip.
You will hear a beep each time a touch is registered.
Make sure the controls are always clean, dry, and that there is no object (e.g. a utensil or a cloth)
covering them. Even a thin film of water may make the controls difficult to operate.
tisira | www.tisira.com
pg 11
OPERATING
INSTRUCTIONS
Choosing the right Cookware
CAUTION // Only use cookware with a base suitable for induction
cooking. Look for the induction symbol on the packaging or on the
bottom of the pan.
You can check whether your cookware is suitable by carrying out
a magnet test. Move a magnet towards the base of the pan. If it is
attracted, the pan is suitable for induction.
If you do not have a magnet:
1. Put some water in the pan you want to check.
2. If does not flash in the display and the water is heating, the pan is
suitable.
Cookware made from the following materials is not suitable: pure
stainless steel, aluminium or copper without a magnetic base, glass,
wood, porcelain, ceramic, and earthenware.
Do not use cookware with jagged edges or a curved base.
Always lift pans off the ceramic hob
– do not slide, or they may scratch
the glass.
Make sure that the base of your pan is smooth, sits flat
against the glass, and is the same size as the cooking zone.
Always centre your pan on the cooking zone.
Using your Induction Hob
To start cooking
1. Touch the ON/OFF control.
After power on, the buzzer beeps once, all displays show “ – “ or “ – – “,
indicating that the induction hob has entered the state of standby mode.
2. Place a suitable pan on the cooking zone that you wish to use.
Make sure the bottom of the pan and the surface of the cooking zone
are clean and dry.
pg 12
www.tisira.com | tisira
OPERATING
INSTRUCTIONS
USING YOUR INDUCTION HOB
3. Touch the heating zone selection control, and a indicator next to the
key will flash
4. Select a heat setting by touching the
or
control.
-
+
If you don’t choose a heat setting within 1 minute, the Induction hob will
automatically switch off. You will need to start again at step 1.
You can modify the heat setting at any time during cooking.
If the display flashes
alternately with the heat setting
This means that:
you have not placed a pan on the correct cooking zone or,
the pan you’re using is not suitable for induction cooking or,
the pan is too small or not properly centred on the cooking zone.
No heating takes place unless there is a suitable pan on the cooking zone. The display will
automatically turn off after 1 minutes if no suitable pan is placed on it.
When you have finished cooking
1. Touch the heating zone selection control that you wish to switch off
2. Turn the cooking zone off by scrolling down to”0” or touching”-“
and”+” control together. Make sure the display shows”0”
-
-
-
OR
3. Turn the whole cooktop off by touching the ON/OFF control.
tisira | www.tisira.com
pg 13
OPERATING
INSTRUCTIONS
4. Beware of hot surfaces
H will show which cooking zone is hot to touch. It will disappear when the
surface has cooled down to a safe temperature. It can also be used as an
energy saving function if you want to heat further pans, use the hotplate
that is still hot.
Locking the Controls
You can lock the controls to prevent unintended use (for example children accidentally turning
the cooking zones on).
When the controls are locked, all the controls except the ON/OFF control are disabled.
To lock the controls
Touch the keylock control. The timer indicator will show “ Lo “
To unlock the controls
1. Make sure the Induction hob is turned on.
2. Touch and hold the keylock control for a while
3. You can now start using your Induction hob.
When the hob is in the lock mode,all the controls are disabled except the ON/OFF, you
can always turn the induction hob off with the ON/OFF control in an emergency, but you
shall unlock the hob before the next operation.
Over-Temperature Protection
A temperature sensor equipped can monitor the temperature inside the Induction hob. When an
excessive temperature is monitored, the Induction hob will stop operation automatically.
Detection of Small Articles
When an unsuitable size or non-magnetic pan (e.g. aluminium), or some other small item (e.g. knife,
fork, key) has been left on the hob, the hob automatically will go into to standby mode in 1 minute. The
fan will keep cooling down the induction hob for a further 1 minute.
Auto Shutdown Protection
Auto shut down is a safety protection function for your induction hob. It shuts down automatically if
ever you forget to turn off your cooking zone. The default working times for various power levels are
shown in the below table:
Power level
Default working timer (hour)
1
8
2
8
3
8
4
4
5
4
6
4
7
2
8
2
9
2
When the pot is removed, the induction hob can stop heating immediately and the hob automatically
switches off after 2 minutes.
CAUTION // People with a cardiac pace maker should consult with their doctor before using this unit.
pg 14
www.tisira.com | tisira
OPERATING
INSTRUCTIONS
Using the Timer
You can use the timer in two different ways:
• You can use it as a minute minder. In this case, the timer will not turn any cooking zone off when
the set time is up.
• You can set it to turn one cooking zone off after the set time is up. You can set the timer up to 99
minutes.
Using the Timer as a Minute Minder
If you are not selecting any cooking zone
1. Make sure the cooktop is turned on.
NOTICE // You can use the minute minder even if you’re not selecting any cooking zone.
2. Touch timer control. The minder indicator will start flashing and “10”
will show in the timer display.
3. Select a time setting by touching the
Hint: Touch the
or
increase by 1 minute.
or
control of the timer.
control of the timer once to decrease or
4. Touching the
and
-
-
-
or
control of the timer to decrease or increase by
Hold the
10 minutes. If the setting time exceeds 99 minutes, the timer will
automatically return to 00 minute.
together, the timer is cancelled, and the”00”
will show in the minute display.
-
-
-
5. When the time is set, it will begin to count down immediately. The
display will show the remaining time and the timer indicator will flash
for 5 seconds.
6. Buzzer will sound for 30 seconds and the timer indicator shows “- - “
when the setting time finished.
tisira | www.tisira.com
pg 15
OPERATING
INSTRUCTIONS
Setting the timer to turn one cooking zone off
1. Touch the heating zone selection control that you want to set the
timer for. (e.g. zone 3#)
2. Touch timer control , The minder indicator will start flashing and
“10” will show in the timer display.
3. Set the time by touching the
or
control of the timer
Hint: Touch the
or
control of the timer once will decrease or
increase by 1 minute.
or
or control of the timer will decrease or
Touch and hold the
increase by 10 minutes.
If the setting time exceeds 99 minutes, the timer will automatically
return to 00 minute.
-
-
-
and
together, the timer is cancelled, and the
4. Touching the
“00” will show in the minute display.
-
-
-
5. When the time is set, it will begin to count down immediately. The display will show the
remaining time and the timer indicator flash for 5 seconds.
NOTICE // The red dot next to power level indicator will illuminate indicating that zone is selected.
6. When cooking timer expires, the corresponding cooking zone will be
switch off automatically.
Other cooking zone/s will keep operating if they are turned on previously.
pg 16
www.tisira.com | tisira
OPERATING
INSTRUCTIONS
COOKING GUIDELINES
Take care when frying as oil and fat heat up very quickly, particularly if you’re using
PowerBoost (on selected models. At extremely high termperatures oil and fat will
ignite spontaneously and this presents a serious fire risk.
Cooking Tips
When food comes to the boil, reduce the temperature setting.
Using a lid will reduce cooking times and save energy by retaining the heat.
Minimise the amount of liquid or fat to reduce cooking times.
Start cooking on a high setting and reduce the setting when the food has heated through.
Simmering, cooking rice
Simmering occurs below boiling point, at around 85°C, when bubbles are just rising occasionally
to the surface of the cooking liquid. It is the key to delicious soups and tender stews because the
flavours develop without overcooking the food. You should also cook egg-based and flourthickened
sauces below boiling point.
Some tasks, including cooking rice by the absorption method, may require a setting higher than
the lowest setting to ensure the food is cooked properly in the time recommended.
Searing steak
To cook juicy flavoursome steaks:
1. Stand the meat at room temperature for about 20 minutes before cooking.
2. Heat up a heavy-based frying pan.
3. Brush both sides of the steak with oil. Drizzle a small amount of oil into the hot pan and then lower
the meat onto the hot pan.
4. Turn the steak only once during cooking. The exact cooking time will depend on the thickness of
the steak and how cooked you want it. Times may vary from about 2 – 8 minutes per side. Press
the steak to gauge how cooked it is – the firmer it feels the more ‘well done’ it will be.
5. Leave the steak to rest on a warm plate for a few minutes to allow it to relax and become tender
before serving.
For stir-frying
1. Choose an induction compatible flat-based wok or a large frying pan.
2. Have all the ingredients and equipment ready. Stir-frying should be quick. If cooking large
quantities, cook the food in several smaller batches.
3. Preheat the pan briefly and add two tablespoons of oil.
4. Cook any meat first, put it aside and keep warm.
5. Stir-fry the vegetables. When they are hot but still crisp, turn the cooking zone to a lower setting,
return the meat to the pan and add your sauce.
6. Stir the ingredients gently to make sure they are heated through.
7. Serve immediately.
tisira | www.tisira.com
pg 17
OPERATING
INSTRUCTIONS
Heating Settings
The settings below are guidelines only. The exact setting will depend on several factors,
including your cookware and the amount you are cooking. Experiment with the cooktop to
find the settings that best suit you.
Heat setting
Suitability
1-2
• delicate warming for small amounts of food
• melting chocolate, butter, and foods that burn quickly
• gentle simmering
• slow warming
3-4
• reheating
• rapid simmering
• cooking rice
5-6
• pancakes
7-8
• sautéing
• cooking pasta
9
• stir-frying
• searing
• bringing soup to the boil
• boiling water
pg 18
www.tisira.com | tisira
MAINTAINING
YOUR COOKTOP
CARE AND CLEANING
The settings below are guidelines only. The exact setting will depend on several factors, including
your cookware and the amount you are cooking. Experiment with the cooktop to find the settings that
best suit you.
What?
How?
Important!
Everyday
soiling on glass
(fingerprints,
marks, stains
left by food or
non-sugary
spillovers on
the glass)
1. Switch the power to the cooktop off.
• When the power to the cooktop is switched off,
2. Apply a cooktop cleaner while the glass is
there will be no ‘hot surface’ indication but the
still warm (but not hot!)
cooking zone may still be hot! Take extreme care.
3. Rinse and wipe dry with a clean cloth or • Heavy-duty scourers, some nylon scourers and
paper towel.
harsh/abrasive cleaning agents may scratch
4. Switch the power to the cooktop back on.
the glass. Always read the label to check if your
cleaner or scourer is suitable.
• Never leave cleaning residue on the cooktop: the
glass may become stained.
Boilovers,
melts, and
hot sugary
spills on the
glass
Remove these immediately with a fish slice, • Remove stains left by melts and sugary food or
spillovers as soon as possible. If left to cool on
palette knife or razor blade scraper suitable
the glass, they may be difficult to remove or even
for Induction glass cooktops, but beware of hot
permanently damage the glass surface.
cooking zone surfaces:
1. Switch the power to the cooktop off at the • Cut hazard: when the safety cover is
retracted, the blade in a scraper is razorwall.
2. Hold the blade or utensil at a 30° angle and
sharp. Use with extreme care and always
scrape the soiling or spill to a cool area of
store safely and out of reach of children.
the cooktop.
3. Clean the soiling or spill up with a dish cloth
or paper towel.
4. Follow steps 2 to 4 for ‘Everyday soiling on
glass’ above.
Spillovers
on the touch
controls
1. Switch the power to the cooktop off.
• The cooktop may beep and turn itself off, and
2. Soak up the spill
the touch controls may not function while
3. Wipe the touch control area with a clean
there is liquid on them. Make sure you wipe
damp sponge or cloth.
the touch control area dry before turning the
4. Wipe the area completely dry with a paper
cooktop back on.
towel.
5. Switch the power to the cooktop back on.
tisira | www.tisira.com
pg 19
Troubleshooting
HINTS AND TIPS
Problem
Possible causes
What to do
The induction hob
cannot be turned on
No power
Make sure the induction hob is connected
to the power supply and that it is switched
on. Check whether there is a power outage
in your home or area. If you’ve checked
everything and the problem persists, call a
qualified technician.
The touch controls are
unresponsive.
The controls are locked
Unlock the controls. See section ‘Using
your induction cooktop’ for instructions.
The touch controls are
difficult to operate.
There may be a slight film of water Make sure the touch control area is dry
over the controls or you may be using and use the ball of your finger when
the tip of your finger when touching touching the controls.
the controls.
The glass is being
scratched.
Rough-edged cookware.
Use cookware with flat and smooth bases.
See ‘Choosing the right cookware’.
Unsuitable, abrasive scourer or cleaning See ‘Care and cleaning’.
products being used.
Some pans make crackling This may be caused by the construction This is normal for cookware and does not
or clicking noises.
of your cookware (layers of different indicate a fault.
metals vibrating differently)
The induction hob
makes a low humming
noise when used on a
high heat setting.
This is caused by the technology
of induction cooking.
Fan noise coming from
the induction hob.
A cooling fan built into your induction This is normal and needs no action. Do
hob has come on to prevent the not switch the power to the induction hob
electronics from overheating. It may off at the wall while the fan is running.
continue to run even after you’ve
turned the induction hob off.
Pans do not become
The induction hob cannot detect the Use cookware suitable for induction
pan because it is not suitable for cooking. See section ‘Choosing the right
induction cooking.
cookware’.
hot and
display.
appears in the
This is normal, but the noise should
quieten down or disappear completely
when you decrease the heat setting
The induction hob cannot detect the pan
because it is too small for the cooking Centre the pan and make sure that its base
zone or not properly centred on it.
matches the size of the cooking zone.
The induction hob or a
Technical fault
cooking zone has turned
itself off unexpectedly,
a tone sounds and an
error code is displayed
(typically alternating with
one or two digits in the
cooking timer display).
pg 20
Please note down the error letters
and numbers, switch the power to the
induction hob off at the wall, and contact
a qualified technician.
www.tisira.com | tisira
Troubleshooting
Failure, Display and Inspection
If an abnormality comes up, the induction hob will enter the protective state automatically and display
corresponding protective codes:
Problem
Possible causes
What to do
F3-F8
Temperature sensor failure
Please contact the supplier.
F9-FE
Temperature sensor of the IGBT
failure.
Please contact the supplier.
E1/E2
Abnormal supply voltage
Please inspect whether power supply is normal.
Power on after the power supply is normal
E3/E4
Abnormal temperature
Please inspect the pot.
E5/E6
Bad induction hob heat
radiation
Please restart after the induction hob cools down.
WARNING // Please do not disassemble the unit by yourself. All servicing must be performed by an
authorised service agent.
tisira | www.tisira.com
pg 21
producT
SpecificationS
Cooking Hob
TIT60
Cooking Zones
4 zones
Supply Voltage
220-240V~
Installed Electric Power
6400W - 7200W
Product Size L×W×H(mm)
590 X 520 X 60 mm
Building-in Dimensions A×B (mm)
560 X 490mm
pg 22
www.tisira.com | tisira
warranty terms &
Conditions
tisira | www.tisira.com
pg 23
CONTACT
DETAILS
pg 24
www.tisira.com | tisira