1
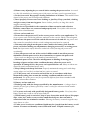
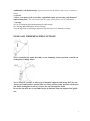
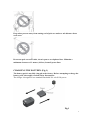
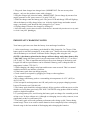
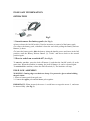
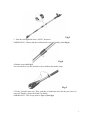
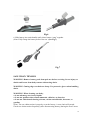
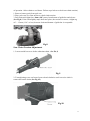
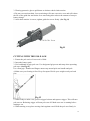
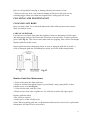
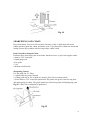
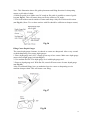
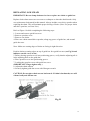
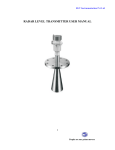
USER MANUAL
18V CORDLESS POLE SAW
Model : TL100
Read the instructions thoroughly before operating the tool and keep this
manual for future reference!
MADE IN CHINA
1
Explanation of Symbols on your product
Do not use unit when raining or allow it to become wet
Read this manual thoroughly, before you use
Read the user manual before using the device
Always wear a helmet, goggles and ear protection
Risk of fatal electric shock! Keep at least 10m distance from overhead lines
DANGER: Do not put the device on when there are children, people or pets in
the area.
Wear gloves for hand protection
Wear safety shoes to be protected against short circuits.
Technical data
Voltage:
Length:
Weight:
Speed:
Max Cutting Diameter:
DC 18 V
1.8m
3.6 kg
2.5m/s
Φ150mm
2
SAFETY INSTRUCTIONS
WARNING: Read all safety warnings and all instructions. Failure to follow the safety
warnings and instructions may result in electric shock, fire and/or serious injury.
Save all warnings and instructions for future reference.
The term "power tool" in the warnings refers to your mains-operated (corded) power tool
or Battery-operated power tool.
1) Work area safety
a) Keep work area clean and well lit. Cluttered or dark areas invite accidents.
b) Do not operate power tools in explosive atmospheres, such as in the presence of
flammable liquids, gases or dust. Power tools create sparks which may ignite the dust
or fumes.
c) Keep children and bystanders away while operating a power tool. Distractions can
cause you to lose control.
2) Electrical safety
a) Power tool plugs must match the outlet. Never modify the plug in any way. Do not
use any adapter plugs with earthed (grounded) power tools. Unmodified plugs and
matching outlets will reduce risk of electric shock.
b) Avoid body contact with earthed or grounded surfaces, such as pipes, radiators,
ranges and refrigerators. There is an increased risk of electric shock if your body is
earthed or grounded.
c) Do not expose power tools to rain or wet conditions. Water entering a power tool
will increase the risk of electric shock.
d) Do not abuse the cord. Never use the cord for carrying, pulling or unplugging the
power tool. Keep cord away from heat, oil, sharp edges or moving parts. Damaged
or entangled cords increase the risk of electric shock.
e) When operating a power tool outdoors, use an extension cord suitable for outdoor
use. Use of a cord suitable for outdoor use reduces the risk of electric shock.
f) If operating a power tool in a damp location is unavoidable, use a residual current
device (RCD) protected supply. Use of an RCD reduces the risk of electric shock.
NOTE: The term “residual current device (RCD)” may be replaced by the term “ground
fault circuit interrupter (GFCI)” or “earth leakage circuit breaker (ELCB)”.
3) Personal safety
a) Stay alert, watch what you are doing and use common sense when operating a
power tool. Do not use a power tool while you are tired or under the influence of
drugs, alcohol or medication. A moment of inattention while operating power tools may
result in serious personal injury.
b) Use personal protective equipment. Always wear eye protection. Protective
equipment such as dust mask, non-skid safety shoes, hard hat, or hearing protection used
for appropriate conditions will reduce personal injuries.
c) Prevent unintentional starting. Ensure the switch is in the off-position before
connecting to power source and/or battery pack, picking up or carrying the tool.
Carrying power tools with your finger on the switch or energising power tools that have
the switch on invites accidents.
3
d) Remove any adjusting key or wrench before turning the power tool on. A wrench
or a key left attached to a rotating part of the power tool may result in personal injury.
e) Do not overreach. Keep proper footing and balance at all times. This enables better
control of the power tool in unexpected situations.
f) Dress properly. Do not wear loose clothing or jewellery. Keep your hair, clothing
and gloves away from moving parts. Loose clothes, jewellery or long hair can be
caught in moving parts.
g) If devices are provided for the connection of dust extraction and collection
facilities, ensure these are connected and properly used. Use of dust collection can
reduce dust-related hazards.
4) Power tool use and care
a) Do not force the power tool. Use the correct power tool for your application. The
correct power tool will do the job better and safer at the rate for which it was designed.
b) Do not use the power tool if the switch does not turn it on and off. Any power tool
that cannot be controlled with the switch is dangerous and must be repaired.
c) Disconnect the plug from the power source and/or the battery pack from the
power tool before making any adjustments, changing accessories, or storing power
tools. Such preventive safety measures reduce the risk of starting the power tool
accidentally.
d) Store idle power tools out of the reach of children and do not allow persons
unfamiliar with the power tool or these instructions to operate the power tool.
Power tools are dangerous in the hands of untrained users.
e) Maintain power tools. Check for misalignment or binding of moving parts,
breakage of parts and any other condition that may affect the power tool’s
operation. If damaged, have the power tool repaired before use. Many accidents are
caused by poorly maintained power tools.
f) Keep cutting tools sharp and clean. Properly maintained cutting tools with sharp
cutting edges are less likely to bind and are easier to control.
g) Use the power tool, accessories and tool bits etc. in accordance with these
instructions, taking into account the working conditions and the work to be
performed. Use of the power tool for operations different from those intended could
result in a hazardous situation.
5) Battery tool use and care
a) Recharge only with the charger specified by the manufacturer. A charger that is
suitable for one type of battery pack may create a risk of fire when used with another
battery pack.
b) Use power tools only with specifically designated battery packs. Use of any other
battery packs may create a risk of injury and fire.
c) When battery pack is not in use, keep it away from other metal objects, like paper
clips, coins, keys, nails, screws or other small metal objects, that can make a
connection from one terminal to another. Shorting the battery terminals together may
cause burns or a fire.
d) Under severe or adverse conditions, liquid may be ejected from the battery; avoid
contact. If contact accidentally occurs, flush with water. If liquid contacts eyes,
4
additionally seek medical help. Liquid ejected from the battery may cause irritation or
burns.
6) Service
a) Have your power tool serviced by a qualified repair person using only identical
replacement parts. This will ensure that the safety of the power tool is maintained.
7) Storage
a) Use of transport guard during transport and storage.
b) Cleaning and maintenance before storage.
c) Securing of the unit during transport to prevent loss of oil, damage or injury.
POLE SAW TRIMMING PRECAUTIONS
Never stand directly under the limb you are trimming. Always position yourself out
of the path of falling debris.
Never stand on a ladder or other type of unstable support while using the Pole saw.
Always use both hands to operate pole saw. Keep a firm, steady pressure on the pole
saw while cutting but do not try to force the saw through the wood.
Do not use the pole saw to cut limbs larger in diameter than the length of the guide
bar.
5
Keep other persons away from cutting end of pole saw and at a safe distance from
work area.
Do not use pole saw near cable, electric power or telephone lines. Maintain a
minimum clearance of 3 metres (10 feet) from all power lines.
CHARGING THE BATTERY (Fig.1)
The battery pack is not fully charged at the factory. Before attempting to charge the
battery pack, thoroughly read all Safety Instructions.
The charger is designed to use standard household 230 volt 50 Hz power.
Fig.1
6
1. Plug cord from charger into charger base. (IMPORTANT: Do not use any other
charger, only use the product comes with a charger)
2. Plug the charger into electrical outlet. (IMPORTANT: Do not charge by means of an
engine generator or DC power source. Use only 230V AC.
3. Slide the charger onto the battery pack .The power LED and charge LED will light up,
Allow the battery to fully charge before use. After the initial charge and under normal
usage, your battery pack should be fully charged in 5 to 7 hours.
4. Unplug charger. Remove the charger by sliding off
5. Place the battery pack in the tool and be certain that it is inserted fully into the tool cavity until
it “clicks” into place. (See Fig.1)
IMPORTANT CHARGING NOTES
Your battery pack was sent from the factory in an uncharged condition.
1. After normal usage, your battery pack should be fully charged in 5 to 7 hours. If the
battery pack is run-down completely, it may take up to 7 hours to become fully charged.
Allow the battery to cool down 30 minutes before charging after using the saw.
(NOTE: A hot battery placed in the charger will not charge and reduce battery life)
2. DO NOT charge the battery pack in an air temperature below 40°F (4.5 °C) or above
105°F (40.5 °C). This is important and will prevent serious damage to the battery pack.
Longest life and best performance can be obtained if battery pack is charged when air
temperature is about 75°F (24°C).
3. While charging, the charger may hum and become warm to touch. This is a normal
condition and does not indicate a problem.
4. If the battery pack does not charge properly
• Check current at receptacle by plugging in a lamp or other appliance.
• Try another receptacle
• Move charger and battery pack to a surrounding air temperature of 4.5°C (40°F) to
40.5°C(105 °F)
• If the receptacle and temperature are OK, and you do not get proper charging contact
Lenoxx Electronics on 1300 666 848
5. The battery pack should be recharged when it fails to produce sufficient power on jobs
which were easily done previously. DO NOT CONTINUE using product with its battery
pack in a depleted condition.
6. To prolong battery life, avoid leaving the battery pack on charger for extended periods
of time (over 30 days without use). Although overcharging is not a safety concern, it can
significantly reduce overall battery life.
7. The battery pack will reach optimum performance after being cycled 5 times during
normal usage. There is no need to run the batteries down completely before recharging.
Normal usage is the best method of discharging and recharging the batteries.
7
POLE SAW INFORMATION
OPERATION
Fig.2
1. Insert/remove the battery pack (See Fig.2)
•Always release the On/Off switch (2) before insertion or removal of the battery pack.
•To remove the battery pack, withdraw it from the tool while pulling the Battery Release
Button (3) down.
•To insert the battery pack, slide the battery along the handle groove and insert in the full
position, until the Battery Release Button (3) “clicks” and moves back to the normal
position again.
2. How to switch on or switch off? (See Fig.2)
To start the machine, press the lock-off button (1) and then the On/Off switch (2) at the
same time. When the machine is running, the lock-off button (1) can be released again.
To switch off the machine, release the On/Off switch (2). The machine will stop.
POLE SAW ASSEMBLY
WARNING: Cutting edges on chain are sharp. Use protective gloves when holding
the pole chain.
1. Remove battery pack from pole saw.
2. Connect the upper pole and the lower pole together.
IMPORTANT: When inserted, the arrow 1 would have to target the arrow 2, and must
be inserted fully. (See Fig.3)
8
Fig.3
3. Turn the locking knob in the “LOCK” direction.
(IMPORTANT: Ensure that the locking knob is secured tightly.) (See Fig.4)
Fig.4
4. Buckle strap (See Fig.5)
You can choose to use the machine with or without the buckle strap.
Fig.5
5. Firstly, open the bottle cap. Then, pour the oil within the oiler into the pole saw's oil
reservoir. Finally, replace the bottle cap firmly.
(IMPORTANT: The oil cap must be tight!) (See Fig.6)
9
Fig.6
6. Slide battery into main handle until release button “snap” together.
(Note: Fully charge the battery before first use.) (See Fig.7)
Fig.7
SAW CHAIN TENSION
WARNING: Remove battery pack from pole saw before servicing. Severe injury or
death could occur from body contact with moving chain.
WARNING: Cutting edges on chain are sharp. Use protective gloves when handling
chain.
WARNING: When cleaning saw body,
• do not submerge saw in any liquids
• do not use products that contain ammonia, chlorine, or abrasives
• do not use chlorinated cleaning solvents, carbon tetrachloride, kerosene, or
gasoline
(Note: The saw chain tension is properly set at the factory. A new chain will stretch.
Check new chain tension frequently (after disconnecting battery) during the first 2 hours
10
of operation. Allow chain to cool down. Follow steps below to check saw chain tension.)
1. Remove battery pack from pole saw.
2. Place pole saw on a firm surface to check chain tension.
3. Pull chain with light force 3mm (1/8") away from bottom of guide bar and release
(See Fig 8). If the chain lightly snaps back into place, the tension is correct, a slight sag
of 1 - 1.5mm (1/16" or less) between chain and bottom of guide bar is acceptable.
Fig.8
Saw Chain Tension Adjustment
1. Loosen guide bar screw before adjusting chain. (See Fig 9)
Fig.9
2. Turn adjusting screw on front of power head clockwise until excessive slack is
removed from the chain.(See Fig 10 )
Fig.10
11
3. Wearing protective gloves pull down on chain to check chain tension
4. Do not over-tension chain. Over-tensioning will cause excessive wear and will reduce
the life of the guide bar and chain. Over-tensioning also reduces the amount of cuts per
battery charge.
5. After chain tension is correct, tighten guide bar screw firmly. (See Fig 11)
Fig.11
CUTTING WITH THE POLE SAW
1. Ensure the pole saw's oil reservoir is filled.
2. Insert the battery pack.
3. Use both hands to grip pole saw. Use designated grip areas and strap when operating
pole saw. (See Fig.12)
Use a firm grip. Thumbs and fingers must wrap around pole saw handle and pole.
4. Make sure your footing is firm. Keep feet apart. Divide your weight evenly on both
feet.
Fig.12
5. When ready to make a cut, press in trigger lockout and squeeze trigger. This will turn
pole saw on. Releasing trigger will turn pole saw off. Make sure saw is running before
starting a cut.
6. When starting a cut, place moving chain against wood. Hold the pole saw firmly in
12
place to avoid possible bouncing or skating (sideways movement) of saw.
7. Remove pole saw from a cut with saw running at full speed. Stop pole saw by
releasing trigger. Make sure chain has stopped before setting pole saw down.
CLEANING AND MAINTENANCE
CLEANING SAW BODY
Keep saw body clean. Use a soft cloth dampened with a mild soap and water mixture.
Wipe saw body to clean.
CARE OF GUIDE BAR
Uneven bar wear causes most guide bar problems. Incorrect sharpening of chain cutter
and depth gauge settings often cause this. When bar wears unevenly, it widens guide bar
groove (See Fig.13). This causes chain clatter and rivet popping. Saw will not cut straight.
Replace guide bar if this occurs.
Inspect guide bar before sharpening chain. A worn or damaged guide bar is unsafe. A
worn or damaged guide bar will damage the chain. It will also make cutting harder.
Fig.13
Routine Guide Bar Maintenance
1. Remove the guide bar from chain saw.
2. Remove sawdust from guide bar groove periodically, using a putty knife or other
suitable tool or wire (See Fig.14).
3. Clean oil slots after each day of use.
4. Remove burrs from sides of guide bar. Use a flat file to make side edges square.
Replace guide bar when
• Bar is bent or cracked
• Inside groove of bar is badly worn
(Note: When replacing guide bar, see Replacement Parts and Accessories for replacement
information. See Parts List for correct bar.)
13
Fig.14
SHARPENING SAW CHAIN
Keep chain sharp. Your saw will cut faster and more safely. A dull chain will cause
undue sprocket, guide bar, chain, and motor wear. If you must force chain into wood and
cutting creates only sawdust with few large chips, chain is dull.
Items Needed to Sharpen Chain
Purchase these items from your local dealer, hardware store, or pole saw supplies outlet.
• 4mm or 5/32" round file
• Depth gauge tool
• File guide
• Vise
• Medium sized flat file
Sharpening Cutters
Use file guide for 30° filing.
1. Adjust chain for proper tension.
2. Clamp guide bar in vise to hold saw steady. (Note: Do not clamp chain.)
3. Press 4mm or 5/32" round file (attached to file guide) into groove between top plate
and depth gauge on chain. File guide should rest on both top plate and depth gauge (see
Fig.15). (Note: File at midpoint of guide bar.)
Fig.15
14
Note: This illustration shows file guide placement and filing direction for sharpening
cutters on left side of chain.
4. Hold file guide level. Make sure 30° mark on file guide is parallel to center of guide
bar (see Fig.16). This will ensure that you file the cutters at 30° angle.
5. File from inside towards outside of cutter until sharp. Only file in this one direction
(see Fig.16). (Note: Two or three strokes with file should be sufficient to sharpen cutter.)
Fig.16
Filing Cutter Depth Gauges
The cutter depth gauge clearance is reduced as cutters are sharpened. After every second
or third sharpening, reset cutter depth gauges.
1. Place depth gauge tool (.025") firmly across top of two cutters. Make sure depth gauge
enters slot in depth gauge tool (see Fig.17).
2. Use medium flat file. File depth gauge level with depth gauge tool.
3. Remove depth gauge tool. With flat file, round off front corner of cutter depth gauge
(see Fig.18).
After several hand filings, have an authorized service center or sharpening service
machine sharpen chain. This will insure even filing.
Fig.17
Fig.18
15
REPLACING SAW CHAIN
IMPORTANT: Do not clamp chainsaw in vise to replace saw chain or guide bar.
Replace chain when cutters are too worn to re-sharpen or when the chain breaks. Only
use replacement chain noted in this manual. Always include a new drive sprocket when
replacing the chain. This will maintain proper driving of chain. (Note: For proper chain
and drive sprocket, see Parts List.)
Refer to Figure 19 while completing the following steps.
1. Loosen and remove guide bar screw.
2. Remove sprocket cover.
3. Remove saw chain.
4. Place new chain around drive sprocket, along top groove of guide bar, and around
guide bar nose.
Note: Make sure cutting edges of chain are facing in right direction.
Position chain so cutting edges on top of guide bar face guide bar nose (see Fig 20 and
indicator on side cover of saw).
5. Before placing sprocket cover into positioning groove, verify that the adjusting nib is
in the adjusting hole on the guide bar.
6. Place sprocket cover into positioning groove.
7. Locking the sprocket cover with guide bar screw.
(IMPORTANT: Finger tighten only.)
8. Adjust the chain tension.
9. Securely tighten guide bar screw with Hexagon wrench.
CAUTION: Do not place chain on saw backwards. If chain is backwards, saw will
vibrate badly and will not cut.
Fig.19
16
Fig.20
STORAGE
If storing saw for more than 30 days, follow steps below.
1. Remove battery from chain saw.
2. Charge battery completely. (Note: It could take up to 7 hours to completely charge the
battery.)
3. When battery is completely charged, remove from charger and put protective cap on
battery terminals.
IMPORTANT: To prolong battery life, avoid leaving battery on charger for extended
periods of time (over 30 days without use).
4. Remove and clean guide bar and chain. Clean guide bar and chain by soaking in
petroleum based solvent or mild soap and water mixture.
5. Dry guide bar and chain.
6. Place chain in container filled with oil. This will prevent rust.
7. Wipe a thin coating of oil over surface of guide bar.
8. Wipe off outside of saw body. Do this with soft cloth dampened with a mild soap and
water mixture.
9. Store chain saw and battery
• in a high or locked place, out of children’s reach
• in a dry place
• in a carrying case or with safety scabbard over the guide bar
17
Warranty Card
This warranty is in addition to other rights and remedies of the consumer
under a law in relation to the goods or services to which the warranty
relates.
“Our goods come with guarantees that cannot be excluded under the
Australian Consumer Law. You are entitled to a replacement or refund for
a major failure and for compensation for any other reasonably foreseeable
loss or damage. You are also entitled to have the goods repaired or
replaced if the goods fail to be of acceptable quality and the failure does
not amount to a major failure.”
18