1
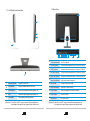
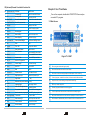
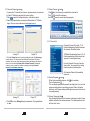
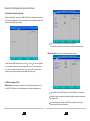
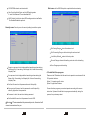
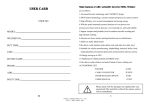
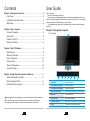
Contents
User Guide
Chapter 1 Recognize Computer..............................................2
Front View.........................................................................2
Left/Right/Look-down View.................................................3
Back View.........................................................................4
Dear Customer:
Thanks for selecting our product!
The product you purchased has strong information management function, as
well as the TV play capability. Whenever you stay at home or office, it's your high
efficient helper and will accompany you all the time.
The below words will help you to understand how to use the product and also
the skills.
Chapter 2 Use Computer........................................................5
Connect Computer.............................................................5
Adjust LCD .......................................................................5
Use All-In-One PC..............................................................5
Remote Controller..............................................................6
Chapter 1: Recognize Computer
1.1 Front View
8
Chapter 3 Use TV Software.....................................................8
Main Screen......................................................................8
Receive Channels ............................................................9
Select Channels..............................................................10
Channel lists...................................................................10
Record Programme.........................................................10
Volume Change ..............................................................10
Chapter 4 Install Operation System and Driver......................11
Install the Operation System.............................................11
Other settings of SCU.......................................................11
Install the Driver program..................................................14
Attention The product appearance, color match and picture in the manual is
only for reference, please check with the real once there is any difference.
The c ompany has the rights to renew the manual as well as the product.
1
1
2
3
4
5
6
7
1
Power button
Turn on/off computer
2
Screen brightness adjust button
Reduce the brightness
3
Screen brightness adjust button
Enhance the brightness
4
Screen Auto-Adjust button
Shows the renewed frequency, color auto-adjust
5
Mute button
Turn on/turn off tone
6
LCD switch button
LCD screen on-off button
7
IR (infrared) interface
Receiving the infrared signal from remote controller
8
Camera
Taking pictures or recording the video
2
9
1.2 Left/Right/Look-down View
1.3 Back View
24
12
11
10
9
14 15 16 17 18 19 20 21
22
11
23
14 TV Interface (optional)
Play TV programme
15 S-VIDEO (optional)
Connect to Video equipment such as , Set-top box, DVD etc.
16 VIDEO (optional)
Connect to Video equipment such as , Set-top box, DVD etc.
17 Left Track (optional)
Connect to Audio equipment such as , Set-top box, DVD etc.
18 Right Track (optional)
Connect to Audio equipment such as , Set-top box, DVD etc.
19 Audio output interface
Audio output, connect to earphone
13
9
Supporting Frame
Support the main LCD
20 Mic. Interface
Connect to microphone outside
10
Card Reader
Support SD/MMC/MS/MS PRO Card
21 Audio Input Interface
Input audio or simple recording
11
USB interface
Connect to keyboard, mouse and printer, etc.
22 Power interface
Insert power adapter and connect to electricity
12
ODD
Insert disc, stall program and play music, etc.
23 RJ-45 interface
Connect to Internet
13
Internal Mic.
Video meeting, dub and recording
24 Ventilation slor
For system cooling
[Attention] Your All-In-One PC may not have all the interface above
according to the specific type, please check with the real.
3
[Attention] Your All-In-One PC may not have all the interface above
according to the specific type, please check with the real.
4
Chapeter 2: Use Computer
2.1 Connect Computer
2.4 Remote Controller
Two mode Remote Controller
(see picture below)
Connect your power adapter to the correct interface located at the back
of the computer.
Connect your keyboard cable to the correct interface (USB interface)
Connect your mouse cable to the correct interface (USB interface)
2.2 Adjust LCD
Adjust your LCD with look-down view to the proper angle
( -3 degree ~25 degree)
Attention
Hold firmly when carry the computer, do not grasp the
support frame directly.
2.3 Use All-In-One PC
Press the switch on/off button under the bottom of the main screen,
power on the computer and enter the operation system.
5
6
PVR mode and MCE mode.
IR (infrared) Remote Controller Function list
N0. Button name list
PVR Mode
MCE Mode
Chapter 3: Use TV software
1
TV
Full screen play
Main Screen MCE Picture
2
PC
One key on/off
One Key On/Off
3
Rew/ FWD
Record file backward/forward
Video file backward/forward
4
Play/Pause/Stop Record file play/pause/stop
Video file play/pause/stop
5
Replay
/
Replay one video
6
Skip
/
Omit the playing video
7
Record
Record program
/
8
Back
Mouse Left Key
back to the previous
9
More
Mouse Right Key
Window App key
10 Up/Down/L/R
Pointer up/down/left/Right
Up/Down/Left/Right move
11
Enter
OK
12 Aspect
Time - shift
Proportion Switch
13 Mode
Switch to MCE Mode
Mode Swtich
14 Videos
Open TV preview
Open the MCE video folder
15 Music
/
Open the MCE music folder
16 Pictures
Snapshot button
Open MCE picture folder
17 My TV
Open the TV program list
/
18 Volume +/-
Volume Change
Volume Change
19 Start
Open PVR
Open MCE
a
Show program status and signal quality.
20 Mute
Mute
Mute
b
Show time and channel number as well name.
21
c
Show the current connecting adapter and the space left for recording.
d
Control program, contains the minimal, full screen and shut down button.
OK
Channel +/-
Turn on the computer, double click PRESTO!PVR icon and you
can watch TV program.
3.1 Main Screen
Digital TV - DVBT
Pre/Next Channel
Pre/Next Channel
22 1-9
Digital symbol input
Numeral Symbol Input
23 *
Signal Switch
* Key
24 #
Backward to the previous channel
# Key
e
Help document, menu setting and input button selecting.
25 Audio
Language Switch
Language Switch
f
EPG only used for digital TV.
26 Title
Switch to DVBT digital television
Subtitles Switch
g
Record program and watch recorded program.
27 RTV
Pop up picture television window
Open MCE record program
28 Guide
Open the electronic program guide Set MCE guide program lists
h
Click to capture real-time screen, and check the recorded program.
29 Radio (optional)
Turn on radio
Turn on radio
I
Adjust and shut down the volume, but also display the current noise level.
30 DVD
Switch to analog TV
DVD Play DVD with MCE
j
Select channel, backward to previous channel or chose from channel lis.t
31 Help
Close the window
Close the window
32
Show the desktop
Show Desktop
7
8
3.2 Receive Channel e area
If receive the TV channel from Internet, please connect your antenna
to Presto! PVRdevice and make the correct setting.
1. Click
, open the Setting dialog box, click device option.
2. Select the proper device according to different kind of TV/Radio
signal .You can chose video device and signal source.
3.3 Select Channel J area
Click Select the channel you wanted from channel list.
Click or to switch the channel.
And click assess to recent watching program.
3.3-1 Channel list
Channel list from left to right TV &
Radio Broadcasting,Favorite channels,
all channels. Details as follow:
Analog TV
Digital TV
3. Click the Channel option in the setting dialog box, and click Scanning to
search channel. The channel will be added into the channel list if been
searched. And you can also selected one channel and change the channel
name. You can also select Newly Add or Renew Channel to update the
scanning, or you can set the frequency range by setting the lowest f
requency or maximum frequency.
TV&Radio Broadcasting: listen to TV &
Radio broadcasting (the button will not
appear if it's analog television)
Favorite channel: Show your favorite
channel list. You can select by setting
channel option in the dialog box.
All channels: Show all the available
channels.
3.4 Record Program g area
When find a wonderful program, click start recording.
The button becomes .
The recorded program will be saved at working folder. You can click
pause recording when on recording progress. When click under
watching, it will stop recording and the preview screen will return to
live programming.
4. Click OK to close Setting dialog box and watch TV program/listen
to radio.
3.5 Volume Change I area
Use plus and minus buttons to increase or decrease volume. Power
indicator will reflect the volume change. Click laud speaker button
will turn on/off voice.
9
10
Analog TV
Digital TV
Chapter 4:Install Operation System and Driver
4.1 Install the Operation System
Before installing OS, you need set USB-CD/DVD to the boot device according
to the following instructions. Open the computer, when display test, press [F2]
key to enter the BIOS Setup screen.
Sata Port: Sata port connect sata device information.
The specific operation can be found in the System promoted screens.
Advanced menu: Conduct the following superior settings.
When enter the BIOS Setup screen, use the [ ] key or [ ]key on the keyboard
to choose Boot, select one device in the Boot priority order, and press the [ + ]
or [ - ] button to set priorities; press the [ X ] in the exclude from boot order
options to adjust the contained option to the Boot priority order.
4.2 Other settings of SCU
Main menu: Set system time and date, check the related information such
as: BIOS, EC, MB version, System Memory, and the extended Memory, etc.
Legacy USB: under the DOS system, set if the USB device can be used.
Summary screen: set whether it need to display the system configuration
during boot-time.
Boot-time Diagnostic Screen: in the POST process to set the image
display mode or the text isplay mode.
11
12
PXE OPROM: network card start switch.
Exit menu: exit the BIOS Setup after completed the relevant setup.
Sata Controller Mode Option: set the HDD working mode.
If install the Windows XP, need disabled AHCI.
AHCI Enable: it is effective when HDD working mode is set as Enable;
The Enabled/Disabled is optional.
Security menu: Security menu: the security setting to enter the system.
Exit Saving Changes
store the value and exit.
Exit Discarding Changes: without storing the value and exit.
Load Setup Defaults restore the factory value.
Discard Changes: discard this setting, and return to the last setting.
Save Changes save the setting.
Supervisor password is: to display whether has settings when entering
the Setup utility; if has setting, it will display Set, if doesn't have setting,
it display Clear.
User password is: to display whether has settings when entering the
Setup utility; if has setting, it will display Set, if doesn't have setting,
it display Clear.
Set User Password: set the password to enter Setup utility.
Set supervisor Password: set the password to enter Setup utility,
authority higher than User password.
Password on boot: the need to set startup password.
4.3 Install the Driver program
Please use the CD attached with the machine to operate in accordance with the
CD operation interface.
Option 1: Computer-specific driver.
Option 2: Application Software.
Choose the driver program you need and operate according to the screen
instruction. System will install the driver program automatically; during the
process, the system may restart.
Set Harddisk Password: set the password to enter HDD.
Warning : P lease remember the password you set, otherwise it will
cause inconvenience for you.
13
14