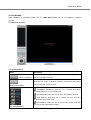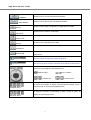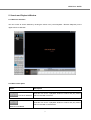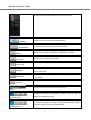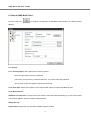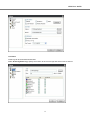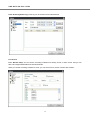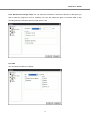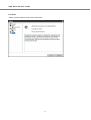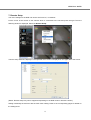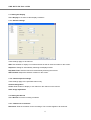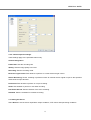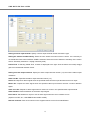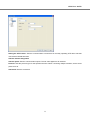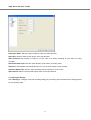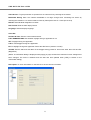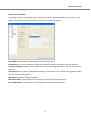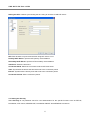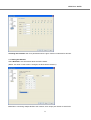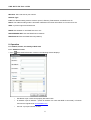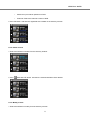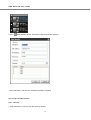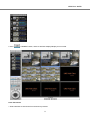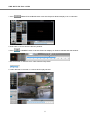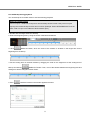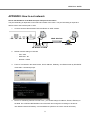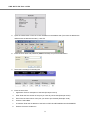
1
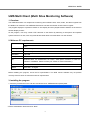
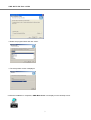
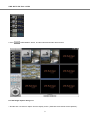
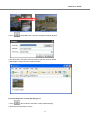
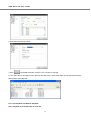
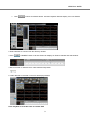
UMS Multi Client User Guide
USER GUIDE
UMS Multi Client
(Multi Sites Monitoring Software)
Version: 1.1
This document contains preliminary information and subject to change without notice.
CMS User Guide
TABLE OF CONTENTS
1. Overview .........................................................................................................................................................................4
2. Minimum PC requirements ..........................................................................................................................................4
3. Installing the program ...................................................................................................................................................4
4. Live Window ..................................................................................................................................................................6
4-1. Main user interface ...................................................................................................................................................6
4-2. Control buttons .........................................................................................................................................................6
5. Search and Playback Window ......................................................................................................................................8
5-1. Main user interface ...................................................................................................................................................8
5-2. Main control panel ....................................................................................................................................................8
6. Setup of UMS Multi Client ......................................................................................................................................... 11
6-1. General ................................................................................................................................................................... 11
6-2. Event.......................................................................................................................................................................12
6-3. Record ....................................................................................................................................................................13
6-4. OSD ........................................................................................................................................................................14
6-5. About ......................................................................................................................................................................15
7. Remote Setup ...............................................................................................................................................................16
7-1. Setting the Display .................................................................................................................................................17
7-2. Setting the Record ..................................................................................................................................................17
7-3. Setting the Device...................................................................................................................................................18
7-4. Setting the Storage ..................................................................................................................................................21
7-5. Setting the System ..................................................................................................................................................22
7-6. Setting the Security.................................................................................................................................................25
7-7. Setting the Network ................................................................................................................................................26
8. Operation......................................................................................................................................................................27
8-1. Addition, Delete, and modify of DVR sites ............................................................................................................27
8-2. Connect and Disconnect .........................................................................................................................................29
8-3. Still-image capture during Live ..............................................................................................................................31
8-4. Recording video on local PC during Live ..............................................................................................................32
2
UMS Multi SW User Guide
8-5. Local Playback and Remote Playback ....................................................................................................................33
8-6. AVI Backup during playback ..................................................................................................................................36
APPENDIX: HOW TO SET NETWORK ............................................................................ 38
3
CMS User Guide
UMS Multi Client (Multi Sites Monitoring Software)
1. Overview
The UMS Multi-Client is a multiple site monitoring client software with; video, audio, and alarm signals from
the DVRs over networks. The UMS Multi-Client does not limit the number of DVR units to register.
The program displays to up 256 live videos on one display and even playback videos window on the same or
another display monitor.
On the program, user may control PTZF cameras on the DVRs. By attaching a microphone and speaker
system to devices on site, user may make bi-directional audio communication over the network.
2. Minimum PC requirements
CPU
Intel PentiumⅣ
2Ghz
Memory
512MB or Higher is recommended.
VGA
128MB or Higher is recommended.
Resolution
1024x768
Disk space
1GB
OS
Windows 2000, XP Professional, XP Home, Vista (Some versions of Vista has
problem in installation. Please contact your vendor for more information.)
Network
10/100Base T
Others
Direct X 8.1 or Higher
Before installing the program, check the PC specifications. The DVR remote software may not perform
correctly if the PC does not meet the minimum requirements.
3. Installing the program
1. Insert the provided CD in the CD drive and double-click “UMSMultiClient (XXXX).exe”
2. Select a destination folder and click “Next”.
4
UMS Multi SW User Guide
3. Select the program folder and click “Next”.
4. The setup status screen is displayed.
5. After the installation is completed, “UMS Multi Client” icon displays on the desktop screen.
5
CMS User Guide
4. Live Window
When installation is completed, double click the “UMS Multi Client” icon on your desktop to start the
program.
4-1. Main user interface
4-2. Control buttons
Button
Description
Click this icon to run a playback window to search and play videos
LOCAL PLAYBACK
that are recorded in local PC.
Click this icon to run a playback window to search and play videos
REMOTE PLAYBACK
that are recorded in remote DVR.
THUMBNAIL REFRESH: Click this icon to refresh and renew
thumbnail image of every connected site.
SITE ADDITION: Click this icon to open ‘Site Addition’ window.
SITE DELETE: Click this icon to delete site from the index
window, after disconnect a site.
SITE MODIFY: Select the site from the index window and click
SITE MANAGEMENT
this icon to open ‘Site Modify’ window.
6
UMS Multi SW User Guide
Click this icon to connect the selected site/sites.
CONNECT
Click this icon to disconnect the selected site/sites.
DISCONNECT
SETUP
CAPTURE
Click this icon to setup configuration of UMS MULTI CLIENT.
Click this icon to capture a still image
EVENT LIST
PAUSE
Click this icon to play/pause live video.
ALARM ON
Enable or disable recording of live video to local disk which has set in
RECORD ON
AUDIO
MIC
setup menu.
Use the volume control bar to set the audio level.
Use the micro phone volume control bar to set the micro phone level.
User can control PAN/TILT & ZOON/FOCUS.
PAN left /right
ZOOM in/out
TILT up/down
FOCUS in/out
To select the numbers of display channel/channels (Single, quad, 9
CHANNEL SPLIT
channels, and 16 channels) of highlighted site.
To select the numbers of DVR/DVRs (1 DVR, 4 DVRs, 9 DVRs, 16
DVR SITE SPLIT
DVRs) on main display screen.
7
CMS User Guide
5. Search and Playback Window
5-1. Main user interface
You can access to search window by clicking the search icon (Local Playback / Remote Playback) on the
upper left of Live Window.
5-2. Main control panel
Button
Description
Click this icon to run a playback window to search and play videos
LOCAL PLAYBACK
that are recorded in local PC.
Click this icon to run a playback window to search and play videos
REMOTE PLAYBACK
that are recorded in remote DVR.
8
UMS Multi SW User Guide
Directory window shows site/sites that are pre-registered.
Click this icon to connect the selected site/sites.
CONNECT
Click this icon to disconnect the selected site/sites.
DISCONNECT
SETUP
CAPTURE
Click this icon to setup configuration of UMS MULTI CLIENT.
Click this icon to capture a still image.
EVENT LIST
Click this icon to set the beginning time for backup of the recorded
MARK IN
video in AVI format.
Click this icon to set the ending time for backup of the recorded video
MARK OUT
in AVI format.
Click this icon to backup the recorded video in AVI format.
BACKUP
AUDIO
Use the volume control bar to set the audio level.
To select the numbers of DVR/DVRs (1 DVR, 4 DVRs, 9 DVRs, 16
DVR SITE SPLIT
DVRs) on main display screen.
To select the numbers of display channel/channels (Single, quad, 9
CHANNEL SPLIT
channels, and 16 channels) of highlighted site.
9
CMS User Guide
To select the channel to playback.
The calendar shows dates with recorded video in color.
To display the recorded data of selected channel or all channels on a
time line scale.
To change a time line scale from 24 hours to 60 minutes or vise
versa.
The timeline shows recorded data in color on the bar. You can adjust
the time line scale and move it to the time you wish to playback. Then
click the play icon to display the recorded video.
Playback buttons.
10
UMS Multi SW User Guide
6. Setup of UMS Multi Client
Click the setup icon
to setup the configuration of UMS Multi Client software. The Setup window
displays.
6-1. General
6-1-1. Security Option: Set a password for security options.
Select security options and set a password.
Then when you access any of selected functions, you need to enter the password.
You can also set the save path for capturing and backup.
6-1-2. Save Path: Specify the location to save captured still image for Capture and Backup data.
6-1-3. Miscellaneous
Automatic reconnection: If a user selects this function, client S/W will automatically try to connect the finally
connected IP address, after the network is disconnected.
Always On Top:
Time Format: Change the way the Client software displays the time.
11
CMS User Guide
6-2. Event
Event log can be archived and searched.
6-2-1. Archiving Event Log: Specify the location to save event logs and select event to archive.
12
UMS Multi SW User Guide
6-2-2. Archiving Event Log: Event log can be searched from selected time.
6-3. Record
6-3-1. Record setup: You can set the recording conditions for Always, Event, or Auto record. And you can
also select target DVR/DVRs and channel/channels.
When you set the recording condition to event, you can set event for motion or alarm with duration.
13
CMS User Guide
6-3-2. Record local storage setup: You can select the local disk to use and the amount of disk space you
want to allow the program to use for recording. You can also select the option to overwrite data or stop
recording when the maximum amount of disk space is full.
6-4. OSD
You can select the OSD to be display
14
UMS Multi SW User Guide
6-5. About
“About” provides network client version information.
15
CMS User Guide
7. Remote Setup
The menu settings for the DVR unit can be set from a PC, via network.
Put the cursor of the mouse on the channel which is connected to the site and press the right. Then the
following window is displayed. Select the Remote Setup.
Then the setup window is displayed. The specified menu screen is displayed on the upper left of the screen.
(Memo: Remote setup may not be supported depending on the DVR model or firmware version.)
Setting is basically the same as with the DVR menu setting. Refer to the corresponding pages for details on
the setting items.
16
UMS Multi SW User Guide
7-1. Setting the Display
Select Display to set the live video display conditions
7-1-1. General settings.
These settings apply to all channels.
OSD: Sets whether to display or not date and time as well as channel number on the screen.
Sequence: Setting for automatically switching the displayed video.
Seq-Dwell Time: Sets the interval for automatically switching the screens.
OSD Contrast: Adjust the character contrast on the screen.
7-1-2. Channel-specific settings
These settings apply to the specified channel only.
Channel designation
Covert: Sets whether to display or not video from the channel on the monitor.
Video image adjustment
7-2. Setting the Record
Select Record to set the recording conditions.
7-2-1. Common to all channels
Resolution: Sets the resolution for the recordings. The set value applies to all channels.
17
CMS User Guide
7-2-2. Channel-specific settings.
These settings apply to the specified channel only.
Channel designation
Frame Rate: Sets the recording rate.
Quality: Sets the image quality in 5 levels.
Recording: Sets the recording mode.
Electronic Light control: Sets whether to perform or not the electronic light control
Sensor Recording: Sensor recording is performed when an external sensor signal is input to the specified
external sensor input terminal.
Pre Record: Sets whether to perform or not pre recording.
Audio: Sets whether to perform or not audio recording.
Post Event Record: Sets the duration of the event recording.
Schedule: Sets the schedule for schedule recording.
7-3. Setting the Device
Select Device to set the sensor input/alarm output conditions, PTZ control and spot setting conditions.
18
UMS Multi SW User Guide
Setting a sensor input terminal: Specify a sensor input terminal number and set the type.
Setting the motion zone/Sensitivity: Select the zone where the motion sensor is active. It is necessary to
set a detection frame when PARTIAL ZONE is selected. Select the level of detection sensitivity of the motion
sensor. Sensitivity selections: 1~9(High sensitivity level)
Partial Zone: If selecting Partial Zone, a button is displayed to the right. Click the button and click(or drag)a
grid cell in the desired detection frame.
Setting an alarm output terminal: Specify an alarm output terminal number (1-4) and set the alarm output
conditions.
Alarm out No.: Specifies the alarm output terminal number (1-4)
Sensor In: Outputs an alarm signal when the specified external sensor input terminal receives an input.
Motion On: Outputs an alarm signal when the specified video input terminal receives a motion detection
signal.
Video Loss On: Outputs an alarm signal when a video loss occurs in the specified video input terminal.
Alarm Duration: Sets the duration of the alarm output signal.
Error Alarm: Sets whether to output or not an alarm signal when the error condition occurs.
(Options are OFF, ALL, HDD ERROR and VIDEO LOSS.)
Remote controller: Sets an ID number on the supplied remote control for its idenfification.
19
CMS User Guide
Setting the PTZ Control: Sets the communication environment for remotely operating PTZ dome cameras
connected to RS485 terminals.
Camera channel designation
Camera speed: Sets the communication speed. The set value applies to all channels.
Protocol: Sets the protocol type for the specified channel. When connecting multiple cameras, set the same
protocol for all.
Camera ID: Sets the camera ID.
20
UMS Multi SW User Guide
Setting the SPOT: Sets the output conditions of the spot video terminal.
Spot Type: Sets the output screen layout of the spot terminal.
Spot On Event: Sets whether to output or not the video of a sensor recording to spot while it is being
recorded.
Spot Event Dwell Time: Sets the output duration of the sensor recording video.
Sequence: Sets whether to automatically switch or not the video output to spot terminal.
Sequence Dwell Time: Sets the video switching interval if Sequence is set to ON.
Spot Channel: Sets the channel that outputs video to the spot terminal.
7-4. Setting the Storage
Select Storage to configure continued recording settings by overwriting the hard disk and the storage period
for the recording data.
21
CMS User Guide
Overwrite: To continue recording by overwriting when the hard disk becomes full, check the checkbox.
Record Limit: Sets whether to limit or not the recording data storage period.
Record Limit Days: Sets a recording data storage period.
7-5. Setting the System
Select System to set system and time settings.
22
UMS Multi SW User Guide
Client Access: To give permission to operate from an external PC by checking the checkbox.
Bandwidth Saving: Sets if the network bandwidth is not large enough when monitoring live videos by
checking the checkbox. Live videos advance frame by frame(At the rate of 1 frame per second)
DVR ID: Sets individual designation to DVRs.
Date Format: Sets the date display format.
Language: Sets the display language.
Clock Set
Set Date & Time: Sets the current date and time.
D.S.T./SUMMER TIME: Sets whether daylight saving is applicable or not.
OFF: Daylight saving not applicable.
U.S.A.: USA daylight saving time applicable.
EU: EU daylight saving time applicable. Select the GMT Area.(+00:00 to +05:00)
OTHER: Sets the start and end dates of the daylight saving period for time zones other than USA and EU.
(Begin/End)
(Memo: A confirmation dialog is displayed when [Apply] or [ok] is clicked if the date and /or time settings have
been changed. The DVR is restarted and the date and time updated when [YES] is clicked on the
confirmation dialog.)
Description: To check information on the DVR such as the version information.
23
CMS User Guide
Setting the Send E-Mail:
This setting is used to automatically send a notification e-mail to a specified address when an alarm occurs.
(Memo: The DVR will be forcibly restarted if a value on this screen is changed.)
Send E-Mail: Sets whether to enable/disable e-mail sending function.
IP Notification: To send a notification e-mail when the DVR IP address is changed, check the checkbox.
Transmission Mode: Enables sending image of the channel that triggered the alarm when an alarm event is
triggered.
Event Alarm: Sets whether to enable/disable sending e-mail reports on the channel that triggered the alarm
when an alarm event is triggered.
Mail Address: Input the destination address.
Mail Server Name: Input the SMTP server name as well as the user ID and password.
Return Mail Address: Set the source e-mail address to be notified to the destination.
24
UMS Multi SW User Guide
Setting the NTP: It allows synchronizing the time using an internet of LAN NTP server.
NTP: Sets whether to synchronize the time using NTP server or not.
Primary SNTP Server: Input the NTP primary server address.
Secondary SNTP Server: Input the NTP secondary server address.
Time Zone: Select the time zone.
Connection Mode: Select the connection mode to NTP time server.
Time: Synchronize the time at the time that is set in the connection period.
Interval: Synchronize the time by hour that is set in the connection period.
Connection Period: Set the connection period.
7-6. Setting the Security
Select Security to set password check for user authentication for the specific functions such as SETUP,
PLAYBACK, PTZ control, RECORD OFF, PLAYBACK ON/OFF and NETWROK connection.
25
CMS User Guide
Checking the checkbox: Ask for a password when the given function is selected for all users.
7-7. Setting the Network
Select Network to set information about the DVR network.
(Memo: If a value on this screen is changed, the DVR will be restarted.)
Port: When connecting multiple DVRs to the network, set a unique port number to each DVR.
26
UMS Multi SW User Guide
Web Port: Set a web server port number.
Network Type
LAN: The address setting mode is manual. Input IP, Gateway, Subnet Mask, and DNS server IP.
DHCP: The address setting mode is automatic. Addresses and other information do not need to be set.
ADSL: Input the login ID and Password.
DDNS: Sets whether to use DDNS service or not.
DDNS SERVER SET: Sets the DDNS server address.
DDNS Interval: Sets the DDNS interval.(5-60min)
8. Operation
8-1. Addition, Delete, and modify of DVR sites
8-1-1. Addition of sites
SITE ADDITION button. And then the following window displays.
1. Click
o
Site Name: Input a name that properly describes a site.
o
IP Address: Input IP address
(Public IP address of a router that DVR is connected.) or Domain
name that is registered at www.bestddns.com
o
Port No.: Input port number of DVR.
27
CMS User Guide
o
Password: Input network password of DVR.
o
Channels: Select the channels number of DVR.
2. Click OK button. And then the registered site is added on the directory window.
8-1-2. Delete of sites
1. Select the site/sites to delete from the directory window.
2. Click
SITE DELETE button. And then the selected site/sites is/are deleted.
8-1-3. Modify of sites
1. Select the site/sites to modify from the directory window.
28
UMS Multi SW User Guide
2. Click
SITE MODIFY button. And then the following window displays.
3. Click OK button. And then the modified information is applied.
8-2. Connect and Disconnect
8-2-1. Connect
1. Select site/sites to connect from the directory window.
29
CMS User Guide
2. Click
CONNECT button, and then site/sites displays/display as connected.
8-2-2. Disconnect
1. Select site/sites to disconnect from the directory window.
30
UMS Multi SW User Guide
2. Click
DISCONNECT button, and then selected site/sites disconnected.
8-3. Still-image capture during Live
1. Double-click a channel to capture from the display screen. (Otherwise all channels will be captured.).
31
CMS User Guide
2. Click
CAPTURE button. And then a Capture window displays.
3. Set Save path, File Name, and File Format. And then click OK button.
4. Still image is saved as set in Capture window.
8-4. Recording video on local PC during Live
1. Click
SETUP button. And then a setup window display.
2. Select Record and set the values.
32
UMS Multi SW User Guide
3. Select Disk and set the values.
4. Click
RECORD ON button. And the color of button is changed.
5. Live video data is recorded as set in Record and Disk setup. These video data can be searched and playbacked with Local Playback.
8-5. Local Playback and Remote Playback
8-5-1. Playback of recorded video on local PC
33
CMS User Guide
1. Click
LOCAL PLAYBACK button. And then Playback Window display over Live Window.
2. Select site/sites to connect from the directory window.
3. Click
CONNECT button. And then Green bar displays on Search calendar and slide window.
4. Move scroll bar on where there is video data and Play button.
5. Video data that is recorded on local PC will be play-backed.
8-5-2. Playback of recorded video on remote DVR
34
UMS Multi SW User Guide
1. Click
REMOTE PLAYBACK button. And then Playback Window display over Live Window.
2. Select site to connect from the directory window.
3. Click
CONNECT button. And then Green bar displays on Search calendar and slide window.
4. Move scroll bar on where there is video data and Play button.
5. Video data that is recorded on a remote DVR is play-backed.
35
CMS User Guide
8-6. AVI Backup during playback
You can backup the recorded videos in AVI format during playback.
Notice for remote backup
User must open 1 additional TCP port for remote backup as AVI format. If this port is not open
properly, the remote backup function does not work. (Example: When NETWORK/PORT is set as
5445, 5446 TCP port of IP address of DVR must be open.)
1. Double-click the target channel to backup.
2. Select the beginning time by using the search calendar and slide bar.
3. Click
MARK IN button, when the scale of the timeline is located on the target time as the
beginning time of backup.
4. Set the ending time on the blue timeline by dragging the scale on the target time as the ending time of
backup and clicking
MARK OUT button. Then, color of the timeline between the beginning time and
ending time will be changed into dark Green.
5. Click
BACKUP. And then the window appears as below.
36
UMS Multi SW User Guide
6. You can also set the beginning time and ending time on this window. After selecting a channel for backup,
click the OK button. The backup will begin.
5. AVI video data is recorded as set in AVI Backup window. AVI format video can be played back by Window
Media Player™ or other media player that is compatible with AVI format video.
Notice
When PC doesn’t have proper H.264 CODEC, the media players can not playback the AVI format video.
Then install CODEC that is provided on the CD.
37
CMS User Guide
APPENDIX: How to set network
How to set IP address of the DVR and open TCP port of the router?
The port forwarding is dependent on the brand and model of the router. The port forwarding is required to
allow access to the DVR beyond a router.
1.
Connect network cable between DVR and Router or ADSL modem.
ADSL Modem
Internet
IP Router or HUB
2.
3.
Default network setting on DVR are
-
Port: 5445
-
WEB Port : 80
-
Network : DHCP
From PC connected in the same Router, find IP address, Gateway, and Subnet mask by IPCONFIG
command in command prompt.
4.
But if IP is something else like 192.168.x.xxx., you should change IP address, Subnet, Gateway on
the DVR. Go to SETUP>NETWORK>LAN of the DVR and change the IP settings to be like IP:
192.168.XXX.XXX and Gateway: 192.168.XXX.XXX. (Refer to the user’s manual of Router.)
38
UMS Multi SW User Guide
5.
Open the web browser. Enter the router IP address in the address bar (The router IP address are
different with the brand and model.), click GO.
6.
Enter the user name and password (admin is default) and press the OK button.
7.
Select the Port Range Forwarding tab.
8.
Enter the each field.
i.
Application: Enter a description of the DVR (Example: store1)
ii.
Start: Enter the first number of the port you need to port forward (Example: 5445)
iii.
End: Enter the last number of the port you need to port forward (Example: 5445)
iv.
Protocol: Select Both.
v.
IP address: Enter the IP address of the DVR on SETUP>NETWORK>LAN>IP ADDRESS.
vi.
Enable: Check the enable box.
39
CMS User Guide
9.
Select the Save settings button located on the bottom of the window. Then Port forwarding is finished.
Network access beyond Router
In order to access beyond Router (Firewall), user must open 1 TCP port that is set on NETWORK
> PORT for Command, Live steaming, and Search streaming. If this port is not open properly, user
can not access DVR beyond a router. (Example: When NETWORK/PORT is set as 5445, 5445
TCP port of IP address of DVR must be open.)
Notice for remote backup
User must open 1 additional TCP port for remote backup as AVI format. If this port is not open
properly, the remote backup function does not work. (Example: When NETWORK/PORT is set as
5445, 5446 TCP port of IP address of DVR must be open.)
Notice for remote setup
User must open 1 additional TCP port for remote setup. If this port is not open properly, the
remote setup function does not work.
th
If DVR sets port number with 5445, 5455 TCP port which is the 10 from the basic port number
must be open.
You can learn how to port forward many kinds of Routers from the bellow site.
http://www.portforward.com/english/routers/port_forwarding/routerindex.htm
40