1
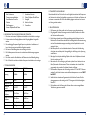
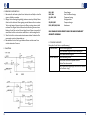
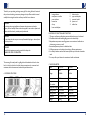
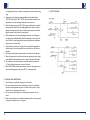
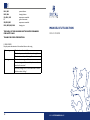
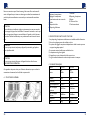
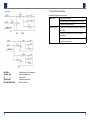
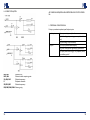
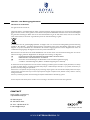
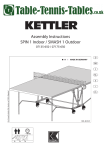
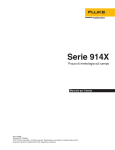
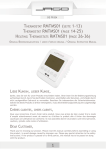
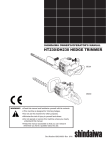
BEDIENUNGSANLEITUNG USER MANUAL MANUEL D´UTILISATION ISTRUZIONI PER L‘USO MANUAL DE INSTRUCCIONES INSTRUKCJA OBSŁUGI KONTAKT GRILL RCCG-1K RCCG-2K WWW.CATERINGROYAL.DE R O Y A L C A T E R I N G Vielen Dank für Ihren Einkauf und die Verwendung des Kontakt Grills. Für die umfassende Nutzung der Funktion des Produkts und zur Senkung unnötiger Schäden und Verletzungen, lesen Sie sich diese Anleitung sorgfältig durch, bevor Sie dieses Gerät benutzen und bewahren Sie die Gebrauchsanleitung auf. Inhalt | Contenu | Content | Contenuto | Contenido | Treść Deutsch 3 English 11 Français 19 Italiano 27 Español 35 Polski 45 WARNUNG! Jede Umrüstung und falsche Installation, Einstellung und Wartung kann zu Sachschäden und zu Kausalitäten führen. Bitte kontaktieren Sie den Anbieter, wenn der Benutzer versucht das Gerät umzubauen oder Einstellungen zu verändern. Dies sollte nur in Absprache mit dem Anbieter und von ausgebildeten, speziellen und professionellen Fachleuten durchgeführt werden. WARNUNG! Zu Ihrer eigenen Sicherheit stellen Sie keine brennbaren Flüssigkeiten, Gase oder andere Objekte rund um das Produkt. WARNUNG! Um Ihre Sicherheit zu garantieren muss die Hülle dieses Gerätes vor dem Gebrauch geerdet werden. VIELEN DANK FÜR IHRE MITARBEIT! Das Gerät ist die erste Wahl für die Lebensmittelindustrie, für Unternehmen wie Western-Food-Restaurants, Fast-Food-Restaurants, Hotels und Supermärkte. A.AUFBAU DES GERÄTES WWW.CATERINGROYAL.DE 3 1. 2. 3. 4. 5. 6. Heiz Gradmesser Temperaturauswahlschalter Kontrollleuchte Power/An Gehäuse Ölauffangwanne Untere Grillplatte/Modul Platte 7. 8. 9. 10. 11. Strebe bzw. Scharnier Obere Grillplatte /Modul Platte Handgriff Kabel und Stecker Gummifüsse B. EIGENSCHAFTEN VON FUNKTIONEN UND STRUKTUR 1. Die oberen und unteren Grillplatten sind emailliert und sind leicht zu reinigen. 2. Es kann zwischen der Einzelgrillplatte und der Doppelgrillplatte frei gewählt werden. 3. Das unabhängige Temperatur-Regler-System ist praktisch zu handhaben und kann dadurch energiewirtschaftliche Ergebnisse erzielen. 4. Der Interne Überhitzungsschutz ist zuverlässig und sicher. 5. Die Grilltemperaturen können nach verschiedenen Anforderungen angepasst werden. 6. Das Gerät sowie die Schublade bzw. die Ölwanne sind aus Edelstahl gefertigt. 7. Der Grill ist leicht zu heben und dadurch bequem zu handhaben und zu reinigen. C. TECHNISCHE DATEN Model RCCG-1K 230V Spannung 50/60Hz Power Temperaturregler Temperatur Bereich Größe der oberen Grillplatte Größe der unteren Grillplatte Gesamtmaße Gewicht 4 RCCG-2K 230V 50/6 0Hz 1,8kW 1 3,6kW 2 50~300°C 50~300°C 215x215mm 215x215mm 240x280mm 500x280mm 310x300x195mm 12,8kg 565x300x195mm 25kg D. TRANSPORT UND LAGERUNG Bitte behandeln Sie den Grill mit Vorsicht und Sorgfalt, bitte während des Transportes des Gerätes nicht auf dem Kopf stellend transportieren, um Schäden am Gehäuse und im Inneren zu vermeiden. Der Grill sollte luftdicht gelagert werden und vor korrosiven Gasen geschützt werden. E. ERLÄUTERUNGEN 1. Die Spannung der Geräte sollte mit der Stromversorgung übereinstimmen. 2. Die geeigneten Schalter, Sicherungen sowie die Steckdose sollten in der Nähe des Gerätes installiert werden 3. Eine Erdungsschraube bzw. ein Erdungsverbindungsstück befindet sich an der Rückseite des Gerätes. Bitte verbinden Sie das Erdungskabel in Übereinstimmung mit den Sicherheitsbestimmungen zuverlässig mit dem Kupferkabel von nicht weniger als 2mm. 4. Bitte überprüfen Sie vor der Inbetriebnahme des Gerätes, ob die Verbindung richtig fest sitzt und überprüfen Sie regelmäßig, ob die Erdung mit der Spannung verbunden ist. 5. Bitte legen Sie nicht jedes beliebige Objekt auf die obere Grillplatte und rütteln Sie nicht ruckartig am Griff. 6. Bitte ziehen Sie vor der Reinigung den Stecker (ziehen Sie am Stecker, nicht am Kabel).Verwenden Sie keine nassen Tücher mit ätzenden oder scharfen Reinigungsmitteln und vermeiden Sie direkten Kontakt mit Wasser. 7. Die einstellbare Temperatur der Geräte liegt zwischen 50°C bis 300°C. Bitte verwenden Sie das Gerät bei einer maximalen Betriebstemperatur von max. 200°C bis 250°C. 8. Stellen Sie keine brennbaren Gegenstände in die Nähe des Gerätes. Die Umgebungstemperatur sollte niedriger als 45°C betragen und die Luftfeuchtigkeit unter 85%. 9. Die Installation und die Wartung des Gerätes sollte von einem ausgebildeten Techniker vorgenommen werden. 5 WICHTIGE HINWEISE WARNUNG! • Dieses Produkt ist für den kommerziellen Gebrauch hergestellt und sollte nur von geschultem Personal betrieben werden. • Bitte bauen Sie die Maschine nicht auseinander. Bitte nicht ruckartig an der oberen Grillplatte rütteln und das Gerät nicht auf den Kopf stellen. Ein Umbauen oder Auseinanderbauen der Maschine kann zu schweren Unfällen führen. • Vor der Reinigung den Netzstecker ziehen (ziehen Sie am Stecker, nicht am Kabel) und das Gerät von der Stromversorgung abschneiden.Vermeiden Sie direkten Wasserkontakt, weil Wasser Strom leiten kann. • Hohe Temperaturen können zu Verbrennungen führen. Wenn das Gerät in Betrieb ist oder nach der Anwendung berühren Sie nicht das Gerät oder die Grillplatte wegen Verbrennungsgefahr. • Verwenden Sie keine Stromversorgung, die nicht den vorgeschriebenen Sicherheitsstandards entspricht. HINWEISE! • • • 6 Bitte verwenden Sie zum Reinigen des Gerätes keine spitzen oder scharfen Gegenstände, um ein zerkratzen oder zerstören der Maschine zu vermeiden. Wenn Sie die Maschine nicht mehr benutzen, bitte schalten Sie das Gerät aus und ziehen Sie den Stecker (ziehen Sie am Stecker nicht am Kabel). Die Installation und die Wartung der Schaltung muss durch zertifiziertes Fachpersonal vorgenommen werden. Wenn das Netzteil beschädigt ist, muss es durch den Hersteller oder einer ähnlich qualifizierten Person ersetzt werden, um einen Schaden, Garantieverlust oder eine Verletzungsgefahr vorzubeugen. F. INBETRIEBNAHME DES GERÄTES 1. Vor der Installation des Gerätes prüfen Sie, ob eine ausreichende Stromversorgung und eine Versorgungsspannung gewährleistet ist. 2. Stecken Sie den Stecker in eine ordnungsgemäße Steckdose und schalten Sie das Gerät ein, die grüne Kontrollleuchte ist an. 3. Bitte drehen Sie das Thermostat im Uhrzeigersinn, um die benötige Temperatur einzustellen. Die grüne Kontrollleuchte ist immer noch an, die gelbe Kontrollleuchte ist auch an, was zeigt dass das Heizelement zu heizen beginnt und die oberen und unteren Grillplatten heiß werden. 4. Die Temperatur kann den verschiedenen Lebensmitteln entsprechend angepasst werden vorzugsweise in einem Temperaturbereich von 180°C~300°C (in der Regel 180°C~250°C). Das Gerät benötigt ca. 8 Minuten um die maximal empfohleneTemperatur von 250°C zu erreichen. 5. Wenn die Temperatur von 250°C erreicht wurde, heben Sie die obere Grillplatte vorsichtig an und pinseln Sie das Speiseöl auf die Platte und auf das Lebensmittel, welches Sie zubereiten wollen. Schließen Sie die Grillplatte vorsichtig, in dem Sie den Griff leicht nach unten drücken. Lassen Sie das Gerät nie während der Zubereitung aus den Augen. 6. Wenn dasThermostat die eingestellte Grad Zahl erreicht hat wird es automatisch vom Netzteil abgeschnitten. Zur gleichen Zeit schaltet sich die gelbe Kontrolleuchte aus und die Grüne ist immer noch an. Es zeigt an, dass das heizen des Heizelements unterbrochen ist bis die Temperatur wieder sinkt. 7. Die Ölwanne befindet sich an der unteren Stirnseite des unteren Moduls. Die Öle der zubereiteten Lebensmittel fließen in das Fach des unteren Moduls. 8. Heben Sie die obere Grillplatte, um die fertigen Speisen zu entnehmen. 9. Wenn die Temperatur der Grillplatten niedriger geworden ist, schaltet sich das Thermostat automatisch ein und das Heizelement beginnt wieder die Grillplatten zu heizen. 10. Nach dem Abschluss Ihrer Arbeiten sollte der Temperaturregler auf „off“ gedreht werden. Bitte ziehen Sie den Stecker (ziehen Sie am Stecker, nicht am Kabel). 11. Hinweis: Ein 240°C Temperaturbegrenzer ist an diesem Gerät angebracht, das bedeutet, der Heiz-Temperaturbereich dieses Gerätes liegt bei 240°C. 7 G. REINIGUNG UND WARTUNG 1. Bitte ziehen Sie den Stecker (ziehen Sie am Stecker, nicht am Kabel) vor dem Reinigen um Unfälle zu vermeiden. 2. Reinigen Sie den Kontaktgrill regelmäßig (mindestens einmal pro Woche). Dieses Gerät darf nicht direkt mit Wasser gereinigt werden. Benutzen Sie ein trockenes Tuch, um den fettigen Schmutz im Inneren des Ofens zu reinigen, dann mit halbtrockenen Tuch reinigen. Nicht mit Wasser direkt in Berührung kommen lassen. Entfernen Sie das Fach aus dem Ofen und legen Sie es in Wasser mit etwas Spülmittel. Wenn das Fach trocken ist dann stellen Sie es in den Kontaktgrill zurück. 3. Wenn Sie das Gerät nicht verwenden bzw. benutzen schalten Sie bitte den Temperaturregler sowie den Hauptschalter aus. 4. Bitte bewahren Sie das Gerät in gut belüfteten Räumen auf und setzen Sie es nicht korrodierenden Gasen aus. I. SCHALTPLAN HL1, HL3 Power Anzeige HL2, HL4 Heiz Grad Messer Anzeige SA, SA1, SA2 Temperatur Anzeige EErdungsanschluss SB, SB1, SB2 Temperaur Anzeige EH1, EH2, EH3, EH4 Heizelement DAS GEHÄUSE DIESES GERÄTS MUSS FÜR IHRE SICHERHEIT GEERDET WERDEN!!! K. TÄGLICHE CHECKLISTE Bitte prüfen Sie das Gerät vor jeder Benutzung! Vor dem Benutzen Nach dem Benutzen 8 Ob die Maschine gekippt ist? Ob das Netzkabel alt, gebrochen oder beschädigt ist? Ob das Bedienfeld beschädigt ist? Ob es merkwürdig riecht? Ob die obere und untere Grillplatten nicht zur gleichen Zeit erhitzt werden? Gibt es irgendwelche eigenartigen Geräusche oder arbeitet das Gerät nicht richtig? 9 Notitzen | Notes USER MANUAL CONTACT GRILL WWW.CATERINGROYAL.DE WWW.CATERINGROYAL.DE Thanks for your purchasing and using contact grill. For making full use of function of this product and reducing unnecessary damage and injure. Please read this manual carefully before using this machine and keep it well for future reference. WARNING! Any refitting and wrong installation, adjustment and maintenance can lead to property loss and causality. Please contact the supplier if user needs to adjust it and all these should be done by trained special professionals. WARNING! For your safety sake, do not put or store any flammable liquid, gas or other objects around the product. WARNING! The shell of this equipment must be grounded for safety sake. THANKS FOR YOUR COOPERATION The contact grill is mainly used for grilling the beef of sandwich and also for other food, it is the first choice for the food industry enterprises such as western food restaurants, fast food restaurants, hotels and supermarkets and etc. A. EXTERIOR STRUCTURE 1. 2. 3. 4. 5. 6. heating indicator temeprature controller power indicaotr bottom box oil tray lower module plate feed wire tube upper module plate operation handel power cord rubber feet B.FEATURES OF FUNCTION AND STRUCTURE 1. The upper and lower module plates are enameled and are easy to be cleaned. 2. One-headed and double-headed grilling pans can be chosen freely. 3. Independent temperature controlling system are convenient to handle and can achieve energy economy as well. 4. Internal temperature protector is reliable and safe. 5. Grilling temperature can be adjusted according to different requirements. 6. It is made by stainless steel and the drawer-style oil tray is also made of stainless steel. 7. It is easy to lift up and down and convenient to handle and maintain. C. BASIC PARAMETER Model Voltage Power Temperature controller number Temperature range Upper grill size Lower grill size Dimension Weight 12 7. 8. 9. 10. 11. RCCG-1K 230V 50/60Hz RCCG-2K 230V 50/6 0Hz 1,8kW 3,6kW 1 2 50~300°C 215x215mm 240x280mm 310x300x195mm 12,8kg 50~300°C 215x215mm 500x280mm 565x300x195mm 25kg 13 D. TRANSPORTATION AND STORAGE Please handle the griller carefully and cautiously in transportation and do not turn it upside down to prevent any damage to the shell and interior. The packed griller should be stored in the storehouse ventilation and non-corrosive gas. Any weatherproof measures should be applied when temporary storage. SPECIAL NOTES WARNING! • • • E. NOTES 1. The working voltage of the equipment should match that of the power supply. 2. Suitable switch, fuse breaker and socket should be installed near the equipment. 3. There is an earth bolt at the back of the equipment. Please connect the earth wire in compliance with the safety regulations reliably with copper cable of no less than 2mm. 4. Before using user should check whether connection is firm and voltage is regular and earth connection is safe. 5. Do not put any object onto the upper module plate and shake the lift operation handle with sudden force. 6. Cut off power supply while cleaning. Do not use wet towel with corrosive cleanser and do not directly splash water on the equipment. 7. The adjustable temperature of the equipment is between 50~300°C. It is recommended that the maximum working temperature normally should be 200~250°C. 8. Do not store any flammable objects near the equipment. The environment temperature lower than 45°C, the humidity is under 85%. 9. The installation and maintenance of the equipment should be made by professional technicians. • • • This product is a commercial machine and it must be operated by trained cook. Do not dismantle and refit the machine. Do not lift the upper module plate with sudden force and tilted installation. The dismantlement and alteration can cause serious accident happens. Before cleaning, unplug the machine and cut off power supply. Do not spray water directly to the product. Water can conduct electricity and electricity leakage happens. Do not pat the product and put heavy object onto the product. Incorrect operation can cause the equipment be damaged and dangerous High temperature will cause scald. When the equipment is in use and before or after using it, do not touch the box and module plate because of high temperature. Do not use any power supply which is not coordinated with safety standards. NOTICE! • Do not destroy the control panel and the surface of the machine with hard or sharp things. • When the machine finishes using , user should close main switch. • The installation and maintenance of circuit must be done by certificated special professionals. If the supply cord is damaged, it must be replaced by the manufacturer or its service agent or a similarly qualified person in order to avoid a calamity. F. OPERATION INSTRUCTION 1. Before using, check whether the power supply installation is regular to make sure the supplied voltage is coordinated with the using one. 2. Put the plug in the socket and turn on the power., green indication light on. 3. Turn the thermostat clockwise to the temperature needed. The green indication light is still on, yellow indiction light is on as well that shows heating element begins to heat and the upper and lower grill plate begins to raise temperature. It 14 15 4. 5. 6. 7. 8. 9. 10. 11. runs repeatedly in this way to make sure temperature is constant within working range. Temperature can be adjusted according to different food preferably within 180°C~300°C (usually it is 180°C~250°C). About 8 minutes is needed for the temperature to be raised to setting temperature since power is on. When the temperature reaches 250°C, lift the upper module plate to a suitable place by operation handle. Put some edible vegetable oil on the lower module plate and constantly place the food on it. Close the plates and press the handle lightly. Keep eyes on the food until it is suitably done. When temperature reaches the setting degree, thermostat cuts off heating power supply automatically. Meanwhile, yellow indication light is off and green indicator is still on. It shows heating element stops working until next temperature drops down to some lower data. At the lower front of the lower module is the oil tray. Substantial vegetable oil and the animal oil from the meat grilled flow to the oil tray from the lower module plate. Lift the upper module plate to take the sandwich and other food already done. When the temperature is a bit lower, the thermostat gets through power supply automatically. The heating elements restart to work to heat the module plates. On completion of the work, temperature controller should be turned to the “off” place. Unplug the equipment and cut off the power. Notice: 240°C minimum temperature limiter is mounted on this equipment, means machine heating temperature range is 240°C - setting temperature. H. CIRCUIT DIAGRAM G. CLEANING AND MAINTENANCE 1. Cut off the power supply before cleaning in case of accident. 2. Do not use wet towel with non-corrosive cleanser to clean the module plate, the surface of the equipment and power cord. Direct wash by water is not permitted in case of any damage of the functions. 3. If do not use it at any time, please turn off temperature controller and main switch. 4. Please store the equipment in a ventilated storehouse without corrosive gas after cleaning when ceasing its work for a long time. 16 17 HL1, HL3 power indicator HL2, HL4 heating indicator SA, SA1, SA2 temperautre controller Eground connection SB, SB1, SB2 temperautre controller EH1, EH2, EH3, EH4 heating wire THE SHELL OF THIS MACHINE MUST BE EARTH GROUNDED FOR SAFETY SAKE. MANUEL D´UTILISATION GRIL À PANINI THANKS FOR YOUR COOPERATION I. DAILY CHECK Everyday notice the situation of the machine before or after using Before using After using 18 Whether the machine is tilted? Whether the power cord is old, broken or damaged? Whether the control panel is damaged? Whether there is strange smell? Whether the upper and lower module plate cannot be heated at the same time? Is there any strange voice or is the machine out of control while the machine is lifting? WWW.CATERINGROYAL.DE Nous vous remercions pour l’achat de notre gril de contact. Pour une bonne utilisation de l’appareil et pour éviter tout dommage ou accident, lisez attentivement le mode d’emploi avant utilisation et conservez-le pour une éventuelle consultation future. ATTENTION! Toute modification ou installation, réglage ou maintenance incorrect peut entraîner des dommages de l’appareil ou des accidents. Contactez le fournisseur en cas de problème, n’essayez jamais d’apporter une modification à l’appareil ou de le démonter vous-même. Cela doit être effectué par un professionnel et avec l’amont du fournisseur. ATTENTION! Pour votre propre sécurité, ne placez pas l’appareil à proximité de gaz, liquide ou autre objet inflammable. ATTENTION! Pour votre propre sécurité, l’armature de l’appareil doit être reliée à la terre. MERCI DE VOTRE COOPÉRATION 1. Indicateur de température 2. Réglage de la température 3.Voyant lumineux de mise en marche 4. Boîtier 5. Réceptacle à huile 6. Plaque de gril inférieure B. SPÉCIFICITÉS DES FONCTIONS ET STRUCTURE 1. Les plaques de gril supérieures et inférieures sont émaillées et faciles d’entretien 2. Une ou deux plaques peuvent être utilisées au choix. 3. Le système de réglage de température indépendant est facile à manier et permet un apport énergétique optimal. 4. La protection anti-surchauffe interne est fiable et sûre. 5. La température du gril est réglable. 6. L’appareil, tout comme le réceptacle à huile, sont en inox. 7. Le gril se soulève facilement et est donc simple à manier et à nettoyer. C. DONNÉES TECHNIQUES Modèle Cet appareil est de premier choix pour l’industrie alimentaire, et pour tout lieu de restauration tel restaurant, fast-food, hôtel ou supermarché. A. STRUCTURE DE L’APPAREIL 20 7. Charnière 8. Plaque de gril supérieure 9. Poignée 10. Cordon et fiche 11. Pieds caoutchoutés Tension Puissance Thermostat Plage de température Taille de la plaque supérieure Taille de la plaque inférieure Dimensions Poids RCCG-1K 230V 50/60Hz RCCG-2K 230V 50/6 0Hz 1,8kW 1 50~300°C 3,6kW 2 50~300°C 215x215mm 215x215mm 240x280mm 500x280mm 310x300x195mm 12,8kg 565x300x195mm 25kg 21 D. TRANSPORT ET ENTREPOSAGE Veillez à ce que l’appareil ne reçoive pas de choc durant le transport et à ce qu’il soit toujours à l’endroit, afin d’éviter tout dommage interne et externe. Le gril doit être entreposé dans un endroit sec et aéré et tenu à l’abri des gaz corrosifs. E. INSTRUCTIONS 1. La tension du secteur doit être la même que celle de fonctionnement de l’appareil. 2. L’interrupteur et autres moyens de sûreté ainsi que la prise de courant doivent être installés à proximité de l’appareil. 3. La vis de mise à la terre, c’est-à-dire la partie permettant de relier l’appareil à la terre, se trouve au dos de l’appareil. Connectez le câble de terre à un câble de cuivre de moins de 2mm selon les normes de sécurité. 4. Avant toute utilisation, vérifiez que les branchements soient bien raccordés et assurez-vous régulièrement que la terre est reliée à l’alimentation. 5. Ne posez rien sur la plaque supérieure et n’effectuez pas de secousses avec la poignée de l’appareil. 6. Avant de nettoyer l’appareil, n’oubliez pas de le débrancher en retirant la fiche électrique de la prise (et non en tirant sur le cordon d’alimentation). N’utilisez pas de produits corrosifs ou abrasifs et évitez tout contact direct avec l’eau. 7. Le plage de température se situe entre 50°c et 300°C. Evitez d’utiliser l’appareil à température maximale entre 200 et 250°C. 8. Ne laissez aucun objet facilement inflammable à proximité de l’appareil. La température autour de l’appareil ne doit pas excéder 45°C et l’humidité doit rester sous 85%. 9. L’installation et la maintenance de l’appareil doivent être effectuées par des professionnels. 22 CONSIGNES IMPORTANTES ATTENTION! • Ce gril est destiné à un usage professionnel et ne doit être utilisé que par des personnes formées. • Ne démontez pas l’appareil. Ne le secouez pas et ne le positionnez pas à l’envers. Un démontage ou une modification de l’appareil peut entraîner des accidents graves. • Avant de nettoyer l’appareil, n’oubliez pas de le débranchez en retirant la fiche électrique de la prise (et non en tirant sur le cordon d’alimentation). Evitez de mettre l’appareil en contact direct avec l’eau car celle-ci est un conducteur d’électricité. • Des hautes températures entraînent des risques de brûlures. Lorsque l’appareil est en marche ou après son fonctionnement, ne le touchez pas, ne touchez pas la plaque de cuisson afin de ne pas vous brûler. • N’utilisez pas d’alimentation électrique qui ne répondrait pas totalement aux normes de sécurité en vigueur. 23 • • • N’utilisez pas d’objet pointu ou coupant pour nettoyer l’appareil afin de ne pas le rayer ou endommager. Lorsque vous ne l’utilisez plus, mettez-le hors tension en retirant la fiche électrique de la prise (et non en tirant sur le cordon d’alimentation). L’installation et la maintenance de l’appareil doivent être effectuées par des professionnels. En cas d’endommagement, le cordon d’alimentation doit être remplacé par le fournisseur ou un professionnel afin d’éviter un dommage, la perte de la garantie ou un accident. F. MISE EN FONCTIONNEMENT DE L’APPAREIL 1. Avant l’installation, vérifiez que l’alimentation et la tension fournies soient adaptées à l’appareil. 2. Branchez l’appareil et mettez-le en marche, le voyant lumineux vert s’allume. 3. Réglez la température en tournant le thermostat dans le sens des aiguilles d’une montre jusqu’à la température souhaitée. Le voyant lumineux vert s‘allume encore,le voyant jaune s’allume aussi : les plaques chauffent. 4. Selon les types d’aliments, la température est à régler entre 180°C et 250°C. Le gril nécessite environ 8 minutes pour atteindre 250°C. 5. Lorsque les 250°C sont atteints, soulevez doucement la plaque supérieure et badigeonnez d’huile alimentaire les plaques et les aliments que vous souhaitez préparer. Fermez le gril en descendant la poignée en douceur. Lors de la préparation ne quittez jamais l’appareil des yeux. 6. Lorsque la température indiquée par le thermostat est atteinte, l’appareil se met automatiquement hors-tension. Le signal jaune s’éteint alors, et le vert s’allume, indiquant que la chauffe des plaques est interrompue. 7. Le réceptacle à huile se trouve sous la plaque inférieure sur le devant de l’appareil. L’huile s’y écoule au fur et à mesure de la préparation de la nourriture. 8. Soulevez la plaque supérieure pour retirer les aliments lorsqu’ils sont prêts. 9. Lorsque la température des plaques diminue, la chauffe reprend automatiquement. 10. A la fin de votre travail, tournez le thermostat sur « off ». Débranchez l’appareil. 11. Remarque : cet appareil est équipé d´un limiteur de température à 240°. Cela signifie que cet appareil peut chauffer jusqu´à 240°C. 24 G. ENTRETIEN ET NETTOYAGE 1. Débranchez l’appareil avant de le nettoyer. 2. Nettoyez le gril régulièrement (au moins une fois par semaine). Ne le mettez pas en contact direct avec l’eau. Passez d’abord avec un chiffon sec afin d’enlever la graisse, puis avec un chiffon légèrement humide. Retirez le réceptacle à huile et plongez le dans l’eau avec du liquide vaisselle. Lorsqu’il est sec, replacez-le dans le gril. 3. Lorsque vous n’utilisez pas l’appareil, éteignez le thermostat et appuyez sur l’interrupteur pour le mettre hors-tension. 4. Laissez-le dans endroit sec et aéré, à l’abri des gaz corrosifs. POINTS À VÉRIFIER QUOTIDIENNEMENT Vérifiez l’appareil avant chaque utilisation! Avant utilisation D‘aprés utilisation L’appareil est-il stable? N’a-t-il pas été renversé? Le câble est-il vieux, endommagé ou usé? Le panneau de contrôle est-il endommagé? Est-ce-qu’une odeur anormale se dégage de l’appareil après utilisation? Est-ce-que les plaques supérieures et inférieures ne chauffent pas simultanément? Est-ce-que l’appareil émet des sons anormaux ? Fonctionne-t-il correctement? 25 H. SCHÉMA DE CÂBLAGE ISTRUZIONI PER L`USO GRIGLIA A CONTATTO HL1, HL3 Indicateur de mise sous tension HL2, HL4 Indicateur de température SA, SA1, SA2 Indicateur de température ERaccordement à la terre SB, SB1, SB2 Indicateur de température EH1, EH2, EH3, EH4 Elément chauffant 26 WWW.CATERINGROYAL.DE La ringraziamo per l’acquisto e l’impiego della griglia a contatto. Al fine di usufruire completamente di tutte le funzioni e diminuire il pericolo di danni e problemi inutili, prima di utilizzare l’apparecchio Vi preghiamo di leggere attentamente queste istruzioni e di custodirle accuratamente. AVVERTENZA! Qualsiasi adattamento e installazione, impostazione e manutenzione errata può causare danni materiali e accidentalità.Vi preghiamo di contattare il Vostro fornitore nel caso in cui l’utente tentassa d’adattare l’apparecchio o di modificarne l’impostazione. Ciò deve essere eseguito solamente in accordo con l’utente o da professionisti specializzati. AVVERTENZA! Per garantire la Vostra sicurezza non collocate liquidi, gas o altri oggetti infiammabili nelle vicinanze del prodotto. AVVERTENZA! Prima dell’uso, al fine di garantire la Vostra sicurezza, il telaio di quest’apparecchio deve essere messo a massa. VI RINGRAZIAMO PER LA COLLABORAZIONE! L’apparecchio rappresenta la prima scelta nell’ambito dell’industria alimentare, per aziende quali la Western Food Restaurants, Fast Food Restaurants, hotels e supermercati. 1. Gradimetro per il riscaldamento 7. 2. Interruttore per la selezione della temperatura 8. 3. Spia di controllo Power/On 4. Telaio 9. 5. Vasca di contenimento per olio 10. 6. Piastra per griglia inferiore/ piastra 11. modulare Membrana di rinforzo telaio o me glio cerniera Piastra per griglia superiore/ piastra modulare Impugnatura Cavo e spina Piedini in gomma B. PROPRIETÀ DELLE FUNZIONI E DELLA STRUTTURA 1. La griglia superiore e quella inferiore sono smaltate e facili da pulire. 2. Si può scegliere liberamente tra l’uso della piastra per griglia singola o di quella doppia. 3. L’indipendente sistema di regolazione della temperatura è pratico da manovrare e in tal modo è in grado di raggiungere risultati favorevoli dal punto di vista energetico. 4. Il sistema interno di protezione dal surriscaldamento è affidabile e sicuro. 5. Le temperature della griglia possono essere adattate a seconda delle diverse esi genze. 6. L’apparecchio, i cassetti e in particolare la vasca per l’olio sono realizzate in acciaioinox. 7. La griglia si solleva facilmente ed è quindi facile da maneggiare e da pulire. A. MONTAGGIO DELL’APPARECCHIO 28 29 C. SCHEDA TECNICA Modello Tensione Potenza Termostato Plage de température Gamma di temperature Dimensioni della piastra superiore Dimensioni Peso RCCG-1K 230V 50/60Hz RCCG-2K 230V 50/6 0Hz 1,8kW 1 50~300°C 3,6kW 2 50~300°C 215x215mm 215x215mm 240x280mm 500x280mm 310x300x195mm 12,8kg 565x300x195mm 25kg D. TRASPORTO E IMMAGAZZINAMENTO Si prega di trasportare l’apparecchio con attenzione e cautela e inoltre di non collocarlo in posizione capovolta durante il trasporto per evitare danni al telaio e alle parti interne. La griglia deve essere immagazzinata ermeticamente e protetta da gas corrosivi. E. NOTE ESPLICATIVE 1. La tensione dell’apparecchio deve corrispondere all’alimentazione elettrica. 2. Gli interruttori, i fusibili e le prese corrispondenti devono essere installati nelle vicinanze dell’apparecchio. 3. Un morsetto di terra in particolare un supporto connettore per la messa a terra si trova sul retro dell’apparecchio. Collegate il conduttore di terra in conformità alle norme di sicurezza con un cavo in rame non minore di 2 mm. 4. Prima di mettere in azione l’apparecchio verificate che il collegamento sia ben saldo e controllate regolarmente che la presa di terra sia collegata alla tensione. 5. Si prega di non collocare oggetti inappropriati sulla griglia e di non scuotere in maniera brusca l’impugnatura. 6. Prima di eseguire l’operazione di pulizia si prega di staccare la spina (tirando afferrate la spina e non il cavo). Non utilizzate panni bagnati con detergenti corrosivi o potenti e inoltre evitate il contatto diretto con l’acqua. 30 7. Il regime d’impostazione della temperatura degli apparecchi è tra i 50°C e i 300°C. Si prega di utilizzare l’apparecchio ad una temperatura massima tra i 200°C e i 250°C. 8. Non collocate alcun oggetto infiammabile nelle vicinanze dell’apparecchio. La temperatura dell’ambiente circostante deve essere al di sotto dei 45°C e l’umidità dell’aria al di sotto dell’85%. 9. L’installazione e la manutenzione dell’apparecchio deve essere eseguita da un tecnico formato specializzato. AVVISI IMPORTANTI ATTENZIONE! • Quest’apparecchio è stato realizzato per uso commerciale e deve essere manovrato solo da personale istruito. • Si prega di non smontare la macchina. Si prega di non scuotere bruscamente la griglia superiore e di non capovolgere l’apparecchio. La modifica o lo smontaggio della macchina può causare gravi incidenti. • Prima dell’operazione di pulizia togliere la spina (tirate afferrando la spina e non il cavo) e staccare l’apparecchio dall’alimentazione elettrica. Evitate il contatto con l’acqua perché l’acqua è conduttrice di corrente. • Alte temperature possono causare ustioni. Quando l’apparecchio è in funzione, oppure dopo l’utilizzo dello stesso, non toccate l’apparecchio o la griglia a causa del pericolo di ustioni. • Non utilizzate un’alimentazione elettrica che non corrisponda agli standard di sicurezza prescritti. • • • Per pulire l’apparecchio si prega di non utilizzare oggetti appuntiti o affilati per evitare che la macchina venga graffiata o rovinata. Quando non utilizzate più la macchina spegnetela e staccate la spina (tirate afferrando la spina e non il cavo). L’installazione e la manutenzione dei comandi deve essere eseguita da personale specializzato certificato. Qualora l’alimentatore sia danneggiato deve essere sostituito dal produttore o da una persona qualificata in senso equiparato per prevenire danni, perdita della garanzia o rischio di ferite. 31 F. MESSA IN FUNZIONE DELL’APPARECCHIO 1. Prima dell’installazione dell’apparecchio verificate che sia garantita un’alimentazione elettrica sufficiente e una tensione di fornitura. 2. Inserite la spina in una presa a norma e accendete l’apparecchio, la spia di controllo verde s’illumina. 3. Si prega di girare il termostato in senso orario per impostare la temperatura desiderata. La spia di controllo verde s’illumina ancora, la spia di controllo gialla s’illumina, l’elemento riscaldante inizia a riscaldarsi e la griglia superiore e quella inferiore diventano roventi. 4. La temperatura può essere adattata rispettivamente ai diversi prodotti alimentari, preferibilmente in un regime di temperatura pari a 180°C~300°C (solitamente 180°C-250°C). L’apparecchio impiega 8 minuti per raggiungere la temperatura massima consigliata di impostazione della temperatura. 5. Una volta raggiunta la temperatura di 250°C sollevate con prudenza la griglia superiore e spennellate con olio alimentare la piastra e l’alimento che volete cucinare. Chiudete con precauzione la griglia premendo leggermente verso il basso l’impugnatura. Non perdete mai di vista l’apparecchio durante la preparazione. 6. Quando il termostato ha raggiunto i gradi impostati viene automaticamente staccato dall’alimentazione elettrica. Al contempo si spegne anche la spia di controllo gialla e s’illumina la spia verde. Indica che è stato interrotto il riscaldamento dell’elemento riscaldante. 7. La vasca per l’olio si trova sulla parte frontale inferiore del modulo inferiore. L’olio dell’alimento preparato rifluisce nello scomparto sotto il modulo. 8. Sollevate la griglia superiore per prelevare il cibo pronto. 9. Quando la temperatura della griglia si è abbassata, si accende automaticamente il termostato e l’elemento riscaldante ricomincia a riscaldare la griglia. 10. Dopo aver finito i lavori girate il termostato in posizione „off“. Si prega di staccare la spina (tirate afferrando la spina e non il cavo). 11. Nota: Questo dispositivo è dotato di un limitatore di temperatura di 240 °C, che significa che questa unità può riscaldare fino a 240 °C. dell’apparecchio. Rimuovete lo scomparto dal forno e immergetelo in acqua con detersivo per piatti. Quando lo scomparto è asciutto rimettetelo nella griglia a contatto. 3. Se la griglia non viene utilizzata spegnete il termostato e l’interruttore principale. 4. Si prega di conservare l’apparecchio in ambienti ben aerati e non esponetelo a gas corrosivi. I. SCHEMA ELETTRICO G. PULIZIA E MANUTENZIONE 1. Prima dell’operazione di pulizia si prega di staccare la spina (tirate afferrando la spina e non il cavo) per evitare incidenti. 2. Pulite regolarmente la griglia a contatto (almeno una volta la settimana). L’apparecchio non deve essere deterso in diretto contatto con l’acqua. Utilizzate un panno asciutto per pulire lo sporco di grasso all’interno del forno e poi continuate a pulite con un panno semiumido. Evitare il diretto contatto con acqua 32 33 HL1, HL3 Indicatore power HL2, HL4 Indicatore misurazione dei gradi di riscaldamento SA, SA1, SA2 Indicatore temperatura ECavo di massa SB, SB1, SB2 Indicatore temperatura EH1, EH2, EH3, EH4 Elemento riscaldante MANUAL DE INSTRUCCIONES K. LISTA DI CONTROLLO QUOTIDIANA Per favore, controllate l’apparecchio prima di ogni utilizzo! Prima dell’utilizzo controllate... che la macchina non sia in posizione obliqua? che il cavo di terra non sia vecchio, spezzato o danneggiato? che il campo dei comandi non sia danneggiato? Dopo l’utilizzo controllate... che non ci siano strani odori? Controllate che entrambe le griglie, quella superiore e quella inferiore, non siano riscaldate contemporaneamente? Ci sono rumori strani oppure l’apparecchio non funziona? 34 PARILLA DE CONTACTO WWW.CATERINGROYAL.DE Muchas gracias por la compra y uso de la parrilla de contacto. Para un uso amplio de las funciones del producto y para la reducción de daños innecesarios y lesiones lea atentamente estas indicaciones antes de usar este aparato y conservelas para su uso posterior. ATENCIÓN! Cada cambio y falsa instalación en el equipo, reparación y mantenimiento del mismo podría causar daños y causalidades. Favor contacte al fabricante si el usuario intenta cambiar o ajustar el equipo. Dicho mantenimiento deberá ser llevado acabo por técnicos profesionales debidamente capacitados y cualificados. ATENCIÓN! Por su propia seguridad no coloque ningún líquido, gas u otro objeto inflamable cerca del Producto. ATENCIÓN! Para garantizar su seguridad el armazón de este aparato deberá ser conectado a tierra. MUCHAS GRACIAS POR SU COLABORACIÓN! El aparato esta primeramente diseñado para la industria alimentaria, para empresas como restaurantes de comida occidental, restaurantes de comida rápida, hoteles y supermercados. 1. 2. 3. 4. 5. 6. Indicador de calor 7. Bisagra Interruptor para selección de tem 8. Plancha superior / Plancha modu- peratura lar Indicador de encendido 9. Mango Armazón 10. Cable y conector Bandeja recolectora de aceite 11. Soporte de goma Plancha inferior / Plancha modular B. CARACTERISTICAS DE FUNCIONES Y ESTRUCTURA 1. La plancha superior e inferior estan esmaltados y son fáciles de limpiar. 2. Es posible elegir libremente entre la plancha simple y la plancha doble 3. El sistema de control de temperatura independiente es práctico de usar y pueden lograr resultados eficientes. 4. El protector interno de sobrecalentamiento es fiable y seguro 5. La temperaturs de las parrillas podrán ser ajustadas de acuerdo a distintas exigen cias. 6. El aparato así como el cajón, es decir, la bandeja recolectora de aceite estan elaborados de acero inoxidable. 7. La parrilla es fácil de levantar y por lo tanto fácil de manipular y limpiar. A. ESTRUCTURA DEL APARATO 36 37 C. DATOS TÉCNICOS Modelo RCCG-1K 230V Tension eléctrica 50/60Hz Poder Regulador de temperatura Rango de temperatura Dimensiones de la plancha superior Dimensiones de la plancha inferior Dimensiones totales Peso RCCG-2K 230V 50/6 0Hz 1,8kW 3,6kW 1 2 50~300°C 50~300°C 215x215mm 215x215mm 240x280mm 500x280mm 310x300x195mm 565x300x195mm 12,8kg 25kg D. TRANSPORTE Y ALMACENAJE Por favor manipule la parrilla con precaución y cuidado, durante el transporte del aparato asegúrese que el mismo no este colocado de cabeza para evitar daños en el armazón y en su interior. La parrilla deberá ser almacenada al vacio y protegida de gases corrosivos. E. EXPLICACIÓN 1. La tensión eléctrica del aparato deberá coincidir con el suministro de energía. 2. Los interruptore, seguridades así como la toma de corriente deberán ser instaladas en la cercanía del aparato. 3. Un tornillo de conexión a tierra o un conector de conexión a tierra esta situado en la parte posterior del dispositivo. Por favor conecte el cable de conexión a tierra de acuerdo con los requisitos de seguridad de forma eficaz con el alambre de cobre no menor a 2mm. 4. Compruebe antes de la puesta en marcha del dispositivo si la conexión esta fija y 38 compruebe regularmente si la conexión a tierra y la tension estan conectadas. 5. Por favor no coloque ningún objeto sobre la plancha superior y no sacuda bruscamente el mango. 6. Por favor desconecte el enchufe antes de la limpieza (extraiga desde la clavija del enchufe y no por el cable). No emplee paños húmedos con detergentes corrosivos y evite el contacto directo con el agua. 7. El ajuste de temperatura del dispositivo yace entre 50°C hasta 300°C. Por favor utilize el dispositivo en un servicio de temperatura maxima entre 200°C hasta 250°C. 8. No coloque ningún tipo de objeto inflamable cercano al dispositivo. La temperatura ambiente deberá ser menor a 45°C y la humedad por debajo del 85%. 9. La instalación y el Mantenimiento del equipo deberá ser realizada por un técnico capacitado. ADVERTENCIAS IMPORTANTES ATENCIÓN! • Este producto esta fabricado para uso comercial y deberá ser operado sólo por personal capacitado. • Por favor no desmonte la maquina. Por favor no agite bruscamente la planca superior de la parrilla y no coloque el dispositivo de cabeza al piso. La reconstrucción o desmontaje de la maquina podría causar graves accidentes. • Retire el enchufe de la toma de corriente antes de la limpieza del dispositivo (extraiga desde la clavija del enchufe y no por el cable). Evite el contacto directo con el agua, ya que el agua puede conducir la electricidad. • Altas temperaturas podrían causar quemaduras. Debido a peligro de quemadura evite el roce del dispositivo o de las planchas de la parrilla cuando éste se encuentre en funcionamiento o luego de su uso. • No utilice ningun suministro de energía que no corresponda a las normas de seguridad requeridas. 39 ADVERTENCIA! • • • Por favor no use ningún tipo de objeto puntiagudo o filoso para la limpieza del dispositivo para evitar raspaduras o destrozos en el mismo. Cuando no haga más uso de la maquina favor apague el dispositivo y extraiga el enchufe de la toma de corriente (no hale el cable). La instalación y el mantenimiento del circuito deberá ser realizado por el Fabricante o una persona debidamente cualificada para prevenir daños, pérdida de garantía o riesgo de lesiones. F. FUNCIONAMIENTO DEL DISPOSITIVO 1. Antes de la instalación del dispositivo compruebe si la alimentación de energía y la tension eléctrica estan debidamente garantizadas. 2. Conecte el enchufe a una toma de corriente adecuada y encienda el dispositivo, la indicador de luz verde iluminará. 3. Gire el termostato en sentido a las agujas del reloj para ajustar la temperadura necesaria. La indicador de luz verde iluminará todavía, la indicador de luz amarillo iluminará, el elemento de calefacción comenzará el proceso de calentamiento y la plancha superior e inferior calentarán. 4. La temperatura podrá ajustarse de acuerdo con los diversos alimentos preferiblemente en un intervalo de 180°C~300°C (en general 180°C~250°C). El dispositivo requiere de aproximadamente 8 minutos parar alcanzar la temperatura de ajuste. 5. Cuando la temperatura de 250°C es alcanzada levante cuidadosamente la plancha superior y pincele con aceite sobre la plancha y sobre la comida que desea preparar. Cierre cuidadosamente la plancha empujandola ligeramente hacia abajo. No pierda en ningún momento de vista el dispositivo durante la cocción de los alimentos. 6. Cuando el termostato haya alcanzado la temperatura deseada el suministro de energía se cortará automáticamente. Al mismo tiempo el indicador de luz amarillo dejará de iluminar y el verde se encenderá. Esto indicará que el calor del elemento de calefacción será interrupido. 7. El cárter de aceite esta situado al frente en la parte inferior del dispositivo. El aceite de los alimentos preparados fluirán en la caja del modulo inferior. 8. Levante la plancha superior para retirar los alimentos ya preparados. 40 9. Si la temperatura de la plancha desciende el termostato de enciende y el elemento de calefacción iniciará nuevamente a calentar las planchas. 10. Luego de finalizar su trabajo deberá girar hasta “off” el regulador de temperatura. Favor extraiga el enchufe (extraiga desde la clavija del enchufe, no hale el cable). 11. Nota: Este dispositivo está equipado con un limitador de temperatura de 240°C. Esto significa que esta unidad puede calentar hasta 240 °C. G. LIMPIEZA Y MANTENIMIENTO 1. Por favor extraiga el enchufe de la toma de corriente (extraiga desde la clavija del enchufe, no hale el cable) antes de la limpieza para evitar accidentes. 2. Limpie regularmente la parrilla de contacto (por lo menos una vez por semana). Este dispositivo no deberá lavarse con contacto directo con el agua. Utilice un paño seco para limpiar la grasa del horno interno, luego limpie con un paño húmedo. No puede entrar en contacto directo con el agua. Retire el cajón interno del horno para limpiar, sumerjalo en agua con algo de detergente. Una vez seco coloque el cajón nuevamente en la parrilla de contacto. 3. En caso de no usar el dispositivo apague el regulador de temperatua así como el interruptor principal. 4. Conserve el dispositivo en un lugar bien ventilado y no lo exponga a gases corrosivos. 41 K. LISTA DE VERIFICACION DIARIA Compruebe el dispositivo antes de su uso! antes de usar después de usarw La maquina esta inclinada? El cable de energía esta muy desgastado, roto o dañado? La superficie de uso esta dañada? Despues de su uso compruebe si el dispositivo libera algún olor extraño. Compruebe si la plancha superior e inferior calientan al mismo tiempo. Existe la presencia de algún sonido extraño o el dispositivo no funciona correctamente? HL1, HL3 Indicador de Energía HL2, HL4 Pantalla indicadora de Calentamiento SA, SA1, SA2 Indicador de Temperatura EToma de tierra SB, SB1, SB2 Indicador de temperatura EH1, EH2, EH3, EH4 Elemento calefactor 42 43 Notitzen | Notes INSTRUKCJA OBSŁUGI GRILL KONTAKTOWY WWW.CATERINGROYAL.DE WWW.CATERINGROYAL.DE Dziękujemy za zakup i użytkowanie grilla kontaktowego. W celu zapewnienia sobie pełnego wykorzystania funkcji produktu oraz zmniejszenia ilości niepotrzebnych szkód i skaleczeń, prosimy o staranne przeczytanie niniejszej instrukcji użytkowania oraz o jej zachowanie w celu późniejszego ewentualnego powrócenia do niej. OSTRZEŻENIE! Wszelka zmiana wyposażenia i nieprawidłowa instalacja, regulacja i konserwacja mogą prowadzić do powstania szkód materialnych i zaistnienia związku przyczynowego. W razie gdyby użytkownik próbował przebudować urządzenie lub zmienić jego ustawienia, prosimy skontaktować z dystrybutorem. Tego typu prace powinni wykonać wykwalifikowani, specjalnie przeszkoleni i profesjonalni fachowcy, ale tylko w porozumieniu z dystrybutorem.. OSTRZEŻENIE! Dla własnego bezpieczeństwa w pobliżu produktu nie należy stawiać zapalnych cieczy, gazów ani innych przedmiotów. OSTRZEŻENIE! The shell of this equipment must be grounded for safety sake. 1. 2. 3. 4. 5. 6. Miernik stopnia nagrzania Przełącznik wyboru temperatury Kontrolka włączonego zasilania Obudowa Pojemnik na zużyty olej Dolna płyta grilla/ płyta modułowa 7. Zastrzał lub zawias 8. Górna płyta grilla/ płyta modułowa 9. Rękojeść 10.Kabel i wtyczka 11.Gumowe stopki B. WŁAŚCIWOŚCI FUNKCJI I STRUKTURA 1. Górna i dolna płyta grilla zostały pokryte emalią i są łatwe w czyszczeniu. 2. Można swobodnie wybrać produkt z pojedynczą lub podwójną płytą grilla. 3. Niezależny system regulacji temperatury jest praktyczny w użytkowaniu i energooszczędny. 4. Wewnętrzne zabezpieczenie przed przegrzaniem jest niezawodne i bezpieczne. 5. Zakres temperatur grillowania można dostosować do różnych wymogów. 6. Urządzenie, szufladkę oraz pojemnik na zużyty olej wykonano ze stali szlachetnej. 7. Grill można w łatwy sposób podnieść, dzięki czemu jest łatwy w obsłudze i czysz- czeniu. C. DANE TECHNICZNE DZIĘKUJEMY BARDZO ZA WSPÓŁPRACĘ! Urządzenie jest najlepszym wyborem dla przemysłu spożywczego, dla przedsiębiorstw takich jak restauracje typu western food, fast-food, hotele i supermarkety. Model RCCG-1K 230V 50/60Hz RCCG-2K 230V 50/6 0Hz A. MONTAŻ URZĄDZENIA Napięcie Moc Regulator temperatury Rozmiar górnej płyty grilla Rozmiar dolnej płyty grilla Wymiary całości Ciężar 1,8kW 1 50~300°C 3,6kW 2 50~300°C 215x215mm 215x215mm 240x280mm 500x280mm 310x300x195mm 12,8kg 565x300x195mm 25kg 46 47 D. TRANSPORT I PRZECHOWYWANIE Prosimy obchodzić się z grillem ostrożnie i ze starannością. Podczas transportu urządzenia prosimy nie ustawiać go „do góry nogami”, aby zapobiec uszkodzeniom obudowy i wnętrza urządzenia. Grill powinno przechowywać się w hermetycznym opakowaniu i chronić go przed gazami powodującymi korozję. E. WYJAŚNIENIA 1. Napięcie wymagane przez urządzenie powinno być zgodne z napięciem zasilania energią. 2. W pobliżu urządzenia należy zainstalować odpowiednie przełączniki, urządzenia zabezpieczające oraz gniazda wtykowe. 3. Z tyłu urządzenia znajduje się śruba uziemienia lub łącznik uziemienia. Kabel uziemienia prosimy zgodnie z przepisami bezpieczeństwa we właściwy sposób połączyć z kablem miedzianym o średnicy co najmniej 2mm. 4. Przed uruchomieniem urządzenia prosimy sprawdzić, czy połączenie jest prawidłowo na stałe przymocowane, a następnie sprawdzać regularnie, czy uziemienie połączone jest z kablem doprowadzającym napięciem. 5. Nie należy kłaść dowolnych przedmiotów na górnej płycie grilla i nie pociągać gwałtownie do tyłu za uchwyt. 6. Przed rozpoczęciem czyszczenia należy wyciągnąć wtyczkę z gniazdka (należy ciągnąć za wtyczkę, a nie za kabel). Nie należy stosować ściereczek zwilżonych żrącymi lub ostrymi środkami czystości oraz należy unikać bezpośredniego kontaktu z wodą. 7. Temperaturę urządzenia można ustawić w zakresie od 50°C do 300°C. Urządzenie można użytkować z maksymalną temperaturą roboczą wynoszącą od 200°C do 250°C. 8. W pobliżu urządzenia nie należy ustawiać łatwo zapalnych przedmiotów. Temperatura otoczenia powinna być niższa niż 45°C, a wilgotność powietrza powinna mieć wartość poniżej 85%. 9. Prace związane z instalacją i konserwacją urządzenia powinna wykonywać wykwalifikowana osoba z obsługi technicznej. 48 WAŻNE WSKAZÓWKI OSTRZEŻENIE! • Produkt przeznaczony jest do użytku komercyjnego i powinien być użytkowany wyłącznie przez przeszkolony personel. • Prosimy nigdy nie rozkładać maszyny na części. Prosimy nie pociągać gwałtownie do tyłu za uchwyt oraz nie stawiać urządzenia „do góry nogami”. Przebudowywanie lub rozkładanie maszyny na części może prowadzić do ciężkich wypadków. • Przed rozpoczęciem czyszczenia należy wyciągnąć wtyczkę sieciową (należy ciągnąć za wtyczkę, a nie za kabel) i odłączyć urządzenie od źródła zasilania. Należy unikać bezpośredniego kontaktu z wodą, gdyż woda przewodzi prąd elektryczny. • Wysokie temperatury mogą powodować oparzenia. Ze względu na niebezpieczeństwo oparzeń nie należy dotykać urządzenia lub płyty grillowej, gdy urządzenie pracuje lub gdy właśnie przestało być używane. • Nie należy stosować zasilania energią, które nie odpowiada standardom bezpieczeństwa. WSKAZÓWKI! • Do czyszczenia urządzenia prosimy nie stosować żadnych ostrych lub ostro zakończonych przedmiotów, gdyż mogą one porysować lub zniszczyć maszynę. • Gdy maszyna nie jest już używana należy wyłączyć urządzenie i wyciągnąć wtyczkę z gniazdka (należy ciągnąć za wtyczkę, a nie za kabel). • Prace związane z instalacją i konserwacją przełącznika musi wykonać specja lista posiadający odpowiedni certyfikat. W razie uszkodzenia zasilacza producent lub posiadająca podobne kwalifikacje osoba musi go wymienić, aby dzięki temu zapobiec powstaniu uszkodzeń, utracie gwarancji lub niebezpieczeństwu obrażeń. 49 F. URUCHOMIENIE URZĄDZENIA 1. Przed rozpoczęciem instalacji należy sprawdzić, czy zapewnione jest wystarczające zasilanie prądem i napięcie zasilania. 2. Włóż wtyczkę do prawidłowego gniazda wtykowego i włącz urządzenie, apala się zielona kontrolka. 3. Przekręć termostat zgodnie z ruchem wskazówek zegara, aby ustawić żądaną temperaturę. Zapala się zielona kontrolkan nadal, zapala się żółta kontrolka, element grzejny zaczyna grzać, a górna i dolna płyta grilla nagrzewają się. 4. Temperaturę można dostosować do wymogów różnych artykułów spożywczych, najlepiej w zakresie temperatur od I80°C~300°C (zwykle 180°C~250°C). Do chwili osiągnięcia maksymalnej żądanej temperatury wynoszącej 250°C urządzenie potrzebuje około 8 minut. 5. Gdy wartość temperatury osiągnie 250°C podnieść górną płytę grilla i za pomocą pędzelka nanieść olej na płytę oraz na żywność, którą chcesz przygotować. Zamknij ostrożnie płytę grilla pociągając za uchwyt w dół. Podczas przygotowywania potraw nie należy pozostawiać urządzenia bez nadzoru. 6. Gdy termostat osiągnie ustawioną liczbę stopni, to zostanie on automatycznie odłączony od zasilacza. W tym samym czasie wyłączy się również żółta kontrola i zaświeci się zielona. Oznacza to, że element grzejny przestał grzać. 7. Pojemnik na zużyty olej znajduje się w przedniej dolnej części dolnego modułu. Olej używany do przygotowywania artykułów spożywczych spływa do dolnej szufladki modułu. 8. Podnieść górną płytę grilla, aby wyciągnąć gotowe potrawy. 9. Gry temperatura płyty grilla obniży się, termostat włączy się automatycznie, a element grzejny zacznie ponownie nagrzewać płyty grilla. 10. Po zakończeniu pracy regulator temperatury należy ustawić w pozycję „off“ (wyłączony). Wyciągnij wtyczkę z gniazdka (należy ciągnąć za wtyczkę, a nie za kabel). 11. Wskazówka: urządzenie wyposażone jest w ogranicznik temperatury 240°C, co oznacza, że wartością graniczną temperatury grzania tego urządzenia jest wartość 240°C. 2. 3. 4. Grill kontaktowy należy czyścić regularnie (co najmniej raz na tydzień). Urządzenia nie należy czyścić za pomocą bezpośredniego strumienia wody. W celu usunięcia tłustych zabrudzeń z wnętrza grilla należy posłużyć się suchą ściereczką, a następnie wyczyścić grill zwilżoną ściereczką. Nie należy dopuszczać do bezpośredniego kontaktu z wodą. Wyciągnij szufladkę z grilla i zamocz ją w wodzie z dodatkiem małej ilości płynu do mycia naczyń. Gdy szu fladka wyschnie, włóż ją z powrotem do grilla kontaktowego. Gdy nie używasz urządzenia wyłącz regulator tem¬peratury i przełącznik główny. Prosimy przechowywać urządzenie w dobrze wentylowanym pomieszczeniu i nie wystawiać go na działanie gazów powodujących korozję. G. CZYSZCZENIE I KONSERWACJA 1. Aby zapobiec ewentualnym wypadkom, przed rozpoczęciem czyszczenia wyciągnij wtyczkę z gniazdka (należy ciągnąć za wtyczkę, a nie za kabel). 2. Grill kontaktowy należy czyścić regularnie (co najmniej raz na tydzień). Urządzenia nie należy czyścić za pomocą bezpośredniego strumienia wody. W celu usunięcia tłustych zabrudzeń z wnętrza grilla należy posłużyć się suchą ściereczką, a następnie wyczyścić grill zwilżoną ściereczką. Nie należy dopuszczać do bezpośredniego kontaktu z wodą. Wyciągnij szufladkę z grilla i zamocz ją w wodzie z dodatkiem małej ilości płynu do mycia naczyń. Gdy szufladka wyschnie, włóż ją z powrotem do grilla kontaktowego. 3. Gdy nie używasz urządzenia wyłącz regulator tem¬peratury i przełącznik główny. 4. Prosimy przechowywać urządzenie w dobrze wentylowanym pomieszczeniu i nie wystawiać go na działanie gazów powodujących korozję. G. CZYSZCZENIE I KONSERWACJA 1. Aby zapobiec ewentualnym wypadkom, przed rozpoczęciem czyszczenia wyciągnij wtyczkę z gniazdka (należy ciągnąć za wtyczkę, a nie za kabel). 50 51 H. SCHEMAT PODŁĄCZEŃ ABY OBUDOWA URZĄDZENIA BYŁA BEZPIECZNA MUSI ZOSTAĆ UZIEMIONA. I. CODZIENNA LISTA KONTROLNA Prosimy o sprawdzenie urządzenia przed każdym użyciem. Przed użyciem Po użyciu Czy maszyna nie jest przechylona? Czy kabel zasilający nie jest zużyty, przerwany lub uszkodzony? Czy panel obsługi nie jest uszkodzony? Czy nie są wyczuwalne dziwne zapachy? Czy górna i dolna płyta nie nagrzewają się jednocześnie? Czy słychać jakieś dziwne odgłosy i czy urządzenie pracuje w prawidłowy sposób? HLI, HL3 Wskaźnik mocy HL2, HL4 Wskaźnik miernika stopnia nagrzania SA, SAI, SA2 Wskaźnik temperatury E Podłączenie uziemienia SB, SB1, SB2 Wskaźnik temperatury EHI, EH2, EH3, EH4 Element grzejny 52 53 Notitzen | Notes DE Hiermit bestätigen wir, dass die hier in dieser Anleitung aufgeführten Geräte CE-konform sind. EN We hereby certify that the appliances listed in this manual are CE compliant. FR Par la présente, nous confirmons que les appareils présentés dans ce mode d´emploi sont conformes aux normes Ce. PL Niniejszym potwierdzamy, że urządzenia opisane w tej instrukcji są zgodne z deklaracją CE. IT Con la presente documentazione si certifica che i dispositivi descritti all´interno del manuale sono conformi alle vigenti norme CE. ES Por la presente confirmamos que los dispositivos detallados en este manual son conformes con las normativas de la CE. WWW.CATERINGROYAL.DE 55 Umwelt- und Entsorgungshinweise Hersteller an Verbraucher Sehr geehrte Damen und Herren, gebrauchte Elektro- und Elektronikgeräte dürfen gemäß europäischer Vorgaben [1] nicht zum unsortierten Siedlungsabfall gegeben werden, sondern müssen getrennt erfasst werden. Das Symbol der Abfalltonne auf Rädern weist auf die Notwendigkeit der getrennten Sammlung hin. Helfen auch Sie mit beim Umweltschutz. Sorgen Sie dafür, dieses Gerät, wenn Sie es nicht mehr weiter nutzen wollen, in die hierfür vorgesehenen Systeme der Getrenntsammlung zu geben. In Deutschland sind Sie gesetzlich [2] verpflichtet, ein Altgerät einer vom unsortierten Siedlungsabfall getrennten Erfassung zuzuführen. Die öffentlich - rechtlichen Entsorgungsträger (Kommunen) haben hierzu Sammelstellen eingerichtet, an denen Altgeräte aus privaten Haushalten ihres Gebietes für Sie kostenfrei entgegengenommen werden. Möglicherweise holen die rechtlichen Entsorgungsträger die Altgeräte auch bei den privaten Haushalten ab. Bitte informieren Sie sich über Ihren lokalen Abfallkalender oder bei Ihrer Stadt- oder Gemeindeverwaltung über die in Ihrem Gebiet zur Verfügung stehenden Möglichkeiten der Rückgabe oder Sammlung von Altgeräten. [1] RICHTLINIE 2002/96/EG DES EUROPÄISCHEN PARLAMENTS UND DES RATES ÜBER ELEKTRO- UND ELEKTRONIK - ALTGERÄTE [2] Gesetz über das Inverkehrbringen, die Rücknahme und die umweltverträgliche Entsorgung von Elektro- und Elektronikgeräten (Elektro- und Elektronikgerätegesetz - ElektroG). Po zakończeniu okresu użytkowania nie wolno usuwać niniejszego produktu poprzez normalne odpady komunalne, lecz należy go oddać do punktu zbiórki i recyklingu urządzeń elektrycznych i elektronicznych. Informuje o tym symbol, umieszczony na produkcie, instrukcji obsługi lub opakowaniu. Zastosowane w urządzeniu tworzywa nadają się do powtórnego użycia zgodnie z ich oznaczeniem. Dzięki powtórnemu użyciu, wykorzystaniu materiałów lub innym formom wykorzystania zużytych urządzeń wnoszą Państwo istotny wkład w ochronę naszego środowiska. Informacji o właściwym punkcie usuwania zużytych urządzeń udzieli Państwu administracja gminna. For the disposal of the device please consider and act according to the national and local rules and regulations. CONTACT emaks spółka z ograniczoną odpowiedzialnością sp.k. Ul. Dekoracyjna 3 65-155 Zielona Góra Nr. kom.: +48 506 06 05 74 E-mail: [email protected] w w w. e x p o n d o . d e WWW.CATERINGROYAL.DE