1
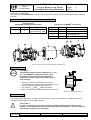
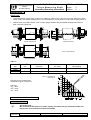
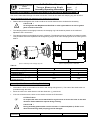
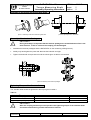
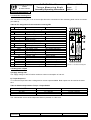
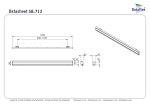
KTR Kupplungstechnik GmbH D-48407 Rheine DATAFLEX® 42/... Torque Measuring Shaft Assembly-/Operating Instructions KTR-N sheet: edition: 49010 E 1 2 DATAFLEX® is a maintenance free torque measurement shaft with integrated speed measurement. In connection with the RADEX®-N steel disc coupling it is a torsionally stiff double cardanic coupling with integrated measuring shaft. General Hints Read these instructions thoroughly before operating the measurement shaft. Please pay special attention to the safety instructions! The assembly instructions are a part of this product. Please store them carefully close to the measuring shaft. The copyright for these assembly instructions belongs to KTR Kupplungstechnik GmbH. Safety and Advise Hints STOP DANGER ! Danger of injury to persons. ! CAUTION ! Damages on the machine possible. ATTENTION ! Pointing to important items. F General Hints to Danger STOP DANGER ! With the assembly, operation, and maintenance of the measuring shaft it is important that the entire drive train has been secured against unintentional engagement. Please read through and observe the following safety instructions. • All work with and to the measuring shaft must be carried out with the idea of “Safety First”. • Secure the measuring shaft and the disengaged drive before work is carried out. • Secure the drive system against unintentional engagement, for example place warning signs at the switch or remove the fuse. • Do not touch the measuring shaft when it is in operation. • Protect the measuring shaft from unintentional contact. Use an appropriate cover or shield. Proper Use You are only allowed to assemble, operate, and maintain the measurement shaft if you • have carefully read and understood the assembly instructions • you are authorized and have the proper training The coupling can only be used in accordance with the technical data (see sheet 11). Unauthorized alterations to the measuring shaft are not allowed. We do not take any responsibility for any resulting damage. In the interest of further technical development of the product we reserve the right for modifications. ® The DATAFLEX -measuring shaft described corresponds to the technical status at the time of printing these assembly instructions. Urheberschutz gemäß DIN 34 Gezeichnet: 19.07.02 Sha/Koe Ersatz für: KTR-N v. 08.02.01 Geprüft: 23.07.02 Sha Ersetzt durch: W K V Verteiler VA M KC KTR Kupplungstechnik GmbH D-48407 Rheine DATAFLEX® 42/... Torque Measuring Shaft Assembly-/Operating Instructions KTR-N sheet: edition: 49010 E 2 2 Generally the measuring shaft is delivered in subassemblies. Before assembly the measuring shaft should be checked for completeness. The position of the DATAFLEX® is variable. The measurement system can be mounted horizontally as well as vertically. Components of DATAFLEX®-Torque Measuring Shaft Components of DATAFLEX®-torque measuring shaft Component Quantity 1 1 Components of RADEX®-N coupling Designation DATAFLEX®torque measuring shaft Component 2 3 Quantity 2 2 4 2 5 2 ® Designation flange hub laminae package clamping ring hub with clamping ring grub screw DIN 916 ® picture 1: DATAFLEX torque measuring shaft with RADEX -N Mounting Hints STOP DANGER ! The maximum permissible bore diameter d1max and ® d2max (see RADEX -N catalogue) should not be exceeded. If these values are not followed the coupling can break. Flying broken parts can put lives in danger. • When the customer manufactures the bore it is important that the customer holds the following runout and concentricity tolerances (see picture 2). • The values d1max and d2max must be observed. • Align the hubs carefully before making the finish bore. picture 2: runout and concentricity Displacements The misalignment values given in table 1 provide security in order to compensate for outside influences for example thermal expansion or foundation shifting. ! Urheberschutz gemäß DIN 34 CAUTION ! In order to ensure a long life of the measuring shaft the shaft ends must be precisely aligned. The misalignment values given must be observed (see table 1). If these values are exceeded the coupling will be damaged. Gezeichnet: 19.07.02 Sha/Koe Ersatz für: KTR-N v. 08.02.01 Geprüft: 23.07.02 Sha Ersetzt durch: W K V Verteiler VA M KC KTR Kupplungstechnik GmbH D-48407 Rheine DATAFLEX® 42/... Torque Measuring Shaft Assembly-/Operating Instructions KTR-N sheet: edition: 49010 E 3 2 Displacements Please note: • The misalignment values given in table 1 are maximum values. They cannot occur at the same time. When radial-, axial- and angular misalignment occur simultaneously, these values must be reduced (see picture 4). • Please check using dial indicator, ruler or feeler gauges whether the permissible misalignment values in table 1 are being observed. angular displacements radial displacements picture 3: displacements axial displacements Table 1: DATAFLEX® size 42/200 42/500 42/1000 RADEX®-N size max. axial displacement ∆KA [mm] max. radial displacement ∆KR [mm] max. angular displacement ∆KW [degree] 60 2,0 5,2 1,3 80 2,6 5,5 1,3 picture 4: combination of displacements Example for the misalignment combinations given in picture 4: Example: ∆KR = 60% ∆KW = 20% ∆KA = 20% Ktotal = ∆KA + ∆KR + ∆KW ≤ 100% Assembly of Hubs F ATTENTION ! We recommend that the bores, shafts, keyway and feather key are checked to make sure they are the correct dimensions before assembly. Urheberschutz gemäß DIN 34 Gezeichnet: 19.07.02 Sha/Koe Ersatz für: KTR-N v. 08.02.01 Geprüft: 23.07.02 Sha Ersetzt durch: W K V Verteiler VA M KC KTR Kupplungstechnik GmbH D-48407 Rheine DATAFLEX® 42/... Torque Measuring Shaft Assembly-/Operating Instructions KTR-N sheet: edition: 49010 E 4 2 Assembly of the RADEX®-Clamping Ring Hubs on the DATAFLEX®-Measuring Shaft The force is transmitted through a frictional connection. The fit for the shaft and clamping ring hub is H7/h6. During assembly please pay attention to the following procedures: • Please clean and degrease the contact surfaces of the hub bores and the shafts before assembly. CAUTION ! Oil and grease with Molybdenum Disulfide or other hydrocarbons as well as grease paste should not be used. ! • The clamping bolts must be lightly loosened, the clamping ring hub should be placed on the shaft and adjusted to the L5 dimension. • The clamping bolts must be tightened evenly crosswise. The tightening torques should be increased in steps. This procedure should be repeated until the tightening torque of all of the clamping bolts is the value given in table 2. picture 5: assembly of the clamping ring hubs picture 6: adjusting to the L5 dimension Table 2: DATAFLEX® coupling size RADEX®-N coupling size clamping bolt size number of bolts z tightening torque TA [Nm] 1) transmittable torque [Nm] (frictional torque) 42/200 60 M8 6 35 42/500 42/1000 80 M10 6 69 1070 1700 1) H7/k6 shaft/hub fit Assembly of the Driven and Driving Side Hubs • Assemble the hubs on the shafts of the driven and driving side (picture 7). The ends of the shafts must not protrude through the hubs. • Move the units in the axial direction until the dimension L2 is achieved. • If the unit is fixed move the hubs on the shaft to achieve the E dimension. F ! Urheberschutz gemäß DIN 34 ATTENTION ! On request the hubs can be machined for a grub screw to secure the hubs in the axial direction. Please make this request during ordering. CAUTION ! During assembly please make sure the correct L2 is observed (table 2). If this is not done the measuring shaft (coupling) can be damaged. Gezeichnet: 19.07.02 Sha/Koe Ersatz für: KTR-N v. 08.02.01 Geprüft: 23.07.02 Sha Ersetzt durch: W K V Verteiler VA M KC KTR Kupplungstechnik GmbH D-48407 Rheine DATAFLEX® 42/... Torque Measuring Shaft Assembly-/Operating Instructions KTR-N sheet: edition: 49010 E 5 2 Assembly of the Driven and Driving Side Hubs picture 7: assembly of the driven and driving side hubs picture 8: adjusting to the L2 dimension Assembly of the Laminae Packages CAUTION ! During assembly it is important that the laminae packages are assembled stress free in the axial direction. If this is not done the coupling can be damaged. ! • Assemble the laminae packages and the DATAFLEX® on the measruing shaft (picture 9). • Initially only hand tighten the parts and alternate the bolts left and right. • Tighten the bolts with a torque wrench until the values given in table 3 are reached. picture 9: assembly of the laminae packages Tightening Torque of the Shoulder Bolts The shoulder bolts should be tightened to the torque given in table 3. Table 3: DATAFLEX® coupling size ® RADEX -N coupling size bolt size tightening torque TA [Nm] ! Urheberschutz gemäß DIN 34 42/200 42/500 42/1000 80 M10 65 60 M8 33 CAUTION ! After the coupling has been put into operation the tightening torque of the shoulder bolts should be checked during normal maintenance intervals. Gezeichnet: 19.07.02 Sha/Koe Ersatz für: KTR-N v. 08.02.01 Geprüft: 23.07.02 Sha Ersetzt durch: W K V Verteiler VA M KC KTR Kupplungstechnik GmbH D-48407 Rheine DATAFLEX® 42/... Torque Measuring Shaft Assembly-/Operating Instructions KTR-N sheet: edition: 49010 E 6 2 Assembly Hints • Fix the Housing CAUTION ! The housing must be secured against rotation. For this purpose a threaded pin is on the underside of the housing. ! • Insulation All DATAFLEX®-measuring shafts of type 42 correspond to the Protection IP50 according to DIN EN 60529. • Maintenance The DATAFLEX®-measuring shaft is maintenance free. CAUTION ! Opening the housing is not required and can lead to damage of the measurement shaft. ! Technical Description 1. General Description All of the electronics are located in the fixed housing so that no additional equipment is needed to send the signal. The measuring shaft can be wired by the connection housing DF 1 available as accessory or manually by the 15-pole High Density Sub-D coupling (for connection diagram see table 4). The measurement system contains three measurement outputs, from these the analog output values for torque and speed are readable. Over two digital outputs the actual operating condition is shown and two digital inputs can be used during calibration. F ATTENTION ! The measuring shaft should initially be turned on when all of the connections have been properly connected. After it has been turned on for the first time the measuring shaft will take around 5 minutes until this warm up phase is finished and the measurement device will have its standard accuracy. 2. Pin assignment of the measuring shaft Table 4: Pin assignment of the D-Sub connection Connection Supply Voltage + Supply Voltage Output Voltage + Output Voltage Output Current + Output Current Output Speed + Output Speed Program-LED Fault Signal Auto-Offset Program Urheberschutz gemäß DIN 34 Sub-D-Pin Characteristic Input Voltage 24VIN 14 24 V DC ± 4 V / 100 mA GND 15 Torque Output UOUT 11 0 ... 10 V (RA = 1 kΩ) GND 6 IOUT 1 4 ... 20 mA (RA ≤ 500 Ω) LOUT2 Speed Output DRZ 12 24 V / 60 impulse/revolution GND 13 LED-Output ULED1+ 10 5 V / 5 mA prepared for LED ULED19 ULED2+ 5 24 V / 5mA prepared for LED GND 15 Calibration Input T1 8 activ on connection with GND (Pin 15) T2 3 Gezeichnet: 19.07.02 Sha/Koe Ersatz für: KTR-N v. 08.02.01 Geprüft: 23.07.02 Sha Ersetzt durch: W picture 10: plug connection ® DATAFLEX K V Verteiler VA M KC KTR Kupplungstechnik GmbH D-48407 Rheine DATAFLEX® 42/... Torque Measuring Shaft Assembly-/Operating Instructions KTR-N sheet: edition: 49010 E 7 2 Technical Description 3. Connection housing DF1 The connection housing DF 1 has 12 screw clips where the connections of the measuring shaft can be connected (see table 5). Table 5: Pin assignment of the connection housing DF1 No. Designation 10 11 24V GND 4 5 6 U GND I 12 11 DRZ GND 1 2 3 NULL GND SCK 13 14 15 16 L1 L2 T1 T2 TP - Function Characteristic Input Voltage Supply Voltage + 24 V DC ± 4 V / 100 mA Supply Voltage Torque Output Output Voltage + 0 ... 10 V (RA = 1 kΩ) Ground Torque Output Output Current + 4 ... 20 mA (RA ≤ 500 Ω) Speed Output Speed Output + 24 V / 60 impulse/revolution. Ground Speed Output Digital Connections Auto-Offset - Input Zero Offset Alignment Ground Digital Connections Output Error Signal In case of error: 24V / 50 mA Operational Control / Indicators Program - LED State Indicator Error LED Error Indicator Button Auto Offset Autom. Zero Alignment Button for Programming New Calibration Low-Pass Button Filter on / off Connection Measuring Shaft 1:1 Connecting Cable picture 11: connection housing DF1 4. Analoguous outputs a) Supply Voltage 24V The supply voltage is 24V DC with a maximum current consumption of 100 mA. b) Torque Output U, l To control the torque there are a voltage and a current output available. Both outputs can be used at the same time. Table 6: Relationship between Torque - Output Values DATAFLEX® size 42 / 200 42 / 500 42 / 1000 ∆U / ∆M 2,5 V / 100 Nm 1 V / 100 Nm 0,5 V / 100 Nm ∆I / ∆M 4 mA / 100 Nm 1,6 mA / 100 Nm 0,8 mA / 100 Nm The characteristic curves of the output are shown in pictures 12.1 and 12.2. Urheberschutz gemäß DIN 34 Gezeichnet: 19.07.02 Sha/Koe Ersatz für: KTR-N v. 08.02.01 Geprüft: 23.07.02 Sha Ersetzt durch: W K V Verteiler VA M KC KTR Kupplungstechnik GmbH D-48407 Rheine DATAFLEX® 42/... Torque Measuring Shaft Assembly-/Operating Instructions KTR-N sheet: edition: 49010 E 8 2 Technical Description The characteristic curves of the output values (see pictures 12.1 and 12.2) picture 12.1: voltage to torque relationship picture 12.2: current to torque relationship • Filter voltage output If the connection housing DF1 is used, the signal of the voltage output can be filtered. Table 7: Low-Pass Button Button adjustment TP left Low-Pass on right Low-Pass off The limit frequency of the filter can be changed by variating the DIP switches (see picture 13) inside the connection housing: picture 13: DIP switch (top view) Table 8: Adjustment of the requested filter frequency Limit frequency [Hz] button 1 15000 OFF 1 OFF 10 OFF 100 OFF 1000 ON A filter frequency of 1,000 Hz is preset. Urheberschutz gemäß DIN 34 button 2 OFF OFF OFF ON OFF Gezeichnet: 19.07.02 Sha/Koe Ersatz für: KTR-N v. 08.02.01 Geprüft: 23.07.02 Sha Ersetzt durch: button 3 OFF OFF ON OFF OFF W K button 4 OFF ON OFF OFF OFF V Verteiler VA M KC KTR Kupplungstechnik GmbH D-48407 Rheine DATAFLEX® 42/... Torque Measuring Shaft Assembly-/Operating Instructions KTR-N sheet: edition: 49010 E 9 2 Technical Description c) Output Speed UN For determining the speed a square wave with a frequency of 60 impulses per revolution is available. The height of the square wave voltage is 24 Volts. speed (1/min) = 1 / ta(s) speed (1/min) = f (1/s) picture 14 5. Digital Input and Output The general parameters for calibration of the measuring shaft are stored electronically and can be changed by operating the external calibration input T1 and T2. As done in the connection box DF1 accessory the connections for the LED output and the calibration input are wired as shown in picture 15 (see Table 4). picture 15 a) LED 1 (Program) For calibration of the measuring shaft the factors for amplification and offset can be set in steps. According to the description of the procedure in chapter 4 (calibration) the PROGRAM-LED shows a change in the mode of operation. b) LED 2 (Error) / Error Signal The perfect function of the measuring system is permanently controlled. An electronic defect is shown by a error signal. If an error is shown permanently, the measuring system is defect and must be returned to KTR. For an easy connection in control systems the error signal is accessible in the connection housing DF1 (connection pin ERROR). Table 9: Condition Normal Operation Error c) LED 2 OFF ON Fault Signal 0V 24V Automatic Offset - Correction If in torqueless state an incorrect value is indicated (≠ 5,0 V), an automatic offset alignment can be effected by pressing the button T1-Auto-Offset for 2 seconds. For this the torque is reduced to 0 and the button T1-AUTO-OFFSET must be pressed for 2 seconds. After successful alignment the saving of the new values is confirmed by 6-fold blinking of the programme - LED and the normal measuring operation is continued automatically. For an easy connection in control systems the Auto-Offset-Connection is acessible in the connection housing DF1 (connection clip NULL). Urheberschutz gemäß DIN 34 Gezeichnet: 19.07.02 Sha/Koe Ersatz für: KTR-N v. 08.02.01 Geprüft: 23.07.02 Sha Ersetzt durch: W K V Verteiler VA M KC KTR Kupplungstechnik GmbH D-48407 Rheine DATAFLEX® 42/... Torque Measuring Shaft Assembly-/Operating Instructions KTR-N sheet: edition: 49010 E 10 2 Technical Description 6. Calibration (Manual adjustment of amplification and offset.) F ATTENTION ! The measurement shaft is delivered calibrated. We recommended checking the calibration every half year. The amplification determines the correct relationship between the torque and the output voltage as well as the output current. It influences the steepness of the curves shown in picture 12.1 and 12.2. The displacement of the curves in vertical direction depends on the offset alignment. Both parameters can be set and saved one after the other (see picture 16). picture 16: flow of the manual setting Instructions for a new calibration: 1. Press the T2-Program key for 2 seconds. The PROGRAM-LED will blink two times. An adjustment of the amplification factor is now possible. 2. The measurement shaft should now be alternately loaded and unloaded by a defined weight. The difference between the output values should be compared to the actual difference between the load and unload. 3. Through a quick press of the T1-AUTO-OFFSET key the amplification factor can be roughly varied. While a fine variation of the amplification factor can be made using a quick press of the T2-PROGRAM key. One after the other all of the types of amplification factors can be adjusted (see picture 17.1). 4. If the difference of the displayed measurement values of the loading and unloading corresponds with the outside determined torque difference, then the adjustment of the amplification is finished. 5. Press the T2-PROGRAM key for 2 seconds. The PROGRAM-LED will blink 4 times. The manual setting of the offset can now begin. 6. As described under point 3 the keys can be pressed quickly to set all of the values (see picture 17.2). When no torque is present the measurement shaft should be adjusted to an output voltage of 5,0 V or rather an output current of 12,0 mA. 7. When the offset adjustment is finished, pressing the T2-PROGRAM key for two seconds will save all of the new parameters. The PROGRAM-LED will blink one time. The measuring shaft will once again be in its normal operating mode. picture 17.1 ! picture 17.2 CAUTION ! With saving all of the old data will be overwritten. F ATTENTION ! • The calibration can be interrupted if the measurement device is turned off for a short time and then turned back on. The previously saved parameters will then be reproduced. • The safe measurement operation can be carried out after saving the new parameters (point 7) or after interrupting the power supply. • After saving the new parameters (point 7) the parameters will stay the same even if the power supply is interrupted. Urheberschutz gemäß DIN 34 Gezeichnet: 19.07.02 Sha/Koe Ersatz für: KTR-N v. 08.02.01 Geprüft: 23.07.02 Sha Ersetzt durch: W K V Verteiler VA M KC KTR Kupplungstechnik GmbH D-48407 Rheine DATAFLEX® 42/... Torque Measuring Shaft Assembly-/Operating Instructions KTR-N sheet: edition: 49010 E 11 2 DATAFLEX® Torque Measuring Shaft picture 18 Table 10: dimension and technical data coupling size DATAFLEX® 42/200 Dimensions [mm] 42/500 dimension d dimension D dimension L1 dimension L2 dimension L3 dimension L4 dimension L5 42/1000 42 130 232 55 122 114 6,5 Electrical Data nominal torque TKN [Nm] limit frequency torque signal [kHz] measuring inaccuracy [%] 1) temperature influence [%/°K] nominal temperature range [°C] supply voltage [V] DC max. current consumption [mA] -200 .. +200 Nm -500 .. +500 Nm 16 1 0,05 0 - 55 24 ± 4 100 -1000 .. +1000 Nm Torque Output output voltage torque [V] output current torque [mA] 0 ... 10 4 ... 20 Speed Output number of impulses / revolution output signal [V] 60 24 Mechanical Data static load limit TKmax. 1) [%] 1) breaking load TK break [%] max. bending torque [Nm] max. radial force [N] max. axial force [kN] weight [kg] torsion spring stiffness CT [Nm/rad] torsion angle at TKN [degrees] mass moment of inertia [kgm 2] 2) permanent speed [1/min] 2) peak speed [1/min] 50 280 12 4,71 40929 0,0007343 150 300 135 750 20 4,84 102321 0,28 0,0007603 7000 8500 270 1500 30 5,01 204643 0,0008048 1) referred to TKN 2) after shrinkage of the bearings Urheberschutz gemäß DIN 34 Gezeichnet: 19.07.02 Sha/Koe Ersatz für: KTR-N v. 08.02.01 Geprüft: 23.07.02 Sha Ersetzt durch: W K V Verteiler VA M KC KTR Kupplungstechnik GmbH D-48407 Rheine DATAFLEX® 42/... Torque Measuring Shaft Assembly-/Operating Instructions KTR-N sheet: edition: 49010 E 12 2 DATAFLEX® Torque Measuring Shaft in Combination with RADEX®-N picture 19: dimensions DATAFLEX with RADEX-N Table 11: dimension and technical data coupling size DATAFLEX® coupling size RADEX®-NC 42/200 42/500 60 Dimensions [mm] dimension d1 / d2 max. 60 dimension D1 130 dimension D2 138 dimension D3 88 dimension L1 364 dimension L2 254 dimension L3 55 dimension L4 114 dimension L5 232 dimension E 11 Clamping Screw [mm] dimension G M8 dimension t 20 tightening torque TA [Nm] 10 Torque of the Coupling TKN [Nm] 690 TKmax. [Nm] 1380 Tkw [Nm] ± 230 Mechanical Data of the Combination (DATAFLEX® with RADEX®-N) mass moment of inertia [kgm²] 0,0173 0,0174 torsion spring stiffness [Nm/rad] 29605 52304 weight [kg] 13,90 14,03 max. speed [1/min] 1) 6700 6700 42/1000 80 80 130 179 117 420 270 75 114 242 14 M10 20 17 1500 3000 ± 500 0,0569 86888 24,39 5100 1) higher speeds on request Urheberschutz gemäß DIN 34 Gezeichnet: 19.07.02 Sha/Koe Ersatz für: KTR-N v. 08.02.01 Geprüft: 23.07.02 Sha Ersetzt durch: W K V Verteiler VA M KC