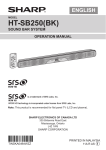
1
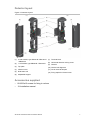
SB Series AIR Beam
Detectors Installation
Manual
EN SB Series AIR Beam Detectors Installation Manual
DE Für eine deutsche Anleitung siehe
www.utcfssecurityproducts.eu/manuals/NT299-ML_RevA_SB_Series.pdf
ES Para manual en Español consultar
www.utcfssecurityproducts.eu/manuals/NT299-ML_RevA_SB_Series.pdf
FR Pour le manuel en Français voir
www.utcfssecurityproducts.eu/manuals/NT299-ML_RevA_SB_Series.pdf
IT Per il manuale in italiano vedere
www.utcfssecurityproducts.eu/manuals/NT299-ML_RevA_SB_Series.pdf
NL Voor de Nederlandse handleiding, gebruik deze link:
www.utcfssecurityproducts.eu/manuals/NT299-ML_RevA_SB_Series.pdf
PT Para Português ver www.utcfssecurityproducts.eu/manuals/NT299ML_RevA_SB_Series.pdf
P/N NT299-EN • REV A • ISS 03JUL12
Copyright
Trademarks and
patents
© 2012 UTC Fire & Security. All rights reserved.
Interlogix, the SB Series AIR Beam Detectors name and logo are
trademarks of UTC Fire & Security.
Other trade names used in this document may be trademarks or
registered trademarks of the manufacturers or vendors of the
respective products.
Manufacturer
UTC Fire & Security Americas Corporation, Inc.
1275 Red Fox Rd., Arden Hills, MN 55112-6943, USA
Authorized EU manufacturing representative:
UTC Fire & Security B.V.
Kelvinstraat 7, 6003 DH Weert, Netherlands
Certification
European Union
directives
1999/5/EC (R&TTE directive): Hereby, UTC Fire & Security
declares that this device is in compliance with the essential
requirements and other relevant provisions of Directive 1999/5/EC.
2002/96/EC (WEEE directive): Products marked with this symbol
cannot be disposed of as unsorted municipal waste in the European
Union. For proper recycling, return this product to your local supplier
upon the purchase of equivalent new equipment, or dispose of it at
designated collection points. For more information see:
www.recyclethis.info.
Contact information
Customer support
www.utcfireandsecurity.com or www.interlogix.com
www.interlogix.com/customer-support.
Content
Introduction 1
General features 2
Detector layout 3
Accessories supplied 3
Installation 4
General guidelines 4
Detector mounting 4
Removing the infrared cover 5
Wiring 6
DIP switch settings 7
Cable length 8
Alarm and disqualification relay 8
Connecting the tamper detection contact 9
Configuration 10
Channel selection 10
Operating modes 11
Single module alignment and settings 12
Installing modules in columns 15
Connections 15
Setting “Slave” mode 17
Module numbering 17
“Master” module selection 18
“Master” module channel selection 19
Detection mode selection 19
Mono-detection of the bottom beam (optional) 20
Column alignment 22
Response time 23
Replacing the infrared cover 24
Final tests 25
Maintenance 26
Troubleshooting 27
Specifications 29
Default configuration 30
Dimensions 30
Accessories and spare parts 31
SB Series AIR Beam Detectors Installation Manual
i
ii
SB Series AIR Beam Detectors Installation Manual
Introduction
The SB250-N / SB2100-N two-beam detectors and the SB450-N / SB4100-N /
SB4200-N four-beam detectors generate an alarm when 1 or 2 beams are
interrupted, ignoring birds, small animals, dead leaves etc.
They consist of two identical detector modules equipped with detector cells
integrating both transmission and reception functions. These modules are
installed facing each other over the distance to be protected providing a nonphysical invisible detection zone.
Detectors are based on a system of pulsed infrared beams, and operate on four
user-selectable frequencies (channels), which allow avoiding any risk of
interference between detectors.
The SB450-N and SB4100-N barriers have 2 operating modes suitable for
different types of installation (see “Operating modes” on page 11):
•
“AND” mode: Simultaneous obstruction of two adjacent cells
•
“OR” mode: Obstruction of one of the cells
Refer to “Installing modules in columns” on page 14 for detailed information on
infrared barriers functionality in columns.
SB Series AIR Beam Detectors Installation Manual
1
General features
•
Maximum outdoor range:
- SB250-N : 50 m
- SB2100-N : 100 m
- SB450-N : 50 m
- SB4100-N : 100 m
- SB4200-N : 200 m
The range of an infrared detector depends directly on visual range.
Maximum range of an infrared cell according to visibility:
- When visibility is 200 m, the range is 200 m.
- When visibility is 60 m (dense fog), the range is 100 m.
•
Four user-selectable frequencies (channels) for distinguishing between
different detectors.
•
SB250-N and SB2100-N detectors are equipped with one cell.
•
SB450-N, SB4100-N and SB4200-N type detectors are equipped with two
cells dual-beam.
•
2 operating modes for SB450-N and SB4100-N: “AND” and “OR”.
•
SB250-N, SB2100-N and SB4200-N have only 1 operating mode: “AND”.
2
SB Series AIR Beam Detectors Installation Manual
Detector layout
Figure 1: Detector layout
(1) 2 cells module, type SB450-N / SB4100-N
/ SB4200-N
(2) 1 cell module, type SB250-N / SB2100-N
(3) Top plate
(4) Infrared cover
(5) Dual-beam cell
(7) Terminal block
(8) Horizontal direction locking screw
(9) Chassis
(10) Vertical cell alignment
(11) Cover removal tampers
(12) Fixing staple for infrared cover
(6) Adjustable support
Accessories supplied
•
8X Ø3.9x13 screws for fixing to column
•
1X Installation manual
SB Series AIR Beam Detectors Installation Manual
3
Installation
General guidelines
See Figure 2 below.
To install the detectors correctly, certain rules must be followed.
•
Do not place the detector on an unstable support (such as a mesh or a poorly
fixed post). See item 1.
•
Do not position the module facing direct sunlight (item 2).
•
Make sure that no vegetation interrupt the cells (item 3).
Figure 2: Potential causes of instability
Detector mounting
To attach the detectors to a metallic support, drill 4 holes measuring 3 mm and
use the sheet metal screws provided.
To fix the detectors to a wall, use appropriate screws and wall plugs for the type
of wall (we recommend at least Ø5 x 30 screws).
•
Drill 4 holes and insert wall plugs.
•
Position the holes in the adjustable support over the wall plugs.
Note: Rotate the module to be able to reach the screw holes in the adjustable
support (see Figure 3 on page 5).
4
SB Series AIR Beam Detectors Installation Manual
Figure 3: Wall mounting
(1) 4 screws
(2) Rear view of the adjustable bracket
Removing the infrared cover
See Figure 4 below.
1. Remove the screw attaching the infrared cover, taking care not to lose the
staple (item 1).
2. Slide the cover upwards until it is stopped by the top plate (item 2).
3. Pull the cover outwards from the grooves in the chassis to remove it (item 3).
Figure 4: Removing the infrared cover
SB Series AIR Beam Detectors Installation Manual
5
Wiring
We recommend that different power supplies are used for the module and
heating.
Note: When using guillotine connectors, put the wire in the connector, and then
pull it out slightly so that it tightens.
Figure 5: Terminals and controls
Item
Description
(1)
Top cell
(2)
Bottom cell
(3)
DIP switches
Note
Channel selection (1 and 2)
Operating mode selection (3 to 5)
(4)
Delay adjustment
An adjustment of the response time of the intrusion alarm (50 to
800 ms)
(5)
Selection button
Select alignment mode
Select cells in alignment mode
(6)
Alarm LED
Intrusion alarm / disqualification (blinking)
Level of the signal in alignment
Table 1: Terminals
Terminal
Description
1
“+” Power
2
“−” Power
3
“+” Heating
6
SB Series AIR Beam Detectors Installation Manual
Terminal
Description
4
“−” Heating
5
NO intrusion relay
6
COM intrusion relay
7
NO disqualification relay
8
COM disqualification relay
9
A column synchronization [1]
10
B column synchronization [1]
[1] See “Installing modules in columns” on page 14.
DIP switch settings
Table 2: DIP switch 1 to 2 - channel selection
Switch 1
Switch 2
Function
OFF
OFF
Channel 1
ON
OFF
Channel 2
OFF
ON
Channel 3
ON
ON
Channel 4
See “Channel selection” on page 10 for more details.
Table 3: DIP switch 3 to 5 - operating modes
Switch 3
Switch 4
Switch 5
Function
OFF
OFF
ON
Single module in “AND” mode
OFF
OFF
OFF
Single module in “OR” mode
OFF
ON
OFF
“Slave” mode with low beam enabled
OFF
ON
ON
“Slave” mode with low beam disabled
ON
OFF
OFF
“Master” mode with the mono detection column
ON
OFF
ON
“Master” mode with double detection column
ON
ON
OFF
Not used
ON
ON
ON
Not used
See “Operating modes” on page 11 for more details.
SB Series AIR Beam Detectors Installation Manual
7
Cable diameter and length
Table 4: Length of 12V DC power cable (m) (screened SYT1-type)
Ø of wire
(mm)
Cross-section
area wire (mm²)
SB250-N
SB2100-N
SB450-N
SB4100-N
SB4200-N
0,6
0,3
159
159
136
136
136
0,9
0,6
359
359
307
307
307
1,4
1,5
800
800
684
684
684
Table 5: Length of 12V AC/DC heating cable (m) (screened SYT1-type)
Ø of wire
(mm)
Cross-section
SB250-N
area wire (mm²)
SB2100-N
SB450-N
SB4100-N
SB4200-N
0,6
0,3
94
94
47
47
47
0,9
0,6
211
211
105
105
105
1,4
1,5
470
470
235
235
235
Note: If a single cable is used to supply power to several elements, the distance given should be
divided by the number of elements connected to the cable. If several wires of the same crosssectional area and polarity are placed in parallel, the distances given should be multiplied by the
number of wires.
Alarm and disqualification relay
When infrared signal is significantly reduced (for example, fog, heavy rain, etc.)
then the disqualification relay will be triggered after 60 s and the Alarm LED will
blink.
In case of obstruction of the beams (for example, by an object or a person) for
more than 60 s, first alarm relay will be triggered, then disqualification relay will
be triggered and alarm relay will be reset (see Figure 6 on page 9 for details).
8
SB Series AIR Beam Detectors Installation Manual
Figure 6: Relay response
Alarm condition
Beam interruption
Min 4 s
Alarms relay
Disqualification due to reduced infrared signal
Reduced Infrared signal
Alarm relay (NC)
Max 60 s
Disqualification relay (NO) [1]
Disqualification due to obstruction by an object or person
Beam interruption
Max 60 s
Alarm relay (NC)
Disqualification relay (NO) [1]
[1]
This releases the alarm relay when there are several alarm relays connected in series (for
example, different modules in one pillar). If this option is not required, connect the alarm and
disqualification relays in series.
Connecting the tamper detection contact
Remove the PCB at the bottom of the module, connect the two wires and then
replace the PCB sliding it in the two grooves until it can go no further, and taking
care not to twist the contact strip.
SB Series AIR Beam Detectors Installation Manual
9
Configuration
Channel selection
To avoid different detectors on the same site interfering with each other, they are
equipped with 4 user-selectable frequencies (channels).
Each of 2 modules composing the detection area must be set with the same
number of channel. This configuration is done using DIP switches 1 and 2 on the
top of the terminal block. The channel is validated once the detector is powered
on. (Switching channels once the detector is powered up has no effect on the
channel selection).
Figure 7: Channel selection switches
Channel 1
(OFF OFF)
Channel 2
(ON OFF)
Channel 3
(OFF ON)
Channel 4
(ON ON)
When the detectors are placed in the same alignment (see Figure 8 below),
allocate different channels to each detector, channel 1 (item 1) to channel 3
(item 3).
Figure 8: Multiple channels example
(1)
(1) Channel 1
10
(2)
(1) Channel 2
(3)
(1) Channel 3
SB Series AIR Beam Detectors Installation Manual
When the detectors are placed one on the top of the other (see Figure 9 below),
allocate the same channel to each detector and relay them to each other by the
synchronization link in Column mode.
Figure 9: Single channel example
(1)
(2)
(2)
(1)
(1) Channel 1
(2) Inter-module connection
Operating modes
The SB450-N and SB4100-N barriers can operate in 2 modes:
•
“AND” mode: simultaneous obscuration of 2 dual-beam cells to trigger the
intrusion alarm.
•
“OR” mode: obscuration of one of the dual-beam cells to trigger the intrusion
alarm.
The mode is selected with DIP switches 3 to 5. The DIP switch location is shown
in Figure 5 on page 6.
See Figure 10 on page 12 for modes illustration and DIP switch settings.
Caution: The DIP switches settings must be identical on both of 2 associated
modules. In OR mode, the response time must be also equal.
SB Series AIR Beam Detectors Installation Manual
11
Figure 10: Operation modes
“AND” mode:
“OR” mode:
Caution: Adjust the intrusion alarm response time by using the potentiometer as
described in “Response time” on page 23. It will adapt the detection sensitivity of
the barrier to the environment. A long response time decreases the sensitivity.
Note: Mode selection is only available in all 2 cell modules beams (SB450-N and
SB4100-N), except for the SB4200-N, which only supports the “AND” mode
Caution: The selected operating mode is activated during barrier power-up. Any
change of appropriate the DIP switch setting has no effect until the detector
power supply is reconnected.
Single module alignment and settings
Optical alignment
Figure 11: Optical alignment
This alignment consists in lining up the optical axes of the modules installed
facing each other.
This basic alignment adjustment is performed for each module using the
integrated sighting system.
12
SB Series AIR Beam Detectors Installation Manual
Aligning the cells visually
Figure 12: Visual alignment
(1) Viewfinder
(3) Oblique angle
(2) Viewfinder image
(4) Vertical adjustment thumbscrew
To align the detector:
1. Slightly unscrew the module’s adjustable support.
2. Position your eye at an oblique angle about 5 cm from the module as shown
in Figure 12, item 3.
3. Look in the mirror inside the module to see the image (item 2) of the module
opposite through the viewfinder (item 1) in the side of the cell.
- Horizontal alignment: Rotate the adjustable support by up to 90°.
- Vertical alignment: Turn the thumbscrew (item 4) by up to 10°.
Once the optimal alignment has been achieved, tighten the screw of the
adjustable support to lock horizontal rotation.
Optimization of the detector alignment (without module synchronization)
Figure 13: Optimization of the detector alignment
1. Power cycle the unit (module)
- The buzzer beeps 1 time for SB250-N and SB450-N.
- The buzzer beeps 2 times for the SB2100-N and SB4100-N.
- The buzzer beeps 3 times for the SB4200-N.
SB Series AIR Beam Detectors Installation Manual
13
2. Hold down “Select” button (for at least 2 seconds) until the buzzer beeps
2 times.
The red LED blinks once and the buzzer sounds one long beep to indicate the
alignment of the bottom cell.
3. Rotate the cell until the buzzer sound becomes continuous and the alarm
LED lights up continuously.
- SB250-N, SB2100-N, SB450-N and SB4100-N: the alignment must be done
cell by cell.
- SB4200-N: the alignment most be done on both cells simultaneously.
See “Alignment status indication” below for status indication details.
4. For the SB450-N and SB4100-N modules, switch to the next cell by pressing
“Select” button. Blinks of the alarm LED and buzzer beeps are indicating the
number of the cell to be aligned.
Rotate the cell until the buzzer signal becomes continuous and the alarm LED
lights up continuously.
To exit from the alignment mode, hold down “Select” button for more than
2 seconds until the buzzer beeps 2 times.
Alignment status indication
Table 6: Alignment status indication
Red LED status
Buzzer status
Alignment status
Slow blink
Slow beep
Bad
Quick blink
Quick beep
Good [1]
Fixed light
Continuous sound
Excellent
Note: In absence of a signal, the buzzer beeps one time per second.
[1] The modules SB4200-N, if the continuous beep cannot be reached, try to
obtain the quickest beep that is possible.
14
SB Series AIR Beam Detectors Installation Manual
Installing modules in columns
It is possible to combine up to 4 modules in one column. Table 7 below shows
the compatibility of detector models in one column.
Table 7: Detector models compatibility
SB250-N
SB450-N
SB2100-N
SB4100-N
SB4200-N
SB250-N
Yes
Yes
No
No
No
SB450-N
Yes
Yes
No
No
No
SB2100-N
No
No
Yes
Yes
No
SB4100-N
No
No
Yes
Yes
No
SB4200-N
No
No
No
No
Yes
We do not recommend mixing detectors of different generations (for example,
SB250 and SB250-N) or brands in a same column.
Connections
Mount the modules as described in “Installation” on page 4.
Connect the modules between themselves via the inter-module connections A
and B (connect the A’s to the A’s and the B’s to the B’s).
Recommendation: wire the alarm relays on the module 2 (the second module
from the bottom of the column) because this module is recommended to be
selected as “Master”.
SB Series AIR Beam Detectors Installation Manual
15
Figure 14: Multiple module wiring
(1) to (4)
16
Modules 1 to 4
(5)
Inter-module connection
SB Series AIR Beam Detectors Installation Manual
Setting “Slave” mode
Put all the modules in “Slave” mode: switch 3 on OFF and switch 4 on ON.
Figure 15: Slave mode
Caution: All the switch configurations of the modules of one column must be the
same as the modules opposite on the other column that constitutes the barrier.
Module numbering
Determine positions of the modules inside a column.
Note: The numbers designating the positions must follow from bottom to top. If
there are less than 4 modules inside a column, there should not be gaps or
overlaps in the numbering (see Table 8 below).
Table 8: Allowed module numbering
Position 1
Position 2
2 modules
X
X
3 modules
X
X
X
4 modules
X
X
X
SB Series AIR Beam Detectors Installation Manual
Position 3
Position 4
X
17
Figure 16: Module configuration
“Master” module selection
Set the module on which the relay alarms are wired in “Master” mode: switch 3
ON and switch 4 OFF.
Caution: A column is composed of 1 “Master” module and 1 to 3 “Slave”
modules. “Master” module can be positioned anywhere within the column:
position 1, 2, 3 or 4. If “Master” is installed in position 1, it is not possible to use
the mono-detection of the bottom beam (see “Mono-detection of the bottom
beam (optional)” on page 20) for more details.
Figure 17: “Master” mode selection
18
SB Series AIR Beam Detectors Installation Manual
“Master” module channel selection
Select the channel of the barrier on “Master” module (see also “Channel
selection” on page 10).
Figure 18: Master module channel selection
Channel 1 (OFF
OFF)
Channel 2
(ON OFF)
Channel 3
(OFF ON)
Channel 4
(ON ON)
Detection mode selection
Select the detection mode: simple detection or interdetection (not available on
the modules SB4200-N).
The detection mode is set on the “Master” module:
•
Switch 5 of the “Master” module ON to select dual-detection.
•
Switch 5 of the “Master” module OFF to select simple detection.
SB Series AIR Beam Detectors Installation Manual
19
Figure 19: Detection mode selection
(A) Interdetection mode
(5) “Master” module settings
(B) Simple detection mode
(6) Dual detection between modules
(1) to (4)
Modules 1 to 4
Important Note: Interdetection can be selected for all kind of modules except for
SB4200-N (item 6).
Mono-detection of the bottom beam (optional)
Important Note: Functionality is not available in SB4200-N, SB250-N and
SB2100-N modules.
The column must be configured in interdetection mode in order to activate the
mono-detection of the bottom beam.
20
SB Series AIR Beam Detectors Installation Manual
The mono-detection of the bottom beam triggers an intrusion alarm when the
bottom beam is cut for a period of 1.5s.
The mono-detection of the bottom beam is activated on the “Slave” module in
position 1 only.
•
Switch 5 of “Slave” module OFF to activate the mono-detection of the bottom
beam.
•
Switch 5 of “Slave” module ON to deactivate the mono-detection of the
bottom beam.
Figure 20: Bottom beam mono-detection
(A) Interdetection mode with mono detection
(5) “Master” module settings
(B) Interdetection mode without mono detection
(6) Dual detection between modules
(1) to (4)
Modules 1 to 4
SB Series AIR Beam Detectors Installation Manual
21
Column alignment
Alignment of the columns: start by aligning the cells with the integrated optical
sight on each cell for each module (see “Single module alignment and settings”
on page 12).
Optimization of synchronized barriers alignment
Figure 21: Optimization of synchronized barriers alignment
(1) to (4)
Modules 1 to 4
(A) to (H)
Cells 1 to 8
1. Power cycle the modules in the barrier.
- The buzzer beeps 1 time for SB250-N and SB450-N.
- The buzzer beeps 2 times for the SB2100-N and SB4100-N.
- The buzzer beeps 3 times for the SB4200-N.
The red LED blinks for 5 to 10 s during the initialization of the column.
2. Press “Select” button of “Master” module (for at least 2 seconds) until the
buzzer of “Master” module beeps twice.
The red LED blinks once and the buzzer sounds one long beep on “Master”
module to indicate the alignment of the bottom cell.
22
SB Series AIR Beam Detectors Installation Manual
3. Rotate and readjust the cell until the buzzer sounds a continuous beep and
the red LED stays lit.
Note: SB250-N, SB2100-N, SB450-N and SB4100-N are aligned cell by cell.
SB4200-N is aligned module by module (two cells of the same module at the
same time).
See “Alignment status indication” on page 14 for status indication details.
4. Move on to the next cell by pressing “Select” button of “Master” module, the
blinks of the red LED and the beeps of the buzzer indicate the number of the
cell to be aligned.
Rotate and readjust the cell until the buzzer sounds a continuous beep and
the red LED stays lit.
To leave the alignment mode, push “Select” button of “Master” module for more
than 2 seconds until the buzzer beeps two times.
Response time
Set the response time of the intrusion alarm by using the potential-meter of
“Master” module.
This allows the sensitivity of the barrier to be adapted to its environment. A long
response time reduces the sensibility of the barrier.
(1) “Master” module
(2) Potentiometer to set the
response time of the
intrusion alarm
SB Series AIR Beam Detectors Installation Manual
(3) Response time
23
Replacing the infrared cover
Figure 22: Replacing the infrared cover
1. Engage the infrared cover in the grooves of the chassis taking care not to
loose the staple (step 1).
2. Slide the cover upwards until it is stopped by the top plate (step 2).
3. Place it flat along the chassis, then slide it downwards and screw in the cover
fixing screw (step 3).
24
SB Series AIR Beam Detectors Installation Manual
Final tests
After installation, make sure everything is working with an overall system test.
SB250-N and SB2100-N barriers
•
•
Movement control in the cell: intrusion alarm.
Extended interruption of the cell for more than 1 minute: disqualification
alarm.
For SB4200-N barriers
•
•
•
Movement control in only one of the two cells: alarm not triggered.
Movement control in both of two cells: intrusion alarm.
Extended interruption of both cells for more than 1 minute: disqualification
alarm.
For SB450-N and SB4100-N barriers
“AND” mode:
•
•
•
Movement control in only one of the two cells: alarm not triggered.
Movement control in both of two cells: intrusion alarm.
Extended interruption of both cells for more than 1 minute: disqualification
alarm.
“OR” mode:
•
•
•
Movement control on the top cell: intrusion alarm.
Movement control in the lower cell: intrusion alarm.
Extended interruption of one of the two cells for more than 1 min:
disqualification alarm.
Modules installed in columns
Simple detection:
•
•
Movement control in only one of the two cells: intrusion alarm.
Extended interruption of one cell for more than 1 min: disqualification alarm.
Interdetection:
•
•
•
•
•
Movement control in only one of the two cells: alarm not triggered.
Movement control in both of two adjacent cells: intrusion alarm.
Movement test on two adjacent cells on two different modules (except
SB4200-N): intrusion alarm.
Extended interruption of one of two cells for more than 1 min: disqualification
alarm.
If the bottom cell is enabled: Movement control in the bottom cell for more
than 1.5 sec: intrusion alarm.
SB Series AIR Beam Detectors Installation Manual
25
Maintenance
To keep good ongoing performance levels, minimal maintenance is required:
•
Clean the infrared cover of each module at least once a year (or more often,
depending on exposure to dirt).
•
Repeat the final tests (once a year). See “Final tests” on page 25.
26
SB Series AIR Beam Detectors Installation Manual
Troubleshooting
How to find the “Master” module
Push the button “Select” for at least 2 seconds:
•
•
The buzzer beeps two times: the module is “Master”.
The buzzer does not sound: the module is “Slave”.
All configurations
Fault
Possible cause
Solution
Red led blinks
The 2nd module creating the
detection zone is not powered
Check the power supply of the
2nd module
The modules creating the
detection zone are using
different channels
Set both of associated modules
on the same channel
Poor cell alignment
Repeat the alignment
procedure
Cells are covered or in
disqualification
Clear cells field of view
Incorrect power supply of the
module
Check power supply
The red alarm LED does not
light up when the beams are
interrupted
Both cell beams are not
Break all cell beams at the
interrupted simultaneously (for same time
SB450-N, SB4100-N and
SB4200-N barriers only)
The red alarm LED does not
light up when only one beam is
interrupted
Modules in “AND” mode
Put module in “OR” mode. See
“Operating modes” on page 11
for more details.
Red LED remains lit for more
than 1 minute
Factory-set configuration
mode
Set DIP switches 3 and 4.
Fault
Possible cause
Solution
Red LED: 1 flash light
Module is in “Master” or
“Slave” mode
Turn off the selected mode.
See “Operating modes” on
page 11 for more details.
Single modules only
SB Series AIR Beam Detectors Installation Manual
27
Modules installed in columns only
Observed fault
Possible cause
Red LED: 1 flash light
Error in modules settings:
28
Solution
Several “Master” modules are
set up
Verify DIP switches 3 to 5
settings. See “Installing
modules in columns” on page
14 for more details.
No “Master” module is set up
Set up one of the “Master”
modules with the switches 1
and 2. See “Installing modules
in columns” on page 14 for
more details.
The position of “Slave” is not
correct
Check the position of “Slave”
modules with switches 1 and 2.
See “Installing modules in
columns” on page 14 for more
details.
Inter-module connection fault
Wire the inter-module
connections. See “Installing
modules in columns” on page
14 for more details.
Mixing of installed ranges.
Verify the compatibility of
modules. Put the modules of
the same range only. See
Table 7 on page 15 for more
details.
SB Series AIR Beam Detectors Installation Manual
Specifications
Detector model
SB250-N
SB2100-N
SB450-N
SB4100-N
SB4200-N
Maximum protected
distance for interior use
125 m
250 m
125 m
250 m
350 m
Maximum protected
distance for outdoor use
with thermostat controlled
heating
50 m
100 m
50 m
100 m
200 m [1]
Type of detection
Pulsed infrared beam of wavelength 950 nm at a choice of
4 channels
Number of cells
1 cell
Detection mode
Cell is interrupted
Intrusion alarm response
time
2 cells
60 s, non-adjustable
Duration of cell interruption, with a minimum of 4 seconds
Power supply
Current consumption at
12 VDC (1 module)
10 to 15 VDC
47 mA
47 mA
Heater power supply
Heater current consumption
at 12 VDC (1 module)
55 mA
55 mA
55 mA
160 mA
160 mA
10 to 15 V AC/DC
80 mA
80 mA
160 mA
Intrusion output for each
switch NC alarm off
Yes
Tamper output for each
switch NC alarm off
Yes
Disqualification output for
each switch NO alarm off
Yes (cutting the intrusion alarm)
Intrusion alarm output
rating
30 VDC, 500 mA
Tamper output rating
30 VDC, 500 mA
Disqualification alarm
output rating
30 VDC, 500 mA
Operating temperature with
thermostat controlled
heating
−25 to +55°C
Protection rating
Weight
Both cells
are
interrupted
Adjustable from 50 to 800 ms
Disqualification alarm
response time
Typical duration of intrusion
alarm
1 or 2 cells are
interrupted. See “Single
module alignment and
settings” on page 12 for
more details.
IP44
0,8 kg
Cell direction adjustability
SB Series AIR Beam Detectors Installation Manual
0,9 kg
1,1 kg
1,2 kg
1,2 kg
Vertically ±10°
29
Detector model
SB250-N
Module direction
adjustability
Integrated alignment tools
SB2100-N
SB450-N
SB4100-N
SB4200-N
Horizontally ±90°
Optical viewfinder system, LED, and buzzer indicating the quality of
the received signal
[1] Depends on visibility. See “General features” on page 2 for more details.
Default configuration
For modules default settings see figure 23. Modules are in “AND” mode by
default.
Figure 23: DIP switch default setting
Dimensions
All dimensions are given in mm.
Figure 24: Detector dimensions
30
SB Series AIR Beam Detectors Installation Manual
Accessories and spare parts
Accessories
•
•
•
•
SB53: Floor socket
SB51: Alignment Controller
SB52: Power Supply
SB18: Anti-climbing Cap
Spare parts
•
•
•
•
•
•
•
•
SB12: Cover for column 1m
SB17: Cover for column 1m50
SB22: Cover for column 2m
SB27: Cover for column 2m50
SB32: Cover for column 3m
SB13: Cover for module SB2XX
SB14: Cover for module SB4XX
SB19: Flask bottom and top + tamper card + cable glands
SB Series AIR Beam Detectors Installation Manual
31
32
SB Series AIR Beam Detectors Installation Manual