1
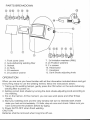
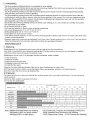
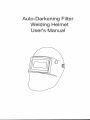
Auto-Darkening Filter
Welding Helmet
User's Manual
A
WARNING
A
1. It is your job to keep your self and others from the hazards associated
with welding. To do this you must familiarize your self with safety rules
for arc welding. Handling high-pressure gas cylinders and general
safety rules.
2. Arc welding gives off fumes, which can be potential health hazard.
Always use adequate ventilation.
3. Never do welding work without adequate eye protection.
4. Always wear appreciate safety equipment when welding.
OWNER'S RESPONSIBILITY
The owner and/or operator shall have an understanding of these operating
instructions and warnings before operating the filter. If the user knows little
English, this instruction shall be read to and discussed in the operator's native
language by the purchaser/owner making sure that the operator comprehends
its content.
TROUBLE SHOOTINGTR
1. If the auto-darkening speed and shade state level decrease, the batteries are low.
Replace the batteries.
2. If the view window will not lighten or become clear, either power switch is OFF
or batteries are low. Turn on the switch or replace batteries.
3. When the light transmittance of the protective sheet in front of the lens is low,
replace with a new one. The standard size is 113x 78 x 1 .Omm.
SPECIFICATIONS
View window area:
Auto-darkening filter dimension:
Ultraviolet ray transmittance rate:
Infrared ray transmittance rate:
Dark shade:
Light shade:
Auto-reaction time:
Recovery time:
Power supply:
91X40mm
120X95X13 mm
313-365nm<2x10⁻⁶%
780-13000.0027%
1300-2000nm<0.097%
7-13 from bright to dark
4
0.0001s
0.6s from dark to bright
AAA
CAUTION!
Before welding
1. When a new auto-darkening welding helmet is used for the first time,
the operator should remove the protective films on the cover Lens;
otherwise, the shade level may be incorrect or fail to work.
2. Make sure that batteries are correct and suitable for the work you then do.
1. Front cover Lens
2. Auto-darkening welding filter
3. Helmet
4. 2xNuts.
5. 2X washers
6. 2X position washer
7. 2x limitation washers (R&L)
8. 2x Position washers
9. 2 x screws
10. Headband
11. Headgear
12. Dark shade adjusting knob
OPERATION
When you are sure you have familiar with all the information included above and get
every thing ready to use the welding helmet, follow the instructions below:
1. Taking up the welding helmet, gently press the ON button on the auto-darkening
welding filter to power on.
2. Setting correct dark shade by turning the dark shade-adjusting knob according to
the welding.
3. Put on the helmet. At this moment, you can see work piece and other things
clearly.
4. Start your welding work and the view window will turn to intended dark shade
state you had set immediately. If it fails, stop at once and check. Make sure you
have overcome the problem before try aging.
5. Power AUTO-OFF when finish welding.
CAUTION:
Batteries shall be removed when long time off use.
/K WARNING:
. This Auto-darkening Welding Helmet is not suitable for laser welding.
. This Auto-Darkening Welding Helmet and the Auto-darkening Welding Filter shall never be placed on hot surfaces
. Never open or tamper with the Auto-Darkening Filter.
. This Auto-darkening welding helmet will not protect against severe impact hazardsjncluding fragmenting grinding
disks.and they must never be used for grinding.
. This Auto-darkening welding helmet will not protect against explosive devices or corrosive liquids. Don't make any
modifications to either the filter or helmet, other than those specified in this manual. Don't use any replacement parts
other than those specified in this manual. Unauthorized modifications and replacement parts will void the warranty
and expose the user to the risk of personal injury.
. Should the Auto-darkening welding helmets not darken upon striding an arc, stop welding immediately and contact
your supervisor or your dealer.
. Don't immerse the filter in water
. Don't use any solvents on filters' screen or helmet components.
. Use only at temperatures:-5 °C-+55 °C (23 °F-131°F)
. Storing temperamre:-20 °C-+70 °C (-4 °F-158 °F).
. Protect filter from liquid and dirt contact.
. Clean filters' surfaces regularly; do not use strong cleaning solutions. Always keep sensors and solar cells clean using
a clean lint-free tissue/cloth
. Regularly replace the cracked/scratched/pitted Front Cover Lens. Severe personal injury could occur if the user fails to
follow the aforementioned warnings, and/or fails to follow the operating instructions.
MAINTENANCE
/h Warning:
. Replacement of any components and/or parts shall be original from the manufacturer.
. User shall not uninstall the auto-darkening welding filter. The filter must be removed by the local dealer or qualified
personnel. Other wise it will cause the warranty invalid.
. Replacing the Cover Lens if it is damaged (cracked, scratched, soiled or pitted).
1. Front cover lens
1.1 Remove the filter.
1.2 Remove the front cover lens.
1.3 Replace a new front cover lens.
1.4 Install the filter again.
. Cleaning The Auto-darkening Welding Filter with a clean lint-free tissue or cotton cloth.
. Don't immerse the lens in water or any other liquid. Never use abrasives, solvents or oil based cleaners.
. Don't try to open the Auto-darkening Welding Filter.
STORAGE:
The helmet and the auto-darkening welding filter shall be stored in dry, and well-ventilated place Do not exposed to
direct sunshine.
. Do not hit, click, scratch or squeeze the helmet.
. Do not dirty the welding filter.
SHADE GUIDE TABLE
Welding process
0.5
2.5
1
1 1
10
20
5
1 1
15
1
40
30
1
1 1 1
9
SMAW
MlG(heavy)
I
Arc Current (Amperes)
80
125
175
40
100
150
200
1 1
1
10 1
11
10
I
11
as
275
250
1 1
9
II
.2
12
PAC
11
10
Note:*SMAW-Shielded Metal Are Welding.
*MIG(heavy)-MIG on heavy metals.
*MIG(light)-MIG on light alloys.
II
1
I-
13
500
1
13
1 14
1
I
1
13
1 14
1n
12
it
8 1 91
1
|
13
13
1
•HH ,o
SAW
PAW
I
11
.0 1
1 1
12
1
1 10 -J
MAG/C02
1 1
450
400
12
|
TIG GTAW
350
300
1
1
1
14
14
1 B 1 .4
1
1
1
13
14
1
*TIG,GTAW-Gas Tungsten Are Welding(GTAW)(TIG).
*SAW-Shielded Semi-Automatic Are Welding.
*PAC-Plasma Are Cutting. *PAW-Plasma Are Welding.