1
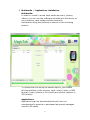
MAGICTAB
User manual
1
Preface
Thank you for purchasing our product. We are sure you will enjoy using it.
Please read this manual carefully before operation of the device and keep
it for your future reference. Our company does not accept any liability
arising from the improper use or accidental damage of the device. Due to
the continuous improvement of our products, the contents of this manual
may be changed. If the actual configuration and operation of the unit
differ from the information contained in the manual, please refer to our
website to see the latest product information. Do not allow water or any
foreign objects get into the interior of the device.
2
I.
NOTE:
1. Avoid dropping the device. The display must not be exposed
to shock, otherwise it can be damaged.
2. Do not use metal objects to touch the device. Otherwise this
may lead to a short circuit.
3. To prevent the loss of data stored on the disk of the device,
there should be periodic data archiving processes performed,
especially before the software update. The Company is not
responsible for any damage caused by data loss.
4. Please, do not disassemble the device. Do not wipe the
surface of the device with alcohol, thinner or benzene.
5. Do not disconnect the device while formatting or uploading /
downloading the data, otherwise it can lead to errors.
6. We do not take responsibility for any user injuries being a
result of the product breakdown, attempts to repair it or other
reasons. Follow the instructions carefully.
7. Do not allow water or any foreign objects get into the interior
of the device.
8. Do not operate the device in a place with extremely high or
low temperature, smoke or moisture.
9. Avoid dropping the device. The display must not be exposed
to shock, otherwise it can be damaged.
10. Specifications are subject to change without notice.
3
II.
Appearance
1
1. Microphone
2. Speaker
3. Volume
4. Menu
5. Volume 6. MiniUSB port
7. SD card slot
8. Headphone jack
9. Battery / AC Power
10. Power button
2
3
6
4
4
7
5
8
III.
Operation instructions
10
1. Power on/off
Power on:
Press the power button, the device displays the start screen
and then the boot screen.
Power off:
Press and hold the power button for 3 seconds to turn the
device off.
2. Charging
When the device prompts the low battery message, charge it
using the included charger.
NOTE:
The battery is charged only when the switch BATTERY /
ADAPTER CHARGING is in the Battery position.
3. Settings
Restore default settings:
This feature is not available due to the possibility of accidental
deletion of all the user data.
Image quality:
Three-step change of the displayed image quality.
Brightness:
Screen brightness adjustment
Information about the system:
Here is the information about the total internal memory
capacity (Disk Total) and the amount of free space available to
the user (Disk Total Free). In addition, you can find out if the
device has detected a memory card placed in the card reader
slot (SD Card Total) and about the amount of free space
available on your SD card (SD Card Total Free). Last position
tells us which version of the software is currently installed on
your device.
5
Sound effect:
We can enable or disable the sound effects accompanying the
use of certain applications, or while returning to the main
menu.
4. Connection to the computer
First install the SpiritPad Synchro software. The software is on
the CD included in the package, or you can download it
directly from the manufacturer's website. Turn the MagicTab
on. While connecting the device to a computer, first connect it
via USB cable included in the package. It will prompt the
screen with the message "USB computer connection". Choose
YES on the tablet screen and run the previously installed
SpiritPad Synchro software.
NOTE:
In case of problems with a proper connection to the computer,
turn off the firewall of the operating system and anti-virus
software. In addition, Windows Vista and Windows 7 users
must run the software (SpiritPad Synchro)
as an ADMINISTRATOR.
6
5. Multimedia / Applications installation
Multimedia:
In order to install / record such media as music, photos,
videos, you can use the software included with the device or
use a memory card reader and the computer.
Installation using the software is shown on the following
picture:
To upload the files using the second option, just create
following folders in the memory card: music (music in MP3
format), video (videos in flv format) and picture (photos in
JPG format).
Applications:
Applications can be downloaded directly from the
manufacturer's website or purchased as special packages
saved to SD cards.
7
NOTE:
Applications can be run only from the SD memory card. They
cannot be installed on the internal memory of the device.
6. Memory cards support
The device supports memory cards up to 32 GB.
7. Music playing
Click "Music" in the main menu to display the music playback
screen. A list of available audio tracks (from media storages)
will be displayed on the screen. Click the name of an audio file
to play it. In the player interface, click the corresponding icons
to play / pause / rewind and switch.
8. Video playing
Click "Movies" in the main menu to display the video playback
interface. A list of available video tracks (from media
storages) will be displayed on the screen. Click the name of a
video file to play it. Click on the center of the left side of the
screen to display a list with video files. In the player interface,
click the corresponding icons to play / pause / rewind and
switch. Click on the bottom of the screen to show them.
9. Pictures viewing
Click "Pictures" in the main menu to prompt the pictures
interface.
10.
Paint
With Paint application not only you can use your own creativity
to create different types of pictures, drawings, etc. The
application has also a coloring book function. Click the "open
folder with three pages sticking of it" icon. It will prompt the
menu with two options. PainterDIY and Internal. The Internal
option allows you to load coloring books directly from the
internal memory of the device, while the PainterDIY reads the
files directly from the memory card.
NOTE:
Some versions of the software may not have the PainterDIY
option available.
8
In this case, to open coloring book files save them to the
internal memory of the device using the SpiritPad Synchro
software.
9