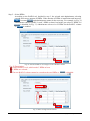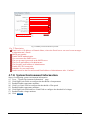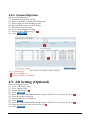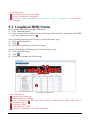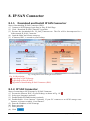
1
iSCSI Cloud Storage User Manual SIGNO INTERNATIONAL B.V. iSCSI User Manual Index 1. Turn-on Storage and Shutdown Storage ...................................................................................... 1 1.1. Turn-on Storage....................................................................................................................... 1 1.2. Shutdown Storage ................................................................................................................... 1 1.2.1. Shutdown Storage by Power Switch ............................................................................... 1 1.2.2. Shutdown Storage by Function List of UI ...................................................................... 1 1.2.3. Shutdown This Storage by Disk Status Panel of UI ....................................................... 2 1.3. Reboot Storage ........................................................................................................................ 2 1.3.1. Reboot This Storage by Function List of UI ................................................................... 3 1.3.2. Reboot Storage by Disk Status panel of UI .................................................................... 3 2. Hardware Reset ............................................................................................................................ 5 3. Storage Initialization .................................................................................................................... 7 4. iSCSI Management System ....................................................................................................... 17 4.1. System Configuration Wizard ............................................................................................... 19 4.2. Hard Disk Management ........................................................................................................ 19 4.2.1. Reset HDD .................................................................................................................... 21 4.2.2. Clean Force Deleted Status of HDDs ........................................................................... 22 4.2.3. Display Detial Information of HDD ............................................................................. 23 4.3. RAID System ........................................................................................................................ 24 4.3.1. Create New RAID Volumes ......................................................................................... 26 4.3.1.1. Field Descriptions of RAID Volume List .............................................................. 34 4.3.1.2. Detail Information of RAID Volume ..................................................................... 36 4.3.2. Delete RAID Volumes .................................................................................................. 38 4.3.3. Configure Spare HDD ................................................................................................... 39 4.3.4. Rebuild RAID Volumes ................................................................................................ 40 4.4. Mass-entry Users、iSCSI Targets、iSCSI LUNs ................................................................ 42 4.5. iSCSI Management ............................................................................................................... 43 4.5.1. LUN Configuration ....................................................................................................... 43 4.5.1.1. Create iSCSI LUNs................................................................................................ 43 4.5.1.2. Modify iSCSI LUNs .............................................................................................. 44 4.5.1.3. Delete iSCSI LUNs................................................................................................ 45 4.5.2. Target Configuration ..................................................................................................... 46 4.5.2.1. 4.5.2.2. Create New iSCSI Targets ..................................................................................... 46 Assign LUNs to iSCSI Targets .............................................................................. 46 I Copyright © 2010 Signo International B.V. SIGNO INTERNATIONAL B.V. iSCSI User Manual 4.5.2.3. Delete Target .......................................................................................................... 47 4.6. User and Group Management ............................................................................................... 48 4.6.1. User Setting ................................................................................................................... 48 4.6.1.1. Create New Users .................................................................................................. 48 4.6.1.2. Assign Targets to Users ......................................................................................... 49 4.6.1.3. Modify User Information ....................................................................................... 50 4.6.1.4. Enable User and Disable User ............................................................................... 51 4.6.1.5. Delete Users ........................................................................................................... 52 4.6.1.6. Unlock Users ......................................................................................................... 53 4.6.2. Group Setting ................................................................................................................ 53 4.6.2.1. Create a New Group .............................................................................................. 53 4.6.2.2. Assign Users .......................................................................................................... 54 4.6.2.3. Assign Shared Targets ........................................................................................... 55 4.6.2.4. Delete Groups ........................................................................................................ 56 4.7. System Management ............................................................................................................. 57 4.7.1. Modify Admin Password .............................................................................................. 57 4.7.2. Modify Storage Name ................................................................................................... 58 4.7.3. Modify Maximum Connections .................................................................................... 59 4.7.4. Modify IP Addresses ..................................................................................................... 59 4.7.5. Time Zone, Date and Time of iSCSI storage ................................................................ 61 4.7.6. Setup Accessible Network Segment ............................................................................. 62 4.7.7. System Notification....................................................................................................... 62 4.7.8. System Environment Information ................................................................................. 63 4.7.9. UPS ............................................................................................................................... 64 4.7.10. Auto Logout .................................................................................................................. 65 4.7.11. Enable/Disable/Reset System Alarm ............................................................................ 65 4.7.12. System Setting............................................................................................................... 66 4.7.12.1. Flow Control .......................................................................................................... 66 4.7.12.2. Read Ahead ............................................................................................................ 66 4.7.12.3. Enable/Disable SSH Connection ........................................................................... 66 4.7.12.4. Enable/Disable Auto-Recovery ............................................................................. 67 4.7.12.5. User Password Security ......................................................................................... 67 4.8. System Maintenance ............................................................................................................. 67 4.8.1. Version Information ...................................................................................................... 67 4.8.2. System Upgrade ............................................................................................................ 68 4.8.3. System Migration .......................................................................................................... 69 4.9. AD Setting (Optional) ........................................................................................................... 69 5. System Inquiry ........................................................................................................................... 73 5.1. I/O Throughput ...................................................................................................................... 73 II Copyright © 2010 Signo International B.V. SIGNO INTERNATIONAL B.V. iSCSI User Manual 5.1.1. Disk I/O Throughput Monitor ....................................................................................... 73 5.1.2. Individual Network Port Throughput ............................................................................ 73 5.1.3. Network Total Throughput ........................................................................................... 74 5.2. Graphical HDD Status ........................................................................................................... 75 5.3. System Environment Information ......................................................................................... 76 5.4. User Information ................................................................................................................... 77 5.5. User Online Status ................................................................................................................. 78 5.6. System Log............................................................................................................................ 79 5.6.1. Disk Event ..................................................................................................................... 79 5.6.2. RAID Event................................................................................................................... 79 5.6.3. Web Management Event ............................................................................................... 80 5.6.4. iSCSI Connection Event ............................................................................................... 81 5.6.5. Miscellaneous Event ..................................................................................................... 82 5.6.6. User Log ........................................................................................................................ 83 6. Exception Handling ................................................................................................................... 85 6.1. Delete Disk Forcedly............................................................................................................. 85 7. User Management Page ............................................................................................................. 87 7.1. User Login ............................................................................................................................. 87 7.2. Modify Alias ......................................................................................................................... 88 7.2.1. Modify Target Alias ...................................................................................................... 88 7.2.2. Modify LUN Alias ........................................................................................................ 89 7.3. Review a User‟s iSCSI Targets ............................................................................................. 90 7.4. User Log ................................................................................................................................ 90 8. IP SAN Connector ..................................................................................................................... 93 8.1.1. Download and Install IP SAN Connector ..................................................................... 93 8.1.2. IP SAN Connector ........................................................................................................ 93 9. Easy IP SAN .............................................................................................................................. 97 9.1. Login Easy IP SAN Management ......................................................................................... 97 9.2. Add Easy IP SAN Members ................................................................................................. 97 9.3. Remove Members from Easy IP SAN .................................................................................. 98 9.4. Review Easy IP SAN Members ............................................................................................ 99 9.5. Performance Monitor of Easy IP SAN .................................................................................. 99 III Copyright © 2010 Signo International B.V. SIGNO INTERNATIONAL B.V. iSCSI User Manual IV Copyright © 2010 Signo International B.V. SIGNO INTERNATIONAL B.V. iSCSI User Manual Figure Index Fig. 1 Turn-on the Storage ................................................................................................................... 1 Fig. 2 Shut the storage down by Function List .................................................................................... 2 Fig. 3 Shut the storage down by Disk Status panel of UI .................................................................... 2 Fig. 4 Reboot the storage by Function List .......................................................................................... 3 Fig. 5 Reboot the storage by Disk Status panel ................................................................................... 3 Fig. 6 Hardware Reset Button .............................................................................................................. 5 Fig. 7 Dialog of asking migration ........................................................................................................ 6 Fig. 8 Connect to the iSCSI Storage Management System by the default URL (https://192.168.1.88) ...................................................................................................................................................... 7 Fig. 9 Warning of CA ........................................................................................................................... 8 Fig. 10 Login iSCSI Management System by default Account and Password .................................... 8 Fig. 11 Change password of “admin” .............................................................................................. 9 Fig. 12 Rename this iSCSI Storage, describe this iSCSI Storage and determine the maximum concurrent iSCSI connections .................................................................................................... 10 Fig. 13 Configure where admin and users can login this management system from. ....................... 11 Fig. 14 Configure IP Address ............................................................................................................. 12 Fig. 15 Configure a NIC‟s IP address ................................................................................................ 12 Fig. 16 Configure DNS ...................................................................................................................... 13 Fig. 17 Configure network trunk function at System Management Wizard ...................................... 14 Fig. 18 Configure Network Trunk Mode at System Management Wizard ........................................ 14 Fig. 19 Configure Time Zone, Date and Time of iSCSI Storage ....................................................... 15 Fig. 20 System Management Wizard is finished and reboot this iSCSI Storage ............................... 16 Fig. 21 After initializing the iSCSI Storage, “admin” login by new password .................................. 16 Fig. 22 Username or Password Error ................................................................................................. 17 Fig. 23 Admin is locked ..................................................................................................................... 17 Fig. 24 Introduction of iSCSI Storage Manager Page ....................................................................... 19 Fig. 25 Disk Initialization .................................................................................................................. 20 Fig. 26 SAS/SATA port sequence of iSCSI storage ........................................................................... 20 Fig. 27 HDDs have reset .................................................................................................................... 22 Fig. 28 Reset Deleted Disk Status...................................................................................................... 23 Fig. 29 Detail Information of a Disk .................................................................................................. 23 Fig. 30 RAID Management Page ....................................................................................................... 27 Fig. 31 Create RAID Wizard – RAID Name, RAID Level and Disks of RAID ............................... 28 Fig. 32 Amount of HDD is not enough to create a RAID 5 volume .................................................. 29 Fig. 33 Select enough amount of disks .............................................................................................. 29 Fig. 34 Decide Chunk size and Capacity of the new RAID volume ................................................. 30 Fig. 35 Configure Spare Disk ............................................................................................................ 31 Fig. 36 The Setting of the New RAID Volume .................................................................................. 32 Fig. 37 A RAID is initiating ............................................................................................................... 33 Fig. 38 The detail information of initializing RAID volume ............................................................. 33 Fig. 39 The initialized process is finished. ......................................................................................... 34 Fig. 40 The field descriptions of RAID volume table -1 ................................................................... 34 Fig. 41 The field descriptions of RAID volume table -2 ................................................................... 34 Fig. 42 The detail information of a RAID volume............................................................................. 36 Fig. 43 The detail information of an initializing RAID volume ........................................................ 37 Fig. 44 LUN table in the RAID detail information ............................................................................ 38 Fig. 45 Delete a RAID volume .......................................................................................................... 39 V Copyright © 2010 Signo International B.V. SIGNO INTERNATIONAL B.V. iSCSI User Manual Fig. 46 Configure spare disks for existing RAID volumes ................................................................ 40 Fig. 47 Find Crash HDD .................................................................................................................... 41 Fig. 48 Recover by RAID .................................................................................................................. 41 Fig. 49 Recover by Disk .................................................................................................................... 42 Fig. 50 Mass entry Users, iSCSI Targets and iSCSI LUNs ............................................................... 43 Fig. 51 The template file for mass-entry function. ............................................................................ 43 Fig. 52Create an iSCSI LUN ............................................................................................................. 44 Fig. 53 Edit an existed iSCSI LUN .................................................................................................... 45 Fig. 54 Delete iSCSI LUNs................................................................................................................ 45 Fig. 55 Create a New iSCSI Target .................................................................................................... 46 Fig. 56 Assign iSCSI LUN to iSCSI Targets ..................................................................................... 47 Fig. 57 Delete Target .......................................................................................................................... 48 Fig. 58 Create a new user ................................................................................................................... 49 Fig. 59 Assing targets to users ........................................................................................................... 50 Fig. 60 Modify User Information ....................................................................................................... 51 Fig. 61 Activate and Deactivate users ................................................................................................ 52 Fig. 62 Delete users ............................................................................................................................ 52 Fig. 63 Unlock the locked users ......................................................................................................... 53 Fig. 64 Create new groups ................................................................................................................. 54 Fig. 65 Assign users to a group .......................................................................................................... 55 Fig. 66 Assign shared targets to groups ............................................................................................. 56 Fig. 67 Delete groups ......................................................................................................................... 57 Fig. 68 Modify Admin‟s password ..................................................................................................... 58 Fig. 69 Modify storage name and description.................................................................................... 58 Fig. 70 Modify the maximum iSCSI connections.............................................................................. 59 Fig. 71 Modify IP addresses............................................................................................................... 60 Fig. 72 Configure Network Trunk...................................................................................................... 61 Fig. 73 Setup Time Zone, Date and Time .......................................................................................... 61 Fig. 74 Configure Accessible Network Segment of Administrator and general users ....................... 62 Fig. 75 Modify events notification by Email ..................................................................................... 63 Fig. 76 Configure system environment information monitor ............................................................ 64 Fig. 77 Configure UPS ....................................................................................................................... 64 Fig. 78 Configure auto logout function .............................................................................................. 65 Fig. 79 Enable, Disable or Reset System Alarm ................................................................................ 66 Fig. 80 System Setting ....................................................................................................................... 67 Fig. 81 Version information ............................................................................................................... 68 Fig. 82 System upgrade ...................................................................................................................... 68 Fig. 83 Select a set of HDDs in System Migration ............................................................................ 69 Fig. 84 This iSCSI Storage joins AD server ...................................................................................... 70 Fig. 85 Enter account, password and AD server IP Address for joining AD server .......................... 70 Fig. 86 List users from an AD server ................................................................................................. 71 Fig. 87 List local users and enable/disable AD authentication .......................................................... 72 Fig. 88 Disk I/O Throughput.............................................................................................................. 73 Fig. 89 Individual Network Throughput ............................................................................................ 74 Fig. 90 Total Network Throughput .................................................................................................... 74 Fig. 91 Graphic HDD Status .............................................................................................................. 75 Fig. 92 The graphic system status ...................................................................................................... 76 Fig. 93 System Environment Information of This iSCSI Storage ..................................................... 77 Fig. 94 The table of user, iSCSI Target, iSCSI LUN and RAID level ............................................... 77 Fig. 95 User Online Status ................................................................................................................. 78 VI Copyright © 2010 Signo International B.V. SIGNO INTERNATIONAL B.V. iSCSI User Manual Fig. 96 Disk Events ............................................................................................................................ 79 Fig. 97 RAID Events .......................................................................................................................... 80 Fig. 98 Web Management Events ...................................................................................................... 81 Fig. 99 iSCSI Connect Events............................................................................................................ 82 Fig. 100 Miscellaneous Events .......................................................................................................... 82 Fig. 101 User Log .............................................................................................................................. 83 Fig. 102 Delete Disk Forcedly ........................................................................................................... 85 Fig. 103 Reset Deleted Disk Status.................................................................................................... 86 Fig. 104 Login User Management Page............................................................................................. 87 Fig. 105 Change a user‟s password .................................................................................................... 88 Fig. 106 Modify iSCSI Target Alias .................................................................................................. 89 Fig. 107 Modify iSCSI LUN Alias .................................................................................................... 89 Fig. 108 Review a user‟s iSCSI Targets ............................................................................................. 90 Fig. 109 User Log .............................................................................................................................. 91 Fig. 110 Hyperlink of downloading IP SAN Connector .................................................................... 93 Fig. 111 IP SAN Connector and its shortcut ...................................................................................... 94 Fig. 112 IPSC is connecting to an iSCSI Storage .............................................................................. 94 Fig. 113 Successfully Connect to an iSCSI storage ........................................................................... 95 Fig. 114 Login page of Easy IP SAN management ........................................................................... 97 Fig. 115 Add a new iSCSI storage into Easy IP SAN ........................................................................ 98 Fig. 116 Remove an iSCSI storage from Easy IP SAN ..................................................................... 98 Fig. 117 Show iSCSI storages of Easy IP SAN ................................................................................. 99 Fig. 118 Performance Monitor of Easy IP SAN .............................................................................. 100 VII Copyright © 2010 Signo International B.V. SIGNO INTERNATIONAL B.V. iSCSI User Manual VIII Copyright © 2010 Signo International B.V. SIGNO INTERNATIONAL B.V. iSCSI User Manual Table Index Table 1 HDD status ............................................................................................................................ 21 Table 2 Description of RAID levels provided by this iSCSI Storage ................................................ 26 Table 3 RAID Volume Status List ...................................................................................................... 35 Table 4 The Group Rules of RAID Level .......................................................................................... 36 Table 5 Spare HDD Flag .................................................................................................................... 37 Table 6 Graphic System Status Descriptions ..................................................................................... 76 Table 7 User Online Status Description ............................................................................................. 78 IX Copyright © 2010 Signo International B.V. SIGNO INTERNATIONAL B.V. iSCSI User Manual X Copyright © 2010 Signo International B.V. 1. Turn-on Storage and Shutdown Storage 1.1. Turn-on Storage Before you turn on your storage, please make sure that the storage is stably locked in your rank mount and the two power cords are setup in the rear panel of storage. Then, push the power switch in front of the storage, like of Fig. 1. The storage makes sound, “PI”. During booting of the storage, Ready LED, of Fig. 1, is twinkling until finishing storage boot process and Ready LED is sustained ON. Then, the storage can serve users or is waiting for initialization processes by the administrator. Fig. 1 Turn-on the Storage Fig. 1 Desciption: Power Switch of Storage Ready LED 1.2. Shutdown Storage The storage provides three manners for shutting the storage down: 1. Push the Power Switch in front of the storage chassis, for example 2. Mouse clicks “Shutdown” in the left field of management UI. 3. Mouse clicks in the Disk Status page of management UI. The following describes the three manners. of Fig. 1. 1.2.1. Shutdown Storage by Power Switch Push Power Switch in of Fig. 1. The Ready LED is twinkling during the shutdowning process. 1.2.2. Shutdown Storage by Function List of UI The storage provides shutting storage down by Web Management System. Administrator can shut the storage down through Internet. Please look for “Shutdown” in the left field of Web Management System, as shown in Fig. 2. In addition, click “Shutdown” to show shutdown page in right field on your web browser. Click on the page and then the web shows a dialog window for confirming. If you select “Yes” in the confirming dialog window, the storage is shutdowned immediately. The Ready LED is also twinkling during the shutdowning process, until power off. 1 Copyright © 2010 Signo International B.V. Fig. 2 Shut the storage down by Function List 1.2.3. Shutdown This Storage by Disk Status Panel of UI The Disk Status of Web Management System includes a front panel of the storage, like Fig. 3. is shutdown button. You can click to execute shutdowning process. Your web browser shows a dialog for confirming. If you select “Yes” in the confirming dialog window, the storage is shutdowned immediately. The Ready LED is twinkling during the shutdowning process, until power off. Fig. 3 Shut the storage down by Disk Status panel of UI Fig. 3 Description: Power Switch at Disk Status panel 1.3. Reboot Storage This storage provides two manners of rebooting the storage 1. Mouse clicks “Reboot” in the left field of management UI. 2. Mouse clicks in the Disk Status page of management UI. The following describes the two manners. 2 Copyright © 2010 Signo International B.V. 1.3.1. Reboot This Storage by Function List of UI The storage provides rebooting storage by Web Management System. Administrator can reboot the storage through Internet. Please look for “Reboot” in the left field of Web Management System, as shown in Fig. 4. In addition, click “Reboot” to show Reboot page in right field on your web browser. Click in the page and then the web shows a dialog window for confirming. If you select “Yes” in the confirming dialog window, the storage is rebooting immediately. The Ready LED is twinkling during the rebooting process, until the storage is “Ready” again. Fig. 4 Reboot the storage by Function List 1.3.2. Reboot Storage by Disk Status panel of UI The Disk Status of Web Management System includes a front panel of the storage, like Fig. 5. is Reboot button. You can click to execute rebooting process. Your web browser shows a dialog for confirming. If you select “Yes” in the confirming dialog window, the storage runs shutdown processes and reboots itself immediately. The Ready LED is twinkling during the rebooting process, until the storage is “Ready” again. Fig. 5 Reboot the storage by Disk Status panel 3 Copyright © 2010 Signo International B.V. Fig. 5 Description: Power Switch on Disk Status panel 4 Copyright © 2010 Signo International B.V. 2. Hardware Reset Hardware Reset will reset all your configurations in the iSCSI Storage. Because this operation is dangerous, Hardware Reset button is hidden into the left hole of the front panel, like Fig. 6 . You can use a needle or a pen to pull the button for 5 seconds. Then, the ready light is twinkling and the storage shutdowns. In next boot, the storage is reset, like a new one. Fig. 6 Hardware Reset Button Fig. 6 Description: Hardware Reset button is hidden in the hole. Hardware Reset function do following processes. Reset Administrator‟s password into 000000000000 (twelve 0). Clear RAID configuration Clear iSCSI LUN configuration Clear iSCSI Target configuration Clear User information Reset IP setting into default (default IP setting is 192.168.1.88/255.255.255.0) Reset Maximum connections Reset Alarm configuration Reset System Setting configuration After Hardware Reset, all configurations in this iSCSI storage disappear; Nevertheless, RAID configuration, iSCSI LUN configuration, iSCSI Target configuration and User information are still in your HDDs. Via these configurations, you can recover before configurations back to the storage, which has been hardware reset. Please do following steps after Hardware Reset. (1) Power-on your storage (2) Connect to your storage by IE (https://192.168.1.88) (3) Choose “System Migration” (4) Do System Migration. Please reference Section 4.8.3 (5) Reboot (6) Connect to your storage by IE (https://192.168.1.88), again (7) Do “System Management Wizard” (8) Done 5 Copyright © 2010 Signo International B.V. Fig. 7 Dialog of asking migration 6 Copyright © 2010 Signo International B.V. 3. Storage Initialization When it is the first time to power on an iSCSI Storage, please do the following processes to initialize the iSCSI Storage. 1. Power on the iSCSI Storage and wait blinking Ready LED becomes sustained lighting. The blinking Ready LED means that the iSCSI storage is booting and has not readied to serve clients. If there are some HDDs in the iSCSI Storage, the status LED (Red) of HDD tray is lighting because these HDDs are not “Read”. Please reference 4.2.1 Reset HDD. 2. Before you connect to iSCSI Management System through a Web browser, please the first network port must configure a RJ45 cord. The first network port has the default IP address: 192.168.1.88. Your computer, which is going to connect to the web management system, has to be in a LAN segment, as same as 192.168.1.xxx. Please check out your computer’s network configuration. 3. Execute your web browser, such as Internet Explorer, like Fig. 8. You have to type “https://192.168.1.88” in URL field. For information security, “https” uses SSL to encripte all communication data between your web browser and the storage. Fig. 8 Connect to the iSCSI Storage Management System by the default URL (https://192.168.1.88) 4. Then, your browser shows the mistrusted certification from the storage website, as shown in Fig. 9. Please choose and click . Although the certification is mistrusted, the communication data between your web browser and the storage is still encrypted by SSL. 7 Copyright © 2010 Signo International B.V. Click here and continuously browse this webside Fig. 9 Warning of CA 5. Fig. 10 is Login page of iSCSI Management System. Because the storage has not been initialized yet, please choose “iSCSI Storage Login”. Then, please enter username and password. The default username and password are Admin and 000000000000 (twelve 0). If “English” is not your mother language, you can choose other languages in of Fig. 10. Finally, left click by your mouse and login to iSCSI Management System. Additionally, you can download IP SAN Connector from the storage. About the configurations and operations of IP SAN connector, please reference 8 IP SAN Connector。 Fig. 10 Login iSCSI Management System by default Account and Password 8 Copyright © 2010 Signo International B.V. Fig. 10 Description: Although CA is not published by a mistrustful CA publishing company, SSL protects all communication information. Select a management function for this login. If you choose “Easy IP SAN Login” and login it, you will enter Easy IP SAN Management System, else you enter iSCSI Storage Management System. Because the iSCSI Storage has not been initialized yet, you have to choose “iSCSI Storage Login”. Please type “admin”, which is the default managing account. Please type “000000000000” (twelve 0), which is the default password for “admin”. Choose language. This is the URL for downloading IP SAN Connector, which is a very convenient tool for connecting to iSCSI storages. 6. This is the first time to enter iSCSI Management System. The system automatically executes “System Management Wizard” in the right field of web page, as shown in of Fig. 11, to guide you to initialize the iSCSI Storage. In the first stage, the system asks you change the password of “Admin” because of the security issue. You must enter the old password in and enter new password two times in and . The new password must include litters and digits and the length of new password has to be over 12 words, ruled by iSCSI Standard (RFC 3720). Finally, click to do next stage. Fig. 11 Change password of “admin” Fig. 11 Description: The right field automatically executes “System Management Wizard”, which guides you to initialize this iSCSI Storage. You have to type the default password (“000000000000”, twelve 0) of “admin” here because the iSCSI storage has not been initialized yet. Type your new password here. Type your new password again. These are Network port statuses. The system illustrates network port conditions via different colors of circle lights. Green Light - A network port has an IP address and connects to a network device (such as Hub, Switch and Router) or a network host (such as a PC or a Server). 9 Copyright © 2010 Signo International B.V. Yellow Light Red Light - 7. A network port must been without any IP address. A network port must have an IP address but it must not connect to any network device or any network host. Name this iSCSI Storage and describe it. That information will help your management in the future, like Fig. 12. Then, you have to decide the maximum concurrent iSCSI connections of this iSCSI Storage. If the value is larger, there are many users to share resources of the storage, such as storage capacity and network bandwidth, and then the quality of server will be lower. Hence, please decide an appropriate value, which depends on your application. Finally, click to do next stage. Fig. 12 Rename this iSCSI Storage, describe this iSCSI Storage and determine the maximum concurrent iSCSI connections Fig. 12 Description: Naming this iSCSI Storage uses an understandable string. Describing this iSCSI Storage uses a string, which describes this storage„s functions and purposes. Setting the maximum number of iSCSI connections in which this iSCSI storage can concurrently serve them. 8. Configure the permitted LAN segment of iSCSI Management System. The iSCSI Management System can limit the LAN segment of a PC, which can connect to the iSCSI Management System. There are two kinds of account in the iSCSI Storage. You can set their permitted segment independently. Administrator: of Fig. 13 set the permitted LAN segment of administrator accounts. You have two rules, as following: LAN Only: An administrator account manages the storage by the PC in the LAN segment, which is the LAN segment of the iSCSI Storage, too. That means that a PC in Internet cannot manage the storage. For example, if network settings of a storage are IP Address = 61.212.1.15, Network Mask = 255.255.255.0 and the Gateway = 61.212.1.1. Thus, the administrator must use a PC, which uses IP address = 61.212.1.xxx, where the xxx is the range from 2~254, excepting 15. WAN: 10 Copyright © 2010 Signo International B.V. An administrator can use any PC to connect to iSCSI Management System. of Fig. 13 set the permitted LAN segment of normal accounts. You have two rules, as following: LAN Only: A normal account manages his/her account by the PC in the LAN segment, which is the LAN segment of the iSCSI Storage, too. That means that a PC in Internet cannot manage the storage. For example, if network settings of a storage are IP Address = 61.212.1.15, Network Mask = 255.255.255.0 and the Gateway = 61.212.1.1. Thus, the account must use a PC, which uses IP address = 61.212.1.xxx, where the xxx is the range from 2~254, excepting 15. WAN: A normal account can use any PC to connect to iSCSI Management System. Fig. 13 Configure where admin and users can login this management system from. 9. This stage configures the network setting of iSCSI storage, as shown in Fig. 14。This page illustrates how many network ports this iSCSI storage has. Field shows the current setting of network ports. The field under provides port settings interfaces in Tabs and a DNS setting interface. For different applications, you should follow the rules as followings: iSCSI Storage directly serves clients: If the storage serves many clients through network switches, please configure IP addresses of the network ports in a same network segment and then these ports will share loading each other. For example, if the storage is located in the segment:61.212.1.xxx, please find out 6 no-collided IP addresses and configure them in the 6 network ports respectively. iSCSI Storage directly serves servers or workstations: If the storage serves servers without any network switch, please configure the 6 network ports in 6 independent network segments. For example, if an IP address of a server is 192.168.1.2, the storage’s network port, connecting to the server, should be 192.168.1.xxx, except 192.168.1.2. In addition, an IP address of another server is 192.168.2.2, the storage’s network port should be 192.168.2.xxx, except 192.168.2.2. 11 Copyright © 2010 Signo International B.V. Fig. 14 Configure IP Address Fig. 14 Description: This field illustrates the overview of network setting. These are Network port statuses. The system illustrates network port conditions via different colors of circle lights. Green Light Yellow Light Red Light - A network port has an IP address and connects to a network device (such as Hub, Switch and Router) or a network host (such as a PC or a Server). A network port must been without any IP address. A network port must have an IP address but it must not connect to any network device or any network host. The first network port has an IP address. Because this iSCSI Storage has not been initialized yet, the first network was the default IP address – 192.168.1.88. IP address fields of NIC 2, NIC 3, NIC 4, NIC 5 and NIC 6 are empty. These network ports have not been set any IP address yet. Enable Network Trunk function Choose a NIC, which you are going to configure. Fig. 15 Configure a NIC‟s IP address 12 Copyright © 2010 Signo International B.V. Fig. 15 Description: Choose a NIC, which you are going to configure. Enable VLAN Setup VLAN ID for this NIC Editable Field for inputting IPv4 Address Editable Field for inputting IPv6 Address Editable Field for inputting IPv4 Network Mask Editable Field for inputting IPv4 Gateway when this iSCSI storage is accessible from Internet hosts. Configure the frame size of MAC protocol (CSMA/CD). Before you determine the size, you must check out the maximum frame size of your Ethernet switches. External IP address of your NAT server or DHCP server must be configured when this iSCSI Storage is accessible from Internet hosts and uses a private IP address. The mapping port from your NAT server or DHCP server Enter DNS setting page VLAN Setting This iSCSI Storage provides VLAN in all of network ports. You choose a network port and click the Tab. you can find out the check box ( of Fig. 15) to enable VLAN function. Then give the network port a VLAN ID. Please fully understand VLAN standard before configuring them. For example, two VLAN ports have different VLAN ID respectively. The IP addresses of the two ports must belong to two different LAN segments respectively. Setting of iSCSI Storage behind firewall or NAT An IP address mapping form a private IP to a public IP should be set if your storage behind a firewall or a NAT server has to serve users from Internet. When an iSCSI Storage is located behind firewall or NAT and uses private IP addresses, such as 192.168.xxx.xxx, you must set the external IPs and the external Ports in network ports. In your Firewall or NAT, your must create a record for mapping from the private IP of the storage to the public IP of the Firewall and NAT. For example, a NAT server obtains a public IP: 61.220.70.175. The NAT should create a mapping, such as 61.220.70.175:3260 -> 192.168.1.88:3260, where 192.168.1.88 is the IP address of the storage and 3260 is the port of the storage. Then, in IP configuration of the storage, the network port with 192.168.1.88 should be set that external IP address and the external port, where are 61.220.70.175 and 3260 respectively. About the detail information of these setting, please reference the manual of a Firewall server or NAT server. At the last of tab list, as shown in Fig. 16, DNS page provides you for configuring two Domain Name Servers in this iSCSI storage. Fig. 16 Configure DNS The storage merges network ports into one ports, called Bond1, when you trunk all bandwidth of the separated network ports. For example, there are 6 network ports in Fig. 16. After enabling the trunk function in of Fig. 17, the storage merges the 6 network ports into one Bond1, as shown in of Fig. 17. 13 Copyright © 2010 Signo International B.V. Fig. 17 Configure network trunk function at System Management Wizard Fig. 17 Description: Enable Network Port Trunking function. NIC1~NIC6 are disappeared. The 6 network ports are trunked into ”Bond 1”. Select Trunking Mode. Then, please choose the trunking mode at Fig. 18. Fig. 18 Configure Network Trunk Mode at System Management Wizard Network Trunk Mode Description: (1) Active Backup (Fail Over) Network ports fail-over each other, but the total bandwidth does not increase. (2) Balance-RR (Round-Robin) The transmitting data are shared among network ports so the total bandwidth increases. When a network port fails, other network ports take the load of the failing network port. This mode supports fail-over and load-balance simultaneously. (3) Balance XOR This mode also supports fail-over and load-balance simultaneously, but the load-balance algorithm is differently from Balance-RR mode. (4) Broadcast All network ports send same packets and receive same packets in the same time. The network ports fail-over each other, but the total bandwidth does not increase. (5) IEEE 802.3ad Group network ports. One of the networks ports is working and other network ports are backup ports. When the working network port fails, one of the backup ports replace the fault network port. If you want to do this mode, please make sure that all NICs and the switch support 802.3ad protocol. 14 Copyright © 2010 Signo International B.V. (6) Balance-tlb(Adaptive Transmit Load Balancing) One of the network ports receives data and all of the network ports can send data. (7) Balance-ale(Active Load Balancing) All of the network ports can send and receive data. 10. Configure Time Zone, Date and Time of the storage. It is important to keep correct time of the storage since the system log of the storage references the time. If the time is incorrect, it is hard to look for problems by the system log. You can check the system time of the storage in of Fig. 19. If it is incorrect, please correct it. Fig. 19 Configure Time Zone, Date and Time of iSCSI Storage Fig. 19 Description: The time of this iSCSI Storage Select Time Zone. Configure Date. Configure Time. 11. Finish System Management Wizard. When you see Fig. 20, the System Management Wizard is finish and the system is rebooting. Please wait until that the ready LED is sustained light. 15 Copyright © 2010 Signo International B.V. The initialized process is finished and this iSCSI Storage is rebooting now. Fig. 20 System Management Wizard is finished and reboot this iSCSI Storage 12. After rebooting of the storage, please input the new IP address on your web browser and then use new password to login the management system, as shown as Fig. 21。 New Password Fig. 21 After initializing the iSCSI Storage, “admin” login by new password 16 Copyright © 2010 Signo International B.V. 4. iSCSI Management System This iSCSI storage uses a web interface GUI system to manage the iSCSI storage. For security issues, you must login the management system by entering a username and a password. To prevent trying the username and the password, the storage just allows you try 4 times to login to Storage Management System. If the management system rejects your username and password 4 times by the storage, the storage will lock your username for 10 minutes, such as Fig. 23. During the locking, you cannot login to Storage Management System even through you use correct username and password. Fig. 22 Username or Password Error Fig. 23 Admin is locked 17 Copyright © 2010 Signo International B.V. Signo iSCSI Storage uses web browsers to manage it. Administrator connects to the iSCSI Storage management system through a web browser and the IP address, configured at Section 3. Fig. 24 is the page layout of the management system. The top bar includes our logo, the IP address, which you connected to and system statuses . The system statuses help administrator to understand system situations. Please look for the description of system statuses in 5.3System Environment Information. shows the model name of the iSCSI Storage. denotes which management function is in the field under . The main page is divided into a left field and a right field. The left field list the management functions of the iSCSI Storage and the right field is operating field of a management function. The iSCSI storage provides following management functions: 1. Deployment and Management (1) . System Management Wizard (2) . Hard Disk Management (3) . RAID Management (4) . Mass Entry (5) . iSCSI Management (6) . User and Group Management (7) . System Management (8) . System Maintenance (9) . AD Setting 2. Inquiry (1) . iSCSI Storage Performance (2) . Hard Disk Status (3) . System Environment Information (4) . User Information (5) . Online User Status (6) . System Log 3. Exception Handling (1) . Delete Disk Forcedly 4. Reboot/Shutdown (1). Reboot (2). Shutdown 5. Logout Finally, the bottom bar shows the time in the iSCSI storage. It is important to keep the time correct. The log system of iSCSI storage in the iSCSI storage records all events included when they happen. If the time is incorrect, these events are recorded wrong time by the log system. 18 Copyright © 2010 Signo International B.V. Fig. 24 Introduction of iSCSI Storage Manager Page Fig. 24 Description: System status quick view obviously illustrates the conditions, which are distributed in Hard Disk Management, RAID Management and System Management. The administrator can quickly understand system conditions and remove them. The more detail description is at 5.3 System Environment Information. The model name of this iSCSI Storage The current page name Management Function List Management Function page The time of iSCSI storage, administrator must always keep it correct. 4.1. System Configuration Wizard System Management Wizard guides administrator to initiate an iSCSI Storage. Section 2 has described the iSCSI Storage initiated process. If you want to initiate this iSCSI storage by the wizard again, you can click “System Management Wizard” to trigger the initiated process again. 4.2. Hard Disk Management After the next successful login, the first page is Hard Disk Management, like Fig. 25. For example, this iSCSI storage has 8 slots. Hard Disk Management lists 8 slots on the webpage. HDDs, used for the iSCSI storage, have to been ready before them participate in RAID volumes. When administrator plugs in a HDD into running iSCSI storage, the storage smartly recognizes the condition of the HDD. There are three possible statuses when you plug a HDD into a slot. 1. 2. 3. Ready Configured Rescuable - When you plug a new HDD into a slot, the status has to be “Ready”. - If the plugged HDD has worked in an iSCSI Storage, the status has to be “Configured”. - If the plugged HDD is able to rescue a crashed RAID volume in the iSCSI storage, the status has to be “Rescuable”. 19 Copyright © 2010 Signo International B.V. Fig. 25 Disk Initialization Fig. 25 Description: Enable Display Detail Information for HDD Enable HDD Location Indicator. When administrator clicks a HDD on this page, the Red LED on the HDD‟s tray is twinkling for 20 seconds. Select all of HDD Select a HDD These HDDs can participate to any RAID volume when the status is “Ready”. The HDDs are able to rescue some RAID volumes in this iSCSI storage. The HDD had been used in other iSCSI storages. The slot did not connect to any HDD. Rescan SAS/SATA slot to refine HDDs. Reset “Configured” status and “Rescuable” status to “Ready” status. Remove Deleted Disks, which are forcedly deleted by admin. Column descriptions of Disk information list: Select Each of SAS/SATA slot includes Select field. You have to select some target HDDs first and then do some operations, such as reset status or reset “Deleted Disk Status”. Disk Slot This iSCSI Storage includes 8 SAS/SATA2 Hot-swapable slots. Hard Disk Management assigns a unique number to each slot. Fig. 26 illustrates the mapping from slot numbers to positions on the storage chassis. 5 6 7 8 1 2 3 4 Fig. 26 SAS/SATA port sequence of iSCSI storage Status This column denotes the HDD status. HDD status has some values, as shown in following Table 1. Status Description Empty Ready This slot does not connect to any HDD. This slot connects to a HDD and the HDD has been “ ready ” to use in RAID system of the iSCSI Storage. 20 Copyright © 2010 Signo International B.V. Configured Rescuable Crash Deleted Disk This slot connects to a HDD and the HDD had been used in other iSCSI storages before. The HDD had been used in this iSCSI storage and is able to rescue a RAID volume in this moment. This slot connects to a HDD but this HDD cannot be Read/Written. This slot is closed. You can remove the HDD from the slot to reopen the slot or click to reset the slot. Table 1 HDD status Volume: Show available capacity of the HDD in units of Giga-Byte (GB). Free Space Show free capacity of the HDD in units of GB. The free capacity can be used for a RAID volume. Supplier Illustrate the manufacturer of the HDD. HDD Interface Show the interface spec. of the HDD Model Show the model name of the HDD. F/W Rev. Illustrate the firmware version of the HDD. Blocks Show how many blocks in the HDD. Block Size Show Block size of the HDD. The block size is usually 512 Byte (0.5KB). Disk ID Disk ID, assigned by the iSCSI Storage, is a unique number of an initialized HDD. If an initialized HDD is deleted, the HDD‟s Disk ID is going to be deleted and will not been used again. For example, an iSCSI Storage is plugged 16 HDDs. After initializing these HDDs, the storage offers Disk ID = 1 ~ 8 to these 8 HDDs. Administrator deletes a HDD, which has Disk ID=8. Then, Administrator initializes the HDD again. The storage offers Disk ID=17 to the HDD. 4.2.1. Reset HDD When statuses of HDDs are “Configured” or “Resucable”, these HDDs cannot join to any RAID volume. can reset such two statuses into “Ready”. Please follow these following steps to reset HDDs. 1. Select some “Configured” HDDs or “Rescuable” HDDs 2. Click If resetting selected HDDs is successful, the status fields of the selected HDDs become “Ready”, as shown in Fig. 27. Warning - After reset HDDs, these HDDs loss all DATA and RAID configurations. 21 Copyright © 2010 Signo International B.V. Fig. 27 HDDs have reset Fig. 27 Description: These slots connect to HDDs and the HDDs are reset. Therefore, these statuses are “Ready”. These slots have not connected to any HDD yet. 4.2.2. Clean Force Deleted Status of HDDs An unnormal HDD is forcedly deleted by Administrator or the RAID system when the HDD has some unrecoveralbe errors and interferes or stops the RAID system. For recovering the service of RAID system, Administrator should visit “Delete Disk Forcedly” page to delete the slot of the HDD and set the status of the slot into “Deleted Disk”. There are two ways to release “Deleted Disk” status from the slot. (1) Replace the unnormal HDD with a normal HDD. when Administrator has removed the unnormal HDD from the slot, the status of the slot is still “Deleted Disk”. Administrator has to plug a normal HDD into the slot to release ” Deleted Disk” status. Finally, the status of the slot is ”Non-Initial”. (2) Using in “Hard Disk Management” page and “Delete Disk Forcedly” reset “Deleted Disk” status from a slot. Please visit those two pages and select slots with “Deleted Disk” status. Then click to reset the selected slots. Finally, the status of the slot is ”Non-Initial”. In Fig. 28, Slot 16 had been forcedly deleted so the status of Slot 16 is ”Deleted Disk”. Administrator should select it and click to reset Slot 16. 22 Copyright © 2010 Signo International B.V. Fig. 28 Reset Deleted Disk Status Fig. 28 Description: The forcedly deleted disk Reset selected “Deleted Disk” into “Empty” 4.2.3. Display Detial Information of HDD Enable Detail Information at of Fig. 29, move your mouse cursor to a row of the HDD list and then click the row. The detail information of the HDD is displayed under the row. The detail information lists the RAID volumes, which include the HDD. The columns of the list are described in Fig. 40 and Fig. 41. Fig. 29 Detail Information of a Disk Fig. 29 Description: Enable showing some detail information of a HDD. After clicking a row of a HDD, the background color of the row is changed from white to 23 Copyright © 2010 Signo International B.V. orange. A new sub-table is inserted under the row and displays some RAID volumes, which use the HDD. The table under the clicked row shows some RAID volumes, which use the HDD in the row. 4.3. RAID System The RAID system of the iSCSI Storage gathers HDDs configured in this storage to create some kinds of RAID volumes for some purposes. RAID levels offered by this storage are described in following Table 2. RAID Level RAID 0 RAID 1 Description Purpose: Gather some HDDs to be a big and fast RAID volume. Storing data to a RAID 0 volume, the data is parallel stored by the participant HDDs. Reading data from the RAID 0 Volume, the data is parallel read from these HDDs. Therefore, the IO performance of RAID 0 is better than that of other RAID level. Amount of HDDs: Minimum – 2 HDDs Maximum – 8 HDDs Advantage: 1. Better capacity efficiency 2. High IO Speed Disadvantage: 1. No data protected ability. A RAID 0 volume has broken because one of the participant HDDs has broken. All of data in the RAID 0 volume is lost. Purpose: Using 2 HDDs creates RAID 1 volume for protecting data. Data is stored in one of the two HDDs and a copy of the data is stored in another one HDD simultaneously. Amount of HDDs: 2 HDDs Advantage: 1. Protect Data Disadvantage: 1. Pool Performance. 24 Capacity S D N S:Capacity of RAID 0 volume D:The capacity, offered by each participant HDD. N:amount of participant HDD S=D S:Capacity of RAID 1 volume D:The capacity, offered by each participant HDD. Remark RAID 0 volume is good for some applications, which need high throughput, but the data is not important. RAID 1 volume is popular in small storages. Big storages usually employ RAID 5 volumes for protecting data. Copyright © 2010 Signo International B.V. RAID 10 RAID 5 + Purpose: Combining some RAID 1 volume into a RAID 0 volume can improve performance of RAID volume. Usually, RAID 10 combines two RAID 1 volumes into a RAID 0 volume, including 4 HDDs. RAID technology can combine many RAID 0 volumes into a RAID 0 volume. The kind of RAID 10 is called RAID 10+. Amount of HDDs: Minimum – 4 HDDs Maximum – Even Amount of HDD Advantage: 1. Protect Data 2. Improve performance of RAID 1 3. Save CPU power Disadvantage: 1. The performance of RAID 10+ is half of RAID 0. Purpose: RAID 5 volumes protect data and provide high IO throughput. There is no data loss when one participant HDD crashes. Amount of HDDs: Minimum – 3 HDDs Maximum – 8 HDDs Advice: Building a RAID 5 volume on 8 HDDs has better performance. For example, an iSCSI Storage has 16 HDDs. The performance of building one RAID 5 volume on 1~8 HDDs and another RAID 5 volume on 9~16 HDDs is better than that of building a RAID 5 volume on 1~16 HDDs. Advantage: 1. Protect Data 2. Good Performance Disadvantage: 1. Need more CPU power than RAID 1 and RAID 10+. 2. Need more memory 25 S D N 2 + S:Capacity of RAID 10 volume D:The capacity, offered by each participant HDD. N:amount of participant HDD RAID 10+ can protect data in crashing of one participant HDD. If two participant HDDs crashed, the two HDD must be in two different RAID 1 volumes respectively. S D N 1 S:Capacity of RAID 5 volume D:The capacity, offered by each participant HDD. N:amount of participant HDD Copyright © 2010 Signo International B.V. RAID 6 JBOD Single Disk Purpose: RAID 6 volumes protect data and provide high IO throughput. There is no data loss when two participant HDDs crash. Amount of HDDs: Minimum – 4 HDDs Maximum – 8 HDDs Advice: Building a RAID 6 volume on 8 HDDs has better performance. For example, an iSCSI Storage has 16 HDDs. The performance of building one RAID 6 volume on 1~8 HDDs and another RAID 6 volume on 9~16 HDDs is better than that of building a RAID 6 volume on 1~16 HDDs. Advantage: 1. Protect Data when two HDDs crashes Disadvantage: 1. Need more CPU power than RAID 5, RAID 1 and RAID 10+. 2. Need more memory Purpose: Combine free spaces of every HDD in to a huge RAID volume, but files are sequentially stored on the HDDs. Amount of HDDs: Minimum – 2 HDDs Maximum – 8 HDDs Advantage: Improve space efficient. Disadvantage: 1. No data protection. 2. Poor Performance S D N 2 S:Capacity of RAID 6 volume D:The capacity, offered by each participant HDD. N:amount of participant HDD S D1 D2 DN S : Capacity of JBOD volume Dx :the free spaces are offered by every participant HDDs. ( Sizes of these free spaces may be different each other. N:amount of participant HDD Purpose: SD A HDD is a RAID volume. S:Capacity of single disk Amount of HDDs: volume A HDDs D:The capacity of the Advantage: HDD 1. Low computing power Disadvantage: 1. No data protection. 2. Poor Performance in a single user. Table 2 Description of RAID levels provided by this iSCSI Storage iSCSI service cannot directly use capacities of HDDs before building RAID volumes. New HDDs must be “Ready” state. The RAID system RAIDs these initialized HDDs into some RAID volumes. iSCSI service can build some iSCSI LUNs on the RAID volumes. 4.3.1. Create New RAID Volumes Administrator can create RAID volume on “Ready” HDDs. Please open “RAID Management” in left function menu and select “Create/Delete”, like Fig. 30. Following the under steps creates a new RAID volume. 26 Copyright © 2010 Signo International B.V. Step 1 – Execute RAID Creation Wizard Click in Fig. 30 . RAID Creation Wizard is operated, like Fig. 31. Fig. 30 RAID Management Page Fig. 30 Description: Enable showing some detail information of a RAID volume. Enable the function of disk indication light. This function helps administrator to find out some HDDs in a RAID volume. After enabling it, administrator clicks a row of RAID volume. Some error LEDs (Red Light) on HDD tray are going to glitter. These HDDs in glittering red LEDs are used in the clicked RAID. List existed RAID volumes, including ordinary RAID volumes, initiating RAID volumes, degraded RAID volumes and crashed RAID volumes. Rescan RAID volume information Go to the page for creating iSCSI LUNs Begin to create a RAID volume through RAID creating wizard. Such wizard guides administrator to create a RAID volume step by step. Remove the selected RAID volumes. Step 2 – Name the creating RAID volume Please use an understandable and unique string to name this new RAID volume. Administrator needs the recognized name for management and assigning space to iSCSI LUNs in the future. Step 3 – Choose RAID Level This iSCSI Storage provides many RAID levels for varied purposes. Administrator must clearly understand the features of RAID levels according to Table 2. After decided RAID level of the new RAID volume, this wizard forces administrator to select enough amount of HDDs in Step 5. 27 Copyright © 2010 Signo International B.V. Fig. 31 Create RAID Wizard – RAID Name, RAID Level and Disks of RAID Fig. 31 Description: Name the RAID volume by an understandable and unique string. Choose RAID Level, such as 0, 1, 10+, 5 , 6, JBOD, Single Disk. Decide how to initialize this RAID volume. Select all of available HDD to participate the RAID volume. These HDDs must been initiated and have free space (free space >0). Select a HDD to participate in the RAID volume. Available HDD list Step 4 – Choose Initialization Mode If administrator selected one of RAID 1, 10+, 5, 6 in Step 3, the wizard asks administrator to decide how to initialize this RAID volume. There are three initialization modes supported by this iSCSI Storage, as shown in follows: 1. Full Initialization Full Initialization would scan and clean all sectors of HDD, participated in the RAID volume. When the storage is initializing the RAID volume, administrator cannot create iSCSI LUNs. After finishing the initialization, administrator would create iSCSI LUNs for targets. Full Initialization can find out problems of HDDs before the RAID volume is used so it can avoid some risks of data protection. For data protection issues, we strongly suggest administrator do Full Initialization for creating a RAID volume. 2. Background Initialization Background Initialization also scans and cleans all sectors of HDD, participated in the RAID volume. However, administrator can create iSCSI LUNs and use them during initializing the RAID volume. It is an eclectic solution between efficiency issues and data protection issues. 3. Non-initialization Non-initialization does nothing in creating a RAID volume. When administrator finished RAID Creating Wizard, he can create iSCSI LUNs and use them immediately. However, non-initialization process does not scan all sectors of HDD. There are a few risks about data protections. 28 Copyright © 2010 Signo International B.V. Step 5 – Select HDDs According to the RAID level, decided in step 3, the wizard wait administrator selecting enough and correct amount of HDDs. If the amount of HDDs is insufficient and incorrect, becomes and administrator cannot do the next step. For example, in Fig. 32, administrator chooses RAID 5 (need 3 HDDs at least) but he/she just selects 2 HDDs. So is disabled. In Fig. 33, administrator selects over 2 HDDs for the RAID 5 volume so is enabled. Fig. 32 Amount of HDD is not enough to create a RAID 5 volume Fig. 32 Description: Choose RAID 5 level, which needs 3 HDDs at least. 2 HDDs are selected. The new RAID 5 volume cannot be created on the two HDDs so is disabled. Fig. 33 Select enough amount of disks 29 Copyright © 2010 Signo International B.V. Fig. 33 Description: Choose RAID 5 level, which needs 3 HDDs at least. 15 HDDs are selected. The new RAID 5 volume can be created on the 15 HDDs so is enabled. Step 6 – Choose Chunk Size Decide chunk size of the new RAID volume. This iSCSI Storage provides two kind of chunk size as shown in following: 64K Byte :Good for smaller files storage, Database and highly random IO. 128K Byte:Good for bigger files storage and sequential IO. Step 7 – Decide Capacity of the new RAID volume The capacity of the new RAID volume is computed by RAID Creation Wizard, according to the selected RAID level, the amount of selected HDD, the minimum free size among the selected HDDs. Each participant HDD offers minimum 1GB. In Fig. 34, there are 7 HDDs participated the RAID 5 volume so the minimum capacity of the RAID 5 volume is 6GB (1GB*(7-1)), where the disappeared 1GB is used for storing XOR data. In Fig. 33, the minimum free space of these 7 HDDs is 521GB so the maximum capacity of the RAID 5 volume is 3,126 GB (521GB*(7-1)). Finally, in Fig. 34, the maximum capacity is 3,126 GB and the minimum capacity is 6GB. Administrator can choose a capacity between 3,126 GB and 6GB. Moreover, if administrator chooses 3,126 GB for the RAID 5 volume, the free space of the 7 HDDs is 0GB. Hence, the HDDs without free space cannot participate in any RAID volume later. Fig. 34 Decide Chunk size and Capacity of the new RAID volume Fig. 34 Description: Select chunk size of the new RAID volume. The amount of selected HDD Each of selected HDD offers the capacity to the RAID volume. Decide capacity of the new RAID volume by drawing the scroll. For example, in Fig. 34, there are 8 HDDs in the new RAID 5 volume. The capacity must be multiple of 6 GB (1GB * 30 Copyright © 2010 Signo International B.V. (7-1)). If administrator wants to precise configure the capacity of the volume, administrator can click bottoms at the two ends of the scroll. Click can decrease 6 GB. Click can increase 6 GB. The capacity of the new RAID volume. Step 8 – Configure Spare Disk This iSCSI storage provides hot-spare function in RAID 1, RAID 10+, RAID 5 and RAID 6 and. Moreover, a RAID volume can be assigned over one spare HDD. Spare HDDs can immediately and automatically rebuild the fail HDD before administrator becomes aware of degraded RAID volumes. At of Fig. 35, if any HDD can be assigned to the new RAID volume, this field is enabled. When administrator select “yes”, the of Fig. 35 is enabled. Administrator should choose a HDD at least. Fig. 35 Configure Spare Disk Fig. 35 Description: Choose “Yes” and then is enabled. You can assign these HDDs in the RAID volume. Step 9 – Verify Setting of The New RAID volume Verify the setting of the new RAID volume after configuring spare HDDs. In Fig. 36 illustrate all your settings of the new RAID volume. Step 10 – Confirm Click to begin initiating the new RAID volume. 31 Copyright © 2010 Signo International B.V. Fig. 36 The Setting of the New RAID Volume Fig. 36 Description: The RAID level of the New RAID volume The RAID name of the New RAID volume The participant HDD of the New RAID volume The Spare HDDs of the New RAID volume The Capacity of the New RAID Volume After Step 10, the iSCSI Storage begin to initiate the new RAID volume immediately. Looking at RAID volume list at RAID Management, a new RAID volume record is shown in the list. The RAID status field of the record is “Initializing” and the following field, “Progress”, denotes the finishing percentage. For example, in Fig. 37, TestRAID 5 is the new RAID volume and RAID system is initializing this RAID volume. When the progress field becomes 100%, the RAID volume is ready. Moreover, RAID system spends very short time initializing RAID 0, Single Disk and JBOD. Usually, you click of Step 9 and the wizard leaves. You are going to find out a ready RAID volume, created by the wizard. RAID system spends a lot of time initializing RAID 1, RAID 10+, RAID 5 and RAID 6. 32 Copyright © 2010 Signo International B.V. Fig. 37 A RAID is initiating Fig. 37 Description: Enable Detail Information TestRAID5_2 is a new RAID volume. RAID system is initiating TestRAID5_2 so RAID status field of TestRAID5_2 is “Initializing”. The initiated percentage of TestRAID5_2 In initializing RAID volumes, administrator can click to enable Detail Information. Such information includes initiated percentages of initializing disks, for example, Fig. 38 illustrates initiated percentages of disks. You can find out the descriptions about RAID Detail information at section 4.3.1.2。 The section describes the means of the columns. Fig. 38 The detail information of initializing RAID volume Fig. 38 Description: The initializing RAID volume The detail information of initializing RAID volume illustrates the initializing progresses of 33 Copyright © 2010 Signo International B.V. HDDs, participated in the RAID volume. The activity of HDD The initialized percentages of HDDs After initialized the new RAID volume, RAID status field of the volume shows “Ready” and the Progress field becomes empty. Administrator can create new iSCSI LUNs in such RAID volume now. Additionally, you can enable Detail Information to observe each HDD status. You can see that all HDD become “Ready”. Fig. 39 The initialized process is finished. Fig. 39 Description: RAID volume is ready to serve users when the status of the RAID volume is “Ready”. The progress bar is empty when the RAID volume is “Ready”. Each HDD is “Ready”. Fig. 40 The field descriptions of RAID volume table -1 Fig. 41 The field descriptions of RAID volume table -2 4.3.1.1. Field Descriptions of RAID Volume List RAID Volume List lists all RAID volumes, built in the iSCSI Storage. Fig. 40 and Fig. 41 illustrate fields of the list. The fields are described as follow: Select Select fields are used for deleting RAID volume. You can select multiple RAID volumes and click to remove them. RAID Name The unique name of RAID volume, this name should be a meaningful English string. 34 Copyright © 2010 Signo International B.V. RAID Level RAID level, meaning RAID volume level, denotes the RAID‟s working algorithm. Table 2 illustrates the features of RAID level. Size (GB) This field shows the capacity of RAID volume. RAID Status RAID Status field denotes status of a RAID volume. Table 3 shows all statuses of RAID volume. Administrator can quickly understand conditions of RAID volumes and do right operations when a RAID volume fails. Especially, some RAID 1, 10+, 5, 6 volumes are in “Degraded” situations. Administrator immediately has to replace crashed HDD with a new one. Administrator can find out the crashed HDD throughput visiting “Hard Disk Management” page and “Disk Status” page. RAID Status Description Ready RAID Initializing The RAID volume is normal and working. This iSCSI storage is initializing the RAID volume. Administrator can know the rate of progress by observing “Progress” field. The RAID volume fails in the initializing process. Administrator should delete the RAID volume and build a new one. Some participated HDD of RAID volumes have troubles. These RAID volumes are degraded and recoverable by replacing trouble HDDs with normal HDDs. This RAID volume is rebuilding by this iSCSI Storage. Administrator can observe the “Progress” field to know the rate of recovering progress. This RAID volume is crashed and not recoverable. Table 3 RAID Volume Status List RAID Initiate Fail Degrade Recovering Crash Progress Illustrate the rate of initializing progress or rebuilding progress when this iSCSI Storage is initializing or rebuilding the RAID volume. The field is empty when the RAID volume is “Ready” and “ Crash”. RAID ID RAID ID is an unique S/N of RAID volume in this iSCSI Storage. It is important for Mass Entry Function. Administrator should write an Excel file with a table. Such table has to include 5 columns, User Name, Target Name, LUN Name, LUN Size and RAID ID. Where the RAID ID denotes the RAID volume, where the LUN builds in. Groups This field is just for RAID 10+ volumes, which support Multi-group function. Please reference Table 2 to understand Multi-group function of RAID volume. Chunk Size (KB) Denote the Chunk Size of RAID volume. Blocks Denote the number of block, included in the RAID volume. Block Size (Byte) Denote the size of Block in the RAID volume. This value is usually 512 bytes. Unit Size (MB) Denote the unit size of RAID volume. This value is usually 1,024 MB. It means that the capacity of RAID volume must be a multiple of 1024MB. Adding Time Denote the built time of RAID volume. Update Time Denote the last updated time of RAID volume. 35 Copyright © 2010 Signo International B.V. 4.3.1.2. Detail Information of RAID Volume Select “Enable Detail Information” and left-click a RAID volume record in RAID volume list by mouse. RAID volume list shows the detail information under the RAID volume record, such as of Fig. 42, where is HDD information of the RAID volume. Fig. 42 The detail information of a RAID volume Fig. 42 Description: Enable illustrating detail information of RAID volumes. Click a RAID volume for illustrating the detail information. The detail information table of the RAID volume The detail information is in of Fig. 42. The follows are the descriptions of columns. Group ID Denote the Group IDs of groups in the RAID volume. Table 4 shows the grouping rules of different levels. RAID Level Grouping Rule RAID 0 RAID 1 RAID 10+ Only one group. Only one group and the group includes 2 HDDs. 2 Groups at least and each group includes 2 HDDs. Because this iSCSI Storage has RAID 10 + function, a RAID 10+ volume may have > 2 groups. Only one group. Only one group. Only one group. Only one group. Table 4 The Group Rules of RAID Level RAID 5 RAID 6 Single Disk JBOD Slot This iSCSI Storage has 16 SAS / SATA slots. The storage identifies the slot by number 1~8, as shown in Fig. 26. This field denotes the physical location of HDDs. Disk Status Denote the current HDD status. Please reference Table 1 to understand all conditions of HDDs。 Activity 36 Copyright © 2010 Signo International B.V. Denote the current activity of a HDD. There are two possible activities in this field, Initializing and Recovering. Progress This field shows progress bar for denoting the rate of progress when this HDD is being Initialized and Recovered. Hot Spare Denote a HDD whether this HDD is a spare HDD or not. Hot Spare Description No Yes This HDD is not a Spare HDD of the RAID volume. This HDD is a Spare HDD of the RAID volume. Table 5 Spare HDD Flag Disk ID The unique S/N in this iSCSI Storage denotes an initialized HDD. Administrator must initialize HDDs, used in this iSCSI Storage. The Storage gives every initialized HDD a unique and non-zero S/N. if a HDD‟s Disk ID is 0, the HDD must be a non-initialized HDD. Fig. 43 The detail information of an initializing RAID volume Fig. 43 Description: Enable illustrating detail information of a RAID volume. The initializing progress percentage of the clicked RAID volume The initializing progress percentages of every HD, participated in the initializing RAID volume This iSCSI Storage supports iSCSI Disk Virtualization function. The storage can divide a RAID volume into many iSCSI LUNs. Hence, A RAID volume‟s detail information illustrates which iSCSI LUNs are in the RAID volume. In Fig. 44, the LUN table shows all iSCSI LUNs, created in the RAID volume. The follows are the descriptions of every column. LUN Name LUN Name, named by Administrator, is a unique name. Please give every iSCSI LUNs meaningful names for easily managing in the future. LUN Alias 37 Copyright © 2010 Signo International B.V. LUN Alias Name, named by the LUN‟s owner, is not a unique name. A User gives the user‟s iSCSI LUN a meaningful name for showing purposes of the iSCSI LUN. LUN ID LUN ID is a unique number of iSCSI LUN. Description Administrator should use a string to describe an iSCSI LUN for future managements. Size The size of iSCSI LUN. Status Denote whether an iSCSI LUN is enabled or not. If the value is “Enable”, the iSCSI LUN is available for its owner. Else, the iSCSI LUN is not available. Target Name Denote an iSCSI Target, which holds the iSCSI LUN. Target ID Denote an iSCSI Target, which holds the iSCSI LUN. Fig. 44 LUN table in the RAID detail information 4.3.2. Delete RAID Volumes Steps: (1) Go to “Create/Delete” Page, as shown in Fig. 45 (2) Select iSCSI LUNs. (3) Click 38 Copyright © 2010 Signo International B.V. Fig. 45 Delete a RAID volume Fig. 45 Description: Select a RAID volume Click to delete the selected RAID volume 4.3.3. Configure Spare HDD Steps of Adding Spare HDD: (1) Go to “Spare Drives” Page (2) Select a RAID 1, RAID 10+, RAID 5 or RAID 6 volume in the existed RAID volume list at Right-top Field, as shown in Fig. 46 . (3) Select unselected HDDs in the HDD list at Right-bottom Field, as shown in Fig. 46 (4) Click Steps of Removing Spare HDD: (1) Go to “Spare Drives” Page (2) Select a RAID 1, RAID 10+, RAID 5 or RAID 6 volume in the existed RAID volume list at Right-top Field, as shown in Fig. 46 . (3) Select selected HDDs in the HDD list at Right-bottom Field, as shown in Fig. 46 (4) Click 39 Copyright © 2010 Signo International B.V. Fig. 46 Configure spare disks for existing RAID volumes Fig. 46 Description: This table illustrates existed RAID volumes, which are built by RAID 5, RAID 6. You can click one RAID volume and then the lower table shows which HDDs are the RAID volume‟s spare HDDs and which HDDs can be the RAID volume‟s spare HDDs. The selected HDDs are spare HDDs of the RAID volume. The unselected HDDs can be the RAID volume‟s spare HDDs. 4.3.4. Rebuild RAID Volumes This iSCSI Storage provides two Rebuild RAID Volume processes, as shown in follows: 1. Auto-Rebuild: (1) Enable RAID Auto-Recovery in System Setting Page (2) Remove crashed HDD from the slot (3) Plug a new HDD in the slot. The capacity of the new HDD must be larger than or equal to that of the crashed one. (4) The iSCSI Storage will rebuild all rebuildable RAID volumes. 2. Manual Rebuild: (1) Disable RAID Auto-Recovery in System Setting Page (2) Select a Degrade RAID volume and Enable Detail Information (3) Find out the crashed HDD, as shown in Fig. 47 (4) Remove the crashed HDD from the slot (5) Plug a new HDD in the slot (6) Initial the new HDD by “Disk Management” Page, as shown in (7) Go to “Rebuild” page (8) Select Recover by RAID. Go to step (9) (9) Select Recover by Disk. Go to step (12) (10) Select a degraded RAID volume in the top field, as shown in Fig. 47 . (11) Select a HDD in the bottom field, as shown in Fig. 47 . (12) Click to begin recovering the RAID volume. (13) Select a HDD in the top field, as shown in Fig. 49 . (14) Select a degraded RAID volume in the bottom field, as shown in Fig. 49 (15) Click to begin recovering the RAID volume. 40 . Copyright © 2010 Signo International B.V. Fig. 47 Find Crash HDD Fig. 47 Description: Enable to show Detail Information Click the raw of RAID volume Detail Information The Crash Disk Fig. 48 Recover by RAID Fig. 48 Description: Select a degraded RAID volume and RAID System shows which HDD can recover the RAID volume. Degraded RAID volume Such HDDs can recover the selected RAID volume. 41 Copyright © 2010 Signo International B.V. Fig. 49 Recover by Disk Fig. 49 Description: List all HDDs in this iSCSI Storage. Please select one. List degraded RAID volumes, which are recoverable by the HDD, selected in . 4.4. Mass-entry Users、iSCSI Targets、iSCSI LUNs Steps of Mass-entry: (1) Download Mass-entry template file from Fig. 50 . (2) Edit the template file. (3) Upload the template file to the iSCSI storage. (4) Click to create users, iSCSI Targets and iSCSI LUNs. 42 Copyright © 2010 Signo International B.V. Fig. 50 Mass entry Users, iSCSI Targets and iSCSI LUNs Fig. 50 Description: Download template file from an iSCSI storage. Upload mass-entry file to the iSCSI storage. Click to mass-entry. Description of Mass-entry file: (1) Open the template file by Excel. (2) Please do not edit the first raw of the template file. (3) Field – UserName: this field denotes the iSCSI target‟s owner. If the UserName is existed in the iSCSI Storage, the storage does nothing. Else, the storage is going to create the username. (4) Field – TargetName: this field denotes the iSCSI LUN‟s holder. If the TargetName is existed in the iSCSI Storage, the storage does nothing. Else, the storage is going to create the iSCSI Target and assign the new target to the username. (5) Field – LUNName: the field denotes the name of new iSCSI LUN. The name must be unique. (6) Field – LUNSize: the field denotes the capacity of iSCSI LUN. (7) Field – RAID ID: the field denotes a RAID volume in the iSCSI storage. The new iSCSI LUN will be built on the RAID volume. Fig. 51 The template file for mass-entry function. Fig. 51 Description: Do not edit this field Mass-entry records 4.5. iSCSI Management 4.5.1. LUN Configuration 4.5.1.1. Create iSCSI LUNs Steps of creating an iSCSI LUN: (1) Go to “LUN Setting” Page (2) Select a RAID volume. Please ensure the free space of the RAID volume is enough for creating a new iSCSI LUN. (3) Name the new iSCSI LUN. (4) Describe the new iSCSI LUN (Optional) 43 Copyright © 2010 Signo International B.V. (5) Decide the Size of the iSCSI LUN (6) Click Fig. 52Create an iSCSI LUN Fig. 52 Description: RAID Volume List Name of new iSCSI LUN Description of iSCSI LUN LUN Type Size of the new iSCSI LUN Go to Create/Delete RAID page Rescan the existed RAID volumes 4.5.1.2. Modify iSCSI LUNs Steps of modifying an iSCSI LUN (1) Go to “LUN Setting” Page (2) Then, go to “LUN Information” Page (3) Select an existed iSCSI LUN from the iSCSI LUN list. (4) Click button (5) Edit LUNName (optional) (6) Edit Description (optional) (7) Extend Size of the iSCSI LUN (optional) (8) Click 44 Copyright © 2010 Signo International B.V. Fig. 53 Edit an existed iSCSI LUN Fig. 53 Description: Select an iSCSI LUN and click Edit iSCSI LUN Name Edit iSCSI LUN Description Extend the size of iSCSI LUN . fields become editable. 4.5.1.3. Delete iSCSI LUNs Steps of deleting an iSCSI LUN (1) Go to “LUN Setting” Page (2) Then, go to “LUN Information” Page (3) Select an existed iSCSI LUN from the iSCSI LUN list. (4) Click button Fig. 54 Delete iSCSI LUNs. 45 Copyright © 2010 Signo International B.V. Fig. 54 Description: Select an iSCSI LUN Click 4.5.2. Target Configuration 4.5.2.1. Create New iSCSI Targets Steps of creating a new iSCSI Target: (1) Go to “Target Setting” page. (2) Type a new target name in Fig. 55 . (3) Decide “Target Type” in Fig. 55 . (4) Describe the new iSCSI Target in Fig. 55 . (optional) (5) Decide the owner of the new iSCSI Target in Fig. 55 and (6) Click . (optional) Fig. 55 Create a New iSCSI Target Fig. 55 Description: Existed iSCSI Target Target Name of new iSCSI Target The full name of the iSCSI Target Target type Description of the new iSCSI Target Does you assign owner to the new iSCSI Target now? The list of existed users Connect to “User Management” page 4.5.2.2. Assign LUNs to iSCSI Targets Steps of assigning LUNs to iSCSI targets: (1) Go to “Target Setting” Page (2) Go to “Assign LUN” Page (3) Select an iSCSI Target from existed iSCSI Target List, as shown in Fig. 56 46 . Copyright © 2010 Signo International B.V. (4) Select an iSCSI LUN in Fig. 56 (5) Click (6) Click . Fig. 56 Assign iSCSI LUN to iSCSI Targets Fig. 56 Description: Existed iSCSI Targets An iSCSI Target‟s iSCSI LUNs Assign the selected iSCSI LUN in Fig. 56 Remove the selected iSCSI LUN in Fig. 56 Go to “LUN Setting” page. The list of free iSCSI LUNs. to the selected iSCSI target. from the selected iSCSI target. 4.5.2.3. Delete Target Steps of deleting iSCSI targets: (1) Go to “Target Setting” Page (2) Go to “Delete Target” Page (3) Select an iSCSI Target in Fig. 57 (4) Click . 47 Copyright © 2010 Signo International B.V. Fig. 57 Delete Target Fig. 57 Description: Existed iSCSI Target List 4.6. User and Group Management 4.6.1. User Setting 4.6.1.1. Create New Users Steps of creating a new user: (1) Go to “User Setting” page (2) Go to “Create User” (3) Input the username, which has to be a unique username. (4) Decide the privilege of new user. (5) Describe the new user by a short string (6) Click 48 Copyright © 2010 Signo International B.V. Fig. 58 Create a new user Fig. 58 Description: Existed user list The username of new user Default Password = “000000000000” (twelve 0) The Privilege of new user, “General” or “Administrator” The Description of new user 4.6.1.2. Assign Targets to Users Steps of assigning targets to users: (1) Go to “ User Setting” Page (2) Go to “Assign Target” Page (3) Select a user in Fig. 59 . (4) Select a free iSCSI Target in Fig. 59 (5) Click (6) Click Steps of removing targets from users: (1) Go to “ User Setting” Page (2) Go to “Assign Target” Page (3) Select a user in Fig. 59 . (4) Select a held iSCSI Target in Fig. 59 (5) Click (6) Click . . 49 Copyright © 2010 Signo International B.V. Fig. 59 Assing targets to users Fig. 59 Description: Existed users The held iSCSI Targets of the selected user Assign a selected iSCSI Target, listed in Fig. 59 , to the user Remove a selected iSCSI Target, listed in Fig. 59 , from the user Go to “Target Setting” Page The free iSCSI Targets in this iSCSI Storage. 4.6.1.3. Modify User Information Steps of modifying user information: (1) Go to “User Setting” page (2) Go to “Modify User” page (3) Modify user‟s privilege (optional) (4) Reset password when the user forgets his/her password (optional) (5) Modify user‟s description (optional) 50 Copyright © 2010 Signo International B.V. Fig. 60 Modify User Information Fig. 60 Description: Existed users Username, but you cannot modify it. User‟s privilege Reset user‟s password beck to 000000000000 (twelve 0) Modify user‟s description 4.6.1.4. Enable User and Disable User Steps of enabling and disabling users: (1) Go to “User Setting” Page (2) Go to “Active User” Page (3) Select a user in Fig. 61 (4) Activate or deactivate the user at Fig. 61 51 Copyright © 2010 Signo International B.V. Fig. 61 Activate and Deactivate users Fig. 61 Description: The existed user list The selected user Activate or deactivate a user 4.6.1.5. Delete Users Steps of deleting users: (1) Go to “User Setting” page (2) Go to “Delete User” page (3) Select user accounts, which you want to delete (4) Click Fig. 62 Delete users Fig. 62 Description: 52 Copyright © 2010 Signo International B.V. The existed user list The detail and selectable existed user list The selected user 4.6.1.6. Unlock Users A user account is locked because the user uses some wrong passwords to login the management system for 4 times. Administrator can unlock the account by following steps: (1) Go to “User Setting” Page (2) Go to “Password Security” Page (3) Select “Locked” users (4) Click Fig. 63 Unlock the locked users Fig. 63 Description: The locked users The normal users Unlock the selected locked users 4.6.2. Group Setting 4.6.2.1. Create a New Group Steps of creating new groups: (1) Go to “Group Setting” page (2) Go to “Create Group” page (3) Enter a name of new group (4) Describe the new group by a string (optional) (5) Click 53 Copyright © 2010 Signo International B.V. Fig. 64 Create new groups Fig. 64 Description: The existed group list New group name The description to describe the new group 4.6.2.2. Assign Users Steps of assigning users to a group: (1) Go to “Group Setting” page (2) Go to “Assign User” page (3) Select a group in Fig. 65 . (4) Select a user in Fig. 65 . (5) Click (6) Click Steps of removing users from a group: (1) Go to “Group Setting” Page (2) Go to “Assign User” Page (3) Select a group in Fig. 65 . (4) Select a user in Fig. 65 . (5) Click (6) Click 54 Copyright © 2010 Signo International B.V. Fig. 65 Assign users to a group Fig. 65 Description: The existed groups list The users, who are members of the selected group Assign a selected user in to the selected group Remove a selected user in from the selected group Go to “Create user” page The users, who are not members of the selected group 4.6.2.3. Assign Shared Targets Steps of assigning shared targets to a group: (1) Go to “Group Setting” page (2) Go to “Assign Target” page (3) Select a group in Fig. 66 . (4) Select shared targets in Fig. 66 . (5) Click (6) Click Steps of removing shared targets from a group: (1) Go to “Group Setting” Page (2) Go to “Assign Target” Page (3) Select a group in Fig. 66 . (4) Select shared targets in Fig. 66 . (5) Click (6) Click 55 Copyright © 2010 Signo International B.V. Fig. 66 Assign shared targets to groups Fig. 66 Description: The existed groups list The shared targets, which are held by the selected group Assign a selected shared target in to the selected group Remove a selected shared target in from the selected group Go to “Create Target” page The shared targets, which are not held by the selected group 4.6.2.4. Delete Groups Steps of deleting groups: (1) Go to “Group Setting” page (2) Go to “Delete Group” page (3) Select groups, which you want to delete (4) Click 56 Copyright © 2010 Signo International B.V. Fig. 67 Delete groups Fig. 67 Description: The existed group list The selected group The selectable existed group list 4.7. System Management 4.7.1. Modify Admin Password Steps of modifying Admin password: (1) Go to “ Administrator Password” Page (2) Enter the old admin password (3) Enter the new admin password (4) Enter the new admin password again (5) Click 57 Copyright © 2010 Signo International B.V. Fig. 68 Modify Admin‟s password Fig. 68 Description: Enter the old password Enter the new password Enter the new password again 4.7.2. Modify Storage Name Steps of modifying storage name and description: (1) Go to “Storage Name” Page (2) Modify the storage name field (3) Modify the description of storage\ (4) Click Fig. 69 Modify storage name and description 58 Copyright © 2010 Signo International B.V. Fig. 69 Description: Modify the storage name Modify the description of storage 4.7.3. Modify Maximum Connections Steps of modifying maximum connections: (1) Go to “Maximum Connections” Page (2) Modify the amount of maximum iSCSI connection (3) Click Fig. 70 Modify the maximum iSCSI connections Fig. 70 Description: Setup the amount of iSCSI connection 4.7.4. Modify IP Addresses Steps of modifying IP addresses: (1) Go to “ IP Address” Page (2) Select a network interface (NIC 1~NIC6) (3) Enable VLAN (optional) (4) Setup VLAN ID (optional) (5) Configure IPv4 IP address, go to (7) (6) Configure IPv6 IP address, go to (9) (7) Configure IPv4 Network Mask (8) Configure IPv4 Gateway (9) Setup Jumbo Frame (optional) (10) Configure IPv4 External IP (optional) (11) Configure External Port (optional) (12) Select “DNS” page (optional) (13) Configure DNS (optional) 59 Copyright © 2010 Signo International B.V. Fig. 71 Modify IP addresses Fig. 71 Description: The list of Ethernet interfaces Enable trunking function of Ethernet interfaces Enable VLAN function Configure VLAN ID IPv4 Configuration and IPv6 Configuration Jumbo frame configuration Configure External IP if your iSCSI storage is into a private network segment. Steps of configuring trunk network: (1) Go to “ IP Address” Page (2) Enable Network port trunking (3) Select “Bound 1” (4) Choose “Port Trunking Mode” (5) Configure IPv4 IP address (6) Configure IPv4 Mask (7) Configure IPv4 Gateway (8) Configure IPv4 External IP address (optional) (9) Configure External Port (optional) (10) Select “DNS” page (optional) (11) Configure DNS (optional) 60 Copyright © 2010 Signo International B.V. Fig. 72 Configure Network Trunk Fig. 72 Description: Enable Network port trunk Trunked network interface: Bound 1 Choose trunking mode 4.7.5. Time Zone, Date and Time of iSCSI storage Steps of configure Time Zone, Date and Time: (1) Go to “ System Clock” Page (2) Setup Time Zone (3) Setup Date (4) Setup Time (5) Click Fig. 73 Setup Time Zone, Date and Time Fig. 73 Description: Illustrate the Time Zone, Date and Time in the iSCSI Storage Setup Time Zone Setup Date Setup Time 61 Copyright © 2010 Signo International B.V. 4.7.6. Setup Accessible Network Segment Steps of setting up accessible network segment for Administrator and general users: (1) Go to “Login Privilege” Page (2) Modify the accessible network segment for Administrator (3) Modify the accessible network segment for general users (4) Click Fig. 74 Configure Accessible Network Segment of Administrator and general users Fig. 74 Description: Decide where Administrator can login to the iSCSI storage from. Decide where general can login to the iSCSI storage from. 4.7.7. System Notification Steps of configuring System Notification (1) Go to “System Notification” Page (2) Setup SMTP Server‟s IP address or Domain Name (3) Setup SMTP Server‟s Port Number (4) Enable SMTP authentication (optional) (5) User Name of SMTP server (optional) (6) Password of the user at SMTP server (optional) (7) The first Email Address of Administrator (8) The second Email Address of Administrator (optional) (9) Enable SSL/TLS secure connection (optional) (10) Schedule of event notification (11) Send testing Email to Administrator (optional) (12) Click 62 Copyright © 2010 Signo International B.V. Fig. 75 Modify events notification by Email Fig. 75 Description: Email server‟s IP address or Domain Name, where the Email server can send event messages to Administrator‟s Email. SMTP port number Enable SMTP authentication User account at the SMTP server The user account‟s password at the SMTP server The first E-mail address of Administrator The Second E-mail address of Administrator Enable SSL/TLS connection Schedule of event notification Send test mail to the first and second Email address of Administrator after “Confirm” 4.7.8. System Environment Information Steps of configuring system environment information (1) Go to “System Environment Information” page (2) Click High Limit Fields to configure the thresholds of temperatures (3) Enable/Disable temperature monitors (4) Click Low Limit Field to configure the thresholds of Fan speed (5) Enable/Disable temperature monitors (6) Click High Limit Field and Low Limit Field to configure the threshold of voltages (7) Enable/Disable voltage monitors (8) Click 63 Copyright © 2010 Signo International B.V. Fig. 76 Configure system environment information monitor Fig. 76 Description: Decide temperature format Configure temperature thresholds and the monitor Configure Fan speed thresholds and the monitor Configure voltage thresholds and the monitor 4.7.9. UPS Steps of enabling UPS support: (1) Go to “UPS” page (2) Enable UPS support in Fig. 77 (3) Select UPS model in Supported UPS List (4) Decide shutdown delay after AC power down. (5) Click Fig. 77 Configure UPS 64 Copyright © 2010 Signo International B.V. Fig. 77 Description: Enable UPS support Select UPS model Setup the shutdown delay when AC power down 4.7.10. Auto Logout Steps of configuring auto logout function: (1) Go to “Logout Timer” Page (2) Decide auto logout delay (3) Click Fig. 78 Configure auto logout function Fig. 78 Description: Choose auto logout function 4.7.11. Enable/Disable/Reset System Alarm Steps of Configuring system alarm function: (1) Go to “Alarm” Page (2) Enable/Disable system alarm Steps of reset system alarm: (1) Go to “Alarm” Page (2) Click 65 Copyright © 2010 Signo International B.V. Fig. 79 Enable, Disable or Reset System Alarm Fig. 79 Description: Enable System Alarm Disable System Alarm Reset System Alarm when the system buzzer is sounding. 4.7.12. System Setting 4.7.12.1. Flow Control Steps of enabling/disabling Flow Control Function: (1) Go to “System Setting” Page (2) Choose enable or disable flow control function (3) Click 4.7.12.2. Read Ahead Steps of enabling/disabling Read Ahead Function: (1) Go to “System Setting” Page (2) Choose enable or disable Read Ahead function (3) Click 4.7.12.3. Enable/Disable SSH Connection Steps of enabling/disabling SSH Connection: (1) Go to “System Setting” Page (2) Choose enable or disable SSH connection for remote maintenance (3) Click 66 Copyright © 2010 Signo International B.V. 4.7.12.4.Enable/Disable Auto-Recovery The RAID system would automatically and immediately recover all degraded RAID volumes when Administrator replaced the crashed HDD to a new one. Administrator can enable/disable this function by following steps: (1) Go to “System Setting” Page (2) Choose enable or disable RAID Auto-Recovery (3) Click 4.7.12.5. User Password Security Steps of enabling/disabling User Password Security: (4) Go to “System Setting” Page (5) Choose enable or disable User Password Security (6) Choose locking policy (10 minutes, 24 hours, Forever) (7) Click Fig. 80 System Setting 4.8. System Maintenance 4.8.1. Version Information (1) Go to “Version Information” Page (2) Review the version 67 Copyright © 2010 Signo International B.V. Fig. 81 Version information 4.8.2. System Upgrade Steps of upgrading firmware: (1) Go to “Firmware Upgrade” Page (2) Browse upgrade file from your PC, which is running this UI (3) Check version in Fig. 82 and (4) Click Fig. 82 System upgrade Fig. 82 Description: Current firmware version The selected firmware version The path of new firmware file The progress of upgrading firmware 68 Copyright © 2010 Signo International B.V. 4.8.3. System Migration Steps of system migration: (1) Shutdown the old iSCSI storage (2) Remove all HDDs from the old iSCSI storage (3) Please make sure that all HDDs are OK. (4) Plug all HDDs in the new iSCSI storage (5) Boot the new iSCSI storage (6) Go to “System Migration” Page (7) Choose a set of HDDs in Fig. 83 (8) Click Fig. 83 Select a set of HDDs in System Migration Fig. 83 Description: The list of HDD sets The list of HDDs in a HDD set 4.9. AD Setting (Optional) Steps of joining AD server: (1) Go to “AD Setting” page (2) Go to “Setting” page (3) Enable AD in Fig. 84 (4) Click (5) Enter an account with Administrator privilege in the AD server, as shown in Fig. 85 (6) Enter the account‟s password (7) Enter the AD server‟s IP address (8) Click (9) Enter an account with Administrator privilege in the AD server, as shown in Fig. 84 (10) Enter the password of the account in Fig. 84 (11) Click 69 . Copyright © 2010 Signo International B.V. Fig. 84 This iSCSI Storage joins AD server Fig. 84 Description: Enable AD function An account can get account list from AD server The account‟s password This iSCSI Storage joins AD server Fig. 85 Enter account, password and AD server IP Address for joining AD server Fig. 85 Description: Enter an account with Administrator privilege in the AD server Steps of import accounts from an AD server: (1) Go to “AD Setting” page (2) Go to “AD User” page (3) Make sure that the iSCSI storage has joined in the AD server. (4) Go to “AD User” page (5) Click to obtain a user list from the AD server (6) Select users, whom you want to import (7) Click to import the selected users into the iSCSI storage 70 Copyright © 2010 Signo International B.V. Fig. 86 List users from an AD server Fig. 86 Description: The list of users in the AD server List users from the AD server Import the selected users into the iSCSI storage Steps of enable AD authorization for users: (1) Go to “AD Setting” page (2) Go to “Local User” page (3) Select some user without AD authorization (4) Click to enable AD authorization for selected users Steps of disable AD authorization for users: (1) Go to “AD Setting” page (2) Go to “Local User” page (3) Select some user with AD authorization (4) Click to disable AD authorization for selected users Remark: When a user is disabled AD authorization, the user‟s password is reset into “000000000000” (twelve 0). 71 Copyright © 2010 Signo International B.V. Fig. 87 List local users and enable/disable AD authentication Fig. 87 Description: The users without AD authorization The users with AD authorization Enable AD authorization for selected users Disable AD authorization for selected users Remark: when users are authorized by AD server, please use IP SAN Connector to connect the iSCSI storage. 72 Copyright © 2010 Signo International B.V. 5. System Inquiry 5.1. I/O Throughput 5.1.1. Disk I/O Throughput Monitor Steps of monitoring disk I/O throughput: (1) Click “iSCSI Storage Performance” (2) Go to “ Disk I/O” Page (3) Real Time Disk I/O throughput is shown in Fig. 88 . (4) The average Disk I/O throughput is shown in Fig. 88 . Fig. 88 Disk I/O Throughput Fig. 88 Description: Real Time Disk I/O throughput Average Disk I/O throughput Blue=Read throughput, Green=Write throughput, Red=Read+Write throughput 5.1.2. Individual Network Port Throughput Steps of monitoring individual network port throughputs: (1) Click “iSCSI Storage Performance” (2) Go to “ Network - Individual” Page 73 Copyright © 2010 Signo International B.V. Fig. 89 Individual Network Throughput Fig. 89 Description: NIC 1 Network throughput NIC 2 Network throughput Blue=Send (Read) throughput, Green=Receive (Write) throughput, Red=Read+Write throughput 5.1.3. Network Total Throughput Steps of monitoring total network throughput: (1) Click “iSCSI Storage Performance” (2) Go to “ Network - Total” Page (3) Real Time Disk I/O throughput is shown in Fig. 90 . (4) The average Disk I/O throughput is shown in Fig. 90 . Fig. 90 Total Network Throughput 74 Copyright © 2010 Signo International B.V. Fig. 90 Description: Real Time Total Network Throughput Average Total Network Throughput Blue=Send (Read) throughput, Green=Receive (Write) throughput, Red=Read+Write throughput 5.2. Graphical HDD Status Steps of monitoring HDDs by Graphic HDD status: (1) Click “Hard Disk Status” (2) Click a slot and then the LED of the slot will twinkle. The S.M.A.R.T. information of the HDD in the slot is illustrated in Fig. 91 . Steps of shutting down this iSCSI Storage by “Hard Disk Status” page (1) Click “Hard Disk Status” (2) Click (3) Confirm for shutting down this iSCSI Storage Steps of rebooting this iSCSI Storage by “Hard Disk Status” page (4) Click “Hard Disk Status” (5) Click (6) Confirm for rebooting this iSCSI Storage Fig. 91 Graphic HDD Status Fig. 91 Description: Reboot this iSCSI Storage Shutdown this iSCSI Storage Click a slot, then the LED of the slot is going to twinkle and the HDD‟s S.M.A.R.T. is illustrated in Fig. 91 . A slot with a HDD A slot without any HDD S.M.A.R.T. Information or SAS Disk Information 75 Copyright © 2010 Signo International B.V. 5.3. System Environment Information 1. Status Bar Administrator can quick understand system statuses through Status Bar on UI, as shown in Fig. 92. Fig. 92 The graphic system status Icon Function Power supply status Color Status Description Power supply is OK Power supply fails Each RAID volume is OK RAID volume status Some RAID volumes have some troubles. All fans are OK. Fan status, including CPU fan speed and system fan speed. Some fans have troubles. Temperature, including CPU temperature and All temperatures are OK. system temperature. Some temperatures are abnormal. Buzzer status Buzzer is ON. Buzzer is OFF. Network port status This network port is normal. This network port without an IP address. This network port without network cable. Table 6 Graphic System Status Descriptions 2. Inquire System Environment Information Steps of inquire system environment information: (1) Click “System Environment Information” (2) Inquire Motherboard Temperatures, CPU Temperatures, HDD Temperatures, CPU Fan speed, System Fan speed, Voltage and Power Supply. 76 Copyright © 2010 Signo International B.V. Fig. 93 System Environment Information of This iSCSI Storage 5.4. User Information Click “User Information” to show detail user information, as shown in Fig. 94. Fig. 94 The table of user, iSCSI Target, iSCSI LUN and RAID level Descriptions of columns in User Information Table: User Name The existed usernames are in this iSCSI storage. If a username keeps N iSCSI LUNs, the username is presented N times in this table. Target Name The existed iSCSI targets are in this iSCSI storage. If an iSCSI Target keeps N iSCSI LUNs, the iSCSI Target is presented N times in this table. 77 Copyright © 2010 Signo International B.V. LUN Name The existed iSCSI LUN names are in this iSCSI storage. An iSCSI LUN is only presented one time in this table. RAID Name Denote the RAID volume, which provides storage space to the iSCSI LUN. RAID Level Denote the RAID volume‟s level. LUN ID Denote the iSCSI LUN‟s ID number. RAID ID Denote the RAID volume‟s ID number. 5.5. User Online Status Click “User Online Status” to show user online conditions, as shown in Fig. 95. Fig. 95 User Online Status Fig. 95 Description: Online User Offline User User Online Status List Descriptions of columns in User Online Table: User Name List all users in this iSCSI storage. Privilege Denote a user‟s privilege, Normal or Administrator. Online Sataus Online Status Online Offline Description The user is using this iSCSI storage now. The user has not connected to this iSCSI storage yet. Table 7 User Online Status Description 78 Copyright © 2010 Signo International B.V. Last Online Time This column denotes the last online time of the user. Adding Time This column denotes when the user was created. 5.6. System Log This iSCSI Storage provide 6 kinds of event logs as following: 1. Disk Event 2. RAID Event 3. Web Management Event 4. iSCSI Connection Event 5. Miscellaneous Event 6. User Log 5.6.1. Disk Event Disk Event, as shown in Fig. 96, records all activities and conditions of disks. The follows are descriptions of the table‟s columns. Name Name, meaning Event Name, denotes which component generates this event. Event A string describes the event. Time Denote the time when this event happens. Fig. 96 Disk Events 5.6.2. RAID Event RAID Event, as shown in Fig. 97, records all activities and conditions of RAID volumes. The 79 Copyright © 2010 Signo International B.V. follows are descriptions of the table‟s columns. Name Name, meaning Event Name, denotes which component generates this event. Event A string describes the event. Time Denote the time when this event happens. Fig. 97 RAID Events 5.6.3. Web Management Event Web Management Event, as shown in Fig. 98, records all activities and conditions of web UI. The follows are descriptions of the table‟s columns. Name Name, meaning Event Name, denotes which component generates this event. Storage IP Denote an IP address of Administrator using to manage this iSCSI storage. Client IP Denote an IP address, which Administrator‟s PC used. Event A string describes the event. Time Denote the time when this event happens. 80 Copyright © 2010 Signo International B.V. Fig. 98 Web Management Events 5.6.4. iSCSI Connection Event iSCSI Connection Event, as shown in Fig. 99, records all activities and conditions of iSCSI Target. The follows are descriptions of the table‟s columns. Name Name, meaning Event Name, denotes which component generates this event. Storage IP Denote an IP address of an iSCSI initiator using to connect to this iSCSI storage. Client IP Denote an IP address which user‟s PC used. Event A string describes the event. Time Denote the time when this event happens. 81 Copyright © 2010 Signo International B.V. Fig. 99 iSCSI Connect Events 5.6.5. Miscellaneous Event Miscellaneous Event, as shown in Fig. 100, records all activities and conditions of iSCSI Storage. The follows are descriptions of the table‟s columns. Name Name, meaning Event Name, denotes which component generates this event. Event A string describes the event. Time Denote the time when this event happens. Fig. 100 Miscellaneous Events 82 Copyright © 2010 Signo International B.V. 5.6.6. User Log User Log, as shown in Fig. 101, records all activities and conditions of user. The follows are descriptions of the table‟s columns. Name Name denotes a user, who generates this event. Storage IP The user connects to the IP address of iSCSI Storage. Clinet IP The client‟s IP. Event A string describes the event. Time Denote the time when this event happens. Fig. 101 User Log 83 Copyright © 2010 Signo International B.V. 84 Copyright © 2010 Signo International B.V. 6. Exception Handling 6.1. Delete Disk Forcedly Steps of deleting disks forcedly: (1) Go to “Delete Disk Forcedly” page. (2) Select a HDD, such as Disk Slot 7 is selected in Fig. 102. (3) Click Fig. 102 Delete Disk Forcedly Steps of resetting deleted disk status: (1) Go to “Delete Disk Forcedly” page. (2) Select a deleted slot, such as Slot 7 is “Deleted Disks” status in Fig. 103. (3) Click 85 Copyright © 2010 Signo International B.V. Fig. 103 Reset Deleted Disk Status 86 Copyright © 2010 Signo International B.V. 7. User Management Page 7.1. User Login Steps of first time to log on user management page: (1) Connect to iSCSI Storage by a web browser, such as IE. (2) Enter your username (not “admin”), as shown in Fig. 104. (3) Enter your password (4) Change your password, as show in Fig. 105. (5) Enter the old password (6) Enter a new password (7) Enter the new password again (8) Click Fig. 104 Login User Management Page Fig. 104 Description: Select “iSCSI Storage Login” Username (not “admin”) Password 87 Copyright © 2010 Signo International B.V. Fig. 105 Change a user‟s password Fig. 105 Description: Enter the older password Enter a new password Enter the new password again 7.2. Modify Alias 7.2.1. Modify Target Alias Steps of modifying iSCSI Target aliases: (1) Go to “Modify Alias” Page (2) Go to “Modify Target Alias” Page (3) Click of an iSCSI Target (4) Enter a new alias (5) Click 88 Copyright © 2010 Signo International B.V. Fig. 106 Modify iSCSI Target Alias 7.2.2. Modify LUN Alias Steps of modifying iSCSI LUN aliases: (1) Go to “Modify Alias” Page (2) Go to “Modify LUN Alias” Page (3) Click of an iSCSI Target (4) Enter a new alias (5) Click Fig. 107 Modify iSCSI LUN Alias 89 Copyright © 2010 Signo International B.V. 7.3. Review a User’s iSCSI Targets Step of reviewing user‟s iSCSI Targets: (1) Go to “Target Information” Page (2) Select an iSCSI Target (3) Review the iSCSI Target and iSCSI LUNs of the iSCSI Target Fig. 108 Review a user‟s iSCSI Targets 7.4. User Log User Log, as shown in Fig. 109, records all activities and conditions of user. The follows are descriptions of the table‟s columns. Name Name denotes a user, who generates this event. Storage IP The user connects to the IP address of iSCSI Storage. Clinet IP The client‟s IP. Event A string describes the event. Time Denote the time when this event happens. 90 Copyright © 2010 Signo International B.V. Fig. 109 User Log 91 Copyright © 2010 Signo International B.V. 92 Copyright © 2010 Signo International B.V. 8. IP SAN Connector 8.1.1. Download and Install IP SAN Connector Steps of downloading IP SAN Connector (IPSC): (1) Connect to iSCSI Storage Login Page or Easy IP SAN Page (2) Click “ Download IP SAN Connector” hyperlink (3) Execute the downloaded file, IP_SAN_Connector.exe. The file will be decompressed in a folder, named IP_SAN_Connector. (4) Open the folder and execute setup.exe. (5) A shortcut, IPSC, is created on your Desktop. Fig. 110 Hyperlink of downloading IP SAN Connector Fig. 110 Description: Login Page of iSCSI Storage Login Page of Easy IP SAN Hyperlink of downloading IP SAN Connector (IPSC) 8.1.2. IP SAN Connector Steps of connecting to iSCSI storage by IP SAN Connector: (1) Execute the shortcut, IPSC, on your Desktop, as shown in Fig. 111 (2) Select your Language (optional) (3) Enable/disable AD authorization (optional) (4) Enable/disable “Cross Internet” (optional). If your PC connects to an iSCSI storage cross Internet, it is better to enable “Cross Internet” (5) Enter the IP address of iSCSI storage (6) Enter username (7) Enter password (8) Click 93 Copyright © 2010 Signo International B.V. (9) IPSC is connecting to the iSCSI Storage, as shown in Fig. 112 (10) Successfully connect to an iSCSI storage, as shown in Fig. 113. becomes Fig. 111 IP SAN Connector and its shortcut Fig. 111 Description: The icon of IPSC The UI of IPSC Select Language Enable/disable AD authentication If your PC accesses the iSCSI Storage via Internet, it is better to enable “Cross Internet”. IP Address of an iSCSI Storage Username Password Mount iSCSI Targets Fig. 112 IPSC is connecting to an iSCSI Storage 94 Copyright © 2010 Signo International B.V. Fig. 113 Successfully Connect to an iSCSI storage 95 Copyright © 2010 Signo International B.V. 96 Copyright © 2010 Signo International B.V. 9. Easy IP SAN 9.1. Login Easy IP SAN Management Steps of logging on Easy IP SAN management: (1) Select “Easy IP SAN Login” on the login page, as shown in Fig. 114 (2) Enter “admin” (3) Enter admin‟s password Fig. 114 Login page of Easy IP SAN management Fig. 114 Description: Please select “Easy IP SAN Login” Enter “admin” Enter admin‟s password 9.2. Add Easy IP SAN Members Steps of adding an iSCSI storage into an Easy IP SAN: (1) Go to “Add IP SAN Member” page (2) Enter an IP address of iSCSI storage in Fig. 115 (3) Click to add the iSCSI storage into the Easy IP SAN 97 Copyright © 2010 Signo International B.V. Fig. 115 Add a new iSCSI storage into Easy IP SAN Fig. 115 Description: The members of this Easy IP SAN Enter a new iSCSI storage‟s IP address and then click the Easy IP SAN to add the iSCSI storage into 9.3. Remove Members from Easy IP SAN Steps of removing an iSCSI storage from Easy IP SAN: (1) Go to “Delete IP SAN Member” page (2) Select iSCSI storages, you want to remove from the Easy IP SAN. (3) Click Fig. 116 Remove an iSCSI storage from Easy IP SAN Fig. 116 Description: The selected iSCSI storage, which will be removed from the Easy IP SAN 98 Copyright © 2010 Signo International B.V. 9.4. Review Easy IP SAN Members Steps of reviewing iSCSI storages: (1) Go to “IP SAN Member” page (2) Click these hyperlinks for connecting to individual management systems of iSCSI storages Fig. 117 Show iSCSI storages of Easy IP SAN Fig. 117 Description: The hyperlinks for connecting to individual management systems of iSCSI storages The list of iSCSI storages 9.5. Performance Monitor of Easy IP SAN Steps of monitoring Easy IP SAN performance: (1) Go to “ IP SAN Performance” Page (2) Real Time Disk I/O throughput is shown in Fig. 118 . (3) The average Disk I/O throughput is shown in Fig. 118 . 99 Copyright © 2010 Signo International B.V. Fig. 118 Performance Monitor of Easy IP SAN Fig. 118 Description: Real Time Disk I/O throughput Average Disk I/O throughput Blue=Send (Read) throughput, Green=Receive (Write) throughput, Red=Read+Write throughput 100 Copyright © 2010 Signo International B.V.