1
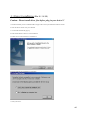
User Manual
Table of Contents
1 ) Introduction
Page 2
2 ) PNY Flash drive 2.0 Series Specification
Page 3
3 ) Driver Installation (Win 98 / 98 SE)
Page 4
4 ) Driver Installation (Win ME / 2000 / XP)
Page 5
5 ) Driver Installation (Mac OS 9.x+)
Page 5
6 ) Driver Installation (Linux Kernel 2.4.0+)
Page 5
7 ) Disconnection
Page 6
8 ) Write/Delete protection
Page 7
1/7
1 ) Introduction
If you want to transfer data from one computer to another, what do you do? Do you take
one or more boxes of floppy disk with you or do you take your hard drive with you? You
may send e-mail, but it takes a lot of time to download if you have a large amount of data.
Now, here is a solution, the PNY USB Flash Drive. Accessing and transporting data has never
been easier with the USB Flash Drive. The USB Flash Drive is a removable hard disk drive
with USB connection and can support up to 1GB disk space, which is 694x of a 1.44MB
floppy disk. The PNY USB Flash Drive is a plug and play device, simply plug into any USB port
and the computer will automatically detect it as a removable disk drive. Now you can read,
write, copy, delete and move data from your hard disk drive to the USB Flash Drive or from
the USB Falsh Drive to your hard disk drive. You can even play MP3 files, run applications
or view videos directly from the USB Flash Drive.
The USB Flash Drive is so compact that you can carry it with you anywhere and hardly
notice its existence. It also comes in various storage capacities of128MB, 256MB, 512MB, 1GB and 2GB.
Now, you don’t have to carry a laptop
computer with you to work, if you have access to a computer. The USB Flash Drive does
not require any battery, it does not need any software or cable and it is compatible with IBM
PC / compatible desktop and laptop computers with USB port.
No more carrying around work in a laptop computer and no more floppy disks are required.
PNY USB Flash Drive is your solution; PNY USB Flash Drive is the future. Thank you for choosing
PNY USB Flash Drive – The Future Mobile Storage Device.
2/7
2 ) Pen Drive 2.0 Series Specification
1. Compatible with USB specification revision 2.0.
2. USB specification revision 1.1 compatible.
3. Built-in USB 2.0-to-Flash interface controller with bulk-only transport of USB mass storage class, support PIO mode 4.
4. Support Windows 98 / 98 SE with device driver
5. Support Linux Kernel version 2.4.10 or above without device driver. (USB 2.0)
6. Support Linux Kernel version 2.4.0 or above without device driver. (USB 1.1)
7. Support Windows ME, Windows 2000 and Windows XP without device driver.
8. LED indicator when in use.
9. Write/Delete protection switch. Protect you from accidentally deleting of data.
10. Hot Plug & Play - Enable you to install anytime.
11. No external power is required - DC 4.5V ~ 5.5V from USB port.
12. CE and FCC certificate of approval.
3/7
3 ) Driver Installation (Win 98 / 98 SE)
Caution : Please install driver first before plug in your device!!!
1. Double check that you have installed USB 2.0 support driver from your motherboard driver CD disc
2. Insert the driver CD disc into your CD-Rom
3. A menu will automatically pop up
4. Select Install / Remove Driver to start installation
5. Follow the on screen instruction to install driver
6. Restart machine after installation is completed
7. Insert your device
4/7
4 ) Driver Installation (Win ME / 2000 / XP)
For these operating systems, no driver is required; simply plug in your device into your
USB port on your computer, and the operating system will automatically recognized the
device with its built-in driver (USB Mass Storage Class Driver).
5 ) Driver Installation (Mac OS 9.x+)
Again, no driver is required for Mac OS users. However, since Mac is not USB 2.0
compliance, hence, you will only have the performance as in USB 1.1.
6 ) Driver Installation (Linux Kernel 2.4.0+)
1. Plug in the device
2. Please check whether it had been enumerated in file /proc/scsi/scsi.
If not please check whether modules had been loaded,
i.e : usb-storage, scsi_mod, sd_mod, ..., by using "/sbin/lsmod".
If not become root or use sudo with "modprobe usb-storage".
3. If the device is enumerated in /proc/scsi/scsi, then it is OK to mount the Pen Drive plus
2.0 to existed desired directory with "mount/dev/sda1 <desired directory>".
If there is no partition existed, please omit the digit. "a" means first LUN (Logical Unit),
then "b", "c", ... and the digit means the partition number.
If fail, please send us the output of 'dmesg' and make sure those messages are collected
after Pen Drive plus 2.0 is plugged in.
4. You may use "Control Center" from Gnome -> Mount Points (left side) -> Hard Drive
and select the appropriate device and partition, specify the mount point (existed
directory) and others, i.e. uid, gid, permission, ..., of course you need root privilege.
Suggest you un-mount it to avoid error messages on the next booting.
5. To eject, use "eject <desired directory>" to flush the buffer and clear the mount
information.
6. After mounting the Pen Drive plus 2.0, you may do any file operations on it.
7. Some latest distributions may automatically mount the USB device on the desktop.
8. If there is any problem, please attach the "dmesg" output and/or /var/log/messages.
5/7
7 ) Disconnection
[A] Windows 98 / 98SE
Wait till the LED light dimmed, then remove directly from USB port.
[B] Windows ME / 2000 / XP
Double-click
(Unplug or Eject Hardware) in the system tray in the lower right of
your screen. A window will appear, select the name of the device that you want to
remove, and then click the “Stop” button.
Confirm the device that you want to remove by click “OK”, wait till the LED light
dimmed, then remove from USB port.
[C] Mac OS 9.x or above
Drag the device icon to the Trash Can, confirm remove, wait till LED light dimmed,
then remove from USB port.
[D] Linux Kernel 2.4.0 or above
To remove, use "eject <desired directory>" command to flush the buffer and clear the
mount information.
6/7
8 ) Write/Delete protection
A write protect switch avoids accidentally deleting of data.
The hardware write protect works like floppy disk write protect switch.
Handle the switch carefully (Use a little plastic stick)
See picture for position:
NO data can be written or erased , only read
Data can be read ,written or erased
7/7