1
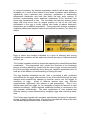
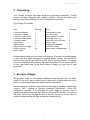
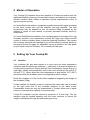
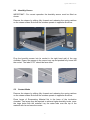
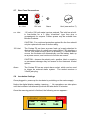
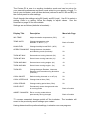
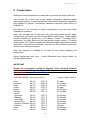
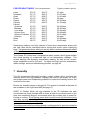
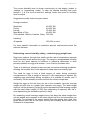
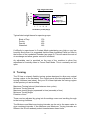
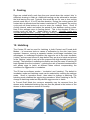
Q3000 GB Issue 03
Operating Instructions
1
Q3000 GB Issue 03
2
Q3000 GB Issue 03
Contents
Section
Subject
Page
1
2
3
4
5
6
7
8
9
10
11
12
13
14
Introduction
Unpacking
Storage of Eggs
Modes of Operation
Setting Up Your Contaq Z6
Temperature Control
Humidity Control
Turning
Cooling
Hatching
Servicing and Cleaning
Troubleshooting
Technical Fault Finding
Specification
3
5
5
6
6
15
16
18
20
20
21
22
23
28
1 Introduction
Congratulations on your purchase of the most advanced egg incubator
available. The Contaq Z6 has been designed to allow the best possible
environment for your eggs to incubate and hatch. These instructions detail the
operation of your new Contaq incubator, incorporating Contact Incubation
Technology (CIT). Please read them carefully before setting up the incubator
in order to achieve best results.
A background into CIT
The method of contact incubation technology is actually as old as the birds
themselves – but what is new is the unique way the method is applied to this
Contaq machine.
The Theory Behind the Product
Contact incubation is based on the natural incubation process. The most
striking difference between natural and artificial incubation is the fact that the
natural parent provides warmth by contact rather than surrounding the egg
with warm air. This may not at first sight seem significant but important
research studies carried out by J. Scott Turner at New York State University
and the University of Cape Town has revealed major unsuspected differences
in thermal behaviour of eggs incubated by contact rather than convection.
Crucially, eggs in a forced draft incubator have near uniform temperature
throughout incubation; there will be some increase in embryonic temperature
towards the end of incubation as a result of increased metabolism but
otherwise the whole egg will remain near incubator air temperature. By
contrast, eggs incubated naturally or by contact, have significant temperature
differences. Heat is entering the egg over a relatively small brood patch,
which is therefore warmer than other regions of the egg, and is being lost from
most of the remaining shell area which is cooler.
3
Q3000 GB Issue 03
In contact incubation, the embryo temperature tends to fall at later stages of
incubation as a result of the embryo’s own blood circulation which becomes
significantly more important than embryonic metabolism in determining
temperature distribution and heat flow within the egg, quite contrary to
previous understanding which assumed metabolism to be dominant and
cause egg temperature to rise. The inevitable fact that the embryo grows
larger and must move from its original position on top of the yolk sack
downwards in the egg to cooler regions also tends to reduce embryonic
temperature as incubation progresses. These important findings emphasise
surprising differences between natural and artificial incubation, but there are
others.
Eggs in nature are certainly subjected to a cycle of warming and cooling
coupled with ventilation as the parent bird leaves the nest to feed and defend
territory, etc.
The Contaq incubator should be viewed as replacing the natural Bird and Nest
combination. The pressurised ‘skin’ mimics the functions of an incubating
parent; providing warmth by contact with the tops of eggs, but also the facility
to lift from the eggs periodically and in doing so, causes a substantial influx of
fresh air in the manner of a bird standing or leaving the nest.
The egg chamber substitutes for the ‘nest’ in providing a safe, protected
environment for the eggs, with provision for air to be induced through the nest
material which enables the operator to exercise control over the degree of
ventilation of eggs.
Nests of different species have very different
characteristics, particularly with respect to gas permeability. This in turn
affects water loss from eggs, so it is necessary to adjust the amount of nest
material accordingly. Where required, additional humidity is introduced to the
egg chamber automatically. The ideal combination of nest material and
humidity setting is best determined by weighing eggs and monitoring water
loss.
The Contaq egg chamber also provides sophisticated provision for automatic
turning of eggs of different sizes. Egg turning coincides with lifting of the skin
and enables programmable fixed or random turns.
4
Q3000 GB Issue 03
2 Unpacking
Your Contaq incubator had been supplied in protective packaging. Please
remove all tape, strapping and packing material. Retain the carton and
packing materials to enable the unit to be repacked if need be.
The Contaq Z6 includes:
Item
Quantity
Item
Quantity
Contaq Incubator
Conveyor Chassis
Conveyor End Cover
Conveyor End Rollers
Conveyor Belts
Egg Rollers
Egg Dividers
Bag of Small O-Rings
Large O-Rings
Mains Lead
1
1
1
2
3
12
7
1
24
1
Contaq Skin Panel
Air Filter Panel
Base Insulation Panel
Hatching Tray / Lid
Hatching Tray Lid Posts
Water Tube
Evaporation Material
Humidity Sensor
Spot-Check Thermometer
1
1
1
2
4
1
2
1
1
Please identify each part and check that they are all present and undamaged.
If there are any parts damaged or missing please contact your retailer or
Brinsea Products (at the address at the end of this document). To register
your new Brinsea product please visit www.brinsea.co.uk and follow the link
on the right hand side of the home page to qualify for your free 2 year
guarantee.
3 Storage of Eggs
Always store eggs in cool, damp conditions. Most species may be safely
stored for up to 14 days before serious reductions in hatch rates are likely.
Daily turning of stored eggs also helps maintain hatchability.
Discard cracked, misshapen and heavily soiled eggs (if possible). Wash eggs
using a 100:1 solution of Brinsea Incubation Disinfectant. Follow the
instructions supplied. It is essential to wash eggs in solution that is
significantly warmer than the egg. Bear in mind that all solutions will remove
the outer cuticle from the egg as well as the dirt and care must be taken to
avoid re-contaminating the eggs during later inspection etc.
5
Q3000 GB Issue 03
4 Modes of Operation
Your Contaq Z6 combines the proven benefits of Contact Incubation with the
additional flexibility of being a forced draft incubator and hatcher in one spaceefficient machine. Both modes of operation provide sophisticated control of
egg turning and cooling.
In Contact Mode the optimum temperature gradient across the eggs is created
by the warm contact skin and the relatively cool egg chamber. The nest
environment may be adapted to suit the species being incubated by the
addition of layers of nest material to provide increased humidity levels by
evaporation.
In Forced Draft Mode the addition of an insulating panel in the base of the egg
chamber provides even temperature around the eggs and allows precise
control of relative humidity levels to optimise hatching conditions. The contact
skin is simply removed and replaced by an air filter panel to provide gentle air
movement around the eggs. An adjustable vent is provided on the rear panel
to give further control of humidity, this is usually left half open.
5 Setting Up Your Contaq Z6
5.1
Location
Your incubator will give best results in a room free from wide temperature
variations and with generous ventilation – particularly if several incubators are
running at the same time. Ensure that the room temperature cannot drop on a
cold night. Ideally thermostatically control the room at between 20 and 25°C
(68 and 77°F). Never allow the room temperature to drop below 15°C (59°F)
and ensure that the incubator cannot be exposed to direct sunlight.
Place the incubator on a flat, level surface capable of supporting the weight of
the incubator (30kg).
If water addition for humidity control is required the water tube inlet is located
on the right hand side of the incubator adjacent to the water pump.
Considerable water use may be experienced in Contact Mode and a water
reservoir of several litres capacity is recommended.
Contac Z6 incubators may be stacked a maximum of 2 units high. The top
machine must be located squarely over the lower machine to ensure the
weight is distributed through the load bearing structure.
6
Q3000 GB Issue 03
5.2
Humidity Sensor
IMPORTANT:- For correct operation the humidity sensor must be fitted as
shown.
Remove the drawer by sliding fully forward and releasing the spring catches
on the drawer slides. Note that the catches operate in opposite directions.
Plug the humidity sensor into its socket in the right hand wall of the egg
chamber. Ensure the sensor is the correct way up and pushed fully home into
the socket. The label “ETC” should be face down.
5.3
Contact Mode
Remove the drawer by sliding fully forward and releasing the spring catches
on the drawer slides. Note that the catches operate in opposite directions.
Place layers of Evaporating Material flat in the base of the incubation
chamber. Two layers may be required to achieve higher humidity levels, cover
the large holes with the material. Lay the water tube over the top of the
material with its end near the centre.
7
Q3000 GB Issue 03
Slide the Contact Skin Frame into the guides in the top of the incubation
chamber. Note that the frame is not square and will only push in fully when
fitted the correct way round. The frame will be a tight, sliding fit to ensure a
good air seal. The black felt should be on the top.
Replace the drawer by aligning the slides and pushing back in. The catches
will automatically engage to prevent accidental release.
5.4
Forced Draft Mode
Remove the drawer by sliding fully forward and releasing the spring catches
on the drawer slides. Note that the catches operate in opposite directions.
Place the Base Insulation Panel in the bottom of the incubation chamber and
ensure it fully covers all the large holes.
Place two layers of Evaporating Material into the recess in the top of the panel
and lay the water tube over the top of the material with its end near the centre.
8
Q3000 GB Issue 03
Slide the Air Filter Frame into the guides in the top of the incubation chamber.
Note that the frame is not square and will only push in fully when fitted the
correct way round. The frame will be a tight sliding fit to ensure a good air
seal.
Replace the drawer by aligning the slides and pushing back in. The catches
will automatically engage to prevent accidental release.
5.5
Conveyor Assembly
Carefully slide the conveyor belt over the chassis.
Insert the large rollers into the ends of the belt.
Locate the roller ends into the bearings as shown (spring loaded bearings
first, then gently lever out the fixed bearings). The spring-loaded bearings
provide tension in the conveyor belt.
Spring-loaded Bearings
Fixed Bearings
9
Q3000 GB Issue 03
The conveyor assembly may now be lowered into the drawer frame. Locate
the end cover down the first slot in the egg roller guides, it only fits one way
round. Place one of the flat egg dividers in the last slot in the egg roller guides
to prevent any eggs accidentally rolling off the back of the conveyor.
When the drawer is closed the conveyor automatically engages with the
turning system drive wheel.
IMPORTANT
When the drawer is closed both drawer handles must be turned fully
clockwise to ensure the drawer is locked in position and the air
pressurisation system is switched to the correct mode. Failure to
observe this may result in the Contact Skin remaining retracted and the
eggs will not be warmed.
To open the drawer, turn both door handles counter-clockwise. A
warning buzzer sounds for 10 seconds while the air pressurisation
system retracts the Contact Skin. It is important to wait while the skin is
lifted from the eggs to prevent the eggs being dislodged as the drawer is
opened. To maintain steady temperature do not leave the drawer open
for any longer than is absolutely necessary.
10
Q3000 GB Issue 03
5.6
Setting Eggs
Your Contaq Z6 is supplied with rollers which may be fitted with large or small
‘O-rings’ to give different effective diameters. Different sizes of eggs may be
accommodated as follows –
Small (e.g. Parrots): Use rollers fitted with one large o-ring on each
end to achieve fine turn control, or to allow option of simultaneous
incubation with larger eggs.
Medium (e.g. Poultry): Use rollers with small diameter ends (no large orings).
Large (e.g. Goose): Rest eggs directly onto the conveyor floor and
divide rows between plastic bars.
Fig 5.6.1 Rollers Slide into Slots
Fig 5.6.2 Positioning of Rollers for
Medium Size Eggs
Fig 5.6.3 Positioning of Rollers for
Small Eggs (Large o-rings should
be staggered as below)
Fig 5.6.4 Dividers for Large Eggs
Large Eggs
Medium Eggs
11
Small Eggs
Q3000 GB Issue 03
Use the small o-rings provided to divide eggs. By placing small o-rings on the
tubing, this will stop eggs from gathering at one end of the tubing during
turning. Rollers should be positioned as far apart as practicable for any
particular sized egg, provided there is no danger of an egg falling through or
getting jammed.
IMPORTANT
During incubation all eggs should rest with their pointed end lower than the
round end, the greater the angle the lower the risk of embryo mal-positioning.
Check by regular observation that this is the case.
WHEN INCUBATING SMALL EGGS USING THE ROLLERS THE
FOLLOWING APPLIES TO ENSURE THIS:
Rollers should be positioned as far apart as practicable for any
particular sized egg, provided there is no danger of an egg falling
through or getting jammed. Eggs supported like this are more likely to
settle with the point slightly downwards. The angle tends to increase
as the air cell dries out, as it does in Nature.
Eggs are set with pointed ends pointing towards the chamber side that
is nearest. Thus eggs in the left half of the incubator should have their
pointed end towards the left and eggs in the right half pointed towards
the right:-
Rollers as far apart
as possible
Egg points to right
Egg points to left
12
Q3000 GB Issue 03
5.7
Rear Panel Connections
+
_
a.c. inlet
a.c. inlet
12V inlet
Alarm
Vent (see section 7)
115 volt or 230 volt mains input as ordered. The inlet has a builtin fuse-holder for a 2 Amp “slow-blow” type fuse plus a
compartment for a spare. Further spares may be ordered from
Brinsea Products.
CAUTION - For continued protection against fire the fuse should
only be replaced with one of similar rating.
12V inlet
The Contaq Z6 can have a power ‘back up’ supply attached to
eliminate the effect of a short term mains failure. By attaching a
12V dc 10A power source (such as a battery), if a mains failure
occurs, the incubator will automatically use the battery back up
as a power source, and continue to function as normal.
CAUTION – observe the polarity red = positive, black = negative
or permanent damage may be caused to the electronic control
system.
Alarm
5.8
The Contaq Z6 has an output alarm socket, which can be used
to trigger an external alarm system. The socket receives a
3.5mm jack plug.
Incubation Settings
Once plugged in, power-up the incubator by switching on the mains supply.
Notice the digital display reading ‘warming…’. No operations can take place
until the incubator has warmed up which will take about 20 minutes.
Once the warming period is finished, the following screen appears:-
xxxgjjgjigiji
TIME > TURN
36.9C
48%
13
INC
1h58
Q3000 GB Issue 03
The Contaq Z6 is now in a working incubation mode and can be set-up for
your personal preferences and those most suited to your species of eggs. To
set-up your incubator, push all three buttons (referred to as B1, B2 and B3) on
the control panel to enter settings.
Scroll through the settings using B2 (back) and B3 (next). Use B1 to select a
setting. Once in a setting, follow the display to adjust values. See the
flowchart on page 26 for more details.
Settings are as follows (defaults in brackets) –
Display Title
Description
More Info Page
INC TEMP
Adjust incubation temperature (39.0)
15
TEMP UNITS
Change temperature units
between ºC and ºF (°C)
Back of booklet
Change humidity levels RH% (40%)
16
HUM LEVEL
OPERATION MODE Change between Incubation
and Hatching mode (Incubate)
20
TURN INT MAX
Set maximum turning intervals (2h)
18
TURN INT MIN
Set minimum turning intervals (1h)
18
TURN ANG MAX
Set maximum turning angles (4s)
18
TURN ANG MIN
Set minimum turning angles (2s)
18
TURN DIR
Change between Random, Alternate,
Reverse and Forward turning directions
(Random)
18
COOL ON/OFF
Switch cooling intervals on or off (on)
20
COOL INTERVALS
Change interval time (24h)
20
COOL PERIOD
Change cooling period time (20m)
20
SAVE & EXIT
Permanently saves changes and exits
to running mode
Back of booklet
ABORT CHANGES* Exit to running mode without
permanently saving changes
Back of booklet
*To reverse unwanted changes switch off the incubator. The incubator will
revert to the previously saved settings upon restart.
Having determined the preferred settings, incubation can now progress.
14
Q3000 GB Issue 03
6 Temperature
Stable and correct temperature is essential for good results. Adjust with care.
Your Contaq Z6 is fitted with a high quality, individually calibrated digital
thermometer system. A calibrated Brinsea “Spot-Check” digital thermometer is
also supplied to provide a convenient calibration reference (see section on
Calibration).
Be cautious of the accuracy of other thermometers used and have them
calibrated if necessary.
Note: Your incubator may not be set to the correct temperature for your eggs.
The following procedure must be followed before setting eggs. These figures
should be taken as a guide only. As in Nature, Contact Incubation “skin”
temperature is higher than that of the egg and the embryo inside it. The guide
temperatures for Contact Incubation are therefore higher than those normally
expected in Conventional Incubation, and the two very different techniques
should not be directly compared.
Allow the incubator to stabilise for at least an hour before adjusting the
temperature.
Adjust temperature with care – small differences have large effects on
hatching performance.
IMPORTANT
Ensure the temperature setting is adjusted when changing between
Contact Mode and Forced Draft Mode. The incubation temperatures for
the two modes are significantly different.
CONTACT MODE Rec’d temperatures:
Typical incubation period:
Hens
Pheasant
Quail
Ducks
Geese
Falcons
Parrots:
Amazons
Macaws
Love birds
African Grey
Sulphur Cockatoo
Eclectus
Rhea
Emu
39.5°C
39.7°C
39.7°C
39.5°C
39.5°C
39.5ºC
103.1°F
103.5°F
103.5°F
103.1°F
103.1°F
103.1ºF
21 days
23-27 days
16-23 days
28 days
28-32 days
31-33 days
39.5°C
39.5°C
39.5°C
39.5°C
39.5°C
39.5°C
38.0°C
38.0°C
103.1°F
103.1°F
103.1°F
103.1°F
103.1°F
103.1°F
100.4°F
100.4°F
24-29 days
28-30 days
22-24 days
26-28 days
29-31 days
28 days
35-40 days
49-52 days
15
Q3000 GB Issue 03
FORCED DRAFT MODE Rec’d temperatures:
Typical incubation period:
Hens
Pheasant
Quail
Ducks
Geese
Falcons
Parrots:
Amazons
Macaws
Love birds
African Grey
Sulphur Cockatoo
Eclectus
Rhea
Emu
37.5°C
37.7°C
37.7°C
37.5°C
37.5°C
37.2ºC
99.5°F
99.8°F
99.8°F
99.5°F
99.5°F
99.0ºF
21 days
23-27 days
16-23 days
28 days
28-32 days
31-33 days
37.2°C
37.2°C
37.2°C
37.2°C
37.2°C
37.2°C
36.0°C
36.0°C
99.0°F
99.0°F
99.0°F
99.0°F
99.0°F
99.0°F
96.8°F
96.8°F
24-29 days
28-30 days
22-24 days
26-28 days
29-31 days
28 days
35-40 days
49-52 days
Developing embryos are fairly tolerant of short term temperature drops and
the user need not be concerned about cooling that occurs when inspecting
eggs. Temperatures above ideal can quickly have a serious detrimental effect
on hatch rates and must be avoided.
The Contaq Z6 is fitted with a temperature alarm system, which gives audible
and visual warning of unexpected high or low temperature readings. The
screen displays the alarming temperature reading, as well as the ‘correct’
target temperature set by the user. To adjust the high and low temperature
alarm settings, see the troubleshooting section, on page 25.
7 Humidity
The Z6 incorporates Brinsea’s humidity control system which monitors the
humidity level in the egg chamber, displays this level on the screen (in %RH)
and pumps water onto evaporating material to control the humidity level to the
level set by the user.
Ensure the humidity sensor is plugged in. The socket is situated in the base of
the incubator on the right hand wall (see page 7).
NOTE: In Contact Mode the egg chamber in the Z6 replicates the nest
environment as far as possible and so there is little air movement most of the
time and occasional large air movements when the contact skin is raised for
turning or cooling. These factors mean that humidity levels will fluctuate during
and after turning or cooling. This is an entirely natural effect and will not
adversely affect the incubating eggs.
The water pump will stop working during a cooling period to prevent excessive
water addition.
16
Q3000 GB Issue 03
The current humidity level is shown continuously on the display (unless in
‘settings’ or ‘engineering’ mode). To alter the desired humidity level push
buttons 1, 2 & 3 at once to enter the ‘settings’ mode, then scroll to ‘humidity
level’ to adjust.
Suggested humidity levels are given below:
During incubation
Waterfowl
Poultry
Parrots
Most Birds of Prey
(Thin shelled - Merlins, Kestrels, Owls)
45-55% RH
40-50% RH
35-45% RH
40-45% RH
50% RH
Hatching
All species
65% RH or more
For more specific information on particular species’ requirements check the
relevant literature.
Determining correct humidity setting – monitoring egg weight loss:Eggs lose moisture through their shells and the rate of evaporation depends
on the humidity levels around the eggs. The range in recommended humidity
level for any given species is because of individual differences in shell
porosity between one egg and another – even if laid by the same bird.
There is a technique whereby water loss can be monitored during incubation,
allowing the humidity level to be adjusted to keep water loss exactly right.
The need for eggs to lose a fixed amount of water during incubation
corresponds to a loss in weight of around 13-18% depending on species. By
weighing eggs periodically during incubation it is possible to monitor and, if
necessary, correct humidity levels to achieve the correct weight loss.
Weigh the eggs on the day they are set in the incubator, take the average
weight and plot this on a graph (see example over page). The ideal weight
loss line can be plotted by joining the point representing initial average weight
with the ideal hatch weight (13-18% less depending on species) with the xaxis representing the incubation period (in days).
By measuring actual average weights every few days the actual weight loss
can be plotted and compared to the ideal weight loss line and corrections can
be made. For example if the actual weight loss was greater than ideal (see
graph below) then the air has been too dry and humidity levels need to be
increased to compensate.
17
Q3000 GB Issue 03
70
Ideal weight
(grams)
65
60
Measured
weight (grams)
55
19
15
11
7
50
3
Average egg weight
(grams)
Egg weight loss chart
Incubation period (days)
Typical ideal weight losses for species groups:
Birds of Prey
Poultry
Parrots
Waterfowl
17%
13%
16%
14%
If difficulty is experienced in Contact Mode maintaining very high or very low
humidity levels then it is suggested that the Base Insulation Panel be fitted in
the bottom of the incubation chamber (see page 8). This will restrict the rate of
air exchange and allow greater control of extremes.
An adjustable vent is provided on the rear of the machine to allow fine
adjustment of humidity when in Forced Draft Mode. This is nominally set half
open.
8 Turning
The Z6 has a uniquely flexible turning system designed to allow any natural
turning regime to be simulated. The control panel provides adjustment of the
turning functions (see below). Set your Z6 to best replicate the turning regime
of the species you are breeding.
Maximum Turning Interval (time between turn cycles)
Minimum Turning Interval
Maximum turning Angle (expressed in time (seconds) of turn)
Minimum Turning Angle
Direction of turn
These can be adjusted by going into the settings menu and scrolling through
to the turning functions.
The Minimum and Maximum turning intervals can be set to the same value to
give consistent intervals. If the Minimum and Maximum Turning Intervals are
different the Z6 will randomly select times between these limits.
18
Q3000 GB Issue 03
The turning Angle is controlled by selecting the time that the turning motor
runs for. The angle of turn will also be a function of the diameter of the eggs.
Larger eggs will need a longer duration of turn to achieve a given angle of turn
than smaller eggs. Use the guide to help you determine the correct duration of
turn for the desired turn angle. PLEASE NOTE these are approximate figures
and it is recommended you check the setting before incubation.
The direction of egg turning can be set to any of the following four options:Continuously right – turning will always be to the right
Continuously left – turning will always be to the left
Alternating – Eggs turned one way on first turn, back the other way on
the second etc.
Random – Tuning direction is randomised by the control system to give
a more ‘natural’ turning regime.
It is recommended that the Random function is normally used.
Recommended Turning Durations / Setup:Standard Egg Rollers / Divider (Medium and Large Sized Eggs):Species
Partridge
Pheasant
Hen
Duck
Turkey
Goose
Emu/Rhea
Ostrich
Harris Hawk
Saker Falcon
40º
60º
1
1
2
2
3
1
1
1
1
2
2
2
3
4
2
2
80º
1
2
2
2
2
3
4
5
2
2
100º
2
2
2
3
3
4
5
6
3
3
120º
2
3
3
4
4
5
7
7
3
3
140º
2
3
3
4
4
6
8
9
4
4
160º
3
3
4
5
5
7
9
10
4
4
180º
3
4
4
6
6
7
10
11
5
5
180º
5
6
7
8
11
Egg Rollers Fitted With Large O-rings (Smaller Sized Eggs):Species
Quail
Partridge
Pheasant
Hen
Duck
Parrots:
Amazon
Hyacinth Macaw
African Grey
Sulphur Cock’too
40º
1
2
2
2
3
60º
2
2
2
3
4
80º
2
3
3
4
5
100º
3
4
4
4
6
120º
4
4
5
5
7
140º
4
5
6
6
9
160º
5
6
7
7
10
2
2
2
2
2
3
3
3
3
4
3
4
4
5
4
5
5
6
5
6
6
7
6
7
6
8
7
8
19
7
9
8
9
Q3000 GB Issue 03
9 Cooling
Eggs are cooled briefly each time they are turned when the contact ‘skin’ is
retracted, drawing in fresh air. Additional cooling can be achieved to simulate
the bird leaving the nest. Typically this would be set for one or two cooling
periods each day of 15 to 20 minutes duration. During the cooling period the
contact skin is retracted and the heater is switched off. To program the cooling
cycle push all three buttons at once to enter the ‘settings’ menu. Scroll to
cooling interval, select and adjust the period of time between cooling cycles.
Next in the settings menu is cooling period. This is the duration of time a
cooling cycle will last for. Again select to adjust. Humidity levels may
fluctuate during and after cooling. This is an entirely natural effect and will not
adversely affect the incubating eggs. The water pump is automatically
switched off during the cooling period to avoid excessive water addition.
10 Hatching
The Contaq Z6 can be used for hatching in both Contact and Forced draft
Modes – in numerous trials no cases of suffocation by the skin have been
reported. However, running a separate hatcher (multi-stage incubation) has
advantages. In multistage incubation the eggs are set in the main incubator
(‘setter’) and removed around 2 days before they are due to hatch and placed
in the ‘Hatcher’ (which is set up for the purpose with high humidity and no egg
turning). The benefits of multistage incubation are that the mess of hatching is
kept separate from the incubator – reducing the risk of bacterial contamination
and allows eggs to hatch at different dates without compromising the
conditions for eggs earlier in incubation.
The Z6 has two software modes – ‘incubation’ and ‘hatching’. The default is
incubation mode and hatching mode can be selected by entering the settings
mode. Scroll to ‘operation mode’, then select to change to hatching. The
hatching mode disables the egg turning procedure. When hatching in the Z6,
change to hatching mode two days before eggs are due to hatch.
In Forced Draft Mode the conveyor assembly may be removed from the
drawer and a dedicated hatching tray can then be placed in the bottom of the
drawer to allow maximum control of humidity.
20
Q3000 GB Issue 03
11 Servicing and Cleaning
In order to get the most out the Contaq Z6 throughout its life, it is essential
that care is taken in service and maintenance. Parts can be removed for
cleaning, or replacement, which is outlined and illustrated in this section.
IMPORTANT:
DISCONNECT THE INCUBATOR FROM THE MAINS POWER SUPPLY
DURING CLEANING.
ENSURE THAT ALL ELECTRICAL PARTS ARE KEPT DRY.
NEVER WASH CONTAQ Z6 PARTS IN LIQUIDS OVER 50°C (120°F). DO
NOT USE A DISHWASHER TO CLEAN COMPONENTS.
Following each hatch in the Contaq Z6 remove all debris from the roller
dividers and replace the conveyor if used during the hatch. Soak parts in a
100:1 solution of Brinsea Incubation Disinfectant. Wipe all internal surfaces
with a soft cloth soaked in 100:1 Brinsea Incubation Disinfectant solution.
Remove loose debris from the Air Filter Panel (if used) with a vacuum cleaner.
Replace if heavily soiled as this may affect temperature measurement
accuracy.
Always clean the incubator before storage and ensure that the unit is totally
dry inside and out.
Re-order Brinsea Incubation Disinfectant by phoning 0845 2260120 and
quoting part ref. 14.35 (100ml) or 14.36 (600ml).
Contact Skin and Air Filter Panels are available as spares from Brinsea
Products. Note that small holes in the Contact Skin are not detrimental to the
effectiveness of the system and larger holes may be simply fixed with tape in
an emergency.
11.1
Humidity Pump Tube
The peristaltic pump will need to have its tube replaced about every 3 months
or if water fails to be pumped / overflows.
Cut a length of tube to about 11cm. Remove the connectors and pull off the
old tube. Replace with the new tube, avoiding twists. All three tubes should be
fitted to the connectors and threaded through the holes in the cabinet before
winding onto the pump capstan.
21
Q3000 GB Issue 03
Use the diagram on the control panel to thread the tube exactly as shown
over the pump head:Hook the left tube connector over the bracket
Wind the tube counter-clockwise around the capstan
Pull the right tube connector over the other end of the bracket
Gently pull the inlet and outlet tubes to remove any kinks
The tension must be sufficient to ensure complete occlusion of the tube
without unnecessary flattening between the pump rollers. Adjust tube length
as necessary. Ensure that the tube does not stick together if left for long
periods by unhooking it from around the capstan during storage.
12 Troubleshooting
12.1
Poor Hatching Results
Poor hatching results are frustrating and can be caused by a large number of
factors. The most common are given below. Brinsea Products will not be held
responsible for loss of eggs or chicks under any circumstances. However we
will try to advise on incubation technique to improve results where necessary.
Gather Information
Gather as much information from the hatching results as possible to enable
the problem to be analysed in detail. Record dates that eggs are set,
incubator settings, dates of hatches, weight losses and the number and
condition of hatchlings. Candle or break open un-hatched eggs to estimate
the extent of embryo development. The Brinsea Cool-Lume or Egg-Lume
candling lamps are available from your dealer. Use Brinsea Eggwise software
to help collate data and repeat successful results.
Embryo Development Guide
1
1
10
3 20
2
7
4
5
6 6
22
7
1) Clear when candled probably infertile (or very
early death) when
candled at 8 days
2) Fertile with red blood
vessels - after 8 days
3) Red or black staining early death when candled
at 8 days
4) Embryo with red blood
‘ring’ - early death when
candled at 8 days
5) Dark outline with illdefined detail - late death
(10-16 days)
6) Live embryo with bill in
air sack - due to hatch in
24-48 hours
7) Normal development of
the air pocket according to
number of days
Q3000 GB Issue 03
Observation
Likely Cause(s)
Solution(s)
No chicks
hatch
Infertility, infection,
drastically incorrect
incubation settings,
parent ill health.
Check egg viability – are similar eggs
hatching naturally. Disinfect the
incubator. Check incubator settings
and procedures – particularly
temperature.
Chicks hatch
earlier than
expected,
deformities.
Incubation
temperature too
high
Reduce incubation temperature
slightly 0.5°C (1°F)
Chicks hatch
later than
expected
Incubation
temperature too
low
Raise incubation temperature slightly
0.5°C (1°F)
Hatch dates
Different rates of
Limit egg storage times. Check for
widely spread development due to incubation temperature variation –
different storage
sunlight, large room variation etc.
times, incubation
temperature
variation.
Late stage
‘dead in shell’
Incorrect humidity,
probably too high.
Try reducing average humidity levels
(but see section 7 above)
Generally
poor results
Incorrect incubation
settings, poor
parent bird health,
inadequate
egg turning,
Improve parent bird health, check all
incubation settings, analyse egg
weight loss to confirm humidity
correct, check turning working
correctly.
For further information refer to the Brinsea Incubation Handbook available on
line at Brinsea.com
13 Technical Fault Finding
Visually check all components for any physical faults. If no faults can be
found, use engineering mode (ENG) to check components and functions in
more detail.
13.1
Engineering (ENG) Mode: -
Engineering mode can be accessed to test components are functioning
correctly. Note that the heater is not controlled while in Engineering Mode so
remove eggs from the machine while making adjustments or checks.
23
Q3000 GB Issue 03
How to Access ENG mode
·
To access ENG mode, firstly make sure the incubator is unplugged.
·
Hold down buttons 2 and 3 on the keypad, then plug in the incubator
(whilst still holding the buttons).
·
Let go of the buttons once the digital display appears.
·
The screen should display the following: -
xxxgjjgjigiji
HEATER
1=Select
·
ENG
3=Next
You are now in ENG mode.
Use buttons 2 and 3 to scroll between test functions. Use button 1 to select a
test function. The following test functions are provided:HEATER
Test the heater by turning it on and off. Note that the
heater is not controlled by the thermostat while in
Engineering Mode.
TEMP SENSOR
Check all temperature sensors are working by viewing
their readings. There may be slight differences between
readings; these are calibrated by the digital control
system.
HUMIDITY PUMP Test the humidity pump by turning it on and off. This test
bypasses the control to check the motor and connections.
HEATER RELAY
Check heater relay is working by turning it on and off. An
audible click should occur.
ALARM RELAY
Check the alarm relay is working by turning it on and off.
An audible click should occur.
BUZZER
Test the buzzer by turning it on and off.
LID SWITCH
This test does not apply to the Contaq Z6. The lid switch
is part of the Contaq X series of incubators.
Scroll to EXIT and select to finish testing. You will now return to working mode
of the incubator.
24
Q3000 GB Issue 03
13.2
System Values
Within ENG mode notice SYSTEM VALUES (VAL).
Please Note: These are the recommended default values and it is not
advised they are changed unless you are at an expert level in incubation
practice and fully understand the relevance of each setting. Please call our
Brinsea technical support team on 01934 823039 for help and advice required
on this section.
Push Button 1 to select System Values from Engineering Mode.
Notice VAL appears in the top right of the display when selected. Use buttons
2 and 3 to scroll between values, and button 1 to select a value. The
following settings are provided, the defaults are in brackets:CALIB TEMP
Use to calibrate the thermometer system up or down (see
section 13.3). (0.0)
EVACUATION
Increase or decrease the time the Contact Skin is
retracted during the turn routine. (1m)
TURN DELAY
Increase or decrease the delay from the start of the turn
routine to when the motor runs. This allows time for the
Contact Skin to retract. (10s)
OVER TEMP
Increase or decrease the high temperature alarm. This is
the difference in degrees Celsius between the set
temperature and the alarm temperature. (2.0°C)
UNDER TEMP
Increase or decrease the high temperature alarm. This is
the difference in degrees Celsius between the set
temperature and the alarm temperature. (5.0°C)
HEAT TC
Increase or decrease the temperature control algorithm
heating time-constant. (20s)
COOL TC
Increase or decrease the temperature control algorithm
cooling time-constant. (7s)
LIGHT ON TIME
Increase or decrease the time the light stays on. Note that
the heater is switched off while the light is on. For
optimum temperature stability only use the light for short
periods. (2m)
AMBIENT
Increase or decrease the temperature control algorithm
initial heating output. (0.0)
HUM CYCLE
Alters the water pump operating cycle time. (1m)
In order to save these settings, ensure you select SAVE & EXIT.
If you are unhappy about any changes you have made, select ABORT
CHANGES.
25
Q3000 GB Issue 03
13.3
Temperature Calibration
CAUTION
Temperature calibration should not be confused with setting the incubation
temperature (section 6). The internal thermometer system is adjustable to
allow its reading to be precisely matched to a reference thermometer.
Do not attempt to calibrate temperature unless the accuracy is suspected to
be significantly compromised. Allow at least 24 hours for the equipment to
fully warm and stabilise before making an adjustment. Small fluctuations over
time are a result of drift in the electronic circuits and variations in room
temperature. Do not be tempted to adjust the calibration very frequently; it
only serves to exaggerate fluctuations. Please call our Brinsea technical
support team on 01934 823039 for help and advice required on this section.
Always use a high quality thermometer calibrated to a traceable
standard. Allow a minimum 30 minutes to stabilise after each
adjustment.
A tube is located behind a rubber bung on the right hand side of the incubator
cabinet. This passes into the centre of the heater chamber adjacent to the
temperature sensors. A calibrated Brinsea Spot-Check thermometer is
provided with a holder made to the correct length for insertion into the tube.
Any alternative thermometer used for this purpose should be a similar length
when inserted into the incubator.
Once the machine and thermometer have stabilised enter Engineering Mode
as explained in section 13.1. Scroll to the ‘system values’ section, and select.
Then scroll to CALIB TEMP and adjust by a minus figure if the display is
reading high, or a positive figure if the display is reading low. Note that the
calibration figure is an offset in degrees Celsius, it is not the actual
temperature. Select “Save and Exit” and allow 30 minutes to stabilise. Adjust
further if required by small increments.
26
Q3000 GB Issue 03
27
Q3000 GB Issue 03
14 Specification
Nominal Egg Capacity:
Quail
Partridge
Pheasant
Hen
Duck
Turkey
Goose
Emu/Rhea
Ostrich
150
85
70
60
35
35
16
8
4
Dimensions:
320mm x 660mm x 590mm h w d
Weight:
30Kg
Max Power Consumption:
110 Watts
Electrical Supply:
230v 50Hz or 110v 60Hz (as ordered)
Back-up Input Supply:
12V DC
10A
Consumable Parts
PN
Description
14.35
14.36
Q3004
Q3005
Q3001
Q3003
Brinsea Disinfectant (100 ml)
Brinsea Disinfectant (600 ml)
Contaq Z6 Contact Skin (inc Frame)
Contaq Z6 Air Filter Panel
Contaq Z6 Egg Turning Conveyor
Contaq Z6 Evaporating Pads “nest material” (pack of 5)
Brinsea Products Ltd., Station Road, Sandford, N. Somerset. BS25 5RA
Tel. +44 (0) 845 2260120Fax (01934) 820250
Email [email protected], website www.Brinsea.co.uk
28