1
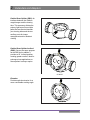
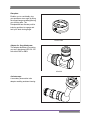
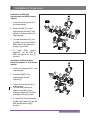
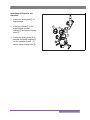
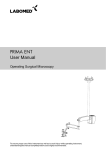
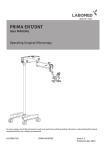
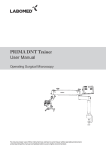
PRIMA proLINE
User Manual
Extenders and Camera Adapters
Contents
1.
Introduction
2
2.
Extenders and Adapters
3-5
3.
Installation of Accessories
6-7
4.
Installation of Cameras
8
5.
Care & Maintenance
9-10
1
1
INTRODUCTION
Congratulations on the purchase of your LABOMED camera accessories!
LABOMED recommends using only original accessories to realize the best results from your
LABOMED product.
This instruction manual is designed as a reference guide for the operation and maintenance of
camera accessories. We recommend that you read it carefully prior to use and follow the
instructions to ensure optimal performance..
Please retain this manual for your own quick reference. Additional copies can be obtained from
your authorized LABOMED dealer or from our sales/service department. Contact information is
provided at the end of this guide.
Accessories are available for live image display through a CCD camera, digital handycam,
digital SLR, or where an assistant requires an additional set of binocular tubes for viewing of
surgical procedures.
LABOMED DBS (Double Beam Splitter) and DBSi (Double Beam Splitter-Inclined) facilitate in
the mounting of various types of cameras, adapters and assistscopes.
Please ensure that you have received the right configuration required for your camera, assistant
viewing or extended viewing.
2
2
Extenders and Adapters Double Beam Splitter (DBS): An
interface between the Galilean
magnichanger and the viewing
tube. This accessory divides the
primary light beam into multiple
paths that are directed towards
your viewing tubes and the two
auxiliary ports for image
management and/or assistant
viewing
6134150
Double Beam Splitter-Inclined
(DBSi): Serves the same purpose
as the DBS but in addition it
provides a 60˚ inclined position,
creating greater comfort, ideal for
prolongued use applications or
where patient is always supine.
6134160
Extender:
Provides optical extension for a
more comfortable working angle.
6134165
3
Rotoplate:
Enables you to comfortably view
your specimen at an angle by tilting
the magnichanger andstraightening
your viewing tube. The
Rotoplatelate has discrete positive
indexing positions to engage and
hold your ideal viewing angle.
6134115-801
Adapter for Sony Handycam:
This adapter facilitates in mounting
your sony handycam HDR-CX-130
with either DBS or DBSi.
6134120
Assistoscope:
A secondary observation tube
adapter enabling assistant viewing.
6134115
4
CCD Camera Adapter:
A CCD camera mounts which
enables you to mount your CCD
camera on either DBS or DBSi for
real time imaging.
6134110
DSLR Camera Adapter:
This photo tube allows various
DSLR cameras to be connected to
your LABOMED microscope.
Attachable camera types:
Configuration
Camera Models
6134130+6134130-110
Canon DS126291
6134130+6134130-111
Nikon D60
6134130+6134130-801
Sony HDR-CX-130
6134130
Bayonet Mount for Nikon, Canon,
and Sony Cameras:
A camera mount that enables you to
mount your DSLR camera with
either DBS or DBSi. Remove the
camera lens, attach the bayonet
mount on the camera and attach this
to the DSLR Camera Adapter.
6134130-110 or 6134130-111 or 61434130-801
5
3
Installation of Accessories Installation of DBSi with
Assistoscope and DSLR Camera
Adapter:
1. Loosen the locking screw① of
the magnichanger.
5
6
3
2. Install the DBSi ③ into the
magnichanger dovetail② and
tighten the locking screw of the
magnichanger.
4
2
3. To install Assistoscope④ into
the DBSi, insert into the DBS or
DBSi side port and tighten the
locking ring provided.
4. To install DSLR camera
adapter⑤ into the DBS or
DBSi and tighten the ring ⑥
provided.
1
Installation of DBS with Sony
Handycam adapter or CCD camera
adapter:
1. Loosen the locking knob① of the
magnichanger.
5
6
2. Install the DBS③ in the
magnichanger dovetail
interface②.
3. Tighten the locking knob① of
magnichanger.
4. To install Sony Handycam
adapter in the DBS, insert
handycam adapter④ into DBS
and tighten the ring provided.
3
4
2
1
5. To Install CCD Camera adapter
in DBS, insert adapter⑤ into the
DBS and tighten the ring⑥
provided
6
Installation of Extenders and
Rotoplate:
1. Loosen the locking knob① of
magnichanger.
2. Install the extender② in the
magnichanger dovetail
interface③ and lock the locking
screw①.
5
4
2
3
3. Loosen the locking screw④ of
extender and install rotoplate⑤
into the extender dovetail. To
secure, tighten locking knob④.
1
7
4
Installation of Cameras Installation of Canon, Nikon and
Sony DSLR cameras.
2
1. Remove zoom lens mechanism
from the camera (as shown in
separate box).
1
4
2. Install bayonet mount on adapter
③ of DSLR by tightening the knob
④ provided. Now insert DSLR ②
camera on the bayonet mount①.
3. Insert video adapter ③ into the
DBSi and tighten the ring provided
3
Installation of CCD camera and
Sony Handycam:
1. Install sony handycam① on its
adapter② and secure it by
rotating ring provided, clockwise.
3
1
2. Place your CCD camera③ on the
adapter④ and secure it by
rotating it clockwise.
4
2
8
5
Care & Maintenance Care instructions:
o
o
o
o
o
o
o
o
o
o
Keep accessories away from dust when not in use (i.e. keep dust cover on when not in use). Remove dust with a pneumatic rubber bulb and soft brush. Use special optical cleaning cloths and pure alcohol for cleaning lenses and eyepieces. Protect your instrument from moisture, fumes, acid and cosmetic materials. Do not store any
chemicals close to your instrument. Protect your instrument from improper handling. Never install other device sockets, unscrew
optical assemblies or mechanical parts unless explicitly instructed to do so in this manual. Protect your instrument from oil and grease. Never oil or grease the guide surfaces or
mechanical parts. Remove coarse contamination using a damp disposable cloth. For proper care of camera, keep optical component clean using a lint-free cloth. Wet an
optical cleaning cloth with methanol or glass cleaner. Do not use ethanol or other aggressive
reagents as those can damage optical coatings. Do not clean products with optical components in a cleaning/disinfecting device or ultra
sound bath. LABOMED MaxLite® coatings are very resistant. Coatings would be preserved for a life time
of use should you follow all instructions above. Tropical environment/fungus:
LABOMED employs certain safety precaution in its manufacturing techniques and materials.
Other preventive measures include:
o
o
o
o
o
Keep optical parts clean at all times. Use and store accessories in a clean environment only. Store under UV light when not in use. Use in a continuously climate-controlled rooms only. Keep moisture away and cover using a plastic filled with silica gel. Occupational safety and health protection: Observe work safety and take all necessary health safety precautions of persons
responsible for processing contaminated products.
Current regulations of hospital hygiene and prevention of infection must be observed in the
preparation, cleaning and disinfection of all LABOMED instruments and accessories.
9
Instructions:
Workplace:
Remove surface contamination with a paper towel.
Reprocessing:
Recommend reprocessing a product immediately after use.
o
o
o
Cleaning:
Needed: water, detergent, spirit microfiber cloth.
Flush the surface with running water (<40˚ C), using detergent if necessary.
Also use laboratory/medically approved reagents to clean optical components.
Dry optical components using optical cloth; dry the rest of the product using a microfiber
cloth.
Service:
Service as and when informed by your LABOMED after-sales service representative or
dealer.
10