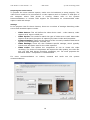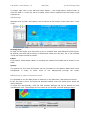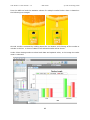
1
PDF Draft version 1.0
Tobii Support
Support Phone Sweden: +46 8 6636003
Support Phone USA: +1 703 738 1321
Email: [email protected]
Web: www.tobii.com
Tobii Studio 1.2 User Manual
Please note that this document is under development. Please check the Tobii
website www.tobii.com for updated versions of this manual.
Manual Version 1.0
PDF Draft, June 2008
All rights reserved. Content subject to change without notice.
© Tobii Technology AB
Tobii Studio 1.2 User Manual v. 1.0
* PDF Draft *
© Tobii Technology 2008
Table of Contents
1. Introduction .................................................................................................. 6 2. Application areas ............................................................................................ 6 3. Create a new project ...................................................................................... 8 4. Design and Record ......................................................................................... 9 4.1 Design ....................................................................................................... 9 4.1.1 Adding Media......................................................................................... 9 4.1.2 Media and stimuli types ........................................................................ 11 4.2 Calibration ................................................................................................ 23 4.2.1 Track Status ........................................................................................ 23 4.2.2 Calibration Options ............................................................................... 24 4.2.3 Calibration procedure ........................................................................... 27 4.3 Recording ................................................................................................. 29 4.4 Monitoring and Logging .............................................................................. 32 4.4.1 Local Live Viewer ................................................................................. 32 4.4.2 Coding Scheme.................................................................................... 33 4.4.3 Tobii Studio Logger .............................................................................. 35 4.4.4 Log events in Tobii Studio Logger ........................................................... 38 4.4.5 Post analysis logging ............................................................................ 39 5. Replay ........................................................................................................ 41 5.1 Replay of the recording ............................................................................... 42 5.2 Replay settings .......................................................................................... 43 5.3 Events...................................................................................................... 45 5.4 User Camera ............................................................................................. 46 5.5 Segments ................................................................................................. 46 5.6 Scenes ..................................................................................................... 49 6. Visualization ................................................................................................ 56 6.1 Getting Started with Visualizations ............................................................... 56 3
Tobii Studio 1.2 User Manual v. 1.0
* PDF Draft *
© Tobii Technology 2008
6.2 Common tools and settings for the visualizations ............................................ 57 6.2.1 Web page grouping .............................................................................. 58 6.3 Filter ........................................................................................................ 62 6.4 Heat Map .................................................................................................. 64 6.5 Gaze Plot .................................................................................................. 68 6.6 Cluster ..................................................................................................... 72 6.7 Bee Swarm ............................................................................................... 73 6.8 Area of Interest ......................................................................................... 77 6.9 Statistics .................................................................................................. 82 6.9.1 Variables ............................................................................................ 86 7. Settings ...................................................................................................... 93 7.1 Computer Settings ..................................................................................... 93 7.1.1 Set Screen Resolution and Colors ........................................................... 93 7.1.2 Configure Monitor Setup (Local Live Viewer Setup) ................................... 93 7.2 Tobii Studio Settings .................................................................................. 94 7.2.1 Screen and Video Capture settings ......................................................... 95 7.2.2 Eye Tracker Connection ........................................................................ 96 7.2.3 Calibration .......................................................................................... 97 7.2.4 Fixation Filters ..................................................................................... 97 7.2.5 Miscellaneous .................................................................................... 100 7.3 Participant Data ....................................................................................... 101 7.4 Minimizing to system tray ......................................................................... 104 8. Export and Import ...................................................................................... 106 8.1 Export recording segments as movie .......................................................... 106 8.2 Export data for statistical analysis .............................................................. 107 8.2.1 Export to SPSS or MatLab ................................................................... 108 8.3 Text Export ............................................................................................. 109 8.4 Import, export and merge tests and projects ............................................... 112 8.4.1 Export .............................................................................................. 112 8.4.2 Import.............................................................................................. 113 4
Tobii Studio 1.2 User Manual v. 1.0
* PDF Draft *
© Tobii Technology 2008
8.4.3 Merge............................................................................................... 114 9. Installation ................................................................................................ 115 9.1 Installation instructions ............................................................................ 115 9.2 License ................................................................................................... 115 10. Appendix ............................................................................................... 116 Appendix I - Event Data ................................................................................. 116 Appendix II – Text Export Columns - Data Definition .......................................... 117 5
Tobii Studio 1.2 User Manual v. 1.0
* PDF Draft *
© Tobii Technology 2008
1. Introduction
Tobii Studio and the Tobii Eye Trackers can be used to analyze many different things in
different scenarios. Different study setup examples can be found in the system
recommendations for the eye tracker used. The different setups or connection
alternatives for the TX-series eye trackers can be found in the guide sent with the eye
tracker. The Tobii Studio analysis software is an application designed to provide easy-touse yet flexible and powerful recording and analysis of eye tracking data.
The package facilitates efficient multi-person and multi-trial studies in the fields of
experimental psychology, commercial usability, advertising, low-vision studies and more.
To facilitate meaningful studies, the software combines the collection and analysis of eye
gaze data with numerous other data sources, including keystrokes, external devices,
video recordings, web browser activities and more.
Installation instructions can be found on the CD and in the chapter installation.
A valid license key is needed to run Tobii Studio. The license can be found on the Tobii
Studio CD cover. It can also be obtained from Tobii by contacting support.
An online help can be opened by clicking the question mark in the different views
in Tobii Studio. The help page for that specific part of the software will appear.
The online help can also be reached from the Help menu.
2. Application areas
With its intuitive workflow and powerful tools, Tobii Studio is the optimal tool for
gathering data from a large number of test participants cost-efficiently. Extensive data is
effortlessly taken to a high level for in-depth analysis, providing an invaluable
understanding of individual user behavior and statistical results from several users.
The intuitive workflow of Tobii Studio enables practitioners, researchers, and students to
work with the system without extensive training or the participation of experts.
Usability studies
Tobii Studio is very well suited for evaluating user experience in regard to:
•
•
•
•
•
•
Websites
Software
Computer games
Interactive TV
Handheld devices
Other physical products
Advertising testing
Tobii Studio is ideal for testing advertising design on a variety of media:
6
Tobii Studio 1.2 User Manual v. 1.0
•
•
•
•
•
* PDF Draft *
© Tobii Technology 2008
Packaging and shopping shelf design and placement
Web advertising
TV commercials
Print advertising, digitally scanned and presented on a monitor.
Print advertising, using the actual physical print.
Psychology & Physiology Research
Tobii Studio is suitable for a wide range of psychology and physiological experiments,
such as:
•
•
•
•
•
Infant Research
General psychological response studies, including the use of scan-paths, gaze
distribution, gaze response times, and manual response times
Studies of autism, ADHD, and schizophrenia
Reading studies
Studies of ocular-motor behavior and vision deficiencies
7
Tobii Studio 1.2 User Manual v. 1.0
* PDF Draft *
© Tobii Technology 2008
3. Create a new project
A project in Tobii Studio can contain several tests, every test has a separate timeline and
separate results, the participants in a project are shared between the different tests.
Create a new project by clicking Create New Project or select File -> New Project...
Enter the name of the project and click Create.
Enter the name of the first test to be included in your study and click OK.
A project can also be created or opened from the File menu in Tobii Studio.
8
Tobii Studio 1.2 User Manual v. 1.0
* PDF Draft *
© Tobii Technology 2008
4. Design and Record
In the Design and Record view, stimuli are selected by adding media to a timeline and
recordings started by pressing a button.
4.1 Design
Select or create a test
The Test List shows a list with all test setups in the study. Click on the test you want to
view or edit. Add a test by clicking Add New Test, enter a name in the window appearing
and click create. The test can also be renamed under the Test tab.
Next step is to add media to the test, see next chapter.
4.1.1 Adding Media
The media can be added to the test by dragging-and-dropping the media icon from the
toolbar to the timeline. Different kinds of media can be mixed on the timeline.
9
Tobii Studio 1.2 User Manual v. 1.0
* PDF Draft *
© Tobii Technology 2008
Adding Multiple Images
Multiple images or movies can be added from Explorer using drag-and-drop. Open the
folder containing the images and mark all images that are to be added to the study. Use
drag-and-drop to add them to the Design and Record view in Tobii Studio.
Select show time option for the images or movies. Read more about the options under
images or movies. To show the images in random order, check the box, "Randomize
Images".
10
Tobii Studio 1.2 User Manual v. 1.0
* PDF Draft *
© Tobii Technology 2008
Edit Media
Highlight and right-click on a media to edit or delete it. In the edit view, the media name,
media path and view time option can be changed.
The test will be locked once recordings have been made in the test. In this case the test
has to be unlocked before the media can be edited. This is done by clicking the lock
symbol in the Design and Record view according to the image below.
Randomize Order
Highlight, right-click on a media and select randomize to set the media to be shown in
random order.
4.1.2 Media and stimuli types
11
Tobii Studio 1.2 User Manual v. 1.0
* PDF Draft *
© Tobii Technology 2008
Different kind of Media can be analyzed using Tobii Studio. The Media shown in this
analysis software is sometimes also referred to as stimuli.
The media types that can be analyzed using Tobii Studio are:
•
Instructions: They are shown as a text on an optional background image can be
added to the study.
Images: Any picture format can be used. The image will be shown in actual size.
Check the image size and screen resolution to make sure the image is shown
correctly.
Movies: Movies have to be in AVI format. Make sure the AVI image size is the
same as the resolution being used during recordings if the AVI is to be shown in
full screen mode. Also check that required video codecs are installed on the
computer.
Web: Web pages can be analyzed. Simply enter the URL, web address, for the
website. It is only possible to use Internet Explorer for web studies.
Screen Recording: This media type is used when analyzing software or just
about anything shown on the computer screen.
Scene Camera: A camera can be used to analyze how people watch physical
objects. It can also be used to film whiteboards, etc., watched by the test
participant.
External Video: This option is used to analyze software, games, a program
running on a different computer, TV, etc.
•
•
•
•
•
•
Instructions
Instructions such as a task for a web page or which button to press to see the next
image can be added to the timeline. An instruction can be placed at the beginning or
between other media elements on the timeline.
The instruction is shown as a text on optional background.
Element Name
An optional name can be typed on the line under Element Name.
Preview
Add the instruction in the Preview text field. The text font can be changed by clicking the
Font... button and the color of the text can be selected in the drop-down menu.
A color or optional image can be selected as a background. Select by clicking the Color or
Image check box. Color is selected from the drop-down menu and the image is selected
by browsing the computer.
The small window to the right under the Preview section shows what the instruction will
look like. Note that the instruction will be in full screen mode during the recording and
that this window only shows a preview.
Show time
•
•
View time: a view time can be selected by pressing the up and down arrows or
typing a time. When the view time is up, the next media on the timeline will be
shown.
Mouse click: the instructions will be shown until someone clicks the mouse. This
can be done by the test participant or the test leader. Thereafter the next media
on the timeline will be shown.
12
Tobii Studio 1.2 User Manual v. 1.0
•
* PDF Draft *
© Tobii Technology 2008
Key press: the instructions will be shown until any key on the keyboard is
pressed. This can be done by the test participant or the test leader. Thereafter the
next media on the timeline will be shown.
Enable for Visualizations
This makes it possible to select whether heat maps, gaze plots, etc., are to be created for
the instructions. Saving them for visualizations will make the project larger. For ForSight
customers, the stimulus will be regarded as an image stimulus for the media in the
visualization.
Image
Element Name
A name will be suggested by the software. If you want to change the name simply click
on the name line and enter a new name. The name chosen here will be the name shown
in all the visualization tools such as the hot spot and the statistics.
Image Source and Size
Browse to find the image that should be included in the test.
Make sure the image is the size it should be when being shown in the test. Images
shown in Tobii Studio during recording will be actual size. Tobii Studio will not resize
images, but they will have to be resized to be shown on optional parts of the screen. To
view the image in full screen mode the image has to have the same size as the screen,
which is the screen resolution. Read more in the chapter computer settings.
Resize Image
An optional image editor can be used to resize images. Common programs in XP are
Microsoft Office Picture Manager and Microsoft Photo Editor. Microsoft Office Picture
13
Tobii Studio 1.2 User Manual v. 1.0
* PDF Draft *
© Tobii Technology 2008
Manager is found under Windows Start -> All Programs -> Microsoft Office Tools. To
resize, go to image object and select resize. Go to File and save the image. The new
resized image can now be used in Tobii Studio.
Microsoft Photo Editor is found under Windows Start -> All Programs -> Microsoft Office
Tools ->. To resize the image go to the Image menu and select Resize.
More recommendations on image editors can be found in the system recommendations.
Use as Dummy Media
This option is developed for ForSight Customers. It can be used when images are shown
in a test but where data should be obtained for only one or a few.
If the box, use as Dummy Media, is checked, no visualization data will be available for
the image. ForSight Customers are not charged for images marked as Dummy Media.
The image will be shown on the eye tracker screen during recording but it will not be
possible to get a gaze plot, hot spot, etc., for the image.
Show Time
•
•
•
View time: A view time can be chosen by pressing the up and down arrows or
typing a time. When the view time is up, the next media on the timeline will be
shown.
Mouse click: The image will be shown until someone clicks the mouse. This can
be done by the test participant or the test leader. Thereafter the next media on
the timeline will be shown.
Key press: The image will be shown until any key on the keyboard is pressed.
This can be done by the test participant or the test leader. Thereafter the next
media on the timeline will be shown.
14
Tobii Studio 1.2 User Manual v. 1.0
* PDF Draft *
© Tobii Technology 2008
Movie – AVI
Element Name
A name will be suggested by the software. If you want to change the name, simply click
on the name line and enter a new name. The name chosen here will be the name shown
in all the visualization tools such as the hot spot and statistics.
Movie Source
Browse to find the movie that should be included in the test. Make sure the video is the
size it should be when being shown in the test. Tobii Studio will not resize the video. If
the movie shall cover the full screen make sure it is the same size as the screen
resolution. Also make sure to use a video codec supported by Tobii Studio. More
information about screen resolution is found in the chapter computer settings.
Movies added to a test in Tobii Studio have to be in AVI format. The AVI contains video
and audio which can be encoded with different codecs. Make sure the codecs selected are
installed on the computer where the tests are run in Tobii Studio. Microsoft Video 1,
Techsmith and MP3 are installed on all Microsoft computers. Other codecs have to be
installed by the user. Information on other codecs can be found in our system
recommendations.
Dummy Media
If set to dummy media, the movie will be shown during the recordings but will not be
available for analysis in the visualization view. ForSight Customers are not charged for
movies marked as Dummy Media.
Show Time
There are different options for ending the viewing of an AVI. After the movie has ended,
the next media on the timeline will be shown. If the movie is the last media on the
timeline the recording will end.
•
Movie End: The movie will be shown and gaze data recorded until the movie
ends.
•
Mouse Click: Movies can be ended by clicking the mouse
•
Key Press: Movies can be ended by pressing any key on the keyboard if this
option is checked.
15
Tobii Studio 1.2 User Manual v. 1.0
* PDF Draft *
© Tobii Technology 2008
Web
All web pages will automatically be opened in Internet Explorer. It is currently only
possible to use Internet Explorer for web studies when using the web stimulus in Tobii
Studio.
Element Name
A name will be suggested by the software. If you want to change the name simply click
on the name line and enter a new name.
Start URL
Sets the address of the web page your recording will start from. There is no need to
specify http://
Stop recording of web
To stop the recording and to close the web browser press F10. The next media on the
timeline will be shown when stopping the recording of the web page. If the web page was
the last media on the timeline in the test the recording will be ended.
Allow multiple windows
More than one browser window may be opened during recording. Only the gaze data and
screen information for the active browser window will be recorded.
Block file download
This blocks the browser from starting download of files to the hard disk if the user clicks
a download link.
16
Tobii Studio 1.2 User Manual v. 1.0
* PDF Draft *
© Tobii Technology 2008
Browser size
A fixed browser size can be defined with height and width of the browser window as well
as location on the screen. Note: This is the origin and size of the whole browser window
not the origin and size of the internal window showing the web page. When the option
Fullscreen is selected the browser will open up in full screen size at the start of the
recording.
Screen recording
Screen Recording is used to record a video of what happens on a screen during gaze
recording. This may be used to achieve a good understanding of gaze behavior while
using different types of software on a computer.
The screen recording is intended for recording low-intensity graphics such as when the
subject is using software such as a word processor, PowerPoint, etc. For highly graphicsintensive applications such as replaying a full quality movie or playing a computer game,
the AVI media or the External video media are recommended instead.
Preparing the screen recording
Drag the screen recording media icon to the timeline, give the media element a name
and click OK. Recordings can now be started. If specific software is to be analyzed, it can
be good to have this opened in the background before starting a recording. To stop the
recording press F10.
17
Tobii Studio 1.2 User Manual v. 1.0
* PDF Draft *
© Tobii Technology 2008
Data recorded
At the start of the recording, the Tobii Studio application is hidden and whatever is
present on the computer desktop is shown. The subject is free to use any type of
application on the computer. Eye gaze data is recorded, as well as a movie of the screen
contents. Keystrokes and mouse clicks are also recorded and saved as events.
The screen recording video is recorded at full screen resolution.
Scene Camera
The scene camera media are intended to be used in combination with the X50 or X120
eye-tracker hardware when video data is collected from a physical scene using a standalone camera. This media type is very similar to the external video media, with the
addition that it also performs a point-of-view compensation to compensate for the fact
that the scene camera is placed at a certain angle relative to the stimuli and the user.
Setup
The scene camera is used for different kinds of setups. See examples under X120
setups and X50 setups in the system recommendations.
Please make sure the eye tracker is properly setup and that the correct parameters, like
distances and angles, have been added in the X120 or the X50 configuration tool before
you do the scene camera setup in Tobii Studio.
A typical scene camera setup will contain the following key items:
•
Some sort of stimulus presented in the physical world. This can, for example, be a
collection of objects that are moved around on a table. For proper gaze recording,
the stimuli should be positioned in a 2-dimensional plane to the greatest extent
possible. Any deviations from the plane (for example, caused by the height of
objects placed in the plane) will cause parallax errors in the gaze estimation.
•
A “calibration grid” which is placed on the surface that is being tracked is used for
individual calibrations and to align the point-of-view calibration.
•
A scene camera, which is used to generate a video of the scene presented to the
test subject. The video from the scene camera will be recorded in Tobii Studio.
•
A Tobii X50 or X120 eye tracker and the correct settings in the configuration tool.
•
Computer with the Tobii Studio software.
18
Tobii Studio 1.2 User Manual v. 1.0
* PDF Draft *
© Tobii Technology 2008
Preparing the scene camera
To prepare the scene camera capture, make sure the hardware is setup properly. The
video source needs to be connected to a video capture card or FireWire or USB port of
the computer where Tobii Studio is running. Please refer to the System
Recommendations or contact Tobii support for information on recommended video
capture cards and setups.
Settings
In the prepare view for Scene Camera, there are a number of settings describing video
source and intended capture results.
•
•
•
•
•
Video Source: This will define the video device used – video camera, video
capture card, input via USB, etc.
Video Inputs: This needs to match the type of video source used. Most video
capture cards have the option of capturing at least S-Video and Composite.
Camera Settings: These are the settings of the currently installed camera and
typically include brightness, contrast, etc.
Video Settings: These are also hardware specific settings, which typically
include size and frame rate for the video captured.
Video Codec: This defines the compressor to use to create the video
recording. The choice of compressor will impact the video quality, the video file
size, the CPU load during recording, portability, etc. For most purposes the
Microsoft Video 1 compressor is recommended.
For more recommendations
recommendations.
on
codecs,
19
cameras
and
cards
see
the
system
Tobii Studio 1.2 User Manual v. 1.0
* PDF Draft *
© Tobii Technology 2008
Calibration Setup
After specifying the video capture settings, a perspective calibration has to be made in
order to correlate the captured video to the physical world. In order to define how this
calibration grid is positioned relative to the scene camera, a perspective calibration is
required. This allows Tobii Studio to recalculate all gaze data to accurately indicate where
on the presented scene the subject has been looking.
To perform the perspective calibration, place the calibration grid on the surface to be
tracked. Instead of using the calibration board, calibration dots can be drawn on a paper
or be shown on a white screen. Below is an example of a calibration grid for a 9-point
calibration and for a 5-point calibration.
Adjust the settings for the video characteristics as described above. Use the preview
panel to adjust the scene camera so that it captures the area on which eye tracking is to
be conducted. Fixate the camera so that it cannot accidentally be moved and click the
New button in the Calibration Image section of the Scene Camera Setup.
20
Tobii Studio 1.2 User Manual v. 1.0
* PDF Draft *
© Tobii Technology 2008
The scene camera now shows an image of the scene, with a polygon drawn on top.
Adjust the polygon by dragging the four squares in the polygon so that these are
precisely on the corner calibration points. To make sure it is set properly you can enlarge
the calibration image by pressing the zoom button. See more about how to set up the
hardware and calibration board in the document, How to set up the Tobii x50 or the X120
Manual or Quick Start Guide.
Performing Calibration
When calibrating a test subject for a real world setting with physical objects it is
advisable to use the manual calibration in Tobii Studio. The manual calibration settings
are found under Tools -> Settings -> Calibration. Read more about how to perform a
manual calibration in the Calibration chapter.
Data recorded
During recording, Tobii Studio will record a complete video of the input from the scene
camera. Gaze data, as well as keystrokes and mouse clicks will also be recorded. Gaze
coordinates are in the calibration grid and range from (0.0) to the resolution of the scene
camera movie.
Important notes - Minimizing parallax errors
The perspective calibration is intended to compensate for the difference in angle from the
calibration grid and the scene camera.
However, this only compensates for angles as seen in the stimulus plane. If threedimensional physical objects are used as stimuli and these have a certain height that
takes them far away from the stimulus plane, this will cause a parallax error. The size of
this error is related to the difference in point of view from the scene camera and the test
subject.
Therefore, to minimize parallax errors, it is recommended that you place the scene
camera at an angle fairly close to that of the test subject, for example, slightly behind
and to the side of the subject or immediately over the subject’s head.
External Video
External video capture media is intended to be used when the video data comes from a
source other than the Tobii Studio computer. Tobii Studio records a video input from
most video sources such as a movie, which can later be used for gaze analysis in Tobii
Studio.
This media type is recommended when presenting stimuli with software other than Tobii
Studio or when doing eye tracking on other dynamic stimuli generated outside Tobii
Studio such as console games, interactive television or resource-intensive computer
games played on another computer.
Video Source
Different video sources are used depending on what is to be captured. Examples of
sources are listed here:
21
Tobii Studio 1.2 User Manual v. 1.0
•
•
•
•
•
* PDF Draft *
© Tobii Technology 2008
Video capture cards for VCR input
VGA capture cards for input from another computer
VGA to USB converter to capture VGA signal from another computer via USB
Digital Camera via FireWire (T/X-series)
Video or web camera via USB streaming
Preparing the external video capture
To prepare the external video capture make sure the hardware is set up properly. The
video source needs to be connected to a video capture card, FireWire or USB port of the
computer where Tobii Studio is running. Please refer to the System Recommendations or
contact Tobii support for information on recommended video capture cards and setups.
Settings
In the setup view for External video capture, a number of settings defining the video to
be captured can be defined
•
•
•
•
•
•
Video Source: This will define the video device used – video camera, video
capture card, input via USB, etc.
Video Inputs: This needs to match the type of video source used. Most video
capture cards have the option of capturing at least S-Video and Composite.
Video Codec: This defines the compressor to be used to create the video
recording. The choice of compressor will impact the video quality, the video file
size, the CPU load during recording, portability, etc. For most purposes, the
Microsoft Video 1 compressor is recommended.
Camera Settings: These are the settings of the currently installed camera and
typically include brightness, contrast, etc.
Video Settings: These are also hardware-specific settings, which typically include
size and frame rate for the video captured.
Use video as stimulus: When this option is checked Tobii Studio will display the
video input on the subject screen during recording.
22
Tobii Studio 1.2 User Manual v. 1.0
* PDF Draft *
© Tobii Technology 2008
Data recorded
During recording, Tobii Studio will record a complete video of the input from the video
source. Gaze data, as well as keystrokes and mouse clicks will also be recorded.
Notes
When performing video capture, the video signal needs to be converted from an analog
to a digital signal in most cases. Thereafter, it needs to be captured and compressed into
a movie. Because of this, delays are induced that affect the precision in timing of the
video. Also, at high CPU load, some video capture devices lose video frames occasionally.
This means that although gaze data and trigger data is timed with the same precision as
for all other Tobii Studio media types, the synchronization of gaze data in relation to the
captured video may be degraded. Make sure to use a high performance computer.
Recommended computers, video capture cards and codecs can be found in the system
recommendations.
4.2 Calibration
The calibration “teaches” the eye tracker the characteristics of a particular subject’s eyes.
This is necessary for accurate estimation of a subject’s gaze point.
4.2.1 Track Status
The track status meter is shown before each calibration and can also be displayed in the
Live Viewer. It can also be activated directly from the View menu.
The purpose of the track status meter is to verify that the test subject is in the correct
position in front of the eye tracker, and that the system is able to properly track the
subject.
The track status meter shows a black box with two white circles and a status bar at the
bottom. The black box represents the field of view of the eye tracking camera and the
white dots represent the eyes of the test subject. As long as at least one of the subject’s
eyes is within the box, the system can track eye movements.
23
Tobii Studio 1.2 User Manual v. 1.0
* PDF Draft *
© Tobii Technology 2008
For best results, both eyes should be in the middle of the box as shown in the picture
above. It is also recommended to start each recording session by having the subject’s
eyes placed in the middle of the track status meter at a distance of about 60 cm for the
1750/X50 or at a distance of 70 cm for the T60/T120/X120. This enables the subject to
move as much as possible during the test without moving outside the box. The colored
status bar indicates the tracking ability. If the bar is colored green and is not flickering,
the system is tracking the test subject well. If the status bar is red or flickering between
red, yellow and green, the system has difficulties tracking the particular subject for some
reason. In most cases, this means that tracking will not be successful, even though it is
possible to try by continuing with calibration and recording
4.2.2 Calibration Options
The default calibration in Tobii Studio consists of five dots shown on the screen during
the calibration procedure.
The calibration settings are found under Tools -> Settings -> Calibration
Regular calibration
In the regular calibration, 5 dots are shown as a default. It is possible to change the
number of calibration dots as well as the color of the dots and the background in the
calibration setup.
Calibration Settings
Set the number of calibration points that are to be shown during calibration by checking
one of the alternatives.
Select background color from the drop down menu. Try to select a calibration background
color similar to the stimuli (media) background color for best tracking quality.
Calibration Type
The alternative Regular calibration is checked as the default type. Verify that it is
selected if other calibration types have been used.
Regular calibration settings
The color of the calibration points is set from the dropdown menu.
24
Tobii Studio 1.2 User Manual v. 1.0
* PDF Draft *
© Tobii Technology 2008
Manual calibration
Manual calibration is used when the scene camera media is used. Manual calibration also
provides the ability to do a step-wise calibration, which is more suitable when calibrating
people with poor vision or people who have problems following the dots in the regular
calibration. The manual calibration is found under Tools -> Settings and the Calibration
tab.
Manual Calibration Settings
The color of the lines in the cross can be changed under the Calibration tab where
manual calibration is selected.
How to use it
Manual calibration is an operator-paced calibration procedure with special graphics during
the calibration procedure. The number of calibration points and their locations are the
same for the manual calibration as for normal calibration, but instead of a pulsating dot,
two lines intersecting the calibration point are displayed. When the space bar is pressed,
the lines change color while calibration is performed and the lines move to the next
calibration point
The calibration is performed after the space bar is pressed. Make sure the test subject
doesn’t move his/her gaze at the sound of the key press
25
Tobii Studio 1.2 User Manual v. 1.0
* PDF Draft *
© Tobii Technology 2008
When the participant has looked at all points, the calibration result will be shown. If the
calibration went well, press Accept and the recording start dialog will be shown.
Infant Calibration
Infant calibration is used when doing studies on infants. Small movies are shown where
the dots are normally shown. This works as an attention grabber suitable for small
children. It can also be used when there are problems giving calibration instructions.
Infant calibration is found under Tools -> Settings and the Calibration tab.
Infant Calibration Settings
Select the movie to show as the calibration point, and optionally, one to show as an
attention grabber. Some sample movies are included in the installation and can normally
be found in the Infant Calibration AVIs folder, under My Documents -> Tobii Studio Media
Files.
To see the instructions for the calibration directly on the screen during the calibration
procedure check the box "Show infant calibration instructions".
26
Tobii Studio 1.2 User Manual v. 1.0
* PDF Draft *
© Tobii Technology 2008
It is also possible to set the background color and the color of the screen in the
calibration setup.
How to calibrate
A movie (AVI) will be shown on the screen instead of the dot that is shown in the regular
calibration. Infant calibration is an interactive calibration mode where an operator uses
the keyboard to control the calibration procedure.
To show the calibration animation selected in the settings dialog, press the right arrow
key. When the subject is watching the animation, press the right arrow key again to start
collecting calibration data. It is assumed that the subject will focus on the center of the
calibration animation. When enough data points are collected, the calibration will move
on to the next calibration point. The operator can again press the right arrow to start
collecting data. This is repeated until all calibration points are done.
Tobii Studio can also display an attention grabbing AVI if test subjects respond poorly or
grow tired of the calibration AVI. To show it, press the up arrow key. To hide any
animation playing, press the left arrow key. The attention grabbing AVIs that come with
Tobii Studio are placed under My Documents -> Tobii Studio Media Files -> Infant
Calibration AVIs.
To control the calibration process, the following keys are used:
•
•
•
Right arrow: Displays the calibration AVI at the next calibration point. If the
calibration AVI is already visible, a calibration is made on that point before
proceeding to the next one.
Left arrow: Pause. Hides the calibration AVI or the full-screen attention-grabbing
AVI
Up arrow: Displays the attention grabbing AVI
4.2.3 Calibration procedure
Positioning for Calibration
Ensure the test participant is sitting comfortably in front of the Tobii at a distance of
approximately 60 cm or 70 cm. The distance depends on the eye tracker model. Please
read more in the eye tracker guide that was sent with the eye tracker. Open the Track
status window found under View -> Show Track Status. Adjust the chair, table, or eye
tracker stand until two dots representing the eyes are shown in the middle of the track
status window and the status color on the bottom of the track status window shows
green.
Perform a Calibration
To calibrate a participant select the Record icon at the bottom of the Design and Record
view. Once a participant is created or selected and the Continue button is clicked, the
calibration dialog with a track status will appear. Make sure the track status looks good
and click the Calibrate button.
27
Tobii Studio 1.2 User Manual v. 1.0
* PDF Draft *
© Tobii Technology 2008
During calibration, the test participant should concentrate on focusing the eyes on these
points. The test participant does not have to keep his/her head still during calibration – in
fact, relaxed movement tends to improve calibration quality.
The Tobii eye tracker has unique “long-lasting” calibrations, which allow individual
calibrations to be re-used for later test sessions. However, for maximum accuracy, it is
recommended to perform a new calibration before each separate test session.
There are several options to customize the calibration procedures to suit a particular
subject or study. These settings are found under the setup for each calibration option.
Calibration Result
When the process is complete, a screen will be displayed showing the calibration result.
If the calibration result is good, click Accept to start a recording. If the result for one or
more calibration points is not satisfying, mark the points for recalibration and click the
Recalibrate button.
Recalibrate
The calibration plot shows error vectors and if the lines are long it is good to recalibrate.
It is also good to recalibrate those calibration points that were not picked up by the eye
tracker. Mark points to improve calibration for and press recalibrate to start a new
calibration.
If the calibration was not successful the calibration result “Not Enough Calibration Data”
will be displayed, when this is shown make sure the test participant is placed correctly in
front of the eye tracker and select Recalibrate.
28
Tobii Studio 1.2 User Manual v. 1.0
* PDF Draft *
© Tobii Technology 2008
4.3 Recording
Start a recording by pressing the Start Recording button. A calibration will be performed
before the actual recording starts. More information about this can be found under the
chapter, calibration. Follow the instructions on the screen.
Start recording
The Recording button can be found in the Design and Record view in Tobii Studio. Click
the button and follow the instructions on the screen.
Before recording
Make sure Tobii Studio is connected to the eye tracker and that study settings such as
user camera and participant data are made before starting a recording. Read more in the
chapter study settings. Media to show during the recording also have to be set up. Read
more in the chapter design.
End recordings
There are different show time options for different media types. See more in the chapter,
media. Recordings can always be ended by pressing the F10 or Esc button.
29
Tobii Studio 1.2 User Manual v. 1.0
* PDF Draft *
© Tobii Technology 2008
Perform a recording
1. Place the participant in front of the eye tracker. Make sure that the person is
sitting comfortably in front of the tracker at a distance of approximately 70 cm.
The distance depends on the hardware used; 70 cm is valid for the TX Series. For
the 50-series the distance is 60 cm (please see our hardware guides for more
information).
2. Click
Start
Recording
in
the
Design
and
Record
view.
A dialog for filling out participant name and data appears. Participants that have
already been created can be selected from the Use Existing Participant tab. The
data can be changed at any time after the recording.
3. Click Continue to start the calibration of the participant.
4.
A track status box appears. Make sure the eyes are detected by the system as in
the picture below and click Start.
30
Tobii Studio 1.2 User Manual v. 1.0
* PDF Draft *
© Tobii Technology 2008
5. Calibration points appear on the screen. Instruct the participant to look at the
points as they move over the screen. The calibration will stop automatically when
the configuration is completed. Note that the calibration settings can be changed
in the settings menu.
6. When the calibration is done, a window with the calibration result appears. The
shorter the lines out from the points, the better the calibration. The calibration
below is successful. Read more in the calibration chapter.
7. Click Accept if the calibration is fine; otherwise click Recalibrate to improve the
calibration.
8. The recording window appears. Enter a name for the recording. Make sure to use
informative names.
9. Click Start Recording to show the media setup in the design phase and start
tracking.
10. The recording finishes with the last media in the setup. Depending on your
settings per media, it will be an automatic ending with time offset or require a
mouse click or a key press by the participant. How recording of different media
can be ended is explained more in detail in the chapter Media.
31
Tobii Studio 1.2 User Manual v. 1.0
* PDF Draft *
© Tobii Technology 2008
Recordings can always be ended with F10 or Esc independent on settings for the
media.
11. When finished with the recording, go to the Visualization view or Replay view to
analyze the data.
4.4 Monitoring and Logging
The Live Viewer, local or remote, is used to monitor a recording session. It shows the
stimuli background with gaze overlay on a supervisor/test leader screen during the
recording. If the user camera is used, an image of the test participant will also be shown.
Events can be logged and used to for example see gaze patterns at specific events
create clips. A keyboard button or mouse click can be used to log specific events
or after the test. Events can be logged either in the Replay view in Tobii Studio
the
post
analysis
or from the
Tobii
Studio
Logger
during
the
and to
during
during
test.
4.4.1 Local Live Viewer
The Live Viewer shows the stimuli background with gaze overlay during the recording. If
the user camera is used, an image of the test participant will also be shown. Drag the
Live Viewer to the supervisor screen, which should be the secondary screen in the setup.
Read more about screen settings under the chapter, Computer Settings.
Start the Live Viewer
The Live Viewer is found in the View menu and in the Setup menu.
If a user camera is connected it has to be enabled under Setup or Tools -> Settings.
Screen Setup
To show the Live Viewer on a secondary screen, the computer has to have a dual head
graphics card or a splitter has to be attached to the monitor port of the computer.
See the section, Configure Monitor Setup, under the chapter, Computer Settings.
Screen Settings
Some settings can also be found in the Live Viewer On-Screen Menu, which will appear if
you right-click in the Live Viewer window.
•
Send Window to secondary screen: The Live Viewer window will automatically
be moved to the secondary screen, which should be the non-eye tracker screen.
The Live Viewer window can also be moved to the secondary screen with dragand-drop.
32
Tobii Studio 1.2 User Manual v. 1.0
•
•
•
* PDF Draft *
© Tobii Technology 2008
Full screen: When selecting this option, the Live Viewer window will be
maximized to cover the full screen of the secondary screen.
Primary screen size: If the Live Viewer window should be the same size as the
primary screen shown to the test participant, select this option.
Resizable: This setting has to be checked before the Live Viewer window can be
resized to optional size. It can be resized by dragging the borders and corners of
the window with the mouse.
Gaze Data
By default, the gaze data overlay will be shown in the Live Viewer. If the test is to be
supervised without showing the eye gaze data, make sure to deselect the option, Overlay
gaze data, in the on-screen menu found by right-clicking in the Live Viewer window.
The gaze data will still be saved and will be available for analysis in Tobii Studio after
the test is ended.
4.4.2 Coding Scheme
Before events can be logged, a coding scheme has to be defined.
The coding scheme, the settings for the logging, is found under Tools -> Coding Scheme.
User defined log events with optional keyboard shortcuts can be added to the test. To
define events, follow the steps below:
1. Description: Click on the empty line under Description, type in the
name/description of the event and press enter when done.
2. Shortcut: Select a shortcut key for the event from the drop down menu. This
button should later be pressed in Tobii Studio Logger to add the event or in the
33
Tobii Studio 1.2 User Manual v. 1.0
* PDF Draft *
© Tobii Technology 2008
Replay view in Studio when replaying the recording. How events are logged is
described under Logging Events.
3. Logging Options: Log messages or comments can be included when logging an
event. A window for the log message or comment and an event selection will
appear when pressing the log key.
If no text is to be entered during logging and for quicker event logging select the
option, Quick Logging. If Quick logging is checked, no window for adding
comments to the events will appear when pressing the log key. The event will still
be logged and will be listed in the event list and shown as a marker on the time
line in the replay view.
4. Color: The color of the markers for the events shown on the timeline in the replay
view can be changed in the color palette, which appears when double-clicking the
color icon.
34
Tobii Studio 1.2 User Manual v. 1.0
* PDF Draft *
© Tobii Technology 2008
4.4.3 Tobii Studio Logger
The Tobii Studio Logger is a separate software component that can be opened on a
remote computer to supervise a test and log events. The Tobii Studio Logger is not
available in all version of Tobii Studio.
The Tobii Studio Logger is found in the windows Start menu under All Programs -> Tobii > Studio
With the Tobii Studio Logger, a test screen with gaze data overlay (Live Viewer) and user
camera picture can be shown on a remote screen. Recordings can be started
and controlled and events can be logged. The Tobii Studio logger can be opened on a
computer in the same or different room than where the test on the Tobii Studio is taking
place. It can also be used to show a recording in real-time in a conference room.
For different setup options see the system recommendations.
Starting Tobii Studio Logger
Before starting a recording and adding logging events from the Tobii Studio Logger
make sure the Tobii Studio Logger is set up properly.
The following settings have to be made in Tobii Studio and Tobii Studio Logger.
1. Enable remote viewing: In Tobii Studio go to Tools -> Settings -> Screen and
Video Capture. Make sure the option, Enable remote viewing functionality, is
selected. If user camera and/or sound is to be used this has to be enabled as well.
If Tobii Studio Logger is to be used for remote viewing on more than one
computer the option Multicast has to be selected. If only one remote computer is
used for Logging or remote viewing do not select this option since it might
degrade performance.
35
Tobii Studio 1.2 User Manual v. 1.0
* PDF Draft *
© Tobii Technology 2008
2. Connect the Tobii Studio Logger to the Tobii Studio computer
IP address
Enter the IP address for the computer where the recordings in Tobii Studio are to
be done. Click on New Connection to enter a new IP address.
Enter the IP address for the Tobii Studio computer.
Finding the IP Address for the Tobii Studio Computer
If Multicast is selected and Tobii Studio Loggers used for remote viewing on more
than one remote computer enter the Multicast IP address found in the Sceen and
Video Capture view in the Global Settings. (See step 1 above).
If Tobii Studio Logger is opened on one computer follow the instructions below to
find the IP address:
A. Click
on
the
windows
Start
36
menu
and
select
Control
Panel
Tobii Studio 1.2 User Manual v. 1.0
* PDF Draft *
© Tobii Technology 2008
B. Click on the Network Connections icon
C. Double click on the Network Connection (normally the Local Area
Connection)
D. In the Connection Status window select the Support tab where you can see
the IP address.
Or in Vista simply go to the start menu and enter cmd /K ipconfig
4. Start the Live Viewer. Make sure the user camera and sound are selected if they
are being used during the study. If they are not, close the Tobii Studio Logger and
go to the settings menu in Tobii Studio to set up the user camera.
37
Tobii Studio 1.2 User Manual v. 1.0
* PDF Draft *
© Tobii Technology 2008
4.4.4 Log events in Tobii Studio Logger
Before events can be logged in Tobii Studio, Logger events have to be defined in Tobii
Studio. Read more under Coding Scheme. Once this is done, shortcut keys can be
pressed to log events in Tobii Studio Logger during the recording.
1. Start the Live Viewer in Tobii Studio Logger, make sure the user camera is
selected if it should be used during the study. If it is not, close the Logger and go
to the settings menu in Studio to set up the user camera.
2. Make sure the participant is seated properly in front of the eye tracker and start
the recording. To make sure the eye tracker can register the eye movements
open the track status, found in the Setup menu in the Tobii Studio Logger.
More information on the track status meter can be found in the chapter, Track
Status.
During the recording, press the shortcut button defined under the coding scheme
(logging scheme) in Tobii Studio, or press the log category line in the Tobii Studio
Logger whenever an event is to be added.
3. Add a comment in the Log Message that appears when logging events. It will not
appear if quick logging is selected, read more under defining logging events.
4. When the recording is finished go to the Replay view in Studio to see the added
events. A marker indicating the event will be displayed on the timeline and the
event will be listed in the Events list to the left in the replay view. Read more
about how to use the events under Create clips in the chapter Replay.
38
Tobii Studio 1.2 User Manual v. 1.0
* PDF Draft *
© Tobii Technology 2008
4.4.5 Post analysis logging
A keyboard button or mouse click can be used to log specific events. If events are added
after the recordings are made the events are logged in the replay view.
The events will be shown in a list next to the recordings in the replay view as well as
event markers under the recordings in the same view.
Logging Events in the Replay View
1. Press the play button or drag the timeline marker to where the event is to be
added.
2. Press the shortcut button defined under the coding scheme (logging scheme) or
press the log comment button and select event from the drop down menu.
3. Add a comment in the Log Message. It will not appear if quick logging is selected.
Read more under defining logging events. When done click OK.
4. A marker indicating the event will be displayed on the timeline and the event will
be listed in the Events list to the right in the replay view. Read more about how to
use the events under, Create clips and AVI Export in the chapter, Replay.
39
Tobii Studio 1.2 User Manual v. 1.0
* PDF Draft *
40
© Tobii Technology 2008
Tobii Studio 1.2 User Manual v. 1.0
* PDF Draft *
© Tobii Technology 2008
5. Replay
The gaze replay is a way to dynamically visualize a gaze recording. It shows the gaze
path overlaid on top of the stimuli, whether it is a still image, a slide show, or a movie.
A user camera can be used to film the test participant during the recording. The film will
be shown next to the media at replay.
To replay a recording the play button is pressed. There are also rewind, forward, stop
and pause buttons in the replay menu.
Test list
The first step in the replay view is to select the test to show replay for or create movie
clips from. All tests in the opened study are shown in the test list. If the test is in a
different study go to File -> Open Study.
Recordings list
A list with all recordings in the test is shown on the left side in the replay view. Mark a
recording to view a replay or to create clips or scenes.
Right-click anywhere in the recordings list to select what kind of data to show for the
recordings. The recordings can also be sorted after the different data.
The data available to display and sort in accordance with are:
•
•
•
•
•
Name of recording
Date, when it was recorded
Duration, how long the recording was
Color, the color, which is also representing the recording as a dot on the timeline in
the replay view and in the visualization tools.
Quality, how well the participant was tracked during the recording represented by
different numbers of stars. Highest tracking quality will result in three stars. When
holding the mouse over the stars a tracking percentage will appear. 100 % means
that both eyes were found during the whole recording, 50 % that one eye was found
for the full recording or both eyes during half of the time. Note that the eyes cannot
be found when a person is looking away from the screen, which results in a lower
percentage. If the test is performed in such a way that the participant is asked
questions during the recording and is looking at a test leader this might not be a good
way to measure the quality of the data.
41
Tobii Studio 1.2 User Manual v. 1.0
•
* PDF Draft *
© Tobii Technology 2008
Participant, the name of the test participant
The option to delete a recording is also found in the menu appearing when right-clicking
in the recordings list.
5.1 Replay of the recording
1. In the Replay view, select a recording to replay.
2. Press the play button to start the replay. There are also rewind, forward, stop, and
pause buttons available. The left and right arrow buttons can be used to jump one frame
forwards or backwards.
3. Position the time line marker at different positions on the time line to show the image
with gaze overlay for that specific moment.
42
Tobii Studio 1.2 User Manual v. 1.0
* PDF Draft *
© Tobii Technology 2008
5.2 Replay settings
The gaze and video settings such as transparency of the gaze overlay and the size of the
image can be adjusted under the settings tab.
Timeline Scaling or Zooming
The timeline can be rescaled to show shorter time intervals. This can be useful when
creating segments from a long recording or when it is important to be able to advance
the replay slowly.
Mark the arrow on the end of the scaling axis and change the scale by dragging the
arrow towards the middle.
Drag the timeline selection to see earlier or later part of the recording.
43
Tobii Studio 1.2 User Manual v. 1.0
* PDF Draft *
© Tobii Technology 2008
Replay Speed
The speed of the replay can be changed to show the replay of the recording in slower or
faster pace. Drag the marker on the speed bar towards the rabbit to increase the speed
and towards the turtle to lower the speed. The middle line, at which the marker is set in
the image below, is the default setting. When this is selected the replay of the recording
will be in true speed.
Resizing the different parts of the replay view
To be able to see all segments and scenes, resize the movie replay view, segmentation,
scene and settings windows. This is done by dragging the lines marked in the image
below.
44
Tobii Studio 1.2 User Manual v. 1.0
* PDF Draft *
© Tobii Technology 2008
5.3 Events
Events such as a picture being shown, a movie starting and mouse clicks will be listed in
the replay view. User defined events added via logging, such as a participant clicking on
a link on a web page, will be in the list. The events are also shown with event markers on
the timeline. Hold the cursor over the event markers to see details for the event. When
an event is marked in the event menu, the time line main marker will be placed at the
time line at the time when the event occurred.
The events can be used to see when something has happened during the recording.
Examples are start and end of a movie or a mouse click done by the test participant
during the recording when, for example, clicking to view the next image or movie.
Events can also be used to create segments.
Segments are used to export movie (recording) clips and to create scenes which make it
possible to create heat maps etc for media like movies and dynamic web pages. Read
more in the chapter, Segments.
Events can be logged either in the Replay view in Tobii Studio during the post analysis
or from the Tobii Studio Logger during the test. A keyboard button or mouse click can be
used to log specific events by the test leader during or after the test. Read more in the
chapter, Logging.
The events can be filtered to show only specific events in the list. Enter the first letters in
the event on the line above the event list.
45
Tobii Studio 1.2 User Manual v. 1.0
* PDF Draft *
© Tobii Technology 2008
Events step-by-step 1. Select a recording to show and handle events for.
2. To view an event, click on the event in the Events list where all events are displayed.
The events can be filtered to show only specific events in the list. Enter the first
letters in the event on the search line above the list. The time line main marker will
be placed at the point on the time line when the specific event occurred.
3. To view details about an event you can hold the cursor over the red or green
marker on the time line (red markers represent events logged by the system; green
markers represent manually logged events).
5.4 User Camera
A user camera to view and record the participant can be used. Settings for the user
camera are made in the Screen and Video Capture menu in the Design and Record view.
If no camera image appears, check the settings, make sure the user camera drivers are
installed and verify that the camera should work with Tobii Studio. For camera
recommendations, please see the system recommendations.
By clicking the tab where it says User camera, right under the user camera image, it is
possible to hide and view the user camera window.
5.5 Segments
A segment is a part of the recording. The segments can be exported as movie clips to be
viewed in external media players.
46
Tobii Studio 1.2 User Manual v. 1.0
* PDF Draft *
© Tobii Technology 2008
Segments can also be used to create a scene, which is recommended if segments or
scenes are created from events using the Segment tool. Scenes have to be created
for recordings where the media types, Screen Recording or Movie (AVI), have been used
in order to be able to use the different visualization tools. Scenes can also be created
directly see more in the chapter, Scenes.
How to create a segment
Segments or clips of the recording can be created manually or automatically by using
events and time offsets.
In the auto-generate segments, tool segments are created from events and can be
created for several recordings at once and as several clips from a recording. Segments
created manually are created in the Replay view in the timeline. The timeline, the
media image, as well as the event list are used as aids to create segments.
Auto-Generate Segments
To generate segments (clips) from the recordings, click the Segmentation button.
Segments can be generated for one or several recordings at a time. An example could be
creating a segment for the first 20 seconds for each recording in a test.
Events as well as time periods can be used to create segments.
Generate segments from events
Events can be used as start or stop points for clips. A time offset can also be added to
the event points to have a clip starting or stopping at a specific offset from the event.
In the Auto-generate segments’ window, segments for the active recording, for all
recordings
in
the
test,
or
for
the
whole
study
can
be
created.
Choose the events that should mark the beginning and end of the segment and also set
the offset if used.
If the segment is to start at a point before the event, set a negative time offset.
If the start and stop events are the same type of event, for example, LeftMouseClick, the
stop point event, Next LeftMouseClick has to be selected. Segments will be created
between all left mouse clicks in this example.
47
Tobii Studio 1.2 User Manual v. 1.0
* PDF Draft *
© Tobii Technology 2008
Generate Clips Manually
Go to the Replay view and choose the test you want to create clips for. Check the
recording the clips are going to be made from
1.
Press the Segments tab
2.
Place the time line marker where you want the clip. If not clear where to start or
end the segment click the timeline to see a preview, drag the marker on the
timeline to adjust what is shown in the preview.
3.
Drag the left time line marker to start position for the clip and the right time line
marker to the end of the clip.
4.
Click the Create clip in the segment menu or Right hand click in the marked
region on the time line and choose, Create Segment from Selection.
Repeat the steps for all clips that should be generated.
Export Recordings and Segments
Segments can be exported as a movie to be used in presentations. Read more in the
export chapter.
Edit Segments
•
Rename a segment by double clicking on the name and entering a new name.
The name can also be changed in the segment menu which appears when right
clicking on the segment name. See the image below.
•
Delete a clip by clicking delete in the segment menu or by marking a segment and
clicking delete.
48
Tobii Studio 1.2 User Manual v. 1.0
* PDF Draft *
© Tobii Technology 2008
Loop Segment
It is possible to loop the replay of a segment. The option is found in the menu by the
segment as seen in the picture below. Note that a segment has to be created to loop a
replay, and that it will show the replay for one segment.
5.6 Scenes
To be able to use the visualization tools, recordings made with the media types, movie,
screen recording, external video and scene camera, as well as for other dynamic content
like flash web pages, have to be divided into scenes. A part of the recording; gaze data
together with one background from the media is defined to create a static image. The
tool for creating scenes is found in the Replay view.
49
Tobii Studio 1.2 User Manual v. 1.0
* PDF Draft *
© Tobii Technology 2008
Creating a scene
Scenes
can
be
created
directly
on
the
timeline
or
from
segments.
To use Segments to create Scenes or to add Segments to a Scene read the next chapter
Use Segments to create a Scene.
If creating Scenes from Selections on the Timeline follow the instructions below:
1. Click the Scenes tab to see the Scenes area and defined scenes.
2. Make a Selection which is the part of the recording to include in the Scene. A
Selection is made by placing the time line marker where a scene should be
created. If not clear where to start or end the Scene click the timeline to see a
preview, drag the marker on the timeline to adjust what is shown in the
preview.
50
Tobii Studio 1.2 User Manual v. 1.0
* PDF Draft *
© Tobii Technology 2008
3. Drag the left scene marker to start position for the clip and the right scene marker
to the end of the clip.
4. Right hand click in the marked region on the time line and choose Click the
Create Scene from Selection.
To add more Selections to the same Scene create a new Selection and add by
selecting Add Selection to Scene and selecting scene to add it to.
51
Tobii Studio 1.2 User Manual v. 1.0
* PDF Draft *
© Tobii Technology 2008
5. Select background for the scene by dragging the timeline main marker to where
the preferred background image is shown.
6. Open the Scene menu and select Set new Scene image.
7. Repeat the steps for all the scenes that are to be created.
Create Scenes from Segments
Scenes can also be created from Segments which can be useful when wanting to use
events or time offsets to create scenes. Segments can be added to a Scene and several
segments can be included in one scene. Segments with the same or equivalent
background are often grouped into one Scene.
To add create a Scene from Segments or to add Segments to a Scene follow the
instructions below:
1. Create Segments. Please see the previous chapter, Segments, to learn how to do
this.
52
Tobii Studio 1.2 User Manual v. 1.0
* PDF Draft *
© Tobii Technology 2008
2. Mark the Segments tab and the Scenes tab to see the Segments and Scenes
available and to create a new scene.
3. To create a new scene to add segments to, right click in the Scenes area and
select Create new scene.
4. Add the Segments to the Scene or Scenes using drag-and-drop.
5. Select background for the scene by dragging the timeline main marker to where
the preferred background image is shown.
53
Tobii Studio 1.2 User Manual v. 1.0
* PDF Draft *
© Tobii Technology 2008
6. Open the Scene menu and select Set new Scene image.
7. Repeat the steps for all the scenes that are to be created.
Edit scenes
Rename a scene
The name can be changed in the Scene menu. A scene can also be renamed by double
clicking on the name in the segment list and entering a new name.
Delete a scene
The scene can be deleted in the Scene menu. A scene can also be deleted by marking the
scene and pressing the delete button.
54
Tobii Studio 1.2 User Manual v. 1.0
* PDF Draft *
55
© Tobii Technology 2008
Tobii Studio 1.2 User Manual v. 1.0
* PDF Draft *
© Tobii Technology 2008
6. Visualization
The visualization view contains different tools for visualizing the gaze data in different
ways. The different alternatives and the parts of the Visualization view are described in
different chapters further down. To get familiar with this part of the software read the
chapter, Visualizations - getting started, and the chapters Common tools and settings for
the visualizations.
All visualization tools are not activated in all versions of Tobii Studio. If a tool is not
activated the button will be grey. If you wish to activate a visualization tool you will need
to upgrade to a license of Tobii Studio where the tool is included.
6.1 Getting Started with Visualizations
1. In the Visualization view, select the media to visualize data for.
2. Choose recording(s) to show data for. By default, all recordings in the test will be
selected. Uncheck the box for recordings that should not be included.
3. If applicable, add a filter to display only a selection of participants in the visualization.
An example could be to include gaze data only for women or for people over sixty.
4. Select a visualization tool:
•
To view a heat map, a gaze plot, or clusters, click Heat Map, Gaze Plot or Cluster.
To display these types of visualizations for movies or screen recordings, the
movie/screen recording first has to be divided into scenes in the Replay view, see
the chapter, Scenes.
•
To visualize gaze data for a movie or a screen recording with several recordings
simultaneously, click Bee Swarm.
•
To view and use the Statistics tool, areas of interest (AOIs) first have to be
created. Click AOI Tool to create the regions and then click Statistics to view the
statistics for the regions specified. To display Statistics for movies or screen
recordings, the movie/screen recording first has to be divided into scenes in the
Replay view.
56
Tobii Studio 1.2 User Manual v. 1.0
* PDF Draft *
© Tobii Technology 2008
6.2 Common tools and settings for the visualizations
All the visualizations share some tools and settings such as media list, recordings list and
filtering.
Media List
All media that can be analyzed using the different kinds of visualization tools below will
be shown in the media list. All images and web pages will be shown here. Movies and
recordings with the screen recording tool have to be processed in the scene tool first. See
the chapter, Scenes, for more details.
There are some special setting options for the web stimuli and how the pages are
grouped for the analysis. Read more further down under web page grouping.
Recordings and Filtering
All the recordings shown in the recordings list can be included in the visualization and
statistics, for example, Heat Map, Gaze Plot and Statistics.
One or a part of the recordings can be selected for the visualization by clicking the check
box.
The participants included can be filtered by using the variables entered under the
participant data in the setup.
Which filter to use is picked in the filter menu. The All filter will include and list all
recordings. Uncheck the box/boxes next to the recordings that are not to be included in
the visualization.
A filter is created by clicking the Create Recording Filter button. A filter can also be edited
or deleted using the edit and delete filter buttons.
57
Tobii Studio 1.2 User Manual v. 1.0
* PDF Draft *
© Tobii Technology 2008
6.2.1 Web page grouping
When using the media web, pages can be grouped for the analysis.
In the Web Group Tool web pages can be grouped in different ways for analysis in the
tools in the visualization view. Pages can be grouped by the predefined grouping modes
URL, Size, ID and Name. They can also be grouped manually. When pages are grouped,
eye gaze data for all pages will be shown on one page representing all the pages. This
page is called Group Image. When grouping images make sure all pages in the group
contain the same data, or that they have the same content for the areas that are to be
analyzed.
How to group the pages can be found under Web Group Tool.
The get to the tool, click the Web Groups button found in the Media List in the
Visualization view.
Once web groups are created, the groups will appear in the media list. Click on the group
to show, for example, a heat map for the group.
Group Criteria
Web pages can be grouped based on:
•
•
•
URL: All frames with the same web address will be placed in the same group and
gaze data for the frames summarized and shown on one frame.
If a web page is displayed as several different pages, even though one web address
is entered, in some cases one page per recording because of differences in page
content such as an image, the pages can be grouped by URL. The background
image/page is selected by selecting the image/page and clicking the Set As Group
Image button.
URL and Size: If frames have the same web address but different sizes the frames
will be divided into different groups. Gaze data for all frames with the same web
address and the same size will be summarized and shown on one frame. The
background image/page is selected by selecting the image/page and clicking the Set
As Group Image button.
Name: Pages with the same name are grouped; pages with different URL can have
the same name.
58
Tobii Studio 1.2 User Manual v. 1.0
•
•
* PDF Draft *
© Tobii Technology 2008
Content: Pages are grouped by content ID. Pages with the same URL or Name
might have different content IDs, selecting this grouping option will group pages
that are identical; same content and url.
Manual: Frames can be grouped manually. More information can be found below.
Group Image
A background image used in the visualizations for the web group has to be selected.
This image will be shown in the heat map, etc., with data for all pages in the web group.
Select one image in the new group list by marking the page and clicking the Set As
Group Image button.
Manual Grouping
Web pages can be grouped using drag and drop. Two frames at a time can be shown.
This makes it possible to compare two frames directly in the tool.
If Manual grouping is to be used follow the instructions below:
1. Click the New Group button.
2. A new group will appear in the list of pages. Double-click on the name, New
Group, to rename, enter optional name and press enter.
59
Tobii Studio 1.2 User Manual v. 1.0
* PDF Draft *
© Tobii Technology 2008
3. Click a link in one of the lists to see the content of the page. Two pages can be
compared by marking one in each list. It can for instance be used to verify that
the content of pages already added to the group and pages to be added should be
in the same group.
4. Add a page to the new group by marking it and using drag-and-drop.
60
Tobii Studio 1.2 User Manual v. 1.0
* PDF Draft *
© Tobii Technology 2008
5. A background to show in the visualizations such as the Heat Map has to be
selected. Gaze data for all pages will be shown on top of the page selected.
Click OK when done.
6.
The new group can now be selected in the Media list in all the visualizations.
61
Tobii Studio 1.2 User Manual v. 1.0
* PDF Draft *
© Tobii Technology 2008
6.3 Filter
Filters based on participant data can be used to get statistics and visualizations for
different participant groups. An example can be a heat map for all women, which can be
compared to a heat map created for all men. The participant data is explained in a
separate chapter, this chapter describes how to create and use filters.
Filter list
Existing filters from a list can be selected for the visualization. The only default filter is
the All filter containing all recordings.
Create Recording Filter
To create a new filter, click the New Recording Filter button. Give the filter a name and
choose the variables defining the filter. One example could be a filter filtering out all
recordings for male participants. In this case the visualizations such as the heat maps
and the gaze plot will only include data from all recordings where the participant is male.
Several variables can be combined in one filter.
62
Tobii Studio 1.2 User Manual v. 1.0
* PDF Draft *
© Tobii Technology 2008
To set variables for a participant, go to the Tools menu. For more details on how to add
variables and handle participants see the chapter participant data.
Edit or delete filter
Filters can be edited or deleted using the edit or delete filter buttons.
Select the filter to edit or delete in the drop down list and press the edit or delete button.
63
Tobii Studio 1.2 User Manual v. 1.0
* PDF Draft *
© Tobii Technology 2008
6.4 Heat Map
The Heat Map plot is a powerful way to visualize the gaze behavior of an entire group of
recordings. To use this, select the recordings you want to include in the plot, and
thereafter click on the Heat Map plot button Visualization view.
The Heat Map plot consists of the stimuli as background image and a Heat Map mask
superimposed on top of this. The Heat Map mask consists of a transparent background,
with highlighted areas where test persons have been looking.
Showing a Heat Map
To get to the Heat Map tool, click on the Heat Map button in the Visualization view.
Select the media in the Media list for which a Heat Map should be shown. Note that the
media has to be a still image. If the media is a screen recording or a movie (AVI), still
images have to be defined before the Heat Map tool can be used. See more under
scenes.
Data Selection
Gaze data for one or several recordings can be shown in the heat map. Select the
recordings to show data for by checking the boxes in front of recordings to include or
filter out recordings based on variables, read more under Filters.
64
Tobii Studio 1.2 User Manual v. 1.0
* PDF Draft *
© Tobii Technology 2008
Time segmentation of the Heat Maps
In some cases it is of interest to create a Heat Map for only a part of the time that the
image was shown during recording. The timeline at the bottom of the Heat Map view
shows the time segments chosen for the Heat Map. Markers on the timeline indicate the
end of the different recordings. The color of the dot indicates which recording was ended.
The color corresponds to the color shown next to the recording in the recordings list. By
dragging the end markers on the timeline, the time segment to include in the Heat Map
can be changed. Note that by making the time segment smaller some recordings might
be excluded from the calculations altogether.
65
Tobii Studio 1.2 User Manual v. 1.0
* PDF Draft *
© Tobii Technology 2008
Save image
To save, right-click on the Heat Map image and select Save Image to save the image to
file. It is also possible to save only the heat map layer without the background image
shown to the test participants. This alternative is also found in the menu appearing when
right-clicking on the heat map.
A legend for the heat map is shown on the heat map image. It is possible to select if and
where to place this on the saved image. This setting will appear after selecting to save
the image. How to change the settings for the heat map is described below.
Heat Map Settings
Fixation data style
There are three types of Heat Map styles:
1. Count: The plot shows the accumulated number of fixations from all the selected
test persons. This means that this plot only shows where people have looked and
not for how long. That means that a 2000 ms fixation will look the same as a 100
ms fixation.
2. Absolute Duration: This plot shows how long the selected test persons have
looked at the different areas in the image. This means a 2000 ms fixation will be
20 times higher (in color value) than a 100 ms fixation.
3. Relative Duration: The sum of the individual fixation lengths relative to the total
fixation time on the image for each recording; if in recording A, the subject looked
at the image for 10 seconds and at a specific object for 3 seconds and in recording
B, the subject looked at the image for 10 minutes and at the specific object for 3
minutes. In this kind of Heat Map the data from recording A and recording B will
have the same weight.
Display settings
Under the display settings the definition for the maximum value, shown in red in the heat
map, is set. What to set here depends on what is selected under Fixation data style
If Count is selected, the minimum number of fixations represented by the color
furthest to the right in the color bar (red by default) in the heat map is set.
•
If Absolute duration or Relative duration is selected the minimum fixation length
represented by the color furthest to the right in the color gradient bar (red by
default) in the heat map, is set.
The color scheme for the heat map can be changed by double clicking on the color
gradient bar. The Color Gradient Settings window will appear. Double click on the color
boxes below the color line and select a color from the color palette that appears.
•
It is possible to show the heat map in different styles. This setting is found under the
Display settings in the Settings menu. The default style is called Heat map. Simply click
one of the other styles to change the style. The style Gaze opacity shows the parts of the
media with the most or longest fixations clearly and shades the rest of the media.
66
Tobii Studio 1.2 User Manual v. 1.0
* PDF Draft *
© Tobii Technology 2008
Opacity
In the Settings menu the opacity, or transparency, of the Heat Map Layer can be
changed. To hide less of the media background, make it more transparent.
Mouse Clicks
If the participant is using a mouse during the test it might be interesting to see the
mouse clicks in the heat map image. To show or hide the mouse clicks on the Heat Map,
click the check box, Show Clicks, under Mouse Clicks in the Settings menu.
AOI Overlay
The Areas Of Interest defined in the AOI tool can be shown in the Heat Map.
Settings such as color and opacity can be found at the bottom of the Heat Map view,
under AOI Overlay settings. More information on the settings is found in the chapter, AOI
under AOI Settings.
Definition Heat Map
Data used to create heat maps
In the heat map tool, the image is either based on fixation data or raw data. In both
cases the input data is a list of data items with a time stamp, duration, and a
spatial location (x and y coordinates). In the case of raw data, each item corresponds to
raw gaze point from the eye tracker and since the speed is 60 Hz (50 or 120 Hz for some
products), the duration of each item becomes 16-17 ms (for 60 Hz system). In the
fixation case, the data from the eye tracker is grouped into fixations, where the duration
67
Tobii Studio 1.2 User Manual v. 1.0
* PDF Draft *
© Tobii Technology 2008
depends on how long the test person looked at a specific point (this is further described
in the manual). This means that the input data typically looks something like this:
Fixation: 1
Start: 132 ms
Duration: 245 ms
Location: (415,711)
Fixation: 2
Start: 264 ms
Duration: 735 ms
Location: (711,491)
Fixation: 3
Start: 591 ms
Duration: 101 ms
Location: (301,10)
.....
Plotting the heat map
The next step is to construct a heat map from this data. What we want to do is to assign
a color value to each point in the image. This is done by going through the fixations one
by one and adding values to the color map at the position indicated by the fixation
location. One possible way to do this could be to add some value just to the specified
position (pixel). However, this would result in a rather useless image, with only a couple
of small colored dots. What we do instead is add values to all the points within a certain
distance to the fixation location. To get a nice plot we let the values that we add
decrease as we move away from the point. The principle is illustrated by the simplified
picture below.
This method reflects the fact that the human eye has the highest visual acuity at the socalled fovea and that this acuity decreases as we move away from this spot on the
retina. This means that when we focus our eyesight on a word in a text, we are able to
read the word and its immediate neighbors, but not words a few centimeters away.
6.5 Gaze Plot
The Gaze Plot displays a static view of the gaze data for each image of the stimuli and is
a useful tool when visualizing scan paths. Each fixation is illustrated with a dot where the
radius represents the length of the fixation. The order of the fixations is shown with a
number in each fixation dot, note that the numbers are per recording.
68
Tobii Studio 1.2 User Manual v. 1.0
* PDF Draft *
© Tobii Technology 2008
Showing a Gaze Plot
To get to the Gaze Plot, click on the Gaze Plot button in the Visualization view.
Select the media in the Media list for which a Gaze Plot should be shown. Note that the
media has to be a still image. If the media is a screen recording or a movie (AVI), still
images have to be defined before a Gaze Plot can be drawn. See more under scenes.
Data Selection
1. Start by selecting the image for which the gaze data is to be shown.
2. Gaze data for one or several recordings can be shown in the gaze plot. Select the
recording(s) to show data for by checking the boxes in front of recordings to
include or filter out recordings based on variables, read more under Filters.
69
Tobii Studio 1.2 User Manual v. 1.0
* PDF Draft *
© Tobii Technology 2008
Time segmentation of the Gaze Plots
In some cases it is of interest to create a Gaze Plot based on only a smaller time segment
than the image that was shown during recording. The timeline at the bottom of the Gaze
Plot view shows the time segment chosen for the Gaze Plot. The color of the dot indicates
which recording was ended. The color corresponds to the color shown next to the
recording in the recordings list. Markers on the timeline indicate the end of the different
recordings. By dragging the end markers on the timeline, the time segment to include in
the Gaze Plot can be changed. Note that by making the time segment smaller some
recordings might be excluded from the calculations altogether.
Save image
To save, right-click on the Heat Map image and select Save Image to save the image to
file.
Changing colors of the fixation points
Double click on the color icon next to the recording the color is to be changed for. A color
table will appear. Select the color and click OK.
Settings
The transparency of the gaze trail and the fixation border color can be altered. The option
of whether to show the mouse clicks can also be found under the settings.
70
Tobii Studio 1.2 User Manual v. 1.0
* PDF Draft *
© Tobii Technology 2008
AOI Overlay
The Areas Of Interest defined in the AOI tool can be shown in the Gaze Plot.
Settings such as color and opacity can be found at the bottom of the Heat Map view,
under AOI Overlay settings. More information on the settings is found in the chapter, AOI
under AOI Settings.
71
Tobii Studio 1.2 User Manual v. 1.0
* PDF Draft *
© Tobii Technology 2008
6.6 Cluster
Clustering of fixation data can be seen as an automatic generation of Areas-of-Interest.
Clustering of fixation data is done by finding an area with a high concentration of fixation
points.
The maximum distance between fixations to include in a cluster can be set as a distance
threshold. The distance threshold can be changed under Settings in the Cluster view to
create smaller or larger cluster areas.
Showing Clusters for a media
To get to the Cluster view, click on the Cluster button in the Visualization view.
Select the media in the Media list for which clusters should be shown. Note that the
media has to be a still image. If the media is a screen recording or a movie (AVI), still
images have to be defined before clusters can be drawn. See more under scenes.
72
Tobii Studio 1.2 User Manual v. 1.0
* PDF Draft *
© Tobii Technology 2008
AOI Overlay
The Areas Of Interest defined in the AOI tool can be shown in the Cluster view.
AOI Overlay Settings
Settings such as color and opacity can be found at the bottom of the Heat Map view,
under AOI Overlay settings. More information on the settings is found in the chapter, AOI
under AOI Settings.
Using the Clusters for statistical analysis
Clusters or Regions-Of-Interest found in the Cluster tool have to be exported to the AOI
tool to be used for the statistical analysis.
All or any cluster(s) can be removed or edited in the AOI tool. Shape, name and location
of the image can be changed just as for the AOIs (Areas-of-Interest)
6.7 Bee Swarm
The Bee Swarm can be seen as a replay of more than one recording or test participant.
The gaze overlay of all participants is displayed on top of selected media and is played in
real time. The fixation of each participant is illustrated with a color coded dot.
73
Tobii Studio 1.2 User Manual v. 1.0
* PDF Draft *
© Tobii Technology 2008
Drop-out graph
On the timeline below the Bee Swarm replay the total gaze time of all participants is
visualized with a drop-out graph. In the graph a color dot representing each participant
is shown at the time the participant stopped viewing the media. The color corresponding
to each recording can be found next to the recording in the recordings list.
Data Selection
Start by selecting the media for which the Bee Swarm is to be shown.
Gaze data for all the recordings selected in the Recordings list will be shown as fixation
dots on the image in the replay of the media.
Recordings are selected by checking the boxes in front of the recordings or by using a
variable filter, read more under Filters.
74
Tobii Studio 1.2 User Manual v. 1.0
* PDF Draft *
© Tobii Technology 2008
Changing colors of the recording dots for the graph
1. Double click on the color icon next to the recording the color is to be changed for.
A color tablet will appear.
2. Select color and click OK.
75
Tobii Studio 1.2 User Manual v. 1.0
* PDF Draft *
© Tobii Technology 2008
Settings
It is also possible to set one color for all dots. This is done at the bottom of the Bee
Swarm view under Settings -> Overlay -> Use Custom Color. To go back to show
different colors for different recordings select Use Recording Colors. See image under
Settings below.
The transparency of the dots (Opacity) and the fixation dot size can be altered in the
settings menu. The dot size setting tells how the dot is drawn in the bee swarm.
It is possible to use the same color for all recordings as well, read more under changing
colors above.
A label telling how many participants that have looked at the image/movie at the time
shown is shown in the top left corner of the Bee Swarm. It is possible to select if
this label should be shown or not under Settings -> Overlay -> Draw Activity Label
Export as Movie
Bee Swarms can be exported as movies, AVIs. These can be used in presentations etc.
1. Click the export button at the bottom of the Bee Swarm view
2. Browse to select a folder where the movie should be saved. For recommendation
on codecs see the system recommendations. Press OK when done. Open the
folder selected as destination path to view the exported Bee Swarm.
76
Tobii Studio 1.2 User Manual v. 1.0
* PDF Draft *
© Tobii Technology 2008
Export Data
The activity data; recordings name and length can be exported to the clipboard to be
pasted
in
other
programs
such
as
Excel
and
PowerPoint.
Right click on the timeline under the Bee Swarm to export the activity data.
6.8 Area of Interest
A very useful tool for quantifying gaze data on a higher level is to use Area Of Interest
(AOI) analysis. When using AOI analysis, you can define areas of interest within your
stimuli. Instead of interpreting your data based on the direct gaze coordinates of the test
subjects, you base the analysis on the frequency, time, etc., that the subject(s) have
been looking within the areas of interest. This is applicable to a range of different
analysis applications, for instance, psychology studies and web usability studies.
The AOI data, such as the fixation count or fixation length in one specific area is
visualized in the statistics tool.
Click on the AOI Tool button in the visualization view to open the AOI tool. You can
create any number of AOIs in any frame of your stimuli. A frame can either be a single
image (for image media), an image of each frame visited during web browsing (for web
media) or a static image representing part of an AVI or screen recording (for screen
recording and movie media).
77
Tobii Studio 1.2 User Manual v. 1.0
* PDF Draft *
© Tobii Technology 2008
Defining a new AOI
1. Select the media for which media AOIs should be defined. Note that the media
has to be a still image. If the media is a screen recording or a movie (AVI), still
images have to be defined before the AOI tool can be used. See more under
scenes.
2. Add a new AOI by clicking on the desired shape under Create.
3. Place the AOI on the image by clicking where the AOI should be and draw the
AOI.
Edit AOI
Change position
Click the edit button to change the position or shape of the AOIs. All AOIs can be moved
around by clicking on the AOI with the mouse and holding the button down.
78
Tobii Studio 1.2 User Manual v. 1.0
* PDF Draft *
© Tobii Technology 2008
Change size
The AOI can be resized by moving its corner points.
Change order
To change the order of the Area Of Interest, right-click on an AOI and select if it should
be in front of the other AOIs or vice versa.
Rename or delete an AOI
1. Select Edit
2. Right-click on the AOI to see the image menu
3. Select Rename or Delete (An AOI can also be deleted by pressing the delete
button on the keyboard) When renaming, simply enter the new name and press
OK.
Zoom
It is possible to zoom in on the AOI or fit it to the screen. Press the buttons over the Area
Of Interest Image or right-click anywhere on the image to get the image menu.
79
Tobii Studio 1.2 User Manual v. 1.0
* PDF Draft *
© Tobii Technology 2008
Save or Export the AOI Image
To save an image with the Area Of Interest on top, right-click on the image and select
Save
Image
from
the
image
menu.
See
the
picture
below.
The export is also found in the image menu. Browse the folder where the image should
be saved and select a name for the image.
Copy AOI
If the same AOI is to be used on several images, copy the AOI on one image and insert
into the other images that should have the same AOI.
To copy AOI from one image to another;
1. Select the image from which an AOI should be copied
2. Click the Edit button.
3. Right-click on the AOI and select Copy AOI. (Or use the keyboard shortcut Ctrl+C)
4. Select the image where the AOI should be inserted/copied to.
5. Select Edit.
6. Right hand click on the image and select Paste AOI. (The keyboard shortcut Ctrl+V can
also be used)
Export AOI Data
AOI Data can be exported and used for analysis in external software.
The AOI Export contains the screen coordinates of the AOIs. For Rectangles and Polygons
the coordinates are the corners, for Ellipses it is points along the outer line of the ellipse.
80
Tobii Studio 1.2 User Manual v. 1.0
* PDF Draft *
© Tobii Technology 2008
To export right click in the AOI and select Export…, see image above. Select folder to
save the data in. A text file will be created, which can be opened from the folder it was
exported to.
AOI Settings
Settings such as color and opacity can be found at the bottom of the AOI view, under
Tools.
Drawing Style
An AOI can be shown as a filled area or as an outlined area with different border styles.
By default, the AOIs will be shown as filled areas. Make sure the box, Fill, is not checked
if only the border should be shown.
Labels
If the option, Show Name Labels, is checked, the names of the AOIs will be shown on the
AOIs.
Opacity
The opacity for the Area Of Interest can be increased or decreased. Make them more
transparent in order to show more of the background through the areas.
AOI Overlay in other visualization tools
It is possible to see the AOI (Areas of Interest) in the Gaze Plot, Heat Map and Cluster.
It can be used to see if the Areas Of Interest created cover the areas where there are
many fixations.
To show the AOI Overlay, click the AOI Overlay Settings tab at the bottom of each
visualization view. The settings are the same as for the AOI, see AOI Settings above.
81
Tobii Studio 1.2 User Manual v. 1.0
* PDF Draft *
© Tobii Technology 2008
6.9 Statistics
The statistics in the statistics tool are based on Areas Of Interest and the data in these
areas. To define Area Of Interest (AOI) go to the AOI tool found in the visualization view.
Create a Chart or Table
1. Select an image in the media list.
2. Select Recordings to include in the statistics either by manually checking the box in
front of recordings to include or by using a filter. By using a filter, recordings and
data for, for example, males or teenagers can be filtered out. Select the default filter,
All, to include all recordings. Read more about the filtering under Filters.
3. Select a Variable in the drop down menu. Examples are fixation count. See more
under Statistics Variables.
4. Select how the data should be visualized for the chart or table under Rows and
Columns. See more under Rows and Columns.
5. For the chart, select how the data should be calculated. In other words if the mean,
max value, etc., are going to be shown in the chart. This is done under the Chart
Settings. For the table the selection is done under Cell Values.
82
Tobii Studio 1.2 User Manual v. 1.0
* PDF Draft *
© Tobii Technology 2008
Chart
In the chart, the data selected under Variable will be shown as bars. Data for all selected
recordings and all AOIs will be included. Data for the images, recordings and AOIs can be
shown in different ways by selecting different viewing options under Rows and Columns.
Select how the data should be calculated under the Summary Settings.
Select the Chart view by clicking the Chart tab in the Statistics view.
Chart Settings
The chart settings such as mean or max value are found under the Chart Settings button
in the chart view. See image above. The different options for calculations of the chart
statistics are found here. One or several options can be shown at the same time.
The options are:
•
•
•
•
•
•
•
Min
Max
Sum
Mean
Median
Stddev
Data
Table
In the table, the data selected under Variable will be listed. Data for all selected
recordings and all AOIs will be included. Data for the images, recordings and AOIs can be
shown in different ways by selecting different viewing options under Rows and Columns.
83
Tobii Studio 1.2 User Manual v. 1.0
* PDF Draft *
© Tobii Technology 2008
Select the Table view by clicking the Table tab in the Statistics view.
Select how the data should be calculated, for instance if the mean or maximum value
should be shown under Cell Values.
Compare statistics for multiple media
Statistics for multiple media, for examples two images, can be compared by selecting
multiple media in the media list.
An example on media to compare can be two different web sites where flight tickets are
booked, or two similar advertisement images to select between. The images below are
84
Tobii Studio 1.2 User Manual v. 1.0
* PDF Draft *
© Tobii Technology 2008
from the AOI tool and the statistics shown for multiple media further down is based on
the following two images.
Several media is selected by holding done the Ctrl button and clicking all the media to
include in the list. A chart or table for all selected media will be shown.
Under Chart Settings select to show both data and optional value, in the image the value
mean is selected.
85
Tobii Studio 1.2 User Manual v. 1.0
* PDF Draft *
© Tobii Technology 2008
6.9.1 Variables
What to calculate and show data for in the chart is selected in the Variables drop down
menu.
Time to first fixation
The time in seconds from when the stimulus was shown until the start of the first fixation
within an AOI.
Recordings/Participants vs AOIs
The time to the first fixation for every AOI is displayed separately for every participant.
Images vs AOIs
The average time to first fixation over all participants is displayed for every AOI.
86
Tobii Studio 1.2 User Manual v. 1.0
* PDF Draft *
© Tobii Technology 2008
Fixation Length
The length of the fixations in seconds within an AOI.
This measure is based on the fixations as defined in the fixation filter found under the
Fixation Filter in the settings menu.
Recordings/Participants vs AOIs
The total length in seconds for all the fixations within and AOI is displayed separately for
every participant.
Images vs AOIs
The average fixation length for all the fixations within an AOI is displayed for the
respective AOIs.
Fixation Count
The number of fixations within an AOI.
This measure is based on the fixations as defined in the fixation filter found under the
Fixation Filter in the settings menu.
87
Tobii Studio 1.2 User Manual v. 1.0
* PDF Draft *
© Tobii Technology 2008
Recordings/Participants vs AOIs
The total number of fixations within an AOI is displayed separately for every participant.
Images vs AOIs
The average number of fixations within an AOI over all participants is displayed for the
respective AOIs.
Observation Length
The total time in seconds for every time a person has looked within an AOI, starting with
a fixation within the AOI and ending with a fixation outside the AOI. Note that there has
to be a fixation within the AOI for it to be an observation.
This measure is based on the fixations as defined in the fixation filter found under the
Fixation Filter in the settings menu.
Recordings/Participants vs AOIs
The total length in seconds for every time a participant has looked within an AOI
displayed separately for every participant.
88
Tobii Studio 1.2 User Manual v. 1.0
* PDF Draft *
© Tobii Technology 2008
Images vs AOIs
The average observation lengths for the different AOIs are displayed, including all
participants.
Observation Count
The number of visits to an AOI.
Recordings/Participants vs AOIs
The total number of visits and re-visits to an AOI is displayed for every participant
separately.
Images vs AOIs
The average number of visits and re-visits to an AOI, including all participants, is
displayed for the respective AOI.
Fixations before
The number of fixations before the participant(s) fixated within an AOI for the first time.
Recordings/Participants vs AOIs
89
Tobii Studio 1.2 User Manual v. 1.0
* PDF Draft *
© Tobii Technology 2008
The number of fixations before a participant fixated within an AOI for the first time is
displayed for every participant separately.
Images vs AOIs
The average number of fixations before the different participants fixated the first time
within an AOI, displayed separately for every AOI.
Participant %
The percentage of participants that have fixated at least once within an AOI. Only
available as a total for all participants (Images vs AOIs).
Rows and Columns
There are two different ways of presenting the statistical data for the different Areas of
Interest (AOI); either as results for the different individual participants
(recordings/participants vs AOIs) or as an average over all participants (Images vs
AOIs).
By using the Cell Values button in the Table view or the Chart Settings button in the
Chart view it is possible to get other values such as averages for the different individuals.
90
Tobii Studio 1.2 User Manual v. 1.0
* PDF Draft *
© Tobii Technology 2008
To choose how the data is grouped and visualized go to the Rows and Columns drop
down menu. The setting will change how the data is grouped in the table as well as in the
chart.
Data Filtering
By using a filter, recordings and data for, for example, males or teenagers can be filtered
out. Select the default filter, All, to include all recordings. Read more about the filtering
under Filters.
AOI information
The AOIs are listed next to the table or chart. To change the name of the AOI doubleclick on the name and type in the new name. Press enter when done. Select whether or
not to include an AOI by using the check box in front of the AOI name.
91
Tobii Studio 1.2 User Manual v. 1.0
* PDF Draft *
© Tobii Technology 2008
Statistics and fixation filters
All the statistical data in Tobii Studio are affected by the fixation filters. By changing the
settings for the fixation filters the results will vary as the idea with the fixation filters is to
reduce the amount of data by combining individual fixations into groups of fixations and
thus reduce the amount of data. In return, the duration of the fixations will be longer.
The timeline in Visualizations also affects the results displayed as data and will only be
available for the time interval selected.
92
Tobii Studio 1.2 User Manual v. 1.0
* PDF Draft *
© Tobii Technology 2008
7. Settings
7.1 Computer Settings
The first thing to do after installing the software (and eye tracking hardware) is to ensure
that the computer settings are appropriate for running eye tracking tests.
7.1.1 Set Screen Resolution and Colors
Tobii’s recommendation is to always use the same resolution and color depth on the
participant monitor, the eye tracker monitor, and the operator monitor.
1.
Open the Start menu on your computer and select Settings Æ Control Panel.
2.
Double-click on Display and click the Settings tab.
3.
Make sure the Screen resolution is set to 1024x768 or 1280x1024.
4.
To lower performance and hard disk load, select Medium (16 bit) in Color Quality. For studies
that require higher color quality, make sure to use a computer with high performance and contact
support for recommendations.
7.1.2 Configure Monitor Setup (Local Live Viewer Setup)
This step is only required if you plan to use your system with an extra monitor to show
the live viewer if both the eye tracker monitor and the live viewer monitor are both
connected to the Tobii Studio™ computer.
In order to use double screens, your computer must be equipped with a dual-head
graphics card and you must have two monitors connected to this card. One monitor is
93
Tobii Studio 1.2 User Manual v. 1.0
* PDF Draft *
© Tobii Technology 2008
the eye tracker monitor, where the stimuli is shown and one is a regular monitor for the
Tobii Studio™ Live Viewer.
1. Once the graphics card is installed with the card-specific drivers, open the Start
menu on your computer and select Settings Æ Control Panel.
2.
Double-click on Display and click the Settings tab.
3. The eye tracker monitor should be the primary monitor and the control station
monitor the secondary monitor. Click Identify to control which screen is the primary
monitor. The screen where a 1 is shown is the primary screen.
For some graphics cards you need to click Advanced on the Settings tab to access this
function. If you are using the recommended ASUS graphics card, you must also click the
tab, Dual head.
4. Click the representation of monitor 2 and check Extend my Windows desktop onto
this monitor to extend the desktop onto the secondary display if no image is shown on
the secondary screen.
5. Make sure the screens have a good resolution. Usually, the same resolution should
be used on both screens. Recommended resolutions to use with Tobii Studio are 1024 x
768 or 1280x1024. If the higher resolution is used, make sure the computer has
sufficient
processing
power
to
handle
recordings
with
this
resolution
7.2 Tobii Studio Settings
The connection to the eye tracker, user camera settings, fixation filter and other study
settings are handled from the Settings menu.
Under settings, the Tobii Studio software is connected to the eye tracker, which has to be
done the first time the eye tracker is connected to the Tobii Studio computer or network
as well as after each time it has been disconnected. The settings for the user camera,
calibration and fixation filter are also found here. Read more under Settings.
The settings menu is found in the Design and Record view under Setup, and also in the
Tools menu found at the top of each view.
94
Tobii Studio 1.2 User Manual v. 1.0
* PDF Draft *
© Tobii Technology 2008
7.2.1 Screen and Video Capture settings
Settings for the screen capture, user camera and user sound, as well as the remote
viewer are found here. Go to the Settings menu and select the Screen and Video Capture
tab.
Video Playback
Video smoothing is used to improve the video quality of playback of the recordings, such
as the replay and live viewer video. If you experience performance problems disable the
option.
Screen Capture
The sampling rate for the screen can be changed. For better quality, choose a higher
frame rate. Note that a high frame rate will increase the data size and the load on the
computer.
User camera and Video and Audio Settings
To save the images and sound from the user camera and user microphone check the
alternatives,
Save
User
camera and User
sound.
See
image
above.
95
Tobii Studio 1.2 User Manual v. 1.0
* PDF Draft *
© Tobii Technology 2008
If the alternatives are not checked, the user image and sound will not be available in
replay or exported clips of the recording.
Select the source for the user camera and sound in the two drop down menus.
Different codecs can be used to save the audio and video. Codecs supported by and
tested with Tobii Studio will appear in one column. To be sure you are using a codec that
will work, choose one of these. Other codecs available on the computer will also be listed
but only use this if you have a clear preference and carry out testing before using it for
real studies. Note that Tobii can only guarantee that the codecs listed in the approved list
will work on all computers. More codec recommendations can be found in the system
recommendations.
7.2.2 Eye Tracker Connection
Connecting to the Eye Tracker from Tobii Studio
1.
Select Setup Æ Settings and click the Eye Tracker tab.
2.
Select the Tobii Eye Tracker to use from the list.
3. Click OK to connect. To make sure the connection works, press the test selected eye
tracker button and make sure the status is, Connected.
96
Tobii Studio 1.2 User Manual v. 1.0
* PDF Draft *
© Tobii Technology 2008
Connecting to an Eye Tracker from the 50 series
When using an X50, a 1750 or 2150 connected directly to the computer, enter local host
(or 127.0.0.1). With this setup, a TET server has to be installed on the Tobii Studio
computer.
7.2.3 Calibration
Settings
Colors and number of dots for the calibration can be changed. See image below. Read
more under the chapter Calibration.
7.2.4 Fixation Filters
Fixation filters are used to group gaze data into meaningful fixations. Many different
algorithms for fixation definition have been proposed and are available among
researchers and practitioners. In part, the purpose of the study influences which types of
fixation filters are most suitable.
The radius can be set for the fixation filters. Note that the radius is in pixels; real size in
centimeters or inches has to be calculated. Also note that the radius has to be changed
when the screen resolution is changed. The best option is to always use the same
resolution in a single study.
97
Tobii Studio 1.2 User Manual v. 1.0
* PDF Draft *
© Tobii Technology 2008
There are different types of fixation filters available in Tobii Studio:
•
Tobii fixation filter
•
ClearView Fixation Filter
•
Raw Data Filter
How the filters work and recommended filter settings are described per filter below.
Tobii Fixation Filter
The Tobii Fixation filter is used as the default filter.
Fixation filter definition
The filter detects quick changes in the gaze point signal using sliding averaging. How
distinct the changes need to be in order to divide fixations can be adjusted with a
threshold radius.
The filter estimates the position of the fixations between changes in gaze position by
using a median-estimator and by checking if adjacent fixations (in the time-domain) are
closer together than a given threshold (in the spatial domain). The threshold, h, is set
under the fixation filter settings. The value is used when calculating whether the gaze
point belongs to a new fixation or not; see step 3 below. The threshold value sets the
maximum for how far apart fixations are allowed to be in pixel radius and still belong to
the same fixation.
98
Tobii Studio 1.2 User Manual v. 1.0
* PDF Draft *
© Tobii Technology 2008
How the filter works
1.
Interpolation of missing data
Interpolation of samples is used when data samples are missing. This happens,
for example, when a user blinks or looks away.
2. Detecting saccades and fixations
Assuming the only eye motions present in the scan-path are fixations and
saccades, we make the following distinction:
a. If a segment of the signal is of constant or slowly changing mean value
due to drift, we classify it as a fixation.
b. If there is an abrupt change in the mean, we classify it as a saccade.
By designing an algorithm that produces an alarm whenever it detects a
change in the mean, we separate the saccades from the fixations. When
this is done, we can estimate the spatial position of each individual fixation
based on the information contained within its timeframe.
3. Calculation of the difference vector
For each gaze point in the gaze data sequence, the difference between the means
of the sample points within two sliding windows are compared:
By comparing the difference between vector, d, with a threshold, h, this method
produces an alarm when there is an abrupt change in the mean. The threshold, h,
is set under the fixation filter settings. The averaging windows have to be
made as long as possible in order to reduce the impact of noise. They also have to
be limited not to span several saccadic motions within a single averaging window.
4.
Create list with peak incides
To find the saccades, all peaks in the d vector are identified. All peaks that are
lower than a specified threshold are removed. One peak (saccade) per sliding
window is allowed. If more than one peak is found within a span of 5 samples, the
highest peak is kept as a saccade candidate and the lower peak is discarded.
5.
Estimate position of fixations
Estimates of the spatial position of the fixations between the candidate saccades
99
Tobii Studio 1.2 User Manual v. 1.0
* PDF Draft *
© Tobii Technology 2008
are calculated using the median of all samples in the interval. The indices of the
candidate saccades (indices of remaining peaks) are here denoted k i and estimates of
spatial fixation positions are denoted fk
ClearView Fixation Filter
Fixation filter definition
The settings for the ClearView fixation filter defines the maximum distance between two
points for them to be considered as belonging to the same fixation and the minimum
time for which gaze needs to be within the radius to be considered a fixation.
Recommended settings for different situations
Stimuli/Media with mostly pictures: Fixation radius 50 pixels and duration 200ms
Stimuli/Media with mostly reading: Fixation radius 20 pixels and duration 40ms
Stimuli/Media with mixed content: Fixation radius 30 pixels and duration 100ms
Raw Data Filter
No fixation filter is applied to the gaze data but all data points are displayed in the
visualizations and used for analysis in the statistics tool. Note that this will require a lot
of computer resources and the analysis will be very slow if a lot of data is recorded.
7.2.5 Miscellaneous
Database paths
The folder where the data is saved can be set under the Miscellaneous tab. Browse to
find the folder where the data should be saved. Select a new folder to create a new
database.
100
Tobii Studio 1.2 User Manual v. 1.0
* PDF Draft *
© Tobii Technology 2008
Warning Dialogs
If warnings are disabled because the checkbox “Don’t show this again” has been checked
and you want the warning to be shown again, press the button under the Warning
Dialogs settings.
Live Viewer and track status windows
Tobii Studio will remember the position of the live viewer and the track status window
when placed on the secondary screen and place it in the same position the next time it is
started. To reset where the Live Viewer or track status is positioned press the button
under the Live Viewer and track status window setting. This can be used if the track
status is selected but is not visible because of the way it is placed on the secondary
screen.
7.3 Participant Data
Participant data, names and different filtering variables such as gender and age can be
entered and used to filter participant data in the visualizations and export.
Participant
Participants can be added and edited under Tools -> Participants -> Manage Participants
Select the Participants tab
101
Tobii Studio 1.2 User Manual v. 1.0
* PDF Draft *
© Tobii Technology 2008
Add new participant
1. Select New under Participant
2. Enter a name for the participant, see image below.
3. Select variables for the participant if you want to use filtering in your
analysis. For example, viewing a heat map for only the women
participating. See image below.
4. Press OK
Auto generate participants
New participants can also be created by clicking the Auto Generate... button. An optional
number of participants named P1 to Px are created, where x is the number of
participants selected.
102
Tobii Studio 1.2 User Manual v. 1.0
* PDF Draft *
© Tobii Technology 2008
Edit existing participant
1. If a participant already exists, select participants from the list, see image below.
Click Edit
2. Follow steps 2 to 4 under "Add new participant"
Independent Variables
1. Click New under Participant Data
2. Enter a name for the variable under Variable Name, e.g. gender, age or length
3. Enter value names in the box under Values, e.g. male and female, 21-30 years
and 31-40 years or length as in the image below.
4. When done, press OK
103
Tobii Studio 1.2 User Manual v. 1.0
* PDF Draft *
© Tobii Technology 2008
7.4 Minimizing to system tray
When selecting the option Minimizing to system tray in the Setup menu, the Tobii Studio
window will be minimized.
An icon will be shown in the system tray instead, see image below. The system tray icon
will also be visible during recordings. Right click on the Tobii Studio system tray icon to
see the menu with the following options:
•
•
•
•
Switch Test
Show the Live Viewer
Show the Track Status
Show the Main Menu
104
Tobii Studio 1.2 User Manual v. 1.0
•
* PDF Draft *
Start and stop a Test
105
© Tobii Technology 2008
Tobii Studio 1.2 User Manual v. 1.0
* PDF Draft *
© Tobii Technology 2008
8. Export and Import
8.1 Export recording segments as movie
Segments can be exported one by one or in batches; several segments at once from the
same or different recordings.
Single segments can be exported from the segment menu appearing when clicking the
arrow on the segment.
To export several segments at once click the Export button in the Replay view and select
Movie Export.
106
Tobii Studio 1.2 User Manual v. 1.0
* PDF Draft *
© Tobii Technology 2008
Export Options
The export window that appears contains options for the export
•
•
•
•
File Settings, select the destination file and file name.
Export Scope, select to export segments for one or several recordings.
AVI encoder, select the encoder for the movie segment. The standard encoders will
be listed in the drop down menu. To select other encoders press the Edit button next
to the Video codec drop down menu. Note that encoders other than the ones listed in
the default drop down menu are not tested by Tobii and full compatibility cannot be
guaranteed. Other recommended codecs are listed in our system recommendations.
User cam settings, select if the user camera image should be shown in the exported
movie. It is also possible to set where in the image the user camera should be placed
as well as size and opacity.
8.2 Export data for statistical analysis
Statistics data can be exported from the statistics view in the Table view. To export all
data, select the Export... button. For instance, the data can be analyzed in Excel. If
exporting to SPSS or Matlab read more under Export to SPSS or Matlab.
107
Tobii Studio 1.2 User Manual v. 1.0
* PDF Draft *
© Tobii Technology 2008
It is also possible to export data in the table by right-clicking and selecting Copy. The
data can be pasted in Excel, etc., for further analysis.
8.2.1 Export to SPSS or MatLab
Data can be exported to Excel, SPSS/MatLab with options to select different metrics to be
included. To export to SPSS or Matlab click the AOI statistics Export… button in table
view in statistics.
In the Settings window that appears, the metrics to include in the export can be selected
as well as AOIs to be included.
1. To export in a format suitable for these applications go to the Table view under
Statistics and select the AOI Statistics Export... button.
2. Start by selecting a filename and a folder to save the file by clicking the browse
button.
3. Select Metrics by marking them.
4. Press the >> button. It is also possible to include all metrics by pressing Select
all.
5. Select AOIs in the same manner
6. Press the >> to add the AOIs to the list
108
Tobii Studio 1.2 User Manual v. 1.0
* PDF Draft *
© Tobii Technology 2008
7. Select to export to SPSS/MatLab
8. To change the format of the exported data go to Advanced, more information
found further down.
9. Press OK when done
Advanced
Number Formatting
The Decimal separator to use in the exported files can be selected as well as the number
of decimals to include.
Row Labels
The row label can be either the Participant name or the Recording name. This will be the
label shown in the export file and in SPSS or MatLab.
8.3 Text Export
The text export can be used to analyze data from Tobii Studio in other analysis or
statistics software such as Excel, SPSS or Matlab. A text file with selected data is created
and this file can be imported into the other software.
109
Tobii Studio 1.2 User Manual v. 1.0
The
text
export
is
found
* PDF Draft *
in
the
Replay
© Tobii Technology 2008
view
under
the
Export
button.
Output format
The output format of the text export is a tab separated text file. It can be opened using
Excel, SPSS, Matlab or any text editor of your choice.
Selecting Data - Default view and Advanced view
The
text
export
dialog
has
two
tabs;
Text
export
and
Advanced.
In the Text export tab, a couple of text export configurations are available to select
from. In the Advanced tab, it is possible to define a custom text export configuration.
Click on the links to the different options to learn more about how data can be selected.
Default view
Folder settings
This setting determines the folder that the export files will be placed in. The selected
folder will be created automatically if it does not exist. A sub-folder per project, test and
recording can be created. The name of the export file will be generated from the file
name scheme in the export configuration. No files will be overwritten; if the specified file
name exists a '_' will be appended to the file name.
Export scope
Current recording: exports the currently recording selected in the replay view.
Segments in current recording: creates one export file for each segment in the current
recording.
All recordings in test: creates one export file for each recording of the currently selected
test.
All segments from all recordings: creates one export file for each segment in all
recordings.
Text export configuration table
Here, all saved configurations are shown. There are five default configurations. To create
custom configurations go to the Advanced tab. When a configuration is selected it will set
default selections in the advanced tab. By using the check boxes, multiple configurations
can be selected for export.
110
Tobii Studio 1.2 User Manual v. 1.0
* PDF Draft *
© Tobii Technology 2008
Default configurations
•
•
•
•
•
•
All data
All possible text export data will be exported
Event data
User and system events will be exported
AOI data
Fixations on AOIs will be exported, one fixation on one AOI on each row in the
text file
Fixation data
All fixations in the selected interval will be exported
Combined data
The combined data format introduced in ClearView, this contains the stimuli
together with gaze data points mapped to the stimuli media
Exported Data - Definitions
To learn more about the data in the exported file see appendix II Text Export Columns.
Advanced view
In the Advanced Text Export tab it is possible to define a custom text export
configuration.
Folder settings This setting determines the folder that the export files will be placed in. The selected
folder will be created automatically if it does not exist. A sub-folder per project, test and
recording can be created. The name of the export file will be generated from the file
name scheme in the export configuration. No files will be overwritten; if the specified file
name exists a '_' will be appended to the file name.
File settings A custom file name scheme can be specified. There are three tags that can be used in the
scheme, when the file name is generated these tags will be replaced as explained below:
[TN]: replaced with the name of the current test
[RN]: replaced with the name of the current recording
[SN]: replaced with the name of the current segment. If the current element is not a
segment, this part will be excluded from the file name.
[TM]: time when the export file was created.
Export scope
•
•
Current recording: exports the current selected recording in the replay view.
Segments in current recording: creates one export file for each segment in the
current recording.
111
Tobii Studio 1.2 User Manual v. 1.0
•
•
* PDF Draft *
© Tobii Technology 2008
All recordings in test: creates one export file for each recording of the currently
selected test.
All segments from all recordings: creates one export file for each segment in all
recordings.
Header, gaze, events and scenes
•
Write header: includes a header with information about the recording, recorder
system, and participant in the export file
•
ClearView compatible: write the header in a format similar to the header format
used in ClearView
•
Write column header: write the data/column description per column on one row
before data is listed
•
Write filter header: write eye and fixations filter information in the header
•
Export gaze data: export gaze point data, one row for each item
•
Only fixations: only write one row for each fixation, do not write one row for each
raw data sample
•
Print AOIs on separate rows: create one row for each fixation on each AOI
•
Export event: include events in the export file
•
Exclude scenes: do not include scenes in the text export file. This is often an
option you want to leave turned on. If scenes are not excluded, fixations will be
mapped to scenes instead of the underlying media.
Save text export configuration
Enter a new name for the configuration; this name will appear in the list view in the Text
export tab.
Columns
Columns can be selected manually in the advanced view. It is also possible to pre-select
data in the default text export view. Configurations selected in the text export
configuration table will set default selections in the advanced tab.
The data in the text export that can be selected under, Columns, is further explained
under Text Export Columns in appendix II.
8.4 Import, export and merge tests and projects
Export and Import of a whole study or tests can be done either in the start up of Tobii
Studio or by going to File -> Export and Import in Tobii Studio.
8.4.1 Export
Which tests and recordings to include in the export can be selected in the export view by
checking the boxes next to the tests and recordings to include. When done, press Export
Project.
112
Tobii Studio 1.2 User Manual v. 1.0
* PDF Draft *
© Tobii Technology 2008
8.4.2 Import
Browse to find the Studio file to import. It has to be a file exported from Studio with the
file extension .nas, for example myproject.nas. As for the export, it is possible to select
to import only parts of the project by checking the tests and recordings to include in the
import. Press Import Project when ready.
113
Tobii Studio 1.2 User Manual v. 1.0
* PDF Draft *
© Tobii Technology 2008
8.4.3 Merge
Recordings and tests in a project can be merged if the project is created on one
computer and thereafter is exported and recordings are made on different computers.
It is not possible to merge projects created on different computers in Tobii Studio.
To merge recordings from different computers into one test or project follow the steps
below:
1. Create a study in Tobii Studio on one computer
2. Export the study by going to File, Export and Import.
3. Import the study to one or several other computers
4. Run the study (record) on the different computers. Make sure to use different
names for the recordings on the different computers to be able to differentiate
between recordings once the studies are merged. Do not change the name of the
study or test.
5. Export the study from all computers except the one where the analysis is to take
place.
6. Import the study from the other computers to the
This is done in Tobii Studio under File, Export and Import.
analysis
computer.
7. All recordings from all computers will now be shown in the same study on the
analysis computer.
114
Tobii Studio 1.2 User Manual v. 1.0
* PDF Draft *
© Tobii Technology 2008
9. Installation
9.1 Installation instructions
1. Microsoft .NET framework must be installed on the target computer. If not installed;
install from the folder on the installation CD.
2. DirectX 9 must be installed on the target computer. This is usually the case with new
computers. To check the DirectX version on your computer, run the dxdiag utility. Dxdiag
can be started by going to the start menu, selecting run and typing “dxdiag” (Windows
XP) or typing the same thing into the search field (Windows Vista). The current DirectX
version can be found in the System tab in dxdiag. If needed, the latest DirectX run-time
can
be
downloaded
from
the
Microsoft
Download
center
http://www.microsoft.com/Downloads/Search.aspx
3. Run “Studio-x.msi”
4. If the hardware is an eye tracker from the 50-series (1750, x50, 2150) the TET Server
has to be installed. Go to the TET Server Installation Files folder and Run "TETServer
2.9.16.msi".
System recommendations
System recommendations is a separate document, which can be downloaded from
www.tobii.com and be obtained from Tobii sales and support.
9.2 License
A license key is needed to run Tobii Studio. The license can be found on the Tobii Studio
CD cover. It can also be obtained from Tobii by contacting support.
115
Tobii Studio 1.2 User Manual v. 1.0
10.
* PDF Draft *
© Tobii Technology 2008
Appendix
Appendix I - Event Data
The table below shows the Events and Event Data that can be found in the text export
and the event list in the Replay view.
Event
Event
Key
Data 1
Data 2
Descriptor
ImageStart
8
Image Name
ImageEnd
16
Image Name
InstructionStart
2048
InstructionEnd
4096
MovieStart
128
Movie Name
MovieEnd
256
Movie Name
ScreenRecStarted
8192
ScreenRecStopped 16384
URLStart
512
URL/website
name
URLEnd
1024
URL/website
name
KeyPress
4
ASCII code for key
pressed
LeftMouseClick
1
X mouse coordinate
Y
mouse
coordinate
RightMouseClick
2
X mouse coordinate
Y
mouse
coordinate
LogData
0
Log name
Logging
comment
116
Key name
Tobii Studio 1.2 User Manual v. 1.0
* PDF Draft *
© Tobii Technology 2008
Appendix II – Text Export Columns - Data Definition
Timestamp
The timestamp in milliseconds for when the gaze data was collected
DateTimeStamp
The timestamp
(mm:ss:ms)
recalculated
and
shown
in
minutes,
seconds
and
milliseconds
DateTimeStampStartOffset
The time for the timestamp in hh:mm:ss. The start time for the recording is also shown
in the Replay and Visualization views in Tobii Studio if the option Show Date is selected in
the Recordings field. The start time is taken from the computer time
Number
The timestamps in numbered order
Gaze PointXLeft
The horizontal screen position of the gaze point for the left eye
GazePointYLeft
The vertical screen position of the gaze point for the left eye
CamXLeft
The horizontal location of the left pupil in the camera image (0 is left edge, 1 is right
edge)
CamYLeft
The vertical location of the left pupil in the camera image (0 is top, 1 is bottom)
DistanceLeft
Distance from the eye tracker to the left eye. The distance is given in mm on a straight
axis right out from the eye tracker plane
PupilLeft
The size of the pupil (left eye) in mm. The distance and pupil size measures are
calculated to be as close to real values as possible. However, individual differences in the
eyes of subjects and the strength of glasses/contact lenses will cause errors in these
values. However the measures still reflect changes in head position and pupil size
accurately
ValidityLeft
The validityof the gaze data. The validity is 0 if the eye is found and the tracking quality
good. If the eye cannot be found by the eye tracker the validity code will be 4. Read
more under the Validity codes section further down
Gaze PointXRight
The horizontal screen position of the gaze point for the right eye
117
Tobii Studio 1.2 User Manual v. 1.0
* PDF Draft *
© Tobii Technology 2008
GazePointYRight
The vertical screen position of the gaze point for the right eye
CamXRight
The horizontal location of the right pupil in the camera image (0 is left edge, 1 is right
edge)
CamYRight
The vertical location of the right pupil in the camera image (0 is top, 1 is bottom)
DistanceRight
Distance from the eye tracker to the right eye. The distance is given in mm on a straight
axis right out from the eye tracker plane
PupilRight
The size of the pupil (right eye) in mm. The distance and pupil size measures are
calculated to be as close to real values as possible. However, individual differences in the
eyes of subjects and the strength of glasses/contact lenses will cause errors in these
values. However, the measures still reflect changes in head position and pupil size
accurately
ValidityRight
The validity of the gaze data. The validity is 0 if the eye is found and the tracking quality
good. If the eye cannot be found by the eye tracker the validity code will be 4. The value
is for the right eye. Read more under the Validity codes section further down
FixationIndex
The indexes for the fixation points
GazePointX
The Gaze PointX can be the horizontal screen position for either eye or the average for
both eyes. The value to show here is specified in Tobii Studio under Tools -> Settings ->
Fixation Filters -> Eye Selection Filter. This value is also used for the fixation definition
GazePointY
The Gaze PointX can be the horizontal screen position for either eye or the average for
both eyes. The value to show here is specified in Tobii Studio under Tools -> Settings ->
Fixation Filters -> Eye Selection Filter. This value is also used for the fixation definition
Event
Events, automatic and logged, will show up under Events. The automatic events are start
and end events for the different media, mouse clicks and key presses. The automatic
events are listed in the event table under Event Key and Data. The logged events are the
manually logged events entered either in the replay view or from the remote logger
EventKey
A unique event key is shown for different key presses. The different event keys with
corresponding events, data and descriptions are listed under Event Key and Data.
118
Tobii Studio 1.2 User Manual v. 1.0
* PDF Draft *
© Tobii Technology 2008
Data1
A data field for the event. The contents of this field vary depending on what type of event
this is. See the Event key table below
Data2
A data field for the event. The contents of this field vary depending on what type of event
this is. See the Event key table below
Descriptor
A description of the event. The contents vary depending on what type of event this is.
See the Event key table further down
StimuliName
The file name of the media given in the setup in Tobii Studio
MediaWidth
Media size in pixels
MediaHeight
Media size in pixels
MediaPosX
The distance from the left side of the screen to the media on the screen given in pixels
MediaPosY
The distance from the top of the screen to the media on the screen given in pixels
MappedFixationPointX
The x coordinate for the fixation point mapped to the media coordinate system, where
the origin for the coordinate system is the top left corner of the image/media
MappedFixationPointY
The y coordinate for the fixation point mapped to the media coordinate system, where
the origin for the coordinate system is the top left corner of the image/media
FixationDuration
Fixation duration. The time in milliseconds that a fixation lasts
AoiIds
ID number for the AOI, usually a counter starting at zero for the first AOI
AoiNames
The name of the AOI or AOIs if fixations on multiple AOIs are to be written on the same
row
WebGroupImage
Filename of the image file that is used to visualize the web group
MappedGazeDataPointX
The x coordinate for the raw gaze data point mapped to the media coordinate system
where the origin for the coordinate system is the top left corner of the image/media
119
Tobii Studio 1.2 User Manual v. 1.0
* PDF Draft *
© Tobii Technology 2008
MappedGazeDataPointY
The y coordinate for the raw gaze data point mapped to the media coordinate system
where the origin for the coordinate system is the top left corner of the image/media
MicroSecondTimestamp
Timestamp for this export row in microseconds
Validity Codes
The validity code ranges from 0 to 4, with the following interpretations for each value:
0
The system is certain that it has recorded all relevant data for the particular
eye and that the data recorded belongs to the particular eye (no risk of
confusing left eye with right eye by the system).
1
The system has only recorded one eye, and has made some assumptions and
estimations regarding if the recorded eye is left or right. However, it is still
highly probable that the estimations made are correct. The validity code on
the other eye is in this case always set to 3.
2
The system has only recorded one eye and has no way of determining if this is
the left or the right eye.
3
The system is fairly confident that the actual gaze data is actually incorrect or
corrupted. The other eye will always have validity code 1.
4
The actual gaze data is missing or definitely incorrect. A couple of gaze data
with validity code 4 on both eyes, followed by a number of gaze data with
validity code 0 on both eyes, are usually a sure sign of a blink.
It is recommended that the validity codes always be used for data filtering to
remove data points, which are obviously incorrect. For most studies, we
recommend removing all data points with a validity code of 2 or higher.
120
Tobii Studio 1.2 User Manual v. 1.0
* PDF Draft *
121
© Tobii Technology 2008