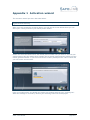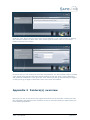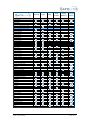
1
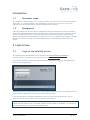
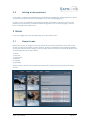
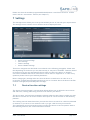
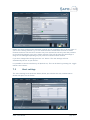
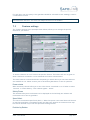
User Manual GUI 1.4
Author:
Version:
Jeroen Bomhof
1.4 / 29-09-2010
Disclaimer
This document contains confidential information intended for a specific (group of)
individual(s) and purpose, and is protected by law. If you are not the intended recipient, you
should delete this document and are hereby notified that any disclosure, copying, or
distribution of this document, or the taking of any action based on it, is strictly prohibited.
Any views or opinions are solely those of the author and do not necessarily represent those of
any SafelinQ group company.
Change and version management / Revision history:
Version
1.0
1.1
1.2
1.3
1.4
Author
Annemiek Apeldoorn
Annemiek Apeldoorn
Annemiek Apeldoorn
Jeroen Bomhof
Jeroen Bomhof
User Manual GUI
Author: Jeroen Bomhof
Date
1 Dec 2008
15 Jan 2009
24 Mar 2009
11 Dec 2009
29 Sep 2010
29-09-2010
Change
First version
Revised version
Revised version
Revised version
Revised version
version 1.4
page 2/27
Contents
Introduction ................................................................................................... 4
1.1
1.2
Login Screen................................................................................... 4
2
2.1
2.2
Login to the SafelinQ service ............................................................... 4
Setting a new password ...................................................................... 5
Home............................................................................................ 5
3
3.1
3.2
Home Screen................................................................................... 5
Initialisation wizard........................................................................... 6
Location ........................................................................................ 9
4
4.1
4.2
4.3
Current Position ..............................................................................10
Route history..................................................................................11
Device Report.................................................................................12
Safety Zone.................................................................................. 13
5
5.1
5.2
Creating a Safety Zone ......................................................................14
Modifying or Deleting a Safety Zone ......................................................15
Buttons ....................................................................................... 16
6
6.1
Setting the buttons ..........................................................................16
Settings ....................................................................................... 17
7
7.1
7.2
7.3
7.4
Device function settings ....................................................................17
Alert settings..................................................................................18
Feature settings ..............................................................................19
Device handset settings.....................................................................21
Guardians .................................................................................... 22
8
8.1
8.1.1
8.1.2
8.1.3
9
Document scope............................................................................... 4
Background..................................................................................... 4
Create Guardian..............................................................................23
Guardian language ........................................................................23
Guardian timezone .......................................................................24
Alarm configuration ......................................................................24
Appendices .................................................................................. 24
User Manual GUI
Author: Jeroen Bomhof
29-09-2010
version 1.4
page 3/27
Introduction
1.1
Document scope
The purpose of this document is to be used as a basic user manual for the front-end website
(User GUI). It contains a step by step explanation on how to access the site, set up and
manages your devices and how to use the different functionalities.
1.2
Background
SafelinQ Products can only be used in combination with the SafelinQ services as provided by
SafelinQ or SafelinQ representatives. SafelinQ offers a platform with a user GUI which can be
used to configure the device. In the User GUI the device function settings, alert settings,
feature settings and specific handset settings can be set up or changed. All settings / changes
are sent to the device by SMS via a SMS Gateway and are automatically picked up by the
device.
2 Login Screen
2.1
Login to the SafelinQ service
The SafeLinQ front-end website can be accessed via www.safelinq.com/safelinq or
alternatively you can login via the login section on www.safelinq.com.
If you follow the above mentioned link you will be prompted for your login and password as
shown in the image below:
Depending on what you agreed with your local SafeLinQ distributor you have already received
a username and password or you need to create these yourself.
If you already have a username and password you can enter these and press the ‘log-in’
button for access to the Home screen of the front-end website.
In case you don’t have a username and password yet please press the ‘activation’ button.
Follow the instructions in the “activation wizard” as mentioned in ‘Appendix 1’ to activate a
new user and register your username and password.
User Manual GUI
Author: Jeroen Bomhof
29-09-2010
version 1.4
page 4/27
2.2
Setting a new password
If you want to change your password you can do this by pressing the ‘change password’ button
on the home screen of the front-end website if you are already logged in.
In case you do not remember your password and are thus unable to log into the front-end
website you can press the ‘username/password forgotten’ link on the login page. You will
have to complete the wizard first.
3 Home
If you are logged in you will automatically go to the home screen.
3.1
Home Screen
Below you can see an image of the home screen of the front-end website. At the top of the
screen you will see a number of menu choices. These are explained in the following chapters
of this user manual and by clicking on any of these menu choices you are taken directly to the
corresponding section of the website.
1. home
2. location
3. safety zone
4. buttons
5. settings
6. guardians
(some of which can also be accessed via the four sub-screens on the left side of the home
screen).
User Manual GUI
Author: Jeroen Bomhof
29-09-2010
version 1.4
page 5/27
As described in 2.3. you can use the ‘Change password’ button on the right side of the screen
to change your password.
The alarm overview will show you a list of the last five alerts including an indication of
priority, type of alert, the name of your device, location when the event occurred and date
and time. The home page automatically refreshes every two minutes.
If applicable you will see a list of “un-initialised units” which need to be activated by use of
the initialisation wizard. This process is described in 3.2
3.2
Initialisation wizard
Before you can start using your device it first needs to be set up. Setting up devices basically
consists of two separate steps. First a device needs to be set up in the administration
website. Your local SafeLinQ distributor will take care of this (unless agreed otherwise).
The next step is that the device needs to be initialised. This chapter describes how this
should be done. If you have an unitialised device in your account this is displayed on the
home screen as shown in the image below.
Before starting the initialisation process make sure that you put the SIM card in the device
and that the device is switched on in order for it to receive the configuration messages.
Depending on the device you want to initialise please make sure that the PIN code on the SIM
card is removed and that you are in a location where the device has GSM network coverage
(and preferably GPS coverage). If this is all done you can press the ‘initialise’ button.
Please note that all information you enter during the initialisation process can still be
changed after the initialisation of your device is finished.
In the following screen of the wizard please enter details like the handset name (20
characters max) and select the country where you intend to use the device. You can also
enter the user details such as name and address but these are all optional fields. If everything
is filled-in please press the ‘next’ button.
User Manual GUI
Author: Jeroen Bomhof
29-09-2010
version 1.4
page 6/27
In the next screen of the wizard you need to specify the service start- and end-time. These
parameters indicate what the time frame is for which you want the device to report its
current location to the SafeLinQ platform.
The tracking interval means how often you want the device to search for a GPS fix and this is
indicated in minutes. If you set it to five minutes is will try to get a GPS fix every five
minutes.
The transmission interval means how often you want the device to send its position back to
the SafeLinQ platform, this is also indicated in minutes.
Please note that tracking and transmission interval don’t have to be the same. If you set the
tracking interval e.g. to five minutes and the transmission interval to fifteen minutes the
device will check its location every five minutes but will only send the positions to the
SafeLinQ platform once every fifteen minutes. This will decrease the data usage or usage of
text messages depending on your preferred communication method. Please press the ‘next’
button when you have finished your selection.
User Manual GUI
Author: Jeroen Bomhof
29-09-2010
version 1.4
page 7/27
You will now have to choose your preferred location data transmission method. There are
three selections possible.
•
•
•
Automatic: the device will first try to use GPRS but will automatically switch to text
messaging if no GPRS communication is possible
Only GPRS: all communication via GPRS
Only SMS: all communication via text messages
When you have selected the preferred communication method please press the ‘next’ button.
At this screen you can switch on a number of key features of your device. Please note that
selection made can be changed at a later stage via the website if the initialisation process is
finished. Now press the ‘next’ button.
User Manual GUI
Author: Jeroen Bomhof
29-09-2010
version 1.4
page 8/27
At this screen you can indicate if you want to receive alert messages for a specific event via
email or text message or both. Please note that these settings can also be changed via the
website after the initialisation process is finished. Now press the ‘next’ button.
This is the final screen of the initialisation process. It shows you an overview of the settings.
If you select ‘restart wizard’ the initialisation process will start all over again. If you select
‘confirm’ the initialisation process is finished and you will be taken back to the home screen
of the front-end website. All configuration messages will now be sent from the SafeLinQ
platform to your device after which you will be ready to start using the device.
4 Location
The location section enables you to see where all your devices are located as well as find out
the current position of a particular device. The map will show the last known position of the
devices and on the left hand side you will see the status and location details.
User Manual GUI
Author: Jeroen Bomhof
29-09-2010
version 1.4
page 9/27
Select a specific device for more details.
4.1
Current Position
To find out the current location of a particular device:
User Manual GUI
Author: Jeroen Bomhof
29-09-2010
version 1.4
page 10/27
* Select the device and click on current position to locate the handset. This will take
between 60-80 seconds and a yellow bar will appear on the screen (as displayed below) whilst
the device is being located. If it cannot be found, the last position will be given.
When the search is completed the result will be displayed as shown below.
Location details can be displayed in three different formats:
•
•
•
Only address
Coordinates when no address available
Coordinates and address
The standard format is coordinates and address. Please note that in case house numbers are
displayed these are meant for reference only.
There are multiple reasons why a position cannot be given, such as weather conditions, a
heavily built up area or when the device is indoors.
4.2
Route history
The route history shows the route(s) the user has recently made and also shows an overview
of all events. The locations are given based on the service time and interval settings and will
be available via the website for 30 days.
In order to see the route history for a specific day please select the day you would like to see
from the calendar. Please note that only the dates displayed in bold have any route history
information.
User Manual GUI
Author: Jeroen Bomhof
29-09-2010
version 1.4
page 11/27
You will now see time, date, address and event type information. If you want to view a
specific location in more detail, click on the number of the location fix to be taken to a map.
An example of a number of route history and events is shown below.
On the right you can see the GPS signal strength indicator which can be seen as an indication
for the fix quality. The more green bars you see the better the quality of the fix, if there is
no GPS fix at all, or if this is irrelevant for a specific event type, the GPS signal strength
indicator is displayed in grey.
It is possible to switch route history off. This can be done in the settings area by pressing the
‘toggle mobile route’ button in the device function settings submenu.
4.3
Device Report
User Manual GUI
Author: Jeroen Bomhof
29-09-2010
version 1.4
page 12/27
The ‘device report’ function enables you to create reports for a specific device in a
downloadable format. Select the required start date and end date for the report from the
calendars on the right and press the ‘generate report’ button as shown below.
Please note that creating the report can take several minutes depending on the selected
dates and the corresponding size of the report. If the creation of the report is ready you will
see a pop-up asking you to open or save a comma separated (.csv) file.
The report contains the following information:
•
•
•
•
•
Date
Time
Device name
Phone number
Address
•
•
•
•
•
Longitude
Latitude
Type of event
Quality
Speed
Please note that for specific devices the additional categories ‘private/business use’ and
‘mileage’ are available.
5 Safety Zone
This section allows you to set-up and manage safety zones. The technology used for the
safety zones is geo fencing. A Geo-fence is a virtual boundary on a geographic area. When
that boundary is crossed it can be recognised as an event and the user/guardian can be
notified of that event.
The user can move freely within each safety zone and, should they enter or leave the safety
zone (depending on settings), a text message or email alert will be sent to the guardian or to
the chosen emergency control centre.
User Manual GUI
Author: Jeroen Bomhof
29-09-2010
version 1.4
page 13/27
Up to four adjustable zones can be set up for each SmartlinQ, BloQ and BloQ Portable, and up
to nine adjustable zones for the QlinQ. The below paragraphs explain how to create, modify
and delete safety zones.
5.1
Creating a Safety Zone
To create a new safety zone for a device, simply select a device and on the right side of the
webpage the settings are displayed. Below you can see an example.
Please note that the configuration options displayed can be different for the various devices.
First start by entering the Zone name. Please note that the name you enter will also be
displayed in all communication related to the usage of the safety zones, e.g. in the guardian
messages.
Now you can set the Zone start- and end time. This represents the time to start and end
checking if the user enters or exits the safety zone.
After this please set the interval. The interval indicates when a guardian will be informed if
the user has left or entered the safety zone. It is possible to make a selection between 1-10
minutes or select ‘Sync with my tracking interval’. If you select the last option the guardian
will be informed at the same times as the selected tracking interval.
You can now select the type of zone notifications, this indicates for which alert type
notification will be sent. The following choices are possible:
•
•
•
Zone out alerts only
Zone in alerts only
Zone in and zone out alerts
It is also possible to specify the number of alerts that should be sent out. This indicates the
number of times the guardian will be notified. A selection can be made between 1-5 times or
unlimited.
User Manual GUI
Author: Jeroen Bomhof
29-09-2010
version 1.4
page 14/27
Please note that if you are in or outside a zone no ‘zone alerts’ will be sent out. The
messages will only be sent if you cross the boundary of the safety zone.
If you have made all selections please press the ‘next’ button and you will see the following
screen.
At this page you can draw the safety zone. Once you have pressed the ‘draw’ button you can
start the safety zone selection by clicking on the map. The first click defines the centre of
the zone, dragging the mouse over the map will create the safety zone circle. To finish the
safety zone selection click once more on the map and press the ‘confirm’ button.
The search option will allow you to search for a specific address and locate the map on that
position to start the safety zone configuration.
Please note that the minimum radius for a safety zone is 200 meters.
5.2
Modifying or Deleting a Safety Zone
In order to modify or delete a safety zone please select the safety zone that needs to be
modified or deleted and select the corresponding button as displayed below.
User Manual GUI
Author: Jeroen Bomhof
29-09-2010
version 1.4
page 15/27
If you press the ‘delete’ button the selected safety zone is instantly deleted. If you press the
‘modify’ button you will see an overview of the settings (like when you create a safety zone)
and you can make changes to the safety zone.
6 Buttons
You can use the ‘buttons’ section to programme the pre-programmable buttons of your
device. Depending on the device this is either up to four, or up to nine phone numbers.
6.1
Setting the buttons
Select your device and you will see the following screen:
To set up the pre-programmed buttons enter the name and phone number and press the
‘configure’ button. Please make sure that the number is entered in international format if
you intend to use your device abroad (e.g. +31302668030).
To modify a pre-programmed buttons simply change the name and phone number and press
the ‘configure’ button. To delete a pre-programmed button press the ‘delete’ button of the
corresponding button.
User Manual GUI
Author: Jeroen Bomhof
29-09-2010
version 1.4
page 16/27
Please note that the numbers programmed behind buttons 1 and 2 have access to ‘stealth
mode’ and the ‘auto answer’ feature (see chapter 7).
7 Settings
The Settings section allows you to set up the SafelinQ service in line with your requirements.
The settings section consists of four different areas as displayed below:
•
•
•
•
Device function settings
Alert Settings
Feature settings
Device Handset settings
These four categories are described in more detail in the following paragraphs. Please note
that depending on the device you use features may or may not be available. Features related
to the device you use are automatically shown when you select the device. A detailed
overview of available features for each device can be found in ‘Appendix 2’. In case of any
questions please contact your SafeLinQ distributor.
Before changing any settings make sure that the device is switched on in order for it to
receive the configuration messages and that you are in a location where the device has GSM
network coverage (and preferably GPS coverage).
7.1
Device function settings
The ‘device function settings’ area (as shown below) allows you to define the service startand end time, tracking and tracing interval to be used for your device.
The service start- and end-time parameters indicate what the time frame is within you want
the device to search for its current location and report its current location to the SafeLinQ
platform.
The tracking interval means how often you want the device to search for a GPS fix (indicated
in minutes). If you set it to five minutes is will try to get a GPS fix every five minutes.
The transmission interval means how often you want the device to send its position back to
the SafeLinQ platform, this is also indicated in minutes.
User Manual GUI
Author: Jeroen Bomhof
29-09-2010
version 1.4
page 17/27
Please note that tracking and transmission interval do not necessarily have to be the same. If
you set the tracking interval e.g. to five minutes and the transmission interval to fifteen
minutes the device will check its location every five minutes but will only send the positions
to the SafeLinQ platform once every fifteen minutes. This will decrease the data usage or
usage of text messages depending on your preferred communication method.
If you have changed the settings press the ‘ok’ button. The new settings will now
automatically be sent to your device.
It is possible to switch route history off (default on). This can be done by pressing the ‘toggle
mobile route’ button.
7.2
Alert settings
The ‘Alert settings’ area (as shown below) allows you to define the way communication
should take place for each alert.
User Manual GUI
Author: Jeroen Bomhof
29-09-2010
version 1.4
page 18/27
For each alert you can specify if the guardians should be informed via text message, email or
a combination of both.
Please note that if you don’t select anything for a specific alert the guardians will NOT be
informed about this alert. The alert will always be shown on the website.
7.3
Feature settings
The ‘Feature settings’ area (example shown below) allows you to manage the specific
features of your device.
To switch a feature on or off click on the specific feature. The button will turn to green to
show it has been activated or red to indicated the feature is deactivated.
The main features are described below. Depending on which device you use these features
are available or not. Please contact your local SafeLinQ distributor in case of questions.
Power status
When activated, this will allow you to see if the device is switched on or off when in either
‘Location’ or ‘Route History’. This is shown against ‘status’.
Safety Zones
This enables safety zone notifications to be displayed on the SafelinQ user website and
notifications to be sent to guardians.
Speed Alert
You can set a maximum speed level (km/h). When this option is activated alerts will be sent
in case the speed limit is exceeded. Please note that your speed is not monitored non-stop
but will be checked in sync with the specified tracking interval.
Position by Button
User Manual GUI
Author: Jeroen Bomhof
29-09-2010
version 1.4
page 19/27
Select one of the pre-programmed buttons you want to configure for ‘position by button’, so
when pressed and held down by the user, the device will send its position, time and date
information back to the SafelinQ server including the number of the button pressed.
Auto Answer
Select pre-programmed buttons 1 or 2 (or both) to access the auto answer facility. It enables
the device to automatically answer a call if, after 10 seconds, the user has not yet answered
the call by pressing the call/answer button.
Motion Sensor
When you activate this feature you will receive an alarm when the motion sensor is triggered.
The motion sensor is triggered when the handset is dropped. You have a choice of sensitivity
levels (ranked from least to most sensitive):
1. Man down – Low
2. Man down – Medium
3. Man down – High
4. Impact
Fake Power Off
When ‘fake power off’ is activated in the platform, the phone will still respond to Real Time
Find’s, auto answer, send mobile route reports and send out alerts, even if it is switched off
by the user.
Stealth Mode
By activating ‘stealth mode’ from the platform the phone will immediately appear to be
switched off. It enables the users of the numbers behind pre-programmed buttons 1 and 2 to
silently switch off the ring tone of the device. If they believe the user is in distress, they can
call the device whilst it is in stealth mode from the pre programmed number. The device will
answer the call silently, allowing the caller to listen in to the situation without drawing any
unwanted attention and to take action if so required.
Emergency Protocol
This feature can be described as a ad hoc feature to immediately contact the user of the
device. Enter the telephone number that you want to use to contact the device and tick
the microphone box (default on) to listen to the user. If you don’t tick the box you won’t hear
anything.
Position by call
Position by call allows you to call the BloQ Portable to get its current position. The device will
reject the incoming call and will then try to get a GPS position. Once it has a GPS position, it
will report the phone number from the incoming call and the position back to the platform.
Non-movement detection
The movement detection can be used to stop cycling when the device has detected that it did
not move a specified distance during a specified amount of cycles. If the speed is higher than
the speed stated in the form, the device will consider itself as moving and will keep cycling
even though the distance is not greater than the amount specified in the form.
Power key
This feature enables or disables the power key on the BloQ Portable. This means that the user
of the device is not able to switch the device on/off.
Function key
User Manual GUI
Author: Jeroen Bomhof
29-09-2010
version 1.4
page 20/27
The function key can be configured in two different modes. When configured in SOS mode
pressing the function key for 3 seconds will send out an emergency alert to the platform.
When configured in Park and BloQ mode pressing the function key two times within two
seconds creates a temporary safety zone with zone out alerting, at your current location with
a radius of 400 meters and check interval of five minutes.
Ignition status
This feature enables you to see the ignition status of the vehicle.
Mileage report
This feature enables you to see, set or reset the mileage of a BloQ. You have the possibility to
enter the current mileage.
Power save
This function enables the sleep mode with ultra low power consumption. When this function
is enabled, you will not be able to communicate with the device until a motion or ignition has
been detected.
7.4
Device handset settings
The ‘Device handset settings’ area (example shown below) allows you to manage the specific
settings for your handset.
The following settings can be changed:
Handset name
User Manual GUI
Author: Jeroen Bomhof
This is the specific name given to the handset. This handset
name is shown in on the SafeLinQ platform and used in all
communication to the guardians. Please note that a maximum
of 20 characters can be used.
29-09-2010
version 1.4
page 21/27
Handset mobile number
This is the phone number allocated to the handset.
Handset network provider
This allows you to select the appropriate network provider. If
you want to select a provider that is not listed please contact
your SafeLinQ distributor.
Handset emergency number
This is the phone number that will be dialled when pressing
the SOS button.
EMC mode
This allows you to specify the communication method in case
of an SOS alert.
There are 4 options available:
• Do not call, send no position:
only the alert message will be send to the SafeLinQ platform (and guardians if alert
messaging is set up)
• Call once, send position:
The programmed emergency number will be called and the position will be sent to the
SafeLinQ platform (and guardians if alert messaging is set up)
• Retry call until answer, send position:
The programmed emergency number will be called and the position will be sent to the
SafeLinQ platform (and guardians if alert messaging is set up). The call can only be ended
by the user of the device. If the connection is lost or if the person answering the call
hangs up the device will automatically redial.
• Retry call until answer, send no position:
The programmed emergency number will be called but no position will be sent to the
SafeLinQ platform. The call can only be ended by the user of the device. If the
connection is lost or if the person answering the call hangs up the device will
automatically redial.
EMC Communication method
Please select the way a emergency alert should be sent to the
SafeLinQ platform. Possible options are:
o Only SMS (preferred choice because of priority)
o Only GPRS
o Automatic
Handset time zone
Select the time zone in line with the location of the user
Preferred comm. method
This is the way the device communicates to the
SafeLinQ platform. There are three options possible:
o
o
o
Automatic: the device will first try to use GPRS but
will automatically switch to text messaging if no GPRS
communication is possible
Only GPRS: all communication via GPRS
Only SMS: all communication via text messages
Please note that the selected communication method together with the set service time and
transmission interval has impact on the invoice you receive from your mobile operator
(depending on the contract you have). If you do not know which option to select please
contact your local SafeLinQ distributor!
8 Guardians
User Manual GUI
Author: Jeroen Bomhof
29-09-2010
version 1.4
page 22/27
The guardians section can be used to add, modify or delete guardians. The guardians added in
this section receive the alarm notifications you configured for your devices, but cannot use
the website.
The following paragraphs explain how to create, modify and delete guardians.
8.1
Create Guardian
Press the create button on the Guardian page to create a new guardian.
Please enter the guardian name, mobile phone number in international format and a valid
email address here and press the ‘create’ button as shown in the image below.
The guardian is now created. Please press the ‘modify’ button to set the guardian language
and alarm configuration. You will see the page displayed below.
8.1.1
Guardian language
User Manual GUI
Author: Jeroen Bomhof
29-09-2010
version 1.4
page 23/27
You have the possibility to change the language that is used for the alert messages that are
sent to guardians. The default setting is the language of the front-end website but it is
possible to change the language.
Please note that by changing the guardian language you do not change the language of the
front-end website. This can only be done via the administration website.
Please note that not all languages in the list are available. Contact your SafeLinQ distributor
to verify if a preferred language is available.
8.1.2
Guardian timezone
When setting up a guardian it is important to select the correct timezone for the guardian in
order to receive all communication about alerts, either via email or text message, in the right
time.
Simply select the right time zone from the pull down menu.
8.1.3
Alarm configuration
In order for the guardian to receive alert messages you need to do the alarm configuration.
Select the device from the pull down menu and indicate for each alert if the guardian should
receive the alert message by clicking on the icon below the alert type.
The way the alerts are communicated to the guardian are defined in the ‘alerts settings’
section. Please note that a guardian will only receive alarms from a device if this enabled in
the (alert) settings page.
9 Appendices
User Manual GUI
Author: Jeroen Bomhof
29-09-2010
version 1.4
page 24/27
Appendix 1 Activation wizard
The activation wizard process is described below.
Please note that before you can use the activation wizard your number already needs to be
registered with SafeLinQ.
When you have pressed the activation button you will see the screen below where you can
select your country and enter your mobile phone number.
Please note that this should not be the mobile phone number that you want to use with your
SafeLinQ device but the mobile phone number that is already registered with SafeLinQ as the
master guardian number. If you have entered the number please press the ‘Next’ button and
you will see the screen below.
Using your mobile phone you should now send a text message with the text “SafelinQ ON”.
When the message is received by SafeLinQ the following screen will be displayed.
User Manual GUI
Author: Jeroen Bomhof
29-09-2010
version 1.4
page 25/27
Press the ‘next’ button and you will receive a text message on your mobile phone containing
the activation request for short code. After entering the activation code on the website
please press the ‘next’ button.
On this screen you can create your username and password. You will automatically be notified
if the chosen username already exists. Please make sure that you enter a secure username
and password combination. If you press the ‘next’ button you will go automatically be logged
in and you will go straight to the home screen of the front-end website.
Appendix 2 Feature(s) overview
Below you can see an overview of the supported features for each product. Please note that
the availability may depend on the firmware version in use and on what you agreed with your
local SafeLinQ distributor.
User Manual GUI
Author: Jeroen Bomhof
29-09-2010
version 1.4
page 26/27
SmartLinQ
QLinQ
BloQ
BloQ
Portable
MyTraQ
Blackberry
Sonim XP3
Sentinel
Location
current position
route history
Safety Zone
create and /or modify upto 4 zones
create and/or modify upto 9 zones
Buttons
upto 4 pre-programmable buttons
upto 9 pre-programmable buttons
Service Settings
service start/end time
Tracking interval
sync zone interval
Feature Settings
power status
position by button
fake power off
auto answer
stealth mode
speed alert
motion sensor
emergency protocol
mileage reporting
contact status
low battery status
non-movement detection
emergency button
disable power on/off button
auto safety zone
position by call
voice monitoring
two-way voice connection
configurable input/ouput settings
tilt sensor
impact sensor
battery level indication
preferred communication method
only SMS
only GPRS
automatic
Alert setting (email/text)
safety zone alert
speed alert
power alert
low battery
emergency alert
shock alert
Position by call alert
ignition on/off alert
Position by button alert
Non-movement alert
Reporting details
Date
Time
device name
phone number
address
Longtitude/Latitude
Quality
Event Type
Mileage
User Manual GUI
Author: Jeroen Bomhof
29-09-2010
version 1.4
page 27/27