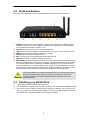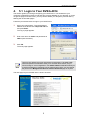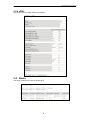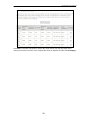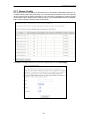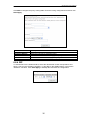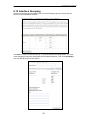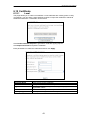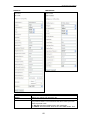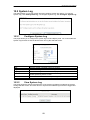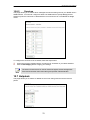
1
RVSG-4014 User’s Manual Residential VDSL Service Gateway RVSG-4014 User’s Manual Rev. Rev 0.2 1.0 Dec. Feb. 2009 2008 Rev. 1.0 Mar. 2011 RVSG-4014 User’s Manual Table of Contents 1. INTRODUCTION ...............................................................................................................1 1.1 1.2 2. GENERAL FEATURES ...................................................................................................1 SYSTEM REQUIREMENT ...............................................................................................1 RVSG-4014 OVERVIEW ...................................................................................................2 2.1 2.2 2.3 LED DESCRIPTION ......................................................................................................2 PORTS AND BUTTONS ..................................................................................................3 INSTALLING YOUR RVSG-4014 ....................................................................................3 3. CONFIGURING TCP/IP .....................................................................................................4 4. 5.1 LOGIN TO YOUR RVSG-4014 ....................................................................................5 5. DEVICE INFO ....................................................................................................................6 5.1 SUMMARY ...................................................................................................................6 5.2 WAN ..........................................................................................................................6 5.3 STATISTICS .................................................................................................................7 5.3.1 LAN .......................................................................................................................7 5.3.2 WAN Service .........................................................................................................7 5.3.3 xTM .......................................................................................................................7 5.3.4 xDSL .....................................................................................................................8 5.4 ROUTE ........................................................................................................................8 5.5 ARP ...........................................................................................................................9 5.6 DHCP ........................................................................................................................9 6. ADVANCED SETUP ....................................................................................................... 10 6.1 LAYER2 INTERFACE .................................................................................................. 10 6.1.1 ATM Interface .................................................................................................... 10 6.1.2 PTM Interface .................................................................................................... 12 6.1.3 ETH Interface ..................................................................................................... 13 6.2 WAN SERVICE ......................................................................................................... 14 6.3 LAN......................................................................................................................... 18 6.4 NAT ........................................................................................................................ 19 6.4.1 Virtual Servers ................................................................................................... 19 6.4.2 Port Triggering ................................................................................................... 22 6.4.3 DMZ Host ........................................................................................................... 23 6.4.4 ALG .................................................................................................................... 24 6.5 SECURITY ................................................................................................................ 24 6.5.1 IP Filtering .......................................................................................................... 24 6.5.1.1 Outgoing ........................................................................................................ 24 6.5.1.2 Incoming ........................................................................................................ 25 6.5.2 MAC Filtering ..................................................................................................... 26 PARENTAL CONTROL ................................................................................................ 28 6.6 6.6.1 Time Restriction ................................................................................................. 28 6.6.2 URL Filter ........................................................................................................... 29 6.7 QUALITY OF SERVICE ................................................................................................ 30 6.7.1 Queue Config ..................................................................................................... 31 6.7.2 QoS Classification .............................................................................................. 32 6.8 ROUTING .................................................................................................................. 33 6.8.1 Default Gateway ................................................................................................ 33 6.8.2 Static Route ....................................................................................................... 33 6.8.3 Policy Routing .................................................................................................... 34 6.8.4 RIP ..................................................................................................................... 35 6.9 DNS ........................................................................................................................ 36 6.9.1 DNS Server ........................................................................................................ 36 6.9.2 Dynamic DNS (DDNS) ....................................................................................... 36 6.10 DSL......................................................................................................................... 37 6.11 UPNP ...................................................................................................................... 38 6.12 DNS PROXY ............................................................................................................ 38 RVSG-4014 User’s Manual 6.13 INTERFACE GROUPING .............................................................................................. 39 6.14 IPSEC ...................................................................................................................... 40 6.15 CERTIFICATE ............................................................................................................ 43 6.15.1 Local .............................................................................................................. 43 6.15.2 Trusted CA..................................................................................................... 45 6.16 MULTICAST............................................................................................................... 46 7. WIRELESS ..................................................................................................................... 47 7.1 7.2 7.3 7.4 7.5 7.6 8. BASIC ...................................................................................................................... 47 SECURITY ................................................................................................................ 49 MAC FILTER ............................................................................................................ 55 W IRELESS BRIDGE ................................................................................................... 55 ADVANCED ............................................................................................................... 56 STATION INFO........................................................................................................... 58 VOICE ............................................................................................................................. 59 8.1 8.2 8.3 8.4 9. VOIP PROFILE .......................................................................................................... 59 VOIP ACCOUNT ........................................................................................................ 62 VOIP LINE MAP ........................................................................................................ 63 VOIP LOG SETTING .................................................................................................. 64 DIAGNOSTICS ............................................................................................................... 65 9.1 9.2 9.3 9.4 10. DIAGNOSTICS ........................................................................................................... 65 TOOLKIT ................................................................................................................... 65 CAPTURE ................................................................................................................. 66 PORT MIRRORING ..................................................................................................... 66 MANAGEMENT .............................................................................................................. 67 10.1 SETTINGS................................................................................................................. 67 10.1.1 Backup ........................................................................................................... 67 10.1.2 Update ........................................................................................................... 67 10.1.3 Restore Default .............................................................................................. 67 10.2 SYSTEM LOG ............................................................................................................ 68 10.2.1 Configure System Log ................................................................................... 68 10.2.2 View System Log ........................................................................................... 68 10.3 SNMP AGENT .......................................................................................................... 69 10.4 TR-069 CLIENT ........................................................................................................ 70 10.5 INTERNET TIME ......................................................................................................... 71 10.6 ACCESS CONTROL.................................................................................................... 71 10.6.1 Passwords ..................................................................................................... 71 10.6.2 Services ......................................................................................................... 72 10.7 HELPDESK................................................................................................................ 72 10.8 UPDATE SOFTWARE.................................................................................................. 73 10.9 REBOOT ................................................................................................................... 73 11. WALL MOUNTING (OPTIONAL) ................................................................................... 74 APPENDIX A. TROUBLESHOOTING .................................................................................... 75 APPENDIX B. SPECIFICATIONS .......................................................................................... 77 RVSG-4014 User’s Manual 1. Introduction The RVSG-4014 is a highly integrated IAD which enables VDSL2, WLAN, VoIP, Switch, File server and Printer Server together. It is positioned to enhance the user's triple play broadband experience with excellent QoS and traffic management. This new generation of platforms not only eases the deployment of DSL-based IAD but also provides new opportunities for the service provider to derive additional value from the emerging VoIP and IP Video service. The capabilities of the RVSG-4014 allow for some highly advanced applications beyond just typical DSL, but also WLAN access points, VoIP, File server and Printer server. RVSG-4014 also provides TR-069 CPE WAN Management Protocol which eases and reduces the management effort of the service providers. 1.1 General Features Compliant to DSL Forum TR-048, TR-067 and TR-100 Interoperability Test Feature-Rich TR-069 supports Remote Registration / Remote Authentication / Remote Configuration Complete solution for integration of DSL, Router, Switch, 11N Draft 2.0 WLAN and VoIP Advanced MIMO technology provides enhanced wireless speed/range and wide coverage area WPS support for easy WLAN client setup Outbound Proxy for NAT Traversal POTS Lifeline backup T.38 fax support SIP and MGCP supported for VoIP signaling User can browse the Internet while talking on the phone and watch IPTV simultaneously Remote / Local configuration & management through Web / Telnet configuration & management Three levels access account management Device management access control based on source IP addresses and incoming interfaces System management includes SNMP, Telnet command line interface and web interface 1.2 System Requirement In order to use the RVSG-4014, you must have the following: xDSL service up and running on your telephone line, with at least one public Internet address for your LAN One or more computers each containing an Ethernet network interface card (NIC) For system configuration using the supplied web-based program: a web browser such as Internet Explorer v5.0 or later, Firefox v2.0 or later, or Netscape v6.1 or later 1 RVSG-4014 User’s Manual 2. RVSG-4014 Overview 2.1 LED Description The front panel contains lights called LEDs that indicate the status of the RVSG-4014s. LED POWER Color Green Red Status On Off On On LAN1-4 Green Blinking Off USB Green On Blinking Off On Green Slow Blinking Fast Blinking Off Red On DSL On Green Internet Blinking Off Red On On PHONE1-2 Green Blinking Off WLAN Green WPS Green Red On Blinking Off On On Description The device is power on. The device is power off. The device is booting up. The LAN port is connected to an powered Ethernet device. The data is sending/receiving via LAN port. The LAN port is not connected to any Ethernet device. A powered device has connected to the USB port. The data is sending/receiving via USB port. No powered device has connected to the USB port. The device is successfully linked with VDSL headend. The device is trying to link with DSL head-end. The device is handshaking with the DSL head-end. The device is not linked with DSL head-end. The device is successfully linked with ADSL headend. The device is successfully connected to the Internet. The device is sending/receiving data via the Internet. The device is not connected to the Internet. The device is failed to authenticate with the ISP due to username or password error. The associated phone port has registered with a SIP proxy server. The associated telephone is ringing or off-hook. The phone line is not registered or the associated device is power off. The wireless feature is enabled. The IAD is sending/receiving wirelessly. The wireless feature is disabled. The WPS is in progress and success status. The WPS encounters problem or session overlap. 2 RVSG-4014 User’s Manual 2.2 Ports and Buttons The rear panel contains the ports for the RVSG-4014's data and power connections. 7 6 5 4 3 8 2 1 1. POWER: Connecter for a power adapter. Using a power supply with a different voltage 2. 3. 4. 5. 6. 7. 8. rating will damage this product. Make sure to observe the proper power requirements. The requirement of adapter is 12VDC/ 1.5A. ON/OFF: Power switch to power on/off the RVSG-4014. LAN1-4: Connectors for Ethernet network devices, such as a PC, hub, switch or router. USB: Connects for USB supported printer and storage. PHONE1-2: Connectors for telephone sets. DSL: Connecter for accessing the Internet through DSL line. WPS Button: Button for perform wireless connection. RST (RESET): Restore the default settings. You may need to restore the RVSG-4014 to its factory defaults if the configuration is changed, you lose the ability to enter the RVSG4014 via the web interface, or following a software upgrade, and you lose the ability to enter the RVSG-4014. To reset the RVSG-4014, simply press the reset button for more than 8 seconds. The RVSG-4014 will be reset to its factory defaults. The reboot process will take about 30 seconds and the RVSG-4014 will become operational again. Warning Be sure that all devices to which the RVSG-4014 is to be connected are properly grounded (earthed) before making a connection. Connecting to improperly grounded equipment can result in electrical shock to the device, users and related equipment. 2.3 Installing your RVSG-4014 1. 2. 3. Locate an optimum location for the RVSG-4014. For connections to the Ethernet and DSL interfaces, refer to the Quick Installation Guide. Connect the Power Adapter. Depending upon the type of network, you may want to put the power supply on an uninterruptible supply. Use only the power adapter supplied with the RVSG-4014. A different adapter may damage the product. 3 RVSG-4014 User’s Manual 3. Configuring TCP/IP This section will help you to establish a connection between a PC and the RVSG-4014. Each computer that will be part of your network needs to communicate with the RVSG-4014. To do this, you may need to configure each PC’s network settings to automatically obtain an IP address. This configuration assumes you have retained the default interface for Windows XP. If you are running the ‘Classic’ interface, please follow the instructions for Windows XP. 1. Select Start > Settings > Control Panel. 2. Double-click Network and Dial-Up Connections. 3. Double-click the Local Area Connection appropriate for your Ethernet adapter. 4. Click Properties. The Local Area Properties window is displayed. 5. Ensure the box next to Internet Protocol (TCP/IP) is selected. 6. Click to highlight Internet Protocol (TCP/IP) and click Properties. The Internet Protocol (TCP/IP) Properties window is displayed. 7. Select Obtain an IP address automatically if you are connecting the RVSG-4014 to the PC via Ethernet. 8. Click OK twice to exit and save your settings. 4 RVSG-4014 User’s Manual 4. 5.1 Login to Your RVSG-4014 This section guides you through configuring your RVSG-4014. You should have your computers configured for DHCP mode and have proxies disabled on your browser. If you do not get the page as shown below, you may need to delete your temporary Internet files by flushing the cached web pages. Follow the procedures below to login to your RVSG-4014. 1. Open your web browser. Type the default IP address of the RVSG-4014 http://192.168.1.1 and press Enter. The Log In page appears. 2. Enter user name as admin and password as admin (case sensitive). 3. Click OK. The main page appears. Note There are two default user name and password combinations. The user / user name and password combination allow you to view the device status, but you cannot change or save configurations. The admin / admin combination allows you to perform all functions. Passwords can be changed at any time. You can change the password in Management->Access Control->Password page at any time. This web page layout of RVSG-4014 is shown as below. 5 RVSG-4014 User’s Manual 5. Device Info This is the first page you see when entering the Web Application. 5.1 Summary This page shows the status summary of the RVSG-4014. 5.2 WAN This page shows the WAN information of RVSG-4014. 6 RVSG-4014 User’s Manual 5.3 Statistics This section shows the statistics information of RVSG-4014. 5.3.1 LAN This page shows the statistics of each connection on your LAN. 5.3.2 WAN Service This page shows the WAN statistics information. 5.3.3 xTM This page shows the ATM interface statistics information. 7 RVSG-4014 User’s Manual 5.3.4 xDSL This page shows the xDSL status and statistics. 5.4 Route This page shows the IP route for RVSG-4014. 8 RVSG-4014 User’s Manual 5.5 ARP This page shows the ARP (Address Resolution Protocol) table on RVSG-4014. 5.6 DHCP This page shows the client devices which are assigned IP addresses by the RVSG-4014. 9 RVSG-4014 User’s Manual 6. Advanced Setup This section allows you to make specific configurations to your RVSG-4014 such as NAT, Quality of Service, DNS and so on. 6.1 Layer2 Interface 6.1.1 ATM Interface This page shows the summary of the current ATM interfaces you have configured. You can set up more than one connection profiles on your RVSG-4014. Click Add to create ATM interface. Enter the information provided by your ISP and then click Save/Apply. 10 RVSG-4014 User’s Manual Field VPI/VCI DSL Link Type Connection Mode Encapsulation Mode Service Category IP QoS Scheduler Algorithm Description Enter the PVC identifier (VPI and VCI) provided by your ISP. Select the DSL link type for the connection. Your ISP should inform you which type to use. Select the connection mode according to your application. Select the encapsulation mode for the connection. Your ISP should inform you which mode to use. Select the encapsulation mode for the connection. If you are not sure which type to select, just use the default type. • UBR without PCR: This service mode does not provide assurance about the cell latency, the bit loss rate, etc. it is a best-effort service. • UBR with PCR/ CBR: This service mode provides constant rate service. It is the idea service for timely and fixed bandwidth. • Non Realtime VBR/ Realtime VBR: This service mode provides assurance such as latency and bit loss rate and is often associated with video and time sensitive service. None Realtime VBR allows more time delay than Realtime VBR. Select the schedule algorithm for IP QoS. • Strict Priority: Always sends the packets with the highest priority. The default value 8 is the lowest precedence. • Weighted Fair Queuing: It is an automatically bandwidth adjusting method, sharing the available bandwidth when congestion happens. The bandwidth is assigned according to the priority and the weight value. You can set the weight value from 1 to 63, and 63 is the highest weight value. The precedence identification range is from 1 to 8, and the highest precedence is 1. Please refer to Quality of Service -> Queue Config section for more information. 11 RVSG-4014 User’s Manual 6.1.2 PTM Interface This page shows the summary of the current PTM interfaces you have configured. You can set up more than one connection profiles on your RVSG-4014. Click Add to create PTM interface. Enter the information required and then click Save/Apply. Field PTM Priority Connection Mode IP QoS Scheduler Algorithm Description Select the priority of the PTM connection. Select the connection mode according to your application. Select the schedule algorithm for IP QoS. • Strict Priority: Always sends the packets with the highest priority. The default value 8 is the lowest precedence. • Weighted Fair Queuing: It is an automatically bandwidth adjusting method, sharing the available bandwidth when congestion happens. The bandwidth is assigned according to the priority and the weight value. You can set the weight value from 1 to 63, and 63 is the highest weight value. The precedence identification range is from 1 to 8, and the highest precedence is 1. Please refer to Quality of Service -> Queue Config section for more information. 12 RVSG-4014 User’s Manual 6.1.3 ETH Interface This page shows the summary of the Ethernet configuration. Click Add to configure ETH port. The following screen appears when you click Add. Select an ETH port and a connection mode for the WAN connection. Then click Save/Apply. Field ETH Port Connection Mode Description Select a Ethernet port to set WAN configuration. Select the connection mode according to your application. 13 RVSG-4014 User’s Manual 6.2 WAN Service This page shows the summary of the WAN service for a selected interface. Click Add to select the WAN interface. Select an interface from the drop-down list and enter the necessary information step by step. Click Next to select WAN service type. Click Next to configure user name and password. 14 RVSG-4014 User’s Manual Field PPP Username PPP Password PPPoE Service Name Authentication Method Enable NAT Enable Fullcone NAT Dial on Demand PPP IP Extension Advanced DMZ Non DMZ IP Address Description Enter the username of your PPP account. Enter the password of your PPP account Enter the service name if required by the ISP. Select the authentication method to be PAP, CHAP or MSCHAP. Select “Auto” to allow the RVSG-4014 to negotiate with PPP server automatically. Check to enable NAT feature. Check to enable fullcone NAT feature. If enable fullcone NAT, all requests from the same internal IP address and port are mapped to the same external IP address and port. And, by sending a packet to the mapped external address, any external host can send a packet to the internal host, Check to enable DOD feature. This is a special feature deployed by some service providers. Do not select (enable) it unless your service provider specially requires this setup. Check to enable advanced DMZ configuration. Enter the IP address for non DMZ host. 15 RVSG-4014 User’s Manual Non DMZ Net Mask Use Static IPv4 Address Bridge PPPoE Frames Between WAN and Local Ports Multicast Proxy Enter the network mask for non DMZ. Select if assign a static IPv4 address to PPPoE link. Select if enable bridging PPPoE frames between WAN and local ports. It allows PC in LAN to set up its own PPP link, or the PC will access internet via the PPP link in WAN port. Check to enable IGMP multicast proxy. IGMP (Internet Group Management Protocol) proxy intercepts the IGMP request from clients and forwards it to the router after some dealings. Click Next to configure system default gateway. Default gateway interface list can have multiple WAN interfaces served as system default gateways but only one will be used according to the priority with the first being the higest and the last one the lowest priority if the WAN interface is connected. Priority order can be changed by removing all and adding them back in again. Click Next to select DNS Server Interface from available WAN interfaces or enter static DNS server IP addresses for the system. In ATM mode, if only a single PVC with IPoA or static IPoE protocol is configured, Static DNS server IP addresses must be entered. DNS Server Interfaces can have multiple WAN interfaces served as system DNS servers but only one will be used according to the priority with the first being the highest and the last one the lowest priority if the WAN interface is connected. Priority order can be changed by removing all and adding them back in again. 16 RVSG-4014 User’s Manual The table below shows the summary of your WAN settings. Make sure they match the settings provided by your ISP so that you can connect to the Internet. 17 RVSG-4014 User’s Manual 6.3 LAN This page shows the current setting of LAN interface. You can set IP address/subnet mask and DHCP server pool for the LAN interface. Field Group Name Description Select a group name for this LAN. This group refers to the group you set in Interface Grouping section. IP Address Subnet Mask Enable IGMP Snooping Enter the IP address for this LAN. Enter the subnet mask for this LAN. Check to enable the IGMP Snooping function. When enable, multicast traffic of a group is only forwarded to ports that have members of that group. • Standard Mode: The multicast traffic will forward to all bridge ports when no client subscribes to a multicast group. • Enable LAN Side Firewall DHCP Server Blocking Mode: The multicast traffic will be blocked when there are noclient subscribes to a multicast group, it won’t forward to the bridge ports. Check to enable LAN side Firewall. If Enabled, the RVSG-4014 will assign IP addresses to PCs (DHCP 18 RVSG-4014 User’s Manual clients) on your LAN when they start up. The default setting is Enabled. Start/End IP Address Configure the DHCP range used by the DHCP server when assigning IP Addresses to DHCP clients. This range also determines the number of DHCP clients supported. Leased Time (hour) Configure the amount of time the clients will be allowed to connect to DHCP server. If set to 0, the allocated IP addresses will be effective forever. Enable DHCP Server Relay Check to enable DHCP server relay function. If DHCP Relay is selected, the DHCP requests from local PCs are forward to the DHCP server that runs on the WAN side. To have this function working properly, disable the NAT to run on router mode only, disable the DHCP server on the LAN port, and make sure the routing table has the correct routing entry. DHCP Server IP Address Eenter the IP address for DHCP server. Static IP Leased Time List Click Add Entries to configure static LAN IP according to its MAC address to the clients. Configure the Second IP Address and Subnet Mask for LAN Interface Automatically Add Clients with the following DHCP Vendor IDs Enter the second IP address and subnet mask for the LAN interface if needed. 6.4 Enter (add) support to automatically map LAN interfaces to PVC’s using DHCP vendor ID (option 60). The local DHCP server will decline and send the requests to a remote DHCP server by mapping the appropriate LAN interface. This will be turned on when Interface Grouping is enabled. NAT 6.4.1 Virtual Servers You can configure the RVSG-4014 as a virtual server. Virtual Server allows you to direct incoming traffic from WAN side (identified by Protocol and External port) to the internal server with private IP address on the LAN side. The internal port is required only if the external port needs to be converted to a different port number used by the server on the LAN side. A maximum 32 entries can be configured. 19 RVSG-4014 User’s Manual Click Add to configure virtual server. Select the virtual server from the drop-down list or custom the service you need. Then complete the server IP address and click the Save/Apply. 20 RVSG-4014 User’s Manual 21 RVSG-4014 User’s Manual 6.4.2 Port Triggering Triggers are used to deal with application protocols that create separate sessions. Some applications, such as NetMeeting, require that specific ports in the Router's firewall be opened for access by the remote parties. Port Trigger dynamically opens up the “Open Ports” in the firewall when an application on the LAN initiates a TCP/UDP connection to a remote party using the “Triggering Ports”. The RVSG-4014 allows the remote party from the WAN side to establish new connections back to the application on the LAN side using the ”Open Ports”. A maximum 32 entries can be configured. 22 RVSG-4014 User’s Manual Click Add to configure the Port Triggering. Select the applications that you want to set up the port settings and then click Save/Apply. 6.4.3 DMZ Host The RVSG-4014 can forward IP packets from the WAN that do not belong to any of the applications configured in the Virtual Servers table to the DMZ host computer. To activate the DMZ host, enter the computer's IP address and click Save/Apply. To deactivate the DMZ host, clear the IP address field and click Save/Apply. 23 RVSG-4014 User’s Manual 6.4.4 ALG The page allows you to configure the ALG (Application Layer Gateway). Please save the ALGs configuration and reboot RVSG-4014 once the ALGs are changed. 6.5 Security 6.5.1 IP Filtering 6.5.1.1 Outgoing The outgoing filter blocks the LAN traffic from entering the WAN side. By default, all outgoing IP traffic from LAN is allowed, but some IP traffic can be blocked by setting up filters. Click Add to create a filter rule to identify outgoing IP traffic. Specify a new filter name and at least one condition. Then click Save/Apply. All of the specified conditions in this filter rule must be satisfied for the rule to take effect. 24 RVSG-4014 User’s Manual Field Filter Name IP Version Protocol Source IP Address / Subnet Mask/ Port Destination IP Address / Subnet Mask / Port 6.5.1.2 Description Enter a name for this filter rule. Select the IP version for IP traffic. Select the protocol to be used from the drop-down list. Enter the source (from the LAN side) IP address, subnet mask and port number. Enter the destination (from the WAN side) IP address, subnet mask and port number. Incoming Incoming IP filter filters the WAN traffic to the LAN side. When the firewall is enabled on a WAN or LAN interface, all incoming IP traffic is blocked. This page allows you to configure filters for accepting some incoming IP traffic. Click Add to create a filter rule to identify outgoing IP traffic. Specify a new filter name and at least one condition. Then click Save/Apply. All of the specified conditions in this filter rule must be satisfied for the rule to take effect. 25 RVSG-4014 User’s Manual Field Filter Name IP Version Protocol Source IP Address / Subnet Mask/ Port Destination IP Address / Subnet Mask / Port WAN/LAN Interface Description Enter a name for this filter rule. Select the IP version for IP traffic. Select the protocol to be used from the drop-down list. Enter the source (from the WAN side) IP address, subnet mask and port number. Enter the destination (from the LAN side) IP address, subnet mask and port number. Select the WAN and LAN interface to apply this rule. 6.5.2 MAC Filtering This page allows you to configure the list of forwarded (allowed) and blocked (denied) MAC addresses. The policy “FORWARDED” means that all MAC layer frames will be forwarded except those matching with any of the specified rules in the following table. The policy “BLOCKED” means that all MAC layer frames will be blocked except those matching with any of the specified rules in the following table. MAC Filtering is only effective when ATM PVCs configured in Bridge mode. 26 RVSG-4014 User’s Manual Note Changing from one policy to another of an interface will cause all defined rules for that interface to be removed automatically! You will need to re-create rules for the new policy. Click Add to create a filter to identify the MAC layer frames. If multiple conditions are specified, all of them take effect. Then click Save/Apply to save and activate the filter. Field Protocol Type Destination MAC Address Source MAC Address Frame Direction WAN Interface Description Select the protocol type. Enter the MAC address of destination. Enter the MAC address of source. Select the necessary frame direction. Select the WAN Interface (Bridge mode only). 27 RVSG-4014 User’s Manual 6.6 Parental Control Parental Control allows you to add the day of the week and URL restrictions to specific LAN clients. 6.6.1 Time Restriction This page allows you to block Internet access from specified LAN clients for specified periods. Make sure that either the system time is specified directly or Internet time server is configured. Click Add to configure the restriction. Enter the settings and then click Save/Apply. Field User Name Browser’s MAC Address Other MAC Address Select Days of the Week Start/End Blocking Time Description Enter a name for this restriction. This is the MAC address of the LAN device where the browser is running. Select and enter other LAN device’s MAC address. Check the days of the week of blocking. Enter the start and end time of blocking. 28 RVSG-4014 User’s Manual 6.6.2 URL Filter This page allows you to block specified URLs from accessing. Maximum 100 entries can be configured. Select the list type first and then click Add to configure the URL entries. Enter the URL address and port number. Then click Save/Apply. Field URL Address Port Number Description Enter the URL address of blocking. Enter the port number of blocking. 29 RVSG-4014 User’s Manual 6.7 Quality of Service You can configure the Quality of Service to apply different priorities to traffic on the RVSG4014. If Enable QoS checkbox is not selected, all QoS will be disabled for all interfaces. To enable QoS, check Enable QoS checkbox and select a default DSCP (DiffServ Code Point) mark to automatically mark incoming traffic without reference to a particular classifier. Then click Save/Apply. Field Enable QoS Select Default DSCP Mark Description Check to enable QoS service. Select the DSCP mark to mark all egress packets that do not match any classification rules. 30 RVSG-4014 User’s Manual 6.7.1 Queue Config This page shows the QoS queue on the RVSG-4014. The Queue configuration allows you to configure a QoS queue entry and assign it to a specific network interface. Each of the queues can be configured for a specific precedence. The queue entry configured here will be used by the classifier to place ingress packets appropriately. If you disable WMM function in Wireless Page, queues related to wireless will not take effects Click Add to configure QoS queue. Enter the settings and then click Save/Apply. 31 RVSG-4014 User’s Manual Field Name Enable Interface Precedence Description Enter a name for the queue. Select to enable or disable this queue. Select an interface for this queue to apply. Select the precedence for this queue. Lower integer values imply higher priority for this queue relative to others. Below is the table of precedence summary: Precedence Meaning 0 Routine 1 Priority 2 Immediate 3 Flash Precedence 4 5 6 7 Meaning Flash Override Critical Internetwork Control Network Control 6.7.2 QoS Classification This page allows you to create a traffic class rule to classify the upstream traffic, assign queue which defines the precedence and the interface and optionally overwrite the IP header DSCP byte. A rule consists of a class name and at least one condition. All of the specified conditions in this classification rule must be satisfied for the rule to take effect. 32 RVSG-4014 User’s Manual Field Traffic Class Name Rule Order Rule Status Class Interface Ether Type Source MAC Address/Mask Destination MAC Address/Mask Assign Classification Queue Mark DSCP Mark 802.1p Priority Tag VLAN ID Description Enter a name for this traffic class. Select a rule order for this traffic class. Select to enable or disable this traffic class. Select an interface for this traffic class to apply. Select the Ether type from the drop-down list. Enter the MAC address and the mask of the computer where packets are coming from. Enter the MAC address and the mask of the computer where the packets will be sent to. Select the classification queue for the traffic class. Select the DSCP to mark. Different markers representing different grades of service placed on various packet streams to be recognized by the router for route purposes. If 802.1q was enabled on WAN, then select a value between 0-7. Enter a VLAN ID for the packet to tag. 6.8 Routing 6.8.1 Default Gateway This page allows you to select a preferred WAN interface to be the system’s default gateway. 6.8.2 Static Route This page allows you to add the routing table. A maximum of 32 entries can be configured. 33 RVSG-4014 User’s Manual Click Add to configure the routing table. Enter the routing configurations and then click Save/Apply. Field IP Version Destination IP Address / Prefix Length Interface Gateway IP Address Metric Description Select the IP version for the static routing to use. Enter the destination IP address and the prefix length. The destination address can be a host address, a subnet address or the destination for the default route (0.0.0.0). The prefix is the part of the address that specifies the network identifier. A prefix length of 128 means that only a destination address of exact 128 bits can use this route. A prefix length of 0 means that any destination address can use this route. of the destination address Select the interface to be used to forward the IP packet. Enter the gateway address (the next-hop IP address) for this route. Enter the number of hops to the destination associated with this route. The metric is commonly used to indicate the number of routers (hops) to the destination. When multiple routes to the same destination exist, the route with the lowest metric is selected as the best route. 6.8.3 Policy Routing This page allows you to add the rules to the policy routing table. 34 RVSG-4014 User’s Manual Click Add to configure the policy routing table. Enter the routing configurations and then click Save/Apply. Field Policy Name Physical LAN Port Source IP Use Interface Default Gateway IP Description Enter a name for this routing policy. Select the LAN port to apply this policy. Enter the source IP address to apply this policy. Select the WAN interface to apply this policy. Enter the gateway IP address to apply this policy. 6.8.4 RIP To activate RIP for the WAN Interface, select the desired RIP version and operation and place a check in the “Enabled” checkbox. To stop RIP on the WAN Interface, uncheck the “Enabled'” checkbox. Click Save/Apply to star/stop RIP and save the configuration. 35 RVSG-4014 User’s Manual 6.9 DNS 6.9.1 DNS Server DNS (Domain Name System) is a distributed database of TCP/IP application. DNS provides translation of Domain name to IP. This page allows you to select DNS Server Interface from available WAN interfaces or enter static DNS server IP addresses for the system. In ATM mode, if only a single PVC with IPoA or static IPoE protocol is configured, static DNS server IP addresses must be entered. DNS server interfaces can have multiple WAN interfaces served as system DNS servers but only one will be used according to the priority, the first being the highest and the last being the lowest priority, if the WAN interface is connected. You can change the priority order by removing all interfaces and adding them back in again. Field Obtain DNS Info from a WAN Use the Following Static DNS IP Address Primary DNS Sever Secondary DNS Sever Description Select the WAN interface to obtain the DSN info. Select to configure the static DNS IP address manually. Enter the IP address of primary DNS server. (Optional) Enter the IP address of secondary DNS server. 6.9.2 Dynamic DNS (DDNS) The Dynamic DNS service allows you to alias a dynamic IP address to a static hostname in any of the many domains, allowing the RVSG-4014 to be easily accessed from various locations on the Internet. Click Add to configure the DDNS. This page allows you to set up DDNS address from DynDNS.org or TZO. You must register with the service provider first and obtain the necessary information. Enter the DDNS information and then click Save/Apply. 36 RVSG-4014 User’s Manual Field D-DNS Provider Hostname Interface DynDNS Username / Password Description Select to use DynDNS.org or TZO.com to be the D-DNS provider. Enter the host name. Select a WAN interface to apply DDNS service. Enter username and password of your account on DysDNS.org. 6.10 DSL This page allows you to select the modulation, phone line type, capability and profile specified by your ISP. The default configuration in this page can work with most xDSL implementations. DO NOT change any setting unless you are instructed to do so. Then click Save/Apply. 37 RVSG-4014 User’s Manual 6.11 UPnP This page allows you to enable the UPnP function. The UPnP function allows devices to connect seamlessly and to simplify the implementation of networks such as data sharing, communications and entertainment. The UPnP feature requires one active WAN interface. You must create one WAN connection before you can enable this function. In addition, the client connecting to the RVSG-4014 should also support this feature. 6.12 DNS Proxy The RVSG-4014 can acts as a DNS proxy when you enable DNS proxy feature. Field Enable DNS Proxy Host Name of the modem Domain name of the LAN Network Description Check to enable DNS proxy feature. Enter a host name for the RVSG-4014. Enter a name for this LAN network. 38 RVSG-4014 User’s Manual 6.13 Interface Grouping Interface Grouping supports multiple ports to PVC and bridging groups. Each group will perform as an independent network. Click Add to create new interface group. To support Interface Grouping feature, you must create mapping groups with appropriate LAN and WAN interfaces. Then click Save/Apply. Only the default group has IP interface. 39 RVSG-4014 User’s Manual Field Group Name WAN Interface used in the grouping Grouped LAN Interfaces Available LAN interfaces Automatically Add Clients with the following DHCP Vendor IDs Description Enter a name for this group. Select a WAN interface used in this grouping fro the drop-down list. Select interfaces from the Available LAN Interfaces list and use the arrow buttons to map them to the Grouped LAN Interfaces list. These are the available LAN interfaces on RVSG4014. Enter (add) support to automatically map LAN interfaces to PVC’s using DHCP vendor ID (option 60). The local DHCP server will decline and send the requests to a remote DHCP server by mapping the appropriate LAN interface. This will be turned on when Interface Grouping is enabled. IMPORTANT! If a vendor ID is configured for a specific client device, you have to reboot the client device attached to the modem to allow it to obtain an appropriate IP address. 6.14 IPSec This page shows the IPSec Tunnel connection. Click Add New Connection to add a new IPSec Tunnel connection. Enter the setting for IPSec connection and then click Save/Apply. 40 RVSG-4014 User’s Manual 41 RVSG-4014 User’s Manual Field IPSec Connection Name Tunnel Mode Remote IPSec Gateway Address Tunnel Access From Remote / Local IP Addresses IP Address for VPN IP Subnet Mask Key Exchange Method Authentication Method Pre-Shared Key Certificate Perfect Forward Secrecy Description Enter a name for this IPSec connection. Select the tunnel mode (protocol) for IPSec connection. ESP: ESP (Encapsulating Security Payload) provides data privacy for IP datagram by encrypting them. AH: AH (Authentication Header) provides authentication of either all or part of the contents of a datagram through the addition of a header that is calculated based on the values in the datagram. Enter the IP address or domain name of the remote IPSec gateway. Select the range of local / remote IP addresses from the drop-down list. Specify the remote / local IP address for VPN. Specify the subnet mask for the remote / local IP address. Select the key exchange method to be auto or manual. Select the authentication method to be Pre-Share Key or Certificate X.509. Specify the Key if you select the authentication method as Pre-Shared Key. Select the certificate from drop-down list if you select the authentication method as Certificate X.509. Select to enable or disable Perfect Forward Secrecy (PFS) feature. There are two phases of IPSec: Phase 1: Start to negotiate IKE parameters including encryption, integrity (hash), DiffieHellman parameter values and lifetime to protect the following IKE exchange. The peer that starts the negotiation proposes all its policies to the remote peer and then remote peer tries to find a highest-priority to match with its policies. This sets up a secure tunnel for IKE Phase 2. Phase 2: Start to negotiate IPSec security for the following IKE exchange and mutual examination of the secure tunnel establishment. Note It is critical that the exact same Phase 1 and Phase 2 proposals be entered at the remote client. Field Advanced IKE Settings Mode Encryption Algorithm Integrity Algorithm Select Diffie-Hellman Group for Key Exchange Key Life Time Description This button is available when you select the Key Exchange Method as Auto mode. Select the mode to be Main or Aggressive. Select the encryption algorithm to be DES, 3DES, AES-128, AES-196 or AES-256. Select the integrity algorithm to be MD5 or SHA1. Select the Diffie-Hellman group to be 768, 1024, 1536, 2048, 3072, 4096, 6144 or 8192-bit for key exchange. Configure the life time for Key (in second). 42 RVSG-4014 User’s Manual 6.15 Certificate 6.15.1 Local This page allows you to crate local certificate. Local certificates are used by peers to verify your identity. You can either create certificate request or import the certificate to add local certificates. Maximum 4 certificates can be stored. Click Create certificate Request to generate a certificate signing request. Click Import Certificate to import the certificate. Enter parameters to create the certificate and then click Apply. Field Certificate Name Common Name Organization Name State/Province Name Country/Region Name Description Enter a name for this certificate. Enter your name or the name of your server. Enter the name of your organization, e.g. company name or organization name. Enter the name of your state or province name. Select your country name for the drop-down list. 43 RVSG-4014 User’s Manual Enter a certificate name, paste the certificate content and private key to create the certificate. Then click Apply. 44 RVSG-4014 User’s Manual 6.15.2 Trusted CA If an entity wants to utilize digital certificates, this entity should retrieve certificates of trusted CA servers so it can authenticate the peer with certificates issued by those trusted CA servers. Maximum 4 certificates can be stored. Click Import Certificate to import the certificate. Enter a certificate name and paste the certificate content to create the certificate. Then click Apply. 45 RVSG-4014 User’s Manual 6.16 Multicast Multicast is a transmission mode that supports point-to-multipoint connections between the sender and the recipient. IGMP protocol is used to establish and maintain the relationship between IP host and the host directly connected multicast router. IGMP (Internet Group Management Protocol) is a communications protocols used to manage the membership of Internet Protocol multicast groups. IGMP is used by IP hosts and the adjacent multicast routers to establish multicast group members. This page allows you to enable multicast configurations. Field Default Version Fast Leave LAN to LAN (Intra LAN) Multicast Enable Description Enter the IGMP protocol version. Check to enable fast leave process. When enabled, IGMP proxy removes the membership of a group member immediately without sending an IGMP membership query on downstream. This is very helpful if you need fast channel (group change) changing in cases like IPTV environment. Check to enable LAN to LAN (Intra LAN) Multicast. If you want to have a multicast data source on LAN side and also need the MLD snooping enabled, then this LAN-to-LAN multicast feature should be enabled. 46 RVSG-4014 User’s Manual 7. Wireless This section allows you to configure wireless settings on the RVSG-4014. 7.1 Basic This page allows you to configure basic features of wireless feature. You can enable or disable the wireless LAN interface, hide the network from active scans, set the wireless network name (also known as SSID) and restrict the channel set based on country requirements. 47 RVSG-4014 User’s Manual Field Enable Wireless Hide Access Point Clients Isolation Disable WMM Advertise Enable Wireless Multicast Forwarding (WMF) SSID (Station Set Identifier) BSSID Country Max Clients WirelessGuest/Virtual Access Points Description Check to enable wireless feature. Check to disable advertising the SSID of the access point (AP) in broadcast messages to wireless clients. Wireless clients will need to know the SSID if they want to join the network. Check to prevent wireless clients from seeing each other. Check to disable WMM (Wi-Fi Multimedia). WMM allows the network packets of the multimedia application to have priority over regular data network packets, allowing multimedia applications to run smoother and with fewer errors. Check to enable WMF feature. Enter a name for your wireless network. Wireless clients must be configured with the correct SSID to access the wireless network. The BSSID is a 48-bit identity used to identify a particular BSS (Basic Service Set) within an area. In Infrastructure BSS networks, the BSSID is the MAC address of the AP and in Independent BSS or adhoc networks, the BSSID is generated randomly. Select your country from the drop-down list. Enter the maximum number of wireless clients that are allowed to connect to the AP (Access Point) at the same period. Check to enable virtual AP. It appears to be an independent physical AP, when in actuality there is only a single physical AP. Virtual AP allows you to control wireless clients’ access and security settings. Wireless guests can access Internet through these guest accounts without compromising the integrity of your network. 48 RVSG-4014 User’s Manual 7.2 Security This page allows you to configure security features of the wireless LAN interface. You can set up configuration manually or through WPS (Wi-Fi protected Setup). WPS uses a push-button or a PIN to simplify the secure network setup. With WPS, RVSG-4014 can automatically set the SSID or network name as part of the setup process and provide strong encryption keys to client devices. You do not need to configure SSID, wireless security setting, etc., in the client software. In order to use WPS, the wireless client software must also support WPS. You can also set up the AP manually. Depending on the network authentication you selected, the screen will change accordingly so that additional fields can be configured for the specific authentication method. 49 RVSG-4014 User’s Manual Field WPS Setup Enable WPS Set WPS AP Mode Select SSID Network Authentication Description Select to enable WPS and add clients by Push-Button or PIN (Personal Identification Number). Push-Button: Select it to start WSP by simply pushing a button, either an actual button or a software one, on both WSP AP and clients to connect. This button acts the same function as the physical button on the upper case of the RVSG-4014 when you select using Push-Button to be the setup AP method. The WPS LED on the RVSG-4014 will blink slowly for 2 minutes when the RVSG-4014 is waiting for incoming WPS request. The pushbutton of WPS is labeled as WPS on the upper case of RVSG4014. PIN: Select it to start WPS by using a same 8-digit PIN (Device PIN) in both AP and WPS clients to make the connection. Device PIN is generated by the RVSG-4014. This PIN changes every time you reboot the RVSG-4014. Select to enable or disable WPS. Select the WPS AP mode and setup AP by Push-Button or PIN. Push-Button: Select it to start WSP by simply pushing a button, either an actual button or a software one, on both WSP AP and clients to connect. This button acts the same function as the physical button on the upper case of the RVSG-4014 when you select using Push-Button to be the setup AP method. The WPS LED on the RVSG-4014 will blink slowly for 2 minutes when the RVSG-4014 is waiting for incoming WPS request. The pushbutton of WPS is labeled as WPS on the upper case of RVSG4014. PIN: Select it to start WPS by using a same 8-digit PIN (Device PIN) in both AP and WPS clients to make the connection. Device PIN is generated by the RVSG-4014. This PIN changes every time you reboot the RVSG-4014. Select the SSID from the drop-down list. Select the authentication to be used. Open: Anyone can access the network. The default is a disabled WEP encryption setting. Shared: WEP encryption is enabled and encryption key strength of 64-bit or 128-bit needs to be selected. Click Set Encryption Keys to manually set the network encryption keys. Up to 4 different keys can be set and you can come back to select which one to use at anytime. 802.1: Requires mutual authentication between a client station and the router by including a RADIUS-based authentication server. Information about the RADIUS server such as its IP address, port and key must be entered. WEP encryption is also enabled and the encryption strength must also be selected. WPA (Wi-Fi Protected Access): Usually used for the larger enterprise environment, WPA uses a RADIUS server and TKIP (Temporal Key Integrity Protocol) encryption (instead of WEP encryption, which is disabled). TKIP uses 128-bit dynamic session keys (per user, per session, and per packet keys). WPA-PSK (Wi-Fi Protected Access – Pre-Shared Key): WPA for home and SOHO environments, also using the same strong TKIP encryption, perpacket key construction, and key management that WPA provides in the enterprise environment. The main difference is that the password is entered manually. WPA2 (Wi-Fi Protected Access 2): Second generation of WPA, which uses AES (Advanced Encryption Standard) instead of TKIP as its encryption method. Network re-auth interval is the time in which another key needs to be dynamically issued. 50 RVSG-4014 User’s Manual WEP Encryption Encryption Strength Current Network Key Network Key 1-4 RADIUS Server IP Address RADIUS Port RADIUS Key WPA Group Rekey Interval WPA Encryption WEP Encryption WPA Pre-Shared Key WPA2 Preauthentication Network Re-auth Interval WPA2-PSK (Wi-Fi Protected Access 2 – Pre-Shared Key): Suitable for home and SOHO environments, it also uses AES encryption and requires you to enter a password and a re-key interval time. Mixed WPA2 / WPA: During transitional times for upgrades in the enterprise environment, this mixed authentication method allows upgraded users and users not yet upgraded to access the network via the router. RADIUS (Remote Authentication Dial-In User Service) server information must be entered for WPA and a as well as a group re-key interval time. Both TKIP and AES are used. Mixed WPA2 / WPA-PSK: useful during transitional times for upgrades in the home or SOHO environment, a pre-shared key must be entered along with the group re-key interval time. Both TKIP and AES are also used. Select to enable or disable WEP (Wired Equivalent Privacy). Select the encryption strength to be 64 or 128-bit. Select the network key from 1 to 4 from drop-down list. Enter 4 sets of network key in each field. Enter the IP address of RADIUS server. Enter the port number for RADIUS server IP address. Enter the key for RADIUS server. The key you set must be the same one as configured in the RADIUS server. Enter the re-key interval for WPA. Select WPA encryption to be TKIP, AES or TKIP+AES. Select to enable or disable WEP encryption. Enter the PSK for WPA. Select to enable or disable WPA2 pre-authentication. Specify the interval for network re-authentication. The RVSG-4014 can be configured as Registrar or Enrolee mode. Registrar: A registrar is the network enrollment center. Enrollee: An enrollee is the device being added to the network. When RVSG-4014 (AP) is configured as Registrar, you should select Set WPS AP Mode as Configured (default). When RVSG-4014 (AP) is configured as Enrolee, the Set WPS AP Mode should be changed to Unconfigured. Please follow the following steps to configure security setting for your RVSG-4014. 51 RVSG-4014 User’s Manual Configure RVSG-4014 as Registrar mode and add Enrollee with PIN method: 1. Select radio button as PIN. 2. Enter PIN number (eg. 33221008) from Enrollee Station. 3. Click Add Enrolee button. 4. RVSG-4014 to start WPS adding enrollee. Launch the wireless client’s WPS utility. (Here we take Ralink Utility for example. Set the mode as Enrollee, press the WPS button on the top bar, select the AP (eg. wlap0) from the WPS AP List. Then press the PIN button located on the middle left of the page to run the scan. 5. The client’s SSID and security setting will now be configured to match the SSID and security setting of the registrar. 52 RVSG-4014 User’s Manual Configure RVSG-4014 as Registrar mode and add Enrollee with Push-Button method: 1. Select radio button as Push-Button. 2. Click Add Enrolee button or press the physical button on the top case of RVSG-4014. 3. RVSG-4014 to start WPS adding enrollee. Launch the wireless client’s WPS Utility Here we use Ralink Utility for example. Set the mode as Enrollee. Then press the WPS button and choose the correct AP (eg. wlap0) from the WPS AP List before pressing the Push-Button (PBC) button to run the scan. 4. When the Push-Button (PBC) button is pushed, a wireless communication will be established between RVSG-4014 and the client. The client’s SSID and security setting will now be configured to match the SSID and security setting of the router. 53 RVSG-4014 User’s Manual Configure RVSG-4014 as Enrollee mode and add Enrollee with Push-Button method: 1. Set RVSG-4014 (AP) to Unconfigured mode and click Config AP button. 2. Launch the wireless client’s WPS utility. Here we use Ralink Utility for example. Set the mode as Registrar. Enter the PIN number (eg. 13241204) in the PIN Code column then choose the correct AP (eg. wlap0) from the WPS AP List before pressing the PIN button to run the scan. 3. The RVSG-4014’s (AP’s) SSID and security setting will now be configured to match the SSID and security setting of the registrar. 54 RVSG-4014 User’s Manual 7.3 MAC Filter This function allows you to manage whether a wireless client is allowed to access the RVSG4014 or not based on the MAC address of device. Select the MAC Restrict Mode you want to use and then click Add to add the MAC address to the wireless MAC address filters. To configure the MAC filter, follow the steps below: 1. 2. Select the MAC Restrict Mode you want to use and then click Add to configure the filter based on MAC address. Enter the MAC address to the wireless MAC address filters. Then click Save/Apply. Field MAC Restrict Mode Description Select to disable, allow or deny the access of RVSG-4014 based on the client’s MAC address. The format of MAC address can be: xx:xx:xx:xx:xx:xx or xx-xx-xx-xx-xx-xx. 7.4 Wireless Bridge This page allows you to configure the RVSG-4014 as a bridge. Wireless bridge feature provides a wireless link between WLAN segments to extend the coverage range. If configure the RVSG-4014 to bridge mode, then Access Point features is disabled. In this next screen you can select the mode, either access point or wireless bridge that you want the router to be in. In the screen below, Bridge Restrict is enabled, therefore you see the Remote Bridges MAC Address fields. If Bridge Restrict is disabled, then there is nothing left to do afterwards. Click Save/Apply to continue. 55 RVSG-4014 User’s Manual Field AP Mode Bridge Restrict Remote Bridges MAC Address Refresh Description Select to enable AP (Access Point) or disable AP (Wireless Bridge). If AP Mode is set to Bridge and this field set to Enabled, it allows you to specify the available bridges. If Bridge Restrict is disabled, any wireless bridge within range may connect. If you select Enabled (Scan), the AP will scan for available wireless bridges and display its MAC address it found. Enter (Bridge Restrict in Enabled mode) or select (Bridge Restrict in Enabled (Scan) mode) the remote bridge MAC address if Bridge Restrict is enabled. Click this button to update the remote bridges. Updating will take few seconds. 7.5 Advanced This page allows you to configure setting for advanced wireless features. This page allows you to configure advanced features of the wireless LAN interface. You can select a particular channel on which to operate, force the transmission rate to a particular speed, set the fragmentation threshold, set the RTS threshold, set the wakeup interval for clients in power-save mode, set the beacon interval for the access point, set XPress mode and set whether short or long preambles are used. 56 RVSG-4014 User’s Manual Field Band Channel Auto Channel Timer 802.11n/EWC Bandwidth Control Sideband 802.11n Rate 802.11n Protection Support 802.11n Client Only RIFS Advertisement OBSS Co-Existence RX Chain Power Save RX Chain Power Save Quiet Time RX Chain Power Save PPS 54g™ Rate Multicast Rate Basic Rate Fragmentation Threshold RTS Threshold DTIM Interval Description The supported band is 2.4GHz. Select the channel you want to use. The wireless network is divided into several channels (region depends). Each channel broadcasts on a slightly different frequency; if you are experiencing interference with another 2.4GHz device such as a baby monitor, security alarm, or cordless phone, then change the channel on your RVSG-4014. This value cannot be changed. Enhanced Wireless Consortium Select the bandwidth to be either 20MHz or 40MHz (dual channel), that the RVSG-4014 will use if 802.11n/EWC is configured as Auto and the Channel is configured as Auto. If the RVSG-4014 detects other adjacent wireless networks, it will use 20 MHz operation so as to not interfere with the networks. If no other adjacent networks are detected, the RVSG-4014 will use 40MHz operation. In both 20 MHz and 40 MHz operation, when the 802.11n/EWC is configured to Auto, the RVSG-4014 will use dynamic channel selection to determine the best channels to transmit in order for optimal operation. Select the extension channel to be in the Upper or Lower sideband. Set the 802.11n rate. These rates are only applicable when the 802.11n/EWC is configured as Auto. Select Auto if there is a possibility that 802.11b or 802.11g devices will use your wireless network. In Auto mode, the wireless devices use RTS/CTS to improve 802.11n performance in mixed 802.11g/802.11b networks. Select Off to maximize 802.11n throughput under most conditions. Select On to support 802.11n clients only Select to enable (Auto) or disable (Off) RIFS advertisement. RIFS (Reduced Inter-frame Spacing) is a 802.11n feature that also improves performance by reducing the amount of dead time required between OFDM transmissions. Select to co-existence (enable) or not (disable) between 20 MHZ and 40 MHZ OBSS (Overlapping Basic Service Sets) in wireless local area networks. Select to enable RX (reception) power save mode. It allows the reducing of power consumption during the idle time. Configure the RX (reception) power saving time period. If the clock (value) increases, required power decreases. Configure the RX (reception) power saving condition in PPS (Packets Per Second). The default rate is “Auto” and operates at up to 54 Mbps data rate when possible but drops to lower rates when necessary, dependent on signal strength and the capacity of the client stations. Use the default setting “Auto” unless there is a specific requirement for multicast. Use the default setting “Auto” unless there is a specific requirement for basic rate. Specify a value between 256 (min) and 2346 (max). This value determines whether packets will be fragmented and at what size. Specify a value to determine the packet size of a transmission through the use of the router to help control traffic flow. The default value of 2347 (maximum length) disables RTS (Request To Send) Threshold. Specify the wake-up interval for clients in power-saving mode. DTIM (Delivery Traffic Indication Message) is as known as Beacon Rate. 57 RVSG-4014 User’s Manual Beacon Interval Global Max Clients Xpress™ Technology Transmit Power WMM (Wi-Fi Multimedia) WMM No Acknowledgement WMM APSD Specify the amount of time between beacon transmissions. Specify the maximum clients that are allowed to connect to the RVSG-4014. Select to enable or disable Xpress™ Technology. Xpress™ Technology is a Broadcom innovation. It utilizes standards based on framebursting to achieve higher throughput. With Xpress™ Technology enabled, aggregate throughput (the sum of the individual throughput speeds of each client on the network) can improve by up to 25% in 802.11g only networks and up to 75% in mixed networks comprised of 802.11g and 802.11b equipment. Select power output to be 20%, 40%, 60%, 80% and 100%. Select the mode to “Auto” for automatically improves the experience for audio, video and voice applications over a Wi-Fi network. Select to enable or disable WMM ACK. Enable this feature only when you are at a good communication quality and low interference area. Select to enable or disable ASPD (Automatic Power Save Delivery). It is a more efficient power management method for low power consumption. 7.6 Station Info This page shows the connected wireless stations and their status. 58 RVSG-4014 User’s Manual 8. Voice This section allows you to configure the parameters for voice feature. 8.1 VoIP Profile This page allows you to configure VoIP profile for voice application. 59 RVSG-4014 User’s Manual MGCP Mode SIP Mode Field Profile Name Description Enter a name for this profile. Region Select your region from pull-down list. DTMF Method Select how to send the tones that your telephone makes when you push its buttons. You should use the same mode your VoIP service provider uses. • SIP Info: Send the DTMF tones in SIP messages. • InBand: Send the DTMF tones in the voice data stream. This 60 RVSG-4014 User’s Manual T.38 method works best when you are using a codec that does not use compression (like G.711). Codecs that use compression (like G.729) can distort the tones. • RFC 2833: Send the DTMF tones in RTP packets. Select to enable or disable T.38 Fax function. STUN Select to enable of disable STUN Traversal function. STUN Server Enter the IP address of STUN server. Digit Map Enter the combination (strings) of one or more dialing rules. A digit map (plan) can be the combination of one or more dialing rules separated by “|” characters. If you dial a set of numbers that fits to more than one section of the digit plan, the system will use the first numerical sequence that fitted to process your inputs. For detail description, please refer to the table on next page. Area Code Enter the code for your home area. Rtp Start Port Enter the lowest port of the range in which the RVSG-4014 receives RTP streams. Change default value only if problems occur. Rtp End Port Enter the highest port of the range in which the RVSG-4014 receives RTP streams. Change default value only if problems occur. Signaling Protocol Select the voice feature protocol to be SIP or MGCP. Registrar Server Enter the IP address of SIP registrar provided by your ITSP. Registrar Server Port Enter the port number of registrar. 5060 is the typical port number. But you might obtain another number from the ITSP. Registrar Expires Enter the expiration timeout value. Default is 300 seconds. Do not change this value unless your ITSP instructs you to do so. Proxy Server Enter the IP address of SIP proxy server. Proxy Server Port Enter the port number SIP proxy server. Outbound Proxy Enter the IP address of outbound proxy server for sending SIP protocol packets to a SIP proxy server. Outbound Proxy Port Enter the port number of outbound proxy server. User Agent Domain Enter the IP address or domain name of the SIP Domain/Realm. User Agent Port Enter the port number of the user agent domain. ReInvite Expires Enter the re-invite request expires header value. If you set to 0, the expires header is not include in the request. DNS SRV Enable Select to enable or disable DNS SRV (service). DNS Address Enter the DNS IP address for DNS service. Signaling Protocol Call Agent Call Agent Port Local Domain Local Port Interface Select the voice feature protocol to be MGCP. Enter the IP address of the Call Agent server in MGCP. Enter the UDP port number for the Call Agent server. Enter the IP address of domain name of Local Domain Enter the UDP port number in MGCP local terminal. Select the interface for VoIP application. 61 RVSG-4014 User’s Manual Dial Map Component Definition Component Description [<digital><digital >] Explicit ranges and explicit sets of symbols, designating alternative events any one of which satisfies that position of the dial plan. For example, [1-5]xxx means extension number(starts with 1-5) which length is 4. X or x The x means any digit from 0 to 9. x means one 0-9 digit, xx means two 0-9 digits and xxx means three 0-9 digits, etc. For example, 024xxxxxxx means you are allowed to dial 024 followed by any seven digits from 0 to 9. . The dot stands for zero or more repetitions of the event selector (event, range of events, set of alternative events, or wildcard) that precedes it. | The “|” mark is used to separate the different dialing rules. E The letter “E” stands for “*”. F The letter “F” stands for “#”. Take a string for example. If you set your digit plan as: [2-4]xxx|8xxxxxxx|Fxxxxx|Exx|9011x. It means the system allows you to dial: a 4-digit outgoing call begin with 2, 3, 4, a 8-digit outgoing call begin with 8, a 5-digit off-site extension (start with #), a star service, 9011 + up to 20 digits that must be dialed in 4 seconds 8.2 VoIP Account This page allows you to configure a VoIP account to a selected profile. Click Add to create or edit the VoIP account. Enter the information required and then click Save. 62 RVSG-4014 User’s Manual Field Profile Description This is the profile name you set on VoIP Profile page. Signaling Protocol This is the signaling protocol your set on VoIP Profile page. Account Enter the phone number for this account. User Name Enter the authorization name (user ID) for this account. Password Enter the password for this account. Call Waiting Enable or Disable Call Waiting feature. Codec Priority 1-3 Select the priority when using codecs. 8.3 VoIP Line Map This page allows you to configure the map rule for FXS1 and FXS2 ports (physical ports). Click Add or Edit to change the mapping rule. Select the rules from drop-down list and then click Save. 63 RVSG-4014 User’s Manual Field Physical Port Description Select the physical port on RVSG-4014 to for VoIP line. Provider Name Select the provider name for pull-down list. Account Name Select the account name (phone number) for this VoIP line. Phone Number Enter the phone number for this account. Line Selection Select the abbreviated number from ##1 to ##9 to map to the physical port. 8.4 VoIP Log Setting This page allows you to configure VoIP log settings. The system will begin to log all the selected events if the log mode is set to enabled. Field Log Log Level Server IP Address Server UDP Port Description Select to enable or disable voice log feature. Select level of voice events to log. Enter the IP Address of remote system log server. Enter the UDP port of the remote system log server. 64 RVSG-4014 User’s Manual 9. Diagnostics 9.1 Diagnostics This page shows the DSL diagnostic information. Usually, you do not have to view this data, but you may find it useful when working with your ISP to diagnose network and Internet data transmission problems. 9.2 Toolkit This page allows you (local user) and the remote support providers to “peer out of” (ping) the RVSG-4014 and confirm WAN side communication. This utility will ping other devices on the network directly from the RVSG-4014. Just enter the test domain name or IP address and press the “Ping Request” to start test the connection. 65 RVSG-4014 User’s Manual 9.3 Capture This page allows you capture packets for debugging purpose. To capture the packets, follow the steps below: 1. 2. Set the criteria including Host IP, Protocol and Interface. Then click Start to start a capture. While the capture is running, data size appears next to Download button. After you have generated the network traffic that you want to analyze, click Stop to stop capturing. You can then click Download to download and view the capture data. Field Host IP Protocol Interface Description Enter the IP address of the target host. Select the type of packet to capture. Select the listen interface when capturing packets. 9.4 Port Mirroring This page allows you to setup port mirroring. Port Mirroring monitors and copies network traffic by transferring copies of incoming and outgoing packets from source ports to a target port. This feature is used as a monitoring, diagnostic and debugging tool, for example, intrusion detection systems that require monitoring of network traffic. Field Monitor Interface Direction Mirror Interface Description Select the interface whose traffic will be captured by a target (mirror) interface. Show the direction of port mirroring. Select the interface for mirroring. 66 RVSG-4014 User’s Manual 10. Management This section allows you to maintain the system, including backing up the configurations, viewing system log, maintaining access control and updating software. 10.1 Settings 10.1.1 Backup This page allows you to backup (copy) current settings to a file on your PC. 10.1.2 Update This page allows you to restore the settings from a previously saved file. To restore a previously saved configuration file onto the RVSG-4014, click Browse to find the file on your PC and click Update Settings. The RVSG-4014 restores settings and reboots to activate the restored settings. 10.1.3 Restore Default This page allows you to reset the configuration to default settings. It deletes all current settings and resets the RVSG-4014 to factory default settings. Click Restore Default Settings and click OK when the pop-up window appears confirming that you want to restore factory default settings to your RVSG-4014. The RVSG-4014 restores the default settings and reboots. IMPORTANT! DO NOT power off the RVSG-4014 or press the Reset button while this process is in progress. 67 RVSG-4014 User’s Manual 10.2 System Log This dialog allows you to view system logs and configure system log options. To view the System Log, click View System Log. To configure System Log, click Configure System Log. 10.2.1 Configure System Log This page allows you to configure the system log level and display level. You must enable the System Log function so that the RVSG-4014 can log the selected events. Field Log Log Level Display Level Mode Server IP Address Server UDP Port 10.2.2 Description Select to enable or disable system log feature. Select level of application events to log. Select level of application events to display. Select to record the events in the local memory, sent them to a remote system log server or both. Enter the IP Address of remote system log server. Enter the UDP port of the remote system log server. View System Log This page shows the events of RVSG-4014. If the system log feature is enabled, the system will log selected events. All events above or equal to the selected log level will be logged and displayed. 68 RVSG-4014 User’s Manual 10.3 SNMP Agent This page allows you to configure SNMP (Simple Network Management Protocol) agent in this device. SNMP is a protocol that enables a management application to retrieve statistics and status from the SNMP agent. Field SNMP Agent Read Community Set Community Description Select to enable or disable SNMP agent feature. Enter the SNMP community password to read SNMP values. The default string is public. Enter the SNMP community password to set SNMP values. Enter the set community string for authorizing read-write rights. The default string is private. System Name Enter a name for the system. (optional) System Location Enter the location of the system. (optional) System Contact Enter the contact information for this system. (optional) Trap Manager IP Enter the IP address of hosting trap manager, where SNMP messages will be sent. 69 RVSG-4014 User’s Manual 10.4 TR-069 Client The RVSG-4014 includes a TR-069 client which is a WAN management protocol. All the values are already filled in. Field Inform Inform Interval ACS URL ACS User Name ACS Password WAN Interface Used by TR-069 Client Display SOAP messages on serial console Connection Request Authentication Connection Request User Name Connection Request Password Connection Request URL GetRPCMethods Description Enable or disable the RVSG-4014 to connect to the ACS periodically. Enter the amount of time (in second) between a successful connection with an ACS server and a new attempt to connect to an ACS server. This field is enabled only when the Inform Enabled is selected. Enter the URL of the Auto Configuration Server (ACS) provided by the ISP. Enter the user name for the ACS to authenticate. Enter the password for the ACS to authenticate. Select the WAN interface from the drop-down for TR-069 client to use. Enable or disable whether display SOAP messages on serial console or not. Check to enable connection request authentication. Enter the username used to authenticate an ACS making a connection request to the RVSG-4014. Enter the password used to authenticate an ACS making a connection request to the RVSG-4014. This is the URL of connection request. Click this button to force the RVSG-4014 to immediately establish a connection to the ACS. 70 RVSG-4014 User’s Manual 10.5 Internet Time This page allows you to manually configure the time and select Time Zone. Field Automatically synchronize with Internet time server First/ Second/ Third/ Fourth/ Fifth NTP time server Time Zone Offset Description Check to enable the RVSG-4014 to synchronize with Internet time server to update the system clock. Select at least one Internet time server from drop-down list or specify its IP address manually. Select The time zone in which the RVSG-4014 resides. 10.6 Access Control 10.6.1 Passwords This page allows you to change the password for all users account. Access to your RVSG4014 is controlled through three user accounts: admin, support, and user. The user name "admin" has unrestricted access to change and view configuration of the RVSG-4014. The user name "support" is used to allow an ISP technician to access your RVSG-4014 for maintenance and to run diagnostics. The user name "user" can access the RVSG-4014, view configuration settings and statistics, as well as, update the router's software. Field Username Old Password New Password Confirmed Password Description Enter the pre-defined username from drop-down list. Enter the old password of this account. Enter the new password for this account. Enter the new password for this account again to confirm the password. 71 RVSG-4014 User’s Manual 10.6.2 Services This page allows you to enable which management services being used in your RVSG-4014’s WAN interface. You need to configure at least one WAN interface (except Bridge) before settings up service control list on WAN interface. Access Service is not available for Bridge mode. To configure the services to be accessed, follow the steps below: 1. 2. Check the services checkbox which you want to be accessed on your WAN interface. Click the Save/Apply button to apply your settings. Note The Access Control service is used to restrict the ingress remote management from remote site rather than restrict the egress packets of WAN interface. 10.7 Helpdesk This page allows you to enable or disable services from being used and set the timeout period. 72 RVSG-4014 User’s Manual 10.8 Update Software The system software used by this RVSG-4014 is called “firmware”. This page allows you to upgrade the firmware to a newer version. This page allows you to update the software (firmware) of RVSG-4014 to a newer version. If your ISP releases new software for RVSG-4014, follow these steps to perform an upgrade. 1. 2. 3. Obtain an updated software image file from your ISP. Click Browse to locate the image file. Click Update Software to upload the new image file. Note The update process takes about 2 minutes to complete, and your DSL Router will reboot. IMPORTANT! DO NOT power off the RVSG-4014 or press the reset button while this process is in progress. 10.9 Reboot This page allows you to reboot the RVSG-4014. IMPORTANT! DO NOT power off the RVSG-4014 or press the reset button while this process is in progress. 73 RVSG-4014 User’s Manual 11. Wall Mounting (Optional) This product can be mounted on wall. There are two holes in the lower case and you can use the screws to mount the device. 74 RVSG-4014 User’s Manual Appendix A. Troubleshooting Below is a list of commonly asked questions. Before calling technical support, please look through these issues to see if they help solve your problem. The RVSG-4014 is not functional. 1. Check to see that the POWER LED is lit and than the network cables are installed 2. 3. 4. 5. correctly. Refer to the Quick Installation Guide for more details. Check to see that the LAN, DSL and Internet LEDs are lit. Check the settings on your PC and RVSG-4014. Again, refer to the Quick Start Installation for more details. From your PC, can you PING the RVSG-4014? Assuming that the RVSG-4014 has DHCP enabled and your PC is on the same subnet as the RVSG-4014, you should be able to PING the RVSG-4014. Can you PING the Internet? Your ISP should have provided the IP address of their server. If you can ping the RVSG-4014 and your protocols are configured correctly, you should be able to ping the ISPs network. If you cannot PING the ISP’s network, make sure your using the correct protocols with the correct VPI/VCI values. I can’t connect to the RVSG-4014. 1. Check to see that the POWER LED is lit and that the network cables are installed 2. 3. 4. correctly. Make sure that the PC and RVSG-4014 is on the same network segment. The RVSG4014’s default IP address is 192.168.1.1. If you are running a Windows based PC, you can open a DOS window and type IPCONFIG; make sure that the network adapter that is connected to the RVSG-4014 is within the same subnet. Also, your PC’s Subnet Mask should match the RVSG-4014’s subnet mask. The RVSG4014 has a default subnet mask of 255.255.255.0. If this still does not work, press the Reset button. This will place the RVSG-4014 into its factory default state. Go through the above procedures again. The DSL LED continues to blink but does not go solid. 1. Make sure you have DSL service. You should get some kind of information from your 2. 3. ISP which states that DSL service is installed. You can usually tell if the service is installed by listening to the DSL phone line; you will hear some high-pitched noise. If you do not hear high-pitched noise, contact your ISP. This means that the DSL line is trying to train but for some reason it cannot establish a valid connection. The main cause of this is that you are too far away from the central office. Contact your DSL service provider for further assistance. Verify that the DSL line is connected directly to the wall and to the line input on the RVSG-4014. The Internet LED is always off. 1. Make sure you have DSL service. You should get some kind of information from your 2. ISP which states that DSL service is installed. You can usually tell if the service is installed by listening to the phone line; you will hear some high-pitched noise. If you do not hear high-pitched noise, contact your ISP. Verify that the phone line is connected directly to the wall and to the line input on the RVSG-4014. If the RVSG-4014 is connected to the wall line outlet via a splitter, make sure you connect the RVSG-4014 to the port labeled MODEM. The Internet LED is always red. Make sure your account for the DSL service is correct. Re-type your username and password for the Internet account. The username and password are usually case sensitive. Make sure your Caps Lock key is not locked when entering the account. 75 RVSG-4014 User’s Manual I cannot ping the RVSG-4014 from the attached LAN. 1. Verify that the IP addresses are properly configured. In most cases, you enable the 2. RVSG-4014’s DHCP function to dynamically assign IP addresses to hosts on the attached LAN. However, if you manually configure IP addresses on the LAN, verify that the same network address (network component of the IP address) and subnet mask are used for both the RVSG-4014 and any attached LAN devices. Make sure the device you want to ping (or from which you are pinging) has been configured for TCP/IP correctly. I cannot connect using the web browser. 1. Make sure you have configured the RVSG-4014 with a valid IP address, subnet mask 2. 3. and default gateway. Make sure you have a valid network connection to the RVSG-4014 and the port you are using has not been disabled. Make sure the cable between the attached PC and the RVSG-4014 is firmly installed. I forgot or lost the password. Press the Reset button on the rear panel (holding it down for at least 8 seconds) to restore the factory default settings. I can’t hear the dial tone after completing the installation. 1. Make sure the POWER LED is lit and that the analog phone line is properly plugged into 2. 3. the RJ-11 jack on the rear panel of RVSG-4014. Make sure the Internet LED is solid green. Confirm that your service has been activated by your ITSP. I can hear the dial tone, but when I dial the telephone number I receive a busy signal. Make sure that the RVSG-4014 is properly configured with the correct account information in the Web Application. 76 RVSG-4014 User’s Manual Appendix B. Specifications Physical Interfaces VDSL/ADSL Compliance PTM protocols PPP support Network Stack Firewall / Security Quality of Service (QoS) Wireless One VDSL port Four 10/100 Mbps Fast Ethernet ports for LAN Two 2dBi antennas for 2T2R 802.11n AP Two VoIP FXS ports One USB2.0 Host port for mess storage and printer G.994 G.992.1 (G.dmt) - Annex A and B G.992.2 (G.lite) - Annex A ANSI T1.413 G.992.3 (ADSL2), Annex A, B, L, and M G.992.5 (ADSL2+), Annex A, B, and M G.993.2 compliant, Annexes A and B Supports dual-priority and dual-latency Supports hardware Ethernet FCS and PTM CRC-16 insertion/checking PPP over ATM PVC (RFC2364&RFC1577) PPP over Ethernet (RFC2516) Multiple PPPoE sessions on single PVC PPPoE pass through PAP, CHAP, MS-CHAP authentication supported NAT Static Port Mappings, NAT/NAPT Bridging: IEEE 802.1d Bridge Routing: Static route, RIP v1 / v2 Multicasting: IGMP Proxy v1/v2/v3, IGMP snooping v1/v2 Management: SNTP, DDNS, UPnP, HTTP, FTP, TFTP, Telnet, SSH, SNMP,TR-069, DHCP client/server/relay SPI (Stateful Packet Inspection) Firewall Application layer gateway for H.323, SIP, IPSec/L2TP/PPTP, etc Mac/IP/TCP/interface Filtering Denial of Service (DOS) Advanced DMZ IPSEC / PPTP Pass through Constant Bit Rate (CBR), Real-Time Variable Bit Rate (VBRrt), Non-Real-Time Variable Bit Rate (VBR-nrt) and Unspecified Bit Rate (UBR) Standards: IEEE 802.11b/g/n wireless LAN Frequency Band: 2.400 ~ 2.4835 GHz ISM band Modulations: 802.11n: OFDM (64QAM, 16QAM, QPSK, BPSK) 802.11g: OFDM (64QAM, 16QAM, QPSK, BPSK) 802.11b: CCK, DQPSK, DBPSK Data Rate: 11 b / g: 1, 2, 5.5, 6, 9, 11, 12, 18, 24, 36, 48, and 54 Mbps 11 n Draft 2.0: 20MHz BW: 13, 26, 39, 52, 78, 104, 117, 130 Mbps 40MHz BW: 27, 54, 81, 108, 162, 216, 243, 270, 300 Mbps Encryption: Hardware-based IEEE 802.11i encryption /decryption engine, Includes 64-bit/128-bit WEP, TKIP, 802.1x, WPA/WPA2 and AES Operating Range: Open space: 100 ~ 300m, Indoor: 35 ~ 100m 77 RVSG-4014 User’s Manual VoIP Specification USB 2.0 Host Dimension Environmental Specification Certificate Voice over IP Protocols: RFC 3261 SIP V2.0, MGCP Voice Codecs: G.711, G.722, G.723.1, G.726, G.729A/B Fax Protocol: T.38 NAT Traversal: Out-bond Proxy Tone Generation / Detection Echo Cancellation CID Generation Call Features: Hold / Retrieve, Transfer, Conference call, Waiting, Forwarding unconditional, Forwarding busy, Forwarding no response, Anonymous call Support FTP server, Mass Storage Devices, and Printer Server (IPP only) Built-in Samba Server for File Sharing (FAT32/NTFS) 40mm (H) x 220mm (W) x 160 mm (D) Power Input Device input power: 12VDC/1.5A Power Consumption: 15W Operating Temperature: 0 °C to 40 °C Non-operating Temperature: -20 °C to 65 °C Operating Humidity: 5% to 95% (non-condensing) CE/ FCC 78