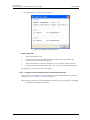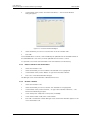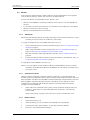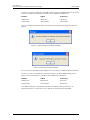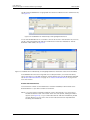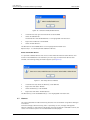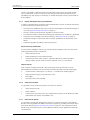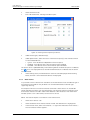
1
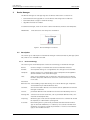
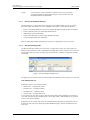
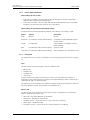
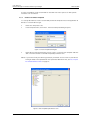
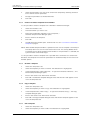
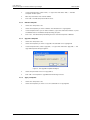
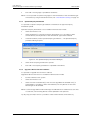
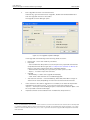
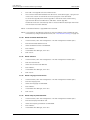
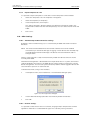
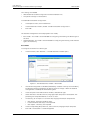
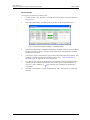
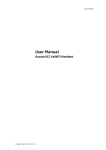
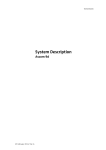
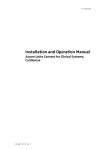
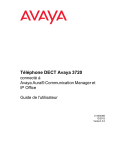
TD 92855EN
User Manual
Device Manager
in Unite Connectivity Manager
27 June 2011 / Ver. B
User Manual
Device Manager in Unite Connectivity Manager
TD 92855EN
Contents
About this document ............................................................................................................ 1
1 Device Manager .............................................................................................................. 2
1.1 Description ................................................................................................................................. 2
1.2 Logging On to Device Manager............................................................................................. 7
1.3 Templates................................................................................................................................... 7
1.4 Numbers .................................................................................................................................. 11
1.5 Devices ..................................................................................................................................... 20
1.6 License Restrictions for Device Handling ........................................................................ 23
1.7 Licenses.................................................................................................................................... 26
1.8 File management in Device Manager ............................................................................... 30
1.9 Import/Export Numbers and Templates ......................................................................... 38
1.10 Other Settings .................................................................................................................... 39
2 Related Documents ...................................................................................................... 42
3 Document History ........................................................................................................ 43
Appendix A: Device Manager Keyboard Shortcuts....................................................... 44
A.1 General..................................................................................................................................... 44
A.2 Devices..................................................................................................................................... 44
A.3 Numbers .................................................................................................................................. 44
A.4 Templates ............................................................................................................................... 44
A.5 Licenses ................................................................................................................................... 45
27 June 2011 / Ver. B
User Manual
Device Manager in Unite Connectivity Manager
TD 92855EN
About this document
This document describes the Device Manager application in Unite Connectivity Manager. The
Device Manager is where administration of devices such as handsets, desktop chargers and
charging racks in the system is managed.
Cross-references in the document
Throughout this document you will find cross-references in the text which indicate further
details that can be found in other sections of this document. The cross-references are
colored blue and linked to the relevant place in the document (example: 1.3.1 Create a
Parameter Template on page 8). Positioning your cursor over the cross-reference text and
clicking the left mouse button will take you to the relevant section.
To return to the original page after viewing a cross-referred page in Adobe Acrobat or
Adobe Reader, click on the “Previous View” arrow (
or
).
27 June 2011 / Ver. B
1
User Manual
Device Manager in Unite Connectivity Manager
1
TD 92855EN
Device Manager
The Device Manager can manage large sets of devices and contains a solution for:
•
•
•
Centralized software upgrade on a set of devices and configuration of devices
Central database storage for all device settings
Upgrade of license for handset
In the Device Manager, much of the work is done with Devices, Numbers and Templates.
IMPORTANT:
Unite CM server shall always be switched on.
Figure 1.
Figure 1. Device Manager in Unite CM.
1.1
Description
This section gives a description of the Device Manager in Unite Connectivity Manager (Unite
CM) and how it is intended to be used.
1.1.1
Basic Terminology
This section gives a brief description of the basic terminology in the Device Manager
Device:
can be a charger or a handset that can be connected to Unite CM
Number:
the complete settings for a single device. Also chargers have a Number.
Template:
general settings for a specific device type. A template can be applied to
several Numbers of the same device type.
Tabs:
there are four different tabs. In these tabs, the information for devices,
Numbers, templates and licenses are shown. Some information is shown
in two tabs.
Parameter
definition file: a file including all possible settings for a certain device type. Templates
are created from parameter definition files.
Software:
the software used in devices. The software can be updated via the Device
Manager in Unite CM.
Version:
parameter definition files and device software are indicated by versions.
Package file:
a file that can contain other files, such as parameter definition files, software files and template files.
Importing:
different types of files can be imported. Note that if a software file should
be imported, it is delivered in a package file.
Associate:
before being able to synchronize parameters between the Device Manager in Unite CM and devices, it is necessary to associate a Number with
the device. Association includes all parameters. If it exists on that device
type, it also includes Contacts.
27 June 2011 / Ver. B
2
User Manual
Device Manager in Unite Connectivity Manager
Assign:
1.1.2
TD 92855EN
it is possible to assign a Number to a device that has not yet been
assigned a Number in the Device Manager. Assign includes only the
parameters defining the Number.
How to use the Device Manager
The following list is a short description to give a basic understanding on how to use the
Device Manager with devices. It is not intended to be used as a work flow description.
•
•
•
•
•
Import a parameter definition file of the corresponding device type to Device Manager.
Create a template from the parameter definition file.
Add a device to Device Manager.
Create a new Number for the corresponding device type.
Associate the Number with the device.
Refer to applicable handset configuration manual for a description of the work flow.
1.1.3
The Device Manager GUI
The Device Manager window has a menu bar, a toolbar and a work area. The toolbar has
different tabs and when a tab is selected the available device types will be shown in the left
hand pane of the work area. The right pane shows devices, numbers or templates already
configured.
Figure 2.
Figure 2. Device Manager Window Area.
The upper part of the work area has search fields with different search criterias for each tab.
Sort and Filter the List
By default, the lists are sorted as follows:
• Devices tab – sorted by Device ID
• Numbers tab – sorted by Number
• Templates tab – sorted by Name
• Licences tab – sorted by Device ID
To sort the list by any other column, click the appropriate column heading. To reverse the
sort order, click the column heading again. The sorting order is indicated by an up or down
arrow in the column heading.
By default, the list in each tab shows all available Devices, Numbers or Templates, but it is
possible to filter the list by selecting the desired device type in the left hand pane of the
work area.
27 June 2011 / Ver. B
3
User Manual
Device Manager in Unite Connectivity Manager
1.1.4
TD 92855EN
Colour coded Information
Colour coding for lists in tabs
•
•
If the version number is shown in red, the Device Manager has found no parameter
definition files supporting that device type.
If the version number is shown in dark red, the parameter definition file is compatible,
but does not have exactly the same version as the device.
Colour coding for parameter and template editing
In the parameter and template editing windows, the following color coding is used:
Colour
Context
Description
Black
General
Normal
Dark blue For templates and parameter editing
Parameter has been edited during the
current session
Purple
For templates
The parameter is included in the template (checked)
Red
For templates and parameter editing
Value not valid
Turquoise For templates and parameter editing
1.1.5
The value differs from the default value
Navigation
For keyboard short-cuts, refer to Appendix A: Device Manager Keyboard Shortcuts on page
44.
Tabs
The information in Device Manager is shown in different tabs:
• Devices tab
• Numbers tab
• Templates tab
• License tab
In each of these tabs, specific information is shown in lists about devices, Numbers or
templates. Some of the information overlaps, for example Device ID, which is tied to both a
specific device and to a specific Number.
The operations that can be done in the Device Manager are done from these tabs and from
the menu. Different menus are accessible in the different tabs.
Devices Tab
The Devices tab shows all devices configured at the site in a detailed list. The following
columns are displayed on each row:
•
•
•
•
•
Device ID – the unique identifier of the device
Description – description of the device.
Software version – shows the version of the software in the device
Device type – the device model
Parameter version – shows the version of the parameters in the device
27 June 2011 / Ver. B
4
User Manual
Device Manager in Unite Connectivity Manager
•
TD 92855EN
Upgrade status – might show one of the following icons:
– software upgrade in progress.
It is also possible to see a progress bar when the device is being upgraded.
– software upgrade Pending, Request sent or Accepted (a green arrow).
– software upgrade Scheduled or Retrying.
– the last upgrade Failed or Aborted (a red broken arrow).
– “Completed”, no symbol is shown
NOTE: A software upgrade from Device Manager should be done on one device to start with.
If successful, the remaining devices can be updated in one operation.
•
•
Online – shows if the device is connected to the Device Manager. The symbol
indicates a connected device.
Latest Number - shows the latest known Number for a device
The columns order can be changed and the application will keep the changes.
Figure 3.
Figure 3. The Devices tab showing a list of devices in a system.
Numbers Tab
The Numbers tab shows all Numbers configured at the site in a detailed list. The following
columns are displayed:
•
•
•
•
•
•
•
Description – description of the number.
Number – the unique identifier of the Number. The identifier is unique for that device
type.
Device type – the device model the Number is intended for
Parameter version – shows the version of the parameters in the Number
Device ID – the unique identifier of the device that the Number is associated to
Online – shows if the device the Number is associated to is online. The
symbol
indicates an online device
Status – shows the parameter synchronization status. A Number can also be queued for
synchronization. Several different indications are used, for example Synchronizing, Sync
queued, Save queued, Synchronized, etc.
When the Number is offline, the database status is shown; Synchronized or Not synched.
27 June 2011 / Ver. B
5
User Manual
Device Manager in Unite Connectivity Manager
•
•
TD 92855EN
Saved – shows if the Number’s parameters have been stored in the database. The
symbol indicates that the parameters have been stored
Last run template - indicates which template that was last run for that Number
Figure 4.
Figure 4. The Numbers tab shows Numbers in a system.
Templates Tab
The Templates tab shows all templates in a detailed list. The following columns are
displayed:
•
•
•
Name – the name of the template
Device type – the device model the template is intended for
Parameter Version – shows the parameter version
Figure 5.
Figure 5. The Templates tab in the Device Manager.
Licenses Tab
The Licences tab shows all devices configured at the site in a detailed list. The following
columns are displayed:
•
•
•
•
•
•
•
Device ID – the unique identifier of the device.
Device type – the device model.
Online – shows if the device is connected to the Device Manager. The
symbol
indicates that the device is online
Serial number – the number identifying the device hardware
Number – The Number associated with the device.
Software version – shows the version of the software in the device
Status – shows the license synchronization status for the devices.
Examples of status that can be shown are:
“Sending” means that Device Manager is sending license information to the device.
27 June 2011 / Ver. B
6
User Manual
Device Manager in Unite Connectivity Manager
TD 92855EN
“Server failure” means that there is some kind of error with the communication between
Device Manager in Unite CM and the license server.
“License too old” – The device has a newer license than the one in Device Manager. A
refresh has to be done.
“Needs update” – An attempt to move a license from one handset to another has been
made, but the latest license does not exist in the handset.
Figure 6.
Figure 6. The Licenses tab in the Device Manager.
1.2
Logging On to Device Manager
NOTE: When an attempt is made to start the Device Manager, a popup window is displayed
with a warning that the program’s digital signature cannot be verified. The text is
displayed in the language used in the computer’s operating system. Click “Run“ (or
the equivalent term in the operating system language).
NOTE: Three clients can be logged in at the same time, but to avoid conflicts make sure that
only one at a time is updating Numbers.
1
Log on to the module.
2
Enter User name and Password and click “OK”.
3
Click “Device Manager” on the start page.
4
Enter your User ID and Password and click “OK”. The Device Manager starts.
1.2.1
Closing the Device Manager
In the File menu, click “Exit”. The Device Manager shuts down.
1.3
Templates
By using a template, the same configuration can easily be applied to many handsets
simultaneously. Templates are also an efficient way to give good control over which changes
that are applied to each handset.
Templates enable configuration of all aspects of a handset from sound volume to keypad
short-cuts.
Your supplier can provide example templates for different PBXs. The handset will have full
functionality towards the PBX even without such a template. By using such a template,
27 June 2011 / Ver. B
7
User Manual
Device Manager in Unite Connectivity Manager
TD 92855EN
though, the handset will be customized for that PBX with menu options for PBX specific
functions such as Callback.
1.3.1
Create a Parameter Template
It is usually desirable to create a customized parameter template that can be applied to all
devices of a certain device type.
1
Select the “Templates” tab.
2
In the Template menu, click “New”. The Create template dialogue opens.
Figure 7.
Figure 7. Create Template Dialogue.
3
Select device type and parameter version, type in a name for the template and click
“OK”. The view switches to the Edit Template parameter view.
NOTE: If you cannot find your device type and/or parameter version in the list, the Device
Manager needs to be updated with new parameter definition files, see 1.8.3 Import
Parameter Definition Files on page 31.
Figure 8.
Figure 8. Edit Template parameter view.
27 June 2011 / Ver. B
8
User Manual
Device Manager in Unite Connectivity Manager
TD 92855EN
4
Select the parameters you want to be saved in the template by selecting the check
box to the left of each parameter.
5
Change the parameters to the desired values.
6
Click “OK”.
1.3.2
Create a Parameter Template from a Number
It is also possible to create a template from a Number in the Device Manager.
1
Select the “Numbers” tab.
2
Mark the Number you want to use.
3
Right-click the Number and select “Use as template...”
The Enter template name dialogue opens.
4
Enter a name for the template.
5
Click “OK”.
6
The Edit template window opens. Continue with 4 to 6 in 1.3.1 Create a Parameter
Template on page 8.
NOTE: When the Edit template window is opened from the “Use as template” command, an
extra drop-down list is shown in the bottom left corner. This setting decides which
parameters that shall be copied from the Number. If “All parameters” is selected, the
synchronization time will be longer.
It is also possible to create a template from a portable that is online but not stored in the
database. The template will contain all parameters for the device except for those that are
Number specific.
1.3.3
Rename a template
1
Select the “Templates” tab.
2
Select the template you want to rename. The selected row is highlighted.
3
In the Template menu, select “Rename...” or right-click and select “Rename...”. The
Rename template dialogue opens.
4
Enter a new name in the “New name” text field.
5
Click “OK”. The Rename template dialogue closes and the new name appears in the
list in the Templates tab.
1.3.4
Copy a template
1
Select the “Templates” tab.
2
Select the template you want to copy. The selected row is highlighted.
3
In the Template menu, select “Copy...” or right-click and select “Copy...”. The Copy
template dialogue opens.
4
Enter a new name in the “New name” text field.
5
Click “OK”. The Copy template dialogue closes and the new template appears in the
list in the Templates tab.
1.3.5
Edit a template
1
Select the “Templates” tab.
2
Select the template you want to edit. The selected row is highlighted.
27 June 2011 / Ver. B
9
User Manual
Device Manager in Unite Connectivity Manager
TD 92855EN
3
In the Template menu, select “Edit...” or right-click and select “Edit...”. The Edit
template window opens.
4
Edit the parameters that shall be edited.
5
Click “OK”. The Edit template window closes.
1.3.6
Delete a template
1
Select the “Templates” tab.
2
Select the template you want to delete. The selected row is highlighted.
3
In the Template menu you can select “Delete”, right-click and select “Delete” or press
the Delete button. The Delete template dialogue opens.
4
Click “Yes”. The Delete template dialogue closes and the template is deleted.
1.3.7
Upgrade a template
1
Select the “Templates” tab.
2
Select the template you want to upgrade. The selected row is highlighted.
3
In the Template menu, select “Upgrade...” or right-click and select “Upgrade...”. The
Upgrade template dialogue appears.
Figure 9.
Figure 9. The Upgrade template dialogue.
4
Select the parameter version to upgrade to.
5
Click “OK”. The template is upgraded and the dialogue closes.
1.3.8
Apply a template
1
Select the “Templates” tab.
2
Select the template you want to use. The selected row is highlighted.
27 June 2011 / Ver. B
10
User Manual
Device Manager in Unite Connectivity Manager
3
TD 92855EN
In the Template menu, select “Apply to...” or right-click and select “Apply to...”. The
Apply template window appears.
Figure 10.
Figure 10. The Apply template window.
1.4
4
If needed, select search parameters or click “Show all”.
5
Select Number(s) to apply the template on.
6
Click “OK”. The template is applied and the window closes.
Numbers
1.4.1
Create New Numbers
1
Select the “Numbers” tab.
2
In the Number menu, select “New...”. Alternatively, right-click in the Numbers list and
select “New...”.
3
In the Device type drop-down list, select device type.
4
In the Parameter version drop-down list, select the parameter version.
5
In the Template drop-down list, select which template to run on the Number. This is
optional and therefore “None” can be selected.
6
In the Prefix field, enter the Number’s prefix (if needed).
7
Select one of the following options:
•
To create a single Number, select the Single option and enter the call number. Click
“OK”.
• To create a range of Numbers, select the Range option. Enter the start call
number, end call number and click “OK”.
Note: The maximum range that can be added at a time is 100 Numbers.
27 June 2011 / Ver. B
11
User Manual
Device Manager in Unite Connectivity Manager
TD 92855EN
NOTE: If a dialogue window “A maximum of...numbers can exist in the system” appears (see
figure 11), see 1.6 License Restrictions for Device Handling on page 23 for more
information.
Figure 11.
Figure 11. Dialogue window, Maximum numbers allowed (example)
1.4.2
Save a Number to Database
The Number of an online device can be saved to the database.
1
Select the Numbers tab.
2
Select the Number.
3
In the Number menu, select “Save”. Alternatively, right-click the Number and select
“Save”
NOTE: The Number of an online device can automatically be saved (default), see 1.10.1
Automatically enable new Devices Settings on page 39 for more information.
1.4.3
Manage Certificate for a VoWiFi Device
NOTE: This function is applicable for VoWiFi handsets only. In addition, the handset must be
online in the Device Manager.
Certificate(s) is used for authorizing a VoWiFi handset to access a WLAN system using
Extensible Authentication Protocol (EAP).
There are two types of certificates: Root certificate and client certificate.
The VoWiFi handset using the root certificate to control if the WLAN system is trusted. If the
system is trusted, the handset sends its client certificate to show that it is authorized to
access and log on the system.
The root certificate contains a public key and can be downloaded to the handset via Device
Manager or via WinPDM. The client certificate contains both a public key and a private key
and can only be downloaded to the handset via the WinPDM.
The following must be done to be able to use certificates:
•
•
Import certificates to handset, see Edit Certificate.
Select which client certificate to use by setting a EAP client certificate parameter, see the
Configuration Manual for the VoWiFi handset.
Edit Certificate
1
Select the “Numbers” tab.
2
In the Number menu, select “Edit certificates”. Alternatively, right-click in the
Numbers list and select “Edit certificates”.
27 June 2011 / Ver. B
12
User Manual
Device Manager in Unite Connectivity Manager
TD 92855EN
A Edit certificates window opens, see figure 12.
Figure 12.
Figure 12. Edit Root Certificate Window
The following information is displayed:
•
•
•
•
•
The number of the device
The device type
The parameter version
The online status of the device
Imported certificates (if any)
3
Click the corresponding “Edit“ button to edit the certificate.
4
Locate the certificate file and click “Open“.
5
If the certificate is passport protected, an Enter Password dialogue appears. Enter the
password and then click “OK”.
A Confirm Certificate windows appears, see figure 13. The following information is
displayed:
•
•
•
•
The algorithm of the certificate
The validity status of the certificate
The validity period of the certificate
The issuer of the certificate
27 June 2011 / Ver. B
13
User Manual
Device Manager in Unite Connectivity Manager
•
TD 92855EN
The authorized users of certificate (issued to).
Figure 13.
Figure 13. Confirm Certificate Window
6
Import the certificate to the device by clicking “Yes“.
If needed, repeat step 3 - 5 for editing additional Root-certificates.
View Certificate Details
1
Select the “Numbers” tab.
2
In the Number menu, select “Edit certificates”. Alternatively, right-click in the
Numbers list and select “Edit certificates”.
3
Select the certificate to view by clicking the corresponding “Details“ button.
A Certificate details window appears, see figure 14 on page 15. The following information is
displayed:
•
•
•
•
The algorithm of the certificate
The validity status of the certificate
The validity period of the certificate
The issuer of the certificate
27 June 2011 / Ver. B
14
User Manual
Device Manager in Unite Connectivity Manager
•
TD 92855EN
The authorized users of certificate (issued to)
Figure 14.
Figure 14. Certificate Details Window
Remove Certificate
1
Select the “Numbers” tab.
2
In the Number menu, select “Edit certificates”. Alternatively, right-click in the
Numbers list and select “Edit certificates”.
3
Select the certificate to remove by clicking the corresponding “Remove“ button.
4
A Remove certificate window opens. Click “Yes“ to remove the selected certificate.
The certificate is now removed from the handset.
1.4.4
Parameter Transfer between a Device and the Device Manager
When a device is connected, it is synchronized with the associated Number in the Device
Manager, see 1.5.2 Synchronize a Device on page 20.
NOTE: When parameters have been edited and the device is synchronized, only the edited
parameters will be sent to the device.
27 June 2011 / Ver. B
15
User Manual
Device Manager in Unite Connectivity Manager
1.4.5
TD 92855EN
Edit Parameters
The Edit Parameters window shows the set of parameters relevant to the Number that is
being edited. The parameter groups are organized in a tree structure in the left pane, with
the parameters in the current node in the right pane. The parameter list has one column
with the parameter name and another column shows the parameter value. This can be for
example a numerical value, a boolean value or text. Clicking the icon
will give a short
description of the selected parameter.
1
Select the “Numbers” tab. The Number view appears.
2
Select the Number. The selected row is highlighted.
3
Click “Edit” in the Number menu. Alternatively, right-click and choose “Edit” or
double-click the Number.
The Edit Parameters for <Number> window opens, where <Number> is the ID of the
current Number.
4
Click the parameter folder (System, Device, etc.)
5
Select parameter to edit.
6
On the Value row, make the changes.
When a parameter has been edited, the name of the node to which the parameter
belongs changes to a blue colour.
(Click “Cancel” if you want to undo all changes to parameters since your last save and
return to the main window.)
7
Click “OK” to save the changes.
Figure 15.
Figure 15. Editing parameters in Device Manager GUI.
NOTE: When you save the parameters, they are automatically sent to the device if it is
online.
27 June 2011 / Ver. B
16
User Manual
Device Manager in Unite Connectivity Manager
1.4.6
TD 92855EN
Run a Template to set Parameter Values
If a template has been created for a device type, it can be used to set the parameter values
for a range of devices or a single device. The command to use is Run template.
1
Select the “Numbers” tab. The Number view opens.
2
Select the Number(s) you wish to run the template on.
3
In the Number menu, click “Run template...”. Alternatively, right-click the Number in
the Number list and select “Run template...” from the menu that appears. The Run
template window appears.
Figure 16.
Figure 16. Selected template to run on one or several Numbers
4
Select a template from the Template list.
5
Click “OK”.
If the parameters in the database have been edited but not yet sent to the device it is
indicated with “Not synched” or “Update queued”.
If the Number has not been associated with a device, it is now possible to do so. Connect a
device and associate it with a Number in the database. The parameters will automatically be
sent from the Device Manager to the device. See 1.4.7 Associate a Number with a Device on
page 17.
1.4.7
Associate a Number with a Device
Before being able to synchronize parameters between Device Manager and devices, it is
necessary to associate a Number with the device. It is possible to enter several Device IDs in
advance and to associate them with a Number at a later moment.
See also 1.5.6 Assign a Number to a device on page 22 and 1.5.5 Create new Device on page
21.
1
Select the “Numbers” tab.
2
Select the Number to associate.
27 June 2011 / Ver. B
17
User Manual
Device Manager in Unite Connectivity Manager
3
TD 92855EN
In the Number menu, select “Associate with device...”. The Associate Number
dialogue appears.
Figure 17.
Figure 17. Associate number dialogue.
4
Select the device you want to associate with in the list and click “OK”.
5
Click “OK”.
If the selected device is online, it will immediately be updated with the selected Number. If
the selected device is not online, it will be updated the next time it is online.
It is possible to associate several Numbers with several devices simultaneously.
1.4.8
Delete a Number in the Site Database
1
Select the “Numbers” tab.
2
Select the Number you want to delete. The selected row is highlighted.
3
In the Number menu, select “Delete” or right-click and select “Delete”.
4
Click “Yes” in the Delete Number dialogue.
The dialogue closes and the Number is deleted from the list.
1.4.9
Rename a Number
1
Select the “Numbers” tab.
2
Select the Number you want to rename. The selected row is highlighted.
3
In the Number menu, select “Rename...” or right-click and select “Rename...”. The
Rename number dialogue opens.
4
In the “New prefix” field, enter a new prefix (if needed)
5
In the “New number” field, enter a new Number.
6
Click “OK”. The Rename number dialogue closes and the new Number appears in the
list in the Numbers tab.
27 June 2011 / Ver. B
18
User Manual
Device Manager in Unite Connectivity Manager
TD 92855EN
1.4.10 Copy a Number
When a Number is copied, the parameter settings and device type for that Number will be
copied to a new specified Number.
1
Select the “Numbers” tab.
2
Select the Number you want to copy. The selected row is highlighted.
3
In the Number menu, select “Copy...” or right-click and select “Copy...”. The Copy
Number dialogue opens.
4
In the “New prefix” field, enter a new prefix (if needed).
5
In the “New number” field, enter a new Number.
6
Click “OK”. The Copy number dialogue closes and the new Number appears in the list
in the Numbers tab.
1.4.11 Import Contacts
NOTE: The number for the handset must be saved, see 1.4.2 Save a Number to Database on
page 12.
Import Contacts From File
A file containing contacts can be imported to Device Manager and synchronized with a
handset. This feature enables transfer of contacts from older types of handsets. If contacts
from 9d23, 9d24 and i75 handsets shall be exported to a file, the SIM card programmer
must be used.
NOTE: When importing a local phonebook file, the local phonebook entries (if any) in the
handset will be replaced by the entries in the file.
1
In the Device Manager, select the Numbers tab.
2
Select a number.
3
In the Number menu, select “Import contacts” > “From file”. Alternatively, right-click
the Number in the Number list and select “Import contacts”> “From file” from the
menu that appears.
4
Find and select a file containing contacts (.txt or .csv). Click “Open”.
The contacts in the imported file are synchronized with the handset.
Import Contacts From Number
This feature enables transfer of contacts from one handset to another, if the numbers have
been saved in the Device Manager.
1
In Device Manager, select the Numbers tab.
2
Select a number.
3
In the Number menu, select “Import contacts” > “From number”. Alternatively, rightclick the Number in the Number list and select “Import contacts”> “From number”
from the menu that appears.
4
Select a number.
5
Click “OK”. The contacts are now imported to the handset.
27 June 2011 / Ver. B
19
User Manual
Device Manager in Unite Connectivity Manager
1.5
TD 92855EN
Devices
A device can be a DECT handset, VoWiFi handset or charger, developed to work together
with the Device Manager. See the user manual for respective device.
All work with devices is performed from the “Devices” view.
•
•
•
•
1.5.1
Devices can be added by connecting the device to the system or use the “Add device”
function.
It is possible to transfer the information for a Number from one device to a new device.
Devices can be reset to factory settings.
Devices can be updated with new software.
Add Devices
NOTE: Before connecting a device to the Device Manager, make sure the connection is set up
according to the instructions in the device’s User Manual.
If a range of new devices are to be added, the easiest way is to:
1
Create a template with all common parameter settings. See 1.3.1 Create a Parameter
Template on page 8.
2
Add a range of Numbers and run the template. See 1.4.1 Create New Numbers on
page 11 and 1.4.6 Run a Template to set Parameter Values.
3
Edit the parameters and change individual settings. See 1.4.5 Edit Parameters on
page 16.
4
Connect the devices and associate them with the Numbers in the database. See 1.4.7
Associate a Number with a Device on page 17.
A single device can be added in the same way.
NOTE: It is not possible to change model of a device already added to the site. Instead, a
new device of the desired model must be added to the site and the parameters set to
the correct values.
1.5.2
Synchronize a Device
When parameters have been changed in a device, the device is synchronized with the
Number saved in the database. When a device is being synchronized, parameters that have
been changed in the device are uploaded to the Device Manager and parameters that have
been changed in the Device Manager are sent to the device. If a parameter has been
changed in both the device and the Device Manager, the setting made in the Device
Manager will take precedence.
1
When a device is connected to the system running the Device Manager and if the
Number is saved and it has a parameter definition, the device is automatically
synchronized.
While synchronizing, a progress bar and a text is shown in the Numbers view.
1.5.3
Delete a Device
1
Select the “Devices” tab.
2
Select the device you want to delete. The selected row is highlighted.
3
In the Devices menu, select “Delete” or right-click and select “Delete”.
4
Click “Yes” in the Delete Device dialogue.
27 June 2011 / Ver. B
20
User Manual
Device Manager in Unite Connectivity Manager
TD 92855EN
The dialogue closes and the device is deleted from the list.
NOTE: You cannot delete a device that is online.
1.5.4
Replace a Device
If a device shall be replaced with a new device, it is possible to transfer its associated
Number including settings, to a new device. The new device must be of the same type as the
old one.
1
If the device to be replaced is still working, make sure that it is synchronized.
2
Switch off the old device or make a factory reset.
3
Connect the new device to the Device Manager.
4
Associate the new device to the Number associated to the old device according to the
instructions in 1.4.7 Associate a Number with a Device on page 17. The Number will
no longer be associated with the old device.
1.5.5
Create new Device
It is possible to enter several new Device IDs in advance into the Device Manager for later
association.
In order to simplify input when handling many devices, it is possible to use a bar code
reader. The bar code reader should send a carriage return after each item, but it is not
necessary. If carriage return is not sent, it is necessary to click “Create” after each read item.
1
Select the “Devices” tab.
2
In the Device menu, select “Add device”. The Create devices dialogue opens.
Figure 18.
Figure 18. The Create devices dialogue.
3
Select Device type and Parameter Version.
4
Enter a Device ID for the device, manually or by using a bar code reader.
5
The “Continuous registration” check box can be used to select whether the “Create
devices” dialogue shall close after clicking “Create” or if it shall still be open.
6
If a bar code reader is used and it does not send carriage return, click “Create”.
27 June 2011 / Ver. B
21
User Manual
Device Manager in Unite Connectivity Manager
TD 92855EN
NOTE: If a dialogue window “You cannot add any more devices due to license restrictions”
appears (see figure 19), see 1.6 License Restrictions for Device Handling on page 23
for information.
Figure 19.
Figure 19. Dialogue window, license restrictions.
7
1.5.6
Repeat 4 to 6 if more devices are to be created, otherwise click “Close”.
Assign a Number to a device
It is possible to assign a Number to a device that has not yet been assigned a Number in
Device Manager. This feature can be used if parameters have been changed on the device
prior to connection to Device Manager.
NOTE: Assign shall not be done on a device that already has a Number.
1
Select the “Devices” tab.
2
Select the device you want to assign a Number for.
3
In the Devices menu, select “Assign number”. The Assign number to device dialogue
appears.
4
Enter a new number in the New number field. New prefix is optional. Click “OK”.
Figure 20.
Figure 20. The Assign number to device dialogue.
5
The new Number appears in the list in the Numbers tab.
NOTE: Some devices need to be restarted for the new numbers to be shown.
1.5.7
Factory Reset
Factory reset means that the device parameters will be reset to factory settings. The
Number in the database that is associated with the device will not be affected.
NOTE: The device must be online.
27 June 2011 / Ver. B
22
User Manual
Device Manager in Unite Connectivity Manager
1.6
TD 92855EN
1
Select the “Devices” tab.
2
Select the device(s) to be reset.
3
Click “Factory reset” in the Device menu. Alternatively, right-click on the device and
select “Factory reset”.
4
A message saying “Do you want to reset the selected device(s) to factory defaults?”
will appear.
5
Click “Yes”.
License Restrictions for Device Handling
The number of Devices and Numbers that can be added to the Device Manager in Unite CM is
determined by the number of licensed users1. Each User license includes 10 users and the
limit for each user is 2 Devices and 5 Numbers.
The number of Devices and Numbers, follows the number of licensed Users up to the
limitations in the Device Manager, see Limitations below:
Limitations
The Device Manager in Unite CM allows up to 10 000 licensed Users but the limit for devices
is 2 000 Devices and the limit for numbers is 5 000 Numbers. This means that Devices and
Numbers follows the number of users up to 1 000 Users, see the graph below.
Figure 21.
Users
10000
2000
vic
De
1000
1000
2000
3000
)
x2
00
10
(
es
4000
)
00x5
rs (10
be
Num
5000
Figure 21. Limitations in Device Manager
The Device Manager will however indicate if you are trying to add more devices or numbers
than allowed by your license, or by the limitations in Device Manager.
Example
The Unite CM in this example has a license for 50 users which allows you to add 100 devices
and 250 numbers. Two scenarios are described in this example.
1.There is an additional license that enables device management for up to 2 000 devices regardless of no. of licensed users.
27 June 2011 / Ver. B
23
User Manual
Device Manager in Unite Connectivity Manager
TD 92855EN
Scenario 1: In this case 90 devices and 200 numbers have been added already, which means
that 10 more devices and 50 more numbers can be added, see table below.
Allowed
Added
Remaining
100 Devices
90 Devices
10 Devices
250 Numbers
200 Numbers
50 Numbers
If you try to add more devices and/or numbers than allowed the following messages will
appear.
Figure 22.
Figure 22. Additional devices cannot be added.
Figure 23.
Figure 23. Maximum numbers allowed.
This issue can be resolved by either adding more user licenses, or deleting devices/numbers.
Scenario 2: In this case 100 devices and 250 numbers have been added already, which
means that no more devices or numbers can be added, see table below.
Allowed
Added
Remaining
100 Devices
100 Devices
0 Devices
250 Numbers
250 Numbers
0 Numbers
If an additional device is registered in the Device Manager, either by placing it in an
advanced charger or via Over-the-Air, this device will automatically be disabled.
27 June 2011 / Ver. B
24
User Manual
Device Manager in Unite Connectivity Manager
TD 92855EN
The ID of the disabled device is highlighted with red color under Device ID in the Devices tab,
see figure 24.
Figure 24.
Figure 24. Disabled device indicated by a red highlighted Device ID.
In case the disabled device has a number it will also be shown in the Numbers tab, else not.
The ID is then highlighted with red color under Device ID and also indicated as “Device
disabled” under Status, see figure 25.
Figure 25.
Figure 25. Disabled device indicated by a red highlighted Device ID and the status Device disabled.
A disabled device cannot be configured such as edit parameters, associate with device,
import contacts etc. To enable the device, another device must first be disabled or deleted.
See Disable and Enable Devices on page 25 or Delete and Enable Devices on page 26 for
more information.
Disable and Enable Devices
If the maximum number of allowed devices have been exceeded, a device needs to be
disabled before it is possible to enable a new device.
NOTE: It is only possible to disable one device at every 60 seconds. If you are trying to
disable two devices after one another within this time period, a dialogue window
appears (see figure 26). So you can disable a device and then immediately enable
another device, but you have to wait until the 60 seconds have elapsed before
disabling the next device.
27 June 2011 / Ver. B
25
User Manual
Device Manager in Unite Connectivity Manager
TD 92855EN
Figure 26.
Figure 26. Failed to enable/disable device.
1
In the Devices tab, right-click the device to be disabled.
2
Select “Disable device”.
The Device ID of the disabled device is now highlighted with red colour.
3
Right-click the device to be enabled.
4
Select “Enable devices”.
The Device ID of the enabled device is now highlighted with black color.
Repeat step 2 - 4 to disable/enable additional devices.
Delete and Enable Devices
It is possible to delete devices that are not online and then enable another devices until
maximum allowed devices are reached. If you are trying to enable more devices than
allowed, the following dialogue window appears (see figure 27).
Figure 27.
Figure 27. Too many devices enabled.
1
In the Devices tab, select the device(s) to be deleted.
2
Right-click and select “Delete”.
3
Select the device(s) to be enabled.
4
Right-click and select “Enable devices”.
The Device ID(s) of the enabled device(s) is now highlighted with black color.
1.7
Licenses
This section describes the device licensing features that can be done using Device Manager
in Unite CM.
In Device Manager, device licensing offers a possibility to view, manage and upgrade
licenses of devices. In the Licenses tab, devices are listed. If a device is selected in the list, the
status of the license options for the selected device is displayed.
27 June 2011 / Ver. B
26
User Manual
Device Manager in Unite Connectivity Manager
TD 92855EN
Note that some tasks include using the license web and the details of how to work with the
license web are not described here.
The following features are described:
•
•
•
•
Upgrade licenses, “Import” and “Export”
Manual synchronization of licensing information, “Refresh”
Move license from one device to another
View license options
The following licensing features are not done in Device Manager and are therefore NOT
described is this document:
•
•
•
How to work with the license web
How to purchase licenses
Manual license upgrade in the handset
Refer to Function Description, Product Licensing Overview, TD 92677GB.
The license of a handset can be upgraded to a license of a higher variant level, for example
from a d62 Talker license to a d62 Messenger license. Depending on the variant used,
additional license options may be available.
NOTE: A handset can be re-licensed a limited number of times. For the d81, d62 and d41
handsets it is limited to 99 times.
1.7.1
License Upgrade alternatives
These are the alternatives for upgrading licenses on devices:
•
•
•
1.7.2
Automatic license upgrade
Used when Unite CM has an internet connection to the license server, see 1.7.2
Automatic license upgrade.
License upgrade using export/import
Used when Unite CM does not have an internet connection, see 1.7.3 Export and Import
Licensing information.
Manual license upgrade
Used to enter the license key manually in the handset, see the configuration manual for
the corresponding handset. In this case, Device Manager is not used.
Automatic license upgrade
NOTE: This feature requires an internet connection. The communication is done via HTTPS
and normally via port 443.
The first time a device logs in the Device Manager asks the license server for the latest
license for the device. When the device logs in at a later time, there is no automatic check for
licenses. If changes have been made, a manual upgrade must be done by selecting Refresh,
see 1.7.7 Refresh on page 30.
In order to get a purchased license for a device, a connection with the license server is made.
Device Manager automatically receives the serial number from the device, sends it to the
license server which returns a license key that Device Manager sends to the device. The
device upgrades and the correct license information is shown in Device Manager and the
device.
Warning: If the Number for the upgraded handset is also used for another handset within
the same family, there can be a conflict when upgrading licenses. For example, if a d62
27 June 2011 / Ver. B
27
User Manual
Device Manager in Unite Connectivity Manager
TD 92855EN
Talker is upgraded to a d62 Messenger and a d62 Messenger with that number already
exists, there will be a conflict. In this case, the settings in the Device Manager will take
precedence over the settings in the device, i.e. the d62 Messenger settings will be used for
both handsets.
1.7.3
Export and Import Licensing information
In order to upgrade licenses on devices when Unite CM does not have an internet connection
to the license server, the following is done:
•
•
•
•
•
•
The information needed for licensing of a device is exported from the Device Manager to
a file, see Export Licensing information on page 28.
The file is used to purchase license upgrades on the license web.
From the license web, a license file containing the license keys for the device is generated
The license file is imported to the Device Manager, see Import Licenses on page 28
The Device Manager communicates the license key (included in the license file) to the
device
The device upgrades according to the license options
Export Licensing information
The information needed for licensing of a device can be exported to a file. This file can be
used to generate licenses for the device.
1
Select the Licenses tab.
2
Select the device(s) that shall be licensed.
3
In the License menu, select “Export”. The Export devices for licensing window
appears. Select a proper name for the file and click “Save” to save the file.
Import Licenses
After a license has been purchased, a file containing the license information can be
generated from the license web. This license file can be imported to the Device Manager.
1
In the File menu, select Import > “Licenses...”. A File Browser window appears.
2
Select the license file(s) to be imported (*.xml).
3
Click “Open”.
4
The license file(s) are imported.
1.7.4
View license options
It is possible to view which license options that exist on a device.
1
Select the License tab.
2
Select a device.
3
In the bottom of the work area, the available license options of the device are listed
and whether the options are enabled or not.
1.7.5
Filter license options
It is possible to search and select devices which have same license options. The selected
devices can be upgraded with additional licenses by exporting a product information file to
the License Web (see Export Licensing information on page 28). The advantage to select
devices with same license options is that additional licenses can be applied for the devices
simultaneously.
27 June 2011 / Ver. B
28
User Manual
Device Manager in Unite Connectivity Manager
1
Select the License tab.
2
Click “Advanced find“. A dialogue window opens.
TD 92855EN
Figure 28.
Figure 28. Filtering license options for devices.
3
Under Device types, select device(s).
4
Under Option filters, select the status of the license option(s) that shall be common
for the selected devices.
• Ignore - show all devices independent of license options.
• Enabled - show devices with a certain license option enabled.
• Disabled - show devices with a certain license option disabled.
The search result is updated directly when selecting devices and license options. In addition,
the
con is also displayed next to the Advanced find button to indicate that the search
result is filtered.
5
1.7.6
When clicking Close, the filtered search result will still be displayed. When clicking
Reset, the filter is removed and all devices are displayed.
Move License
It is possible to move a license from one device to another device of the same device type. A
move license command can only be done to an unlicensed handset of a device type
supporting licensing.
An example of when to use the Move license command is when there is an unused d62
Talker and a d62 Protector with a broken display. Use the Move license command to move
the Protector license to the d62 Talker which becomes a d62 Protector. Then the broken
handset (which is now a d62 Talker) can be sent for service.
NOTE: This feature requires a connection to the license server.
1
Select the “Licenses” tab.
2
Select the device whose license shall be moved. The selected row is highlighted.
3
In the License menu, select “Move license...” or right-click and select “Move license...”.
The Move license window appears.
27 June 2011 / Ver. B
29
User Manual
Device Manager in Unite Connectivity Manager
4
TD 92855EN
Select the device that shall receive the license. Click “OK”.
If no devices are shown in the Move license window, there are no devices that are
selectable to move the license to.
1.7.7
Refresh
If a device is already registered in Device Manager and new license has been purchased from
the license web, the information needs to be updated. By doing a Refresh, the device license
information in Device Manager is synchronized with the information in the license server
and transferred to the device.
NOTE: This feature requires a connection to the license server.
1
Select the License tab.
2
Select device(s).
3
In the License menu, select “Refresh”. The correct license is fetched from the license
server, sent to the device and displayed in the Device Manager.
1.7.8
Remove Devices from the License View
This command removes devices from the Licenses tab view.
1.8
1
Select the “Licenses” tab.
2
Select the device(s) that shall be removed from the list. The selected row(s) are
highlighted.
3
In the License menu, select “Remove device” or right-click and select “Remove
device”.
4
Click “Yes” in the Remove device dialogue. The dialogue closes and the device is
removed from the list.
File management in Device Manager
This chapter covers file management for parameter definition files, software files, language
files and company phonebook files.
Import and export of templates and Numbers is described in 1.9 Import/Export Numbers
and Templates on page 38.
The parameter definition file holds the definitions of all parameters for a specific version of a
Number’s parameter set. Updated software and new parameter definition files for devices
and Numbers can be added to the Device Manager, see 1.8.3 Import Parameter Definition
Files on page 31 and 1.8.4 Import new Software for Devices on page 32.
If there is a naming conflict when importing, a warning message is displayed.
1.8.1
Definition File Version – Parameter Version
Both definition files and device software include parameters and are indicated by a version
number.
NOTE: The version of the definition file matches the version of the device software.
If a device is updated with a new parameter version it does not always demand a new
definition file. An old definition file can often be used but if new parameters have been
27 June 2011 / Ver. B
30
User Manual
Device Manager in Unite Connectivity Manager
TD 92855EN
added in the new parameter version, these parameters will not be editable. The release note
will tell you if a new definition file is needed to match the new parameters.
Example
If a parameter version for a Number is 2.5, then a parameter definition file with a version
between 2.0 and 2.5 is required.
1.8.2
Import a Package File
A package file may include different types of files, such as software files, parameter
definition files and/or template files. If the package does not include a certain file, it can be
imported separately. See 1.8.3 Import Parameter Definition Files on page 31, 1.8.4 Import
new Software for Devices on page 32 and/or 1.9.2 Import Templates on page 38.
1
In the File menu, select “File management”.
2
Select the Parameter definition tab or Software tab and click “Add”.
3
Select the package file (.pkg) to be imported and click “Open”.
The files included in the package are now imported. If needed, select the Parameter
definition tab or Software tab to view the corresponding imported files (if any).
If template(s) has been imported, it can be viewed by clicking “Close“ and then selecting the
Template tab.
4
1.8.3
Click “Close”.
Import Parameter Definition Files
Updated parameter definition files are distributed by your supplier.
NOTE: Parameter definition files (.def) are mainly included in package files (.pkg)
distributed by your supplier, see 1.8.2 Import a Package File.
1
In the File menu, click “File management”. The File management window opens.
2
Click the Parameter definition tab.
3
Click “Add”. The Import files window opens.
4
Select the definition files to be imported.
Only files with a corresponding extension are shown, such as .def and .pkg.
5
Click “Open”.
6
Check that the newly imported definition files appear in the list.
7
Click “Close”.
If a definition file for a certain device type already exists in the database and an attempt is
made to import a definition file with the same parameter version and with a lower revision,
the file will not be imported.
If a definition file for a certain device type already exists in the database and a new
definition file with the same parameter version and with a higher revision is imported, the
old file will be replaced with the imported file.
For each update of a parameter definition file, the revision is increased. An update does not
necessarily affect the parameter version.
27 June 2011 / Ver. B
31
User Manual
Device Manager in Unite Connectivity Manager
TD 92855EN
The following columns are displayed:
•
•
•
•
Device type – the device model.
Revision – the revision number of the definition file. Used to determine which
definition file is the most recent.
Parameter version – shows the version of the parameters in the definition file.
Used to determine compatibility with device software.
File – the name of the imported definition file.
Figure 29.
Figure 29. File management window, Parameter definition files tab.
1.8.4
Import new Software for Devices
Updated software files are distributed by your supplier.
NOTE: Software files (.bin, .img, .mot, etc.) are mainly included in package files (.pkg)
distributed by your supplier, see 1.8.2 Import a Package File on page 31.
1
In the File menu, click “File management”. The File management window opens.
2
Click the “Software” tab.
3
Click “Add”. The Import files window opens.
4
Select the software files to be imported.
Only files with a corresponding extension are shown, such as .bin and .pkg.
5
Click “Open”.
6
Check that the newly imported software files appear in the list.
7
Click “Close”.
Figure 30.
Figure 30. File management window, Software tab.
27 June 2011 / Ver. B
32
User Manual
Device Manager in Unite Connectivity Manager
1.8.5
TD 92855EN
Import Language files for Devices
For adding a new language to a device, a language file (.lng) distributed by your supplier
must be imported to the Device Manager and then uploaded to the device.
NOTE: Spaces or other unsafe URL characters must not be included in the name of the
language file. If unsafe characters are included in the name it cannot be uploaded to
handset with Advanced charger.
1
In the File menu, click “File management”. The File management window opens.
2
Click the “Language” tab.
3
Click “Add”. The Import files dialogue opens.
4
Select the language files to be imported.
5
Click “Open”.
6
Check that the newly imported language files appear in the list.
7
Click “Close”.
8
To apply the language for a device, see 1.8.7 Upload a Language to a Device on page
34.
Figure 31.
Figure 31. File management window, Language tab.
1.8.6
Import Company Phonebook files
It is possible to import a phonebook file for later use.
1
In the File menu, click “File handling”. The File management window opens.
2
Click the “Company Phonebook” tab.
3
Click “Add”. The Import files dialogue opens.
4
Select the company phonebook files to be imported.
5
Click “Open”.
6
Check that the newly imported company phonebook files appear in the list.
7
Click “Close”.
27 June 2011 / Ver. B
33
User Manual
Device Manager in Unite Connectivity Manager
TD 92855EN
Figure 32.
Figure 32. File management window, Company Phonebook tab.
1.8.7
Upload a Language to a Device
It is possible to upload a language to handsets that support Language Upload.
Upload of languages is not available in Demonstration mode.
1
Select the “Devices” tab.
2
Select the device(s) to upload a language to. It is possible to select several devices,
but only devices of the same Device Type can be selected.
3
In the Device Menu, select “Upload Language...”. The Upload Language dialogue
appears.
Figure 33.
Figure 33. The Upload language dialogue.
4
Do one of the following:
•
•
If needed; import the language file (.lng) to be used by clicking “Import...”, locate
the file and click “OK”. In the Available files: drop-down list, select which language
to upload.
Enter the URL where the language file is located.
27 June 2011 / Ver. B
34
User Manual
Device Manager in Unite Connectivity Manager
5
TD 92855EN
Click “OK”. The language is uploaded to the device.
NOTE: It is also possible to upload a language on several handsets of the same device type
simultaneously using the Baseline function, see 1.10.2 Baseline settings on page 39.
1.8.8
Upload Company Phonebook
It is possible to upload a company phonebook to handsets that support Company
Phonebook Upload.
Upload of Company Phonebook is not available in Demonstration mode.
1
Select the “Devices” tab.
2
Select the device(s) to upload a company phonebook to. It is possible to select
several devices, but only devices of the same Device Type can be selected.
3
In the Device Menu, select “Upload company phonebook...”. The Upload company
phonebook dialogue opens.
Figure 34.
Figure 34. The Upload Company Phonebook dialogue.
4
Select which company phonebook to upload.
5
Click “OK”. The company phonebook is uploaded to the device.
1.8.9
Upgrade a Device with new Software
It is possible to upgrade the software in a device.
Upgrade of device software is not available in Demonstration mode.
1
Connect a device to the system.
2
Select the “Devices” tab.
3
Select from the list the device(s) that are to be upgraded. The selected row(s) is
highlighted. It is possible to select several devices, but only devices of the same
Device Type can be selected.
NOTE: A software upgrade from Device Manager should be done on one device to start with.
If successful, the remaining devices can be updated in one operation.
Tip: By using Ctrl and/or Shift it is possible to select several devices simultaneously.
27 June 2011 / Ver. B
35
User Manual
Device Manager in Unite Connectivity Manager
4
TD 92855EN
Click “Upgrade software” in the Device menu.
Alternatively, right-click and choose “Upgrade”, double-click the desired device or
click the “Upgrade” button in the toolbar.
The Upgrade software dialogue opens.
Figure 35.
Figure 35. The Upgrade software dialogue
In the Upgrade software dialogue the following fields are shown:
•
•
•
•
Device type – shows the model of your device.
Imported
– The Available files: drop-down list contains previously imported software files
compatible with the device type (see 1.8.4 Import new Software for Devices on
page 32); the latest used software file is selected by default.
– The Enter URL: text field gives a possibility to enter a path to a URL.
– Import...: is used to import new software.
Upgrade
– Immediately: is used to start upgrade immediately
– Later: enter a date and time for a scheduled upgrade.
Activate new software – mark Immediately, When idle, When idle in charger or
After manual restart, depending on when new software shall be activated.
5
If the software to be used for upgrade is not available, it can either be imported or
selected from an external server1. If you want to import the software, click
“Import...”. The Import software dialogue opens. Locate the file and click “Open”. The
file is imported to the Device Manager.
6
Imported software can be selected in the Available files: drop-down list.
1. It is recommended to use Enter URL: if the software is stored on an external server and should not be imported
to the Device Manager. Open a web browser and enter the URL (for example http://myserver/kathy_v1.5.7.bin).
Make sure that the web browser asks you to save or open the correct file. Copy the URL and paste it in the Enter
URL: text field.
27 June 2011 / Ver. B
36
User Manual
Device Manager in Unite Connectivity Manager
TD 92855EN
7
Click “OK”. The Upgrade software window closes.
8
The software will be downloaded to the device. For some device types, a progress bar
in the Status column for the device shows the progress of the download.
To cancel the upgrade, click “Cancel upgrade” in the Device menu. Alternatively,
right-click the device in the device list and select “Cancel upgrade”.
The device will restart automatically after a successful download, except when After
manual restart has been selected.
NOTE: A switched off device is upgraded when restarted.
NOTE: It is possible to upgrade the software on several handsets of the same device type
simultaneously using the Baseline function, see 1.10.2 Baseline settings on page 39.
1.8.10
Delete Parameter Definition Files
1
In the File menu, click “File management”. The File management window opens.
2
Click the Parameter definition tab.
3
Select the definition files to be deleted.
4
Click “Delete”.
5
In the Delete files dialogue, click “Yes”.
6
Click “Close”.
1.8.11
Delete Software
1
In the File menu, click “File management”. The File management window opens.
2
Click the Software tab.
3
Select the software to be deleted.
4
Click “Delete”.
5
In the Delete files dialogue, click “Yes”.
6
Click “Close”.
1.8.12
Delete Language File for Devices
1
In the File menu, click “File management”. The File management window opens.
2
Click the Language tab.
3
Select the Language to be deleted.
4
Click “Delete”.
5
In the Delete files dialogue, click “Yes”.
6
Click “Close”.
1.8.13
Delete Company Phonebook File
1
In the File menu, click “File management”. The File management window opens.
2
Click the Company Phonebook tab.
3
Select the company phonebook to be deleted.
4
Click “Delete”.
5
In the Delete files dialogue, click “Yes”.
27 June 2011 / Ver. B
37
User Manual
Device Manager in Unite Connectivity Manager
6
1.9
TD 92855EN
Click “Close”.
Import/Export Numbers and Templates
This section describes import and export of Numbers and templates.
Import and export of licensing information is described in 1.7 Licenses on page 26. Import
and additional file handling of parameter definition files, software files, language files and
company phonebook files is described in 1.8 File management in Device Manager on page
30.
The purpose of importing and exporting Numbers and Templates is to be able to move
Numbers and Templates to another site or for use at a later time. It is also possible to move
between PDM Windows Version and Device Manager in Unite CM.
The parameter configuration in Numbers can be exported to a file. This file can be used by
the supplier to pre-program devices before delivery to the customer.
If there is a naming conflict when importing a template, the new template is saved with a
number added to the file name. If there is a Number conflict when importing Numbers, an
error message is displayed.
1.9.1
Import Numbers
1
In the File menu, click “Import > Numbers...”. A File Browser window appears.
2
Select the Number files to be imported (*.xcp).
3
Click “Open”.
4
The Number(s) will be imported.
1.9.2
Import Templates
A template may be imported from another system. Updated Template files may be
distributed by your supplier.
1
In the File menu, click “Import > Templates...”. A File Browser window appears.
2
Select the Template files to be imported (*.tpl).
3
Click “Open”.
4
The Template(s) will be imported.
1.9.3
Export Numbers to a File
It is possible to configure Numbers for a site and export the settings to a file. One or several
Numbers can be selected.
The exported file can then be used when producing new devices for the customer.
1
Select the “Numbers” tab. The Numbers view appears.
2
Select the Number (or Numbers).
3
In the Number menu, click “Export”.
The “Export Numbers” dialogue appears. By default the file will be saved in the
My documents folder with the name EliseSite.xcp. You can select another name and
folder.
4
Click “Save”.
27 June 2011 / Ver. B
38
User Manual
Device Manager in Unite Connectivity Manager
1.9.4
TD 92855EN
Export Templates to a File
It is possible to export templates to a file. One or several templates can be selected.
1
Select the “Templates” tab. The Templates view appears.
2
Select the template (or templates).
3
In the Template menu, click “Export”.
The “Export Templates” dialogue appears. By default the file will be saved in the
My documents folder with the name Templates.tpl. You can select another name and
folder.
4
Click “Save”.
1.10 Other Settings
1.10.1 Automatically enable new Devices Settings
By default, when a new device logs in, it is automatically enabled and saved in Unite CM
database.
NOTE: The Unite CM license determines the number of devices that can be enabled
simultaneously in the Device Manager. If logging in more devices than allowed, they
will be disabled in the Device Manager. The devices must be enabled in order to
configure them.
When a single Unite CM is used, the Automatically enable new devices function should
normally be enabled.
When Device Management is distributed over multiple Unite CM’s in a system, the function
shall be disabled. If the function is enabled, devices will be saved on all Unite CM’s running
device management. This will cause synchronization problems and the logged in devices will
consume license positions on each Unite CM.
To disable automatic saving of new numbers:
1
In the Options menu, click “Preferences”. The Preferences dialogue opens.
Figure 36.
Figure 36. The Preferences dialogue.
2
In the Preferences dialogue, disable “Automatically enable new devices”.
3
Click “OK”.
1.10.2 Baseline settings
It is possible to select which version of software, language and/or template that shall be
applied for all devices of a selected device type. This is done by setting a baseline.
27 June 2011 / Ver. B
39
User Manual
Device Manager in Unite Connectivity Manager
TD 92855EN
Two settings are needed:
•
•
Whether device baseline configuration shall be enabled or not.
The specific settings for the baseline.
To enable device baseline configuration:
1
In the Options menu, click “Preferences”.
2
In the Preferences window, enable “Use device baseline configuration”.
3
Click “OK”.
The baseline management can be displayed in two modes;
•
•
Basic mode - This mode is recommended for configuring and viewing one device type at
the time.
Advanced mode - This mode is recommended for configuring and viewing several device
types simultaneously.
Basic mode
To configure a baseline for a device type:
1
In the File menu, click “Baseline...”. The Edit baselines window opens.
Figure 37.
Figure 37. The Edit baselines window - Basic mode
2
If baseline management is disabled (indicated by a red bar in the top of the window),
enable the baseline management by clicking “Click to change”. When the baseline
management is enabled, the bar becomes green.
3
In the left pane of the Edit baselines window, select device type.
4
Select whether to include software, language and/or template in the baseline. The
percentage of compatible devices is shown as a bar.
5
If necessary, do an import of a software file, language file and/or template file.
6
• Click Import. The Import window opens.
• Locate and select the file(s) to be imported.
• Click “Open”. The file(s) are imported.
In the corresponding drop-down list, select software, language and/or template.
7
Click “OK”. The baseline is saved and applied.
27 June 2011 / Ver. B
40
User Manual
Device Manager in Unite Connectivity Manager
TD 92855EN
Advanced mode
To configure a baseline for a device type:
1
In the File menu, click “Baseline...”. The Edit baselines window in basic mode opens,
see figure 37.
2
Click “Advanced mode”. The Edit baselines window in advanced mode opens.
Figure 38.
Figure 38. The Edit baselines window - Advanced mode
3
If baseline management is disabled (indicated by a red bar in the top of the window),
enable it by clicking “Click to change”. When the baseline management is enabled,
the bar becomes green.
4
If necessary, import software file, language file and/or template file by clicking “File
handling”. The File management windows appears, see 1.8 File management in
Device Manager on page 30 for more information.
5
For a device type; click corresponding column and select software, template and/or
language to be included in the baseline. The percentage of compatible devices is
shown as a bar. In addition, a
icon indicates that a baseline for the device is
configured.
6
Click “OK”. The baseline is saved and applied.Click “OK”. The baseline is saved and
applied.
27 June 2011 / Ver. B
41
User Manual
Device Manager in Unite Connectivity Manager
2
TD 92855EN
Related Documents
Installation and Operation Manual, Unite Connectivity Manager
27 June 2011 / Ver. B
TD 92735EN
42
User Manual
Device Manager in Unite Connectivity Manager
3
TD 92855EN
Document History
For details in the latest version, see change bars in the document.
Version Date
Description
A
10 June 2011
First released version.
B
27 June 2011
Updates in chapter 1.4.11 Import Contacts on page 19
27 June 2011 / Ver. B
43
User Manual
Device Manager in Unite Connectivity Manager
TD 92855EN
Appendix A: Device Manager Keyboard Shortcuts
The following table shows the shortcuts that can be used in the Device Manager.
A.1
A.2
A.3
A.4
General
Shortcut
Description
Ctrl + H
Open the File management window
Ctrl + B
Open the Edit Baselines window
Ctrl + Tab
Switch tab
Alt + F4
Close the application
Devices
Shortcut
Description
Ctrl + N
Add a new device
Enter
Upgrade the selected device(s)
Delete
Delete the selected device(s)
Ctrl + F
Find a device
Ctrl + Enter
Open the Properties window for the selected device
Numbers
Shortcut
Description
Ctrl + N
Add a new Number
Enter
Edit the selected Number
Ctrl + C
Copy the selected Number
F2
Rename the selected Number
Ctrl + S
Save the selected Number to the database
Delete
Delete the selected Number from the database
Ctrl + F
Find a Number
Templates
Shortcut
Description
Ctrl + N
Add a new template
Enter
Edit the selected template
Ctrl + C
Copy the selected template
F2
Rename the selected template
Delete
Delete the selected template
Ctrl + F
Find a template
27 June 2011 / Ver. B
44
User Manual
Device Manager in Unite Connectivity Manager
A.5
TD 92855EN
Licenses
Shortcut
Description
Delete
Remove the selected device(s) from the license view
Ctrl + F
Find a device
27 June 2011 / Ver. B
45