
1
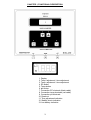
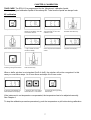
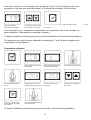
USER-MANUAL EPH-119 Temperature compensated EC/pH/°C-meter with automatic calibration Rev: from SN075663 PREFACE Congratulations with your "Nieuwkoop" EC/pH/°C-meter with automatic temperature compensation and calibration. With the EPH-119 it is very easy to measure EC, pH and temperature in liquids and soils. The instrument is supplied in a useful carrying case complete with calibration liquids and all the accessories needed for measuring water and soil samples. Due to 40 years of experience from Nieuwkoop BV in the agriculture and horticulture, the reliability, userfriendliness and accuracy of the instrument are guaranteed. We wish you good luck with the instrument. 1 CONTENTS Chapter 1, Chapter 2, Chapter 3, Chapter 4, Chapter 5, Chapter 6, Chapter 7, Chapter 8, Chapter 9, Chapter 10, Chapter 11, Chapter 12, Preface ........................................................................................................ 1 Contents ...................................................................................................... 2 Functional description ................................................................................. 3 Technical specifications .............................................................................. 4 Measuring with temperature compensation in a liquid ............................... 5 Measuring without temperature compensation in a liquid .......................... 6 Measuring EC and pH in soil....................................................................... 6 Calibration ................................................................................................... 7 Switching the instrument off ........................................................................ 10 Adjustment of the reference temperature ................................................... 10 Error messages ........................................................................................... 11 The EPH-119RS ......................................................................................... 11 Maintenance................................................................................................ 12 Stability check.............................................................................................. 12 2 CHAPTER 1, FUNCTIONAL DESCRIPTION 1. Display 2. Temp. adjustment / time adjustment 3. Temp. adjustment / time adjustment 4. EC-button 5. Temp-button 6. pH-button 7. Connection EC-electrode (black cable) 8. Connection temp-electrode (red cable) 9. Connection pH-electrode 10. Read-out 11. Time adjustment indication 12. Stability check indication 13. Low battery indication 3 CHAPTER 2, TECHNICAL SPECIFICATIONS 1) EC Range Resolution Accuracy Temperature compensation Temperature coefficient Reference temperature : 0-20,00 mS : ± 0,01 mS : dependent on calibration : manual or automatic by electrode : 2,2 %/°C (during calibration 2,1 %/°C) : adjustable to 18, 20 or 25°C (during calibration fixed to 25°C) 1-Point calibration with automatic recognition of standard buffer solutions (2 mS and 4 mS KCl). Possibility for manual calibration with other buffer solutions. 2) pH Range : 0-14,00 pH Resolution : ± 0,01 pH Accuracy : dependent on calibration Temperature compensation : manual or automatic by electrode Recognition pH-7 : ± 1,00 pH Recognition pH-4 : 90-105% 2-Points calibration with automatic recognition of standard buffer solutions (pH-4, pH-7 and pH-9). Possibility for manual calibration with other buffer solutions. 3) Temperature Electrode : RTD Pt1000 Range : 0-65°C Resolution : ± 0,1°C Accuracy : dependent on calibration 1-Point calibration, manual in steps of 0,1°C. Manual temperature adjustment (when temperature electrode is not connected) in steps of 0,1°C with the "" and "" buttons. 4) General Power supply Absorption Low battery indication Display Size Weight (instrument) Label Guarantee : 9V battery (4 x 1,5V on request) : EPH-119 15mA EPH-119RS 25mA : "BATT" : LCD 3½ digit : 190x135x45mm : 460 grams : polycarbonate membrane : 1 year (3 months on pH-electrode) The chosen measurement will by indicated by a blinking "LED" at the corresponding button. Switching off the instrument can be manual or automatic. The time before the instrument switch off can be adjusted at 90 or 180 seconds. 4 CHAPTER 3, MEASURING WITH TEMPERATURE COMPENSATION IN A LIQUID. EC measurement 1. Press the EC-button. The LED on the button will be blinking. 2. Put the EC electrode into the liquid and rinse carefully. 3. Wait until the value is stable and read the measurement. 4. Clean the electrode with demi water and store dry. 1. Push the pH-button. The LED on button will blink. 2. Remove the rubber cap, rinse the electrode in demiwater. 3. Put the EC and pH-electrodes in the liquid and rinse carefully. 4. Wait until the value is the stable and read the measurement. 5. Clean the EC-electrode in demiwater and store dry. 6. Clean the pH-electrode with demiwater. 7. Fill the cap with storage liquid and put it on the pH-electrode pH measurement Temperature measurement 1. Push the temp button. The LED on the button will blink. 2. Put the EC-electrode into the liquid. 3. Wait until the value is stable and read the measurement. 5 4. Clean the electrode with demiwater and store dry. CHAPTER 4, MEASURING WITHOUT TEMPERATURE COMPENSATION IN A LIQUID To measure without temperature compensation (temperature probe not connected), before measurement the temperature has to be adjusted as follows 1. Push the temp button. The LED on the button will blink. 2. Measure the temperature with the thermometer. 3. The adjusted temperature is indicated on the display. 4. Adjust the right temperature with the "" or "" button. Afterwards measurements can be done as in chapter 3. CHAPTER 5, MEASURING EC AND pH IN SOIL For measurements of EC and pH in soil firstly we have to make a soil sample. For a extraction of 1:2 the next steps has to be followed: - Fill the ABC sample cup up to line C with demiwater. - Add soil to the sample cup up to line A (remove stones etc.). - Shake the cup firmly. - Wait until the soil has settled down and measure EC and/or pH in the water above (see Chapter 3). - Now you are measuring EC and/or pH in an extraction of 1 part soil and 2 parts water. When soil extracts too much water (for example dry peat), we need to make a soil sample of 1 part soil to 5 parts water. Fill the sample cup up to line B with demiwater and up to line A with soil. In order to get the EC-value of a 1:2 extraction; the measured EC has to be multiplied by 2,5. 6 CHAPTER 6, CALIBRATION TAKE CARE: The EPH-119 is programmed for the “Nieuwkoop” calibration liquids. Use always original calibration liquids of Nieuwkoop BV. Take care the liquids are always fresh. EC-calibration 1. Keep the EC button pressed. 2. Release the button when "CAL" appears on the display. The LED on the button will burn. 3. On the display appears "EC1". This means that you are in the calibration mode. 4. Clean the EC-electrode with demiwater and make it dry. 5. Put the electrode into the EC-4 buffer solution and rinse carefully. 6. While the value blinks and the "~" sign is visible, the meter checks the stability. 7. When the value is stable, it will be compared to the standard values. 8. When the value is recognised, it appears on the display. 9. When this is the right value, confirm by pushing the EC button. 10. Clean the electrode with demi water and store it dry. When a buffer solution is not standard (2mS of 4mS), the solution will not be recognised. In this case you must follow steps 1 to 5 from above and steps 6 to 8 here under. 6. When the value stabilise, this will be indicated on the display. 7. Adjust the value of the solution manual with the "" or "" button. 8. Confirm the value by pressing the EC-button. If the instrument is not temperature compensated, the temperature has to be adjusted manually. See Chapter 4. To stop the calibration procedure prematurely, push the temperature or pH button during calibration. 7 The instrument can be set to factory calibration by pressing the "" and "" buttons together with the EC-button during calibration. pH-calibration 1. Keep the pH button pressed. 2. Release the button when "CAL" appears on the display. De LED on the button will burn. 3. "PH1" appears on the display. you are now in the calibration mode. 5. Clean pH- and EC-electrode with demiwater and make them dry. 6. Place the pH-electrode in the pH-7 solution and rinse carefully. Place the EC-electrode in a liquid with the same temperature as the pH-7 buffer solution. 7. While the value blinks and the "~" sign is visible, the meters checks the stability. 9. When the solution is recognised, the value (at that temp.) is shown on the display. 10. When this is the right value confirm by pushing the pH button. 11. "PH2" will appear on the display 12. Clean the pH-electrode with demiwater and dry it with a tissue. 13. Place the pH-electrode in the pH-4 solution and rinse carefully. Place the EC-electrode in a liquid with the same temperature as the pH-4 solution (for instance EC-4 solution). 14. While the value blinks and the "~" sign is visible, the meter checks the stability. 15. When the value is stable, it will be compared to the standard values. 16. When the liquid is recognised, the value (at that temp.) is shown on the display. 17. If this is the right value, confirm by pressing the pH-button. 18. Clean the EC-electrode with demiwater and store it dry. 19. Clean the pH-electrode with demiwater. 20. Fill the rubber cap with storage liquid and put it on the pH-electrode. 8 4. Remove electrode rubber cap 8. When the value is stable, it will be compared with the standard values. from the If the buffer solution is not a standard buffer solution (pH-4, pH-7 or pH-9) the liquid will not be recognised. In this case you must follow steps 1 to 5 from above and steps 6 to 8 here under. 6. When the value is stable it value of the calibration will be shown on the display. 8. Confirm the value by pressing liquid with the "" or "" button. 7. Set the the pH-button. If the instrument is not temperature compensated, the temperature has to be manually set before calibration. This procedure is described in chapter 4. To stop the calibration procedure prematurely, push the temperature or EC button during calibration. The instrument can be set to factory calibration by pressing the "" and "" buttons together with the pH-button during calibration. Temperature calibration 1. Keep the temp button pressed 2. Release the button when the display indicates “cal”. The LED Will stay alight 3. Now “t 1” will appear on the display. This means that we are in the calibration procedure. 4. Clean the EC-electrode with demi water and dry the electrode. 5. Place the electrode in a liquid from which the temperature is known 6. As long as the measuring is blinking, and the "~" sign is alight the stability will be checked. 7. When the value is stable, compare this with the real temperature 8. When the temperature is not right, adjust this with the or the button. 9. When you have the correct value, confirm this by pressing The °C button. 10. Clean the electrode with Demi water and store it dry.. To stop the calibration procedure prematurely, push the EC or pH button during calibration. 9 The instrument can be set to factory calibration by pressing the "" and "" buttons together with the Temp-button during calibration. CHAPTER 7, SWITCHING THE INSTRUMENT OFF The instrument can be switched off manually as follows: 1. Keep the EC and pH-buttons pressed. 2. Release the buttons when "OFF" is shown on the display. The instrument will switch off automatically after 90 or 180 seconds. The time can be adjusted as follows: 1. Keep the "" and "" buttons display shows the set time pressed. 2. 3. Keep the "" and "" buttons pressed in seconds with the time adjustment until the desired time is shown. indication. CHAPTER 8, ADJUSTMENT OF THE REFERENCE TEMPERATURE The temperature compensation of the EC measurement is always referring to a standard temperature. This value differs per country and per branch. Because of this the reference temperature is adjustable. Standard it will be 25°C (other options are 18°C or 20°C). Only the reference temperature of the measurement is adjustable. During calibration the reference temperature is fixed to 25°C. The reference temperature adjustment is as follows. 1. Keep the temp and EC buttons at the same time pressed. 2. Release the buttons when “cal” is written on the display the two LED’s will keep alight 3. Now "r 25" will appear on the display. This means that you are in the calibration procedure. 1. Confirm with the EC or the Temp button. 10 4. Adjust with the or button the right reference Temperature. The CHAPTER 9, ERROR MESSAGES During pH calibration the following error messages can appear on the display: "ERR1”: The zero (pH-7) calibration of the pH-electrode is out of range (± 1,00pH). "ERR2”: The span (pH-4) calibration of the pH-electrode is out of range (90%-105%). Press the pH-button to stop the error message. During 10 seconds one of the following messages will appear on the display: "AH”: The zero (pH-7) calibration of the electrode is out of range (± 1.00pH). "SH”: The span (pH-4) calibration of the electrode is out of range (> 105%). "SL”: The span (pH-4) calibration of the electrode is out of range (< 90%). During EC calibration the following error messages can appear on the display: "ERR3”: The calibration of the electrode is out of range (70%-100%). Press the EC-button to stop the error message. During 10 seconds one of the following messages will appear on the display: "SH”: The span (EC-4) calibration of the electrode is out of range (> 130%). "SL”: The span (EC-4) calibration of the electrode is out of range (< 70%). During temperature calibration the following error messages can appear on the display: "ERR4” followed by “AH”: The calibration of the electrode is out of range (±2,0°C). Press the Temp-button to stop the error message. The instrument will continue temperature measurement. When one of these error messages occurs, check if the buffer solutions have the right values and that the electrode is properly placed into the liquid. Check also if the electrode is properly connected to the instrument. Start the calibration procedure again. When the error message still appears, contact your supplier. CHAPTER 10, THE EPH-119RS The EC/pH/°C-meter EPH119RS is provided with a serial port RS232 and can be connected with any equipment with a RS232 serial port. Data are sent every 0.3 seconds, i.e. every time the display of the EPH119 is updated. Data format: ±xx.xx°C ±xx.xxpH ±xx.xxmS 11 Serial port configuration: Baud rate Data Parity Stop Flow control : : : : : 1200 bit/sec 8 bit NONE 1 bit NONE Serial port connections (DB9 M) Rx Tx GND pin 2 pin 3 pin 5 Data can be received and memorised by using a standard Terminal program (Terminal.exe, Hyperterminal.exe, etc.) which is configured as above described. Example: EPH119RS DB9 M DB9 M of P.C. Rx Tx GND 3 2 5 2 3 3 Tx Rx GND CHAPTER 11, MAINTENANCE For a long lifetime and reliable measurements we advise the following: - Store the instrument in a dry room. - Do not expose the instrument to high temperature changes (because of condensation). - To clean the outside of the instrument, use a moisten cloth. - Clean the electrodes after measurement always with distilled water. - Protect the pH-electrode against desiccation by storing it always in storage liquid. - Protect instrument and electrodes against high shocks and dirt. CHAPTER 12, STABILITY CHECK When in automatic calibration, the instrument will check for a stable reading of the measuring value. A pH reading is considered stable by the instrument when the difference between 4 readings tested from 1 to 8 seconds is less then 0,01 pH. A EC reading is considered stable by the instrument when the difference between 4 readings tested from 1 to 8 seconds is less then 0,025 mS. 12


![TMI Engels [Gebruiksaanwijzing]](http://vs1.manualzilla.com/store/data/005770663_1-1aba264af1c7d1df8261c0c562f11233-150x150.png)

