1
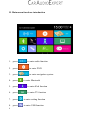
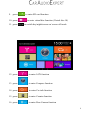
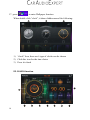
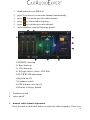
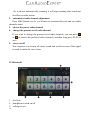
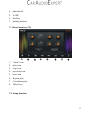
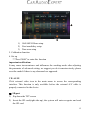
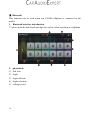
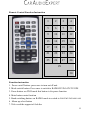
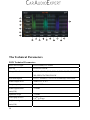
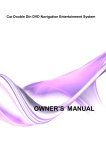
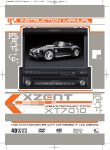
TOUCH SCREEN
CAR DVD NAVIGATION SYSTEM
USER MANUAL
SPECIAL CAR DVD
User manual
Thanks for your purchase of the car multimedia player from our company,
please read this instruction manual before you use it, and confirm to set up it
correctly. And please keep this manual for future reference.
This instruction manual introduces you how to operate DVD, GPS, AV, TV.
The manual used in the example screen may vary with the actual picture
This manual of the product will improve its performance, functions and change
the screen at any time without notice .
The machine to display the contents of the screen may be different with the
actual content.
Important
1. Please read the prospectus before use it in order to avoid error operation
for the inconvenience
2. This machine is for 12V power(must connect ground wire), do not connect
to 24V power such as truck
3. Do not use sharp objects or devices to touch panels, otherwise the touch
screen will be damaged
4. If you did not buy high-speed DVD-t, when vehicles>70KM, the screen
may not display properly
5. If the TFT screen prevents interference with the driver of the optical line of
1
sight, you can press the DISP button panel or long press MUTE of touch
screen on the X-shaped Icon. Until TFT screen automatically closed. And
the voice of the normal output.
6. Unusual when the machine can not continue to work, can be reset by the
RST key to restore the initial value
7. Please use the machine within the strict standard accessories and screws to
install in order to avoid excessive use of other accessories and equipment
damaged screws
Foreword
Important safety information
1. Before using this equipment, be sure to carefully read and fully understand
the following safety information
2. before operating this machine, please read the entire user’s manual
3. the navigation function of this product(and optional reversing camera)only
play the role as supplement when you are driving a vehicle, it doesn’t
mean you can be distracted, careless or loss of judgment while driving
4. If the operation of the equipment(and optional reversing camera)will
distribute your attention of security when you are driving, as well as the
obeying traffic rule and regulations. If there are any difficulties when you
are operating the system by watching the monitor, please park the vehicle
in a safe place, use the parking brake, and then do the necessary
adjustments
5. No other person use this system unless they have read and understand
instructions
6. In case of you are on the road of going to hospital, police station or similar
2
7.
8.
9.
10.
11.
12.
13.
14.
15.
16.
organizations emergently it is prohibited to use the navigation system.
The routes of navigation information which the system shows if for
reference only and many not accurately reflect the latest licensed line, the
traffic, one-way road, road closures or traffic restrictions.
The traffic proposal and restrictions of the current implementation is
always the first issue of this navigation system information. Therefore, be
sure to comply with the current traffic restrictions, even when the
navigation system provides the current recommendations of the contrary.
If it is unable to enter the accurate local time, it may lead to that the
navigation system can not provide appropriate routes and navigation
instructions.
Do not set the volume of equipment too highly, otherwise you can not hear
the vehicle traffic conditions outside the vehicle and emergency vehicles.
considering the security, some of the features will not be able to operate,
unless you stop the vehicle or use the parking brake.
please keep this manual on hand for reference of operating procedures and
safety information.
please pay special attention to all the manual notes, and strictly comply
with the instructions.
In the following cases, please do not install the equipment (I) may block
the driver’s line of sight;(II)That may affect the operation system of the
vehicle and the performances of safety, including air bags, risk alarm light
button; (III)That may affect drivers safely driving vehicles
Please remember to fasten you seatbelt when you are driving. It will bring
much less harm and danger for your fastening the seatbelt than not
fastening. Once there is a traffic accident.
Please don’t wear headphones when driving a vehicle.
System before the note and other safety information
1. The pink wire of the power connector is used to detect the status of
3
2.
3.
4.
5.
6.
7.
8.
9.
10.
11.
4
parking, it must be connected to the power-side switch of the parking
brake
It many violate applicable law and resulting in serious injuries or damages
if the wire is not connected or used properly
Don’t place this product under the environments which is damp or can be
easily affected with damp and corrosion. You’d better install it in dry and
ventilation environment
If the battery power off or the discharge, the system’s memory will be
cleared, and it must be re-programmed.
Do not contact the system with the liquid; otherwise, it will lead to electric
shock, and damage or smoke or overheating to the system.
Warning: Security of driving
In order to prevent accidents, to avoid possible violation of applicable laws,
please don’t use the system for other purpose which beyond the manual.
Simultaneously the rear monitor can not be used when it hinder the
driver’s sight.
In some areas, it is illegal for the driver or other people in the vehicle to
watch the images in the monitor. These laws and regulations should be
obeyed under the applicable situation, and the rear video output also
should not be used.
The system can detect whether the parking brake of the vehicle is working
or not. And it can prevent you from watching the images in the monitor at
the front. When you try to watch an image, it will appear warning words in
front of the monitor of “no watching the video information in the front seat
while driving”.
Don’t not connect the brake test line with the ground for mandatory to
achieve the purpose of watching the video, otherwise, it may lead to
serious potential safety hazard when you are driving part of the menu
which can not operate the equipment, also can not operate some AV
features.
To see the image in front of the monitor, please park the vehicle in a sage
12.
13.
14.
15.
16.
place and use the parking brake.
When you have to use the monitor to connect with the rear monitor output,
the rear monitor output of the system used to connect the monitor, so as to
let the people in the rear seat can watch the images.
Do not install in the rear monitor in the location which the driver could
watch its image while driving, in order to prevent the depletion of the
battery, please follow the following instructions.
Make sure to use the system only when you start the engine. Cause the
battery will run out if you use the system when you not start the engine
To the identify the rear condition of the vehicle conveniently, the images
which the rear camera display may be the mirror image
Please do not repair, decompose or improve the product. If this product has
the fault or can not work normally, please ask the customer service
advisory department for help.
5
Standard accessories:
6
CANBUS
Remote control
GPS antenna
RCA wire
iPod cable
USB cable
Touch pen
Dismantle key
Fitting Screw
I. Instruction of front panel buttons
1.
2.
3.
4.
5.
6.
7.
8.
9.
10.
11.
12.
13.
14.
15.
press
to turn on/off
press
to turn off voice
press
to switch mode
Press
to turn up voice
press
to turn down voice
press
to fast enter main interface
Press
to pause/play
MIC: Bluetooth audio input
Press
for Bluetooth function and hand free
Press
to enter navigation
Press “Band” Icon to switch radio wave bands FM1 FM2 FM3 AM1 AM2
Press
for the previous
press
for the next
to read disc
press
Press
to scan the radio channels. Press it more than 3s to scan and
save radio channel
16. Reset, press it to restore the factory default
7
II. Main menu functions introduction
1. press
to enter radio function
2. press
to enter DVD
3. press
to enter navigation system
4. press
to enter Bluetooth
5. press
to enter iPod function
6. press
to enter TV function
7. press
to enter setting function
8. press
to enter USB function
8
9. press
10. press
11. press
to enter SD card function
to enter virtual disc function (Virtual disc 10)
to switch day/night/screen on/ screen off mode
12. press
to enter AUX function
13. press
to enter Compass function
14. press
to enter Car info function
15. press
to enter Counter function
16. press
to enter Rear Camera function
9
17. press
to enter Wallpaper function
When double click “clock”, it shows hidden menu like following:
1) “clock” Icon, there are 6 type of clocks can be chosen
2) Click this icon for the time choice
3) Press it to back
III. RADIO function
10
1.
2.
3.
4.
5.
6.
Band button to scan FM/AM
press 2s or above to scan radio channels automatically
press
to scan the previous radio channel
press
to choose radio frequency
press
to scan the next radio channel
audio amplifier setup as following picture
1).TREBLE down/up
2). Bass down/up
3). VOL down/up
4). EQ type choice, classic, POP, Roll
5).FL/FR/RL/RR adjustment
6).keytone on/off
7).Loudness switch
8).GPS mixture voice on/off
9).Restore to factory default
7.
8.
Loudness switch
stereo on/off
1. manual radio channel adjustment
Press forward or backward button to adjust the radio frequency. Press over
11
1.5s to choose automatically scanning, it will stop scanning after search out
an effective radio station
2. automatical radio channel adjustment
Press AMS button over 3s, it will enter to automatically scan and save radio
channels status.
3. choose the preset radio channel
4. change the present saved radio channel
If you want to change the present saved radio channels, you can press
or
to choose the preferred radio channels, and then long-press P1-P6 to
save
5. stereo on/off
You can press icon to turn off stereo sound and switch to mono if the signal
is weak to make the voice clear.
IV. Bluetooth
1. dial icon
2. handphone switch on/off
3. calling record
12
4.
5.
6.
7.
phonebook
A2DP
dial key
pairing indicate
V. Virtual memory CD
1.
2.
3.
4.
5.
6.
7.
8.
“burn” icon
play icon
stop icon
previous icon
next icon
Repeat play
Circulation play
Delete key
VI. Setup function
13
1. Navi setup
2. video setup as picture below:
1) brightness adjustment
2) camera setup: normal/mirror
3) handbrake function
3. Audio setup
4. Time setup as picture below:
14
1) AM/AM/24 Hour setup.
2) Year/month/day setup
3) Time area setup
5. Calibration function
6. Set up
***Press"0000" to enter this function
important notification:
It may cause inconvenience and influences the working mode after adjusting
the parameter of advanced setting. we suggest you do it conscienciously. please
reset the model if there is any abnormal use appeared.
VII. AV-IN
Click external video icon in the main menu to access the corresponding
interface. This function is only available before the external A/V cable is
properly connected to the device
Ⅷ. SD port
1) flip-down the TFT screen
2) Insert the SD card(right side-up), the system will auto recognize and read
the SD card
15
Ⅸ. Bluetooth
This function can be used when one CGSM cellphone is connected to the
model
1. Bluetooth interface introduction
** please note the dial board and digit are useless when switching to cellphone
2.
1)
2)
3)
4)
5)
16
phonebook
dial icon
digits
digits deletion
digits selection
calling record
1 dial icon
○
2 phone number display area
○
3 deletion one by one icon
○
4 dialed call record
○
5 received call record
○
6 missing call record
○
7 Elimination
○
6) phonebook
7) A2DP
8) Pairing indicate, it shows green when paired
3. Using instruction
1) paring procedure
preparing a GSM handphone with Bluetooth function, click pairing icon to find
out the model and input the code”0000” according to the indicate
you can use this function after pairing done(the Bluetooth logo turns to green
color)
2) A2DP
You can enjoy the music after paired, the model will import music from
handphone automatically
3) Dialing
17
You can freely dial people from the model or handphone, you can process and
control dialing from both the model and handphone
4) call receiving
the model will show the phone number and press receiving icon to pick up.
Press ending icon to hang up
5) check the dialed call
6) check the received call
7) check the missing call
Ⅹ. GPS Funtion
a) Insert GPS SD card
Insert the SD card to GPS SD card slot, please kindly note the sd card should
be right-side-up
1. GPS path setup
Enter the setting menu and choose GPS path setting menu to choose the
GPS .exe program and tick it to run the GPS software as the picture below
18
After choose and tick the program, the system will back to gps setting menu,
press “NAVI” to start the navigation.
Ⅺ. Remote controller instruction
Please remove the film which sticks to battery.
1. instruction
1) power on/off button: to power on/off the model
2) Mute button: to mute the model
3) Mode button: to switch the functions from RADIO/AUX/DVD/TV/GPS
4)
disc in/out
5) DVD button: to enter DVD mode
6) Stop: to stop the DVD or music
7) VOL+: turn up voice
8)
9)
10)
11)
12)
13)
14)
pause/play button
GPS: to enter GPS mode
previous button
OK button: to adjust EQ
next button
TV button, to enter TV mode
Band: band switch in the radio status. It is for image format switch in
TV/DVD status
15) VOL-: voice down
19
16) AUDIO: to switch Chinese/English
17) 0-10+ digits: to choose channels in the radio/TV status, choose specified
items in the DVD status
18) RPT: repeat function, you can choose all repeat or title repeat in the status
of DVD
19) TITLE: to back to DVD title
20) Zoom: to zoom in or zoom out. In the DVD status, to process zoom x2, x3,
x4, x1/2,x1/3, zoom off
21) GOTO: to show dvd playing problems
22) A-B: to slow down the DVD playing
23) Set up: to setup the DVD
24)
,to move up the selected menu
25) Angle: to adjust the playing angel
26) ROOT: DVD repertoire adjustment
27) , move the selected menu to the left
28) ENT: confirm button
29)
move the selected menu to the right
30) ROM
31) INFO: DVD repertoire slide
32)
move down the selected menu
33) PIC: Bluetooth shortcut
34) SUB-T: DVD caption setting
35)
the previous episode
36)
the next episode
37) MENU: to back to DVD menu
38) Exit
Ⅻ. IPOD instruction
The model will automatically turn to IPOD mode when IPOD/IPONE docked
1. IPOD interface
1) voice on/off
20
2) repertoire display area
3) song name and singer display area
4) repeat function to choose single repeat, all repeat and repeat off
5) cycleplay function to choose single cycleplay, all cycleplay, and cycleplay
off
6) previous button to choose previous song
7) next button to choose the next song
8) voice setting
1. Treble sound setting
2. alto sound setting
3. low pitch sound setting
4. bass sound setting
5. sound reduction setting
6. FL setting
7. FR setting
8. Mute
9. loudness on/off
10. GPS mixture voice on/off
11. EQ Setting
12. Voice down/up control bar
13. back button
2. the introduction of IPOD interface
1) press song selection button to import IPOD songs
2) press video file selection button to import the video files from IPOD
3) press picture file selection button to import the image files
4) files display area, choose the preferred songs to play
5) main menu file button
6) digital selection button for songs
7) last page
8) next page
21
XIII. USB instruction.
The model will automatically read the USB files after docking USB.
1) previous button to choose the last song
2) pause/play
3) next button to choose the next song
4) repeat function to choose single repeat, all repeat and repeat off
5) cycleplay function to choose single cycleplay, all cycleplay, and
cycleplay off
6) voice button
7) back button
8) loudness on/off
9) current file display area
10) time calculator for song play
XIII. The playback screen for original car usb:
①
②
③
① Original car temperature display
22
② Original car USB play timer
③ Original car USB play control command
The user interface for original blue&me status:
1. The voice conversation of people with car status:
2. Talking on the phone status:
Car door display status:
23
It will display this status when use the DVD to open car door in any condition, when people
close the car door will auto off this interface.
24
Remote Control Function Instruction
1
2
3
4
5
6
7
8
9
10
11
12
13
14
15
16
17
18
19
20
21
22
23
24
25
26
27
28
29
30
Function instruction
1. Power on/off button: press once to turn on/off unit.
2. Mode switch button: Press once to switch to RADIO/DVD/AUX/TV/GPS
3. Pause button: on DVD mode this button is for pause function
4. Mute button: mute function
5. Band switching button: on RADIO mode to switch to FM1/FM2/FM3/AM1/AM
6 . Menu up select button
7. Title: need the support of dvd disc
25
8. SUB-T: need the support of dvd disc
9. Menu left select button
10.Confirm button
11. Menu right select button
12. DVD stop button
13. Time-out button
14. Menu down select button
15. Angle button
16. Easy ahead button
17. Repeat button
18. Programming button
19. Volume+
20. Enlargement button
21. Random play button
22. MovePrevious button(SEEK-)
23. Volume control button
24. MoveNext button(SEEK+)
25. DVD menu
26. DVD information display
27. Volume28. Audio switch button.on TV mode to switch audio.on dvd to switch
left/right Sound
29. Number key
30. GOTO
26
XIV. Input interface
1
○
2
○
3
○
8
○
1.
2.
3.
4.
5.
6.
7.
8.
4
○
7
○
5
○
6
○
Radio antenna port.
iPod port.
TV port.
Original USB/AUX wire port.
GPS antenna port.
USB cable.
Original car power wire port.
RCA OUT interface including:
1 way AU video input
1 way rear camera input
2 way video output
4 way audio output
1 way DBB output
Wheel control operation instruction: (Special canbus don’t need setting)
1.press"steer" in main menu
2.keep pressing the keypad on wheel when it appears a voltage value in
"assign" area.then click"assign" to finish
27
The Technical Parameters
DVD Technical Parameters
Laser wave length
DVD 650nm;CD 780nm
Pick up
HITACHI 1200W
Compatible disc
MPEG-4(DIVX),DVD,DVD+R,DVD-R,VCD,CD,MP3,
WA,JPEG,CD,CDR,CD-R/W
Anti-Shockproof
DVD 3 seconds;VCD/CD 10 seconds;mp3 90seconds
Audio output level
Audio:1.2V ± 0.2
Frequency response
20Hz-20KHz
Audio signal-noise
≥80dB
ratio(S/N)
Dynamic scope
≥80dB
Video pup ut level
1.0 ± 0.2Vp-p
Brightness signal-noise
≥56dB
ratio(S/N)
28
≥60dB
Color signal-noise
ratio(S/N)
Display system
Auto/NTSC
Menu language
Chinese/English/Spanish/French/German/Italian/Turkish
TV Technical Parameters
Frequency Range
48.25MHz-847.25MHz
TV display system
PAL/NTSC/SECAM/SECAM-L
Audio system
DK/I/BG
Radio Technical Parameters
FM Frequency Range
87.5MHz-108.0MHz
AM Frequency Range
522MHz-1620MHz
FM sensitivity
AM sensitivity
≤25dB
≤45dB
Signal-noise ratio(S/N)
≥50dB
Distortion
≤0.3%
TV Technical Parameters
Frequency Range
48.25MHz-847.25MHz
TV display system
PAL/NTSC/SECAM/SECAM-L
Audio system
DK/I/BG
Technical Parameters of TFT-LCD Screen
LCD Screen Size
6.2 inch
LCD Screen Ratio
16:9
Spot pitch
0.107(h)x0.372(V)
Resolution
800X3X480
29
Contrast
150:1
Brightness
300cd/㎡
Response speed
R:30/F:50
Viewing angle
U:15/D:35 L/R:55
Original luminous lamp
LED
Lamp longevity
Over 10 thousand hours
30
18.Trouble Shooting
Notes:
1. Due to continuing improvements, the features and design are subject to change without any notice.
2. To make sure the machine work normally, it is recommended to use the attached
accessories and optional parts..