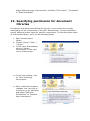
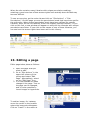
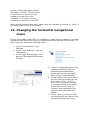
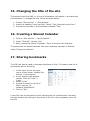
1
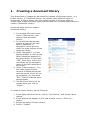
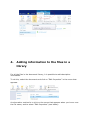
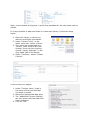
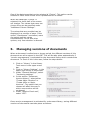
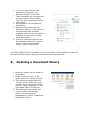
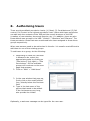
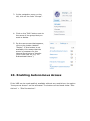
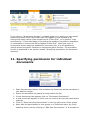
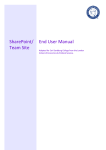
VRE User Manual Table of Contents 1. Creating a document library ................................................................... 2 2. Adding files to a document library ........................................................... 3 3. Creating a folder within a document library .............................................. 3 4. Adding information to the files in a library ................................................ 4 5. Managing versions of documents ............................................................ 6 6. Deleting a document library ................................................................... 7 7. Creating a subsite ................................................................................. 8 8. Authorising Users.................................................................................. 9 9. Creating and deleting User Groups ........................................................ 10 10. Enabling Autonomous Access............................................................. 11 11. Specifying permission for individual documents ................................... 12 12. Specifying permission for document libraries ....................................... 13 13. Editing a page ................................................................................. 14 14. Changing the horizontal navigational menu ......................................... 15 15. Changing the title of the site ............................................................. 16 16. Creating a Shared Calendar ............................................................... 16 17. Sharing bookmarks .......................................................................... 16 18. Receiving notifications about changes in the VRE ................................. 17 1. Creating a document library Text documents or images can be shared by creating a Document Library or a Picture Library. A "Document Library" can contain many different types of documents. A Picture library can only contain images. If a library ought to contain both images and other types of documents, the recommended practice is create a “Document Library”. Follow the steps below to create a Document Library: 1. In the upper left hand corner, click on “Site Actions”, and choose "New document Library". 2. In the window that appears, provide a name for the new library. Optionally, a description can be given to clarify the main purpose of the document library. 3. Under "Navigation", you can specify whether or not the new library should be displayed in the quick launch. If you select "YES", there will a link to this new library on the navigation menu on the left hand side of the screen. 4. Under "Version History", you can make specify that all versions of edited documents must be stored. If this will not be necessary, you can select "NO". This will evidently save storage space. 5. The document library will be created when you click on "Create". To create a Picture Library, do the following: 1. In the upper left hand corner, click on “Site Actions”, and choose "More options". 2. A new window will appear. In this new window, click on "Filter by > Library" 3. Choose the option "Picture Library". 4. Click on "Create". 2. Adding files to a document library Files can be added to Libraries by following the steps below: Open a Document Library, by clicking on name of the Library in the navigation menu on the left hand side of the screen. 1. Click on “Add Document”. 2. In the window that appears, select the document that needs to be uploaded by clicking on the button labelled “Browse …”. After the document is selected, click on “OK”. The document will become visible in the library. If necessary, multiple documents can also be uploaded simultaneously. 3. 1. 2. 3. 4. 5. Click on "Add Documents", and select "Upload Multiple Files". A new window will pop up in which you can navigate to a folder on your local computer. In this window, select the documents that you want to upload. It is also possible to select all the files in a certain folder. The files can be uploaded to the VRE after you have clicked on "OK". Creating a folder within a document library Firstly, open the document library. From the "Library Tools" menu in the upper menu bar, select "Documents". Click on "New Folder" Provide a name for this new folder in the window that pops up. Click on "Save". 4. Adding information to the files in a library For all the files in the document library, it is possible to add descriptive information. To do this, select the document and click on “Edit Properties” in the menu that appears. An alternative method is to click on the arrow that appears when you hover over the file name, and to select “Edit Properties” (see below). Next, a new window will appear in which the metadata for the document can be edited. It is also possible to add new fields in a document library. Follow the steps below. 1. Open the Library in which you want to record the information. 2. Under "Library Tools", in the upper menu bar, select "Library" 3. The menu bar underneath the "Library Tools" section will now change. From this list of option, choose "Library Settings", in the right hand side of the screen. 4. Under "Columns", select "Create Column". A new screen will appear. 1. Under “Column name”, type in the name of the new fiels that you want to create 2. Select the appropriate data type. 3. The “additional Column Settings” will vary along with the data type that is selected. 4. Click on “OK”. One of the data types that can be selected is “Choice”. This option can be selected if users must choose from a predefined list of values. When the data type “Choice” is selected, the lower half of the screen will change. The values that users can choose from can be specified under “Additional Column Settings”. The values that are provided can be displayed in a number of ways. If the option “Checkboxes” is selected, users can select multiple values simultaneously. In the two other options, only one selection is allowed. 5. Managing versions of documents When a document is edited over a longer period, the different versions of this document can all be stored in the VRE. This will be take place automatically if "version management" is activated for the document library which contains the document. To check if this is the case, follow the steps below: 1. Click on "Library" in the Library Tools menu in the upper menu bar. 2. Click on "Library Settings", in the upper right corner of the screen. 3. Under "General Settings", select "Versioning settings" 4. In the section "Document Version History", select either "Create Major Versions" or "Create Minor or Major Versions". The option that you choose will affect the way in which new versions will be numbered. 5. Under "Require Check out", select "YES". Once version management is activated for a document library, saving different versions of documents can take place as follows: 1. From the menu that can be opened by clicking on the filename, select "Check Out". Team members can now see that the document is being edited. The icon that represents the file will change. 2. Download the file and edit the document. 3. upload the file back into the document library. If the name of the document has not been changed, the new version will be saved as a new version of the same document. 4. Previous versions of the file can be opened by selecting "Version History" from the pull-down menu under the file name. N.B. When Office 2010 is installed on your computer, it also possible to edit the document online without having to download the document first. 6. Deleting a document library 1. Open the Library which needs to be deleted. 2. Under "Library Tools", in the upper menu bar, select "Library" 3. The menu bar underneath the "Library Tools" section will now change. From this list of options, choose "Library Settings", in the right hand side of the screen. 4. The setting for the Library will now be visible on the page. Under "Permissions and Management", select "Delete this Document Library". 7. Creating a subsite To create a new subsite, select “Site Actions” > “New Subsite” In the windows that follows, choose the option “Team Site”. Prove a title and a URL for the subsite. To make sure that the subsite has the same graphical interface as the main site, choose “Site Actions” > “Site Settings” > “Manage Site Features” (under “Site Actions”). In the list that appears in the next page, activate the “SharePoint Server Publishing” module. 8. Authorising Users There are three default permission levels: (1) Read, (2) Contribute and (3) Full control. Full Control is the highest permission level. Users with these permission can edit both the contents of the VRE and the overall structure of the VRE (creation of new subsites, document libraries, etc.). In addition, there are also three default user groups in the VRE: “Visitors”, “Members” and “Owners”. The three permission levels that were mentioned have been assigned to these three groups respectively. When new persons need to be authorised in the site, it is usually most efficient to add them to one of the existing groups. To add users to a group, do the following: 1. Depending on what the new user is allowed to do, select the appropriate group by clicking on “Site actions” (top right) > “Site Permissions”. All the available groups will be shown on the new page that appears. 2. Click on “New” > “Add Users” 3. In the new window that pops up, firstly click on the small booklet Icon, directly below the first text field. 4. Type in the last name of the person that needs to be added. If the list becomes very long, also provide the initials. Optionally, a welcome message can be typed for the new user. 9. Creating and deleting User Groups To create a new user group, in addition to the groups that exist already, follow the steps below: 1. Click on “Site actions” > “Site Permissions”. 2. Under “Users and Permissions”, click on “People and groups”. 3. In the navigation menu on the left, click on the links “Groups”. 4. In the screen that appears click on “New” > “New Group”. 5. On the last screen, provide a name for the group and specify what this group is allowed to do. To delete a group, follow the instructions below: 1. Click on “Site actions” > “Site Permissions”. 2. Under “Users and Permissions”, click on “People and groups”. 3. In the navigation menu on the left, click on the links “Groups”. 4. Click on the “Edit” button next to the name of the group that you want to delete. 5. On the new screen that appears, click on the button labeled “Delete”. If this button is not available, this means that the group is necessary for the internal functioning of the site (this is the case for e.g. “All Authenticatd Users”). 10. Enabling Autonomous Access If the VRE can be made publicly available without any restrictions, the option "Anonymous Access" can be activated. The button can be found under "Site Actions" > "Site Permissions". If you click on “Anonymous Access”, a window pops up on which you can specify what anonymous users (users that have not logged in) are allowed to do. Anonymous users can be given access to the “Entire Site”, or to specific “Lists and Libraries”. If the start page of the entire site needs to be publicly accessible, it is advisable to choose the option labeled “Entire Site”. Note that, even if anonymous access has been enabled for the entire site, it is still possible to restrict access to specific libraries or documents within the site. The procedure for this is explained in the section named “Specifying persmission for document libraries”. 11. Specifying permission for individual documents 1. Open the document library that contains the document whose permissions 2. 3. 4. 5. 6. you want to change. Select the document by placing a check before the file. In the document that appears click on “Document Permissions” A new screen will appear in which you can view all the current permissions settings. Click on “Stop Inheriting Permissions” in the top left corner of the screen. Next, edit the permissions of user group or of individual users, by firstly selecting them, and by clicking on “Edit User Permissions”. It is possible to assign different types of permissions, including “Full Control”, “Contribute” or “Restricted Read”. 12. Specifying permission for document libraries Permissions that have been defined for the site in its entirety are normally inherited by all the components of the VRE. Nevertheless, it is also possible to specify different access rights for specific components. To edit the access rights of a document library, carry out the following steps: 7. Open the document library. 8. Choose "Library Tools" > "Library". 9. In the menu that appears, click on "Library Permissions" in the right corner of the screen. 10. In the next window, click on "Stop Inheriting Permissions". 11. Next, make the necessary changes. You can click on a group or on an individual and select "Edit User Permissions" or "Remove User Permissions". When the site contains many Libraries with unique permissions settings, retaining a good overview of how access rights have actually been divided may become difficult. To see an overview, go the main site and click on “Site Actions” > “Site Permissions”. On this page you see the permissions levels that have been set for the entire site. When unique permission levels have been defined for specific Libraries, there will be link labelled “Show me uniquely secured content”. If you click on this link, a new window will appear on which all the Libraries with unique permissions are listen. If you click on the names of one of these Libraries, you can see how the access rights have been set for this Library. 13. Editing a page Edit a page takes place as follows: 1. Open the page that you want to edit. 2. Go to “Site Actions” in the upper left column of the screen and select “Edit Page”. Alternatively, select on the “Edit Page” Icon. 3. It is now possible to make change to the page. Text on the page can be changed, and it is also possible to insert images or hyperlinks. To add an image, for instance, move the cursor to the location where the image should appear. Click on “Insert” in the menu at the top of the page. Next, choose the option “Picture”. This will open a new screen on which you can upload an image from your computer, or in which you can navigate to a location in the VRE. When all the changes have been made, save the changes by clicking on “Save” in the upper right corner of the screen. 14. Changing the horizontal navigational menu On the home page of the VRE, it is possible to create links to subsites or to other locations within the VRE on the horizontal menu bar at the top of the screen. To add a new link, follow the following steps: 1. Click on Site Actions > Site Settings. 2. Under "Look and Feel", click on "Navigation". 3. On the page that appears, scroll down to "Navigation Editing and Sorting". 4. Click on "Global Navigation" and make sure that this option is selected (the selected item should be coloured light grey). 5. Next, click on "Add Heading". 6. A new window pops up in which you can enter a heading for the link (under "Title") , and in which you can specify the URL. If you want to link to a subsite of the VRE, you can click on "Browse" and navigate to the subsite in the menu that will appear. 7. Finally, when you click on "OK", the new link will be visible in the horizonal navigational menu. 15. Changing the title of the site The central title of the VRE, or of one of its subsites, will appear in the dark blue horizontal bar. To change the title, follow the steps below. 1. Choose “Site Actions” > “Site Settings”. 2. Under the heading “Look and Feel”, select “Title, Description and Icon”. 3. Provide the new title in the field that is labeled “Title”. 16. Creating a Shared Calendar 1. Click on “Site Actions” > “More Options”. 2. Under “Filter By”, choose “List” 3. Next, choose the option “Calendar”. Enter a name for the Calendar. To synchronise the shared calendar with your individual calendar in Outlook, select “Connect to Outlook”. 17. Sharing bookmarks The VRE can also be used to manage collections of links. To create a new list of bookmarks, do the following: 1. In the menu on the top right 2. 3. 4. 5. corner of the screen, choose Site Actions > More options In the window that appears, choose “Filter by Types" > "Lists" Select "Links" Provide a name for the list of URLS, such as, for instance,“Bookmarks”. Click on “OK”. A new URL can be recorded by firstly opening the list of bookmarks. Normally, this can be done by clicking on the name of the list in the navigation menu on the left. 1. Once the list is opened, click on “Add new link”. 2. In the window that appears, the URL and a brief description can be provided. 3. Some further information about the link can be provided under “Notes”. 4. Click on "Save" 18. Receiving notifications about changes in the VRE To remain informed of the changes in the VRE, so-called “alerts” can be created. This means that e-mails will be sent when certain activities have taken place. To receive notifications of changes in a document library, for instance, do the following: 1. Open the document library. 2. Click on Library Tools > Library (upper menu bar) 3. Choose "Alert Me" > "Set alert on this library" 4. In the window that pops up, you can specify how and how often the updates need to be sent: by mail or by SMS, or on an immediate, daily or weekly basis. Note that this possibility is not available by default to users who access the site via a guest account. If you are a guest user wishing to receive alerts, please send an e-mail to your contact person within the University Library.