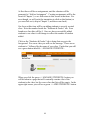
1
 User Manual
Version 1.1
Steve Joordens
Advanced Learning Technology Lab
University of Toronto Scarborough
www.peerScholar.com
www.stevejoordens.com
Contact for peerScholar Europe:
[email protected]
Table of Contents
Welcome to peerScholar!
………………………………… XX
Chapter 1: Setting the Stage …………..….………………. XX
1.1 Introduction to this Manual
……………..………………… XX
1.2 The Pedagogical Basis of peerScholar
1.3 The Basic peerScholar Process
……………………. XX
…………………………… XX
1.4 A Final Word on Learning Objectives
……………………. XX
Chapter 2: Creating and Populating a Class ………………. XX
2.1 Creating a Class and Adding Students
2.2 Adding Team Members
…………………… XX
………….........……..…………. XX
Chapter 3: Creating an Assignment ……………..…………. XX
3.1 Setting Up the Create Phase ………………………………… XX
3.2 Setting Up the Assess Phase ………….........……..…………. XX
3.3 Setting Up the Revise/Reflect Phase
2 ……………………… XX
Welcome to peerScholar!
My name is Steve Joordens and, along with my colleague Dwayne
Pare, we are the co-creators of peerScholar. We still both recall
the conversations we used to have in our office in which we shared
our “delusions of grandeur” with respect to watching the use of
peerScholar spread from our classroom to the world, and having a
positive influence on the future of education in the process. At that
time it was a deep hope, a wish that is now coming true, thanks
very much to forward thinking educators like you.
So please let me begin this manual with a sincere thank you for
you interest in peerScholar! It truly is a powerful education
technology that incorporates three processes long known to
positively enhance learning in a manner the exercise transferable
cognitive skills including critical and creative thought, selfreflective thought, and both productive and receptive
communication. In one sense there is nothing new about
peerScholar other than the fact that it now allows educators to
harness these powerful processes in a manner that is easy to use
and that actually saves, rather that costs, them valuable time.
The purpose of this manual is to show you how to create and
administer peerScholar assignments, and how to generate reports
and export marks once an assignment is complete. The basic
peerScholar process is simple one, and yet we have also tried to
make the tool both flexible and powerful for those who desire
something more than the basic peerScholar process. We have tried
very hard to combine power with ease of use, and we are confident
that you will soon feel confident in your ability to harness the
power of peerScholar in your classroom, or in whatever context
you choose to use it in.
3 Before getting started let me also mention two further points.
First, if you prefer to watch videos rather than read, I have also
created a set of videos that describe peerScholar in a manner that
directly parallels this manual. These videos can be found at
www.peerScholar.com, and I will also begin each section with a
URL specifically for the video related to that section. Second, I
have been told that my style of writing and speaking is somewhat
unconventional; it’s been call informal, folky, honest and real. To
me, it’s just me, and I really know of no other way to
communicate. So my hope is that you might appreciate this “style”
and that it might make this manual a little less dry than the typical
software manual.
OK, on with the manual! Thank you again, and let’s get at it!
Sincerely,
Steve for the entire peerScholar team
4 Chapter 1:
Setting the Stage
This chapter is intended to introduce you to this manual and to
peerScholar. It presents the context, purpose and structure
underlying the remainder of this manual and, critically, it also
provides the larger theoretical framework that guided the creation,
and that should also guide the use, of peerScholar.
I know some of you, though, are eager to play! If that’s you,
please feel free to jump straight to Chapter 2, which is all about
getting started in peerScholar.
5 1.1 Introduction to this Manual
peerScholar is a tool that was created to support a painless
transformation of learning from a process that focuses primarily on
the transmission of information, to one that also includes repeated
effective practice with the sorts of cognitive skills related to the socalled “transferable skills” that are often highlighted in documents
focusing on desired learning outcomes or “21st Century Skills”. It is
thus hard to imagine an educator using peerScholar to create an
assignment without that educator having a good sense of what skills
they feel are most important, and how to structure a peerScholar
assignment to give students the optimum practice with those skills.
Given this, in writing this manual I have two clear goals. One is my
desire to introduce you to all the various features in a manner that will
allow you to create and oversee peerScholar assignments and then
obtain desired reports and data when an assignment is complete. My
second goal is to make the connection between these features and the
cognitive skills they exercise clear, thereby helping you to maximize
the educational power of this tool.
But now allow me to take a step backward for a moment. The fact
that you are reading this manual likely implies that either you, or your
institution, has chosen to license peerScholar. In so doing you, or
your institution, receives more than just access to peerScholar. To get
the most out of this tool, and to facilitate it’s widespread use, we
recommend and support the following approach. Especially in the case
of institutional adoptions, we recommend that some individual be
identified, perhaps one that already helps with information technology
support, to become your certified peerScholar IT professional. That
individual, or individuals in a larger institutional adoption, will get
free access to our training course which is available at
www.peerScholar.com. The course is composed of less than 20 short
videos, videos that are publically available, but when used in
conjunction with our registration and assessment modules will give
your IT professional formal certification. This will allow your
peerScholar certified IT professional a direct line of communication
with the central peerScholar support team. In a sense they will
become an extension of our team.
6 Once a certified peerScholar IT professional is in place, that
individual – or individuals – will serve as the primary point of contact
for your institution. Any colleagues who are using peerScholar, or are
considering using peerScholar, would interact with your local
professional who, given their training, should be well equipped to
provide virtually all the support that is needed. However, in cases
where an educator wishes to use peerScholar in some highly exotic
manner, or if potential bugs are discovered, the IT professional would
serve as the intermediary, bringing any such issues directly to the
central peerScholar team, and transmitting the responses or
suggestions back to the educator.
Thus the role of the peerScholar certified IT professional is twofold.
First they provide basic support to both new and experienced users,
likely serving as the first point of contact for new users. Second, they
provide the communication link that connects the institution to the
larger peerScholar support network.
In addition to providing basic user support, the central peerScholar
team also hope to provide intellectual nourishment. As we have seen
repeatedly, once passionate educators begin using peerScholar they
find creative and powerful ways to use it, and the impact of those
ideas is enhanced when they are shared and celebrated. Thus we have
also created, and continue to enhance, a website accessible off of our
main peerScholar.com website that is designed to support the larger
community of peerScholar users, a place where you can meet other
users, share challenges, share assignment ideas, and generally enjoy
the positive exchanges that are core to any community.
This manual, then, is one part of a larger set of supports. It is a great
place to begin, but to truly get the most of our peerScholar it should be
used in conjuction with interactions with your local peerScholar
certified IT professional and with the larger peerScholar user
community.
The manual itself is composed of four chapters, this one included.
The first chapter introduces you to this manual, and to the pedagogical
basis of peerScholar. The second chapter shows you how to set up a
course, and add students. The third chapter is all about setting up an
assignment, walking you through the features and explaining the
7 various assignments that can be created when these features are used
in certain combinations. Finally, the fourth chapter focuses on
managing an ongoing assignment, and then generating or exporting
data once an assignment is complete.
Structurally, the organization of this manual mirrors that of the videobased course available at www.peerScholar.com. As such, one highly
effective manner of learning peerScholar is to first read a section of
this manual, and then to view the associated video to both review the
material and see it play out within the program.
1.2 The Pedegogical Basis of peerScholar
Before I set up the Advanced Learning Technology lab at the
University of Toronto most of my research focused on the basic
processes and structures of human memory. In many ways the ALT
lab is an applied extension of much of what I had learned as a student
and researchers of memory. One specific fact is highly relevant to
peerScholar and the role it can play with respect to enhancing
education. That fact is this; although we speak of memory as though
it were a single system, humans have different systems for acquiring
information versus acquiring skills, and those systems require very
different learning experiences to function effectively.
Information, such as the core content or most courses, can be
effectively learned via mere exposure to that information, as long as
the student is sufficiently engaged and the information is presented in
a structured and comprehensive manner. By using a good text, that
embodies a coherent curriculum, especially as presented by a
passionate and effective teacher, a student can learn a great deal about
the facts, theories, important figures and events, etc, that define the
subject area of some course.
However, educators are increasingly under pressure to teach more
than just the core content area of their courses. They are being asked
to also teach the sort of transferable skills – the so-called 21st Century
Skills – that will help their students succeed in general. Often these
skills are specified in terms of specific learning objectives and these
8 objectives vary somewhat from one specification to another, but
certain core skills reappear consistently. These core skills include
teaching students to think critically, creatively, and reflectively while
also teaching them strong communication skills including expressive
writing and speaking, but also including receptive communication
skills. That is, the ability to critically listen to others, especially when
those others are trying to give suggestions or advice.
Skills, however, cannot be learned by simple exposure. Instead, one
only learns how to do something by doing it, repeatedly, preferably
within a structured environment that provides immediate feedback on
performance. For example, imagine you would like to “learn piano”.
You can learn a lot “about” playing pianos by reading books, or
listening to a piano teacher. They can teach you how the keys relate
to notes, they can show you the patterns of certain scales, etc. You
can gain the information quite easily. But if instead you want to be
able to “play” piano, no book or teacher will suffice. You must
simply start to play, poorly at first but with increasing practice the
skill becomes more fluent and more natural. This is how skills are
learned, and this is the sort of learning peerScholar is aimed at
supporting.
In fact, I think this is why so many educators are frustrated by the
desires put on them to teach 21st Century Skills. It is not that they do
not appreciate the relevance of those skills but, rather, it is more a
question of how. Given the time already spend on the core course
content, how are they to find the time and resources needed to add in
the sort of repeated effective practice that is required to build up a
skill base? Does their whole approach to education have to change,
and what exactly should this change look like?
peerScholar provides a concrete answer to this “how?” question, one
that does NOT require major modifications to the existing curriculum.
By employing peer and self-assessment within a formative learning
context, the peerScholar process naturally requires students to think
critically and reflectively, and to both communicate their creative
ideas to their peers and to evaluate and appropriately react to the
feedback provided by their peers, and it does so in a structured
environment. The best way to appreciate this claim is to consider it in
the context of a typical peerScholar assignment.
9 1.3 The Basic peerScholar Process
peerScholar assignments are composed of four sequential phases.
Most of the specifics about what happens within a given phases can be
configured by the educator and thus we be discussed more generally
here. Details about setting up a phase in specific way will be left to
Chapter 3.
The sections that follow describe the general peerScholar process. To
connect this process to the “skill development” claims made above I
will, at times, emphasize the skills being practiced by noting them in
parentheses after describing some aspect of the process.
The Create Phase. In the first phase of a peerScholar assignment
students are asked to submit some type of digital assignment as
defined by their instructor. It could be a written assignment, a video,
an image or a piece of music (expressive communication of whatever
sort is desired). In fact, one of the nice things about peerScholar is
that it allows very unconstrained, open-ended assignments and
perhaps the best assignments are ones that push a student to think
creatively (creative thought) or critically (critical thought). Whatever
skill the assignment exercises in the student, that exercise will be
amplified through the remainder of the assignment process.
Most instructors include some form of evaluation rubric with their
assignment. As will become important, evaluation – and the critical
thinking skills associated with it – are central to peerScholar
assignments so providing a good sense of how assignments will be
evaluated right from the start sets the stage well for the remainder of
the assignment.
Thus, students are given the assignment and the rubric and are asked
to submit their assignment, via peerScholar, by a specified due date
and time. Optionally, they can also be asked to self-assess their
submission at this or in any of the subsequent phases (self-reflection).
The Assess Phase. At some point after the assignments have been
submitted the assess phase is opened. When students log in to the
assess phase they are presented with an instructor-specified subset of
10 randomly selected and anonymously presented peers submissions.
Their primary task is to evaluate these submissions in a manner the
provides each peer with a sense of the quality of their work (critical
thought, effective communication) and at least one well-presented idea
about how that work could be improved (creative thought, effective
communication). As they work through these pieces they must
contrast and compare to ascertain quality, and their own submission is
available to them through this process. Thus critical thought and selfreflective thought come together as students not only see how their
work compares to that of their peers, but also get clear ideas about
those aspects that distinguish higher quality work.
Instructors have a lot of freedom with respect to determining how
students provide feedback to their peers. One strong suggestion
though is that they be asked to provide at least one written comment
that is aimed at giving each peer specific and rich advice about at least
one thing they could do to make their work better. This sort of
feedback exercises critical thought (of all the possible problems with
this piece what is the largest problem?), critical thought (OK, now
that I know the problem, how do I think it would best be remedied?),
and expressive communication (now I must express my suggested
improvement in a way my peer understands and values). In addition,
it also enhances the general feeling of community in a classroom as
students are not helping each other improve their work.
Again, students can be asked to self-assess (self-reflection) their work
after having just assessed the work of their peers. There is a point
here worthy of emphasis. Yes students will get a grade and various
forms of feedback within peerScholar, just as they do in other
assignment contexts. However, there is something much more
palpable, much more personally, about seeing your own work in the
context of peer work, especially in an evaluative situation. Getting a
C is one thing, clearly seeing that your work is average at best, and
directly seeing submissions that are clearly better than yours, can be
more informative that any grades or comments might be.
Students must complete their assessments by some specified due date
and time. In all other phases, an instructor can choose to allow
students to submit late, but for the assess phase students MUST
complete their assessments on time.
11 The Reflect/Revise Phase. The next phase can play out in two
distinct manners that result in fairly different assignment types. The
critical distinction is whether or not students are allowed to submit
revised versions of their assignment. Generally speaking, we
recommend allowing revision and resubmission as doing so results in
a true formative experience whereby students immediately use the
feedback they receive to improve their work, but doing so requires
some expert, the instructor or a teaching assistant, to provide
comments and grades at the end of the assignment. Thus there are
resource implications, although these are not more – and are typically
less – than those associated with a typical essay type assignment.
However in some contexts it is this ability to exercise all of these
cognitive skills WITHOUT resource demands that makes peerScholar
especially impressive. Thus both types of assignments are supported.
Regardless of whether one is using the “with” or “without” revision
assignment type, the first step in this phase is identical. Once the
phase opens students see the comments and assessments that their
peers provided for their draft submission. They are typically
instructed to move from peer to peer, reading the feedback carefully
(receptive communication) and assessing how useful they feel the
feedback is with respect to helping them improve their work (critical
thought, self-reflective thought) by choosing either “not useful, useful,
or very useful” from a pull down menu.
When a “without revision” assignment type is used the process can
end here, with students receiving a grade that is equal to the average
of the peer grades given to their work. In research from our lab we
have shown that as long as this average is composed of at least four to
six peer ratings then it is as reliable as a single grade provided by an
expert grader (See Pare & Joordens, 2008). If the instructor wishes
though, they can also add another feedback-informed self-assessment
(reflective thought) step which would prompt the students to provide
the grade that they now think there original draft deserved.
Once again, the primary advantage of the “without revision” approach
is that is does not require the educator to assess the students’ work
directly. Thus one can give students practice with all of the
highlighted cognitive processes in manner that is extremely time and
12 resource friendly. This can be a major advantage when peerScholar is
used in very large classes, wherein resource and time demands can be
logistically crippling, or in situations wherein an educator wants their
students to complete, say, weekly assignments to maximize their
thinking and communication practice.
Alternatively, after they have assessed the feedback from their peers,
students can then be given the opportunity to revise their draft with
the aiming of using the feedback to improve their work (self-reflective
thought, expressive communication). This is a true “formative
assessment” context, and a great deal of research has shown that
students both appreciate, and learn a great deal, when they are given
the opportunity to use timely feedback to improve their work. In
terms of maximizing the educational benefits of a peerScholar
assignment, this is the preferred assignment type.
After students submit their revision they can then be asked to selfassess. In the “with revision” assignment type they are typically
asked to make two self-assessments. First they are asked to rate the
quality of their initial draft, and then they are asked to rate the quality
of their final submission. This enhances the kind of self-reflection
students are engaging in because they are not just assessing the quality
of the given pieces, but they are also thinking about their learning
process by documenting their perception of the learning that has
occurred.
As a final step students, regardless of assignment type, can be asked to
write a short reflection piece defined in whatever manner the
instructor wishes. In my class I typically ask students to use this
reflection box to justify why they revised their work in light of some
comments but not others. My intent is to have them combine selfreflection and critical thought as they provide this justification.
1.4 Final Thought on Learning Objectives
Hopefully the previous two sections have convinced you that, simply
on the basis of what students are being asked to do, peerScholar
assignments exercise the kinds of cognitive processes related to our
13 most desired learning objectives, especially those related to critical
thought, creative thought, self-reflective thought, and both expressive
and receptive communication, and that is does so within a context that
is powered by collaboration and mutual support. Of course is does
this using an internet-based digital tool, meaning that students are also
gaining experience with some of the more technical skills often
associated with 21st Century Learning. The exercising of these skills
is a direct result of the assignment process and thus occurs for every
peerScholar assignment, regardless of the actual specifics of the
assignment itself.
However, an educator can also enhance exercise with a given skill, or
even introduce new skills to be exercised, by carefully considering the
specific assignment they give to students. In fact, whatever skills are
needed to perform the exercise are significantly amplified by the basic
peerScholar process, transforming a good assignment into a great one.
For example, while peerScholar does require students to think
creatively when they think about how a given piece of work could be
improved, what is an educator really wanted to make creative thought
the centerpiece of their assignment? Well, as assignment in which
students are told about some fictional product, and are then asked to
script a short commercial that they think would sell the product.
Clearly this assignment asks them to think creatively, which is the
original purpose, but notice that they will then also be assessing the
creativity of their peers, and then they will be considering their peers
comments about their creativity. Thus, creative thought will be what
all the thinking and communication revolves around, amplifying the
intent of the original experiment.
Of course this also means that an educator could introduce any
learning outcome and have the skills underlying it exercised
powerfully using peerScholar. Perhaps an educator wants their
students to learn to interpret graphical representations, in which case
the assignment would ask them to do just that, and all of the
subsequent thinking and communication would amplify that exercise.
Thus the basic peerScholar process always exercises that skills
associated with our most desired learning objectives, and in the right
hands a peerScholar assignment can be used to exercise the skills
related to virtually any learning objective.
14 Chapter 2:
Creating and Populating a Class
A given educator may be teaching several classes with different
students, and may wish to have peerScholar assignments for each
class. They may also be working with teaching team members
who they wish to associate with given classes. This chapter
describes how to create new classes, and how to populate each
class with students and team members.
NOTE: This chapter assumes that the educator already has an
account, and has been associated with a specific school, within
peerScholar. Typically this account is created at the time of
product registration. However, when an educator begins using
peerScholar for the first time within an institution that has a
license, they may need to contact their local peerScholar IT
support team to get set up.
15 NOTE: If your institution uses a learning management system (LMS) and if
peerScholar has been integrated with that specific LMS, then Section 2.1
will be unnecessary as classes and students will be automatically configured
by the system. However, the system will not automatically configure team
members, so Section 2.2 may remain relevant.
Related to this, because we will soon have peerScholar integrated with all
LMSs, and because doing so will render everything described under Section
2.1 irrelevant, some of the interfaces you will encounter as you go through
Section 2.1 are not as attractive as they could be. It seemed
counterproductive to put a lot of time, energy and resources “cleaning up”
parts of the system then will soon disappear completely. We hope you will
tolerate this short-term inelegance with our apologies.
2.1 Creating Classes
Instructors log in to peerScholar by entering their username and
password as www.peerScholar.ca. When they log in they will first
come to a Dashboard that displays announcements they have made to
their classes, and a calendar showing upcoming peerScholar deadlines.
This page can be returned to at any time by clicking on the
“Dashboard” tab.
If an educator has not yet set up any classes then they will see a grey
button labeled <+ ADD A CLASS> just to the right of the Dashboard
tab.
When this button is clicked the user is prompted to enter a name for
their class and to then click the <Create> button.
16 Once entered, that name then becomes a tab displayed just to the right
of the Dashboard tab.
Multiple classes can be created in this manner, with each new created
class resulting in another class tab. Eventually a given educator will
have one tab for each class in which they are using peerScholar.
When any of these class tabs is clicked on it opens up the class
window with the “Assignment” tab foregrounded, and the “Student &
Grades” and “Reports” tabs backgrounded.
17 At first there will be no assignments, and the educator will be
prompted to “Add an Assignment”. Creating assignments will be the
focus of Chapter 3, so we will return to this screen at that time. For
now though, we will resist the temptation to click on that button (or
you can click on it, skip to Chapter 3, and then come back).
Our focus at this time will be on adding students to a newly created
class. Note the number beside the “Students & Grades” tab. For a
brand new class this will be 0. Once we have successfully added
students to our class it will change to reflect the number of student
added.
Click on the “Students & Grades” tab to bring that screen to the
foreground. For a new class you will see the message “There are no
students in “ followed by the name of your class. Under that you will
see a green button labeled <+ MANAGE STUDENTS>
When you click the green <+ MANAGE STUDENTS> button you
will be taken to a page that will eventually contain a list of the
students in the class, but for a new class that list will be empty. In the
upper right corner you will see a green <+ ADD STUDENTS> button.
18 When you click on the green <+ ADD STUDENTS> button a window
will open. The left portion of the window is titled “Step 1” and the
right portion “Step 2”. We’ll be focusing on Step 1 for now. Note
that the portion under Step 1 contains two tabs labeled “Enter Students
Manually” and “Import User List (CSV file)” respectively.
Manually Adding Students. If you have a fairly small class you may
wish to enter your students one at a time, which you can do by
keeping the “Enter Students Manually” tab foregrounded, and filling
out the appropriate fields in the form that makes up Step 1. Please
keep in mind that the “Username” and “Password” that you enter will
19 be what that student will use to log on to the system, and you will
need to communicate that information to the students at some point.
Also keep in mind that each username must be unique; the system will
not allow you to repeat a username or an e-mail address for different
students.
When you are finished entering a given students information click on
the green <+ VERIFY USER(S)> button at the bottom of the form.
When you do so it will check to make sure the username and e-mail
address are unique and, if so, it will then add the student to a list that
will form under the “Step 2” portion of the window.
Continue adding individual students in this way until all students have
been added and verified under “Step 2”. Then click on the green
“Done” button located at the bottom of the “Step 2” portion of the
window. This will result in a list of the added students along with
their usernames and passwords. You can print out this list if you’d
like a record of the student information.
20 Importing a Student Classlist. For any reasonably large class it
makes more sense to simply import a classlist of student names and
information rather than entering each student’s information
individually. Before getting into the details of how to import the
classlist, let’s first discuss the classlist file itself. peerScholar expects
an “excel like” classlist file that has common separate fields (i.e., a socalled CSV file”. If you are acquiring your classlist from an LMS,
take a good look at the name of the file that is created. Some LMSs
create long and complex file names that include many special
characters. If this is true of your file, please resave it with a
straightforward name to insure a smooth import. Also, make sure that
the file that is being imported includes separate columns for the
students last name, first name, identification number, and hopefully
(but not necessarily) also includes other columns like e-mail address
and perhaps an LMS username. While you are looking at the file also
take a look at the top row and note whether it contains actual student
information or headings that explain the student information below it.
Usually the latter is true, but you will need to know. Taking a
moment to verify these things before importing can save many easilyavoidable annoyances.
21 To begin the process of uploading a classlist, start by clicking on the
“Import User List (CSV file) tab. When you do so the portion of the
window under Step 1 will change to a smaller form.
The form asks you to first specify the role for the individuals you will
be adding. When adding a student list, the default “student” role will
suffice, so no change is needed.
Just below that is where you tell peerScholar where you classlist file
is. Simply click on the <Browse> button, and locate and select your
file.
Just below that the form asks you whether to “Ignore top/title row?”
of the CSV. Again, usually you do want to ignore this top row as it
contains labels and not real student information, so then you simply
check that box.
Finally it asks you to specify which of your courses this is a classlist
for. It will default to the course you came into this window from, and
that’s usually the one you want. But if you want to batch upload
different students lists for different courses one at a time, you can do
22 that by simply repeating the process described in this section,
choosing the appropriate class and classlist each time through.
When you have all that information specified, click on the green < =>
IMPORT> button at the bottom of the Step 1 portion of the window.
When you do so, the contents of the Step 1 portion of the window will
change to a form that will allow you to map columns of your CSV file
onto variable names that peerScholar users.
In most cases this mapping should be straightforward. For “First
Name” for example, simply click on the pull down menu to see a list
of the column names from you CSV, and choose the one that
corresponds to the students’ first names. Do the same for “Last
Name”, although obviously choosing the column that lists the last
names. Jumping to the last one, do the same for “Student ID”,
choosing the column that corresponds to the student numbers. If you
have a column with e-mail addresses, then also point peerScholar to
that column for the E-mail Address field, but if you don’t have e-mail
addresses or prefer not to link them to peerScholar, leave that as is.
The most important fields are the Username and Password fields.
Whichever columns you choose for each of these will respectively set
23 the Usernames and Passwords that students will use to log into
peerScholar. It is very important that usernames be unique, so if you
do know student e-mail addresses, they make great usernames (and
yes you can choose map the same column to BOTH username and email address). Otherwise, if one of your columns includes an LMS
username for each student, that also would make a good username
choice. I typically choose the LMS username column for Username,
and then choose the column with student numbers as the initial
Password. I find that easy to communicate to students and, of course,
they can reset their password as soon as they log in. You can also
have student number (also a unique identifier) as BOTH Username
and initial password. Finally, if you like, you can generate your own
column and append it to the CSV file before importing, then you can
specify that column as your Username and/or Password.
Note that as you choose columns the “Example” portion of the
window populates with the first students’ student information to give
you a clear sense of the mapping your are specifying.
Once you are happy with the mapping you have specified click on the
green <+ VERIFY USER(S)> button. Doing so will result in the table
under “Step 2” being populated with your list of users.
24 Under the list you see two options for getting this information to
students. The first (default) option is to show a list to you that you
can print and then transmit to students however you like. The second
option is to e-mail the username and password to each student.
Although this second option sounds tempting, our experience suggests
that it is only a good idea if (a) you have an e-mail address on record
for every student, (b) you mapped that e-mail field correctly in the
previous step and (c) you are sure that the e-mail address you have on
file for a student is one they actually use. Often one of more of these
is uncertain, so more often than not it is best to leave the “Email
username and password to users” option off.
When you are ready to complete the import process click on the green
“Finish and Add Users” button on the bottom of the Step 2 portion of
the window. When you do so you will see an admittedly uglyish list
to student names (see the Note that started this section) that you can
copy and paste into some other file or do with as you please. When
you are done, click on the <Done> button at the bottom of the list, or
just click the large X in the upper right corner to close the box.
25 Confirmation. Regardless of whether you entered students manually
or used a CSV file import you likely want to confirm that what you
did worked. You can do that by clicking on the relevant class tab.
Once again the “Assignments” tab will be foregrounded, but the
number you now see beside the backgrounded “Students & Grades”
tab should correspond to the number in your class, and if you click on
that tab you can see a list of the students and their information.
2.2 Adding Teaching Team Members
Educators sometimes have other individuals like student teachers or
teaching assistants who may assist them with the administration or
grading of assignments. This section of the manual shows you how to
set up accounts for these team members, and how to associate them
with a specific, already created, class.
Sometimes this is done as a first step that enables other possibilities.
For example, when discussing the Advanced Options in Chapter 3, I
will describe how one can subdivide a class into smaller groups and
then associate a given team member with a given subgroup. When
this is done, that team member then only sees their subgroup, which
can make tasks like grading much more efficient. However, in order
to do something like that, the team members first need to be
recognized by the system and associated with a class, and that is what
I’ll show you how to do here.
26 You can begin this process from anywhere within peerScholar. Just
above the course tabs you’ll see some other menu options, and the one
we are interested in here is the one labeled “Manage”. When you
mouse over that label you will see a list of different things you can
manage including “My Team Members”. If you then mouse over that
you will see you list of courses.
To associate team members with a specific course, click on that course
from the list. When you do, a new window will open.
Click on the green <+ Add Team Members> button. When you do
you’ll see a window that looks just like the one we used previously to
add students to your class in Section 2.1. The left portion of the
window is titled “Step 1” and the right portion “Step 2”. We’ll be
focusing on Step 1 for now. Note that the portion under Step 1
contains two tabs labeled “Enter Students Manually” and “Import
User List (CSV file)” respectively.
27 Typically we only have a small number of team members associated
with a given course, so the “Enter Students Manually” tab will
typically suffice. By filling out the fields for the form we will be both
creating accounts for our teaching team and associating those team
members with the course we specify.
The first field asks you to specify a role, and here we want to specify
“Teaching Assistant”, which is the default when you come here
through the “Manage Team Members” pulldown. If you believe this
team member may already be in the system you can type their name in
the search box and see if their information comes up. If so, you can
just use it, choose the course you now want to associate them with. If
they are not yet in the system, then you need only to fill in each field.
Once again though, keep in mind that the Username and Password
you specify will become that individuals peerScholar username and
their initial password, and it is necessary that usernames be unique.
Often using their e-mail address as a username assures uniqueness, but
you are free to choose what you like. Whatever you choose as
28 username and password, remember you’ll have to communicate that
information to the team member.
When you are finished entering a given team member’s information
click on the green <+ VERIFY USER(S)> button at the bottom of the
form. When you do so it will check to make sure the username and email address are unique and, if so, it will then add the team member to
a list that will form under the “Step 2” portion of the window.
Continue adding individual students in this way until all students have
been added and verified under “Step 2”. Then click on the green
“Done” button located at the bottom of the “Step 2” portion of the
window. This will result in a list of the added students along with
their usernames and passwords, just as you saw when entering
students. You can print out this list if you’d like a record of the
student information.
29 Chapter 3:
Creating an Assignment
We designed peerScholar to be easy to use while also
allowing educators to flexibly create assignments with the
settings and process that best suits their educational goals.
This chapter walks you through the process of setting up
whatever kind of assignment you prefer.
At times I will go a little beyond a simple description of the
settings you can choose and will briefly tie them into some
educational principles and best practices.
30 3.1 Creating an Assignment
There are two ways to create an assignment within peerScholar. An
assignment can be created “from scratch”, with the educator essentially
beginning with a blank slate and specifying all aspect of the assignment
by choosing to turn certain features on or off, or by specifying various
other parameters. Alternately, one can choose an assignment from an
ever-growing, crowd sourced library of assignments and then either use
it “as is” or tweak it to fit their needs.
However, in order to use library assignments well, it helps to have a
good understanding of the parameters that can be changed, and what
specific settings of those parameters imply in terms of the ultimate flow
of the assignment. With this in mind, I’ll first walk you through the
process of creating an assignment from scratch and, once through that,
we will revisit the notion of beginning with a library assignment.
As a starting point, log into peerScholar and then choose one of your
course tabs. If there is currently no assignment in that course tab you
will see a message that says “There are no assignments for”, followed
by the course name. Underneath that you’ll see a green button that
reads <+ Add an Assignment>.
If the course already has some assignments in it, those assignments will
be visible and the green <+ Add an Assignment> button will be to the
upper right.
31 In either case, the first thing to do is to click on that button. When you
do so you will see an “Add New Assignment” pop-up box that asks you
to choose whether you wish to <Create New Assignment> or <Use a
Library Assignment>. We will revisit the use of library assignments
near the end of this chapter so, for now, click on <Create New
Assignment>.
This will populate the assignment tab of the specified course with a
new “assignment bar”. It will be waiting for you to give your
assignment a name. Type in a name, and then click on the green <Save
& Continue> button that is located at the upper right of the assignment
bar, just left of the <X> you would use to cancel the new assignment if
you wanted to.
32 The window that then appears is the primary interface for creating
assignments. It’s important that you come to know it well, so I want to
begin by slowly walking you through it. The title of your assignment is
written along the top, you can modify that at any time. Most of the
action will happen below that line and one can think of that area is
being composed of two parts. The larger box to the left is the place
where we will be specifying parameters and making decisions. The list
of items in the right margin specifies what component of the
assignment we are modifying, and it is organized in a very specific
way.
33 So let’s focus in on that right margin. It is essentially split into four
sections as suggested by the horizontal lines. The first section includes
only the “Assignment & Dates” link, is what we will use to define the
overall assignment. The second section includes the “Create”,
“Assess” and “Reflect/Revise” links, and these will be used to define
the student experience supported by the assignment. The third section
includes the “Grading Options” and “Advanced Options” links, and this
section relates to how we want to administer the assignment behind the
scenes. Finally, the fourth section includes the “Preview”, “Save”,
“Save and Finish” and “Cancel” buttons that will allow us to see the
effects of our changes, save our changes, or quit making changes.
34 peerScholar assignments can be thought of as three sub-assignments
conducted within the context of some larger overall assignment. That
is, the Create, Assess and Reflect phases all have their own individual
tasks that students must perform, but all are performed in the context of
some larger overall assignment. Thus the first thing the educator must
do is decide what that overarching assignment is, and then provide the
students with the information and resources they need to do it well.
They also need to specify
This is what the “Assignment & Dates” link is all about. When you
click on that link the area to the left opens up the “Assignment and
Media” definition screen. The text box is where the educator describes
the over-arching assignment to the students, without worrying about the
details of the Create, Assess or Reflect/Revise phases. What is it that
students are supposed to be doing in this assignment?
The “Add Media” icons above and to the left of the text box allow the
educator to supplement the written instructions with an image, video
file, audio file or any other digital file (e.g., a PDF reading the students
must react to). They work in the typical “browse” manner in the sense
that clicking on an icon calls a pop-up box that allows one to browse
their computer and choose the file they wish to attach.
Above and to the right of the text box are two other optional
attachments labeled “Add Graphic Organizer” and “Add Rubric”
respectively. Graphic organizers are planning sheets the students can
use to help the plan out their assignment before actually beginning it,
and peerScholar comes preloaded with a large number that can be
35 browsed through and chose by clicking on the “Add Graphic
Organizer” button.
Of all these potential additions to the assignment text, the “Add Rubric”
is likely the most important for a peerScholar assignment. Given that
students are going to be assessing one another, and then reflecting on
the assessments peers attached to their work, it is important that the
basis of all assessments be made clear, and there is no better place to do
that than at the outset of the assignment. Some educators like very
specific rubrics, while others prefer rubrics that intentionally leave
more room for interpretation. In addition, the details of a rubric often
depend on the specific assignment students are being asked to do. So,
unlike the graphic organizers, there is not a set of pre-created rubrics
that one can just choose. Rather, we suggest that the educator create
their own rubric – which is simply a clear presentation to students of
what is expected and what will be assessed – and then they save that
rubric as a PDF. Then by clicking the “Add Rubric” button, one can
then browse to, and choose, the created Rubric.
It is important to note that once the educator has defined the
overarching assignment then it, and all of the other files associated with
it, will be available to the students at all stages of the assignment.
Just to make the distinction between the “overarching assignment” and
the information we will be entering in the Create, Assess and
Reflect/Revise phases clear, let me suggest an overarching assignment,
36 and then build off of it in my discussion of the subsequent stages of
assignment creation. An overarching assignment could be something
like the following.
As specified by the advertising expert who came to our class,
many advertisements do not give much information about the
product at all but, instead, simply associate the product with
various other positive stimuli to make us “like” it. Your
assignment is to look at some advertisements on YouTube, find one
that you think fits this “positive association” notion well, then
submit the link along with your analysis of what those associations
are and how they might sell the product.
Of course, this is a peerScholar assignment so after you submit
your analysis you will assess analyses submitted by some of your
peers, and then you will see the assessments you peers associated
with your work. Be sure to consult the rubric carefully when
creating your analysis because this is the basis upon which you
will both assess your peers and be assessed by them.
Note that there is no need to get into details about exactly what the
students is expected to do within each phase, there will be an
opportunity to do that in the sections that follow.
The only remaining thing to do in the “Assignment & Dates” section is
to specify the open and closing dates and times for the various phases
of your assignment. By scrolling down within the box to the left you
will see the area where this is done. Using a calendar tool and drop
down time choices you specify two dates and times for each phase;
when you want that phase to become available, and when you want it to
close.
37 Note that you also can choose to allow late submissions for the Create
and Revise/Reflect phases, but NOT for the Assess Phase. The basic
algorithm underlying peerScholar requires that once the Reflect/Revise
Phase begins, students can no longer submit assessments. This point
must be made clear to students, and sometimes the easiest way to be
clear is not to allow late submissions in any phase. That decision is
yours. But peerScholar can handle late Create submissions and late
Revise/Reflect submissions without problem, it’s more a question of
the culture you want to create.
One tip is the following. Especially for your first few peerScholar
assignments, leave a space of a day or two between phases. Then if
some students haven’t completed the work you can bump back the due
date of the previous (closed) phase and give students a second chance
to do their work immediately. As long as the next phase has not begun,
you can move back the due date of the previous phase, even for an
ongoing assignment.
38 3.2 Setting Up the Create Phase
Now that we have the overarching assignment defined, the next step is
to give students more specific information about what is expected of
them during each phase, and to define exactly how you want each
phase to run.
In terms of providing specific information, think of it in the following
manner. When students log in to do a specific phase, the first thing
they will see is the instructions you provide to them about that specific
phase. What do you want them to do in this phase? At the same time,
two buttons labeled “Assignment” and “Rubric” (and, if you chose to
use it, a third one labeled “Graphic Organizer) will always be present,
and students can click on them any time to be reminded of the overall
assignment and assessment rubric. So the overarching assignment is
always available, but it is the specific details of what they are to do now
that are in the forefront.
In keeping with this, when you click on the “Create” link the first thing
you see at the area on the left is a text box for you to give your students
any specific “Instructions & Tips” particularly with respect to this
phase.
39 So you might say something like …
Before doing anything, first click on the “Assignment” button and
re-read the overall assignment, then click on the “Rubric” button
and remind yourself about how your work will be assessed. With
these things in mind, check out a number of different
advertisements on YouTube. Don’t just pick the first one you find
because your analysis will be better if you can find an ad that
gives you a lot – or better yet something unique and interesting –
to talk about. So look at a few, think about analyzing each, then
choose the one that will allow you to show your understanding the
best.
You may also wish to emphasize due dates and any policies you have
with respect to late submissions or the like, but again, keep it focused
on the Create Phase.
Once you have written your “Instructions & Tips”, scroll down to see
the other things you can choose or activate in this phase. The first of
these is entitled “STUDENT SUBMISSION TYPE” and it is a pull
down menu that allows you to specify what it is you want your students
to submit.
peerScholar was originally created as a tool for supporting writing, but
it is not constrained to written submissions. If you prefer, you can ask
your students to submit an image, a file, an audio file, or even a video
file. Again, the default of “Written Assignment” is most common, but
we leave it to your imagination.
Your final option for the Create Phase is whether you want to enable
self-assessment at the end of this phase. If you turn self-assessment on,
then after students submit their composition they will be asked to
40 perform some sort of assessment of that composition. The textbox
under the title “Self Assessment Question” allows you to specify
exactly how or what you want them to self-assess, but a typical selfassessment question would be something like “Now that you’ve
submitted your work take another look at the rubric. What mark do you
think your work deserves?”
Of course the goal of self-assessments is to encourage students to
reflect on the quality of their work and, as you’ll see, you can enable
them in every phase if you wish. Our research, however, suggests there
is some risk to enabling it in this first Create Phase. That is, students
have a tendency to overestimate the quality of their work, so they give
it a high grade. This high grade then constrains the range of grades
they give to peers. So our advice is the following. If you have a good
reason for enabling self-assessment in the Create Phase, go for it. But
if you don’t have a good reason to do it in the Create Phase, it might be
better to not do it, and do it instead in one or both of the subsequent
phases.
That’s all there is to do with respect to setting up the Create Phase. By
the way, it’s always a good idea to save your work from time to time,
so why not hit the green “SAVE” button at this point.
3.3 Setting Up the Assess Phase
The Assess Phase is the engine that really drives all of the pedagogical
power of peerScholar. This is where students will exercise the analytic,
comparison, evaluation and categorize skills so important to critical
thought, and also where they will be pushed to effective communicate
their creative ideas for improvement. There are a number of options
41 related to this phase, so let’s go through them and make sure all are
clear.
To start then, let’s click on the Assess link from within the “Create an
Assignment” interface. When we do so, the first thing we’ll again do is
specify the “Instructions and Tips” for this phase.
Continuing with the running example related to the “overarching
assignment” I presented earlier in this chapter, here is the sort of thing I
might include here.
In this phase your primary task will be to assess the work of your
peers with the goal of ultimately giving them one good idea about
how their work could be improved. I suggest you use the
following approach when assessing your peers. First, read the
analysis submitted by each of the 6 peers that have been assigned
to you, asking yourself which one seems better and why? Then try
to translate this vague feeling of quality into a mark/rating for
each peer. Then, peer by peer, add to your mark/rating in two
ways. First, highlight something this student is already doing
well, something you think they should continue to do in future
work. Second, of all the ways a peers’ work could be improved, try
42 to hone in on the one thing that you think could result in the
biggest improvement in quality and explain that thing to your peer
as clearly and constructively as possible.
After you assess your peers you will then be asked to assess your
own work. Read the question given to you at that point and
provide your rating.
Notice once again how this “Instruction & Tips” differs from the
overarching assignment. It is phase-specific instructions. If the
students need to be reminded of the overarching assignment they can
click on the green Assignment button at any time.
Once you have written your “Instructions and Tips” you now have
several other decisions to make. Scroll the left side of the screen down
to see the pull-down menus and text boxes related to these decisions.
The first is a parameter setting related to the number of peers, which
you specify by clicking on the arrow head and choosing the appropriate
number from the pull-down menu.
This number actually is simultaneously setting two things (1) the
number of peers each student will be asked to assess and (2) the
number of assessments each peer will receive in the Reflect/Revise
Phase. There are a number of issues to consider when choosing this
number. The first is the assignment length. I typically prefer
assignments that ask students to write 1 to 2 pages of efficient text, and
I set this “Number of Peers” to 6. But if the assignments were longer –
say 5 to 8 pages each – students would likely get annoyed at having to
43 read so much. So in that case I might use a lower number like 3 or 4.
So more generally, keep student workload in mind.
However, if the grade students will be receiving is the average of the
grades given to them by their peers, as often happens with the “without
revision” assignment type is used, then you need to have at least 5 or 6
peers assessing each piece for that average to be a justifiably valid
measure of quality. So in those cases I would assume a “Number of
Peers” at about 6, and then make sure the assignment was not so long
as to be asking too much from your students.
The next thing you can modify is whether or not you want the peer
assessments to be anonymous.
The default is set to “on” reflecting qualitative findings we have that
suggest students feel they can be more direct and honest when they are
presenting their feedback anonymously. However, if you prefer that
students see the identity of who they are reviewing and, ultimately, who
reviewed them, you can flip this switch to off.
Your next decision has to do with how you want students to assess one
another, and which particular options you want activated. These are all
configurable under the “TYPE OF ASSESSMENT” box.
44 We’ve tried to give you lots of flexibility here, but this is one area
where I worry that the flexibility could result in some confusion. So let
me go through this carefully.
Turn on “overall comments” if you want to ask your students to provide
some general overall comments on the pieces they are assessing. For
example, I often will turn this on and I will ask them to give two overall
comments, one in response to “Something this student is already doing
well” and another in response to “Your idea about how this
composition could be improved”. Note that once you turn the option
on you can then add additional comments via the “ADD COMMENT”
button, and you can remove them by clicking on the little garbage can.
So you can have as many overall comments as you like, and you can
make them focus on whatever you like.
The next option is to turn “Inline Comments” on or off.
When inline comments is set to “on” then when students are assessing
their peers written compositions they can tag additional comments to
specific parts of the text. This is useful for what I call “micro level”
comments such as “this isn’t a sentence”, “you lost me here”, “this goes
against what you said in your third sentence”, or “not spelled right”.
Little comments that show what the assessor was thinking as they read
45 the piece. I typically have this set to on in addition to using the overall
comments suggested above.
Some educators were not satisfied with the just the options above and
asked for the ability to tie ratings, and perhaps comments, directly to
parts of the rubric. So imagine a rubric has five different factors that
students are to consider. They wanted students to give a rating to a
piece on each of the five factors, and perhaps also give a comment that
explained that rating. This is what the “Ratings” part of the “TYPE OF
ASSESSMENT” box is four.
When turned on it allows you to specify a scale type that can then be
re-used across a number of different ratings. You can add as many
scales as you like via that “ADD SCALE” button, label them to fit the
rubric you are using and, by checking the comment box, also include a
text box that students will use to justify the ratings they provide. This
rating scale approach is very powerful when used in conjunction with a
good rubric, especially when working in a domain or with a student
group that benefits from a very explicit assessment approach.
Let me offer one word of advice with respect to these assessment
options. If I were to use the rating scales, I likely would not use the
overall comments, or vice versa. Asking students to do both overall
46 comments and comments related to specific ratings seems a little
excessive and runs the risk of making them dislike the endeavor. So
while I am comfortable combining inline comments with either overall
comments or specific rating scales, I would discourage using all three
approaches to assessment simultaneously.
Finally, students can again be asked to complete their Assessment
Phase by performing a self-assessment.
I personally believe this is a very good idea. The students are in a
critical thinking, evaluative mindset after having just assessed their
peers, and I see this as a fantastic time to have them turn that mindset
on their own work. I almost always turn this option on and use a
prompt that reads something like “You’ve just assessed the work of
your peers. Now look at your own work again and think about it like
you just thought about the work of your peers. What mark or rating do
you think it deserves?”
3.4 Setting Up the Revise/Reflect Phase
In the reflect/revise phase, students see and assess the feedback that
peers have associated with their work (receptive communication,
critical thinking) and, in addition, they can be asked to revise their
work in light of those comments (expressive communication). They
can also be asked to reflect on the some question that the educator
highlights such as providing justifications for the revisions they did and
didn’t make, and they can be asked to self-assess in a manner that
encourages them to reflect on their learning experience (self-reflection).
47 As was true of the previous phases, the first task to perform when
setting up the Revise/Reflect Phase is to provide specific “Instructions
& Tips” for this phase. I would typically tell my students something
along the following lines.
In this phase you will see the comments and ratings that your
peers have associated with your work. Look at this feedback one
peer at a time, think deeply about what they said and decide how
useful you feel their feedback is. That is, don’t assume what they
are telling you is useful but, rather, assess whether or not it is
useful and then communicate your assessment by categorizing it
as “not useful, useful, or very useful” using the pull-down menu.
Then move on to the next set of peer comments and assess those,
continuing to do this until all peer comments have been assessed.
You will then be shown your original draft composition and will
be allowed to revise it in accord with the feedback you felt was
useful. Once you have completed your revision you will be
presented with a “reflection box”. Use this box to justify the
changes you made, and didn’t make to your work.
Finally, given everything you have learned while doing this
assignment, you will be asked to look back at your work and
assess both your draft and your revised composition.
This description assumes certain settings that you may or may not use
in your own assignment. These settings are specified in the area below
the “Instructions and Tips” box, and each will now be discussed in turn.
Critically, peerScholar then allows you to specify whether or not you
will allow your students to submit a revised version of their
composition via the Revise/Resubmit option.
Recall the earlier discussion of the two assignment types commonly
used in peerScholar. If one wishes the process to end after students see
48 (and potentially assess) the feedback they received, with the students’
grades being based on the average peer rating of their work, then
Revise/Reflect should be switched to OFF.
But if the full formative process is preferred, then when the
Revise/Resubmit switch is set to ON students will be shown their draft
composition and given the opportunity to revise it. The assumption of
the full formative process is that an educator or team member will
provide the final grade, a grade that can be based on the draft, the final
composition, the quality of the comments given to peers, and the
appropriateness of the revision. I will return to this possibility when
discussing the Grading Options, but suffice it to say that when the
resources are available to allow use of the full formative model, the act
of grading the process, as well as the product, allows the educator to
emphasize the primary skills peerScholar is intended to develop.
Moving down the interface, your next decision is whether you want
students to assess the feedback provided by their peers.
The default is set to ON, which means that below each set of peer
ratings and comments there will be a pull-down menu that students will
use to categorize a given set of feedback as either not-useful, useful or
very useful. This is essentially asking students the think critically about
feedback (receptive communication) relating to potential improvements
to their work (self-reflection). Thus it brings together 3 of the cognitive
skills related to our most desired learning objectives and, thus, having
this set to ON seems to make a lot of sense. However, in contexts
where one is worried about having students assess either others
evaluations, for example perhaps when working with very young
children or those new to providing feedback, this option can simply be
set to OFF and no usefulness pull-down will be presented.
Next, via the Reflection option, students can be asked to reflect on …
well, on whatever the educator wishes them to reflect on … now that
they have essentially completed the assignment. So, for example,
49 students might be asked to either justify their revisions, if the full
formative assignment type is used, or they might be asked to specify
what they will do differently in the future if the full-formative model
was not used.
Finally, after students have done everything else, they can once again
be asked to assess their own work. This time though, at least with the
full-formative assignment type is used, they can be asked to assess both
their draft and their final compositions. The really nice aspect of doing
this is that it asks students to reflect on the improvement to their work
that is due to what they learned from their peers, so it directly asks
them to reflect on their learning.
50 Notice that there are spaces for you to add three text labels here. The
first is a place for you to specify the general question you want students
to answer and while it is intended to be a self-assessment question, you
can ask them anything you want. The next two direct them which
portion of the assignment to focus on when responding to the overall
question. Again, although we envision this as being used to practice
self-assessment (self-reflection) it can be used in other ways if the
educator has different goals.
At this point you have specified all aspects of the assignment that will
affect what students see, and what they are asked to do, while they do
your assignment. I hope it is now obvious how peerScholar
assignments provide structured and repeated practice with the cognitive
skills underlying our most desired learning objectives. We have a ever
growing research basis demonstrating the efficacy of peerScholar but
sometimes the “smell test” is a great place to start. Skills develop
through repeated effective practice, and given the process supported by
peerScholar, that kind of practice is core and can be then applied in the
context of any specific assignment an educator thinks is effective for
their goals.
3.5 Setting Up the Grading Options
The next option listed along the right side of the edit screen relates to
grading options. Once again, peerScholar is a flexible tool, both in
terms of the exact form of the assignment one creates, but also in terms
of how that assignment will be graded, and this link will allow the
educator to specify a number of aspects related to grading, and the
choices they make will configure the grading interface that they or their
team members use to evaluate students’ work.
When you click on the “Grading Options” link you will see the
following screen to the left of the edit screen.
51 The first option that can be set is whether or not to include the students’
names at the top of the grading interface.
As odd is it may seem to many of us who educate, students often worry
about bias in the grading process that might be associated with them
personally, or with a cultural to which they belong as signified by their
name. Given this, they really appreciate knowing that they’re name is
not included and, thus, that they are being graded only on the basis of
the work they submitted. Thus we recommend setting this option to
ON. Of course, once the grading process is complete the grades are reassociated with the student names before grades are exported,
automatically integrated into the LMS, or provided within a report.
Moving on, there are two sections below the “Student Anonymity”
option. The first is labeled INSTRUCTOR’S GRADE and the next is
labeled AVERAGE PEER GRADE. Each has a slider to determine the
weighting given to each evaluation source (i.e., the instructor versus the
52 peers) and these sliders are linked such that the total weight is always
100%. For example, if one wished the instructor grade to be worth
75% and the average peer grade worth 25% of the final grade, one can
simply slide either slider to the appropriate value and the other slider
will change appropriately along with it.
In addition, the instructor’s grade can be broken down into several
specific criteria, each of which can be given a specific value. This
criteria are added using the “ADD CRITERION” button which then
prompts the user for a criterion label and a mark value. So, for
example, one could combine the use of sliders and instructor criteria to
produce something like the following.
3.6 Grouping via Advanced Options
For many educators, the “Advanced Options” link off from the right
margin of the Edit Window need never be clicked. However for some
it can add a level of flexibility that allows one to do certain things that
would not be possible otherwise. In this section I’ll begin by giving
you a sense of what grouping does in general, and then I will highlight
a couple of ways in which grouping is sometimes used.
53 Generally speaking then, there are times when it can be useful to split
an entire class into subgroups. The grouping function allows you to do
just that, taking your entire class and breaking it into smaller subgroups
that still allow the assignment to function given the other constraints
you have set (e.g., number of peers). Allow me to highlight that last
point; if you are ever trying to break your class into a certain number of
groups and peerScholar does not present that number as an option, that
means that your previous settings make that number untenable given
the algorithms peerScholar uses. Either you will have to have less
students assess fewer (and be assessed by fewer) peers to have the
number of groups you want, or you will have to be content with a
different number of groups.
OK, so why would anyone want to group anyway, and how does it
work? Let me mention two examples, and then give the hands-on walk
through for one.
In a conventional peerScholar assignment students and the peers they
are assessing were working on the same core assignment. That means
that when the full peerScholar process is used, there is the potential for
students to borrow ideas from their peers when revising their paper. Is
this a good thing or a bad thing? That often depends on the context.
When I ask students to form an argument about some issue, I am not
horrified if their ultimate argument was informed by the arguments they
were exposed to in the assessment phase. Arguments should evolve
when new data, ideas or perspectives are experienced.
However, when management instructors were using peerScholar for
business case studies, they wanted to discourage the borrowing of
ideas. So they used what we call the A/B design. That is, using the
grouping feature they split their class into two halves. One half was
given Case A to analyze, the other was given Case B. Then, during the
assessment, the A students assessed the B students, and vice versa.
Thus the students ultimately had to learn two cases, and while they
could borrow general ideas they would at least have to adapt them to
their own case. peerScholar allows A/B designs via grouping.
Another common use for grouping is to assign teaching team members
to separate subsets of the class, typically for evaluation purposes. For
example, my Introduction to Psychology class has 1800 students, and
54 their peerScholar assignments are ultimately graded by about 9
teaching assistants. So we create 9 groups, and assign a teaching
assistant to each group of roughly 200 students. Now when one of
them logs in to grade, they only ever see their 200 students rather than
seeing, and having to page through, all 1800.
There are many other things you can do with grouping, including using
peerScholar as an educational research tool by performing within class
manipulations of the assignment and assessing their effects on learning
and/or satisfaction. Hopefully these examples give you a sense of its
potential usefulness so I will now turn to giving you a sense of how the
grouping function works. Because it can be used so flexibly, its
difficult to specifically show all the possibilities. Instead I will focus
on the “associating a team member with a subset of the class” example
as it illustrates the basic steps that are common to any use.
So now, let me remind you about Section 2.2: Setting Up Team
Members. Before you can associate team members with subgroups of
students you will need to make sure the team members exist in
peerScholar. So do that first, then continue on.
The first thing you would do is click on the Advanced Options link
from the right margin of the Add/Edit an Assignment interface. When
you do you will see a blurb over an icon, with the icon labeled as
Divide class into groups.
55 Click on that icon, then click on the green “+ CREATE NEW GROUP”
button. When you do you will see the following pop-up.
Notice the “Number of groups” pulldown arrow. The options that are
provided to you will depend on the number of students in your class,
and the number of peers that each student will assess as specified
previously when setting up the Assess Phase. Hopefully the number of
groups you want is possible given these constraints and, if so, click on
that number.
Once you do that you then click either on “Auto Generate” or
“Manually Create”. If you choose Auto Generate then peerScholar will
randomly assign your students to the groups, if you choose Manually
Create you define the groups by dragging student names into each
group from a classlist. Obviously the Auto Generate works well for
large or very large classes, and the Manually Create option is more
appropriate when you want tight control over which students are in
which groups.
If you do choose “Auto Generate” you will then see a pop-up that
allows you to specify either an equal or unequal number of students in
each group.
If you choose “Equal #” it will try to divide your class into the number
of groups you specified as equally as possible. If you choose “Unequal
#” you will be further prompted as follows.
56 From here you can specify exactly how many students you want in your
groups. It shows three groups here because I had specified 3 groups
from the pull-down menu.
Generally, it is much easier to choose “Equal #” and allow peerScholar
to assign your students to groups for you. When I do that with my very
large class, I then see the following interface, which I have
purposefully shrunk to the point where individual names are
unreadable. The critical bits though are really three sections. On the
left you see a “Student List” over a “Team Member List”, and on the
right you see your three (or however many you asked for) groups.
57 Notice that in my example, there is one student left in the Student List.
When peerScholar evenly split the class into three groups this student
was left over. The instructor can then click on that student and drag it
to any of the three groups.
Similarly, the instructor can also drag Team Members to groups, which
will assign the dragged Team Member to the group they were dropped
onto, and will display the Team Member on the top. So if I named my
groups, BLUE, RED and YELLOW … if I dragged the remaining
student to the BLUE group … and then dragged the first three team
members to BLUE, RED and YELLOW respectively, then when I was
done it would look like this.
Now let’s shift our attention to the very top of this screen which looks
like …
Notice the “SAVE GROUPS” button that you can use to save these
groups. Once you have set up and saved groups for a given class you
58 can re-use this grouping in subsequent assignments by choosing the
“LOAD EXISTING GROUPS” button instead of creating groups from
scratch each time.
Also notice the “Feedback Type” selector. This allows you to choose
one of three potential ways in which the groups can interact during
assessment.
The default is to have students assessing each other randomly, as if the
grouping structure was completely irrelevant. However, you can use
the “Between Groups” option to have one group assess only the other
group, and vice versa, as is done when the A/B design is implemented.
Using the “Within Groups” option you can essentially have
compartmentalized assignments whereby those in Group 1 only assess
others in Group 1, and so on for the other groups. This option is great
when doing educational research where the different groups might have
slightly different assignment options.
Once you have made your selections, save your groups, it will ask you
to give your grouping a name when you do so. Now if you decide to do
additional assignments with this class, and wish to use the same
grouping, you can simply load this grouping and you’re set.
There is one more point to mention about grouping. Once you have
saved a grouping, then when you return to the Add/Edit Assignment
window you will see a new button at the upper right that looks like this.
Now, the settings you created are essentially the default settings for the
assignment but, if you wish, you can alter these settings for one or more
of your groups. So, for example, let’s say you want to have some of
your students do self-assessment in both the Create and Assess Phase,
but others only do it in the Assess Phase, perhaps as part of a research
59 project. Now you can set up your assignment to use self assessment in
both the Create and Assess Phase, but you can now choose a specific
group from the pull-down and turn the self-assessment off in the Create
Phase for that group only … with all other aspects of the assignment
left the same. This shows you the power and flexibility that the
grouping function affords.
Perhaps this section blew your mind, either because you see all that is
now possible, or because I have confused you entirely. It is absolutely
true that the simple little Advanced Options link provides great power,
but remember that iconic phrase from Spiderman, “with great power
comes great responsibility.” When you are using grouping for any
reason it is always a great idea to go a little more slowly and to make
sure you are specifying things as you intend. You can use this feature
to do almost anything you want, and many other things you don’t want.
So be careful and double check your thinking.
If you don’t need to use grouping, feel free to ignore that link
completely!
3.7 Saving and Sharing Your Assignment
OK, you’ve done it! You have completely defined your peerScholar
assignment. Congratulations, all of this will be second nature in no
time. But now what?
As I’ve mentioned before, we view peerScholar as a tool that can
significant enhance learning without requiring a complete disruption of
how teachers currently work. In fact, we would like peerScholar to
make life easier, not harder, for teachers. So yes, one can take an
assignment they already use and simply by presenting it within
peerScholar students will gain enhanced practice at virtually all of the
skills underlying our core learning objectives. But we can do even
better by connecting teachers with teachers, and letting you all share
your knowledge and materials. Here’s how it works.
When you save your peerScholar assignment it is saved to your
personal library, which means only you can see it. But if you would
like you can share your assignment either with other educators within
60 your institution, or with the entire world. To do this, we will leave the
Add/Edit Assignment screen and return to one of the class tabs.
Then look at the very top of the interface and click on the “Library”
link. When you do so, you will see a window that looks like …
This window shows you all the libraries available to you, but for now
let’s just look at your library; the place where assignments you have
61 created are stored. You get there by clicking on the MY LIBRARY
button from the horizontal selection bar.
Doing so will bring up a screen. For me, the screen looks like this.
This is a list of the assignments that Professor Brainiac has created or
modified, and then saved to his personal library. Notice that the left
portion of the table provides the name and some subject and level
information, and then to the right of each assignment you see a set of
icons.
These icons allow you to preview, gain information about, edit, share or
delete the assignment respectively.
62 For now, we wish to focus on the share icon. If you choose one of the
assignments and click on that icon you will see the following.
As illustrated, at this point you can choose to share your assignment
either with others in your school, or with the world via the Public
option. Simply check off the appropriate box, and your assignment is
shared.
What that means is that when others click on their library they may
now be able to see your assignment in their list. If you shared with
your school, then others at your institution will see and use your
assignment. If you shared with the Public, then anyone who uses
peerScholar anywhere in the world will be able to see and use your
assignment. All of which brings us full circle.
3.8 Using a Library Assignment
Right, so let me return to a point I made much earlier in this document.
We really want peerScholar to satisfy two different sorts of educators.
Some educators love technological toys, and really want to “get their
hands dirty” in terms of shaping an assignment to be exactly what they
want it to be. The previous sections of this chapter were largely meant
to support those sorts of educators. But other educators, while still
caring deeply about the educational experience their students have,
would prefer an approach whereby they could have an assignment up
and ready with as little work, and as little interaction with technology,
as possible. Hey, we at peerScholar know how hard educators work,
and how much is expected of them on a daily basis. Time is tight, and
learning new things in depth takes time. A simpler route that still
produces quality results can be a precious thing to have.
That is what the library assignments are all about. As the peerScholar
user base grows, and as more and more educators choose to share the
63 assignments they have created with the world, the library of available
assignments will become more and more rich. At present, an educator
can search this library by level and subject area, and find assignments
that might be suitable for, say, their Grade 10 History course, or their
first year university Psychology course. As will be described here, it is
then trivial to simply choose and use that library assignment with a
minimum of editing; as little as specifying dates.
But before describing the process of using library assignments allow
me to describe the promise of where this library is going. Being able to
choose an assignment based on level and area is all well and good, but
it would much better if an educator could see exactly what learning
outcomes an assignment targeted, what other educators who used the
assignment thought of it, and what students who performed the
assignments thought of it. Then it would be possible to select, say, a
Grade 10 History assignment that exercised Creative Thought, that
educators other that the creator felt produced a great educational
experience, and that students found engaging and fun. By relying our
crowd sourcing then, our ultimate goal is an iTunes-like library that
contains assignments that have been rated by educators and students
alike in terms that are relevant to the educational experience. We’re
not there yet, but will be very soon.
OK, promises aside for now, here is the current reality and process. To
use a library assignment one begins as they did when creating an
assignment from scratch. That is, you first go to the relevant course tab
and will see one of two things. If you have already created any sort of
assignment for that course you will see something like.
64 If you haven’t, you will see this
In either case, click on the green “+ ADD AN ASSIGNMENT” button.
When you do, you will see this pop-up
At the beginning of this chapter we started here to create an assignment
from scratch, but this time we are going to click on the green <USE A
LIBRARY ASSIGNMENT> button. When we do, we see
65 As the library continues to grow, this initial page becomes less useful
as will show you the first few of countless available assignments. What
is most important initially is to use the search functionality available
above the list to zero in on the level and subject matter you are
interested. So, let’s say you are interested in assignments related to
your Grade 10 History course; if you select History from the Subject
drop-down menu, and 10 from the Grade Level drop-down menu, you
then get the following more useful listing.
As you see, you then get a title and short blurb describing each
assignment. Let’s say the second in the list interests you, well then you
have three options. You can click on the eye-ball to preview it from a
student’s perspective, you can click on the i icon to get a listing of the
parameters of the assignment, or you can click on the green “USE”
button if you want to use the assignment. Let’s click on the green
“USE” button, which launches this pop-up.
66 This pop-up is there simply to insure that you add the assignment to the
course you mean to add it to. The selection will default to the course
you were in when you clicked “Add an Assignment”, so assuming that
is the course you want the assignment added to, just click SELECT.
Otherwise choose the desired course from the pull-down menu and then
click SELECT.
Either way, you will end up back in the now-familiar “Add/Edit an
Assignment” interface. Click through some of the options in the menu
along the right margin (i.e., Assignment & Dates, Create, Assess, etc.)
and notice that this time the all of the boxes are populated, and all of
the various parameters have been set according to the assignment
creators preferences. It is a good idea to look through these settings so
you have a good sense of how the assignment, as created, will run.
If you want to use the assignment “as is” then all you need to do is
specify the open and close dates (and times) associated with the Create,
Assess, and Reflect/Revise phases, decide whether or not you want to
allow late submissions in the Create and Reflect/Revise Phases, then
click on the green “Save and Finish”. That will take you back to your
course tab which will now include your assignment.
67 Of course you are also free to alter any of the instructions or parameters
to modify this library assignment to your specific goals. In that case,
simply change what you wish to change, then press the green “Save and
Finish” button and your modified library assignment will appear on
within the specified course tab.
Note that if the assignment appears but is greyed out, that means it is
not currently visible to your students. If the date settings are not
appropriate, then sometimes this will happen automatically, and you
will not be able to make your assignment visible until you alter them
appropriately. But you also have control over making the assignment
visible or not to students using the lock icon, the fifth icon in the row
that is presented just above the “STUDENT PROGRESS” button.
Actually, since we’re discussing these icons, let me highlight what each
does. The first allows you to see the parameters of an assignment at a
glance. The next is intended to allow you to preview the assignment
from a student’s perspective. As I write this we are not happy with
how this works and will be fixing it very soon … hopefully it works
very well by the time you’re reading this. The third icon allows you to
duplicate an assignment, which is handy if you use the same general
parameters and instructions across a number of assignments and just
want to change the overall instructions and/or the dates and times. The
fourth icon is used to go to the “Add/Edit an Assignment” interface, the
fifth is the toggle to make an assignment visible or invisible to students,
and the final icon is used to delete an assignment from your class.
3.9 Summary
Phew! Now you are an expert with respect to creating assignments,
sharing them with colleagues, and using assignments your colleagues
have shared with you. As you now can see, peerScholar does provide a
lot of flexibility in terms of how you create assignments. You can use a
library assignment and simply alter the dates, you can start with a
68 library assignment and then customize it to your needs, or you can
create your own assignment from scratch. No matter what tact you
take, it is still a very good idea that you understand what the various
parameters do, and how they effect the student experience. But in all
cases you will end up with an assignment that challenges students to
think critically about whatever topic you set, and then gives them
exercise in terms of communicating with their peers, and reflecting on
comments peers associated with their work.
Let me also take this opportunity to mention our website again:
www.peerScholar.com. One of the things we’d like to do on this
website is highlight some of the creative and powerful assignments that
you all create. So if you feel particularly proud of an assignment you
created, let us know and let’s tell other educators about it. The work
you put into it could end up impacting many more students than those
you see everyday. In fact, your assignment could have a global
influence. Seriously, that’s cool.
69 Chapter 4:
Overseeing an Assignment, Grading,
And Outputting Reports
Your assignment is set up, and the first phase opens. Now
what? Well, there are still three issues to address. While the
assignment is ongoing you can oversee the progress of your
students and, if necessary, intervene in various ways. Once
the students have gone through all phases then, if you choose
to use the full peerScholar process and students have
submitted a revision of their work, you or a team member
will have to evaluate their work. Finally, once you have
evaluated their work you may wish to export the grades, or
export a summary report.
This final chapter then focuses on these administrative
aspects and should complete the information you need to
know to get the most out of peerScholar.
70 4.1 Overseeing an Assignment
Let me begin this section with a tip. Whenever possible it is sometimes
useful to have some sort of gap between phases when creating a
peerScholar assignment. Then, as described in this section, you should
peek in on the assignment during this gap to make sure all is cool, and
to step in if anything needs rectifying. This is an especially good idea
for the first few assignments you do as it will also allow you to feel
comfortable with were things are before peerScholar moves on to the
next phase.
So how do you keep an eye on things? Well, this is where that student
progress button at the upper right of the assignment bar comes in.
When you click on this button you will see a student list open up below
the assignment bar that includes some specific information about how
things are going, broken down by each individual student in your class.
Before anyone has done anything it will look something like the picture
below. Note that there is really not much to report at this point because
none of the students have done anything.
71 But as students begin to work on the assignment you will see the
information in this listing change. For example, I am going to log in as
“A Student” and “B Student” and do a little work. Here goes …
OK, admittedly I didn’t really do the assignment, I just copied some
documents I had into the assignment. But nonetheless, let’s note what
is changing. First on the assignment bar itself you can see that some
students are beginning to do the assignment.
Notice the 2/4 Completed bar at the bottom of the Create Phase. This
feature alone is really nice just to let you know how things are going.
A word of warning though, if you watch these numbers closely the fear
you have about students doing their work at the last minute will be
amplified. It is truly amazing to watch how slowly this number grows
72 initially, and how quickly its growth accelerates as the due date
approaches!
Now let’s click on the “STUDENT PROGRESS” button again and
focus on the table of students that appears.
This particular assignment required students to upload a file during the
create phase rather than typing their work into a text window. So now
we can see that “A Student” and “B Student” have both done just that,
and we get a sense of the size of the file they have attached.
If you move your mouse over the Create cells associated with these
students you will see a “VIEW” button appear, and if you click on it the
following pop-up will appear.
Once again, this particular assignment required students to upload a
file, so what we see here is the file name. If we click on it, and
assuming we have the software necessary to view the file (in this case
Microsoft Word) then we will see what they uploaded. That is, it will
download and open as a separate window outside of peerScholar.
73 If, however, the student had entered their text within peerScholar itself,
we would see what they entered.
Note the EDIT button. There are two common reasons why a teacher
may choose to edit a student’s assignment. It is possible that the
student has said or done something inappropriate, and the teacher wants
to modify it accordingly before it is viewed by peers in the Assess
Phase. In our experience this almost never occurs, but some instructors
still appreciate the ability to check. More commonly, a student either
did not submit an assignment before the deadline, or wants to alter their
submission after the deadline. In these cases the student can send their
instructor their assignment, and the instructor can use the edit feature to
paste it in. In either case, the instructor does their edits and then clicks
on the DONE button, and the edited version is then used throughout the
remainder of the assignment.
The story is very much the same as the assignment continues. As
students complete the various phases this table becomes populated with
information about their progress. Instructors can click on a cell to see
details about what the student has done and, if they feel it is necessary,
they can edit anything that needs to be edited. Thus this table provides
an effective means to oversee what is happening and to intervene as
necessary.
The vast majority of the instructors we have spoken with say that they
liked this feature a lot initially, but then eventually they reached a point
where they just allowed the process to continue without oversight or
intervention. That is, at first it was nice to be very plugged into what
was happening, but eventually, after watching a few assignments
closely, it was obvious that once instructed properly students do what
you ask them to do, and there is no need to intervene.
That said, some instructors – and especially those teaching smaller,
more personal classes – really like how this feature allows them to
continue to be part of the assignment process even though the
assignment is occurring online.
74 4.2 Grading an Assignment
The students have done their part. They have successfully negotiated
all three phases. Now what? Well, the answer to that question depends
a little on how you set up your assignment. However, let me stress the
following. The students will not be able to see their grades within
peerScholar until you toggle the “SHOW MARKS” switch on the
assignment bar to “on”. Anything you do when it is toggled to “off” is
invisible to the students.
Final Mark is Average Peer Grade. If you set up the grading options
such that the final mark is to be composed only of the average peer
mark (see Pare & Joordens, 2009) then you have two options. If you
simply want to reveal the grades to the students, then toggle the
“SHOW MARKS” switch to “on” and you’re done. However, if you
want to look through the grades before releasing them to students, then
click the green “GRADE NOW” button in the Evaluate cell of the
assignment bar. Doing so will open up the same student progress table
you would see if you had just clicked on the “STUDENT PROGRESS”
button, except that it will also display the final grade for each student in
the EVALUATE cell of the table as shown below.
75 If you wish to alter any of these grades before they are made available
to students you can do so in the following manner. Move the mouse
over the grade you wish to edit. When you do a green “EDIT GRADE”
button will appear. When you click on that button you will see
something that looks like:
You can click on various components of this interface to get detailed
information both about this students’ behavior in the course of the
assignment, and also the peers’ reaction to their work. Should you
decide that you do wish to alter the mark after reviewing the work then
simply click on the “Change” arrow that is right under the displayed
grade. When you do, an edit box will open.
Simply select the grade in the edit box, change it to a grade you feel is
appropriate, then click the “SAVE” box. You can then close the edit
box by clicking on the X at the bottom right of the box.
76 When you are finished review and revising grades, then click the X at
the top right of the Evaluation Phase box to return back to the
Assignment Bar with the student progress table open below it. If you
are satisfied with the grades, toggle the “SHOW MARKS” switch to
“on” and students will be able to see their grades as well as all the
details associated with their assignment. You’re done.
Incorporating An Expert Marker. If the Grading Options were set up
such that part or all of the mark is to be provided by an Instructor or
teaching team member, then clearly some grading needs to occur before
the marks can be released to the students. This process begins just like
the process described above. First click on the green “GRADE NOW”
button on the Evaluate Phase to open the student progress table.
If you have not yet done any grading you will see green “GRADE
NOW” buttons in the Evaluate Phase for all students. If you’ve done
some grading, you will see grades for those you have graded, and the
green “GRADE NOW” button for those students who still need a grade.
Go to the first green “GRADE NOW” button and click on it to open the
grading interface.
Notice that in the case displayed above the “Student Anonymity During
Grading” option was switched to “on” and, as a result, the student name
is not presented by rather a number is presented (i.e., Student 13). This
interface is specifically meant to give any grader efficient access to all
the information they might need to grade and provide comments. The
best way to get a good understanding of this interface is simply to start
clicking on the various components. But here are some highlights.
77 • By clicking on the orange arrows on either side of the student
name (or number) you can move forward or backward in the
student list.
• Clicking the “TEACHER’S GRADE” button will show you the
criteria you set up in the Grading Options, providing an easy
location for you to input your grade for each criterion. When
you save the grades for the specific criteria, those component
grades will then feed into the automatic generation of a final
mark.
• Clicking the “TEACHER’S COMMENTS” button opens up a
textbox where the marker can provide comments to accompany
the numeric grades.
• In the lower portion of this interface are bars related to each of
the three phases. By clicking on any of these bars you will gain
access to all of the details relating to the student’s behavior in
that phase. The specifics of what you will see depend on the
options that were set when the assignment was created.
Thus, the general notion is that the grader will use the interface to
support their grading of whatever criteria they have specified. For
example, if one component of the grade was the “quality of comments
given to peers”, a grader could click on the Assess Phase Bar, then on
the “Feedback to peers” tab, which opens up a display with tabs for
each peer and which displays the comments the student gave that peer,
the rating they provided, and the usefulness of those comments as
perceived by the student who received them as shown here.
78 So a grader can toggle through the peer tabs and quickly get a rich
sense of the comments this student provided and their peers’ reaction to
those comments.
Similarly, the grader can access any information they might need to
provide a rich and useful evaluation that will help their students
understand what they are already doing well and how they can improve
their work further. Once the grader has provided all ratings and
comments for all students, then they are done.
Note that if an instructor has used the “ADD TEAM MEMBERS” to
identify team members, then used the ADVANCED OPTIONS to
create groups and identify team members with groups, then when the
team members log in upon completion of the assignment they can grade
just as described above. They will only see those students who they
were assigned to though, so if you have a number of team members
grading, they will each have to complete grading their subset of
students before all the grading is complete. The instructor can oversee
the grading progress by clicking on the STUDENT PROGRESS button.
When marks are entered they will show up in the Evaluate Phase.
79 To release the grades return to the relevant course tab, find the relevant
assignment, then flip the “SHOW MARKS” toggle that you will see in
the Evaluate section of the assignment bar. When you do, it will turn
green as shown below.
This green box tells you that when students log in they will also see this
box as green and when they click on it, they will see the grade they
received as will also have access to all of the peer reviews and
individual ratings. Should any student dispute their grade the instructor
can continue to view all the details and edit grades just as described in
this section.
4.3 Outputting Grades or Reports
Once an assignment is complete and graded, it is possible to output
either the grades or various reports related to that assignment. To do
this, first go to the class tab for the class you’re interested in, then click
on the “REPORTS” tab. This will open up the Reports Table.
80 This table will list all assignments associated with that class, and will
give you three options for each; (1) Assignment Summary, (2) Student
Summary, and (3) Student Assignment reports. Each will open up a
table for inspection, and to the upper left of each table is a “CSV”
button that can be used to output the tables as comma-separated files
that can be imported in, for example, Microsoft Excel.
The Assignment Summary table is a straightforward set of descriptive
statistics related to the assignment as shown below.
The Student Summary table breaks down the assignment data by each
student. This table can become very complex is everything tagged to
each student is displayed. Thus, before the table is presented a pop-up
window opens that allows you to specify only those indices you would
like included in the table, thereby making it as simple as possible. The
pop-up looks like this.
81 Check off only those indices you are interested in viewing, then click
on the green SUBMIT button. The table you have defined will then
appear and will look something like this.
Finally, the Student Assignment Reports allows you to output student
work if you wish to view it offline. Once again, the first step in the
process is to specify exactly what you wish to output view a pop-up
window that, this time, looks like this.
82 What you will ultimately then see depends on what is specified in this
table, but the results are self-evident. For example, if you select
Student Final Assignments you will see each student’s name and their
final assignment.
83 Chapter 5:
Summary and Near Future
When I started writing this manual I had no expectation it
would be longer than 80 pages! In many ways peerScholar is
a relatively simple tool that allows educators to effectively
harness three proven educational practices; peer assessment,
self assessment and formative assessment. However, we also
tried hard to make peerScholar a flexible tool, and this
enhanced flexibility does mean that the effective use of
peerScholar can take a while to describe. I thank you for
reading and I hope you learned a lot.
One of the huge challenges of writing a manual for
peerScholar is that it is an organic product that keeps growing
and improving. We are aware of certain aspects of the current
build that need improving, and we are working on those now.
We are also integrating peerScholar with a wide variety of
Learning Management Systems (LMSs) to provide single
sign-on and gradebook migration, which will make
peerScholar even easier to use if you mount your course using
a supported LMS. And of course we also have ideas about
how peerScholar can become an even more powerful tool, and
those ideas are being built into Version 2.0, and will undergo
thorough research to insure they do enhance both learning and
user satisfaction.
I want to complete this manual by stressing that while I may
have referred to peerScholar as a tool, it is actually much more
than that. Yes it can take any assignment an educator
84 currently uses and make it better by giving students extensive
practice with critical thought, creative thought, clear receptive
and expressive communication, and self-reflection. But it is
especially powerful when the learning process it supports is
applied to assignments that are also created to exercise critical
learning objectives. These assignments will come from
educators, not from peerScholar itself, and we very much
would like to work closely with innovative educators to build
and share powerful assignments that can impact student
learning worldwide. If you are such an educator, please go to
www.peerScholar.com to become part of our peerScholar
community.
85