1
TD 92364GB
User Manual
Administration
XGate
18 November 2010/ Ver. E
User Manual
Administration, XGate
TD 92364GB
Contents
1 XGate User Interface............................................................................................... 1
2 Introduction............................................................................................................. 2
3 Administration ........................................................................................................ 3
3.1 Work Flow of the Configuration ........................................................................ 3
3.2 Planning ............................................................................................................ 4
3.3 Configuration of Input/Output Interfaces ........................................................... 4
3.4 Define Event Elements ....................................................................................... 4
3.5 Action Configuration ......................................................................................... 7
3.6 Add Event Assignment ..................................................................................... 30
3.7 Layout Setup .................................................................................................... 33
3.8 Set up Access Rights ........................................................................................ 39
3.9 Conversion Tables ............................................................................................ 41
4 Related Documents ............................................................................................... 43
5 Document History ................................................................................................. 43
Appendix A: Overview Picture................................................................................ 44
Appendix B: Action Nomenclatures........................................................................ 45
18 November 2010/ Ver. E
User Manual
Administration, XGate
1
TD 92364GB
XGate User Interface
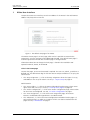
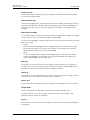
To open the XGate User Interface, enter the IP address of the XGate in the web browser
address field, http://xxx.xxx.xxx.xxx/
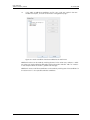
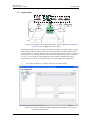
Figure 1. The default start page of an XGate.
The XGate’s home page is an html page, which makes it possible to customize the
appearance – pictures and text can be added and changed. If the default home page is
used the appearance will look like the home page in the figure above.
Information about how to change the html page, is found in the Installation and
Operation Manual, XGate, TD 92338GB.
Links in the home page
To enter the pages, User ID and Password is required. The users are, admin, sysadmin or a
defined user. The defined user logs in with own User ID and password that is set up by the
administrator.
• The “Duty Assignment”, is a link to the Duty Assignment where the layout is set up,
and addresses are set up for actions. See also, 3.7 Layout Setup on page 33.
Administration:
• The “Access Rights”, is a link to the Access Right Administration page, where access
rights to the GUIs are set up. See also, 3.8 Set up Access Rights on page 39.
• The “Action Configuration”, is a link to the Action Configuration page, where actions
for the events are configured. See also, 3.5 Action Configuration on page 7.
• The "Event Assignment", is a link to the Event Assignment page, where Event
Elements are defined and assigned Events are administrated.
• The “Advanced”, is a link to the XGate configuration and administration page. It is
only possible to log in as admin or sysadmin. All links can also be reached from this
page. See also, 2 Introduction on page 2.
18 November 2010/ Ver. E
1
User Manual
Administration, XGate
2
TD 92364GB
Introduction
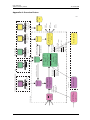
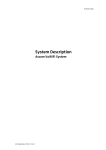
An overview picture over the XGate Runtime is found in the Appendix A: Overview Picture
on page 44.
1
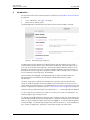
Click “Advanced”, see figure 1 on page 1.
2
Enter User ID and Password.
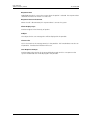
The following page is opened when the correct User ID and Password is entered.
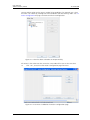
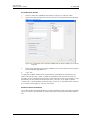
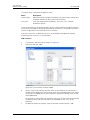
Figure 2. The XGate Basic Setup GUI.
This document will only describe the administrational part of the Basic Setup, which is
used for administrators where; events and actions are defined, and access rights for the
users are set up for the XGate functions. The Duty Assignment describes how to set up
locations in for example a hospital, and how to define conditions for Event Elements. A
description of how to assign users to specific locations and associated events is found in
the User Manual, Duty Assignment, TD 92374GB.
How to change the language, making backup/restore, and information about the
Advanced Setup is described in the Installation and Operation Manual, XGate,
TD 92338GB.
The Basic Setup consist of different Graphical User Interfaces, Runtime Environment,
which are used to configure the XGate module. Event and Actions has to be set up in a
certain order in the XGate when it is configured for the first time, or when new Event and
Actions are going to be implemented, see 3.1 Work Flow of the Configuration on page 3.
Fields that always need to be filled in are marked with a "*", remaining fields are optional.
It is also necessary to install the Java, JVM 4.2.1 or later, to run the Java applications. To
find the program, go to www.java.com.
TIP: during the configuration there are many GUIs to log in to, and all of them prompt for
User ID and Password. During the configuration it is possible to keep the main GUI applet
open, i.e. the first page that opens after you have logged in, in case you need to go back
to make changes. It is only possible to log in to one GUI at the time, i.e. if you already have
one "Action Configuration" opened it is not possible to log in to another one.
18 November 2010/ Ver. E
2
User Manual
Administration, XGate
3
TD 92364GB
Administration
3.1
Work Flow of the Configuration
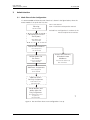
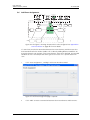
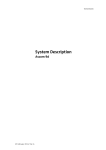
It is recommended to follow the work flow that is shown in the figure below, when the
XGate module is set up for the first time.
Planning
UM = User Manual
IOM = Installation and Operation Manual
IOM TD 92338GB
Dashed lines: configuration is not done in the
XGate Graphical User Interface.
Configure RS232/ASCII
and IP ports
(TAP) 900 module
IOM TD 92338GB
Define Event Elements
Event Assignment
UM TD 92364GB
Define actions for
the Events
Action Configuration
UM TD 92364GB
Assign Event Elements,
and administrate
databases
Event Handler (Advanced)
IOM TD 92338GB
Add Event Assignments
Event Assignment
UM TD 92364GB
Add User Teams
for Duty Assignment
Authorization, ESS
IOM TD 92253GB
User Administration and
Assignments
UM TD 92364GB
012
Setup location and
access rights for
Duty Assignment
Figure 3. The work flow when a new configuration is set up.
18 November 2010/ Ver. E
3
User Manual
Administration, XGate
3.2
TD 92364GB
Planning
This is done by the system administrators. A step-by-step guide is found in the Installation
and Operation Manual, XGate, TD 92338GB.
3.3
Configuration of Input/Output Interfaces
Information about the configuration is found in the Installation and Operation Manual
XGate, TD 92238GB.
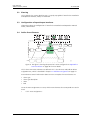
3.4
Define Event Elements
First time setup (commissioning)
Event Handler Configuration
(Ascom)
XGate Runtime
User
Administration
Event Assignment
(Admin)
Event Assignment
Handler
048
(Decision on what has
happend)
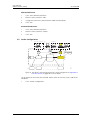
Figure 4. The figure is showing the part that is to be configured. See Appendix A:
Overview Picture on page 44 for more details.
This is where new Event Elements are defined. This is also where to add, edit or delete
assigned Events, which is described in chapter 3.6 Add Event Assignment on page 30.
Event Elements contain information about an Event. Examples of Event Elements are:
•
•
•
•
alarm type
alarm type description
room
bed
Go to the Event Assignments to set up which Event Elements that correspond to a certain
Event.
1
Click "Event Assignment".
18 November 2010/ Ver. E
4
User Manual
Administration, XGate
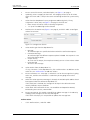
2
TD 92364GB
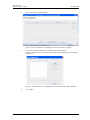
Log in with User ID and Password.
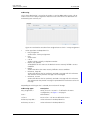
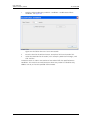
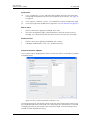
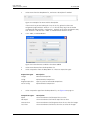
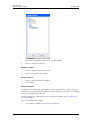
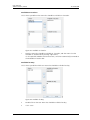
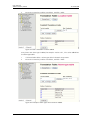
Figure 5. Event Assignment is displayed, no Events have been assigned.
3
Click "Event Element Definition" to define new Event Elements.
("Add" is used later on to create the connection between defined Event Elements
and Events.)
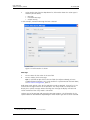
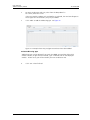
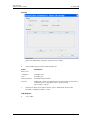
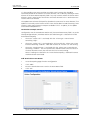
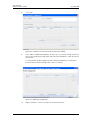
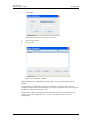
Figure 6. "Event Elements" is displayed, no Event Elements have been defined.
4
Click "Add".
18 November 2010/ Ver. E
5
User Manual
Administration, XGate
TD 92364GB
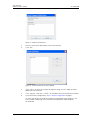
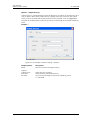
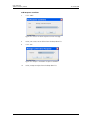
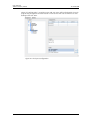
Figure 7. Define Event Element.
5
Enter the name and a description of the Event Element.
6
Click "OK".
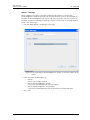
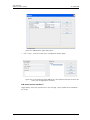
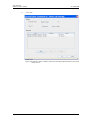
Figure 8. An Event Element has been added.
7
Click "Close" to return to the Event Assignment page, or click "Add" to define
additional Event Elements.
8
Click "Log out", and then "Cancel", to shut down the Event Assignment window.
9
Go to the Action Configuration, see 3.5 Action Configuration on page 7.
It is now also possible to assign Event Elements and administrate databases, see
Event Handler (Advanced) in the Installation and Operation Manual XGate,
TD 92238GB.
18 November 2010/ Ver. E
6
User Manual
Administration, XGate
TD 92364GB
Edit Defined Events
1
Click "Event Element Definition".
2
Mark the event, and click "Edit".
3
Change the name of the Event Element and/or the description.
4
Click "OK".
Delete Defined Events
3.5
1
Click "Event Element Definition".
2
Mark the event, and click "Delete".
3
Click "OK".
Action Configuration
First time setup (commissioning)
User
XGate Runtime
Administration
Action Configuration
(Admin)
Action Handler
049
(Decision on what to do
about it)
Figure 9. The figure is showing the part that is to be configured. See Appendix A:
Overview Picture on page 44 for more details.
Set up actions for the event that occurred. Define; what to transmit, success and failure
conditions.
1
Click "Action Configuration".
18 November 2010/ Ver. E
7
User Manual
Administration, XGate
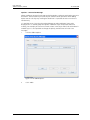
2
TD 92364GB
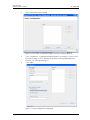
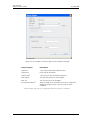
Log in with User ID and Password.
Figure 10. The Action Configuration page, no Events have been defined.
3
Click “Synchronize”, to get defined Event Elements, see chapter 3.4 Define Event
Elements on page 4. This is needed later on when inserting predefined Event
Elements, see Message on page 10.
4
Click "Add".
Figure 11. Event Configuration is displayed.
18 November 2010/ Ver. E
8
User Manual
Administration, XGate
TD 92364GB
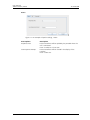
5
Enter a name of the Event, and a description, see figure 11 on page 8.
6
Optionally, enter a category for the Event. The category will be set for all actions
within this Event and is a help in the search and sorting function for system activity
logs.
7
Select from the drop-down list Duty assignment addressing levels, if Duty
assignment is to be used, see figure 11 on page 8. The levels are:
• None: Events will not be visible in the Duty Assignment.
• 1-5: up to five addressing can be selected.
8
Mark Root in the Action Tree (figure 11 on page 8), and click “Add” to configure
actions for an Event.
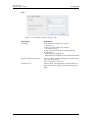
Figure 12. Configure the actions.
9
Select Action Type from the drop-down list:
• Message
To send messages to a specific destination and with a confirmation request.
• Interactive Message
To send messages with different response options included. The response is sent
back with chosen option.
• Output Activity
To set or reset an output, for example to remotely turn on a siren or close a door.
• Erase Message
To erase a sent message.
10
Select Actions from the drop-down list.
If it says “No Items” in the drop-down list, click “Define Action” to add items to the
action list. See Define Action to add new actions.
11
Enter a Reference. In a "Message" a reference is set for the message that is going
to be sent, and the same reference is used when you are going to erase that
message.
12
When the Action Type Erase Message is selected, the Exclude replier address check
box appears below the Reference drop-down list.
If this check box is checked, the message will be kept in the device that most
recently fulfilled a success condition.
13
Select Work Shift. Defined in the ESS, see Installation and Operation Manual,
Enhanced System Services, TD 92253GB.
14
Enter a Message ID. This enables a possibility to update messages in a handset by
sending a new message with the same Message ID.
If this field is left empty it is not possible to update that message later.
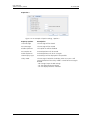
Define Action
1
Click "Define Action", and click "Add".
18 November 2010/ Ver. E
9
User Manual
Administration, XGate
2
TD 92364GB
Select Action Type from the drop-down list (information about the action types is
found in point 8 above):
• Message
• Interactive Message
• Output Activity
In this example, Interactive Message has been selected.
Figure 13. Define actions is shown.
Message
3
Enter a Name for the action in the text field.
4
Enter a Subject, for the message.
Tip: It is possible to right click in the text fields for Subject and Body, to insert
predefined Event Elements. This is only possible if a synchronization has been done,
see 3.5 Action Configuration, point 3.
Body, Beep Code, Priority, Time To Live and Sticky mode are optional. Time to live, is the
time for the message to remain in the portable1. The Sticky mode is used to lock the
display for a specific message. When receiving that message the display will lock and
remain locked until the sticky mode is turned off.
Options are set for Message and Interactive Message response. The information in the
Option folder will look different depending on which Action Type that has been selected.
1.The function, Time To Live, does not exist in all portables.
18 November 2010/ Ver. E
10
User Manual
Administration, XGate
TD 92364GB
Options – Message
When sending a message it is possible to add message response. It can be with
acknowledgement accept only where you will know that the user has acknowledge the
message, or acknowledgement with accept and reject where the user also will have the
possibility to reject the message. If nothing is chosen it will be with no message response,
which is the default type.
• Click the folder Options, to add type of message.
Figure 14. The type Manual Acknowledgement, Accept, is chosen as option to the
action.
• Select Type from the drop-down list:
• Normal
Default, no message response.
• Manual Acknowledgement, Accept
if you want acknowledgement with only accept.
• Manual Acknowledgement, Accept/Reject
if you want acknowledgement with the possibility to accept and reject.
• Click "OK".
18 November 2010/ Ver. E
11
User Manual
Administration, XGate
TD 92364GB
Options – Interactive Message
When sending an Interactive message and using options, Option ID and Option text must
be filled in. The Function Key ID shall only be used for certain portables when adding
option text for soft keys. By marking the check-box it is possible to enter an ID for the
Function Key.
It is possible to set a layer that the option belongs to and to add extra layers to be
displayed. This is used to group the options in different layers for quicker and easier
usability, for example you can have all main actions in one layer and all sub action data in
another layer. It is also possible to change the priority and the time to live for sent
messages.
1
Click the folder Options.
Figure 15. No added options.
2
Click "Add".
18 November 2010/ Ver. E
12
User Manual
Administration, XGate
TD 92364GB
Figure 16. An example of common data for the Interactive Message.
General options
Description
Option ID:
1-99, XGate will provide a default value.
Option Text:
Enter text for the option.
Display
Layera:
1-99, the layer that the option belongs to.
New Priority:
The previous priority can be changed.
New TTL:
Use Function Key
The time to live can be changed.
IDsa:
When marked, enter Function Key ID. This is used when
adding an option text for a soft key (only for some
Portables).
a.Not all portables support the use of Display Layers and Function Key IDs in combination.
18 November 2010/ Ver. E
13
User Manual
Administration, XGate
TD 92364GB
Data >
Figure 17. An example of Option settings, "Data"
Data options
Description
Response Data:
Data entered here will be replied by the portable when the
call is connected.
Enter a number or a short text.
User Response Prompt:
Data entered here will be viewed in the display of the
Handset.
Enter a short text.
18 November 2010/ Ver. E
14
User Manual
Administration, XGate
TD 92364GB
Call >
Figure 18. An example of Option settings, "Call".
Call options
Description
Dial Digits:
Enter telephone number, e.g. 123456.
- Connect Call
A new call is connected to the number.
- Call and Disconnect
A new call is connected to the number and then
disconnected.
- DTMF during an ongoing call.
- DTMF during an ongoing call and then disconnected.
Response Data on Disconnect:
Data entered here will be replied by the portable when
the call is disconnected.
Enter a number or a short text.
Disconnect call:
When marked, the ongoing call is disconnected. This
option shall not be used in combination with the Dial
Digits.
18 November 2010/ Ver. E
15
User Manual
Administration, XGate
TD 92364GB
Properties >
Figure 19. An example of Option settings, "Options".
Property options
Description
Close Message:
The message will be closed.
Erase Message:
The message will be erased.
Disable Option ID:
This Option ID will be disabled.
Erase Option ID:
Entered Option ID will be erased.
Enable Option ID:
Entered Option ID will be in use again.
Show Display Layer:
Entered layer will be displayed in the portable.
Sticky mode:
The message is locked in the display when set to On. It will
remain locked until the Sticky mode is turned off or message is
deleted.
- No Change: keeps the old settings.
- On: the display becomes locked.
- Off: the display becomes unlocked.
18 November 2010/ Ver. E
16
User Manual
Administration, XGate
TD 92364GB
Addressing
This is where destination is set up for the actions. It can be addressed to a User, Call ID,
and to a user via the Duty Assignment. Note that Users and Call IDs are defined in the
Enhanced System Services, ESS.
Figure 20. Destinations are taken from assigned users at level 1 in Duty Assignment
1
Select Type from the drop-down list:
• Duty Assignment
send to users via Duty Assignment.
• User
send to users.
• Call ID
send to Call IDs, typically a telephone number.
• Replier, only updates
send updates for this event to the device that most recently fulfilled a success
condition.
• Replier
send to the device that most recently fulfilled a success condition.
• Reference, keep old
send to the devices that has previously received a message with this reference.
The reference for the previous message is left unchanged.
• Reference, set new
send to the devices that has previously received a message with this reference.
The reference for the previous message is replaced with the reference set for this
message.
Depending on which Type that is selected, the next box will change:
Addressing types
Description
Duty Assignment >
None, or Level 1 to Level 5 – if defined in the Event
Configuration, see figure 11 on page 8.
User >
Defined Users
Call ID >
Enter Call ID – Call IDs are defined in the ESS
Reference, keep old >
Select reference in the drop-down list
Reference, set new >
Select reference in the drop-down list
18 November 2010/ Ver. E
17
User Manual
Administration, XGate
2
TD 92364GB
For Duty Assignment and User, select from the drop-down list.
For Call ID, enter the Call ID.
If the types Replier, updates only and Replier are selected, the next box disappears.
These types have no selections, they are just added.
3
Click “Add” to add the addressing type. See figure 20.
Figure 21. Example where Duty Assignment and User have been added.
Delete Addressing Type
Addressing types can be deleted if you mark the added type and then either click
"Delete" button, or right click on marked "type" and then click on the displayed
"Delete". In both cases you will be asked if you want to delete or not.
4
Click "OK" when finished.
18 November 2010/ Ver. E
18
User Manual
Administration, XGate
TD 92364GB
Options – Output Activity
Output activity is used to remotely activate or deactivate an output, for example turn on a
siren, or open a door. When Output Activity is going to be used, a name of the output
activity must be entered, and an output name must be selected. It can be triggered on
activation or on deactivation, and it can also be set to how long the activation should stay
active.
Outputs >
Figure 22. An example of Option settings, "Outputs".
Output options
Description
Name:
Enter the name of the output activity.
Output >
Output name:
Activation:
Duration:
18 November 2010/ Ver. E
Select one of the outputs.
Select between, Activate/Deactivate
The time for how long the activation should stay active.
0 = unlimited.
19
User Manual
Administration, XGate
TD 92364GB
Figure 23. Added Action Types and options.
• Click "Close", to return to the Event Configuration Actions page.
Figure 24. A new action has been added. (4) is the reference that was set when the
action was configured for the Event.
Add Success/Failure Conditions
To get delivery and status response on a sent message, success and/or failure conditions
are set up.
18 November 2010/ Ver. E
20
User Manual
Administration, XGate
1
TD 92364GB
Mark the action under Root, and click “Conditions” to add success/failure
conditions. See figure 24.
Figure 25. The failure time-out is set to 60 seconds.
2
Enter the time for the Failure Timeout. At expire of this time the action fails.
3
Select the check box for the action, in this example "patient call message", and
click "Define".
OnSuccess occurs as soon as one receiver of one action fulfils the specified success
conditions. This means that OnFailure occurs when every action has failed for every
address sent to, or after the specified failure timeout.
18 November 2010/ Ver. E
21
User Manual
Administration, XGate
TD 92364GB
Delivery
Figure 26. Add delivery and status response for the action.
4
Select Requested Status from the drop-down list.
Status
Description
Don’t Care:
-
In progress:
Message valid.
Sent:
Message sent
Delivery Receipt:
Reached final destination.
Failure if:
Redirected – when message diversion has occurred in the ESS and it is
important for the message to reach a specific person.
Not available – absent
5
Mark one or both of the Failure if boxes, when "Redirected" or/and "Not
Available" should be handle as a fault.
Add Response
6
Click "Add".
18 November 2010/ Ver. E
22
User Manual
Administration, XGate
TD 92364GB
Add Response Condition
7
Click "Add".
Figure 27. Success or failure response on the message.
8
Select, On success or On failure from the drop-down list.
9
Click "OK".
Figure 28. Accept is selected as response condition.
10
Select, Accept or Reject from the drop-down list.
18 November 2010/ Ver. E
23
User Manual
Administration, XGate
11
TD 92364GB
Click "OK".
Figure 29. Response type, condition and result have been defined with success and
failure result.
18 November 2010/ Ver. E
24
User Manual
Administration, XGate
12
TD 92364GB
Click "Add" to add other conditions, or click "OK", and "OK" again in the next
window that opens, to return to the Action Configuration page.
Figure 30. Action conditions have been added to the action tree.
Additional actions can be made by marking the Root in the action tree, and press "Add".
An action can also be edited or deleted by clicking the action and click "Edit" or "Delete".
In the example above the action is, patient call message.
Additional success and failure conditions can be made by marking one of the conditions in
the action tree. It is also possible to delete conditions.
18 November 2010/ Ver. E
25
User Manual
Administration, XGate
TD 92364GB
You can add an action on the success and/or failure conditions, for example start a siren
on failure. This is done by marking one of the conditions and then clicking “Add”. See 3.5
Action Configuration on page 7 on how to make the configuration.
Figure 31. A siren has been selected as an Output Activity.
All actions in the action tree that are on the same node will be sent at the same time.
13
Click "OK", to return to the Action Configuration page for Events.
Figure 32. A new Event is added to the Action Configuration page.
18 November 2010/ Ver. E
26
User Manual
Administration, XGate
TD 92364GB
Synchronize
14
Click “Synchronize”, to save, and to be able to add all the Events that have been
created and configured into to the Event Assignment User interface. See figure 32
on page 26.
15
Click "Log out" and then "Cancel", to shut down the Action Configuration page.
16
Go to the Assignments to add Event Assignments. See 3.6 Add Event Assignment.
Edit an Event
1
Mark the Event that is going to be edited, click "Edit".
2
The Event Configuration page is opened where the name of the Event can be
changed. It is also possible to edit the action for the Event from the same page.
Delete an Event
1
Mark the Event that is going to be deleted, click "Delete".
2
A dialogue window opens, click "Yes" to delete the Event.
Action Termination / Updates
This is used to stop an ongoing Event when a certain new Event is activated or to update
an ongoing event.
Figure 33. This is where termination of actions is set.
The Terminate Event By field contains which event that shall terminate the current event.
Any already defined event can be used in this field. When the selected event is activated
all ongoing instances of the current event will be terminated. If no terminating event is
wanted the field should be left empty.
18 November 2010/ Ver. E
27
User Manual
Administration, XGate
TD 92364GB
It is also possible to put extra restriction on which event instances that should be
terminated, based on the content of an Event Element. This is done by selecting an Event
Element in the Event Element Equality field. If set, only instances where the chosen Event
Element's value is equal to the value of the same Event Element in the "Terminate Event"
instance will be terminated.
The Update event element field specifies (based on the content of an Event Element) if an
update to a currently active instance of this event shall be done instead of creating a new
instance. Select event element to compare to decide if this is an update, in the Update
event element drop-down list.
Termination example scenario:
Configuration: For the created event Patient Call, the Terminate Event By field is set to the
already configured Event, Terminate Patient Call and Alarm type is selected in the field
Event Element Equality.
1
The Event "Patient Call" is activated, with the "Alarm type" Event Element
containing "high".
2
The Event "Patient Call" is activated again, this time with the "Alarm type" Event
Element containing "medium". Now two instances of "Patient Call" are running.
3
The Event "Terminate Event" is activated, with the "Alarm type" Event Element
containing "medium". This will terminate the second instance since the values of
the Event Elements match, but will leave the first instance running.
Note: If nothing was selected in the "Event Element Equality" field both instances
would have been terminated.
Add Termination Event Names
1
Go to the opening page of Action Configuration.
2
Click "Add".
3
Enter the Termination Event name in the Event Name field.
4
Click "OK".
Figure 34. In this example there are some added terminate event names.
18 November 2010/ Ver. E
28
User Manual
Administration, XGate
TD 92364GB
Set Termination Actions
1
Mark the Event that should be terminated, see figure 34, and click “Edit”.
2
Select event that shall terminate the current event in the Terminate Event By dropdown list, see figure 35.
Figure 35. A terminate action has been added with an extra condition on an Event
Element.
3
Select event element to be an extra condition for an Event Element from the Event
Element Equality drop-down list.
4
Click "OK".
It is possible to add an action to the termination by marking the On Terminate in the
action tree and then click “Add”. It could for example be that you want to erase the
message, or have a notification sent when a termination of an Event has started. It is only
possible to have one action termination per Event, see figure 35 on page 29. When
“Patient call” is terminated the terminate action “Erase (4)” is executed, which will erase
the “Patient call message (4)” that was sent earlier.
Delete an Action Termination
This is done by opening the drop-down list under Terminate Event By and select the empty
row first in the list. You will then be asked if you want to loose the termination node or
not.
18 November 2010/ Ver. E
29
User Manual
Administration, XGate
3.6
TD 92364GB
Add Event Assignment
First time setup (commissioning)
Event Handler Configuration
(Ascom)
XGate Runtime
User
Administration
Event Assignment
(Admin)
Event Assignment
Handler
050
(Decision on what has
happend)
Figure 36. The figure is showing the part that is to be configured. See Appendix A:
Overview Picture on page 44 for more details.
It is now time to make the connection between the Event Elements and the Events that
have been defined in the Action Handler. This is done by adding different conditions on
the Event Elements. For example, if the Event Element, alarm type is defined, you can add
condition so that if for example the alarm type has the value "4" a specific action will
start.
1
Click "Event Assignment", and log in with User ID and Password.
Figure 37. The Event Assignment page is opened.
2
Click "Add" to create a connection between the Event Elements and the Events.
18 November 2010/ Ver. E
30
User Manual
Administration, XGate
3
TD 92364GB
Select Event from the drop-down list, and enter a description if needed.
Figure 38. Example of an Event with its description.
If the event that you are looking for is not in the list, go back to the Event
Assignment page and click "Refresh". If it is still not there, log in to the Action
Configuration GUI and click "synchronize". Go back to the Event Assignment GUI,
click "Refresh" and then click "Add". It should now be found in the list.
4
Click "Add", to add conditions.
Figure 39. Event Elements conditions have been added.
5
Select Event Element from the drop-down list.
6
Select Comparison from the drop-down list. These are expression types:
Expression types
Description
Integer:
Numerical comparison.
String:
Alphanumerical comparison.
Regular Expression:
Special syntax for advanced comparisons.
Part of string:
Alphanumerical comparison.
7
Select Comparison Type from the drop-down list, see figure 39 on page 31.
Comparison types
Description
Equal:
The Event Element shall be equal the set value.
Not Equal:
The Event Element shall not be equal the set value.
Greater Than:
The Event Element shall be greater than the set value for integer.
Less Than:
The Event Element shall be less than the set value for integer.
18 November 2010/ Ver. E
31
User Manual
Administration, XGate
8
TD 92364GB
Click "OK".
Figure 40. Conditions on the Event Element have been added.
9
Click "Add", to add more conditions, or click "OK", to save the settings and return
to the Event Assignment page. When more than one condition is used, all of them
must match.
It is also possible to edit or delete the Event Element conditions by marking the
Event Element and then clicking either, "Edit" or "Delete".
Figure 41. Add Event Assignments.
10
Log out and click "Cancel" to return to the XGate Interface.
18 November 2010/ Ver. E
32
User Manual
Administration, XGate
3.7
TD 92364GB
Layout Setup
XGate Runtime
First time setup (commissioning)
User
Event Handler Configuration
(Ascom)
Duty Assignment
(User)
Administration
Duty Assignment
Handler
051
(Decision on who is
assigned to handle it)
Figure 42. The figure is showing the part that is to be configured. See Appendix A:
Overview Picture on page 44 for more details.
The Duty Assignment part of this document describes how to set up the layout structure
with locations and User Teams, and to set up who should be available for duty and on
which location. It is only the administrator that will be able to do this. There is a separate
document for users and administrators which describes how to assign events and levels
for users, see User Manual, Duty Assignment, TD 92374GB. The document can be
reached from the link on the top right corner of the entry page Duty Assignment.
1
Click "Duty Assignment" and log in with User ID and Password.
Figure 43. The Duty Assignment page is displayed. An example of a layout with
User Teams and locations.
18 November 2010/ Ver. E
33
User Manual
Administration, XGate
TD 92364GB
The layout setup is created in the Options menu:
Menu
Description
Layout Setup:
Add new location and define conditions for each location. Decide who
should be available for duty and on which location.
Auto Save:
Saves the configuration periodically - the time is set in seconds.
Disabled as default.
The root and common are default locations, they can not be deleted, though the default
names can be changed to something applicable for the business. The location common is
used for assignments that all locations have in common.
User Teams and users are defined in the ESS, see Installation and Operation Manual,
Enhanced System Services, ESS, TD 92253GB.
Add Locations
2
Click Option, and select Layout Setup, see figure 43.
3
Mark root and click "Add"
Figure 44. A new location has been added.
4
Enter a name for the location and click enter on the keyboard, a new field for a
location will be added every time you click enter after entered location name. When
all locations are added you can click somewhere outside the editing frame to stop
more added fields.
To get rid of an empty field that you do not want you can click somewhere outside
the editing frame, click the enter tab on the keyboard or click "Esc" on the
keyboard.
5
To add levels below the location, keep the location marked and click "add".
18 November 2010/ Ver. E
34
User Manual
Administration, XGate
TD 92364GB
Figure 45. A level below "Ward Green" has been added.
6
Enter a name for the location.
Rename Locations
1
Mark the location you want to rename.
2
Enter a new name for the location.
Delete Locations
1
Mark the location you want to delete.
2
Click "Delete".
Define Conditions
Conditions can be defined for each location, except common which is always active for
assignments. By selecting a predefined Event Element and enter a value for it, an incoming
event can be connected to a location.
The Event Elements are defined in the Event Assignment Handler, see 3.4 Define Event
Elements on page 4.
To set up a condition do as follow.
1
Click “Define Condition”, see figure 44 on page 34.
18 November 2010/ Ver. E
35
User Manual
Administration, XGate
2
TD 92364GB
Click "Add".
Figure 46. Event Element and a value is chosen
3
Select Event Element.
4
Enter a value.
.
Figure 47. A condition is added.
More conditions can be defined by clicking "Add". At least one condition must be
fulfilled.
If one location has conditions matching a received event, all locations on the path
between the top location and this location in the tree is selected as well, even if they have
conditions themselves that do not match.
You can edit or delete a condition that has been defined. When finished either click
"Done" to save the configuration, or "Cancel" if you do not want to save the
configuration.
18 November 2010/ Ver. E
36
User Manual
Administration, XGate
TD 92364GB
Available on Locations
This is where you define what event that should be available on a location.
Figure 48. Available on location.
1
Mark the Event that should be available on a location, and then move it to the
Available on location box by clicking "right arrow".
It is also possible to double click on the Event, it will then automatically be moved to
the Available on location box.
Available for Duty
This is where you define which User Team that should be available for duty.
Figure 49. Available for duty.
2
Double click on the User Team that should be available for duty.
3
Click "Save".
18 November 2010/ Ver. E
37
User Manual
Administration, XGate
TD 92364GB
When this configuration is saved the events and user teams will be displayed in the main
page of Duty Assignment and the location is marked. You will also see which users that
belong to the User Team.
Figure 50. The layout configuration.
18 November 2010/ Ver. E
38
User Manual
Administration, XGate
3.8
TD 92364GB
Set up Access Rights
First time setup (commissioning)
User
Administration
Access Rights
Configuration
(Admin)
052
XGate Runtime
Figure 51. The figure is showing the part that is to be configured. See Appendix A:
Overview Picture on page 44 for more details.
In User Administration, access rights are given to User Teams to be able to log in to the
Graphical User Interface (GUI); Access Rights Administration, Event Assignment, Duty
Assignment, and Action Configuration.
For the Duty Assignment, it is possible to choose if user teams should have; Admin, User,
or None access to the GUI.
Authority
Description
Admin:
rights to administrate Duty Assignments
User:
rights to make assignments
None:
no access rights to the GUIs
User teams are set up in the ESS, see Installation and Operation Manual, Enhanced System
Services, ESS, TD 92253GB.
18 November 2010/ Ver. E
39
User Manual
Administration, XGate
1
TD 92364GB
Click "Access Rights".
Figure 52. Access rights have been set up for default User Team.
2
Click "Select User Teams" to add User Teams.
3
Mark the User Team that access rights should be given to. Move the user team from
the All User Teams list box, by clicking on the arrow pointing to the right. The User
Team will be moved to the Selected User Teams.
Figure 53. Add User Teams.
4
Click "OK".
5
Select which User Interface the User Team should have access to by marking the
check boxes.
6
Select between, Admin, User, or None for the Duty Assignment.
7
Click "Submit" to save the access rights.
18 November 2010/ Ver. E
40
User Manual
Administration, XGate
TD 92364GB
Remove Access Rights
1
Click "Access Rights".
2
Click "Select User Teams".
3
Mark the User Team that access rights should be taken away from. Move the User
Team from the Selected User Team, by clicking on the arrow pointing to the left.
The user team will be moved to the All User Teams.
4
Click "OK".
5
A dialogue window opens, click "Yes" to remove the User Team from the Access
Rights Administration page.
Delete invalid User Teams
By clicking on the " Delete invalid User Teams", all User Teams that are not available in the
system will be deleted.
3.9
Conversion Tables
Note: The example in this chapter is based on the XGate database configuration example
included in XGate delivery. The sample database can be loaded from "Database
Administration" on the Advanced Setup page.
• The link “Translation Table” under the heading Input Data Conversions in the Basic
Setup menu, leads to the Event Handler Configuration. For information about
Conversion Tables refer to Programming Guide, Event Handler TD 92329GB.
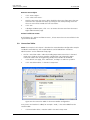
1
In the default start page, click "Advanced", and log in as admin or sysadmin.
2
Click "Translation Tables" in the Basic Setup menu.
Figure 54. The Conversion Tables in the Event Handler Configuration.
Every time a new location is added, for example a "Bed", it has to be added into the
Location table.
1
Click Translation Tables > Location table in the Basic Setup menu.
18 November 2010/ Ver. E
41
User Manual
Administration, XGate
2
TD 92364GB
Enter text to translate, and the translations, and click "Add".
Figure 55. Bed 1 and bed 2 has been added.
Every time a new alarm type is added, for example "Patient Call", it has to be added into
the Alarm type table.
1
Click Translation Tables > Alarm type table in the Basic Setup menu.
2
Enter text to translate, and the translations, and click "Add"..
Figure 56. Example of alarm types that have been added.
18 November 2010/ Ver. E
42
User Manual
Administration, XGate
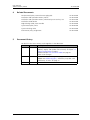
4
TD 92364GB
Related Documents
Function Description, Interactive Messaging (IM)
5
TD 92168GB
Installation and Operation Manual, XGate
TD 92338GB
Installation and Operation Manual, Enhanced System Services, ESS
TD 92253GB
Installation Guide ELISE2
TD 92232GB
Programming Guide, Event Handler
TD 92329GB
System Description, Unite
TD 92243GB
System Planning, Unite
TD 92258GB
User Manual, Duty Assignment
TD 92374GB
Document History
For details in the latest version, see change bars in the document.
Version
Date
D
2008-04-09 Added parameters; Exclude replier address, Replier, only
updates, Replier, and Update event element, to chapter 3.5
Action Configuration on page 7.
Updated chapter 3.9 Conversion Tables on page 41.
Other minor changes.
E
2010-11-18 Added info. about Message ID on page 9.
Added new Addressing types, “Reference, keep old” and
“Reference, set new” on page 17.
18 November 2010/ Ver. E
Description
43
18 November 2010/ Ver. E
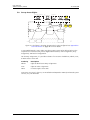
System 900
Event Handler
(Input filter & extract
Elements)
Event Handler
Other XGate
(unstructured
str
text
AB
“ABC123qxy”)
Input of
type Message
M
Unite modules
(MailGate, NetPage...)
ASCII
RS232
UDP
TCP
XGate Runtime
User
Duty Assignment
Handler
Event Elements
Event: Fire
(Decision on who is
Location: 1-2
assigned to handle it)
e Alarm
Event Text: Fire
Location Text:
xt: Floor 1, Room 2
Generic Event
(Decision on what has
happend)
Action Handler
Action Configuration
(Admin)
Action Handler
Duty Addresses
ne
Level 1: Frank, Jane
Level 2: Simon, Helen
en
Event
nt Elements
Event:
t: Fire
Location:
on 1-2
Event Text:
xt Fire Alarm
Location Tex
Text: Floor 1, Room 2
n
Event Action
General escalation,
at
3-levels
(Decision on what to do
about it)
Ass
Assigned Event
Available Events
Available Event Elements
Event Assignment
(Admin)
Administration
Event Assignment
Handler
Duty Assignment
(User)
Available Event Elements
Event Handler Configuration
(Ascom)
First time setup (commissioning)
All users
Users:
Simon, Helen
Users:
Frank, Jane
Users:
Access Rights
Configuration
(Admin)
ESS
User Manual
Administration, XGate
TD 92364GB
Appendix A: Overview Picture
44
047
User Manual
Administration, XGate
TD 92364GB
Appendix B: Action Nomenclatures
Terms are listed in alphabetical order.
Activation
Which state the output should get when the Output Action is triggered.
• Activate = Opposite to Initial State
• Deactivate = Initial state
The Initial State is set in the I/O Setup menu of the XGate. See Installation and Operation
Manual, XGate, TD 92338GB.
Beep Code
To set the alert signal for the sent message, 1 - 5 beeps, 10 beeps, Silent and Siren.
Body
The message text.
Dial Digits
A telephone call is connected to defined number when the option is selected.
Disable Option ID
The Option ID will be disabled when selected.
Disconnect Call
The ongoing call will be disconnected when the option is selected.
Display Layer
The layers are used to group the Interactive Message options into a hierarchy similar to a
portable’s menu tree. Each layer is identified with a number between 1 and 99.
Duration
The time for how long the output should be activated. If the time is set to 0, the output
activation is valid until next activation.
Enable Option ID
Specified Option ID will no longer not be disabled. If no Option ID is specified, all disabled
options will be enabled.
Erase Message
An erase message requests a portable to delete a specific, previously sent, message.
Erase Option ID
The specified Option ID will be erased.
18 November 2010/ Ver. E
45
User Manual
Administration, XGate
TD 92364GB
Function Key ID
The Function Key ID is used to specify that the option should be connected to a specific
key on the receiving portable.
Interactive Message
Interactive Messaging (IM) is an enhancement of basic messaging. An IM enables two-way
communication between a portable and the messaging system. When responding to an
interactive message, the user can choose among a list of options sent along with the
message.
Manual Acknowledge
It is possible to request a reply to a message. The reply is called acknowledge in messaging
systems. Observe that not all portables support acknowledge.
If a manual acknowledge is received, it guarantees that the user of the portable has acted
upon the message.
• Accept
Positive manual acknowledge, accept, is triggered when the user pushes the accept
button on the portable as an answer to a message. The message must have been
generated with a request for manual acknowledge.
• Reject
A user can respond with a negative acknowledge, reject, to messages that request
manual acknowledge. The message must have been generated with a request for
manual acknowledge that also allow reject.
Message
A message is an event sent within the messaging system and consists of a simple text
message. A user can easily respond to the message, for example, acknowledge that the
message was received, or accept or decline a meeting invitation.
Option ID
Each option in an IM is identified with a numerical Option ID between 1 and 99. The ID is
used when you want to disable, enable or erase an Option ID.
Option Text
Text that describes the option to the user. The option text should be as short as possible.
Output Name
Outputs are defined in XGate and are possible to use when defining actions.
The Output Name is set in the I/O Setup menu of the XGate. See Installation and
Operation Manual, XGate, TD 92338GB.
Priority
This will affect transmission priority and might also affect how the message is displayed in
the portable.
18 November 2010/ Ver. E
46
User Manual
Administration, XGate
TD 92364GB
Response Data
Predefined data that is sent to the system when the option is selected. The response data
should be numerical or written as a short text.
Response Data on Disconnect
When the call is disconnected, this response data is sent to the system.
Show Display Layer
Used to navigate in the hierarchy of options.
Subject
The subject for the sent message that will be displayed in the portable.
Time To Live
This is the time that the message remains in the portable. This function does not exist on
all portables. If omitted no limitation will be set.
User Response Prompt
Used to request the receiver of the IM to define data and send it as a response to the
system. The defined text will be displayed in the portable.
18 November 2010/ Ver. E
47