1
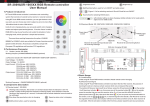
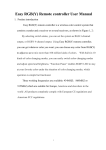
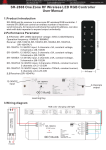
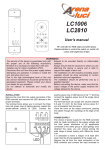
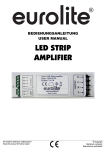
SR-2809&SR-1005XX RGB Remote controller
User Manual
3.Components description
3.1 Sender (model:SR-2809)
Working status indicator, the sender is in dormant status when the indicator is off. The
sender is under working when the indicator is flashing rapidly. If the indicator continues
flashing at the frequency of 1 second, it indicates that the sender batteries low and needs to
be recharged.
Slow down the speed when color is changing
Speed up when color is changing
Multifunction button, used for selecting
Brightness down
Pause
Brightness up
Multifunction button, used for turn ON/OFF and CW, WW , NW output
Figure 1-2 is for selecting receiver's ID and ID itself to turn ON/OFF
Remote: SR-2809
Touch wheel for selecting R/G/B colors
Receiver: SR-1005FA
Receiver: SR-1005TA
RF Touch RGB remote controller is a wireless color controlling system that consists of a sender
left indicator will be on when charging, middle indicator is for reset switch,
right one is for USB socket.
4.Wiring diagram
and a receiver or several receivers
RGB color changing LED light
Using RF Touch RGB remote controller, you can get whatever color you want, you can choose
any color to adjust so as to mix more than 100 million kinds of colors. With built-in
R
R
G
G
B
B
brightness. “Function Pause” enables RGB LED to stay at your favorite color under the situation
of color changing mode, which operation is simple but functional.
There are three working frequencies for option: 434MHZ,868MHZ or 915MHZ, which are
Power Supply
Input 12-36VDC
kinds of color changing mode, you can easily switch color changing modes and adjust speed and
SR-1005FA
PRI:
Uin=12-36VDC
Iin=15.8A
SEC:
Uout=3x(12-36)VDC
Iout=3x5A
Pout=3x(60-180)W
TEMP RANGE:-20℃-+50℃
suitable for Europe, Americas and all global market demands .All products completely comply
with European CE regulations and American FCC regulations.
2.Performance Parameter
2.1 Sender: (model: SR-2809)
Working frequency:434MHZ/868MHZ/915MHZ (optional)
N
L
110-240V
5.Basic Usage
5.1 Install battery
2.2 Receiver (model: SR-1005TA/SR-1005FA/SR-1005FA3/SR-1005FA7)
Initial using RF Touch RGB remote controller, Needs remote control charging
Input Voltage:12-36VDC
5.2 Receiver learning ID
Output Voltage:12-36VDC
Initial using RF Touch RGB remote controller must learn the ID of the receiver, the purpose of
Input Current:3CH×3A max (SR-1005TA)
3CH×5A max (SR-1005FA)
3CH×350mA (SR-1005FA3)
3CH×700mA (SR-1005FA7)
Output power:3CH×(36-108W) max (SR-1005TA)
3CH×(60-180W) max (SR-1005FA)
3CH×(4.2-12.6W) (SR-1005FA3)
3CH×(8.4-25.2W) (SR-1005FA7)
Working Frequency:434MHZ/868MHZ/915MHZ ( optional)
learning ID code is to make a certain receiver which can correspond the sender.
The method of Receiver learning ID is as follows: press the ID learning button
the ID learning indicator
is on, then press one of the number button
on the sender,
on the sender,
press the number that you want this receiver to be, E.g. If you want this receiver to be No. 1,
please press button
the sender, such as
first, then touch the wheel
,or you can press any functional button on
etc. to transmit signal to the Sender, after Receiver receives
the signal from the sender, the indicator will flash a few times and then turns off, then receiver ID
is activated. If the ID activation is failed at the first time, please repeat the previous procedures.
Attention: The receiver ID learned by touching color wheel
is different from the reciever
that learned by pressing function button
.The receiver ID learned by
touching color wheel
that we define it as SLAVE receiver, the receiver ID learned by
pressing function button
that we define it as MASTER receiver. The
purpose of learning these two kinds of receivers is to ensure the receivers and color
changing synchronously to avoid the color changing out of order. This point will be noted
later.
5.3 Delete ID and ID re-learning
If you need to delete the ID learned in the receiver, press ID learning button
for more than 5
seconds, when learning indicator is off, then the learned ID is deleted. If you need the receiver
learn a new ID, repeat the operation of 4.2 (Receiver learning ID).
5.4 Choose color by touching color wheel
After the receiver learned the ID, you can change each receiver's color by touching color wheel. If
you want to change the color of receiver NO.1.. Press button
,then make rotating touch on
color wheel
by your figures, at this time, the color of receiver No.1 will be changed constantly ,
when your favorite color appears, stop rotating and leave the color wheel
.
If you need change color of several receivers at the same, just choose a number for these several
receivers first, then touch color disc
.For example, change color for receivers NO.1, 2 at the
same time, you need press number 1 to 2 button
first, then touch the color wheel
.
5.5 Choose color changing mode
Selecting the mode button
,receiver change colors, there is 1 color changing mode.
6.2 Usage of ON/OFF
6.2.1 Press of ON/OFF button
for turning ON/OFF receiver.
6.2.2 Press ON/OFF button
for more than 2 seconds, it can reveal white light output, each
channel is 100% output.
6.3 The usage of number button
6.3.1 Press on number button for choosing the corresponding receiver, E.g. to adjust the
brightness of receiver 1, you need to press 1 button
, then press button
or button
to
adjust its brightness.
6.3.2 Pressing number button can turn on/Off the corresponding single receiver, E.g. If you need
to turn off receiver 1, press button
more than 2 seconds, if you need turn it on again, please
press button
again for more than 2 seconds.
Notice: If you turn off the extension by pressing the corresponding number button, you
must turn on this receiver in the same way, The receiver can not be switched on through
button ON/OFF.
7.Symptoms and solutions
If you want one or several receivers under color changing mode, press number button
,
and choose receiver number, then press button
again. press of button
, receiver will
pause change, the receiver will be paused, it will stay at one color. Press button
again,
receiver will continue change, The receiver will be at one of static colors by touching the color
wheel in color changing modes. Then press
button , receiver will be changed from start.
5.6 Brightness adjustment
Under the static color status or color changing status, you can adjust the brightness by press
button
and pressing button
to increase the brightness. The brightness is divided into 8
levels, the minimum is 10%, and the maximum is 100%.
5.7 Changing speed adjustment
Under color changing mode, you can slow down the changing speed by pressing button
speed up changing speed by pressing button
,10 speed levels in total are available.
When Master receiver is set, this group receivers are changing color at same time, synchronized
signal will be emited so as to ensure this group receiver will be in order no matter how long the
color changes and keep changing forever . For example, 10 receivers are learned to be ID 1. ,
these 10 receivers will change according to one mode, in order to avoid chaos of working units
after a long time, one of the receivers is needed to be set as Master ,the Master will launch
synchronized signal when color is changing, thus ensure this group of receivers are in good order
no matter how long the color is changing
,or
6.Expanded Usage
6.1 Color changing for multiple same ID receivers under same mode
One receiver of the sender can be learned (unrestricted) by multiple receivers, a receiver can be
only defined one ID No. from one sender .If one of senders is learned by several receivers, all
these receivers will share the same ID No. When all these receivers are changing color at the
same time, to ensure long-time changing in order, one of the receivers from this groups is needed
to be set as Master receiver and other receivers need to be set as Slave receivers. How to set
Master receiver and Slave receiver, please refer to 4.2(Receiver learning ID code.) Notice: Only
one receiver(Master) can be set amont a group of receivers, otherwise it may cause chaotic
phenomena.
7.1 The Receiver cannot be learned to the sender
Analysis:1.Exceed learning time, every learning time is 5Seconds only
2.Sender is under dormancy status
solution:1.Press receiver learning button, LED indicator is ON, press the number button before
led indicator is OFF, then press function button or touch color wheel
2.Press On/Off to make the sender under working status.
7.2 The sender cannot control the receiver
Analysis:1.Receiver isn't learned to the sender
2.The receiver isn't learned to the sender correctly
3.Remote distance is out of range
4.Incorrect receiver
solution:1. To learn the receiver by the sender
2.When receiver is learned to the sender, press number button first, then press function
button or touch color wheel
3.Shorten the remote distance
4.Choose correct receiver ID
7.3 Color changing isn't synchronized
Analysis:1.MASTER receiver isn't set.
2.More than two MASTER receivers are set.
solution:1. Reset a new MASTER receiver.
2.Relearn all the receivers with one Master receiver
7.4 Wrong color
Analysis: Wrong connection of RGB(W) electric wires
solution: Reconnect RGB(W) electric wires
7.5 LED flashing
Analysis: the power is not enough
solution: Change a higher power supply
8.Precautions
8.1 Don't fall the sender from a high place or don't squeeze it.
8.2 Please replace new batteries if there is a warning indicator of insufficient power, otherwise it
would cause damage to the sender..
8.3 Receiver is non-waterproof, not for outdoor use