1
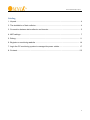
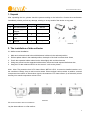
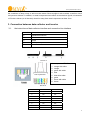
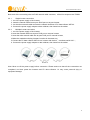
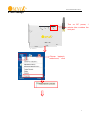
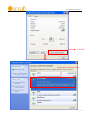
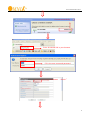
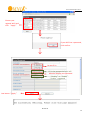
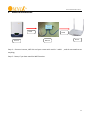
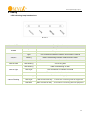
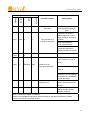
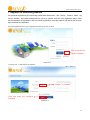
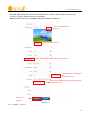
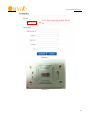
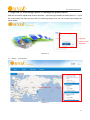
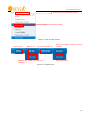
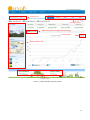
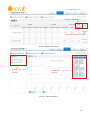
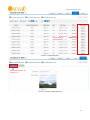
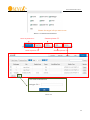
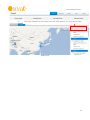
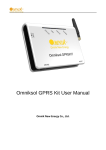
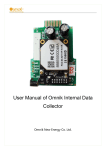
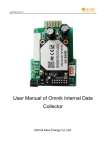
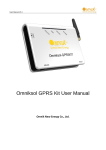
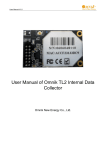
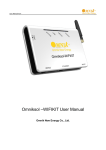
Omniksol WIFI Kit User Manual Omnik New Energy Co., Ltd. User manual version V2.1 Overview of WiFi Kit Functions Omniksol WIFI Kit is developed by Omnik as an external communication monitoring device, which integrates WiFi functions for users to monitor their systems remotely. By connecting with inverters through RS485 interface, the kit can receive information from inverters and realize cascade of inverters. It can connect to the router both wirelessly or through network cable so as to transfer inverter data to the web server. Users can monitor the runtime status of the device by checking the 4 LEDs on the panel which indicates Power, RS485, Link and Status respectively. 2 User manual version V2.1 Catalog 1. Unpack ............................................................................................................................. 4 2. The installation of data collector ....................................................................................... 4 3. Connection between data collector and inverter ............................................................... 5 4. WiFi settings ..................................................................................................................... 7 5. Debug ............................................................................................................................. 11 6. Register on monitoring website ...................................................................................... 14 7. Login the PV monitoring system to manage the power station ....................................... 17 8. Contacts ......................................................................................................................... 25 3 User manual version V2.1 1. Unpack After unpacking the box, please check the parts according to the below list. Contact the manufacturer immediately, should you find any damage, missing or wrong model of the device or any parts. Serial Name Quantity Model A PV data collector 1 WiFi kit B power supply adapter 1 FY0502000 C screw 2 -- D expanded rubber 2 -- 1 -- tube E manual Picture1 2. The installation of data collector 2.1. Wall-mounted installation 1. 2. 3. 4. 5. Mark two horizontal round holes which distance is 69mm in the selected position; Drill two φ6mm holes in the marked position, the depth of the hole is not less than 30mm; Punch the expanded rubber tubes into the holes lightly with a rubber hammer; Wring two screws into the expanded rubber tubes, the screws head exposed wall about 6cm; Hang the PV data collector WiFi kit on the screws(refer to the picture)。 Note:Note: The protection level of PV data collector WiFi kit is IP21. It cannot be installed outdoors or in the conditions of damp, dusty or with corrosive steam. Direct sunlight is also avoided. In addition, as metal components have effect on the wireless signals, the antenna of PV data collector (in all direction) should be away from metal components at least 10cm. Picture2 2.2. Horizontal data collector installation Lay the data collector on a flat surface。 4 User manual version V2.1 Note:Note: The protection level of PV data collector WiFi kit is IP21. It cannot be installed outdoors or in the conditions of damp, dusty or with corrosive steam. Direct sunlight is also avoided, as well as shock and pressure defense. In addition, as metal components have effect on the wireless signals, the antenna of PV data collector (in all direction) should be away from metal components at least 10cm. 3. Connection between data collector and inverter 3.1. the instructions of data collector interface and connection line interface serial instructions A RS485/422 interface B Ethernet C Reset D SVDC power port E Antenna Picture 3 RJ45 crystal head Line sequence of T568B 1. orange with white 2. orange 3. green with white 4. blue 5. blue white white 6. green 7. brown with white 8. brown Picture 4 Pin NO. RS485 RS422 1 NC NC 2 NC NC 3 NC RX+ 4 A TX+ 5 B TX- 6 NC RX- 7 GND GND 8 GND GND 5 User manual version V2.1 3.2. Steps of connection Both ends of the connecting wire are RJ45 network cable connector,all the line sequence are T568B. 3.2.1 Single inverter connection 1. cut of the power supply of the inverter; 2. Insert the network cable into anyone RJ45 port on anyone inverter; 3. Let the other network cable connects the network interface of PV data collector WiFi kit. 4. Connect the power supply adapter to data collector, then insert into the socket 3.2.2 Multiple inverter connection 1. cut of the power supply of the inverter; 2.Insert the network cable into anyone RJ45 port on anyone inverter; 3.Insert the other network cable into anyone RJ45 port on second inverter; 4.Make the needed monitoring inverters in series in the same way; 5.Connect the PV data collector WiFi kit to a inverter with the bus,(constitute serial LAN); 6. Connect the power supply adapter to data collector, then insert into the socket Picture 5 Note: Must cut off the power supply before connection. Please make sure that all the connections are completed, and then power the inverters and PV data collectors. Or may cause personal injury or equipment damage. 6 User manual version V2.1 4. WiFi settings Turn on DC power, 1 minute later continue the next part Choose “network neiborhood,” click 7 User manual version V2.1 Left click Choose WiFi Left Double Click 8 User manual version V2.1 Connect successfully Enter 10.10.100.254 in your browser Fill in the user name and password Lest button “Search” 9 User manual version V2.1 Choose your regional WI‐FI and click “Apply” If your WiFi has a password, click confirm Do not fill in Fill in the password of your wifi Whether display your password “Disable”or“Enable” , “Enable”suggested Lest button“Apply” Picture 6 10 User manual version V2.1 5. Ethernet connection Cable Inverter Cable WIFI kit Router Step 1:Connect inverter, WIFI kit and your router with reticle(cable), and do not need to set anything. Step 2:Reset, if you have used the WIFI function. 11 User manual version V2.1 6. Debug LED indicating lamp Introductions Picture 7 Name of LED POWER 485\422 STATUS Dark STATUS Light STATUS Flashing Status Description of status Light The power is normal Dark The power is abnormal Light The connection between collector and inverter is normal Flashing Data is transferring between collector and inverter Dark The connection between collector and inverter is abnormal LINK Flashing Connecting WiFi LINK Flashing Data is transferring of WiFi LINK Light The connection of collector is normal LINK Dark The connection of collector is abnormal LINK Flashing Data is transferring of port LINK Light WiFi is in the AP way ,a terminal is connecting with the equipment LINK Dark WiFi is in the AP way ,no terminal is connecting with the equipment 12 User manual version V2.1 Trouble shootings with LEDs phenomenon Light Dark Dark X STATUS 485/422 Dark LINK POWER Dark Dark X Possible reasons Dealing ways Haven’t connected to the power Connect power and ensure that the power supply is good. The connection of inverter is abnormal Check the connection cable is right and ensure that the order is according to 568-B Ensure the stability of RJ-45 connector line Confirm the status of inverter and ensure it’s working condition is normal Flashing Light X In the AP Mode Set network settings X Confirm if the antenna is loose or fall off. If so, please screw it. Light X Flashing Dark Collector is not connected with WIFI Check if the WIFI wanted is covered. Restore the factory settings according to the installation manual and reset. Light Light Dark Light Fail to connect the remote server Please confirm that WIFI can be connected with the Internet. Light Dark Dark Dark The system is initialized Please wait. If there is no change in 2min, please reset the collector. Note1:x means the status is instability Note2: If the equipment still cannot work according to the above instructions, please connect your device customer service. 13 User manual version V2.1 7. Register on monitoring website Our products supported by PV monitoring system Web site browser:IE8,Firefox,Chrome,safari,log into the website http://www.omnikportal.com, Click on register, enter the user registration page, follow the requirements for registration, after successful registration, enter the mailbox and activity the account, then complete the registration. 6.1 Click Register button to go to registering interface for new account Click and enter the register interface Picture 6‐1 7.2 Fill in user’s information as required choose“Owner”or“Installer” Click and enter the configure interface Picture 6‐2 14 User manual version V2.1 6.2.1 “Owner” Account Remarks: please read the <Omnik service agreement >carefully, the enclosure is the cost list for all the countries, please choose your operators Owner means the final user; Installer means the installer or distributor Click and choose the aim pic Click”OK”save the pic Fill in GPRS card’s S/N code, see pic 6‐5 Click the map, choose the installation site Select, and choose it to be the share mode, other user can see Finish the register Picture 6‐3 6.2.2 “Installer” Account 15 User manual version V2.1 Fill in WiFi card’s S/N, please see pic 6‐5 Picture 6-4 Picture 6-5 16 User manual version V2.1 7. Login the PV monitoring system to manage the power station After the successful register and account activation,open the login interface as below picture 7-1, input the correct email and code and enter the PV monitoring system, then you can monitor and manage the power station. Input the correct email and code Picture 7‐1 7.1 “Owner” User Interface Power station list Picture 7-2 17 User manual version V2.1 Choose your aim station and enter Edit or delete the case Picture 7-3 List of power stations Not yet open Back to 7‐2 Enter the sharing case Add one case under your account, same as 7‐3 Enter the configure “company account” interface Reset password Picture 7-4 navigation bar 18 User manual version V2.1 Change case Case info search Real‐time power and generated energy Print current Power station info Energy saving Picture 7-5 Main interface of power station 19 User manual version V2.1 Internal temperature Latest data collecting time Picture 7-6 Real Time Interface Choose the aim inverter Parameter options Picture 7-7 History Interface 20 User manual version V2.1 Click ,turn to picture 7‐7 Picture 7-8 Alert Interfaces The interface same as picture 7‐3 Picture 7-9 System Setting Interface 21 User manual version V2.1 Picture 7-10 System Setting Interface 7.2 “Installer” User Interface Power station information Collector info 22 User manual version V2.1 Choose the target info you want to see Picture 7-11 Home main interfaces Same as picture7‐11 Same as picture 7‐7 Same as picture 7‐8 Same as picture 7‐6 Picture 7‐12 23 User manual version V2.1 Click map, choose the aim station, you will enter picture 7‐5, only can be view Picture 7-13 24 User manual version V2.1 8. Contacts If you have any technical problems about our products,please contact us,you should confirm the follow things before contact us: Device model Data collector serial number The number of connected inverter Add: Xinghu Road No.218 bioBAY Park C2, Suzhou China Zip code:215213 Fax: +86 512 6295 6682 Tel: +86 512 6295 6676 Mail: [email protected] 25