1
NetwoRC provider user's guide
-1-
NetwoRC provider
DENSO Robot
Version 1.2.18
User's guide
July 17, 2012
【Remarks】
ORiN Forum
DENSO WAVE Inc.
NetwoRC provider user's guide
-2-
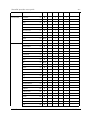
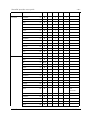
【Revision history】
Version
Date
Content
1.0.0
2006-05-11
First edition.
1.0.1
2006-07-17
@n, ROTATE pose option, ST_* commands were supported.
1.0.2
2006-08-31
SYSSTATE, Pose Data Type Transformation, Conveyer Tracking
Commands were supported.
1.0.3
2006-09-13
POSEDATA type was supported.
1.0.4
2006-10-16
Trouble Shooting was added.
1.0.5
2006-12-09
A “Len” option of I/O variable was added
1.1.0
2007-07-12
Servo Log Commands were added, RC5 was supported.
1.1.1
2007-08-10
MyIP option was added.
1.1.2
2007-11-21
TORetry option was added.
1.2.0
2008-01-14
Extended-joints were supported.
1.2.1
2008-01-211
Error code table was added.
1.2.2
2008-06-18
An high path accuracy command was added.
1.2.3
2008-07-02
Minor upgrade.
1.2.4
2008-08-22
FIGAPRP, FIGAPRL were supported.
1.2.5
2008-09-30
Minor upgrade.
1.2.6
2008-11-21
Variable name with ‘*’ (ex. I[*]) and UDP local port option were added.
1.2.7
2009-06-12
Collision Detection Commands was supported.
1.2.8
2009-07-03
Tips were added.WDIn and WDOut were supported.
1.2.9
2009-07-07
Variable time stamp (Microsecond property) was supported.
1.2.10
2010-02-11
Mini I/O All-general was supported. Error code was added.
1.2.11
2010-05-21
CtrlChk option was added.
1.2.12
2010-11-17
Correct Execute command name.
1.2.13
2011-01-11
“Transferring PAC program” upgrade.
1.2.14
2011-02-01
“caoRobot” Commands upgrade.
1.2.15
2011-04-05
Correct Hardware version.
1.2.16
2011-04-21
Non-stop motion calculator option was added.
1.2.17
2011-05-16
@ERROR_CODE_HEX was added.
1.2.18
2011-05-26
The Bundle connection limitation (max. 3) was abolished.
2012-07-17
Document versioning rules was changed
ORiN Forum
DENSO WAVE Inc.
NetwoRC provider user's guide
-3-
【Hardware】
Model
Version
Notes
RC7
Ver2.330 or higher
“ORiN” option (1214) is required.
RC5
Ver1.998 or higher
“ORiN” option (1213) is required. See Appendix D for details.
【Attention】
The maximum number with which NetwoRC can be connected 1 at a time is 79.
1
Connected Number = Number of instances of NetwoRC providers = Number of objects made with CaoWorkspace::AddController
ORiN Forum
DENSO WAVE Inc.
NetwoRC provider user's guide
-4-
Contents
1. Introduction.............................................................................................. 8
1.1. Outline.......................................................................................................................................9
2. Setup ......................................................................................................11
2.1. Emergency stop device position .............................................................................................11
2.2. Controller setup.......................................................................................................................11
2.2.1. Setup using a teach pendant ............................................................................................11
2.2.2. Setup using the mini pendant ...........................................................................................13
2.3. Treatment of special I/O port...................................................................................................17
2.3.1. I/O treatment for standard configuration controller (without I/O extension board) ............17
2.3.1.1. Mini I/O All general option ..........................................................................................18
2.3.2. I/O treatment for controllers with I/O extension board ......................................................18
2.4. Robot controller’s Executable Token .......................................................................................20
2.4.1. Basic knowledge concerning robot controller’s Executable Token....................................20
2.4.2. Notes in ANSI type robot controller...................................................................................20
2.5. Transferring PAC program ......................................................................................................23
2.6. Introduction of RobMaster.......................................................................................................23
3. Programming with NetwoRC provider ................................................... 25
3.1. Connection..............................................................................................................................25
3.2. Variable Read/Write ................................................................................................................26
3.2.1. Connection .......................................................................................................................26
3.2.2. Read/Write Variabl............................................................................................................27
3.2.3. Disconnection ...................................................................................................................27
3.2.4. Sample program ...............................................................................................................28
3.3. Start and stop PAC program PAC ...........................................................................................28
3.3.1. Connection .......................................................................................................................29
3.3.2. Start/Stop PAC program ...................................................................................................29
3.3.3. Sample Program...............................................................................................................29
3.4. Robot motion...........................................................................................................................30
3.4.1. Connection .......................................................................................................................31
3.4.2. Move and stop robot.........................................................................................................31
3.5. Another samples .....................................................................................................................32
4. Outline of provider ................................................................................. 33
4.1. List of method .........................................................................................................................33
4.2. Method and Property...............................................................................................................34
4.2.1. CaoWorkspace::AddController method ............................................................................34
4.2.1.1. Conn option................................................................................................................35
ORiN Forum
DENSO WAVE Inc.
NetwoRC provider user's guide
-5-
4.2.2. CaoController::AddCommand method..............................................................................36
4.2.3. CaoController::AddFile method ........................................................................................36
4.2.4. CaoController::AddRobot method.....................................................................................37
4.2.5. CaoController::AddTask method.......................................................................................38
4.2.6. CaoController::AddVariable method .................................................................................38
4.2.7. CaoController::get_TaskNames property..........................................................................39
4.2.8. CaoController::get_VariableNames property ....................................................................39
4.2.9. CaoController::Execute method .......................................................................................39
4.2.10. CaoController::OnMessage event ..................................................................................43
4.2.11. CaoCommand::Execute method.....................................................................................44
4.2.12. CaoCommand::get_Parameters property.......................................................................44
4.2.13. CaoCommand::put_Parameters property.......................................................................44
4.2.14. CaoFile::AddFile method ................................................................................................44
4.2.15. CaoFile::AddVariable method .........................................................................................45
4.2.16. CaoFile::get_VariableNames property............................................................................45
4.2.17. CaoFile::Copy method....................................................................................................45
4.2.18. CaoFile::Delete method..................................................................................................45
4.2.19. CaoFile::Move method ...................................................................................................45
4.2.20. CaoFile::get_DateCreated property................................................................................45
4.2.21. CaoFile::get_DateLastAccessed property ......................................................................45
4.2.22. CaoFile::get_DateLastModified property ........................................................................45
4.2.23. CaoFile::get_FileNames property ..................................................................................45
4.2.24. CaoFile::get_Attribute property.......................................................................................45
4.2.25. CaoFile::get_Path property.............................................................................................46
4.2.26. CaoFile::get_Size property .............................................................................................46
4.2.27. CaoFile::get_Type property ............................................................................................46
4.2.28. CaoFile::get_Value property ...........................................................................................46
4.2.29. CaoFile::put_Value property ...........................................................................................46
4.2.30. CaoRobot::Accelerate method .......................................................................................46
4.2.31. CaoRobot::AddVariable method .....................................................................................46
4.2.32. CaoRobot::get_VariableNames property ........................................................................46
4.2.33. CaoRobot::Halt method ..................................................................................................46
4.2.34. CaoRobot::Change method............................................................................................47
4.2.35. CaoRobot::Drive method ................................................................................................47
4.2.36. CaoRobot::Move method................................................................................................47
4.2.37. CaoRobot::Rotate method ..............................................................................................51
4.2.38. CaoRobot::Speed method ..............................................................................................52
ORiN Forum
DENSO WAVE Inc.
NetwoRC provider user's guide
-6-
4.2.39. CaoRobot::Execute method ...........................................................................................53
4.2.40. CaoTask::AddVariable method .......................................................................................72
4.2.41. CaoTask::get_VariableNames property ..........................................................................73
4.2.42. CaoTask::Start method ...................................................................................................73
4.2.43. CaoTask::Stop method ...................................................................................................73
4.2.44. CaoVariable::get_Value property ....................................................................................73
4.2.45. CaoVariable::put_Value property ....................................................................................73
4.2.46. CaoVariable::put_ID property .........................................................................................73
4.2.47. CaoVariable::get_ID property .........................................................................................74
4.2.48. CaoVariable::get_Microsecond property.........................................................................74
4.2.49. CaoMessage::Clear method...........................................................................................74
4.3. Variable list..............................................................................................................................75
4.3.1. Controller class.................................................................................................................75
4.3.2. Robot class.......................................................................................................................78
4.3.3. Task class .........................................................................................................................80
4.3.4. File class ..........................................................................................................................81
5. Outline of robot operation command execution..................................... 82
6. Tips........................................................................................................ 83
6.1. How to write data in an error state ..........................................................................................83
6.1.1. Enable a supervisory task ................................................................................................84
6.1.2. Make a supervisory task...................................................................................................85
6.1.3. Notify to a supervisory task from a PC .............................................................................86
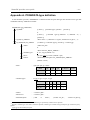
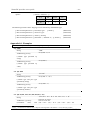
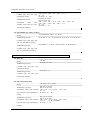
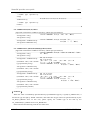
Appendix A. POSEDATA type definition .................................................... 87
Appendix A.1. Examples ................................................................................................................88
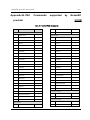
Appendix B. PAC Commands supported by NetwoRC provider ............... 93
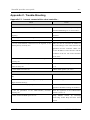
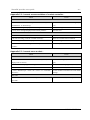
Appendix C. Trouble-Shooting .................................................................. 96
Appendix C.1. I cannot connect with a robot controller... ...............................................................96
Appendix C.2. I cannot access variables of a robot controller........................................................97
Appendix C.3. I cannot move a robot.............................................................................................97
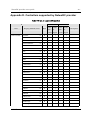
Appendix D. Controllers supported by NetwoRC provider ........................ 98
Appendix E. Error code of NetwoRC provider ......................................... 103
Appendix F. Non-Stop Motion Calculator - Trajectory Generator Command
for Non Stop Inspection ........................................................................... 105
Appendix F.1. Parameter..............................................................................................................105
Appendix F.2. Error Codes ...........................................................................................................105
Appendix F.3. Restrictions............................................................................................................107
Appendix F.4. Sample Program ...................................................................................................107
ORiN Forum
DENSO WAVE Inc.
NetwoRC provider user's guide
-7-
Appendix F.5. Workaround at the time of the Adjustment Failure (Error Code:0x800123xx)........108
ORiN Forum
DENSO WAVE Inc.
NetwoRC provider user's guide
-8-
1. Introduction
This document describes external specifications of the CAO provider for NetwoRC controller (RC7) of the
DENSO robot. In this document, CAO provider (CaoProvRoboTalk.dll) is called as NetwoRC provider. The
NetwoRC provider implements all interfaces defined in the CAO provider specification.
This document describes the NetwoRC provider specifications on connection parameters, system variables,
user variables, files and original enhancement.
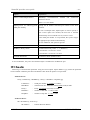
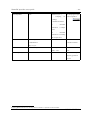
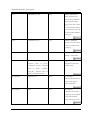
The dependency of the NetwoRC controller’s model and version is described in the next table used as Sign
in this document.
Table 1-1 NetwoRC controller’s model and version
Controller
Model
Version
RC7M
2.330 or more
Sign
Explanation
If the controller version is
2.330 or more, it is valid.
-
-
"RobSlave.pac" program need
to be executed commands.
!
ORiN Forum
All global variables (I, F, D, V, P, J, T, S) from [0] to [9] have been reserved
with the system.
Please do not access these variables in the user’s program.
DENSO WAVE Inc.
NetwoRC provider user's guide
-9-
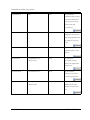
1.1. Outline
The NetwoRC provider is CAO provider that absorbs RC7 dependant part and offers the function defined by
the CAO provider interface specifications. The file format is DLL (Dynamic Link Library), and it is
dynamically loaded from CAO engine when it is used. To use NetwoRC provider, registry need to be manually
registered according to the table below.
Table 1-2 NetwoRC provider
File name
CaoProvNetwoRC.dll
ProgID
CaoProv.DENSO.NetwoRC
Registry registration 2
regsvr32 CaoProvNetwoRC.dll
Remove registry registration
regsvr32 /u CaoProvNetwoRC.dll
A license key is required to use the CAO Engine module. Please refer to “License registeration” section of
“ORiN2 SDK User’s Guide”.
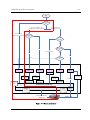
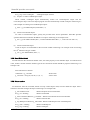
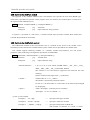
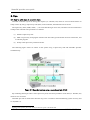
NetwoRC provider communicates to the controller using RS232C or Ethernet, and the provider supports
functions like controller variable read/write, PAC program invocation, and robot motion. ORiN supports
various communications to connect to the robot controller, as shown in Figure 1-1. Thisprovider supports the
communication method shown in the red frame.
2
In case of installation from ORiN2 SDK, register and unregister operation is not required.
ORiN Forum
DENSO WAVE Inc.
NetwoRC provider user's guide
- 10 -
Start
Required
functions for an
app.
Only I/O and Variable, and
Configuration should be separated.
All functions, or
Performance is important
I/O, Variable and
basic Robot motion
Wants to use a
read-made OPC
app.
Special add-in
is prepared.
NO
NO
YES
Ex. HALCON Add-in
Wants to run it
without ORiN2
CAO.
YES
NO
YES
Has COM API
skill.
YES
Software Architecture
OPC
App. 2
App. 1
CaoSQL
App. 3
NO
App. 4
b-CAP
App. 6
App. 5
Add-in
CaoOPC
User’s Guide
ORiN2
Programer’s
Guide
CaoSQL
User’s Guide
CaoOPC
CaoSQL
(COM API)
(COM API)
DENSO b-CAP
User’s Guide
NetwoRC_Win3
2_ja.pdf
Prototyping
NetwoRC.dll
(Win32 API)
ORiN2 CAO (COM API)
NetwoRC
Provider
User’s Guide
DENSO NetwoRC Provider
Proprietary Protocol
(ROBOTalk)
b-CAP
Provider
User’s Guide
b-CAP
Provider
ORiN2 b-CAP
Figure 1-1 Robot connection
ORiN Forum
DENSO WAVE Inc.
NetwoRC provider user's guide
- 11 -
2. Setup
2.1. Emergency stop device position
A robot emergency stop switch should be prepared and set up near a robot operator before operating the
robot, so that the switch can immediately stop the robot motion in an emergency situation.
The robot emergency stop switch should meet the following requirement.
(1) The emergency stop switch should be red-colored.
(2) After the emergency stop switch is activated,
the switch should not return to normal (robot
operating) position automatically or by other operator’s careless action.
(3) A robot emergency stop switch should be set up separately from the power switch.
The emergency stop device shall be in accordance with IEC 60204-1:2005, 10.7 and ISO 13850.
2.2. Controller setup
A robot controller need to be setup before is controlled by the NetwoRC provider. A teach pendant or a mini
pendant is needed for the robot controller setup. Following is the procedure to setup the controller.
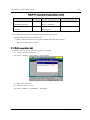
2.2.1. Setup using a teach pendant
Setup a robot controller with a teach pendant according to the following procedure.
(1) Set the robot controller to the manual mode.
①
②
④
③
⑤
⑥
Figure 2-1 ORiN option activation
ORiN Forum
DENSO WAVE Inc.
NetwoRC provider user's guide
- 12 -
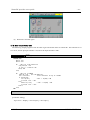
(2) Set controller’s communication permission. When you use Ethernet, Set “Read/Write” in the
menu “Communications setting menu” => “Permit.” When you use RS-232C, set “Read/Write”
in the same menu
①
②
④
③
⑤
④ to ⑤
Set RS-232C port to disable
⑥
⑦
⑥ to ⑦
Set Ethernet to enable
Figure 2-2 Setting of communication permission
(3) Activate ORiN option. Select “Option” => Input password “1214” in the function expansion
menu to activate “ORiN” option. 3 Input “1213” if robot controller is RC5.
(4) To turn ON/OFF the motor of the robot, or to start programs from an ORiN application, it is
necessary to set controller’s executable token. Set the executable token to “Ethernet” by setting
the “Communications setting menu” => “Ext.Run”, and set IP address of client PC by “F4:IP
set” menu afterwards when you use Ethernet as the connection method. Set the executable
token to each COM port when you use RS232 C.
3
By setting “ORiN” option, ORiN applications can freely access the variables and I/Os. Access the variables and I/Os after fully understanding
the state and the content of the robot controller program etc. Especially, the changing the variables and I/Os might give the critical effect to the
movement of the robot and the program.
In the internal automatic mode, when “ORiN” option is activated, the robot program stops if an error more than level 3 occurs. However, in
external automatic mode, the robot program stops if an error more than error level 2 occurs. Therefore, when a robot is in external automatic
mode, please be careful not to perform wrong operation or not to transmit a wrong command.
ORiN Forum
DENSO WAVE Inc.
NetwoRC provider user's guide
①
- 13 -
②
④
③
⑤
Figure 2-3 Settings of Executable token
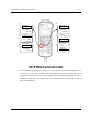
2.2.2. Setup using the mini pendant
Setup a controller with a mini pendant according to the following procedure.
(1) Set a robot controller to the manual mode.
(2) Activate ORiN option. [Aux Function] => [Extension] => [Extension] => Input “1214” with
Add and make “ORiN” effective. 3
ORiN Forum
DENSO WAVE Inc.
NetwoRC provider user's guide
- 14 ①
Aux.Function
・Arm.Aux
・M aintnanc
・Extension
[Cancel/OK]
②
Extens ion
・Extension
・DisplyKey
[Cancel/OK]
③
Extens ion
・Add
・Delete
[Cancel/OK]
④
Password
1214
[Cancel/OK]
⑤
Add:ORiN
[OK]
Figure 2-4 ORiN option activation
(3) Set robot controller’s communication permission. When you use Ethernet, go to COM Setting
of mini pendant => Set R/W to Ethernet with Permit. When you use RS232C, set R/W to
appropriate COM port.
ORiN Forum
DENSO WAVE Inc.
NetwoRC provider user's guide
①
- 15 -
④
COM Setting
・Permit
・RS-232C
・IP Address
COM Setting
・Permit
・RS-232C
・IP Address
[Cancel/OK]
②
Permission
・(RW) COM 2
・(X ) COM 3
・(X ) COM 4
[Cancel/OK]
⑤
[Cancel/OK]
Permit- Ether
・Disable
・Read only
・Read/Write
③
[Cancel/OK]
Permission
・(X ) COM 3
・(X ) COM 4
・(X ) Ether
[Cancel/OK]
⑥
Permit- Ether
・Disable
・Read only
・Read/Write
[Cancel/OK]
Figure 2-5 Setting of communication permission
(4) To turn ON/OFF the motor of the robot, or to start programs from an ORiN application, it is
necessary to set controller’s executable token. When Ethernet is used for communication, go to
COM menu of mini pendant and set the executable token to Ethernet in [Ext Run], and also set
IP address of client PC in [Client IP] menu. Set the executable token to appropriate COM port
when you use RS232 C.
ORiN Forum
DENSO WAVE Inc.
NetwoRC provider user's guide
- 16 -
①
COM Setting
・RS-232C
・IPAddress
・Ext.Run
[Cancel/OK]
②
Ext.Run
・Ext.Run
・Client IP
[Cancel/OK]
③
Ext.Run
・I/O
・Ethernet
・COM 2
[Cancel/OK]
Figure 2-6 Setting of Executable token
①
COM Setting
・RS-232C
・IP Address
・Ext.Run
[Cancel/OK]
②
Ext.Run
・Ext.Run
・Client IP
[Cancel/OK]
③
IP Address
192.168. 0.200
[Cancel/OK]
Figure 2-7 Input of IP address of client PC
ORiN Forum
DENSO WAVE Inc.
NetwoRC provider user's guide
- 17 -
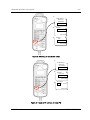
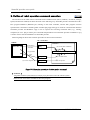
2.3. Treatment of special I/O port
DENSO robot controller has a lot of system input signals.
To operate robot from PCs connected to the robot controller using ORiN, “Step stop (All tasks) signal” and
“Instantaneous stop signal” need to be set to enable robot program execution.
Connector assignment and pin assignment of “Step stop (All tasks) signal” and “Instantaneous stop signal”
are different depending on the robot controller configuration and I/O assignment. Please confirm the robot
controller configuration to make correct I/O treatment to enable robot program execution.
[Note 1] The I/O treatment is not necessary for RC5, because these versions of software does not support
running robot program using ORiN.
[Note 2] The I/O treatment is not necessary, if ORiN is used only to access variables or files, and if ORiN is
NOT used to control robot motion or robot program (PAC).
2.3.1. I/O treatment for standard configuration controller (without I/O extension board)
Please close Mini I/O general purpose / system I/O connector CN5 – terminal No.11.
By closing the signal, Step stop (All tasks) signal (port number 0) becomes ON, and robot and program
execution is enabled.
Close Mini I/O: General
purpose/System
I/O
connector CN5 - No.11
Figure 2-8 Step stop (All tasks) treatment
ORiN Forum
DENSO WAVE Inc.
NetwoRC provider user's guide
- 18 -
Confirm Step Stop (All
tasks) signal is ON.
Figure 2-9 Signal confirmation after I/O treatment
This type of I/O does not have Instantaneous stop signal, so no treatment is necessary.
2.3.1.1. Mini I/O All general option
Mini I/O All-general option, available on Version 2.90 or later, is for robot system that does not require
special I/O port assigned to mini I/O. By activating the option, all mini I/O ports are assigned as general I/O,
and step stop signal wiring becomes not necessary.
To activate the option, setup a robot controller with a teach pendant according to the following procedure.
(1) Set a robot controller to the manual mode.
(2) To activate Mini I/O All-general option, select “Option” => “Function expansion” menu and input
password “6319”.
(3) Turn off and restart a robot controller.
[Note 1] By activating mini I/O all-general option, a special I/O input assignment of step stop signal is
nullified, and the robot cannot be step-stopped by the I/O input.
[Note 2] By activating mini I/O all-general option, step stop wiring becomes not necessary. However,
wirings for auto enable input and emergency stop input are still necessary even if the option is activated.
2.3.2. I/O treatment for controllers with I/O extension board
If a robot controller is configures with extension I/O board (parallel I/O, DeviceNet, CC-Link, PROFIBUS,
etc.), please refer “Installation and maintenance guide” and “Options Manual – Part2: RC7M I/O extension
ORiN Forum
DENSO WAVE Inc.
NetwoRC provider user's guide
- 19 -
board”, and turn on “Step stop (All tasks) signal” and “Instantaneous stop signal”.
ORiN Forum
DENSO WAVE Inc.
NetwoRC provider user's guide
- 20 -
2.4. Robot controller’s Executable Token
2.4.1. Basic knowledge concerning robot controller’s Executable Token
It is necessary to set the executable token for turning ON/OFF the motor or starting the program from the
ORiN application. (Refer to 2.2.1and 2.2.2). For the safety reason and to meet with “Single point of control”
requirement, only the selected equipment can control a robot controller from the outside. Moreover, the robot
controller becomes executable only in the external automatic mode as for turning ON/OFF the motor and
starting the task from the ORiN application.
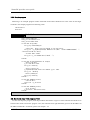
The executable token changes as shown in the following figures.
Executable token
I/O
PC
Ext. Auto
1
PLC
rs232c /
Ethernet
2
1
Int. Auto
TP
Transition timing of “Executable Token”
1
1.
2.
3.
4.
[ANSI/Std.] When switching with TP/miniTP (Note 1).
[Std.] When switching with I/O.
[Std.] When switching with PC (ORiN).
[Std.] When a error occurred. (External to Internal).
2
1. [ANSI/Std.] When switching with TP/miniTP (Note 1).
(Note 1) The switching procedure depends on the specification.
Figure 2-10 Transition of executable token
2.4.2. Notes in ANSI type robot controller
As previously stated, turning ON/OFF the motor and starting a program from the ORiN application is
possible only if the controller is in the external automatic mode.
For the robot controller of the ANSI type, please note that you need to go to “I/O Auxiliary Function” –
“single point of control” menu and select “External automatic operation” to change the robot controller to
external automatic mode.
Following is the procedure to select external automatic mode in ANSI type controller. (Note: The ext button
ORiN Forum
DENSO WAVE Inc.
NetwoRC provider user's guide
- 21 -
on RobMaster does not work for ANSI type robot controllers.)
(4) Mode selection procedure using the teach pendant
After the following procedure is completed and robot is set to automatic mode, robot mode will be
changed to the selected (internal or external) automatic mode.
①
②
③
④
Figure 2-11 Internal/external automatic mode selection by teach pendant
(5) Mode selection procedure using the mini pendant
After the following procedure is completed and robot is set to automatic mode, robot mode will be
changed to the selected (internal or external) automatic mode.
ORiN Forum
DENSO WAVE Inc.
NetwoRC provider user's guide
- 22 -
Aux.Function
・M aintnanc
・Option
・SnglPtCtl
[Cancel/OK]
SinglPtCtrl
・Intetnal
・External
Internal Auto Mode
External Auto Mode
[Cancel/OK]
Figure 2-12 Internal/external automatic mode selection by mini pendant
ORiN Forum
DENSO WAVE Inc.
NetwoRC provider user's guide
- 23 -
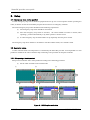
2.5. Transferring PAC program
To execute robot motion commands (refer to Table 0-3) with NetwoRC provider, following PAC programs,
RobSlave.pac, RobSlave.h and UserExtention.pac, need to be sent to the robot controller and need to be
executed.
To transfer PAC program to a robot controller, Using RobMaster.exe tool included ORiN SDK.
Mini pendant (mini TP) or Teach pendant (TP) is necessary for these method.
RobMaster.exe 4 is a tool to show robot controller status and to control RobSlave task directly from PC, and
the tool program is stored in NetwoRC provider installation folder.
<ORiN2 installation folder>¥CAO¥ProviderLib¥DENSO¥NetwoRC¥Bin
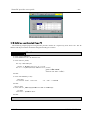
Start RobMaster.exe and follow this procedure to setup the controller.
1.
Start robot controller, and change to [manual] mode.
2.
Start RobMaster.exe program.
Start > All Programs > ORiN2 > CAO > ProviderLib > RobMaster
3.
Press [Connect] button to connect the program to the robot controller.
4.
Press [Setup] button of RobMaster.exe and follow the instructions to send necessary PAC programs
to the robot controller.
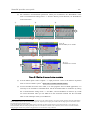
2.6. Introduction of RobMaster
Bundled tool RobMaster is connected to a robot controller, and offers the following function.
1.
Set up a robot controller to be used with ORiN.
2.
Start and stop the controller’s RobSlave task.
3.
Turn on and off the motor power of the controller.
4.
Display robot controller error status and clear error.
5.
Display robot controller ٛ tatues.
Following is the introduction of RobMaster functions.
4
<ORiN2 SDK install folder>¥CAO¥ProviderLib¥DENSO¥NetwoRC¥Bin¥RobMaster.exe
ORiN Forum
DENSO WAVE Inc.
NetwoRC provider user's guide
- 24 -
Specify controller's connection option
(eth:<IP>).
Start / Stop the RobSlave task.
Display the Auto Mode
Switch to External-Auto mode
Display the Emergency Stop
Turn on or off the motor
Display current tool / work number
Display the internal speed,
And acceleration, deceleration
Display the external speed,
And acceleration, deceleration
Display the current error number.
Display the error screen by clicking
here. (see right figure. )
Clear the error.
Set up the controller.
1) obSlave.pac, obSlave.pac and
UserExtension.pac are forwarded
2) Compile.
3) Set ORiN option (1214).
Display the messages.
Figure 2-13 Function introduction of RobMaster
ORiN Forum
DENSO WAVE Inc.
NetwoRC provider user's guide
- 25 -
3. Programming with NetwoRC provider
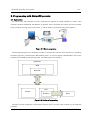
3.1. Connection
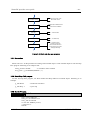
To control robot with NetwoRC provider, communication between an ORiN installed PC and the robot
controller should be established with RS232C or Ethernet. Some commands also require the robot controller
setup. For details of setup, please refer chapter 2, and for details of commands, please refer chapter 4.
Figure 3-1 Robot connection
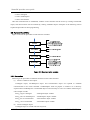
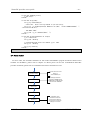
The developed program uses NetwoRC provider to communicate with the robot controller, by generating
NetwoRC proprietary communication (RoboTALK) packet. An special program called RobSlave runs on the
controller for handshaking and operating robot. For details please refer chapter 5.
Application
ORiN
Rob Talk
NetwoRC
RC7M
PAC
Variable
RobSlave
Robot
Figure 3-2 Outline of programing
NetwoRC provider establishes communication between the PC and the robot controller by the following
procedure.
ORiN Forum
DENSO WAVE Inc.
NetwoRC provider user's guide
- 26 -
・ Create CaoEngine
・ Create CaoWorkspace
・ Create CaoController
After the communication is established, variables in the controller will be access by creating CaoVariable
object, and robot motions will be initiated by creating CaoRobot object. Examples in the following section
explain the procedure of robot programming.
3.2. Variable Read/Write
Figure 3-3 shows the procedure to read and write variables.
Figure 3-3 Read and write variable
3.2.1. Connection
Following is the procedure to establish connection to the robot controller.
(1) Create a variable to store object
CaoEngine object, CaoWorkspace object and CaoController object are required to establish
communication to the robot controller. CaoWorkSpace need not prepare a variable if it is directory
acquired from CaoWorkspaces. CaoVariable object is also necessary to access to variables. Following is a
code example in VB6.
Dim g_eng as CaoEngine
‘ CaoEngine object variable
Dim g_wrks as caoWorkspace ‘ CaoWorkspace object variable
Dim g_ctrl as CaoController
‘ CaoController object variable
Dim g_val as CaoVariable
‘ CaoVariable object variable
(2) Create CaoEngine object
CaoEngine object is created with New keyword..
ORiN Forum
DENSO WAVE Inc.
NetwoRC provider user's guide
Set g_eng = New CaoEngine
- 27 ‘ CaoEngine object creation
(3) Acquire or create CaoWorkspace object
When created, CaoEngine object automatically creates one Caoworkspaces object and one
Caoworkspace object. The next sample program uses the automatically created workspace. Following is a
code example of creating new CaoWorkspace object.
g_wrks = g_ctrl.Addworkspace("NewWrks", "")
(4) Create CaoController object
To create a CaoController object, specify the provider name and its parameters. NetwoRC provider
specifies destination controller IP address as an option. Following is an example code.
g_ctrl = g_wrks.AddController("RC", "CaoProv.DENSO.NetwoRC", "", "conn=eth:192.168.0.1")
(5) Create CaoVariable object
Create an object of CaoVariable for the accessed variable. Following is an example code of accessing
the 10th element of P type variable.
g_val = g_ctrl.AddVariable("P10", "")
3.2.2. Read/Write Variabl
To read and write the connected variable value, use Value property of CaoVariable object. To read and write
value, another variable with the suitable type for the connected variable should be prepared. Following is an
example code.
Dim vntPotision as Variant
vntPotision = g_val.Value
' Read value
g_val.Value = Array(50, 50, 50, 0, 0, 0, -1)
' Write value
3.2.3. Disconnection
To disconnect from the controller, delete not only created object itself, but also delete the object from a
collection class that manages the object. Following is an example code.
g_ctrl.Variables.Clear
' Delete all objects from CaoVariables
Set g_val = Nothing
' Delete CaoVariable
g_wrks.Controllers.Remove g_ctrl.Index ' Delete CaoController from CaoControllers
Set g_ctrl = Nothing
' Delete CaoCtonroller
g_eng.Workspaces.Remove g_wrks.Index ' Delete CaoWorkspace from CaoWorkspaces
Set g_wrks = Nothing
' Delete CaoWorkspace
Set g_eng = Nothing
' Delete CaoEngine
ORiN Forum
DENSO WAVE Inc.
NetwoRC provider user's guide
- 28 -
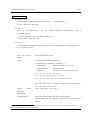
3.2.4. Sample program
Following is an example program written with VB6. IP and Port should be set to the value for the target
controller. This sample program uses following value.
IP:192.168.0.1
Port:4112
List 3-1
Variable.frm
Dim g_eng As CaoEngine
Dim g_ctrl As CaoController
Dim g_val As CaoVariable
Private Sub Form_Load()
Set g_eng = New CaoEngine
' connect RC : IP/Port setting depends on your RC setting.
Set g_ctrl = g_eng.Workspaces(0).AddController("RC7", "caoProv.DENSO.NetwoRC", "",
"conn=eth:192.168.0.1:4112")
' variable name "IO150"
Set g_val = g_ctrl.AddVariable("IO150", "")
End Sub
Private Sub Form_Unload(Cancel As Integer)
' destroy variable
g_ctrl.Variables.Clear
Set g_val = Nothing
' destroy contoroller
g_eng.Workspaces(0).Controllers.Remove g_ctrl.Index
Set g_ctrl = Nothing
' Destroy CaoEngine
Set g_eng = Nothing
End Sub
Private Sub Command1_Click()
' read variable
Text1.Text = g_val.Value
End Sub
Private Sub Command2_Click()
' write variable
g_val.Value = CBool(Text2.Text)
End Sub
3.3. Start and stop PAC program PAC
To start and stop PAC program, used the procedure described in Figure 3-4.The controller should be set to
external auto mode to start PAC program. Also, the controller start right should be given to the IP address of
the ORiN installed PC. For details, please refer chapter 2.4.
ORiN Forum
DENSO WAVE Inc.
NetwoRC provider user's guide
- 29 -
controller setting
external automatic mode
Executable Token
connect
caoWorkspace::AddController
caoController::AddTask
start pac
caoTask::Start
stop pac
caoTask::Stop
disconnect
caoTasks::Clear
caoTask::Terminate
caoControllers::Remove
caoController::Terminate
caoEngine::Nothing
Figure 3-4 Start and stop pac program
3.3.1. Connection
Please refer 3.2.1 for the procedure of creating CaoController object. Create CaoTask object to start and stop
PAC program. Following is an example code.
Dim g_task as CaoTask
' A variable to store CaoTask
Set g_task = g_ctrl.AddTask("PRO01", "")
3.3.2. Start/Stop PAC program
To start and stop PAC program, use Start method and Stop method of CaoTask object. Following is an
example.
g_task.Start 2
' Continuous execution
g_task.Stop 3
' Cycle stop
3.3.3. Sample Program
List 3-2
Task.frm
Dim g_eng As CaoEngine
Dim g_ctrl As CaoController
Dim g_task As CaoTask
Private Sub Command1_Click()
g_task.Start 2
End Sub
ORiN Forum
DENSO WAVE Inc.
NetwoRC provider user's guide
- 30 -
Private Sub Command2_Click()
g_task.Stop 3
End Sub
Private Sub Form_Load()
Set g_eng = New CaoEngine
' connect RC : IP/Port setting depends on your RC setting.
Set g_ctrl = g_eng.Workspaces(0).AddController("RC7", "caoProv.DENSO.NetwoRC", "",
"conn=eth:192.168.0.1")
' Task Name "PRO1"
Set g_task = g_ctrl.AddTask("PRO1", "")
End Sub
Private Sub Form_Unload(Cancel As Integer)
g_ctrl.Tasks.Clear
Set g_task = Nothing
g_eng.Workspaces(0).Controllers.Remove g_ctrl.Index
Set g_ctrl = Nothing
Set g_eng = Nothing
End Sub
3.4. Robot motion
To move robot, the controller should be set auto mode and RobSlave program should be started on the
contoller. For RobSlave, please refer to chapter 2.5. Motor power can be also controlledwith NetwoRC
provider. For details, please refer to CaoTask:Execute motor command in 4.2.39.
controller setting
external automatic mode
Motor on
start RobSlave.pac
connect
caoEngine::Initialize
caoEngiine::AddWorkspace
caoWorkspace::AddController
caoController::AddRobot
robot moves
robot stops
disconnect
ORiN Forum
caoRobots::Clear
caoRobot::Terminate
caoControllers::Remove
caoController::Terminate
caoEngine::Terminate
DENSO WAVE Inc.
NetwoRC provider user's guide
- 31 -
3-5 Robot Moves
3.4.1. Connection
Please refer 3.2.1 for the procedure of creating CaoController object. To move robot, create CaoRobot object.
Following is an example code.
Dim g_robot as CaoRobot
'
A variable to store CaoRobot object
Set g_ robot = g_ctrl.AddRobot("Arm", "")
3.4.2. Move and stop robot
CaoRobot::Move method moves the robot. Please refer chapter 4.2.36. for the details of Move. By adding
NEXT option to Move, CaoRobot:Halt method can stop the robot motion while it is moving.
List 3-3
Robot.frm
Dim g_eng As CaoEngine
Dim g_ctrl As CaoController
Dim g_robot As CaoRobot
' Stop Move
Private Sub Command2_Click()
g_robot.Halt
End Sub
' Start Move
Private Sub Command1_Click()
g_robot.Move 1, "@P P10", "NEXT"
End Sub
Private Sub Form_Load()
Set g_eng = New CaoEngine
Set g_ctrl = g_eng.Workspaces(0).AddController("RC7M", "caoProv.DENSO.NetwoRC", "",
"conn=eth:10.6.235.60")
Set g_robot = g_ctrl.AddRobot("Arm")
End Sub
Private Sub Form_Unload(Cancel As Integer)
g_ctrl.Robots.Clear
Set g_robot = Nothing
g_eng.Workspaces(0).Controllers.Remove g_ctrl.Index
Set g_ctrl = Nothing
Set g_eng = Nothing
End Sub
ORiN Forum
DENSO WAVE Inc.
NetwoRC provider user's guide
- 32 -
3.5. Another samples
Please refer to ORiN2¥CAO¥ProviderLib¥DENSO¥NetwoRC¥Sample and its subdirectories of ORiN2
SDK for other samples.
Table 3-1 Sample program list
Sample name
Division
Content
Variable
CaoVariable
Read/Write controller variable, I/O and CNF.
File
CaoFile
Read/Write file of controller.
Tree
CaoFile
Display folder list and get file in the controller.
Log
CaoFile
Get controller’s error log and operation log.
Task
CaoTask
Display information and operate (start and stop) controller’s task.
[note] The task cannot start with RC5.
Robot
CaoRobot
Execute robot motion command, get robot current position, call
user extension command.
[note] RobSlave.pac, UserExtention.pac and RobSlave.h files
stored at ORiN2¥CAO¥ProviderLib¥DENSO¥NetwoRC¥Bin are
necessary.
[note] Cannot use this with RC5.
Trans
CaoController Backup and restore Controller’s all data.
CaoVariable
CaoFile
Info
CaoController Display information of controller.
CaoVariable
CaoRobot
Tracking
CaoRobot
Sample code for the Conveyer Tracking function.
[note] Cannot use this with RC5.
SrvLog
CaoRobot
Single axis control log acquisition.
[note] Cannot use Run and Motor command with RC5.
ORiN Forum
DENSO WAVE Inc.
NetwoRC provider user's guide
- 33 -
4. Outline of provider
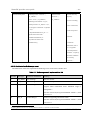
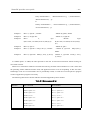
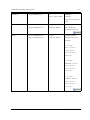
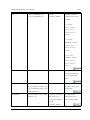
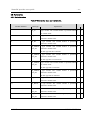
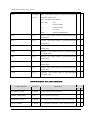
4.1. List of method
Table 4-1 List of method
Category
Method/Property
Function
caoWorkspace
Addcontroller
Connects communication to RC.
P.34
AddCommand
AddFile
AddRobot
AddTask
AddVariable
get_TaskNames
get_VariableNames
Execute
OnMessage
Connects to file or folder(PAC, system file).
Connects robot.
Connects task.
Connects variable.
Get list of tasks.
Get list of variables.
Execute command of controller.
Event of OnMessage
P.36
P.36
P.37
P.38
P.38
P.39
P.39
P.39
P.43
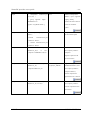
Execute
get_Parameters
put_parammeters
Execute command.
Get parameter of execution.
Set parameter of execution.
P.44
P.44
P.44
AddFile
AddVariable
get_VariableNames
Copy
Delete
Move
get_DateCreated
get_DateLastAccessed
get_DateLastModified
get_FileNames
get_Attribute
get_Path
get_Size
get_Type
get_Value
put_Value
Connect pac file or controller folder.
Connect system variable of files.
Get list of system variable name.
Copy file.
Delete file.
Move file.
Get created date.
Get accessed date.
Get Modified date.
Get list of files.
Get attributes of file.
Get path of file.
Get size of file.
Get extension of file.
Get value of file.
Set value of file.
P.44
P.45
P.45
P.45
P.45
P.45
P.45
P.45
P.45
P.45
P.45
P.46
P.46
P.46
P.46
P.46
caoController
CaoCommand
CaoFile
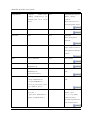
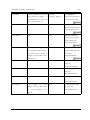
CaoRobot
ORiN Forum
DENSO WAVE Inc.
NetwoRC provider user's guide
- 34 -
Accelerate
AddVariable
get_VariableNames
Halt
Change
Drive
Move
Rotate
Speed
Execute
Set the internal acceleration and deceleration ratio of the
robot.
Connect the system variable
Get catelogue of the system variable.
Stop the robot motion.
Change the tool / user coordinate system of robot.
This method is not supported directly in this provider.
Robot moves.
Robot rotates around the specified axis.
Set the internal movement speed of the robot.
Execute command of robot.
P.46
P.46
P.46
P.47
P.47
P.47
P.51
P.52
P.53
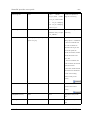
AddVariable
get_VariableNames
Start
Stop
Connect the system variable of the robot.
Get list of the system variable.
Start the pac program.
Stop the pac program
P.72
P.73
P.73
P.73
get_Value
put_Value
put_ID
get_ID
get_Microsecond
Get value.
Set value.
Set variable number.
Get variable number.
Get Timestamp.
P.73
P.73
P.73
P.74
P.74
Clear
Clear error.
P.74
P.46
CaoTask
CaoVariable
CaoMessage
4.2. Method and Property
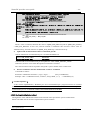
4.2.1. CaoWorkspace::AddController method
At AddController, NetwoRC provider refers communication connection parameters and connects
communication.
Option specifies communication method, connection parameter and time-out time. Option and option are
delimited by “,” .
Syntax AddController( <bstrCtrlName:BSTR>,<bstrProvName:BSTR>,
<bstrPcName:BSTR > [,<bstrOption:BSTR>] )
bstrCtrlName
:
[in]
Controller name
bstrProvName
:
[in]
Provider name (Fixed to “CaoProv.DENSO.NetwoRC”)
bstrPcName
:
[in]
Provider execution machine name
bstrOption
:
[in]
Option character string = “<option1>, <option2>, …”
Following is a list of option string items.
Table 4-2 Option cstring of CaoWorkspace::AddController
ORiN Forum
DENSO WAVE Inc.
NetwoRC provider user's guide
- 35 -
Option
Explanation
Conn=< connected parameter >
Mandatory.
Communication
method
and
connection
parameters are set.
Refer 2.2.1.1 for details.
MyIP=[<local IP address>]:[local Specify the IP address and UDP port number of the local
UDP port number]
machine.
In case of multiple NICs, MyIP option is used to specify a
NIC. If this option was omitted, the first NIC is selected
automatically. If an invalid IP was set, an error occurs.
If the UDP port number is not specified, the system assigns
an appropriate port number automatically.
In case of RS232c, this option is ignored.
Timeout =< Time-out time >
Communication time-out time. (default: 400) msec
TORetry=<Retry count>
Communication retry count. 1 – 7 (default:5)
It is treated as 1 in case of 1 or less.
It is treated as 7 in case of 7 or more.
CtrlChk=True/False
Connection check. (default: False)
In case of RS232C, only one CaoController object is creatable for one RS232C port.
4.2.1.1. Conn option
Following is communication parameter string for Comm option. Square blanket (“[]”) means the parameter
can be omitted. Underline part shows the default value when the option is not specified.
・ RS232C device
“com:[<COM Port>[:<BaudRate>[:<Parity>:<DataBits>:<StopBits>]]]"
<COM Port>
:
COM port number. ‘1'-COM1,‘2'-COM2,…
<BaudRate>
:
Transmission rate. 4800,9600,19200,38400,57600,115200.
<Parity>
:
Parity. ‘N'-NONE,‘E'-EVEN,‘O'-ODD.
<DataBits>
:
Number of data bits. ‘7'-7bit,‘8'-8bit.
<StopBits>
:
Number of stop bits. ‘1'-1bit,‘2'-2bit.
・ EtherNet device
“eth:<IP Address>[:<Port No>]"
<IP Address>
ORiN Forum
:
Internet Protocol address.
DENSO WAVE Inc.
NetwoRC provider user's guide
- 36 Example:“127.0.0.1",“192.168.0.1"
<Port No>
:
UDP connection port number. 4112,4113… any port number
can be assigned.
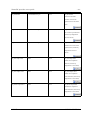
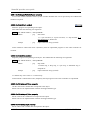
4.2.2. CaoController::AddCommand method
The argument of the AddCommand method of the CaoController class specifies the command name (BSTR
type).
4.2.3. CaoController::AddFile method
The argument of the AddFile method of the CaoController class specifies the file name (BSTR type). The
specified "File name" is PAC program name or the system reserved file name.
An directory can be specified as an argument by designating only file path. If the path is not specified, files
in the default directory "/rom/prj" are specified.
Following shows the argument specification of AddFile.
Syntax AddFile( <bstrName:BSTR > [,<bstrOption:BSTR>] )
bstrName
:
[in]
File name
bstrOption
:
[in]
Option character string
The option uses the following character strings.
Table 4-3 Option character string of CaoController::AddFile
Option
Meaning
@Create[=<0 to 2>]
When the specified file does not exist, the file is created according to this option.
0:The file is not created. (default)
1:The file is made.
2:The directory is made.
If the specified file exists, or the file name is the drive name, this option is ignored.
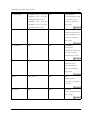
The table below shows the list of the file. Please refer to the file specification for a detailed format of the file.
Table 4-4 File implementation status list
ORiN2 file name
Form
Explanation
1
*.PAC
text
PAC source
2
*.H
text
PAC header
3
*.NIC
bin
PAC execute form
ORiN Forum
DENSO WAVE Inc.
NetwoRC provider user's guide
- 37 -
4
*.MAP
text
Refer between PAC.
5
@VAR_INT
bin
I type variable
6
@VAR_SNG
bin
F type variable
7
@VAR_DBL
bin
D type variable
8
@VAR_VEC
bin
V type variable
9
@VAR_POS
bin
P type variable
10
@VAR_JNT
bin
J type variable
11
@VAR_TRN
bin
T type variable
12
@VAR_STR
bin
S type variable
13
@VAR_TOOL
bin
Tool coordinates definition
14
@VAR_WORK
bin
Work coordinates definition
15
@VAR_AREA
bin
Area definition
16
@LOG_ERROR
bin
Error log
17
@LOG_OPERATION
bin
Operation log
18
@LOG_CONTROL
bin
Control log
19
@CNF_ITP
bin
Interpreter environment setting
20
@CNF_PAC
bin
Program environment setting
21
@CNF_DIO
bin
I/O environment setting
22
@CNF_ARM
bin
Trajectory generation environment setting
23
@CNF_SRV
bin
Servo environment setting
24
@CNF_SPD
bin
Usage condition setting
25
@CNF_VIS
bin
Vision environment setting
26
@CNF_COM
bin
Communication environment setting
【 attention 】
CaoFile object does not support simultaneous access to a file.
Be sure to implement exclusive file access control routine in the application.
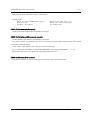
4.2.4. CaoController::AddRobot method
The argument of the AddRobot method of the CaoController class specifies the robot name (BSTR type).
"Robot name" specified here is an arbitrary string. For instance, specify like AddRobot("ROBOTalk1"). A
CaoRobot object is retrieved by calling the AddRobot method.
Syntax AddRobot( <bstrName:BSTR > [,<bstrOption:BSTR>] )
bstrName
:
[in]
Robot name
bstrOption
:
[in]
Option character string (unused)
ORiN Forum
DENSO WAVE Inc.
NetwoRC provider user's guide
- 38 -
4.2.5. CaoController::AddTask method
The argument of the AddTask method of the CaoController class specifies the task name (BSTR type).
"Task name" specified here specifies a PAC program name. For instance, the CaoTask object is retreieved in
the expression like AddTask("pro1").
Syntax AddTask( <bstrName:BSTR > [,<bstrOption:BSTR>] )
bstrName
:
[in]
Task name
bstrOption
:
[in]
Option character string (unused)
If "@ALL" is specified as a task name, a created CaoTask object provides CaoTask::Start method and
CaoTask::Stop method for the all tasks.
4.2.6. CaoController::AddVariable method
The AddVariable method of this CaoController class is a method for the access to the variable. In the
NetwoRC provider, both the user variable and the system variable can be specified for the variable name.
User variable supports following variables, i.e., controller variable (I,F,V,P,J,D,T,S), I/O, and system
parameter (CNF). Following is the argument specification of AddVariable.
Syntax AddVariable( <bstrName:BSTR > [,<bstrOption:BSTR>] )
bstrName
:
[in]
Variable name
bstrOption
:
[in]
Option character string
<Variable identifier>
:
I, F, V, P, J, D, T, S, IO, TOOL, WORK, AREA, _ ITP, _ PAC, _ DIO, _
ARM, _ SRV, _ SPD, _ VIS,_ COM, WDIn, WDOut
The character is not case-sensitive (uppercase and lowercase has same
meaning).
System variable (CNF) begins with “_" (underscore).
< number >
:
Variable index or '*' or '*_<Index>'
The number is specified by a decimal number.
In case of '*', the initial index is 0. The index can be retrieved and changed
by 'ID' property.
< option >
:
"LEN=<bit length>" (valid only for I/O variables)
<bit length>: 1 or 8 or 16. (default = 1)
“[” and ”]” ca be omitted.
(example 1)
“i0", “I[0]"
・・・
specify the 0th I type variables.
(example 2)
“IO128", “io[128]"
・・・
specify the 128th I/O variables.
(example 3)
“_ARM0", “_arm[0]"
・・・
specify the 0th element of ARMCNF.
(The number of elements of ???CNF is stored
ORiN Forum
DENSO WAVE Inc.
NetwoRC provider user's guide
- 39 in ???CNF[0]. )
(example 4)
“_itp19", “_itp[19]"
・・・
specify the 19th element of ITPCNF.
(example 5)
“tool10", “tool[10]"
・・・
specify the 10th element of Tool.
(example 6)
“I*”, “_PAC[*]”
・・・
specify the index by ID property.
(example 7)
“I*_1”, “I*_2” , “I*_3”
・・・
create various I*
Please note that the number of CNF variable (_ITP,_PAC,_DIO,_ARM,_SRV,_SPD,_VIS,_COM) is not as
same as the number displayed on NetwoRC teach pendant. The value shifts because the 0th number of
elements is not displayed in the pendant. (in many cases, CNF variable = pendant display +1)
When a system variable is specified, “@" is applied at the beginning of the variable name. All variable
names without “@” at the beginning is treated as an user variable.
Please refer 4.3Variable list about the system variable implemented in the NetwoRC provider.
4.2.7. CaoController::get_TaskNames property 5
A list of the PAC program name that can be specified by the AddTask method is acquired.
4.2.8. CaoController::get_VariableNames property
A list of the variable identifier and the system variable identifier that can be specified by the AddVariable
method is acquired.
4.2.9. CaoController::Execute method
The argument of the Execute method of the CaoController class specifies the command name (BSTR type).
The list of the command that can be specified is shown in Table 4-5.
Syntax [<vntRet:VARIANT> = ] Execute( <bstrCmd:BSTR > [,<vntParam:VARIANT>] )
bstrCmd
:
[in]
Command
vntParam
:
[in]
Parameter
vntRet
:
[out]
Return value
Example
Dim vRes as Variant
vRes = caoCtrl.Execute(“GetAutoMode”)
5
= VT_ARRAY|VT_VARIANT (less than Ver1.1.0, VT_ARRAY|VT_BSTR)
ORiN Forum
DENSO WAVE Inc.
NetwoRC provider user's guide
- 40 -
Table 4-5 CaoController::Execute method implemented command list
Command
Parameter
Return value
Operation
GetAutoMode
None
<Mode:VT_I2> =
Get auto mode
0:Unkown
1:Internal auto
2:External auto
PutAutoMode
<Mode:VT_I2> =
None
Set auto mode
1:Internal auto
2:External auto
StartLog
None
None
Start log recording
StopLog
None
None
Stop log recording
ClearLog
None
None
Clear log data
SaveFile
None
None
Request to save file
GetFileTransMode
None
<Mode:VT_I4> :=
Get file transfer mode
File transfer mode
0= normal transfer
0bit: Old procedure
1bit: ROM operation
2bit: Status notification
(with OnMessage
event. )
PutFileTransMode
<Mode:VT_I4> =
<Mode>
File transfer mode
None
Set file transfer mode
0=normal transfer
0bit: Old procedure
1bit: ROM operation
2bit: Status notification
(With OnMessage event. )
ORiN Forum
DENSO WAVE Inc.
NetwoRC provider user's guide
ChangeConfig
<CnfID:VT_I2> =
<CnfID>
1 : COMCNF
- 41 None
Change notice of CNF
None
Set pseudo input
2 : ARMCNF
3 : VISCNF
4 : PACCNF
5 : SRVCNF
6 : SPDCNF
7 : ITPCNF
8 : DIOCNF
9 : SYSCNF
SetDummyIO
<IO:VT_I2> =
<IO>
I/O number
All setting is cleared
<Value>
<Value:VT_I2> =
when < IO>=-1
[<Range>]
State 0: OFF 1:ON
(<Value> is ignored.
[<Range:VT_I2>] =
Range must be omitted
Range(default: 1. )
or specify 1 )
ex. 1 -> Only < IO >
8 -> From < IO >
To < IO>+7
GetDummyIO
<IO:VT_I2> =
<Value:VT_I2> =
Get pseudo input
<IO>
I/O number
State 0: OFF 1:ON
LoadNIC
< WaitForCompletion :VT_BOOL> =
None
Load NIC file.
<WaitForCompletion>
Wait load completion.
None
Notify the timing of
<Value>
(True/False)
DoSignal
< Mode:VT_I4>= mode
<Mode>
< Action:VT_I4>= action
process start to
<Action>
controller
GetVarSize
<Type of variable:VT_BSTR>
<Type>
“I”,”F” ,”D”,”V”,”P”,”J”,”T”,”S”
Compile
None
<Size:VT_I4>
Get the variable
number.
None
Execute
the
compilation.
ORiN Forum
DENSO WAVE Inc.
NetwoRC provider user's guide
GetCompileState
None
- 42 <Mode:VT_I4> :=
Get the progress report
1 :
of the compilation.
Compiling. ( or
Loading)
0:Normal termination
-1
:
Abnormal
termination ( Compile
error)
-2
:
Abnormal
termination ( Excluding
the compile error)
SetExtension
<Mode:VT_I2>=
None
1:Add,2:Remove
Add or remove robot
controller extension.
<Key:VT_I4>
ClearError
InitNonStopPathLib 6
<Error No.:VT_I4>
None
<Res:VT_I2>=
Clear robot controller
0:OK, -1:NG
error.
None
Initializate non-stop
trajectory generation
process
6
【Attention】Additional license for "Non-Stop Motion Calculator" is required to use this Command.
ORiN Forum
DENSO WAVE Inc.
NetwoRC provider user's guide
GenerateNonStopPath 7
- 43 -
<Teaching Points: <Position> |
<Motion Points:
Generate non-stop
VT_ARRAY>,
<Position> |
trajectory.
<Area: <Area> | VT_ARRAY>,
VT_ARRAY>
<Teaching Point Number: VT_I4>,
<Total speed rate: VT_R4(0.0~1.0)>,
< Convergence Coefficient: VT_R4(0.0
~1.0)>,
[<Adjustment Method: VT_I4> = 1:
Synchronous motion with
The first <Teaching
Point> is Start Point,
and the Last point is
End Point.
Extended-Joint(default), 0:
Asynchronous motion with
Extended-Joint]
For detailed
information, refer to
“6.1.3.Appendix
F.Non-Stop Motion
Calculator - Trajectory
Generator Command
for Non Stop
Inspection ”
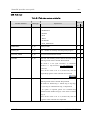
4.2.10. CaoController::OnMessage event
The table below shows the implemented OnMessage event of the CaoController class.
Table 0-1 OnMessage event implementation list
Number Data type
Content of notification
Meaning
1
VT_BSTR
Error message
The error occurs.
2
VT_BSTR
Error message
There is no response.
3
VT_I4
<LONG:RangeMax>
GetText: Start
Progress status notification starts. Maximun range is
<RangeMax>.
The bit2 of Execute(“Put_FileTransMode <Mode>”) need
to be set as 1.
4
VT_I4
<LONG:Range>
GetText: Progressing and returns status.
The bit2 of Execute(“Put_FileTransMode <Mode>”) need
to be set as 1.
7
【Attention】Additional license for "Non-Stop Motion Calculator" is required to use this Command.
ORiN Forum
DENSO WAVE Inc.
NetwoRC provider user's guide
5
VT_I4
- 44 -
< LONG:RangeMax > GetText: Completed. Returns maximum range size if
or -1(error)
normally finished. Returns –1 if NG.
The bit2 of Execute(“Put_FileTransMode <Mode>”) need
to be set as 1.
6
VT_I4
<LONG:RangeMax>
PutText: Start
Progress status notification starts. Maximun range is
<RangeMax>.
The bit2 of Execute(“Put_FileTransMode <Mode>”) need
to be set as 1.
7
VT_I4
<LONG:Range>
PutText: Progressing and returns status.
The bit2 of Execute(“Put_FileTransMode <Mode>”) need
to be set as 1.
8
VT_I4
<LONG:RangeMax> or PutText: Completed. Returns maximum range size if
-1(error)
normally finished. Returns –1 if NG.
The bit2 of Execute(“Put_FileTransMode <Mode>”) need
to be set as 1.
4.2.11. CaoCommand::Execute method
A command is executed.
Please refer to Table 4-5 for necessary parameters for command execution and returned result.
Parameters necessary to execute command need to be specified by PutParameters property beforehand.
4.2.12. CaoCommand::get_Parameters property
Get currently set execution parameters.
4.2.13. CaoCommand::put_Parameters property
Set command execution parameters.
Required parameters differ depending on the command to be executed. Please refer Table 4-5 for command
name and parameters to be set.
Even if the content of the parameter doesn’t match the specification of executed command, this property
doesn't return an error. The error is returned
when the command is executed.
4.2.14. CaoFile::AddFile method
Create an file object like in the same way as 4.2.3. The file path corresponding to the created CaoFile object
is “<path of the parent object>/<fine name specified in AddFile>”.
ORiN Forum
DENSO WAVE Inc.
NetwoRC provider user's guide
- 45 -
4.2.15. CaoFile::AddVariable method
The argument of the AddVariable method of the CaoFile class specifies the system variable name.
Please refer Table 0-9 for the list of implemented system variables.
4.2.16. CaoFile::get_VariableNames property
A list of the variable identifier and the system variable identifier that can be specified by the AddVariable
method is acquired.
4.2.17. CaoFile::Copy method
Copy a file corresponding to the object to the specified place.
4.2.18. CaoFile::Delete method
Delete a file corresponding to the object. After de deletion of the file, object is not deleted. If the object is
not necessary, client program need to delete the object.
4.2.19. CaoFile::Move method
Move a file corresponding to the object The placement of the corresponding file is changed, but object name
is not changed.
4.2.20. CaoFile::get_DateCreated property
Get the file creation date of the file corresponding to the object.
4.2.21. CaoFile::get_DateLastAccessed property
Get the last file access date of the file corresponding to the object.
4.2.22. CaoFile::get_DateLastModified property
Get the last file modification date of the file corresponding to the object.
4.2.23. CaoFile::get_FileNames property
8
Get a list of file in the directory.
Only executable when the path corresponding to the object is a directory.
4.2.24. CaoFile::get_Attribute property
Get the attribute of the file corresponding to the object.
8
= VT_ARRAY|VT_VARIANT (less than Ver1.1.0, VT_ARRAY|VT_BSTR)
ORiN Forum
DENSO WAVE Inc.
NetwoRC provider user's guide
- 46 -
4.2.25. CaoFile::get_Path property
Get the path to the file corresponding to the object. The retrieved value does not include file name.
4.2.26. CaoFile::get_Size property
Get the size of the file corresponding to the object.
4.2.27. CaoFile::get_Type property
Get the extension of the file corresponding to the object.
4.2.28. CaoFile::get_Value property
Get the contents of the file corresponding to the object.
4.2.29. CaoFile::put_Value property
Set the contents of the file corresponding to the object.
4.2.30. CaoRobot::Accelerate method
Set the internal acceleration and deceleration ratio of the robot.
This method corresponds to ACCEL instruction of PAC language.
Following is the argument specifications of Accelerate.
Syntax Accelerate <lAxis:LONG >, <fAccel:FLOAT> [,<fDecel:FLOAT>]
lAxis
:
[in]
Axis number -1: Tool accel (ACCEL),0:All axes (JACCEL)
fAccel
:
[in]
Acceleration (-1: keep current setting)
fDecel
:
[in]
Deceleration (-1: keep current setting)
Example 1.
Accelerate 0, 50.0, -1
// acceleration =50%, deceleration = no change.
Example 2
Accelerate 0, -1, 60.0
// acceleration = no change, deceleration =60%
4.2.31. CaoRobot::AddVariable method
The argument of the AddVariable method of the CaoRobot class specifies the system variable name.
The list of the implemented system variable is shown on Table 0-7.
4.2.32. CaoRobot::get_VariableNames property
A list of the variable identifier and the system variable identifier that can be specified by the AddVariable
method is acquired.
4.2.33. CaoRobot::Halt method
By adding "NEXT" option to a CaoRobot class motion method like Move, Drive or Rotate, the motion
ORiN Forum
DENSO WAVE Inc.
NetwoRC provider user's guide
- 47 -
method are executed asynchronously. While a robot moves with an asynchronously executed motion method,
Halt method can stop the robot motion.
However, if two or more asynchronous motion methods are executed in succession, halt method cannot
stop robot motion. In this case, before the preceding motion method execution is finished, next motion method
goes into "wait" status. In this status, OnMessage event of CaoController class is periodically issued, and Halt
method is not accepted. To stop robot motion in this status, one of following action is necessary.
(6) Stop the execution of "ROBSLAVE" task using Stop method of CaoTask class
(7) Input robot stop signal from dedicated I/O port.
Executing Halt method while robot is not moving has no effect on robot motion.
4.2.34. CaoRobot::Change method
Change the tool / user coordinate system of robot.
This method corresponds to CHANGETOOL and the CHANGEWORK instruction of PAC language.
Following is the argument specifications of Change method.
Syntax Change <bstrName:BSTR>
bstrName
:
[in]
for CHANETOOL= “Tool <number>”
for CHANGEWORK= “Work <number>”
<number>
:
numerical value expressed by decimal number
4.2.35. CaoRobot::Drive method
This method is not supported directly in this provider.
Instead, please use "DriveEx" or "DriveAEx" command of CaoRobot::Execute that can operate two or more
axes all at once.
4.2.36. CaoRobot::Move method
Robot moves to the specified coordinates.
This method corresponds to MOVE instruction PAC language.
Following is the Move argument specifications.
Syntax Move <lComp:LONG >, <vntPose:POSEDATA>, < bstrOpt:BSTR>
lComp
:
[in]
Interpolation 1:MOVE P,... , 2:MOVE L,... , 3:MOVE C,... , 4:MOVE S,...
vntPose
[in]
Pose data
bstrOpt
[in]
Motion option, “NEXT” =Asynchronus call
Please refer to “6.1.3.Appendix APOSEDATA type definition” for the POSEDATA type..
The form and the meaning when the character string is specified by the POSEDATA type are as follows.
ORiN Forum
DENSO WAVE Inc.
NetwoRC provider user's guide
- 48 -
In case of VT_BSTR
・ If Comp = 1, 2
"[<@pass motion beginning displacement>] < pose > [<extended-joints>]"
ex. "P1", "@P T100", "@E J520"
・ If Comp = 3
"<pose 1> [<extended-joints>], [<@ pass motion beginning displacement>] <pose 2>
[<extended-joints>]"
- *** pose 1 and pose 2 need to be same variable type. ***
ex. "P1, @E P2", "T100, @P T101"
・ If Comp = 4
"[<@pass motion beginning displacement>] <free curve trajectory number> [<extended-joints>]"
ex. "1", "@P 20", "@E 5"
<free curve trajectory
:
a decimal number (1 to 20)
:
"<variable type><variable number>" or
number>
<pose>
"[<variable type>](<element1>,<element2>,…)"
:
<variable type>
:
One character either 'P', 'T' or 'J'
<variable number>
:
a decimal number
<element n>
:
an element of variable either 'P', 'T' or 'J'
P(<x>,<y>,<z>,<rx>,<ry>,<rz>,<fig>)
J(<j1>,<j2>,<j3>,<j4>,<j5>,<j6>,<j7>,<j8>)
T(<x>,<y>,<z>,<ox>,<oy>,<oz>,<ax>,<ay>,<az>,<fig>)
[Note] For 4-axis robot, T element of P type variable corresponds to
<rz>. <rx> and <ry> are not used.
<@pass
motion
:
"@0", "@P", "@E", or "@<value>"
:
The syntax of an exteded-joints option is shown below. 9 .
beginning
displacement>
<extended-joints>
(Please specify the extended-joints option after the pose data and
blank.)
9
To use extended joint option, please define extended joint related settings (e.g. arm group definition) on the controller, and use TakeArm
command to select arm group for controlled extended joint.
ORiN Forum
DENSO WAVE Inc.
NetwoRC provider user's guide
- 49 -
"EX((<JointNumber1>,
<RelativeDistance1>)[,
(<JointNumber2>,
<RelativeDistance2>)…])"
or
"EXA((<JointNumber1>, <AxisCoordinates1>)[, (<JointNumber2>,
<AxisCoordinates2>)…])"
Example 1.
Move 1, “@P P1” ,”NEXT”
‘ MOVE P, @P P1, NEXT
Example 2
Move 3, “P1,@E P2”
‘ MOVE C, P1,@E P2
Example 3
Move
2,
“@0
P(307.1856,-157.8244,107.0714,160,0,0,1)”
‘
MOVE
L,@0
P(307.1856,-157.8244,107.0714,160,0,
0,1)
Example 4
Move 4, “@E 2”
Example 5
Move 1, “@P P10
‘ MOVE S, @E 2
EX((7, 30.5))” ,”NEXT”
‘ MOVE P, @P P10
EX((7,30.5)),
NEXT
Example 6
Move 2, “@E P20
EXA((7, 30.8), (8, 90.5))
‘MOVE L, @E P20
EXA((7, 30.8),
(8, 90.5))"
If <NEXT option> is added, the robot proceeds to the next no-movement instruction without waiting for
movement to finish.
When two or more Move method is executed consecutively, the latter motion method is in “wait” status until
the preceding motion method execution ends, and application seems to be not responding. In this wait state,
OnMessage event #9 of CaoController class is periodically issued, so catch the event and pass the program
control to application program if necessary.
The following table shows the PAC MOVE command supported by Move method.
Table 0-2 Move command list
Division
PAC command
Move method
MOVE P,…
MOVE P, P<n1>
Move 1, “P<n1>”
MOVE P, @P P<n1>
Move 1, “@P P<n1>”
MOVE P, @E P<n1>
Move 1, “@E P<n1>”
MOVE P, T<n1>
Move 1, “T<n1>”
MOVE P, @P T<n1>
Move 1, “@P T<n1>”
MOVE P, @E T<n1>
Move 1, “@E T<n1>”
MOVE P, J<n1>
Move 1, “J<n1>”
MOVE P, @P J<n1>
Move 1, “@P J<n1>”
ORiN Forum
DENSO WAVE Inc.
NetwoRC provider user's guide
MOVE L,…
MOVE C,…
MOVE S,…
MOVE P, @E J<n1>
Move 1, “@E J<n1>”
MOVE L, P<n1>
Move 2, “P<n1>”
MOVE L, @P P<n1>
Move 2, “@P P<n1>”
MOVE L, @E P<n1>
Move 2, “@E P<n1>”
MOVE L, T<n1>
Move 2, “T<n1>”
MOVE L, @P T<n1>
Move 2, “@P T<n1>”
MOVE L, @E T<n1>
Move 2, “@E T<n1>”
MOVE L, J<n1>
Move 2, “J<n1>”
MOVE L, @P J<n1>
Move 2, “@P J<n1>”
MOVE L, @E J<n1>
Move 2, “@E J<n1>”
MOVE C, P<n1>, P<n2>
Move 3, “P<n1>, P<n2>”
MOVE C, P<n1>, @P P<n2>
Move 3, “P<n1>, @P P<n2>”
MOVE C, P<n1>, @E P<n2>
Move 3, “P<n1>, @E P<n2>”
MOVE C, T<n1>, T<n2>
Move 3, “T<n1>, T<n2>”
MOVE C, T<n1>, @P T<n2>
Move 3, “T<n1>, @P T<n2>”
MOVE C, T<n1>, @E T<n2>
Move 3, “T<n1>, @E T<n2>”
MOVE C, J<n1>, J<n2>
Move 3, “J<n1>, J<n2>”
MOVE C, J<n1>, @P J<n2>
Move 3, “J<n1>, @P J<n2>”
MOVE C, J<n1>, @E J<n2>
Move 3, “J<n1>, @E J<n2>”
MOVE S, n1
Move 4, “n1”
MOVE S, @P n1
Move 4, “@P n1”
MOVE S, @E n1
Move 4, “@E n1”
Extended-joints MOVE P, P<n1> EX((j1, v1))
Misc.
- 50 -
Move 1, “P<n1> EX((j1,v1))”
MOVE P, P<n1> EX((j1, v1),(j2, v2))
Move 1, “P<n1> EX((j1,v1),(j2, v2))”
MOVE P, P<n1> EXA((j1, v1))
Move 1, “P<n1> EXA((j1,v1))”
MOVE P, P<n1> EXA((j1, v1),(j2, v2))
Move 1, “P<n1> EXA((j1,v1),(j2, v2))”
MOVE P, P<n1> + (x,y,z,rx,ry,rz)
Move 1, DEV(“P<n1>”, “P(x,y,z,rx,ry,rz)”)
MOVE P, P<n1> + (x,y,z,rx,ry,rz)H
Move 1, DEVH(“P<n1>”, “P(x,y,z,rx,ry,rz)”)
*Please refer to CaoRobot::Execute for DEV and
DEVH.
< n1 > ,< n2>: integer 0-65535
Please refer to the sample of CAO robot class robot motion command coding supplied with ORiN2 SDK,
which is stored at ORiN2¥CAO¥ProviderLib¥DENSO¥NetwoRC¥Sample¥Robot.
【 essential requisites 】
At the current implementation, “RobSlave.pac” program need to be executed beforehand on the robot
ORiN Forum
DENSO WAVE Inc.
NetwoRC provider user's guide
- 51 -
controller to execute robot motion command of CaoRobot class (Table 0-3). RobSlave.pac is in
ORiN2¥CAO¥ProviderLib¥DENSO¥NetwoRC¥Bin.
Robot controller’s T[0], T[1], and I[0] variable are used for the communication. DO NOT use these
variables for other purposes.
Table 0-3 Motion Commands requiring “RobSlave.pac”
Method
Command name
CCaoProvRobot::Accelerate
CCaoProvRobot::Change
CCaoProvRobot::Halt
CCaoProvRobot::Move
CCaoProvRobot::Rotate
CCaoProvRobot::Speed
CCaoProvRobot::Execute
Approach, Depart, Draw,
SetSplinePoint,
Motor, ClrSplinePoint,
GetSplinePoint,
WaitSplinePoint,
WaitMotionEnd, MotionSkip, MotionComp, DefTool,
DefWork,
DefArea,
Interrupt,
PosClr,
Arrive,
RotateH, DriveEx, DriveAEx, Delay, SYSSTATE,
J2P,
J2T,
P2J,
NORMTRN,TMUL,
FIGAPRL,
P2T,
T2J,
DEV,
T2P,
DEVH,
TrackDataInitialize,
TrackDataGet,
TrackDataInfo,
CurTrackPos,
CurTrackSpd,
TINV,
FIGAPRP,
TrackDataSet,
TrackDataNum,
WaitTrackMove,
CalcWorkPos, CurTrackPosEx, WaitTrackMoveEx,
SetTrackMove, ResetTrackMove, SetTrackStartArea,
UserExt, ST_*, TakeArm, GiveArm,
【 attention 】
All global variables (I, F, D, V, P, J, T, S) from [0] to [9] have been reserved with the system.
Please do not access these variables in the user’s program.
4.2.37. CaoRobot::Rotate method
Robot rotates around the specified axis.
This method corresponds to ROTATE instruction PAC language.
Following is the Rotate argument specifications.
ORiN Forum
DENSO WAVE Inc.
NetwoRC provider user's guide
- 52 -
Syntax Rotate <vntRotSuf:POSEDATA >, <fDeg:FLOAT>, <vntPivot:POSEDATA>, <bsreOpt:BSTR>
vntRotSuf
:
[in]
rotation surface
fDeg
:
[in]
angle(deg)
vntPivot
:
[in]
rotation center
[in]
motion option
bstrOpt
motion option, “@0”, “@P”, “@E” , “@<value>”
or “pose=<n>”
or “NEXT”
Please refer to “6.1.3.Appendix APOSEDATA type definition” for the POSEDATA type..
The form and the meaning when the character string is specified by the POSEDATA type are as follows.
In case of VT_BSTR
・ vntRotSuf: [in] rotation surface
“V < n1 >, V < n2 >, V < n3 > “ or “XY”,”YZ”,”ZX”,“XYH”,”YZH”,”ZXH”
or “V(<x>,<y>,<z>),V(…),V(…)”
ex. “V100,V101,V102”
・ vntPivot:
[in] rotation center
“V < n4 >” or “V(<x>,<y>,<z>)”
ex. “V103”
Example 1.
Rotate “V1,V2,V3”, 45.8, “V4”, “@E”
‘ ROTATE V1,V2,V3, @E 45.8, V4
Example 2.
Rotate “V(0,0,1),V(0,1,0),V(0,0,0)”, 30.0, “V(0,0,0)”, “@E,pose=1,NEXT”
Example 3.
Rotate “XY”, 90.0, “V(0,0,0)”, “@P”
Example 4.
Rotate “XYH”, -45.0, “V(250,0,0)”, “@150”
Rotation surface is specified by three V type variables. The three points in base coordinate system defines
the surfaces. Argument vntRotSuf specifies three V type variables in BSTR (string) type variable separated by
comma, space or tab.
Rotation center point vntPivot is specified by a V type variable expressed in BSTR(string) type.
4.2.38. CaoRobot::Speed method
The internal movement speed of the robot is specified.
This method corresponds to SPEED and JSPEED instruction PAC language.
About the external movement speed of the robot, please use "ExtSpeed" command of CaoRobot::Execute.
Following is the Speed argument specifications
ORiN Forum
DENSO WAVE Inc.
NetwoRC provider user's guide
- 53 -
Syntax Speed <lAxis:LONG >, <fSpeed:FLOAT>
lAxis
:
[in]
axis number
-1:effective to Tool axis(SPEED), 0:effective to all axis(JSPEED)
fSpeed
:
[in]
speed
4.2.39. CaoRobot::Execute method
The Execute method defines peculiar operation commands to the robot that isn’t supported by the CaoRobot
class, and offers the function to implement them.
Syntax [<vntRet:VARIANT> = ] Execute( <bstrCmd:BSTR > [,<vntParam:VARIANT>] )
bstrCmd
:
[in]
Commad
vntParam
:
[in]
Parameter
vntRet
:
[out]
Return value
The list shows available commands.
Table 0-4 List of implemented Execute command of CaoRobot class10
Command
UserExt
Parameter
<command
Return value
number:VT_I4>
,
PAC command
VT_R4 | VT_ARRAY
Execute extension method.
VT_R4
GetJntData
<parameter 1:VT_R4>...
GetJntData
<data
number:VT_I4>,<axis
number:VT_I2>
Gets the internal servo data
of a specified joint.
GetSrvData
<data number:VT_I4>
VT_R4 | VT_ARRAY
GetSrvData
Gets the internal servo data
of robot joints.
Approach
<
Interpolation
method:VT_I2
None
APPROACH <Interpolation
(=1:P, 2:L) >
method>, <pose variable
< base variable :POSEDATA-C0>
type><pose variable
<
[pass]
approach
length
:
number>, <pass> <approach
POSEDATA-C2>
length>[, NEXT]
[,option :VT_BSTR “NEXT”]
Execute the absolute
movement designated in the
tool coordinate
system.
10
Please refer to “6.1.3.Appendix APOSEDATA type definition” for the POSEDATA type.
ORiN Forum
DENSO WAVE Inc.
NetwoRC provider user's guide
Depart
<
- 54 -
Interpolation
method:VT_I2
None
DEPART <Interpolation
method >, <pass> <approach
(=1:P, 2:L) >
<
[pass]
approach
length
:
length>[, NEXT]
POSEDATA-C2 >
Executes the relative motion
[,option :VT_BSTR “NEXT”]
in the tool coordinate
system.
ExtSpeed
<external speed:VT_R4 (=0.1 to
None
ExtSpeed,ExtAcc,ExtDec
100.0)> ,
<external
Sets the external speed.
acceleration:VT_R4
(=0.0001 to 100.0)>,
<
external
deceleration:VT_R4
(=0.0001 to 100.0)>
SetSplinePoint
<Free
curve
number:VT_I2(=1
trajectory
to
None
SETSPLINEPOINT <Free
20)>,
curve trajectory number>
<Viapoint : POSEDATA-C0(P,J) >
<Viapoint>
Registers viapoints in the
free curve motion.
GetSplinePoint
<Free
curve
trajectory
number:VT_I2>,
<P
type
VT_R4|VT_ARRAY>
<Viapoint number:VT_I4>
:
<Approach (P) point> =
GETSPLINEPOINT (<Free
curve trajectory number>,
<Viapoint number>)
Gets the viapoints for a
registered free curve motion.
ClrSplinePoint
<Free
curve
trajectory
number:VT_I2 (=0 to 20)>
None
CLRSPLINEPOINT <Free
curve trajectory number>
Clears all viapoints for free
curvemotion.
ORiN Forum
DENSO WAVE Inc.
NetwoRC provider user's guide
WaitSplinePoint
- 55 -
<Viapoint
<Waiting
number:VT_I4>,
condition:VT_I2
None
(=0:
xdWAITSPLINE <Viapoint
number>, <Waiting
command value, Not 0: encoder
condition>
value)>
Waits for the free curve to
pass the designated viapoint.
WaitMotionEnd
None
None
Wait for robot motion end
MotionSkip
None
None
MotionSkip
Aborts running motion
commands.
MotionComp
None
VT_I2 0:running/1:done
MotionComp
Judges whether execution of
running motion commands is
complete.
Motor
VT_I2 1:ON/0:OFF
DefTool
<no:VT_I2>,<P
None
Motor ON/OFF
type:
None
For define tool in auto mode.
type:
None
For define work in auto
POSEDATA-C0>
DefWork
<no:VT_I2>,<P
POSEDATA-C0>
mode.
[,<0:Normal/1:Fixed>]
DefArea
<no:VT_I2>,
None
,<P type: POSEDATA-C0>,
For define area in auto
mode.
,<V type: POSEDATA-C1>,
<io:VT_I4>,<pos:VT_I4>,<err:VT
_I4>,<enable:VT_I2(0,1)>
Draw
<
Interpolation
method:VT_I2
None
DRAW <Interpolation
(=1:P, 2:L) >
method >, <pass>
< [pass] vector : POSEDATA-C1>
(<x>,<y>,<z>)[, NEXT]
[,option :VT_BSTR “NEXT”]
Executes the relative
movement designated in the
work coordinate system.
ORiN Forum
DENSO WAVE Inc.
NetwoRC provider user's guide
DriveAEx
- 56 -
< [pass] (<Axis1 number >,
None
DRIVEA <Pass start
<Axis1
displacement> (<Axis1
coordinate>):POSEDATA-C3>,
number>, <Axis1
[(<Axis2 number>, <Axis2
Coordinate>), (<Axis2
coordinate>),
number>, <Axis2
…
Coordinate>),…(<Axis8
[(<Axis8 number>, <Axis8
number>, <Axis8
coordinate>)]]
Coordinate>) [,NEXT]
[,option :VT_BSTR “NEXT”]
Executes the absolute
motion of each axis.
DriveEx
< [pass] (<Axis1 number >,
None
DRIVE <Pass start
<Axis1
displacement> (<Axis1
coordinate>):POSEDATA-C3>,
number>, <Axis1
[(<Axis2 number>, <Axis2
Coordinate>), (<Axis2
coordinate>),
number>, <Axis2
…
Coordinate>),…(<Axis8
[(<Axis8 number>, <Axis8
number>, <Axis8
coordinate>)]]
Coordinate>) [,NEXT]
[,option :VT_BSTR “NEXT”]
Executes the relative motion
of each axis.
RotateH
< [pass] <Relative rotation angle
around
approach
None
ROTATEH <Pass start
displacement> <Relative
vector>:POSEDATA-C2>,
rotation angle around
[,option :VT_BSTR “NEXT”]
approach vector> [,NEXT]
Executes rotary motion by
taking an approach vector as
an axis.
ORiN Forum
DENSO WAVE Inc.
NetwoRC provider user's guide
Arrive
- 57 -
<Motionratio:VT_R4>
None
ARRIVE <Motionratio>
Defines the motion ratio
relative to the programmed
full travel distance to the
target point in order to make
the current program stand by
to execute the next step until
the robot reaches the defined
motion ratio.
PosClr
<JntNumber:VT_I2>
None
POSCLR <JntNumber>
Forcibly restores the current
position of a joint to 0 mm
or 0 degree.
Interrupt
<VT_I2:0:OFF 1:ON>
None
INTERRUPT ON/OFF
Interrupts a robot motion.
ST_aspACLD
<Mass
of
<Payload
payload:VT_R4>,
center
of
None
gravity
Changes the internal load
coordinate X :VT_R4>, <Payload
center
of
gravity
ST_aspACLD
condition values.
coordinate
Y:VT_R4>, <Payload center of
gravity coordinate Z:VT_R4>
ST_aspChange
<Mode:VT_I2>
None
ST_aspChange
Selects the internal mode for
proper control setting of
motion optimization.
ST_SetGravity
None
None
ST_SetGravity
Compensates for the static
load (gravity torque) applied
to each joint and attains
balance with gravity torque.
ORiN Forum
DENSO WAVE Inc.
NetwoRC provider user's guide
ST_ResetGravity
None
- 58 None
ST_ResetGravity
Disables the balance setting
between the limited motor
torque and gravity torque,
which is made with
ST_SetGravity.
ST_SetGrvOffset
None
None
ST_SetGrvOffset
Compensates the torque of
each joint programmed with
ST_SetGravity for gravity
torque.
ST_ResetGrvOffset
None
None
ST_ResetGrvOffset
Disables the gravity offset
function.
ST_SetCurLmt
<AxisNumber:VT_I2>,
None
<Value:VT_R4>
ST_SetCurLmt
Sets the limit of motor
current to be applied to the
specified axis.
ST_ResetCurLmt
<AxisNumber:VT_I2>
None
ST_ResetCurLmt
Resets the motor current
limit of the specified axis.
ST_SetEralw
<AxisNumber:VT_I2>,
<Value:VT_R4>
None
ST_SetEralw
Modifies the allowable
deviation of the specified
axis.
ORiN Forum
DENSO WAVE Inc.
NetwoRC provider user's guide
ST_ResetEralw
<AxisNumber:VT_I2>
- 59 None
ST_ResetEralw
Resets the allowable
deviation value of the
specified axis to the initial
value.
ST_OnSrvLock
<specified axis:VT_I2>
None
ST_OnSrvLock
Servo-locks a specified axis
(exclusively designed for
four-axis robots).
ST_OffSrvLock
<specified axis:VT_I2>
None
ST_OffSrvLock
Releases servo lock for the
specified axis (exclusively
designed for four-axis
robots).
ST_SetCompControl
None
None
ST_SetCompControl
Enables the compliance
function (exclusively
designed for 6-axis robots).
ST_SetCompFControl
None
None
ST_SetCompFControl
Enables the compliance
control function (exclusively
designed for 6-axis robots).
ST_ResetCompControl
None
None
ST_ResetCompControl
Disables the compliance
control function (exclusively
designed for 6-axis robots).
ORiN Forum
DENSO WAVE Inc.
NetwoRC provider user's guide
ST_SetFrcCoord
<Set value:VT_R4>
- 60 None
ST_SetFrcCoord
Selects a force limiting
coordinate system
(exclusively designed for
6-axis robots).
ST_SetFrcLimit
<Limiting rate along X:VT_R4>,
None
ST_SetFrcLimit
<Limiting rate along Y:VT_R4>,
Sets the force limiting rates
<Limiting rate along Z:VT_R4>,
(exclusively designed for
<Limiting rate about X:VT_R4>,
6-axis robots).
<Limiting rate about Y:VT_R4>,
<Limiting rate about Z:VT_R4>
ST_ResetFrcLimit
None
None
ST_ResetFrcLimit
Initializes the force limiting
rates (exclusively designed
for 6-axis robots).
ST_SetCompRate
<Compliance along X:VT_R4>,
None
ST_SetCompRate
<Compliance along Y:VT_R4>,
Sets the compliance rates
<Compliance along Z:VT_R4>,
under the compliance control
<Compliance about X:VT_R4>,
(exclusively designed for
<Compliance about Y:VT_R4>,
6-axis robots).
<Compliance about Z:VT_R4>
ST_ResetCompRate
None
None
ST_ResetCompRate
Initializes the compliance
rates (exclusively designed
for 6-axis robots).
ORiN Forum
DENSO WAVE Inc.
NetwoRC provider user's guide
ST_SetFrcAssist
<Force
- 61 assistance
X:VT_R4>,
along
assistance
along
<Force
assistance
Y:VT_R4>,
<Force
along
<Moment
None
Sets the force assistance
under the compliance control
Z:VT_R4>,
assistance
ST_SetFrcAssist
(special compliance control
about
function statement)
X:VT_R4>, <Moment assistance
(exclusively designed for
about Y:VT_R4>,
6-axis robots).
<Moment
assistance
about
Z:VT_R4>
ST_ResetFrcAssist
None
None
ST_ResetFrcAssist
Initializes the force
assistance (special
compliance control function
statement) (exclusively
designed for 6-axis robots).
ST_SetCompJLimit
<J1 current limit:VT_R4>, <J2
None
ST_SetCompJLimit
current limit:VT_R4>, <J3 current
Sets the current limit under
limit:VT_R4>,
<J4
current
the compliance control
limit:VT_R4>,
<J5
current
(special compliance control
limit:VT_R4>,
<J6
current
function statement)
limit:VT_R4>
(exclusively designed for
6-axis robots).
ST_ResetCompJLimit
None
None
ST_ResetCompJLimit
aInitializes the current limit
under the compliance control
(special compliance control
function statement)
(exclusively designed for
6-axis robots).
ORiN Forum
DENSO WAVE Inc.
NetwoRC provider user's guide
ST_SetCompVMode
None
- 62 None
ST_SetCompVMode
Sets the velocity control
mode under the compliance
control (special compliance
control function statement)
(exclusively designed for
6-axis robots).
ST_ResetCompVMode
None
None
ST_ResetCompVMode
Disables the velocity control
mode under the compliance
control (special compliance
control function statement)
(exclusively designed for
6-axis robots).
ST_SetCompEralw
<Allowable deviation X:VT_R4>,
None
ST_SetCompEralw
<Allowable deviation Y:VT_R4>,
Sets the allowable deviation
<Allowable deviation Z:VT_R4>,
values of the position and
<Allowable deviation X:VT_R4>,
the posture of the tool tip
<Allowable deviation Y:VT_R4>,
under the compliance control
<Allowable deviation Z:VT_R4>
(exclusively designed for
6-axis robots).
ST_ResetCompEralw
None
None
ST_ResetCompEralw
Initializes the allowable
deviation values of the
position and the posture of
the tool end under the
compliance control
(exclusively designed for
6-axis robots).
ORiN Forum
DENSO WAVE Inc.
NetwoRC provider user's guide
ST_SetDampRate
- 63 -
<DampRate
along
X:VT_R4>,
<DampRate
along
Y:VT_R4>,
None
ST_SetDampRate
Sets the damping rates under
<DampRate along Z:VT_R4>,
the compliance control
<DampRate
about
X:VT_R4>,
(exclusively designed for
<DampRate
about
Y:VT_R4>,
6-axis robots).
<DampRate about Z:VT_R4>
ST_ResetDampRate
None
None
ST_ResetDampRate
Initializes the damping rates
under the compliance control
(exclusively designed for
6-axis robots).
ST_SetZBalance
None
None
ST_SetZBalance
Sets the gravity
compensation value of the Z
and T axes (exclusively
designed for 4-axis robots).
ST_ResetZBalance
None
None
ST_ResetZBalance
Disables the gravity
compensation function
(exclusively designed for
4-axis robots).
DELAY
<value:VT_I2>
None
Msec
Suspends program
processing for a designated
period time.
SYSSTATE
None
None
SYSSTATE
Gets the system status of the
robot controller.
ORiN Forum
DENSO WAVE Inc.
NetwoRC provider user's guide
J2P
<J type:POSEDATA-C0>
- 64 <P type:
J2P
VT_R4|VT_ARRAY>
Transforms joint type data to
position type data.
J2T
<J type:POSEDATA-C0>
<T type:
J2T
VT_R4|VT_ARRAY>
Transforms joint type data to
homogeneous transformation
type data.
P2J
<P type:POSEDATA-C0>
<J type:
P2J
VT_R4|VT_ARRAY>
Transforms position type
data to joint type data.
P2T
<P type:POSEDATA-C0>
<T type:
P2T
VT_R4|VT_ARRAY>
Transforms position type
data to homogeneous
transformation type data.
T2J
<T type:POSEDATA-C0>
<J type:
T2J
VT_R4|VT_ARRAY>
Transforms homogeneous
transformation type data to
joint type data.
T2P
<T type:POSEDATA-C0>
<P type:
T2P
VT_R4|VT_ARRAY>
Transforms homogeneous
transformation type data to
position type data.
TINV
<T type:POSEDATA-C0>
<T type:
TINV
VT_R4|VT_ARRAY>
Calculates an inverse matrix
of homogeneous
transformation type data.
ORiN Forum
DENSO WAVE Inc.
NetwoRC provider user's guide
NORMTRN
<T type:POSEDATA-C0>
- 65 <T
NORMTRN
type:VT_R4|VT_ARRA
Normalizes
Y>
homogeneous-transformatio
n data.
TMUL
<T type n1:POSEDATA-C0>,
<T type:
=T<n1> * T<n2>
<T type n2:POSEDATA-C0>
VT_R4|VT_ARRAY>
Matrix operation for
transformation type data.
DEVH
<P type n1:POSEDATA-C0>,
<P type:
Calculates destination
<P type n2:POSEDATA-C0>
VT_R4|VT_ARRAY>
coordinates based on tool
coordinates.
If
n1>1 then
=P<n1> + (P<n2>.x,
P<n2>.y, P<n2>.z,
P<n2>.rx, P<n2>.ry,
P<n2>.rz )H
If
n1=0 then
=DESTPOS + (P<n2>.x,
P<n2>.y, P<n2>.z,
P<n2>.rx, P<n2>.ry,
P<n2>.rz )H
If
n1=-1 then
=CURPOS + (P<n2>.x,
P<n2>.y, P<n2>.z,
P<n2>.rx, P<n2>.ry,
P<n2>.rz )H
ORiN Forum
DENSO WAVE Inc.
NetwoRC provider user's guide
DEV
- 66 -
<P type n1:POSEDATA-C0>,
<P type:
Calculates destination
<P type n2:POSEDATA-C0>
VT_R4|VT_ARRAY>
coordinates based on base
coordinates.
If
n1>1 then
=P<n1> + (P<n2>.x,
P<n2>.y, P<n2>.z,
P<n2>.rx, P<n2>.ry,
P<n2>.rz )
If
n1=0 then
=DESTPOS + (P<n2>.x,
P<n2>.y, P<n2>.z,
P<n2>.rx, P<n2>.ry,
P<n2>.rz )
If
n1=-1 then
=CURPOS + (P<n2>.x,
P<n2>.y, P<n2>.z,
P<n2>.rx, P<n2>.ry,
P<n2>.rz )
TrackDataInitialize
<Initialization mode:VT_I2>
None
TRACKDATAINITIALIZE
Initializes data within the
conveyer tracking data
buffer.
TrackDataSet
<conveyer_number:VT_I2>,<num
None
TRACKDATASET
ber_of_recognized_workpieces:VT
Saves data in the conveyer
_I2>,<recognized_workpiece_posit
tracking buffer.
ion:POSEDATA-C0>
TrackDataGet
<conveyer_number:VT_I2>,<data_
<number_of_remaining_
TRACKDATAGET
number:VT_I2>
data_items:VT_I2>,
Obtains data from the
<recognized_workpiece_
conveyer tracking buffer.
position:
VT_R4|VT_ARRAY >
ORiN Forum
DENSO WAVE Inc.
NetwoRC provider user's guide
TrackDataInfo
- 67 -
<conveyer_number:VT_I2>,<data_
<encoder_value_at_reco
TRACKDATAINFO
number:VT_I2>
gnition:VT_I4>,<availabi
Obtains information within
lity:VT_I2>,<recognized
the conveyer tracking buffer.
_workpiece_position:
VT_R4|VT_ARRAY >
TrackDataNum
<conveyer_number:VT_I2>
<number_of_saved_data
TRACKDATANUM
_items:VT_I2>
Obtains the number of data
items retained with
TRACKDATASET.
CurTrackPos
CurTrackPosEx
WaitTrackMove
<conveyer_number:VT_I2>,<reco
<position:
CURTRACKPOS
gnized_workpiece_position
VT_R4|VT_ARRAY >
Obtains the position of the
type:POSEDATA-C0>,<mode:VT_
workpiece subject to
I2>
tracking as a P type.
<conveyer_number:VT_I2>,<reco
<position:
CURTRACKPOSEX
gnized_workpiece_position
VT_R4|VT_ARRAY >
Obtains a tracking-target
CurTrackSpd
P
type:POSEDATA-C0>,<mode:VT_
workpiece position in the
I2>
P-type form.
<conveyer_number:VT_I2>,<reco
gnized_workpiece_position
WaitTrackMoveEx
P
None
P
WAITTRACKMOVE
Waits for tracking-target
type:POSEDATA-C0>,<timeout:V
workpiece to enter into a
T_I2>
tracking start area.
<conveyer_number:VT_I2>,<reco
<error_information:VT_I
WAITTRACKMOVEEX
gnized_workpiece_position
2>
Waits for tracking-target
P
type:POSEDATA-C0>,<timeout:V
workpiece to enter into a
T_I2>
tracking start area.
<conveyer_number:VT_I2>
<conveyer_speed:VT_R4
CURTRACKSPD
>
Obtains the speed of the
conveyer specified in
<conveyer_number>.
ORiN Forum
DENSO WAVE Inc.
NetwoRC provider user's guide
CalcWorkPos
- 68 -
<conveyer_number:VT_I2>,<work
<position:
CALCWORKPOS
piece_position_at_recognitin
VT_R4|VT_ARRAY >
Obtains the current position
P
type:POSEDATA-C0>,<encode_va
of the specified workpiece.
lue_at_recognition:VT_I4>
SetTrackMove
<conveyer_number:VT_I2>
None
SETTRACKMOVE
Starts the tracking operation
for the specified conveyer.
ResetTrackMove
None
None
RESETTRACKMOVE
Switches from the tracking
operation mode to the
normal operation mode.
SetTrackStartArea
<conveyer_number:VT_I2>,<conv
None
SETTRACKSTARTAREA
eyer_upstream_(-)side_tracking_st
Sets the tracking start range
art_position:VT_I2>,<conveyer_do
at the time of
wnstream_(+)side_tracking_start_p
WAITTRACKMOVE.
osition:VT_I2>
ClearSrvLog
None
None
Clearness of single axis
control log
=PAC:ClearSrvMonitor
StartSrvLog
None
None
Beginning of single axis
control log
=PAC:StartSrvMonitor
StopSrvLog
None
None
End of single axis control
log
=PAC:StopSrvMonitor
SetSrvLogCond
<Axis
number : VT_I2>,<Data
None
Condition setting of single
number 1:VT_I2>,<Data number
axis control log
2 : VT_I2>,<Sampling
=PAC:SetMonitorCond
rate :
VT_I2>
ORiN Forum
DENSO WAVE Inc.
NetwoRC provider user's guide
GetSrvLogCond
None
- 69 <Axis
number
VT_I2>,<Data
:
number
Condition acquisition of
single axis control log
1:VT_I2>,<Data number
2 : VT_I2>,<Sampling
rate : VT_I2>,<Sampling
counts:VT_I2>
GetSrvLog
None
<Servo
data
(Two
dimension array):VT_R4
Acquisition of single axis
control log
| VT_ARRAY>
TakeArm
<Arm group : VT_I4> [, <Keep
None
option:VT_I4>]
TakeArm
<Keep option>:= 0(default):
0: The tool coordinate and
the work coordinate are
returned to the origin, and
the internal speed, the
internal acceleration, and the
internal deceleration are
set to 100.
1: The tool coordinate, the
work coordinate, the internal
speed, the internal
acceleration, and the internal
deceleration are maintained
to their current setting.
Obtains visual process
priority.
GiveArm
None
None
GiveArm
Releases robot control
priority.
SetHighPathAccuracy
None
None
High path accuracy mode
ON
ResetHighPathAccuracy
None
None
High path accuracy mode
OFF
ORiN Forum
DENSO WAVE Inc.
NetwoRC provider user's guide
SetSingularAvoid
- 70 None
<Mode:VT_I2 = 0:OFF, 1:ON>
Singular-point avoidance
mode ON/OFF
<Mode> = 0:OFF, 1:ON
FigAprp
<Reference
position
:
<Fig:VT_I2>
FIGAPRP
POSEDATA-C0 (P type only)> ,
Calculates figures at an
<Approach length : VT_R4>
approach position and a
standard position available
to move in PTP motion.
FigAprl
<Reference
position
:
<Fig:VT_I2>
FIGAPRL
POSEDATA-C0 (P type only)> ,
Calculates figures at an
<Approach length : VT_R4>
approach position and a
standard position available
to move in CP motion.
GetCollisionForce
ClearCollisionForce
None
<Max
None
value:
Get a maximum external
VT_R4|VT_ARRAY>
force value.
None
Clear a maximum external
force value.
ResetCollisionJnt
<Axis No: VT_I2>
None
Disable collision detection
for the specified axis
SetCollisionJnt
<Axis No: VT_I2>
None
Enable collision detection
for the specified axis.
SetCollisionLevel
<Axis No: VT_I2>,
<Detection
Level:
None
Set collision detection level.
None
Enable/Disable
VT_I4(1 ~
500)>
SetExtForceDetect
<Enable: VT_I2(0/1)>
collision
detection.
RPM
<Axis No: VT_I2>,
<SPEED
<RPM value: VT_R4>
VT_R4>
value
(%):
Convert the rotation speed of
the specified joint, which is
specified in rpm, to the
percentage
(%)
of
the
maximum
internal
speed
in
PTP
motion.
ORiN Forum
DENSO WAVE Inc.
NetwoRC provider user's guide
MPS
<MPS value: VT_R4>
- 71 <SPEED
value
(%):
VT_R4>
Convert the speed value
specified in mm/sec to the
percentage
(%)
of
the
maximum internal speed in
CP motion.
The argument of the Execute method of the CaoRobot class specifies command number + parameter by the
VARIANT array.
Example:
Dim vRes as Variant
vRes=caoRobot.Execute(“GetJntData”,Array(1,6)) ‘ 6th joint motor current speed[rpm]
caoRobot.Execute(“ExtSpeed”,Array(50.0, 25.0, 25.0 ) )
‘external speed =50%, acceleration =25%, deceleration =25%
caoRobot.Execute “APPROACH”, Array(1, “P11”, “@P 100”, “NEXT”)
‘APPROACH P,P11,@P 100, NEXT
The user can enhance an original command by defining an additional command in the UserExtention
program of the UserExtention.pac file, and describing the execution code corresponding to it. Following is an
concrete code example when GETSRVDATA and the GETJNTDATA command are added
1.
UserExtention.pac and RobSlave.h are acquired.
Refer to ORiN2¥CAO¥ProviderLib¥DENSO¥NetwoRC¥Bin¥ folder.
2.
Define the corresponding command number into RobSlave.h.
Define the corresponding command number and add it into RobSlave.h.
The value of RBS_CMD_EXTENTION is 10000. It is defined by RobSlave.h.
‘User Extention Commands Def.
‘----------------------------------------------------------#define RBS_CMDEX_APPROACH_L
(RBS_CMD_EXTENTION
#define RBS_CMDEX_APPROACH_P
(RBS_CMD_EXTENTION
#define RBS_CMDEX_GETSRVDATA
(RBS_CMD_EXTENTION
#define RBS_CMDEX_GETJNTDATA
(RBS_CMD_EXTENTION
3.
+1)
+2)
+3)
+4)
Describe the execution code to an additional command.
Pv.x (=T[RBS_IDX_COMMAND].X) stores execution command ID. Refer this value and branch to
the actual execution code using SELECT-CASE statement. Command arguments are stored in pv.Y, pv.Z,
ov.X, ov.Y, ov.Z, av.X, av.Y, and av.Z (= T[RBS_IDX_COMMAND]. Y and Z etc.).
‘ User Extention Commands Impl.
‘-------------------------------------------------------------------------------------PROGRAM UserExtention(pv as VECTOR, ov as VECTOR, av as VECTOR)
DEFSNG ret
DEFINT index, path
DEFINT vartype, varindex
DEFSNG length
DEFJNT jv
select case POSX(pv)
‘-----------------------------------------------------------
ORiN Forum
DENSO WAVE Inc.
NetwoRC provider user's guide
- 72 -
case RBS_CMDEX_GETJNTDATA
‘GetJntData(<Index>, <JontNo>)
‘----------------------------------------------------------LETX T[RBS_IDX_RESULT] = GetJntData ( POSY(pv), POSZ(pv) )
I[RBS_IDX_STATE] = RBS_STA_RETVAL ‘ Return value
case RBS_CMDEX_GETSRVDATA
‘GetSrvData(<Index>)
‘----------------------------------------------------------jv = GetSrvData ( POSY(pv) )
#ifdef __VERTICAL_ROBOT__
T[RBS_IDX_RESULT] = ( JOINT(1,jv), JOINT(2,jv), JOINT(3,jv), JOINT(4,jv), JOINT(5,jv),
JOINT(6,jv), 0,0,0, -1 )
#else
T[RBS_IDX_RESULT] = ( JOINT(1,jv), JOINT(2,jv), JOINT(3,jv), JOINT(4,jv), 0,0,0,0,0, -1 )
#endif
I[RBS_IDX_STATE] = RBS_STA_RETVAL ‘ Return value
‘----------------------------------------------------------case else
I[RBS_IDX_STATE] = RBS_STA_ERR
end select
If the call does not return value, set I[RBS_IDX_STATE] = RBS_STA_DONE.
When a value is returned, substitute the value in T[RBS_IDX_RESULT] and set I[RBS_IDX_STATE]
= RBS_STA_RETVAL. In this case, Execute method of CaoRobot class will have return value of
VARIANT array, and each elements of T[RBS_IDX_RESULT] is stored in the array.
4.
Update CRC32 information of the UserExtention.pac file.
CRC32 information of UserExtension.pac is recorded in RobSlave.h.
'CRC code
#define RBS_SLVCRC_CODE11
#define RBS_EXTCRC_CODE
&H62cb2dc4
&H1e5d8368
Calculate CRC32 of UserExtension.pac and update the value of RBS_EXTCRC_CODE.
Otherwise, the error occurs when the operation command is executed.
The value of CRC32 can be acquired in the @CRC system variable of the CaoFile class.
5.
Execute CaoRobot::Execute method with “UserExt” command.
Command=”UserExt”
Parameter=<additional command >,<arg1>,<arg2>,…
(array of VARIANT)
Example: vRes = CaoRobot.Execute( “UserExt”, Array(10004, 1, 6 ) )
'= GetJntData(1,6)
【 essential requisites 】
At the current implementation, “RobSlave.pac” and “UserExtention.pac” programs need to be executed
beforehand on the robot controller to execute Execute method of CaoRobot class. RobSlave.pac and
UserExtention.pac are in ORiN2¥CAO¥ProviderLib¥DENSO¥NetwoRC¥Bin.
4.2.40. CaoTask::AddVariable method
The argument of the AddVariable method of the CaoTask class specifies the system variable name.
Please refer Table 0-8 for the list of implemented system variables.
11
CRC32 of RobSlave.pac
ORiN Forum
DENSO WAVE Inc.
NetwoRC provider user's guide
- 73 -
4.2.41. CaoTask::get_VariableNames property
A list of the variable identifier and the system variable identifier that can be specified by the AddVariable
method is acquired.
4.2.42. CaoTask::Start method
Start PAC program corresponding to the object.
This method has the following two arguments.
Syntax Start <lMode:LONG>, <bstrOpt:BSTR>
lMode
:
[in]
Start mode
1: 1 Cycle execution, 2: Cyclic execution, 3: 1 Step forward, 4: 1
Step backword, 5: Resume all
bstrOpt
:
[in]
Option character string (unused)
If this method is called with mode 5 (Resume), then all suspeneded programs in the robot controller are
resumed.
4.2.43. CaoTask::Stop method
Stop PAC program corresponding to the object. This method has the following two arguments.
Syntax Stop <lMode:LONG>, <bstrOpt:BSTR>
lMode
:
[in]
Stop mode
1: Instant stop, 2: Step stop, 3: Cycle stop, 4: Initialized stop, 5:
Suspend all
bstrOpt
:
[in]
Option character string (unused)
"0: default stop" is the same as "1: Instant stop".
If this method is called with mode 5 (Suspend), then all programs in the robot controller are suspeneded.
4.2.44. CaoVariable::get_Value property
Get the value of the variable that corresponds to the object.
Please refer 2.3 for implementation situation and supported data type.
4.2.45. CaoVariable::put_Value property
Set the value of the variable that corresponds to the object.
Please refer 2.3 for implementation situation and supported data type.
4.2.46. CaoVariable::put_ID property
Set the index of the varialbe that corresponds to the object.
ORiN Forum
DENSO WAVE Inc.
NetwoRC provider user's guide
- 74 -
This property can be used for the object created with '*'.
Example (VB):
Set objIO = caoCtrl.AddVariable( “IO[*]” )
objIO.ID = 128
boolValue = objIO.Value
‘ Specify a wild card (*) for I/O.
‘ Specify the index by ID property
‘ get IO[128] value
4.2.47. CaoVariable::get_ID property
Get the index of the varible that corresponds to the object.
4.2.48. CaoVariable::get_Microsecond property
Get time stamp of the variable corresponding to the object.
Time stamp counter is incremented by one on every 500 microsecond after controller boot, with counter
value 0 at the controller startup.
As the counter value increases, the value goes around as following.
0,1,2→2147483647(0x7fffffff) ,-2147483648(0x80000000) ,-2147483647(0x80000001) →-2,-1,0
[Note] If the object does not support time stamp, the property returns 0.
4.2.49. CaoMessage::Clear method
Clear the occurring error status by using the Clear method of the CaoController class.
ORiN Forum
DENSO WAVE Inc.
NetwoRC provider user's guide
- 75 -
4.3. Variable list
4.3.1. Controller class
Table 0-5 Controller class user variable list
Variable identifier
I
Data type
VT_I4
Explanation
Attribute
get
put
I type variable. The variable number is specified behind √
√
the variable name.
F
VT_R4
F type variable. The variable number is specified √
√
behind the variable name.
D
VT_R8
D type variable. The variable number is specified √
√
behind the variable name.
V
VT_ARRAY V type variable. The variable number is specified √
| VT_R4
√
behind the variable name.
The data type has three elements.
P
VT_ARRAY P type variable. The variable number is specified √
| VT_R4
√
behind the variable name.
The data type has seven elements.
VT_ARRAY J type variable. The variable number is specified behind √
J
| VT_R4
√
the variable name.
The data type has six elements.
T
VT_ARRAY T type variable. The variable number is specified √
| VT_R4
√
behind the variable name.
The data type has ten elements.
S
VT_BSTR
S type variable. The variable number is specified √
√
behind the variable name.
IO
VT_BOOL
IO type variable. The variable number is specified √
√
behind the variable name.
TOOL
VT_ARRAY TOOL.The variable number (0 or greater) is specified √
| VT_R4
WORK
ORiN Forum
behind the variable name.
VT_ARRAY WORK.The variable number (0 or greater) is specified √
| VT_R4
√
behind the variable name.
DENSO WAVE Inc.
√
NetwoRC provider user's guide
- 76 -
VT_ARRAY AREA.The variable number (0 or greater) is specified √
AREA
| VT_R4
√
behind the variable name.
(V[0],..,V[8],IO,Pos,Err,Enable)
_ITP
VT_I4
V[0]~V[8]:
area
IO
:
I/O port number
Pos
:
position number
Err
:
error flag
Enable
:
function enable/disable
ITPCNF . The variable number is specified behind the √
√
variable name.
_PAC
VT_I4
PACCNF . The variable number is specified behind the √
√
variable name.
_DIO
VT_I4
DIOCNF . The variable number is specified behind the √
√
variable name.
_ARM
VT_I4
ARMCNF . The variable number is specified behind √
√
the variable name.
_SRV
VT_I4
SRVCNF . The variable number is specified behind the √
√
variable name.
_SPD
VT_I4
SPDCNF . The variable number is specified behind the √
√
variable name.
_VIS
VT_I4
VISCNF . The variable number is specified behind the √
√
variable name.
_COM
VT_I4
COMCNF . The variable number is specified behind √
√
the variable name.
Table 0-6 Controller class system variable list
Variable identifier
Data type
Explanation
@CURRENT_TIME
VT_DATE
@FREE_USER_MEM
Attribute
get
put
Current time held in the controller
√
√
VT_I4
Free user memory size (byte)
√
×
@NORMAL_STATUS
VT_BOOL
true = normal, false = abnormal (an error is occurring.)
√
×
@AUTO_MODE
VT_BOOL
true = automatic mode, false = not in automatic mode
√
×
ORiN Forum
DENSO WAVE Inc.
NetwoRC provider user's guide
- 77 -
@MODE
VT_I2
1: manual, 2: teach check, 3: auto, 4: external auto
√
×
@BUSY_STATUS
VT_BOOL
true = program is executed.
√
×
√
×
√
×
Currently occurring error code by hexadecimal √
×
False = program is not executed.
@EMERGENCY_STOP
VT_BOOL
true = emergency stop is active.
False = emergency stop is not active.
@ERROR_CODE
VT_I4
Currently occurring error code.
Returns 0 if no error is occurring
@ERROR_CODE_HEX
VT_BSTR
character string.
@ERROR_DESCRIPTION
VT_BSTR
Currently occurring error description.
√
×
@MAKER_NAME
VT_BSTR
“DENSO CORPORATION”
√
×
@TYPE
VT_BSTR
“NetwoRC Controller”
√
×
@VERSION
VT_BSTR
Controller’s version
√
×
@SERIAL_NO
VT_BSTR
Controller’s serial number
√
×
ORiN Forum
DENSO WAVE Inc.
NetwoRC provider user's guide
- 78 -
4.3.2. Robot class
Table 0-7 Robot class system variable list
Variable identifier
@CURRENT_POSITION
Data type
get
put
√
×
VT_ARRAY Current robot position (each axis value). The unit is √
×
VT_ARRAY Current robot position. The unit is arbitrary.
| VT_R4
@CURRENT_ANGLE
@SERVO_ON
Attribute
Explanation
P type variable.
| VT_R4
arbitrary. J type variable
VT_BOOL
True = servo ON, false = servo OFF
√
×
@ZERO_RETURN_REQUIR VT_BOOL
True = zero return is necessary, false = zero return is √
×
ED
not necessary.
@BUSY_STATUS
VT_BOOL
true=arm moving,false=arm stopping
√
×
@TYPE_NAME
VT_BSTR
Robot type name
√
×
√
×
√
×
“VM-D”,”VS-D”,”VSS-D”,”DM-D”,”Unknown”
@TYPE
VT_I4
@CURRENT_TRANS
VT_ARRAY
| VT_R4
Robot type data
Current robot position expressed in T type
@CURRENT_TOOL
VT_I2
Currently used tool number
√
×
@CURRENT_WORK
VT_I2
Currently used work number
√
×
@SPEED
VT_R4
Internal speed
√
×
@ACCEL
VT_R4
Internal acceleration
√
×
@DECEL
VT_R4
Internal deceleration
√
×
@JSPEED
VT_R4
Internal joint speed
√
×
@JACCEL
VT_R4
Internal joint acceleration
√
×
@JDECEL
VT_R4
Internal joint deceleration
√
×
@EXTSPEED
VT_R4
External speed
√
×
@EXTACCEL
VT_R4
External acceleration
√
×
ORiN Forum
DENSO WAVE Inc.
NetwoRC provider user's guide
@EXTDECEL
VT_R4
- 79 √
×
√
×
@HIGH_CURRENT_ANGLE VT_ARRAY Current robot position (each axis value). The unit is √
×
External deceleration
@HIGH_CURRENT_POSITI VT_ARRAY Current robot position. The unit is arbitrary.
ON
| VT_R4
P type variable.
The value is indefinite under machine-locked because it
is retrieved from an encoder directly.
When the controller is not in machine-lock mode, the
current encoder value is returned. (update resolution:
500 microsecond)
When the controller is in machine-lock mode, the
internal position target value is returned. (update
resolution: 8 msec)
The time stamp of data acquisition can be referred by
Microsecond property of CaoVariable class.
[Note]
Controllers prior to Version 2.90 do not support time
stamp. On machine-lock mode, current position is
indefinite.
| VT_R4
arbitrary. J type variable.
For
function
specification,
please
refer
to
@HIGH_CURRENT_POSITION.
√
@HIGH_CURRENT_TRANS VT_ARRAY Current robot position expressed in T type.
| VT_R4
For
function
specification,
please
refer
to
@HIGH_CURRENT_POSITION.
ORiN Forum
DENSO WAVE Inc.
×
NetwoRC provider user's guide
- 80 -
4.3.3. Task class
Table 0-8 Task class system variable list
Variable identifier
@STATUS
Data type
VT_I4
Attribute
Explanation
State of task.
get
put
√
×
1: DORMANT
2: READY
3: RUN
4: WAIT
6: SUSPEND
0: NON_EXISTENT
@PRIORITY
VT_I4
Priority of task.
√
×
@LINE_NO
VT_I4
Line – number of currently executing main program.
√
×
@CYCLE_TIME
VT_I4
One cycle execution time of task.
√
×
@START
VT_I4
Start task. The meaning of the value is the same as the ×
√
Mode argument of the CaoTask::Start method.
The mode is 1: one cycle execution, 2: continuous
executes, 3: 1 step forward, 4: 1 step backward. , 5:
resume all
(Note) If the value is set to 5 (resume all), then all
suspended programs in the controller are resumed.
@STOP
VT_I4
Stop task. The meaning of the value is the same as the ×
Mode argument of the CaoTask::Stop method.
The mode is 0: default stop, 1: Instant stop, 2: step stop,
3: Cycle stop, 4: Initialization stop, 5: Suspend all
If an option is required, please use CaoTask::Stop
method instead. Default stop (0) is the same as Instant
stop (1).
(Note) If the value is set to 5 (resume all), then all
programs in the controller are suspended.
ORiN Forum
DENSO WAVE Inc.
√
NetwoRC provider user's guide
- 81 -
4.3.4. File class
Table 0-9 File class system variable list
Variable identifier
@ACTIVE
Data type
VT_I4
Explanation
Active of file(compile flag).
Attribute
get
put
√
√
√
×
0: Inactive
1: Active
@CRC
ORiN Forum
VT_I4
CRC32
DENSO WAVE Inc.
NetwoRC provider user's guide
- 82 -
5. Outline of robot operation command execution
The execution of the robot motion commands of the CaoRobot class (Move, GoHome, Accelerate, Change,
Speed, and Execute method) has been achieved in the following way. NetwoRC provider communicate with a
PAC program RobSlave (RobSlave.pac) running on the robot controller, and the PAC program executes
specified PAC command. Controller global variables I[0], T[0] and T[1] are used for communication between
NetwoRC provider and RobSlave. I[0] is uses to express the executing command status, e.g., running,
completed, or error. T[0] is used to pass command and parameters from NetwoRC provider to RobSlave. T[1]
is used to return value from RobSlave to NetwoRC provider.
Following diagram shows the execution procedure of robot motion command.
RC7 controller
ORiN2
NetwoRC
(1)command +
parameter
RobSlave
T[0]
(6) get return
(2) execute PAC command
MOVE L, @P J[POSX(ov)], NEXT
value
(5) receive response
T[1]
(3) set return value
I[0]
(4) set response
Figure 5-1 Execution procedure of robot motion command
【 attention 】
All global variables (I,F,D,V,P,J,T,S) from [0] to [9] have been reserved with the system.
Please do not access these variables in the user's program.
ORiN Forum
DENSO WAVE Inc.
NetwoRC provider user's guide
- 83 -
6. Tips
6.1. How to write data in an error state
NetwoRC controller rejects all writing data request (ex. Variable, I/O) when an error occurred because of
safety reason. By using a suprevisory task (PAC) in the controller, the limitation can be solved.
The suprevisory tasks (TSR1, TSR2, ...) can write data during an error state, and those can be invoked at the
startup of the controller. The procedure is as follows.
(1) Enable a suprevisory task
(2) Make a suprevisory task program which writes data when got notification from an external PC, and
invoke the program.
(3) Notify to the suprevisory task from the PC.
The following figure shows an outline of the system using a suprevisory task and NetwoRC provider
simultaneously.
Figure 6-1 Expanded system using a suprevisory task (PAC)
By combining Stream provider 12 and a suprevisory task, it becomes possible to write data (ex. Variable, I/O)
while an error occurred.
NetwoRC provider is much faster than this way, but it is useful for the manufacturing system recovery and
so on(Table 6-1).
12
Regarding Stream provider, please refer "Stream provider user's guide" in the ORiN2 SDK.
ORiN Forum
DENSO WAVE Inc.
NetwoRC provider user's guide
- 84 -
Table 6-1 A comparison of communication methods
Method
1. NetwoRC provider
Speed
Fast
(ROBOTalk/UDP/IP)
2. Stream provider
Supervisory Task
Not required
Write data in an error state
Impossible
(System + RobSlave)
Slow
(TCP/IP)
Required
Possible
(PAC program)
For the details of a supervisory task, please refer the following manual.
DENSO ROBOT SETTING-UP MANUAL
Chapter 3 General Introduction to Operation Modes and Additional Functions
Supervisory Task (Software PLC)
6.1.1. Enable a supervisory task
To enable a supervisory task, the following steps are required.
(1) Add [1111] and [1112] options.
Top screen -> Set[F6] -> Options[F7] -> Extension[F8]
(2) Restart the controller.
(3) Enable a supervisory task.
Top screen -> SHIFT -> S-TASK[F2] -> Setting[F2]
ORiN Forum
DENSO WAVE Inc.
NetwoRC provider user's guide
- 85 -
(4) Restart the controller again.
6.1.2. Make a supervisory task
The following sample program writes I/O when it gets notification from an external PC. The controller is set
as a server, and its input port number is #4, and its TCP port number is 5001.
List 6-1
TSR1.pac
PROGRAM TSR1
Defint lval
Defstr sval
Do
' Wait for a TCP connection
com_state #4, lval
If lval <> -1 Then Exit Do
Delay 100
Loop
Do
' Wait for a command
Input #4, sval ' #4 = TCP 5001 port
lval = Val(sval)
' Covert character string to a number
If lval>0 Then
Set IO[lval]
'”128” -> IO[128] = ON
Print #4, sval; “ ON”
Else
Reset IO[-lval]
‘”-128” -> IO[128] = OFF
Print #4, sval; “ OFF”
End If
Loop
END
[Controller setting]
Top screen -> Set[F6] -> Set Com.[F5] -> Server[F11]
ORiN Forum
DENSO WAVE Inc.
NetwoRC provider user's guide
- 86 -
6.1.3. Notify to a supervisory task from a PC
The following sample program using Stream provider notifies to a supervisory task. from a PC. The IP
address and the port number should be changed according as set above.
List 6-2
Client.frm
Private eng As CaoEngine
Private WithEvents ctrl As CaoController
Private Sub Form_Load()
Set eng = New CaoEngine
' Connect to NetwoRC controller as a client
Set ctrl = eng.Workspaces(0).AddController("Client", _
"CaoProv.DNWA.STREAM", _
"", _
"Conn=eth:192.168.0.1:5001")
End Sub
Private Sub Command1_Click()
' Send data
ctrl.Execute "Send", text1.Text
‘ Ex. “128” -> IO128=ON
End Sub
' Receive data
Private Sub ctrl_OnMessage(ppCaoMess As CAOLib.ICaoMessage)
' get data
text2.Text = ppCaoMess.Value
End Sub
ORiN Forum
DENSO WAVE Inc.
NetwoRC provider user's guide
- 87 -
Appendix A. POSEDATA type definition
In the NetwoRC provider, “POSEDATA” is defined so that the pose data type data and the vector type data
of DENSO robot by VARIANT variable.
POSEDATA type (VARIANT)
VT_BSTR 13
"[<Pass>]
[<Variable type>]<Index> [<ExJnt>]"
or
"[<Pass>]
[<Variable type>](<Element 1>,<Element 2>,...)
[<ExJnt>]"
VT_R4|VT_ARRAY
14
<Raw value> = (<Element 1:VT_R4>,<Element 2:VT_R4>,...) 15
VT_VARIANT|VT_ARRAY
<Value>
(<0:Value>[,<1:Variable type>[,<2:Path>[, <3:ExJnt>]]])
<Index:VT_R4>
or
<Raw value:VT_R4|VT_ARRAY>
<Variable type>
P, T, J, V type (default=P)
<Pass>
@P, @E, @0, @<value> (default=@0)
<ExJnt>
<Extended-joints option:VT_VARIANT|VT_ARRAY>
(default=None)
<Pass>
: @P, @E, @0, @<value>
Mark
@P
@E
@0
@<数値:n>
None
VT_BSTR
"@P"
"@E"
"@0"
"@n"
""
-1
-2
0
n
0
VT_I4
<Variable type>
: P type, T type, J type, V type
Mark
P
T
J
V
None
VT_BSTR
"P"
"T"
"J"
"V"
""
0
1
2
3
-1
VT_I4
13
14
<Index>
: <value:VT_R4>
<Element n>
: <value:VT_R4>
<Extended-joints
: (<EX
or
EXA>,
(<Joint1:VT_I4>,
<Value1:VT_R8>)[,
In case of VT_BSTR, more than one POSEDATA type separated by commas can be specified.
Because <Variable type> and <Pass> cannot be specified, variable type is treated as P type and pass type is treated as @0 by
default.
15
Cannot specify the extended-joints option.
ORiN Forum
DENSO WAVE Inc.
NetwoRC provider user's guide
option>
- 88 -
(<Joint2>,<Value2>)...])
表記
EX
EXA
なし
VT_BSTR
"EX"
"EXA"
""
1
2
0
VT_I4
The following formats of PAC language can be indicated by POSEDATA type.
[<Pass start displacement >] <Pose:P,T,J type>
[<ExJnt>]
(C0-format)
[<Pass start displacement >] <Vector:V type>
(C1-format)
[<Pass start displacement >] <Value> [<ExJnt>]
(C2-format)
[<Pass start displacement >] (<Element1>,< Element 2>,...) [<ExJnt>]
(C3-format)
Appendix A.1. Examples
[<Pass start displacement >] <Pose:P,T,J type> [<ExJnt>]
(C0-format)
ex1. T200
String
"T200"
VARIANT type array
Array(200,”T”)16
(variable type specified by
string)
Array(200,1)
VARIANT type array
(variable type specified by
value)
ex2. @P J100
String
"@P J100"
VARIANT type array
Array(100,”J”,”@P”)
(variable type and pass type
specified by string)
Array(100,2,-1)
VARIANT type array
(variable type and pass type
specified by number)
ex3. @E P(10.0, 10.5, 34.6, 0.0, 90.0, 0.0, -1.0)
String
"@E P(10.0, 10.5, 34.6, 0.0, 90.0, 0.0, -1.0)"
VARIANT type array
Dim p(6) as Single
Dim vP as Variant
p(0) = 10.0 : p(1) = 10.5 : p(2) = 34.6 : p(3) = 0.0
(immediate
16
value,
with
Array(…) is a function to return an array composed of the argument to the function. (Array function of VB6)
ORiN Forum
DENSO WAVE Inc.
NetwoRC provider user's guide
variable type and pass type
specified by string)
VARIANT type array
(immediate
value,
with
variable name and pass type
specified by number)
- 89 p(4) = 90.0 : p(5) = 0.0 : p(6) = -1.0
vP = p()
Array(vP, ”P”, ”@E”)
Dim p(6) as Single
Dim vP as Variant
p(0) = 10.0 : p(1) = 10.5 : p(2) = 34.6 : p(3) = 0.0
p(4) = 90.0 : p(5) = 0.0 : p(6) = -1.0
vP = p()
Array(vP, 0, -2)
ex4. @P J100 EXA((7, 30.5), (8, 90.5))
String
"@P J100 EXA((7, 30.5), (8, 90.5))"
VARIANT type array
Array(100,”J”,”@P”, Array(“EXA”,Array(7,30.5), Array(8,90.5)))
(variable type, pass type and
aux. axis specified by string)
VARIANT type array
Array(100,2,-1, Array(2, Array(7,30.5), Array(8,90.5)))
(variable type, pass type and
aux. axis specified by number)
[<Pass start displacement >] <Vector:V type>
(C1-format)
ex1. @P V20
String
"@P V20"
VARIANT type array
Array(20,”V”,”@P”)
(variable type and pass type
specified by string)
VARIANT type array
Array(20,3,-1)
(variable type and pass type
specified by number)
ex2. @E V(0.0, 125.5, 50.0)
String
"@E V(0.0, 125.5, 50.0)"
VARIANT type array
Dim v(2) as Single
Dim vV as Variant
v(0) = 0.0 : v(1) = 125.5 : v(2) = 50.0
vV = v()
Array(vV, ”V”, ”@E”)
(immediate value, with variable
type and pass type specified by
string)
VARIANT type array
(immediate value, with variable
type and pass type specified by
Dim v(2) as Single
Dim vV as Variant
v(0) = 0.0 : v(1) = 125.5 : v(2) = 50.0
vV = v() ‘ = VT_R4 | VT_ARRAY
Array(vV, 3, -2)
number)
ORiN Forum
DENSO WAVE Inc.
NetwoRC provider user's guide
- 90 -
[<Pass start displacement >] <Value> [<ExJnt>]
(C2-format)
ex1. @P 1
String
"@P 1"
VARIANT type array
Array(1, ””, ”@P”)
(variable type and pass type
specified by string)
VARIANT type array
Array(1,-1,-1)
(variable type and pass type
specified by number)
ex2. @P 1.56
String
"@P 1.56"
VARIANT type array
Array(1.56,””,”@P”)
(variable type and pass type
specified by string)
VARIANT type array
Array(1.56,-1,-1)
(variable type and pass type
specified by number)
[<Pass start displacement >] (<Element1>,< Element 2>,...) [<ExJnt>]
(C3-format)
ex1. @P (1, 30.0)
String
"@P (1, 30.0)"
VARIANT type array
Dim v(1) as Single
v(0) = 1 : v(1) = 30.0
Dim vV as Variant
vV = v()
Array(vV, ””, ”@P”)
(variable type and pass type
specified by string)
VARIANT type array
(variable type and pass type
specified by number)
Dim v(1) as Single
v(0) = 1 : v(1) = 30.0
Dim vV as Variant
vV = v()
Array(vV, -1, -1)
Other examples
ex1. V1,V2,V3
(Rotation plane for CaoRobot::Rotate())
String
"V1,V2,V3"
String array
Array("V1","V2","V3")
VARIANT array
Array(Array(1,”V”),Array(2,”V”),Array(3,”V”))
ORiN Forum
DENSO WAVE Inc.
NetwoRC provider user's guide
( variable type
specified
- 91 by
string)
Array(Array(1,3),Array(2,3),Array(3,3))
VARIANT array
( variable type
specified
by
number)
ex2. APPROACH P,P70, 60, NEXT
(Approach command for CaoRobot::Execute(), without pass specification)
2nd argument : string
.Execute "APPROACH", Array(1, "P70", "60", "NEXT")
3rd argument : string
2nd argument : VARIANT array
.Execute "APPROACH", Array(1, Array(70, "P"), _
Array(60, "", ""), "NEXT")
3rd argument: VARIANT array
ex3. APPROACH L,J(60.5,30.3,400,90),@100 70, NEXT
(Approach command for CaoRobot::Execute(), without pass specification)
2nd argument : string
.Execute "APPROACH", Array(2, "J(60.5,30.3,400,90)", "@100
70", "NEXT")
3rd argument : string
2nd argument : VARIANT array
(immediate value, with variable
type specified by string)
3rd argument : VARIANT array
Dim j(3) as Single
Dim vJ as Variant
j(0) = 60.5 : j(1) = 30.3 : j(2) = 400 : j(3) = 90
vJ = j() ‘ = VT_R4 | VT_ARRAY
.Execute "APPROACH", Array(2, Array(vJ, "J"), _
Array(70,"","@100"), "NEXT")
(immediate value, with variable
type specified by string)
2nd argument : VARIANT array
(immediate value, with variable
type specified by string)
3rd argument : VARIANT array
Dim j(3) as Single
Dim vJ as Variant
j(0) = 60.5 : j(1) = 30.3 : j(2) = 400 : j(3) = 90
vJ = j() ‘ = VT_R4 | VT_ARRAY
.Execute "APPROACH", Array(2, Array(vJ, "J"), _
Array(70, -1, 100), "NEXT")
(immediate value, with variable
type specified by number)
【 attention 】
When the value is immediately specified directly by POSEDATA type by VT_R4|VT_ARRAY form, it
becomes P type and @0 by default. Therefore, data other than P type cannot be specified directly by the
VT_R4|VT_ARRAY form. In this case, please specify the variable type of the data by the
VT_VARIANT|VT_ARRAY form or VT_BSTR form.
Please note that the following codes do not make sense.
ORiN Forum
DENSO WAVE Inc.
NetwoRC provider user's guide
- 92 -
‘[PAC] MOVE P, J100
Dim vJ as Variant
vJ=CaoCtrl.Variables(“J100”).Value
Robot.Move 1, vJ
‘VT_R4|VT_ARRAY
‘= MOVE P, P(<j1>,<j2>,<j3>,…) NG!!
The correct code is as follows.
Robot.Move 1, Array(vJ,”J”)
ORiN Forum
‘=MOVE P, J(<j1>,<j2>,<j3>,…) OK
DENSO WAVE Inc.
NetwoRC provider user's guide
Appendix B. PAC
- 93 -
Commands
supported
by
NetwoRC
provider
Table 6-2 List of PAC Commands
Group
Commands
Availability
Motion Control
HALT
×
INTERRUPT ON/OFF
√
Speed Control
APPROACH
√
DEPART
√
SPEED
√
DRAW
√
JSPEED
√
DRIVE
√
ACCEL
√
DRIVEA
√
JACCEL
√
HOME
×
DECEL
√
GOHOME
×
JDECEL
√
MOVE
√
CURACC
√
ROTATE
√
CURJACC
√
ROTATEH
√
CURDEC
√
CURJNT
√
CURJDEC
√
CURPOS
√
CURJSPD
√
CURTRN
√
CURSPD
√
CUREXJ
×
CUREXTACC
√
DESTJNT
×
CUREXTDEC
√
DESTPOS
×
CUREXTSPD
√
DESTTRN
×
EXTSPEED
√
DESTEXJ
×
CHANGETOOL
√
ARRIVE
√
CHANGEWORK
√
POSCLR
√
CURTOOL
√
SETSPLINEPOINT
√
CURWORK
√
CLRSPLINEPOINT
√
GETSPLINEPOINT
√
SETAREA
√
FIGAPRL
√
RESETAREA
√
FIGAPRP
√
Stop Control
HOLD
ORiN Forum
×
Interference Check
Internal Servo Data
GetSrvData
√
GetJntData
√
DENSO WAVE Inc.
NetwoRC provider user's guide
GetSrvState
- 94 √
Motor Power
MOTOR {ON|OFF}
ST_ResetZBalance
√
Pose Data Type Transformation
√
Particular Control
J2P
√
J2T
√
ST_aspACLD
√
P2J
√
ST_aspChange
√
P2T
√
ST_SetGravity
√
T2J
√
ST_ResetGravity
√
T2P
√
ST_SetGrvOffset
√
TINV
√
ST_ResetGrvOffset
√
NORMTRN
√
ST_SetCurLmt
√
ST_ResetCurLmt
√
TRACKDATAINITIALIZE
√
ST_SetEralw
√
TRACKDATASET
√
ST_ResetEralw
√
TRACKDATAGET
√
ST_OnSrvLock
√
TRACKDATAINFO
√
ST_OffSrvLoc
√
TRACKDATANUM
√
ST_SetCompControl
√
CURTRACKPOS
√
ST_SetCompFControl
√
CURTRACKSPD
√
ST_ResetCompControl
√
WAITTRACKMOVE
√
ST_SetFrcCoord
√
CALCWORKPOS
√
ST_SetFrcLimit
√
CURTRACKPOSEX
√
ST_ResetFrcLimit
√
WAITTRACKMOVEEX
√
ST_SetCompRate
√
SETTRACKMOVE
√
ST_ResetCompRate
√
RESETTRACKMOVE
√
ST_SetFrcAssist
√
CONVCAL
×
ST_ResetFrcAssist
√
CALCCAMCALPOS
×
ST_SetCompJLimit
√
CALCIOTEACHPOS
×
ST_ResetCompJLimit
√
SetTrackStartArea
√
ST_SetCompVMode
√
CalcConvPos
×
ST_ResetCompVMode
√
SetConvLowVelErr
×
ST_SetCompEralw
√
CalcConvVec
×
ST_ResetCompEralw
√
SortTrackData
×
ST_SetDampRate
√
SortTrackAllData
×
ST_ResetDampRate
√
ST_SetZBalance
√
MotionSkip
√
ORiN Forum
Conveyer Tracking
Other
DENSO WAVE Inc.
NetwoRC provider user's guide
- 95 -
MotionComp
√
XdWaitSpline
√
DELAY
√
SYSSTATE
√
ClearSrvMonitor
√
StartSrvMonitor
√
StopSrvMonitor
√
ORiN Forum
DENSO WAVE Inc.
NetwoRC provider user's guide
- 96 -
Appendix C. Trouble-Shooting
Appendix C.1. I cannot connect with a robot controller...
Check
Action
■ Robot controller side
□ Is the NetwoRC ROM version higher than V2.330?
If version is below v.2330, please update
controller ROM Image to v2.330 or above.
□ Is the cable, RS232C or Ethernet cable connected
Ensure that the cable is not loose on the
properly?
connector.
□ Is the type of cable such as Straight and Cross correct?
Check the cable.
□ In case of Ethernet, is the address correctly set?
Chech the address settings.
□ In case of the ethernet connection over the segment, is the
Make sure that the Controller IP address in
default gateway correctly set?
the COM settings is the same between the
application and the controller. Make sure
that the IP address of the client PC and the
IP address of the ext. run on the controller
are the same.
□ In case of RS232c, is the communication parameter
Check the parameters of RS232c.
correctly set?
□ Is the communication permission on the communication
Check the communication permission. (see
menu correctly set?
2.2.1)
□ Is the ORiN extension set?
Add the ORiN option. (see 2.2.1)
■ PC side
□ Is the Windows version correct? (Windows 2000, Windwos
Check the version.
XP)
□ In case of RS232c, is another application program such as
Terminate the application.
HyperTerminal running?
□ Does RobMaster work properly?
Execute RobMaster.exe. The RobMaster
application should be running on Windows.
□ Are the parameters of the AddController() function
Check the arguments of the AddController
correctly set?
function. (see 4.2.1)
□ Is the version of ORiN up to v.2.0.3?
Verify
ORiN2
version
by
executing
CAOConfig. Select Help and then select
Version.
ORiN Forum
DENSO WAVE Inc.
NetwoRC provider user's guide
- 97 -
Appendix C.2. I cannot access variables of a robot controller...
Check
Action
■ Robot controller side
□
Is
the
communication
permission
correctly
set?
Check the communication settings. (see
("Read/Write" or "Read-only")
2.2.1)
□ Is any edit dialogue displayed in the teach pendant?
Close the dialogue.
□ Is any error message displayed in the teach pendant?
Clear the error.
■ PC side
□ Is the variable name correctly set?
Check the variable name.
□ In case of writing, is not the variable read-only?
Check the variable and I/O attribute.
□ Is the range of index correctly specified?
Check the range.
□ Do the written value and type meet the specification of the
Check the specifications.
variable?
Appendix C.3. I cannot move a robot...
Check
Action
□ Is the "Executable token" for a robot correctly set? (ANSI:
Check the settings. (see 2.4.2 for ANSI
Single point of control)
type)
□ Is the "RobSlave" program running?
Run the “RobSlave” program. (see 2.6)
□ Is the robot in the executable state?
Check the condition. (see 2.2.1)
□ Does RobSlave.pac match the version of "NetwoRC
Use the modules included in the same ORiN
Provider"?
Package.
■ Robot controller side
■ PC side
□ Are the command names and parameters correctly
Check the command (funtion) specification.
specified?
ORiN Forum
DENSO WAVE Inc.
NetwoRC provider user's guide
- 98 -
Appendix D. Controllers supported by NetwoRC provider
Table 6-3 List of supported Controllers
RC5
Class
CaoController
ORiN Forum
Property, Method, Event
R/W
RC7
Less
1.998
Less
2.330
than
or
than
or
1.998
higher
2.330
higher
Attribute
P
R
-
√
-
√
CommandNames
P
R
-
√
-
√
Commands
P
R
-
√
-
√
ExtensionNames
P
R
-
√
-
√
Extensions
P
R
-
√
-
√
FileNames
P
R
-
√
-
√
Files
P
R
-
√
-
√
Help
P
R
-
√
-
√
ID
P
R/W
-
√
-
√
Index
P
R
-
√
-
√
Name
P
R
-
√
-
√
RobotNames
P
R
-
√
-
√
Robots
P
R
-
√
-
√
Tag
P
R/W
-
√
-
√
TaskNames
P
R
-
√
-
√
Tasks
P
R
-
√
-
√
VariableNames
P
R
-
√
-
√
Variables
P
R
-
√
-
√
AddCommand
M
S
-
√
-
√
AddExtension
M
S
-
√
-
√
AddFile
M
S
-
√
-
√
AddRobot
M
S
-
√
-
√
AddTask
M
S
-
√
-
√
AddVariable
M
S
-
√
-
√
Execute
M
S
-
√
-
√
GetMessage
M
R
-
√
-
√
OnMessage
E
R
-
√
-
√
Description
DENSO WAVE Inc.
NetwoRC provider user's guide
- 99 -
CaoVariable
CaoFile
ORiN Forum
Attribute
P
R
-
√
-
√
DateTime
P
R
-
√
-
√
Help
P
R
-
√
-
√
ID
P
R/W
-
√
-
√
Index
P
R
-
√
-
√
Microsecond
P
R
-
√
-
√
Name
P
R
-
√
-
√
Tag
P
R/W
-
√
-
√
Value
P
R/W
-
√
-
√
Attribute
P
R
-
√
-
√
DateCreated
P
R
-
√
-
√
DateLastAccessed
P
R
-
√
-
√
DateLastModified
P
R
-
√
-
√
FileNames
P
R
-
√
-
√
Files
P
R
-
√
-
√
Help
P
R
-
√
-
√
ID
P
R/W
-
√
-
√
Index
P
R
-
√
-
√
Name
P
R
-
√
-
√
Path
P
R
-
√
-
√
Size
P
R
-
√
-
√
Tag
P
R/W
-
√
-
√
Type
P
R
-
√
-
√
Value
P
R/W
-
√
-
√
VariableNames
P
R
-
√
-
√
Variables
P
R
-
√
-
√
AddFile
M
S
-
√
-
√
AddVariable
M
S
-
√
-
√
Copy
M
W
-
√
-
√
Delete
M
W
-
√
-
√
Execute
M
S
-
√
-
√
Move
M
W
-
√
-
√
Run
M
W
-
-
-
-
DENSO WAVE Inc.
NetwoRC provider user's guide
CaoTask
CaoRobot
- 100 -
Attribute
P
R
-
√
-
√
FileName
P
R
-
√
-
√
Help
P
R
-
√
-
√
ID
P
R/W
-
√
-
√
Index
P
R
-
√
-
√
Name
P
R
-
√
-
√
Tag
P
R/W
-
√
-
√
VariableNames
P
R
-
√
-
√
Variables
P
R
-
√
-
√
AddVariable
M
S
-
√
-
√
Delete
M
W
-
√
-
√
Execute
M
S
-
√
-
√
Start
M
W
-
-
-
√
Stop
M
W
-
√
-
√
Attribute
P
R
-
√
-
√
Help
P
R
-
√
-
√
ID
P
R/W
-
√
-
√
Index
P
R
-
√
-
√
Name
P
R
-
√
-
√
Tag
P
R/W
-
√
-
√
VariableNames
P
R
-
√
-
√
Variables
P
R
-
√
-
√
Accelerate
M
W
-
-
-
√
AddVariable
M
S
-
√
-
√
Change
M
W
-
-
-
√
Chuck
M
W
-
-
-
-
Drive
M
W
-
-
-
-
See
“Execute”
ORiN Forum
Execute
M
S
-
-
-
√
GoHome
M
W
-
-
-
-
Hold
M
W
-
-
-
√
Halt
M
W
-
-
-
√
Move
M
W
-
-
-
√
DENSO WAVE Inc.
NetwoRC provider user's guide
CaoCommand
CaoExtension
CaoMessage
ORiN Forum
- 101 -
Rotate
M
W
-
-
-
√
Speed
M
W
-
-
-
√
Unchuck
M
W
-
-
-
-
Unhold
M
W
-
-
-
-
Attribute
P
R
-
√
-
√
Help
P
R
-
√
-
√
ID
P
R/W
-
√
-
√
Index
P
R
-
√
-
√
Name
P
R
-
√
-
√
Parameters
P
R/W
-
√
-
√
Result
P
R
-
√
-
√
State
P
R
-
√
-
√
Tag
P
R/W
-
√
-
√
Timeout
P
R/W
-
√
-
√
Cancel
M
S
-
√
-
√
Execute
M
S
-
√
-
√
Attribute
P
R
-
√
-
√
Help
P
R
-
√
-
√
ID
P
R/W
-
√
-
√
Index
P
R
-
√
-
√
Name
P
R
-
√
-
√
Tag
P
R/W
-
√
-
√
VariableNames
P
R
-
√
-
√
Variables
P
R
-
√
-
√
AddVariable
M
S
-
√
-
√
Execute
M
S
-
√
-
√
DateTime
P
R
-
√
-
√
Description
P
R
-
√
-
√
Destination
P
R
-
√
-
√
Number
P
R
-
√
-
√
SerialNumber
P
R
-
√
-
√
Source
P
R
-
√
-
√
DENSO WAVE Inc.
NetwoRC provider user's guide
Meaning
Value
P
R
-
√
-
√
Clear
M
W
-
√
-
√
Reply
M
W
-
√
-
√
of M:Method
sign
ORiN Forum
- 102 -
R:Read
P:Property
W:Write
E:Event
S:Specification
DENSO WAVE Inc.
NetwoRC provider user's guide
- 103 -
Appendix E. Error code of NetwoRC provider
The structure of the NetwoRC provider error code is HRESULT fromat. Please refer to the following URL
for the HRESULT structure.
<http://msdn2.microsoft.com/en-us/library/bb401631.aspx>
There are two kinds of error codes in the provider. One is "Standard error codes" defined by Microsoft
Windows, and the other is "Custom error codes" defined by NetwoRC provider. The standard error is the
global error defined in Winerror.h. The custom error is the local error defined in the NetwoRC provider. The
table of the error codes is shown as follows.
Table 6-4 Error code of NetwoRC provider
Number
Macro name
Description
Standard Error (excerpt)
0x00000000
S_OK
No error occurred
0x00000001
S_FALSE
No error occurred, but the command was not
finished properly.
0x8000FFFF
E_UNEXPECTED
Catastrophic failure
0x80004001
E_NOTIMPL
Not implemented
0x8007000E
E_OUTOFMEMORY
Ran out of memory
0x80070057
E_INVALIDARG
One or more arguments are invalid
0x80004005
E_FAIL
Unspecified error
Custom Error
RobSlave program does not exist in the robot
0x80000801
E_CAOP_NO_ROBSLAVE
0x80000802
E_CAOP_ROBSLAVE_NOT_READY
0x80000803
E_CAOP_ROBSLAVE_CRC_ERROR
RobSlave program CRC error.
0x80000804
E_CAOP_ILLEGAL_CTRLVER
Illegal robot controller version.
0x80000805
E_CAOP_NO_EXECTOKEN
No executable token.
0x80000806
E_CAOP_ILLEGAL_ROBSLAVE
Illegal RobSlave version.
controller.
RobSlave program in the robot controller is
not running.
The count of connections is over the possible
0x80000807
E_CAOP_NO_LICENSE
number.
Please
purchase
an
additional
license.
0x80000900
E_TIMEOUT
Timeout occurred
0x80010900
E_SEND_NAK
NAK occurred
ORiN Forum
DENSO WAVE Inc.
NetwoRC provider user's guide
- 104 -
0x80010902
E_REJECTED
Reject occurred
0x80010903
E_ABNORMAL_R_PACKET
Receive packet broken
0x80010904
E_ABNORMAL_S_PACKET
Send packet broken
ORiN Forum
DENSO WAVE Inc.
NetwoRC provider user's guide
Appendix F. Non-Stop
- 105 -
Motion
Calculator
-
Trajectory
Generator Command for Non Stop Inspection
Appendix F.1. Parameter
Following is details of <Position > parameter and <Area> parameter of GenerateNonStopPath command.
<Position: VT_VARIANT | VT_ARRAY> =
<X:VT_R4>,
<Y:VT_R4>,
< Z:VT_R4>,
< RX:VT_R4>,
< RY:VT_R4>,
< RZ:VT_R4>,
< Fig:VT_I4>,
< J7:VT_R4>,
< J8:VT_R4>,
<Motion Velocity : VT_R4>=(0.0~1.0),
<Motion Pattern: VT_I4> = (0: @P, 1: @0, 2: @E),
< Tool Number: VT_I4>
<Area: VT_R4 | VT_ARRAY > =
<Area Size X: VT_R4>,
<Area Size Y: VT_R4>,
< Area Size Z: VT_R4>,
< Area Angle: VT_R4>,
< Area Size J7: VT_R4>,
< Area Size J8: VT_R4>
Appendix F.2. Error Codes
The following table shows error codes of GenerateNonStopPath Command, which is defined in
the provider.
Error No.
Macro Name
0x800120**
ERR_ORG_P2J_CONV
ORiN Forum
Meaning
Conversion Error from Position to Joint
DENSO WAVE Inc.
NetwoRC provider user's guide
- 106 -
(Teaching Data)
0x800121**
ERR_ORG_SOFT_LIMIT
0x800122**
ERR_ECH_SPD_RATE
0x800123**
ERR_GEN_P2J_CONV
Software limit Error (Teaching Data)
Out of Speed Rate Range
Conversion Error from Position to Joint
(Revised Data)
0x800124**
ERR_GEN_SOFT_LIMIT
0x800125**
ERR_GEN_IMPOSSIBLE
Software limit Error (Revised Data)
Revision operation convergence is
impossible
0x800126**
ERR_TOO_NEAR_POINT
Too near teaching points (Position and
Posture)
0x800127**
ERR_SPEED_ZERO
0x800128**
ERR_INVALID_AREA_INFO
0x80012A0*
ERR_INVALID_JOINTFLG
Joint Flag must be set as “limited rotation”.
0x80012F00
ERR_SPEED_RATE
Out of total speed rate range
0x80012F01
ERR_GEN_COEF
Out of Coefficients Range
0x80012F02
ERR_PASS_GEN
Trajectory Pass Generation fail
0x80012F03
ERR_MEMORY_TOO_SMALL
Low Memory
0x80012F04
ERR_ARMDNTLL_LOAD_FAIL
ArmNT.dll Load fail
0x80012F05
ERR_DIVISION_BY_ZERO
Division by Zero
0x80012F06
ERR_UNESTB_ARMCNF
ArmCnf is unsetted
0x80012F07
ERR_UNESTB_SPDCNF
SpdCnf is unsetted
0x80012F08
ERR_UNESTB_SRVCNF
SrvCnf is unsetted
0x80012F09
ERR_MEMORY_LEAK
Memory Leak
0x80012F0A
ERR_OUT_OF_DATA_NUM
Out of Data Number
0x80012F10
ERR_IVALID_TOOL_DATA
Invalid Tool Data
ORiN Forum
Zero Speed definition
Invalid Area Data (Teaching Data)
DENSO WAVE Inc.
NetwoRC provider user's guide
ERR_OUT_OF_TOOL_NUM
0x80012F50
- 107 Out of Tool Number
Error Code:0x80012000~0x80012800
The symbol of “**” indicates the error occurred position number. The value is “the error occurred position
number + 1”.
Error Code:0x80012A0*
The symbol of “*” indicates the number of the axis which is set as “unlimited rotation”.
Appendix F.3. Restrictions
Restrictions of GenerateNonStopPath Command are as follows:
-
Max. Number of Teaching Points = 200
-
Available for 6-axis robot only
-
Area size for additional axis should be assigned in [degree] (for rotational axis) or [mm] (for
linear axis) according to the axis setting.
-
Unavailable for Unlimited rotation of the extra-joint
Appendix F.4. Sample Program
The following sample program is described in CaoScript. The following sample teaching data is for
VS-6577G-BA robot. Assign appropriate IP Address for the target controller. This sample assumes the target
controller IP addres is 10.6.235.72.
Sample
NonStopPath.vbs
' Generate NonStopPath
Const RC_ADDRESS = "10.6.235.72"
Sub Main
Dim rc
Dim vntTeachPos()
Dim vntAreaInfo()
Dim vntMovePos
Dim vntParam
Dim lIndex
dbg.ClearLog
set rc = cao.AddController("RC", "CaoProv.DENSO.NetwoRC", "", "conn = eth:" & RC_ADDRESS)
' --------------------------------------' Initialize NonStopPath Library
' --------------------------------------call rc.Execute("InitNonStopPathLib")
' GenerateNonStopPath Command Parameter(Pos, Area, Size, SpdRate, Coef)
' Pos : TeachPoint Data(x, y, z, rx, ry, rz, fig, J7, J8, SpdRate, attr, ToolNum)
redim vntTeachPos(7)
vntTeachPos(0) = Array(300.0, 100.0, 600.0, 180.0, 0.0, 180.0, 5, 0.0, 0.0, 100 * 0.01, 1, 0)
ORiN Forum
DENSO WAVE Inc.
NetwoRC provider user's guide
vntTeachPos(1)
vntTeachPos(2)
vntTeachPos(3)
vntTeachPos(4)
vntTeachPos(5)
vntTeachPos(6)
vntTeachPos(7)
=
=
=
=
=
=
=
Array(300.0,
Array(310.0,
Array(315.5,
Array(300.0,
Array(300.0,
Array(300.0,
Array(300.0,
- 108 91.0,
30.0,
24.5,
10.0,
10.0,
10.0,
10.0,
600.0,
600.0,
600.0,
600.0,
600.0,
600.0,
600.0,
180.0,
180.0,
180.0,
180.0,
180.0,
180.0,
180.0,
0.0,
0.0,
0.0,
0.0,
0.0,
0.0,
0.0,
-180.0, 5, 0.0, 0.0, 100 * 0.01, 0, 0)
-180.0, 5, 0.0, 0.0, 100 * 0.01, 1, 0)
-180.0, 5, 0.0, 0.0, 100 * 0.01, 0, 0)
173.0, 5, 0.0, 0.0, 100 * 0.01, 1, 0)
176.0, 5, 0.0, 0.0, 100 * 0.01, 0, 0)
171.0, 5, 0.0, 0.0, 100 * 0.01, 0, 0)
-180.0, 5, 0.0, 0.0, 100 * 0.01, 1, 0)
' Area : Area Info(x, y, z, angle, J7, J8)
redim vntAreaInfo(7)
vntAreaInfo(0)
vntAreaInfo(1)
vntAreaInfo(2)
vntAreaInfo(3)
vntAreaInfo(4)
vntAreaInfo(5)
vntAreaInfo(6)
vntAreaInfo(7)
=
=
=
=
=
=
=
=
Array(4,4,4,4,0,0)
Array(4,4,4,4,0,0)
Array(4,4,4,4,0,0)
Array(4,4,4,4,0,0)
Array(4,4,4,4,0,0)
Array(4,4,4,4,0,0)
Array(4,4,4,4,0,0)
Array(4,4,4,4,0,0)
dbg.Output "Teach Points"
for lIndex = 0 to Ubound(vntTeachPos)
dbg.Output lIndex & ":" & dat.BstrFromVariant(vntTeachPos(lIndex))
next
' --------------------------------------' Generate NonStopPath
' --------------------------------------vntMovePos = rc.Execute("GenerateNonStopPath", Array(vntTeachPos, vntAreaInfo,
Ubound(vntTeachPos) + 1, 100.0 * 0.01, 0.7, 1))
dbg.Output "Move Points"
for lIndex = 0 to Ubound(vntMovePos)
dbg.Output lIndex & ":" & dat.BstrFromVariant(vntMovePos(lIndex))
next
End Sub
Appendix F.5. Workaround at the time of the Adjustment Failure (Error
Code:0x800123xx)
The GenerateNonStopPath command fails when the revised angle is out of maximum adjustment angle
range. If the failure occurs and error code 0x800123xx (xx represents teaching position number) is shown,
change the teaching position, or adjust parameters for the selected Adjustment Method as shown in below.
・ In case of Synchronous motion with Extended-Joint (default)
Adjust the following parameters in cOrbitGenSync.ini (in Bin folder of NetwoRC Provider)
Parameter
Oultime
Input Limitation
FIGCHECK.MAX_DISPLACEMENT_dJ1
Offset of Maximum Adjustment -180.0 ~ 180.0
Angle for 1st axis (deg)
FIGCHECK.MAX_DISPLACEMENT_dJ2
Offset of Maximum Adjustment -180.0 ~ 180.0
Angle for 2nd axis (deg)
ORiN Forum
DENSO WAVE Inc.
NetwoRC provider user's guide
- 109 -
FIGCHECK.MAX_DISPLACEMENT_dJ3
Offset of Maximum Adjustment -180.0 ~ 180.0
Angle for 3rd axis (deg)
FIGCHECK.MAX_DISPLACEMENT_dJ4
Offset of Maximum Adjustment -180.0 ~ 180.0
Angle for 4th axis (deg)
FIGCHECK.MAX_DISPLACEMENT_dJ5
Offset of Maximum Adjustment -180.0 ~ 180.0
Angle for 5th axis (deg)
FIGCHECK.MAX_DISPLACEMENT_dJ6
Offset of Maximum Adjustment -180.0 ~ 180.0
Angle for 6th axis (deg)
FIGCHECK.MAX_DISPLACEMENT_J7
Offset of Maximum Adjustment 0.0 ~ 180.0
Angle for 7th axis (deg)
FIGCHECK.MAX_DISPLACEMENT_J8
Offset of Maximum Adjustment 0.0 ~ 180.0
Angle for 8th axis (deg)
FIGCHECK.ERROR_DISTANCE
Maximum Adjustment Length (mm)
Adjustment Angle for each axis is shown in MaxDispJoint.csv file. To save the MaxDispJoint.csv file, set
DEBUG.FILEOUT parameter in cOrbitGenSync.ini as 1, and the file is saved in the folder set by
DEBUG.FILEPATH.
The maximum adjusted angle for each joint is defined as a sum of “the angle calculated from the
maximum
adjustment
length”
and
“the
offset
of
maximum
adjustment
angle
(MAX_DISPLACEMENT_dJ*)” for each joint.
DEBUG.FILEOUT
1
DEBUG.FILEPATH
Output Folder
[Remarks] While the DEBUG.FILEOUT parameter is set to 1, the .csv file is created each time when
InitNonStopPathLib
or
GenerateNonStopPath
command
is
executed.
Therefore,
reset
the
DEBUG.FILEOUT parameter to 0, after the offset parameters are adjusted.
・ In case of Asynchronous motion with Extended-Joint
Adjust the following parameters in cOrbitGen.ini (in Bin folder of NetwoRC Provider)
Parameter
Outline
Input Limitation
FIGCHECK.MAX_DISPLACEMENT_dJ1
Maximum Adjustment Angle for 1st 0.0 ~ 180.0
Axis (deg)
FIGCHECK.MAX_DISPLACEMENT_dJ2
Maximum Adjustment Angle for 0.0 ~ 180.0
2nd Axis (deg)
ORiN Forum
DENSO WAVE Inc.
NetwoRC provider user's guide
FIGCHECK.MAX_DISPLACEMENT_dJ3
- 110 Maximum Adjustment Angle for 0.0 ~ 180.0
3rd Axis (deg)
FIGCHECK.MAX_DISPLACEMENT_dJ4
Maximum Adjustment Angle for 0.0 ~ 180.0
4th Axis (deg)
FIGCHECK.MAX_DISPLACEMENT_dJ5
Maximum Adjustment Angle for 0.0 ~ 180.0
5th Axis (deg)
FIGCHECK.MAX_DISPLACEMENT_dJ6
Maximum Adjustment Angle for 0.0 ~ 180.0
6th Axis (deg)
FIGCHECK.MAX_DISPLACEMENT_J7
Maximum Adjustment Angle for 0.0 ~ 180.0
7th Axis (deg)
FIGCHECK.MAX_DISPLACEMENT_J8
Maximum Adjustment Angle for 0.0 ~ 180.0
8th Axis (deg)
ORiN Forum
DENSO WAVE Inc.