1
USER GUIDE
Features
Surveys
Useful Terms
Integration
ABC
A/B Testing
Experiments
i
Reporting
What’s in the ebook?
Chapter 1. Integration 1
Chapter 2. Useful terms 5
Chapter 3. How to use the features
6
Chapter 4. Create your first experiment 12
Chapter 5. Create a survey 23
Chapter 6. Reporting 26
MARKETIZATOR USER GUIDE
Chapter 1. Integration
Chapter 1. Integration
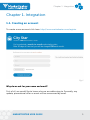
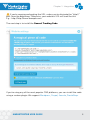
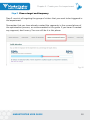
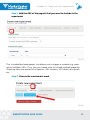
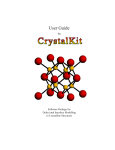
1.1.Creating an account
To create a new account click here: http://www.marketizator.com/register
Fig. 1
Why do we ask for your name and email?
First of all, we would like to know who we are addressing to. Secondly, any
update, promotional offer or event will be announced by email.
MARKETIZATOR USER GUIDE
1
Chapter 1. Integration
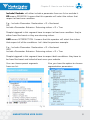
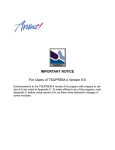
If you have already registered,
you can find the Log In area in the
upper right corner on the homepage:
Fig. 2
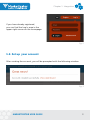
1.2.Set up your account
After creating the account, you will be prompted with the following window:
Fig. 3
MARKETIZATOR USER GUIDE
2
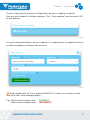
Chapter 1. Integration
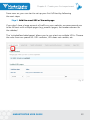
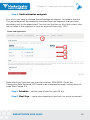
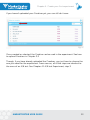
The first step into the account configuration process is adding a website.
Your account supports multiple websites. Click “New website” and the exact URL
of the website:
Fig. 4
Fill up the requested details of your website. It is important to complete this form
in order to properly configure the account:
Fig. 5
When adding the URL of a website MANUALLY, make sure to leave out the
final slash like in the example below:
E.g.: http://www.example.com
http://www.example.com/
CORRECT
INCORRECT
MARKETIZATOR USER GUIDE
3
Chapter 1. Integration
If you’re copying and pasting the URL, make sure to eliminate the “http://”
part. from the beginning. Otherwise, your website’s URL will look like this:
E.g. : http://http://www.example.com
The next step is to install the General Tracking Code:
Fig. 6
If you’re using any of the most popular CMS platforms, you can install the code
using a custom plugin. We support Wordpress, Drupal, Joomla, PrestaShop.
MARKETIZATOR USER GUIDE
4
Chapter 2. Useful terms
ABC
Chapter 2. Useful terms
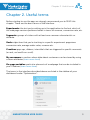
Before starting to use the app, we strongly recommend you to READ this
chapter. These are the basic terms of the interface:
Experiments: the test you’re setting up in the application to find out which of
the web page versions performs better in terms of revenue, conversion rate, etc.
Segments: groups of visitors with at least one common characteristic or
attribute.
Goals: objectives that you’re tracking in a specific experiment: pageviews
conversion rate, average order value, revenue etc.
Creatives: pop-ups, ribbons, interstitials that are triggered in specific moments
(on exit, on load & on scroll).
My consumers: a section where data about customers can be stored by using
custom attributes (learn more here).
On-page variables: particular elements of a webpage that can be included in
your Creatives (learn more here).
The terms in the interface described above are listed in the sidebar of your
dashboard under “Optimization”:
Fig. 7
MARKETIZATOR USER GUIDE
5
Chapter 3. How to use the features
i
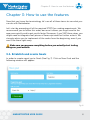
Chapter 3: How to use the features
Now that you know the terminology, let’s use all of these terms to see what you
can do with Marketizator.
Let’s start by presenting all of the required STEPS for creating experiments. We
recommend you to follow this order, because it allows you to get used to the
app more quickly and to get results faster. Moreover, if you SKIP these steps, you
might need to integrate small pieces of Javascript code for further actions. We
strongly advise you to implement all the codes from the beginning, even if you
won’t use them right away.
Make sure you prepare everything before you actually start testing
things on your website.
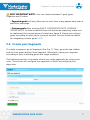
3.1.Establish and create Goals
In order to create a goal, go to Goals (See Fig. 7). Click on New Goal and the
following window will appear:
Fig. 8
MARKETIZATOR USER GUIDE
6
Chapter 3. How to use the features
i
VERY IMPORTANT NOTE: You can choose between 2 goal types,
Pageview and Custom:
•Pageview goals will only allow you to track how many people have seen a
particular web page.
•Custom goals allow tracking SALES, CONVERSION RATE, AVERAGE
ORDER VALUE. In order to benefit from this advanced reporting, make sure
to implement the second piece of code from figure 6. Name your custom
goals according to what you’re trying to monitor. See the technical details
for integrating custom goals HERE.
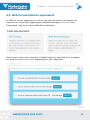
3.2. Create your Segments
To create a segment, go to Segments (See Fig. 7). Then, go to the top sidebar
and click the green button: New Segment. Afterwards, name your segment
according to your marketing goals and target audience.
The following section is the place where you create segments by using some
rules. These rules will configure the segments of traffic according to your
objectives.
Fig. 9
MARKETIZATOR USER GUIDE
7
Chapter 3. How to use the features
i
Include/ Exclude: will either include a parameter from our list or exclude it.
OR means REUNION. It means that this operator will select the visitors that
respect at least one condition.
E.g. : Include >Parameter: Geolocation > IS > Bucharest
OR
Include >Parameter: Behavior- Returning visitors > IS > True
People triggered in this segment have to respect at least one condition: they’re
either from Bucharest or they are returning visitors.
AND means INTERSECTION. It means that this operator will select the visitors
that respect all of the conditions. Let’s take the previous example:
E.g. : Include >Parameter: Geolocation > IS > Bucharest
AND
Include >Parameter: Behavior- Returning visitors > IS > True
People triggered in this segment have to respect both conditions: they have to
be from Bucharest and visited at least once your website.
You can choose preset segments
from our list:
Also, you have the option to choose
segmentation parameters:
Fig. 10
MARKETIZATOR USER GUIDE
Fig. 11
8
Chapter 3. How to use the features
i
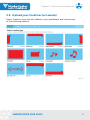
3.3. Upload your Creatives (art-works)
Select Creatives from the left sidebar in your dashboard and choose one
of the following options:
Fig. 12
MARKETIZATOR USER GUIDE
9
Chapter 3. How to use the features
i
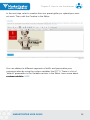
In the next step, select a creative from our preset gallery or upload your own
art-work. Then, edit the Creative in the Editor:
Fig. 13
You can address to different segments of traffic and personalize your
communication by using the custom variables like {CITY}. There is a list of
“default” parameters in the Variables section in the Editor. Learn more about
custom variables HERE.
MARKETIZATOR USER GUIDE
10
Chapter 3. How to use the features
i
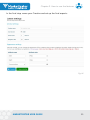
In the final step, name your Creative and set up the final aspects:
Fig. 14
MARKETIZATOR USER GUIDE
11
Chapter 4. Create your first experiment
Chapter 4. Create your first experiment
In order to begin your first tests on your website and see if they have any impact
on the conversion rate, click on “New Experiment”. Choose between A/B testing
and Web Personalization depending on your goals and hypotheses:
Fig. 15
4.1.A/B test experiment
Fig. 16
NOTE: You can either add the exact URL of the exact web page that will be
included in the experiment or add the URL of the Home Page and then navigate
in the Editor until you find the desired page.
MARKETIZATOR USER GUIDE
12
Chapter 4. Create your first experiment
From now on, you can start to set up your first A/B test by following
the next steps:
Step 1. Add the exact URL of the web page
If you don’t have a large amount of traffic on your website, we recommend you
to do AB tests with multiple pages (e.g. product pages, the header element or
the sidebar).
The ‘included/excluded pages’ allows you to run a test on multiple URLs. Choose
the rules from our preset list: URL contains, URL does not contain, etc.
Fig. 17
MARKETIZATOR USER GUIDE
13
Chapter 4. Create your first experiment
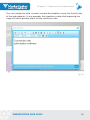
Step 2. Make the change in the Editor
In step 2, click on Variation and start making the desired changes using our
WYSIWYG editor.
Fig. 18
MARKETIZATOR USER GUIDE
14
Chapter 4. Create your first experiment
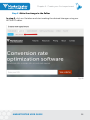
Example: this is our website’s homepage. We’ll change the headline, by editing
the content. In order to do that, just click on the element that you want to
change, like in the example below:
Fig. 19
MARKETIZATOR USER GUIDE
15
Chapter 4. Create your first experiment
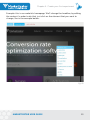
You can change the style, content, remove the headline, move it to the left side
of the web page etc. In our example, the hypothesis states that improving the
copy will have a positive effect on the conversion rate.
Fig. 20
MARKETIZATOR USER GUIDE
16
Chapter 4. Create your first experiment
In the Editor in Fig. 19, we’ve changed the text into “The conversion rate
software you were looking for”. The result:
Fig. 21
MARKETIZATOR USER GUIDE
17
Chapter 4. Create your first experiment
Step 3. Choose target and frequency
Step 3 consists of targeting the group of visitors that you want to be triggered in
the experiment.
Remember that you have already created the segments in the second phase of
the optimization process, as recommended in this guide. If you haven’t created
any segment, don’t worry! You can still do it in this phase:
Fig. 22
MARKETIZATOR USER GUIDE
18
Chapter 4. Create your first experiment
Step 4. Traffic allocation and goals
First of all, you have to choose the percentage of subjects included in the test.
This percentage will be randomly extracted from the segment that you have
decided to use in the experiment. You can run the test on all of the visitors who
are included in the segment or only on a part of them (e.g.: 30%).
Fig. 23
Now select the Goal that you want to measure. REMINDER: Goals like
Conversion Rate, Revenue, AOV need to be integrated through a short piece of
code (See Chaper 3.1).
Step 5. Schedule – set the time-frame for your AB test
Step 6. Final Step – name your experiment and set it as active or paused
MARKETIZATOR USER GUIDE
19
Chapter 4. Create your first experiment
4.2.Web Personalization experiment
In order to run an experiment in which you want to interact with particular
segments of visitors by triggering personalized messages, click on “New
Experiment” and then choose Web Personalization.
Now choose when you want your Creative (pop-up, interstitial etc.) to appear:
on-load, on-exit or on-scroll, depending on your objectives.
Fig. 24
MARKETIZATOR USER GUIDE
20
Chapter 4. Create your first experiment
Step 1. Add the URL of the page(s) that you want to include in the
experiment
Fig. 25
The ‘included/excluded pages’ rule allows you to trigger a creative (e.g.: popup) on multiple URLs. Thus, you can create rules to include multiple pages by
choosing from our preset list of options: URL contains, URL does not contain
etc.
Step 2. Choose the creative/art-work
Fig. 26
MARKETIZATOR USER GUIDE
21
Chapter 4. Create your first experiment
If you haven’t uploaded your Creatives yet, you can still do it now:
Fig. 27
Once created or selected, the Creative can be used in the experiment. See how
to upload Creatives in Chapter 3.3.
Though, if you have already uploaded the Creatives, you just have to choose the
one you need for the experiment. From now on, all of the steps are identical to
the ones of an A/B test. See Chapter 4.1.A/B test Experiment, step 3.
MARKETIZATOR USER GUIDE
22
Chapter 5. Create a survey
Chapter 5. Create a survey
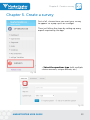
First of all, choose how you want your survey
to appear: as a pop-up or as a widget.
Then just follow the steps by setting up every
aspect required by the app.
•Select the questions type (with multiple
choice answers, unique answer, etc.)
Fig. 28
Fig. 29
MARKETIZATOR USER GUIDE
23
Chapter 5. Create a survey
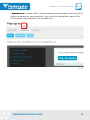
•Appearance: choose colors, write some persuasive copy to convince your
visitors to answer to your questions; you can also change the copy of the
CTA buttons (next question, ask me later etc.)
Fig. 30
MARKETIZATOR USER GUIDE
24
Chapter 5. Create a survey
•Final settings: choose your target audience, the URL of the page where
you want to trigger the survey, allocate traffic and schedule.
Fig. 31
MARKETIZATOR USER GUIDE
25
Chapter 6. Reporting
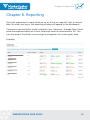
Chapter 6. Reporting
Once the experiment is ready to be set up as active, our app will start to receive
data. So when you log in, the reporting window will appear in the dashboard.
Conversion rate and other similar indicators (e.g.: Revenues, Average Oder Value)
need the implementation of a short Javascript code (as mentioned at 3.1). You
can also access the details concerning the integration of custom goals here.
Example:
Fig. 32
MARKETIZATOR USER GUIDE
26
www.marketizator.com