1
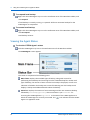
User Guide
CTERA Agent for
Windows
September 2013
Version 4.0
Copyright © 2009-2013 CTERA Networks Ltd.
All rights reserved. No part of this document may be reproduced in any form or by any
means without written permission from CTERA Networks Ltd.
Information in this document is subject to change without notice and does not represent a
commitment on part of CTERA Networks Ltd.
CTERA, C200, C400, C800, P1200, CloudPlug, NEXT3, Cloud Attached Storage, and Virtual
Cloud Drive are trademarks, service marks, or registered trademarks of CTERA Networks Ltd.
All other product names mentioned herein are trademarks or registered trademarks of their
respective owners.
The products described in this document are protected by U.S. patents, foreign patents, or
pending applications.
Tip
For legal information and for the end user license agreement, refer to Legal
Information (on page 137) in this guide.
i
Contents
Introduction---------------------------------------------------------------------------------------------- 3
About Cloud Attached Storage ------------------------------------------------------------------------ 3
About the CTERA Agent --------------------------------------------------------------------------------- 3
CTERA Agent Licensing (Appliance Mode)---------------------------------------------------------- 4
CTERA Agent Licensing (Cloud Mode) --------------------------------------------------------------- 5
Supported Backup Operations ------------------------------------------------------------------------ 5
Contacting Technical Support ------------------------------------------------------------------------- 7
Installing the CTERA Agent --------------------------------------------------------------------------- 9
Requirements --------------------------------------------------------------------------------------------- 9
Installing the Agent ------------------------------------------------------------------------------------ 10
Uninstalling the Agent--------------------------------------------------------------------------------- 13
Centrally Installing CTERA Agent via Active Directory -------------------------------------- 15
Using the CTERA Agent in Appliance Mode ---------------------------------------------------- 23
Workflow ------------------------------------------------------------------------------------------------- 23
Connecting the Agent to a CTERA Appliance ---------------------------------------------------- 24
Using the CTERA Agent Manager ------------------------------------------------------------------- 26
Selecting Files and Folders for File-Level Backup ----------------------------------------------- 38
Manually Starting Backup ---------------------------------------------------------------------------- 39
Stopping the Current Local Backup Operation -------------------------------------------------- 39
Suspending and Resuming Local Backup --------------------------------------------------------- 39
Viewing the Agent Status ----------------------------------------------------------------------------- 40
Viewing Agent Details --------------------------------------------------------------------------------- 41
Disconnecting the Agent from a CTERA Appliance --------------------------------------------- 41
Restoring Files from File-Level Backup ------------------------------------------------------------ 41
Restoring Files from Disk-Level Backup ----------------------------------------------------------- 44
Accessing Files on the Appliance ------------------------------------------------------------------- 58
Using the CTERA Agent in Cloud Agent Mode ------------------------------------------------- 59
Workflow ------------------------------------------------------------------------------------------------- 59
Connecting the Agent to the CTERA Portal ------------------------------------------------------ 60
Using the CTERA Agent Web Interface ------------------------------------------------------------ 62
Selecting Files and Folders for Backup ----------------------------------------------------------- 107
Contents
Manually Starting Backup --------------------------------------------------------------------------- 108
Stopping the Current Backup Operation--------------------------------------------------------- 109
Suspending and Resuming Backup ---------------------------------------------------------------- 109
Viewing the Agent Status ---------------------------------------------------------------------------- 109
Viewing Agent Details -------------------------------------------------------------------------------- 110
Disconnecting the Agent from the CTERA Portal ---------------------------------------------- 111
Restoring Files from Cloud Backup ---------------------------------------------------------------- 111
Accessing the Cloud Drive Folder ------------------------------------------------------------------ 115
Browsing the Cloud Drive Folder Online --------------------------------------------------------- 116
Collaborating on Projects ---------------------------------------------------------------------------- 116
Sharing Files with Guest Invitations--------------------------------------------------------------- 121
Restoring System State Data, NTDS, and SYSVOL ------------------------------------------- 125
Restoring from a System State Backup on Windows 2003 Server SP2 ------------------- 125
Restoring NTDS (Active Directory) and SYSVOL Applications on Windows 2003 / 2008
Server----------------------------------------------------------------------------------------------------- 129
Using Pre/Post Backup Scripts ------------------------------------------------------------------- 135
Legal Information ------------------------------------------------------------------------------------ 137
CTERA End User License Agreement -------------------------------------------------------------- 137
GNU GENERAL PUBLIC LICENSE -------------------------------------------------------------------- 141
GNU GENERAL PUBLIC LICENSE 3------------------------------------------------------------------ 144
Apache License ----------------------------------------------------------------------------------------- 151
Index ---------------------------------------------------------------------------------------------------- 153
1
Introduction
This chapter introduces the CTERA Agent and Cloud Attached Storage technology.
In This Chapter
About Cloud Attached Storage ------------------------------------------------------------------------------------ 3
About the CTERA Agent --------------------------------------------------------------------------------------------- 3
CTERA Agent Licensing (Appliance Mode) ---------------------------------------------------------------------- 4
CTERA Agent Licensing (Cloud Mode) --------------------------------------------------------------------------- 5
Supported Backup Operations ------------------------------------------------------------------------------------ 5
Contacting Technical Support ------------------------------------------------------------------------------------- 7
About Cloud Attached Storage
CTERA's Cloud Attached Storage® combines on-premises Network Attached Storage devices
and/or CTERA Agent software with cloud services in a single, integrated solution. File sharing
is performed on the local network, while cloud storage services are used for off-site backup
and disaster recovery. Automated differential backup and restore functions include the
industry's latest block-level de-duplication, compression, and encryption technologies,
ensuring secure and efficient synchronization between the cloud storage service and the
CTERA appliance or CTERA Agent-installed computer.
About the CTERA Agent
You can back up data from any computer on your network that is installed with the CTERA
Agent. You can also use the CTERA Agent to easily backup roaming PCs or remote offices even
when they are outside your network.
The CTERA Agent supports the following modes:
Appliance mode
The CTERA Agent connects to a local CTERA appliance, which provides the backup and
restore capabilities of a local network solution, together with the safety and
manageability of a cloud backup service. Data from the CTERA Agent-installed computer
is backed up to a network share on the CTERA appliance and from the appliance to the
CTERA Portal.
CTERA Agent for Windows User Guide
3
1
Introduction
The CTERA Agent can be remotely managed and monitored from the CTERA appliance's
Web interface. For information, refer to your CTERA appliance's user guide.
Cloud Agent mode
The CTERA Agent connects directly to CTERA Portal, without utilizing the services of an
intermediate CTERA appliance. Data from the CTERA Agent-installed computer is backed
up to a folder on the CTERA Portal.
Cloud Agent mode also supports Cloud Drive synchronization, a subscription service that
enables you to synchronize your portal cloud drive with a specific folder on the CTERA
Agent.
The CTERA Agent can be remotely managed, monitored, and accessed from the CTERA
Portal. For information, refer to the CTERA Portal User Guide.
Tip
The CTERA Agent is also available as an app that can be installed on mobile
devices. For information refer to the CTERA Mobile User Guide.
CTERA Agent Licensing (Appliance Mode)
When the CTERA Agent is installed on a Windows Workstation operating system, it consumes
one CTERA Workstation Agent license from the pool of workstation agents in your appliance.
If your appliance runs out of the included number of workstation agent licenses, it requests
additional licenses from the CTERA Portal Workstation Backup licenses pool allocated to your
CTERA Portal account.
When the CTERA Agent is installed on a Windows Server operating system, it consumes one
CTERA Server Agent license from the pool of server agents in your appliance. If your appliance
runs out of the included number of server agent licenses, it requests additional licenses from
the CTERA Portal Server Agents licenses pool allocated to your CTERA Portal account.
Tip
A license is taken for as long as an agent is defined in your appliance. If you are no
longer using an agent, you can delete the agent entry from the appliance to regain
its license.
4
CTERA Agent for Windows User Guide
Introduction
1
CTERA Agent Licensing (Cloud Mode)
When the CTERA Agent is installed on a Windows Workstation operating system, if you are
subscribed to the Cloud Backup service, the agent consumes one Workstation Backup license
from your CTERA Portal quota. If you are only subscribed to the Cloud Drive service, and not
to Cloud Backup service, your agent does not consume Workstation Backup licenses.
When the CTERA Agent is installed on a Windows Server operating system, the agent
consumes one CTERA Server Agent license from your CTERA Portal quota.
Tip
A license is taken for as long as an agent is defined in your CTERA Portal Account.
If you are no longer using an agent, you can delete the agent entry from your
CTERA Portal Account to regain its license.
Supported Backup Operations
The CTERA Agent supports the following types of backup operations:
File-level backup
File-level backup allows backing up files and folders from the CTERA Agent local interface
to the CTERA appliance. The CTERA Agent can back up both unlocked and locked files.
In addition, you can back up the following server applications:
Microsoft SQL Server
Microsoft Exchange
Microsoft Active Directory
Microsoft SharePoint
Hyper-V (Virtual PC)
Tip
Application backup utilizes Microsoft’s Volume Shadow Copy Service (VSS). VSS
enables backups that are point-in-time and application-level consistent.
Tip
To enable backup and restore of Microsoft SharePoint, you need to enable the
Windows SharePoint Services VSS Writer service by running the following
command on the SharePoint server:
stsadm -o -registerwsswriter
The backed up files and applications can later be restored as needed.
Disk-level backup
CTERA Agent for Windows User Guide
5
1
Introduction
Disk-level backup, also known as “bare-metal backup”, allows backing up an image of the
CTERA Agent-installed computer’s hard drives to the CTERA appliance. In case of an
operating system error or a hard drive failure, the computer can be restored in full from
the disk-level backup, returning the system to its exact state when the backup was
performed. You can also restore disk-level backups to dissimilar hardware (provided it has
sufficient disk space), and even to a virtual machine (VM).
When CTERA Agent is used in conjunction with CTERA’s Cloud Backup, a copy of disk-level
backups is stored offsite for complete disaster protection, while maintaining a local copy
for fast restore. CTERA’s advanced deduplication efficiently handles the disk-level
backups, ensuring that only differences are sent over the Internet.
When CTERA Agent is used in conjunction with CTERA’s NEXT3 snapshots, users can easily
roll back to earlier versions of their disk-level images. NEXT3 ensures that only differences
are stored between versions, thus greatly reducing the required storage space.
Disk-level backups are stored using the industry-standard Virtual Hard Disk (VHD) file
format. VHD files can be mounted using standard tools to allow extraction of individual
files and folders, and it is even possible to run the VHD disk image on a virtual machine
(VM) for immediate disaster recovery after hardware failures. For information on
restoring files from disk-level backup, see Restoring Files from Disk-Level Backup (on
page 44).
Tip
Disk-level backup operates over the Windows File Sharing protocol (CIFS). To
perform disk-level backups, ensure that the computer running CTERA Agent has
access to the CTERA appliance using Windows File Sharing.
Tip
Disk-level backup does not support backing up volumes larger than 2TB.
Tip
Disk-level backup is not supported on Windows 7 Home Premium, Windows 7
Home Basic, and Windows 2003 Server.
Tip
Disk-level backup is supported in Appliance mode only.
System state backup
6
CTERA Agent for Windows User Guide
Introduction
1
System state backup, available on Windows 2003 Server only, creates a backup file for
critical system-related components. The system state data includes the registry, COM+
Class Registration database, files under Windows File Protection, and system boot files.
Depending on the server’s configuration, additional data may be included in the system
state data, as well. For example, if the server is a certificate server, the system state will
also contain the Certificate Services database. If the server is a domain controller, Active
Directory and the SYSVOL directory are also included in the system state data.
The system state backup is stored in NTBACKUP format, and the Microsoft NTBACKUP
tool can be used to recover the system state from the backup file.
For information on restoring your system from a system state backup, see Restoring from
a System State Backup on Windows 2003 Server SP2 (on page 125).
Traffic generated by CTERA Agent backup operations of any type can be secured with Secure
Socket Layer (SSL) encryption.
Contacting Technical Support
If you require assistance in configuring or using your CTERA Agent, contact technical support
at http://www.ctera.com/support.
CTERA Agent for Windows User Guide
7
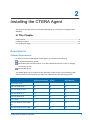
2
Installing the CTERA Agent
This chapter describes how to install the CTERA Agent on a computer running Microsoft
Windows.
In This Chapter
Requirements---------------------------------------------------------------------------------------------------------- 9
Installing the Agent ------------------------------------------------------------------------------------------------ 10
Uninstalling the Agent --------------------------------------------------------------------------------------------- 13
Requirements
Software Requirements
In order to install and manage the CTERA Agent, you will need the following:
A supported operating system
Either Microsoft Internet Explorer 7.0 or later, Mozilla Firefox 3.0 or later, or Google
Chrome 5.0 or later
Adobe Flash Player
The CTERA Agent can be installed on the operating systems shown in the following table,
which also shows which backup operations are supported by each operating system.
Supported Operating Systems and Backup Operations
Operating System
Supports Server
Supports Disk-Level Supports System
Application Backup Backup
State Backup
Workstation Agent
Microsoft Windows XP
No
No
No
Microsoft Windows Vista
Yes
Yes
No
Microsoft Windows 7
Yes
Yes
No
Microsoft Windows 8
No
Yes
No
Yes
No
Yes
Yes
Yes
No
Server Agent
Microsoft Windows Server 2003
SP1
Microsoft Windows Server 2008
CTERA Agent for Windows User Guide
9
2
Installing the CTERA Agent
Microsoft Windows Server 2008 R2 Yes
Yes
No
Microsoft Windows Server 2012
Yes
No
No
Opening Ports on Your Firewall
In order to back up roaming PCs and remote offices outside your network in Appliance mode,
you must open your firewall for the network where the CTERA appliance is located, to allow
incoming TCP ports 995 and 873 to the CTERA appliance.
Installing the Agent
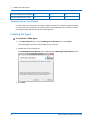
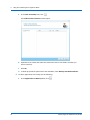
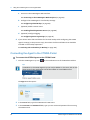
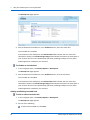
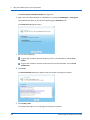
To install the CTERA Agent
1 In the My Computers tab, choose CTERA Agent for Windows, then click Install.
The CTERA Agent installer is downloaded to your computer.
2 Double-click on the installer file.
The CTERA Agent Setup Wizard opens, displaying the CTERA Agent Setup Wizard screen.
3 Click Next.
10
CTERA Agent for Windows User Guide
Installing the CTERA Agent
2
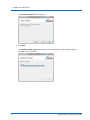
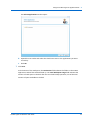
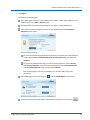
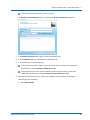
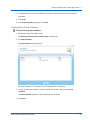
The License Agreement dialog box appears.
4 Choose I Agree.
5 Click Next.
The Select Installation Folder dialog box appears.
6 Click Browse and browse to the folder in where the CTERA Agent should be installed.
7 Click Next.
CTERA Agent for Windows User Guide
11
2
Installing the CTERA Agent
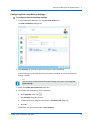
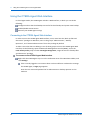
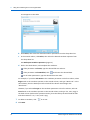
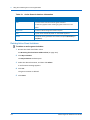
The Confirm Installation screen appears.
8 Click Next.
The Installing CTERA Agent screen appears with a progress bar, and the CTERA Agent is
installed on your computer.
12
CTERA Agent for Windows User Guide
Installing the CTERA Agent
2
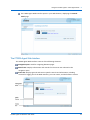
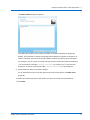
The Installation Complete screen appears.
9 Click Close.
CTERA Agent is added to the Windows Start menu, and an icon is added to the Windows
taskbar.
Uninstalling the Agent
To uninstall CTERA Agent
1 Do one of the following:
In the Windows Start menu, click All Programs > CTERA > Uninstall.
In the Add or Remove Programs window, locate CTERA Agent, and click Remove.
A confirmation message appears.
2 Click Yes.
The CTERA Agent is uninstalled.
CTERA Agent for Windows User Guide
13
3
Centrally Installing CTERA Agent via
Active Directory
You can centrally install CTERA Agent on multiple computers via Microsoft Active Directory.
The following procedure describes installation using a Windows 2008 Active Directory
domain. It is relevant for both Windows Server 2003 and Windows Server 2008.
To centrally install CTERA Agent via Active Directory
1 Prepare the CTERA Agent installation file for central use, by doing the following:
a On the Active Directory machine, create a shared folder called Agent under C:\.
b Copy the CTERA Agent installation file to the new folder.
c Right-click on the folder, then click Properties.
The Properties dialog box appears displaying the General tab.
d Click the Sharing tab.
CTERA Agent for Windows User Guide
15
3
Centrally Installing CTERA Agent via Active Directory
The Sharing tab appears.
e Click Share.
The File Sharing dialog box appears.
f
For each user or user group for which you would like to install CTERA Agent, do the
following:
1 Specify the desired user/group, either by typing the user/group's name in the
field, or by clicking the drop-down list arrow and then clicking Find people.
To enable installing CTERA Agent for all users/groups, type "Everyone".
2 Click Add.
The user/group appears in the file sharing list.
16
CTERA Agent for Windows User Guide
Centrally Installing CTERA Agent via Active Directory
3
3 In the user/group's row, click on the arrow in the Permission Level column, then
click Read.
g Click Share.
The File Sharing dialog box displays a success message.
h Click Done.
i
Click Close.
2 Create a policy that controls the installation of CTERA Agent, by doing the following:
a In the START menu, click Administrative Tools, and then click Group Policy
Management.
The Group Policy Management Console opens.
CTERA Agent for Windows User Guide
17
3
Centrally Installing CTERA Agent via Active Directory
This console enables you to create domain-wide policies or policies for specific
organizational units.
b In the navigation pane, right-click on the domain or organizational unit for which you
want to create the policy, then click Create a new GPO in this domain and Link it
here.
The New GPO dialog box appears.
c In the Name field, type a name for the policy.
For example, "Agent 3.0".
d Click OK.
e In the navigation pane, click on the policy you created.
The policy appears in the right pane.
f
In the Security Filtering area, for each user or user group for which you would like to
install CTERA Agent, do the following:
1 Click Add.
18
CTERA Agent for Windows User Guide
Centrally Installing CTERA Agent via Active Directory
3
The Select User, Computer, or Group dialog box appears.
2 In the Enter the object name to select area, type the name of the user/group.
To enable installing CTERA Agent for all users/groups, type Everyone.
3 Click OK.
g In the navigation pane, right-click on the policy you created, then click Edit.
The Group Policy Management Editor opens.
h In the navigation pane, expand User Configuration > Policies > Software Settings.
i
Right-click Software Installations, then click New > Package.
CTERA Agent for Windows User Guide
19
3
Centrally Installing CTERA Agent via Active Directory
The Open dialog box appears.
j
Specify the network location of the shared folder containing the CTERA Agent
installation file, which you created in step 1.
You can view the network location of the shared folder in the folder's Properties
dialog box, in the Sharing tab.
k Click Open.
20
CTERA Agent for Windows User Guide
Centrally Installing CTERA Agent via Active Directory
3
The Deploy Software dialog box appears.
l
Choose Assigned.
This option ensures that when a user or group specified in the policy's Security
Filtering area logs in to the domain, CTERA Agent will automatically be installed on
their computer.
m Click OK.
3 Add the ctera-agent.adm file to Domain Group Policy as an administrative template,
by doing the following:
Tip
This file contains the agent deployment settings.
a Open the Group Policy Object Editor.
b In the navigation pane, right-click on Administrative Templates, then click
Add/Remove Templates.
CTERA Agent for Windows User Guide
21
3
Centrally Installing CTERA Agent via Active Directory
The Policy Templates window opens.
c Select the ctera-agent.adm file and click Open.
The Enable CTERA Agent automatic deployment Properties dialog box opens.
d In the Sign into server field, type the fully qualified DNS name of the CTERA Portal or
appliance to which the CTERA Agent should connect.
e Click OK.
22
CTERA Agent for Windows User Guide
4
Using the CTERA Agent in
Appliance Mode
This chapter explains how to use CTERA Agents to perform local backup by connecting them
to a CTERA appliance.
In This Chapter
Workflow ------------------------------------------------------------------------------------------------------------- 23
Connecting the Agent to a CTERA Appliance ---------------------------------------------------------------- 24
Using the CTERA Agent Manager ------------------------------------------------------------------------------- 26
Selecting Files and Folders for File-Level Backup ----------------------------------------------------------- 38
Manually Starting Backup ---------------------------------------------------------------------------------------- 39
Stopping the Current Local Backup Operation -------------------------------------------------------------- 39
Suspending and Resuming Local Backup---------------------------------------------------------------------- 39
Viewing the Agent Status ----------------------------------------------------------------------------------------- 40
Viewing Agent Details --------------------------------------------------------------------------------------------- 41
Disconnecting the Agent from a CTERA Appliance --------------------------------------------------------- 41
Restoring Files from File-Level Backup ------------------------------------------------------------------------ 41
Restoring Files from Disk-Level Backup ----------------------------------------------------------------------- 44
Accessing Files on the Appliance-------------------------------------------------------------------------------- 58
Workflow
To use the CTERA Agent for local backup in Appliance Mode, do the following:
1 Install the CTERA Agent on the computer whose files you want to back up to the CTERA
appliance.
See Installing the Agent (on page 10).
2 Connect the CTERA Agent to the CTERA appliance.
See Connecting the Agent to a CTERA Appliance (on page 24).
3 If local configuration of the agent is enabled, do the following:
a Connect to the CTERA Agent Manager.
See Connecting to the CTERA Agent Manager (on page 27).
CTERA Agent for Windows User Guide
23
4
Using the CTERA Agent in Appliance Mode
b Configure the agent-specific settings for the CTERA Agent.
See Configuring the Agent (on page 29).
c If you did not select files and folders for file-level backup while configuring the CTERA
Agent's settings (in the previous step), then select the files and folders that should be
included in local backup operations.
See Selecting Files and Folders for File-Level Backup (on page 38).
Local configuration is controlled by the Allow user to configure the agent check box in
the CTERA Agent global settings. See your CTERA appliance's user guide, Configuring
Global Settings for All CTERA Agents.
Connecting the Agent to a CTERA Appliance
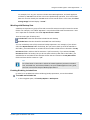
Tip
You can use CTERA Agent for backing up remote sites or roaming employees. To
do so you must perform the following steps:
1. Open your firewall for incoming TCP ports 995 and 873 to the CTERA appliance.
2. If you do not have a fixed IP address, you need to use the Dynamic DNS (DDNS)
Service. Go to the Cloud Services > Status page in your CTERA appliance's Web
interface, and make sure that you are subscribed to the DDNS service. Note the
DNS address that was allocated to your appliance. Enter this address in the Server
field.
24
CTERA Agent for Windows User Guide
Using the CTERA Agent in Appliance Mode
4
To connect the CTERA Agent to the CTERA appliance
1 Click the CTERA Agent tray icon
in the notification area of the Windows taskbar.
Tip
In Windows 7, the CTERA Agent tray icon may be hidden. In this case, click on the
white arrow in the notification area of the taskbar to reveal hidden icons:
The Sign In window opens.
2 In the Server field, do one of the following:
Type the CTERA appliance's IP address.
Type the CTERA appliance's host name, as it appears in the Web interface's Main >
This Device page.
If your appliance is connected to CTERA Portal and subscribed to the Dynamic DNS
service, enter the appliance DNS name as it appears in the Services page, in this field. If
you opened the appropriate ports on your firewall, this will enable the CTERA Agent to
back up from anywhere on the Internet. See Opening Ports on Your Firewall (on page
10).
3 In the Username and Password fields, type your user name and password on this
appliance.
4 Click Sign in.
The following things happen:
The CTERA Agent connects to the CTERA appliance.
CTERA Agent for Windows User Guide
25
4
Using the CTERA Agent in Appliance Mode
The CTERA Agent tray icon changes to
, and the CTERA Agent screen opens.
A shortcut to the files on the appliance is automatically created on your desktop
.
Using the CTERA Agent Manager
By default, the CTERA Agent inherits settings from the global settings for all CTERA Agents. If
desired, you can override the global settings, as well as configure the following agent-specific
settings, via the CTERA Agent Manager:
Enable file-level backup for the agent
Files and folders to back up during file-level backup
Applications to back up during file-level backup
Volumes to back up during disk-level backup
Configure system state backup
Configure integration with Windows Explorer
26
CTERA Agent for Windows User Guide
Using the CTERA Agent in Appliance Mode
4
Connecting to the CTERA Agent Manager
To allow end users to connect to the CTERA Agent Manager, where they can modify their
own CTERA Agent's settings and select files or folders to backup without assistance from an
administrator, select the Allow user to configure the agent check box in the global settings.
See your CTERA appliance's user guide, Configuring Global Settings for All CTERA Agents.
To manage the agent, a user must have the "Back up files and directories" privilege. On
Windows, users in the groups "Administrators", "Backup Operators", and "Domain
Administrators" have this privilege by default. To allow a user who does not belong to one of
these groups to manage the agent, do the following: Open the Microsoft Management
Console (MMC), and in the Local Security Policy snap-in under User Rights Assignment,
assign the user the "Backup files and directories" privilege.
If the Allow user to configure the agent option is not enabled, or if the CTERA Agent user
does not have "Back up files and directories" privileges on Windows, then agent settings can
only be configured by administrators via the appliance Web interface. See your CTERA
appliance's user guide, Configuring the Agent.
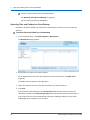
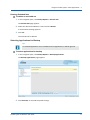
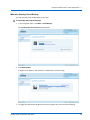
To connect to the CTERA Agent Manager
Right-click the CTERA Agent tray icon in the notification area of the Windows taskbar, and
click Settings.
The following things happen:
If you are not yet logged in to the CTERA appliance Web interface, the Log In page
appears.
Enter your username and password, then click Log In.
CTERA Agent for Windows User Guide
27
4
Using the CTERA Agent in Appliance Mode
The CTERA appliance Web interface opens displaying the CTERA Agent Manager.
28
CTERA Agent for Windows User Guide
Using the CTERA Agent in Appliance Mode
4
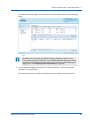
Configuring the Agent
Configuring General Settings
To configure general settings
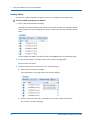
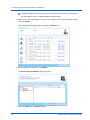
1 In the CTERA Agent Manager, click the Settings tab.
The Settings tab appears.
2 Click Override, to override the global general settings.
Tip
You can revert to global general settings at any time, by clicking Use global
settings.
3 Complete the fields using the information in the following table.
4 Click Save.
CTERA Agent for Windows User Guide
29
4
Using the CTERA Agent in Appliance Mode
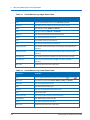
General Settings Fields
In this field...
Do this...
Destination Share
Select the local CTERA appliance network share with which the
files and folders from the CTERA Agent-enabled computer
should be backed up.
Subdirectories will automatically be created under this network
share for each backed up folder.
Use SSL Connection
Specify whether to use Secure Socket Layer (SSL) encryption for
connections from the CTERA Agent to the CTERA appliance:
Enabled. The CTERA Agent will use SSL.
Disabled. The CTERA Agent will not use SSL.
Automatic. The CTERA Agent will not use SSL when in the
same LAN as the CTERA appliance, and will use SSL when
they are not in the same LAN as the CTERA appliance.
The default value is Automatic.
Allow user to configure the agent
Select this option to allow CTERA Agent users to configure their
own agent.
In order for CTERA Agent users to manage their own agents,
this option must be selected, and the CTERA Agent users must
have the "Back up files and directories" privilege on Windows.
By default, Windows grants this privilege to users belonging to
the "Backup Operators" and "Administrators" groups. If the
computer is in an Active Directory domain, the "Domain
Administrators" group also has this privilege by default.
To assign "Back up files and directories" privileges to a user, do
one of the following:
Add the user to the "Backup Operators", "Administrators",
or "Domain Administrators" group on the CTERA
agent-installed computer.
Open the Microsoft Management Console (MMC), and in
the Local Security Policy snap-in under User Rights
Assignment, assign the user the "Backup files and
directories" privilege.
Note: When this option is cleared, selecting files for local
backup can only be done by an administrator in the CTERA
appliance Web interface. The CTERA Agent user cannot select
files for backup locally, nor can they configure agent settings via
the CTERA appliance Web interface. However, the user can still
initiate backup and restore operations.
30
CTERA Agent for Windows User Guide
Using the CTERA Agent in Appliance Mode
4
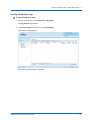
Configuring File-Level Backup Settings
To configure file-level backup settings
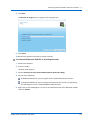
1 In the CTERA Agent Manager, click the File-level Backup tab.
The File-level Backup tab appears.
2 To override the general settings for file-level backup, click Override.
General settings include the file-level backup schedule.
Tip
You can revert to general file-level backup settings at any time, by clicking Use
global settings.
3 To enable file-level backup, select the Enable file-level backup check box.
4 To schedule file-level backup, do the following:
a In the Schedule field, click
.
The Schedule dialog box appears.
b Complete the fields using the information in Schedule Fields (page 34).
c Click OK.
The default file-level backup value is Every 24 hours.
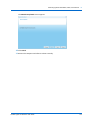
5 To select files and folders for backup, do the following:
CTERA Agent for Windows User Guide
31
4
Using the CTERA Agent in Appliance Mode
a In the Files to Back Up field, click
.
The Folder & Files Selection window opens.
b Expand the tree nodes and select the check boxes next to the folders and files you
want to back up.
c Click OK.
d To back up special file permissions and metadata, check Backup extended attributes.
6 To select applications for backup, do the following:
a In the Applications to Back Up field, click
32
.
CTERA Agent for Windows User Guide
Using the CTERA Agent in Appliance Mode
4
The Select Applications window opens.
b Expand the tree nodes and select the check boxes next to the applications you want
to back up.
c Click OK.
7 Click Save.
At the bottom of the workspace, the Destination field indicates the folder on the CTERA
appliance to which files will be backed up. The Local Disk Space Usage field indicates the
amount of used space on the disk after the next local backup operation, out of the total
amount of space available on the disk.
CTERA Agent for Windows User Guide
33
4
Using the CTERA Agent in Appliance Mode
Table 1: File-Level Backup Tab Fields
In this field...
Do this...
Manual Only
Choose this option to disable automatic backups.
Periodically
Choose this option to specify that automatic backups should be
performed every certain number of hours.
The Start Every field is enabled, and you must complete it.
Start Every
Use the arrows to specify the interval between backups, in
hours.
Specific Time
Choose this option to specify that automatic backups should be
performed at a certain hour on certain days.
The Start Time and On Days fields are enabled, and you must
complete them.
Start Time
Select the hour at which backups should start.
On Days
Specify on which days backups should occur, by selecting the
relevant check boxes or clicking Every Day.
34
CTERA Agent for Windows User Guide
Using the CTERA Agent in Appliance Mode
4
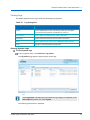
Configuring Disk-Level Backup Settings
To configure disk-level backup settings
1 In the CTERA Agent Manager, click the Disk-level Backup tab.
The Disk-level Backup tab appears.
2 Click Override, to override the general settings for disk-level backup.
General settings include whether disk-level backup is enabled, as well as the disk-level
backup schedule.
Tip
You can revert to global disk-level backup settings at any time, by clicking Use
global settings.
3 Select the Enable disk-level backup check box.
4 To schedule disk-level backup, do the following:
a In the Schedule field, click
.
The Schedule dialog box appears.
b Complete the fields using the information in Schedule Fields (page 34).
c Click OK.
The default disk-level backup value is Every 24 hours.
CTERA Agent for Windows User Guide
35
4
Using the CTERA Agent in Appliance Mode
5 To select volumes for backup, do the following:
a In the Volumes to back up field, click
.
The Volumes window opens.
b Expand the tree nodes and select the check boxes next to the volumes you want to
back up.
For an explanation of the icons and check boxes next to each folder, see Folder Icons
(page 36).
c Click OK.
6 Click Save.
Table 2: Folder Icons
This icon...
Indicates...
Existing files in this folder are selected for backup. New files
and folders in this folder will be backed up.
This folder and all of its sub-folders are selected for backup.
Note that the check box has a white background.
Some (but not all) of the folder’s sub-folders are selected for
backup.
Note that the check box has a gray background.
This folder and all of its sub-folders will not be backed up.
36
CTERA Agent for Windows User Guide
Using the CTERA Agent in Appliance Mode
4
Configuring System State Backup Settings
System state backup is performed as a type of file-level backup.
To configure system state backup settings
Perform file-level backup, and select System State as a backup application.
See Configuring File-Level Backup Settings (on page 31).
Configuring Windows Explorer Integration Settings
To configure Windows Explorer integration settings
1 In the CTERA Agent Manager, click the Explorer Integration tab.
The Explorer Integration tab appears.
2 Complete the fields using the information in the following table.
3 Click Save.
CTERA Agent for Windows User Guide
37
4
Using the CTERA Agent in Appliance Mode
Table 3: CTERA Agent Explorer Integration Fields
In this field...
Do this...
Display icons in Windows Explorer
Select this option to display CTERA backup icons in Windows
Explorer.
Files and folders that are selected for backup will be marked
with the
icon in Windows Explorer. Folders for which only
part of the contents are selected for backup will be marked
with the
Notify user when backup started
icon.
Select this option to display a pop-up notification above the
CTERA Agent tray icon, when backup starts.
Notify user when backup ended
Select this option to display a pop-up notification above the
CTERA Agent tray icon, when backup ends.
Selecting Files and Folders for File-Level Backup
Tip
To allow end users to select files or folders to backup without assistance from an
administrator, select the Allow user to configure the agent check box in the
global settings. See your CTERA appliance's user guide, Configuring Global Settings
for All CTERA Agents.
If this option is not enabled, files and folders for backup can only be configured by
appliance administrators, via the Web interface. See your CTERA appliance's user
guide, Selecting Files and Folders for File-Level Backup.
To select files and folders for file-level backup using Windows Explorer
integration
1 Open Windows Explorer, and browse to the desired files and/or folders.
2 Do any of the following:
To specify that a file or folder should be backed up to the CTERA appliance, right-click
on the desired file/folder, and click CTERA Agent > Add to backup.
If the Display icons in Windows explorer check box is selected in the agent's file-level
backup settings, the file/folder is marked with the
icon. For information on
configuring file-level backup settings, see Configuring File-Level Backup Settings (on
page 31).
To specify that a file or folder should not be backed up to the CTERA appliance,
right-click on the desired file/folder, and click CTERA Agent > Remove from backup.
The
38
icon is removed from the file/folder.
CTERA Agent for Windows User Guide
Using the CTERA Agent in Appliance Mode
4
Manually Starting Backup
The CTERA Agent will automatically back up files, applications, and volumes to the CTERA
appliance according to the schedule configured on the CTERA appliance. If desired, you can
manually trigger backup at any time.
To manually start backup
1 Click the CTERA Agent tray icon in the notification area of the Windows taskbar.
The CTERA Agent screen appears.
2 Next to the desired backup type, click Backup now.
A progress bar appears, and the number of files and bytes remaining for local backup are
displayed.
The CTERA Agent backs up files to the CTERA appliance.
Stopping the Current Local Backup Operation
To stop the current backup operation
1 Click the CTERA Agent tray icon in the notification area of the Windows taskbar.
The CTERA Agent screen appears with a progress bar.
2 Click Cancel.
The current backup operation is stopped.
Suspending and Resuming Local Backup
You can suspend local backup for a CTERA Agent, including:
The currently running local backup for the CTERA Agent
All scheduled automatic local backups for the CTERA Agent
CTERA Agent for Windows User Guide
39
4
Using the CTERA Agent in Appliance Mode
To suspend local backup
Right-click the CTERA Agent tray icon in the notification area of the Windows taskbar, and
click Suspend.
If local backup is currently running, it is paused. All future automatic backups for the
CTERA Agent are suspended.
To resume local backup
Right-click the CTERA Agent tray icon in the notification area of the Windows taskbar, and
click Unsuspend.
Local backup resumes.
Viewing the Agent Status
To view the CTERA Agent's status
Click the CTERA Agent tray icon in the notification area of the Windows taskbar.
The CTERA Agent screen appears.
The screen is composed of the following parts:
Main frame. Displays the available types of backup, along with controls for
performing these backups and restoring from the created backup files. Under each
type of backup, the amount of time since the last backup is displayed, as well as an
indication of whether the backup was successful. Mousing over the backup result
displays a tooltip with additional details about the backup.
Status bar. Displays the amount of time remaining until the next automatic backup,
followed by username@appliance, where username is your username for
accessing the CTERA appliance appliance is the name of the CTERA appliance to
which the CTERA Agent is currently connected. The
icon indicates that the CTERA
Agent is in Appliance mode.
40
CTERA Agent for Windows User Guide
Using the CTERA Agent in Appliance Mode
4
Viewing Agent Details
You can view CTERA Agent details, including its version, the operating system on which it is
installed, and copyright information.
To view CTERA Agent details
1 Right-click the CTERA Agent tray icon in the notification area of the Windows taskbar, and
click About.
The About CTERA Agent screen appears.
2 To view the end user license agreement and services agreement, click Legal Information.
3 To close the window, click OK.
Disconnecting the Agent from a CTERA Appliance
If desired, you can disconnect the CTERA Agent from a CTERA appliance.
To disconnect the CTERA Agent from a CTERA appliance
1 Right-click the CTERA Agent tray icon in the notification area of the Windows taskbar, and
click Sign out.
A confirmation message appears.
2 Click OK.
The CTERA Agent disconnects from the CTERA appliance.
Restoring Files from File-Level Backup
To restore files from file-level backup
1 Do one of the following:
Connect to the CTERA Agent Manager, then click the Restore tab.
See Connecting the Agent to the CTERA Agent Manager.
CTERA Agent for Windows User Guide
41
4
Using the CTERA Agent in Appliance Mode
Right-click on the CTERA Agent tray icon in the notification area of the Windows
taskbar, and click Restore.
The CTERA Agent Manager opens displaying the Restore tab.
2 Next to the desired snapshot, click Restore.
The Restore Files from Backup dialog box opens.
3 To view a folder's contents, select the folder in the left pane.
The selected folder's contents appear in the right pane.
4 In either pane, select the check boxes next to the files and folders you want to restore.
42
CTERA Agent for Windows User Guide
Using the CTERA Agent in Appliance Mode
4
For an explanation of the icons and check boxes next to each folder, see Folder Icons
(page 36).
5 If you want to restore files to a location other than the original location:
a Click in the Restore to Folder field. The Folder Browser dialog box appears.
b Select the folder to which you would like to restore the files.
c Click Close.
6 Click Next.
The Restore In Progress screen appears with a progress bar.
The selected files and folders are restored.
7 Click Finish.
CTERA Agent for Windows User Guide
43
4
Using the CTERA Agent in Appliance Mode
Restoring Files from Disk-Level Backup
There are a number of ways to restore files from disk-level backup:
Restore individual files
See Restoring Individual Files from Disk-Level Backup (on page 44).
Restore your entire computer
See Restoring the Entire Computer from Disk-Level Backup (on page 44).
Restoring Individual Files from Disk-Level Backup
When Windows File Sharing (CIFS) is enabled, you can use WinImage shareware to restore
individual files from disk-level backup.
To restore an individual file
1 Download and install WinImage from http://www.winimage.com.
2 Use WinImage to open the disk-level backup file (a VHD file).
3 Copy the desired file from the disk-level backup to your computer.
Restoring the Entire Computer from Disk-Level Backup
You can restore your computer from disk-level backup, using any of the following methods:
Recovery via the Recovery Control Panel
This option can be used to restore your system image to the same computer or a
different one. It can only be used if the Control Panel is accessible.
Recovery using a system repair or Windows installation disk
If your computer is configured to start from a CD or DVD, and you have a system repair or
Windows installation disk, then you can use the disk to restore your computer.
Tip
On Windows Vista, only a Windows installation disk is supported.
Recovery using preinstalled recovery options
Many computer manufacturers install preinstalled recovery options on your PC. This
option should be used if the Control Panel is inaccessible, and preinstalled recovery
options are already installed on your PC.
44
CTERA Agent for Windows User Guide
Using the CTERA Agent in Appliance Mode
4
Warning
This procedure will replace all existing files, settings, and programs with those in
the disk-level backup.
To restore your computer via the Recovery Control Panel
Tip
Use this procedure, if you are able to access the Windows Control Panel.
1 Click Start > Control Panel.
2 In the search box, type "recovery".
3 In the search results that appear, click Recovery.
4 Click Advanced recovery methods.
5 Click Use a system image you created earlier to recover your computer.
6 Do one of the following:
If you want to backup your computer before starting the restore, click the Back Up
Now button and you will be walked through creating a new backup.
Otherwise, click Skip.
7 Click Restart.
The system restarts.
8 Choose your language settings.
9 Click Next.
10 If you are using a Windows installation disk, click Repair your computer. Continue with
Re-imaging Your Computer (on page 46).
To restore your computer using a system repair or Windows installation disk
1 Insert the installation disk or system repair disk.
2 Boot the computer from the inserted disk.
3 Choose your language settings.
4 Click Next.
5 If you are using a Windows installation disk, click Repair your computer. Continue with
Re-imaging Your Computer (on page 46).
CTERA Agent for Windows User Guide
45
4
Using the CTERA Agent in Appliance Mode
To restore your computer using pre-installed recovery options
Tip
Use this procedure, if your PC manufacturer pre-installed recovery options on
your PC.
1 Restart your computer.
On operating systems other than Windows Vista, this step must be performed by pressing
the computer's power button.
2 Do one of the following:
If your computer has only one operating system installed, press the F8 key while your
computer is restarting.
You must press this key before the Windows logo appears. It is recommended to
press it repeatedly, to ensure that you press it in time.
If you do not succeed in pressing the key before the Windows logo appears, restart
your computer and try again.
If your computer has more than one operating system installed, select the desired
operating system, and then press F8.
3 In the advanced boot options, select Repair your computer.
4 Press Enter.
5 Select a keyboard layout.
6 Click Next.
7 Specify a user name.
8 Type the password.
9 Click OK. Continue with Re-imaging Your Computer (on page 46).
Re-imaging Your Computer
This procedure is performed in the context of restoring your entire computer from disk-level
backup. See Restoring the Entire Computer from Disk-Level Backup (on page 44) for
information on the necessary steps preceding this procedure.
To re-image your computer in Windows Vista:
1 Select the operating system.
If more than one operating system is installed, and the number of bits in the system and
installation differ from one another (that is, if one is 32-bit and one is 64-bit), do not
select an operating system.
2 Click Next.
46
CTERA Agent for Windows User Guide
Using the CTERA Agent in Appliance Mode
4
3 In the system recovery options, click Windows Complete PC Restore.
4 Follow the instructions that appear.
To re-image your computer in Windows 7 / 2008 / 2008 R2
1 When you click Repair your computer (see Restoring the Entire Computer from
Disk-Level Backup (on page 44)), the System Recovery Options dialog box appears.
2 In the System Recovery Options dialog box, choose Restore your computer using a
system image that you created earlier.
3 Click Next.
The Re-image your computer wizard opens displaying the Select a system image backup
dialog box.
4 Choose Select a system image.
5 Click Next.
CTERA Agent for Windows User Guide
47
4
Using the CTERA Agent in Appliance Mode
The Select the location of the backup for the computer you want to restore dialog box
appears.
6 Click Advanced.
The Advanced dialog box opens.
7 Click Search for a system image on the network.
A confirmation message appears.
8 Click Yes.
The Specify the location of the system image dialog box appears.
9 In the Network Folder field, type the UNC path of the folder where the disk-level backup
is stored.
Tip
The UNC path of the folder where the drive-level backup is stored is:
\\{devicename}\{{share name}}\agents\{agentname}\computer.
10 Click OK.
48
CTERA Agent for Windows User Guide
Using the CTERA Agent in Appliance Mode
4
The Enter Network Password dialog box opens.
11 Enter your user name and password for authenticating to the CTERA appliance.
12 Click OK.
The disk-level backup image you specified appears in the Select the location of the
backup for the computer you want to restore dialog box.
13 Select the disk-level backup image.
14 Click Next.
The Select the date and time of system image to restore dialog box appears.
15 Select the desired date and time.
CTERA Agent for Windows User Guide
49
4
Using the CTERA Agent in Appliance Mode
16 Click Next.
The Choose additional restore options dialog box appears.
17 To format and repartition disks to match the source disk-level backup image, select the
Format and repartition disks check box.
18 To exclude specific disks from reformatting and repartitioning, do the following:
Tip
This step is optional and not recommended, as it is preferable to reformat and
repartition all disks.
a Click Exclude disks.
A dialog box appears.
b Select the disks to exclude.
c Click OK.
19 To configure advanced options, do the following:
a Click Advanced.
50
CTERA Agent for Windows User Guide
Using the CTERA Agent in Appliance Mode
4
A dialog box appears.
b Select the desired options.
c Click OK.
20 Click Next.
The final dialog box appears.
21 Click Finish.
A warning message appears.
22 Click Yes.
The re-imaging process begins.
Once the process has finished, the machine reboots to Windows.
CTERA Agent for Windows User Guide
51
4
Using the CTERA Agent in Appliance Mode
To re-image your computer in Windows 8 / 2012
1 When you click Repair your computer (see Restoring the Entire Computer from
Disk-Level Backup (on page 44)), the Advanced Startup options menu appears.
2 Click Troubleshoot.
The Troubleshoot menu appears.
3 Click Advanced options.
52
CTERA Agent for Windows User Guide
Using the CTERA Agent in Appliance Mode
4
The Advanced options menu appears.
4 Click System Image Recovery.
A repair process searches for all Windows 8 / 2012 installations on your computer and
then displays them.
5 Select the operating system.
CTERA Agent for Windows User Guide
53
4
Using the CTERA Agent in Appliance Mode
The Re-image your computer wizard opens displaying the Select a system image backup
dialog box.
6 Choose Select a system image.
7 Click Next.
The Select the location of the backup for the computer you want to restore dialog box
appears.
8 Click Advanced.
The Advanced dialog box opens.
9 Click Search for a system image on the network.
A confirmation message appears.
10 Click Yes.
54
CTERA Agent for Windows User Guide
Using the CTERA Agent in Appliance Mode
4
The Specify the location of the system image dialog box appears.
11 In the Network Folder field, type the UNC path of the folder where the disk-level backup
is stored.
Tip
The UNC path of the folder where the drive-level backup is stored is:
\\{devicename}\{{share name}}\agents\{agentname}\computer.
12 Click OK.
The Enter Network Password dialog box opens.
13 Enter your user name and password for authenticating to the CTERA appliance.
14 Click OK.
The disk-level backup image you specified appears in the Select the location of the
backup for the computer you want to restore dialog box.
15 Select the disk-level backup image.
16 Click Next.
CTERA Agent for Windows User Guide
55
4
Using the CTERA Agent in Appliance Mode
The Select the date and time of system image to restore dialog box appears.
17 Select the desired date and time.
18 Click Next.
The Choose additional restore options dialog box appears.
19 To format and repartition disks to match the source disk-level backup image, select the
Format and repartition disks check box.
20 To exclude specific disks from reformatting and repartitioning, do the following:
Tip
This step is optional and not recommended, as it is preferable to reformat and
repartition all disks.
a Click Exclude disks.
56
CTERA Agent for Windows User Guide
Using the CTERA Agent in Appliance Mode
4
A dialog box appears.
b Select the disks to exclude.
c Click OK.
21 To configure advanced options, do the following:
a Click Advanced.
A dialog box appears.
b Select the desired options.
c Click OK.
22 Click Next.
The final dialog box appears.
CTERA Agent for Windows User Guide
57
4
Using the CTERA Agent in Appliance Mode
23 Click Finish.
A warning message appears.
24 Click Yes.
The re-imaging process begins.
Once the process has finished, the machine reboots to Windows.
Accessing Files on the Appliance
You can access files on the appliance using the following procedure.
To access files on the appliance
Do one of the following:
Right-click the CTERA Agent tray icon in the notification area of the Windows taskbar,
and click Access Files.
Double-click on the Files on Appliance shortcut on your desktop
.
Windows Explorer opens displaying the shares on the appliance.
58
CTERA Agent for Windows User Guide
5
Using the CTERA Agent in Cloud
Agent Mode
This chapter explains how to use CTERA Agents to perform cloud backup by connecting them
to the CTERA Portal.
In This Chapter
Workflow ------------------------------------------------------------------------------------------------------------- 59
Connecting the Agent to the CTERA Portal ------------------------------------------------------------------- 60
Using the CTERA Agent Web Interface ------------------------------------------------------------------------ 62
Selecting Files and Folders for Backup ---------------------------------------------------------------------- 107
Manually Starting Backup -------------------------------------------------------------------------------------- 108
Stopping the Current Backup Operation -------------------------------------------------------------------- 109
Suspending and Resuming Backup --------------------------------------------------------------------------- 109
Viewing the Agent Status --------------------------------------------------------------------------------------- 109
Viewing Agent Details ------------------------------------------------------------------------------------------- 110
Disconnecting the Agent from the CTERA Portal --------------------------------------------------------- 111
Restoring Files from Cloud Backup --------------------------------------------------------------------------- 111
Accessing the Cloud Drive Folder ----------------------------------------------------------------------------- 115
Browsing the Cloud Drive Folder Online -------------------------------------------------------------------- 116
Collaborating on Projects --------------------------------------------------------------------------------------- 116
Sharing Files with Guest Invitations -------------------------------------------------------------------------- 121
Workflow
To use the CTERA Agent for backup in Cloud Agent mode, do the following:
1 Install the CTERA Agent on the computer whose files you want to back up to the CTERA
appliance.
See Installing the Agent (on page 10).
2 Connect the CTERA Agent to the CTERA appliance.
See Connecting the Agent to the CTERA Portal (on page 60).
3 Configure CTERA Agent settings, by doing the following:
CTERA Agent for Windows User Guide
59
5
Using the CTERA Agent in Cloud Agent Mode
a Connect to the CTERA Agent Web Interface.
See Connecting to the CTERA Agent Web Interface (on page 62).
b Configure the CTERA Agent's cloud backup settings.
See Configuring Cloud Backup (on page 65).
c (Optional) Enable remote access.
See Enabling/Disabling Remote Access (on page 88).
d (Optional) Configure logging.
See Configuring Event Log Settings (on page 95).
4 If you did not select files and folders for file-level backup while configuring the CTERA
Agent's settings (in the previous step), then select the files and folders that should be
included in local backup operations.
See Selecting Files and Folders for Backup (on page 107).
Connecting the Agent to the CTERA Portal
To connect the CTERA Agent to the CTERA Portal
1 Click the CTERA Agent tray icon
in the notification area of the Windows taskbar.
Tip
In Windows 7, the CTERA Agent tray icon may be hidden. In this case, click on the
white arrow in the notification area of the taskbar to reveal hidden icons:
The Sign In window opens.
2 In the Server field, type the CTERA Portal's DNS name.
3 In the Username and Password fields, type you user name and password for accessing
the CTERA Portal.
60
CTERA Agent for Windows User Guide
Using the CTERA Agent in Cloud Agent Mode
5
4 Click Sign in.
The following things happen:
The CTERA Agent connects to the CTERA Portal, and the CTERA Agent appears in the
CTERA Portal, in the Main > Devices page.
A backup folder is automatically created for this agent on the CTERA Portal.
If this is the first time this agent connects to the CTERA Portal, the Initialization
Required screen opens.
Do one of the following:
To use an automatically generated encryption key to protect the created backup
folder, choose Use an automatically generated encryption key, and then click
Initialize.
To secure the backup folder with your own secret passphrase, choose Use my
own secret passphrase, enter the desired passphrase in the Secret Passphrase
and Re-type Passphrase fields, and then click Initialize.
Each time the agent connects to CTERA Portal, you will need to enter this
passphrase.
The CTERA Agent tray icon changes to
, and the CTERA Agent screen opens.
A shortcut to the cloud drive folder is automatically created on your desktop
CTERA Agent for Windows User Guide
.
61
5
Using the CTERA Agent in Cloud Agent Mode
Using the CTERA Agent Web Interface
In Cloud Agent mode, the CTERA Agent includes a Web interface, in which you can do the
following:
Configure and use the Cloud Backup service for file-level backup and system state backup
Enable/disable remote access
Monitor your CTERA Agent via logs
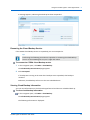
Connecting to the CTERA Agent Web Interface
In order to access the CTERA Agent Web interface, a user must have the "Back up files and
directories" privilege. On Windows, users in the groups "Administrators", "Backup
Operators", and "Domain Administrators" have this privilege by default.
To allow a user who does not belong to one of these groups to access the CTERA Agent Web
interface, do the following: Open the Microsoft Management Console (MMC), and in the
Local Security Policy snap-in under User Rights Assignment, assign the user the "Backup files
and directories" privilege.
To connect to the CTERA Agent Web interface
Right-click the CTERA Agent tray icon in the notification area of the Windows taskbar, and
click Settings.
If the currently logged in user account does not have sufficient credentials to manage
the CTERA Agent, a Login page appears.
Enter the user name and password of an administrator or backup operator on this
machine.
62
CTERA Agent for Windows User Guide
Using the CTERA Agent in Cloud Agent Mode
5
The CTERA Agent Web interface opens in your Web browser, displaying the Control
Panel page.
The CTERA Agent Web Interface
The CTERA Agent Web interface consists of the following elements:
Navigation pane. Used for navigating between pages.
Main frame. Displays information and controls for the menu item selected in the
navigation pane.
Status bar. Displays general and session-specific controls and information, including
controls for logging out of the Web interface, your user name, and the firmware version
CTERA Agent for Windows User Guide
63
5
Using the CTERA Agent in Cloud Agent Mode
Sorting Tables
You can sort a table according to a specific column, in ascending or descending order.
To sort a table according to a column
1 Click on the desired column's heading.
The table is sorted according to the column. An arrow in the column's heading indicates
that the table is sorted according to the column. The arrow's direction indicates the sort
order.
In this example, the table is sorted according to the Type column, in descending order.
2 To reverse the column's sort order, click on the column's heading again.
The sort order is reversed.
3 To select the desired sort order from a list, do the following:
a Mouse-over the column's heading.
An arrow appears in the right side of the column heading.
b Click on the arrow, then click on the desired sort order in the drop-down list.
The column is sorted accordingly.
64
CTERA Agent for Windows User Guide
Using the CTERA Agent in Cloud Agent Mode
5
Navigating Between Table Pages
When a table contains multiple pages, you can navigate between the pages by using the
controls at the bottom of the table.
To navigate between pages
Do any of the following:
To navigate to the next page, click
.
To navigate to the previous page, click
To navigate to page 1, click
.
.
To navigate to a specific page, in the Page field, type the desired page number.
Refreshing Table Contents
You can refresh the contents of various tables in the main frame.
To refresh a table's contents
At the bottom of the table or list, click
.
The table's contents are refreshed.
Configuring Cloud Backup
To configure cloud backup
1 Specify the data that should be included or excluded from backup operations, by doing
one or more of the following:
To choose specific files and folders to include in the back up, select the desired files
and folders.
See Selecting Files and Folders for Cloud Backup (on page 66).
To choose specific file types to include in or exclude from backup operations, define
and enable backup sets.
See Working with Backup Sets (on page 67).
To choose specific applications to include in the backup, select the desired
applications.
See Selecting Applications for Backup (on page 77).
2 Do one or more of the following:
Schedule automatic backup of the selected folders.
See Scheduling Automatic Cloud Backup (on page 80).
The files will be backed up according to the configured schedule.
CTERA Agent for Windows User Guide
65
5
Using the CTERA Agent in Cloud Agent Mode
Perform a manual backup of the selected folders.
See Manually Starting Cloud Backup (on page 83).
The files will be backed up immediately.
Selecting Files and Folders for Cloud Backup
By default, all folders and files are selected for cloud backup. If desired, you can modify the
selection.
To select files and folders for cloud backup
1 In the navigation pane, click Backup Options > Backup Files.
The Backup Files page appears.
2 Expand the tree nodes to reveal the folders.
For an explanation of the icons and check boxes next to each folder, see Folder Icons
(page 36).
The folder contents appear in the right pane.
3 Select the check boxes next to the files and folders you want to back up.
4 Click Save.
At the bottom of the workspace, the Selected Files field indicates the size of the files
selected for backup. The Cloud Storage Usage field indicates the amount of used space in
your account after the next cloud backup operation (including backups from any other
CTERA appliances included in your account).
66
CTERA Agent for Windows User Guide
Using the CTERA Agent in Cloud Agent Mode
5
For example, let's say your account includes two CTERA appliances, and each appliance
will back up 100 MB worth of files in the next cloud backup operation, for a total of 200
MB. Your account already has 350 MB worth of files stored online. In this case, the Cloud
Storage Usage field will display "550MB".
Working with Backup Sets
A backup set represents a group of files with certain file extensions and/or located in certain
folders. For example, a set called "My Music" may include all files with the extensions *.wav
and *.mp3 that are located in the folder My Documents > Music.
There are two types of backup sets:
Included sets. Files that should be included in each backup
Excluded sets. Files that should be excluded from each backup
You can use backup sets to fully customize backup operations. For example, if you did not
select the My Documents folder for backup, but you want to back up all of the PDF files in
this folder, you would define an included set that includes all files that are located in the My
Documents folder and have the file extension *.pdf. Conversely, if you selected the My
Documents folder for backup, but you do not want to back up PDF files in this folder, you
would define an excluded set that includes all files that are located in the My Documents
folder and have the file extension *.pdf.
Tip
For information on the order in which the CTERA appliance processes included
sets, excluded sets, and selected folders, see your CTERA appliance's user guide,
How Can I Control the Scope of Backup Operations?.
Enabling/Disabling Included Sets
In order for an included set to be used during backup operations, it must be enabled.
To enable an included set
1 In the navigation pane, click Backup Options > Backup Sets.
CTERA Agent for Windows User Guide
67
5
Using the CTERA Agent in Cloud Agent Mode
The Backup Sets page appears.
2 Next to the desired included set, in the Enabled column, select the check box.
The included set is enabled.
At the bottom of the workspace, the Selected Files field indicates the size of the files
selected for backup. The Cloud Storage Usage field indicates the amount of used space in
your account after the next cloud backup operation (including backups from any other
CTERA appliances included in your account).
To disable an included set
1 In the navigation pane, click Backup Options > Backup Sets.
The Backup Sets page appears.
2 Next to the desired included set, in the Enabled column, clear the check box.
The included set is disabled.
At the bottom of the workspace, the Selected Files field indicates the size of the files
selected for backup. The Cloud Storage Usage field indicates the amount of used space in
your account after the next cloud backup operation (including backups from any other
CTERA appliances included in your account).
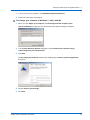
Adding and Editing Included Sets
To add or edit an included set
1 In the navigation pane, click Backup Options > Backup Sets.
The Backup Sets page appears.
2 Do one of the following:
To add a new included set, click New.
68
CTERA Agent for Windows User Guide
Using the CTERA Agent in Cloud Agent Mode
5
To edit an existing included set, click on its name.
The Backup Set Details Wizard opens, displaying the Backup Set Details dialog box.
3 In the Backup Set Name field, type the name of the backup set.
4 In the Comment field, type a description of the backup set.
5 In the If field, do one of the following:
To specify that all of the conditions must be met in order for a file to be included in
the backup set, select all of the conditions are true.
To specify that one or more of the conditions must be met in order for a file to be
included in the backup set, select at least one of the conditions is true.
6 Define the desired conditions for a file to be included in the backup set, by doing the
following for each condition:
a Click Add condition.
CTERA Agent for Windows User Guide
69
5
Using the CTERA Agent in Cloud Agent Mode
A row appears in the table.
b Click Select, then select the desired condition parameter from the drop-down list.
c In the second column, click Select, then select the desired condition operator from
the drop-down list.
See Backup Set Condition Operators (page 73).
d Click in the third column, and complete the condition:
If the parameter is File Size, type the desired file size and unit.
If the parameter is File Modified, click
and choose the desired date.
For all other parameters, type the desired free-text value.
For example, if you select File Name as the condition parameter in the first column, select
begins with as the condition operator in the second column, and type "Work-123-" in the
third column, then the backup set will include all files whose names begin with
"Work-123-".
Likewise, if you select File Type as the condition parameter in the first column, select is
one of with as the condition operator in the second column, and type "avi, mov, mpg" in
the third column (without the quotation marks), then the backup set will include all files
with the extension *.avi, *.mov, and *.mpg.
7 To delete a condition, click
in its row.
8 Click Next.
70
CTERA Agent for Windows User Guide
Using the CTERA Agent in Cloud Agent Mode
5
The Select Folders dialog box appears.
This dialog box enables you to select the folders to which this backup set applies. By
default, the root folder is selected, meaning that the backup set applies to all files in all
folders. If desired, you can select specific folders to which this backup set should apply.
For example, you can create an backup set that contains all files that have the extension
*.txt and reside in the folder /share1/textfiles by entering "txt" in the previous
dialog box, and then choosing the folder /share1/textfiles in this dialog box.
9 Expand the tree nodes to reveal the folders.
For an explanation of the icons and check boxes next to each folder, see Folder Icons
(page 36).
10 Select the check boxes next to the folders you want to include in the included set.
11 Click Next.
CTERA Agent for Windows User Guide
71
5
Using the CTERA Agent in Cloud Agent Mode
The Done screen appears.
12 Click Finish.
Tip
If you added a new included set, it is automatically enabled.
72
CTERA Agent for Windows User Guide
Using the CTERA Agent in Cloud Agent Mode
5
Table 4: Backup Set Condition Operators
Use this operator...
To do this...
equals
Include all files for which the parameter in the first column
matches the string in the third column.
This operator is relevant for the File Name, File Path, and File
Type parameters only.
begins with
Include all files for which the parameter in the first column
begins with the string in the third column.
This operator is relevant for the File Name, File Path, and File
Type parameters only.
ends with
Include all files for which the parameter in the first column ends
with the string in the third column.
This operator is relevant for the File Name, File Path, and File
Type parameters only.
contains
Include all files for which the parameter in the first column
contains the string in the third column.
This operator is relevant for the File Name, File Path, and File
Type parameters only.
is one of
Include all files for which the parameter in the first column is
included in the set specified in the third column.
This operator is relevant for the File Name, File Path, and File
Type parameters only.
less than
Include all files whose size is less than the amount specified in
the third column.
This operator is relevant for the File Size parameter only.
more than
Include all files whose size is more than the amount specified in
the third column.
This operator is relevant for the File Size parameter only.
before
Include all files whose last modification date is before the date
specified in the third column.
This operator is relevant for the File Modified parameter only.
after
Include all files whose last modification date is after the date
specified in the third column.
This operator is relevant for the File Modified parameter only.
CTERA Agent for Windows User Guide
73
5
Using the CTERA Agent in Cloud Agent Mode
Deleting Included Sets
To delete an included set
1 In the navigation pane, click Backup Options > Backup Sets.
The Backup Sets page appears.
2 Select the desired included set's name and click Delete.
A confirmation message appears.
3 Click Yes.
The included set is deleted.
Enabling/Disabling Excluded Sets
In order for an excluded set to be used during backup operations, it must be enabled.
To enable an excluded set
1 In the navigation pane, click Backup Options > Exclude Sets.
The Exclude Sets page appears.
2 Next to the desired excluded set, in the Enabled column, select the check box.
The excluded set is enabled.
At the bottom of the workspace, the Selected Files field indicates the size of the files
selected for backup. The Cloud Storage Usage field indicates the amount of used space in
your account after the next cloud backup operation (including backups from any other
CTERA appliances included in your account).
74
CTERA Agent for Windows User Guide
Using the CTERA Agent in Cloud Agent Mode
5
To disable an excluded set
1 In the navigation pane, click Backup Options > Exclude Sets.
The Exclude Sets page appears.
2 Next to the desired excluded set, in the Enabled column, clear the check box.
The excluded set is disabled.
At the bottom of the workspace, the Selected Files field indicates the size of the files
selected for backup. The Cloud Storage Usage field indicates the amount of used space in
your account after the next cloud backup operation (including backups from any other
CTERA appliances included in your account).
Adding and Editing Excluded Sets
To add or edit an excluded set
1 In the navigation pane, click Backup Options > Exclude Sets.
The Exclude Sets page appears.
2 Do one of the following:
To add a new excluded set, click New.
To edit an existing excluded set, click on its name.
The Backup Set Details Wizard opens, displaying the Backup Set Details dialog box.
3 In the Backup Set Name field, type the name of the backup set.
4 In the Comment field, type a description of the backup set.
5 In the If field, do one of the following:
To specify that all of the conditions must be met in order for a file to be included in
the backup set, select all of the conditions are true.
To specify that one or more of the conditions must be met in order for a file to be
included in the backup set, select at least one of the conditions is true.
6 Define the conditions that must be met in order for a file to be included in the backup set,
by doing the following for each condition:
a Click Add condition.
A row appears in the table.
b Click Select, then select the desired condition parameter from the drop-down list.
c In the second column, click Select, then select the desired condition operator from
the drop-down list.
See Backup Set Condition Operators (page 73).
CTERA Agent for Windows User Guide
75
5
Using the CTERA Agent in Cloud Agent Mode
d Click in the third column, and complete the condition:
If the parameter is File Size, type the desired file size and unit.
If the parameter is File Modified, click
and choose the desired date.
For all other parameters, type the desired free-text value.
For example, if you select File Name as the condition parameter in the first column, select
begins with as the condition operator in the second column, and type "Work-123-" in the
third column, then the backup set will include all files whose names begin with
"Work-123-".
Likewise, if you select File Type as the condition parameter in the first column, select is
one of with as the condition operator in the second column, and type "avi, mov, mpg" in
the third column, then the backup set will include all files with the extension *.avi, *.mov,
and *.mpg.
7 To delete a condition, click
in its row.
8 Click Next.
The Select Folders dialog box appears.
This dialog box enables you to select the folders to which this backup set applies. By
default, the root folder is selected, meaning that the backup set applies to all files in all
folders. If desired, you can select specific folders to which this backup set should apply.
For example, you can create an backup set that contains all files that have the extension
*.txt and reside in the folder /share1/textfiles by entering "txt" in the previous
dialog box, and then choosing the folder /share1/textfiles in this dialog box.
9 Expand the tree nodes to reveal the folders.
For an explanation of the icons and check boxes next to each folder, see Folder Icons
(page 36).
10 Select the check boxes next to the folders you want to include in the excluded set.
11 Click Next.
The Done screen appears.
12 Click Finish.
Tip
If you added a new excluded set, it is automatically enabled.
76
CTERA Agent for Windows User Guide
Using the CTERA Agent in Cloud Agent Mode
5
Deleting Excluded Sets
To delete an excluded set
1 In the navigation pane, click Backup Options > Exclude Sets.
The Exclude Sets page appears.
2 Select the desired excluded set's name and click Delete.
A confirmation message appears.
3 Click Yes.
The excluded set is deleted.
Selecting Applications for Backup
Tip
If a selected application is not installed on the target device, it will be ignored.
To select applications for backup
1 In the navigation pane, click Backup Options > Backup Applications.
The Backup Applications page appears.
2 Click Override, to override the portal settings.
CTERA Agent for Windows User Guide
77
5
Using the CTERA Agent in Cloud Agent Mode
Tip
You can revert to portal settings at any time, by clicking Use portal settings.
The Applications tree pane becomes active.
3 Expand the tree nodes and select the check boxes next to the applications you want to
back up.
4 Click Save.
Canceling the Current Cloud Backup
You can cancel a running cloud backup.
Tip
Only the current backup will be canceled. The next automatic backup will occur as
scheduled.
To cancel the current cloud backup
1 In the navigation pane, click Main > Cloud Backup.
The Cloud Backup Control Panel page appears.
2 Click Cancel.
The current backup is canceled.
Suspending the Cloud Backup Service
You can suspend the CTERA Cloud Backup service, including:
The currently running backup
All scheduled automatic backup
Tip
Performing the following procedure is equivalent to suspending the Cloud Backup
service via the CTERA Agent tray icon's right-click menu.
To suspend the CTERA Cloud Backup service
1 In the navigation pane, click Main > Cloud Backup.
The Cloud Backup Control Panel page appears.
2 Click Suspend.
If a backup is currently running, it is paused. All future automatic backups are suspended.
78
CTERA Agent for Windows User Guide
Using the CTERA Agent in Cloud Agent Mode
5
A message appears, indicating that backup has been suspended.
Resuming the Cloud Backup Service
If the CTERA Cloud Backup service is suspended, you can unsuspend it.
Tip
Performing the following procedure is equivalent to resuming the Cloud Backup
service via the CTERA Agent tray icon's right-click menu.
To resume the CTERA Cloud Backup service
1 In the navigation pane, click Main > Cloud Backup.
The Cloud Backup Control Panel page appears.
2 Click Unsuspend.
If a backup was running at the time when backups were suspended, that backup is
resumed.
Otherwise, cloud backup will occur at the next scheduled time.
Viewing Cloud Backup Information
You can view information on the last backup performed and the next scheduled back up.
To view cloud backup information
In the navigation pane, click Main > Cloud Backup.
The Cloud Backup Control Panel page appears.
The following information is displayed:
CTERA Agent for Windows User Guide
79
5
Using the CTERA Agent in Cloud Agent Mode
Table 5: Cloud Backup Information
This field...
Displays...
Next backup will run in
The amount of time until the next scheduled automatic backup.
The last backup result
The status of the last backup:
Completed successfully
Backup in Progress
The last backup has failed, followed by the reason it failed
If an error occurred during backup, refer to the backup logs for
details. See Viewing Cloud Backup Logs (on page 98).
Mouse-over this icon to view the following information about the last
backup:
The total size of the files that you selected for backup
The total number of files that you selected for backup
The amount of time the backup took
The amount of time since the last backup ended.
Scheduling Automatic Cloud Backup
To schedule automatic cloud backup
1 In the navigation pane, click Backup Options > Schedule.
The Schedule page appears.
2 Click Override, to override the portal settings.
80
CTERA Agent for Windows User Guide
Using the CTERA Agent in Cloud Agent Mode
5
Tip
You can revert to portal settings at any time, by clicking Use portal settings.
3 Complete the fields using the information in the following table.
4 Click Save.
CTERA Agent for Windows User Guide
81
5
Using the CTERA Agent in Cloud Agent Mode
Table 6: Backup Schedule Fields
In this field...
Do this...
Periodically
Choose this option to automatically back up files every specified
number of hours.
The Start Every field is enabled, and you must complete it.
Start Every
Type the amount of time between automatic cloud backups, in
hours.
The default value is 24 hours.
Specific Time
Choose this option to automatically back up files according to a
specified daily schedule.
The Start Time, Stop Time, and On Days fields are enabled, and
you must complete them.
Start Time
Select the time at which cloud backup should start.
Note: If a given backup extends past the scheduled time for the
next automatic backup, the next automatic backup will
commence immediately upon completion of the prior backup.
Stop Time
Select the time at which cloud backup must end. This can be
any of the following:
A specific hour
On Completion. The backup operation will only end when
cloud backup is complete.
The default value is On Completion.
Note: If the amount of changed data to back up is large, the
backup process can take several hours or days. Therefore, if a
stop time is configured, the backup process may not be
completed within the time frame. For example, if you specify
that data should be backed up between 12 AM - 2 AM, and the
backup requires 3 hours, the backup will not be completed.
On Days
Select the days on which cloud backup should be performed.
This can be any of the following:
One or more specific days
Every Day. Cloud backup will occur every day.
The default value is Every Day.
82
CTERA Agent for Windows User Guide
Using the CTERA Agent in Cloud Agent Mode
5
Manually Starting Cloud Backup
You can manually start cloud backup at any time.
To manually start cloud backup
1 In the navigation pane, click Main > Cloud Backup.
The Cloud Backup Control Panel page appears.
2 Click Backup Now.
A progress bar appears, and the files are backed up to cloud storage.
3 To toggle the information displayed under the progress bar, do one of the following:
CTERA Agent for Windows User Guide
83
5
Using the CTERA Agent in Cloud Agent Mode
To display the effective throughput (in Kbit/sec), click the
Show effective throughput.
To display the bandwidth usage (in bit/sec), click the
bandwidth usage.
icon, and then click
icon, and then click Show
Preparing a Backup Seeding Hard Drive
When you have a lot of information to back up, the initial backup to the cloud can take a long
time. If your CTERA service provider offers a backup seeding service, then you can speed up
the initial backup by preparing a backup seeding hard drive, that is, is a drive that contains all
of the files you want to include in your initial backup. You then deliver the seeding drive to
the service provider, and the service provider uses the seeding drive to create the initial
backup.
The seeding drive can optionally be encrypted using AES-256 and RSA public key encryption,
so even if the drive is lost, there is very little risk to your sensitive information.
To prepare a backup seeding hard drive
1 Select the files and folders you want to include in the initial backup.
See Selecting Files and Folders for Cloud Backup (on page 66).
These files and folders will be written to the seeding drive.
2 In the navigation pane, click Main > Cloud Backup.
The Cloud Backup Control Panel page appears.
3 Click Seeding.
84
CTERA Agent for Windows User Guide
Using the CTERA Agent in Cloud Agent Mode
5
Tip
This option will appear only if the backup seeding service is supported by your
service provider.
The Select seeding destination dialog box appears.
4 Choose the drive to use as the seeding drive.
Warning
The contents of this drive will be deleted.
5 To encrypt the seeding drive, select the Use encryption check box.
6 Click Finish.
A confirmation message appears.
7 Click Yes.
The selected files and folders are written to the seeding drive.
You can now deliver the seeding drive to your service provider.
Tip
During the time your service provider is loading the backup seeding drive to your
account, the backup service will be temporarily disabled for your appliance.
Logging Out of the CTERA Agent Web Interface
To log out of the CTERA Agent Web interface
In the status bar, click Logout.
You are logged out of the CTERA Agent Web interface.
CTERA Agent for Windows User Guide
85
5
Using the CTERA Agent in Cloud Agent Mode
Tip
You will be automatically logged out after a period of inactivity.
Restricting Throughput
If desired, you can restrict the amount of bandwidth used for backing up files online.
To restrict throughput
1 In the navigation pane, click Backup Options > Throughput.
The Throughput Control page appears.
2 Click Override, to override the portal settings.
3 Complete the fields using the information in the following table.
4 Click Save.
86
CTERA Agent for Windows User Guide
Using the CTERA Agent in Cloud Agent Mode
5
Table 7: Throughput Control Fields
In this field...
Do this...
Do not throttle
Choose this option to specify that throughput should not be
restricted.
Throttle the Internet bandwidth
Choose this option to restrict the bandwidth used for cloud
usage
backups.
The rest of the fields on the page are enabled, and you must
complete them.
Limit outgoing bandwidth to
Type the maximum bandwidth to use for cloud backups in
kilobytes per second.
During these hours
Select this option to specify that the bandwidth used for cloud
backups should be restricted only at specific times of the day.
Then use the drop-down lists to specify the time range during
which the bandwidth should be restricted.
On Days
Select to specify that the bandwidth used for cloud backups
should be restricted only on specific days. This can be any of
the following:
One or more specific days
Every Day. Bandwidth used for cloud backup will be
restricted every day.
The default value is Every Day.
CTERA Agent for Windows User Guide
87
5
Using the CTERA Agent in Cloud Agent Mode
Enabling/Disabling Remote Access
You can enable and disable administration of this agent from the portal.
To enable remote access
1 In the navigation pane, click Remote Access.
The Remote Access page appears.
2 Slide the lever to the On position.
Remote access is enabled.
88
CTERA Agent for Windows User Guide
Using the CTERA Agent in Cloud Agent Mode
5
A link appears, which you can click on to view a remote management page. You can keep
this link in your browser bookmarks, for remote access to this appliance.
To disable remote access
1 In the navigation pane, click Remote Access.
The Remote Access page appears.
2 Slide the lever to the Off position.
Remote access is disabled.
Using Cloud Drive Synchronization
If you are subscribed to the Cloud Drive service on your service provider’s CTERA Portal, cloud
drive synchronization is enabled in the CTERA Agent by default, enabling you to synchronize
your portal cloud drive with a specific folder on one or more CTERA agents in cloud mode.
Synchronization is bi-directional. Conflicts that may occur when a file has been modified on
multiple sources are detected and automatically resolved by choosing the most recent
version of the file. On a computer with an older file version, the file is moved to the cloud
drive's .conflicts folder, called the "conflicts trashcan". Files in the conflicts trashcan are
automatically deleted after a configurable time.
Tip
In order for conflict resolution to be performed correctly, your computer clock
must be synchronized with the CTERA Portal clock. If there is more than one hour
difference between the two clocks (after taking into account timezone
differences), the agent will not synchronize the cloud drive folder.
CTERA Agent for Windows User Guide
89
5
Using the CTERA Agent in Cloud Agent Mode
Suspending/Unsuspending Cloud Drive Synchronization
To suspend cloud drive synchronization
1 In the navigation pane, click Main > Cloud Drive.
The Cloud Drive page appears.
2 Click Suspend.
Cloud drive synchronization is suspended.
To unsuspend cloud drive synchronization
1 In the navigation pane, click Main > Cloud Drive.
The Cloud Drive page appears.
90
CTERA Agent for Windows User Guide
Using the CTERA Agent in Cloud Agent Mode
5
2 Click Unsuspend.
Cloud drive synchronization is no longer suspended, and you can now configure the
desired settings.
Selecting Cloud Folders for Synchronization
You can specify which of the portal cloud folders should be synchronized with the CTERA
appliance.
To select portal cloud folders for synchronization
1 In the navigation pane, click Main > Cloud Drive.
The Cloud Drive page appears.
2 Click Settings.
The Cloud Drive Settings window opens displaying the Select Folders tab.
The Select Folders tab displays a tree of the folders in the portal cloud drive that are
available to be synchronized.
3 Expand the tree nodes and select the check box next to the portal cloud folder you want
to synchronize with the CTERA appliance. By default, the selected portal cloud folder is
synced to the path CTERA\CTERA Agent\CloudDrive under your system's ProgramData
folder.
CTERA Agent for Windows User Guide
91
5
Using the CTERA Agent in Cloud Agent Mode
4 If you would like to map a different local folder to synchronize with the selected portal
cloud drive folder, click Settings. The Map local folder dialog box appears.
5 Check Map local folder.
6 Click . The Folder Browser window appears. Browse to the local folder you want to
synchronize to the selected portal cloud folder. If, at any time, you want to revert to the
default local folder, uncheck the Map local folder box in the Map local folder window.
7 Click Close.
8 In the Map local folder window, click OK.
9 Click Save.
Configuring Advanced Cloud Drive Synchronization Settings
You can specify which local folder should be synchronized with the cloud drive, as well as how
conflicts between file versions should be handled.
To configure advanced cloud drive synchronization settings
1 In the navigation pane, click Main > Cloud Drive.
The Cloud Drive page appears.
2 Click Settings.
The Cloud Drive Settings window opens displaying the Select Folders tab.
3 Click the Advanced tab.
92
CTERA Agent for Windows User Guide
Using the CTERA Agent in Cloud Agent Mode
5
The Advanced tab appears.
4 Expand the tree nodes and select the local folder under which folders should be created
for each portal cloud folder you chose for synchronization.
For information on choosing portal cloud folders for synchronization, see Selecting Cloud
Folders for Synchronization (on page 91).
5 In the After resolving conflict, keep original for field, use the arrow buttons to specify the
number of days that the appliance should retain the original version of a file that was
independently modified on more than one replica.
After this time, the conflicting copies are deleted. Conflicting copies are stored in the
conflicts trashcan folder, .conflicts.
6 Click Save.
Viewing Cloud Drive Synchronization Status
You can view information on cloud drive synchronization status and the amount of cloud
storage used.
To view cloud drive synchronization status
In the navigation pane, click Main > Cloud Drive.
The Cloud Drive page appears.
The following information is displayed:
CTERA Agent for Windows User Guide
93
5
Using the CTERA Agent in Cloud Agent Mode
Table 8: Cloud Drive Synchronization Information
This field...
Displays...
Cloud Storage Usage
The amount of used space in your account, followed by the number of
files on the cloud drive.
Status
The cloud drive synchronization status. Some possible statuses are:
Sync in progress. Synchronization is currently in progress.
Path is not configured. The path to the local folder which should
be synchronized with the cloud drive is not configured. To
configure it, see Configuring Advanced Cloud Drive
Synchronization Settings (on page 92).
Managing Files and Folders on the Cloud Drive
You can manage files and folders directly on the CTERA Portal cloud drive.
To manage files and folders on the cloud drive
1 Using a Web browser, log in to your CTERA Portal account.
The CTERA Portal opens displaying the My Account tab.
2 Click the Cloud Drive tab.
94
CTERA Agent for Windows User Guide
Using the CTERA Agent in Cloud Agent Mode
5
The Cloud Drive tab opens.
3 Navigate to the portal folder you selected in Selecting Cloud Folders for Synchronization
(on page 91).
4 Manage the files as desired.
Configuring Event Log Settings
You can configure settings for the CTERA appliance Event Log, including log storage and the
log level to display.
To configure Event Log settings
1 Do one of the following:
In the navigation pane, click Advanced > Log Settings.
When viewing any log category, click Settings.
See Viewing Logs (on page 97).
CTERA Agent for Windows User Guide
95
5
Using the CTERA Agent in Cloud Agent Mode
The Log Settings page appears.
2 Complete the fields using the information in the following table.
3 Click Save.
Table 9: Log Settings Fields
In this field...
Do this...
Log Level
Select the minimum log level to display in the CTERA appliance Web
interface.
For example, if you select Critical, then only Alert, Critical, and
Emergency logs will appear in the CTERA appliance Web interface.
The default value is Info.
Cloud Backup Log Level
CTERA appliance automatically logs all backup and restore
operations. Specify whether CTERA appliance should display
additional information about files that are backed up and restored,
by selecting one of the following:
Log Every File. Provide additional information about all backed
up and restored files.
Log Errors Only. Only provide additional information about files
for which errors occurred during backup and restore operations.
No Logging. Do not provide additional information about backed
up and restored files.
The additional information includes file name, deduplication ratio,
and more. See Viewing Backup Logs (see "Viewing Cloud Backup
Logs" on page 98).
The default level is Log Errors Only.
96
CTERA Agent for Windows User Guide
Using the CTERA Agent in Cloud Agent Mode
5
Viewing Logs
The CTERA appliance Event Log includes the following log categories:
Table 10: Log Categories
This log category...
Displays...
System
General CTERA Agent events, including connecting to the CTERA
Portal, disconnecting from the CTERA Portal, and so on
Cloud Backup
Events related to cloud backup or restore operations
Cloud Sync
Events related to cloud drive synchronization operations
Access
Events related to user access to the CTERA Agent Web interface
Audit
Changes to the CTERA Agent configuration
Viewing System Logs
To view System logs
In the navigation pane, click Advanced > Log Viewer.
The Log Viewer page appears displaying the system logs.
Tip
If the Log Viewer is already open and a different log category is displayed, in the
Select Topic drop-down list, select System.
The following information is displayed:
CTERA Agent for Windows User Guide
97
5
Using the CTERA Agent in Cloud Agent Mode
Table 11: System Log Fields
This field...
Displays...
Type
An icon indicating the log level. See Log Levels (page 98).
Date
The date and time at which the event occurred.
User
The user who triggered the event.
Details
A description of the event.
More Info
Additional information about the event.
Table 12: Log Levels
Icon
Log Level
Emergency
Alert
Critical
Error
Warning
Notice
Info
Debug
Viewing Cloud Backup Logs
To view Cloud Backup logs
1 Do one of the following:
To access Cloud Backup logs from the Cloud Backup Control Panel page, click History.
To access Cloud Backup logs from the Log Viewer:
1 In the navigation pane, click Advanced > Log Viewer.
The Log Viewer page appears.
2 In the Select Topic drop-down list, select Cloud Backup.
98
CTERA Agent for Windows User Guide
Using the CTERA Agent in Cloud Agent Mode
5
The Cloud Backup logs appear. For information on the displayed fields, see the following
tables.
Tip
By default, the lower pane will appear displaying all files for which an error
occurred during backup. However, if you disabled additional logging for backup
operations, the lower pane will not appear. For information on configuring the
logging level, see Configuring Event Log Settings (on page 95).
2 To view additional logging information for a backup operation, click on the desired
operation in the upper pane.
Information about files included in the backup operation appears in the lower pane.
CTERA Agent for Windows User Guide
99
5
Using the CTERA Agent in Cloud Agent Mode
Table 13: Cloud Backup Log Upper Pane Fields
This field...
Displays...
Type
An icon indicating the log level. See Log Levels (page 98).
Start Time
The date and time at which the backup operation started.
Mode
The operation mode, Backup or Restore.
Type
The type of backup, Manual or Scheduled.
Duration
The amount of time the backup operation took.
Result
The result of the backup operation.
Files
The number of files to be backed up.
Size
The total size of the files to be backed up.
Transferred Files
The number of files transferred to cloud storage during the backup
operation.
Transferred Size
The size of the files transferred to cloud storage during the backup
operation.
Changed Files
The number of files that changed since the last backup operation.
Changed Size
The total size of the files that changed since the last backup
operation.
More Info
Additional information about the event.
Table 14: Cloud Backup Log Lower Pane Fields
100
This field...
Displays...
Type
An icon indicating whether backup was successful (
Operation
The operation performed (create, delete, modify, or rename).
File Name
The name of the backed up file.
Path
The path to the backed up file.
Duration
The amount of time backup took for the file.
Size
The size of the file.
Transferred Size
The size of the file transferred to cloud storage.
Dedup Ratio
The deduplication ratio for the file.
Result
The result of the backup operation.
More Info
Additional information about the event.
) or not (
).
CTERA Agent for Windows User Guide
Using the CTERA Agent in Cloud Agent Mode
5
Viewing Cloud Sync Logs
To view Cloud Sync logs
1 In the navigation pane, click Advanced > Log Viewer.
The Log Viewer page appears.
2 In the Select Topic drop-down list, select Cloud Sync.
The Cloud Sync logs appear.
The following information is displayed:
CTERA Agent for Windows User Guide
101
5
Using the CTERA Agent in Cloud Agent Mode
Table 15: Cloud Sync Log Fields
This field...
Displays...
Type
An icon indicating the log level. See Log Levels (page 98).
Operation
The synchronization operation performed:
New. A new file or directory was created.
Updated. A file or directory was updated.
Direction
The synchronization operation's direction:
In. From the cloud drive to the local drive.
Out. From the local drive to the cloud drive.
File Name
The name of the file transferred during the synchronization
operation.
Path
The path to the file transferred during the synchronization operation.
Start Time
The date and time at which the synchronization operation started.
Duration
The amount of time the synchronization operation took.
Size
The size of the synchronized file.
Transferred Size
The actual amount of data transferred.
Dedup Ratio
The deduplication ratio for the file transferred during the
synchronization operation.
Result
The result of the synchronization operation.
More Info
Additional information about the event.
Viewing Access Logs
To view Access logs
1 In the navigation pane, click Advanced > Log Viewer.
The Log Viewer page appears.
2 In the Select Topic drop-down list, select Access.
102
CTERA Agent for Windows User Guide
Using the CTERA Agent in Cloud Agent Mode
5
The Access logs appear.
The following information is displayed:
Table 16: Access Log Fields
This field...
Displays...
Type
An icon indicating the log level. See Log Levels (page 98).
Date
The date and time at which the event occurred.
User
The user that triggered the event.
Protocol
The protocol used when triggering the event:
GUI
CIFS (Windows File Sharing)
AFP
FTP
NFS
RSync
CTERA Agent
WebDAV
Details
A description of the event.
Client IP
The IP address from which the user triggered the event.
More Info
Additional information about the event.
CTERA Agent for Windows User Guide
103
5
Using the CTERA Agent in Cloud Agent Mode
Viewing Audit Logs
To view Audit logs
1 In the navigation pane, click Advanced > Log Viewer.
The Log Viewer page appears.
2 In the Select Topic drop-down list, select Audit.
The Audit logs appear.
The following information is displayed:
Table 17: Audit Log Fields
This field...
Displays...
Action
The action type. See Audit Log Action Types (page 105).
Date
The date and time at which the event occurred.
User
The user who performed the action.
Type
The type of setting that was affected by the action.
For example, if user JohnS was deleted, this column displays
"Users".
Target
The object that was affected by the action.
For example, if user JohnS was deleted, this column displays
"JohnS".
More Info
104
Additional information about the event.
CTERA Agent for Windows User Guide
Using the CTERA Agent in Cloud Agent Mode
5
Table 18: Action Types
Icon
Label
Description
Added
An object was added to the CTERA appliance Web interface.
Deleted
An object was deleted from the CTERA appliance Web
interface.
Modified
An object was modified.
Formatted
A disk was formatted.
Expanded
An array was enlarged.
Disabled
A setting was disabled.
Enabled
A setting was enabled.
Filtering Logs
In any log category, you can filter the logs so that only those with a certain minimum log level
are displayed.
Tip
For information on configuring the default minimum log level to display in all log
pages, see Configuring Event Log Settings (on page 95).
To filter logs in a log category
1 View the desired log category.
See Viewing Logs (on page 97).
2 In the Minimum Severity drop-down list, select the minimum log level to display in this
category.
For example, if you select Critical, then only Alert, Critical, and Emergency logs will be
displayed.
The logs are filtered accordingly.
Clearing Logs
You can clear logs for any log category.
To clear logs for a log category
1 View the desired log category.
See Viewing Logs (on page 97).
2 Click Clear.
CTERA Agent for Windows User Guide
105
5
Using the CTERA Agent in Cloud Agent Mode
A confirmation message appears.
3 Click Yes.
The logs in this category are cleared.
Exporting Logs
You can export logs in any category to a Comma-Separated Values (*.csv) file on your
computer, which you can view in Microsoft Excel as a worksheet.
To export logs in a log category
1 View the desired log category.
See Viewing Logs (on page 97).
2 Click Export to Excel.
The logs are exported.
Configuring Windows Explorer Integration Settings
To configure Windows Explorer integration settings
1 In the navigation pane, click Advanced > Explorer Integration.
The Windows Explorer Integration page appears.
2 Complete the fields using the information in CTERA Agent Explorer Integration Fields
(page 38).
3 Click Save.
106
CTERA Agent for Windows User Guide
Using the CTERA Agent in Cloud Agent Mode
5
Configuring the CTERA Agent Language
You can configure the language to be displayed in the CTERA Agent's interface.
The following languages are supported: English, French, German, Hebrew, Italian, Polish, and
Spanish.
To configure the CTERA Agent language
1 In the navigation pane, click Advanced > Regional Settings.
The Regional Settings page appears, displaying the date, time, and time zone currently
configured on the CTERA Agent.
2 Click Change Language.
The Set Interface Language dialog box appears.
3 In the Interface Language drop-down list, select your language.
4 Click Save.
Selecting Files and Folders for Backup
Tip
Files and folders can also be selected for backup via the CTERA Agent Web
interface. See Selecting Files and Folders for Cloud Backup (on page 66).
To select files and folders for file-level backup
1 Open Windows Explorer, and browse to the desired files and/or folders.
CTERA Agent for Windows User Guide
107
5
Using the CTERA Agent in Cloud Agent Mode
2 Do any of the following:
To specify that a file or folder should be backed up to the CTERA Portal, right-click on
the desired file/folder, and click CTERA Agent > Add to backup.
To specify that a file or folder should not be backed up to the CTERA Portal, right-click
on the desired file/folder, and click CTERA Agent > Remove from backup.
The
icon is removed from the file/folder.
Manually Starting Backup
The CTERA Agent will automatically back up files, applications, and volumes to the CTERA
Portal according to the schedule you configured in the CTERA Agent Web interface (see
Scheduling Automatic Cloud Backup (on page 80)). If desired, you can manually trigger
backup at any time.
Tip
Backup can also be manually started via the CTERA Agent Web interface. See
Manually Starting Cloud Backup (on page 83).
To manually start backup
1 Click the CTERA Agent tray icon in the notification area of the Windows taskbar.
The CTERA Agent screen appears.
2 Next to the desired backup type, click Backup now.
A progress bar appears, and the number of files and bytes remaining for local back up are
displayed.
The CTERA Agent backs up files to the CTERA Portal.
108
CTERA Agent for Windows User Guide
Using the CTERA Agent in Cloud Agent Mode
5
Stopping the Current Backup Operation
Tip
Backup can also be stopped via the CTERA Agent Web interface. See Cancelling
the Current Cloud Backup (see "Canceling the Current Cloud Backup" on page
78).
To stop the current backup operation
1 Click the CTERA Agent tray icon in the notification area of the Windows taskbar.
The CTERA Agent screen appears with a progress bar.
2 Click Cancel.
The current backup operation is stopped.
Suspending and Resuming Backup
You can suspend backup for a CTERA Agent, including:
The currently running backup for the CTERA Agent
All scheduled automatic backups for the CTERA Agent
Tip
Backup can also be suspended and resumed via the CTERA Agent Web interface.
See Suspending the Cloud Backup Service (on page 78) and Resuming the Cloud
Backup Service (on page 79).
To suspend backup
Right-click the CTERA Agent tray icon in the notification area of the Windows taskbar, and
click Suspend.
If backup is currently running, it is paused. All future automatic backups for the CTERA
Agent are suspended.
To resume backup
Right-click the CTERA Agent tray icon in the notification area of the Windows taskbar, and
click Unsuspend.
Backup resumes.
Viewing the Agent Status
To view the CTERA Agent's status
Click the CTERA Agent tray icon in the notification area of the Windows taskbar.
CTERA Agent for Windows User Guide
109
5
Using the CTERA Agent in Cloud Agent Mode
The CTERA Agent screen appears.
The screen is composed of the following parts:
Main frame. Displays the available types of backup, along with controls for
performing these backups and restoring from the created backup files. Under each
type of backup, the amount of time since the last backup is displayed, as well as an
indication of whether the backup was successful. Mousing over the backup result
displays a tooltip with additional details about the backup.
Status bar. Displays the amount of time remaining until the next automatic backup,
followed by username@portal, where username is your username for accessing
the CTERA Portal and portal is the name of the CTERA Portal to which the CTERA
Agent is currently connected. The
icon indicates that the CTERA Agent is in Cloud
Agent mode.
Viewing Agent Details
You can view CTERA Agent details, including its version, the operating system on which it is
installed, and copyright information.
To view CTERA Agent details
1 Right-click the CTERA Agent tray icon in the notification area of the Windows taskbar, and
click About.
110
CTERA Agent for Windows User Guide
Using the CTERA Agent in Cloud Agent Mode
5
The About CTERA Agent screen appears.
2 To view the end user license agreement and services agreement, click Legal Information.
3 To close the window, click OK.
Disconnecting the Agent from the CTERA Portal
If desired, you can disconnect the CTERA Agent from the CTERA Portal.
To disconnect the CTERA Agent from the CTERA Portal
1 Right-click the CTERA Agent tray icon in the notification area of the Windows taskbar, and
click Sign out.
A confirmation message appears.
2 Click OK.
The CTERA Agent disconnects from the CTERA Portal.
Restoring Files from Cloud Backup
Restoring Files and Folders from the Cloud Backup Control Panel
You can restore individual files or folders that were backed up to cloud storage. Alternatively,
you can simultaneously restore all backed up files and folders, in order to roll back your disk
contents to a previous point in time.
Note that if the same files already exist on your computer, they will be overwritten with the
files you selected for restoration. Files that have been deleted since the date of the selected
files will be recreated. Files that exist on your computer, but which do not exist in cloud
storage or were not selected for restoration, will not be affected.
To restore files, the CTERA Agent must be connected to the CTERA Portal.
To restore backed up files from the Cloud Backup Control Panel
1 In the navigation pane, click Main > Cloud Backup.
The Cloud Backup Control Panel page appears.
CTERA Agent for Windows User Guide
111
5
Using the CTERA Agent in Cloud Agent Mode
2 Click Restore.
The Restore Files Wizard opens, displaying the Select Files to Restore dialog box.
3 In the Snapshot drop-down list, select the date and time of the snapshot from which you
want to restore files.
4 Specify which files and folders you want to restore, by doing any of the following:
To select individual files and folders:
1 In the left pane, expand the nodes and click on the desired folders.
The folder contents appear in the right pane.
2 Select the check boxes next to the desired folders and files.
For an explanation of the icons and check boxes next to each folder, see Folder
Icons (page 36).
To select all files, click Select All.
To un-select all files, click Clear All.
5 If you want to restore files to a location other than the original location:
112
CTERA Agent for Windows User Guide
Using the CTERA Agent in Cloud Agent Mode
5
a Click in the Restore to Folder field. The Folder Browser dialog box appears.
b Select the folder to which you would like to restore the files.
c Click Close.
6 Click Next.
The Restore Files dialog box appears.
7 Specify how the CTERA appliance should handle files that exist both on your drive and in
the selected backup, by doing one of the following:
To specify that the files on your drive should be overwritten by the files in the backup,
choose Overwrite the destination file.
To specify that the files on your drive should have the modification date appended to
their name, choose Append modification date to the file name.
8 Click Next.
CTERA Agent for Windows User Guide
113
5
Using the CTERA Agent in Cloud Agent Mode
The Wizard Completed screen appears.
9 Click Finish.
A progress bar appears, and the files are restored form the selected backup.
10 To toggle the information displayed under the progress bar, do one of the following:
To display the effective throughput (in Kbit/sec), click the
Show effective throughput.
To display the bandwidth usage (in bit/sec), click the
bandwidth usage.
114
icon, and then click
icon, and then click Show
CTERA Agent for Windows User Guide
Using the CTERA Agent in Cloud Agent Mode
5
Canceling the Current Restore Process
When restoring files from the Cloud Backup Control Panel, you can cancel a running file
restore process.
To cancel the current restore process
1 In the navigation pane, click Main > Cloud Backup.
The Cloud Backup Control Panel page appears.
2 Click Cancel.
The current restore process is canceled.
Accessing the Cloud Drive Folder
If you are subscribed to the Cloud Drive service, your cloud drive will automatically be
mapped as a network drive. You can access the cloud drive and its contents using the
following procedure.
To access the cloud drive
Do one of the following:
Click the CTERA Agent tray icon in the notification area of the Windows taskbar, and
click Open Folder in the CTERA Agent screen.
Right-click the CTERA Agent tray icon in the notification area of the Windows taskbar,
and click Cloud Drive.
Double-click on the Cloud Drive shortcut on your desktop
.
Windows Explorer opens displaying the contents of the cloud drive.
CTERA Agent for Windows User Guide
115
5
Using the CTERA Agent in Cloud Agent Mode
Each file is marked with an icon indicating its current synchronization status. Files that are
in sync are marked with the
marked with the
icon, and files that are currently synchronizing are
icon.
Browsing the Cloud Drive Folder Online
You can browse the contents of your cloud drive folder online.
To browse a cloud drive folder online
1 Access the cloud drive folder.
See Accessing the Cloud Drive Folder (on page 115).
2 Right-click anywhere in the cloud drive folder, and click CTERA Agent > Browse folder
online.
The CTERA Portal opens in your browser displaying the Cloud Drive tab and the contents
of the cloud drive folder.
Collaborating on Projects
You can easily share files and folders with fellow workers, by defining collaboration projects.
When connected to a portal for which project collaboration is enabled, you can create a
project and invite co-workers to join the project as project members. Project members
receive an email notification inviting them to collaborate on the project. They can then view
files in the project and/or add files and folders to the project, depending on their
permissions.
116
CTERA Agent for Windows User Guide
Using the CTERA Agent in Cloud Agent Mode
5
Creating Projects
To create a collaboration project
1 Browse the cloud drive folder online.
See Browsing the Cloud Drive Folder Online (on page 116).
2 Navigate to the projects share.
3 Click New Project.
The Collaboration Project Details dialog box opens.
4 In the Project Name field, type a name for the project.
5 (Optional) In the Description field, type a description of the project.
6 Specify the project owner, by doing the following in the Owner area:
a In the Local Users drop-down list, select one of the following:
Local Users. Search the user accounts defined locally on the CTERA appliance.
Domain domain Users. Search the user accounts belonging to the domain called
domain.
b In the Quick Search field, type a string that appears anywhere within the name of the
user account you want to add, then click
CTERA Agent for Windows User Guide
.
117
5
Using the CTERA Agent in Cloud Agent Mode
A table of user accounts matching the search string appears.
c Select the desired user account in the table.
The user account appears in the Quick Search field.
7 In the Group field, select the folder group whose contents should be included in the
collaboration project.
8 To make the project appear directly under the cloud drive's root folder, instead of
appearing under the projects folder, check the Quick Access box. (This requires an
administrator user role.)
9 To add a project member, do the following in the Project Members area:
a In the Local Users drop-down list, select one of the following:
Local Users. Search the user accounts defined locally on the CTERA appliance.
Domain domain Users. Search the user accounts belonging to the domain called
domain.
Local Groups. Search the user groups defined locally on the CTERA appliance.
Domain domain Groups. Search the user groups belonging to the domain called
domain.
b In the Quick Search field, type a string that appears anywhere within the name of the
user account or user group you want to add, then click
118
.
CTERA Agent for Windows User Guide
Using the CTERA Agent in Cloud Agent Mode
5
A table of user accounts or user groups matching the search string appears.
c Select the desired user account or user group in the table.
The user account or user group appears in the Quick Search field.
d Click Add.
The user account or user group appears in the Project Member list.
10 In the project member's row, click the Permission field, and do one of the following:
To specify that the member should be able to add, edit, and delete files and folders in
this project, select Read/Write.
To specify that the member should only be able to view files and folders in this
project, select Read Only.
11 To specify an expiration date for a member, do the following:
a In the project member's row, click the Expiration field, and then click
.
A calendar appears.
b Select the date on which the member's access should end.
The Expiration column is updated accordingly.
12 To delete a project member, click
in the desired project member's row.
13 Click Save.
CTERA Agent for Windows User Guide
119
5
Using the CTERA Agent in Cloud Agent Mode
The project is added to the project share.
If the mail server is set up, and email addresses are defined for the users you added as
project members, the CTERA appliance will send email notifications to the new project
members, inviting them to collaborate on the project.
Editing Projects
To create a collaboration project
1 Browse the cloud drive folder online.
See Browsing the Cloud Drive Folder Online (on page 116).
2 Navigate to the projects share.
3 Select the project and click Manage Project.
The Collaboration Project Details dialog box opens.
4 In the Project Name field, type a name for the project.
5 (Optional) In the Description field, type a description of the project.
6 To add a project member, do the following:
a In the Local Users drop-down list, select one of the following:
Local Users. Search the users defined locally on the CTERA appliance.
Domain domain Users. Search the users belonging to the domain called domain.
Local Groups. Search the user groups defined locally on the CTERA appliance.
Domain domain Groups. Search the user groups belonging to the domain called
domain.
b In the Quick Search field, type a string that appears anywhere within the name of the
user or user group you want to add, then click
.
A table of users or user groups matching the search string appears.
c Select the desired user or user group in the table.
The user or user group appears in the Quick Search field.
d Click Add.
The user or user group appears in the Project Member list.
7 In the project member's row, click the Permission field, and do one of the following:
To specify that the member should be able to add, edit, and delete files and folders in
this project, select Read/Write.
120
CTERA Agent for Windows User Guide
Using the CTERA Agent in Cloud Agent Mode
5
To specify that the member should only be able to view files and folders in this
project, select Read Only.
To specify that the member should bot be able to view files and folders in this project,
select None.
8 To delete a project member, click
in the desired project member's row.
9 Click Save.
The project is added to the project share.
If the mail server is set up, and email addresses are defined for the users you added as
project members, the CTERA appliance will send email notifications to the new project
members, inviting them to collaborate on the project.
Deleting Projects
To delete a collaboration project
1 Browse the cloud drive folder online.
See Browsing the Cloud Drive Folder Online (on page 116).
2 Navigate to the projects share.
3 Select the project.
4 Click Actions, and then click Delete.
A confirmation message appears.
5 Click Yes.
The project is deleted.
Sharing Files with Guest Invitations
You can share files and folders in your cloud drive folder with other people, both inside and
outside your network, by sending them a guest invitation for the desired files/folders.
The guest invitation includes a URL. The URL contains a special code, which when clicked
allows the invitee to view or edit the files/folders from anywhere, using a Web-based file
manager. Upon clicking the URL or path, invitation recipients are granted read-only or
read-write access to the shared files/folders.
Sending Guest Invitations
To send a guest invitation for a file or folder
1 Access the cloud drive folder.
CTERA Agent for Windows User Guide
121
5
Using the CTERA Agent in Cloud Agent Mode
See Accessing the Cloud Drive Folder (on page 115).
2 Right-click in the desired folder or a file/folder in it, and click CTERA Agent > Invite guest.
The CTERA Portal opens in your browser displaying the Cloud Drive tab.
The Invite Guest dialog box opens.
3 Do one of the following:
To grant the invitation recipient read-only access to the file/folder, choose Invite
viewer.
To grant the invitation recipient read-write access to the file/folder, choose Invite
collaborator.
4 Click Invite.
The Send Invitation dialog box appears with the content of the guest invitation.
5 Click Send by mail.
Your email client opens a new message containing the invitation.
122
CTERA Agent for Windows User Guide
Using the CTERA Agent in Cloud Agent Mode
5
6 In the To field, fill in the email address of the person with whom you want to share the
file/folder.
7 Click Send.
8 In the Send Invitation dialog box, click Close.
Viewing Active Guest Invitations
To view active guest invitations
1 Browse the cloud drive folder online.
See Browsing the Cloud Drive Folder Online (on page 116).
2 Click My Invitations.
The My Invitations window opens.
For each invitation the information in the following table is displayed.
3 To view an individual invitation, select the desired invitation, and then click View
Invitation.
The Send Invitation dialog box opens displaying the invitation.
4 Click Close.
CTERA Agent for Windows User Guide
123
5
Using the CTERA Agent in Cloud Agent Mode
Table 19: Active Guest Invitations Information
This field...
Displays...
User
The name of the user who sent the guest invitation.
This field only appears when viewing all guest invitations in the
system.
Expires On
The date on which the guest invitation expires.
Path
The path to the shared file/folder on the CTERA appliance.
Access
The type of access granted to the invitation recipient (Read Only or
Read/Write).
Deleting Active Guest Invitations
To delete an active guest invitation
1 Browse the cloud drive folder online.
See Browsing the Cloud Drive Folder Online (on page 116).
2 Click My Invitations.
The My Invitations window opens.
3 Select the desired invitation, and then click Delete.
A confirmation message appears.
4 Click Yes.
The guest invitation is deleted.
5 Click Close.
124
CTERA Agent for Windows User Guide
6
Restoring System State Data,
NTDS, and SYSVOL
This chapter explains how to restore a server's system state data, NTDS (Active Directory),
and SYSVOL.
In This Chapter
Restoring from a System State Backup on Windows 2003 Server SP2 ------------------------------ 125
Restoring NTDS (Active Directory) and SYSVOL Applications on Windows 2003 / 2008 Server129
Restoring from a System State Backup on Windows 2003 Server
SP2
This procedure restores a server's system state data, including the following:
The computer name
IP address
Registry
COM+ Class Registration database
Files under Windows File Protection
Tip
Depending on the server’s configuration, the system state data may include the
following, as well:
The Certificate Services database, if the server is a certificate server
Active Directory directory service, if the server is a domain controller
The SYSVOL directory, if the server is a domain controller
Cluster service information, if the server is part of a cluster
IIS Metadirectory, if the ISS is installed
Any other role which was previously installed and is not listed above must be
manually installed, for example roles such as DNS, DHCP, and so on.
To prepare for system state restoration
1 Install the following on your computer:
Windows 2003 Server SP2
CTERA Agent for Windows User Guide
125
6
Restoring System State Data, NTDS, and SYSVOL
CTERA Agent
2 Obtain the system state backup file, by doing one of the following:
In Appliance mode, do the following:
1 Connect the CTERA Agent to the CTERA appliance.
See Connecting the Agent to a CTERA Appliance.
2 Restore the system state backup file from the CTERA appliance to your computer.
See your CTERA appliance's user guide, Restoring Files from File-Level Backup (on
page 41).
In Cloud Agent mode, do the following:
1 Connect the CTERA Agent to the CTERA Portal.
See Connecting the Agent to the CTERA Portal.
2 Ask the portal administrator to associate the old CTERA Agent's backup folder
with your new CTERA Agent.
3 Restore the system state backup file from the CTERA Portal to your computer.
See your CTERA appliance's user guide, Restoring Files and Folders from the Cloud
Backup Control Panel (on page 111).
To restore from a system state backup
1 Restart the computer.
2 Press the F8 key.
The boot menu appears.
3 Choose Directory Services Restore Mode (Domain Controllers Only).
4 Login using the local administrator account.
5 In the START menu, click Programs > Accessories > System Tools > Backup.
126
CTERA Agent for Windows User Guide
Restoring System State Data, NTDS, and SYSVOL
6
The Backup or Restore Wizard opens.
6 Click Next.
The Backup or Restore dialog box appears.
7 Choose Restore files and settings.
8 Click Next.
CTERA Agent for Windows User Guide
127
6
Restoring System State Data, NTDS, and SYSVOL
The What to Restore dialog box appears.
9 Click Browse, and browse to the system state backup file.
The file appears in the Items to restore pane.
10 In the Items to restore pane, select System State.
11 Click Next.
The Completing the Backup or Restore dialog box appears.
12 Click Finish.
128
CTERA Agent for Windows User Guide
Restoring System State Data, NTDS, and SYSVOL
6
The Restore Progress window opens and tracks the progress of system state restoration.
13 Once restoration is complete, click Close.
A message appears asking whether you want to restart the computer.
14 Click Yes.
15 Allow the computer to boot normally, and log in with the domain administrator account.
Once Windows has finished starting up, a message appears asking whether you want to
restart the computer.
16 Click Yes.
Restoring NTDS (Active Directory) and SYSVOL Applications on
Windows 2003 / 2008 Server
The following procedure can be used to restore NTDS (Active Directory), SYSVOL, or both
simultaneously, to the same server.
To restore NTDS and/or SYSVOL in Appliance mode
1 Restart the computer.
2 Press the F8 key.
The boot menu appears.
3 Choose Directory Services Restore Mode (Domain Controllers Only).
4 Do one of the following:
In Windows 2003 Server, log in using the restore mode administrator account.
CTERA Agent for Windows User Guide
129
6
Restoring System State Data, NTDS, and SYSVOL
In Windows 2008 Server, log in using the local administrator account, by specifying
the following user name: <ComputerName>\Administrator.
5 Right-click on the CTERA Agent tray icon in the notification area of the Windows taskbar,
and click Restore.
The CTERA Agent Manager opens displaying the Restore tab.
6 Next to the desired snapshot, click Restore.
The Restore Files from Backup dialog box opens.
7 Select the NTDS and/or SYSVOL folder(s).
130
CTERA Agent for Windows User Guide
Restoring System State Data, NTDS, and SYSVOL
6
8 Click Next.
The Restore In Progress screen appears with a progress bar.
9 Click Finish.
10 Restart the computer and allow it to boot normally.
To restore NTDS and/or SYSVOL in Cloud Agent mode
1 Restart the computer.
2 Press the F8 key.
The boot menu appears.
3 Choose Directory Services Restore Mode (Domain Controllers Only).
4 Do one of the following:
In Windows 2003 Server, log in using the restore mode administrator account.
In Windows 2008 Server, log in using the local administrator account, by specifying
the following user name: <ComputerName>\Administrator.
5 Right-click on the CTERA Agent tray icon in the notification area of the Windows taskbar,
and click Restore.
CTERA Agent for Windows User Guide
131
6
Restoring System State Data, NTDS, and SYSVOL
The Restore Files Wizard opens displaying the Select Files to Restore dialog box.
6 Select the NTDS and/or SYSVOL folder(s).
7 Click Next.
The Restore Files dialog box appears.
8 Choose Overwrite the destination file.
9 Click Next.
132
CTERA Agent for Windows User Guide
Restoring System State Data, NTDS, and SYSVOL
6
The Wizard Completed screen appears.
10 Click Finish.
11 Restart the computer and allow it to boot normally.
CTERA Agent for Windows User Guide
133
7
Using Pre/Post Backup Scripts
CTERA Agent includes pre-backup and post-backup scripts, which are shell scripts that are
executed before and after the backup, respectively. You can use these scripts to perform
necessary actions before the backup (for example, dumping a database to a file) and after the
backup (for example, deleting temporary files that were created by the pre-backup script).
Tip
The scripts are supported both in Cloud Agent mode and Appliance mode.
The scripts return an exit code of 0 for success or any other value for failure. Upon failure, the
pre-backup script's output is automatically saved to C:\ProgramData\CTERA\CTERA
Agent\pre-backup.log, and the post-back script's output is automatically saved to
C:\ProgramData\CTERA\CTERA Agent\post-backup.log.
Tip
The pre-backup and post-backup scripts are executed or terminated as follows:
If the pre-backup script fails, the backup process does not run, and the
post-backup script is executed immediately.
The post-backup script is executed regardless of whether the pre-backup
script succeeded or failed.
If the user cancels backup, both the pre-backup and post-backup scripts will
still run to completion.
If a script runs longer than 20 minutes, an error is considered to have
occurred, and the script is terminated.
To use the pre-backup or post-backup script
1 Open the desired script in any text editor.
The location of the pre-backup script is: C:\ProgramData\CTERA\CTERA
Agent\pre-backup.cmd
The location of the post-backup script is: C:\ProgramData\CTERA\CTERA
Agent\post-backup.cmd
2 Edit the script as desired.
Here is an example of a pre-backup script:
‘* Prepare for backup here…
CTERA Agent for Windows User Guide
135
7
Using Pre/Post Backup Scripts
C:\MyDatabase\dump-database > c:\backup-files\db-dump.txt
‘* This script returns success result code
exit 0
Here is an example of a post-backup script:
‘* Clean up
del c:\backup-files\db-dump.txt
‘* This script returns success result code
exit 0
3 Save the script.
136
CTERA Agent for Windows User Guide
8
Legal Information
This chapter contains important legal information about your CTERA products.
In This Chapter
CTERA End User License Agreement ------------------------------------------------------------------------- 137
GNU GENERAL PUBLIC LICENSE ------------------------------------------------------------------------------- 141
GNU GENERAL PUBLIC LICENSE 3 ----------------------------------------------------------------------------- 144
Apache License ---------------------------------------------------------------------------------------------------- 151
CTERA End User License Agreement
This End User License Agreement (the "Agreement") by and between the individual installing and/or using the Software (as such
term is defined below) and any legal entity on whose behalf such individual is acting (collectively, "You" or "you") and CTERA
Networks Ltd. ("CTERA"), governs Your use of the object code format of (i) any software or firmware program embedded or
included in any hardware product supplied by CTERA or its authorized partners, and (ii) any software program supplied by CTERA
or its authorized partners; and (iii) all accompanying manuals and other documentation, and all enhancements, upgrades, and
extensions thereto that may be provided by CTERA or its authorized partners to You from time to time, unless otherwise
indicated by CTERA (the "Software").
PLEASE NOTE: BY DOWNLOADING, INSTALLING, COPYING, ACCESSING, OR USING THE SOFTWARE, OR BY CHOOSING THE "I
ACCEPT" OPTION LOCATED ON OR ADJACENT TO THE SCREEN WHERE THIS AGREEMENT MAY BE DISPLAYED, YOU INDICATE
YOUR ACKNOWLEDGMENT THAT YOU HAVE READ THIS AGREEMENT AND AGREE TO BE BOUND BY AND COMPLY WITH ITS
TERMS. YOUR WRITTEN APPROVAL IS NOT REQUIRED FOR THE VALIDITY OR ENFORCEABILITY OF THIS AGREEMENT. IF YOU ARE
ACCEPTING THESE TERMS ON BEHALF OF ANOTHER PERSON OR A COMPANY OR OTHER LEGAL ENTITY, YOU REPRESENT AND
WARRANT THAT YOU HAVE FULL AUTHORITY TO BIND THAT PERSON, COMPANY, OR LEGAL ENTITY TO THESE SOFTWARE
LICENSE TERMS. IF YOU DO NOT AGREE TO THESE SOFTWARE LICENSE TERMS, DO NOT DOWNLOAD, INSTALL, COPY, ACCESS, OR
USE THE SOFTWARE AND PROMPTLY RETURN THE SOFTWARE, INCLUDING ALL PACKAGING, MEDIA, DOCUMENTATION, AND
PROOF OF PAYMENT, TO THE PARTY FROM WHOM IT WAS OBTAINED FOR A REFUND OF THE AMOUNT PAID, PROVIDED THAT
THE RETURN IS MADE WITHIN TEN (10) DAYS OF THE DATE OF PURCHASE.
1. License to Use Software
1.1 Subject to proper payment to CTERA and Your compliance with the terms and conditions of this Agreement, CTERA hereby
grants You a non-exclusive, non-sublicensable, non-transferable license to install and use the Software, solely for Your internal
business needs, in accordance with the terms set forth in this Agreement and subject to any further restrictions in CTERA
documentation, and solely on the CTERA appliance on which CTERA installed the Software, or, for stand-alone Software, solely
on a single computer running a validly licensed copy of the operating system for which the Software was designed. You agree
that, except for the limited, specific license rights granted in this section 1, You receive no license rights to the Software.
CTERA Agent for Windows User Guide
137
8
Legal Information
1.2 Unless otherwise authorized in writing by CTERA and to the extent otherwise provided in the applicable license for Free
Programs (as defined below), You undertake not to (and not to allow third parties to) (1) sublicense, lease, rent, loan, or
otherwise transfer the Software to any third party, (2) decompile, disassemble, decrypt, extract or otherwise reverse engineer or
attempt to reconstruct or discover any source code of, or any underlying ideas in, the Software ("Reverse Engineering"), , (3)
modify, enhance, supplement, adapt, or prepare derivative works from the Software, (4) allow others to use the Software and
use the Software for the benefit of third parties, (5) develop any other product containing any of the concepts and ideas
contained in the Software, (6) remove, obscure, or alter CTERA's or any third party's trademarks or copyright or other
proprietary rights notices affixed to or contained within or accessed in conjunction with or through the Software, and (7) make
unauthorized copies of the Software (except as necessary for backup purposes). If, notwithstanding the prohibition set forth in
subsection (2) above, applicable law permits Reverse Engineering, You will, before commencing or permitting any Reverse
Engineering (A) inform CTERA of the planned Reverse Engineering, (B) conduct or allow such Reverse Engineering only to achieve
interoperability between the Software and other computer programs, (C) request from CTERA the information necessary to
achieve such interoperability, (D) provide CTERA ample opportunity to supply the information necessary to achieve
interoperability.
1.3 CTERA has no obligation to provide support, maintenance, upgrades, modifications, or new releases of the Software under
this Agreement. You may contact CTERA or its authorized resellers to determine the availability of such support, maintenance,
distribution or upgrade of the Software, and the fees, terms and conditions applicable thereto.
2. Intellectual Property
2.1 You acknowledge that CTERA or other third parties own all right, title and interest, including all intellectual property rights, in
and to the Software, portions thereof, or software or content provided through or in conjunction with the Software. Except for
the license granted in accordance with Section 1
of this Agreement, all rights in and to the Software are reserved, no licenses,
implied or otherwise, are granted by CTERA, You are not authorized to use CTERA’s trademarks, service marks, or trade dress,
and You agree not to display or use them in any manner.
2.2 If You have comments on the Software or ideas on how to improve it, please contact us. By doing so, You also grant CTERA a
perpetual, royalty-free, irrevocable, transferable license, with right of sublicense, to use and incorporate Your ideas or comments
into the Software (or third party software, content, or services), and to otherwise exploit Your ideas and comments, in each case
without payment of any compensation.
3. GPL License
The Software makes use of free and open source programs (the "Free Programs"), licensed under the following license
agreements: GNU General Public License (GPL), version 2 or later: www.gnu.org/ licenses/gpl.html, GNU Lesser General Public
License (LGPL), version 2.1 or later: www.gnu.org/ licenses/lgpl.html, Apache License, Version 2.0 or later:
www.apache.org/licenses/LICENSE-2.0. It is Your responsibility to review and adhere to all licenses to Free Programs.
Notwithstanding anything to the contrary in this Agreement, You may redistribute the Free Programs and/or modify them under
the terms of the corresponding license agreement. The Free Programs are distributed in the hope that they will be useful, but
WITHOUT ANY WARRANTY; without even the implied warranty of MERCHANTABILITY or FITNESS FOR A PARTICULAR PURPOSE.
To obtain the source code for the Free Programs subject to the terms of the corresponding license agreement, please send a
request by mail to: Open Source Requests, CTERA Networks Ltd, Imber 24, Petach Tikva, Israel.
4. Third Party Software
Software licensed to CTERA by third parties for direct or indirect distribution to end users (“Third Party Software”) may be
embedded in the Software and sublicensed directly to You. Third Party Software is provided to You subject to separate licenses
directly between You and the third party licensor, available from CTERA at Your request. You will have no recourse against CTERA
unless CTERA is the stated licensor and then only to the extent provided in such license. You will be responsible to do whatever is
necessary or required by the third party licensor for the licenses and related terms to take effect (e.g. online registration). You
are also accepting the terms and conditions of the licenses applicable to any Third Party Software (including any open source
software) included with the Software.
5. Acceptable Use and Conduct
You shall use the Software in compliance with all applicable laws, ordinances, rules and regulations, shall not violate or attempt
to violate CTERA’s system or network security, and shall not misuse the Software in any way. You shall be responsible for Your
conduct while using the Software.
138
CTERA Agent for Windows User Guide
Legal Information
8
6. Term and Termination
CTERA shall have the right to terminate this Agreement at any time due to Your breach of this Agreement by providing You with
a written notice. Upon CTERA's termination of this Agreement, You shall not be entitled to any compensation, reimbursement or
damages of any kind. You shall have the right to terminate this Agreement at any time due to CTERA’s breach of this
Agreement by providing CTERA with a written notice. You agree that, upon termination or expiration of this Agreement for any
reason, You will cease using the Software and either destroy all copies of the Software and CTERA documentation or return them
to CTERA. The provisions of this Agreement, other than the license granted in section 1 ("License to User Software"), shall survive
termination.
7. Disclaimer of Warranties
THE SOFTWARE IS PROVIDED “AS IS”. CTERA AND CTERA'S LICENSORS AND RESELLERS MAKE NO REPRESENTATIONS OR
WARRANTIES OF ANY KIND, WHETHER EXPRESS, IMPLIED, STATUTORY OR OTHERWISE WITH RESPECT TO THE SOFTWARE.
EXCEPT TO THE EXTENT PROHIBITED BY APPLICABLE LAW, CTERA AND ITS LICENSORS AND RESELLERS DISCLAIM ALL
WARRANTIES, INCLUDING, WITHOUT LIMITATION, ANY IMPLIED WARRANTIES OF MERCHANTABILITY, SATISFACTORY QUALITY,
FITNESS FOR A PARTICULAR PURPOSE, NON-INFRINGEMENT, QUIET ENJOYMENT, AND ANY WARRANTIES ARISING OUT OF ANY
COURSE OF DEALING OR USAGE OF TRADE. CTERA AND ITS LICENSORS AND RESELLERS DO NOT WARRANT THAT THE SOFTWARE
WILL FUNCTION AS DESCRIBED, WILL BE UNINTERRUPTED OR ERROR FREE, OR FREE OF HARMFUL COMPONENTS, OR THAT THE
DATA YOU STORE BY USING THE SOFTWARE WILL BE SECURE OR NOT OTHERWISE LOST OR DAMAGED. NO ADVICE OR
INFORMATION OBTAINED BY YOU FROM CTERA OR FROM ANY THIRD PARTY OR THROUGH THE SOFTWARE SHALL CREATE ANY
WARRANTY NOT EXPRESSLY STATED IN THIS AGREEMENT. YOU UNDERSTAND AND AGREE THAT YOU USE THE SOFTWARE, AND
ALL THIRD PARTY SOFTWARE OR SERVICES MADE AVAILABLE IN CONJUNCTION WITH OR THROUGH THE SOFTWARE, AT YOUR
OWN DISCRETION AND RISK AND THAT YOU WILL BE SOLELY RESPONSIBLE FOR ANY DAMAGES TO YOUR COMPUTER SYSTEM OR
LOSS OF DATA THAT RESULTS FROM THE USE OF THE SOFTWARE AND SUCH THIRD PARTY SOFTWARE AND SERVICES. SOME
STATES OR OTHER JURISDICTIONS DO NOT ALLOW THE EXCLUSION OF IMPLIED WARRANTIES, SO THE ABOVE EXCLUSIONS MAY
NOT APPLY TO YOU. YOU MAY ALSO HAVE OTHER RIGHTS THAT VARY FROM STATE TO STATE AND JURISDICTION TO
JURISDICTION. THIS SECTION CONSTITUTES A CONTRACT FOR THE BENEFIT OF EACH OF CTERA'S LICENSORS, RESELLERS AND
DISTRIBUTORS.
8. Limitation of Liability
NEITHER CTERA NOR ANY OF ITS LICENSORS AND RESELLERS SHALL BE LIABLE TO YOU FOR ANY DIRECT, INDIRECT, INCIDENTAL,
SPECIAL, CONSEQUENTIAL OR EXEMPLARY DAMAGES (EVEN IF CTERA ITS LICENSORS OR RESELLERS HAVE BEEN ADVISED OF THE
POSSIBILITY OF SUCH DAMAGES) IN CONNECTION WITH THIS AGREEMENT, INCLUDING, WITHOUT LIMITATION, ANY SUCH
DAMAGES RESULTING FROM: (i) THE USE OR THE INABILITY TO USE THE SOFTWARE; (ii) THE COST OF PROCUREMENT OF
SUBSTITUTE GOODS AND SERVICES; OR (iii) UNAUTHORIZED ACCESS TO OR ALTERATION OF YOUR CONTENT. IN ANY CASE AND
WITHOUT DEROGATING FROM THE ABOVE, TO THE EXTENT THAT THE AFOREMENTIONED LIMITATION OF LIABILITY SHALL NOT
BE ENFORCEABLE, CTERA'S AGGREGATE LIABILITY UNDER THIS AGREEMENT AND ANY OTHER AGREEMENT BETWEEN CTERA AND
YOU SHALL BE LIMITED TO THE LOWER OF (I) THE AMOUNT ACTUALLY PAID BY YOU TO CTERA FOR THE SOFTWARE WHICH IS
THE SUBJECT MATTER OF THE CLAIM, OR (II) US$1,000,000. THE SOFTWARE IS NOT INTENDED FOR USE IN CONNECTION WITH
ANY INHERENTLY DANGEROUS APPLICATION. SOME JURISDICTIONS DO NOT ALLOW THE EXCLUSION OF CERTAIN WARRANTIES
OR THE LIMITATION OR EXCLUSION OF LIABILITY FOR INCIDENTAL OR CONSEQUENTIAL DAMAGES. ACCORDINGLY, SOME OR ALL
OF THE ABOVE EXCLUSIONS OR LIMITATIONS MAY NOT APPLY TO YOU, AND YOU MAY HAVE ADDITIONAL RIGHTS. THIS SECTION
CONSTITUTES A CONTRACT FOR THE BENEFIT OF EACH OF CTERA'S LICENSORS, RESELLERS AND DISTRIBUTORS.
9. Indemnification by You
9.1 You shall indemnify, defend and hold CTERA, its affiliates and licensors, each of its and their business partners and each of its
and their respective employees, officers, directors and representatives, harmless from and against any and all claims, losses,
damages, liabilities, judgments, penalties, fines, costs and expenses (including reasonable attorney fees), arising out of or in
connection with any claim arising out of (i) Your use of the Software in a manner not authorized by this Agreement, and/or in
violation of the applicable restrictions and/or applicable law, (ii) Your violation of any term or condition of this Agreement or any
applicable additional policies, or (iii) Your or Your employees’ or personnel’s negligence or willful misconduct.
CTERA Agent for Windows User Guide
139
8
Legal Information
9.2 CTERA shall promptly notify You of any claim subject to indemnification; provided that CTERA's failure to do so shall not
affect Your obligations hereunder, except to the extent that CTERA's failure to promptly notify You materially delays or
prejudices Your ability to defend the claim. At CTERA's option, You will have the right to defend against any such claim with
counsel of Your own choosing (subject to CTERA's written consent) and to settle such claim as You deem appropriate, provided
that You shall not enter into any settlement without CTERA's prior written consent and provided that CTERA may, at any time,
elect to take over control of the defense and settlement of the claim.
10. Indemnification by CTERA
Notwithstanding CTERA’s disclaimer of any warranty of non-infringement as set forth in Section 7 above, in special
circumstances, in CTERA’s sole discretion, CTERA may choose to indemnify You in accordance with the provisions of this Section
10.
10.1 Indemnification. CTERA may defend or settle, at its option and expense, any action brought by a third party against You,
only to the extent such action arises from any third party claim brought against You alleging that the Software infringes any
patent, copyright, trademark, trade secret, or other intellectual property right of any third party (the "IP Claim"), and may pay all
costs, liabilities, damages and legal fees finally awarded against You in, or paid in settlement of, such action.
10.2 Remedy by CTERA. In the event that any Software or portion thereof is held, or in CTERA’s reasonable opinion may be
held, to constitute an infringement, CTERA, at its option and expense, may either (i) obtain for You the right to continue to use
such Software as contemplated herein, (ii) modify such Software so that it becomes non-infringing, but without materially
altering its functionality, (iii) replace such Software with a functionally equivalent non infringing Product, or (iv) terminate this
Agreement and provide you with a refund of the amount paid for the infringing Software.
10.3 Exceptions. The foregoing does not apply to claims to the extent arising from: (i) the combination of a Software with other
products not supplied by or on behalf of CTERA where such claim would not have arisen from the use of the Software standing
alone, (ii) compliance by CTERA with Your specifications, (iii) any modification of the Software not made by or on behalf of
CTERA, where such claim would not have arisen but for such modification, or (iv) where You continue an activity where such
claim would not have arisen but for such activity after having received and had a commercially reasonable time to install
modifications from CTERA that would have completely avoided the activity.
10.4 Entire Liability. This section 10 states the entire liability of CTERA and Your exclusive remedy for any proceedings or claims
that the Software infringes or misappropriates a third party's intellectual property, in respect of which CTERA chooses to provide
indemnification.
10.5 Requirements for Indemnity. You agrees to provide CTERA with (i) prompt written notice of the IP Claim giving rise to
CTERA’s indemnity option hereunder, (ii) sole control over the defense or settlement of such claim or action, if CTERA so
requests (provided that CTERA shall not, without Your prior written consent, settle any such claim or action if such settlement
contains a stipulation to or admission or acknowledgment of any liability or wrongdoing on Your part), and (iii) reasonable
information and assistance in the defense and/or settlement any such claim or action at CTERA’s option and expense.
11. Miscellaneous Provisions
11.1 The Software may be subject to export control laws of the State of Israel and/or may be subject to additional export control
laws applicable to You or in Your jurisdiction. You shall not ship, transfer, or export the Software into any country, or make
available or use the Software in any manner, prohibited by law. You warrant and agree that You are not: (i) located in, under the
control of, or a national or resident of Cuba, Iran, North Korea, Syria or Sudan, or (ii) on the U.S Treasury Department list of
Specially Designated Nationals or the U.S. Commerce Department's Table of Deny Orders.
11.2 This agreement will be governed by and construed in accordance with the laws of the State of Israel, without giving effect to
any conflict of laws and provisions that would require the application of the laws of any other jurisdiction. The parties hereby
expressly reject any application to this Agreement of (a) the United Nations Convention on Contracts for the International Sale of
Goods; and (b) the 1974 Convention on the Limitation Period in the International Sale of Goods, as amended by that certain
Protocol, done at Vienna on April 11, 1980.
11.3 All disputes arising out of this Agreement will be subject to the exclusive jurisdiction of the competent courts of Tel Aviv,
Israel, and the parties agree and submit to the personal and exclusive jurisdiction and venue of these courts, except that nothing
will prohibit CTERA from instituting an action in any court of competent jurisdiction to obtain injunctive relief or protect or
enforce its intellectual property rights.
140
CTERA Agent for Windows User Guide
Legal Information
8
11.4 The failure of CTERA to exercise or enforce any right or provision of this Agreement does not constitute a waiver of such
right or provision. If for any reason a court of competent jurisdiction finds any provision or portion of this Agreement to be
unenforceable, the remainder of this Agreement will continue in full force and effect.
11.5 This Agreement constitutes the entire agreement between CTERA and You with respect to the subject matter hereof and
supersedes and replaces all prior or contemporaneous understandings or agreements, written or oral, regarding such subject
matter. Any waiver of any provision of this Agreement will be effective only if in writing and signed by CTERA.
11.6 You may not assign or transfer any of Your rights or obligations under this Agreement to a third party without the prior
written consent of CTERA. CTERA may freely assign this Agreement. Any attempted assignment or transfer in violation of the
foregoing will be void.
GNU GENERAL PUBLIC LICENSE
Version 2, June 1991
Copyright (C) 1989, 1991 Free Software Foundation, Inc.,
51 Franklin Street, Fifth Floor, Boston, MA 02110-1301 USA
Everyone is permitted to copy and distribute verbatim copies of this license document, but changing it is not allowed.
Preamble
The licenses for most software are designed to take away your freedom to share and change it. By contrast, the GNU General
Public License is intended to guarantee your freedom to share and change free software--to make sure the software is free for all
its users. This General Public License applies to most of the Free Software Foundation's software and to any other program
whose authors commit to using it. (Some other Free Software Foundation software is covered by the GNU Lesser General
Public License instead.) You can apply it to your programs, too.
When we speak of free software, we are referring to freedom, not price. Our General Public Licenses are designed to make
sure that you have the freedom to distribute copies of free software (and charge for this service if you wish), that you receive
source code or can get it if you want it, that you can change the software or use pieces of it in new free programs; and that you
know you can do these things.
To protect your rights, we need to make restrictions that forbid anyone to deny you these rights or to ask you to surrender the
rights. These restrictions translate to certain responsibilities for you if you distribute copies of the software, or if you modify it.
For example, if you distribute copies of such a program, whether gratis or for a fee, you must give the recipients all the rights
that you have. You must make sure that they, too, receive or can get the source code. And you must show them these terms so
they know their rights.
We protect your rights with two steps: (1) copyright the software, and (2) offer you this license which gives you legal permission
to copy, distribute and/or modify the software.
Also, for each author's protection and ours, we want to make certain that everyone understands that there is no warranty for
this free software. If the software is modified by someone else and passed on, we want its recipients to know that what they
have is not the original, so that any problems introduced by others will not reflect on the original authors' reputations.
Finally, any free program is threatened constantly by software patents. We wish to avoid the danger that redistributors of a
free program will individually obtain patent licenses, in effect making the program proprietary. To prevent this, we have made
it clear that any patent must be licensed for everyone's free use or not licensed at all.
The precise terms and conditions for copying, distribution and modification follow.
GNU GENERAL PUBLIC LICENSE
TERMS AND CONDITIONS FOR COPYING, DISTRIBUTION AND MODIFICATION
CTERA Agent for Windows User Guide
141
8
Legal Information
0. This License applies to any program or other work which contains a notice placed by the copyright holder saying it may be
distributed under the terms of this General Public License. The "Program", below, refers to any such program or work, and a
"work based on the Program" means either the Program or any derivative work under copyright law: that is to say, a work
containing the Program or a portion of it, either verbatim or with modifications and/or translated into another language.
(Hereinafter, translation is included without limitation in the term "modification".) Each licensee is addressed as "you".
Activities other than copying, distribution and modification are not covered by this License; they are outside its scope. The act of
running the Program is not restricted, and the output from the Program is covered only if its contents constitute a work based on
the Program (independent of having been made by running the Program). Whether that is true depends on what the Program
does.
1. You may copy and distribute verbatim copies of the Program's source code as you receive it, in any medium, provided that you
conspicuously and appropriately publish on each copy an appropriate copyright notice and disclaimer of warranty; keep intact all
the notices that refer to this License and to the absence of any warranty; and give any other recipients of the Program a copy of
this License along with the Program.
You may charge a fee for the physical act of transferring a copy, and you may at your option offer warranty protection in
exchange for a fee.
2. You may modify your copy or copies of the Program or any portion of it, thus forming a work based on the Program, and copy
and distribute such modifications or work under the terms of Section 1 above, provided that you also meet all of these
conditions:
a) You must cause the modified files to carry prominent notices stating that you changed the files and the date of any change.
b) You must cause any work that you distribute or publish, that in whole or in part contains or is derived from the Program or
any part thereof, to be licensed as a whole at no charge to all third parties under the terms of this License.
c) If the modified program normally reads commands interactively when run, you must cause it, when started running for such
interactive use in the most ordinary way, to print or display an announcement including an appropriate copyright notice and a
notice that there is no warranty (or else, saying that you provide a warranty) and that users may redistribute the program under
these conditions, and telling the user how to view a copy of this
License. (Exception: if the Program itself is interactive
but does not normally print such an announcement, your work based on the Program is not required to print an announcement.)
These requirements apply to the modified work as a whole. If identifiable sections of that work are not derived from the
Program, and can be reasonably considered independent and separate works in themselves, then this License, and its terms, do
not apply to those sections when you distribute them as separate works. But when you distribute the same sections as part of
a whole which is a work based on the Program, the distribution of the whole must be on the terms of this License, whose
permissions for other licensees extend to the entire whole, and thus to each and every part regardless of who wrote it.
Thus, it is not the intent of this section to claim rights or contest your rights to work written entirely by you; rather, the intent is
to exercise the right to control the distribution of derivative or collective works based on the Program.
In addition, mere aggregation of another work not based on the Program with the Program (or with a work based on the
Program) on a volume of a storage or distribution medium does not bring the other work under the scope of this License.
3. You may copy and distribute the Program (or a work based on it, under Section 2) in object code or executable form under the
terms of Sections 1 and 2 above provided that you also do one of the following:
a) Accompany it with the complete corresponding machine-readable source code, which must be distributed under the terms
of Sections 1 and 2 above on a medium customarily used for software interchange; or,
b) Accompany it with a written offer, valid for at least three years, to give any third party, for a charge no more than your cost
of physically performing source distribution, a complete machine-readable copy of the corresponding source code, to be
distributed under the terms of Sections 1 and 2 above on a medium customarily used for software interchange; or,
c) Accompany it with the information you received as to the offer to distribute corresponding source code. (This alternative is
allowed only for noncommercial distribution and only if you received the program in object code or executable form with such
an offer, in accord with Subsection b above.)
142
CTERA Agent for Windows User Guide
Legal Information
8
The source code for a work means the preferred form of the work for making modifications to it. For an executable work,
complete source code means all the source code for all modules it contains, plus any associated interface definition files, plus
the scripts used to control compilation and installation of the executable. However, as a special exception, the source code
distributed need not include anything that is normally distributed (in either source or binary form) with the major components
(compiler, kernel, and so on) of the operating system on which the executable runs, unless that component itself accompanies
the executable.
If distribution of executable or object code is made by offering access to copy from a designated place, then offering equivalent
access to copy the source code from the same place counts as distribution of the source code, even though third parties are not
compelled to copy the source along with the object code.
4. You may not copy, modify, sublicense, or distribute the Program except as expressly provided under this License. Any
attempt otherwise to copy, modify, sublicense or distribute the Program is void, and will automatically terminate your rights
under this License. However, parties who have received copies, or rights, from you under this License will not have their licenses
terminated so long as such parties remain in full compliance.
5. You are not required to accept this License, since you have not signed it. However, nothing else grants you permission to
modify or distribute the Program or its derivative works. These actions are prohibited by law if you do not accept this License.
Therefore, by modifying or distributing the Program (or any work based on the Program), you indicate your acceptance of this
License to do so, and all its terms and conditions for copying, distributing or modifying the Program or works based on it.
6. Each time you redistribute the Program (or any work based on the Program), the recipient automatically receives a license
from the original licensor to copy, distribute or modify the Program subject to these terms and conditions. You may not
impose any further restrictions on the recipients' exercise of the rights granted herein. You are not responsible for enforcing
compliance by third parties to this License.
7. If, as a consequence of a court judgment or allegation of patent infringement or for any other reason (not limited to patent
issues), conditions are imposed on you (whether by court order, agreement or otherwise) that contradict the conditions of this
License, they do not excuse you from the conditions of this License. If you cannot distribute so as to satisfy simultaneously
your obligations under this License and any other pertinent obligations, then as a consequence you may not distribute the
Program at all. For example, if a patent license would not permit royalty-free redistribution of the Program by all those who
receive copies directly or indirectly through you, then the only way you could satisfy both it and this License would be to refrain
entirely from distribution of the Program.
If any portion of this section is held invalid or unenforceable under any particular circumstance, the balance of the section is
intended to apply and the section as a whole is intended to apply in other circumstances.
It is not the purpose of this section to induce you to infringe any patents or other property right claims or to contest validity of
any such claims; this section has the sole purpose of protecting the integrity of the free software distribution system, which is
implemented by public license practices. Many people have made generous contributions to the wide range of software
distributed through that system in reliance on consistent application of that system; it is up to the author/donor to decide if he
or she is willing to distribute software through any other system and a licensee cannot impose that choice.
This section is intended to make thoroughly clear what is believed to be a consequence of the rest of this License.
8. If the distribution and/or use of the Program is restricted in certain countries either by patents or by copyrighted interfaces,
the original copyright holder who places the Program under this License may add an explicit geographical distribution limitation
excluding those countries, so that distribution is permitted only in or among countries not thus excluded. In such case, this
License incorporates the limitation as if written in the body of this License.
9. The Free Software Foundation may publish revised and/or new versions of the General Public License from time to time.
Such new versions will be similar in spirit to the present version, but may differ in detail to address new problems or concerns.
Each version is given a distinguishing version number. If the Program specifies a version number of this License which applies
to it and "any later version", you have the option of following the terms and conditions either of that version or of any later
version published by the Free Software Foundation. If the Program does not specify a version number of this License, you may
choose any version ever published by the Free Software Foundation.
10. If you wish to incorporate parts of the Program into other free programs whose distribution conditions are different, write to
the author to ask for permission. For software which is copyrighted by the Free Software Foundation, write to the Free
Software Foundation; we sometimes make exceptions for this. Our decision will be guided by the two goals of preserving the
free status of all derivatives of our free software and of promoting the sharing and reuse of software generally.
CTERA Agent for Windows User Guide
143
8
Legal Information
NO WARRANTY
11. BECAUSE THE PROGRAM IS LICENSED FREE OF CHARGE, THERE IS NO WARRANTY FOR THE PROGRAM, TO THE EXTENT
PERMITTED BY APPLICABLE LAW. EXCEPT WHEN OTHERWISE STATED IN WRITING THE COPYRIGHT HOLDERS AND/OR OTHER
PARTIES PROVIDE THE PROGRAM "AS IS" WITHOUT WARRANTY OF ANY KIND, EITHER EXPRESSED OR IMPLIED, INCLUDING, BUT
NOT LIMITED TO, THE IMPLIED WARRANTIES OF MERCHANTABILITY AND FITNESS FOR A PARTICULAR PURPOSE. THE ENTIRE
RISK AS TO THE QUALITY AND PERFORMANCE OF THE PROGRAM IS WITH YOU. SHOULD THE PROGRAM PROVE DEFECTIVE,
YOU ASSUME THE COST OF ALL NECESSARY SERVICING, REPAIR OR CORRECTION.
12. IN NO EVENT UNLESS REQUIRED BY APPLICABLE LAW OR AGREED TO IN WRITING WILL ANY COPYRIGHT HOLDER, OR ANY
OTHER PARTY WHO MAY MODIFY AND/OR REDISTRIBUTE THE PROGRAM AS PERMITTED ABOVE, BE LIABLE TO YOU FOR
DAMAGES, INCLUDING ANY GENERAL, SPECIAL, INCIDENTAL OR CONSEQUENTIAL DAMAGES ARISING OUT OF THE USE OR
INABILITY TO USE THE PROGRAM (INCLUDING BUT NOT LIMITED TO LOSS OF DATA OR DATA BEING RENDERED INACCURATE OR
LOSSES SUSTAINED BY YOU OR THIRD PARTIES OR A FAILURE OF THE PROGRAM TO OPERATE WITH ANY OTHER PROGRAMS),
EVEN IF SUCH HOLDER OR OTHER PARTY HAS BEEN ADVISED OF THE POSSIBILITY OF SUCH DAMAGES.
GNU GENERAL PUBLIC LICENSE 3
Version 3, 29 June 2007
Copyright © 2007 Free Software Foundation, Inc.
Everyone is permitted to copy and distribute verbatim copies of this license document, but changing it is not allowed.
Preamble
The GNU General Public License is a free, copyleft license for software and other kinds of works.
The licenses for most software and other practical works are designed to take away your freedom to share and change the
works. By contrast, the GNU General Public License is intended to guarantee your freedom to share and change all versions of a
program--to make sure it remains free software for all its users. We, the Free Software Foundation, use the GNU General Public
License for most of our software; it applies also to any other work released this way by its authors. You can apply it to your
programs, too.
When we speak of free software, we are referring to freedom, not price. Our General Public Licenses are designed to make sure
that you have the freedom to distribute copies of free software (and charge for them if you wish), that you receive source code
or can get it if you want it, that you can change the software or use pieces of it in new free programs, and that you know you can
do these things.
To protect your rights, we need to prevent others from denying you these rights or asking you to surrender the rights. Therefore,
you have certain responsibilities if you distribute copies of the software, or if you modify it: responsibilities to respect the
freedom of others.
For example, if you distribute copies of such a program, whether gratis or for a fee, you must pass on to the recipients the same
freedoms that you received. You must make sure that they, too, receive or can get the source code. And you must show them
these terms so they know their rights.
Developers that use the GNU GPL protect your rights with two steps: (1) assert copyright on the software, and (2) offer you this
License giving you legal permission to copy, distribute and/or modify it.
For the developers' and authors' protection, the GPL clearly explains that there is no warranty for this free software. For both
users' and authors' sake, the GPL requires that modified versions be marked as changed, so that their problems will not be
attributed erroneously to authors of previous versions.
Some devices are designed to deny users access to install or run modified versions of the software inside them, although the
manufacturer can do so. This is fundamentally incompatible with the aim of protecting users' freedom to change the software.
The systematic pattern of such abuse occurs in the area of products for individuals to use, which is precisely where it is most
unacceptable. Therefore, we have designed this version of the GPL to prohibit the practice for those products. If such problems
arise substantially in other domains, we stand ready to extend this provision to those domains in future versions of the GPL, as
needed to protect the freedom of users.
144
CTERA Agent for Windows User Guide
Legal Information
8
Finally, every program is threatened constantly by software patents. States should not allow patents to restrict development and
use of software on general-purpose computers, but in those that do, we wish to avoid the special danger that patents applied to
a free program could make it effectively proprietary. To prevent this, the GPL assures that patents cannot be used to render the
program non-free.
The precise terms and conditions for copying, distribution and modification follow.
TERMS AND CONDITIONS
0. Definitions.
“This License” refers to version 3 of the GNU General Public License.
“Copyright” also means copyright-like laws that apply to other kinds of works, such as semiconductor masks.
“The Program” refers to any copyrightable work licensed under this License. Each licensee is addressed as “you”. “Licensees” and
“recipients” may be individuals or organizations.
To “modify” a work means to copy from or adapt all or part of the work in a fashion requiring copyright permission, other than
the making of an exact copy. The resulting work is called a “modified version” of the earlier work or a work “based on” the
earlier work.
A “covered work” means either the unmodified Program or a work based on the Program.
To “propagate” a work means to do anything with it that, without permission, would make you directly or secondarily liable for
infringement under applicable copyright law, except executing it on a computer or modifying a private copy. Propagation
includes copying, distribution (with or without modification), making available to the public, and in some countries other
activities as well.
To “convey” a work means any kind of propagation that enables other parties to make or receive copies. Mere interaction with a
user through a computer network, with no transfer of a copy, is not conveying.
An interactive user interface displays “Appropriate Legal Notices” to the extent that it includes a convenient and prominently
visible feature that (1) displays an appropriate copyright notice, and (2) tells the user that there is no warranty for the work
(except to the extent that warranties are provided), that licensees may convey the work under this License, and how to view a
copy of this License. If the interface presents a list of user commands or options, such as a menu, a prominent item in the list
meets this criterion.
1. Source Code.
The “source code” for a work means the preferred form of the work for making modifications to it. “Object code” means any
non-source form of a work.
A “Standard Interface” means an interface that either is an official standard defined by a recognized standards body, or, in the
case of interfaces specified for a particular programming language, one that is widely used among developers working in that
language.
The “System Libraries” of an executable work include anything, other than the work as a whole, that (a) is included in the normal
form of packaging a Major Component, but which is not part of that Major Component, and (b) serves only to enable use of the
work with that Major Component, or to implement a Standard Interface for which an implementation is available to the public in
source code form. A “Major Component”, in this context, means a major essential component (kernel, window system, and so
on) of the specific operating system (if any) on which the executable work runs, or a compiler used to produce the work, or an
object code interpreter used to run it.
The “Corresponding Source” for a work in object code form means all the source code needed to generate, install, and (for an
executable work) run the object code and to modify the work, including scripts to control those activities. However, it does not
include the work's System Libraries, or general-purpose tools or generally available free programs which are used unmodified in
performing those activities but which are not part of the work. For example, Corresponding Source includes interface definition
files associated with source files for the work, and the source code for shared libraries and dynamically linked subprograms that
the work is specifically designed to require, such as by intimate data communication or control flow between those subprograms
and other parts of the work.
The Corresponding Source need not include anything that users can regenerate automatically from other parts of the
Corresponding Source.
CTERA Agent for Windows User Guide
145
8
Legal Information
The Corresponding Source for a work in source code form is that same work.
2. Basic Permissions.
All rights granted under this License are granted for the term of copyright on the Program, and are irrevocable provided the
stated conditions are met. This License explicitly affirms your unlimited permission to run the unmodified Program. The output
from running a covered work is covered by this License only if the output, given its content, constitutes a covered work. This
License acknowledges your rights of fair use or other equivalent, as provided by copyright law.
You may make, run and propagate covered works that you do not convey, without conditions so long as your license otherwise
remains in force. You may convey covered works to others for the sole purpose of having them make modifications exclusively
for you, or provide you with facilities for running those works, provided that you comply with the terms of this License in
conveying all material for which you do not control copyright. Those thus making or running the covered works for you must do
so exclusively on your behalf, under your direction and control, on terms that prohibit them from making any copies of your
copyrighted material outside their relationship with you.
Conveying under any other circumstances is permitted solely under the conditions stated below. Sublicensing is not allowed;
section 10 makes it unnecessary.
3. Protecting Users' Legal Rights From Anti-Circumvention Law.
No covered work shall be deemed part of an effective technological measure under any applicable law fulfilling obligations under
article 11 of the WIPO copyright treaty adopted on 20 December 1996, or similar laws prohibiting or restricting circumvention of
such measures.
When you convey a covered work, you waive any legal power to forbid circumvention of technological measures to the extent
such circumvention is effected by exercising rights under this License with respect to the covered work, and you disclaim any
intention to limit operation or modification of the work as a means of enforcing, against the work's users, your or third parties'
legal rights to forbid circumvention of technological measures.
4. Conveying Verbatim Copies.
You may convey verbatim copies of the Program's source code as you receive it, in any medium, provided that you conspicuously
and appropriately publish on each copy an appropriate copyright notice; keep intact all notices stating that this License and any
non-permissive terms added in accord with section 7 apply to the code; keep intact all notices of the absence of any warranty;
and give all recipients a copy of this License along with the Program.
You may charge any price or no price for each copy that you convey, and you may offer support or warranty protection for a fee.
5. Conveying Modified Source Versions.
You may convey a work based on the Program, or the modifications to produce it from the Program, in the form of source code
under the terms of section 4, provided that you also meet all of these conditions:
a) The work must carry prominent notices stating that you modified it, and giving a relevant date.
b) The work must carry prominent notices stating that it is released under this License and any conditions added under section
7. This requirement modifies the requirement in section 4 to “keep intact all notices”.
c) You must license the entire work, as a whole, under this License to anyone who comes into possession of a copy. This
License will therefore apply, along with any applicable section 7 additional terms, to the whole of the work, and all its parts,
regardless of how they are packaged. This License gives no permission to license the work in any other way, but it does not
invalidate such permission if you have separately received it.
d) If the work has interactive user interfaces, each must display Appropriate Legal Notices; however, if the Program has
interactive interfaces that do not display Appropriate Legal Notices, your work need not make them do so.
A compilation of a covered work with other separate and independent works, which are not by their nature extensions of the
covered work, and which are not combined with it such as to form a larger program, in or on a volume of a storage or
distribution medium, is called an “aggregate” if the compilation and its resulting copyright are not used to limit the access or
legal rights of the compilation's users beyond what the individual works permit. Inclusion of a covered work in an aggregate does
not cause this License to apply to the other parts of the aggregate.
6. Conveying Non-Source Forms.
146
CTERA Agent for Windows User Guide
Legal Information
8
You may convey a covered work in object code form under the terms of sections 4 and 5, provided that you also convey the
machine-readable Corresponding Source under the terms of this License, in one of these ways:
a) Convey the object code in, or embodied in, a physical product (including a physical distribution medium), accompanied by
the Corresponding Source fixed on a durable physical medium customarily used for software interchange.
b) Convey the object code in, or embodied in, a physical product (including a physical distribution medium), accompanied by a
written offer, valid for at least three years and valid for as long as you offer spare parts or customer support for that product
model, to give anyone who possesses the object code either (1) a copy of the Corresponding Source for all the software in the
product that is covered by this License, on a durable physical medium customarily used for software interchange, for a price no
more than your reasonable cost of physically performing this conveying of source, or (2) access to copy the Corresponding
Source from a network server at no charge.
c) Convey individual copies of the object code with a copy of the written offer to provide the Corresponding Source. This
alternative is allowed only occasionally and noncommercially, and only if you received the object code with such an offer, in
accord with subsection 6b.
d) Convey the object code by offering access from a designated place (gratis or for a charge), and offer equivalent access to
the Corresponding Source in the same way through the same place at no further charge. You need not require recipients to copy
the Corresponding Source along with the object code. If the place to copy the object code is a network server, the Corresponding
Source may be on a different server (operated by you or a third party) that supports equivalent copying facilities, provided you
maintain clear directions next to the object code saying where to find the Corresponding Source. Regardless of what server hosts
the Corresponding Source, you remain obligated to ensure that it is available for as long as needed to satisfy these requirements.
e) Convey the object code using peer-to-peer transmission, provided you inform other peers where the object code and
Corresponding Source of the work are being offered to the general public at no charge under subsection 6d.
A separable portion of the object code, whose source code is excluded from the Corresponding Source as a System Library, need
not be included in conveying the object code work.
A “User Product” is either (1) a “consumer product”, which means any tangible personal property which is normally used for
personal, family, or household purposes, or (2) anything designed or sold for incorporation into a dwelling. In determining
whether a product is a consumer product, doubtful cases shall be resolved in favor of coverage. For a particular product received
by a particular user, “normally used” refers to a typical or common use of that class of product, regardless of the status of the
particular user or of the way in which the particular user actually uses, or expects or is expected to use, the product. A product is
a consumer product regardless of whether the product has substantial commercial, industrial or non-consumer uses, unless such
uses represent the only significant mode of use of the product.
“Installation Information” for a User Product means any methods, procedures, authorization keys, or other information required
to install and execute modified versions of a covered work in that User Product from a modified version of its Corresponding
Source. The information must suffice to ensure that the continued functioning of the modified object code is in no case
prevented or interfered with solely because modification has been made.
If you convey an object code work under this section in, or with, or specifically for use in, a User Product, and the conveying
occurs as part of a transaction in which the right of possession and use of the User Product is transferred to the recipient in
perpetuity or for a fixed term (regardless of how the transaction is characterized), the Corresponding Source conveyed under
this section must be accompanied by the Installation Information. But this requirement does not apply if neither you nor any
third party retains the ability to install modified object code on the User Product (for example, the work has been installed in
ROM).
The requirement to provide Installation Information does not include a requirement to continue to provide support service,
warranty, or updates for a work that has been modified or installed by the recipient, or for the User Product in which it has been
modified or installed. Access to a network may be denied when the modification itself materially and adversely affects the
operation of the network or violates the rules and protocols for communication across the network.
Corresponding Source conveyed, and Installation Information provided, in accord with this section must be in a format that is
publicly documented (and with an implementation available to the public in source code form), and must require no special
password or key for unpacking, reading or copying.
7. Additional Terms.
CTERA Agent for Windows User Guide
147
8
Legal Information
“Additional permissions” are terms that supplement the terms of this License by making exceptions from one or more of its
conditions. Additional permissions that are applicable to the entire Program shall be treated as though they were included in this
License, to the extent that they are valid under applicable law. If additional permissions apply only to part of the Program, that
part may be used separately under those permissions, but the entire Program remains governed by this License without regard
to the additional permissions.
When you convey a copy of a covered work, you may at your option remove any additional permissions from that copy, or from
any part of it. (Additional permissions may be written to require their own removal in certain cases when you modify the work.)
You may place additional permissions on material, added by you to a covered work, for which you have or can give appropriate
copyright permission.
Notwithstanding any other provision of this License, for material you add to a covered work, you may (if authorized by the
copyright holders of that material) supplement the terms of this License with terms:
a) Disclaiming warranty or limiting liability differently from the terms of sections 15 and 16 of this License; or
b) Requiring preservation of specified reasonable legal notices or author attributions in that material or in the Appropriate
Legal Notices displayed by works containing it; or
c) Prohibiting misrepresentation of the origin of that material, or requiring that modified versions of such material be marked
in reasonable ways as different from the original version; or
d) Limiting the use for publicity purposes of names of licensors or authors of the material; or
e) Declining to grant rights under trademark law for use of some trade names, trademarks, or service marks; or
f) Requiring indemnification of licensors and authors of that material by anyone who conveys the material (or modified
versions of it) with contractual assumptions of liability to the recipient, for any liability that these contractual assumptions
directly impose on those licensors and authors.
All other non-permissive additional terms are considered “further restrictions” within the meaning of section 10. If the Program
as you received it, or any part of it, contains a notice stating that it is governed by this License along with a term that is a further
restriction, you may remove that term. If a license document contains a further restriction but permits relicensing or conveying
under this License, you may add to a covered work material governed by the terms of that license document, provided that the
further restriction does not survive such relicensing or conveying.
If you add terms to a covered work in accord with this section, you must place, in the relevant source files, a statement of the
additional terms that apply to those files, or a notice indicating where to find the applicable terms.
Additional terms, permissive or non-permissive, may be stated in the form of a separately written license, or stated as
exceptions; the above requirements apply either way.
8. Termination.
You may not propagate or modify a covered work except as expressly provided under this License. Any attempt otherwise to
propagate or modify it is void, and will automatically terminate your rights under this License (including any patent licenses
granted under the third paragraph of section 11).
However, if you cease all violation of this License, then your license from a particular copyright holder is reinstated (a)
provisionally, unless and until the copyright holder explicitly and finally terminates your license, and (b) permanently, if the
copyright holder fails to notify you of the violation by some reasonable means prior to 60 days after the cessation.
Moreover, your license from a particular copyright holder is reinstated permanently if the copyright holder notifies you of the
violation by some reasonable means, this is the first time you have received notice of violation of this License (for any work)
from that copyright holder, and you cure the violation prior to 30 days after your receipt of the notice.
Termination of your rights under this section does not terminate the licenses of parties who have received copies or rights from
you under this License. If your rights have been terminated and not permanently reinstated, you do not qualify to receive new
licenses for the same material under section 10.
9. Acceptance Not Required for Having Copies.
148
CTERA Agent for Windows User Guide
Legal Information
8
You are not required to accept this License in order to receive or run a copy of the Program. Ancillary propagation of a covered
work occurring solely as a consequence of using peer-to-peer transmission to receive a copy likewise does not require
acceptance. However, nothing other than this License grants you permission to propagate or modify any covered work. These
actions infringe copyright if you do not accept this License. Therefore, by modifying or propagating a covered work, you indicate
your acceptance of this License to do so.
10. Automatic Licensing of Downstream Recipients.
Each time you convey a covered work, the recipient automatically receives a license from the original licensors, to run, modify
and propagate that work, subject to this License. You are not responsible for enforcing compliance by third parties with this
License.
An “entity transaction” is a transaction transferring control of an organization, or substantially all assets of one, or subdividing an
organization, or merging organizations. If propagation of a covered work results from an entity transaction, each party to that
transaction who receives a copy of the work also receives whatever licenses to the work the party's predecessor in interest had
or could give under the previous paragraph, plus a right to possession of the Corresponding Source of the work from the
predecessor in interest, if the predecessor has it or can get it with reasonable efforts.
You may not impose any further restrictions on the exercise of the rights granted or affirmed under this License. For example,
you may not impose a license fee, royalty, or other charge for exercise of rights granted under this License, and you may not
initiate litigation (including a cross-claim or counterclaim in a lawsuit) alleging that any patent claim is infringed by making, using,
selling, offering for sale, or importing the Program or any portion of it.
11. Patents.
A “contributor” is a copyright holder who authorizes use under this License of the Program or a work on which the Program is
based. The work thus licensed is called the contributor's “contributor version”.
A contributor's “essential patent claims” are all patent claims owned or controlled by the contributor, whether already acquired
or hereafter acquired, that would be infringed by some manner, permitted by this License, of making, using, or selling its
contributor version, but do not include claims that would be infringed only as a consequence of further modification of the
contributor version. For purposes of this definition, “control” includes the right to grant patent sublicenses in a manner
consistent with the requirements of this License.
Each contributor grants you a non-exclusive, worldwide, royalty-free patent license under the contributor's essential patent
claims, to make, use, sell, offer for sale, import and otherwise run, modify and propagate the contents of its contributor version.
In the following three paragraphs, a “patent license” is any express agreement or commitment, however denominated, not to
enforce a patent (such as an express permission to practice a patent or covenant not to sue for patent infringement). To “grant”
such a patent license to a party means to make such an agreement or commitment not to enforce a patent against the party.
If you convey a covered work, knowingly relying on a patent license, and the Corresponding Source of the work is not available
for anyone to copy, free of charge and under the terms of this License, through a publicly available network server or other
readily accessible means, then you must either (1) cause the Corresponding Source to be so available, or (2) arrange to deprive
yourself of the benefit of the patent license for this particular work, or (3) arrange, in a manner consistent with the requirements
of this License, to extend the patent license to downstream recipients. “Knowingly relying” means you have actual knowledge
that, but for the patent license, your conveying the covered work in a country, or your recipient's use of the covered work in a
country, would infringe one or more identifiable patents in that country that you have reason to believe are valid.
If, pursuant to or in connection with a single transaction or arrangement, you convey, or propagate by procuring conveyance of,
a covered work, and grant a patent license to some of the parties receiving the covered work authorizing them to use,
propagate, modify or convey a specific copy of the covered work, then the patent license you grant is automatically extended to
all recipients of the covered work and works based on it.
A patent license is “discriminatory” if it does not include within the scope of its coverage, prohibits the exercise of, or is
conditioned on the non-exercise of one or more of the rights that are specifically granted under this License. You may not convey
a covered work if you are a party to an arrangement with a third party that is in the business of distributing software, under
which you make payment to the third party based on the extent of your activity of conveying the work, and under which the
third party grants, to any of the parties who would receive the covered work from you, a discriminatory patent license (a) in
connection with copies of the covered work conveyed by you (or copies made from those copies), or (b) primarily for and in
connection with specific products or compilations that contain the covered work, unless you entered into that arrangement, or
that patent license was granted, prior to 28 March 2007.
CTERA Agent for Windows User Guide
149
8
Legal Information
Nothing in this License shall be construed as excluding or limiting any implied license or other defenses to infringement that may
otherwise be available to you under applicable patent law.
12. No Surrender of Others' Freedom.
If conditions are imposed on you (whether by court order, agreement or otherwise) that contradict the conditions of this
License, they do not excuse you from the conditions of this License. If you cannot convey a covered work so as to satisfy
simultaneously your obligations under this License and any other pertinent obligations, then as a consequence you may not
convey it at all. For example, if you agree to terms that obligate you to collect a royalty for further conveying from those to
whom you convey the Program, the only way you could satisfy both those terms and this License would be to refrain entirely
from conveying the Program.
13. Use with the GNU Affero General Public License.
Notwithstanding any other provision of this License, you have permission to link or combine any covered work with a work
licensed under version 3 of the GNU Affero General Public License into a single combined work, and to convey the resulting
work. The terms of this License will continue to apply to the part which is the covered work, but the special requirements of the
GNU Affero General Public License, section 13, concerning interaction through a network will apply to the combination as such.
14. Revised Versions of this License.
The Free Software Foundation may publish revised and/or new versions of the GNU General Public License from time to time.
Such new versions will be similar in spirit to the present version, but may differ in detail to address new problems or concerns.
Each version is given a distinguishing version number. If the Program specifies that a certain numbered version of the GNU
General Public License “or any later version” applies to it, you have the option of following the terms and conditions either of
that numbered version or of any later version published by the Free Software Foundation. If the Program does not specify a
version number of the GNU General Public License, you may choose any version ever published by the Free Software
Foundation.
If the Program specifies that a proxy can decide which future versions of the GNU General Public License can be used, that
proxy's public statement of acceptance of a version permanently authorizes you to choose that version for the Program.
Later license versions may give you additional or different permissions. However, no additional obligations are imposed on any
author or copyright holder as a result of your choosing to follow a later version.
15. Disclaimer of Warranty.
THERE IS NO WARRANTY FOR THE PROGRAM, TO THE EXTENT PERMITTED BY APPLICABLE LAW. EXCEPT WHEN OTHERWISE
STATED IN WRITING THE COPYRIGHT HOLDERS AND/OR OTHER PARTIES PROVIDE THE PROGRAM “AS IS” WITHOUT WARRANTY
OF ANY KIND, EITHER EXPRESSED OR IMPLIED, INCLUDING, BUT NOT LIMITED TO, THE IMPLIED WARRANTIES OF
MERCHANTABILITY AND FITNESS FOR A PARTICULAR PURPOSE. THE ENTIRE RISK AS TO THE QUALITY AND PERFORMANCE OF
THE PROGRAM IS WITH YOU. SHOULD THE PROGRAM PROVE DEFECTIVE, YOU ASSUME THE COST OF ALL NECESSARY SERVICING,
REPAIR OR CORRECTION.
16. Limitation of Liability.
IN NO EVENT UNLESS REQUIRED BY APPLICABLE LAW OR AGREED TO IN WRITING WILL ANY COPYRIGHT HOLDER, OR ANY OTHER
PARTY WHO MODIFIES AND/OR CONVEYS THE PROGRAM AS PERMITTED ABOVE, BE LIABLE TO YOU FOR DAMAGES, INCLUDING
ANY GENERAL, SPECIAL, INCIDENTAL OR CONSEQUENTIAL DAMAGES ARISING OUT OF THE USE OR INABILITY TO USE THE
PROGRAM (INCLUDING BUT NOT LIMITED TO LOSS OF DATA OR DATA BEING RENDERED INACCURATE OR LOSSES SUSTAINED BY
YOU OR THIRD PARTIES OR A FAILURE OF THE PROGRAM TO OPERATE WITH ANY OTHER PROGRAMS), EVEN IF SUCH HOLDER OR
OTHER PARTY HAS BEEN ADVISED OF THE POSSIBILITY OF SUCH DAMAGES.
17. Interpretation of Sections 15 and 16.
If the disclaimer of warranty and limitation of liability provided above cannot be given local legal effect according to their terms,
reviewing courts shall apply local law that most closely approximates an absolute waiver of all civil liability in connection with the
Program, unless a warranty or assumption of liability accompanies a copy of the Program in return for a fee.
150
CTERA Agent for Windows User Guide
Legal Information
8
Apache License
Version 2.0, January 2004
http://www.apache.org/licenses/
TERMS AND CONDITIONS FOR USE, REPRODUCTION, AND DISTRIBUTION
1. Definitions.
"License" shall mean the terms and conditions for use, reproduction, and distribution as defined by Sections 1 through 9 of this
document.
"Licensor" shall mean the copyright owner or entity authorized by the copyright owner that is granting the License.
"Legal Entity" shall mean the union of the acting entity and all other entities that control, are controlled by, or are under
common control with that entity. For the purposes of this definition, "control" means (i) the power, direct or indirect, to cause
the direction or management of such entity, whether by contract or otherwise, or (ii) ownership of fifty percent (50%) or more of
the outstanding shares, or (iii) beneficial ownership of such entity.
"You" (or "Your") shall mean an individual or Legal Entity exercising permissions granted by this License.
"Source" form shall mean the preferred form for making modifications, including but not limited to software source code,
documentation source, and configuration files.
"Object" form shall mean any form resulting from mechanical transformation or translation of a Source form, including but not
limited to compiled object code, generated documentation, and conversions to other media types.
"Work" shall mean the work of authorship, whether in Source or Object form, made available under the License, as indicated by
a copyright notice that is included in or attached to the work (an example is provided in the Appendix below).
"Derivative Works" shall mean any work, whether in Source or Object form, that is based on (or derived from) the Work and for
which the editorial revisions, annotations, elaborations, or other modifications represent, as a whole, an original work of
authorship. For the purposes of this License, Derivative Works shall not include works that remain separable from, or merely link
(or bind by name) to the interfaces of, the Work and Derivative Works thereof.
"Contribution" shall mean any work of authorship, including the original version of the Work and any modifications or additions
to that Work or Derivative Works thereof, that is intentionally submitted to Licensor for inclusion in the Work by the copyright
owner or by an individual or Legal Entity authorized to submit on behalf of the copyright owner. For the purposes of this
definition, "submitted" means any form of electronic, verbal, or written communication sent to the Licensor or its
representatives, including but not limited to communication on electronic mailing lists, source code control systems, and issue
tracking systems that are managed by, or on behalf of, the Licensor for the purpose of discussing and improving the Work, but
excluding communication that is conspicuously marked or otherwise designated in writing by the copyright owner as "Not a
Contribution."
"Contributor" shall mean Licensor and any individual or Legal Entity on behalf of whom a Contribution has been received by
Licensor and subsequently incorporated within the Work.
2. Grant of Copyright License. Subject to the terms and conditions of this License, each Contributor hereby grants to You a
perpetual, worldwide, non-exclusive, no-charge, royalty-free, irrevocable copyright license to reproduce, prepare Derivative
Works of, publicly display, publicly perform, sublicense, and distribute the Work and such Derivative Works in Source or Object
form.
3. Grant of Patent License. Subject to the terms and conditions of this License, each Contributor hereby grants to You a
perpetual, worldwide, non-exclusive, no-charge, royalty-free, irrevocable (except as stated in this section) patent license to
make, have made, use, offer to sell, sell, import, and otherwise transfer the Work, where such license applies only to those
patent claims licensable by such Contributor that are necessarily infringed by their Contribution(s) alone or by combination of
their Contribution(s) with the Work to which such Contribution(s) was submitted. If You institute patent litigation against any
entity (including a cross-claim or counterclaim in a lawsuit) alleging that the Work or a Contribution incorporated within the
Work constitutes direct or contributory patent infringement, then any patent licenses granted to You under this License for that
Work shall terminate as of the date such litigation is filed.
CTERA Agent for Windows User Guide
151
8
Legal Information
4. Redistribution. You may reproduce and distribute copies of the Work or Derivative Works thereof in any medium, with or
without modifications, and in Source or Object form, provided that You meet the following conditions:
a. You must give any other recipients of the Work or Derivative Works a copy of this License; and
b. You must cause any modified files to carry prominent notices stating that You changed the files; and
c. You must retain, in the Source form of any Derivative Works that You distribute, all copyright, patent, trademark, and
attribution notices from the Source form of the Work, excluding those notices that do not pertain to any part of the Derivative
Works; and
d. If the Work includes a "NOTICE" text file as part of its distribution, then any Derivative Works that You distribute must
include a readable copy of the attribution notices contained within such NOTICE file, excluding those notices that do not pertain
to any part of the Derivative Works, in at least one of the following places: within a NOTICE text file distributed as part of the
Derivative Works; within the Source form or documentation, if provided along with the Derivative Works; or, within a display
generated by the Derivative Works, if and wherever such third-party notices normally appear. The contents of the NOTICE file
are for informational purposes only and do not modify the License. You may add Your own attribution notices within Derivative
Works that You distribute, alongside or as an addendum to the NOTICE text from the Work, provided that such additional
attribution notices cannot be construed as modifying the License.
You may add Your own copyright statement to Your modifications and may provide additional or different license terms and
conditions for use, reproduction, or distribution of Your modifications, or for any such Derivative Works as a whole, provided
Your use, reproduction, and distribution of the Work otherwise complies with the conditions stated in this License.
5. Submission of Contributions. Unless You explicitly state otherwise, any Contribution intentionally submitted for inclusion in
the Work by You to the Licensor shall be under the terms and conditions of this License, without any additional terms or
conditions. Notwithstanding the above, nothing herein shall supersede or modify the terms of any separate license agreement
you may have executed with Licensor regarding such Contributions.
6. Trademarks. This License does not grant permission to use the trade names, trademarks, service marks, or product names of
the Licensor, except as required for reasonable and customary use in describing the origin of the Work and reproducing the
content of the NOTICE file.
7. Disclaimer of Warranty. Unless required by applicable law or agreed to in writing, Licensor provides the Work (and each
Contributor provides its Contributions) on an "AS IS" BASIS, WITHOUT WARRANTIES OR CONDITIONS OF ANY KIND, either
express or implied, including, without limitation, any warranties or conditions of TITLE, NON-INFRINGEMENT,
MERCHANTABILITY, or FITNESS FOR A PARTICULAR PURPOSE. You are solely responsible for determining the appropriateness of
using or redistributing the Work and assume any risks associated with Your exercise of permissions under this License.
8. Limitation of Liability. In no event and under no legal theory, whether in tort (including negligence), contract, or otherwise,
unless required by applicable law (such as deliberate and grossly negligent acts) or agreed to in writing, shall any Contributor be
liable to You for damages, including any direct, indirect, special, incidental, or consequential damages of any character arising as
a result of this License or out of the use or inability to use the Work (including but not limited to damages for loss of goodwill,
work stoppage, computer failure or malfunction, or any and all other commercial damages or losses), even if such Contributor
has been advised of the possibility of such damages.
9. Accepting Warranty or Additional Liability. While redistributing the Work or Derivative Works thereof, You may choose to
offer, and charge a fee for, acceptance of support, warranty, indemnity, or other liability obligations and/or rights consistent
with this License. However, in accepting such obligations, You may act only on Your own behalf and on Your sole responsibility,
not on behalf of any other Contributor, and only if You agree to indemnify, defend, and hold each Contributor harmless for any
liability incurred by, or claims asserted against, such Contributor by reason of your accepting any such warranty or additional
liability.
152
CTERA Agent for Windows User Guide
Index
A
About Cloud Attached Storage • 3
About the CTERA Agent • 3
Accessing Files on the Appliance • 58
Accessing the Cloud Drive Folder • 118, 119,
125
Adding and Editing Excluded Sets • 76
Adding and Editing Included Sets • 69
Apache License • 155
B
Browsing the Cloud Drive Folder Online • 119,
123, 124, 126, 128
C
Canceling the Current Cloud Backup • 79, 111
Canceling the Current Restore Process • 117
Centrally Installing CTERA Agent via Active
Directory • 15
Clearing Logs • 108
Collaborating on Projects • 119
Configuring Advanced Cloud Drive
Synchronization Settings • 94, 95
Configuring Cloud Backup • 60, 66
Configuring Disk-Level Backup Settings • 35
Configuring Event Log Settings • 60, 97, 101,
107
Configuring File-Level Backup Settings • 31,
37, 38
Configuring General Settings • 29
Configuring System State Backup Settings • 37
Configuring the Agent • 24, 29
Configuring the CTERA Agent Language • 109
Configuring Windows Explorer Integration
Settings • 37, 108
CTERA Agent for Windows User Guide
Connecting the Agent to a CTERA Appliance •
23, 24
Connecting the Agent to the CTERA Portal •
60, 61
Connecting to the CTERA Agent Manager • 24,
27
Connecting to the CTERA Agent Web Interface
• 60, 63
Contacting Technical Support • 7
Creating Projects • 119
CTERA Agent Licensing (Appliance Mode) • 4
CTERA Agent Licensing (Cloud Mode) • 5
CTERA End User License Agreement • 141
D
Deleting Active Guest Invitations • 128
Deleting Excluded Sets • 78
Deleting Included Sets • 75
Deleting Projects • 124
Disconnecting the Agent from a CTERA
Appliance • 41
Disconnecting the Agent from the CTERA
Portal • 113
E
Editing Projects • 123
Enabling/Disabling Excluded Sets • 75
Enabling/Disabling Included Sets • 68
Enabling/Disabling Remote Access • 60, 89
Exporting Logs • 108
F
Filtering Logs • 107
G
GNU GENERAL PUBLIC LICENSE • 145
GNU GENERAL PUBLIC LICENSE 3 • 148
153
Index
I
Installing the Agent • 10, 23, 59
Installing the CTERA Agent • 9
Introduction • 3
L
Legal Information • 2, 141
Logging Out of the CTERA Agent Web
Interface • 87
M
Managing Files and Folders on the Cloud Drive
• 96
Manually Starting Backup • 39, 110
Manually Starting Cloud Backup • 66, 84, 110
N
Navigating Between Table Pages • 65
O
Opening Ports on Your Firewall • 10, 25
P
Preparing a Backup Seeding Hard Drive • 85
R
Refreshing Table Contents • 65
Re-imaging Your Computer • 46, 47
Requirements • 9
Restoring Files and Folders from the Cloud
Backup Control Panel • 114, 130
Restoring Files from Cloud Backup • 114
Restoring Files from Disk-Level Backup • 6, 44
Restoring Files from File-Level Backup • 42,
130
Restoring from a System State Backup on
Windows 2003 Server SP2 • 7, 129
Restoring Individual Files from Disk-Level
Backup • 44
Restoring NTDS (Active Directory) and SYSVOL
Applications on Windows 2003 / 2008
Server • 134
154
Restoring System State Data, NTDS, and
SYSVOL • 129
Restoring the Entire Computer from Disk-Level
Backup • 44, 45, 47, 52
Restricting Throughput • 87
Resuming the Cloud Backup Service • 80, 111
S
Scheduling Automatic Cloud Backup • 66, 81,
110
Selecting Applications for Backup • 66, 78
Selecting Cloud Folders for Synchronization •
92, 94, 97
Selecting Files and Folders for Backup • 60,
110
Selecting Files and Folders for Cloud Backup •
66, 67, 85, 110
Selecting Files and Folders for File-Level
Backup • 24, 38
Sending Guest Invitations • 125
Sharing Files with Guest Invitations • 124
Software Requirements • 9
Sorting Tables • 64
Stopping the Current Backup Operation • 111
Stopping the Current Local Backup Operation
• 39
Supported Backup Operations • 5
Suspending and Resuming Backup • 111
Suspending and Resuming Local Backup • 39
Suspending the Cloud Backup Service • 79,
111
Suspending/Unsuspending Cloud Drive
Synchronization • 91
T
The CTERA Agent Web Interface • 64
U
Uninstalling the Agent • 13
Using Cloud Drive Synchronization • 90
Using Pre/Post Backup Scripts • 139
Using the CTERA Agent in Appliance Mode •
23
CTERA Agent for Windows User Guide
Index
Using the CTERA Agent in Cloud Agent Mode •
59
Using the CTERA Agent Manager • 26
Using the CTERA Agent Web Interface • 62
V
Viewing Access Logs • 104
Viewing Active Guest Invitations • 126
Viewing Agent Details • 41, 113
Viewing Audit Logs • 106
Viewing Cloud Backup Information • 80
Viewing Cloud Backup Logs • 81, 98, 100
Viewing Cloud Drive Synchronization Status •
95
Viewing Cloud Sync Logs • 103
Viewing Logs • 97, 99, 107, 108
Viewing System Logs • 99
Viewing the Agent Status • 40, 112
W
Workflow • 23, 59
Working with Backup Sets • 66, 68
CTERA Agent for Windows User Guide
155