1
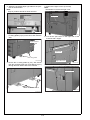
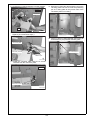
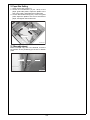
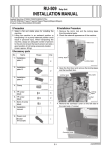
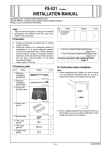
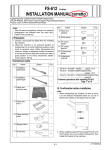
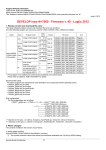
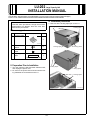
LU-202 Large Capacity Unit
INSTALLATION MANUAL
Applied Machine: C6501/C6501P/C5501/C6500/C6500P/C5500/C65hc/C7000/C7000P/C6000/C70hc
COLOR MFP: 65ppm/55ppm COLOR PRESS:(71ppm/71ppm)/(70ppm/70ppm)/(60ppm/60ppm)
Product code: A0U0/A0U1/A0U2/A03U/A03V/A0E7/A0Y8/A1DU/A204/A1DV/A205
III. Installation procedures
Note:
Take the same procedures, though the machine
photographs are different from the ones illustrated in the procedures.
1. Remove all the locking tapes put on the LU.
Locking tapes
Locking tape
I. Accessory parts
No.
Name
Shape
Q’ty
1. LU fixing plate
2
A03WIXC001SA
2. TP screw
M4x10
6
3. TP screw
M3x6
2
4. Paper type
label
Locking tape
Accessory parts
1
* Used North America only
II. Preparation Prior to Installation
Locking tapes
1. Turn the machine’s Sub and Main switches OFF,
and unplug the power cord.
2. Do not turn the power switch ON unit all the locking materials are removed from the LU.
Locking tapes
Locking tapes
A03WIXE001SA
E-1
A03W955044
2. Attach the enclosed paper type label to the position as shown below.
Note:
Only for products bound for North America.
5. Remove the right cover/3. (2 screws)
Note:
Remember to remove the right cover.
Right cover/3
Paper type label
A03WIXE015SA
3. Open the right side door of the machine, put the
LU fixing plates (2 pcs.) in the door, and close the
door.
A03XIXE007SA
6. Cut off the split cover on the right side of the
machine with a nipper.
Right side door
Split cover
LU fixing plates
Right side cover
A03WIXE002SA
4. Secure the LU fixing plates (2 pcs.) with screws
from the accessory parts (TP screw M4x10: 4 pcs.)
through the front screw holes to the machine.
A03WIXE005SA
7. Pull out the connector plate.(2 screws)
Connector plate
TP screws M4x10
A03WIXE006SA
A03WIXE003SA
E-2
11. Open the LU front door and mount the LU on the
LU fixing plates. Be sure to meet the positioning
pin of LU fixing plate to the junction hole of the
LU bottom plate on mounting.
8. Connect the LU-202 connectors (3) to the machine.
Machine
Connectors
LU
A03WIXE007SA
9. Fix the connector plate and wire relay bracket
together.(TP screw M3x6: 2pcs.)
A03WIXC002SA
12. Fix the LU to the LU fixing plate with the screws (TP
screw M4x10: 2 pcs.) from the accessory parts.
Connector plate
TP screws M4x10
Wire relay bracket
TP screw
M3x6: 2pcs.
A03WIXE008SA
10. Install the connector plate using the 2 screws
removed from the connector plate.
A03WIXE010SA
Machine
Removed screws
A03WIXE009SA
E-3
IV. Vertical opening / level adjustment
3. Adjusting directions (vertical opening/level)
Example:
If the top end of the LU is too far away, extend
the LU adjuster feet to raise the LU.
(1) Loosen the nuts (front/rear: 2 places) on the
LU adjuster feet using a wrench.
(2) Lower the up-down plate to the very bottom,
and use a flathead screwdriver to extend the
LU adjuster feet from inside the LU to raise it.
(3) Adjust the front and rear adjuster feet to make
the LU parallel to the direction the paper passes.
Note:
Check again the vertical opening.
(4) When the adjustment is complete, tighten the
nuts (front/back: 2 places) on the LU adjuster
feet.
1. Adjust the height of the adjuster feet to make the
vertical opening between the machine and the
LU even.
A03WIXC003SA
2. Open the top door of the LU, and check if the
machine’s paper passing area is parallel to the
gap in the top door. If it’s not parallel, adjust the
heights of the front and rear adjuster feet.
Paper passing area
ӲTurn
Top door
of the LU
ӱLoosen the nuts
A03WIXE012SA
A03WIXE011SA
Adjuster foot rods
Should be parallel
Wrench
E-4
V. Paper Size Setting
1. Open the top door of the LU.
2. Loosen the knobscrews (2 pcs. each) of the
paper guide side plates, adjust the plates to the
size of the paper, and tighten the knobscrews.
3. Loosen the knobscrews (2 pcs.) of the end guide
plate, adjust the plates to the end of the stack of
paper, and tighten the knobscrews.
Knobscrews
Knobscrews
A03WIXE013SA
VI. Skew adjustment
Make a sample copy and if it is skewed, move the
set position of the positioning pin at the LU bottom
plate.
Positioner
Screws
A03WIXE014SA
E-5