1
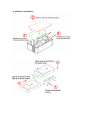
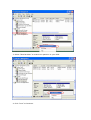
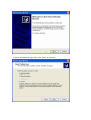
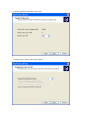
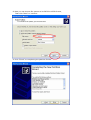
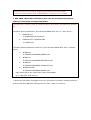
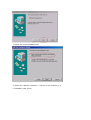
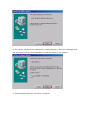
Dual Hard Disk Enclosure User’s Manual
1. Product Overview
DUAL HDD Enclosure is a function-friendly and cost-effective storage solution for
home and SOHO users Support RAID 0 and JBOD function to expend the HDD up to
1TB capacity. This is a perfect solution to store, share and back up your documents,
pictures, video and audio files.
This product is Available in USB2.0 version and USB2.0 +IEEE1394 Combo version.
2. Product features
z
Portable desktop design
z
Support SATA II Hard Drive, highest capacity up to 1TB. (e.g. 500G HDD x2)
z
USB2.0 specification transfer rate up to 480Mbps (USB2.0 version)
z
IEEE1394 specification transfer rate up to 400Mbps (Combo version)
z
support Raid 0 /JBOB functions
3. Specification
Product name:
USB2.0 DUAL HDD Enclosure
Data transfer rate: Up to 480Mbps (USB2.0)
Power supply:
Supporting Hard
Disk
Partition
Configuration
USB2.0+ 1394 DUAL HDD
Enclosure
Up to 480Mbps (USB2.0)
Up to 400Mbps
(1394)
External Power adapter 12V DC===4A
SATA I & SATA II Hard Disk Drive
FAT32 / NTFS
Product Dimension 120(W)x 180(D)x80 (H) mm (main body)
Weight
700g (Exclude hard disk)
Operation
Operation Temperature: 0C~70C, Operation Humidity:
Environment :
10~90RH
Storage
Environment:
Certification:
Storage Temperature: -20C~70C, Storage Humidity: 5~95RH
CE, FCC Certified
Package content:
1x USB2.0 DUAL HDD
1x Combo DUAL HDD Enclosure
Enclosure
1x USB2.0 Cable
1x USB2.0 Cable
1x IEEE1394 Cable
1x External Power Adapter
1x External Power Adapter
1x Driver CD (with User
1x Driver CD (with User manual
manual inside)
inside)
4. Jumper setting for RAID functions
Before install the Hard Disk please read below information carefully, this enclosure
supports 3 different mode of operation.
Factory default will set in JBOD (Spanning) mode, if you wish to change the
setting please do it before install hard disk drive.
Important info: All data will be lose after change settings, so please make sure all
dates has been saved in other place before change RAID function setting.
5. Hardware installation
6. Format your Hard Drive
if you are selecting RAID ) or JBOD function, than you need to reformat and partition
both HDD first by following below steps.
1. Click on right mouse in “My computer” and select “Manage”
2. Select “Disk Management” to check Hard Disk information, click right side of mouse
and select “Convert to Dynamic Disk”.
3. Select “New Partition” to create new partition in your HDD.
4. Click “next” to Continue.
5. Select the partition type than click “Next” to continue.
6. Select partition size than click next.
7. Assign driver letter than click “Next”.
8. Now you can choose file system to be FAT32 or NTFS format,
Than click “Next” to continue.
9. Click “Finish” to completing the partition format.
Important info: If you wish to cerate FAT32 format more than 30GB
Partitions. Please install utility “SWISSKNIFE” enclosed in the CD ROM.
7. Win 98SE /Win 2000 installation (Can only be installed when jumper
setting is in Striping and Spanning Mode)
Important note: Before install we need to prepare some files in Win2000 and Win98se
CD.
-Windows 2000 Professional ( Use Microsoft MSDN Disc 0013.1 / April 2002 ):
1.
USBSTOR.sys
C:\WINNT\system32\driver\
2. USBSTOR.inf & USBSTOR.PNF
C:\WINNT\inf\
-Windows 98 Second Edition install CD ( Use Microsoft MSDN Disc 2397 / October
2003 ):
1.
NTMAP.sys
D:\ENGLISH\WIN98SE\BASE5.CAB
2.
NTMAP.inf
D:\ENGLISH\WIN98SE\PRECOPY2.CAB
3.
NTMAP.cat
D:\ENGLISH\WIN98SE\CATALOG3.CAB
4.
NTMAPHLP.PDR
D:\ENGLISH\WIN98SE\BASE5.CAB
copy these files to the new folder under OS Win98se
(e.g.:\Win98se_USB_driver).
1. When the USB cable is plugged in the PC, the system will show a message that the
system finds the USB Mass Storage Device. Click “ Next” to continue.
2. Select the recommended mode.
3. Select the “Specify a location :” and key-in the location (e.g.
C:\Win98se_USB_driver).
4. Install success from the new driver to the system.
5. After while, the system will detect the new hard disk.
6. The system will detect the USB device is 1394/USB Disk in the Device Manager, and
will show that it needs the NTMAP.INF to install the driver in the system.
7. Install success from the new driver to system.
In the Device Manager, we can find the new hard disk in the Disk drives.