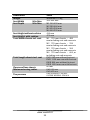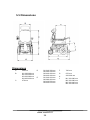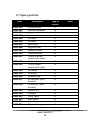
1
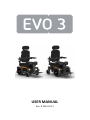
USER MANUAL Rev. D 2014-10-11 DECLARATION OF CONFORMITY The manufacturer Neatech.it 4/A, A. de Curtis, 80040, Cercola (NA), Italy under its responsibility, states that the wheelchair EVO3 satisfies the conditions laid down by the European Directive 93/42 and its subsequent updates; according to the criteria for classification of Annex IX of this directive, the EVO3 is classified as class I medical device It also complies with the requirement of the harmonized standards: UNI EN 12182 – Technical aids for disabled person UNI EN 12184 – Electrically powered wheelchairs, scooters and their chargers 1 WHEELCHAIR PRESENTATION .................................................12 2 STARTING UP .........................................................................13 2.1 Checks to be made on delivery .......................................13 2.2 Unpacking ......................................................................14 2.2.1 3 4 Remove the EVO3 from the pallet ...........................15 2.3 Assembly operation ........................................................16 2.4 Transport and storage ....................................................16 ADJUSTMENTS .......................................................................17 3.1 Armrests.........................................................................17 3.2 Legrest ...........................................................................20 3.2.1 Height .....................................................................20 3.2.1 Footrest width and angle ........................................22 3.3 Backrest .........................................................................24 3.4 Seat depth ......................................................................25 3.5 Drive profile ...................................................................26 USE OF THE WHEELCHAIR ......................................................27 4.1 Rnet control console .......................................................27 4.2 Using the wheelchair ......................................................31 4.3 Manual brake release lever ............................................36 4.4 Powered function ...........................................................37 4.4.1 Seat lift ...................................................................37 5 4.4.2 Seat tilt ...................................................................38 4.4.3 Backrest biomechanical recline ...............................39 4.4.4 Legrest biomechanical elevation .............................40 4.5 Battery charging .............................................................41 4.6 Use as seat in motor vehicle ...........................................43 MAINTENANCE.......................................................................46 5.1 Tire puncture ..................................................................47 5.2 Checks to be made on the wheelchair ............................49 5.3 Troubleshooting .............................................................50 5.3.1 Rnet system fault ....................................................51 5.4 Specification ...................................................................52 5.5 Dimensions.....................................................................54 5.6 Magneto hydraulic protection ........................................55 5.7 Spare part list .................................................................56 5.8 Instruction for replacing parts ........................................58 5.8.1 Antitip castor ..........................................................58 5.8.2 Front cover for FWD wheelchair (back cover for RWD wheelchair) ............................................................................59 5.8.3 Back cover for FWD wheelchair (back cover for RWD wheelchair) ............................................................................60 5.8.4 Legrest cover ..........................................................61 5.8.5 Backrest cover ........................................................61 5.8.6 Tire of traction (with tube) ......................................62 6 5.8.7 Tire of castor wheel (with tube) ..............................63 5.8.8 Armrest pad............................................................64 5.8.9 Joystick ...................................................................65 5.8.10 Seat cushion ...........................................................65 5.8.11 Backrest cushion .....................................................65 WARRANTY TERMS ................................................................66 6.1 SERIAL NUMBER .............................................................66 6.2 INCIDENT REPORTING.....................................................66 TIPPING HAZARD Any transport on a slope greater than the maximum security slope can be dangerous. ELECTROMAGNETIC RADIATION DANGER The behavior of the wheelchair while driving may be affected by electromagnetic fields created by transceivers such as: Citizens band (CB) radios, walkie-talkies, fire and police radios, cellular phones, lap-top computers, two-way radios, and commercial radio and television broadcast antennas. PLEASE USE CAUTION in the presence of these devices. EMI can cause your chair, without warning, to: • Release its brakes • Move by itself • Move in unintended directions If any of these occur, it could result in severe injury to you or others. EMI can damage the control system of your chair. There is no way to know the effect on EMI if you add accessories or modify this chair. Any change to your chair may increase the risk of EMI. Parts from other suppliers have unknown EMI properties. The wheelchair might disturb the operation of devices in its environment that emit electromagnetic fields TEMPERATURE The temperature of some surfaces may increase when the chair is exposed to external heat sources as sunlight. Do not install, maintain or operate your wheelchair without reading all warnings and this entire user’s manual. Always keep this manual in connection with your wheelchair. NOTICE TO RIDER—WARNING Do not use your wheelchair on stairs or escalators. Do not lift or move the wheelchair by any of its removable parts. The wheelchair should be turned off prior to entering or exiting the wheelchair. The wheelchair may come to a sudden stop at any time during operation. Do not operate the wheelchair if it is behaving abnormally or erratically. Do not operate the wheelchair with low batteries, to minimize risk of becoming stranded. Don’t use the wheelchair if your weight exceed the maximum user weight written in the specification of this user manual. Do not carry passengers on the wheelchair independently of the age of the passenger. PINCH HAZARDS – WARNING Make sure your feet do not “hang up” or get caught in the space between the footrests. In general, make sure you have proper space in areas you will travel through to minimize pinching or entrapment of body parts. Do not use an escalator to move the wheelchair between floors. Serious bodily injury may occur. Do not lean over the top of the back upholstery to reach objects from behind as this may cause the wheelchair to tip over. Do not shift your weight or sitting position toward the direction you are reaching as the wheelchair may tip over backwards or sideways Do not tip or wheel the wheelchair with wheel locks. Wheel locks are not brakes. Do not stand on the frame of the wheelchair. Always use caution when transferring in or out of the wheelchair. Every precaution should be taken to reduce the transfer distance. Also be certain the wheel locks are engaged to prevent the wheels from moving. Caution—Obstacles Riding over curbs or obstacles can cause tipping and serious bodily harm. If you have any doubt that you can safely cross any curb or obstacle, ALWAYS ASK FOR HELP. Be aware of your riding skills and personal limitations. Develop new driving skills only with the help of a companion. Caution—Anti-Tippers Using anti-tippers substantially reduces your risk of falling over backwards, which can cause serious injury. The Anti-Tippers will keep you from falling over, but they will limit your ability to be pulled up curbs and some other maneuvers. IT IS NOT POSSIBLE TO HAVE THIS WHEELCHAIR WITHOUT ANTI TIPPERS. The wheelchair is not designed for weight training and is unsafe for use as a seat while weight training. Weight training from the wheelchair substantially changes the stability of the chair and cause tipping. The wheelchair is not intended to be dismantled. There is no parts of the wheelchair expected to be handled during normal use of it. It is recommended to not use the wheelchair near public way without lights turned on. MODIFICATIONS Any unauthorized modifications to the wheelchair may increase the risk of personal injury and damage to the wheelchair. All modifications should be done by an authorized service center. Do not use any unauthorized accessories or spare parts on the wheelchair. Do not use the wheelchair in combination with other medical devices without first having considered any risk due to combination of more product. AUTHORIZED SERVICE CENTER For any need not expressly explained in this manual, please contact an authorized service center. For a list of authorized service center please contact the manufacturer: Neatech.it 4/A, A. de Curtis, 80040, Cercola (NA), Italy www.neatech.it – [email protected] - +39 081 555 1946 DISPOSING This product and all its components can not be treated as household waste. For more detailed information on how recycling and disposal this product contact your local waste disposal service. 1 WHEELCHAIR PRESENTATION Thank you for purchasing EVO3 electronic wheelchair. EVO3 is a battery powered wheelchair. Its intended use is to provide indoor mobility to person limited to seated position that are capable to operate and drive an electronic wheelchair. Though EVO3 was designed to be used mainly indoors it is possible to have lights and to use the wheelchair even in some outdoor environments. Motors 2x 220 W Batteries 2x55Ah 12V Electronic Tilt (45°) + Electronic Negative Tilt (45°) Electronic Lift (30 cm) Electronic Reclining Backrest (0-170°) Electronic Elevating Central Mounted Footrest WARNING: It is prohibited to use wheelchair or its parts for any purpose other than that indicated. For a correct use please follow the instructions given in this manual. NEATECH.IT disclaims any responsibility for damages caused by improper use of aids. NEATECH.IT disclaims any responsibility for inappropriate selections of wheelchair models The information in this manual may be subject to change without notice. All information, pictures and specifications are based upon the product information that was available at the time of printing. They are representative examples and not intended to be exactly as the actual wheelchair www.neatech.it 12 2 STARTING UP 2.1 Checks to be made on delivery Check for the integrity of the original packaging. Check for any anomalies on the shipping documents. Check for the functionality and integrity of the device in all its parts, at the time of delivery or immediately thereafter, to ensure that no damage has resulted from a careless transport. Make sure the surface of the device is not damaged, scratched, bent, etc. Any fault or damage found must be immediately reported on the shipping documents and promptly communicated to the carrier. For any other questions, please contact the manufacturer. www.neatech.it 13 2.2 Unpacking Be sure to put the package of the EVO3 on a stable and secure surface and remove straps with scissors. Pull away the box as shown in Figure 1. Figure 1 Inside the box there is: EVO3 wheelchair N. 1 Charger Documentation and manuals www.neatech.it 14 2.2.1 Remove the EVO3 from the pallet Figure 2 Figure 3 Unlock the engine with the lever on the left and right side as shown in Figure 2 and Figure 3 and slide gently down the EVO3 from the pallet. After positioning the EVO3 in a safe place, return the lever to its original position. PACKAGING DIASPOSAL To properly recycle the packaging materials follow the instructions provided by your local waste disposal service. www.neatech.it 15 2.3 Assembly operation Mount the backrest on the wheelchair as it is described in section 3 ADJUSTMENTS. 2.4 Transport and storage If you do not use your EVO3 for a long time make sure that you set the switch OFF as shown in Figure 4. You should keep the EVO3 in a place free from dust and moisture and away from heat sources. If you need to transport the EVO3, turn off the switch. For the transport be sure that the vehicle is approved for this purpose and set the brake release levers in right position (UP, brakes engaged). The wheelchair isn’t intended to be dismantled for storage or transport. Figure 4 www.neatech.it 16 3 ADJUSTMENTS EVO 3 wheelchair has the possibility of many adjustments to best suit the specific user. To perform these adjustments they are required a 4 mm allen wrench, a 5 mm allen wrench and a 8 mm open-end wrench. These adjustments can be made by the vendor or by an assistant of the user. 3.1 Armrests The available adjustments are in height and angle; these need to be made on the same order as they are presented. For the armrest height loosen the four bolts shown in Figure 5 and adjust the height with the single bolt located upon the support shown in Figure 6. For this operation use the 5 mm allen wrench Figure 5 www.neatech.it 17 Figure 6 For the armrest angle, you can decide to adjust the horizontal and vertical angle. For the horizontal angle, lift the armrest that you want to modify and unscrew the bolt indicated in Figure 7; after this you can set the right armrest angle, screwing the bolt to fixing the correct angle. For this operation use the 4 mm allen wrench Figure 7 www.neatech.it 18 For the vertical angle rotate clockwise the screw shown in Figure 8 to lower the armrest, rotate counterclockwise the screw to let up the armrest. Figure 8 www.neatech.it 19 3.2 Legrest 3.2.1 Height To adjust the legrest height, remove the cover (Figure 9) and loosen the bolts shown in Figure 10 with the 4 mm allen wrench; Figure 9 Figure 10 www.neatech.it 20 It is possible to adjust separately the height of right and left footrest. After loosen the bolts you can adjust the height of footrest, moving it up or down. To move it down it is required to push it towards the chassis and that push it down as it is shown in the Figure 11. After this adjustment you have to screw again the bolts loosen to fix the legrest position. Figure 11 www.neatech.it 21 3.2.1 Footrest width and angle You can adjust separately right and left paddle. Loosening two bolts for one paddle as shown in Figure 12 (with the 4 mm allen wrench) you can move it in the chosen position as shown in Figure 13. Figure 12 Figure 13 www.neatech.it 22 Loosening the bolt shown in Figure 14 (with the 4 mm allen wrench), under the paddle, it is possible to modify the angle of paddle. Figure 14 www.neatech.it 23 3.3 Backrest To perform the adjustment of the backrest for different type of height, you have to screw off the nuts positioned over the four different bolts as it is possible to see in Figure 15. To screw off the nuts, it is necessary a 8 mm open-end wrench. Figure 15 After screwed off the nuts it is possible to adjust in height the backrest. To facilitate the mounting of the backrest up the support it may be useful to remove the upholstery of the backrest. www.neatech.it 24 3.4 Seat depth To adjust the seat depth, loosen the 6 bolts on the right side and the 3 bolts on the left side of the seat, as it is shown in Figure 16. Figure 16 In this way you can move forward and backward the seat. When the chosen position is reached it is necessary to screw again the bolts. Figure 17 www.neatech.it 25 3.5 Drive profile As default in the wheelchair they are saved some different drive profile for the use indoor and outdoor. Additional profiles should be the result of customization for the individual user. Use the button “PROFILE” of the joystick to change different types of profiles: they are sorted from the more indoor one to the more outdoor one. For each profiles it is possible to change the speed. INDOOR PROFILES When these profiles are activated most of the parameters of the wheelchair are cut off. For example the maximum speed and the acceleration are limited. In this way the handling is really improved and there is more margin for mistake on the lever of the joystick. In this way it is comfortable to use the wheelchair in indoor environments. OUTDOOR PROFILES When these profiles are activated most of the parameters of the wheelchair are at the maximum value. For example the maximum speed and the acceleration are not limited. In this way it is comfortable to use the wheelchair in outdoor environments. However remember that the wheelchair EVO3 was designed for use mostly in indoor environments. www.neatech.it 26 4 USE OF THE WHEELCHAIR 4.1 Rnet control console The user interface is a joystick with a lever, buttons and a display. Figure 18 For the use of joystick please refer to the following instructions. Figure 19 www.neatech.it 27 This button turns on and off the wheelchair. Don’t use this button to stop the wheelchair unless it is an emergency. On-Off Button When this button is pressed the horn will sound Horn Button This button allow the user to navigate through the available function of the wheelchair (drive, actuators, preloaded movements) Mode Button This button allow the user to navigate through the available driving profiles for the wheelchair Profile Button These buttons decrease/increase the maximum speed setting Speed Buttons This button activates and deactivates the wheelchair’s hazard lights. When activated the Led will flash. Hazard Button + Led This button activates and deactivates the wheelchair’s lights. When activated the Led will illuminate Lights Button + Led Left-Right Indicator Button + Led These buttons activates and deactivates the wheelchair’s indicators. When activated the Led will flash Use the controller of the joystick to get in gear. Its proportional functionality allows you to adjust speed and direction according to the intensity with which you act on the controller. Releasing the lever of the controller automatically activates the electromagnetic brake that locks the wheels of the EVO3. www.neatech.it 28 BATTERY INDICATOR TIME SPEED INDICATOR SPEED LIMIT INDICATOR PROFILE IN USE Figure 20 The installation menu allows the user to access a range of setting: Set Time Display Time Distance Backlight Background Exit A right joystick inclination will enter the menu for the clock adjustment Left and right the joystick to change between 12h, 24h, off You can enter a screen where you can see the total distance driven using the wheelchair, the distance driven from last reset and you can reset this distance You can adjust the intensity of the LCD screen from 0 to 100 % in step of 10% You can choose the color of the background of the LCD screen between blue and white. Exit this menu www.neatech.it 29 www.neatech.it 30 4.2 Using the wheelchair Do not drive your wheelchair for the first time without the presence of an assistant near to you. At the beginning always use INDOOR profiles. Do not let children use the wheelchair without supervision. Do not drive your wheelchair under the influence of alcohol. Some pathologies may limit your ability to drive your wheelchair safely. Be sure to consult with a doctor about your physical limitations. Avoid sudden stops or starts. To stop the wheelchair use the lever of the joystick and don’t suddenly turn off the joystick unless it is an emergency. Don’t turn the wheelchair at high speed. When driving downhill, select the slowest speed. When driving uphill, try to keep moving at a stable speed. Anyway avoid driving on ramps without any edge protection. Do not drive up or down slopes with a slope greater than one indicated in the technical specifications of this manual. Center of balance of the wheelchair and so its stability cab be affected by: Lifting of the seat User position Us of a backpack Tilting of the seat WARNING If your wheelchair begins to behave in an unexpected manner, immediately release the joystick to stop the wheelchair and turn it off. www.neatech.it 31 DEFAULT POSITION Default position mean a safe position for the seat system of the wheelchair: o Height of the seat = 0 cm o Angle of seat = 0° o Angle of legrest = 90° o Angle of backrest = 90° Obstacle climbing When facing with an obstacle it is recommended to set the position of the seat in the “default position”. In order to riding over higher obstacles it is strongly recommended to take a run up of almost 500 mm when facing the obstacle first with castors. Dealing with uphill When facing an uphill road it is recommended to set the position of the seat in the “default position”. In order to best come over an uphill it is strongly recommended to use an outdoor profile at maximum speed with the wheelchair facing forward. WARNING Stopping and starting the chair while moving up an incline makes the wheelchair more difficult to control www.neatech.it 32 Dealing with downhill When facing a downhill road it is recommended to set the position of the seat in the “default position”. In order to best come over a downhill it is strongly recommended to use an indoor profile at minimum speed with the wheelchair facing forward. WARNING Don’t drive up or down slopes with a gradient than indicated in section 5.4. WARNING Don’t drive up or down ramps that are not equipped with proper edge protection to prevent the wheelchair from falling down. WARNING Don’t drive down or up a hazardous incline if the surface is covered with snow, ice or the surface is uneven. Driving on side slopes When facing with side slopes, always drive the wheelchair with great caution and at minimum speed www.neatech.it 33 Turning with the wheelchair Don’t turn with the wheelchair at high speed. Driving in dark environments Driving in dark environments can only be done if the wheelchair has functioning lights DRIVE WITH SEAT SYSTEM NOT IN DEFAULT POSITION Operating seat lift, tilt, backrest recline and legrest elevation may change the center of gravity and increase the risk of tipping over. Always drive in low speed and only use these functions on level surface. Safety belt Evo3 wheelchair has the predisposition for a pelvic belt, that can be purchased as an accessory. Pelvic belt is only designed to position the user and not for any protection in case of accident www.neatech.it 34 Transfer into and out the wheelchair Before entering or leaving the wheelchair turn it OFF. Users transfer is recommended with the assistance of an attendant. Don’t use the joystick as a hanrhold or point of support. Don’t use footrests or armrests as support. www.neatech.it 35 4.3 Manual brake release lever In case of necessity it is possible to manually move the wheelchair. First of all you have to turn off the wheelchair acting on the specific button of the joystick, see Figure 20. Then you can act on the release lever shown in Figure 21 and Figure 22. When the brakes are released, it is not be possible to drive the wheelchair. Figure 21 Figure 22 WARNING When the brakes are released never use the wheelchair on a slope or a wet surface. Don’t operate the brake release without the presence of an assistant www.neatech.it 36 4.4 Powered function Depending on the configuration of your own EVO3 some of this function should be not available or different. WARNING Operating these functions changes the center of gravity and increases the risk of tipping over. Always drive in low speed and only use these functions on horizontal plane. 4.4.1 Seat lift Figure 23 Figure 24 A maximum lift of 30 cm allows the user to have more independence. www.neatech.it 37 4.4.2 Seat tilt Adjusting the tilt of the wheelchair (45°) causes a better distribution of pressure on the body of the user. This helps to reduce the incidence of all problems due to punctual localization of loads. Figure 25 Moreover tilting helps you to avoid retention of fluids in the lower leg, make it easier to sit on the wheelchair. Figure 26 www.neatech.it 38 4.4.3 Backrest biomechanical recline Figure 27 Figure 28 Powered reclining of the backrest (range 90°-170°) helps to improve the posture. It is also useful to facilitate personal care. To best fit physiological movement as the backrest recline, it also slides down. The point of rotation of the backrest can’t coincide with the human’s anatomical point of rotation of the back. The biomechanical reclining is the best way to solve this and make the backrest and the headrest to remain in the same position in relation to the back. www.neatech.it 39 4.4.4 Legrest biomechanical elevation A central mounted legrest takes up less space than separated legrest making it easier to move with the wheelchair. In this way even lateral transfer will be easier. Figure 29 Figure 30 www.neatech.it 40 The knee that is the point of rotation of the lower leg can’t coincide with the point of rotation for the elevation of the footrest. EVO3 legrest has an innovative way to compensate this and assure that the knee and the thighs remain firmly on the wheelchair. 4.5 Battery charging To recharge the batteries use only the provided charger or one recommended by Neatech.it. The manufacturer is not responsible for damage to person or property resulting from the use of nonoriginal product. For a list of recommended charger please contact your vendor. Connect the power cord to a power supply 230 V. Connect the cable to the joystick as shown in Figure 31 and Figure 32. Figure 31 Figure 32 When batteries are loaded unplug the power cord and the battery cable. Battery charging should be done in well ventilated environments. Never charge in bathroom or wet room. When the charger is connected it is not possible to drive the wheelchair www.neatech.it 41 Each battery is subject to a normal “self-discharge”, so batteries that are not used for long time will discharge by itself. Charging time is influenced by multiple factors such as remaining battery power, battery state of aging and temperature. However the approximate charging time is about 7-9 hours. If the charge duration was reduced (about 1 hour), that is a sign of failure: contact the vendor for a possible replacement of batteries. Don’t use the wheelchair during the charge. SHOCK HAZARD Check if charger data sheet matches with the network power (voltage, frequency). Only use the charger supplied with the wheelchair. RELEASE DANGER Any impact to the batteries could cause a loss of fluids. Pay attention ENVIRONMENTAL HAZARD It is recommended to properly recycle used batteries. Contact your local agency for waste disposal for more information. www.neatech.it 42 4.6 Use as seat in motor vehicle Hooks for local travel (four-point tie-down) The wheelchair was tested when used as a front-facing seat in a motor vehicle, meeting the requirements of ISO 7176-19 The way of access to the motor vehicle and handling within it is influenced by the size of the wheelchair. It is recommended to use the pelvic seat belt along the front of the pelvic area, so that the angle of the belt is between 30° and 75° from the horizontal, as shown in Figure 33; a greater angle, always in the expected range, is preferable. Figure 33 www.neatech.it 43 You should keep your seat belts as tight as possible to the body, but without affecting the comfort Make sure that the belts are not twisted during use. It is recommended to use both the pelvic belt and the shoulder belt to reduce the possibility of impact of the head and chest with vehicle components. Figure 34 Remove and assure inside the vehicle any not essential accessory from the wheelchair in order to reduce the potential risk of injury. If the wheelchair has been involved in some type of collision between vehicles, it must be tested by the manufacturer before reuse. Don’t make any alteration or tampering on point of safety or structural parts. www.neatech.it 44 Use extreme care when positioning the wheelchair, so that the release button of the seat belt can not be pressed by its components in case of impact. The hooks that can be used with the wheelchair are “Four-Point TieDown” type. The wheelchair will be hooked up inside the motor vehicle in 4 points: 2 front and 2 rear, as shown in Figure 35. Figure 35 Don’t use any postural systems in a motor vehicle unless they are conform to ISO 7176-19. www.neatech.it 45 5 MAINTENANCE Regular maintenance help to preserve functionality and safety of the Evo3. The lack or inadequacy of care and maintenance implies a limitation of the warranty from the manufacturer. To clean the chair don’t use any device to spray water at high pressure and in any case protect the control device from water and humidity. For plastic or metal parts use a soft cloth moistened with a non-aggressive detergent. For pads and covers use warm water and mild detergent. Do not use chemical cleaners, solvents, acids, etc. Tires can be cleaned with water and detergent. CAUTION All interventions on the wheelchair’s systems must be performed by an authorized service center SHOCK HAZARD The main switch must always be switched off when batteries are replaced or you are doing any maintenance of the wheelchair. Always turn off the joystick before interrupting the power with the main switch. www.neatech.it 46 5.1 Tire puncture In case of tire puncture please see following instruction: CASTERS PUNCTURE Disassemble the punctured caster unscrewing the bolt shown in Figure 36 by locking the nut (1) with an open-end wrench of 13 mm and unscrew the bolt (2) with an allen wrench of 6 mm. 2 1 Figure 36 Contact an authorized service center to repair the punctured wheel. When the authorized service center returns to you a repaired wheel, mount it following the instructions in reverse order. www.neatech.it 47 TRACTION WHEELS PUNCTURE Disassemble the punctured wheel unscrewing the four bolts indicated in Figure 37 with a 6 mm allen wrench. Figure 37 Pay attention when unscrewing the bolts and pulling away the wheel because in case of incorrect procedure it is possible to damage the hub motor. Contact an authorized service center to repair the punctured wheel. When the authorized service center returns to you a repaired wheel, mount it following the instructions in reverse order. www.neatech.it 48 5.2 Checks to be made on the wheelchair CHECK PERIOD Battery charge level Before each utilize Electric cables obstacle Tightening of removable parts Before each utilize Before each utilize NOTE Check the battery charge level on the indicator located on the joystick. (see Figure 20) Check that the wires do not interface with the movements of the wheelchair. Ensure all removable parts are securely locked in place. Verify that the tire pressure is consistent with the given values: Tire pressure Lights check Cleaning of wheelchair Brake release lever check Weekly Weekly Monty Monty Tire usury Monty Checking tightness of chassis screws Annual DRIVE WHEELS: 280 kPa CASTOR WHEELS: 250 kPA Overfilling can cause a risk of explosion Verify that all lights and indicators work properly and are clean. This point can apply only if you have lights on your wheelchair Clean the wheelchair and the upholstery according to the instructions of this manual Check that the brake release is working properly Check for the tire usury and if necessary contact an authorized service center for the replacement For this operation please contact an authorized service center www.neatech.it 49 5.3 Troubleshooting EVENT The wheelchair can not be started POSSIBLE CAUSE Batteries discharged Joystick cable not connected or badly connected Main switch is set to OFF The wheelchair is turned on but the chair does not drive The wheelchair stops while driving The wheelchair can only be driven at low speed Batteries in charging Brake release lever in wrong position Magneto – hydraulic protection switch has triggered Joystick cable not connected or badly connected Seat lift is too high or anyway the position of the seat is such that the speed need to be limited for safety reasons Wheelchair makes noise Release lever not properly inserted Tire puncture Tire puncture Problems with the seat system Broken actuator or software fault REMEDY Charge the batteries Properly insert the joystick cable Turn the main switch to ON. If the problem continues, it means that there are some electric problems. Please don’t use your wheelchair and contact an authorized service center Wait that the batteries are completed charged Set properly the brake release lever as it is shown in section 4.3 Turn the main switch to ON. If the problem continues, it means that there are some electric problems. Please don’t use your wheelchair and contact a qualified technician Properly insert the joystick cable Adjust the position of the seat Insert the release lever correctly as it is shown in section 4.3 See section 5.1 Contact an authorized service center www.neatech.it 50 5.3.1 Rnet system fault When the control system is triggered and the wheelchair can’t be used, a diagnostic screen is displayed in the display of the joystick. First switch off the wheelchair and leave it off for some minutes. Then reboot the wheelchair. If the fault still continues, contact an authorized service center. Figure 38 Identified Module indicates the module that had the problem For example: PM= Power Module, JSM= Joystick, ISM= Light Module, CxSM= Seating Module The Trip Text is a brief description of the problem The Trip Code is a four digit code that allow an authorized service center to identify the problem Joystick Error If the joystick is moved from the central position during or immediately after turning on an error will be displayed, see Figure 39. To enable the wheelchair to drive again set the joystick in the central position and reboot the wheelchair. Figure 39 For any other need, please contact the manufacturer. www.neatech.it 51 5.4 Specification General Feature Product code - name Class (EN 12184) Enclosure class Value Performance Feature Maximum user weight Range Obstacles climbing Maximum safe slope Static stability Maximum speed Value S042 – Evo3 Class B IPX4 80 kg 25 km 50 mm 6° 9° RWD: 10 km/h FWD: 6 km/h 55Ah 12V Sealed Type 2x220W 80 A Batteries Motors Main circuit breaker Control force Joystick 3N Environmental temperature Level of resistance to ignition Expected lifetime -10 °C - +50 °C The wheelchair is compliant with EN 12184:2014 point 9.5 5 years www.neatech.it 52 Dimensions Weight Seat Width Seat Depth Value Min-Max Min-Max Seat Height without cushion Seat Height: with cushion Total Width chassis incl. seat Total Length chassis incl. seat Clearance floor-chassis Minimum turning radius Tire pressure Maximum 125 kg 280-460 mm M1 340-420 mm M2 380-460 mm M3 420-500 mm M4 440-520 mm 410 mm 470 mm M1 570 mm chassis - 480 mm including seat and armrests M2 570 mm chassis - 520 mm including seat and armrests M3 570 mm chassis - 560 mm including seat and armrests M4 570 mm chassis - 600 ,m including seat and armrests FWD 880 mm without footrest FWD 1120 mm con with footrest RWD 800 mm without footrest RWD 1090 mm con with footrest 66 mm RWD 850 mm FWD 655 mm DRIVE WHEELS: 280 kPa CASTOR WHEELS: 250 kPA www.neatech.it 53 5.5 Dimensions Dimensions A 560 mm B M1 280-300 mm M2 320-340 mm M3 360-380 mm M4 400-420 mm 470 mm C D E M1 340-390 mm M2 390-440 mm M3 440-490 mm M4 440-490 mm M1 340-420 mm M2 380-460 mm M3 420-500 mm M4 440-520 mm www.neatech.it 54 F 780 mm G 870 mm H 200-300 mm J M1 300-380 mm M2 300-380 mm M3 380-440 mm M4 380-440 mm 5.6 Magneto hydraulic protection Use the switch, see Figure 40 and Figure 41 to turn on and off the EVO3. The switch also has the function of protecting the wheelchair from overloaded current and short circuit. If the power chair suddenly stops, use the switch to turn on the chair. If the problem still continues, it means that there are some electric problems, please contact technical support. Figure 40 Figure 41 www.neatech.it 55 5.7 Spare part list Code R042-001 R042-002 R042-003 R042-004 R042-005 R042-006 R042-007 R042-008 R042-009 R042-010 R042-011 R042-012 R042-013 R042-014 R042-015 R042-016 R042-017 R042-018 R042-019 R042-020 R042-021 R042-022 R042-023 R042-024 Description Antitip castor Backrest actuator Legrest actuator Front cover Rh cover Lh cover Back cover Legrest cover Backrest cover Traction wheel Tire of traction wheel (with tube) Castor wheel Tire of castor wheel (with tube) Rh motor Lh motor Armrest pad Rh armrest (with bracket) Lh armrest (with bracket) Battery set Charger Front lights Back lights Joystick Rh joystick support Type of service A B B A B B A A A B A www.neatech.it 56 B A B B A B B B A B B A B Note R042-025 R042-026 R042-027 R042-028 R042-029 Lh joystick support Power module Light module Seating module Advanced seating module Footplate Complete legrest Legrest belt Rnet cable 2.5 m Rnet cable 1.5 m Rnet cable 0.5 m Rnet cable 1.0 m Actuator cable Advanced seating module cable Seat cushion Backrest cushion R042-030 R042-031 R042-032 R042-033 R042-034 R042-035 R042-036 R042-037 R042-038 R042-039 R042-040 Type of service A B B B B B B B B B B B B B B B A A Code Parts that the final user can buy at an authorized service center and substitute by himself. Parts that need the intervention of an authorized service center for the maintenance Use of unapproved aftermarket accessories and parts may make the wheelchair unstable or uncontrollable For any other need, please contact the manufacturer. www.neatech.it 57 5.8 Instruction for replacing parts 5.8.1 Antitip castor Unscrew the screw indicated in Figure 42 using a PH2 star head screwdriver positioned from the internal side of the castor. Remove the castor. Figure 42 To mount the new part screw again the screw using the same tool still positioned from the internal side of the castor. www.neatech.it 58 5.8.2 Front cover Unscrew the screws indicated in Figure 43 and remove the cover. For this operation use a 4 mm allen wrench. Figure 43 To mount the new part repeat the operations in reverse order. www.neatech.it 59 5.8.3 Back cover Unscrew the screws indicated in Figure 44 and remove the cover. For this operation use a 3 mm allen wrench. Figure 44 To mount the new part repeat the operations in reverse order. www.neatech.it 60 5.8.4 Legrest cover Take the two lower side of the legrest cover and pull them out. Then you have to take two higher side of the cover and pull them out. In this way you are able to take away the legrest cover Figure 46 Figure 45 To mount the new part repeat the operations in reverse order. 5.8.5 Backrest cover Remove the backrest cover first removing the lower part and then pulling it upward. Figure 47 To mount the new part repeat the operations in reverse order. www.neatech.it 61 5.8.6 Tire of traction (with tube) Remove the screws (1) shown in Figure 48 with a 6 mm allen wrench and remove the wheel of traction. Then remove the screws (2) indicated in Figure 49 and take away the rim; after that it is possible to remove the tire with its tube. 1 Figure 48 2 Figure 49 To mount the new part repeat the operations in reverse order. www.neatech.it 62 5.8.7 Tire of castor wheel (with tube) Disassemble the castor unscrewing the bolt shown in Figure 50 by locking the nut (1) with an open-end wrench of 13 mm and unscrew the bolt (2) with an allen wrench of 6 mm. 2 1 Figure 50 Remove the screws (1) shown in Figure 51 and take away the rim; after that it is possible to remove the tire with its tube. 1 Figure 51 To mount the new part repeat the operations in reverse order. www.neatech.it 63 5.8.8 Armrest pad Unscrew the screws indicated in Figure 52 and substitute the armrest pad with a 4 mm allen wrench. Figure 52 To mount the new part repeat the operations in reverse order. www.neatech.it 64 5.8.9 Joystick Switch off the wheelchair using the power button on the joystick, see Figure 19. Switch off the main circuit breaker, see section 5.6. Unplug the joystick cable. Seeing Figure 53 unscrew the two screws below the joystick to remove it. Figure 53 Substitute the joystick, screw the two screws and plug the cable again. After mounting the new joystick reboot the wheelchair. Ensure that the cable is properly connected. 5.8.10 Seat cushion Remove the seat cushion pulling it up. Place the new cushion on the straps and ensure it is correctly got it right 5.8.11 Backrest cushion Remove the backrest cushion pulling it forward. Place the new cushion on the straps and ensure it is correctly got it right www.neatech.it 65 6 WARRANTY TERMS Evo3 is a product globally guaranteed for 24 months with the exception of batteries that are guaranteed for six months. The warranty covers defects in materials or workmanship. The warranty doesn’t cover parts subject to usury or damaged parts by: overload, misuse, alterations and repairs made by unauthorized third parties. The warranty expires in case of tampering, improper storage, unauthorized or incorrect maintenance. 6.1 SERIAL NUMBER For any report or assistance request communicate the unique identification code on the chassis of each Evo3 as shown in Figure 54 Figure 54 6.2 INCIDENT REPORTING If an incident occurs please contact an authorized service center. For a list of authorized service center please contact the manufacturer: Neatech.it 4/A, A. de Curtis, 80040, Cercola (NA), Italy www.neatech.it – [email protected] - +39 081 555 1946 www.neatech.it 66 MODEL: SERIAL NUMBER: YEAR OF CONTRUCTION: MAXIMUM USER WEIGHT: MADE IN: www.neatech.it 67 EVO3 USER MANUAL EVO3 www.neatech.it