1
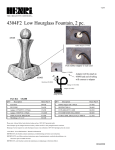
U S E R M AN U AL
ABS CASE
FRONT
GRAPHIC DISPLAY
NAVIGATION SWITCH
2
MOUNTING HOLES
BACK
BATTERY COVER
PC INTERFACE PORT
SPEAKER
3
The Skytronic GFX Skydiving Computer is our most
advanced instruments to date. It is designed to more effectively
improve safety, to more easily keep track of skydiving activity,
and the GFX contains features that will satisfy the most demanding
technical skydiver. It offers new functions, but it has been designed
for ease of use, with its intuitive Graphic User Interface and the
unique Navigation Switch which operates very much like a familiar
joystick. A wide graphic display, combined with menu icons and
tooltips, allows to set up and use within a few minutes, even
without referencing the manual. We’re sure you will enjoy all
the features of the Skytronic GFX, and we invite you to read the
information contained in this manual, as well the on-line
information available on our website www.parasport.it
4
The Navigation Switch
The Navigation Switch controls
the Skytronic GFX functions. It
can be moved in 4 directions
(up, down, left, and right very
much like a familiar joystick) and
depressed like a normal
pushbutton (ENTER function). It
also has an auto-repeat
functionality, so you can held the switch in place to have the
last action repeated. Throughout the different function selections,
the depressing action confirms, the up and down movement
changes values, and the left and right movement browses the
main menu and changes, programs or resets functions. The
Navigation Switch is also used to wake the unit when the display
is turned off (standby mode).
5
The Main Menu
The main menu will be displayed by moving the Navigation
Switch in any of the five directions. A row of icons will show at
the top of the screen, and you may browse them with the switch.
Select the desired function by depressing the Navigation Switch.
Warning Icons
Some icons may appear on the Skytronic GFX display to provide
extra information. These icons won't appear while in freefall to keep
the display clean for altitude display only.
CANOPY
SIGNALS ON
SOUND OFF
6
LOW BATTERY
Installing the battery
The Skytronic GFX is never turned off, so it is shipped with the
single CR2450 3V Lithium battery not installed. Expected battery
life is about 18 months, but it really depends on the number of
jumps, time connected to a computer, and time spent not in
stand-by mode. If you’re planning not to use the unit for some
time (like during Wintertime, for example) we suggest to remove
the battery to save battery life. Replace the battery when the
low-battery indicator turns on (please note that extreme cold
weather may falsely activate this indicator!). If the low-battery
signal turns on at temperatures above 50°F (10°C) the battery
needs immediate replacement. To install or replace the battery
follow these steps:
1. Remove the battery compartment cover by rotating it counterclockwise with a coin. Be careful not to lose the rubber ring at
the top of the battery compartment -- it must be installed for all
jumps!
7
2. Discard the old battery, if present, and install the new battery
with the + sign on top.
3. Close the battery compartment cover with the help of a coin,
rotating it clockwise until it stops, making sure that the rubber
ring is in place.
Note: battery installation should be made with extra care. The
rubber ring is critical for proper performance. The operator is
responsible for installing the battery and rubber ring properly
behind the battery compartment cover.
All of the information stored in the GFX is kept when replacing
the battery.
8
Configuring the Skytronic GFX
The Skytronic GFX is highly adaptable to your own personal
habits. Your settings will be stored and recalled also when your
replace the battery. When you first get the unit and install the
battery, we recommend to go through the following steps.
1. Set date and time
Date set
The unit immediately goes to this function when you install the
battery. Time and date can also be set going to menu
UTILS/CONFIG/ DATE. Simply move the switch up and down to
set the values,
confirming each of
them with E NTE R.
When you’re done,
move the switch right
to confirm the settings.
9
2. Choose the unit of measure
Configure units
Several units can be customized to your preferences. Go to
UTILS/CONFIG/UNITS and choose the units you prefer for
altitudes, temperatures, speeds, time, and date display.
10
3. Choose the sound level
Configure sound
The unit can be configured for different sound levels. Sound can
also be turned off when using the Skytronic as a visual altimeter
only. (Note: Confirmation signals are always at low volume).
Choose the volume you prefer from UTILS/CONFIG/SOUND.
Note: volume for canopy warnings is set separately, see the
ALARMS section below
11
4. Configure display
Display resolution
When displaying the altitude in freefall, the Skytronic GFX will
update the display at fixed altitude intervals. At higher freefall
speeds may be convenient to choose a higher resolution value
to have a more stable reading of the freefall altitude. Choose
your preferred setting in UTILS/CONFIG/DISPLAY/RESOLUTION.
The available choices will be shown in the measurement units
set.
12
Rotate the display
The altitude display in freefall can be rotated 180 degrees: choose
t h i s o p t i o n i n U T I L S / C O N F I G / D I S P L AY / R OTAT I O N .
Note: the display rotation will affect only the freefall altitude
display.
13
Change contrast
It may be useful to change the contrast of the display to match
different lighting situations.
Set the contrast in UTILS/CONFIG/DISPLAY/CONTR AST.
14
Altimeter view
When climbing to altitude the Skytronic GFX can show detailed
information, or the regular digital altimeter view. Choose the way
you prefer from UTI LS/CON F IG/DI SP L AY/ALTI M E TE R.
Altimeter view changes according to unit of measure setting and
the altitude. The unit will
show in ground mode
simple information when
altimeter view is selected,
and a complete
configuration summary
otherwise.
Detailed view
15
Metric
When unit of measure is metric, the display will show hundreds
of meters with larger digits, and meters with smaller digits. When
you go below 1000 meters, all of the digits will be large.
Altimeter view
16
Feet
When unit of measure is feet, altitudes higher that 10,000 feet
will be shown as thousands of feet in larger digits, with tens of
feet in smaller digits. Below 10,000 feet the tens of feet digits
will become larger, and below 1,000 feet the display will show
the complete altitude as large digits.
17
5. Set your number of jumps
Your Skytronic GFX logs your jumps, and numbers them starting
from the number you will set. Go to LOGBOOK, and move the
switch left to reset the logbook. Once you have set your number
of jumps you can confirm the action selecting YES using the
Navigation Switch.
18
6. Set your total freefall time
The unit accumulates freefall time starting from the time you
will set. You can set your total freefall time. Go to TOTALS, and
move the switch left to reset the totals. Once you have set your
total freefall time you can confirm the action selecting YES using
the Navigation Switch.
19
7. Alarms
The Skytronic GFX has 7 different alarms that are easy to recognize
and program and can be categorized as follo ws:
Freefall alarms: prepare to breakoff altitude, prepare to deploy
altitude, danger altitude, countdown timer.
Low speed alarms: up to three altitudes can be set for personal
purposes.
Freefall alarms
Breakoff alarm will go off at any vertical speed, while the other
two altitude warnings and the countdown timer will go off only
if still in freefall. A freefall altitude warning can be disabled setting
at the same altitude as another one. The countdown timer (that
signals the last 5 seconds of the preset time after the exit) can
be disabled setting the time to 0.
Freefall alarms settings can be grouped in “profiles”, so that
20
different altitude settings for different type of jumps can be
recalled easily. Profiles can be associated with a name of jump,
and this name is stored together with the jump in your logbook.
If the warning altitudes haven’t been recalled from a profile, the
type of the jump won’t be stored in the logbook entry.
To configure a profile go to PROFILES, scroll to the desired
number moving the switch up or down (1 to 9 are available)
and then move the switch left to program it. Each profile can be
associated with a jump name (names are preset and can’t be
changed). Once you’re
done programming the
profile, move the switch
right to confirm the
settings.
21
To select a profile go to PROFILES, scroll to the desired number
moving the switch up or down, and select depressing the switch.
22
Low speed alarms
Up to three separate low speed alarms can be set (like setting
a landing pattern for swooping) or all may be disabled. These
alarms can be set using the special profile 10. Different from the
other profiles, the low speed alarms can be enabled by selecting
CPY ON or CPY OFF, depending on your desire to have the want
canopy warnings on or off. Also, these warnings have a separate
volume settings, but are disabled if volume is turned off in the
sound configuration. Low speed alarms can be programmed just
like the other profiles.
23
Logbook
The Skytronic GFX senses the different phases of your skydive
(like acceleration, freefall and opening) by the changes in air
pressure and tracks that information in its electronic logbook.
The logbook can store up to 200 jumps, and can be reset at any
time. Jumps can be reviewed by moving the switch up or down.
24
To see details, press the switch to select the jump. Details are
shown on two separate pages than can be switched back and
forth by pressing ENTER. Jumps can also be reviewed from the
jump details page by moving the switch up and down.
Note: the average
freefall speed is
calculated by
removing the
acceleration portion
of the jump.
25
The jump counter can also be personalized to match your current
number of jumps. When you first set up your unit, pull up the
logbook from the main menu, go to its reset page by moving
the switch to the left, and then post your next jump number by
moving the switch up or down, and pressing ENTER to move
through the number fields. Once you have input your next jump
number, select YES by moving the switch right and confirm the
reset of the log by pressing the switch.
26
Totals
While logging jump information,
your Skytronic GFX tracks statistics,
like your total freefall time, in
addition to your total jumps.
When you first set up your unit, you may enter your current
freefall time and the Skytronic GFX will continue calculating your
freefall time from that point. To set your freefall time, pull up
the totals page from the main menu, go to its reset page by
moving the switch up or down and pressing ENTER to move
through the number fields. Once you have input the current total
freefall time, select YES by
moving the switch right and
confirm the reset of the totals by
pressing the switch.
27
Alarms
Alarms can be changed directly without selecting a user profile.
Select ALARMS from the main menu, change the altitudes and
time using the Navigation Switch, and move it to the right to
save the new settings.
28
Inflight view
During the climb to altitude the Skytronic GFX can show a simple
altimeter view, or more detailed information (see
UTILS/CONFIG/DISPLAY/ALTIMETER). The screen with more
detailed information shows the current altitude, the estimated
climb rate, and the estimated time (in minutes) to target altitude,
i.e. the ne x t 1000 meters, or the ne x t 3000 feet.
The warning altitudes you have set are also visible. And as further
backup, the Skytronic GFX will emit sounds while climbing to
altitude at your preset pull and breakoff altitudes.
29
Utilities
The utilities menu will read differently during the climb to altitude.
PC mode and jump test functions are disabled during this time
and the GROUND SET function is only available during this time.
GROUND mode
INFLIGHT mode
30
PC mode
The Skytronic GFX may be connected to a PC through a dedicated
interface (not supplied with the instrument) that is plugged into
the back of the unit after removing the rubber plug. The data
transfer must be activated from the utilities menu: from this
screen move the Navigation Switch to the right to close the
communication link and return to ground mode. Refer to the PC
interface manual for further details.
31
Sound test
For diagnostics, the sound test will go through the different
signals available to the Skytronic GFX, at the sound level chosen.
The sequence can be interrupted by holding the Navigation
Switch to the right.
32
Jump test
Verifying the settings of the Skytronic GFX is very easy. By selecting
the JUMP TEST, the GFX will simulate a jump beginning at 1,600
feet (500 meters) above the breakoff altitude and opening 650
feet (200 meters) below the pull altitude. The simulation will
use all your settings for display, volume, etc. It will not simulate
the countdown timer.
The simulation can be
interrupted by holding
the Navigation Switch to
the right.
Ground reset
The Skytronic GFX has been programmed to be auto-adaptive
(corrects automatically) when the air pressure changes on the
ground, so it’s always current. In some situations may be
33
necessary to manually reset the ground reference. This can be
done in two different ways, depending on what we see on the
screen.
If the unit shows the in-flight screen (though on the ground),
go to the utilities functions, and select the ground set item.
Choose YES to reset the new ground reference. DO NOT use
this function while climbing to altitude!
If the unit shows the altimeter view suggesting you are under
the open canopy (though on the ground), press the Navigation
Switch until you hear the unit beep: the Skytronic GFX will show
the ground screen
confirming that the new
ground reference has
been set.
34
Delete last jump
It is possible to delete from the logbook the last jump recorded.
The totals will be changed subtracting one jump from the jumps
totalled and the freefall time of this jump.
35
Installing on the wrist mount (optional)
Available by separate purchase, the wrist mount allows the use
of the Skytronic GFX as a digital altimeter. Low speed warnings
are also audible, and can be used to set a landing pattern guided
by sounds. The unit
can be installed on
the wrist mount
sliding it from the
back of the holder.
The assembly can
be secured to the
left or right wrist
with the Velcro strap
provided.
36
How to install an audible on helmets with IAS setup
1-Open the back of the holder on the inside of the helmet. Pull
horizontally first to unlock it, and then rotate to open.
2-Insert the audible into the rubber holder.
Depending on the instrument installed, it
could be necessary to use the spacer
supplied with the helmet. This will allow
the audible not to move when the holder
is closed.
3-Close the holder
assuring that the back
is well locked.
37
Mounting with screws
Four mounting holes can be found on the back of the Skytronic
GFX. Standard metric M2 screws can be used to fix the skydiving
computer: length of the screws depends on the thickness of the
material the unit should be installed on, keeping in mind that
about 5 mm (1/5 of inch) will go into the case to secure it. Drill
four holes corresponding to the four screws. If the Skytronic GFX
is used as audible altimeter, a larger hole corresponding to the
speaker must also be drilled to let the sound reach the ear.
38
Water resistance
The Skytronic GFX provides water protection when swooping
into ponds or in case of an unintentional water jump. If the unit
gets wet, immediately put it in a dry, controlled environment
away from sunlight; remove the battery and let all parts dry out
before reassembling.
Unit care
Operate on the unit only as described in this manual. Do not try
to perform any other service to the Skytronic GFX or attempt to
open the case. Protect your unit from shocks, extreme heat and
cold, and prolonged exposure to direct sunlight. If not in use,
your Skytronic GFX should be stored in a clean, dry environment
at room temperature. The Skytronic GFX can be cleaned with a
clean cloth lightly moistened with warm water, do not use soap
or detergents. Do not attempt to take the Skytronic GFX apart
or service it by yourself.
39
Technical specifications
• Microprocessor based Skydiving Computer
• Wide size graphic LCD
• Intuitive graphical user interface
• Ergonomic Navigation Switch
• Real time altitude indicator
• Altitude range: 0-21,500 ft (0-9.000 meters)
• Water resistant
• Up to three separate freefall altitude warnings:
1,000 to 9,000 feet (300 to 3.000 meters)
• First altitude warning always goes off at preset altitude,
the others only at vertical speed exceeding 100 ft/s (30 m/s)
• Up to three separate low speed altitude warnings:
100 to 6,000 feet (30 to 2.000 meters)
• Powerful audible signals, distinct and easily recognizable
• Warning altitude set with 30 feet (10 meters) increments
40
• Countdown timer: 5 to 150 seconds from exit (can be disabled)
• User profiles: up to 9 customized preset values of warnings
can be stored and recalled
• Self-calibration (manual reset allowed), self-test,
no power-on, low consumption
• Easily programmable on the ground or while climbing to
altitude
• Jumps log (up to 200 jumps): date, time, exit altitude,
deployment altitude, freefall time, average and maximum
freefall speeds
• Statistics: number of jumps, total freefall time, highest exit
altitude, lowest deployment altitude, maximum freefall speed
• PC link to download information to a computer
(external interface optional)
• Battery: 1 x CR2450
• Size 64 x 43 x 14 mm
41
Skytronic GFX functions map
MAIN MENU
LOG
UTILS
PROFILES
DATE
TOTALS
PC MODE
(1)
ALARMS
UNITS
RESET
TOTALS
PROGRAM
PROFILE / SWOOP
WARNINGS
RESOLUTION
CONFIG
SOUND
ROTATION
JUMP TEST
(1)
RESET LOG
DISPLAY
CONTRAST
SOUND
TEST
ALTIMETER
MODE
DELETE
LAST JUMP
(1) Active in INFLIGHT mode only
(2) Active in GROUND mode only
42
RESET
GROUND
(2)
Warranty and limits of liability
If this product should fail due to defects in manufacturing,
Parasport Italia will repair or replace the units or parts of it free
of charge for three (3) years from the date of purchase. This
warranty applies to the original purchaser and covers only failures
due to defects in materials and workmanship that may occur
during normal operations while in the period of the warranty. It
doesn’t cover damage or failures resulting in accident, misuse,
neglect, mishandling, alteration, or modifications of the product,
or any failure caused by operation of the product outside the
scope of its specifications or any cause not covered by this
warranty.
43
TRIXDESIGN
PARASPORT ITALIA - Via Vigone, 25/a - 10061 CAVOUR (TO) Italy
Tel. +39(0121)69692 - Fax +39(0121)6207
www.parasport.it - [email protected]