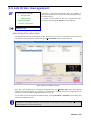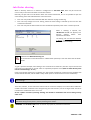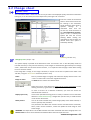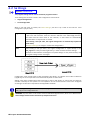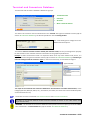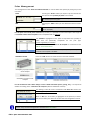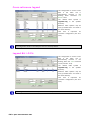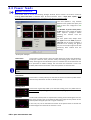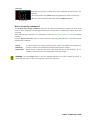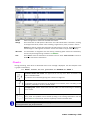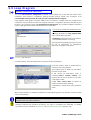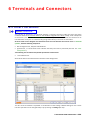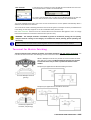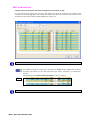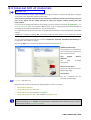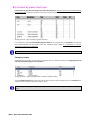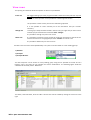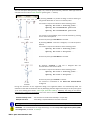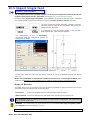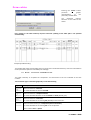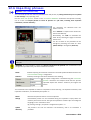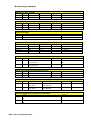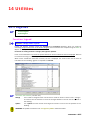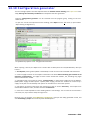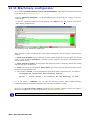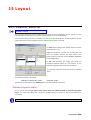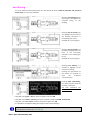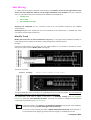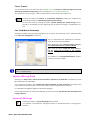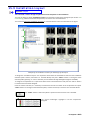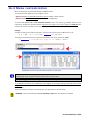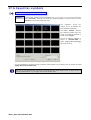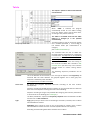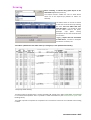
1
Spac Automazione 2011 User Manual October 2010 Tutti i diritti riservati. Tutti i prodotti SDProget sono marchi registrati. Altri marchi o nomi di prodotto citati nel testo sono marchi registrati o marchi commerciali delle rispettive case. SDProget Industrial Software Via delle Industrie, 8 10040 ALMESE (TO), ITALIA Tel. +39, 011, 9346666 Fax +39, 011, 9351193 Internet E-mail : [email protected] Internet WEB pages : http://www.sdproget.it Summary SUMMARY................................................................................................................................................... 1 1 INSTALLATION ........................................................................................................................................ 15 1.1 HARDWARE AND SOFTWARE REQUIREMENTS ............................................................................................. 15 For 32 bit operating systems ............................................................................................................... 15 For 64 bit operating systems ............................................................................................................... 16 1.2 INSTALLATION ...................................................................................................................................... 17 Setup .................................................................................................................................................. 18 Stand-alone hardlock.......................................................................................................................... 21 Network hardlock ............................................................................................................................... 21 Installation and configuration of the licensed server (TCP\IP)......................................................................... 22 Installation and configuration of the licensed client (TCP\IP).......................................................................... 22 Installation and configuration of the licensed server (ANP) ............................................................................ 23 Installation and configuration of the licensed client (ANP) ............................................................................. 23 Data migration and customization utility ............................................................................................ 24 File Migration................................................................................................................................................. 24 Library Migration ........................................................................................................................................... 25 Dictionary Migration ...................................................................................................................................... 25 Installation changes............................................................................................................................ 26 Restore installation............................................................................................................................. 26 Uninstall ............................................................................................................................................. 26 1.3 NEW IN THE RELEASE 2011 .................................................................................................................... 27 1.4 PREVIOUS VERSIONS .............................................................................................................................. 28 2 BASICS .................................................................................................................................................... 29 2.1 WORKING ........................................................................................................................................... 29 2.2 START WORKING................................................................................................................................... 30 Command Locations (pop-menu) ........................................................................................................ 32 2.3 THE JOB ORDER.................................................................................................................................... 35 2.4 THE MULTISHEET .................................................................................................................................. 36 The sheet ............................................................................................................................................ 36 2.5 JOB ORDER MANAGEMENT ..................................................................................................................... 37 Selecting the job order ........................................................................................................................ 37 New job order ................................................................................................................................................ 38 Open job order............................................................................................................................................... 39 New multisheet.............................................................................................................................................. 40 Open Multisheet ............................................................................................................................................ 41 Job order Path................................................................................................................................................ 42 Table of job orders .............................................................................................................................. 43 CSV file........................................................................................................................................................... 44 Find functions................................................................................................................................................. 45 Customer management....................................................................................................................... 46 Fields.............................................................................................................................................................. 47 Start settings....................................................................................................................................... 48 Summary • 1 Job Order copy .................................................................................................................................... 48 Job Order sharing................................................................................................................................ 49 Job Order files ..................................................................................................................................... 50 3 SHEET MANAGEMENT ............................................................................................................................ 51 3.1 CREATE MULTISHEET ............................................................................................................................. 51 Sheets processing................................................................................................................................ 54 Sheet title............................................................................................................................................ 56 Summary ............................................................................................................................................ 56 3.2 CHANGE SHEET..................................................................................................................................... 57 3.3 NEXT SHEET ......................................................................................................................................... 58 3.4 PREVIOUS SHEET................................................................................................................................... 58 3.5 LAST SHEET .......................................................................................................................................... 58 3.6 DELETE SHEET ...................................................................................................................................... 59 3.7 SHIFT SHEET......................................................................................................................................... 60 Forwards............................................................................................................................................. 60 Backwards .......................................................................................................................................... 61 Checking ............................................................................................................................................. 61 3.8 STORE SHEET ....................................................................................................................................... 62 Lista.dat file ........................................................................................................................................ 63 Sheet classification ............................................................................................................................. 63 3.9 INSERT STORED SHEETS .......................................................................................................................... 64 New sheet........................................................................................................................................... 65 Wizard ................................................................................................................................................ 65 Save Association............................................................................................................................................. 65 Retrieve Associations ..................................................................................................................................... 65 Import Associations........................................................................................................................................ 65 3.10 EXPLODE (BOOM) ............................................................................................................................... 66 3.11 SPLIT MULTISHEET............................................................................................................................... 66 Unsplit ................................................................................................................................................ 67 3.12 COPY BETWEEN SHEETS........................................................................................................................ 68 3.13 MOVE BETWEEN SHEETS ...................................................................................................................... 69 3.14 CLEAR SHEET...................................................................................................................................... 69 3.15 NUMBER SHEETS................................................................................................................................. 70 3.16 PRINT SHEETS .................................................................................................................................... 71 Print page setup.................................................................................................................................. 72 Plot area......................................................................................................................................................... 72 Grouping ........................................................................................................................................................ 73 Assign Pens .................................................................................................................................................... 73 3.17 SHEET REVIEW ................................................................................................................................... 74 Management ...................................................................................................................................... 74 Delete Revisions.................................................................................................................................. 75 Revision Symbol .................................................................................................................................. 76 Revision Legend .................................................................................................................................. 77 Sheet sequence .............................................................................................................................................. 78 Revision sequence.......................................................................................................................................... 78 3.18 SHEET UTILITIES .................................................................................................................................. 79 Sheet title............................................................................................................................................ 79 Sheet legend ....................................................................................................................................... 80 Location Symbol.................................................................................................................................. 84 Master title blocks .............................................................................................................................. 85 Sheet slides ......................................................................................................................................... 85 4 GENERAL COMMANDS............................................................................................................................ 87 4.1 SETUP ................................................................................................................................................ 87 4.2 SETTINGS ............................................................................................................................................ 88 Export Settings.................................................................................................................................... 89 2 • Spac Automazione 2011 New Original Cfg ............................................................................................................................................ 89 Change Original Cfg........................................................................................................................................ 89 Import Settings ................................................................................................................................... 90 Sheet Dimensioning ............................................................................................................................ 91 Cross Reference................................................................................................................................... 92 Symbol Configuration ......................................................................................................................... 93 Pin association ............................................................................................................................................... 95 Prefix archive ................................................................................................................................................. 95 New prefix archive ......................................................................................................................................... 96 Materials association...................................................................................................................................... 97 Symbol referencing ............................................................................................................................. 98 Incremental identification .............................................................................................................................. 98 Sheet – Prefix in Absolute incremental identification ..................................................................................... 99 Sheet – Prefix in Relative incremental identification ...................................................................................... 99 Prefix – Sheet in Absolute incremental identification ..................................................................................... 99 Prefix – Sheet in Relative incremental identification ...................................................................................... 99 Positional identification................................................................................................................................ 100 Free referencing........................................................................................................................................... 100 Panel Prefix .................................................................................................................................................. 101 Absolute Prefix............................................................................................................................................. 101 Incremental Format ..................................................................................................................................... 101 Returns ..............................................................................................................................................102 Automatic Positioning .................................................................................................................................. 102 Power returns .............................................................................................................................................. 102 Connection returns....................................................................................................................................... 103 On-line Cross (Start + Destination)................................................................................................................ 103 Preferences ........................................................................................................................................104 Insert blocks with fence................................................................................................................................ 104 Snap-to-segment block insertion .................................................................................................................. 104 Number wires after inserting symbol ........................................................................................................... 105 Preview CSV file ........................................................................................................................................... 105 Program test ................................................................................................................................................ 105 Intelligent delete.......................................................................................................................................... 105 Selection Preview......................................................................................................................................... 106 Functions near contacts................................................................................................................................ 107 Dialogue windows state ............................................................................................................................... 107 Estimate list ................................................................................................................................................. 107 Location Manager ........................................................................................................................................ 108 Same component references........................................................................................................................ 109 Symbol attribute features ..................................................................................................................110 Wire and Terminal numbers...............................................................................................................111 Positional numbering ................................................................................................................................... 111 Wire properties............................................................................................................................................ 112 Terminal properties...................................................................................................................................... 112 Color management....................................................................................................................................... 112 Options ........................................................................................................................................................ 113 Advanced options......................................................................................................................................... 114 Wires Labels................................................................................................................................................. 116 Automatic numbering ........................................................................................................................118 Terminal box......................................................................................................................................118 Cable database ..................................................................................................................................119 New cable .................................................................................................................................................... 120 Duplicate Cable ............................................................................................................................................ 121 Set Default ................................................................................................................................................... 121 Color codes .................................................................................................................................................. 122 Import \ Export Cables ................................................................................................................................. 122 Terminal and Connectors Database ...................................................................................................123 Terminals Archive......................................................................................................................................... 124 Connectors Archive ...................................................................................................................................... 126 Poles Management ...................................................................................................................................... 128 Summary • 3 Accessories Archive ...................................................................................................................................... 129 Wires’ Terminals Archive.............................................................................................................................. 130 Loop Diagram ....................................................................................................................................131 Terminal block ...................................................................................................................................132 Sheet title legend ...............................................................................................................................134 Revision legend..................................................................................................................................134 Function legend .................................................................................................................................135 Symbol legend ...................................................................................................................................135 Cross-reference legend.......................................................................................................................136 Legend Bit I-O Plc ...............................................................................................................................136 4.3 PANEL SETTING ...................................................................................................................................137 Location setting .................................................................................................................................138 Table..................................................................................................................................................139 4.4 POWER FEEDS .....................................................................................................................................140 Power returns ....................................................................................................................................142 4.5 CONNECTIONS ....................................................................................................................................143 Connection returns.............................................................................................................................145 Quick Wire .........................................................................................................................................146 4.6 DRAWING UTILITIES..............................................................................................................................147 Connection.........................................................................................................................................147 Automatic Connection........................................................................................................................147 Shield.................................................................................................................................................148 Multisheet Scan .................................................................................................................................148 Updating Lists and Tables ..................................................................................................................149 4.7 COMPONENT REFERENCES .....................................................................................................................152 Reference duplicated Parents.............................................................................................................153 Use current Prefix Archive ..................................................................................................................153 Automatic (1).....................................................................................................................................154 Manual (2) .........................................................................................................................................154 Incremental referencing.....................................................................................................................155 Absolute incremental Sheet - Prefix referencing .................................................................................155 Relative incremental Sheet - Prefix referencing ..................................................................................156 Absolute incremental Prefix - Sheet referencing .................................................................................156 Relative incremental Prefix - Sheet referencing ..................................................................................157 Positional referencing ........................................................................................................................157 5 WIRE NUMBERING.................................................................................................................................159 5.1 NUMBER WIRES...................................................................................................................................159 Numbering.........................................................................................................................................159 Renumbering .....................................................................................................................................161 Number wires connected to terminals................................................................................................162 Numbering wires connected to returns ..............................................................................................162 5.2 AUTOMATIC WIRE NUMBERING ..............................................................................................................163 Numbering.........................................................................................................................................164 Wires already numbered.............................................................................................................................. 165 Positional numbering.........................................................................................................................166 5.3 USED NUMBERS LIST .............................................................................................................................167 CSV file...............................................................................................................................................167 5.4 INTERNAL PANEL WIRING ......................................................................................................................168 Checks................................................................................................................................................169 Wiring tables .....................................................................................................................................170 CSV file...............................................................................................................................................171 5.5 NUMBER SUMMARY .............................................................................................................................172 5.6 DELETE NUMBERS ................................................................................................................................172 5.7 DDATTEF ............................................................................................................................................173 Ddattef Wires.....................................................................................................................................173 4 • Spac Automazione 2011 Ddattef Power feeds ..........................................................................................................................174 Ddattef Terminals ..............................................................................................................................175 5.8 COPY WIRE NO. ...................................................................................................................................176 5.9 LOOP DIAGRAM...................................................................................................................................177 Configuration.....................................................................................................................................179 5.10 DATA INDICATIONS.............................................................................................................................180 6 TERMINALS AND CONNECTORS .............................................................................................................181 6.1 INSERT TERMINALS ...............................................................................................................................181 Terminal Box......................................................................................................................................183 Multiple terminals..............................................................................................................................184 Terminal for Matrix Patching .............................................................................................................185 6.2 INSERT CONNECTORS ............................................................................................................................186 6.3 TERMINALS AND CONNECTORS ...............................................................................................................188 Terminal block drawing .....................................................................................................................190 Terminal block table ..........................................................................................................................191 Terminal usage drawings...................................................................................................................193 Connector drawing ............................................................................................................................194 Connector table .................................................................................................................................194 RailDesigner 2....................................................................................................................................195 CSV file...............................................................................................................................................195 Terminal block List .............................................................................................................................196 List (Table).................................................................................................................................................... 196 List (Csv File) ................................................................................................................................................ 196 Edit terminal block .............................................................................................................................197 Change terminal........................................................................................................................................... 198 Add terminal ................................................................................................................................................ 199 Terminal repositioning ................................................................................................................................. 199 Sort terminals............................................................................................................................................... 200 Sort by usage................................................................................................................................................ 200 Renumber NumM ........................................................................................................................................ 201 Edit connectors ..................................................................................................................................202 Modify Connector ........................................................................................................................................ 203 Insert Accessories......................................................................................................................................... 204 Update terminals ...............................................................................................................................205 Rename .............................................................................................................................................206 Checks................................................................................................................................................206 6.4 USAGE ...............................................................................................................................................207 Panel Hierarchy .................................................................................................................................208 Assign usage......................................................................................................................................208 Automatic .................................................................................................................................................... 208 Manual......................................................................................................................................................... 208 Check Usage not Assigned ............................................................................................................................ 208 Delete Usage......................................................................................................................................209 6.5 DDATTEF TERMINALS ............................................................................................................................210 6.6 NUMM NUMBERING ............................................................................................................................211 NumM = NumI ...................................................................................................................................211 6.7 NUMI AND NUMO SETTINGS..................................................................................................................212 6.8 DELETE TERMINALS ..............................................................................................................................212 7 CROSS-REFERENCING.............................................................................................................................213 7.1 CROSS-REFERENCING ............................................................................................................................213 Cross-referencing a Parent.................................................................................................................214 Parent symbol .............................................................................................................................................. 214 Child symbol................................................................................................................................................. 214 Example ....................................................................................................................................................... 215 Return Cross-Referencing...................................................................................................................216 Return signal ................................................................................................................................................ 216 Summary • 5 Example ....................................................................................................................................................... 216 Parent and return cross-referencing...................................................................................................217 Editing.......................................................................................................................................................... 218 7.2 PIN REFERENCE ...................................................................................................................................220 Save Pin .............................................................................................................................................222 7.3 ERRORS .............................................................................................................................................223 Parent symbol errors..........................................................................................................................223 Return symbol errors..........................................................................................................................227 7.4 REAL-TIME CROSS-REFERENCE ................................................................................................................228 7.5 CROSS-REFERENCE LEGEND ....................................................................................................................229 7.6 CROSS UTILITY ....................................................................................................................................230 Change by Cross.................................................................................................................................230 Delete Cross Reference.......................................................................................................................230 8 BILL OF MATERIALS................................................................................................................................231 8.1 MATERIALS DATABASE ..........................................................................................................................231 Database information........................................................................................................................232 File Import/Export..............................................................................................................................232 Database print...................................................................................................................................233 Inserting a code .................................................................................................................................234 Edit code ............................................................................................................................................234 General ........................................................................................................................................................ 235 Technical Notes............................................................................................................................................ 236 Layout .......................................................................................................................................................... 237 Electrical BLK................................................................................................................................................ 238 Unravelling................................................................................................................................................... 239 Tools ..................................................................................................................................................240 Define a filter ............................................................................................................................................... 240 Associating filters ......................................................................................................................................... 241 Apply filter ................................................................................................................................................... 241 Find codes.................................................................................................................................................... 242 Hide information.......................................................................................................................................... 242 Hidden component management................................................................................................................. 242 Import file Terminals (DAT) .......................................................................................................................... 242 Options ........................................................................................................................................................ 242 Database utilities ...............................................................................................................................243 Edit macro .........................................................................................................................................243 Edit Macro Connectors.......................................................................................................................244 8.2 ASSOCIATE MATERIALS ..........................................................................................................................245 Options ..............................................................................................................................................247 See codes ..................................................................................................................................................... 248 See macros................................................................................................................................................... 248 Update materials with same symbols ........................................................................................................... 248 Confirm each code ....................................................................................................................................... 248 Material supply..................................................................................................................................249 Supply codes ................................................................................................................................................ 249 Estimated Bill of material codes .........................................................................................................250 Import Dmw................................................................................................................................................. 250 8.3 INTERNAL BILL OF MATERIALS .................................................................................................................251 Edit .............................................................................................................................................................. 252 Update ......................................................................................................................................................... 253 Delete .......................................................................................................................................................... 253 Details.......................................................................................................................................................... 253 Overtemperature ......................................................................................................................................... 253 Technical Manual ......................................................................................................................................... 253 Bill sorted by reference ......................................................................................................................254 Bill sorted by panel and reference ......................................................................................................254 Bill sorted by type ..............................................................................................................................255 6 • Spac Automazione 2011 Compact view............................................................................................................................................... 255 Bill sorted by panel and type ..............................................................................................................256 Compact view............................................................................................................................................... 256 Bill table.............................................................................................................................................257 CSV file...............................................................................................................................................259 DMW File ...........................................................................................................................................260 8.4 EXTERNAL BILL OF MATERIALS.................................................................................................................261 Import/Export Bill ..............................................................................................................................261 View rows ..........................................................................................................................................262 Free codes.................................................................................................................................................... 263 Codes tied to a materials database............................................................................................................... 263 Update from a file..............................................................................................................................264 Print...................................................................................................................................................264 Table..................................................................................................................................................265 8.5 EXTRACTION BY EXTERNAL MODULE.........................................................................................................266 8.6 IMPORTING BY EXTERNAL MODULE ..........................................................................................................266 8.7 IMPORT CSV FILE.................................................................................................................................267 8.8 FILTER MATERIALS DATABASE .................................................................................................................267 8.9 DISASSOCIATE MATERIALS......................................................................................................................267 8.10 BILL COMPARISON USING CSV FILE ........................................................................................................268 8.11 LIBCENTER .......................................................................................................................................269 8.12 DBCENTER .......................................................................................................................................270 Materials database TreeView ............................................................................................................271 Associated materials list ....................................................................................................................272 Drawing mode ...................................................................................................................................273 Filters.................................................................................................................................................274 DbCenter Toolbar...............................................................................................................................275 9 OVERTEMPERATURE..............................................................................................................................277 9.1 OVERTEMPERATURE CALCULATION ..........................................................................................................277 Starting the program .........................................................................................................................277 Panel window ....................................................................................................................................278 Calculate ...................................................................................................................................................... 278 Print ............................................................................................................................................................. 278 Export to drawing......................................................................................................................................... 279 Panel component window..................................................................................................................280 General info .......................................................................................................................................280 Results ...............................................................................................................................................281 9.2 DESIGN INFORMATION ..........................................................................................................................282 Panel database ..................................................................................................................................282 Components database .......................................................................................................................282 Panel constants database ..................................................................................................................283 9.3 CALCULATION – BASIC CONCEPTS ............................................................................................................284 Basic concepts....................................................................................................................................284 Ventilation .........................................................................................................................................285 9.4 OVERTEMPERATURE TABLE ....................................................................................................................287 10 SINGLE FEED DRAW .............................................................................................................................289 10.1 SINGLE FEED DRAW ............................................................................................................................289 10.2 SINGLE FEED NUMBER WIRES ...............................................................................................................291 10.3 SINGLE FEED DATA TABLES...................................................................................................................292 10.4 EDIT SINGLE FEED CIRCUIT ...................................................................................................................293 10.5 IMPORT SINGLE FEED ..........................................................................................................................294 Order of Returns .......................................................................................................................................... 294 11 CABLES.................................................................................................................................................295 11.1 CABLES ............................................................................................................................................295 Summary • 7 Cable selection...................................................................................................................................297 Automatic Association.................................................................................................................................. 298 Wire details.................................................................................................................................................. 298 Controls .............................................................................................................................................298 Draw cables .......................................................................................................................................299 Cable table.........................................................................................................................................300 CSV file...............................................................................................................................................300 11.2 CABLE DEFINITION..............................................................................................................................301 Cable table.........................................................................................................................................301 Table..................................................................................................................................................302 CSV file...............................................................................................................................................302 11.3 CABLE DATABASE ...............................................................................................................................303 11.4 CABLE INFORMATION..........................................................................................................................304 12 TRANSLATOR .......................................................................................................................................305 12.1 TRANSLATOR BLOCKS ..........................................................................................................................305 12.2 INSERT PHRASES ................................................................................................................................306 Insert Phrases toolbar ........................................................................................................................307 12.3 TRANSLATION ...................................................................................................................................308 12.4 TRANSLATOR SETTINGS .......................................................................................................................310 Color text processing..........................................................................................................................311 Translated text features .....................................................................................................................311 Translation position ...........................................................................................................................312 Processed blocks ................................................................................................................................312 Associate Tag................................................................................................................................................ 313 Force style..........................................................................................................................................314 Language–Style association .......................................................................................................................... 314 Constant phrase.................................................................................................................................315 12.5 PHRASE DATABASE .............................................................................................................................316 Phrase filter .......................................................................................................................................317 Update existing phrases.....................................................................................................................317 Enter new phrases..............................................................................................................................317 "Wild card" symbol ............................................................................................................................318 Dictionary management ....................................................................................................................319 Create new................................................................................................................................................... 319 Copy dictionary ............................................................................................................................................ 319 Change dictionary ........................................................................................................................................ 320 Import file .................................................................................................................................................... 320 Export file..................................................................................................................................................... 320 12.6 IMPORTING PHRASES ..........................................................................................................................321 12.7 SHIFT WITHIN BLOCK ..........................................................................................................................323 12.8 DELETE TRANSLATION .........................................................................................................................323 12.9 LANGUAGE EXTENSIONS ......................................................................................................................324 Installing on Windows® XP .................................................................................................................324 12.10 EDIT TRANSLATION ...........................................................................................................................325 Installing a keyboard layout...............................................................................................................325 Using on-screen keyboard..................................................................................................................326 13 PLC.......................................................................................................................................................327 13.1 PLC I/O BITS .....................................................................................................................................327 Individual bits ....................................................................................................................................327 Board.................................................................................................................................................328 Board terminals .................................................................................................................................328 Bit numbering ....................................................................................................................................329 Numbering examples ................................................................................................................................... 330 13.2 SYMBOLS LIBRARY ..............................................................................................................................331 Plc database management.................................................................................................................333 8 • Spac Automazione 2011 Available series ............................................................................................................................................ 334 Modules....................................................................................................................................................... 335 Associated blocks ......................................................................................................................................... 336 Advanced settings ........................................................................................................................................ 337 13.3 PLC MANAGER ..................................................................................................................................338 Spreadsheet.......................................................................................................................................338 Edit table ...........................................................................................................................................339 Individual Bit insertion ................................................................................................................................. 339 Multiple Bit insertion ................................................................................................................................... 339 Delete Bit ..................................................................................................................................................... 340 Bit Duplication.............................................................................................................................................. 340 Bit Change.................................................................................................................................................... 340 Multiple value application............................................................................................................................ 341 Update data from drawing ................................................................................................................341 Update Bits selected from DWG ................................................................................................................... 341 Update all DWG bits..................................................................................................................................... 341 Update data in a drawing ..................................................................................................................341 Update selected bits..................................................................................................................................... 341 Update all Bits.............................................................................................................................................. 341 Update selected summaries ......................................................................................................................... 342 Update all summaries................................................................................................................................... 342 Update all bits summaries............................................................................................................................ 342 Drawing.............................................................................................................................................342 Drawing selected bits ................................................................................................................................... 342 Automatic drawing of selected Bits .............................................................................................................. 343 Importing data from file.....................................................................................................................343 Exporting data to file .........................................................................................................................343 Usage style management...................................................................................................................343 Insertion of a new Usage.............................................................................................................................. 344 Change Usage............................................................................................................................................... 345 Delete Usage................................................................................................................................................ 345 Usage macroblocks....................................................................................................................................... 345 Filters........................................................................................................................................................... 346 13.4 PLC CONFIGURATION .........................................................................................................................347 Unity Pro interface.............................................................................................................................349 13.5 PLC DRAWING ..................................................................................................................................350 13.6 PLC UTILITY ......................................................................................................................................352 Same name ........................................................................................................................................352 Assign element...................................................................................................................................352 Summaries.........................................................................................................................................353 Prepare summaries ...................................................................................................................................... 353 I-O Import/Export...............................................................................................................................353 I-O Bit legend .....................................................................................................................................355 14 UTILITIES ..............................................................................................................................................357 14.1 LEGENDS ..........................................................................................................................................357 Function legend .................................................................................................................................357 Drawing........................................................................................................................................................ 358 CSV file......................................................................................................................................................... 358 Symbol legend ...................................................................................................................................359 14.2 ATTRIBUTE CHANGES ..........................................................................................................................360 Graphic changes ................................................................................................................................360 Attributes visibility .............................................................................................................................361 Value substitution..............................................................................................................................362 Force value ........................................................................................................................................363 Fast Attedit ........................................................................................................................................363 Copy attributes ..................................................................................................................................363 Fit width (T+ and T-) ...........................................................................................................................363 Summary • 9 Import attributes ...............................................................................................................................364 Export attributes ................................................................................................................................364 14.3 SUBSTITUTION OF A BLOCK...................................................................................................................365 Single block........................................................................................................................................365 List.....................................................................................................................................................365 Exchange files............................................................................................................................................... 366 14.4 MARKING .........................................................................................................................................367 Manual Marking ................................................................................................................................368 Update ......................................................................................................................................................... 368 Delete .......................................................................................................................................................... 368 Automatic Marking............................................................................................................................369 Update ......................................................................................................................................................... 369 Delete .......................................................................................................................................................... 369 Show\hide Wire Numbers ..................................................................................................................369 14.5 LABELS.............................................................................................................................................370 Wire extraction ..................................................................................................................................370 Wire extraction by panel .............................................................................................................................. 371 Terminal extraction............................................................................................................................372 Reference extraction ..........................................................................................................................372 Function extraction ............................................................................................................................372 Simplo................................................................................................................................................372 14.6 NAVIGATOR ......................................................................................................................................373 14.7 IGNORE SYMBOLS...............................................................................................................................375 CSV file...............................................................................................................................................376 14.8 EDIT CSV DOCUMENT .........................................................................................................................377 14.9 MACHINERY OPTIONS .........................................................................................................................378 Options marking ................................................................................................................................379 Highlight marks .................................................................................................................................380 Remove marks ...................................................................................................................................380 Export Data........................................................................................................................................380 14.10 CONFIGURATION GENERATOR.............................................................................................................381 14.11 MACHINERY CONFIGURATOR ..............................................................................................................382 14.12 SCHEME GENERATOR ........................................................................................................................383 14.13 SCADA ...........................................................................................................................................384 15 LAYOUT................................................................................................................................................385 15.1 CABINET EXTERIOR .............................................................................................................................385 Cabinet layout scale...........................................................................................................................385 Accessories ........................................................................................................................................386 15.2 CABINET INTERIOR .............................................................................................................................387 Plate ..................................................................................................................................................387 Raceway ............................................................................................................................................387 Database ...................................................................................................................................................... 388 Component ........................................................................................................................................388 Terminal block ...................................................................................................................................389 Options ..............................................................................................................................................389 Size table...................................................................................................................................................... 389 15.3 TOPOGRAPHIC MANAGER ....................................................................................................................390 Component Management ..................................................................................................................393 Dimensions and Block Choice .............................................................................................................396 Block Specifications...................................................................................................................................... 397 15.4 PUSHBUTTON PANEL ..........................................................................................................................398 Configuration.....................................................................................................................................398 Panel wiring.......................................................................................................................................399 Drawing........................................................................................................................................................ 401 Update ......................................................................................................................................................... 401 Panel front.........................................................................................................................................402 10 • Spac Automazione 2011 Panel rear ..........................................................................................................................................402 15.5 PANEL SYMBOLS ................................................................................................................................403 Symbols – Pushbutton panel front......................................................................................................403 Symbols – Pushbutton panel rear.......................................................................................................403 15.6 PANEL UTILITIES.................................................................................................................................404 15.7 TESYS U...........................................................................................................................................405 TeSys U – Configuration .....................................................................................................................406 TeSys U – Draw ..................................................................................................................................407 15.8 UNRAVEL PANEL WIRES ......................................................................................................................408 See Wiring .........................................................................................................................................410 Edit Wiring.........................................................................................................................................411 Modify Track ................................................................................................................................................ 411 Force Tracks ................................................................................................................................................. 412 Set Forbidden Raceways............................................................................................................................... 412 Export Wiring Data ............................................................................................................................412 Unravel Settings.................................................................................................................................412 15.9 INSTALLATION LAYOUT ........................................................................................................................413 Tracks length .....................................................................................................................................415 Cable labels .......................................................................................................................................415 Installation Layout Report..................................................................................................................415 16 CUSTOMIZATION .................................................................................................................................417 16.1 BLK SYMBOLS ....................................................................................................................................417 16.2 MBLK MACROSYMBOLS .......................................................................................................................419 16.3 BLK LIBRARY .....................................................................................................................................420 16.4 MENU CUSTOMIZATION ......................................................................................................................421 Normal direct insert ...........................................................................................................................422 RFSS direct insert ...............................................................................................................................422 Normal insert via a window ...............................................................................................................423 Inser RFSS via a window.....................................................................................................................423 Inser automatic by dialogue...............................................................................................................424 17 SYMBOLS .............................................................................................................................................425 17.1 CATEGORIES OF SYMBOLS ....................................................................................................................425 Parent symbol....................................................................................................................................426 Registration reference symbol............................................................................................................428 Child symbol ......................................................................................................................................430 Pres identification for child symbols............................................................................................................. 431 Element symbol..................................................................................................................................432 Return symbol....................................................................................................................................433 Accessory symbols .............................................................................................................................434 Terminal symbol........................................................................................................................................... 434 Plug symbol.................................................................................................................................................. 436 Terminal block symbol ................................................................................................................................. 437 17.2 SYMBOL CREATION .............................................................................................................................438 Graphics ............................................................................................................................................438 Attributes...........................................................................................................................................438 Attribute modes........................................................................................................................................... 439 Slide...................................................................................................................................................439 17.3 SYMBOL INSERTION ............................................................................................................................440 Parent symbol....................................................................................................................................441 Entering blocks with fence ........................................................................................................................... 443 Snap–to–segment block insertion................................................................................................................. 443 Child symbol ......................................................................................................................................444 Real–time cross–reference OFF.................................................................................................................... 444 Real–time cross–reference ON..................................................................................................................... 445 Functions near contacts................................................................................................................................ 445 Summary • 11 Element symbol..................................................................................................................................446 17.4 CHANGE SYMBOLS..............................................................................................................................447 Delete ................................................................................................................................................447 Copy ..................................................................................................................................................448 Clone .................................................................................................................................................448 Edit ....................................................................................................................................................448 Move .................................................................................................................................................449 Stretch ...............................................................................................................................................450 17.5 LOCATION LABELS ..............................................................................................................................451 17.6 FAVORITES SYMBOLS ..........................................................................................................................452 17.7 LAST USED SYMBOLS ...........................................................................................................................453 17.8 CATALOGUE SYMBOL LIBRARIES ............................................................................................................454 Inverter & Modules Library ................................................................................................................454 DataBase Management .....................................................................................................................455 Series available............................................................................................................................................. 456 Modules....................................................................................................................................................... 457 Associated Blocks ......................................................................................................................................... 457 17.9 CUSTOM BLK SUITE ............................................................................................................................458 Registration Reference Structure........................................................................................................461 17.10 BLACK BOX .....................................................................................................................................462 18 CANECO ...............................................................................................................................................465 18.1 CANECO ...........................................................................................................................................465 Export data from planimetric .............................................................................................................466 Import data to Caneco .......................................................................................................................466 Export data from Caneco ...................................................................................................................467 18.2 IMPORT SINGLE-FEED DIAGRAM ............................................................................................................467 Return order ................................................................................................................................................ 468 Import directly from planimetric drawing ..........................................................................................468 19 CATALOGUES .......................................................................................................................................469 19.1 SCHNEIDER ELECTRIC CATALOGUE .........................................................................................................469 20 CABLE MODULE ...................................................................................................................................471 20.1 CABLE MODULE .................................................................................................................................471 20.2 LAY CABLES .......................................................................................................................................472 Enable New Cable ..............................................................................................................................473 Enable Existent Cable .........................................................................................................................475 Definition...........................................................................................................................................477 Cable Label block ...............................................................................................................................478 Cable Data Info ..................................................................................................................................479 Disassociate.......................................................................................................................................480 Twist..................................................................................................................................................480 Spares................................................................................................................................................480 Rebuild cable file................................................................................................................................480 20.3 CUSTOMIZE WIRES .............................................................................................................................481 Wire Label block ................................................................................................................................483 20.4 DDATTEF WIRE DATA ..........................................................................................................................484 20.5 CABLE PROCESSING ............................................................................................................................485 Cable choice.......................................................................................................................................488 Wire detail ................................................................................................................................................... 490 View conductor ............................................................................................................................................ 490 View cable.................................................................................................................................................... 490 Update...............................................................................................................................................490 Cable bundle choice ...........................................................................................................................491 CSV file...............................................................................................................................................492 Table..................................................................................................................................................493 12 • Spac Automazione 2011 Bi-directional Table............................................................................................................................494 Table Customization..................................................................................................................................... 495 Drawing.............................................................................................................................................497 Cables Module version 3.0 ........................................................................................................................... 498 Customization of the Cable Drawing block ................................................................................................... 498 Cables ................................................................................................................................................500 Draw bundles.....................................................................................................................................502 Bundles..............................................................................................................................................502 20.6 HIDE LABELS .....................................................................................................................................503 20.7 CONVERT ABB FILE ............................................................................................................................503 20.8 UNCONNECTED CABLES.......................................................................................................................503 20.8 ERROR MESSAGES ..............................................................................................................................504 Errors during cable scanning..............................................................................................................504 Ddattef wire data errors ....................................................................................................................504 Cable processing errors......................................................................................................................505 Wire customization errors..................................................................................................................507 INDEX .......................................................................................................................................................509 Summary • 13 14 • Spac Automazione 2011 1 Installation 1.1 Hardware and Software requirements For 32 bit operating systems • AutoCAD • AutoCAD Electrical 2010 / 2011 • AutoCAD Oem 2010 / 2011 2010 32 bit - Hardware requirements: • Personal computer processor: Intel® Pentium® 4 AMD Athlon ™ • Video board resolution: 1024x768 • RAM Memory: 2 GB • DVD reader (for installation). • Parallel or USB port for a hardware protection key. (or higher) with technology SSE2 (or higher) with technology SSE2 (minimum) with 16.8 million colours. Optional Hardware: • Modem or Internet access (used only for on-line update). 32 bit - Software configuration: Administrator access is necessary for installation purposes. Authorisations of the domain administrator are not necessary. For information, apply to the system administrator. • Operating system: Windows® XP (32bit) Service Pack 3 (or higher) Windows® Vista (32bit) Service Pack 1 (or higher) Windows® 7 (32 bit) • Web Browser: • AutoCAD 2010 / 2011 must be installed and working. • AutoCAD is not required for the OEM version. Microsoft ® Internet Explorer 6.0 (or later). For 64 bit operating system Always refer to the Hardware requirements necessary for the AutoCAD release in your possession. WARNING: AutoCAD LT versions are not considered valid for this installation. Installation on Windows® 98, ME , NT 4.0, 2000 and 2003 Server operating systems is not allowed. 1 Installation • 15 Per sistemi operativi a 64 bit • AutoCAD 2010 / 2011 • AutoCAD Electrical 2010 / 2011 • AutoCAD Oem 2010 64 bit - Configurazione Hardware richiesta: • Personal computer processore: Intel® Pentium® 4 (o superiore) con supporto Intel EM64T e tecnologia SSE2 Intel® Xenon® (o superiore) con supporto Intel EM64T e tecnologia SSE2 AMD Athlon ™ AMD Opteron (o superiore) con tecnologia SSE2 ™ (o superiore) con tecnologia SSE2 • Scheda video con risoluzione: 1024x768 (minimo) con 16,8 milioni di colori. • Memoria RAM: 2 GB (consigliati 4 GB) • Unità DVD (per l’installazione). • Porta parallela o USB per la chiave di protezione hardware. Hardware facoltativo: • Modem o accesso ad Internet (solo per aggiornamenti online). 64 bit - Configurazione Software richiesta: Per installare è necessario disporre delle autorizzazioni di amministratore di sistema. Non sono necessarie le autorizzazioni di amministratore di dominio. Per informazioni rivolgersi all'amministratore di sistema. • Sistema operativo: Windows® 7 (64 bit) • Browser Web: • AutoCAD 2010 \ 2011 deve essere già installato e funzionante. • AutoCAD non è richiesto nella versione Oem. Microsoft ® Internet Explorer 6.0 (o successivo). Fare sempre riferimento ai requisiti Hardware richiesti per la release di AutoCAD in vostro possesso. ATTENZIONE: Le versioni di AutoCAD LT non sono valide per l’installazione. Non è permesso installare con i sistemi operativi Windows XP e Vista a 64bit. 16 • Spac Automazione 2011 1.2 Installation Spac Automazione 2011 guides you through the installation process, with all instructions appearing on screen. The program transfers files from the release DVD to one or more sub-directories created on the hard disk and creates a new program group in the Start menu. Before using the installation program, you will need to have a general idea of how your computer operates and a working knowledge of Windows, and verify that your computer complies with recommendations in paragraph “1.1 Hardware and Software requirements“. If you are installing the Applicative software version to AutoCAD, ensure that the proper AutoCAD version is installed and working correctly. If you are installing the Oem software version, CAD engine is merged in the software itself, so it doesn’t need a separate installation. To install Spac Automazione you must have administrator rights. If you want to install a single/independent seat, choose “Master Installation” during Setup. Installation of many seats in a LAN, sharing libraries and job orders, requires a “Master installation” for the main seat, and “Slave Installation” for remaining ones. “Slave Installation” doesn’t involve libraries and common files, being them already copied during “Master” installation; you have only to select folders where they are located and shared inside the LAN. • Setup (installation) • Installation changes • Restore installation • Uninstall The software release files are compressed. The installation program (Setup) is required to install. WARNING: Spac Automazione 2011 can coexist with previous versions, you are not required to uninstall previous version(s). (See ”Data migration and customization utility”). It’s not allowed to have more than one installation of the same software version on a single PC: each setup run after the first installation will ask for maintenance only. 1 Installation • 17 Setup Only insert hardlock key (USB or LPT key) when the installation program asks for it. The installation program is run from a DVD unit. (The procedure described below refers to unit D. If necessary, change "D" to the appropriate letter for the configured DVD unit). Insert DVD in disk unit D and double click SpacAutomazione2011.exe application file and follow the instructions which appear in the dialogue windows. Or select Run from the Windows Start menu, then key in the command “D:\SpacAutomazione2011”. Choose the installation language you prefer. Choose the version product to be installed. Read Information concerning the installation you are running. Read the “Software License Agreement”, installation will continue only after accepting terms and condition exposed hereby. The hardware protection driver is installed and/or updated. Now insert the hardlock key . If the key (USB or LPT) cannot be found, you are asked to indicate the type of key you have, or install the driver manually. Fill in the form: - User Name. - Company Name. - Serial Number (*). * Serial number : is provided by SDProget, you must specify the INSTALLATION CODE shown here in your request. The Serial Number must be requested from SDProget via fax. Use the appropriate registration form provided in the pack and quote the INSTALLATION CODE that appears in the dialogue box. Press button “Master Installation” to continue a single seat installation (or the LAN master installation). This installation includes Libraries and common files. Press button “Slave Installation” to install the other LAN seats. This installation doesn’t involve libraries and common files, being them already installed by “Master” one. 18 • Spac Automazione 2011 Select installation folder for the main program (if you have no particular requirements you are advised to use the default). C:\Programs\SPAC Automazione 2011 Select installation folder for job orders: ...\Projects (In case of “Slave Installation” choose the libraries folder shared in the LAN). Select installation folder for libraries and archives: ...\Libraries (In case of “Slave Installation” choose the libraries folder shared in the LAN). Choose program group name (default Spac Automazione 2011). Select a Full or Customized installation ( “Master” installation only): Full : Spac is installed with all graphic libraries and archives. Custom : you can choose components to install. Installation can now begin following your choices. Select the constructors to insert in the database of the materials. If a preceding version of SPAC Automazione is already installed, the program “Data migration and customization utility“ starts up automatically at the end of setup, allowing you to automatically save any Customization or changes made in the previous version. Shortcuts to the program and its utilities appear on Windows desktop. The Spac Automazione installation has finished. At the end of the process Windows have to be restarted in order to apply system changes and execute the program correctly.. You can now start the program and begin working. 1 Installation • 19 SPAC must be launched and operated with the hardlock key inserted. If the key is not in at program start-up, the error message "Failed to recognize hardware protection" will appear. • Stand-alone hardlock. • Network hardlock. The hardlock (both parallel and USB) usually doesn’t need any configuration (if connected during software installation). You can check status and version of the hardlock key driver by launching the program SDI.exe found in the folder \Key Utility on DVD. WARNING: Always read carefully installation dialogs content. This pictures are for sample use, the producer can modify or improve the installation program without notice 20 • Spac Automazione 2011 Stand-alone hardlock The hardware key found in each pack (except for the update version) can be one of two types and differs according to the personal computer port used: LPT - (Figure 1) • Parallel Port (LPTn:) (Figure 1) • USB Port (Figure 2) The hardlock (both parallel and USB) usually doesn’t need any configuration, if connected during software installation. If the “New hardware guided installation” for the “SmartKey USB” peripheral driver window appears during installation, proceed with the suggested choices until selection of a driver search path. Select only the "Specify path:" option and use the "Browse" button to locate D:\Key Utility. USB - (Figure 2) (Replace “D” with the letter of the configured DVD unit). The hardlock can be checked and configured any time after the installation: 1 – From the installation DVD run SDI.Exe in folder \Key Utility. 2 – Use Parallel or USB section depending on your key. 3 – Press “Install” to update or install “SmartKey” drivers. 4 – Then press “Update” to check version and activity of the driver. 5 – Sometimes it’s necessary to press the “Uninstall” button before proceeding from point (1). Run Test32.exe or SPInfo.exe in folder \Key Utility of the installation DVD to get all information about the installed SmartKey. Network hardlock Network hardware protection key with multiple floating license means: • Network hardware protection = The hardware protection (key) for the program is installed on a different computer to that on which the program runs. • Multiple = A single hardware key enables several sessions of the protected program to run simultaneously, according to the maximum number of authorized licenses. • Floating = The program user license can be used (blocked) by any computer on which the software has been installed and configured. WARNING : The licensed computer server should, preferably, not also be a client on which the product will be run. If possible, use a 24-hour access computer on which to install and configure the protection key. If a computer is intended to function either as a licensed network server (in which the protection key is to be installed physically) or as a client (on which will run), follow the instructions for the Licensed SERVER and then for the Licensed CLIENT. The following operations must be performed only if there is a network hardware key; doing so with a local hardware key will impair software operation (if in doubt, you are advised not to proceed). 1 Installation • 21 Installation and configuration of the licensed server (TCP\IP) 1. Logon as “Administrator”. 2. Insert DVD and run SDI.EXE from \Key Utility folder. 3. Use Parallel or USB section depending on your key. 4. Press “Install” to install the local driver concerning the “SmartKey” plugged in. 5. Then press “Update” to check version and activity of the driver and close SDI. 6. Run SCC.EXE from the DVD from \Key Utility folder. 7. Open the "Multilan Service" section. 8. Enable the TCPIP option. 9. Set the “Port” value with the number of a port not used by any other applications (for example 5500). 10. Set the Timeout(s) value to 15. 11. Press "Apply" and then "OK". If there is a firewall on the licensed client computer, remember to open the port to be used for both the TCP and the UDP protocols. Installation and configuration of the licensed client (TCP\IP) 1. Logon as “Administrator”. 2. Insert the DVD. 3. Run SCC.EXE from \Key Utility folder. 4. Open the "Client" section. 5. Select Windows program category from the "Configuration settings for". 6. Press "Add", select "TCPIP" , "OK". 7. Enter in the field “Server name or IP address” computer name (licensed server) configured in the preceding section if the server IP address varies as it is obtained automatically (DHCP service enabled), or enter the IP address if a fixed setting for the licensed server. 8. Enter the “Server port” value identical to the “Port” value set on the licensed server, press “OK” then “Apply”. 9. Disable option "Use local protocol as last resource"; "OK". If there is a firewall on the licensed client computer, remember to open the port to be used for both the TCP and the UDP protocols. 22 • Spac Automazione 2011 Installation and configuration of the licensed server (ANP) 1. Logon as “Administrator”. 2. Start Explorer. 3. Create a directory entitled ANP on the hard drive. 4. Share usage of this directory using shared name ANP, thereby giving complete control rights to enabled users. 5. Insert DVD and run SDI.EXE from \Key Utility folder. 6. Use Parallel or USB section depending on your key. 7. Press “Install” to install the local driver concerning the “SmartKey” plugged in. 8. Then press “Update” to check version and activity of the driver and close SDI. 9. Run SCC.EXE from the DVD from \Key Utility folder. 10. Open the "Multilan Servicer" section. 11. Enable the ANP option. 12. Press the "Browse …" button is enabled in the same group as ANP. 13. Select, from the hard drive, the sub-directory entitled ANP (see point 3) and press "Open". 14. A composite path (example c:\Anp\) should appear in the Edit control box to the left of "Browse…". 15. Set the Timeout(s) value to 15. 16. Press "Apply" and then "OK". If the errors “ANP error” or “ANP or network error” appear, you need to configure server and client via the TCP\IP protocol (described below). Installation and configuration of the licensed client (ANP) 1. Logon as “Administrator”. 2. Insert the DVD. 3. Run SCC.EXE from \Key Utility folder. 4. Open the "Client" section. 5. Select Windows program category from the "Configuration settings for". 6. Press "Add", select "ANP" (shared directory), "OK", "Browse…". 7. "Search in:" select "Network resources". 8. Select the name of the computer (licensed server) on which you have shared the ANP directory. 9. Select the shared directory ANP, press "Open", "OK" and then "Apply". 10. Disable option "Use local protocol as last resource"; "OK". If the errors “ANP error” or “ANP or network error” appear, you need to configure server and client via the TCP\IP protocol (described below). 1 Installation • 23 Data migration and customization utility From version 2004 to 2011 : When you have finished installing SPAC Automazione 2011 (Setup), customization and changes set on previous versions are saved automatically. The purpose of this utility is to enable a rapid version change (update installation) by saving existing settings. The migration utility only acts in relation to the following versions : Spac Automazione 2004 updated with Service Pack 14.0.4 Spac Automazione 2005 updated with Service Pack 15.0.4 Spac Automazione 2006 updated with Service Pack 16.0.2 Spac Automazione 2007, 2008, 2009, 2010 (Updates are available from the Downloads area on our website www.sdproget.it). WARNING: for migration carried out after installation, use the program Migrator.exe located in the Program\Migrator folder. The migration utility saves : ü Files (See “File Migration”) ü Libraries (See “Library Migration”) ü Dictionaries (See “Dictionary Migration”) File Migration Materials Files The amw files are copied from the folder Librerie\Archivi in the previous version. Cable File The file ArcCavi.mdb is integrated with Manufacturers, Codes and Cable data that has been changed in or added to the previous version file. Inner Cabinet Component file in the current Armadi.ini file is replaced by the previous version. Layout File Raceway files in the current Canaline.dat file are integrated by the changes and additions in the previous version Over-temperature data Files The files Armadi.dat, Compon.dat and kQuadri.dat are integrated by changes and additions to the previous version. Terminal Archives The file Morsetti.dat (of Terminals, Plugs, Connectors and Accessories) is integrated in the amw file (general materials file). PLC Manager User Files The file Utenze.mdb is integrated by the changes and additions to the previous version. PLC Database The file CatalogoPlc.mdb is integrated with the Manufacturers, Models and Codes changed or added in the previous version. Any new symbols are imported if associated with codes added by the user. Any customized symbols are imported if associated with codes added by the user. Symbol Configuration The file Description-Lib.mdb is integrated by the “Prefix Files” generated by the user in the previous version. Changes and/or additions to existing files are also saved. If these are additions, new symbols are also imported 24 • Spac Automazione 2011 Library Migration Blk Symbols All Blk* and MBlk* symbols (dwg and sld) are saved from the Librerie\Blk folder in the previous version. Cfg Folder The*.ini files in the previous version are saved, but only those with a different name to the standard ones installed in the current version Clienti Folder (Customer) The current file is replaced by those in the previous version, (current version renamed as .bak). Common Symbols All *.dwg and *.sld files are copied without overwriting. Configurator Folder All *.cm files are copied, only overwriting those installed by the current version. Documenti Folder (Document) All *.doc and *.pdf files are copied, only overwriting those installed by the current version. Sheet Folder (Stored sheets) All *.dwg, *.sld and *.abb files are copied, only overwriting those installed by the current version. The Lista.dat list is updated based on Sheets saved LoopDiagram Symbols All *.dwg and *.sld files are copied without overwriting. Panel Symbols All *.dwg and *.sld files are copied without overwriting Control Panel Symbols All *.dwg and *.sld files are copied without overwriting. GestTop Symbols (Quadri folder) All *.dwg and *.sld files are copied without overwriting. Aus\Cnt\Tsa Symbols (Referim folder) All *.dwg and *.sld files are copied without overwriting Card symbols All *.dwg and *.sld files are copied without overwriting. Those associated with codes added by users in the PLC Database are copied by overwriting. Input\Output Symbols (Schede\UtenzePlc) All *.dwg and *.sld files are copied without overwriting. Symbols Folder All *.dwg and *.sld files are copied without overwriting. Return Symbols (Simboli folder) All *.dwg and *.sld files are copied without overwriting. Tesys_U Folder The current dbTesys.mdb file is updated and integrated with changes to the Template made in the previous version. Symbols (*) Symbols regarding records modified in Symbol Configuration of the previous version (Description-Lib.mdb), are saved by copying the *.dwg file with no overwriting. Please Note: The slidelib slb file containing the slide sld is not saved. (*)CEI15, CEI25, ELETTR, FIAT15, FIAT25, FLUIDI, IEC, JIC, UNIF, VDE15. Dictionary Migration Dictionary Folder Phrase File (Translator) All translator configuration files *.cfg are copied without overwriting The current Trad.mdb file is integrated with new dictionary generated by the user in the previous version. All changes and/or additions to standard dictionary are saved using the Italian version as reference (comparison key). If new languages have been added (database columns), these are only saved by the migration procedure if there is a related Italian translation. 1 Installation • 25 Installation changes Running again the installation procedure (Setup) when Spac Automazione is already installed, cause the execution of the maintenance tool. Pressing “Modify” when Spac is installed as “Master”, lets you add new components to the program, or remove existing. Changing the current installation is useful especially to add symbol libraries or archives (material, PLCs) not installed the first time. Pressing “Modify” when Spac is installed as “Slave”, lets you change the path of Job Orders and Libraries folders, shared inside the LAN. Restore installation Running again the installation procedure (Setup) when Spac Automazione is already installed, causes the execution of the maintenance tool. Pressing “Repair” you obtain a check of the current installation, then found components are restored in case they have been removed or damaged. Uninstall Spac Automazione is removed using the automatic uninstall process. The function is run from the "Control Panel" by clicking on the "Add/Remove programs" icon and then selecting "SPAC Automazione 2011" from the list of removable applications. Choose “Remove” and press “Next” to start the uninstallation procedure. Choose the item “SPAC Automazione 2011” including installation folder and language (IT or EN) : This process removes from the disk all files belonging to the installation, except for new ones (created by the User) and those changed from their original state. 26 • Spac Automazione 2011 1.3 New in the release 2011 Version for AutoCAD 2010, 2011, OEM 2010. The following list shows the main differences of Spac Automazione® 2011 compared to the previous 2010 version (October 2009). OEM Version Output File and Tables OEM Autodesk 2010 Engine. Possibility to memorize and manage the partial configurations. COMMANDS Function 3.16 Print Sheets Description Command completely renewed and simplified. The “Page Settings” is now integrated in the new command, the PDF, DWF and JPG print settings use the PC3 configurations of the Autodesk print drivers. Creation of the Job Order DWF format. 4.2 Settings Location Management at 3 levels: Possibility to set the visible data on the location labels. Selection Preview Visualization of the User Material Code (internal code). 4.3 Panel setting The “Rename” function acts in an extended way: The Panel is renamed also in Terminals, Connectors, PLC bits and Cables. Several improvements in the management of 3 levels locations. 6.3 Terminals and connectors 8.3 Internal bill of materials The selection window was renewed and simplified. “Edit Terminal Blocks” consents the numbering of the NumM even in a partial way. The selection window was renewed and simplified. Several improvements as the management of the 3 levels location. 11.2 Cable definition Several improvements as the possibility to indicate the Cable's Source and Destination Panel. New setting of the Panel for the Bill of Materials. 12.2 Insert phrases Command completely renewed and simplified. Possibility to insert directly the phrases with the related translation; management of the changes directly on the DB. 12.3 Translation Filter on the repeated phrases on the command “Save Phrases List”. 13.2 Symbols library The library was implemented with new models: Telemecanique M238, M258 and LMC058, Siemens Telemecanique Twido, Premium and M340serie updated. S7 1200. The insertion of Synoptic, Layout and Summary symbols consents now the definition of the CPU, Rack and Slot associated. 13.4 PLC Configuration Possibility to import or export the settings on a file. Several improvements in the as the optimization of the scanning time. 14.5 Labels Counting of the threads number even on single-feed drawings. Interface with 2 new brands: Cembre (Genius) and Cabur (MarKing Pro). 1 Installation • 27 1.4 Pr e vious versions Previous version to Spac Automazione® 2011 : • Release 2010 (October 2009) • Release 2009 (November 2008) • Release 2008 (November 2007) • Release 2007 (September 2006) • Release 2006 (October 2005) • Release 2005 (November 2004) • Release 2004 (October 2003) • Release 2003 (July 2002) • Release 2002 (November 2001) • Release 2001 (September 2000) • Release 9.1 (Novembe 1999) • Release 9.0 (March 1998) For further information please refer to the manual for each specific version. 28 • Spac Automazione 2011 2 Basics 2.1 Working Draftsmen use this program to draw up electrical documentation rapidly and securely. To simplify the numerous operations typical of an electrical design, the software provides specific functions created and developed according to precise industry requirements. A document created using this software is not merely a drawing but a kit of useful information to obtain a series of design checks and controls. Correct use of the program enables it to be used to its full potential, so it is advisable to read this manual carefully. Suggest essential reading route : 1 – “2.2 Start working” (Commands for loading the program) 2 – “2.3 The Job Order” (Structure of design) 3 – “2.5 Job Order management” (Opening a new design) 4 – “Command Locations (pop-menu)” (Overview of command menus) 5 – “4.1 Setup” (Opening a new design – Setting-up) 6 – “3.1 Create multisheet” (Create new design pages) 7 – “17.3 Symbol insertion” (Diagram – Symbol insertion) 8 – “4.5 Connections” (Diagram – Symbol connections) 9 – “7.1 Cross-referencing” (Symbols – Cross-References) 10 – “5.1 Number wires” (Connections – Numbering) All instructions for commands in this manual assume a good knowledge of the CAD program on the part of the user. 2 Basics • 29 2.2 Start working You start Spac Automazione by double clicking on the icon highlighted on the desktop. Program icons are automatically set out as shortcuts on the Windows desktop at the end of setup. Start by clicking on “01 – Spac Automazione” from the Windows Program group. The “Job Order Management” window opens automatically when the program has been loaded. See “2.3 The Job Order” All existing job orders are listed in the window. You can “Choose the Job Order” or press the button”New job order“to start a new design. See “2.5 Job Order management” New Job Order: All new job order data must be entered in this window starting with the name comprising a max. of 18 characters and the description (max 40 characters). The first time you are able to associate the customer with the job order “(No Customer)”, you will be given the option of the starting configuration “(Basic)”. By pressing OK you go back to “Job Order Management”, the new order is listed with existing ones. You access this window where any existing drawings are listed. Press the New multisheet button to create a new dwg file: the file name can be chosen freely. By pressing OK you return to the window “Job Order Multisheets”, the new multisheet is listed with any existing ones. From this window press “ Open Multisheet” to enter the new drawing. WARNING : Do not open multisheet drawings using the command “Open”. Always use the specific function “2.5 Job Order management”. 30 • Spac Automazione 2011 After positioning yourself on sheet 1 (or by choice on the first page available) you can start drawing the electrical diagram using the specific functions. In the pop-up menu “product name” you will find all the drawing commands needed to lay the wires and power feeds, while all electrical symbols are available in the pop-up menu named from the symbol (e.g.. “IEC”). You can start by either laying wires or inserting symbols: • Wires and power feeds stop automatically in the presence of symbols. • Symbols interrupt wires and power feeds automatically. In the “product name” pop-up menu you will find all the wire management commands (numbering and lists) and for inserting terminals and connectors, while symbol management commands are found in the pop-up menu “Modify Symb”. Finally, the pop-up menu for “UTIL” commands contains all final design processing commands (CrossReference, Materials Bill, Lists, etc.). See “Command Locations (pop-menu)”. 2 Basics • 31 Command Locations (pop-menu) File 2.5 Job Order management • Selecting the job order • New job order • Open job order • Customer management Sheets 3.1 Create multisheet 3.2 Change sheet 3.3 Next sheet3.4 Previous sheet 3.5 Last sheet Change by Cross 3.6 Delete sheet 3.7 Shift sheet 3.8 Store sheet 3.9 Insert stored sheets 3.10 Explode (Boom) 3.11 Split multisheet Unsplit 3.12 Copy between sheets 3.13 Move between sheets 3.14 Clear sheet 3.15 Number sheets 3.17 Sheet review - 3.16 Print Sheets Master - 3.18 Sheet utilities Spac 4.1 Setup 4.2 Settings 4.3 Panel setting Quick Wire 4.4 Power feeds - 4.5 Connections Power returns Connection returns 4.6 Drawing utilities - Updating Lists and Tables 4.7 Component - 8.11 LibCenter 5.1 Number wires 5.2 Automatic wire numbering 5.3 Used numbers list-5.4 6.1 Insert terminals 6.2 Insert connectors 6.3 Terminals and connectors - 6.4 Usage 5.7 Ddattef 32 • Spac Automazione 2011 Util 7.1 Cross-referencing 7.6 Cross Utility 8.3 Internal bill of materials 8.12 DbCenter - 8.1 Materials database 11.1 Cables 11.2 Cable definition 11.4 Cable information 12.1 Translator blocks 12.2 Insert phrases 12.3 Translation - 12.4 Translator settings 13.4 PLC Configuration 13.5 PLC drawing 13.2 Symbols library 13.1 Plc I/O bits Inverter & Modules Library 14.5 Labels 14.4 Marking 14.11 Machinery configurator Layout Cabinet layout scale 15.1 Cabinet exterior Accessories 15.2 Cabinet interior 15.3 Topographic 9.1 Overtemperature 15.4 Pushbutton panel Panel front Panel rear 15.7 TeSys U 14.13 2 Basics • 33 Modify Symbol 17.4 Change symbols 17.7 Last used symbols 17.6 Favorites symbols 17.4 Change symbols 14.6 Navigator 14.7 Ignore symbols Fast Attedit 17.5 Location 14.2 Attribute changes Function legend - Symbol legend 14.3 Substitution of a block IEC & Switches 17.3 Symbol insertion … BLK 16.3 Blk Library 16.1 Blk symbols … 16.2 Mblk macrosymbols 17.9 Custom Blk Suite The producer reserves the right to modify or improve the program at any time. Pop-menu > Sheet This manual symbol identifies command position in the pop-up menus. 34 • Spac Automazione 2011 2.3 The Job Order For the purposes of the program, all drawings and documents belonging to the same job belong to the same job order. The job order is, consequently, a directory that contains all the files necessary to draw up a specific electrical design. The most important files in the order are the drawings (files with .DWG extension); each drawing file is identified by the name of the multisheet (see Sect. 2.4). For each new job order, a new directory is created automatically, with the same name as specified by the user (20 characters max.). The new directory is created in the "Job Order Path" specified during installation. Position of example Job Order The drawing file path can only be modified through the specific function “Job order Path”. To correctly view the list of job orders indicated in the figure (Example, ProjectA, ProjectB etc...) the Path has been set up in Spac Automazione\Commesse. Example Job Order Structure This structure is managed by the specific command “2.5 Job Order management”. Job Order Multisheets (dwg files) Description EXAMPLE 1° multisheet: Schema.dwg Electrical scheme 2° multisheet: Layout.dwg Cabinet \ Pushbuttons topography 3° multisheet: Liste.dwg Material list and BOM 4° multisheet: Opzioni Macchina.dwg Machinery Configurator sample WARNING: If drawings are moved manually to other folders (or sub-folders) they are no longer visible through the function “Job Order Management”. 2 Basics • 35 2.4 The mult isheet The software stores graphics from several electrical drawing sheets within a single file with a .DWG extension; this is called a multisheet. This structure enables the simultaneous management of a large number of sheets, avoiding the need to create numerous files. A drawing is organized in an unlimited number of layers, with each layer (or level) corresponding to a sheet in the electrical documentation, thus ensuring that sheet 1 is drawn on the layer with name 1, sheet 2 is drawn on layer 2 and so on. This multisheet structure, in theory, has no page limits. The program manages this structure so that the screen displays only one sheet at a time, freezing all the others to render them invisible. The only layer that is never frozen is the layer called 0 (the name of this layer may not be changed). Features common to all sheets, e.g. the title block box, are inserted on sheet 0. If you wish to draw 50 sheets of documentation, you can create a single multisheet file containing 50 layers, or two files of 25 layers, or one file of 10 and another of 40 sheets, etc. This is permitted in the sense that there are no limits concerning multisheet structure, however it is advisable to use a single multisheet file as far as possible. Choose one of the following two options according to requirements: Single multisheet The job order requires a limited number of sheets (up to 50 sheets, or no more than 100). A single multisheet enables a clearer, more immediate view of the design. All processing occurs more rapidly, as all necessary data are available immediately. N multisheets An excessive number of sheets in a single multisheet creates files so large that they can cause delays in handling graphics. Dividing the work into several multisheets allows for work on several areas simultaneously. Dividing the work into several multisheets makes it possible to structure the job order into separate sections. Several multisheets enable the numbering of sheets that are identical but distinguished by alphabetical prefixes. The best option must be decided according to each case, in order to optimize work organization with respect to the above factors. Multisheets are created by using the “2.5 Job Order management” command followed by the “3.1 Create multisheet” command. The sheet Each multisheet contains as many layers as have been created with the Create multisheet command; each Layer bears the number of the corresponding sheet. When you request to view a sheet, layer 0 (where the title block has been inserted) and the layer bearing the name of the specified sheet are unfrozen simultaneously. All other layers remain frozen so that they are invisible. Each sheet has available all the colors and line types available with the program CAD. Each sheet can be stored in such a way that it can be re-used for future jobs (see Sect. 3.8), or it can be detached for different uses by applying command “3.11 Split multisheet” which permits individual files to be created in .DWG format. If a layer is re-named, the name of the sheet also changes; the software does not accept alphabetical names, except in specific cases (see Sect. 3.2). 36 • Spac Automazione 2011 2.5 Job Order management • Selecting the job order • New job order • Open job order This function is activated automatically when the software is started, permitting the user to view a list of all existing job orders and create new ones. The function may be called from the first command pull-down menu (File) or by entering SP_START from the keyboard. • Table of job orders • Customer management Pop-menu > File Selecting the job order The dialogue window lists all existing job orders. By clicking on the name, it is possible to access and view the contents of the multisheets, while pressing the New Job Order button creates new ones. Main "Job Orders" dialogue window. Every job order corresponds to a directory configured using the Job order path. When working with several stations linked together on a network, it is convenient to have the same path configuration for all operators, in order to handle a single database common to all. The job order list can be sequenced in different ways, pressing Job orders or Customer (colums title) sorts the list into alphabetical order. The job order list can be exported in .CSV file format or shown in table form by selecting the Table tabs. The button is not enabled the first time is accessed. A multisheet must first be opened and the "Job order management" command called up. 2 Basics • 37 New job order All data relating to a new job order must be entered in this dialogue window, starting with the name, comprising a maximum of 18 characters (see Sect. 2.2), and the description (40 characters max.). The next step is to add the name of the customer (see “Customer management”) for which the new design is being developed and select a Start setting: If OK, the new job order is entered in the list containing existing jobs. "New Job Order" window The name and description must not contain punctuation marks. Special characters such as comma, apostrophe, percentage, etc. are not permitted either. Blanks are allowed. Pressing Change (from menu on the right button of the mouse) changes the description and the customer for existing job orders. These data are stored in the Job-Description._SP file contained in each job order directory. Customer selection implies automatic association with a master title block, and this data may only be changed by accessing the "Customer Management" section. It is possible to define customers not associated with title blocks. In this case, the symbol must be inserted manually (in Layer 0) immediately after entering a “New multisheet“ (see Sect. 3.18). Moreover, customer selection implies automatic association of the Start setting (when a setting exists which has the same name as the customer). Start setting selection enables you to begin a new drawing using the “4.1 Setup” and “4.2 Settings” parameters already established. If you start a new job order associated with the customer, the Start setting for it will be suggested (only if it exists). Creating a Job Order also automatically generates a directory bearing the same name. This directory will store not only the drawings but also all other configuration and support files created for that job order. The Planimetric Master block configuration, if present, exists only on grounds of compatibility with Spac Impianti (to be shared by the same customers) and is never used by Spac Automazione. 38 • Spac Automazione 2011 Open job order This window is accessed after selecting a job order and lists any existing drawings. It is possible to access one of these (using the Open button) or create new ones (using the New button). To open a multisheet drawing, double click on the corresponding command, or select it from the list and press the Open button. To get a preview of multisheet content, press “Preview”. "Job order multisheet" list. Each drawing displays the date, time and name of the draftsman who created it. This information is stored in the Job-Description._SP file contained in each job order directory. Each multisheet is numbered progressively starting from No.1. This numbering order determines the file sequence, hence processing priority and order of sheets with the same name (same number but with a different prefix). To change this priority you need to use the Move functions (move Up and Down the selected multisheet one position at a time). Change enables you to change the descriptive data on each multisheet. Multisheets marked with an asterisk * are considered by default by product processing functions. Multisheets to process may be selected as required by changing the default list. This configuration is enabled on creation of a “New multisheet” with the setting “To manage during processing”. Summary Data (Multi sheet – Job Order) The activation of the "Summary Data" consents the count of all the pages contained in the Job Order's Multi-Sheets. WARNING: It is suggested to enable this option only when it is required given that the pages' count makes slower the system while browsing the Job Orders. Preview Pressing the “Preview” button gives a preview of multisheet content. Buttons “+” and “- “ allow you to turn pages (only when the drawing is a multisheet). The left mouse button zooms between 2 chosen points. The scroller performs the zoom In and zoom Out function. The right mouse button moves the current view (pan). 2 Basics • 39 New multisheet Creating a new multisheet means creating a new .dwg file: the name of the file may be chosen freely (or be in the form of "job order name" + number), it's possible to associate information like description and draftsman name to the new multisheet. There are three ways to name a new multisheet: 1. Number (requires to input a number only). 2. Free Name 3. Use template (requires to choose a file). "New multisheet" dialogue window. Data relating to "description" and name of "draftsman" are stored in the Job-Description._SP file in the job order directory. “Number” mode requires to input a number (from 1 to 99) only, typing e.g. n° 1, you get automatically the multisheet name made of 'Job Order' + Number (2 digits), so: Example200501 (“0” is added automatically). “Free Name” mode lets you specify a free name whose maximum length is 20 characters, with the limitation of all file names: punctuation characters, special characters as double quotes, single quote, percentage, etc. are not allowed. Blanks are accepted. “Use template” mode let you start on the basis of an already existing file (the file to be used must be selected by pressing the “…” button). This mode is useful in case of many similar drawing to do. A prefix (6 characters max.) can be associated with the new multisheet: this will be associated with all the page numbers generated using the appropriate command (see Sect. 3.1). With prefix A, for example, by creating 10 sheets starting with no. 1 you obtain: A1, A2, A3, etc. The prefix is used when it is necessary to differentiate between equivalent page numbers on separate multisheets, for example: Multisht. No.1 EXAMPLE200301 Prefix: A Sheet nos.: A1, A2, A3, etc. Multisht. No.2 EXAMPLE200302 Prefix: B Sheet nos.: B1, B2, B3, etc. Multisht. No.3 LAYOUT Prefix: LY Sheet nos.: LY1, LY2, LY3, etc. The prototype drawing used to create new multisheets is Spac2011.dwt, stored in folder Spac Program\Utente and can be customized. 40 • Spac Automazione 2011 Multisheets marked with an asterisk * Depends on the setting “To manage during processing”, which establishes whether the drawing is included during processing by various commands. Processed Multisheets (*). Enabling this setting means that, when processing is initiated, the multisheet is selected (by default). Manual selection is still possible at any time. Open Multisheet To open a multisheet drawing, double click on the corresponding command, or select it from the list and press the Open button. A multisheet can be opened for the first time, or an existing drawing can be opened. Open new When a multisheet is opened the first time, he following commands are run automatically (in order): 1 – “4.1 Setup” to choose symbols set and master title block. 2 – “3.1 Create multisheet” to add the desired number of pages. 3 – “3.15 Number “ to number pages created at point 2. If New multisheet is a template, the title block and related data are already present. Open existing multisheet When opening a multisheet you can find the last setting used, stored during the last "Save" operation. No command is enabled automatically. WARNING: The "Open.." command may not be used to open multisheet drawings. You must always use the appropriate function “2.5 Job Order management”. The icons The Multi-Sheet's visualization is facilitated with the next icons: Identifies the Multi-Sheet being use. It could be the current Multi-Sheet or a Multi-Sheet opened by a user that shares the Job Order folder. Identifies a Multi-sheet memorized in a newer DWG version. The Multi-Sheet could not be opened by the current version. 2 Basics • 41 Job order Path By pressing this command you modify search path and job order position. Is allowed to display at the same time more Job Order Path (Add path). The position of drawings within the database cannot be changed, unless Job Order Path is used. Each job order corresponds to a directory. This directory stores all the drawings (multisheets) created for a job order together with all other configuration and support files necessary for that design. The Job orders Path must not contain any spaces or punctuation characters. WARNING: If drawings are moved manually to other directories (or sub-directories), they will no longer be visible through the "Job order management" function. 42 • Spac Automazione 2011 Table of job orders This function enables you to draw or export, in CSV format, a list of all existing job orders. You must select the job orders to be processed and use this option to obtain either a list of specific job orders or a complete list of all those selected (recommended option). Only the selected job orders are then presented in a list with all the details available on the multisheets contained. By selecting Table you can continue the job order drawings in table form (parametric mode). The function requests parameters for the drawing: Each item of data (Tag) under "Available fields" is entered in "Output fields", by selecting Add, to represent a column in the table. Each Tag has two variables, the width and title of the column, which can be changed by pressing the Change button. Number of lines This value serves to split the table into several parts, even on different sheets. On reaching the maximum number of lines, it requests a new insertion point or asks you to proceed to the next sheet. Text height This is the height of all text contained in the table. This parameter exerts a proportional influence on the height of each line, thus on the total height of the 2 Basics • 43 table. Title height This is the height of the column titles. This parameter influences the calculation of the total height of the table. Table width This is the total sum of the widths assigned to each output field. Measurements are expressed in millimeters. This value must never exceed the Sheet width value to avoid the table overshooting the margins of the title block. Table height The maximum table height is calculated on the basis of the maximum number of lines estimated and on the text height. This value must never exceed the Sheet height value to avoid the table overshooting the margins of the title block. Standard This constitutes the basic settings for output fields (where required). By pressing Default, the current setting is saved in local mode (see Sect. 4.2) for later use. If confirmation occurs without pressing Default, the setting will be considered temporary and used only once. The function requests: Select table insertion point: The settings in the previous figure correspond to the following graphic representation: Example of job order table The settings for the drawing in the table include the following options: Request insertion point When several sheets are needed to complete the drawing of the table, you may choose whether you wish to alter the insertion point of the table on successive sheets. Line spacing (x2) The space occupied by each row is calculated in proportion to the height set for the text. This parameter enables this space to be doubled so that two lines of text can be inserted. This condition is particularly appropriate for the insertion of translations. Sheet + character When several sheets are needed to complete the drawing of the table, you may choose whether to continue on numerically successive sheets (new or existing) or create numerically intermediate sheets (e.g. 1, 1A, 1B, etc. CSV file Selecting CSV File activates setup to create a data extraction file. The setup process is the same as that described earlier for table mode. Enabling Preview CSV file, the file is stored and then opened automatically (in preview mode), and may be read without the aid of Microsoft® Excel. 44 • Spac Automazione 2011 Find functions This function consents to search a material code, a symbol name or even a component’s ID inside the Job Orders selected. First, it is necessary to select the Job Orders to be considered during the search process; then, by clicking the "Find" button, you will see the next window: Select the element you want to find by inserting the whole name (the "*" character is not accepted in this field). When you click on the "Find" button, all the data corresponding to the text inserted is displayed. Clicking on the "Open Multi-Sheet" button, the Software opens directly the page with all the items found. The search process is executed by processing the file dbSpac.mdb on the Job Order's folder. For the Job-Orders without the dbSpac.mdb file, the search function is not enabled. 2 Basics • 45 Customer management Each job order is associated with a customer. This association enables automatic functions, like automatic title block insertion and related filling in of attributes with job order data, by running the command “4.1 Setup”. Moreover, initial setup can be set to coincide with each customer. We shall now look at the procedures, in sequence, for entering a new customer: 1. Select Customer tabs to access the specific window. 2. Press New: enter the name of the new CUSTOMER. 3. Select in the list the Functional Master Block: select the most suitable one for the new customer (see “Master title blocks” Sect. 3.18). 4. Press Change (or Associate from the contestual menù) to access the specific window: select one of the data items available from the Fields List, then select from the Tag list the attribute of the title block with which you wish to associate it. To confirm, press Save. Data is stored in the Customers.mdb file in the Librerie\Archivi directory. If the attributes in the title block symbol are changed press Update Tag Master, this setting must be updated the same way. Example of "Association of title block attributes". The association remains valid for successive customers using the same Title Block. 46 • Spac Automazione 2011 Fields New values can be inserted in the Field List. This is necessary when there are Tags that have not been associated. If you intend to fill in several title block attributes directly in this phase (rather than setting them up on the drawing using the command “Ddatte”), a new field must be added, completed and associated with each Tag. Example: Adding fields Pressing Add Field accesses the option of adding new fields available for all customers; in the example opposite, the new "Customer (10 – Example)" field is generated and inserted in list. All new fields are then displayed in the main “Customer management” window and are available for each customer and for all types of title block. The added Fields must then be associated with a Tag, and the contents (Value) must be entered manually. The "Value" (different for each customer) are assigned to field by pressing the "Apply" button or <Enter> on the keyboard. NOTE: It is not possible to delete fields associated with Tags. The relevant association must be removed first. Certain system fields are fixe (the buttons Delete and Apply are frozen), their “Value” is retrieved automatically from Job Order and Multi-sheet data (these are completed automatically according to the names and descriptions associated with the job order and multisheet and they cannot be changed during the active working session). Example of manual association of an additional field value. 2 Basics • 47 Start settings Each job order is associated with a customer (see “Customer management”), a start setting can be made to coincide with each customer. When a customer is associated during the creation of a new job order, the function searches for a start setting saved under the same name as the customer, in order to propose it as a default setting. In any case, you may choose a different start setting from that proposed by the program. The start setting stores not only the setting relating to the customer title block, i.e. dimensions, segments, position of sheet numbers (see Sect. 3.15), etc., but also all settings relating to symbols, numbering, terminals, tables (see Sect. 4.2), etc. Aligned Customer and Setting The example shows the customer SDProget aligned with the setting SDProget. This is the ideal condition under which to start a new job order. All settings are immediately configured according to the specific requirements of the customer. Unaligned Customer and Setting The example shows the customer SDProget and the setting (Basic). This condition enables a new job order to be started, but not configured according to the requirements of the customer. This compels the user to check all settings on starting a new drawing. The start settings are stored in files with INI extensions in the Librerie\Cfg directory. When a new job order is started, the start setting is automatically copied and stored in "local" mode. The "local" setting is represented by the file SPAC_cfg.ini in the job order Cfg directory, so all changes made after setup remain in force only, and exclusively, for the current job order, leaving the Start settings unchanged. To create new settings or to change existing ones, use the “Export Settings” (see Sect. 4.2). The BASIC setup contains the settings which tend to be used most frequently. You may use this setting when starting job orders associated with "No Customer". WARNING: When there is no start setting, the program uses its own default settings. Job Order copy This function enables you to copy an existing job order. A new job order directory is created (with contents identical to the one selected originally) with the address indicated in the Job Order Path. Only the name of the "New job order" is requested, but it is also possible to change the description and the path. 48 • Spac Automazione 2011 Job Order sharing When a directory shared on a network is configured as a Job Order Path, work may be carried out concurrently on the same Job Order from several stations. Naturally, the job order must be broken down into several multisheets, as it is not possible to open the same drawing from several workstations at the same time: • Each user may create new multisheets with due attention to page numbering. • Each user may change the "local" setting, whilst the start setting is selected by the user who first created the Job Order. • Each user may use the data contained in the multisheets opened by other users in read-only mode. When a drawing is opened, the “Multisheets in use” list appears; this warning appears before each operational command. The setting “Do not show this window in future” must be cleared every time you return to the drawing. Identifies the Multi-Sheet being use. It could be the current Multi-Sheet or a Multi-Sheet opened by a user that shares the Job Order folder. To give a practical example, data relating to the "Internal bill of materials" (see Sect. 8.3) can be scanned even when all multisheets in the job order are opened by respective users (data are taken directly from the last saved drawings "in use"). Once scanning (data collection) is complete, the "Internal bill of materials" presents the list complete with all information collected, and the table is easily drawn (even on sheets from the current multisheet). The information collected might not be reliable or updated if the last saved drawings "in use" is not recent enough. There are, however, certain restrictions which must be noted: for example, the "Internal bill of materials" enables information collected to be changed using the Edit function, but the changes made cannot be transferred to multisheets which are in use. All the "Update" functions (involving drawing) are limited to multisheets that are not being used by other users. Certain commands, such as "Print Sheets" (see Sect. 3.16), immediately warn the draftsman of multisheets being used by others, thereby excluding these sheets. WARNING: The Job Orders Path must not contain any spaces or punctuation characters. 2 Basics • 49 Job Order files File Name Ext. Description Job-Description _Sp Description of job order (Bak backup copy). Multisheet name Dwg Multisheet (CAD drawing). DbSpac Mdb Database storing general job order data. Job-Description Csv Job order descriptions in Ascii mode. IdSymbol-List Csv List of component references in ASCII format. Terminal-List Csv Index of panels, terminals and connectors. CrossRef-Data Crp Cross-reference scan. Data_Save for saving changes. CrossLine-Data Crp Real-time cross-reference scan. CrossRef-E Csv Cross-reference output (-M, -R, -S, -X). Cross Reference Nav File of errors for Navigator cross. Tesys Crp Tesys U configuration (motor starters). IdWires-List Csv List of wire numbers used in ASCII format. Wiring-Internal Cab Internal panel wiring. Wiring-Internal Csv List of internal panel wiring in ASCII format. Wiring-Internal-Data Crf Scan cable and wiring connections (temporary BLK working file). Loop-Diagram Mdb Scan loop diagram. Cables-Used Csv List of used cables in ASCII format. Cables-List Csv List of available cables in ASCII format. Mcables-Data Mdb Scan cable module. Materials-Data _Ds Scan internal bill of materials. Last-Materials Mat List of last materials associated. Last-Estimated Mat List of materials to be associated with the estimate list. Materials-List Dss Export internal bill of materials. Materials-List Csv List of internal bill of materials in ASCII format. Wires-List Dss Export internal wire list. Wires-List Csv List internal wire list in ASCII format. SheetTitles-Data Blk Scan sheet titles. SheetTitles-List Csv Output sheet title legend in ASCII format. Revision-Data Txt General description of revisions. Revision-List Csv Output Revision Legend in Ascii format. Plc-List Csv Output PLC Legend in Ascii format. UseType-List Csv Output Function Legend in Ascii format. Panel-Data Crc Scan pushbutton panel layout (temporary BLK working file). Find-Terminal Crn Navigator, scan terminals. Find-Connector Crn Navigator, scan connectors. Find-LYBlock Crn Navigator, scan layout symbols. Find-Block Crn Navigator, scan components. IgnoredSymbol-List Csv ASCII file of "Ignore symbols" list. NotAssign-Usage Csv List of terminals without usage (during automatic assignment). Drawing-Check Csv ASCII file of errors (Sp_Verif). 50 • Spac Automazione 2011 3 Sheet management 3.1 Create multisheet Pop-menu > Sheets This command is used to create pages within a drawing. This function runs automatically after creating a “New multisheet” using the “2.5 ” command. Example of multisheet page generation. Enter the approximate number of sheets required for the current multisheet under the "Sheets to Create" item in the dialogue window. The system automatically prompts the starting number in the "First Sheet" box. This number can be changed as required (the system prompts number 1 for the first multisheet in the job order, with subsequent sheets numbered according to the sheets already created). Press "Create" to confirm and obtain a drawing in which the number of layers is equivalent to the number of sheets to be created (in addition to layer 0). The command can be repeated to add more new groups of sheets. In the example shown above, when Create is pressed, 10 new sheets will be created, from number 31 to number 40 (with Increment = 1). With Increment = 2 in the previous figure, 10 new sheets would be generated starting from number 31 to number 49 (31, 33, 35 …). 3 Sheet management • 51 Add Sheet The Add Sheet command has been integrated in command “3.1 ”. It can be used to increase the number of sheets in the current multisheet and to add intermediate sheets, which are associated with alphanumerical names (number followed by a letter). If 3A is set, as shown in the example, a new intermediate sheet is created between 3 and 4 (as usual by pressing Create). 3A, 3B…. 3Z are, consequently, all diagram sheets which the program considers to be inserted between sheets 3 and 4. To add (non-intermediate) sheets at the end of the current multisheet, simply enter the number that immediately follows the last existing page and remove the additional character. (See “3.6 Delete sheet”). Formatting 1 No. 1, 2, 3 … 10, 100 etc. Is used to set the number of characters (4 max.) for the sheet number. 01 No. 01, 02, 03 … 10, 100 etc. The configured format is used by all commands. 001 No. 001, 002, 003 … 010, 100 etc. 0001 No. 0001, 0002, 0003 … 0010, 0100 etc. Literal Sheets The software allows sheet name change by simply using a list contained in an external file. Activating the function “Literal Sheets” activates the search button “…” to choose files with an .ini extension. Example of transformation into Literal Sheets. [SHEET_CONVERSION] To be considered valid, the (ini) file 1=Info1 chosen must contain the section 2=Info2 [SHEET_CONVERSION] with the list of 3=PS1 sheets to be converted. ... The “Literal Sheet” function can only be No Sht = Literal Name activated if there is a sheet list present. Example of configuration file for Literal Sheets. Setting up of “Literal Sheets” should only be used when absolutely necessary, thereby avoiding conflict with other program settings. The sheet conversion file content is used in the condition it is found in. WARNING: Keeping the ini conversion file in the job order folder is recommended. If the file is moved (or lost) the sheets convert back to the original layer name. 52 • Spac Automazione 2011 Select Image for Zoom By clicking on the preview image, the picture is magnified and offers a display check option. The – and + buttons reduce and increase the magnification factor. The Reset button restores the default values. The sheet preview image depends on “Sheet Preview” under “3.2 Change sheet”. The Multisheet The group of drawings and documents belonging to the same job order are considered by the program as belonging to the same job order. Therefore the job order is a folder containing all necessary files in order to create specific electrical documentation. The most important job order files are undoubtedly the drawings (files with extension dwg), each drawing file is identified by the multisheet name. 3 Sheet management • 53 Sheets processing It is a configuration that allows the user to indicate which pages must be really be considered when processing the various commands. This function can exclude sheets when the user intends to exclude all the pages of a multi-sheet and it is best to use directly the parameter “Manage during processing” (this states if the multi-sheet is processed or not by the various commands). (See “New multisheet”). With this configuration of “Sheet Processing”, it is possible to act in a detailed way inside the various multi-sheets. Add Used to store to memory a new configuration (filter). Each filter consists of two lists: - List of enabled commands - List of sheets to be processed In the “Current configuration” list, all stored filters are available, press “Activate Sheets Processing” to enable the desired filter. It is advisable to activate warning messages. (The warning window “Filters Activated” appears each time a command in the list of “Enabled Commands” is called). Change Pressing “Change”, the variations made to the two lists are applied to the current configuration. Delete Used to delete the current configuration. The filter configurations are stored to “local” memory in the Spac_cfg.ini file contained in the Cfg folder of the job. 54 • Spac Automazione 2011 List of Enabled Commands The list is built by selecting a command “Available” and by pressing the “Add” key. The sheet filter is only applied to the enabled commands . It is best to keep the “Filters Activated” warning setting enabled List of sheets to be processed The list is built by selecting the sheets (the sheets to be taken into consideration by the command scan) and by pressing the “Add” key. The selected sheets are placed in the following list. Delete Pressing “Delete”, a sheet is cancelled from the list. Pressing “Change”, the variations made to the two lists are applied to the current configuration. Empty Used to cancel all the sheets on the list. The list of sheets to be processed is used only for “Enabled” commands. For “Un-enabled” commands scanning is performed normally on all sheets. Press “Activate Sheets Processing” to enable the desired filter. Use of “Filters for Sheets to be processed” is a function for expert users. WARNING: It is best to always keep a copy of the Spac_cfg.ini file (found in the Cfg folder of the job). If the file is not delivered with the project, tracking of the filters used for processing is lost. 3 Sheet management • 55 Sheet title A title can be associated with each sheet in the job order. Titles consist of symbols which are selected by pressing the "…" button. To insert a title, first select a sheet number from the list, then enter the relative description in Title. To confirm, press either <Enter> from the keyboard or Apply. Existing titles can be changed in the same way. Pressing the "…" button opens the title list used in the job order. You can also access phrases from the translator dictionary directly. The normal Windows Copy and Paste functions (Ctrl+C and Ctrl+V) can be used to insert identical titles. Titolo1 is used translations. for managing Example of TITOLO0.dwg symbol application Sheet titles (and translations, where applicable) are summarized in drawing tables using the “Sheet legend” command (see Sect. 14.1). No additional attributes or Tags can be managed other than those indicated. Sheet title symbols can also be inserted manually using the corresponding “Sheet title” command (see Sect. 3.18). Summary This option enables you to see the multisheet "sheet situation" in the current job order. It is also used to check whether there are any multisheets "in use" by other users (see Sect. 2.5 “Job Order sharing”). In this example, the job order comprises 3 multisheets; the highlighted one ("List") is currently being worked on. The first is “Scheme”, with pages from nos. 1 to 15 (15 sheets in total) currently “in use”, i.e. opened by another user connected to the network. The second is “Layout”, with pages from nos. 16 to 20 (5 sheets in total). 56 • Spac Automazione 2011 3.2 Change sheet Pop-menu > Sheets This command enables a sheet from the current job order to be displayed quickly, whichever multisheet it belongs to; it can be called up from the keyboard by entering the "F" command. Enter the number of the desired sheet or select it from the sheet list relating to the multisheet shown at bottom. If the sheet in question belongs to a multisheet other than the current one, check the status of the “Save Multisheet Changes” option. If this is enabled, the system will save the current drawing before loading the multisheet file that contains the desired sheet (this option is enabled by default). Summary (see Sect. 3.1). Change by Cross (see par. 7.6). The system displays a preview of the destination sheet. This function uses an .SLD file (slide) resident in the Slide directory in each job order directory. These images are automatically generated by the "Change sheet", "Next sheet" and "Previous sheet" functions, i.e. a snapshot of the first page is taken when moving from one sheet to another. If the image box is empty, or the image is obsolete, a request can be sent to update all the slides in the .SLD files, using the “Sheet slide” command (see Sect. 3.18). Select Image for zoom Go to sheet 0 Click on preview image to magnify and enable the display check function. Use – and + to reduce and increase the magnification factor. The Reset button restores the default values. Select this item to move directly to sheet 0 of the current multisheet, to edit drawing constants (e.g. title block or logo) or to create new blocks. To move to sheet 0 of a different multisheet, you must first access the multisheet that contains it. Display layout only This function optimizes framing (zoom on sheet) in relation to the co-ordinates defined in “Sheet Dimensioning” configuration (see Sect. 4.2.) to make the best use of monitor dimensions. Sheet preview This can be used to disable the preview image (slide) of the sheet selected, in order to speed up the procedure. This parameter also affects the "Previous sheet" and "Next sheet" commands, which, under normal conditions, create and update the slide image at each sheet change. WARNING: Text styles which use the TTF character fonts often slow down the sheet change process. The Sheet Preview function should therefore be disabled when these text styles are used. 3 Sheet management • 57 3.3 Next sheet Pop-menu > Sheets This command is used to move to the next sheet. It can also be enabled by pressing + on the keyboard. Intermediate sheets are considered to be sequential, for instance, 3, 3A and 4; in case of any missing sheets, the command jumps to the next available sheet. "Next Sheet" cannot be used to jump from the last sheet of the current multisheet to the first sheet of the next multisheet. In this case, a warning message is displayed. (See “3.4 Previous sheet”). WARNING: The keyboard command "+" cannot be repeated by pressing <Enter>. The command can only be repeated by entering "_+". 3.4 Previous sheet Pop-menu > Sheets This command is used to move to the previous sheet. It can also be enabled by pressing "-" on the keyboard. Intermediate sheets are considered to be sequential, for instance, 4, 3A and 3; in case of any missing sheets, the command jumps to the previous sheet available. Previous Sheet can be used to jump from the first sheet of the current multisheet to sheet 0. (See “3.3 Next sheet”). 3.5 Last sheet Pop-menu > Sheets This command is used to return to the sheet used before the current one. “Last Sheet” can operate to pass through sheets belonging to different multisheets, and in this case this warning message appears: “Save when you change multisheet”. By clicking on “Yes” the current drawing is saved before the multisheet file containing the page required is loaded. (See “3.3 Next sheet”). (See “3.4 Previous sheet”). You can recall the function quickly by keying in the command “FB”. 58 • Spac Automazione 2011 3.6 Delete sheet Pop-menu > Sheets This command is used to delete sheets from the current multisheet. From the list of sheets present in the multisheet, choose the sheet to be deleted. Multiple choices can be made to delete several sheets at the same time. Before removing a sheet, the command asks for confirmation. To restore a page just deleted use the command “Cancel”. If a multiple choice is used (several sheets chosen), the command asks for confirmation for each individual removal. By answering “No” to the question “Do you want to confirm deletion for each sheet selected?”, the next confirmation (“Are you sure?”) is valid for all sheets. To delete a page quickly double click on the page number to be deleted and confirm the operation. Go back to the previous sheet if you have deleted the current worksheet. You cannot delete “Sheet 0”. (See “3.5 Last sheet”). Note that this command does not “clear” the page content, but physically removes the drawing file. WARNING: The “Cancel” command does not allow you to restore pages after closing a Multisheet. 3 Sheet management • 59 3.7 Shift sheet Pop-menu > Sheets This command is used to shift the entire contents of all pages, starting with the highlighted sheet, onto previous or subsequent sheets. • Shift Forwards • Shift Backwards • Checking The current sheet is the first to be shifted, by default. The user must specify the first sheet to shift. Shifting affects all subsequent sheets. The number of positions indicates by how many sheets the contents of drawings must be shifted. Caution is necessary when using this function, as it changes page numbers. Forwards This parameter defines the type of shift. Assuming 5 sheets numbered from 1 to 5: 1 2 3 4 5 Shift forward by 1 position from sheet 1 to obtain: 2 3 4 5 6 1 2 13 14 15 System prompts creation of empty sheet No. 1 1 2 3 4 5 Shift forward by 10 position from sheet 3 to obtain: System prompts creation of empty sheets Nos. 3 to 12 Any missing sheets are not compressed during forward shifts and are considered empty sheets. In the following example, there are 4 missing sheets: 1 2 3 4 Shts 8 Shift forward by 1 position from sheet 3 to obtain: System prompts creation of empty sheet No. 3 60 • Spac Automazione 2011 1 2 4 4 Shts 9 Backwards This parameter defines the type of shift. Assuming 5 sheets numbered from 11 to 15: 11 12 13 14 15 Shift backward by 1 position from sheet 11 to obtain: 10 11 12 13 14 System prompts creation of empty sheet No. 15 In this case (from sheet 11) it is not possible to carry out a backward shift by more than 10 positions (max. up to sheet 1). Any missing sheets preceding the sheet to be shifted are compressed; subsequent sheets are not compressed. In the following example, there are 4 missing sheets: 1 2 3 4 Shts 8 Shift backward by max. of 4 positions from sheet 8 to 1 obtain: 2 3 4 5 System prompts creation of empty sheets from Nos. 6 to 9 In the following example, there are 2 missing sheets in 2 positions: 1 2 Shts 4 2 Shts 7 Shift backward by max. of 2 positions from sheet 4 to 1 2 2 Shts 5 obtain: System prompts creation of empty sheets Nos. 6 and 7 Checking After executing the "Shift sheets" command, check the state of the document: You must repeat command “3.15 Number ”, If positional symbol references have been used, these must be updated (see Sect. 4.7); likewise, wires with a prefix the same as a page number must also be renumbered (see Sect. 4.2). If cross-referencing has already been run, it must always be repeated (see Sect. 7.1). Summary: (see Sect. 3.1). Check the contents of all pages for which page number has altered and restore any references to page numbers. 3 Sheet management • 61 3.8 Store sheet Pop-menu > Sheets The Store Sheet command is used to handle and store sheets containing duplicate drawings, so that these can be reused as and when required, even in different job orders. Use command “3.9 Insert” to retrieve a stored sheet. Sheets which do not contain any processed data or wire and terminal numbers should be stored, so that they are completely neutral and can be used as master sheets. Master can also be used as the name of a file in which to classify and store these neutral sheets. The command affects the current sheet (shown highlighted). Whole sheet "Whole" is used to store the entire contents of the current sheet, except the title block and other entities on sheet 0. The symbol containing the sheet title is also stored, while page numbers are automatically excluded. Use "Select <" to define the parts of the current sheet to be stored, except the title block and other entities on sheet 0, which are discarded in any case. "Select" can only be enabled when "Whole" has been disabled. File Name Key in the name of the sheet to be stored (max 20 characters) with its description, the sheet is stored in.dwg format in the sheet folder. Pressing the “…” browse key it is possible to set a new destination folder (Library\Sheets is the default folder). Description When the drawing is saved, the related image displayed during insertion is also stored (in an .SLD file). Classification The classification is a name (15 characters max.) that may be used to divide the sheets in the database into various groups, in order to facilitate the search process. Classification List When entering data concerning a sheet to be stored, the user should scroll this list to select the name of the classification directly from the existing list of names. 62 • Spac Automazione 2011 Change Change the description and group to which it belongs by pressing the Change button. All changes are only effective when confirmed with the "Save changes" button. Delete Use this function after selecting the sheet to be deleted from the list of existing sheets. The file is only deleted after confirming with "Save changes". When clicking on "Save" or "Save Changes" the contents of the database are updated in the Lista.dat file. The asterisk (*) indicates sheets which are present in the Lista.dat file but not in the Fogli directory. Lista.dat file As explained previously, this file contains all information concerning stored sheets. The structure of the file is illustrated below: ("SHEET1" "CLASS A" "Distribution") ("SHEET2" "CLASS B" "Motor power") Each time data are stored, the system creates a new record, consisting of 3 fields: File name, Classification and Description. Data can also be edited manually, providing the above syntax is maintained. WARNING: If the Lista.dat file is removed, the list of stored pages is set to zero. Sheet classification Classification is essential to ensure that pages stored periodically are classified in an orderly manner. This parameter can be used to display only certain classes during the operation, to facilitate the search for the sheet required. Example of classification according to machine type: Interlocking All pages (power and auxiliary circuits) relating to interlocking circuits. Machining All pages (power and auxiliary circuits) relating to machining circuits. Load shedding All pages (power and auxiliary circuits) relating to load shedding circuits. Etc. Example of classification according to type of drawing: Sheet0 Customized master title block sheets to be inserted on 0 sheets. Distribution Power feed distribution sheets. Power Sheets with motor starters and power feeds in general. Auxiliaries Auxiliary circuits and PLC diagrams. Single-feed Single-feed diagrams. Etc. 3 Sheet management • 63 3.9 Insert stored sheets Pop-menu > Sheets The Insert Sheets command is used to access the stored sheets database in order to open these and insert them in the relevant worksheets. Select the sheet from the list to preview its contents. The sheet is inserted at its original position on the sheet. Use the Explode on sheet option to enable automatic explosion onto the current layer of the stored sheet block. Command “3.10 Explode (Boom” is run automatically. By pressing Insert, the selected sheet is inserted directly onto the current page. Summary: (see Sect. 3.1). To insert a stored sheet: Associate 1. Press the “…” browse key to choose the sheets folder. 2. Select the required sheet from the list of stored sheets. 3. Select the page where the sheet is to be inserted. Press Associate to create a link between the two. The associated page is marked ">". Remove association To remove an incorrect association, select one of the pages marked ">" and press Remove. Filter This filter displays the list of stored sheets that correspond to the required groups. This function is extremely useful, especially when working with very long lists. Classifications are defined during storing (see Sect. 3.8). Insert should be used when you only wish to insert a single sheet. Press OK to confirm. A prompt requests the method of insertion in associated sheets: Replace The entities on the sheet where the new one is to be inserted are automatically removed to make room for the new sheet. Add The entities on the sheet where the new one is to be inserted are not removed and the new sheet overlaps existing contents. Keep cross-refs. The stored sheet is inserted with or without registration references. This function is useful when inserting a sheet that was stored after cross-referencing. Keep wire numbers The stored sheet is inserted with or without wire numbers. This function is useful when inserting a sheet that was stored with normal or automatic wire numbering. When complete, the stored sheet is inserted in the associated page as required. 64 • Spac Automazione 2011 New sheet This command is used to increase the number of sheets in the current multisheet. Intermediate sheets can be added and associated with alphanumerical names (see Sect. 3.5). Add Enter the sheet number in the "New sheet" box and press this button to confirm and add it to the list. Press Cancel to abort the creation of the new sheet and quit the command. Wizard Complete electrical documentation can be generated automatically by associating a number of stored sheets with an equivalent number of pages on which to insert them. Prepare for this association by repeating the Associate procedure for one sheet, as described above. This generates a list of sheets marked >. When confirmed, the system requests the method of insertion, in the same way as for adding one sheet, and provides the additional option of selecting Replace or Add for each sheet. Sheet by sheet The insertion method is requested for each associated sheet: If Overlap (Add) is selected, the entities on the sheet where the new one is to be inserted are not removed and the new sheet overlaps existing contents. If Replace is selected, the entities on the sheet where the new one is to be inserted are removed automatically to make room for the new sheet. This function only affects sheets belonging to the current multisheet. The wizard system is the quickest drawing tool if stored sheets have been created in master mode or at least according to suitable criteria, and the various make-ups are stored in associations. Save Association This button is used to store wizards (association of several sheets). Associated sheets are saved in the Sheet library directory by default, in an .ABB file that can be named as required. An example of the file structure is shown below: ("0". "") ("1". "SHEET1") ("2". "SHEET2") Each association consists of a record with 2 fields: Sheet number and Name of sheet to be associated. Data can also be edited manually, provided this is effected in the above manner. Retrieve Associations To retrieve a stored wizard, select the corresponding .ABB file. Any sheet numbers in the association file that do not correspond to sheets in the current multisheet are associated with new sheets, which are created automatically without further prompts. Import Associations The .abb file is imported from the sheet number selected (the sheet numbers contained in the association file are ignored). All the components, terminals, cross references, etc., are inserted on the drawing with a prefix that could be chosen by the use. In that way, it is possible to avoid components with the same name after import several files in the same multisheet. The prefix by default is 0. The function asks if it is required to compact the list to be imported, when there are pages not associated to memorized sheets on the .abb file that should not be considered. 3 Sheet management • 65 3.10 Explode (Boom) Pop-menu > Sheets This command enables a block (or a stored sheet inserted without the "Explode (Boom) on sheet" option) to be exploded whilst keeping it on the current layer, unlike the "Explode" command, which brings exploded entities onto the original layer on which they were created (usually Layer 0). WARNING: If the Explode command is used incorrectly exploded entities are displayed concurrently on all sheets. Use command “3.13 Move between sheets” to restore the original condition and transfer the entities concerned from sheet 0 to the correct destination sheet. 3.11 Split multisheet Pop-menu > Sheets This command is used to create an individual file for each sheet in the current multisheet. These files are created in either DWG or DXF format depending on the program CAD version. To create a customized list of the sheets to be extracted, select these from the list of sheets in the current multisheet. Use All to select all sheets in the current multisheet. Use None to remove all sheets to be processed from the extract list. The Include Sheet 0 Title Block option is used to save sheets complete with title blocks (on sheet 0). If Save all entities to Sheet 0 is enabled, the title block and all entities on the sheet are extracted to an individual layer 0 (recommended). See Unsplit. Extracted files (DWG and DXF) are placed in the SPLIT directory located under each job order directory, and the following check prompts are displayed: Sheet 1 saved in … \SPLIT\1.DWG (200x) Sheet 2 saved in … \SPLIT\2.DWG (200x) Sheet 4 saved in … \SPLIT\4.DWG (200x) Sheet 5 saved in … \SPLIT\5.DWG (200x) Each newly extracted file replaces any files extracted previously, without further prompts. WARNING : Individual files extracted using this procedure contain graphic representation, but not all hidden information stored in the original multisheet. In case of Unsplit you don't get back a file equivalent to the original. Original multisheet must be preserved always. When "Save all entities to Sheet 0" is disabled, each DWG file comprises 2 layers: the original layer with the sheet number and the 0 layer, which is always present, whether the sheet is empty or contains the title block. 66 • Spac Automazione 2011 Unsplit Pop-menu > Sheets Operates in opposition to “3.11 Split multisheet“, that extracts individual pages of the multisheet to individual dwg or dxf drawings, saving them in Job Order folder named Split. Unsplit lets you rebuild a multisheet importing individual files, whose location is chosen pressing button “…”. Unsplit doesn't check file content, in case more than one file you are going to import was saved (during Split) with option “Include sheet 0 master title block”, you get as many master title blocks overlapped as these files are (one per page). To create the multisheet you have to associate individual files to available sheets: Associate 1. Select the chosen file from the list (to the left). 2. Select the page you want to associate it with (list to the right). The two are then associated by pressing “Associate” the function shows the association between the file and the folder available in the column “Sheet associated”. Associate Multiple You can also associate a multiple selection to add several files at the same time: 1. Select the chosen files from the list (to the left). 2. Select the starting page, from which to start adding the chosen files: The two are then associated by pressing “ Associate”. Remove To cancel association press the “Remove” button. Preview Allows you to preview the content of a dwg file. The left mouse button zooms between 2 chosen points. The scroller performs the zoom In and zoom Out function. The right mouse button gives the current view (pan). The function only works on sheets belonging on the current multisheet worksheet. Once the composition has taken place (between individual files and available folders) you need to set the “Unsplit Mode” valid for all pages added: 3 Sheet management • 67 Replace What is present on the sheet involved is removed to make room for the new sheet automatically (including sheet number and title). Add What is present on the sheet involved is not removed, file content will be placed over existing drawing parts. This function is launched by pressing “Unsplit”, the files are added to the associated pages in the mode chosen. The individual files (Dwg e Dxf) used for associating are kept in the original folder, in which the file Last_Unsplit.csv is generated containing the list of associations carried out. WARNING : Individual files extracted using “3.11 Split multisheet“ contain graphic representation, but not all hidden information stored in the original multisheet. Unsplit doesn't create a file equivalent to the original. 3.12 Copy between sheets Pop-menu > Sheets This command is used to copy objects from one sheet to another. Variable position In this case, the positions of the objects on the destination sheet are to be different to that on the starting sheet. After choosing the items to be copied you need to indicate the sheet they are to be copied to (you can do multiple selections to copy on several sheets at the same time). Indicate the starting point with your mouse and then the destination on the chosen page: First point of movement: Destination point: In the case of multiple selection (several destination sheets selected), the command is cyclical for all the following sheets. The “Variable Position” copy type only works on sheets belonging to the current multisheet. Fixed Position This is the case when the items on the destination sheets must be copied to the same position as the starting one. After choosing the items to be copied you need to indicate the sheet they are to be copied to (you can do multiple selections to copy on several sheets at the same time). To copy quickly, double click on the destination page number. If the destination sheet (where the copy is going) belongs to a multisheet that is not the current one, you must check the status of the “Save at multisheet change” option: If active, the current drawing is saved before the multisheet file where the chosen page is resident is loaded (by default). You can only copy between sheets belonging to different multisheets by using “Fixed Position”. 68 • Spac Automazione 2011 3.13 Move between sheets Pop-menu > Sheets This command is used to move selected entities from one sheet to another. Select the entities to be moved and then specify the destination sheet. Use the mouse to indicate the starting point and then the destination point on the selected sheet: First shift point: Destination point: To move quickly, double click on the destination page number. The function only affects sheets belonging to the current multisheet. 3.14 Clear sheet Pop-menu > Sheets Select this command to delete the entire contents of a sheet, including sheet number and related title symbol. From the lists of sheets present in the multisheet, choose the sheet to be cleared; you can make multiple choices to clear several sheets at the same time. Before “clearing” a sheet, the command asks for confirmation. To restore a page that has just been cleared, use the “Cancel” command. In the case of multiple choice (several sheets chosen), the command suggests confirming each time. By responding “No” to the question “Do you confirm the clearing operation for each individual sheet chosen?”, the next confirmation (“Are you sure?”) is valid for all sheets. If the page to be cleared should have no deletable parts the command answers with "Clear Sheet". Therefore, the confirmation request means sure deletion of items. To clear a page quickly, double click on the page number to be cleared and confirm. The function only works on sheets belonging to the current multisheet. Note that this command does not physically remove the drawing file pages but “clears” them of their content. WARNING: The “Cancel” command does not restore the pages after a Multisheet has been closed. 3 Sheet management • 69 3.15 Number sheets Pop-menu > Sheets This command is used to number all sheets in the job order automatically, via user-defined co-ordinates, for sheet number, next sheet number, previous sheet number and total number of sheets. Renumbering entails the substitution of previous page numbers, even if these are in a different position (only on drawings using 8.x or later releases). Define a position for each item of data ("centered" text) by configuring co-ordinates X and Y using the "Select <" button. Text heights range from 2 to 10. Summary: (see Sect. 3.1). Rotation 0 – 90 Defines number orientation. The setup is common for all 4 data. Total sheets This value is only considered if the "Total sheets" number is enabled. The system prompts the highest existing sheet number. Delete sheet numbering Select this option to delete all existing sheet numbers. Renumbering automatically results in the replacement of existing data on drawings. Sheet, Multisheet or Job order This option is used to define whether "Sheet numbering" or "Delete sheet numbering" must be carried out on the current sheet only, on the current multisheet or on the entire job order (all multisheets). Add prefixes Inserts the multisheet prefix (see “”). In the following example, with prefix “A”: On: produces: A1, A2, A3, etc. Off: produces: 1, 2, 3, etc. Numbering Examples The color or style of numbers must be edited in the size 1 blocks called NUMFG, NUMFGP, NUMFGS and NUMFGT.dwg in the Symbols directory (these symbols have a centered insertion point in cyan 4, Roman font and style). This function is often called up automatically by the functions which require it, such as “3.1 ” or by the "Table" drawing command when new pages have been created. 70 • Spac Automazione 2011 3.16 Print Sheets Pop-menu > Sheets This command manages the automatic sequential printing of sheets belonging to multisheets from the same job order. Summary: (see 3.1). "All" of the job order can be printed directly (all sheets are automatically included in the list). Alternatively, the list of sheets to print can be customized and the sheets required can be selected from the various multisheets. The following buttons operate on the multisheet sheet list: Add To create a customized list of sheets to print, select a multisheet and highlight the list of sheets it contains. Click on the sheets required. Press “Add“ to include all the selected sheet numbers in the list of sheets to print. Repeat the procedure for each multisheet in order to obtain a customized print list. All All sheets in the selected multisheet are highlighted. Press “Add“ to include these in the print list. Delete To delete previous selections. The following buttons operate on the list of sheets to print: Remove Removes selected sheets from the print list. Clear Removes the entire list of sheets to be printed. Press OK to save automatically the drawing before printing. The system used to manage sheet images is that described for command “3.2 Change sheet”. Use “Sheet slide” to handle obsolete or missing images (see Sect 3.18). 3 Sheet management • 71 Print page setup List of the page settings available for the automatic printing “Print Sheets”. From DWG: This is the list of the page settings memorized on the drawing. It is possible to create or modify them with the AutoCAD command “Page Settings Management”, or pressing the “…” button (Browse). Customized : This is the list of page settings memorized on SPAC. The PDF, DWF and JPG settings are fixed, it is not possible to modify or delete the print driver associated. It is only possible to edit pressing the “…” button (Browse). To create a new “customized” setting, select the item <New> from the list. DWG These are the “Page Settings” for the classic AutoCAD printing. It is possible to copy the settings from one drawing to the other. Customized These are the predefined settings for the printing in PDF, DWF and JPG file formats. These settings are memorized on the file FIlePlotStd.ini on the SPAC folder Program\utente\Settaggi. To print with different line thickness, it is possible to associate the default configuration “SPAC Default.Ctb”. Plot area Extension The valid print area is equivalent to the Zoom Extension command carried out on the drawing. This is the most commonly used option in that it enables optimization of the print area on paper. Limits The valid print area is equivalent to the Zoom All command applied to the drawing. Screen The valid print area is equivalent to the current Zoom to the drawing. WARNING: The Windows setting cannot be used. If the default setting is Windows, printing is aborted after the first sheet. 72 • Spac Automazione 2011 Grouping This functionality is enabled only for the printing of PDF and DWF file formats. It consents to print the schemes in a single file (for the Job Order), in one file for each multi-sheet and in one file for single scheme. Single Sheet The file name is managed automatically: NameMultiSheet_NumberSheet.pdf (or dwf) A Pdf (or Dwf) file is created automatically on the Job Order directory to store all the files created. Multi-Sheet I The file name is managed automatically: NameMultiSheet.pdf (o dwf) A Pdf (or Dwf) file is created automatically on the Job Order directory to store all the files created. Job Order The file name is proposed by default: NameJobOrder.pdf (or dwf) The file name and directory could be modified by the user. Indicating an existing file name, it is possible to add the pages to the existing file or to overwrite the existing file. Assign Pens Each item in the drawing is associated with a color. Depending on the type of plotter, each color can be printed using a different pen and a different type of line and width. The software features a default configuration, "Default.ctb". Some devices, such as laser or electrostatic printers, can print lines that vary in thickness or density. To load the default configuration, press "…" then select Default.ctb from the Plot Style table (pen assignements). To view or edit default configurations, access the AutoCAD command "Plot Style Manager”. The software has no print configurations using stored STB styles. 3 Sheet management • 73 3.17 Sheet review Pop-menu > Sheets This function is used to manage job order sheet review, store the progress status of changes and save pages that have been changed. You may access the revised sheets at any time to view or print them. To create new revisions or view existing ones, use the ”Management“ command. It is also possible to manage revisions “manually” using the “Revision Symbol” and “Revision Legend” commands; in this case, the revised sheets are not stored. WARNING: The use of revisions significantly increases the size of the multisheet DWG file. Management This command is used to create new revisions or to view existing ones. Creating a revision basically means saving the current sheet status within a revision sheet. The revision sheets are saved in the layers under the revision name “sheet no_REV_no”. Example: effecting two revisions of sheet 1, as pictured, obtains the following layers: Layer 2_REV_00: Revision 00, equivalent to the first draft of the drawing. Layer 2: Revision 02; in this case it also coincides with the "Last revision” command. New revision 02, if applicable, entails the creation of new layer 2_REV_01, on which sheet 1 is stored in its current working state (Last revision), also corresponding to the status of revision 01. To create a sheet revision, select the desired “new revision number” and press “Create”. The selected revision number may correspond to the last one already used for other sheets, or may be the value immediately following it. All new revision data must be inserted: Description, date and "signature" (change author) relating to the change you wish to implement. The “General Description” is stored in the job order file Revision-Data.txt 74 • Spac Automazione 2011 This button enables the extraction of data inserted in other sheets that correspond to the same revision number. The data can also be inserted directly (even manually) in “Revision Symbol”. Pressing “Create” produces a copy of the current sheet on the revision layer “sheet no_REV_no”, and the revision symbol is inserted (or updated) automatically; the drawing sheet must then be changed as described in the newly created revision. The Revision Legend command allows access to the documentation for all updated sheets. WARNING: The description of a new revision describes the change that will then be made to the drawing sheet, and not the content of the sheet that is stored. If there are no revision symbols on the drawing (or on initial use), you must select blocks by pressing the “Select” button in order to access inserted data. Selection The “Select” button enables you to select the “Revision symbol”; this choice is limited to symbols corresponding to the Master title blocks in use. The button is disabled when there is already a symbol on the multisheet used automatically by default. Set The list contains all existing job order revisions and enables you to restore a previous job order status. Revised sheets may be accessed, viewed or printed at any time. The example shows the last revision number 02, which, in this case, also corresponds to the “Last revision”. Delete Press the “Cancel Last revision” key to delete the latest revision only. To cancel all revisions, use the specific command available. When a revision is effected, only commands “3.2 Change sheet”, “3.3 Next sheet”, “3.4 Previous sheet” and “3.16 Print Sheets”. It is not possible to access any processing when viewing revisions. Delete Revisions Pop-menu > Sheets This command deletes all revisions from the multisheet. It removes and deletes all “sheet no_REV_no” sheets saved on the CAD layer. The “Revision Symbol” is kept to enable access to the "Revision legend" (for manual intervention). To run the command, you must first call up the “Last revision” window. Deleted revisions can only be restored by using the "Cancel" command, and only up until the drawing is saved or closed. WARNING: Removing revisions significantly reduce the size of the DWG in the multisheet. 3 Sheet management • 75 Revision Symbol Pop-menu > Sheets Each sheet in the job order can be associated with the relative revision symbol. This is useful for identifying updated sheets in complex documentation. These symbols have 1, 2, 3, 4 or a maximum of 5 groups of attributes (hence, a maximum of 5 revisions): REV_NUM_n Indicates the revision number or progressive revision (change) code. REV_MOD_n Brief indication of the type of change effected on the sheet in question. REV_DAT_n Date of change REV_FIR_n Name of person who made the change. Contents can be entered (or edited) manually using the "Ddatte" command. The block is inserted automatically at the 0,0 co-ordinate. Each type of title block consequently corresponds to a customized Revision block. The Revision Legend command can be used with these blocks to obtain a list of all revisions made. Revision Symbol (with 3 groups of attributes for 3 revisions) Revision blocks are stored in the Librerie\Simboli directory. Each .DWG block corresponds to an .SLD image (slide) with the same name to be displayed in the dialogue window. _REVIS symbol with 2 updates New blocks can be customized and stored in the same directory as existing blocks. The name of the block must follow on consecutively from existing names (_REVIS4, _REVIS5, _REVIS6, etc.), with a maximum of 20 blocks (the dialogue box can display a maximum of 20 windows). If a symbol is deleted, symbols with subsequent numbers cannot be displayed. WARNING: The _Revis1 symbol consists of attributes only (the graphic part is drawn on the Master3 title block for which the block has been adapted). In the first attribute group, REV_NUM_1 is predefined as 00 so that at least one visible part can be selected using "Ddatte". 76 • Spac Automazione 2011 Revision Legend Pop-menu > Sheets The Revision legend function can only be used if the drawing contains " “Revision Symbol“, which are used to indicate the changes and revisions effected on the various sheets of the design. Each time a new revision or a change to an existing revision is inserted, the user must update the legend. First of all, select the drawing file to be processed, in order to obtain the specific legend for each multisheet, or select the complete legend for the entire job order (recommended choice). Revisions may be sorted according to Sheet Number or Revision Number. The legend sorted by "Revision number" can only be obtained parametrically (by pressing Table). The Drawing with table block option is not available (Drawing button). Summary: (see Sect. 3.1). The legend sorted by "Revision number" only considers sheets containing a revision symbol that has been drawn and filled in correctly. For legends sorted by "Sheet number", the sheets without revisions and sheets with empty revision symbols (attributes not prepared) may be excluded. Revisions are also taken into account in the Sheet legend (see Sect. 3.18). After processing (scanning), all revisions found are listed, together with the name of the multisheet, in order to distinguish the position of any sheets with the same sheet number. Press Table to draw the revision list in table form (parametric mode). The function prompts for drawing parameters. Example of Revision Legend (sorted by sheet). Press CSV File to create a data extraction file. The file is automatically stored in the job order directory as Revision-list.csv. 3 Sheet management • 77 Press Drawing to draw revisions using a table block. The table and the position of the data it contains can be customized using the appropriate configuration (see “Revision legend” Sect. 4.2). The system defines 24 revisions for each sheet. The sheets needed to complete the legend follow on consecutively from the first sheet, which is shown as the starting number. Number of first sheet for Revision Legend: If the destination sheet is full, the function asks whether to continue on regardless or abort and prompt for the selection of a new sheet number. Confirmation is requested each time for each subsequent sheet. "Clear current sheet" deletes all entities contained before drawing. If the destination sheet is new, the function continues without further prompts. Each sheet after the first is generated automatically in consecutive sequence. The numbers for new sheets are prompted automatically. The default table symbol is LegendR.dwg, which resides in the symbol directory. Customized tables may be used, provided these are present in the same directory. The color chosen during configuration (see Sect. 4.2) for inserting text is important for translating into a foreign language (see “Color text processing” Sect. 12.4). Sheet sequence All revisions contained in each sheet are entered consecutively. This system automatically excludes from the list any sheets without revisions or with empty revision symbols. The Drawing and Table graphic options are permitted (in addition to CSV Files). Multisheet Sheet EXAMPLE10-01 EXAMPLE10-01 EXAMPLE10-01 1 2 3 EXAMPLE10-01 4 EXAMPLE10-01 5 EXAMPLE10-01 EXAMPLE10-01 6 7 Revision 1 2 1 2 1 Change Date Change author GD1 Replaced Control Lamps External Line Deleted Control Lamps GD1 Replaced 06/04/99 06/04/00 16/05/99 06/04/00 06/04/99 S. Franchino C. Maritano S. Franchino C. Maritano S. Franchino Example of Revision Legend on CSV file (sorted by sheet). Revision sequence All sheets containing a revision number are entered consecutively for each number. This system automatically excludes from the list any sheets without revisions or with empty revision symbols. The Table graphic option is permitted (in addition to CSV files). Revision 1 2 Multisheet EXAMPLE10-01 EXAMPLE10-01 EXAMPLE10-01 EXAMPLE10-01 EXAMPLE10-01 Sheet 4 5 6 4 5 Change Date Change author GD1 Replaced External Line Deleted GD1 Replaced Control Lamps Control Lamps 06/04/99 16/05/99 06/04/99 06/04/00 06/04/00 S. Franchino S. Franchino S. Franchino C. Maritano C. Maritano Example of Revision Legend on CSV file (sorted by revision number). 78 • Spac Automazione 2011 3.18 Sheet utilities • Sheet title • Sheet legend • Location Symbol • Master title blocks • Sheet slide Sheet title Pop-menu > Sheets A title can be associated with each sheet in the job order, by using either the command “3.1 ” or by selecting the title manually from the shortcut menu. These blocks have two Title attributes: one for inserting the description of page contents, the other for translating into a foreign language, where applicable. Contents can be edited manually using the "Ddatte" or "Create multisheet" command. When the same drawing contains different types of symbols, these can be standardized using Create multisheet ("Various" is displayed). The "sheet title" block is inserted at the 0,0 co-ordinate. Each type of title block thus corresponds to a customized title block. The Sheet legend command can be used with these blocks at the end of the job order to obtain a list of all descriptions associated with the pages. 'Titolo' Symbol Title blocks are saved in the Librerie\Simboli directory. Each .DWG block corresponds to an .SLD image (slide) with the same name to be displayed in the dialogue window (the symbol in the diagram is exploded). Symbol Titolo0.dwg The Titolo attribute is used for the main description, whilst Title1 is used for translations, where applicable. New blocks can be customized and saved in the same directory as existing blocks. The block name must follow on consecutively from existing names (Titolo3, Titolo4, etc.), with a maximum of 20 blocks (the dialogue box can display a maximum of 20 windows). When a symbol is deleted, symbols with subsequent numbers cannot be displayed. 3 Sheet management • 79 Sheet legend Pop-menu > Sheets The Sheet Title legend function must only be used after ensuring that the titles associated with each sheet (preferably when the job order is complete) are present and correct and contain the description of sheet contents insert title symbols on the drawing using the “Sheet title” and “3.1 ” commands. Each time changes are made to existing titles the legend must be updated by the user. The content of the last sheet revision, under “Revision Symbol”, is also taken into consideration for each page. First, select the drawing file to be processed, to obtain the specific legend for each multisheet or the complete file for the entire job order (recommended choice). Processed sheets are then listed as shown in the example below. The first column contains the name of the multisheet, in order to distinguish the position of any sheets bearing the same page number. Sheet title list. 80 • Spac Automazione 2011 Press Table to draw the sheet list in table form (parametric mode). The function prompts for drawing parameters: Each item (Tag) in "Available Fields" is a piece of data that, by pressing Add, can be inserted in Output Fields to represent a column in the table. Each Tag has two variables, the width and title of the column. These can be changed by pressing Change. Number of rows This value is used to split the table into several parts, even on different sheets, when (on reaching the maximum number of rows), it asks the user for a new insertion point or to continue on the next sheet. Text height This parameter is used to configure the height of all text in the table and proportionally affects the height of each row and, subsequently, the overall height of the table. Title height This parameter defines the height of column titles and affects the calculation of the overall height of the table. Table width This is the overall sum of the widths assigned to each output field, expressed in millimeters. This value must never exceed the Sheet width value, to prevent the table from overshooting title block margins. Table height The maximum table height is calculated on the basis of the predefined maximum number of rows and text height. This value must never exceed the Sheet height value, to prevent the table from overshooting title block margins. Standard Standard output field configuration (where applicable). 3 Sheet management • 81 Press Default to store the current configuration in "local" mode (see Sect. 4.2) for future use. If confirmed without pressing Default, the configuration is considered to be temporary and is only used once. The function prompts: Select table insertion point: The configuration in the previous figure corresponds to the following graphic output: Example of Sheet Legend table The following options are available for table drawing configuration: Request insertion point When more than one sheet is required to complete the table drawing, the user can choose whether or not to change the table insertion point on subsequent sheets. Line spacing (x2) The space occupied by each row is calculated in proportion to text height configuration. This parameter can be used to double the space to allow two text lines to be inserted. This condition is especially useful for inserting translations. Sheet + Character When more than one sheet is required to complete the table drawing, the user can choose whether to continue on sheets with consecutive numbers (either new or existing) or whether to create sheets with intermediate numbers (e.g.: 1, 1A, 1B, etc.). A maximum width of 190mm has been selected to enable at least 2 tables to be drawn on the same sheet (valid for A3 format or larger). Press CSV File to create a data extraction file. The file is automatically stored as SheetTitles-List.csv in the job order directory. 82 • Spac Automazione 2011 Press Drawing to draw the sheet list using a table block. This option enables the user to decide whether to write the title in the main language and the translation, where applicable, on the same line (separated by "\"), or on different lines. In the first case, 52 titles are listed for each sheet, in the second case, 26 (using the default table). The table and position of the data it contains can be customized using the relevant configuration (see “Sheet title legend” Sect. 4.2). LegendT.dwg is the default table symbol. This resides in the symbol directory. Customized tables may be used, providing these are stored in the same directory. Example of Legend with translation on same line. The pages required to complete the legend follow on consecutively from the first page: Number of first sheet for sheet list: If the destination sheet is full (Status: contains entities), the function displays a prompt asking whether to continue regardless or whether a new sheet number is to be defined. Enabling "Clear current sheet" deletes all entities contained before drawing. A prompt requests confirmation for each subsequent sheet. If the destination sheet is new, the function continues without further prompts. Subsequent sheets are automatically created in consecutive sequence. Page numbering for new sheets is prompted automatically. The color selected during configuration (see Sect. 4.2) for inserting text must be selected bearing in mind that these descriptions might already have been translated into a foreign language (see “Color text processing” Sect. 12.4). 3 Sheet management • 83 Location Symbol Pop-menu > Sheets For each sheet of electrical scheme in the job order you can associate a “Location Symbol”, used to set the default location level of the current page. The information stored in this symbol is used working on projects where option “Location Manager” (of Preferences) is set. This command shows the list of sheets belonging to the current multisheet. Pressing button “…” to browse symbols you can choose the one fitting better current master title block. Pressing “Apply” the location (made combining Location, Panel and Function Gr.) is associated to all selected pages. Pressing button “Delete” you delete the location symbol from selected pages. See “17.5 Location”. The existence of location symbol has consequences on “location marks” contained in sheets with it: default symbol labels are automatically set invisible in order to hide excessive and repeated information. Location Symbol These symbols are provided of three attributes to insert Location, Panel and Function Group, and are stored in Librerie\Simboli folder. Each symbol ( .dwg file) has its equivalent slide image (.sld file) with same name, loaded as thumbnail in the dialogue. Insertion point is automatically set to 0,0 , for each new master title block you must associate a customized location symbol. Symbol Location1.dwg You can create new blocks saving them in the same folder. Block name must be consecutive to existing names (Location3, Location4 etc.) with a maximum of 20 blocks (dialogue box can show max 20 items). If you delete a symbol, all following ones by name order are not shown in the dialogue. WARNING : it's better not to use CAD command “Ddatte” to modify "location symbol" data, because they don't trigger the visibility of “ location marks” symbols present on the sheet. 84 • Spac Automazione 2011 Master title blocks Pop-menu > Sheets The title block is usually inserted automatically by the command “4.1 Setup” when opening a new drawing, depending on the user configuration associated with the job order (see Sect. 2.5). In other cases, this function is used for manual insertion. The command presents 4 sample master title blocks to be inserted manually in sheet 0 of each multisheet. These blocks feature attributes for rapid insertion of table data (which can then be changed using the CAD "Ddatte" command). Title blocks are inserted at the 0,0 coordinate. Once inserted, it is advisable to check “Sheet Dimensioning” (see Sect. 4.2) under Settings, i.e. configuration of useable space and title block characteristics (segments). Master title blocks are stored in the Librerie\Simboli directory. Each .DWG block corresponds to an .SLD image (slide) with the same name to be displayed in the dialogue box. New title blocks can be customized and stored in the same directory as existing ones. The name of the block must follow on consecutively from existing names (Master4, Master5, etc.), with a maximum of 20 title blocks (the dialogue box can display a maximum of 20 windows). If a master block is deleted, masters with subsequent numbers cannot be displayed. WARNING: Master3 is the only available title block of a suitable size for producing single-feed drawings. Sheet slides Pop-menu > Sheets This utility is used to enable the automatic creation of images (slides) used as previews by commands such as "Change sheet", "Print sheets", "Automatic wire numbering", etc. Select "Sheets" to create slides relating to the current multisheet. Select "Multisheet" to create slides for the entire job order. When this operation is carried out, a new sub-directory called Slide is automatically created under the job order directory. This contains the .SLD files. File names consist of the multisheet name, separator (_) and sheet number: Layout_100.sld, for instance, is the file that contains the slide for sheet 100 in the Layout.dwg multisheet. 3 Sheet management • 85 86 • Spac Automazione 2011 4 General commands 4.1 Setup Pop-menu > Product name This command starts automatically when a new multisheet is accessed. This loads the symbol format that has been selected (IEC format, by default), and associates these symbols with the most appropriate values for operating, snap and grid pitches. It is also used to configure the file containing the reference prefixes to associate with symbols. Enter SETUP to call up the command from the keyboard. If there is already a title block (see Sect. 3.18) in the drawing (on sheet "0"), this can be updated with information concerning the Customer associated with the job order (see Sect. 2.5) by selecting "Update title block". When accessing the drawing for the first time, enable "Insert title block" to insert the title block (configured for the Customer). If these two items are disabled, title block data must be entered and updated manually (no Customer). Symbols Select one of the symbol formats available. Menu file is loaded, containing the requested pull-down symbols menu (the system presents IEC symbols, by default). Recommended values for wire pitch, power feed pitch, help and prefixes have been predefined for each set of symbols. Setup can also be used to change the symbol command menu (to avoid using CAD commands). Wires Wire pitch and color affect wire connection commands (see Sect. 4.5); the wire color is also used as the BYLAYER color on all sheets in the multisheet, except for sheet 0 (with the title block). Power feeds The pitch and color of power feeds are variables which affect power feed drawing commands (see Sect. 4.4). The default color setting is 1 red. Prefixes Use this function to choose “Prefixes” archive containing symbol configuration, this prefixes setting is essential to facilitate the insertion of symbols in drawings. The contents of the .pre file can be viewed from “Symbol Configuration” (see Sect. 4.2). 4 General commands • 87 4.2 Settings Pop-menu > Product name The program Settings can be used to customize program functions. These settings are stored at 2 levels in two configuration environments: • Original Configuration • Local Configuration When a new job order is created, the “Start settings” (see Sect. 2.5) is used as the basis for "local configuration" (of job order). Original There may be many original configurations. For instance, there may be one for each type of job or for each customer. These are stored in .ini files in the Librerie\Cfg directory. Files often have the same name as the customer, so that these are automatically associated when a new job order is created. When starting a new job order, the original configuration is automatically copied and stored locally. Use “Export Settings” to change or create new configurations. Local When starting a new job order, the original configuration is copied locally in the SPAC_cfg.ini file in the job order Cfg directory, in order to obtain the basic settings. Subsequent customizations of settings for the specific design are only saved "locally" and the original settings remain unchanged. Configuration must include sheet set box parameters (title block), co-ordinates and number of divisions (segments); the correct operation of all commands depends on these values. Always check these configurations before starting to draw a new design, to ensure that the reference variables necessary for the specific use and operation of the various functions have been configured according to construction requirements and applicable standards. When no original configuration is available, the program uses its default settings and stores the empty SPAC_cfg.ini local configuration file. WARNING: Any text editor can be used to read and edit ini configuration files, which are in ASCII format. These changes should not be carried out by inexperienced users. 88 • Spac Automazione 2011 Export Settings Use this function to save or change “Start settings”, starting with the local settings in the SPAC_cfg.ini file in the job order Cfg directory. Enter an existing file name to edit that file. Enter a new file name to create a new original cfg file. "Partial" changes can also be made to existing configurations. New Original Cfg This command opens the list of all "local" configurations: Enter the name of the new configuration to be created and select the settings (keys) to be transferred to the original configuration (usually all). The figure shows an example of how to create a new original file, called User_Cfg.ini. If there is already a customer with that name, the association is made automatically when the new job is opened. Change Original Cfg This command opens the list of all "local" configurations: Select the name of the configuration to be edited and the settings (keys) to be transferred to the original configuration. The figure shows an example of partial "change" of the settings for all Legends in the original configuration called (BASE).ini. 4 General commands • 89 Import Settings This command is used to import partially or completely the settings stored in “Start settings” into Spac_cfg.ini file. It's possible to import the same data from a "Local Configuration" of a job order, selecting the Spac_cfg.ini file existing in Cfg job order folder. Command asks you to choose the configuration file; default list point to Librerie\Cfg folder where you can find "Original configuration" files. To select a local "Configuration File" browse for job order folders pressing button “Other…”. After the file choice, it's loaded the [chiavi] (settings) list there stored: choose from the list settings to transfer to the current local configuration. Message “ * CAN'T IMPORT: Configuration with less parameters than current one ” warns that's impossible to import highlighted keys (the ones marked with an asterisk), because they appear to be older or incomplete respect to the ones in current job order Spac_cfg.ini file. After importing settings, always ensure that these are correct. In case of partial import, verify compatibility between imported and existing data. 90 • Spac Automazione 2011 Sheet Dimensioning Carry out (or check) dimensioning for each new drawing, or immediately after inserting the master title block in sheet 0. This setting affects most commands, so it is essential to check that the data is correct each time. Segment Position Defines the position of the segments dividing the sheet; on abscissa means the numerical segment of the master title block lies on the x-axis (divided into columns); on ordinates means the segment lies vertically on the y-axis (divided into rows). Set double segment if the title block is divided both horizontally (numerically) and vertically (alphabetically). It is not possible to manage the alphabetical segment only. Click on Example to obtain help for each of the three positions. Segment numbers Define the number of divisions on the sheet. In case of numerical segments, also specify whether numbering starts from 0 or 1. Alphabetical segments start with the letter A and proceed in alphabetical order from top to bottom. Segment increment This setting indicates the type of numbering on segments. With increment 1, segments are consecutive: 0, 1, 2, etc.; with increment 2 segments are numbered 0, 2, 4, etc. Number of last segment The number assigned to the last segment is calculated according to the number of divisions and the "increment" setting. Formatting It is possible to format the numbers of segments up to 4 characters: 1 produces numerical segments: 1, 2, 3, etc. 01 produces numerical segments: 01, 02, 03, etc. Useable area Always enter (or select on the drawing) the co-ordinates of the points that define the area within the segments. This area, divided by the number of segments, determines sheet configuration. Click on "Example" to display the help image. See “Snap-to-segment block insertion“. It is essential that the “Sheet dimensioning” be correctly configured in the “Start settings” settings (see Sect. 2.5). 4 General commands • 91 Cross Reference "Real-time cross-reference" enables information concerning contacts (or Child symbol), o be processed immediately and directly whilst inserting these in the drawing; it also allows the user to select the position of the contact, according to coil availability (or Parent symbol). The Pin value and the position of the parent symbol (or coil) are processed and written immediately both on the contact (child symbol) and on the registration cross-reference of the coil (parent symbol). The general parameters of function “7.1 Cross-referencing” are configured. Automatic insertion of registration reference When working with the "Cross along contact line", the point of insertion on the drawing of the Registration reference symbol (cross) can be selected manually or automatically during insertion of the Parent symbol (based on the co-ordinates of the Offset attribute). Cross with pin marking Pin markings on parent and child components and elements are inserted according to the “Symbol Configuration” settings (see Sect. 4.2). The example shows the configuration required to obtain the graphic result of the Pins on symbol Q11 (IEC). Q11 Parent symbol with pin identification Add segment When disabled, the position on the parent and return symbols is simplified and described using the sheet number only. In this example, the second return R1 has no segment (only sheet number); "Add Segment to Returns" is enabled on the first. Separator This character is used to compose registration data. To ensure compatibility with drawings produced using earlier versions, use of the "dot" character is recommended for this purpose. “Cross along contact line” updates the contacts and registration cross-references in real time. Using CAD commands to make changes calls up potentially conflicting items of information. This renders it necessary to run a check via a complete processing of command “7.1 Cross-referencing”. 92 • Spac Automazione 2011 Symbol Configuration When opened, this configuration loads the contents of the prefix file associated during “4.1 Setup”, for each symbol library exists at least one “Pref”, but you can generate other and different archives, in order to comply graphical rules depending on chosen norm. Archives are stored in Description-Lib.Mdb database file in Librerie\Archivi folder, each archive contains prefixes to associate to symbols and Cross Reference registration, Pin configuration, multilanguage description, material features and graphical matching used in Loop Diagram and Panel. Set graphical parameters of “5.9 Loop Diagram” and “15.4 Pushbutton panel” commands. Symbol It's the electrical symbol name ( .dwg file) you are going to associate parameters. Pressing “…” you browse Librerie folder, if you select a “Child symbol “ is allowed insertion or modification of generic description only. Pressing ”Symbol“ (or the arrow) name list is sorted alphabetically. Pressing again order toggles from ascending to decreasing. (See “Parent symbol” and “Element“ Sect. 17.3) Prefix It's the component reference: KM1 symbol is a relay coil with prefix KM, so on the drawing it will be referenced with names like: KM1, KM2 etc. (if incremental), 1KM1 or KM1.1 (if positional) etc… Pressing ”Prefix“ (or the arrow) prefix list is sorted alphabetically. Pressing again order toggles from ascending to decreasing. Description It's the generic symbol description (in 10 languages plus Italian), pressing “…” the string edit dialogue appears. 4 General commands • 93 Character Before Adds or removes (with a single scan) a character before all listed prefixes (e.g.: +, -, =, etc. ) Reference Defines the ”Registration reference symbol” to associate to Parent symbols (defining pins on related child symbols). This data is written inside Codice attribute existing in all Parent symbols. As a matter of facts it marks the availability to store Child symbols registration. With symbol 11P (see picture at left) relay coil KM1 is now available to be associated with three open power contacts (FAP) + 1na (FA) + 1nc (FC). Choice is done pressing “CNT” and “AUS” buttons (see Sect. 7.2 and Sect. 15.2). Reference 11P Press “Change” to confirm a name typed manually. CNT (Contactors) Chooses a ”Registration reference symbol” (contactors family) among the ones stored in Librerie\Simboli\Riferim\Cnt folder. AUS (Auxiliary) Chooses a ”Registration reference symbol” (auxiliary family) among the ones stored in Librerie\Simboli\Riferim\Aus folder. Loop Diagram Associates each symbol in library to a layout block used in Loop Diagram graphic. Press “…” to browse Librerie\LoopDiagram folder, press “Change” to confirm a name manually typed. (See Loop Diagram “Configuration” Sect. 5.9) LD_Motor symbol Front-Panel Rear-Panel Associates each symbol in library to layout blocks used in Front and Rear Panel graphic. Press “…” to browse Librerie\Pannello folder, press “Change” to confirm a name manually typed. (See Pushbutton Panel “Configuration” Sect. 15.4) LYPlt_8 symbol Pin Applies only to symbols of family Parent and Element, configures the cabling numbers (pin) of modules. Pins configured in prefix archive are associated to the symbols during Cross Reference process. (See “7.2 Pin reference ”). Materials association Applies only to symbols of family Parent and Element, assigns a material code with manufacturer and description. (See “8.2 Associate materials”). WARNING : If you insert a symbol not previously configured, or with an empty “Prefix”, you are asked for a temporary reference. In case of unspecified “Reference”, default value is RIF1. Blk and Comuni symbol library can have a single prefix archive only, always in use as the one set for symbols. 94 • Spac Automazione 2011 Pin association This can be carried out on all parent and element symbols and consists of the configuration of wiring numbers (pins) on components. These are visible upon completion of cross-referencing with pin identification (see Sect. 7.2). The following example illustrates configuration of the KM1 relay coil symbol pins. Two pin attributes are visible on the exploded symbol (PinA1 and PinB1): If A1 is attributed to the first pin and A2 to the second, after cross-referencing (with pin identification option), the values shown in the example appear on the component. See “7.2 Pin reference”. Prefix archive For each symbol library, there is at least one Prefix Archive with the same name. This archive is automatically prompted by default when the command “4.1 Setup” is used to define (or change) the symbol format currently in use. From Symbol Configuration you can customize or create new archives, pressing button “…” as shown in picture below, you can import files with extension Pre, Pfr, Lpd and Des containing customizations of previous versions. See “New prefix archive”. Following picture shows archives associated to IEC symbol library, note that archive name begins with the same name of the related library, this relationship is a rule for creating new archives. Example: IEC library can have archives named IEC (standard), IECn, IEC_name, etc. (it's not allowed the character “— “ in the archive name). Choosing prefix archive during setup Having more archives for each symbol set let you preset numerous combinations of material codes and pin: this let you easily group features used more frequently for some customers, or associate features of a specific manufacturer to the symbol library. All prefix archives are tables of Description-Lib.Mdb database file, stored in Librerie\Archivi folder. 4 General commands • 95 New prefix archive From Symbol Configuration open “Archive management” pressing button “…”. To create a new archive select one of the existing, it will be used as template to copy the symbol list. The archive used as template must belong to the same symbol set of the one you are going to create After filling in the new archive name (max 16 characters) and its description (for the languages you want), press button “Ins”: After that choose if you want to copy structure only or both structure and data. Structure only From template archive are copied symbol list and prefixes only. Copy structure and data Template archive is cloned: symbol list and prefixes are copied with pin configuration, material codes, Loop Diagram configuration, Panel etc. Creating a new IEC symbol archive. To delete an existing archive press button “Del”. Pressing button “Import” you can recover customizations of previous program versions importing files with Pre, Pfr, Lpd and Des extension. WARNING : character “—“ is not allowed in archive names. 96 • Spac Automazione 2011 Materials association This can be performed on parent and element symbols and consists of assigning a material code with description and related manufacturer. These codes are used to process the bill of materials (see Sect. 8.1). The code assigned to the symbol during this configuration is prompted as the default value when the symbol is inserted in the drawing; prompted values can be accepted, changed or deleted each time (see Sect. 17.3). Configuration can be carried out in 3 ways: Database Press the button to associate the symbol with the code (or macro code) selected directly from the materials database (see Sect. 8.1). The manufacturer’s name and description of the item are also included. Schneider To access “19.1 Schneider Electric Catalogue” Manual The name of the manufacturer, material code (from catalogue) and description of the product are entered manually if these are not present in the external materials database. 4 General commands • 97 Symbol referencing This configuration is used to define the type of component identification, according to requirements and specific standards. These parameters are used when inserting symbols in drawings and by command “4.7 Component”. Main referencing systems : • Incremental • Sheet – Prefix in Absolute increments • Sheet – Prefix in Relative increments • Prefix – Sheet in Absolute increments • Prefix – Sheet in Relative increments • Positional • Free Component referencing in Free mode is always possible with any configuration; in fact, when symbols are inserted, the system prompts a reference that can be replaced or changed by entering any value (see Sect. 17.3). Each referencing system can be further customized by adding prefixes or modifying formatting of the incremental value. Incremental identification This is the simplest referencing system, suited to small projects. When symbols are inserted in a drawing, the system prompts an incremental reference: this is associated with the symbol prefix and is automatically incremented by one unit each time. Incremental is the default setting. For example, the prefix of symbol C1031 is configured in the Cei15.Pre file as "KA"; references will therefore be KA1, KA2, KA3, etc. Incrementing re-starts from 1 for each new prefix. 98 • Spac Automazione 2011 Sheet – Prefix in Absolute incremental identification The characteristics are the same as those for "Incremental Identification" above. The only difference is in the addition of the sheet number before the symbol prefix. The number is incremented by one unit each time (absolute). For example, the references on sheet 1 with the "KA" symbol prefix will be: 1KA1, 1KA2, 1KA3, etc. Absolute sets one increment for all sheets. On sheet 2, references will follow on consecutively: 2KA4, 2KA5, etc. Incrementing re-starts from 1 for each new prefix and is not set to zero when the sheet is changed. Sheet – Prefix in Relative incremental identification The characteristics are the same as those for "Sheet - Absolute Incremental Identification" above. The difference is that the increment is not absolute but re-starts from 1 for each sheet (not absolute). For example, the references on sheet 1 with the "KA" prefix will Relative set increment that re-starts for be: 1KA1, 1KA2, 1KA3, etc. each sheet. On sheet 2, incrementing is reset to zero, thus: 2KA1, 2KA2 2KA3, etc. The increment re-starts from 1 for each new prefix. Prefix – Sheet in Absolute incremental identification Same features as the previous “Absolute Incremental Sheet-Prefix ”. The only difference consists in the reversed position of sheet number and symbol prefix. To avoid same name risks, we advise using a separation character placed between sheet and increment. The increment is one unit each time (absolute). Example: on sheet no. 1 with symbol prefix ”KA” and separator “.”, the codes will be: KA1.1, KA1.2, KA1.3 etc.. On sheet no. 2 they will be consecutive: KA2.4, KA2.5 etc.. Single increment for all sheets. The increment starts from 1 again for each new prefix, and is not zeroed when the sheet changes. Prefix – Sheet in Relative incremental identification Same features as the previous “Relative Incremental Sheet-Prefix “. One difference consists in the positions exchanged between sheet number and prefix symbol, the other in the increment, which is not absolute, but starts from 1 again for each sheet (not absolute). To avoid same name risks, we advise using a separation character placed between sheet and increase Example: on sheet no. 1 with symbol prefix ”KA” and separator “.”, the codes will be: KA1.1, KA1.2, KA1.3 etc.. On sheet no. 2 increments are zeroed thus: KA2.1, KA2.2, KA2.3 etc.. The increment starts from 1 for each new prefix. Increment relative to sheet. 4 General commands • 99 Positional identification When symbols are inserted in the drawing, the system automatically creates the positional references: this configuration can be used to define the parameters for creating references according to the position on the drawing. “Sheet Dimensioning” must therefore be configured correctly. Positional PFC with "." separator If, for example, the C1031 symbols (in the figure) have been drawn on sheet 1: the first is in segment 1 (KA1.1) and the second in segment 2 (KA1.2): The positional mode features a number of configuration parameters: Composition The prefix is a variable defined in "Symbol Configuration" according to the type of element: for example, "KA" for relay coils and "SB" for pushbuttons; Sheet and Segment are the sheet and segment numbers (see example in "Sheet Dimensioning"); PFC and FPC are the abbreviations for Prefix, Sheet and Segment. Separator The separator character is essential in PFC composition (the dot is usually used) but unnecessary for FPC (see Sect. 4.7). Final zero The final zero is an additional suffix. It is optional and not incremental. Prefix archive (see “Symbol Configuration”) associated during “4.1 Setup” affects variable P (prefix), while “Sheet Dimensioning” affects the variable Cat (segment). Free referencing When symbols are inserted in the drawing, the system prompts a reference deriving from one of the 4 previous settings. This reference can be edited (manually) by entering any value. References entered manually are not kept when the program is requested to recreate all references (see Sect. 4.7). References entered manually are kept only using "Ignore in commands" list, where you can exclude components from main processes as manual and automatic Referencing (see “14.7 Ignore symbols”). Manual reference (free). See “17.3 Symbol insertion”. If the symbol prefix is not configured in the .Pre file, no reference is prompted when symbols are added to the drawing and references must be entered by hand (entered as required from keyboard). 100 • Spac Automazione 2011 Panel Prefix This option enables the component reference to be associated with the panel name. The character "-" (default) is used to separate the panel prefix from the component reference. The two examples illustrate the same incremental reference (KM1) associated first with panel =QG (MAIN PANEL) and then with panel =BM. You can't activate “Panel Prefix ” option while “Location Manager” or “Same component” are active in preferences. WARNING: If the following string, contained in the SPAC_cfg.ini configuration file (see Sect. 2.5), is edited manually, the separator can be redefined: [Siglatura_Simboli] Prefisso_PrefissoQuadro= Suffisso_PrefissoQuadro=- Absolute Prefix Option allowing you to associate component references to an absolute prefix value, thus placed before any other potential prefix from the various possible combinations. The example figure shows application of an absolute prefix, (PA), used together with the Panel prefix =QG with incremental reference KM1. Maximum length for an absolute prefix is 4 characters. Incremental Format “Format” is used to set the character number (max 4) of the incremental value. Example with prefix “KA” associated to Incremental Referencing. 1 KA1, KA2 … KA10, KA100 etc.. 01 KA01, KA02 … KA10, KA100 etc.. 001 KA001, KA002 … KA010, KA100 etc.. 0001 KA0001, KA0002 … KA0010, KA0100 etc. “Incremental Format” is ignored while “Positional Referencing” is in use. 4 General commands • 101 Returns Press the relative "…" buttons to select the symbol to be used as horizontal or vertical start and destination arrows. The symbols are contained in the directory Librerie\Simboli\Rimandi. There are two symbol families: • Power returns • Connection returns Enables configuration of the return symbols to be used when drawing “4.4 Power feeds” and “4.5 Connections”. New return symbols can be customized and saved in the same directory as existing symbols. Block names must bear the prefix _ALIM for power feeds and _SIGN for connections. The different behavior of the two families is fundamental especially during “5 Wire numbering” (see Sect. 5.1). Return symbols are independent from symbol set in use and from options chosen in “4.1 Setup”. Automatic Positioning Return symbol is placed in the final point nearest to the one used to select the line; this method is not applicable to symbols rotated by 180° and 270°. On the other hand each time a dialogue prompts for the appropriate symbol to use. When a wire or horizontal line is selected, symbols with 0° rotation are used; selecting a wire or vertical line means using symbols rotated by 90°. When a line is selected in a point nearest to its start point (top or left) start returns are inserted (0° or 90°). When a line is selected in a point nearest to its end point (right or bottom) destination returns are inserted (0° or 90°). Power returns A distinction should be made in drawings between Power and Connection returns. These are the power feed return arrows. If this return is present, the number of the connected wire can never be different to the value already defined on the return. The wire receives the number from the return. When drawing and/or numbering wires, "Power feed returns" are easily recognizable because the wire color changes (default 1 red). The "power feed color" parameter is defined from “4.1 Setup”. Use this type of return to "block" the numbering of power lines. On drawings produced using earlier versions, names of symbols had the prefix _FREC; these are compatible. They operate similarly to power returns, so _FREC = _ALIM. 102 • Spac Automazione 2011 Connection returns A distinction should be made in drawings between Connection and Power feed returns. These are returns on connecting wires that continue on other sheets. The value on the return depends on the wire number. The return automatically assumes its value when the wire is already numbered. In any case, the number of the wire that is connected always defines the value on the return. The return receives the number from the wire. When drawing and/or numbering wires, these stay the same color (default 9 grey), The "wire color" parameter is selected from “4.1 Setup”. Use this type of return to make wire or power line values modifiable. This return family was not available in earlier program versions. On-line Cross (Start + Destination) This configuration is enabled during insertion of a start return (both Power Feed and Connection), and enables immediate insertion of the corresponding destination return on a selected page (see “Power returns” Sect. 4.4 and 4.5). Position selection for destination return The setup is also enabled with the “Delete Symbol” command when a start return is deleted, as the user is asked whether he also wishes to immediately delete the corresponding destination return (see Sect. 17.4). See “Intelligent delete”. Cross-reference along Return line: On the sheet and in the segment established (at the centre), apart from the destination return, a part of wire or of power feed (10 mm in length) is also drawn, already correctly numbered and already bearing a crossreference. It is, therefore, sufficient to lengthen the existing lines (directly with Grips or with the “Stretch” command) in order not to have to intervene with a new wire numbering process. Destination return “Cross-reference along return line” updates, on-line, the Start and Destination return situation. Using CAD commands to run changes or shifts calls up potentially conflicting information. In these cases, it is necessary to run a check through a complete processing of command “7.1 Cross-referencing”. 4 General commands • 103 Preferences Enables customization of some command functions. • Insert blocks with fence • Snap-to-segment block insertion • Number wires after inserting symbol • Preview CSV • Program test • Intelligent delete • Functions near contacts • Selection Preview • Dialogue windows state • Estimate list • Location Manager • Same component Insert blocks with fence Enabled by command “17.3 Symbol insertion” o insert a symbol in a space (not on wire). On This enables a 2nd point to be entered to create a fence for inserting multiple symbols (on all lines intercepted by the fence). Press Enter to confirm the 1st point in space. Off The 1st point in space is automatically confirmed without pressing Enter. “Entering blocks with fence” (see Sect. 17.3). Snap-to-segment block insertion Enabled only on insertion of a symbol in a space (not on wire). On In relation to the point selected on the drawing, the symbol is moved to the centre of the segment nearest the indicated point. This means the automatic alignment of the symbols corresponding with the segments during “17.3 Symbol insertion”. Off The symbol is inserted at the point indicated on the drawing, independently of the form and sub-division of the segments. ”Snap–to–segment block insertion” (see Sect. 17.3). WARNING: The setup “Sheet Dimensioning“ setup is essential. 104 • Spac Automazione 2011 Number wires after inserting symbol This works during insertion or deletion of a symbol, only on a wire or wires that have already been numbered. On During scanning all processed data are displayed in sequence, so that it is possible to intercept the point that is the cause of an interruption (debug). Off The program does not assist the user in the re-numbering of wires interrupted by the new symbol inserted. You must then use “5.1 Number wires” or “Ddattef”. Preview CSV file This works as default for all commands having a CSV file output, opening a preview of the file wit no need of Microsoft® Excel installed. On Off CSV file is written and then opened in preview mode (recommended choice). CSV file is written, but not opened and shown. See ”14.8 Edit CSV”. Program test This can be used whilst scanning or processing certain functions. On Off During scanning all processed data are displayed in sequence, so that it is possible to intercept the point that is the cause of an interruption (debug). Scanning is much faster because no data are displayed (recommended choice). Intelligent delete Enabled with the "Delete Symbol" command (see Sect. 17.4). On Prevents deletion of parent symbols if the relative child symbols are still present in the diagram. This setting is also used to delete Start returns, as it asks whether the user wishes to delete the corresponding destination return immediately. Off No check during deletion of parent symbols. “On-line Cross (Start + Destination)” (see Sect. 4.2). 4 General commands • 105 Selection Preview Activated when the mouse cursor is placed over any component or over any connection, by opening automatically the details window. Components Activates the Selection Preview on components (Parent, Child and Element), terminals and connectors. The details window is opened after a delay time that can be set with the “Delay” parameter. Example of the Selection Preview on a component: The window is closed by moving the cursor away from the component, or by pressing the “Modify” button (XS or Edit) or the “Navigator” button (see par. ”14.6 Navigator”). Wires & Cables Activates the Selection Preview on connections (wires, cables, power supply lines or returns). The details window is opened after a delay time as set on the “Delay” parameter. Example of a Selection Preview on Wires and Cables: The window is closed by moving the cursor away from the connection line, or by pressing the “Modify” button (XS) (see par. “5.7 Ddattef”). Delay A delay time set to 0 causes the immediate opening of the window. 106 • Spac Automazione 2011 Functions near contacts Set the visibility of attributes Funzione1 and Funzione2 of Child symbols. This works while a child symbol is inserted. On Off Aside contacts is shown the function associated to Parent symbol. Command “Update“ executed from Function Legend updates possible modifications done to the parent symbols. Attributes Funzione1 and Funzione2 are invisible “Function legend” (see Sect. 14.1). Dialogue windows state Records the state of dialogue windows (dcl). As example open dialogue window of command “8.3 Internal bill of materials”, having default order set to “Reference”, now set it to “Type” and have a look to possible behaviors: Do not record Next time you recall this command, order is set to “Reference” again. Record for job order Next time you recall this command, order is set to “Type”, but only if using current job order. Set as default Order is set to "Type" always. Dialogue state is stored only if command is confirmed and/or it is executed completely. Estimate list Changes the function of command “8.2 Associate materials“. On The codes are extracted from a DMW file of the External Bill of Materials. The codes are removed automatically from the "Available Codes" list by means of a meter that decreases the quantity on each association. Off “Associate Materials” functions in the traditional way: the codes are extracted from Materials Database and kept in the "Available codes" list. “Estimated Bill of material codes” (see Sect. 4.2). 4 General commands • 107 Location Manager Set operating mode of command “4.3 Panel setting“, defining location levels (or Panel structure) of every component, terminal or connector. This setting changes the behavior and appearance of many commands. On Structure is set to 3 levels: Location, Panel and Function Group. This is a hierarchical structure, where a Location contains one or more Panels, and each Panel contains one or more Function Groups. Erasing a Location implies erasing automatically all related Panels and Function Groups. If no Location is specified, the system uses the default name. If no Panel is specified, the system uses as default =QG (Main Panel). If no Function Group is specified, the system uses the default name. To remark the exact components location on the drawing, a label (MText format) is automatically drawn on symbol Parent and Element, describing their belongings. Refer to Norm CEI-EN 61346 for details about three level structure. Off Structure is set to 1 level : Panel (default setting). Default Panel name is =QG (Main Panel). One level structure Three level label You can modify visibility of automatic location labels (MText format) using command “17.5 Location“. See “17.3 Symbol insertion”. See “Location Symbol” (Sect. 3.18). It's not allowed to activate “Location Manager” while “Panel Prefix” is set active in ”Symbol referencing“ preferences. WARNING: A project drawn using 3 level setting cannot be converted to 1 level. 108 • Spac Automazione 2011 Same component references Components references may be unique in the entire project (in all multisheets of the job order), or be unique only inside a Panel (or Panel and Function Group if “Location Manager“ is set to 3 levels). On Each Panel has its own reference index, in fact reference numbering restarts from 1 for each new Panel. To remark the exact components location on the drawing, a label (MText format) is automatically drawn showing the Panel who belongs the component. Components with same name (but belonging to different Panels) are not considered a "Duplicated Reference" error". WARNING: Activating “Same component references ” when the job order has been partially developed (or on existing multisheets) implies the conversion of the entire project, including the automatic labeling and referencing of all components (Parent, Element and Child symbols). Off Component references are unique in the project (unique reference index). Components with same name (although belonging to different Panels) are considered as “Duplicated Reference” error (standard behavior). WARNING: When a project has been developed with option “Same component references”, avoid deactivating this option, or you risk to have duplicated names. Unique referencing Automatic labeling for components with same reference (but different Panel) You can modify visibility of automatic location labels (MText format) using command “17.5 Location“. See “4.3 Panel setting“ See “17.3 Symbol insertion” See “Location Symbol” (Sect. 3.18). It's not allowed to activate “Same component references ” while “Panel Prefix” is set active in ”Symbol referencing“ preferences. WARNING: While “Same component references” is active, you can't input free names inserting a Child symbol. 4 General commands • 109 Symbol attribute features This enables you to configure the graphic features of symbol attributes, in relation to the default status configured in the block creation phase. When inserting the symbol in the drawing, the attributes assume the “new” configured features; otherwise, the attributes maintain the standard (default) aspect configured during the block creation phase. With “Activate change”, the function is enabled only for the attributes in the list. In order to create the list, you must first select the attribute, associate it with features (Height, Color, Visibility, etc.) and then press the “< Add” button. The “Change” button is used to change the features of an attribute already on the list. Pressing “Save” stores the configuration in the SPAC_cfg.ini “local” file. The configuration in the example shows: new Height, Text style and Visibility. "Standard" attribute aspect Changed attribute aspect (See “17.1 Categories of symbols”). Symbols inserted in the drawing before enabling “Activate change” can be converted to "new characteristics” using the “Graphic changes“ (see Sect. 14.2). WARNING: It's recommended not to modify visibility status of Panel attribute if “Location Manager” or “Same component” options are in use (see “17.5 Location”). 110 • Spac Automazione 2011 Wire and Terminal numbers This configuration can be used to customize commands “5.1 Number wires” and “6.1 Insert terminals”. Height refers to the wire number (usually 2 mm). To change the color or type of character used to write numbers, edit the Blcor_Dx and Blcor.Sx.dwg size 1 blocks in the Librerie\Simboli directory. Distance is the space between the wire number and the line that represents that wire (usually 1 mm). Position is used to configure the number to the right or left of the wire. This variable is only valid for vertical wires; on horizontal wires the number is always placed above the line and is not rotated. NumI Represents the terminal input wire number. NumO Represents the terminal output wire number NumM Represents the terminal number. Rotate only affects numbers on vertical wires. On horizontal wires the number is always placed at 0 degrees. In some cases, the 90° Right combination of is not accepted. Positional numbering This type of wire numbering is based on the "Positional referencing" of elements, i.e. the value assigned to the wires is derived from the sheet number, the segment on which the wire is placed and an incremental numerical value. For example, with positional numbering on sheet 3 of wires drawn in segment 5, wire numbers will be 351, 352, 353, etc. On sheet 3, segment 6, wire numbers will be 361, 362, 363, etc. With positional numbering, an infinite number of spare numbers is available for each sheet. This is especially useful for any changes to the electric diagram. As the rules governing this numbering system impose a number of limitations, it should only be used if absolutely necessary. WARNING: The use of positional numbering is not recommended if master title block contains more than 9 segments. 4 General commands • 111 Wire properties Increment Set a whole number. This is the automatic increment of the values that are forced in the NumI and NumO terminal attributes when inserting terminals on wires which are not numbered. The same increment is used by non-positional wire numbering (usual increment setting is 1). Force number to This option determines the priority for numbering a wire already connected to wire terminals. The Force condition is the most common, as it enables a more uniform distribution of numbers. When the wire selected is connected to terminals, these receive the new updated value, whether or not they are already numbered. If "Same" is enabled in the terminal properties (same or different input/output), the wire number is forced in the NumI attribute (input number) and the NumO attribute (output number) of the terminal. If "Different" is enabled during numbering, the upstream wire and the downstream wire of the terminal must both be selected. Receive wire number This option determines the priority for numbering a wire already connected to terminals. The "Receive" condition is used to block the values on the terminals inserted before numbering wires. Data on terminals are not changed or updated with new values. When a wire upstream of the terminal is selected, the wire receives the input number (contained in the terminal "NumI" attribute). When the downstream wire is selected it receives the value contained in the "NumO" attribute. The best method to simplify work and maximize automatic operation is to combine "Force wire in terminal " with "Same Input as Output". Terminal properties Same Input as Output When inserting terminals on wires that have not yet been numbered, the same values can be configured for NumI (terminal input wire number) and NumO (output wire). Under normal operating conditions the input wire is always the same as the output wire. Different Input Output When inserting terminals on wires that have not yet been numbered, different values are configured for NumI and NumO. NumO is increased by the "Increment" value (usually 1). Color management This is simply a filter used to define the selection of wire colors to be numbered. With "All except", lines drawn using the colors in the list are not considered as wires, so that wire and terminal numbering functions and various processing routines, etc. do not affect these lines. With "Only colors", lines drawn using colors other than those in the list are not considered as wires so that wire and terminal numbering functions and various processing routines, etc. do not affect these lines. 112 • Spac Automazione 2011 Options Accessories Reference During the terminals insertion, if they are associated with any accessory (see “Accessories Archive”), then they are identified as a normal component. Example: Terminal with fuse in 2 different conditions The accessories identified as a normal component are considered independently in the Bill of Materials. An accessory is identified only if the article code is associated to an electrical block in the Materials' Archive. (see “8.1 Materials database”) The Identification of the accessories is executed only if the accessory's code belongs to the category “Identifiable” (associated to an electrical block). Modular Connectors The management of the Modular or Composable Connectors is done according to the connector's name. This option consents the activation of the recognition of a character (according to your choice) in the connector's name, then it is possible to know if they are independent or modular connectors; the character works as a separator, that is ../1. ../2 etc.. Example with the separator character “/” : If we design 3 connectors with the names indicated in the figure, the program will recognize them as modular. They will be managed as a unique connector during the design and edit functions (see par. 6.3 “Edit connector”). The chassis for the 3 modules must be inserted as an accessory code from the Materials' tab (sheet). (“Accessories Archive”) Example of “Edit modular connector” 4 General commands • 113 Advanced options Since wire numbers must be consistent with the related data on the terminal, the settings configured here affect the characteristics of both items. When "Sheet number as prefix" is enabled, the current sheet number is automatically associated with the wire number (and therefore with the terminal number). When enabling this, select the position Before or After the Constant value (if there is no Constant this is irrelevant). For example, when numbering sheet 3: Starting with number 1, the following values are assigned to wires: 3.1, 3.2, 3.3, etc. When this parameter is enabled, Sh. is displayed in the main dialogue window. With this numbering method, the spare number variable available for each sheet (during automatic wire numbering) is not enabled, since numbering always re-starts from 1 on each sheet. Separator The character (or string) that is inserted between the sheet number and the wire value. This is usually a "dot". For example, on sheet 3: Separator "-": 3-1, 3-2, 3-3, etc. Separator "AB": 3AB1, 3AB2, 3AB3, etc. Constants A prefix and/or suffix with any constant value can be associated with the wire number (and therefore with the terminal NumI and NumO): 24V, IN, OUT, etc. In the example, "P" and "S" are displayed in the main dialogue window when this parameter is enabled. Wire number formatting Progressive wire numbers with up to 4 characters can be formatted. With 1, example of numbers: 1, 2, 3, 10, 11, 100, 999, 1000, etc. With 01, example of numbers: 01, 02, 03, 10, 11, 100, 999, 1000, etc. With 001, example of numbers: 001, 002, 003, 010, 011, 100, 999, 1000, etc. With 0001, example of numbers: 0001, 0010, 0100, 1000, etc. Sheet Prefix, separator and constants are not counted. Sheet number formatting This option is only available when the "Sheet number as prefix" parameter is enabled. This value is configured using command “3.1 ”. Example on sheet 3 with separator ".": With 1, example of numbers: 3.1, 3.10, 3.999, 3.1000, etc. With 01, example of numbers: 03.1, 03.10, 03.999, 03.1000, etc. When wire formatting is enabled concurrently to 0001: With 1, example of numbers: 3.0001, 3.0010, 3.0999, 3.1000, etc. With 01, example of numbers: 03.0001, 03.0010, 03.0999, 03.1000, etc. When constant prefix A and suffix 24V are enabled concurrently: With 01, example of numbers: A03.000124V, A03.001024V, A03.099924V, etc. 114 • Spac Automazione 2011 Receive number When the starting point of a wire coincides with a symbol, this configuration can be used so that the wire number is the same as the contents of any attribute in the symbol. In the example, the symbol name, INP1, contains several attributes. The one containing the text E0.0 to be used as the wire number is the INPUT attribute. The configuration to obtain this result is Tag=INPUT and Block=INP1. To apply this configuration to all symbols of the same type (with INP prefix) you can insert Block=INP* . When “Positional” is configured, the advanced options are reduced to the following: The rules imposed by this numbering system exclude the “ Wire properties“ and “Terminal prop” settings, as well as the preceding "Advanced options" parameters. Wire number It is possible to format progressive wire numbers up to 4 characters. formatting Wire numbers like the following are assigned to segment 6 on sheet 3: With 1, number examples: 361, 362, 363, etc. Con 01, number examples: 3601, 3602, 3603, etc. Sheet number This is considered only when the "Sheet number as prefix" parameter is enabled. formatting The value is configured using command “3.1 ”. Wire numbers like the following are assigned to segment 6 on sheet 3: With 1, number examples: 361, 362, 363, etc. With 01, number examples: 0361, 0362, 0363, etc. 4 General commands • 115 Wires Labels This configuration enables you to customize the command “14.4 Marking” for the EC116-1 standard Marking System IEC391 Norm. Activate Output marking the processing (lists, tables and drawings) of Terminal boards and Connectors taking into account identifiers found on the drawing. Do not show double markings: specifically with “Standard1” and “Standard2” when there are several connections on the same component pin (or terminals) you have identical marking values. This setting sets just one, single identifier for all conductors with the same marking. Marking Connections Standard: you can choose one of the following 6 configuration types, not modifiable by the user: • Standard 1 - Pin of the component it is connected to • Standard 2 – Reference and Pin of the component it is connected to • Standard 3 - Pin of the 2 components connected • Standard 4 – Reference and Pin of the 2 components connected • Standard 5 – Reference and Pin of the opposite components • Standard 6 - Pin of the 2 components and wire numbering The example in “Preview” is only available for the “Standard” configuration (the preview is not available for the “User” configurations). 116 • Spac Automazione 2011 Marking Connections User Choosing the “User” marking style allows you to choose one of the customized user configurations (not standard). To create a new “user” configuration you have to type in the name (in the “Description” field), the “Composition” (see marking composition parameter tables) and press “Add”. The configuration “Example1” (in the figure) is as follows: %S1(Name 1st component) : (separation character) %P1 (Pin 1st component) - (separation character) %NF (No. wire) “User” configuration (%S1:%P1-%NF) In the section “Text features” you set the text style, position and features to be associated with the wire identifier. Height Enter the text height. Color Enter the text color code (clicking the colored rectangle you enter the color choice window directly). Width factor 1 corresponds to the width factor of the original font, with values less than 1 you compress the text (values allowed between 0.5 and 1). Offset The distance between the identifier text and the line of (normally 1 mm). Style The text style list (created with the command “Style”). Table of marking composition parameters Parametr (%) Description %S1 Reference of first component %S2 Reference of second component %P1 Pin first component %P2 Pin second component %U1 Position first component %Q1 Panel first component %F1 Function group first component %U2 Position second component %Q2 Panel second component %F2 Function group second component %NF Wire number Changes to the list by pressing Add, Modify or Delete are stored “locally” in the job order file SPAC_cfg.ini (see “Export Settings“ Sect. 4.2). 4 General commands • 117 Automatic numbering This window contains parameters used only by the automatic wire numbering function. The main parameter for automatic numbering is search scanning: Type A scanning is generally used on power diagrams, while type B scanning is used in all other cases. Types C and D are only used when numbering on vertical drawings (JIC). The "Spares for sheet" value is ignored when numbering with "sheet prefix" enabled (as numbering re-starts from the first value for each sheet). The Number summary option enables the automatic operation that inserts a block specifying the first and last wire numbers on the current sheet. This block is called Blinfi and can also contain the last useable number in case of changes (calculated according to the "Spares for sheet" configuration). Press "…" to access the pull-down menu to select the block to be inserted. Number summary "Blinfi" blocks are saved in the Librerie\Simboli directory. Each .DWG block corresponds to an .SLD image (slide) with the same name to be displayed in the dialogue window. New blocks can be customized and saved in the same directory with existing blocks. The name of the block must follow on consecutively from existing names (Blinfi4, Blinfi5, etc.), with a maximum of 20 blocks (the dialogue box can display a maximum of 20 windows). Blinfi1.dwg symbol Note: If a block is deleted, blocks with subsequent numbers cannot be displayed. Terminal box The box is a method for accelerating the insertion of terminals on components that belong to panels other than the default panel. In addition to inserting terminals, a rectangle is drawn around the component, with color and type defined by the graphic features that have been configured. During the running of command “6.1 Insert terminals” with the box option, the system requests the name of the panel to which it belongs. This value is text with the settings configured in "Height" and "Text Color". 118 • Spac Automazione 2011 Cable database When opened, the configuration highlights the database of cables saved in the DbCables.Mdb file resident in the Librerie\Archivi directory. During manual or automatic wire numbering and drawing of Power feeds, cable properties are attributed to the wire. This configuration can be used to edit the database and define values and default settings. This database is also used during “Cable selection” (see Sect. 11.1), “11.2 Cable definition” and “20.2 Lay cables”. Before adding a new cable to the database, at least one manufacturer, one category and the relevant colors must be configured. Category Useful for the subdivision of cables according to a specific type: Example: Favorites, Low Voltage, etc.. The “All“ category is always present and cannot be deleted. Manufacturers Filter on the Manufacturer's name. The “All“ category is always present and cannot be deleted. Wires Filter on the quantity of wires (it acts on the cable's composition). The “All“ category is always present and cannot be deleted. Cables associated with wires and power feeds can also be viewed with “5.4 Internal panel wiring” and “5.9 Loop Diagram”. 4 General commands • 119 New cable Press New to open the following window. To add a new code to the database, first select the Category, then the Manufacturer, and then enter the Code, Description, Formation, Conductors and Outside Diameter (data obtained from manufacturers’ catalogues). Code (Type) CEI 20-27 and CEI-UNEL 35011 standard codes used to identify cable construction characteristics. Description Description of the item, useful for bill of materials. Set the total number of wires (or threads) in the cable. Conductors This value is used for the execution of the “Composition”. Formation The make-up summarizes the number of wires and the diameter: the make-up of a 3wire cable with a 1.5 mm diameter is 3x1.5. Diameter The approximate outside diameter (in mm). Each wire must be associated with an ID (number or color) and Diameter (in mm²). The Remarks and Technical Notes fields are optional. ID Cond Name: each cable conductor has a numerical or alphanumerical code. Section The diameter in mm must be assigned to each cable conductor. Indicator of “twisted” wires. Twist The fields identified with (*) are mandatory.. The Id Cond (ID or cable's thread) could be both a color or a numeric value. To facilitate the compilation you can use the “Wires Numbering” button for a progressive numbering, or the commands on “Insert\Modify Wires”. 120 • Spac Automazione 2011 Inserisci\Modifica Conduttori Select first the Id Cond (ID or wire's thread) to be associated to a color, then select the code to associate from the colors' list and finally press the “Insert\Modify” button. Repeat the previous operation for all the wires on the cable to obtain a result as the one illustrated in the figure. During the color association, it is possible to insert the section value. The “Section” could be easily modifies by selecting all the wires (that have the same value) and pressing the “Insert\Modify” button. Press the browse “…” button to add the colors and colors' combinations missing. To manage the “twisted” cables, it is required to select the "Id Cond" of the wire to be twisted, then the conductor to be used from the “Twist” list and finally press the “Insert\Modify” button. Cavo “twistato” Duplicate Cable This function is used to save a new cable using data that already exist for a cable in the database. Use the right-hand mouse button to highlight the line containing the specific cable and open the command menu, as shown in the example. Set Default This is used to configure the default cable to be used during drawing. Wire The configured wire is prompted by default during “5.1 Number wires”. New values can be assigned from time to time without entering the database. Show Default: the cable configured as the "Default wire" is highlighted in the database. Press the button to set values. To check settings at a later date, use Show Default. Power feed The configured cable is prompted by default when “4.4 Power feeds” are drawn. New values can be assigned from time to time without accessing the database. Show Default: the cable configured as the "Default Power feed" is highlighted in the database. 4 General commands • 121 Color codes The color of wires in cables can be written in full or using abbreviations as specified by CEI-UNEL 00722. The abbreviated form is always used automatically during “Cable table” (see Sect. 11.1). The relative abbreviated form must always be configured for each color (or color composition). Import \ Export Cables Import Cables' Archive: Consents to import an archive of cables registered on file DbCables.Mdb, and contained usually on the Spac folder "Librerie\Archivi". Export Cables' Archive: Consents to export an archive of cables registered on file DbCables.Mdb, and contained usually on the Spac folder "Librerie\Archivi". Import Cables' Archive from previous versions to 2010: Consents to import the cables archives from the previous versions of Spac, and registered on file ArcCavi.Mdb. Usually, this file is located on Spac folder "Librerie\Archivi". Import Cables' Archive from CABLING: Consents to import the cables archives from Cabling Software. Update Cables on the drawing: This command allows the fast modification of the cables' codes contained in one or several multi-sheets, creating a substitution table. On one side you get all the cables obtained from the design, and on the other, the new cables that must substitute the selected codes. Pressing this button you execute the scanning of the selected multi-sheet, in order to create the list of “Cables on the drawing”. Opens the “Search Cables” window: Consents the selection of a new cable to substitute another one selected previously from the list “Cables on the drawing”. Removes an associated cable. Activates the procedure to modify the cables associated the substitution table. The unassociated codes remain unchanged. 122 • Spac Automazione 2011 on Terminal and Connectors Database The terminals and connectors database is divided in 4 groups: • Terminals Archive • Connector • Accessori • Wires’ Terminals Archive The data in this archive is read and memorized in the .amw file of the general materials archive (refer to section “8.1 Materials database”), the file set by default is used as Starting Archive. The .amw starting file is configured on the Materials Archive options. This feature does not consent to add or modify the materials codes, but only to manage them properly for the insertion on the schemes and for the association to the graphical specifications. Example: to add a new terminal code it is required to work as for any other material code, that is, it is required to access the general materials archive (refer to section “8.1 Materials database”), associating to the new catalogue code the Terminal “Type” (or the most convenient), as indicated in the figure. Types available: The scope of the terminals and connectors database is the association of further characteristics, as the Category (Normal, Multiple, Switch, etc.), the Section, the Levels, the Terminal and Terminal Block Symbol, and the accessories if any. The archive is used on commands “6.1 Insert terminals” and “6.2 Insert connectors”. The codes on the general materials archive could be imported by clicking on the “Add” button (one single code at a time). WARNING: The terminals and connectors database of the previous versions of Spac (up to version 2008) were memorized in the Morsetti.Dat file (refer to section “8.1 Materials database”). 4 General commands • 123 Terminals Archive The terminals archive shows a list of all the codes present in the general materials archive (refer to section “8.1 Materials database”) associated to the Terminal “Type”. The codes present on the general materials archive, could be imported pressing the “Add” button. Add To import one code from the general materials archive (a single code at a time). Mod To modify or define the terminal specifications. Del To delete a terminal code (only from the terminals archive in use). Every terminal should have the following specifications: Category You can select from “Normal”, “Multiple”, “Diode”, “Fuse” (with fuse embedded), and other terminals. Each category has a specific symbol group. For the “Multiple” terminal, you have to specify the data related to the levels. 2 Section This is the value of the cross-sectional area in mm . For articles already present in the archive, the section was obtained from the manufacturer’s catalogue. Terminal Symbol This is the graphical symbol to be associated to a new code inserted on the archive. Each category “Normal”, “Multiple”, “Diode”, etc. has its own group of symbols with a specific graphic. The symbol associated is used by the command that inserts the component in the drawing, and it is selected according to the normative you are working with (IEC or JIC). It is possible to personalize new blocks for terminals memorizing them in the same folder of those already present (SPAC\Library\Symbols), the block name should be consecutive to those in the folder (Example: _Mors-n3 , _Mors-n4, etc. for the “Normal” category IEC). Each .dwg block must be associated with an image (slide) with the same name of the block for the visualization of the dialogue box. The image could be created using the command “_Mslide” (from the keyboard) to highlight the visible attributes. NOTE: By deleting a symbol you can make not visible other symbols identified with consecutive numbers. 124 • Spac Automazione 2011 Terminal-Block Symbol Configures the graphical block to represent the terminal on the terminal block (see section 6.3). (Return Block ) The “Terminal Block Symbol” can be selected from the blocks on the folder Symbols\Terminals. New blocks could be personalized and memorized in the same directory of those already present in the system. NOTE: The terminal block symbols have the file name with a prefix MO- . (MOA- prefix is used for the accessories and MOC- for the constructive connectors). For the multiple terminal codes, it is required to specify the levels list: Add To add a new level (type first the level name). Mod To modify a selected level (type first the new level name). Del To delete a level (verify the terminals already designed with this code). Levels In this list it is required to make a description of the numbers or names of the levels on the multiple terminals. Let’s see an example of a double terminal: 1 2 or A B It is not allowed to insert level names with spaces. NOTE: For multiple terminals it is required to associate adequate “Terminal Symbols” according to the levels quantity. Some models (inserted as examples) are available on the folder Symbols\Terminals\Common block: MO-Ass-2LEV (2 levels), MO-Ass-3LEV (3 levels) etc. Each terminal code is compatible with a list of potential accessories : Add Opens the “Accessori” to add a compatible accessory. Del To delete an accessory (only from the terminals archive in use). The accessories could be of different types: fuses, diodes, labels, etc. All the accessories that are internal to the terminal must be considered on the Bill of Materials (but are not designed in the terminal block). The list of “compatible accessories” is proposed during the insertion of the terminal on the scheme. The designer could select from time to time the accessories to be associated to the terminal. The archive is used with feature “6.1 Insert terminals”. WARNING: The “Accessori” is composed by accessories for terminals and terminal blocks. It is important to associate only codes that are compatible with the terminals. The accessories for the terminal block must be used exclusively during the personalization of the terminal blocks with command “Edit terminal block”. The codes on the general materials archive, could be imported pressing “Add” button. Neutral material codes are contained in the archive associated to manufacturer “None” or “Nessuno”. 4 General commands • 125 Connectors Archive The Connectors archive (Plugs \ Connectors) for terminals shows the list of all the codes present on the general materials archive (see “8.1 Materials database”) associated to the “Type” Plug\Connector. The codes present on the general materials archive, could be imported by pressing the “Add” button. Add Imports a code or a connector macro code (see “Edit Macro Connectors” from the general materials archive (a single code at a time). Mod To modify or define the connector specifications. Del To delete a connector code (only from the connector’s archive in use). Every Plug / Connector code must have the following specifications: Category The possibilities are “Plug” (with M+F), “Plug-M” (male) and “Plug-F” (female). Each category has a specific symbol group. Nr. Poles This is the quantity of poles (pins); the value is obtained on section “Poles and related Contacts” (see “Poles Management”). Symbol Connector Pin This is the graphical symbol to be associated to the connector’s poles (pins). There are specific graphical symbol groups to every category “Plug”, “Plug-M”, “Plug-F” etc. (for scheme) The symbol associated is used by the command that inserts the element on the scheme; it is selected according to the normative used in the Job Order (IEC or JIC). It is possible to personalize new blocks and memorize them on the same folder of those already present in the system (SPAC\Library\Symbols). The name of the block must be consecutive to those in the folder (Example: _MorsZ12 , _MorsZ13 etc. for the category “Plug” IEC). Each .dwg block must have an image (slide) associated with the same name of the block to visualize it on the dialogue box. The image could be created using the command “_Mslide” (from the keyboard) to highlight the visible attributes. NOTE: By deleting a symbol you can make not visible other symbols identified with consecutive numbers. 126 • Spac Automazione 2011 Connector Symbol Configures the graphical block to represent completely the connector with all the poles (see section 6.3). (Return Block) The “Connector Symbol” is selected from the blocks structure on the folder Symbols\Terminals. It is possible to personalize new blocks and memorize them on the same directory of those already present in the system. NOTA: The symbols for the connector have the file name with a MO- prefix. (MOA- prefix is used for the accessories and MOC- for the constructive connectors). Connector Symbol It is a graphical symbol to be associated (optional) to the connectors in the archive. There is a specific design by each brand, model and code. (Constructive) The “Constructive Symbol” is selected from the blocks on the structure of folder Symbols\Terminals. It is possible to personalize new blocks and memorize them on the same directory of those already present in the system. NOTE: The symbols for the constructive have the file name with the MOC- prefix. For each Plug / Connector code it is required to specify the list of poles and related contacts: Add To add a new pole (opens the window “Poles Management”). Series To add a series of poles (opens the window “Poles Series”). Mod To modify the characteristics of one or more poles. Del To delete one or more poles. Poles In this list it is required to make a description of the numbers or names of the poles (pins) on the connector. Let’s see an example of a plug of 6 pins + Ground: (Pins) 1 2 3 4 5 6 PE or RED BLACK YELLOW GREEN BLUE WHITE PE It is not possible to insert poles names with spaces. NOTE: For the connector’s jack to be crimped it is possible to specify the possible contact crimp types compatibles (optional). Each connector code is compatible with a list of possible accessories : Add Opens the “Accessori” to add a compatible accessory. Del To delete an accessory (only from the terminal archive in use). The accessories could be if different types: covers, cases, etc. The list of “compatible accessories” is proposed during the insertion of the connector on the design. The designer can select from time to time the accessory to be associated, to be counted on the Bill of Materials (they are not designed on the graphical representation of the complete connector). The archive is used by function “6.2 Insert connectors”. WARNING: The codes of the metallic contacts to crimp are contained on the “Wires’ Terminals Archive”. It is possible to manage the accessories from command “Edit connector”. Neutral material codes are contained in the archive associated to manufacturer “None” or “Nessuno. 4 General commands • 127 Poles Management The management of the “Poles and related Contacts” is used to define the quantity of poles (pins) on the connector. Series Pressing the “Series” button you import only the name of the first pole and the quantity of poles to be created. NOTE: Eventual contact codes to be crimped are indicated in the same way for every pole. Add Pressing the “Add” button you can define the name of a new pole. NOTE: Often used for the poles with a non-consecutive name (PE for example). For the jacks of the multi-polar connectors (or similar) it is possible to make a description of the type of the metallic contact to be crimped that are compatible with it (optional), The “Number” highlighted on the poles list represents the quantity of codes that are potentially compatible for the pole type (interchangeability of contacts). The codes of the metallic contacts to be crimped are contained on the “Wires’ Terminals Archive”. NOTE: For the Male+Female connectors, the quantity of compatible contacts to be crimped is doubled. Available Contacts Press the “Add” button to create the list of contacts available. Example of a jack for contacts to be crimped Example of a contact to be crimped For the connectors with a basin shape, or with a fixed connection (screw, spring, etc.), it is required to disable the setting of the “Contacts to be crimped” (without additional contacts). This setting is valid for all the connectors that does not consent the interchangeability of the contacts. When a “No” (Nr. of Contacts) is highlighted in the poles list, it means that the connector pole does not consent the interchangeable contacts. The contacts codes to be crimped are not requested during the insertion of the connector on the scheme. They could be managed with command “Edit connector”. 128 • Spac Automazione 2011 Accessories Archive The Accessories archive shows a list of all the codes present on the general materials archive (refer to section “8.1 Materials database”) associated to the “Type” of Terminals / Connectors accessories. The codes on the general materials archive could be imported pressing the “Add” button. Add To import an accessory from the general materials archive (a single code at a time). Mod To modify the specifications of an accessory. Del To delete an accessory code (only from the connectors archive in use). Accessories for terminals Fuses, diodes, labels, etc. Considered for the Bill of Materials. Accessories for connectors Covers, cases, etc. Considered for the Bill of Materials. Accessories for terminal blocks Fixing wires’ terminals, wires’ terminal boards, separators etc. Considered for the Bill of Materials and designed on the terminal block. The “compatible accessories” list is proposed during the insertion of the terminal on the scheme. The “compatible accessories” list is proposed during the insertion of the connector on the scheme. Inserted with the personalization of the terminal blocks with “Edit terminal block”. Symbol (Return Block) Sets the graphical block to represent the accessories in the terminal block (see section 6.3). The “Accessory Symbol” is selected from the blocks on the structure of the folder Symbols\Terminals. New blocks could be customized and memorized in the same directory of those already present in the system. NOTE: The accessories symbol on the terminal block has a file name with MOAprefix. The archive is used on commands “6.1 Insert terminals” and “6.2 Insert connectors”. Only the terminal block accessories are associated to the symbol, while the terminals and connectors accessories have not a graphical representation. 4 General commands • 129 Wires’ Terminals Archive The wires’ terminals archive shows the list of all the codes on the general materials archive (see “8.1 Materials database”) associated to the Wires Terminals\Contacts “Type”. The codes are present on the general materials archive, and could be imported pressing the “Add” button. Apart from the contacts to be crimped, the termination tubes, insulated wires’ terminals, etc. could also be found in this archive. Add To import a wires’ terminal from the general materials archive (one single code at a time). Mod To modify the wires’ terminal specifications. Del To delete a wires’ terminal code (only from the connectors archive in use). Counterpart Used for the creation of the association male-female between the contacts to be crimped. They are managed during the connectors’ customization with “Edit connector”. The archive is used with commands “6.1 Insert terminals” and “6.2 Insert connectors”. The contacts codes to be crimped are not requested during the insertion of the connector on the scheme. They could be managed with command “Edit connector”. 130 • Spac Automazione 2011 Loop Diagram This is used to define the graphic features of summary tables for connections created by the command “5.9 Loop Diagram”. The parameters also establish position and dimensions. Starting coordinate This is the insertion point for the first column to the left of the connections. It depends on the useful dimensions of the title block; press the “Select <” button to select a point directly on the drawing. Width This is the width, in mm, of the connections column. Press the “Select <” button to select two points directly on the drawing, corresponding to the desired distance. Qty in sheet This is the maximum number of connection columns drawn for each page; past this limit the function continues onto the next page. Distance between Establishes the pitch of horizontal connections. Pins Use Config. in Archives When you choose a configuration different from the one set in “Pref”, containing matching between library symbols and Loop Diagram specific blocks (or when there is no matching), a neutral symbol (named LD_Neutral.dwg) is used instead. This symbol appears as a rectangular box containing the same symbol used in the electrical diagram, resized to fit the box. (See Loop Diagram “Configuration” ). The configuration in the figure is the one stored by default. 4 General commands • 131 Terminal block This is used to define the graphic characteristics of the terminal block drawing created by command “6.3 Terminals and connectors”. Table parameters are used to define the maximum overall dimensions of the terminal block during automatic creation of the drawing. "Start" is the co-ordinate onto which the first "Return terminal block" is inserted (configured in the Terminal and Connectors Database), The number of terminals inserted in the same sheet (horizontally or vertically) is the number configured in "Number of Terminals", at the distance configured in "Pitch" (this value must be the same as the height of the return terminal block). When the first column of terminals (strip) is complete, the terminal block continues on the next sheet if the "Number of columns" is set to 1, or in a new strip on the same sheet, starting at the distance configured in "Pitch between columns". “External jumpers” are only activated during terminal board drawing (not in the case of “Usage Drawing” output) tracing outside the terminal symbol connections to be achieved using jumpers. On Activate external jumpers: you can set the jumper drawing for the Input (NumI) and Output (NumO) wire number. The external jumper is drawn even if NumI and NumO are not consecutive. By activating the external jumper you turn off the “traditional” jumper Example : NumI : Distance -30 NumO : Distance 50 Step : 5 Example of external jumper activated on NumI and NumO WARNING: The external jumper is not compatible with the blocks “Terminal block symbol“ which do not have the attribute CRS_CONN_POINT (symbols prior to the 2007 version). 132 • Spac Automazione 2011 Off Turn off external jumper: Enables jumper drawn in the “traditional” way. Example of “traditional” jumper (on consecutive NumI) By “traditional” jumper we mean one drawn between terminals with the same NumI value placed consecutively. The jumper is drawn by tracing a normal line (poly-line 0.5mm thick), where starting and destination positions are determined by a point (drawn using the command “Point”) present in the symbols to be jumped. The Return Block (default symbol) is configured with the name of an existing symbol in the Symbols directory. The value can be selected by pressing "…". The Visible Usage Fields set parameters used for “Terminal usage drawings“ (see Sect. 6.3). Always use the default symbol: On Terminal board with unified graphics: the drawing terminal board is created using only this symbol. Used only for table terminals (Tab-Mor*). Off Terminal board with detailed graphics: the default symbol is used only in cases where a terminal in the database does not have its own "return block" configuration. New blocks can be customized and saved in the same directory as existing blocks. The block name must be selected from those available (from MOBLK1 to 24). Each new symbol must correspond to an image (slide) with the same name to be displayed in the dialogue window. Terminal block drawn with return block AB2-50 The configuration shown in the example is the one stored by default. Visible Usage Fields set useful parameters for the “Terminal usage drawings“ (see Sect. 6.3). 4 General commands • 133 Sheet title legend This configuration is used to insert data in the table. This is automatically inserted in the drawing when the “Sheet legend” command is sent (see Sect. 3.18). The default table symbol is LegendaT.dwg in the symbols directory. Different table symbols can be used, provided these are saved in the same directory. Text color is important for Translator configuration (see Sect. 12.4). The configuration shown in the example is the one stored by default. Revision legend This configuration is used to insert data in the table. This is automatically inserted in the drawing when the “Revision Legend” command is sent (see Sect. 3.17). The default table symbol is LegendaR.dwg in the symbols directory. Different table symbols may be used, provided these are saved in the same directory. Text color is important for Translator configuration (see Sect. 12.4). The configuration shown in the example is the one stored by default. 134 • Spac Automazione 2011 Function legend This configuration is used to insert data in the table. This is automatically inserted in the drawing when the “Function legend” command is sent (see Sect. 14.1). The default table symbol is LegendaF.dwg in the symbols directory. The same directory contains 3 table symbols, that differ for the number of columns (2, 3 and 4 columns). Different table symbols can be used, provided these are saved in the same directory. Text color is important for Translator configuration (see Sect. 12.4). The configuration shown in the example is the one stored by default. Symbol legend This configuration is used to insert data in the table. This is automatically inserted in the drawing when the “Symbol“ command is sent (see Sect. 14.1). The default table symbol is LegendaS.dwg in the symbols directory. The same directory contains 3 table symbols that differ for the number of columns (2, 3 and 4 columns). Different table symbols may be used, provided these are saved in the same directory. Text color is important for Translator configuration (see Sect. 12.4). The configuration shown in the example is the one stored by default. 4 General commands • 135 Cross-reference legend This configuration is used to insert data in the table. This is automatically inserted in the drawing when command “7.5 Cross” is sent. The default table symbol is LegendaC.dwg in the symbols directory. Different table symbols may be used, provided these are saved in the same directory. Text color is important for Translator configuration (see Sect. 12.4). The configuration shown in the example is the one stored by default. Legend Bit I-O Plc This configuration is used to insert data in the table. This is automatically inserted in the drawing when the “I-O” command is sent (see Sect. 13.4). The default table symbol is LegendaP.dwg in the symbols directory. Different table symbols may be used, provided these are saved in the same directory. Text color is important for Translator configuration (see Sect. 12.4). The configuration shown in the example is the one stored by default. 136 • Spac Automazione 2011 4.3 Panel setting Pop-menu > Product name This is used to store the list of references to attribute to panels, pushbutton panels, boxes, zones, etc. While a component, terminal or connector is inserted in the drawing you are asked for the name of the Panel he has to be referred to. Panels structure is usually set to 1 level (default behavior), in case of specific needs you can refer to norm CEI-EN 61346 and set it to 3 levels (see “Location Manager”). This is a hierarchical structure made of Location, Panel and Function Group, where for each Location you may have many Panels, and for each Panel you may have many Function Groups. To insert new panels (14 characters max.) enter the reference and then press "Add" to the list. To assign a description to a Panel press “Change”. Press button “Save” to apply list modifications. It’s allowed to delete a Panel value only if it is not in use. Dialogue “Panel setting” (1 Level). See “Location setting”). To delete all unused Panels automatically, press the button “Del non Used”. To import the Panel structure used in an existing job order (not the current one), press “Import” and choose the job order.Function “Update” modifies Panel value on symbols already existing (and selected) in diagram. The new value replaces the previous one without any confirmation request. The value is stored in attribute “quadro” of each symbol. Rename Function “Rename” lets you change Panel value in all diagram symbols. The example at left shows an automatic replacement of value Panel =P1 with =P2 ; command applies after pressing button “Rename” on all components of all selected multisheets. Finally, on command line is reported the number of updated components. 4 General commands • 137 Location setting Activate specific setting “Location Manager” in Preferences to set 3 level Panel structure. While a component, terminal or connector is drawn you are asked for names of Location and Panel it belongs to; optionally you can specify a Function Group, as described in norm CEI-EN 61346. To insert a new level reference (max 14 characters) type its name then press “Add” to the list at preferred level. For each Location, Panel or Function Gr. You can associate a description pressing “Change” button. Press button “Save” to apply list modifications. It’s allowed a level value only if it’s not in use. Note: Deleting a Location value implies automatic deletion of all sub-levels (Panels and Function Groups) it contains. Dialogue “Panel setting” (3 Levels). See “4.3 Panel setting“ To delete all unused items in a level, press “Del not Used” for the level required. To import the Panel structure used in an existing job order (not the current one), press “Import” and choose the job order. “Update” function modifies level values of symbols already existing (and selected) in diagram. New values replace previous ones without any additional confirmation request. 3 level values are stored in “panel” attribute of each symbol, following the syntax: Location # Panel # Function Group Character # is used as separator (Example : +Location#=BM#-GF2). “Rename” function changes level values of all symbols on diagram. WARNING: A project developed with a 3 level structure can’t be converted to 1 level. 138 • Spac Automazione 2011 Table You can draw the Panel list in table form or save on file CSV (Board-List.Csv) by pressing the button “Table”. The number of columns in the table depends on the Panel structure set, 1 level (standard functioning) or 3 levels (standard CEI-EN 61346). Panel table with 1 level setting. (see “4.3 Panel setting“) Panel table with 3 level setting. (see “Location setting”). 4 General commands • 139 4.4 Power feeds Pop-menu > Product name Select Power feeds to access the following dialogue window, which contains all functions useful for drawing power feed lines in different ways. All these functions have a "super wire" system, which automatically recognizes the dimensions of symbols on the wire or connection path. Line color (default 1 red), distance between lines (power feed pitch) and type of return are configured in ”4.1 Setup”. The Number of power feeds (from 1 to 20) refers to the number of parallel lines required (configure before selecting the function from the window). For each power feed, always select the signal name and cable properties. Line type can be used to configure a dashed line for drawing the ground line, for instance (line types must have previously been loaded onto the drawing). ”Power feed” dialogue Power feeds This function is used to draw a series of power feed lines quickly, with destination arrows (for reference from previous sheet) and starting point arrows (to next sheet). Starting point and destination point co-ordinates are stored each time and then presented as default settings the next time the command is used. This enables power feeds to be drawn in the same position on several sheets. This command should not be used on the first sheet of the drawing, which must not contain destination arrows. Destinations This function is usually called up to draw the last sheet onto which a power feed is referred. Only destination arrows are drawn (to left). Starting points This function is generally called up to draw the starting point of a power feed on the first sheet. Only starting point arrows are drawn (to right). Auxiliaries The first and second points are requested for starting and terminating the first line (top), then one point only is requested to define the height for the position of the second power feed (pass point of 2nd signal at bottom). In this case, too, the co-ordinates and names of the power feeds are stored and presented again the next time the function is used. 140 • Spac Automazione 2011 Branch This function is used to draw power feeds that branch off from existing lines in a perpendicular direction and automatically take the name of the connection. The only data that must be entered is the Branch (used for connections with the same signal name) in order to indicate that the double starting point is intentional and not a "repeated start" error. L-Branch This function is similar to that described above. The only difference is that the new power feeds are drawn parallel to existing ones and in the reverse return sequence. X-Branch Same as L-Branch, but the return sequence is not reversed. The various functions can be drawn to feature different connection modes. The connection point is optional in all 3 cases: Standard The traditional method is certainly the easiest and quickest way of drawing, but it is restricted in the sense that there is no graphic representation of how the connection is actually made. This limits some functions and reduces processing potential. N.B.: If connections are drawn using the standard method, data contained in tables “5.4 Internal panel wiring” and “5.9 Loop Diagram” is less reliable than if "Parallel and Serial" drawing methods are used. Parallel When this method is used, the type of connection is specified in detail: In the example, components QF1 and QF2 receive the power feed directly from the terminal block. Serial The example illustrates how component QF1 receives the power feed directly from the terminal block, while QF2 is supplied by means of a jumper run from QF1. 4 General commands • 141 Power returns This command is used to insert return symbols, one by one, in points you select. If “Automatic Positioning“ is active (see Sect. 4.2), command chooses where to insert a start or destination return depending on selection point and line slope, rotating it 0° or 90°. If “Automatic Positioning“ is inactive, a dialogue window is shown, containing all configured symbols (see “Returns” Sect. 4.2), included the ones rotated by 180° and 270°. Return is placed in the extreme point nearest to the one used to select the line. In case the selected line has data stored inside, there are picked up and used without further questions. When you insert a return you must type the Signal name, while Description (or Branch) is optional in case of double start from a single line. Power feed data include cable features, too; these data are set by default using command “Cable database” (see Sect. 4.2). You can choose each time different cable features and colors pressing button “…” You can’t apply modifications in case the signal name already exists, or the name is chosen using the list of existing names. ”Power returns” dialogue To use Description (or Branch) correctly, see “Return Cross-Referencing”. If ”On-line Cross (Start + Destination)” is set in return options (see Sect. 4.2) while you insert a start return you can insert the associated destination return on a specified page, too. You are not allowed to place returns anywhere, but only selecting a wire (or line). To change returns data use command ”5.7 Ddattef” only, while “Ddatte” have different results. WARNING : Avoid using CAD “Ddatte” command to change returns data. 142 • Spac Automazione 2011 4.5 Connections Pop-menu > Product name Select Connections to access this dialogue window, which contains 12 functions frequently used to accelerate electric drawing layout. All these functions have a "super wire" system, which automatically recognizes the dimensions of symbols on the wire or connection path. Line colors (BY LAYER) and the distance between lines (wire pitch), are configured in ”4.1 Setup”. The Number of wires (from 1 to 20) to be drawn only affects the 6 "wire" and "node" functions. “Connections" Window Wire This is used to draw a line and insert connection points automatically (if enabled). When the wire starts from a line that has already been drawn, it assumes the color and line type features of that line. This efficiently connects elements drawn in series (these must be perfectly aligned): on inserting the first point on the higher power feed line and the second on the lower power feed, the necessary links are drawn inclusive of connections. With standard connections, the function proceeds without requesting any further information; with serial and parallel connections, the system requests wiring directions, right or left for connecting the wire to horizontal lines, up or down when connecting to vertical lines. The difference between serial and parallel connections is explained in the previous paragraph (see “4.4 Power feeds”). The user is advised to work with Ortho and Snap always enabled. Tables produced using “5.4 ” and “5.9 Loop Diagram”, with standard drawn connections, present data which is less reliable than that produced by "Parallel and Serial" drawing methods. Branch This is used to enable rapid drawing of lines connecting several parallel components. If the starting point is on an existing line, the wires automatically assume the color and line type of that line. The <first termination point> connects the first component; <subsequent termination points> connect parts parallel with the first. The user is advised to work with Ortho and Snap always enabled. Branch is only operational in Standard connection mode. 4 General commands • 143 Wires This is used to draw a series of parallel lines, according to the number configured in "Number of wires", between 2 orthogonal points (or wires for straight line connections) at the distance configured in "Wire pitch" with command ”4.1 Setup”. L-Wires This function operates in the same way as the Wires function. It is used to draw non-orthogonal connections between a vertical component and a horizontal one. The user is advised to work with Ortho and Snap always enabled. X-Wires This function operates in the same way as the Wires function. It is used to draw non-orthogonal connections between a vertical component and a horizontal one, crossing the signals. Node This function is often used to connect a vertical component to a power feed. The number of branch wires is configured in "Number of wires". The function makes sure that the number of branch wires does not exceed the number of power feed lines. The node takes the color and line type characteristics from existing power feed lines. L-Node This function operates in the same way as the Node function. It is used to connect a multipole component with 90° rotation to a horizontal power feed. The user is advised to work with Ortho and Snap always enabled. X-Node This function operates in the same way as the Node function. It is used to connect a multipole component with 90° rotation to a horizontal power feed, reversing signal sequence. Multiple super wire The function operates in the same way as the super wire, with the difference that the operation is repeated from left to right, according to the "Number of connections" configuration, at the distance defined in "Pitch between connections". Patch This function is used to re-connect two wires that are separated when a symbol is deleted from the electrical diagram. Select these to make an individual connection. Note: Caution is necessary in case of wires are already numbered! Use ”5.7 Ddattef” to check wire status after executing Patch. Connection This is used to insert connection points on a T-intersection of two lines. The function controls the exact position of the point and checks that the T-intersection has been drawn with only two lines. The block used for connections is saved in the symbols directory and the file is called Punto.dwg. Some functions are called using the centre mouse button (3-button mouse), or by pressing the right mouse button with Shift [⇑] on the keyboard (2-button mouse). 144 • Spac Automazione 2011 Connection returns This is used to insert return symbols, one by one, in points you select. If “Automatic Positioning“ is active (see Sect. 4.2) the command choose whether to insert a start or destination return depending on the selected point and line slope, rotating it 0° or 90°. If “Automatic Positioning“ is inactive, a dialogue window is shown, containing all configured symbols (see “Returns” Sect. 4.2), included the ones rotated by 180° and 270°. The return is inserted on the final point nearest to the point used to select the line. When the selected wire is already numbered the data are automatically extracted and moved to the return symbol without further notice. In order to insert a return on wires which are not numbered, the user must enter the wire number (see Sect. 5.1, equivalent to the Signal name itself, while Description (or Branch) is optional for a possible double start from a single line. Cable properties are default values configured using the “Cable database” command (see Sect. 4.2). Different cable properties and colors can be selected each time. Returns cannot be inserted into empty spaces, but only after a wire (or line) has been selected. “Connection returns” dialogue box For an optimal use of Description (or Branch) see “Return Cross-Referencing”. If, in the chosen settings (see Sect. 4.2), the ”On-line Cross (Start + Destination)” option is configured, during insertion of a start return it is also possible to insert the corresponding destination return on the chosen page. You are not allowed to place returns anywhere, but only selecting a wire (or line). To change returns data use command ”5.7 Ddattef” only, while “Ddatte” have different results. Note: In order to ensure correct use, it is essential to distinguish between the features and properties of "Connection" and "Power returns" (see Sect. 4.4). 4 General commands • 145 Quick Wire Pop-menu > Product name This is used to draw quickly a wire inserting a single point in the diagram. When the wire links to an existing line, it takes automatically cable features, color and line type; connection points are added automatically, too. Using standard connection mode, the command works with no demand of additional information, but with serial and parallel connections you are asked for cabling directions, right or left if the wire is connected to an horizontal wire, top or bottom when it is connected to a vertical wire. Difference between serial and parallel connections is described in previous section (see “4.4 Power feeds”). You are suggested to work with Ortho and Snap always active. Quick Wire works horizontally using command HH and vertically using command VV. These commands (HH and VV) prompt with message “No valid entity intercepted” if there are not significant points to create the connection. Command example (vertical) You can run this command by keyboard typing command “HH” (horizontal Quick Wire) and “VV” (vertical Quick Wire). 146 • Spac Automazione 2011 4.6 Drawing utilities • Connection • Automatic Connection • Shield • Multisheet Scan • Updating Lists and Tables Pop-menu > Product name Connection This command is to transform a standard connection to serial or parallel or simply to modify it from serial to parallel or vice versa. The function requires: Choose a wire... Always choose the wire starting at the inter-section (the T intersection must be drawn with just two lines). Press the space bar (on the keyboard) till the desired connection appears. Press “Enter” to exit the command. Change from Standard to Parallel or Serial This command also lets you modify existing connections, from serial to parallel or vice versa. The change is started by choosing any one of the three wires involved. Automatic Connection This command automatically transforms all standard connections into parallel ones. Processing occurs on all files indicated when the command is launched. Automatic transformation takes place following the 4 rules indicated in the figure. Case 1 and Case 2: implements a parallel connection from the left. Case 3 and Case 4: implements a parallel connection from above. Automatic change from Standard to Parallel 4 General commands • 147 Shield This command is used to switch from a serial connection to a parallel connection or vice versa. This is similar to command “11.4 Cable information” with "Slot" option. In this case, instead of asking the user to enter data, the system requests connection of the shielded wire. The connection point is automatically displayed if the 3rd point is indicated on an existing wire. The following prompts are displayed: Select first point <Enter = Exit>: ... select second point: to point: (3rd point) Drawing of shield to point: (4th point, etc.) The size of the shield drawing is proportional to the "Wire Pitch" configured in ”4.1 Setup”. Multisheet Scan This is used to update (o create if it doesn’t exist) the job order database, file DbSpac.mdb stored in each job order older. The database contains the Panel list, the index of all component references, the index of terminals and connectors, the signal names of “Returns” and data of Cables and Terminal Blocks used in the job order. This database is essential to number, reference and label diagram symbols in a unique mode; you are suggested to update this database each time big modifications are made on the diagram, especially if done without the aid of commands. Command “Scan Multisheets” runs automatically when drawing, replacing the old commands “Rebuild References File”, “Rebuild Terminals File” and “Rebuild Returns File” manually run in the previous versions. 148 • Spac Automazione 2011 Updating Lists and Tables This command enables regeneration of Lists and Tables created using the following commands: • Revision Legend • Sheet Legend • Bit I-O Legend • Function Legend • Symbol Legend • 6.3 Terminals and Connectors • 8.3 Internal Bill of Materials The command starts by showing the list of outputs present on the various multi-sheets of the job. Only the outputs belonging to the current multi-sheet can be updated, the command starts to select the sheets automatically; the user can choose to make a partial selection of the sheets. The outputs selected belong to the current multi-sheet. This command is particularly useful to quickly recreate the legends, lists, bills of material and terminals, especially after having performed drawing modifications that require data update. View Pressing the “View” key, the output selected is highlighted on the drawing. When the output to be highlighted is drawn on a different multi-sheet than the current one, saving the drawing is requested. Move Allows moving a table or list without having to select the single objects (texts, lines, etc.). “Move” is only active for the outputs present on the current sheet. Delete Pressing “Delete” the selected outputs are fully deleted. Lists and tables removed in such a way avoid browsing the document and selecting the objects. “Delete” is only active for the outputs present on the current multi-sheet. 4 General commands • 149 The lists, tables and terminals drawn with previous versions are not inserted in this list; they must therefore be updated by cancelling and redrawing the table again. Automatic “Updateable” outputs are easily identified (graphically) thanks to a symbol placed on the insertion point. The user can customize the symbol by changing the block _Table.dwg stored in the Library\Spac Symbols folder. The symbol could be shown as a simple point (command “_Point”) if it is necessary to make it invisible. “Updateable” Output It is very important to never cancel this reference symbol. If the reference symbol is cancelled (_Table) the table will be excluded from the list of updateable tables. The terminals and connectors can only be updated with outputs of Drawing, Table and Table List types, highlighted by the item (Auto Rigen). WARNING: this command permits automatic updating of Lists and Tables only, that have been created with the Spac Automazione 2008 version and onwards. Regenerate with current parameters (Graphics and Data) On Lists, Tables, Bills of material and Terminals are fully updated both for the data contained in them and graphically. The new graphic form is set by the current settings. Off Lists, Tables, Bills of material and Terminals are updated only in their contents (data). Graphically they maintain their actual form (using the settings chosen originally). Example: If a table was drawn in red, it will remain unchanged, even though in the current settings the colour set is different. The value normally used for this setting is “Off” (default). When using the value “On”, it is advisable to check the pages where the regenerated outputs are present (after graphical updating the dimensions could be very different). 150 • Spac Automazione 2011 Regenerate in order of current fields On Off The tables are fully updated regarding their contents and graphics. The new graphic form takes into account the columns (exit fields) set by the current settings. The tables are updated only in their contents (data). They graphically maintain their actual form (using the fields chosen originally). Example: If a Bill of material (BOM) was drawn using the columns Abbreviation, Description and Quantity (3 fields), after updating the BOM remains unchanged, even though the current settings are with 4 fields and the price is also selected. The value normally used for this setting is “Off” (default). When using the value “On”, it is advisable to check the pages where the regenerated outputs are present (after graphical updating the dimensions could be very different). Selecting the Multi-sheets to be processed On Off A new list of multi-sheets is shown for a new scan The scan is performed using the multi-sheets originally chosen. The value normally used for this setting is “Off” (default). WARNING: Processing different multi-sheets with respect to the original scan, can cause very different results in the lists and tables when compared to the original lists and tables. 4 General commands • 151 4.7 Component references Pop-menu > Product name This command produces a list with all the references of the components that have been drawn; it can also be used to update and edit the references of all the components in the job order (or part of the order) in one single operation. Process is run on components belonging to the multisheets selected in the list. The list permits surveys: in case of duplicated references you are warned (duplicated names are marked with an asterisk). Summary: (see Sect. 3.1). Upon completion of scanning, the following dialogue window is displayed. In the example, reference FU1 is marked with an asterisk as it is used twice, on sheets 1 and 4. Press Re-reference (mode 1Automatic or 2-Manual) to update the names of the components in the drawing in consecutive sequence according to the "Type:" shown. Automatic (1) Manual (2) Using “Automatic Re-reference” all listed references are changed. Using “Manual Re-reference“ you are asked to select components being modified. In any case you can roll back (to previous references), pressing button “Restore previous References” just after the execution of “Re-reference” command. To change mode (or Type) of referencing you have to configure its settings, (see “Symbol referencing” Sect. 4.2) you can choose: • Incremental • Absolute incremental Sheet - Prefix referencing • Relative incremental Sheet - Prefix referencing • Prefix – Sheet in Absolute incremental identification • Relative incremental Prefix - Sheet referencing • Positional 152 • Spac Automazione 2011 Sheet scanning (horizontal or vertical) is not enabled in Positional mode. Press "CSV file" to create the ASCII file, called IDSymbol-List.csv, in the job order directory, containing all the information displayed in the list. Symbols with attributes containing "I" or "IGNORE" (for compatibility with previous versions), as well as those in the “14.7 Ignore symbols” list, are discarded from the list. Reference duplicated Parents When the list of duplicated names contains “Parent symbols”, button “Automatic Re-reference” is frozen (for safety reasons); before proceeding you must activate the checkbox “Reference duplicated Parents”. Contacts (Child symbols) are all associated to one of the Parents with duplicated reference. Pay attention to the message: Warning: contacts with duplicated Parent KA2 has been associated to Parent KA2 laying in Sheet 6.3 WARNING : this message implies the need of update or run the Cross Reference (see Sect. 7.1). When Parent symbols appear in the list of duplicated names, you are suggested to solve the problem as soon as possible. Use current Prefix Archive During Re-reference, both “Automatic (1)” and “Manual (2)“, prefixes to associate to component references may have two different sources. Each symbol “keeps” its original prefix, the one extracted from the Prefix Archive used while drawing, or better in use when the symbol was inserted in diagram. During Re-reference you can choose to keep the original prefix or the use extracted from the current Prefix Archive, in case it is different from the original. Suppose you drawn an IEC relay coil symbol using IEC archive (Norm IEC 750), and the set IEC_61346 archive (Norm IEC 61346) in use: See “4.1 Setup”. This setting permits you to choose from which Archive extract prefixes. On It is used Archive IEC_61346 , set the second time. Reference KM1 of the relay symbol (prefix KM) is changed to Q1 (prefix Q). Off It is used Archive IEC, set in origin. Reference KM1 of the relay symbol keeps the same prefix (KM). 4 General commands • 153 Automatic (1) Press Automatic Re-referencing to change all the references contained in the list. If any symbols are found to have a prefix that has not been configured in the .Pre file, these are displayed as shown in the example. The "Assign prefix" button can be used to assign a provisional prefix to each one. N.B.: All symbols without a prefix are unaffected by rereferencing and keep their previous reference. Press Continue re-referencing to update the names of all valid components (or components with provisional prefix) according to the specific mode setting. See “Manual (2)“. WARNING: The "Automatic re-referencing" button is disabled only when duplicate parent symbol references are present: continue by setting "Parent reference with same name". Manual (2) When Manual re-referencing is pressed, the user is asked to select the components to be changed. A list is displayed, as shown in the example, containing the references selected (current) and the list of references prompted by the program (new). If any symbols are found to have a prefix that has not been configured in the .Pre file, these are displayed in the same way as for "Automatic Re-referencing". To redefine the new references prompted by the program, the user proceeds as follows: Select the reference to be redefined, enter the new value in the *** User Reference *** space and press Change Reference. The new reference associated with the Parent symbol is also included in the related child symbols. See “Automatic (1)“. WARNING: "Manual re-referencing" is the only tool available for editing a component name correctly. 154 • Spac Automazione 2011 Incremental referencing An incremental value is associated with the symbol prefix. The new reference associated with the Parent symbol is also included in the related child symbols. Symbol C1031 is inserted in the drawing with the prefix KA (configured in the Cei15.Pre file). References will therefore be updated in consecutive sequence on all sheets: KA1, KA2, KA3, etc. The increment re-starts from 1 for each prefix. Incremental If “Same component” mode has been activated in Settings, reference numbering restarts from 1 for each new Panel and prefix. With this mode active, components with same name but belonging to different Panels, are not considered errors of “Duplicated references”. To distinguish components with same name, a location label is placed near the symbol automatically, remarking the Panel it belongs to (see “17.5 Location”). Absolute incremental Sheet - Prefix referencing Similar to normal Incremental referencing described above. The only difference consists in the addition of the sheet number upstream of the symbol prefix. An incremental value is associated downstream of the symbol prefix. The increment restarts from 1 for each new prefix and is not set to zero when the sheet is changed (absolute). The new reference associated with the Parent symbol is also included in the related child symbols. The sheet number is added upstream of the prefix KA, producing 1KA… on sheet 1, 2KA… on sheet 2, etc. References are updated in consecutive sequence on all sheets: on sheet 1: 1KA1, 1KA2, 1KA3, etc. on sheet 2: 2KA4, 2KA5, 2KA6, etc. Absolute: Single increment for all sheets. The increment re-starts from 1 for each prefix. If “Same component” mode has been activated in Settings, reference numbering restarts from 1 for each new Panel and prefix. With this mode active, components with same name but belonging to different Panels, are not considered errors of “Duplicated references”. To distinguish components with same name, a location label is placed near the symbol automatically, remarking the Panel it belongs to (see “17.5 Location”). 4 General commands • 155 Relative incremental Sheet - Prefix referencing Similar to "Absolute incremental referencing" described above. The difference is only visible downstream of the symbol prefix, which is associated with an incremental value which re-starts from 1 for each new sheet and prefix (it is set to zero at each sheet change). The new reference associated with the Parent symbol is also included in the related Child symbols. The sheet number is added upstream of the prefix KA, producing 1KA… on sheet 1, 2KA… on sheet 2, etc. References are updated in consecutive sequence on each sheet: on sheet 1: 1KA1, 1KA2, 1KA3, etc. on sheet 2: 2KA1, 2KA2, 2KA3, etc. Relative: the increment is set to zero at each new sheet. The increment re-starts from 1 on each sheet for each prefix. If “Same component” mode has been activated in Settings, reference numbering restarts from 1 for each new Panel and prefix. With this mode active, components with same name but belonging to different Panels, are not considered errors of “Duplicated references”. To distinguish components with same name, a location label is placed near the symbol automatically, remarking the Panel it belongs to (see “17.5 Location”). Absolute incremental Prefix - Sheet referencing Same features as the previous “Absolute Incremental Prefix Sheet”. The only difference is in the converse position between sheet number and symbol prefix. The symbol reference associated with the Parent symbol is also transferred to the related Child symbol. To avoid the same name risk we advise using a separation character between sheet and increment. Downstream of the prefix ”KA” the page number is added, thus KA1… on page 1, KA2… on page 2 etc.. References are updated in consecutive order on all sheets: on sheet no. 1: KA1.1, KA1.2, KA1.3 etc.. on sheet no. 2: KA2.4, KA2.5, KA2.6 etc.. The increment starts from 1 again for each prefix. If “Same component” mode has been activated in Settings, reference numbering restarts from 1 for each new Panel and prefix. With this mode active, components with same name but belonging to different Panels, are not considered errors of “Duplicated references”. To distinguish components with same name, a location label is placed near the symbol automatically, remarking the Panel it belongs to (see “17.5 Location”). 156 • Spac Automazione 2011 Relative incremental Prefix - Sheet referencing Same features as the previous “Relative Incremental Prefix-Sheet“. One difference consists in position exchanged between sheet number and symbol prefix, the other in the increment that is not absolute but starts from 1 again for each sheet. The new reference associated with the Parent symbol is also transferred to the related Child symbol. To avoid the same name risk we advise using a separation character between sheet and increment. Downstream of the prefix ”KA” the page number is added, thus KA1… on page 1, KA2… on page 2 etc.. References are updated in consecutive order on each sheet: on sheet no. 1: KA1.1, KA1.2, KA1.3 etc.. on sheet no. 2: KA2.1, KA2.2, KA2.3 etc. The increment starts from 1 again on each sheet for each prefix. If “Same component” mode has been activated in Settings, reference numbering restarts from 1 for each new Panel and prefix. With this mode active, components with same name but belonging to different Panels, are not considered errors of “Duplicated references”. To distinguish components with same name, a location label is placed near the symbol automatically, remarking the Panel it belongs to (see “17.5 Location”). Positional referencing The symbol prefix is associated with its position on the drawing; for this reason “Sheet Dimensioning” must be carried out correctly (see Sect. 4.2). The new reference associated with the Parent symbol s also included in the related child symbols. The number of the sheet and segment (column) are added to the symbol with prefix KA, hence: KA1.1 on sheet 1 in segment 1 KA1.2 on sheet 1 in segment 2 KA2.1 on sheet 2 in segment 1, etc. PFC-type references In the example, references are of the PFC type (Prefix, Sheet and Segment). If there are 2 parent symbols with the same prefix in the same segment, the function distinguishes these with a letter: KA1.1A, KA1.1B, etc., thus avoiding unwanted duplications. If the 2 parent symbols (with same prefix or position) belong to different Panels, no character is added in case you activated in Preferences “Same component” mode. To distinguish components with same name, a location label is placed near the symbol automatically, remarking the Panel it belongs to (see “17.5 Location”). The prefix archive (see “Symbol Configuration”) associated through “4.1 Setup” affects variable P (prefix), while “Sheet Dimensioning” value affects variable Cat (segment). 4 General commands • 157 158 • Spac Automazione 2011 5 Wire numbering 5.1 Number wires Pop-menu > Product name In multi-wire electrical diagrams, connections are identified by assigning unique references to all the wires in the entire job order. There are many methods and standards for wire numbering. Check the “Wire and Terminal numbers” settings (see Sect. 4.2) before starting, in order to customize numbering according to specific requirements. All lines drawn in the diagram are considered as wires and can therefore be numbered, except: • Polylines and Multilines. • Non-orthogonal lines. • Ignored lines, i.e. lines in colors not to be processed (see "Color management", Sect. 4.2). The following are considered special functions: • Lines connected to returns. • Lines already numbered. • Lines with non-conforming data. Wire numbering can be performed manually or automatically (see Sect. 5.2). Numbering The manual wire numbering command opens this dialogue window. Numbers can be incremental (1, 2, 3...) or use strings (1, R1, 1R380V, etc.). The Wire Reference is the actual value assigned to the wire. It may be composed in a number of ways, using prefixes, formats, sheet number and progressive number. Set the progressive number in the Number box. By default, this is the next number after the last one that was used. The parameters set during configuration may be changed provisionally, only for the current (local) command, by pressing Settings (see Sect.4.2). "Wire data" settings can be changed each time or stored as default settings by pressing the "…" button. "Indicate un-numbered wires" simplifies the job by displaying the remaining wires to be numbered on the current page. 5 Wire numbering • 159 Number using strings No. with superscript symbol No. with superscript symbol This method is used to identify wires using text or numbers that are not necessarily incremental. To start numbering using strings, enter a superscript before the wire name. In this case, the superscript (‘) enables recognition of the entire contents of the string. Otherwise, only value 1 is considered. For strings that start with a number, the superscript is mandatory. Wires must often be numbered numerically but without conforming to current prefix, constant or various formatting configurations. In this case, the superscript allows these configurations to be ignored: the number on the wire will be 6 instead of 02.006 (example with prefix Sheet 2, separator "." and 3-character format 00No.). In this case the superscript is superfluous, as the string starts with a character. No. without superscript symbol Numbering does not comply with the parameters configured in the "Advanced Options" or local prefix settings. Numbering with strings can only be used to number one wire at a time. Incremental number This method is used to number wires progressively from the number indicated at the start. The function automatically increments the number on the next wire (the increment value is configured in the settings). This type of numbering can be used to number several wires concurrently. Enter the first point in the space to automatically enable selection in "fence" mode . Wires selected in "fence" mode Several "fences" may be created before confirming. The point on which the wire is selected or the line used to select the "fence" is used as the position for number insertion: When wires are selected which have already been numbered, the system asks whether these are to be updated (see “Renumbering”). The values assigned to each numbered wire are those present in "Wire Data". This information is used by functions “5.4 ” and “5.9 Loop Diagram”. 160 • Spac Automazione 2011 Local prefixes or suffixes This method is used to number wires with a provisional (local) prefix or suffix without editing configurations. It is possible to enable just one prefix (or suffix) to be used for all wires. In the example below, numbering starts from 1: Single prefix Several prefixes (or suffixes) can be enabled if separated by a space. In the example below, numbering starts from 1: Prefixes separated by spaces Wires can be selected concurrently in "fence" mode. The enabling of local prefixes is added to the parameters configured in the “Advanced options” settings. Renumbering There is no need to delete wire numbers already present in the drawing in order to update them. They are automatically updated, in the same position if applicable, during the new numbering process. Press Update to assign the new number "100" to the wire. Press No update to keep the former Wire Contents value of "1". Before pressing Update, enable Update Following Wires to update a series of wires automatically. The "Number Contents" field is null when the number block graphic is deleted. The "Wire Contents" field represents the actual value attributed to the line. If the Number and Wire contents do not correspond, the "Inconsistent Values" condition is generated. The "Inconsistent Values" condition is usually generated as a result of changes to the wire number using the "Ddatte" command. This is an incorrect operation in the sense that it only changes the text in the number symbol graphically, but does not change the actual data inside the line (extended data). The "Terminal Contents" field is null when no terminals are connected to the wire; it is varied when the terminal Input and Output wires have different values. When "Ddatte" command is used to change terminal data (incorrect operation), the "Inconsistent Values" condition is generated. Press Update to update "Inconsistent Values" unambiguously on all branches. Always use the “5.7 Ddattef” command to change wire numbers. 5 Wire numbering • 161 Number wires connected to terminals The "Input same as or different to Output" configuration defined in the settings is of fundamental importance for numbering wires connected to terminals (configure if the number on the wire entering the terminal is the same as the number on the output wire). NumI same as NumO This is the most common condition. The wire connected upstream of the terminal (NumI) has the same value as the wire connected downstream (NumO). In this case, select the wire once to number the entire connection. With this method, it is advisable to use terminals on which NumI and Terminal block data are displayed. When working with the "Force wire number to terminal" configuration, all NumI and NumO values automatically acquire the wire number value. NumI differs from NumO In this condition, a different value is assigned to the wires connected upstream (NumI) and downstream (NumO) of the terminal. In this case, the wire must be numbered before and after the terminal. With this method, the use of terminals on which NumI and NumO data are shown is recommended (as illustrated in the example). When working with the "Force wire number to terminal" configuration, the NumO value (on the 1st terminal) and NumI value (on the 2nd terminal) automatically acquire the wire number value. With the "Receive Wire No. from terminal" configuration, wires can be numbered using values already present in the terminal, in the NumI and NumO attributes (see Sect. 4.2 “Wire properties“). Numbering wires connected to returns When numbering a wire connected to a return, the function checks whether it is a “Power returns” or a “Connection returns”. Power Returns The wire is ignored. Wire numbering does not alter the value entered previously when inserting the return (see Sect. 4.4). The system checks the consistency of data and line colors with those configured during “4.1 Setup” of "Power feed color". The contents of a Power return (and the relative connected wire) can only be changed using command “5.7 Ddattef”. Connection returns Numbering changes the value of the wire (and the relative connected return) in the same way as with all other wires. Ddattef Command “5.7 Ddattef” is used to change the numbering of any wire whilst ensuring that data remain consistent. This is the only command that can be used to change numbers of wires connected to "Power returns". If "Update selected branch only" is not enabled, all returns with the same name in all multisheets of the job order are updated automatically. 162 • Spac Automazione 2011 5.2 Automatic wire numbering Pop-menu > Product name Automatic wire numbering operates by the same rules described previously for command “5.1 Number wires”. When enabled, the following dialogue window is displayed. The Start Wire Number is the value from which wire numbering starts. Enter the whole positive number. The "Wire reference" is the combination of "Start number" and any parameters (prefixes, constants, etc.) defined during Setup of “Wire and Terminal numbers” (see Sect. 4.2). The parameters defined during configuration can be changed locally, only for the current command, by selecting Settings (see Sect. 4.2). The Start wire number does not exist when Positional numbering is used (the number is incremented, starting from 0, for each segment change). The "Protect" options affect wires that are already numbered. The function then requests the sheets to be numbered. Press "Entire Job Order" to automatically include all sheets in the list. To customize the list of sheets to be numbered, select the pages required from the multisheets. Summary: (see Sect. 3.1). These buttons affect the sheet list of the multisheet: Select To create a customized list, select the multisheet in order to view the sheets it contains in the list at the side. Click on the pages required. Press Add to include all the highlighted sheet numbers in the list of sheets to be numbered. Select all All the sheets in the selected multisheet are highlighted. Press Add to include these in the print list. Delete selection Deletes previous selections. 5 Wire numbering • 163 These buttons affect the list of sheets to be numbered: Add The list of sheets to be numbered is incremented by the values selected in the sheet list. Delete The selected sheets are removed from the list of sheets to be numbered. Clear The entire list of sheets to be numbered is set to zero. When the list to be numbered is confirmed, numbering begins without further prompts. The number insertion point is calculated as approximately the middle point on the line. The system used to manage sheet images is the same as that described for the "Change sheet" function (see Sect. 3.2). Use Sheet Slides to update obsolete or missing images (see Sect 3.18). Numbering Sheet by sheet wire numbering enables the starting wire number to be set each time. Automatic wire numbering is often used for concurrent numbering of a group of sheets with the same features (all power sheets, auxiliaries or PLC boards). The only condition that ensures unambiguous numbering with no duplicates is when all job order sheets are numbered together. In this case, between one sheet and the next, numbering starts by taking into account the number of spares configured in the settings. The number of spares is not considered if "Sheet Number as Prefix" is enabled. In this condition, numbering on all sheets re-starts from the same value configuration (usually 1). Automatic numbering considers the following variables, which are configured in the settings and can be viewed by pressing the Info button (see “4.2 Settings”): Insert summary If configured in the settings, a "summary" block is automatically inserted in each numbered sheet (at the 0,0 position). This block indicates the first and last numbers used with any spares. When the drawing contains numbers originating from different configurations, the following message is displayed: *** Error: wire number composition mismatch. Blinfi1.dwg symbol Sheet spares If "Sheet number as prefix" is enabled, numbering on all sheets usually starts from 1; this condition renders this "summary" virtually irrelevant, as an infinite number of spares is available on each drawing. This value is displayed when numbering several sheets (value indicated in the Blinfi block as the last useable number for changes). Color omitted The numbering process omits some wire colors. This applies not only to the lines, but also to all polylines, in the excluded colors. N.B.: This parameter is essential for drawing objects not to be considered as wires. 164 • Spac Automazione 2011 Scan type Indicates the sequence in which wires to be numbered are searched for and selected: "A" is often used to scan power diagrams (especially for motor connections). "B" is the most commonly used search type for auxiliary diagrams. "B" Type scan Wires already numbered The "Protect wires already numbered" option can be used to (automatically) number only wires which have not been numbered, by filtering those which have already been numbered (this may be performed manually). After performing this operation, it is advisable to check the “5.3 Used numbers list“ for any duplicate numbers. Use the "Protect wire data" option to keep information regarding cable features (on wires which have already been numbered). Protect Numbering The wire numbers for already numbered wires remain unchanged. If not enabled, all previous numbers are removed and replaced without further prompts. Protect Data Wires already numbered keep their cable type data (color and diameter). If not enabled, all previous data are removed without further prompts. WARNING: The two Protect options must be disabled whenever the entire numbering process is requested so that new numbers are assigned in consecutive sequence. 5 Wire numbering • 165 Positional numbering Wire number is made up of the sheet number, segment and an incremental value starting from 0. When “Positional” is configured in “Settings”, it must be remembered that this is only a recommended configuration for the automatic numbering command. Manual wire numbering is used only when changes are made to the diagram or for specific requirements. Unlike other numbering methods, with "positional" numbering, the starting wire number is not displayed in the dialogue window, as numbering always starts from "0" for each new segment. The "Save wires already numbered" option may not be used to filter previously numbered wires. To simplify the task, “Indicate un-numbered wires” displays the remaining wires to be numbered on the current page. Available only with manual numbering. WARNING: As the rules governing this numbering system imply a number of limitations, this configuration should only be used if absolutely necessary. Operation is the same as that described for non-positional Automatic numbering. The “Sheet Dimensioning” configuration ensures correct reading of the segment number. The example refers to wire numbering on sheet 1: The wires in segment 1 are: 110, 111, 112 … The wires in segment 2 are: 120, 121, 122 … This type of numbering is only correct when the title block is made up of segments with a one-digit number (not more than 9), in order to avoid the inconsistencies, such as, for example: the number 1213 could be interpreted in three different ways: 1. Sheet 12 segment 1 number 3 Example of automatic positional numbering. 2. Sheet 1 segment 21 number 3 3. Sheet 1 segment 2 number 13 Using segments with only one digit eliminates the inconsistency illustrated in case 2. To ensure unambiguous reading, however, there should be no more than 10 wires (from 0 to 9) for each segment, in order to eliminate the incorrect reading illustrated in case 3. 166 • Spac Automazione 2011 5.3 Used numbers list Pop-menu > Product name > Wires Utility This command is used to create the list of used wire numbers; it is also useful for checking any duplicate numbers repeated by mistake. If the wire list is sorted "by number", all wire numbers used in the design are displayed in progressive sequence. If the wire list is sorted "by sheet", page numbers are listed in progressive sequence, together with the wire numbers contained in each one. Pay attention to numbers marked with an asterisk: these are duplicated. If the list only contains "Duplicate" numbers, it filters any duplicate wire numbers. If the list only contains "Returns", it filters any wire numbers generated by a return symbol (numbers on power feed returns). Summary: (see Sect. 3.1). Press "Scan Multisheets" to start the search producing the list of wires; press "Use last list" to display the last list of numbers immediately, without repeating the search for data in the job order. Pay attention to numbers marked with asterisk: they are duplicated. For example, for "Duplicates" which only need one filter from the overall list, "Use Last List" can be used to save time and avoid re-processing. "Use last list" can be used to enable immediate viewing of the last list of numbers, sorted differently, without repeating the search for data in the job order. Lists can be sorted in two ways: Logically Priority is given to characters, numbers and then numbers associated with characters. Alphabeticall Priority is given to numbers, then numbers associated with characters and, lastly, y characters (ASCII character sequence). Note: numbers marked with an asterisk are duplicated. For each Sheet number indication (following the first) exists at least one repetition. CSV file Press CSV File to activate the configuration used to generate the data-mining file named IdWires-List.Csv . Standard (if active) it’s the base configuration of output fields. Each item of the list “Available fields” it’s a data existing in the cabling list; the ones added to “Output fields” pressing command Add generate a new column of the output file. Pressing Default current configuration is set as default for next use. If the process is run without pressing Default this customized configuration is not saved. See ”14.8 Edit CSV”. 5 Wire numbering • 167 5.4 Internal panel wiring Pop-menu > Product name > Wires Utility Internal panel wiring is used to process the single-pole cables used to connect all components inside the same panel. This is only possible when all wires necessary for making the connection have been numbered (see Sect. 5.1 and 5.2). During data processing, all numbered and valid wires needed to connect components and terminals belonging to the same panel are extracted from the drawing. Drawing with the appropriate serial or parallel connection methods (see Sect. 4.4 and 4.5) produces more reliable and realistic results than the traditional standard connection method. The extracted wires contain the information with which they were associated during the wire numbering process: command “5.7 Ddattef” is used to change the number, cable code, color and diameter. Pay special attention to the following graphic conditions: In the 1st condition, QF2 is connected to QF1 by means of a jumper. 1 - Parallel (OK) 2 - Serial (OK) 3 – Standard In the 2nd condition, QF1 and QF2 are connected in series in the same way on the component (or terminal) drawn upstream. In the 3rd condition, the function automatically selects the type of connection. For this reason, the standard drawing method is considered less reliable for use with the internal panel-wiring table. Call up this function to display the following dialogue window. Press Scan Multisheets to process the selected multisheets: the function considers all wires, terminals and components belonging to the "panel to be worked on". If any changes are made to the contents of the cables list, these are saved in a new WiringInternal.cab file. Use View Save to display the new situation (a new scan would display lists prior to change). Processing ignores symbols in the drawing without a panel attribute (or an empty panel attribute) and all connected wires. When scanning is complete, the wiring table is displayed as shown in the example below. Information concerning the type of terminal and tubular outer sheathing (starting and destination points), cable length and any wiring notes can be attributed to wires (optional). 168 • Spac Automazione 2011 Details Select a single wire to view all its available information. Change Press this button to add optional "Wire start" and "Wire destination" information, relating to the type of terminal, tubular outer sheathing, length and any notes, to wires in the list. Change can also be used to edit information already present in the list. Press Save to store these changes in a Wiring-Internal.cab file. The file is created in the job order directory. Wire data This information is assigned to the wire during numbering (both manual and automatic) and can only be changed using command “5.7 Ddattef”. Save Press Save to store the information contained in the list. Press "View save.cab" in the first window to retrieve this information. Checks During processing, some wires are discarded and an error message is displayed. The most frequent cause is graphic inconsistency: *** ERROR: branch 100 not processed in EXAMPLE-01 SHEET 1 Connection drawn with 3 lines: this type of error can only occur when connections are drawn in standard mode. The problem can be solved by joining lines 1 and 3 in a single line. Crossed connection with 2 lines: no solution. This problem can be eliminated only by deleting the connection point or drawing a new connection, preferably in serial or parallel mode. Overlapping lines: delete excess lines and then make sure that numbering on remaining lines is correct. Component with no Panel value: the wire is connected to a symbol that is not associated with a panel. This problem can be solved by filling in the missing information. Use the abbreviated Edit command (XS, from the keyboard) to view all available data. Any inconsistencies concerning connections, overlapping lines and incorrect symbols are determined by the “Program Check” (Sp_Verif) command. 5 Wire numbering • 169 Wiring tables Press Table to draw the wiring list and related information in table form (parametric mode). The function requests drawing parameters: Each item (Tag) in "Available fields" is a piece of information. Press Add to enter these data into "Output fields" to represent a column in the table. Each Tag has two variables, the width and title of the column. These can be changed by pressing Change. Number of rows This value is used to split the table into a number of parts, even on different sheets, when (having reached the maximum number of rows) a request is sent for a new insertion point or to continue on the next sheet. Text height This parameter represents the height of all text in the table; it proportionally affects the height of each row and, consequently, the overall height of the table. Title height This parameter represents the height of column titles and affects the calculation of the overall height of the table. Table width This is the overall total of the widths assigned to each output field, expressed in millimeters. This value must never exceed the sheet width value, to prevent the table from overshooting title block margins. Table height The maximum table height is calculated according to the predefined maximum number of rows and text height. This value must never exceed the sheet height value, to prevent the table from overshooting title block margins. Standard Standard output field configuration (where applicable). 170 • Spac Automazione 2011 Press Default to save the current configuration in "local" mode (see Sect. 4.2) for future use. If confirmed without pressing Default, the configuration is considered to be temporary and is only used once. The function prompts: Select table insertion point: The configuration of the previous figure corresponds to the following graphic output: Example of Internal panel wiring table. The following options may be used to configure the table drawing: Request insertion point When more than one sheet is required to complete the table drawing, the user may choose whether or not to change the table insertion point on subsequent pages. Line spacing (x2) The space occupied by each row is calculated in proportion to the text height configuration. This parameter can be used to double the space to allow two text lines to be inserted. This condition is especially useful for inserting translations. Sheet + character When several sheets are required to complete the table drawing, the user may choose whether to continue on numerically successive sheets (either new or existing) or whether to create numerically intermediate sheets (E.g.: 1, 1A, 1B, etc.). CSV file Press CSV file to enable the configuration to create the Wiring-Internal.csv data extraction file. Standard is the standard output field configuration (if enabled). Each item in the "Available fields" list is information contained in the wiring list. Press Add to enter these data into "Output fields" to represent a column in the output file. Press Default to save the current configuration for future use. If confirmed without pressing Default, the customized configuration is considered to be temporary. See ”14.8 Edit CSV”. 5 Wire numbering • 171 5.5 Number Summary Pop-menu > Product name > Wires Utility This function is used to insert the Blinfi block in the current sheet manually (with automatic numbering, these are inserted automatically). This symbol contains the value of the first and last wire numbers used on the sheet and the number of available spares for any changes. This symbol is not managed in case of positional numbering or with the sheet prefix enabled. The function uses the symbol configured in the automatic numbering parameters (see “4.2 Settings”). "Blinfi" blocks are stored in Librerie\Simboli directory. Each .DWG block corresponds to an .SLD image (slide) with the same name to be displayed in the dialogue box. These are inserted at the 0,0 co-ordinate. New "Blinfi" blocks can be customized and stored in the same directory as existing blocks. The name of the block must follow on consecutively from existing names (Blinfi4, Blinfi5, etc.), with a maximum of 20 blocks (the dialogue box can display a maximum of 20 windows). If a block is deleted, blocks with subsequent numbers cannot be displayed. If the Blinfi block is already in the drawing, the following prompt is displayed to update its contents: Summary already entered: keep spares value <Yes>/No? Press Y to leave the maximum number of spares unchanged. Press N to calculate a new value according to configuration (default 10). Symbol values can be edited manually using the CAD Ddatte command. Always ensure that the available spares value is correct, as numbers could be in use on other sheets. 5.6 Delete numbe r s Pop-menu > Product name > Wires Utility This command is used to remove wire numbering on the sheet selected, on the whole sheet or on the current multisheet. Removal not only affects the graphic elements of symbols containing the wire number, but also deletes the current wire value stored inside the line data. Subsequent wire numbering operations do not require the value to be updated, as would be the case if only the graphic element had been removed. This command is also used before storing sheets in neutral mode (master). 172 • Spac Automazione 2011 5.7 Ddattef Pop-menu > Product name The Ddattef command is used to change the numbers of wires and power feeds and related terminals, whilst ensuring that the data remain consistent. The command behavior differs depending on the selected entity in the following cases: • Ddattef • Ddattef Power feeds (wire connected to a power return, _Alim*). • Ddattef Terminals (plug or connector). You can also recall the function quickly by typing in the command “XS”. Ddattef Wires This is used to modify wires already numbered or connected to “Connection returns” (see Sect. 4.5). Click on the wire or terminal, if any, to which this is connected. The system opens a dialogue window which can also be used to enter new cable color, diameter and type configurations useful for “5.4 ” and “5.9 Loop Diagram”. If the message "Inconsistent Values" is displayed, this is due to differing number, wire or terminal contents. When a new value is confirmed, all data are updated unambiguously, thus eliminating the inconsistency. The "…" button changes wire data using the data configured in the “Cable database” (see Sect. 4.2). When the current wire data are not present in the cable database, the following message is displayed in the description ***Cable not in database ***. Operations can only be carried out on wires that have already been selected using the wire numbering or terminal insertion commands. For empty wires the following message is displayed in the command line: Warning: selected wire not yet numbered. The "Number contents" field is null when a number is deleted graphically. The "Wire contents" field represents the actual value attributed to the line. If the "Number" and "Wire" contents do not correspond, the "Inconsistent values" condition is generated: this error is usually due to changes to the wire number using the "Ddatte" command (invalid operation), as it only changes the text contained in the number symbol graphically, instead of changing the actual data stored inside the line (extended data). When the wire is connected to a return, the change is effected inside the signal attribute of the return symbol (_Sign*). In this specific case, the return symbol replaces the number symbol. 5 Wire numbering • 173 Ddattef Power feeds This is used to modify power feeds data or wires connected to “Power returns” (see Sect. 4.4). When a power feed number is changed, all returns with the same name in all multisheets of the job order are automatically updated. Enable the "Update selected branch only" setting to change only the selected power feed in "local" mode. Click on the wire or return symbol. The system opens a dialogue window which can also be used to enter new cable color, diameter and type configurations useful for “5.4 ” and “5.9 Loop Diagram”. If the "Inconsistent Values" message is displayed, this is due to the differing content of the start and destination signals (or, in any case, of signals connected to the same branch). When a new value is confirmed, all data are updated unambiguously, thus eliminating the inconsistency. Use the "…" button to change data using information configured in the “Cable database” (see Sect. 4.2). When current wire data are not present in the cable database, the following message is displayed in the description: ***Cable not in database ***. The "Return contents" field refers to the signal attribute in the return symbol. The "Wire contents" field represents the actual value attributed to the line. If "Return" and "Wire" contents do not correspond, the "Inconsistent Values" condition is generated: this error is usually due to changes made using the "Ddatte" command (invalid operation). When "Update selected branch only" is not enabled, all returns with the same name are updated on all multisheets in the job order. 174 • Spac Automazione 2011 Ddattef Terminals This is used to modify terminals data or plug and connectors data (see Sect. 6.1), avoiding using “Ddatte” command (wrong operation!). When you select a terminal, all data associated when it was inserted in diagram are shown; now you are allowed to modify Panel, Terminal Block and material features. “Set NumI and NumO” is used to toggle the value of wire numbering variable “Input equal or different from Output” (see Sect. 4.2), it’s very similar to command “6.7 NumI and NumO settings” but limited to the selected terminal. If you get the warning “Inconsistent Values” usually caused by a different content of number, wire or terminal, you can solve the problem using command “Ddattef “. Button “…” is used to change the return block (symbol representing the terminal on the terminal block), choosing from the ones available in Terminal and Connectors Database. Possible modifications manually made to field “Usage” must comply the syntax rule described in “6.4 Usage“. 5 Wire numbering • 175 5.8 Copy wire no. Pop-menu > Product name > Wires Utility Usually Wire Numbering inserts only one number per wire in the diagram, even if the drawing contains a number of segments and branches. This command copies the wire number on each selected segment or all ramifications. Insert Numbers: copies wire numbers on selected entities or branches. You can select wires one by one or use “fence selections” as in Numbering. Selection points correspond to insertion points of copied wire numbers. Erase Numbers: copies of wire numbers on selected entities or branches are removed. Only the “original” wire number is kept. Update Numbers: in case wire numbering has changes, it updates number copies with the value of the “original” number. Command “5.6 Delete number” do not remove duplicated wire numbers if they were generated by “Copy wire no.” . Use this command when strictly necessary only, because “Wire Numbering” ignores (number) copies during possible numbering updates. 176 • Spac Automazione 2011 5.9 Loop Diagram Pop-menu > Product name > Wires Utility This is the interconnection management command, which enables you to view the entire path of the conductors that connect a component, passing through terminal boards and connectors. It is recommended that this function be used only with a completed electric diagram. Loop Diagram draws graphic summary tables of the connections, complete with the passage of the conductors over the terminal boards and support connectors. The graphic document produced by this function is very useful for wiring and fundamental for finding faults, as it provides complete connections to pins, cable type and functions associated with the components. To process the multisheets selected from the list, press Scan multisheets. Scanning generates the Loop_Diagram.mdb file in the job order directory. Use Backup enables fast access to previously processed data without re-scanning. Scanning ends by displaying the panel list and the list of components (in alphabetical sequence) contained in each panel. Summary: (see Sect. 3.1). From this position, select all components to represent in the Loop Diagram. From this position, select all components to represent in the Loop Diagram. The program starts to draw the data tables from the current sheet. If the current (or destination) sheet is occupied (Status: contains entities), the function asks the user to continue or to enter a new page number. Enable “Clear current sheet” to delete all entities contained before drawing. Confirmation is requested for each successive sheet. When several sheets are needed to complete the Loop Diagram graphics, the function inserts the sheet returns automatically. Inconsistencies relating to connections, overlapping lines and incorrect symbols are detected by the “Program check” (Sp_Verif) command. WARNING: It is advisable to process diagrams produced with "Serial and Parallel" type connections. On drawings produced with standard connections, the result is considered less attainable. To modify connections use the commands “Connection” and “Automatic Connection” (see Sect. 4.6). 5 Wire numbering • 177 The following is an example of a loop diagram, produced for motor M1: This represents the connection of the 4 motor-M1 conductors belonging to the panel =BM; with terminal board XM1 =BM, the connection continues via cable C2 to the terminal board XG =QG (MAIN PANEL); finally, at the output from the second terminal board, it shows the connection to the thermal protection FR1 (via 3 conductors) and ground. Upstream of the connection to thermal protection FR1, the conductor wire number changes, so the graphics end at the fourth step of the connection. Data relating to the type and color of the conductor are also entered: data relating to single-pole conductors are defined during Wire Numbering. Cable data are defined by the commands “20.2 Lay cables” or “20.5 Cable processing” in the cable module. The graphic parameters for designing these tables are configured in the settings “Loop Diagram” command (see Sect. 4.2). Cable module is an OPTIONAL program. Loop Diagram does not consider cables processed using the standard function in the command “11.1 Cables” (serial). 178 • Spac Automazione 2011 Configuration Each symbols library (IEC, CEI, VDE, etc.) has a “Pref” used as a base from which to generate a match for each symbol in the library with a block for the Loop Diagram. In folder Librerie\LoopDiagram you can find all symbols you need for this configuration, generic block included. Prefix LD_ for symbols name is compulsory and is used to distinguish block type. Certain symbols used to draw the loop diagram are standard, others are configurable; anyway the name specified in this table must be kept. Symbol Description LD_Neutral Neutral symbol. This is used when there is no matching in Pref, or when you choose not to use this configuration. The block provides a rectangular box in which to insert the same symbol used for the appropriately re-scaled electric diagram. LD_Terminal_streep Symbol for terminal boards. LD_Connector Symbol for plugs and connectors. LD_PLC_Input Symbol for PLC input bit. LD_PLC_Output Symbol for PLC output bit. LD_SIGN_0 Symbol for Start return. LD_SIGN_1 Symbol for Destination return. LD_MORS Symbol used for drawing connections that pass through a terminal board or a connector. The NumI, NumO and NumM are indicated. LD_PIN-DX Symbol used for drawing connections and to indicate the wire number and pin on the Destination unit. LD_PIN-SX Symbol used for drawing connections and to indicate the wire number and pin on the Start unit. LD_Scollegato Symbol used to indicate an irresolvable connection (wire disconnected or not connected to any parent, element, child or PLC bit symbol). LD_Wire Symbol used to draw connections; contains data relating to the diameter and color of the conductor. LD_Cable Symbol used to draw connections; contains the name of the cable and the formation and color (or identifier) of the conductor. “Symbol Configuration” (see Sect. 4.2). In previous program versions, each new configuration generated a file with extension LPD; you can recover customizations using the import command of archive files. WARNING: Attributes contained in the standard symbols must also be kept as such following any graphic customization. Deleting or changing these attributes impairs Loop Diagram operation. 5 Wire numbering • 179 5.10 Data indications Pop-menu > Product name > Wires Utility This is used to insert wire features indications in the diagram, such as manufacturer, type description, poles etc…. These information are usually stored inside wires during numbering with command ”5.1 Number wires“ and may be changed with specific command “5.7 Ddattef wires”. A selection of one wire (or more, with a “fence”) is required. Select a Connection or fence / Enter for options : Data set with “5.1 Number wires” Before proceeding with first Selection you’ve better to check Settings (from Options menu activated pressing Enter), in order to configure graphically the indication with desired features (colors and list of information). Clicking in the free space let you automatically activate the selection of one or more lines using a “fence”. Data assigned during wire numbering are automatically retrieved from selected wires, and indications are built depending on current configuration (from Options menu). In case you Renumbering wires with indications, an execution of Update data may be necessary to transfer modifications on cable features to indications. Example of “fence” selection In Options menu you can find the following commands: Selection A selection of one wire (or more, with a “fence”) is required. Settings This is used to set data (fields) to show and configure indications graphically (text style, color, etc.). Pressing Default current configuration is stored “locally” (see Sect. 4.2) for future use. If you confirm the operation without pressing Default, the configuration is used only once. Update data This is used to update indication information, in case after wire re-numbering some cable features has changed. Update graphics This is used to update indication graphics; new settings are applied to selected objects only. See “11.4 Cable information”. Use this command when strictly necessary only, because “Wire Numbering” ignores indications data during possible numeration updates. 180 • Spac Automazione 2011 6 Terminals and Connectors 6.1 Insert terminals Pop-menu > Product name The insertion of terminals in an electrical diagram is normally carried out after the wires have been numbered because the terminal takes on the numbers assigned to the wires, except under exceptional circumstances (see “Wire and Terminal numbers“ Sect. 4.2). The command allows the terminals to be inserted either one by one or simultaneously (using several wires) in the fence or box modes. All lines drawn on the diagram are considered wires and can therefore be used to insert a “Terminal symbol”, with the following exceptions: • Non-orthogonal lines, Polylines and Multilines. • Ignored lines, i.e. those whose color indicates that they need not be processed (see Sect. 4.2 “Color management“). The following are considered exceptional operational circumstances: • Unnumbered lines. All terminal data can be selected and entered from the dialogue box: The wire to be terminated is requested on confirmation of the settings. Default settings for the current insertion operation can be changed locally only by clicking on Settings (See 4.2). 6 Terminals and Connectors • 181 If the terminal is attached to wires that have already been numbered, the terminal always takes on the values of the wires. If the terminal is attached to wires that have not been numbered, the terminal data (NumI and NumO) is passed onto the wire (NumO is calculated according to the Increment configuration). The input and output wire numbers (NumI and NumO) are only taken into consideration when the wire is unnumbered and takes on the terminal number automatically. However, the terminal number NumM is always used and increments automatically every time a terminal is inserted: The terminal number (*) is assigned to the wire (Wire not numbered) The terminal number (*) is taken from the wire (Wire already numbered) (*) = NumI and NumO Panel Select the panel to which the terminals are to be added from the pull-down list. New panels can be inserted by clicking on New or alternatively by choosing the appropriate command (see Sect. 4.3). Terminal Block All terminal blocks contained in the selected panel are shown. Terminal blocks can be added by clicking on New and then entering an identifier (max 8 characters) and optionally a long description (max 50 characters) for each. Normal or multiple terminals can be specified during the process of creating a new terminal block. NumM The Terminal number increments automatically after each insertion and can be used to sort the terminals within the terminal block (or to identify double terminals). The “Request NumM” option can be used to specify a value each time. The “6.6 NumM” command re-sequences these as necessary. NumI This is an Input wire number: It is used only when a terminal is inserted on an unnumbered wire. NumO This is an Output wire number: It is used only when a terminal is inserted on an unnumbered wire. The output number is always calculated in relation to the input number. The two are the same if the related variable has been set in “Settings”; otherwise NumO is increased by the preset increment value. NumM Request Each time a terminal is inserted the following is requested: NumM value <1>: This setting has no effect for multiple terminals. Local Prefixes or Suffixes This value is used when terminals need to be inserted with temporary (local) prefixes or suffixes. Only one prefix for all wires can be specified. The following example starts from NumI no. 1: Single prefix More than one prefix can be specified by entering a space-separated list of prefixes. The following example starts from NumI = 1: Prefixes separated by spaces 182 • Spac Automazione 2011 Terminals can be inserted after having chosen the terminal type, panel and terminal block. It is possible to select one wire at a time, or to click anywhere near but not on a wire to automatically activate selection in fence mode. Selection of wires in fence mode More than one fence can be created before confirming. The point at which the fence intersects the wire becomes the terminal insertion position. Terminal Box This option is used to draw a box enclosing all elements to be associated with a panel other than the current one. All wires connected to elements contained in the box are terminated. The panel values of the components inside the box are changed automatically. Two points must be selected to create the box (as shown). When a terminal is inserted on a numbered wire using Box, it always takes on the wire number. The configuration settings specific to Box are used for graphic element creation (see Sect. 4.2). 1st and 2nd point for the construction of the Box A box is usually used to highlight components on keypads, pulpits, machines, external panels, etc. This option is not active for multiple terminals. WARNING: Box Terminals cannot create empty boxes. 6 Terminals and Connectors • 183 Multiple terminals Multiple terminals are terminals placed in layers. In practice, the same connections need to be made with one multiple terminal as with two or more normal terminals. These are often used where space is limited or other specific conditions. The program handles multiple terminal graphics by dividing them into individual terminals. In practice, each layer (level) of the multiple terminal is drawn on the diagram as if it were a normal terminal. In order to work out which terminals belong to the same multiple terminal they are automatically given the same NumM value (terminal number). This example shows a 2-layer (level) terminal. Note that this double terminal has the same NumM value. Once the terminal types, panel and terminal block have been chosen, the terminals can be inserted. Wires can be selected one at a time, or automatically in fence mode by clicking anywhere near but not on a wire. The program will request that a level be specified for each terminal. Once all levels of a multiple terminal have been used, the program will prompt for a new terminal with the next NumM value. There are 3 ways of selecting both the NumM and level: Consecutive values Traditionally (by clicking on OK from the Terminal Insertion box), the function suggests the level value and NumM that is sequential to the previously used value. The example on the left shows the last terminal inserted (NumM=1 Level=1), 1/2 indicates that 1 level out of the 2 available has already been used. The program therefore suggests NumM=1 (as seen in the title of the dialog box in the figure on the right) and Level=2. When New is clicked (in the figure on the right) the program suggests NumM=2 (or the next value to that previously seen in the title of the figure on the right) and Level=1, leaving NumM=1 Level=2 still available. Uses available values The list of multiple terminals shows that some still have levels available. 1/2 means that there is 1 level available. After clicking on New the program proposes the NumM next value and Level=1. 184 • Spac Automazione 2011 New Terminal A new terminal is created using the NumM value that follows the last used. The calculated value is shown in the NumM box: To create a new terminal with a number that is not sequential to the last one used, the desired value must be entered manually into the NumM box. The list of available levels refers only to the current terminal block. The list updates automatically when a different terminal block is selected. The Terminal File needs rebuilding whenever level terminals (part of a multiple terminal) are deleted from the drawing so that they reappear on the list of available levels (see Sect. 6.7). Use “Edit connector” function from the Terminal Block and Connectors Management menu to change both technical data and commercial characteristics (see Sect. 6.3). WARNING: The multiple terminal is considered in general as connection passing; the not passing multiple terminals belong to the category of terminals for matrix patching (matrix patching and distributor). Creation of mixed terminal blocks (containing both normal and multiple terminals) is allowed. Terminal for Matrix Patching The equi-potential matrix patching terminals are multiple terminals with not passing connection. The insertion of these terminals in the drawing is similar to that described in section Multiple terminals. While in Multiple Terminals it is possible to insert the levels on wires with different numbers, for Matrix Patching Terminals it is possible to insert the levels only on wires or power lines with the same number. Example of an application as Matrix Patching Terminal : 4-Levels Multiple Terminal (passing Example of an application as Distributor Terminal : 4-Levels Equi-potential Terminal (not passing) 6 Terminals and Connectors • 185 6.2 Insert connectors Pop-menu > Product name This command draws plugs and connectors on the wires of an electric diagram. It operates generally as described above for the insertion of terminals. All data relating to the connector can be selected or entered from the dialogue window below. Once the data has been confirmed, the wire on which to insert the connector must be selected. If the plug/connector is attached to wires that have already been numbered the “Plug symbol” (or connector) always takes on the value of the wire. If the plug/connector is attached to wires that have not been numbered the data NumI and NumO are passed to the wire (NumO is calculated according to the Increment configuration). Depending on selected Panel, all existing connectors can be viewed within the selected panel. A long description can be entered (max. 8 characters) for each new connector reference. At this stage, the connector type configuration cannot be changed. Selecting characteristics (manufacturer, type, etc.) is enabled only for new connectors. The list of available connectors and their respective specifications can be changed in “4.2 Settings”. Panel, Local prefixes, NumI and NumO have the same functions as described above for terminals. Symbols can be inserted after having chosen the connector type, panel and reference. It is possible to select one wire at a time, or to click anywhere near but not on a wire to automatically activate selection in fence mode. 186 • Spac Automazione 2011 Example of 6-pole connector, having pins 1, 2, 3, 4, 5, 6 and PE: The first fence intersects the three lines above the inserted block: 3 connector pins therefore link up as required, pins marked → N ← are already connected, only those that remain free can be selected. NOTE: The pin value is written inside the NumM attribute, this value is an attribute that is always visible in symbols. The second fence intersects the three lines below the inserted block: The Associate Pin dialogue box appears, where pins A, B and C are marked → N ← because they are connected. Those that remain free can be selected. Insertion of 6-pole connector using 2 fence method NOTE: in order to rotate the connector symbol simply click on the image before creating the second fence. This allows the selection of a different connector symbol from those available. When the poles of a connector are deleted from the drawing, the Terminal File must be rebuilt so that they reappear as available in the Associate Pin window (see Sect. 6.7). Modular Connectors The management of the modular or composable connectors is enabled on the settings related to the “Wire and Terminal numbers” (see par. 4.2 “Options”). This option consents the activation of the recognition of a character (according to your choice) in the connector's name, then it is possible to know if they are independent or modular connectors; the character works as a separator, that is ../1. ../2 etc.. Example with the separator character “/” : If we design 3 connectors with the names indicated in the figure, the program will recognize them as modular. They will be managed as a unique connector during the design and edit functions (see par. 6.3 “Edit connector”). Use the “Edit connector” function from the Terminal Block and Connectors Management menu to change both technical data and commercial characteristics (see Sect. 6.3). 6 Terminals and Connectors • 187 6.3 Terminals and connectors Pop-menu > Product name This command brings up the list of all the terminal blocks and connectors that have been drawn. Its content can be viewed for each terminal (or connector) in order to make changes. Tables and drawings can then be made. Processing affects all components of multisheets selected in the list. You can preview the content of a multisheet by pressing “Preview”. If the contents or the sequence in the terminal block lists are changed (through “Edit terminal block”), they are saved and entered into the next scan. Clicking Output on Drawing creates the terminals block drawing. Summary: (see Sect. 3.1). Processed terminals are sorted according to a series of parameters: Diameter The diameter of the terminal in mm. This is the most important criterion. In practice, all terminals with the same diameter are grouped together. Subsequent ordering within each group depends on other criteria. This parameter has no effect on sorting connectors because it is not associated with them. Sorting By default, terminals are sorted according to their input wire number (NumI). Sorting by NumM (terminal number) is only possible when the information has been entered correctly during terminal insertion. Sorting according to NumI, NumM, etc. only works when the diameter variable has been entered as “not applicable”. Sorting according to use is only feasible when the necessary data has been entered for all terminals on the drawing (see Sect. 6.4). Click on the Sort by use button under “Edit terminal block”. Type If Logical is selected, priority in the list is given to characters, numbers and finally numbers associated with characters. If Alphabetical is selected, priority in the list is given to numbers, then numbers associated to characters and finally characters (according to ASCII character order). The ascending and descending sequence options work on both numbers and letters. 188 • Spac Automazione 2011 Processing the multisheets creates the list of drawn terminal blocks and connectors. List of Terminal Blocks and Connectors. Edit Permits change of terminal block or connector data, changes must be transferred to the drawing by clicking on Update. It permits making changes to sort parameters and it allows moving terminal (but not connector) positions on the terminal block freely or sorting according to Use. It also permits terminal block customization with accessories - end brackets, terminal boards, separators, etc. If saved changes are not transferred to the drawing by clicking on Update, a list of “Not update Terminal blocks and Connectors” is presented at the next scan. See “Edit terminal block” and “Edit connectors”. The example figure shows how to recover changes to terminal blocks XM2 and XM3 (not updated on the design). The data will be lost for the remaining terminal blocks (and connectors), which were previously changed using Edit. Use the “Ctrl” key keyboard to make selections. on the multiple List of Saved but not Updated Terminal blocks. Drawings, Tables and exported CSV Files for all the terminal blocks and connectors on the list can be produced immediately. Output in tabular form is normally used for connectors while graphics are preferable for terminals as they include jumpers. 6 Terminals and Connectors • 189 Terminal block drawing This option draws terminals according to the parameters entered in “Settings” under the “Terminal and Connectors Database” or under “Terminal block” (see Sect. 4.2). Clicking Output on Drawing, after selecting one or more terminals from the list, creates the terminals (provided graphics are configured). This displays only the selected data. Edit allows the selection of the desired graphic for each terminal. After confirmation, select the sheet to be drawn on. If the selected sheet is already in use, the message Status: Contains entity is displayed and the following sheet is suggested. Terminal block drawn with AB2-50 return block Multiple terminals, drawn using return block MM-2LIV See “Edit terminal block”. Terminals insertion points are suggested according to the coordinates entered at configuration. It is necessary first to check that the variable CAD Attreq is set to 1. Usage information for the assigned block (if available) has four elements: Panel, Reference, Function1 and Function 2 (see “6.4 Usage“). You can have “Terminal usage drawings“, too. The “-“ (hyphen) character is inserted automatically between data in the usage description to simplify reading. Only some return blocks have this attribute visible (R_Utenza). Terminal block with return blocks NO2-50 and PE2-50 with Usage visible (complete) Output in drawing form is normally used only for terminal blocks. Output in tabular form is advised for connectors. 190 • Spac Automazione 2011 Terminal block table This option draws up tables of terminal blocks. Tables for data entered in output fields (parametric form) can be drawn up after selecting a single terminal block from the list, and then clicking Output on Table. Each piece of data (Tag) contained in Available fields can be put onto the Output fields list by clicking on Add. Each header on the list forms one column of the table. Each Tag has two variables, width and header, which can be altered by clicking on Change. Number of Lines This value sets the maximum number of lines a table section can contain and thus divides the table into parts. This is useful where a new insertion point is required or when it is desirable to continue on the next sheet. Text Height This is the height of the text in the table. This parameter affects the height of each line and therefore the height of the entire table. Header Height This is the height of the column headings. This parameter affects the height of the whole table. Table Width This is the total of all the output field widths expressed in millimeters. This sum must not exceed the value in Sheet Width less the left and right margin widths. Table Height The maximum height of the table is calculated according to the established maximum number of lines, text height and header height. This value must not exceed the value in Sheet Height less the top and bottom margin heights. Standard This is the basic configuration of the output fields (where applicable). 6 Terminals and Connectors • 191 The current settings can be stored in local mode (see Sect. 4.2) for subsequent use by clicking on Default. If the settings are confirmed without clicking on Default they are regarded as a one-off. The function requests: Select table insertion point: The settings in the previous illustration give the following result: Example of Terminal Block Table A maximum width of 100mm has been selected in order that the table will have the same width as the terminal block drawing using the symbol TabMor1 (default). The settings for setting-up the table include the following options: Insertion Point Request Where the table requires more than one sheet, the table insertion point can be changed on subsequent sheets. Line spacing (x2) The space taken up by each line is calculated in proportion to the settings for text height. This parameter can be doubled so that two lines of text can be entered. This is particularly useful where a translation needs to be inserted. Sheet + Character Where the table requires more than one sheet it can be continued on consecutively numbered sheets (new or otherwise) or, alternatively, intermediate sheets can be generated (e.g. 1, 1A, 1B, etc.). A maximum width of 100mm has been selected so that the table will have the same width as the Terminal Drawing using the symbol Tab-Mor1 (default). Example of Multiple Terminal Table Table output does not follow the jumper drawing. 192 • Spac Automazione 2011 Terminal usage drawings Choose Usage Drawing, press Output, and after you select one terminal block from the list (inactive for multiple terminals and connectors) the terminal block is generated with graphics and data of its usages (using the same configuration of “Terminal block drawing“). In order to use “Terminal Block Drawing” correctly, terminals are expected ordered on the Usage content: it’s necessary to execute “Edit terminal block” and press button “Sort by Usage”. Graphically the terminal block is drawn horizontally always, but it’s possible to configure the size of the box containing usage symbol and data (see “Terminal block” Sect. 4.2). After pressing Ok, you are asked for the sheet where the drawing is going to be inserted. In case the selected sheet were not empty, you are warned with the message “Status: Containing entity” and the following page is suggested. Example of Usage linked to the terminal block symbol See “6.4 Usage“ 6 Terminals and Connectors • 193 Connector drawing This option draws connectors following the parameters set in Settings under the heading “Terminal and Connectors Database” (see Sect. 4.2). Connectors are created (with graphic elements as configured) showing only the requested data by first selecting one or more plugs form the list and then clicking Output on Drawing. Edit can be used to select the desired graphic for each connector. Connectors, drawn using return block TAB-CONN Once the data has been confirmed, select which sheet to draw on. If the sheet selected is already in use, the Status: Contains entity message is displayed and the following sheet is suggested. See “Edit connectors”. Connector table This option draws up data tables for connectors. Tables are drawn up using the data categories entered in the output fields list (parametric mode) by selecting only one connector from the list and then clicking Output on Table. Current settings are stored in local mode (see Sect. 4.2) for subsequent use by clicking on Default. If the settings are confirmed without clicking on Default they are regarded as a single application. The function requests: Select table insertion point: The default configuration gives the following result: The connector is described according to its NumM (Pin) and NumI data, which are chosen from the available fields. A maximum width of 50mm has been selected in order to minimize the space taken up by the table. Example of Connector table 194 • Spac Automazione 2011 Two connector tables take up the same space as a terminal table. RailDesigner 2 This Output function interfaces with Weidmüller software RailDesigner 2 . Data export is restricted to terminal blocks associated to Weidmüller material codes, generating a specific file (Ascii) compatible to the interface. Product overview: RailDesigner 2 lets you virtually build a terminal block, detailed and with photorealistic preview; cross connections, references, terminal plates, separators, screw terminals, empty spaces, wired jumpers, etc. are available both in graphical representation and material list (BOM or assembling kit). Function "Assembling warnings" highlights assembling errors. All chosen terminal blocks are shown in a detailed ‘navigator’. Terminal blocks can be ordered directly from RailDesigner, by e-mail or disk file. A tutorial is enclosed to the program, for a quick and easy training. RailDesigner 2 is optional software not enclosed to program package. RailDesigner is distributed directly from Weidmüller, you can find additional information or download it from web site www.weidmuller.it . CSV file An ASCII file named Terminal-List.Csv can be created by clicking Output on CSV File to export terminal block and connector data. Standard gives the basic output field configuration (where applicable). Each field header included in the “Available fields” list is a terminal or connector attribute. Each attribute moved to the Fields list by clicking on Add generates a column in the file and appears in the order listed. Default stores customized output field data for subsequent use. See ”14.8 Edit CSV”. Output fields can be customized in order to have a file with all desired information. 6 Terminals and Connectors • 195 Terminal block List Allows you to draw the list of Terminal Boards and Plugs/Connectors processed in table form or extrapolate into CSV. List (Table) Option allowing you to draw the list (Terminal Boards and Plugs/Connectors) in table form. Press the Output of Table List and you draw the table showing the data configured as output fields (parametric mode). Press Default and the current configuration is stored “locally” (see Sect. 4.2) for subsequent use. If you confirm without pressing Default the configuration is considered temporary and used just once. The function requires: Select the table insert point : The default configuration corresponds to the following graphic result: Maximum default width is 200mm. Example of Terminals and Plugs table List List (Csv File) Press Output of File CSV List and you generate an ASCII file called Terminal-Table.Csv to extract the terminal and connector list. Standard represents the basic configuration for the output fields (where set). By pressing Add all data present in the “Available fields” is taken to “Fields sorted by output” and represents a file column. Default stores Customization of the output fields for subsequent use. Activating the Csv file Preview stores and opens it automatically (in preview) for immediate use. Preview of CSV file See ”14.8 Edit CSV”. You can parameterize file features by modifying the field write mode. 196 • Spac Automazione 2011 Edit terminal block The Edit terminal block function changes terminal block specifications. It provides the means to change terminal sequence duplicate and insert terminals, to change terminal make or model, the graphics for terminal blocks with return blocks, and usage or other annotations and insert accessories - end brackets, terminal boards, separators, etc. The sequence that terminals are shown in on the “Connections” list can be easily customized by Drag & Drop: select the terminals to be moved and drag it to the desired position. Accessories can be added by choosing them from an “Accessories” file and specifying their position on the terminal block, and then by clicking on the Add button (in the “Materials” list”). You can duplicate a terminal also with “Copy” & “Paste”. The new terminal automatically occupies the first value of NumM available. Visualization of the terminals with more connections (in input or output) or multi levels (multiple terminals). With double clic is possible to visualize the connections in the detail. These changes remain even after a new scan. 6 Terminals and Connectors • 197 Change terminal In the “Connections” list: NumM To modify the NumM value (terminal number) it is enough to make a double click on the field of interest. To identify the level terminals that belong to the same multiple terminal, the same NumM value is associated automatically (terminal number). The changes on the NumM value are extended to all the terminal levels. Levels Useful to modify or to invert the position of the levels on the multiple terminals. It is required to select first the terminal line to be changed; then make double click on the “Levels” list and select the new level to be occupied. To use the feature “Interchange levels”, the two levels to be modified must be selected beforehand. Usage The Usage is an information that could be optionally associated to a terminal to represent its destination (see “6.4 “). The Usage (when used) is located in the Output Notes field. To modify its value, it is enough to make a double click on the field of interest. Input notes (ID field at left) Output notes (ID field at right) Available to the user. The content can be viewed on the terminal block depending on the visibility of the R_Note-MO attributes on the return block. Available to the user. The content can be viewed on the terminal block depending on the visibility of the R_Note-MO attributes for the return block. In the “Materials” list: On “Materials” it is possible to sort the terminals an to edit them easily according to the column selected. Manufacturer and model They are visible by selecting the “Materials” window, to assign a new brand/model to the terminal (or all the terminals), it is required to press the “Modify” button (or “Modify Elements” using the right button of the mouse). (See “Add terminal”) Delete Terminal (Add) To delete a terminal duplicated or an accessory added, you can use the right button of the mouse pressing the command Delete. It is not possible to delete terminals present in reality on the scheme. Return Block This is the symbol used for the representation in the terminal block. The entire terminal block could be designed using the same graphical symbol, or changing it according to the user requirements. The value by default is the one set during the configuration (see section 4.2). It is possible to modify the return block for all the terminals selected by pressing “Change Return Blk”. WARNING : The system to count the “Repetitions” according to the attribute “Rip” (present on the terminal) is no longer used. Save stores all operations and Update transfers the new values to the symbols in the drawing and replaces the old values. 198 • Spac Automazione 2011 Add terminal To add a new terminal (or accessory) in the terminal block it is required to select the desired code from the list “Terminals Archive” or “Accessori” and press the button “…” (browse). After select the article, we can define the position to be used in the terminal block. If no position is chosen, then the terminal is located at the end of the terminal block (on the last position). After select the article, the position and the quantity, we can press the “Insert” button. It is consented to duplicate a terminal (or several terminals) even by using “Copy” & “Paste”. The new terminal will be identified with the first NumM available. The terminals and accessories with an “Add” indication are not drawn in the terminal block. They are valid only for the graphical outputs of the terminal block or table and for the creation of the Bill of Materials. Terminal repositioning To change the position of a terminal (or a group of terminals) we can use a Drag&Drop approach to select the terminal to be moved and place it on the desired position. Repositioning a terminals The same operation can be made using the right button of the mouse: Executing a Cut of the terminal (or terminals) in departure, and Paste on the terminal that represents the arrival position. To align the electrical scheme after the free displacements made, we can sort the NumM according to the new list with “Re-number NumM”; then by clicking on Update you can apply the changes to the scheme. 6 Terminals and Connectors • 199 Sort terminals Sorting parameters can be set from the opening dialogue window “6.3 Terminals and connectors” for those parameters that are common to all the terminal blocks and connectors to be sorted. The Sort option allows setting the precise manner for each individual terminal block. From “Materials” window, it is possible to organize the terminals to edit them easily according to the column selected. The diameter variable has the highest priority: Not used Sorting is not carried out by the diameter parameter. Either NumI, NumM or NumO has absolute priority when “ Diameter ” is lacking. Descending Terminals are sorted from the highest diameter value to the lowest. Terminals are sorted secondarily according to NumI, NumM or NumO within each group having the same diameter. Ascending Terminals are sorted from the lowest diameter value to the highest. Terminals are sorted secondarily according to NumI, NumM or NumO within each group having the same diameter. Logical sorts the list first by characters, second by numbers, and then by numbers associated with characters. Alphabetical orders the list first by numbers, second by numbers associated with characters, and then characters (ASCII character set order); Ascending and Descending have effect on both characters and numerical values. If the option “Keep the additional Terminals and the Accessories” is disabled, all the terminals and accessories inserted manually on the list are removed (in “Edit terminal block” are visualized with “Add” button). Sort by usage The terminal block is sorted alphabetically according to the contents of “6.4 Usage“. This order is essential to have the “Terminal usage drawings“. 200 • Spac Automazione 2011 Renumber NumM Clicking on this button, the values of NumM found in the “Terminal block Make-up” list are reassigned starting from NumM=1 for the first terminal on the list, increasing to the last terminal. It is used after “free” repositioning using Drag&Drop carried out on a terminal block, to reflect the new order in the assignment of NumM. Using Update to transfer the changes in NumM to the diagram is the only way to align the drawing with the “free” repositioning effected while “Edit terminal block”. NumM ordered according to position The figure shows the effect of “Renumber NumM”. Note that terminal position (NumI and NumO) has remained fixed, while NumM takes on new values. 6 Terminals and Connectors • 201 Edit connectors The Edit function consents the execution of changes to the connector or plug. It is the instrument to change the connector type, brand and model, to change the pin sequence, the composition, the existing graphics and output, the Usage and notes. It also consents the insertion of the accessories of the contacts to be crimped (additional), covers, etc. NOTE: NumM represents the number of each pin of the connector. The addition of codes or accessories is done with the “Insert” button (“Materials” window), only after the selection of the new article from the “Wires’ Terminals” or “Accessories” archives. Indicates the pins that have several connections (in input or output): Making a double click it is possible to visualize the connections in detail. The changes are maintained even after a new scanning. 202 • Spac Automazione 2011 Modify Connector From the “Connections” window: NumM \ Pin To modify the value of NumM (pin number), it is enough to make a double click on the field of interest. In case a used pin is selected, the values are interchanged. To use the function “Change Pin”, it is required to select first the two data to invert. NumM = N° pin Usage The Usage is an information that could be optionally associated to a pin to represent the destination (see “6.4 ”). The Usage (when used) is located in the Output Notes field. To modify its value, it is enough to make a double click on the field of interest . Input Notes (ID field at left) Output Notes (ID field at right) Available for the user. The content is visible on the design according to the visibility state of the attributes R_Note-MO on the return block Available for the user. The content is visible on the design according to the visibility state of the attributes R_Note-VA on the return block From “Materials” window: On “Materials” it is possible to sort the terminals an to edit them easily according to the column selected. Manufacturer and Model Data visible only by selecting the “Materials” window, to assign a new brand/model to the connector by pressing the “Modify” button (or the “Modify Elements” button using the right button of the mouse). (See “Insert Accessories”) Selecting a new model, the conversion and the pin substitution is executed automatically: it is important to select a connector compatible. W = Wrong Pin association Delete Elements (Add) A model with a lower pin number or with incompatible data is visualized in red color (W) (see “Poles Management”). The problem is solved by selecting a new compatible model. To delete an accessory added, you can use the right button of the mouse pressing the command Delete. It is not possible to delete terminals present in reality on the scheme Return Block It is the symbol used for the graphical representation. The default value is the one set during the configuration (see section 4.2). With Save all the operations are memorized and with Update they are introduced on the design on the symbols that substitutes the obsolete values. 6 Terminals and Connectors • 203 Insert Accessories To insert an Accessory it is required to select the desired code from the list “Accessori” pressing the “…”(Browse) button. After the article selection, you can press the “Insert” button. The selected article is added at the bottom of the connector (in the last position); you can recognize it because it is associated to the “Accessory” category (last column on the right). To add one or more wires’ termininals it is required to select beforehand the pins to be used, then the desired code must be selected from the “Wires’ Terminals Archive” pressing the “…” (Browse) button. You can press “Insert” button after the article selection. The article selected will be inserted on the row of the selected pins; it could be recognized easily because it is associated to the “Contact” (last column on the right). Example of a M+F Connector, the contacts to be crimped are inserted with the counterpart. The insertion of contact to be crimped on the complete M+F Connectors (M+F type), implies the automatic insertion of the counterpart, on Male or Female Connectors (M or F type) only the selected code is inserted. Press the “Delete” button to remove the accessories or wires’ termininals added. The accessories and contacts with an “Add” indication are not design in reality. They are valid only for the graphical outputs of the terminal blocks / tables and for the count in the Bill of Materials. 204 • Spac Automazione 2011 Update terminals “Edit terminal block” and “Edit connector” allow you to change data lists. These changes can be stored by clicking on Save and recalled by clicking on Use Saved. When carrying out a fresh scan, i.e. extracting data again from the drawing, changed values will be different from the new values extracted. It is essential to Update before extracting new data to avoid this inconsistency, as a result all data stored using Save is the same as that present on the diagram symbols. If changes are not transferred to the drawing using Update, the “Saved but not Updated Terminal block” list pops up at the successive scan. The figure illustrates how to recover changes (not updated on the drawing) for terminal blocks XG and XM3. The specifications for the remaining terminal blocks (and connectors) changed using Edit will be lost. List Terminal blocks and Connectors not updated. Use the “Ctrl” key on the keyboard to make multiple selections. Update replaces symbol attribute data. Any data changed manually will be lost. 6 Terminals and Connectors • 205 Rename This is used to change a terminal block name or a connector reference. To set the “new name” first select the new Panel value, then the terminal reference. Pressing “New” at left, command “4.3 Panel setting“ is run to create new Panel references, obviously not yet listed. Press “New” at right to specify the terminal block name to get. This command can be used to merge two different terminal blocks, too, renaming a terminal block with the same name of another existing one (having the same ‘parent’ Panel). This opportunity is not applicable to Plug and Connectors, due to restricted pin number. “Rename” applies to Terminal Blocks and Connectors only, all other components can be renamed using the specific function included in command “4.3 Panel setting“. Checks Some connectors (or terminals) may be marked with an asterisk during processing. This indicates an error. Error (*) at XC10 The most frequent source of error is a connector for which specifications are not in the “Terminal and Connectors Database” (see Sect. 4.2). The problem can be solved using the Edit connector function, associating a new make and model to the anomalous connector. It is essential to Update here to add the new data to the drawing. 206 • Spac Automazione 2011 6.4 Usage Pop-menu > Product name > Terminal and Connector Utility The Usage value can be assigned to the terminal to denote function or destination. In practice, this is the name of an element connected upstream or downstream from the terminal. Usage parameter is useful for sorting terminal blocks on the basis of terminals having the same usage, that is terminals for connecting to the same component. An example would be 3 terminals connected to a motor, which are always positioned consecutively in a terminal block independently of their NumI, NumO and NumM values. Usage is assigned automatically only after having se “Panel Hierarchy“ first, otherwise Usage must be assigned manually by selecting components. The figure illustrates automatic usage assignment to terminals for connecting to a motor (M1). The “direction” (upstream or downstream) usage values depend on the panel hierarchy settings. The applied hierarchy is defined so that the terminal blocks in panel =QG (Main Panel) receive =BM as usage, while the terminal blocks in =BM receive the elements contained in the same panel as usage. Automatic usage Hierarchy “Terminal usage drawings“ (see Sect. 6.3). The terminals in the example automatically take on the following usage values on the basis of the configured hierarchy: U1 Terminal block XG Terminal block XG is contained in panel =QG (Main Panel), which must receive usage from panel =BM according to the configured hierarchy. Usage direction is derived from downstream in this case, at the connection to =BM through terminal U1 (NumM = 1) on terminal block XM1. The usage annotation, [=BM!XM1§1], is derived from this information. Brackets [ … ] indicate that usage is by a terminal. Brackets ( … ) indicate that usage is a contact (child symbol). U1 Terminal blockXM1 Terminal block XM1 is housed in panel =BM, which must receive usage from elements of the same panel according to the configured hierarchy. Usage direction is derived from downstream in this case, at the connection to =BM, through pin U on motor M1. The usage annotation, =BM!M1§U], is derived from this information. The § character separates the reference from the connection pin; this example has no brackets [ … ], so the usage is a component. 6 Terminals and Connectors • 207 Panel Hierarchy Pop-menu > Product name > Terminal and Connector Utility Usage is assigned automatically only after panel hierarchy has been configured first. This control serves to establish priority between panels defining the “direction” (upstream or downstream) from which to derive usage values. Panels must be dragged (Drag&Drop) from the “Defined panel” list and dropped into position in the panel hierarchy window. Pushing “Delete” on the keyboard eliminates highlighted panels in the hierarchy. Assign usage Pop-menu > Product name > Terminal and Connector Utility This function assigns usage value to terminals either automatically or manually. Automatic This option assigns usage values to terminals automatically whenever “Panel Hierarchy“ has been configured first. Usage values are assigned for all selected multisheets by pressing Scan Multisheets. A specific message warns if any terminals have not been assigned a usage value or for other anomalous situations. In the attribute “Upstream Notes” of terminals and connectors are set data of the usage at the other end of the line (only in case the second one belongs to a Panel not included in its hierarchy). The list of terminals with no Usage is written in the file NotAssign-Usage.Csv. Manual This option assigns usage values to terminals manually. A choice is requested to be made between operating on all terminals on a page or only those that still do not have a usage value, after a choice has been made, the first terminal to be assigned a value on the list is highlighted: A destination element (or terminal) must be selected on the diagram and so on. The usage value is composed of symbols denoting the selected component’s (or terminal’s) name and panel and is reported by the attribute of the same name on each terminal. Check Usage not Assigned This is used to get the list of the sheets where command “Assign usage” can be run; for each sheet you can know the number of terminals without Usage. 208 • Spac Automazione 2011 Delete Usage Pop-menu > Product name > Terminal and Connector Utility This command (Disassociate Enabled Usage) removes information assigned to terminals through the command “Assign usage”. The command acts for terminals chosen, or by choice for all terminals present on the sheet, multisheet or entire job order. 6 Terminals and Connectors • 209 6.5 Ddattef terminals Pop-menu > Product name This is used to modify terminals data associated during its insertion in the drawing. It applies to terminals, connectors and plugs (see Sect. 6.1), avoiding using “Ddatte” command (wrong method). Selecting a terminal all data associated during its insertion are shown in the dialogue box; here you can change Panel, Terminal Block and material features. “NumI and NumO setting” is used to change the value of wire numbering variable “Input equal to or different from Output” (see Sect. 4.2), and in fact is equal to the command “6.7 NumI and NumO settings” but applied to selected terminal only. If the message Values do not coincide is displayed this is due to a discrepancy between wire and terminal numbers that you can solve using command “Ddattef “. Button “…” is used to modify the return block (symbol used to figure the terminal on the terminal block), choosing it from the ones in Terminal and Connectors Database. Manual modifications to field “Usage” must comply the syntax required for this string (see “6.4 Usage“). 5.7 Ddattef 210 • Spac Automazione 2011 6.6 NumM numbering Pop-menu > Product name > Terminal and Connector Utility This command sorts terminal NumM attribute values numerically. A different starting NumM can be set for each terminal block inserted using the Add command, while a scan is common to all. Horizontal and Vertical Scan are the search criteria for terminals yet to be numbered. In practice they are part of the same search system as that employed in the automatic numbering of wires and they are known as Scans A and B (see Sect. 5.2). This renumbering of NumM is a particularly useful function wherever stored sheets are in widespread use or where the drawing has been changed substantially and this value needs to be restored to consecutive sequence. NumI Number of terminal Input wire. NumO Number of terminal Output wire. NumM Terminal number The manual selection of terminals does not affect the scanning criteria. The new numbering does not affect connectors since NumM stands for Pin value in this case. NumM = NumI This configuration copies NumI value to NumM (for the same terminal). Both starting NumM and scanning sequence settings are irrelevant when working in this mode. It is no longer possible to use NumM as a sorting parameter for terminals in terminal blocks after this function is used. WARNING: If wires are renumbered after such an operation, NumM and NumI values may no longer coincide. 6 Terminals and Connectors • 211 6.7 NumI and NumO settings Pop-menu > Product name > Terminal and Connector Utility This command changes the Input same as or different from Output variable (see Sect. 4.2) contained in terminals or connectors already drawn on the diagram. It is used to define whether the wire entering the terminal does or does not have to keep the same number as on the output wire during a subsequent numbering of wires. Input equals Output All terminals (or connectors) selected from the diagram change their status to NumI=NumO. This is the most commonly used setting. The wire connected upstream from the terminal (NumI) keeps its value downstream (NumO). The wire need only be selected once in order to number the entire connection (see Sect. 5.1). Input different from All terminals (or connectors) selected from the diagram change their status to Output NumI different to NumO. This is when the wire connected upstream of the terminal (NumI) has a different value to the one downstream (NumO). The wires upstream and downstream from the terminal must be numbered. According to attributes The variable is set to zero. During the subsequent numbering of wires one of the above methods is used according on the actual contents of the terminal NumI and NumO attributes. The According to Attributes setting adapts the terminal function to any changes that may be made manually to the block using the Ddatte command. 6.8 Delete terminals Pop-menu > Product name > Utility Mors-Conn The command allows you to remove terminals and plugs/connectors on the whole sheet or on selected wires. Removal does not just mean deleting the terminal symbol, but acts by restoring wire numbering correctly. In the case in which wires with different numberings are connected (upstream or downstream of the terminal), the request for the wire number to be kept appears. Default means keeping the upstream number (Wire above) with deletion of those downstream (Wire below). This operation also updates the values on any wires connected to the wire losing its original value. 212 • Spac Automazione 2011 7 Cross-Referencing 7.1 Cross-referencing Pop-menu > Util Cross-reference automatically handles cross-references according to the position of the sheet and segment of components on the current multisheet or one chosen from within the job order. Parent and child symbols that have the same name are cross-referenced, as are return symbols between start and end points that have the same signal. Clicking Ok processes all selected multisheets. “Parent and Returns” is the most used Cross Reference option, because you process in the same time all available Parent and Return symbols. You can process a single component or return, too; in that case you have to select it on the drawing using command “Sel. >”. Choosing “Selection” among the available Cross options, you can limit the process to a group of components (and\or returns) chosen on the drawing (using button “Sel. >”); this is useful to test small modifications or updates. Summary: (see Sect. 3.1). Processing follows parameters configured in “Cross Reference” (see Sect. 4.2). “On-line Cross” let you process automatically contacts (or Child) information while they are inserted in the drawing. Moreover it asks the position to be used from the contact, according to the coil (or Parent) availability. This availability is defined from the symbol Registration reference symbol. Those symbols containing I or IGNORE in the TYPE attribute (this is for backwards compatibility) or included on the “14.7 Ignore symbols” list will be excluded from the cross-reference process. WARNING : Real-time cross-referencing” does not act on references to connections or power feeds. 7 Cross-Referencing • 213 Cross-referencing a Parent Parent symbol Components linked to other elements in the diagram are termed parent symbols. These include coils with contacts, switches and auxiliaries, pushbuttons and add-ons, etc. This option processes one or all parent symbols in the job order, highlighting the position of related child symbols. Parent blocks must contain certain attributes for the match to be successful (see Sect. 17.2): • The NOME attribute contains the Parent symbol reference. Child symbols must have the same name as the parent to which they are connected (this feature is case sensitive). • The CODE attribute is only essential for parent symbols that have no registration REGn attributes. In practice, the code contains the Reference block name (contained in the Librerie\Riferim\... directory) that must be assigned to the parent. The reference block contains REGn attributes for writing child element positions. Parent symbols that contain REGn attributes do not need the CODE, it is recommended nevertheless. Symbols have a default CODE value. For example REF1 for coils, REF2 or REF3 for switches, etc. • The OFFSET attribute is associated with the CODE attribute. It indicates the position of the Reference block on the drawing. The position is in relation to the insertion point of the parent symbol. If the OFFSET is @0, @-10,0 the reference block is inserted at coordinates X=0 Y=-10 in relation to the parent’s insertion point (@). 0 is the angle of rotation. • The PRES attribute is essential for the program to recognize the parent symbol and must contain M. • The REG attributes contain records of where Child symbols are positioned. REG is always followed by a number. Even numbered REG. values contain records of open and transfer contacts (children). Odd numbered REG values contain those of closed contacts. These attributes are incompatible with OFFSET values and render CODE values less important (for example, in relay coils with fixed reference). Child symbol Child symbols must also respect the presence of certain attributes (see Sect. 17.2): • The NOME attribute must include reference to the parent component to which it is to be associated. • The PRES attribute is for Child symbol, recognition by the program. The content of PRES can be altered to suit the block type: PRES Description PRES Description FA normally open contact FC normally closed contact FAP open power contact FCP closed power contact FT triple (power) contact FS transfer contact FL lamp FA2 twin normally open contacts FC2 twin normally closed contacts FAn N normally open contacts FCn N normally closed contacts FAP2 twin open power contacts FCP2 twin closed power contacts FAPn N open power contacts FCPn N closed power contacts F*_RE Delayed pick up F*_RD Delayed drop out F*_RED Del. Pick up/drop out • The REG attribute (without number) contains the position of the corresponding parent symbol. 214 • Spac Automazione 2011 Example Two parent symbols are shown in the example below (coils KA1 and KA2) and two child symbols (contacts KA2 and KA1) For the purposes of the example they are on sheet no.1 in segments 1 and 2: Attributes of parent symbols (Pres=M): KA1:Code=RIF1_44 Offset=@0,@-10,0 KA2:Code=12E Offset=@0,@-10,0 Attributes of child symbols: KA1: Pres=FA KA2: Pres=FC Situation in Fig. 1 before cross-referencing. The code is entered during the insertion of the symbol into the drawing, and can be changed at any time using the XS (Edit symbol) command. The default value is set in symbol configuration. Once the multisheet is scanned the general situation report is displayed: The report shows any errors or anomalies that cannot be edited or resolved in this work session. Record details of each component can be viewed as shown by clicking on parents under View, as seen in the figure: changes (editing) such as replacing the contactor or adding heads (where the coil cannot accept all the necessary contacts) can be carried out in this session. In practice, reference symbols are replaced. Situation during the processing. Update transfers (only valid) processed data to the drawing. Child symbols (contacts) receive the position (sheet and segment) of the related Parent while Ref1_44 and 12E (set in the Code) reference blocks are inserted next to parents (coils) as indicated by Offset. The reference block contains the sh.cat records of the child symbol positions. Error messages may be displayed during processing (see Sect. 7.3). This example has been carried out without Pin marking. Situation in Fig. 1 after cross-referencing. 7 Cross-Referencing • 215 Return Cross-Referencing Return signal Components used to handle wire returns and/or power feed between different diagram sheets are known as Return symbols. This option processes one or all return symbols in the job order, highlighting the position of start returns (indicating the destination sheet and segment) and their respective destination return (indicating start points). Matching is determined by certain attributes (see Sect. 17.2): • The SEGNALE (Signal) attribute indicates the name of the wire or power feed to which it is connected. Returns are created between start and destination signals having the same name. • The #LINEA (Branch) attribute is only completed where more than one return starts from the same wire or power feed, and therefore has the same name: The 1st return has Signal=R and Branch=(null) The 2nd return has Signal=R and Branch=1,2 then 3 for the third, and so on. • The PRES attribute is essential so that the program recognizes the Return symbol: Pres=P in the Start symbol and Pres=A in the Destination symbol. • The REG attribute contains the position (sheet and segment) cross-referenced with corresponding Returns. Example The figure shows two equivalent start signals (sheet 1) and the corresponding destination on sheets 2 and 3: Start Attributes (Pres=P) of Fig. 1: 1st. Signal = R Branch= (null) 2nd. Signal = R Branch = 1 Destination Attributes (Pres=A) of Fig. 2: 1st. Signal = R Branch = (empty) Destination Attributes (Pres=A) of Fig. 3: 2nd. Signal = R Branch = 1 Signal and branch values are entered during the insertion of symbols into the drawing. Situation in Fig. 1, 2 and 3 before cross. Once a multisheet has been scanned, a general situation report is displayed: The report shows any errors or anomalies that cannot be edited or resolved in this work session. Record details of each return can be viewed as shown by clicking on Returns under View. Situation during the cross-referencing process. 216 • Spac Automazione 2011 Update transfers (only valid) processed data to the drawing. Start symbols (contacts) are labeled with the position (sheet and segment) of the related destination and vice versa. Branch data is invisible on the drawing. The Ddatte command displays and allows changes to its value. Error messages may be displayed during processing (see Sect. 7.3). Situation in Fig. 1, 2 and 3 after cross. Parent and return cross-referencing This is the most popular cross-reference option. It simultaneously processes all parent symbols and all Returns as described above. Once a multisheet has been scanned, a general status report is displayed: The report shows the number of processed components along with the main detected errors. An ASCII file is created in the job order directory with the name CrossRef-R.txt by clicking on Output. The file contains the same information as seen. The options under View can be changed to display the details of each processed group. View Parents All processing relating to parent symbols is filtered. An ASCII file is created in the job order directory with the name CrossRef-M.csv by clicking on Output. The file contains the same information as seen. This option highlights details of errors that were not visible in the report. It is the only option that allows data change or correction. View Elements All processing relating to element symbols is filtered. An ASCII file is created in the job order directory with the name CrossRef-E.csv by clicking on Output. The file contains the same information as seen. View Returns All processing relating to Return symbols is filtered. An ASCII file is created in the job order directory with the name CrossRef-S.csv by clicking on Output. The file contains the same information as seen. 7 Cross-Referencing • 217 Editing Data can only be changed under View Parents. This is a useful function of edit that sorts out some errors that cross-reference detects during the processing of a job order, thus avoiding any graphical interference with the drawing. The Code present in the symbol KA2 has value 12E, which means that the parent component is big enough to host as large a number of child elements as the 12E reference allows. Note that 12E allows the component to host 1 NO (open) contact and 2 NC (closed) contacts, whereas 3 NC and 1 NO contacts are present on the drawing (there is one NC too many). View parents shows that the reference Warning has highlighted the error in KA2. The error detected is Max no. closed FC contacts exceeded. Clicking on Preview shows that there is only one NC contact too many. Only the closed contact that has caused the error is displayed In the Unassigned contacts box (see figure). Pressing Legend allows access to the abbreviations used for the various contacts. 218 • Spac Automazione 2011 There are two different ways of solving the problem: Substitute the contactor By clicking on Contactors (or Auxiliaries for switches, selector pushbuttons, etc.) a new Reference other than the 12E can be selected which can host the third closed contact: either 03E or 13E, etc. Once the new reference is confirmed, the error message is immediately deleted. Contactor and Auxiliary symbols are present in the two directories Librerie\Riferim\Cnt and \Riferim\Aus. If a contactor is replaced the type of material must also be replaced: this solution is only valid where the bill of materials has not yet been established (see Sect. 8.1). Add Head The added head allows the number of contacts to be increased without changing the 12E reference. A reference to add to 12E can be selected by clicking on Heads: for example 02T or 11T, etc. (more than one head can be added). Head symbols are present in the directory Librerie\Riferim\Tsa. Once the added reference is confirmed the error message is immediately deleted. Adding heads means that the type of material must also be updated (adding an article): this solution is only valid where the bill of materials has not yet been established (see Sect. 8.1). Heads can be removed by simply selecting a new contactor. These changes are stored temporarily (in the file named CrossRef-Data_Save.Crp) by clicking on Save and can be called up with the Use Saved. Error messages that appear during processing can be partly resolved using the edit function in View parents. For details see the section entitled Errors (see Sect. 7.3). 7 Cross-Referencing • 219 7.2 Pin reference This option processes parent, child and element symbols in the job order, highlighting the respective pin configurations described in the settings and transferring them to the symbols. Cross-references depend on certain PIN attributes (see Sect. 17.2). Cross-references with pin references make it easier for the final user to read electric diagrams during wiring and maintenance since connections are described in detail. Processing is controlled by settings configured in “Cross Reference” (see Sect. 4.2). Parent symbols (Pres=M) KA1 and KA2: Code KA1 = REF1_44 (NO Pin reference) Code KA2 = 12E (OK Pin reference) Element symbols HL1 and HL2: Code ignored (if present). Parent and element symbols in the figure need specific configuration for pin referencing. Pin attributes must be set for this to be possible. Child symbols without pin references assume the configuration of the related parent according to the code (the code indicates name of the Registration reference symbol). Cross-reference without pin reference. The registration reference symbol contains the pin reference to be transferred to the child symbols. Let us look more closely at the configuration of the various symbols in the example: Parents KA1 and KA2 The pair of attributes PinA1 and PinB1 is configured with values A1 and A2 as shown in the dialogue window. The configuration can be changed from the corresponding Prefix Archive (see “Symbol Configuration”). Exploded diagram of symbol This configuration refers only to the setting-up of Parent symbol, it does not affect Child symbols. Child KA1 and KA2 There is no child symbol configuration. The pair of attributes PinA1 and PinB1 is compiled according to the content of the Registration reference symbol (cross-reference) assigned by the code in the parent symbol. 220 • Spac Automazione 2011 Elements HL1 and HL2 Element symbol configuration is described in the same way as parent symbol configuration. This configuration can be changed as necessary at any time. Each symbol configuration. Ref. Reg. 12E Rif. Reg. RIF1_44 has only one The pin attributes that form part of this Configuration Code 12E: symbol have pre-assigned values. They PinB0=14 PinA0=13 therefore contain a default value PinB1=22 PinA1=21 assigned when the block was built. PinB3=32 PinA3=31 Registration references may not have Code REF1_44: pin attributes, or may have zero PinB0= PinA0= default values (empty Pin attributes as PinB1= PinA1= in Ref1_44). PinA3= Pin reference cannot be processed in PinB3= either case. “Pin” (see Sect. 4.2). Cross-referencing with pin references gives the following result: KA2 (Code 12E) is given the symbol ref. 12E containing the pin values. These values are transferred to the child symbols of the parent in question. KA1 has no pin reference as the reference symbol REF1_44 does not allow it (default pin attributes have zero value). As a result, the child symbols from the parent in question also have none. REF1_44 is also termed generic reference in that it has no pin reference limitations. HL1 and HL2 (Element symbols) have pin values as configured. A fresh cross-referencing process becomes necessary when an electric diagram has been changed substantially. Cross-reference with pin reference. Symbols containing I or IGNORE as a TIPO (Type) attribute (this is for backward compatibility) or those included in the “14.7 Ignore symbols” list will be excluded from the cross-reference process. WARNING: To remove a pin reference completely, a fresh cross-referencing process is necessary Execute cross-reference with Pin and Save Pin must be deactivated. 7 Cross-Referencing • 221 Save Pin Pin values on a drawing are completely updated after each processing operation. When a diagram is changed, some pin values may be assigned to other components. Save Pin must be activated to prevent this from happening. Save child pin must be activated to ensure that information entered with Real-time cross-reference is preserved (see Sect. 7.4). When Sub-element pins is activated, the function only keeps previous values for symbols in this category. Activating Component pins keeps previous values for all parent and Element symbols. To remove a pin reference from a diagram completely, “Cross-reference with Pin” (in settings) and both “Save Pin” options must be deactivated. 222 • Spac Automazione 2011 7.3 Errors Cross-reference (see Sect. 7.1) and Pin reference (see Sect. 7.2) have no diagnostic function for the drawing; error messages could appear during processing. • Parent symbol errors • Return symbol errors Parent symbol errors 1) Error, Parent without name There is a parent symbol (Pres=M) with an empty name attribute in the position shown (the message is displayed in the initial report). 2) Error, Child without name There is a child symbol (Pres=F*) with an empty name attribute in the position shown (the message is displayed in the initial report). 3) Error, Element without Name There is an element (without Pres attribute) with an empty name attribute in the position shown (the message is displayed in the initial report). 4) Error, Reference without name There is a Registration Reference Symbol (Pres=R) with an empty parent attribute in the position shown (the message is displayed in the initial report). 5) Error, Parent symbols with same name There is more than one parent symbol (Pres=M) with the same name in the position shown (the message is displayed in the initial Report). Cross-referencing cannot be carried out on symbols displaying this error message. 6) Error, Elements with same name There is more than one element symbol (without Pres) with the same name in the position shown (the message is displayed in the initial report). 7) Error, Element with same name The parent symbol in question has the same name as an element symbol in the position shown (the message is displayed in the initial report). Cross-referencing cannot be carried out on symbols displaying this error message. 8) Error, Child without Parent This error arises when a Child symbol is not associated with a related parent symbol, for example a contact without the related coil (the message is displayed in the initial report). 9) Error, Reference without Parent This error arises when a Registration Reference Symbol (cross-reference) is not associated with a related parent symbol; this error is usually produced when a parent name is changed manually without changing the related registration cross-reference. The problem can be solved by deleting the concerned Reference from the drawing (the message is displayed in the initial report). 10) Error, Parent, Child or Reference symbol with incorrect Pres The message is displayed both in the initial report and in the parent report. The Pres attribute for the symbol in question is invalid (or is empty). Cross-referencing cannot be carried out on symbols displaying this error message. When this message is displayed in the initial report, there is a good chance that the symbol in question is a child symbol. When this message is displayed in the parent report the symbol is a Parent or a Registration Reference (in this case delete the symbol from the drawing). Cross-referencing cannot be carried out on symbols displaying this error message. 7 Cross-Referencing • 223 11) Error, Code attribute missing in Parent The symbol indicated by the error message has been designated a parent block (Pres=M) during building. It must therefore contain the code attribute for associating the registration reference. Symbols displaying this error message must be rebuilt. 12) Error, Offset attribute in parent missing The symbol indicated by the error message has been designated a parent block (Pres=M) during building. It must therefore contain the offset attribute for the insertion coordinates of the Registration Reference block indicated in the code. Symbols displaying this error message must be rebuilt. The error message is not displayed in parent blocks with “Fixed Registration Reference" (lacking offset but containing Reg attributes). 13) Warning: Code attribute in Parent empty The code attribute of the parent symbol in question is empty. Code is the name of the Registration Reference associated with it. In this case, cross-referencing cannot be carried out. The problem is solved without interfering graphically with the drawing by associating a new valid Contactor (or Auxiliary). 14) Warning: Reference not found The parent symbol code attribute in question is invalid. Code is the name of the Registration Reference and the symbol must be in the directory Librerie\Riferim. The problem is solved without interfering graphically with the drawing by associating a new valid Contactor (or Auxiliary) 15) Error, Parent with fixed registration reference The symbol in question has an integrated registration reference. It is therefore unsuitable for pin referencing. The position of child symbols is recorded with parents and vice versa in any case. This Error message is only displayed during a cross-referencing with the pin reference option. 16) Warning: Parent with fixed registration reference The symbol in question also contains Reg. attributes that host the records of child symbols (for example the C1031R block, coil with fixed internal reference for symbol CEI15). These symbols do not require the presence of code and offset attributes. This warning message becomes an error message when pin referencing is carried out. 17) Warning: Offset attribute in parent invalid The content of this attribute does not conform to syntax recognized by cross-reference. Offset indicates in where to insert the Reference symbol indicated in the code related to the insertion point of the parent, as in: valid default value in coil "@0,@-10,0" valid default value in tripolar switch "@15,@-5,0". The cross-reference cannot be carried out on symbols displaying this error message. 18) Warning: Parent without Child Parent symbols are highlighted in this way when no Reference symbol (in the code attribute) will be entered because there are no child symbols to record. This warning is not to be confused with an error message. 19) Warning: Code and Reference do not match The code attribute in the parent symbol contains a value different from the real Registration Reference symbol. This is normally due to a manual change (the message is displayed in the parent report). The problem is solved without interfering graphically with the drawing by associating a new valid Contactor (or Auxiliary). The conflicting reference is automatically deleted from the drawing. 224 • Spac Automazione 2011 20) Warning: Reference obsolete The parent symbol in question is associated with a Registration Reference that has not been updated to the current version of the program. These are replaced automatically where possible. The problem is solved without interfering graphically with the drawing by associating an updated Contactor (or Auxiliary). Symbols displaying this warning can undergo cross-referencing despite having no pin reference. Note: This error message is not to be confused with that described in point 32. 21) Error, Reference with incorrect Offset The content of this attribute does not conform to syntax recognized by cross-reference. Offset indicates where to insert the additional head with reference to its insertion point, as in for example: valid default value in 12E " @0,-14" valid default value in 11P " @0,-22". Symbols displaying this error message must be rebuilt. 22) Error, maximum number of FA open contacts exceeded Error, maximum number of FAP or FT open contacts exceeded Reg attributes in the registration reference block (in the parent code attribute) are not sufficient (with even numbers) to record all necessary open contacts. The registration reference is not inserted. The solution is to delete excess contacts. There are nevertheless other possible solutions as described in Editing (see Sect. 7.1). 23) Error, maximum number of FC closed contacts exceeded Error, maximum number of FCP closed contacts exceeded Reg attributes in the registration reference block (in the parent code attribute) are not sufficient (with odd numbers) to record all necessary closed contacts. The registration reference is not inserted. The solution is to delete excess contacts. There are nevertheless other possible solutions as described in Editing (see Sect. 7.1). 24) Error, maximum number of FS transfer contacts exceeded Reg attributes in the registration reference block (in the parent code attribute) are not sufficient (with odd numbers) to record all necessary transfer contacts. The registration reference is not inserted. The solution is to delete excess contacts. There are nevertheless other possible solutions as described in Editing (see Sect. 7.1). 25) Error, maximum number of FL lamp contacts exceeded Reg attributes in the registration reference block (in the parent code attribute) are not sufficient to record all necessary lamp contacts. The registration reference is not inserted. 26) Warning: transfer contact recorded as normal There are transfer contacts on the drawing that are associated with parents having a code that does not allow association (except for open and closed contacts). The contact is recorded as closed, with "tc" added on. Warning: Open FAP or FT contact recorded as normal Warning: Closed FCP contact recorded as normal It happens usually using generic references (REIF1, REF1_44, REF1_22, REF2, REF3 etc.) or with incorrect references, not suitable to be associated with power contacts. The registration is done as normal open/closed contact (not power contact). 7 Cross-Referencing • 225 27) Error: switch not present in parent code This check is only active when processing takes place with pin reference. There is a transfer contact on the drawing associated with a parent having a code that does not allow registration. The problem is solved without interfering graphically with the drawing by associating a new contactor (or head) such as 2TC, 3TC, etc. Without pin referencing this error message becomes a warning: Transfer contact recorded as normal (see point 26). 28) Error: reference with pin error This check is only active when processing takes place with pin reference. The Registration Reference in question has empty pin attributes. Just one without number or with repeated pin values is sufficient to cause this error (in these cases the block must be reviewed). This usually happens when generic References are used (REF1, REF1_44, REF1_22, REF2, REF3, etc.) or, alternatively when References are stored incorrectly. The problem is solved without interfering graphically with the drawing by associating a different Contactor (or Auxiliary). Generic references are often used intentionally to show that the design has been carried out without basis for the insertion of pins. 29) Warning: references and Heads sharing pins This check is only active when processing takes place with pin reference and additional heads are used. The main Registration Reference and the additional head (or one of the heads) have the same pin number. Replacing one of the two components solves the problem. 30) Warning: child with repeated pin There are child symbols on the drawing (belonging to the same parent) that have the same pin values. (This happens when a symbol that already contains a pin reference is copied). Alternatively, the same symbol contains two identical pins. The problem is solved automatically. This warning indicates that the existing pin values cannot be saved. 31) Warning: parent with pin list not found. The symbol in question is not in the .Pre configuration file list (see Sect. 4.2); alternatively, it could be that the .Pre default file is inadequate for the symbols being used. Registration for a child takes place all the same based on the Reference in the code attribute. 32) Warning: child with pin not found in reference There are child symbols on the drawing that have inadmissible pin values. Those allowed are described in the Registration Reference. The problem is solved automatically. This warning indicates that the existing pin values cannot be saved. 33) Error, new and obsolete references This error is similar to that in point 20. The parent symbol in question contains a registration reference that has not been updated to match that of the current program version and a corrected additional head. Associating an updated contactor without interfering graphically with the drawing solves the problem. Symbols displaying this warning can undergo the cross-referencing despite having no pin reference. 34) Error, child with incorrect pin sequence A child symbol pin attribute has been manually deleted. This warning indicates that the existing pin values cannot be saved. It is always necessary to check components on the drawing that have associated errors or warnings. 226 • Spac Automazione 2011 Return symbol errors 1) Error, Return without name A Return symbol (Pres=P or A) at the indicated position has an empty signal attribute (the message is displayed in the initial report). 2) Error, incorrect attributes Pres found A Return symbol at the indicated position has an invalid Pres attribute; Pres=A in destination returns, Pres=P in start returns. Any other values are not accepted (the message is displayed in the initial report). 3) Error, widowed start arrow A start return on the indicated sheet has no destination on any other sheet. In this case, the signal record is nullified (the message is displayed in the initial report). Deleting the symbol from the drawing solves the problem. 4) Error, widowed start arrow A destination return on the indicated sheet has no start on any other sheet. In this case, the signal record is nullified (the message is displayed in the initial report). Deleting the symbol from the drawing solves the problem. 5) Error: returns with same X coordinate There are identical signals at the same X coordinate of the same sheet. The problem can be solved by inserting a branch value for each repeated signal (with the “Ddatte” command). The signal record is nullified in this case. This check is carried out when “Sheet size” (see Sect. 4.2) is set with the segments along the x-axis. 6) Error, returns with same Y coordinate There are identical signals at the same Y coordinate of the same sheet. The problem can be solved by inserting a branch value for each repeated signal (with the “Ddatte” command). The signal record is nullified in this case. This check is carried out when segments are set along the y-axis under Sheet size (see Sect. 4.2). 7) Error, return sequence invalid There are two or more identical start (or destination) signals on the same sheet. If the signals are on the same branch, the problem is solved by giving a Branch value to one of the signals (using the CAD command). Otherwise, one of the signals must be deleted. The signal record is nullified in this case. 8) Error, P A return sequence not feasible There are consecutive destination returns. One of these is on the same sheet as the start return, the other on the next sheet. This problem simultaneously gives rise to the error in point 9. Deleting any one of the destination returns solves the problem. 9) Error, consecutive start returns. There are identical and consecutive start returns on two different sheets. Entering a destination return with the same name between the two solves the problem. The signal record is nullified in this case. 10) Error, consecutive destination returns There are identical and consecutive destination returns on two different sheets. Entering a start return with the same name between the two solves the problem. The signal record is nullified in this case. 7 Cross-Referencing • 227 7.4 Real-time cross-reference If a Child symbol (contact) is inserted in a drawing, it can be directly associated with its position on the coil (Parent symbol) depending on its availability as defined by the code (Registration reference symbol). This mode is activated in settings (see Sect. 4.2). Let us consider the example of the insertion of an open contact (KM1) in two different ways: Real-time cross-reference OFF Proceed as usual: the list of all references for drawn parent symbols is displayed.The position of the contact (with pin values) is associated by cross-referencing according to processing sequence (see Sect. 7.1 and 7.2). Real-time cross-reference is usually OFF when pins are not used. It is advisable to set Real-time crossreference to OFF when generic registration references are used (Ref1, Ref1_22, Ref1_44, etc.). Real-time cross-reference ON Select the coil symbol, then (at the bottom of the dialogue window) the position of the contact with their respective pin values. Real-time cross-reference is usually ON when coil availability needs to be checked immediately without waiting for the general processing of cross-referencing to be completed (limiting the number of possible anomalies). It is advisable to set Real-time crossreference to ON to select the desired pin values. The cross-reference function associates them according to its processing order. You are not allowed to fill in the field “Parent reference” freely (it’s frozen) while the setting “Same component” is active. Symbols containing I or IGNORE as a TIPO (Type) attribute (this is for backward compatibility) or those included in the “14.7 Ignore symbols” list will be excluded from the cross-reference process. WARNING: General Cross-referencing should be processed using the option Save Pin to Child to preserve information introduced using Real-time Cross-referencing. 228 • Spac Automazione 2011 7.5 Cross-reference legend Pop-menu > Util > Cross Utility The Cross-reference Legend function must be used only after job order processing is completed and finalized. The related legend must be updated after each new cross-reference process. Example of component KA present in cross-reference legend All the parent symbols with related Registration References are taken from the drawing and entered in the table as in the figure above. All technical data is also included for each component. The option Parent symbols only filters out all symbols in the element category (see Sect. 17.1). The table and the positioning of data in it can be customized using the settings functions (see “Crossreference legend” Sect 4.2). The color selected in settings for inserted text (see Sect. 4.2) is significant for translation into foreign languages (see “Color text processing” Sect. 12.4). The default table contains 12 symbols per sheet. The sheets needed to complete the legend, follow the indicated starting sheet. First sheet number for Cross-reference Legend: If the selected sheet is in use, the function asks whether to continue or to stop the process in order to select a new sheet number. The program asks for confirmation for each subsequent sheet When Clear current sheet is enabled, all entities are deleted prior to beginning the drawing. If the sheet selected is new, the function proceeds without further prompting. Subsequent sheets are created automatically in consecutive sequence. The default table symbol is LegendaC.dwg and is in the symbols directory. It is possible to use customized tables provided they are saved to the same directory. Symbols contained in these tables are purely graphic. They are not used in any other processing. 7 Cross-Referencing • 229 7.6 Cross Utility • Change by Cross • Delete Cross Reference Change by Cross Pop-menu > Sheets This command does a sheet change, with destination corresponding to the page contained in the registration chosen. The function requires: Select a Registration Ref : The example figures show registration selections to do the ** Change sheet on page 5 ** . Change sheet selecting registration See: Summary You can also recall the function quickly by typing in the command “FX”. Delete Cross Reference Pop-menu > Util > Cross Utility This command deletes Cross-references from the current sheet or multisheet. It works by emptying all symbols from cross-references (Reg and Reg* attributes) and deleting all registration reference symbols. The content of the code and offset attributes is not reset to the original default values. 230 • Spac Automazione 2011 8 Bill of Materials 8.1 Materials database Materials database management comes with the specific Materials Database program. It is possible to access and use the database processed here within a drawing to associate material codes with the symbols on the drawing (see Sect. 8.2). The Materials Database is able to handle additional database files. It is initialized with these default files: Every database has an AMW extension, each can contain an infinite number of manufacturers. The example in the previous figure shows a database structure at 3 levels: • Manufacturer: this is a file containing an unlimited number of families. • Family: this is a group containing an unlimited number of codes. • Code: this is a catalogue with the related description & commercial data for any article. Right mouse clicking on Manufacturer, Family or Code allows you to conduct Insertion, Deletion and Duplication operations, while left clicking twice activates the Renaming operation. New This command allows you to create an empty file with a new .amw file name. It is possible to manually insert new Manufacturers with related code families, or import a database that already exists in any of various formats. Open This allows you to load an already existing database. The current one is stopped temporarily. Save with Name It is possible to duplicate (using a different name) the current database. 8 Bill of Materials • 231 Database information Right clicking on the database file name gives access to database information. The information shows file content in numeric form. This function is particularly useful for checking if there are any "hidden" items at the moment of opening the file (see “Hide”). File Import/Export Material codes can be imported into any file, both new and already existing: manufacturers and existing items are updated and integrated based on prompts made to the user during importing. It is possible to import Me*tel price lists in both formats I and II (010 and 020). Files from previous versions of Spac, from release 2004 to 2007, can be imported by selecting the specific item (Import files vers. 2004) from the model present in the list. Imports using “Fixed Text“ and ”Delimited Text“ must be customized by the user according to the structure of the file being imported. Exports using “Fixed Text“ and ”Delimited Text“ must be customized by the user according to needs. We suggest you conduct the various imports into new AMW files so that the database is empty and therefore faster and more effective at importing data. Databases can be exported in two possible file formats, ASCII (fixed length fields) and ACCESS. The configuration for these parameters can be obtained by clicking on "Details." Details This allows you to analyze and set up already existing Import/Export items. For some types of importing you cannot customize, these items are indicated as "Blocked profile." New It is possible to create new materials database import or export functions (optional, for programming). Eliminate This is for removing import/export functions. Composition and customization of new Import/Export profiles is suggested only for those with programming experience. 232 • Spac Automazione 2011 Database print The printing of a Materials Database can be configured to the user’s specific needs, every layout is a customized printing format. There are some ready to use printing configurations, each is an .lst file in the Distinta\Report directory. "Compressed Database" printing is done in profile and there are no Internal or EAN codes. It is therefore the most suitable for paper-saving. "Complete database" printing is in landscape. All important item information is present; it is therefore the best for detailed printing. Preview This allows you to see the sheets that must be printed on the monitor; this function is useful for checking the database in the chosen layout. Change Clicking on "Change" activates the sheet layout customization program (optional for programming use), it is advisable at this stage to access the online instructions and help. New You can create a new printing configuration. Again in this case you activate the sheet layout customization program (optional for programming use). The instructions for each function are contained only in the available online help. Delete This is for removing printing templates. After having chosen a printing layout from those available, click on "Continue>>" to determine the involved manufacturers (and families). Follow the on-screen instructions. The creation of new printing templates is an operation only for users who have programming experience. 8 Bill of Materials • 233 Inserting a code Before being able to manually insert a material item, the names of the manufacturer and family/group it belongs to must already be present. A new Manufacturer can be added by right clicking on the name of a database file and selecting Add Manufacturer from the popup menu. Right clicking on the name of a new Manufacturer opens the menu for retrieving Information first and then Inserting Family. The information can be entered or changed by the user. It consists of two fields: the first is Data and is for recognizing validity of a listing. Click on "Ignore" when there are no data. The second is "Notes" which can be freely used: "No information stored" appears when nothing has been entered. The name of the family must be chosen to facilitate mnemonically the search for the next item. Insert components, which opens the "Edit code" panel, can be retrieved by right clicking on the name of the new family. Is possible to move or copy codes from one manufacturer to another: Copy You must select one or more codes: these must be dragged to the group belonging to the Manufacturer that is different from the Start group. It is not possible to copy the Codes between groups of the same manufacturer, double codes in the listing are not permitted. The symbol “+” appears during the "dragging" of the cursor. Move You must select one or more codes: holding down the keyboard Shift [⇑] key you must drag the codes to a group different from the start group (and between groups of the same manufacturer). During the dragging of the cursor no symbol appears. Copy and Move act in the same way on an entire Family. Edit code Making a double click on an existing code, it is possible to display and change its characteristics. The dialogue panel is the same panel as when inserting a new article and consists of the following 5 data tabs: 1. General 2. Technical Notes 3. Layout 4. Electrical BLK 5. Unravelling 234 • Spac Automazione 2011 General Making a double click on an existing code, it is possible to display and change its characteristics. The Manufacturer and Family fields are two fields that can be changed using this function (they can be renamed by double clicking on the item in the archive). Catalogue Code corresponds to the data written in the Type attribute of the symbols on the drawing during the operation “8.2 Pair Materials” (obligatory field). Internal code frequently corresponds to a company and/or warehouse code, whilst EAN code (European Article Number) is a European code (data not shown on symbols). Description corresponds to the data written in the Description attribute of the symbols on the drawing during the operation “8.2 Pair Materials”. Some manufacturers have descriptions in different languages. It is possible to check for alternative languages by selecting one of the flags at the side. The Notes field allows the user to insert additional comments and can be used freely. In the Price field the value of the price list can be indicated, whilst the Discount % can only be managed from the “external” BOM (See “8.4 External Bill of Materials”). The Document\Data Sheet is associated by pressing the “Browse.” button and it is possible to associate a file in Doc (Word) format or PDF (Acrobat) format. Pressing “Open” it is possible to view the previously associated document. The use of this configuration is linked to the management of the “Technical Manual” (see parag. 8.3). Preview of the product is displayed only when an image file (bmp or jpg format) is present in the Library\Archives\Images folder in Spac and has a name corresponding to the catalogue code. The Catalogue code is the only obligatory field, whilst the use of the Description field is strongly advised (it is displayed in most parts of the configurations for Bills of Material). 8 Bill of Materials • 235 Technical Notes Making a double click on an existing code, it is possible to display and change its characteristics. This panel allows the user to customise material “technical” data and to manage selection filters (by pressing the “Define Filter” and “Pair Filter” keys). Cut, Delta-Cut, Colour, Code and Thermal Dissipation (Support attribute) are examples of possible attributes contained in the symbol. Code corresponds to the name of “Registration Reference Symbol” from the Cross-reference; use the “Cnt”, “Aus” and “Tsa” keys to browse the available options. The user is allowed to associate information to any attribute present in the symbol by configuration of the attribute name (TAG) and its respective value ( = Value): Add Used to create a new association TAG = Value. Change Used to confirm changes in an existing association. Delete Cancels the current association. View Opens the list of associations. Example: If during a “Pairing Materials” operation the user wishes to insert “Motor Protection” (together with other commercial data of the Manufacturer, Type and Description) in the attribute “Function1” (of the symbol) it is necessary to configure the fields (TAG) = Value as shown in the previous figure. The configuration (TAG) = Value substitutes the system value $Attribute=Information$ adopted in previous versions of Spac. WARNING: Technical Notes is a field used to insert comments (used freely) and is no longer valid for the system value $Attribute=Information$ as used in the previous versions of Spac. 236 • Spac Automazione 2011 Layout Making a double click on an existing code, it is possible to display and change its characteristics. See: 15.3 Topographical Management In the Dimensions (mm) field, set the real sizes of the component: these dimensions are used to make automatic the drawing procedures for the topographic electrical panel (a generic rectangular block is inserted using the symbol Ly_Default ). As an alternative, it is possible to insert directly the name of the graphic symbol to be used in the Re-entry Block field. Pressing the “Browse.” key, it is possible to choose a specific symbol from the symbols available in the Library\GestTop folder. Configuring both Dimensions and Re-entry Block the priority depends on the type of block: - With “real” symbols, priority is given to the block and the dimensions are ignored. - With “generic” symbols, the symbol is drawn with its set dimensions. “Real” symbols are those drawn with the real dimensions of the component (real sizes), whereas “generic” symbols are those drawn to 1x1x1 sizes (See “Dimensions and Block Selection” parag. 15.3). Rules do not exist to identify beforehand “real” symbols from “generic” symbols. (Symbols installed with Spac can normally be identified by their names, i.e. those with a LY_ prefix are generic, whereas those with a LY- prefix are real). 8 Bill of Materials • 237 Electrical BLK Making a double click on an existing code, it is possible to display and change its characteristics. See: 8.12 DbCenter Each single Code can correspond to a graphic symbol of the four main libraries (IEC, JIC, Fluids and Singlewire) plus a generic configuration (called “Other Blocks”), which permits any symbol to correspond to the code (being part of the Spac libraries), for example a Blk created by the user (See ”16.1 Blk Symbols”). This configuration is used by “Drawing Mode” in DbCenter (see parag. 8.12). The symbol configured in the “Other Blocks” field is used in the two following cases: 1 – When a different library other than IEC, JIC, Fluids or Single-wire is used. 2 – When using the current library (IEC, JIC, Fluids or Single-wire) no symbol is configured. 238 • Spac Automazione 2011 Unravelling Making a double click on an existing code, it is possible to display and change its characteristics. This configuration is used from the command “15.8 Unravel Panel Wires”. “The Unravelling” is a programme used to analyse and optimise the paths of wires and cables and can be integrated in the Spac Automation environment for advanced management of the functions “15.3 Topographical Management”. This image shows an example development for wires and cables obtained using the Unravelling Module. Unravelling Module. See: 15.8 Unravel Panel Wires 8 Bill of Materials • 239 Tools • Define a filter • Associating filters • Apply filter • Find codes • Hide information • Hidden component management • Import file Terminals (DAT) • Options Define a filter Defines filters for combining materials in the database. All components in a file that do not correspond to the configured type are hidden when using “Apply filter” . This way, specific simplified searches can be carried out to determine objects categories. See “Apply filter”. There are three levels of filters: Item 1, Item 2 and Item 3. It is not necessary that a filter have all three data, thus a filter that has only item 1 can therefore be created. The dialogue window appears with two columns, one for entering new data and the other for selecting already existing data (this gives congruence to the entries). Creation of a filter for socket mounted industrial relays having a 110 VAC coil is illustrated in the example. A filter using the same Item 1 and Item 3, but Item 2 for a 24 VDC coil could be successively created. Filter configuration is stored by clicking on “OK”. 240 • Spac Automazione 2011 Associating filters Associates a filter (an already defined one) to one or more components in the materials database. The component(s) are selected from the database first, then Associate Filter is selected from the contextual menu that pops up when having right-clicked on the selected component(s). Codes linked to filters are indicated by a symbol bearing an “F” (as in the figure). Use the same procedure, but clicking on “Delete the link between filter and selected components” to disassociate component(s) from a filter. Icons Identifies a single material code. Identifies a single material code paired to a Filter. Apply filter All database components that do not correspond to a filter’s characteristics are not displayed when a filter is applied. This simplifies a search to within a determined category of items. Filter linked to selected component: the filter linked to the selected component is displayed. Filter defined in the Filtro.ini file: (see Sect. 8.8). Other filter defined in database: Select a filter configured with “Define a filter”. The Materials Database is filtered when “OK” is clicked and only the components that satisfy the filter parameters will be displayed. Just click on “Clear filter” to restore the display to the complete database. 8 Bill of Materials • 241 Find codes This function is useful for quickly finding a code within the current file. The search is conducted within an individual manufacturer when specified, otherwise all manufacturers in the file are considered. In the example, the code to be search for is "601280*" under the indicated manufacturer. The code number is incomplete and finishes with the “*” wildcard character. This causes the search to find all codes beginning with those six digits and followed by any sequence of characters allowed in the code. You run through the file viewing the positions of all the found codes by clicking on "Find next". Exiting the function without clicking Close leaves the search results in memory to be used later. It is important to insert the character *, otherwise only one code will be searched for. Hide information This function is useful to delete manufacturers, family and codes that are not frequently used from display. This makes the file faster and easier to access. The Hide command can be applied to any data by right clicking the selected data and choosing Hide from the popup menu. The “Database information“ command immediately reveals whether there are any hidden codes within a materials file. The hidden information can be viewed by using the command “Hidden component management”. Hidden component management This function is useful for revealing manufacturers, family and codes that have been hidden from file access by using the “Hide information” command. The “Database information” reveals the presence of hidden codes within the materials database. Import file Terminals (DAT) It allows to import the file (with extension DAT) supplied from specific constructors, or from the Morsetti.Dat file of a prevoius version of Spac. Options A materials database (file with the extension .AMW) can be set to load by default at program launch. 242 • Spac Automazione 2011 Database utilities There are two utilities dedicated to database maintenance: Compact database Use this function with files that have undergone considerable changes and updates. Compression gives faster access to data by reorganizing the data It is not possible to compress the current work file. Compression allows you to reduce file size after the deletion of significant amounts of data. Restore database Recover allows you to load damaged files. The potential for recovery depends on the type of errors found in the damaged file. It is always necessary to check the content of a recovered file because some data have been lost during the recovery operation. Edit macro This command is for running macrocode programs (codes that represent the sum of multiple codes). A name and description for the macro must be entered after clicking on New. The macro is written to the .AMW file of the current materials database by clicking on Save. Codes must be retrieved from the materials database to complete the macro. We suggest that you set the two windows up side by side to make the operation easier. An item must first be selected from the materials database to insert its code. Then it must be dragged to the appropriate area of the "Selected macro components" until obtaining a result similar to the figure. Only the quantity part of a macro code can be changed. To delete the code just select it and then press "Delete" on the keyboard. The creation of a macro can also be achieved by copying and pasting (Ctrl+C and Ctrl+V) between the Materials Database and the Macro Editor. 8 Bill of Materials • 243 Edit Macro Connectors This command manages the “Connectors” macro-codes (addition of several codes) and consents the creation of the “Plug M+F” type (complete connector) used on the Connector. After pressing the New Macro option, it is required to provide the description and the codes family (all the families in the manufacturer’s archive are shown). Pressing the Save button, the “Connector” macro is stored in the .amw file. To create the macro, it is required to get the codes from the materials archive. It is suggested to place one window besides the other to make the operations easier. Before the insertion of an article code, it is necessary to select it from the materials archive, then it could be placed on the desired place with a drag&drop approach from the “Components of the selected macro”. The result you should obtain is illustrated in the figure. To cancel a code it is enough to select it and press the “Canc” button on the keyboard. See “Connector”. The icons The icons differentiate the “Plug M+F” codes (macros) from “Plug-M” (male) and “Plug-F” (female) codes. Identifies a single code from the Plug\Connector type (“Plug-M” and “Plug-F”). Identifies a macro code from the Macro Connector type (“Plug-M+F”). The “connector” macro is composed using the materials codes of the same manufacturer. 244 • Spac Automazione 2011 8.2 Associate materials Pop-menu > Util > List Utility This function allows you to associate a material code or macrocode with one or more components on the diagram. Materials are normally associated using the DBCenter (see“8.12 DbCenter”), otherwise this command permits association of codes during symbol insertion on the drawing to associate all symbols alike. New data is added to already current data by clicking on Add and forms "local" macrocode. With Replace, the new data replaces data previously selected in the existing data list. Selected current data are eliminated with Delete button. Use Clear to eliminate all current data (*). Clicking on “Available” adds current codes (*) to the upper list of those available. The manufacturer's logo is present only in certain cases. The function views data previously associated with the component (* = current code), if the component has never been associated with any code the lower part of the window is empty. To insert a code manually, you can type Manufacturer, Type and Description in the 3 fields and press “Add” (or Add). To make the temporary code available (typed manually) for any subsequent associations, you must select and press “> Disp” (or Available), then the code is inserted in the list of “Codes and Macros available” found in the top part of the dialogue window. Pressing button “M.s.” you open “Material supply” management. The settings of “Update same Symbols“ and “Confirm each Code“ can only be activated/disactivated when the command “Associate materials” is used independently. Use is frozen during symbol insertion. 8 Bill of Materials • 245 Press OK and the following data is transferred to symbol attributes: • The MANUFACTURER (OR BRAND) attribute is retrieved from the material. • The CODE is retrieved from the materials catalogue for the TYPE attribute. • A generic description (if it exists) is substituted with a DESCRIPTION of the material in the DESCRIPTION attribute. • Any information configured in the NOTE field (see “Edit code” Sect. 8.1). For every symbol (selected) you must confirm with Update or Cancel, which allows you to proceed to the next symbol. To completely cancel the operation you must click on Cancel for all of the symbols that have been selected. It is possible to also perform "Associate Materials" operations during the addition of symbols to a drawing by clicking on Database (or Db). The figure shows the current symbol with no codes. Un-encoded component. To associate materials for a single code, enter the following 3 data: Double click from the available code list and press OK, to quickly associate an individual code. Association of individual material code. Let us assume that the component in question is an illuminated pushbutton made up of 5 codes: Manufacturer Type Description FINDER 60123024 RELAY OCTAL FINDER 9901902479 MODULE LED FINDER 9022 WAINSCOT RELAY SDP 001VT FIXING SCREW SDP 001VT FIXING SCREW 246 • Spac Automazione 2011 Associate Material of a macrocode inserts the 4 following groups of data: Double click on the available macrocode list and press OK, to associate a macro-code quickly. Associating a Macrocode Use the command “8.9 Disassociate materials” to remove material codes associated to components (clearing attributes), and restoring the original default “Description” values. See “8.12 DbCenter”. The data associated to symbols during Associate Materials are written within Manufacturer, Type and Description. Maximum data limits must be observed (minimum length 256 characters). If the macro-code includes elements belonging to several manufacturers they are transferred to Manufacturer attribute with the different Brands separated from one another by point/comma character. You can also insert these values manually (using command “Ddatte”), paying special attention to the order they are put in (example: the 2nd code ”..;B1L0W;..” corresponds to the second description and the second Manufacturer and so on). The button “Acquire” allows allows to import of the codes contained in external file (Abbina.ini): the functionality of this command is tied to eventual customization. See “8.1 Materials database”. Options • See codes • See macros • Update materials with same symbols • Confirm each code 8 Bill of Materials • 247 See codes The “Available codes” list is compiled automatically, maintaining codes in the list that have been drawn little by little from the material database. Codes already among the symbols (* = current codes) can also be rendered available for successive association by clicking on “> Available”. Useless codes can be removed from the list by pressing the Delete button. The code list can be sorted in 3 ways: The list is sorted alphabetically by brand clicking on Manufacturer (or the arrow). The list is sorted alphabetically by catalogue code by clicking on Type (or the arrow). The list is sorted alphabetically by description by clicking on Description (or the arrow). The sorting order alternates between ascending and descending with repeated clicking. Data are stored in the Last-Materials.Mat file in the folder for each order. See macros Click on See Macro to display another list. The “Available Macros” list is completed automatically, maintaining codes in the list that have been drawn little by little from the Macro database. Selecting a materials code automatically selects all codes linked to the same macro. Remove useless macros from the list by clicking on Delete. Data are stored in the Last-Materials.Mat file in the folder for each job order. Update materials with same symbols The function is identical to that previously described, the only difference is the fact that the association of material is suggested for all of the symbols that are the same as the one selected. The operation can be cancelled by first deselecting “Confirm each code” and then clicking on Cancel once. Confirm each code Active by default. This parameter is useful for accessing all of the symbols, one at a time, counted by the function (where the selected symbol is identical). The Update and Cancel operations become absolute (for all of the same symbols) when this option is deselected. 248 • Spac Automazione 2011 Material supply To material codes already associated to a component you may add a further reference in order to specify the supply mode (Warehouse, In-process etc.). This can be done only using Associate Materials during symbol insertion (see “17.3 Symbol insertion”) or with “Edit” (Xs). Pressing button “M.s.” you open the dialog box for management: The chosen “supply code” is associated to the material code pressing “<Add”. To remove this reference press button “Remove>”. For each material code you can associate more than one “Supply codes”, as you can see in the previous picture the contacts has been referenced (see column M.s.) with WM and S, to indicate “Warehouse Material” and “Spare” respectively. This marks are useful when drafting the bill of materials (see “8.3 Internal bill of materials“), where you can filter specific lists for each material supply mode. Pressing button ”Codes” you open the dialog box for “Supply codes [M.s.]” management. There you can create, remove or modify the default list. WARNING: The “Supply codes” are the only valid filters for the Internal Materials Bill (see Sect. 8.3), they are not managed by the External Materials Bill (see Sect. 8.4). Supply codes Supply codes are used to mark material codes already associated to the component pressing button “M.s.” (Material) while inserting symbols or with “Edit” (Xs). M.s. code (max length 3 chars) is reported in material code following this example syntax. 161290240240 § SG : cod. + Stock Goods 001VT § SP : cod. + Spare Parts Character “§” is used as separator between material and supply codes, as shown in the following example: Associating material and supply code. List modifications done pressing Add, Modify or Remove, are stored “locally” in the job order Spac_cfg.ini file (see “Export Settings“ sect. 4.2). 8 Bill of Materials • 249 Estimated Bill of material codes This option to Associate Materials can be activated in Preferences with the “Estimate list“ setting (see Sect. 4.2). The need for this option arises from the requirement to collect all the materials codes that have been chosen previously from a Bill of materials (often generated before execution of the drawing specifically to obtain an estimate). Both any inexactness in the estimate and the current design status with respect to initial projections are checked step by step by decrementing the quantity of material from the list and estimate with every association on the drawing. The characteristics of “8.2 Associate materials” remain unchanged for the most part, the difference lies in the handling of “Available codes”. The dialogue window displays the “Import DMW” button and a control variable to activate “Code counter” when this option is set: On Off • Codes are extracted from a External Bill of Materials DMW file. • The codes can be removed from the “Available codes” list after use. • The “Available codes” list is written to the Last-Extimated.Mat file. • Codes are extracted from a Material Database AMW file. • The codes are added to the “Available codes” list after use. • The “Available codes” list is written to the Last-Materials.Mat file. Import Dmw Clicking on this button imports a Bill of materials in format DMW created with an external module (see Sect. 8.4) Both the codes and the related quantities are loaded already suitably divided between individual codes (See codes) and macro codes (See macro): “See Macro” also displays the names and components belonging to the bill of materials (only for simple viewing). The “Code counter”, which decrements quantity with each association, should be activated during code linking to symbols on the drawing, codes are removed automatically from the “estimate” list when they are no longer available (Quantity = 0). The effective state of an estimate with respect to project conditions can be checked in this way. An estimate is correct only when planning on a drawing is also complete (optimal conditions) and the lists are empty, i.e., when neither individual codes (See codes) nor macro codes (See macro), are available. Disabling the “Code counter” means misaligning the drawing state with respect to the estimate. Do so only when there is particular need. 250 • Spac Automazione 2011 8.3 Internal bill of materials Pop-menu > Util There are two ways to produce a bill of materials: using the "External" module (see Sect. 8.4) or using the "Internal" function within the graphics environment. A bill of all the materials associated to the components (including terminals and connectors) that are part of the system can be quickly obtained by using this function, without needing any data import/export. You must list all components coded on the drawing in the bill using the commands “8.12 DbCenter“, “8.2 Associate materials” with “Edit” symbol or XS (see Sect. 17.4), or manually with the command Ddatte (at least filling in the attributes Manufacturer, Type and Description). Un-coded components must also be listed in the bill (with manufacturer name and material code clearly empty). A new bill is created by pressing “OK”, processing includes all items present in the multisheets selected and belonging to the Panels chosen from the list. You can choose which items should be counted: Components, Terminals, Connectors and Raceways can be selected to be counted on request. By pressing “Open” you can load a bill previously stored in the “DMW File”. Symbols without Panel: any components or symbols that are not enabled to any Panel are also counted in the bill. Only symbols Materials: you filter components. without un-coded Process current sheet: you just do a bill for the current sheet (single page). Sort by sheet: you do a complete bill but sorted by individual page. Summary: (see Sect. 3.1). Data on the bill can be sequenced according to 4 types of criteria, as needed: • Bill sorted by reference • Bill sorted by panel and reference • Bill sorted by type, also available in “Compact” • Bill sorted by panel and type, also available in “Compact view” The bill lists all symbols with at least NAME and TYPE attributes (even if empty). Symbols with the Type attribute containing “I” or “IGNORE” are discarded (for compatibility with previous versions), as well as those present in the list “14.7 Ignore symbols”. 8 Bill of Materials • 251 The list appears on-screen at the conclusion of the multisheet scan. The result of this list can be placed in a Table or written to a CSV file. Button “M.s.” let you filter the Bill of material according to “Supply codes“ associated to material codes (see “Material“ Sect. 8.2). Edit Component data can be changed by using Edit, which opens a second dialogue window. The changed data can be transferred to the drawing using Update. The function shows the initial data for the chosen component. The upper part of the window will be empty if the component is without codes. After Manufacturer, Code and Description values have been added you continue by: 1 - clicking Replace. New data replaces existing data. 2 - clicking Add. New data is added to existing data forming a "local" macrocode. Edit does not act upon the Terminal or Connectors. You must use the specific “Edit terminal block” function to replace the commercial data of these two groups of components (see Sect. 6.3). 252 • Spac Automazione 2011 You can enter the new values in 4 different ways: By clicking on "Clear" the previous data is deleted thus allowing the entering of new Manual data. The manufacturer, the catalogue code and the product description are manually entered where they are not present in the external materials database (see Sect. 8.1). Database This follows the same function as “8.2 Associate materials”. Schneider This activates the electronic catalogue for Schneider materials “19.1 Schneider Electric Catalogue”. Copy The Edit function opens a second dialogue window where the list of all used codes is located. This allows the copying of list item data for transfer to components to be changed. Update We have seen that "Edit" can make changes to data lists, such changes are transferred to the drawing using the Update function. Delete This removes components from the list. It is useful for excluding some existing data from the table drawing. Data are not really deleted from the system even after later Update operations. Eliminated data is restored with a new scan. Details Details displays all component data. Overtemperature This button is active only when a bill is run for an individual panel. The overtemperature calculation program is automatically called (“9.1 Overtemperature”), all of the material in the list is transferred into the Components file with related dissipated power data (if existing). Technical Manual Clicking on this button initiates a search within the Librerie\Documenti directory for a Doc or Pdf file, depending on the code selected from the list. If you select the code, FINDER "60123048", for example, the function searches for (if available) all related technical documentation in the 60123048.doc or 60123048.pdf file. If there are other technical reports the function attempts to open documents 60123048_01.doc, 60123048_02.doc, 60123048_03.doc, etc. up to a maximum of 20 documents. If no technical report exists (no file with the same name as the code) an advisory message appears. In the file .Err file located in the Utente’s directory are listed all documents not found. The documents cannot be changed, they can only be looked at or sent directly to the printer (in the same sequence that they appear on the List). 8 Bill of Materials • 253 Bill sorted by reference Components are sorted alphabetically by reference, codes that are part of the same component (macrocodes) are listed consecutively. Terminals and connectors with any reference are always placed at the bottom of the list - they form a group that it is sorted alphabetically. We examine an example of 7 components divided into two different panels in the following figure: Sorting by Reference: 6 columns of data (11 lines). It is important to note that the macrocodes (KM1 and KM2) are listed in order and the non-encoded elements (HL1 and HL2) are posted at the top of the list. The terminals (in total 9 at the top of the list) are divided by terminal block, therefore 3 groups of 3. Bill sorting by reference is most commonly used. Bill sorted by panel and reference The components are first grouped according to panel and then sorted alphabetically by reference. Sorting by Panel - Reference: 6 columns of data (11 lines). 254 • Spac Automazione 2011 Bill sorted by type Components are first grouped according to Manufacturer and then sorted alphabetically according to catalogue code. Codes that are part of the same component (macrocodes) are not listed alphabetically. Sorting by Type: 6 columns of data (18 lines). It is important to note that macrocodes (CN2 and CN3) are not consecutive and that the elements not encoded (HL1 and HL2) are set at the top of the list. Terminals (9 in all) are listed as single items (EIK3) and independently (not grouped). It is important to note the significant number of lines obtained. The sorting of a bill by Type (or Panel - Type) gives the most detailed results. Compact view References, Sheets and Panels associated with codes are not visible in compact view; all codes that are the same can therefore be combined into one quantity. Compact Sorting by Type: 3 columns of data (5 lines). The un-encoded elements are placed at the top of the list and are indicated with 3 asterisks (***). Terminals (13 in total) are listed in a single group from 9. It is important to note the lower number of lines obtained. Bill sorting by Type in Compact view gives the least detailed display. It is often used for purchasing purposes. 8 Bill of Materials • 255 Bill sorted by panel and type Components are grouped according to the panel they belong to and then they are sorted alphabetically by catalogue code. Codes that are part of the same component (macrocodes) are not listed consecutively. Sorting by Panel - Type: 6 columns of data (15 lines). It is important to note that macrocodes (CN2 and CN3) are not consecutive. The terminals (9 in total) are listed independently (not by group) under two individual panels (EIK3). It is important to note the significant number of lines obtained. Bill sorting by Panel - Type (or Type) gives the most detailed results. Compact view Code Reference and sheet are not shown in compact view. It is possible, however, to bring together all of the same codes belonging to the same panel. Sorting by Panel – Type in Compact view: 4 columns of data (5 lines). The un-encoded elements are placed at the top of the list and have 3 asterisks (***). The terminals (9 in total) are listed in 2 groups (one per panel), 6 and 3. The sorting of the Compact list by Panel – Type is often used as a list for specific purchases for every Panel. 256 • Spac Automazione 2011 Bill table This option that allows you to display the bill of materials in table form. Chart drawing parameters vary according to the needs of the moment and the chosen sort key (Type, Reference, etc.). Charts are drawn up with the data as output fields (parametric mode) by clicking on Table after having viewed the desired sequence on-screen. Each Tag contained in the "Available Fields" is information that is inserted into the "Output Fields" becoming a chart column by pushing Add. Each Tag has two variables, column width and title, that can be changed by clicking on Change. Number of lines This value breaks the chart up into various parts, even on different sheets. A decision is requested for a new insertion point (after completing the maximum number of lines) or to continue onto the next sheet. Text Height This is the height of all the text contained in the chart. This parameter proportionately influences the height of every line, and therefore the total height of the chart. Title height This is the height of the column titles, this parameter influences the total height of the chart. Table Width This is the total sum of the width assigned to every output field. The measurement is in millimeters. This value must never exceed the sheet width less the horizontal margins to avoid the chart going outside of its margins. Table Height Based on the maximum number of lines and the height of the text, the maximum size of the chart is calculated. This value must never exceed the sheet height less the vertical margins to avoid the chart going outside the margins of the title blocks. Standard This represents the basic configuration of the output fields (where necessary). 8 Bill of Materials • 257 Current configuration is stored "locally" (see Sect. 4.2) for future use by clicking on Default. If you confirm without clicking Default, the configuration will be considered temporary and used only once. The function requires: Select the table insertion point: The configuration of the previous figure corresponds to the following graphic result: Example of Internal Bill of Materials chart sorted by Reference. The configuration for chart drawing allows the following options: Insertion Point Request Line spacing (x2) When you need more than one sheet to complete the chart drawing, you can choose to change the chart insertion point on the subsequent sheets or not. The space taken up by every line is calculated in proportion to the configured text height. This parameter allows double-spacing to allow the insertion of two lines of text. This setup is particularly favorable for inserting translations. Sheet + Character When you need more than one sheet to complete a document, you can choose to continue on numerically consecutive sheets (new or already existing) or with numerically intermediate sheets (E.g. 1, 1A, 1B, etc.). In the list “Available fields” you can find data (Tag) Db.CodiceInterno, DbNote and DbPrezzo; differently to all other fields these 3 information are get from the materials database and not from the symbol content. It’s important to check which materials archive is set as default before processing. 258 • Spac Automazione 2011 CSV file Create an ASCII file for retrieving Internal Bill of Materials data by clicking on CSV file. Standard is the basic configuration of the output field (where possible). Every item in the "Available Fields" list is an attribute of the terminal or connector. Each attribute that is brought into the "Fields in output sequence" using Add is a column in the file. To export information that is not shown in the “Available Fields” list, you must insert the attribute name as “New Field”, and then insert it in “Fields in output sequence”. See ”14.8 Edit CSV”. In the list “Available fields” you can find data (Tag) Db.CodiceInterno, DbNote and DbPrezzo; differently to all other fields these 3 information are get from the materials database and not from the symbol content. It’s important to check which materials archive is set as default before processing. Default serves to store customized output for future use. It is advisable to use Microsoft Excel® to transfer the attributes to other programs and/or file formats (warehouse management for example): upon opening, the CSV file is presented in tabulated form as in the following figure: This setup makes it simple to change fields and format to best exchange information with other types of software. Setting “Preview CSV“ the file is written to disk, then automatically shown in preview mode, even if Microsoft® Excel is not installed. 8 Bill of Materials • 259 DMW File Pressing Save DMW you store the bill of materials (processed internally) in a file format that is the same generated with the “External” module. The DMW file (Bill of Materials Windows) is also compatible with “15.3 Topographic”. See “8.4 External bill of materials” In the previous versions, the passage of information between the Internal and the External Bill of Materials was through the DSS exchange files. 260 • Spac Automazione 2011 8.4 External bill of materials There are two ways to create the bill of materials, using the "Internal" function (see Sect. 8.3) or using the program "External" module in the graphic environment. The external module makes it possible to work on the bill order to make changes and updates freely. This system is decidedly slower than the internal function, but offers, among other advantages, greater flexibility, more data sorting options and higher information storage. The following window appears on the screen upon opening the program. Import from DSS file: the new bill of materials starts with the importing of data that have been taken from a drawing. DSS files are created using the command “8.5 Extraction by external module”. Empty: starts with a blank sheet. This option is almost always used for processing bills "manually". Open existing bill: a job is taken from an already existing bill by choosing among those available. Each bill is a file with a DMW extension. The name is chosen automatically by the program in some cases: Import DSS The name of the DMW file is the same as that which generated the DSS file. Empty The name of the DMW file is "WithoutName.dmw". To open or save a bill of materials: New Bill This is like saying "Empty" in the opening phase: a new "WithoutName.dmw" bill file is created. Open This allows you to load an already existing list. Save It is disabled when you are in "WithoutName.dmw". Save as It is possible to duplicate the current file (using a different name). It is important to give a name to a job begun as "WithoutName.dmw". Import/Export Bill This command includes import and export procedures for non DMW files. It is advisable to carry out import operations within an empty bill. Import DSS file Imports data that have been extracted from the drawing using the command “8.5 Extraction by external module“, to start a new job. Export DSS file This export operation serves to update symbol content on the diagram (alignment of data with corresponding symbols). Updating is effected with the command “8.6 Importing by external module”. Export CSV file Generates a file in CSV format (also compatible with Microsoft Excel for Windows). It is used for drawing up a bill of materials “Table” with the command “8.7 Import CSV”. As of recent version, you can store the content of “8.3 Internal bill of materials” directly in the DMW file format compatible with the external module “8.4 External bill of materials”. 8 Bill of Materials • 261 View rows The opening of a Dmw list allows the operator to work on a spreadsheet: Insert row We suggest setting up the two program windows related to the File (see Sect. 8.1) and the List, it is much easier to select an item directly from the file and drag it directly to the list. The same operation is also possible for introducing macrocodes. This operation creates as many lines as the codes being imported. It is also possible to insert manually all of the information that you consider necessary. Change row To change (or check) the data located in the list lines, just right click (on the line that interests you) and activate the command "View - Change". It is possible to change only one line at a time. Delete row It is necessary to select the entire record (by clicking on the button to the left of the columns the entire line is highlighted) and click "Delete" to remove a line. It is possible to delete only one line at a time. The data in the list can be sorted alphabetically in any of the columns based on 3 main viewing groups: 1) Detailed 2) Compact 3) Compact & Panel The data sequence can be chosen for every viewing group using the list (located to the left of the 3 buttons), only in this way can you activate the various combinations. The following figure shows the "detailed' List sorted by "Code - Reference": The Notes, Technical Notes, Prices and Dim. columns can also be viewed by moving the scroll bar to the right. 262 • Spac Automazione 2011 Some columns, such as Reference, Panel (or Zone) and Sheet columns, are not considered in "compact" view and the list is therefore notably reduced. Items with the same codes are summed in the same line. Double click on a column heading to sort the data according to that column, for example on Manufacturer: Free codes The green rectangle (symbol of an open segment) located to the left of a component reference means that the catalogue code is free; this normally happens when an article is not taken from the file but rather inserted manually. A "free" code can become "Tied to a file" only when it corresponds to an item contained in a current AMW file. Codes tied to a materials database The yellow rectangle (symbol of a closed segment) located to the left of a component reference means that the catalogue code is tied to the materials database, if the "Update from File" operation is performed, the various codes in the list are automatically changed according to the new file. A "Tied to File" code can become "Free" when you wish to manually make changes (on the description for example). 8 Bill of Materials • 263 Update from a file This operation allows you to update all codes (tied to the database) based on the new AMW file. This operation is often used to update already existing prices on the basis of a new listing. The update status can be accessed in the details for each code in the list. A code must be made "Free" to exclude it from the update operation. Print Printing of an External Bill of Materials can be configured by the user based on specific needs; every layout is a customized printing format. There are 3 default print layouts ready for use, these correspond to the 3 main view types: "Detailed," "Compact" and "Compact + Panel." Preview This allows screen viewing of the sheets that must be printed, this function is useful for checking the arrangement of data based on the layout chosen. Change You activate the sheet layout customization program by clicking on "Change" (optional for programming use); in this phase it is advisable to access the available online help. New This allows the creation of a new print layout, in this case you also activate the sheet layout customization program (optional for programming use). The instructions for every function are located only in the available online help. Delete This is to remove the printing template. Example of a Printed Bill of materials in Compact View. 264 • Spac Automazione 2011 Table To draw a processed bill of materials using the external module, you must first retrieve the data and then transfer them to the drawing using the command “8.7 Import CSV”. With the Import/Export command you must choose "Export to Excel (CSV file)": then continue with "Continue >>" to proceed with the next on-screen instruction. This operation creates a CSV file (also compatible with Microsoft Excel). When the export is finished you must enter the drawing and go to an available sheet. You draw charts with fields that return the processed data by using the “Return from External Module” command. Every item from the "Available Fields" list represents a chart column that can be moved to "Output Fields" by clicking on Add. Based on the type of sort chosen (by Type, Reference, etc.) the chart design parameters vary depending on the requirements. The current setup is stored for future use by clicking on Default. If you confirm without clicking on Default, the setup will be considered temporary. The result is graphically like in the following figure: Example of an Imported External Bill of Materials. These additional fields are also considered - Internal Code, Dim. and Price - when processing a chart compared to the Internal Bill of Materials (see Sect. 8.3). WARNING: The CSV file is created on the basis of the displayed view defined for the monitor. 8 Bill of Materials • 265 8.5 Extraction by external module Pop-menu > Util > List Utility This operation allows you to export the necessary information from job order drawings in order to create a Bill of Materials using an external program in the graphic environment (see “Import/Export ” Sect. 8.4). All of the multisheets selected from the list are processed. A scan locates all of the Components, Terminals and Connectors depending on your choice of setup; but only for panels of interest. Summary: (see Sect. 3.1). The scan finishes with a view of the list of all filtered data. Data are extracted in the form of .DSS files by clicking on the Export button. A file has the same name as the job order by default, but it is also possible to give a different name to distinguish various exports. We suggest saving DSS files in the corresponding job order directory. WARNING: In the DSS file generated by this command the “Supply codes” (see sect. 8.2 are not exported, as they are not managed by the External Bill of Materials. As of recent version, you can store the content of “8.3 Internal bill of materials” directly in the DMW filw format compatible with the external module “8.4 External bill of materials”. 8.6 Importing by external module Pop-menu > Util > List Utility This operation serves to update symbol content on the diagram, aligning data with corresponding symbols with those of the external Bill of Materials (see “Import/Export ” Sect. 8.4). The function requests that a .DSS file be selected for import, the information is transferred to all symbols that are in both the Bill of Materials and the current drawing. The attributes of the corresponding symbols are updated without further confirmation. This function effects the alignment of the contents in the “8.3 Internal bill of materials” with those processed by the external module, “8.4 External bill of materials”. 266 • Spac Automazione 2011 8.7 Import CSV file Pop-menu > Util > List Utility This command imports a Bills of Materials produced with the external module into multisheets, generating a “Table” drawing graphically (see Sect. 8.4). The function requests the choice of a CSV file to import. This file is created with the “8.4 External bill of materials”, by the Import/Export function, by selecting Export in Excel (CSV file)”. See ”14.8 Edit CSV”. This function can import and configure a table related to any CSV file. 8.8 Filter materials database Pop-menu > Util > List Utility This function is used to capture information (the prefix in particular) from a selected symbol for storing in the Filter.ini file (in the Program\Distinta directory). This information is used by the Materials Database program to filter the display of items in the database so as to simplify searches. If, for example, we select a switch symbol, the function shows the message: *** Filter Generated QF The Materials Database accepts the command “Associating filters” (see Sect. 8.1). The various characteristics correspond to the items in the database. 8.9 Disassociate materials Pop-menu > Util > List Utility This command allows you to remove the material codes associated with components, thereby canceling the effects of the “8.2 Associate materials” command. This function acts on a Current Sheet or multisheet. Associated material removal is carried out by removing all of the attribute content symbols in the Manufacturer and Type, while the original default value is restored into the Description attribute. 8 Bill of Materials • 267 8.10 Bill comparison using CSV file Pop-menu > Util > List Utility This is used to highlight differences between two Csv files having the same column number. Useful to compare two different Bill of Materials, or know modifications done during the work progress. The two buttons “…” browse for base file and file to compare. The following figure shows a comparison window, differences among files can be filtered in three groups: New, Modified and Erased. Example of Csv file comparison. Table Pressing button Table (after the choice of at least a filter) are generated tables (for New, Modified and Erased) containing differences only. CSV file Pressing button CSV file (New, Modified and Erased) are generated three files containing differences only. It's possible to compare Bills generated with the same sorting settings. The presence of field "Reference" (Name) is compulsory. WARNING: comparison can't be done in case the two files have different column headings or different fields number (columns). 268 • Spac Automazione 2011 8.11 LibCenter Pop-menu > Spac LibCenter is a specific programme to quickly insert symbols. It can be used as an alternative to the “traditional” method where symbol insertion is carried out through the pop-up menu of the library chosen (See parag. 17.3). In the LibCenter the symbols are divided up into groups and sub-groups, searching for a component is easy due to the tree-view structure of the programme and it is possible to browse down to selection of the symbol visible in the preview window. When the LibCenter is functioning, the operator has available the drawing area and also a dialogue window that is always active in a similar manner to the properties window in AutoCAD. Its functioning mode is very simple, after having selected the symbol to be inserted on the display, just drag the block with the mouse (Drag & Drop) to the drawing area, when the (left) mouse button is released proceed to select the insertion point. NOTE: Drag & Drop is performed by keeping pressed the left button on the mouse from the LibCenter window to the drawing area. After selecting the insertion point on the diagram page, the functions available vary according to the type of symbol. Example LibCenter See ”17.3 Symbol insertion”. In the symbol preview window it is possible to perform the zoom command (indicating 2 points without releasing the left key of the mouse) or the Pan command (indicating 2 points without releasing the right key of the mouse). The function mode of LibCenter is similar to “Drawing mode” of DbCenter. 8 Bill of Materials • 269 8.12 DbCenter Pop-menu > Util > List Utility DbCenter is a new way to interface drawing and material database, allowing quick material codes associations, it is used alternatively to command “8.2 Associate materials” and is more powerful and rapid. When DbCenter is active you can see a toolbox window on your left; its behavior is similar to the CAD program Properties window. This window lets you interact simply and quickly with the materials database (see “8.1 Materials database”) searching for codes or macrocodes that can be “Dragged&Dropped” in the drawing area. The procedure is very simple, after the selection of the material code to associate to one or more objects of the drawing, it's sufficient to drag it with the mouse pointer (Drag&Drop) and release the mouse button over the drawing object to be associated. The new code is always added (without further confirmations) to the one(s) already existing. The new code replaces (without further confirmations) the existing one(s) (if any) in case the Drag&Drop operation is done while pressing the Shift [ ⇑ ] key. NOTE : the Shift button has to be pressed before beginning the drag&drop operation, and kept pressed during the entire procedure. If the mouse button is released over an invalid object (or over an empty region, by mistake or by choice) you are asked to select one or more objects on the drawing to associate the material code to. Alternatively to Drag&Drop, you can double click the material code (in the DbCenter tool window) and then select one or more objects on the drawing. DbCenter example DbCenter counts three tool windows: - Materials database TreeView - Associated materials list - Drawing mode - Filters See ”DbCenter Toolbar”. 270 • Spac Automazione 2011 Materials database TreeView This is used as 'navigator'' through the typical archive groups Manufacturer and Family. For each material are displayed code and description. Materials are usually sorted by code, but can be sorted by description pressing button “Sort by description” you can find in DbCenter toolbar. Tool windows can float over the drawing area, or be hooked on the left or right side. You can activate the “Find” function by right clicking the mouse (from any tree position) . Right-click the code to view details of the selected code. Alternatively to materials this window can show macrocodes stored in the database (group of materials) by pressing button “Show macro” in the DbCenter toolbar. In this case you can navigate through the defined macro list. For each macro are displayed manufacturer, code and description of materials of which it is composed. Like codes TreeView, right-clicking the code you can display its details. Codes TreeView Toggling again “Show macro” you go back to Codes TreeView. MacrocodesTreeView Find Codes You can search in the entire database, for an individual manufacturer or for a specific family, depending on the position on the tree when you right click on the mouse. You can insert the string being searched for or use the wild card character “*” to carry out multiple searches. To view all codes found in sequence press “F3”. Search for a code Back to “8.12 DbCenter”. 8 Bill of Materials • 271 Associated materials list Lists materials already associated to an object of the drawing. This tool window is shown pressing button “Show materials” in the DbCenter toolbar. The tool window can float over the drawing area, or be hooked on the left or right side. To display the material codes associated to an object just select it: the corresponding object on the drawing will be highlighted by a color 6 dotted rectangle. You can Delete a material code from the list (pressing <Del> key or using the menu that appears rightclicking on the list) or Find it in the database to search for more details. To search for a code in the materials database, you must right click in the TreeView (from any tree position) and activate the “Find” function. To view all codes found in sequence press “F3”. If the PickAdd button (to control the item selection method) is on, the associated materials list always refers to the last symbol selected. Back to “8.12 DbCenter”. 272 • Spac Automazione 2011 Drawing mode Pressing the “Drawing Mode” key, the symbol preview window appears. Preview is only active for material codes, which have been configured for this mode. The configuration is performed by the “Materials database” (See parag. 8.1), in data panel “Electrical BLK”. This mode enables the user to draw the symbol directly on the wiring diagram, it is sufficient to drag the symbol with the mouse and drop it in the drawing area (Drag & Drop) and then proceed to select the insertion point. Pressing the Shift [ ⇑ ] key on the keyboard, only the material code is dragged, exactly the same as what happens when the “Drawing mode” button is turned off (especially useful for code not associated to any symbol). In the symbol preview window it is possible to perform the zoom command (indicating 2 points without releasing the left key of the mouse) or the Pan command (indicating 2 points without releasing the right key of the mouse). Icons Identifies a code not associated to a symbol. Identifies a code associated to dimensions (in the data panel “Layout”). Identifies a code associated to a symbol (in the data panel “Electrical BLK”). The codes highlighted with this icon are valid for drawing mode. With “Drawing mode” off only the material code can be dragged. With “Drawing mode” active, pressing Shift [ ⇑ ] only the material code can be dragged. With “Drawing mode” active a symbol paired to the material code can be dragged. Return to “8.12 DbCenter”. 8 Bill of Materials • 273 Filters This is used to search in the database applying filters to stored data in order to list only the search result in the tool window. The dialogue is activated pressing button ”Filter settings” in the DbCenter toolbar and can float over the drawing area, or be hooked on the left or right side. There are two filter types: Filters defined in database: in this case you can use (if existing) filters defined in the database, e.g. Data1, Data2 or Data3 (see Sect. 8.1 “Define a filter”). Once set the filter press button “Apply filter ” to start the search. Database defined filters Manual filters: in this case the filter is composed of a maximum of three consecutive strings in the three text boxes; these are searched as substrings in the material codes, macros or descriptions. Moreover this search can be filtered on a single manufacturer specified in the combo-box. Once set the filter press button “Apply filter ” to start the search. Manual filters Applying a filter causes a materials database rebuild: The background color of Materials database TreeView changes, to remind you that listed materials are less than the whole because of the applied filter. Button “Apply Filter” in the DbCenter toolbar appears pressed, because the filter is active. Toggling again “Apply Filter” you go back displaying the entire database, and the TreeView background color changes to the standard one. Filters are not destroyed, so it's sufficient to toggle “Apply Filter” to apply the last used filter. Automatic filter If the “Apply Filter” is activated when the PickAdd button (to control the item selection method) is off, the database is filtered automatically (based on the component name prefix) while the items are selected. Back to “8.12 DbCenter”. 274 • Spac Automazione 2011 DbCenter Toolbar The toolbar contains all the buttons necessary to use and customize DbCenter. Database location When using DbCenter the first time you are asked to specify the Material Database file path and name (file with .amw extension). Pressing this button you can specify another file. Update Materials database TreeView is updated, this “refresh” can be useful when materials database is shared and has been modified in the meantime. Show macro Tool window changes to macrocodes TreeView. Sort by description Materials are usually sorted by part item code; pressing this button they are sorted by description. Show unassociated blocks Press this button to highlight drawing objects (blocks) with no material code associated. The command ends answering "Yes" to the command line question “Go back to previous view? [No] <Yes>”. Show materials Toggles the tool window “Associated materials list”. PickAdd Control of item selection method If off, the last item selected replaces the one selected previously, which is removed from the selection. This happens when working with the automatic filter. If on, each item selected is added to the current selection group. In this situation the database filters are not updated automatically (with Apply filter on). Filter Settings Toggles the tool window “Filters”. Apply filters Is automatically activated when listed materials database is filtered. Toggling button “Apply Filters” you go back listing the entire materials database. Drawing mode This mode allows the user to draw a symbol directly on the display. Help Run on-line help. Back to “8.12 DbCenter”. 8 Bill of Materials • 275 276 • Spac Automazione 2011 9 Overtemperature 9.1 Overtemperature calculation Pop-menu > Layout This program is designed to calculate overtemperature for low voltage equipment, as described in IEC standards 17- 43. The power dissipated by each individual component installed in the panel is summed up, then the cabinet overtemperature calculated according to appropriate formulae. The results can be sent directly to the printer or imported into the drawing. Starting the program “Overtemperature calculation” can be started in three different ways. 1. From the program directory. 2. From the drawing, with the "Overtemperature" command. 3. When processing an individual panel, the direct access button to “Details displays all component data. 4. Overtemperature” appears under “8.3 Internal bill of materials“. New A new design can be created using this command starting from a blank slate. Open This is used to open an existing design stored in the file with PRQ extension. Save This is used to save the design in a file with PRQ extension. The default save directory is the job directory. Print This opens the design and data preview. General data and calculation results are displayed on the first sheet; a list of the components installed within the panel appears on successive sheets. The character font can be customized before confirming the print 9 Overtemperature • 277 Panel window This is the main working directory as it contains most of the information relating to panel features. Installation type: The following installation modes can be specified by clicking on the plan views, whilst a special command enables you to specify whether the panel has a covered top: • Separate cover, exposed on all sides • Separate cover for wall mounting • Central cover, exposed type • Central cover, wall mounted type • First or last cover, exposed type • First or last cover, wall mounted type Dimensions: The exact dimensions of height, width and depth can be selected or entered for the panel in question. A database can be created to store the dimensions for the most frequently used panels. See Panel database. Options: The number of horizontal baffles within the cabinet can be entered or set. Horizontal baffles significantly affect the calculation. Enter or set the Usage factor for the components mounted within the panel. Setting this to 1 determines that all component dissipation values will be used as indicated in the table. If, for example, 0.8 is entered, the calculation is effected using 80% of each component dissipation value. Enter or set the Simultaneous usage factor. Setting the value to 1 determines that all components will always operate simultaneously. Ventilation: The type of ventilation planned for the panel can be set as follows: • Closed (no ventilation) • Natural ventilation • Forced ventilation • Heat exchanger • Forced cooling If Natural ventilation is set, a new dialogue window appears in which to indicate the size of the ventilation window (in square centimeters). Thermal transmission co-efficient: This is used to select the type of material from which the cabinet is 2 made in order to determine the value of the thermal transmission co-efficient [W/m . K] needed for the cabinet climate control calculation (see Sect. on Ventilation). The value may be selected from a list of standard types (polyester, stainless steel, painted steel plate, aluminum, etc.) or customized using new types via the Databases menu. Calculate This button starts the calculation process, which displays the results on the right hand side of the window in use. Displayed results are set to zero every time the calculation parameters are changed. The F5 button also calls up the calculation function. Print This button opens the print preview window that displays design results and data. General data and calculation results are displayed on the first sheet; a list of components installed within the panel is displayed on successive sheets. 278 • Spac Automazione 2011 Export to drawing This option exports the data relating to the results; command “9.4 Overtemperature“ produces on the drawing a graphic representation of the panel with the summary of results. HEIGHT Panel height WIDTH Panel width DEPTH Panel depth EXPOSURE Installation type BAFFLES Number of horizontal baffles F_UTIL Usage factor F_CONT Simultaneous usage factor PSUPD Upper Wall Dimension PANTD Front Wall Dimension PPOSTD Rear Wall Dimension PSXD Left Side Wall Dimension PDXD Right Side Wall Dimension PSUPT Upper Wall Surface PANTT Front Wall Surface PPOSTT Rear Wall Surface PSXT - PDXT Left Side Wall Surface - Right Side Wall Surface FSUP Upper Wall Factor b FANT - FPOST Front Wall Factor b - Rear Wall Factor b FSX - FDX Left Side Wall Factor b - Right Side Wall Factor b PSUPJ Upper Effective cooling surface PANTJ Front Effective cooling surface PPOSTJ Rear Effective cooling surface PSXJ Left Side Effective cooling surface PDXJ Right Side Effective cooling surface SUPTOT Total Effective cooling surface POWTOT Total power dissipated by components POWDISS Power effectively dissipated by components T1 diff. Temperature difference at top of panel T05 diff. Temperature difference at mid panel PRAD Maximum power radiated by panel TMED Average Temperature within panel TMAX Maximum Temperature within panel T_EXT Ambient temperature T_INT Maximum specified temperature within panel DESCRBOX Panel installation type TYPEBOX Panel description VENTNAT Ventilation aperture (cm ) VENTFORZ Specified fan flow rate SCAMB Specified heat exchanger efficiency KOND Specified air conditioner cooling power EXTFORCEQD Cover constant: “False” for metallic cabinet, “True” for forced value. BOX_K_DISTR Value of “cover constant”. BOX_MATERIAL_NAME Description of panel material. BOX_MATERIAL_K 2 Thermal transmission co-efficient [ W/m . K ]. 2 9 Overtemperature • 279 Panel component window The features of components mounted on the panel under consideration can be specified in this window. If the Starting the program is done using option 1 or 2 (as indicated before), the component list is empty. If, on the other hand, the program is started by running the bill of materials for a panel, the list will already contain all the components of the chosen panel. The following commands can be effected using the right-hand mouse button: New line Insert a new line in the list. New last line Insert a new line at the foot of the list. Delete line Delete the selected line. Sort on Sorting on various list fields. Each line in the table provides for the completion of the following fields: Reference Reference to be displayed on the screen for the component (optional). Type Material code (optional). Description Component description (optional). Q.ty Quantity (mandatory). P.diss [W] Power dissipated by the component (mandatory). Manufacturer Manufacturer (optional). Only the fields indicated as mandatory are essential to the calculation. General info A panel for setting and displaying general data is located in the lower right-hand corner of the window. From here, the following settings can be configured: • Ambient temperature of the location for the panel under consideration • Maximum temperature specified for the panel interior The value of the power radiated from the panel surface is calculated by the program according to the panel dimensions, thermal transmission co-efficient and temperatures and is displayed in the "Max power radiated by panel" field. 280 • Spac Automazione 2011 Results A results display panel is located in the upper right-hand corner of the window. The default values are normally 000000 and can be updated by clicking on the Calculate button. Panel power consumption Sum of the power consumed by all components installed in the panel. Panel power dissipation Sum of the power consumed by all components installed in the panel multiplied by usage factor and simultaneous usage factor. Effective surface area Effective cooling surface (see Basic Concepts) T1 diff. at top of enclosure The overtemperature value of the air in the upper part of the panel enclosure (see Basic Concepts). T2 diff. at mid height The overtemperature value of the air at mid height in the panel enclosure (see Basic Concepts). Average temperature in panel enclosure Average temperature within the panel enclosure. If the value exceeds the specified maximum temperature within the panel enclosure, the result is displayed in red. Maximum temperature The maximum temperature reached within the panel enclosure. If the value in panel enclosure exceeds the specified maximum temperature within the panel enclosure, the result is displayed in red. Whenever cabinet ventilation is requested, a specific dialogue window in the lower left-hand side of the window highlights the characteristics which the cooling equipment should possess to keep the temperature lower than, or equal to, the internal temperature requested. 9 Overtemperature • 281 9.2 Design information The data given here are used in the results printout header. These are not mandatory data; wherever they are not indicated, the spaces in the printout remain empty. Panel database The dimensions of the most frequently used panels can be saved in this table. Each line of the table provides for the completion of the following fields: Description Description of Panel for selection purposes. Height Panel height in centimeters. Width Panel width in centimeters. Depth Panel depth in centimeters. Air intake area Ventilation aperture dimensions in square centimeters. Baffles Number of horizontal baffles within the panel. Ventilation Type of ventilation specified. An empty ventilation field indicates that the panel can be used with any type of ventilation. If the field is filled with a value from 0 to 4, the cabinet is associated with a type of ventilation: 0 = Closed (no ventilation) 1 = Natural ventilation 2 = Forced ventilation 3 = Heat exchanger 4 = Forced cooling Several panel database files can be stored under any name using the File drop-down menu. The program Librerie\Overtemperature directory is the default saving location. The created file always has a .DAT extension. A saved file can be opened by using the Open option from the File drop-down menu in the Panel database. Components database Specifications for the most frequently used components can be stored in this table. Each line of the table provides for the completion of the following fields: Manufacturer Name of manufacturer Description Component description Dissipated Power Power dissipation in Watts Several component database files can be stored under any name using the File drop-down menu. The program Librerie\Overtemperature directory is the default saving location. The created file always has a .DAT extension. A saved file can be opened by using the Open option from the File drop-down menu in the Component database. 282 • Spac Automazione 2011 Panel constants database This table can be used to store the thermal transmission co-efficients relating to the type of material of which the cabinet is made, expressed in W/m2 . K necessary for calculation of climatic cabinet (see Sect. on Ventilation). Each line of the table provides for compilation of the following fields: Italian Panel description for selection in that language. English Panel description for selection in that language. French Panel description for selection in that language. Spanish Panel description for selection in that language. German Panel description for selection in that language. Constant value Value of thermal transmission co-efficient. Several panel constant database files can be stored under any name using the File drop-down menu. The program Librerie\Archivi directory is the default saving location. The created file always has a .DAT extension. 9 Overtemperature • 283 9.3 Calculation – basic concepts Basic concepts of overtemperature calculation can be displayed and printed. The document is in PDF format. Calculation of internal panel overtemperature according to IEC standard 17 – 43. Basic concepts The overtemperature value inside cabinets and distribution panels, under operational thermal conditions, must be predicted precisely in the panel design stage. The air temperature inside individual cabinets must be compatible with the admissible overtemperature for the components and for the enclosure itself as defined by IEC standards EN 60439. Calculation of the air overtemperature for ANS panels using the IEC standard 17-43 calculation method can substitute actual testing. The following data are necessary to calculate the air temperature inside a panel: • Panel height, width and depth • Presence or absence of ventilation openings • Installation type • Number of horizontal baffles inside the panel • Effective power dissipated by the equipment installed on the panel Installation type particularly influences the effective panel surface area that contributes to shedding heat produced by components. Installation type Factor b Exposed upper surface area 1.4 Covered upper surface area 0.7 Exposed lateral parts 0.9 Covered lateral parts 0.5 Central casing lateral parts 0.5 Base surface area Not considered The effective cooling surface Ae of an enclosure is given by the sum of the individual surfaces Ao multiplied by the surface area factor b. Ae=A1b1+ A2b2+ … Anbn Factor b = surface area factor according to installation type (see preceding table). The temperature gradient inside a panel varies with height; the hottest point is at the top. The overtemperature value at mid panel is calculated using the following formula: DT2 = kdpx K The panel constant depends on the total cooling surface area Ae and on any ventilation apertures (casing constant). d This factor takes into account the dependence of overtemperature on the number of internal baffles. p Power in watt dissipated by the equipment on the panel. x Exponent equal to 0.804 for panels without ventilation apertures and 0.715 for those with ventilation apertures. 284 • Spac Automazione 2011 The overtemperature value of the air in the upper part of the enclosure is calculated using the formula: DT1 = c DT2 c The temperature division factor within the panel depends on the type of installation. Ventilation The “Max panel radiated power” necessary for calculating cabinet climate control, is calculated by the program and displayed. Calculation of the radiated power emitted from the panel surface area (cabinet) is effected as follows: Ps = K . Ae . (Ti – Tu) K Thermal transmission co-efficient [ W/m2 . K ]. Typical values are, for example: K = 3.5 W/m2.K for polyester cabinets K = 3.7 W/m2.K for stainless steel cabinets K = 5.5 W/m2.K for laminated plate cabinets K = 12 W/m2.K for aluminum cabinets Ae Effective calculated radiating surface area of cabinet [m2]. (See calculation basic concepts) Ti Required internal temperature [°C ]. Tu Ambient temperature [°C ]. Thus: Ps < 0 incoming radiation (Ti < Tu) Ps > 0 outgoing radiation (Ti > Tu) The required cooling power will consequently be calculated by the following formula: Pk = Pv – Ps where Pv is the total power installed, dissipated in the panel [ W ], obtained through calculation across the sum of powers of the components installed in the panel, the usage factor and the simultaneity factor. Where Ps < 0, the cabinet climate control must consist of an anti-condensation heater. Closed (no ventilation) The only dispersion of heat in this case occurs through the casing. Natural ventilation Heat dispersion is aided by openings in the casing. In this case, the program does not restore any value relating to the openings but indicates only the temperatures reached in the panel. 9 Overtemperature • 285 Forced ventilation Forced ventilation is necessary to aid heat dispersion whenever the temperature within the panel exceeds the maximum admissible temperature for the components used. On completion of the calculation, the volume of air necessary for maintaining the required temperature will be indicated. The value is obtained by the following formula and expressed in cubic meters/hour: Pv - K . Ae . (Ti – Tu) Air volume = f (h) . [ m3 / h ] (Ti – Tu) where f (h) is the height exercise factor at sea level. Specifically: f ( 0-100 m) = 3.1 m3 . K/W . h f ( 100-250 m) = 3.2 m3 . K/W . h f ( 250-500 m) = 3.3 m3 . K/W . h f ( 500-750 m) = 3.4 m3 . K/W . h f ( 750-1000 m) = 3.5 m3 . K/W . h In the calculation made by the program, the average value selected is 3.3. Heat exchanger Heat exchangers work with two separate ventilation circuits. The warmer air in the panel is pushed down by a fan from above, towards a separate element with blades on a large surface area. A second fan works externally, in the opposite direction. This method emits a flow of heat from the panel. On completion of the calculation, the thermal power needed to maintain the required temperature is indicated. The value is obtained from the following formula: qw = Pv (Ti – Tu) - K . Ae [W/K] Forced cooling The coolers work on the same principle as household refrigerators; cooling circuit and component aeration is effected by a fan and air circulating within the panel. The temperature inside the panel can be lowered to a value below ambient temperature using this system. On completion of the calculation, the power necessary to maintain the required temperature is indicated. The value is obtained from the following formula: Power of cooling group = Pv – Ps [ W ] 286 • Spac Automazione 2011 9.4 Overtemperature table Pop-menu > Layout After effecting “9.1 Overtemperature” for a particular panel and having exported the data to drawing, this command produces a design summarizing the results. The operation requires, first of all, specification of the symbol for the template to be designed, and then the .OUT file to be imported (the selection dialogue box opens by default in the current job directory); the result is similar to the following figure: Detailed overtemperature table (Termic0). The symbol used is Termic0.dwg and can be found in the program Librerie\Simboli directory for any customization needed. The name Termic1 can also be found in the same directory, to be used as a compacted table for importing results for two panels onto the same sheet (A3 format). New blocks can be customized whilst keeping the attributes unchanged, and saving must be carried out in the same window as those already present. The block name must be consecutive to already existing names (Termic2, Termic3, etc.), with a maximum of 20 blocks (the dialogue window can display a maximum of 20 fields). Deleting a symbol compromises the display of any symbols following on numerically. 9 Overtemperature • 287 288 • Spac Automazione 2011 10 Single feed Draw 10.1 Single feed Draw Pop-menu > Single Feed Macro This command is used for the graphical creation of the single feed schemes. As soon as it is activated, it opens the program window showed bellow, where the user is prompted to insert the data required for the protection and the line. Example of a fast compilation of the fields using a Drag&Drop approach. Protection (Primary and Secondary) Selecting from the possible combinations, it is necessary to set the primary and secondary protection; the code and other data required (related to the protections) could be “moved” directly from the DbCenter with a Drag&Drop approach (see section “8.12 DbCenter”) to the codes of the protection of interest. The data “displaced” is inserted on the protection with the flag code activated. 10 Single feed Draw • 289 Line The line descriptive data (polarity, length, etc.) must be typed manually, while the cable type must be selected from the codes on Cable database (pressing the “…” button). By selecting “Arrival” it is possible to design a new line starting on the general distribution or even on a new sub-panel. The function requires the indication of the following points: Specify the line’s starting point... Specify the intermediate point N°1 Specify the intermediate point N°2 … The request of intermediate points could be finished by pressing “Enter” from the keyboard. Arrival On the final point (5) a Start Return is inserted. By selecting “Return” a new line is designed, or a new sub-panel is defined. The function requires the indication of the following points: Specify the line’s starting point... Specify the line’s end point... On the final point (2) a Start Return is inserted. Return By selecting “Terminal” a new line is designed with the characteristics of the terminal block. The function requires the indication of the following points: Specify the line’s starting point... Specify the line’s end point... On the final point (2) a Terminal is inserted. Terminal The terminal is associated to the Panel and Terminal Block configured. During the execution of the single-feed design, the single-feed tables are automatically filled. The definition of the table to be filled is done by identifying the table aligned vertically to the first point (point 1) of each drawing (see section “10.3 Single feed Data tables”). Obviously the filling of the table is executed if it is present on the drawing and not for those inserted subsequently. Command always active The command is recalled automatically in a cyclic way. Multiple Insertions The drawing is repeated without recall the command. It is suggested to insert the “Single-Feeds Table” before the execution of the single-feed drawing. WARNING : The commands for the single-feed design are active only if the Single-Feed symbols (UNIF) are configured by command “4.1 Setup”. 290 • Spac Automazione 2011 10.2 Single feed Number wires Pop-menù > Single Feed Macro This is a specific command for the wires numbering on the single-feed schemes. The single-feed wires numbering assigns several wire values to each single wire (line): The quantity of values assigned depends on the “Polarity” configured for each line during the graphical design (see “10.1 Single feed Draw”). This command can be used easily; it is enough to set the start number and the combination of prefix / suffix to be used. The traditional wires numbering should not be used for this type of schemes (not adequate), in this case a single wire value is assigned to each single wire (each line). Wire numbering of Single-Feed drawings The option “Enable PE insertion” is used to add a connection with a dedicated terminal (visible in the terminal block). As for the traditional wires numbering, it is possible to select the wires to be numbered one at a time or all together using the “fence” between two points as indicated in the figure. See “5.1 Number wires”. The wires numbers inserted with this type of numbering are counted in the same way as the wires inserted with the traditional command. WARNING : The commands for the single-feed design are active only if the Single-Feed (UNIF) symbols are configured from the command “4.1 Setup”. 10 Single feed Draw • 291 10.3 Single feed Data tables Pop-menù > This command opens the “Data Tables” macro-symbols library that contains the typical data of the SingleFeed schemes. The command presents 8 sample tables of “10-circuit data tables” that could be inserted manually in each single-feed sheet. These macro-blocks has attributes for the fast insertion of the table’s data (these can be changed later with commands “Eattedit” or “Ddatte”). The insertion of the tables is done in coordinates 0,0. The tables’ symbols are memorized on the SPAC Librerie\Unif folder. Each .dwg block has an .sld image (slide) associated with the same name for the visualization on the dialogue box. It is possible to customize new table symbols memorizing them on the same folder of those contained in the system. The block name must be consecutive to the names already present in the system (Cdati10-8, Cdati10-9 etc.) for a maximum of 20 tables (the dialogue box could visualize a maximum of 20 windows). The tables with “10-circuit data tables” are composed by 10 blocks of a length of 40mm : The first “descriptive” block on the left is a graphical symbol with the textual descriptions of the fields contained on the next blocks. On the right of the 1st “descriptive” block there are 9 copies of the “data” block (equal for all the circuit data tables). These tables are automatically filled in the single-feed design phase (see “10.1 Single feed Draw”). The research of the table to be filled is executed by identifying the table that is vertically aligned to the first point in each drawing. For this reason it is suggested to insert the “Single-Feed data Table” before the design of the single-feed drawing. Example of a Data Table with “10-circuit data tables”. The deletion of a symbol can affect the visualization of those numerically consecutive. WARNING : The size of the Table with “10-circuit data tables” requires the use of an adequate template (see section “Master”), Master-Unif and Master3 are appropriated symbols (useful length of 400mm). The symbols of the Master0 ,1 and 2 templates are not adequate because of their reduced dimensions. 292 • Spac Automazione 2011 10.4 Edit Single feed Circuit Pop-menù > Single Feed Macro This command is used to modify the data in the single-feed schemes. By selecting the single wire (line) of the circuit to be modified, the program opens the same window used for the design. In this window it is possible to insert new data using a Drag&Drop approach directly from the DBCenter (see“8.12 DbCenter”). The data “displaced” is inserted on the protection with the flag code activated. Example of Edit single -feet circuit with Drag&Drop. See “10.1 Single feed Draw”. WARNING : The commands for the single-feed design are active only if the Single-Feed (UNIF) symbols are configured from the command “4.1 Setup”. 10 Single feed Draw • 293 10.5 Import Single feed Pop-menù > Single Feed Macro This command consents the automatic execution of the functional Single-Feed scheme both with the graphical representation and the “data tables” (see section “10.3 Single feed Data tables”). The functionality Import Single-Feed Scheme uses the .txt files on the current Job Order folder. These files are created by SPAC Impianti (in planimetrics mode) or by Caneco calculation software (optional). The files created by Caneco calculation software (optional) allow the automatic filling of the “data tables” with the results obtained by the calculation. It is important to save the Caneco project, on the Job Order folder with the files _IMP.TXT to be imported. The configuration of the “Y Coordinates” corresponds with the components position as indicated on the figure: The size of the Table with “10-circuit data tables” requires the use of an adequate template (see section “Master”): Master-Unif and Master3 are appropriated symbols because they have a useful length of 400mm, while symbols of the Master0 ,1 and 2 templates are not adequate because of their reduced dimensions. Order of Returns The design starts in the current sheet and continues (when requested) on those consecutives. The circuits placement is done according to two possible priorities. From Caneco Circuits are designed with the same placement visible in Caneco. Alpha-numerical Circuits are designed in an alphabetic order according to the reference ID. This configuration does not exclude the possibility to execute future modifications and customizations with the regular design tools. WARNING : The commands for the single-feed design are active only if the Single-Feed (UNIF) symbols are configured from the command “4.1 Setup”. Caneco is an optional software that is not provided with SPAC Automazione (www.caneco.eu). 294 • Spac Automazione 2011 11 Cables 11.1 Cables Pop-menu > Util The necessary cables can be processed only when the terminals and connectors for connections have been placed correctly on the electrical diagram (see Sect. 6.1). If the “20.1 Cable module” program is available (optional), the program requests confirmation of the type of processing to be carried out. All numbered, valid wires connecting components which belong to different panels are extracted from the drawing during data processing. When a drawing is executed correctly, these wires must be connected to an output terminal block on the first panel and to an input terminal block on the second. As a rule then we can thus state that: a wire is intended as a possible cable connection when it is connected between two terminals or connectors belonging to different panels (direct connection). Look at the following illustrated cases carefully: All connections must be made either above the first terminal or below the second; Figure 2 illustrates a connection violating this rule. Each terminal (or connector) must have a single input and output wire. Figure 3 illustrates a connection violating this rule. 1 2 3 YES NO NO Example of a cable connecting terminal block M1 on panel =QG (MAIN PANEL) to terminal block XP1 on pushbutton panel =P1. Figure 1 (left) illustrates the only correct manner for drawing a cable connection. All the multi-sheets selected in the list are processed by pressing Scan multisheets. Cable data stored previously (using Save) can be accessed rapidly via the Use Saved Files option to avoid repeating scans. It is advisable to select as the Start panel the one that provides the greatest number of connections to other panels. This leads to a better, more global perspective of the connections to be made by cable association 11 Cables • 295 The figure below shows an example of two circuit parts: The elements are located on the following panels: Main panel =QG terminal block M1 QF1, QF2, KA1 and KM1 Pushbutton panel =P1 terminal block XP1 HL1 (lamp) Machine =BM terminal block XM1 M1 (motor) The panel =QG is connected to pushbutton panel =P1 by conductors 100 and 101 and is also connected to machine =BM by conductors 203, 204 and 205. Since =P1 and =BM are not connected, it is advisable to set =QG as the "start panel" before scanning the multisheet. Any deletion of motor M1 terminals (terminal block BM XM1) results in processing as a direct connection. The following dialogue window appears after scanning: 296 • Spac Automazione 2011 The dialogue window shows wires 203, 204 and 205 connecting component KM1 terminals and motor M1 as illustrated in the previous diagram. Clicking on NMP or WIRE lets the user choose the sequence in which the data are displayed. All conductors which are necessary in the drawing to connect the various panels are displayed by choosing between the start and destination panels. NMP The NumM (terminal number) value indicated on the start terminal (upstream). NMA The NumM (terminal number) value indicated on the destination terminal (downstream). Usage The content of the service attribute (optional) is indicated on the downstream terminal. If the usage information is given, it must correctly indicate which component the downstream terminal is connected to (see Sect. 6.4). Cable Indicates the cable reference; the information is only displayed for associated wires Conductor Indicates the reference, number or name of the wire of the indicated cable. Definition The “11.2 Cable definition” command is used to create new cables. Current cable All defined cables appear in the list by pressing the "Cables" button or the one associated with the currently selected wire. When the optional “20.1 Cable module” program is available, the program requests confirmation of the type of processing to be carried out. Cable selection Two cables have been stored using command “11.2 Cable definition” one with reference C1 (10x1.5, for connecting to the pushbutton panel =P1) and another with reference C2 (4x4.0, for connection to motor M1). 1. Now select panel and terminal block for start =QG XG and destination =BM XM1. 2. Select C1 from the Current cable list, in order to view the make-up in terms of conductor number, diameter and type in the right-hand column. 3. Click on wire PE, then click on the conductor chosen for the selected wire in the second column, e.g. conductor 1; the connection is made by pressing Associate (Alt+A). Repeat the operation for wire 71, associating it with conductor 2. Alternatively, click on "Select all" and on the first conductor; pressing Associate renders the connection automatic for all successive wires and conductors (Automatic association). Press Disassociate to remove an association. Press "All" and then Disassociate to remove all associations from a cable, or use the quicker Reset option (for the current cable). Conductors marked with " < " contain by wires on the current list. Conductors marked with " > " contain by wires from other combinations. 11 Cables • 297 Now select destination panel and terminal block =BM XM1. 4. Select C2 from the Current cable list (C1 does not appear it has already been used). 5. Pressing Associate connects wires 129, 130 and 131 with conductors BU, BN and BK (3 of 10 conductors). 6. Press Save to store everything created so far. The graphic results can be viewed in the “Draw cables” and “Cable table” sections. This button is used to check which wires have been associated, as the job is not completed until all wires have been highlighted. Saving transfers all data from this make-up to the wires drawn in the diagram. Access "Use saved files" to continue working on the saved data. Automatic Association Point (4) of the previous example demonstrated the association of a wire with a cable connection; several wires can be associated with several cables simultaneously to speed up the process: In the previous example, the 2 wires could have been selected (by pressing All), followed by the first pin in the association; now, pressing Associate would link all the available pins. Wire details "Details" enables all possible data for a wire to be viewed together, including the number of the page ("sheet" option) on which it is drawn and the multisheet containing the page. Controls Some wires are discarded during processing and an error message is displayed. The most frequent cause is graphic inconsistency: *** ERROR: branch 100 was not processed in EXAMPLE-01 sheet 1 Connection drew with 3 lines: this type of error can occur only when the connections are drawn in standard mode. The problem can be resolved by joining lines 1 and 3 into a single line. Connection with 2 lines crossed: not resolvable. The problem can be eliminated by deleting the connection point or by drawing a new connection, if possible in Serial \ Parallel mode. Superimposed lines: delete the surplus lines, then check that the remaining ones are numbered correctly. Component without Panel value: the wire is connected to a symbol not associated with any panel. The problem can be resolved by filling in the missing information; use the Edit command (XS on the keyboard) to view all those available. Any inconsistencies relating to connections, overlapping lines and incorrect symbols are detected by the “Program Check" (Sp_Verif) command. 298 • Spac Automazione 2011 Draw cables Pressing the "Draw" button produces a graphic representation of the previously created cable. The command requires selection of the cables to be drawn. Every change to the cable make-up requires successive updating of the table (this is not updated automatically). Example of cable drawing. The symbol table used is Listcav.dwg, which can be found in the Simboli directory. Incorrect customization of this parametric symbol is indicated by the message: *** Error: Incorrect LISTCAV block. The pages necessary to complete the composition are consecutive to the one indicated as the start number. The connection type is indicated graphically in the cable drawing: Symbol Description Cable connected to a terminal. The value identifies the terminal NumM. Cable connected to a multiple terminal. The value identifies two data: terminal NumM and Level (NumM_Lev). Cable connected to a connector. The value identifies the connecting Pin (NumM) on the connector. Cable connected directly to a component (direct connection). The value identifies the connecting Pin on the component. Cable numbers color is yellow. 11 Cables • 299 Cable table All cables leading from the indicated panel are drawn automatically, according to the previous make-up, by pressing the "Table" button. Every change to cable make-up requires successive updating of the table (this is not updated automatically). The command requires selection of the cables to be drawn. The table symbol used is Listcav.dwg, which can be found in the Symbols directory. Example of Cable table. CSV file Make-up data can be extracted for other uses. The necessary fields can be chosen by first pressing the "CSV File" button; these will be stored in the job directory in a file called Cables-List.csv. The "Available fields" list data items imported into "Fields in output sequence" through Add, represents a column in the file. Standard This is the factory configuration of the output fields. Default This is used to store the customized output fields for later use. See ”14.8 Edit CSV”. 300 • Spac Automazione 2011 11.2 Cable definition Pop-menu > Util The definition of cables used in the “Cable selection” operation (see Sect. 11.1) can be effected at one of two different times: 1. During the graphic drawing of the electric diagram: this specific command is used in this case as it enables the recording of necessary cable types and related specifications. 2. During "Cable selection" in the make-up phase: this is most appropriate for changing cables which have been stored as in point (1) or for generating new cables. Begin by selecting a cable from the “Cable database” (see Sect. 4.2) and then press the "…" button. Next, identify the cable using a Reference (12 characters max.) and the various descriptions: Function, Interference and Length (optional data). The new cable is stored with those already defined by pressing Add. Use "Change" and "Delete" to make changes to already defined cables or to delete them. The Clear button empties all fields. All cables are stored in a file named Cables-Used.CAV and are available during the make-up phase. Cable table Press Cable Table after selecting one of the cables defined in the list, in order to draw only the specified cable in table form, according to the configured fields and columns. The configuration shown in the dialogue window corresponds to the following graphic results: Cable table The cable is described using certain "title" fields and the ID_Cable and NR.Wire data, which have been selected from available fields 11 Cables • 301 Pressing Add inserts selected data items (Tags) contained in "Available fields" into "Output fields" displayed as table columns. Each Tag possesses two variables, column width and title, which can be changed by pressing the Change button. Number of Lines This value divides the table into several parts, even onto different sheets, as a new point of insertion or continuation onto next sheet is requested when the maximum number of lines has been reached. Text Height This is the height of all the text contained in the table; this parameter influences the height of each line proportionally and, consequently, the overall height of the table. Title Height This is the height of the column headings; this parameter influences the calculation of the overall height of the table. Table Width This is the overall sum of the widths assigned to each output field, expressed in millimeters. This value must never exceed the Sheet width in order to avoid the table overshooting the title block margins. Table Height The maximum overall dimension of table height is calculated on the basis of the maximum number of lines provided for and the text height. This value must never exceed the Sheet height in order to avoid the table overshooting the title block margins. Standard This is the basic configuration for the output fields (where provided for). The current configuration is stored "locally" (see Sect. 4.2) for later use through Default. If the configuration is accepted without pressing Default, it will be considered temporary and will consequently be used only once.. Tabular output is normally used after completing make-up. If this is not the case, the NR.Wire field is empty. Table By pressing Table, a tabular list is created of all the cables defined, with the columns and fields as configured. Data items (Tags) in “Available fields” can be inserted in "Output fields" by pressing Add and these then represent columns in the table. CSV file This enables all cables defined in the list to be exported to a .CSV file. The file is stored in the job order directory as Cables-Used.csv. Standard Output fields factory settings. Default This custom choice is stored and become the standard in the following uses. See ”14.8 Edit CSV”. 302 • Spac Automazione 2011 11.3 Cable database Pop-menu > Util > Cable Utility This configuration is opened by highlighting the cable database file DbCables.Mdb, in the program Libraries\Database directory. This is the same database used during wire numbering (manual or automatic) and during "power feed" design to attribute cable characteristics to the wire. Under these operating conditions, the database is automatically filtered for single-feed type cables only. During cable definition (see Sect. 11.2), the database is displayed without any filters (complete). The “Cable database” command enables default values to be set (see Sect. 4.2). 11 Cables • 303 11.4 Cable information Pop-menu > Util > Cable Utility This command is used to write the information related to the cable type directly into the drawing. Selection of one or more wires is requested via a "fence". Before making the first Insertion, it is advisable to carry out Setup in order to graphically configure information using the desired parameters (colors and information). Diameter information associates the selected wire with a "Diameter" symbol (to be chosen from those available) giving information relating to conduction. 1 Wire Data relating to Type, Diameter and Color (or from configuration) are automatically imported from the selected wire, i.e. data assigned during wire numbering. Graphically, there are 4 drawing options: Nothing, Point, Line segment or Circle "Nothing" corresponds to the specification of wire 103 in the figure. "Circle" is rarely used in the selection of an individual wire. Fence Placing a point in an empty space automatically activates the selection of lines via a "fence". The figure illustrates the selection of 3 wires with the same characteristics. When selecting multiple wires with different characteristics to each other, the function describes each wire individually. Graphically, there are only 4 drawing options (3 are illustrated in the figure). Diameter information "Diameter" symbols are stored in the common libraries directory; an image (slide) with the same name corresponds to each .dwg block for display in the dialogue window. New blocks can be customised and stored in the same directory as existing ones. The block name must be consecutive to already existing names (Diameter4, Diameter5, etc.), with a maximum of 20 blocks (the dialogue window can display a max. of 20 windows). NOTE: Deleting a block compromises the display of blocks that follow numerically. See “5.10 Data indications”. The Cables Module is an OPTIONAL program, the “Cable's indications” related to this program are activated only if the Cables module is installed (see “Cable Data Info”). 304 • Spac Automazione 2011 12 Translator 12.1 Translator blocks Pop-menu > Util The translator is an (optional) module that enables the replacement or insertion of comments in a foreign language. These symbols are specifically geared to receive phrases to be translated (during processing). Selecting a symbol prompts a request for one or more comment lines to be entered manually: The symbol produces 2 comment lines: TEXT1: 110V AUXILIARY POWER SUPPLY (type) Symbol Trad2.dwg TEXT3:(Enter) The symbol produces 4 comment lines: TEXT1: 110V AUXILIARY (type) Symbol Trad1.dwg TEXT2: POWER SUPPLY (type) TEXT3:(Enter) TEXT4:(Enter) The first 2 lines are for the original language; lines 3 and 4 are to be completed with the translation. The comments can also be entered using command “12.2 Insert phrases”. The translator blocks normally contain 4 attributes (from Text1 to Text4); the first two must be completed with the phrase in the original language, while the last two must remain free, as they will be completed automatically with the translated phrase. The two pairs of attributes are drawn in different colors and with different inclinations (the text of the attributes to be translated is colored magenta and inclined at 15°) to facilitate differentiation of the text. There is no limit to the number of lines contained in the blocks; the 4 lines in the Trad2.dwg symbol can also contain 4 different languages. The "Trad" symbols are stored in the Simboli directory. For every .dwg block there is a corresponding .sld slide (image) using the same name to be displayed in the dialogue window. New symbols can be customized by storing them in the same directory as existing symbols. The name of the block must be consecutive to already existing names (Trad6, Trad7, etc.), with a maximum of 20 symbols (the dialogue box can display max. 20 windows). The deletion of a symbol will compromise the display of symbols that follow numerically. 12 Translator • 305 12.2 Insert phrases Pop-menu > Util “Insert Phrases” is the program that interfaces the design and the Translator archive; it consents to get the phrases from the database in order to insert them on the drawing as texts or attributes. From this window, it is possible to interact in a simple and easy way with the phrases archive (see “12.5 Phrase database”) in order to search the comments that can be inserted (Drag&Drop) on the design. Vocabulary selection Translation selection Example “Insert Phrases” example The command operation is very easy; after the selection of the phrase to be inserted on the drawing, it is enough to drag it with the mouse (Drag&Drop) on the drawing and indicate the insertion point. Insert The new phrase is inserted on the block\text selected, within the attributes specified in the configuration (see par. 12.4). If the “Inser translated phrase” is active, the translation is inserted automatically. Modify The phrase is inserted modifying the comments of a block \ text already present on the drawing. The substitution of the existent phrases is performed without any confirmation request. If the “Inser translated phrase” is active, even the translation is modified. Automatic Filter Simplifies the research of the phrases to be inserted. The list of the phrases affected by a filter are displayed in Yellow color. The variable text of the phrase with the "Wild card" symbol“ * “ is displayed on the drawing between the two separation characters set, substituting the asterisk. Example: * à [ text ] 306 • Spac Automazione 2011 Insert Phrases toolbar Inser translated phrase If enabled the translation to the selected language is inserted automatically.. Modify Phrases Consents the visualization and edit of the selected phrase in all the languages on the vocabulary. Pressing “Modify” the changes are saved. Pressing “Insert” the new phrase is inserted along with the changes made. To memorize definitively the modifications made (and the new phrases) in the Translator database, press the “Save Changes on the Phrases DB” button. To delete a phrase, it is possible to use the “Delete Phrase” command on the mouse right-button menu. The “New Phrase” command inserts a new empty row. The horizontal cursor allows the dimensioning of the characters height on the phrases list. Save Changes on the Phrases DB Consents the registration of the changes and the new phrases “locally” on the translator database (see “12.5 Phrase database”). The changes that were not saved definitively will be available until the closure of the drawing. Update Phrases DB Allows to load an updated Database. Translator Settings Access directly the configuration environment “12.4 Translator settings”. 12 Translator • 307 12.3 Translation Pop-menu > Util The (optional) translator module allows the replacement or insertion of comments in a foreign language based on the text and attributes on diagrams, on lists, function lists, symbol lists, indices, etc. Phrases may be translated whether they are generated using the Text and Dynamic Text commands or the specific translator blocks and any other configured symbols (see Sect. 12.4). The “Entire job order” may be translated directly: all sheets are transferred to the list automatically. Alternatively, the list of sheets to be processed can be customized by selecting the relevant pages from the various multi-sheets. All pages in the current multi-sheet can be selected using “Select all”. “Add“ customizes the list of sheets to be translated by selecting the relevant pages from the list. The list of sheets to be translated can be changed by removing one page at a time (Delete) or all at once (Clear). Comments to be translated are extracted depending on the type of filter, whether applied to blocks, text or to selected objects. When sheet “0” is inserted in the list of sheets to be translated, the Master and any other entities drawn on layer 0 are processed. WARNING : It is possible to translate phrases created by the Text and Testodin (dynamic) commands, but not those created by MText (multiple). Texts Processing acts only on text considered to be valid in accordance with “12.4 Translator settings”. Blocks Processing acts on comments contained in the valid symbol attributes according to the “Processed blocks” (see Sect. 12.4). Selection Processing acts on both selected text and blocks on the drawing. On completion of sheet scanning, the comments to be translated are transferred to a list. The process is enabled by pressing Translate: ">" indicates the phrases translated by the process. These are transferred back to the drawing by pressing Update Drawing. Before beginning translation, it is advisable to check certain settings: Dictionary Selection of the dictionary (database) with which to process the job order (all dictionaries are contained in the Trad.MDB file). Original language This is the language of the phrases used on the drawing. Translation Selection of the language to translate into: choose from those available in the dictionary used. Delete Use to delete phrases not to be translated from the list. 308 • Spac Automazione 2011 Every phrase has a symbol: "t" is text. "a" is an attribute. "+" is the 2nd attribute (second line in the symbol). ">" is a translated phrase. Translate This is the command that activates translation. The phrases corresponding to the original language are searched for in the database. At the end, only the unmatched phrases remain on the screen. Disenabling "View only list of untranslated phrases" allows for checking of translations assigned to the phrases marked " > ". Change All phrases present can be changed in terms of content. First select the phrase, then alter it. Clicking on "Change" confirms local update (the new phrase is not stored in the database). Update dB Untranslated phrases can be translated manually during this phase and stored in the current dictionary for future use. First select the phrase to be translated, then insert the translation in the second line and store it by pressing "Update DB". The new phrase is automatically translated and marked with " > ". Upper case Transforms the selected phrase completely into upper case letters. Lower case Transforms the selected phrase completely into lower case letters. Details By selecting a phrase and pressing "Details" you can view the complete status. For attributes: the Tag containing the phrase and name of the block it belongs to are shown. For text: the Colour, Layer, Height, Angle, Width factor, Inclination, Style and Insertion point are shown. At the end of the process, only the untranslated phrases are displayed. Once all the phrases have been translated, corrected and checked, press Update drawing to activate insertion of the translation into the drawing in the positions indicated in “12.4 Translator settings”. Save to File enables creation of a file containing the entire list of phrases in the original language. This operation is useful for transferring phrases to other systems. 12 Translator • 309 12.4 Translator settings Pop-menu > Util > Translator Utility Translator configuration is explained in this section. The appropriate configuration must be used to set the features of the blocks and text to be processed. The default configuration is stored in the Trad.cfg file contained in the program Librerie\Vocabola directory. "Change" enables a new configuration file to be loaded; "New" generates a copy of the current database with a different name. • Color text processing • Translated text features • Translation position • Processed blocks • Force style • Constant 310 • Spac Automazione 2011 Color text processing It is possible to generate text search filters based on the colors used. Press "Add" or "Delete" accordingly, to formulate a list of colors (clicking twice on the orange rectangle enables direct access to the color availability window): All except All text parts are processed except those in the colors inserted in the list. These colors only All text parts in the colors inserted in the list are processed. Example. If the "Terminal box" function is used in drawing the diagram (see Sect. 6.1), text appears in the upper left-hand corner of the box to indicate the panel to which the box belongs. This writing is in red, by default (see “Terminal box” Sect. 4.2): to exclude this from translation, insert color 1 (red) in the list and enable "All, except". To exclude lists, legends and bills of materials from the translation, simply put the text to be excluded in colors to be omitted. Translated text features This section sets up the features to be assumed by the translated text. Alternatively, the same features as the original text may be used. Colour Enter the number of the color to be used for the translated text (clicking twice on the colored rectangle enables direct access to the window of available colors). The default color is 6 (magenta), like the translation attributes available in “12.1 Translator blocks”. Height Enter the height of the text to be used for the translated text. Width factor Value 1 retains the width of the original font, below 1 narrows the text and above 1 widens it. Inclination This value, expressed in degrees, indicates the inclination of the characters. The default is 15°, as for the available translation attributes for translation symbols (see Sect. 12.1). Style This is the list of text styles created by the "Style" command. 12 Translator • 311 Translation position This section describes how to configure the position of the translated text in relation to the original. Above / below the original text The translated text will be inserted below (or above) the original text, at the distance indicated in the "Offset" field (default 5 interline). Add to the original The translated and original text becomes a single line (assuming the characteristics of the translation). A prefix character should be inserted to separate the two comments: in the example, the " \ " symbol has been used. This parameter also works on the symbol attributes. Replace with original The translated text replaces the original and the initial phrase is deleted. This parameter also works on the symbol attributes. Interline \ Spacing Setting of the offset mode (considers the distance required to insert the translated text). Offset The offset is the distance at which to insert the translation and works in conjunction with the options "Below original text" and "Above original text". Prefix This is used to indicate a separator in the "Add to text / Orig. Attributes" option (characters or text). Suffix It is possible to specify a suffix to be associated with the translated text. Processed blocks This section allows configuration of the Blocks to be processed and specification of the attributes (tags) to be translated and those to host the translation. A list of symbols must be formulated: Use Select Block to list all symbols used in the multisheet. Choose these one by one and use Add to insert them in the list. Use Select < to transfer the name of the block onto the drawing. Use Add to insert the chosen or selected block in the list and Delete to remove it. Select "TRAD*" to produce a list of all TRAD blocks. The example shows a list containing both TRAD* and TRAD2; this means that the TRAD symbols configuration is valid for all symbols except TRAD2. 312 • Spac Automazione 2011 Associate Tag For every block in the list, the combination of attributes (tags) must be configured, e.g. for the translation of sheet titles: Title2 is the symbol on the drawing which relates to the “Sheet title” (see Sect. 3.18): The symbol is made up of two attributes: _TITOLO for the original language and _TITOLO1 for the translation "Tag List" displays a list of symbol attributes: 1. First, select "_TITOLO" and press "Add" under "Start Tag". 2. Next, select "_TITOLO1" and press "Add" under "Destination Tag". 3. Press "Create" to combine the two. The TITOLO* block configuration is valid for all title symbols. Example - comment translation: Trad2 is a symbol specifically for translations, found in “12.1 Translator blocks”: The symbol is made up of 4 attributes: TESTO1 and 2 for the original language, 3 and 4 for the translation. "Tag list" displays a list of symbol attributes: 4. First, select "TESTO1" and press "Add" under "Start tags", then repeat the operation for "TESTO2". 5. Next, select "TESTO3" and press "Add" under "Destination tags", then repeat the operation for TESTO4. 6. Press "Create" to combine the two. The TRAD* block configuration is valid for all TRAD symbols. 12 Translator • 313 Use "Delete" to remove incorrect combinations. TESTO1+TESTO2 means that the complete original phrase constitutes the sum of the contents of these two; the translation is to be inserted in the space represented by the 2 lines of TESTO3+TESTO4. If the start and destination tags coincide (same tag), the translation is written over itself. Force style This setting forces the text style to be associated to translated phrases (both attributes and texts). Pressing button “…” you open the “Language–Style association” configuration dialogue box. On Off Style associated to the translation depends on the Language–Style Association. Each language in dictionary has its peculiar style and fonts, used to translate both texts and attributes (symbol tags). Style associated to the translation does not depend on the Language–Style Association. Style set in “Translated text features” is used for texts. Style defined in block attributes is used for symbol Tags. Toggling on this option enables the UNICODE® 16 character set support, allowing to manage easily languages using alphabet different form English such as Russian, Chinese, Japanese. Language–Style association Using this dialogue box you can associate a specific text style to each language in dictionary, that will be applied to translated phrases. These associations are used when the setting “Force style“ is toggled ‘on’. Languages in dictionary: all dictionary languages stored in Trad.Mdb are listed there. Style associated to the language: list of all the styles stored in the current multisheet (using command “Style”), plus factory styles Asian, Cyrillic and European (and others) stored in Trad.Mdb . Styles Asian and Cyrillic are UNICODE® 16 ready, and can be used to manage languages such as Russian, Chinese and Japanese. 314 • Spac Automazione 2011 Constant phrase This setting establishes the 2 delimiter characters that determine the fixed or constant part of a phrase to be translated. This parameter enables phrases to be managed using the "wild card" “ * “ symbol. (See “"Wild card" symbol”). Example: In this example, phrases are inserted in the drawing using the delimiter characters specified in the settings: [ ]. Situation of phrases 1 and 2 on the Phrase1: [110V] POWER SUPPLY drawing before translation: Phrase2: [24V] POWER SUPPLY In “12.5 Phrase database” a single phrase with wildcard:” * POWER SUPPLY“ with the relative translation “ALIMENTAZIONE AUSILIARI * ” produces: Situation of phrases 1 and 2 on the Phrase1: ALIMENTAZIONE AUSILIARI [110V] drawing after translation: Phrase2: ALIMENTAZIONE AUSILIARI [24V] The delimiter characters must not be used for phrases in the database, but only for those to be translated in the drawing. The asterisk (*) "wild card" character must be used in the database. 12 Translator • 315 12.5 Phrase database Pop-menu > Util > Translator Utility The translation is based on the exchange of phrases contained in the databases (dictionaries). All dictionaries are contained in the Trad.MDB file located in the Libraries\Dictionary directory and each one is divided into multiple languages (Italian, French, English, etc.). Press New dictionary to create new dictionaries and duplicate already existing ones in order to change them. Use Delete dictionary to remove them. Each dictionary can be expanded with new phrases of a maximum 255 characters in length; there is no limit to the number of languages. Phrases can be added manually or by using the “12.6 Importing phrases” function. See “12.9 Language extensions”. Microsoft Access for Windows can also be used to customize the dictionary, but it is important not to alter the structure of the file. These change operations are not advisable for less experienced users. Button “Language styles” displays the dialogue box where you can associate languages stored in dictionary to a specific text style. See “Language–Style association“ Sect. 12.4. 316 • Spac Automazione 2011 Phrase filter Filters can be used to check the content of the current dictionary. Enter the characters or words to be filtered on the top line (or press the "Select <" button to retrieve the phrase to insert into the dictionary directly from the drawing). Search Beginning Phrases beginning with the initial letters indicated are searched for and displayed in the "Record list". Search for Word All phrases containing the word indicated are searched for. Search for phrase The search is based on an entire phrase (this can be retrieved from the drawing using the "Select < " button); if this does not exist in the current dictionary, it must be stored in the system. View All The entire currently stored dictionary is displayed in alphabetical sequence without any search filter. Update existing phrases Select the phrase to change from the "Record list", in order to see what languages are present in the dictionary and which of these languages the phrase is translated into. In the example, the phrase "Alimentatore" has been selected, which can be presumed to have no associated translation in French: 1. Click on French. 2. Enter the translated phrase. 3. Press Modify (or Enter) to confirm. The phrase is registered in the current dictionary. Updating phrases To modify or correct existing phrases use the same procedure. Enter new phrases To insert new phrases in the database, first click on New to view the languages in the dictionary. With the new phrase "BREMSE", for example: 1. Press the New button. 2. Click on German. 3. Enter the phrase "BREMSE". 4. Click Change (or Enter) to confirm. 5. Repeat the operations (2), (3) and (4) for English, French, Italian, etc. Entering a new phrase The phrase is registered in the current dictionary. The database can be expanded by using the “12.6 Importing phrases”. Windows Microsoft Access can also be used to customize the dictionary, but it is important not to alter the structure of the file. 12 Translator • 317 "Wild card" symbol The "wild card" refers to the asterisk (*) symbol used in the database phrases. The asterisk is replaced after a translation by the content of a phrase on the drawing placed between the delimiter characters (which determine the constant part of a phrase). (See “Constant”). For example: The "wild card" character has been inserted at the end of the phrase “ALIMENTAZIONE AUSILIARI * “. Note that the position of the "wild card" varies in the respective translations. Notice how it is placed at the start of a phrase in English. In this example, phrases are inserted in the drawing using the delimiter characters specified in 12.4 Translator settings”. E.g.: [ ]. Before translation: the “constant phrase” part is 110V for phrase1 and 24V for phrase2. Frase1: ALIMENTAZIONE AUSILIARI [110V] Frase2: ALIMENTAZIONE AUSILIARI [24V] After translation: the “constant phrase” part is placed at the start of the phrase, as specified in the database of phrases for translation into English. Phrase1: [110V] POWER SUPPLY Phrase2: [24V] POWER SUPPLY Several joker characters may be used for each phrase. The position of the jokers is also kept in the translation, e.g.: Italian: LAMPEGGIANTE * - MOTORE * English: * LIGHTING DEVICE – * MOTOR To translate: LAMPEGGIANTE [24V] - MOTORE [0.5kw] Translated: [24V] LIGHTING DEVICE - [0.5kw] MOTOR 318 • Spac Automazione 2011 Dictionary management Pressing the “Dictionary management” button enables access to a series of functions useful for creating or duplicating new dictionaries, or for importing dictionaries customized in previous versions. “Dictionary management” comprises: • Create new • Change dictionary • Copy dictionary • Delete • Export file • Import file See “12.9 Language extensions”. All dictionaries are stored in file Trad.Mdb located in folder Vocabola. Create new The example shows the creation of a new dictionary, entitled PERSONAL: the languages are entered in the appropriate space and inserted in the list by pressing Add. The languages shown in the list will only form part of the new current dictionary (New); other dictionaries will not be altered. The newly created dictionary is empty (no phrases). Copy dictionary This function first asks which of the existing dictionaries are to be duplicated, then presents a list of the languages contained in the original database. The list of languages can be changed; it is also possible to add or remove new items. The example shows the creation of a new dictionary entitled COPY; this is a duplication of the previous PERSONAL, from which the Italian language has been removed to be replaced with Swedish. Acquire Content The phrases present in the original dictionary are retained in the copy, relative to the languages kept in the new database. Otherwise, the newly generated dictionary is empty (of phrases). 12 Translator • 319 Change dictionary This enables changes (additions and deletions) to languages in existing dictionaries. The dictionary currently in use is prompted as the default. Import file Allows you to create a dictionary by getting the phrases from a CSV (or Xls) file. Importing can only take place if there are at least 2 languages in the CSV file to be imported. Another condition is that at least one of the languages be present in the dictionary, to have a reference language at the time of importing; if a language does not exist it is added. For each phrase (or file record), if it corresponds with the “reference language” the dictionary is updated, otherwise a new phrase is inserted (in the languages contained in the importing file). At the end a message appears with the count of the updated phrases and the language used as reference. The first line of the CSV file must contain the name of the languages it contains; the text is subdivided into columns by the separator character, " ; ". Export file This enables a .CSV (or Xls) file to be created by taking phrases from an existing dictionary. Exporting occurs exclusively for the languages selected in the list: the figure shows the export of only two of the four available languages. A compatible .CSV (or Xls) file is created for any later importing into a dictionary using “Import file”. To ensure compatibility, do not remove from the CSV file the first line containing the name of the languages; the text is subdivided into columns by the separator character, " ; ". 320 • Spac Automazione 2011 12.6 Importing phrases Pop-menu > Util > Translator Utility This command expands the dictionary database with new phrases, by taking them directly from symbols on the drawings or by importing a file. Use the “Enter new phrases” unction in the “12.5 Phrase database” command to add phrases manually, one at a time. Use Import phrases to insert all phrases in a job order, including their respective translations, into the dictionary. The comments are extracted from the sheets in the list. Press "Add all" to import all the sheets into the list automatically. Alternatively, use "Add" to customize the sheet list by choosing the pages of interest from the list. The list of sheets to be processed can be changed by removing one sheet at a time (Delete sheet) or all together (Clear list). To process a complete job order, comments need to be re-imported to all the multi-sheets that belong to the job. WARNING: It is only possible to import the phrases contained in the symbols that are declared in the configuration (see Sect. 12.4), not those contained in the text. Blocks Enables importing of comments contained in the valid symbol attributes based on the “12.4 Translator settings” configuration. Selection Enables processing of the blocks selected on the drawing. The import configuration is activated using the “12.2 Insert phrases” command: the example shows that the phrases imported expand the "Electric" dictionary for English and Italian. The comments to be imported are listed on completion of sheet scanning. The imported comments, with respective translations, are indicated by the symbol ">". Delete Removes the phrases that are not to be imported. Change Untranslated phrases can be translated during this operation: simply select the relevant phrase from the list and type the equivalent comment (for the configured language) in the "Translation" field. By pressing "Change", the phrase is assigned the symbol " > ". Update dictionary The phrases in the list are inserted in the dictionary, even if no translation is provided. 12 Translator • 321 When Update dictionary is pressed, the function message advises of the possible presence of untranslated phrases. Press Yes to insert all phrases in the dictionary. The example shows that 1 phrase has not been translated. There is no update in case the "source phrase" already exists in dictionary. The phrases without translations can easily be identified. They can be viewed by filtering the list with the command "View only untranslated phrases": With "Save phrase list to file", the phrases can be exported (only those from the reference language) in ASCII format (.txt file). This operation is carried out if a third party intends to complete the translation, using the Windows Notepad text editor. The completed file (with translations) is imported using "Import Phrases from File". Original phrases are distinguished from translated phrases by the presence of the separation character, ";". Example of valid file for importing purposes: RETRO PULSANTIERA =P1; =P1 PUSH BUTTON PANEL ORIGINAL PHRASE; TRANSLATED PHRASE Phrases must not contain the character ";", as this is used by the program to recognize the end of the reference language and the beginning of the translated phrase. WARNING: the dictionary and languages (reference and destination) are set up via “12.2 Insert phrases”. If this is not carried out, default data from the last translation is used (see Sect. 12.3). 322 • Spac Automazione 2011 12.7 Shift within block Pop-menu > Util > Translator Utility Text This command enables a normal text to be moved inside the attribute (line) of a TRAD symbol under “12.1 Translator blocks”. The original start text on the drawing is automatically deleted (use the "Oops" command to restore it). The command asks for line identification each time text is to be inserted. Function Use this command to copy the contents of the Function1 and Function2 attributes for a component on the diagram within the attributes (lines) of a TRAD symbol. The contents of the original start symbol attributes are retained. The position at which the text is inserted is the same as that configured in “Associate Tag” (see Sect. 12.4). 12.8 Delete translation Pop-menu > Util > Translator Utility This command enables translated phrases to be deleted from the drawing. This entails the removal of all phrases inserted during the various stages of “12.3 Translation“. Deletion occurs on the sheets inserted in the list: Use “Add all” to select all pages of the current multi-sheet and insert them in the list. Use “Add“ to customize the list by selecting only the pages of interest. The list of sheets to be processed can be changed by removing one sheet at a time (Delete) or all at once (Clear). Translated comments are deleted according to the type of filter applied to blocks, text or selected objects. 12 Translator • 323 12.9 Language extensions The Translator module is enabled to support UNICODE® 16 character set. Basically this let you manage languages using non-Latin alphabets such as Russian (Cyrillic), Chinese, Japanese (ideograms). Differently from ASCII table, that can figure a (theoretical) maximum of 256 characters or symbols, UNICODE® 16 system can figure a (theoretical) maximum of 65536 ( = 216). Thus is possible to manage Chinese, Japanese, Korean ideograms and alphabets such as Cyrillic, Arabic, Greek and Hebrew. The CAD program supports UNICODE® 16 characters indirectly, using its own internal coding. This to get over the internal coding (ASCIII 8 bit) of text and attributes strings. Simply an ideogram like < ? >, the 37636TH symbol of UNICODE set (9304 HEX) is registered as \U+9304. To view this strings correctly you need to install the language extensions for Windows® 2000 / XP (or above). When you choose to use SHX fonts instead of TTF, remember to attach them to the job order before sending it to your customers. See “Installing on Windows® XP”. Language extensions are required when using eastern languages. OS Windows® XP countrified for westEurope are natively ready to manage languages such as Italian, French, English, German, etc. Installing on Windows ® XP Make sure to have the Windows® XP installation CD. Open the Control Panel from Start menu and double click on “Date, Time, Language and International Settings ”. Double click on “International Settings”. Select language groups you are interested in, listed in section Languages – “Additional language support ”, and press OK. You are asked to insert the Windows® XP installation CD-ROM, eventually to reboot the system. Windows® XP language extensions 324 • Spac Automazione 2011 12.10 Edit translation Pop-menu > Util > Translator Utility Command Edit Translation let you edit texts and attributes containing both ASCII and UNICODE® 16 character set in WYSIWYG mode, not yet supported by program CAD commands. Concerning dictionaries, the dialog box interfacing with the database is UNICODE® compliant, permitting direct modifications (kana keyboard, copy and paste operations) and import of external resources (XLS, TXT, CSV file format). Concerning commands, “Text”, “MText” and “Ddatte” don't figure non–ASCII characters, but you can get over this problem using “Edit translation” command. Test editing is not limited to copy/paste operation from existing texts: you can type new phrases directly, too. You need to install a proper keyboard layout as described hereafter, then choose one of the following input methods: 1. Replace physically the keyboard, or apply a “key-mask” to the current keyboard. 2. Use a bi-language keyboard (e.g.: English/Czech), where each key has more than one character printed on. 3. “Using on-screen keyboard” available in Windows® . The keyboard shortcut of this command is “Edtt”. Installing a keyboard layout Installing different keyboard layouts permit to associate many characters to a single physical key. For example pressing the [Q] key of the English keyboard with a Cyrillic layout active the character [? ] appears instead of the usual 'Q'. Open Control Panel from Start menu and double click on “Date, Time, Languages and International Settings ”. Double click on “International settings”. Press Details button on section Languages – “Text services and input language”, then press “Add” and select the Language-Keyboard associations you are interested in. 12 Translator • 325 Eventually pressing button “Language bar ” you can make visible on the application bar, or as floating toolbar, the current layout indicator. Clicking the language indicator to the active application window. you can change the layout applied Note: the layout is peculiar to the application it was applied; changing application you change the keyboard layout, too. Using on-screen keyboard The on-screen keyboard is a standard application of Windows® 2000 and XP. It can be run from menu: See “12.10 Edit translation”. Programs à Accessoriesà Easy access à On-screen keyboard . It's a convenient tool because costless, supporting as many keyboard layouts as you installed. No need of other physical input tools to change from keyboard to keyboard. For example, try to type a Cyrillic text (you must have enabled the Russian keyboard previously): 1. Run the on-screen keyboard. 2. Place the cursor in the point you want to type the text. 3. Select the RU layout in the language bar 4. Now if you select the on-screen keyboard, it has Cyrillic characters on each key finally you can click with the mouse the virtual keys to type the desired Russian words. 326 • Spac Automazione 2011 13 Plc 13.1 Plc I/O bits Pop-menu > Util The program includes a set of commands to draw and deal with input and output boards for Programmable Logic Controllers (PLCs). Drawings can be carried out in either of two different ways according to the graphic requirements of the design. • Individual I/O bit design The bits are drawn non-consecutively (not grouped) on different sheets of the functional electrical diagram. The first bit must be completed using the initial “Board terminals” symbol to enable inclusion in the Bill of Materials. • I/O board bit design The bits that make up a board are drawn consecutively (grouped together). The graphic design must be completed by adding the “Board terminals” to enable inclusion in the Bill of Materials. Use command “13.2 Symbols library” to access the I/O boards. Individual bits This command is used to insert individual bits into the input and output boards of the PLC. This is very useful for those who wish to carry out a design by positioning the bits on different sheets of the functional diagram (rather than having them all together on dedicated sheets). The input bit symbols must be named INPn in order to be recognized by the various functions, while the output bits must be named OUTn. These symbols contain the attributes necessary to import and export comments and complete summary tables. The information required for this can be entered and changed using the 'Ddatte' command. Blocks are stored in Board directories. Each .DWG block corresponds to an .SLD image (slide) of the same name that is displayed in the dialogue window. Individual INP2.dwg bit New symbols can be customized and stored in the same directory that already contains the existing blocks. The name of the block must follow on consecutively from those that already exist (INP5, INP6, etc. for inputs, and OUT5, OUT6, etc. for outputs), with a maximum of 20 symbols for each category (the dialogue box can show a maximum of 20 windows). If one block is deleted this may prevent blocks with successive numbers from being displayed. WARNING: The first 'individual bit' in the same board must be associated with a start “Board terminals” symbol to which data for the Bill of Materials can be assigned. 13 Plc • 327 Board This command makes it possible to insert PLC input and output boards with between 8 and 16 bits into the drawings (the same blocks can be used to build 32-bit boards). Bits must be placed at a distance of either 20 or 30 mm apart (when placed 20 mm apart 16 bits can be drawn on the same A3 size sheet of paper). These boards are macroblocks made up of “Individual bits”, each of which contains the attributes necessary to import and the export comments and complete summary tables. All data for every individual bit will be requested when these are inserted into the drawing. Input boards symbols must be named I_PLCn in order to be recognized by the various functions, while output boards must be named O_PLCn. The necessary data can be entered and changed using the “Ddatte” command. Macroblocks are stored in the Board directory. Each .DWG macroblock corresponds to an .SLD image (slide) of the same name, which can be seen in the dialogue window. New symbols can be customized and stored in the same directory that already contains the existing blocks. The name of the block must follow on consecutively from those that already exist (I_PLC5, I_PLC6 etc. for inputs, O_PLC5, O_PLC6 etc. for outputs), with up to a maximum of 20 symbols for each category (the dialogue box can only display a maximum of 20 windows). Output board O_PLC2.dwg complete with start "terminal" for the Bill of Materials. Use the “13.2 Symbols library” command to access the I/O Boards WARNING : board terminals may be unnecessary in case you draw the Plc synoptic schema using command “13.2 Symbols library”. The wire numbers for wires that connect the bits on the board can be taken directly from bit name according to the configuration in the appropriate settings (see “Options” Sect. 4.2). If one block is deleted this may prevent blocks with successive numbers from being displayed. Board terminals Board terminals are purely graphic symbols that are used to complete the graphics of an I/O board. The presence of terminals indicates whether or not a board continues on the next sheets. The symbols are stored in the Board directory. Each .DWG terminal has a corresponding .SLD image (slide) with the same name that can be seen in the dialogue window. New symbols can be customized and stored in the same directory that already contains existing symbols. The name of the block must follow on consecutively from those that already exist (T_PLC16, T_PLC17, etc.), with up to a maximum of 20 symbols (the dialogue box can only display a maximum of 20 windows). The 'terminal' symbol at the beginning of the board is the symbol to which all data (panel, manufacturer and code) used to calculate the Bill of Materials must be associated (see Sect. 8.1). WARNING : board terminals may be unnecessary in case you draw the Plc synoptic schema using command “13.2 Symbols library”. 328 • Spac Automazione 2011 Bit numbering Command for the progressive numbering of the I/O bits on the PLC boards. The bit name is composed by a prefix (Literal Base + Numeric Base), incremental number (address). from a separator and an The number associated to a bit is incremented progressively from the value selected until a limit imposed by the numbering type (Octal, Decimal or Hexadecimal). After that, the address is reset and the numbering is re-started with the “Numeric Base” increased by 1. The format indicates the number of characters to be used in the address. The home panel and slot number will appear on all the subsequent bits that are selected. This command is also useful for compiling the values of the bits contained in 'PLC Summaries' (see Sect. 13.6). The bit name is made up of a prefix, a separator and an incremental number: The options available lists contain the most commonly used values but different values can also be entered, for example: X0.0, Y0.0 or INP1\0, OUT1\0 etc. You will be prompted to select the symbols required. Click on one bit at a time if you have designed a ‘single bit' system, or use a “fence” if you have used a board. “Fence” selection method for progressive numbering of bits on the board. 13 Plc • 329 Numbering examples Allen-Bradley PLC-5 Octal Base Type Separator : Input I : Output O Address from 000 from 000 Separator / / Address 00 00 Allen-Bradley SLC 500 Decimal Base Type Separator Address : Input I from 000 : Output O from 000 Separator / / Address 00 00 Omron Decimal Base Input Output Base Address from 000 to 099 from 100 to 199 from 00 to 15 from 00 to 15 Siemens Octal Base Input Output An. Input An. Output Type E A EW AW Position 0 to n° 0 to n° 0 to n° 0 to n° Telemecanique/Modicom TSX Nano Decimal Base Type Position Input I 0 Base or extension 1 I/O extension Output Q 0 Base or extension 1 I/O extension Telemecanique/Modicom TSX Micro Decimal Base Type Position Input I Position in Rack from 0 to 10 Output Q Position in Rack from 0 to 10 Separator . . . . Address from 0 to n° from 0 to n° from 0 to n° from 0 to n° Separator . Address min from 0 to 5 max from 0 to 13 min from 0 to 3 max from 0 to 9 . Separator . . Telemecanique/Modicom TSX Premium Decimal Base Type Rack Address Module Position Input I Rack Address Position in Rack from 0 to 7 from 00 to 10 Output Q Rack Address Position in Rack from 0 to 7 from 00 to 10 Telemecanique/Modicom TSX Quantum Decimal Base Type Input 1 3 Output 0 4 330 • Spac Automazione 2011 Address from 0 to 127 from 0 to 127 Separator . Address from 0 to 127 . from 0 to 127 Address from 0001 (1xxxx) from 0001 (1xxxx) 13.2 Symbols library Pop-menu > Util This command comprises all the symbols in the PLC library, including customized symbols for each manufacturer according to the product family. The library consists of symbols divided according to the type of use: Board, Summaries, Synoptic and Layout. Synoptic 2D symbol for PLC make-up, includes Racks, Power Supply Units, CPUs, I/O modules, etc. It belongs to the part symbols category and references are therefore defined automatically (.Pre boards), calculated by the Bill of Materials and other processing functions. They replace “Board terminals” symbols function. These symbols are present in the Librerie\Schede directory. Electric diagram board 2D macroblock of the PLC board made up of single bits (Input or Output), used for drawing connections on the electric diagram (see “Board” Sect. 13.1). These symbols are contained in the Librerie\Schede directory. Summary 2D symbols drawn in “reduced” graphic form, only showing the bit position reference in the diagram, and in “expanded” form to include comments describing the bit. “Summaries” are very useful in designs that use the “Individual bits” drawing method (see sect. 13.1). These symbols are contained in the Librerie\Schede directory. Layout 3D symbols for drawing topographic cabinet layouts (see Sect. “15.3 Topographic”). These symbols are contained in the Librerie\Quadri\GestTop. 13 Plc • 331 The command dialogue box shows the current archive: Select the manufacturer, series and family to obtain the list of models contained in the database and the related associated graphic blocks. To insert the block press the “Insert” button that corresponds to the type of use required. Select image for zoom Click on the sheet preview image to magnify and enable the display check function. Use – and + to reduce and increase the magnification factor. Use the Reset button to restore default values. See “17.8 Catalogue Symbol Libraries”. You can customize the symbol library using command “Plc“. WARNING : To insert more easily frame or rack mounted Layout symbols, you are suggested to enable Osnap mode “Node”. Symbols involved in the process incorporate fastening points for this purpose. 332 • Spac Automazione 2011 Plc database management Pop-menu > Util > Plc Utility This command opens the Plc symbols configuration suite (see “13.2 Symbols library“) used to edit or add new items to the library. Customization affects file CatalogoPlc.Mdb located in Librerie\Archivi folder. This is the initial dialogue box: 13.4 PLC. Available series For manufacturer and related product lines management. It's possible to import Csv manufacturer archives from previous versions. Modules Here you can specify item part numbers of the selected product line; each part number corresponds to a module of type Rack, Power Supply, CPU, Board or Accessory. Associated blocks This is used to associate graphics to each module used during the design process. Advanced settings Set design parameters. In previous version, each manufacturer archive was stored in file Plc-Costruttore.Csv locate in folder Librerie\Archivi (full archive was file Plc-Spac.Csv). (See “Import” from Available series). 13 Plc • 333 Available series This is used to manage manufacturer and related product lines. Moreover, it's possible to import Csv manufacturers archives from previous versions, or export a manufacturer with related symbol set. Add Adds a new manufacturer and/or a new product line. This figures shows the dialogue box where you can add a new product line, of an existing manufacturer or a brand new one (combined box 'manufacturer' is enabled both for choice and typing). Press button “Multilanguage description” or key [F2] to edit descriptions. It's important to specify the new PLC series type: Modular without Rack, Modular with Rack or Rack Integrated (like TelemecaniqueTSX Micro series, where the CPU modules act as a Rack). Other (optional) information are Number of BITs used by a WORD data channel and the Offset of Modules in a Rack when this value is unique for the entire series; anyway it's possible to specify this information for each single rack. For example TSX Quantum series (Telemecanique) has Offset = 1, being each slot numbered from 1. On the other hand PSS 3100 (Pilz) series has an Offset different for each Rack : Rack PSS1 BMP 5/2 has Offset = -2, having working modules mounted in slot 0 to N, and the first two dedicated to CPU and power supply. Rack PSS1 BMPS 3/1 has Offset = -1 because it is natively equipped with power supply. Edit Import Edit information given when module was “Add”ed. This is used to import new ones supplied in Mdb format. In previous version, each manufacturer archive was stored in file Plc-Costruttore.Csv locate in folder Librerie\Archivi (full archive was file Plc-Spac.Csv). 334 • Spac Automazione 2011 Export Exports a PLC series in Mdb format (version compliant). This command can optionally create a .zip (compressed) file containing all related symbols (dwg and sld files) concerning the exported series. Delete Removes the selected manufacturer or a single series from the tree of “Available series”. Modules Once selected or added manufacturer and series, you can insert catalogue part item numbers of Racks, Power supplies, CPUs, Boards and Accessories. Add Adds a new part number (unique identifier), with all its peculiarities (family, description, type, module occupation etc.). Edit Edits module peculiarities such as part number, description etc. To change the family you have to re-type the name (even if it is already listed), because the family is used as filter, and choosing it from the list implies to reload modules instead of change the family to the module currently selected. Delete Deletes a module. To insert a new module you have to provide the following information: Part number Part number identifying the module in the manufacturer catalogue. Family The family it belongs to can be typed or chosen from the list. You have to type a new value when the family or category has to be created. The Family combined box permits both typing and choice from list. Automatic Insertion If enabled, when blocks concerning electric schema are drawn you are not asked for the insertion point, because it is managed automatically. Multilanguage description You can edit descriptions double clicking the text, pressing [F2] key or button “Multilanguage description” after the selection of desired text. Type Rack, Power supply, CPU, Board or Accessory: you can select more than one option assigning different functionalities to the module, influencing its behavior when it is configured and drawn. E.g.: for a CPU module integrating a power supply and some I/O you must check Power supply, CPU and Board. You can't select more then one option in case of Accessory. Occupation If the Module has to be mounted in a Rack, you have to specify how many slots it is going to occupy. In case the module is a Rack, this number means how many slots are available. Channel type Specifies the Bit channel type: Analogue, Analogue/Digital, Digital, or “unspecified”. 13 Plc • 335 Referencing prefix Prefix to use when referencing the module. Input number Number of input Bits available on the module, if any. Output number Number of output Bits available on the module, if any. Associated blocks This is used to associate graphics used when drawing the scheme to the “Modules”. For each type of scheme (Electric, Synoptic, Summary, Layout) you can assign more than one symbol. There are situations where you can specify the “Mutual exclusion among blocks ”: when a symbol must be inserted in a unique way (e.g. Synoptic scheme) you can avail of two different graphics, one with connections and the other without. You ought to insert only one of the two or more options available (to avoid homonymous symbols). 13.5 PLC The "Mutual exclusion among blocks" is usually inactive for Electric graphics, because a Module with a large number of Bits (e.g. 32) is drawn split in many parts and different sheets (e.g. 4 blocks drawn on 4 different sheets). For Electric and Summary graphics you have to specify the “Number of Bit per block ” (e.g. 4 different blocks of 8 Bits each). Each bit is mapped by color: • Analogue Input (pink) • Analogue Output (red) • Digital Input (yellow) • Digital Output (green) Synoptic, Board and Summaries symbols are located in program folder Librerie\Schede, while Layout symbols in Librerie\Quadri\GestTop. 336 • Spac Automazione 2011 Advanced settings Set parameters related to Bit Offset. The Offset is the base value that, incremented positionally, becomes part of the I/O address. Let's have an example using module TSXDMY28RFK (Telemecanique part, Premium series) having 16 Input Bits and 12 Output Bits: their addresses are formed with “%I” (Input) or “%O” (Output) + Rack No + Slot No. So with Rack 0 and Slot 2 we get addresses from %I0.2.0 to %I0.2.15 (Input), and from %Q0.2.16 to %Q0.2.27 (Output). Correct setting are: Input Bit Offset = 0 and Output Bit Offset = 16. If the Module is a Rack, the text box Rack Module Offset is active. At the moment this value is used only by Unity Pro Import/Export interface only. 13 Plc • 337 13.3 PLC manager Pop-menu > Util > I/O Bit This application allows the user to handle all aspects of Input and Output lists quickly, in an environment resembling a spreadsheet. It is used to facilitate all data import, maintenance and export operations. The user is able to interact with the PLC program software to import/export all Input/Output-related data. It is also possible to exchange data and draw automatically on the multi-sheet using usage definitions. Open existing document: this directly accesses the search file window to choose which document to open. The program searches for files with the extension PLW. Empty Document: this accesses an empty spreadsheet that is ready to receive manual data input or data imported from drawings. Import file: this directly accesses the search file window to choose the file to be imported. The program is able to import the following file formats: CSV ASCII file in which the fields are separated by a ";". SDF ASCII file exported from Siemens S7. ASC File exported from Siemens S7. SEQ ASCII file exported from Siemens S5. TXT ASCII file exported from FANUC. XML Standard format. Spreadsheet The program accesses a spreadsheet, in which the following data are managed. Right click to access the various functions. Address I/O address I/O board Reference of the board in which I/O is cabled I/O terminal board Terminal board to which I/O is connected CPU CPU that commands the bit Rack Rack number Slot Slot in which the I/O board is mounted Pin Pin number of the bit wiring on the I/O board Mnemonic Mnemonic address reference Comments 1 2 3 4 I/O comment rows (only the first and the third are sort keys) Usage Primary component reference in Input or Output Usage panel Reference of board in which usage is cabled Usage terminal block Reference of terminal block in which usage is cabled (*) Sheet Diagram sheet on which the I/O bit is drawn (*) Wire number Number of the connected wire on the I/O bit diagram (*) (*) = fields that cannot be changed without a new import from the drawing. Fields in bold are sort keys. Click on column heading to sort data. 338 • Spac Automazione 2011 Edit table Individual Bit insertion This function is used to insert a new bit into the table. Simply right-click and select the 'Insert individual bit’ command. Indicate the number and the type of the new bit (input or output). When this has been confirmed the program adds a new row to the table and lists the bit alphabetically with the rest. Multiple Bit insertion Up to 999 new bits can be added at the same time. Simply right-click and select the "Insert multiple bits" command. When the “CPU type used” variable in Options is set to Siemens the program displays the following bit insertion window: The start address is made up of 4 parts so that the first letter, byte number, separator and bit number can be entered separately. For instance: E 0 . 0 can be entered as a start address. Only the numerical fields are mandatory (i.e. the byte and bit numbers). The others can be left empty. “Number of addresses to enter” indicates the total number of bits to be created. Enter any number from 1 to 999. When octal numbers are used, pre-set values are 8, 16, 24 ... When decimal numbers are used, pre-set values are 10, 20, 30, etc. When the “CPU type used” variable in Options is set to other, the program displays the following bit insertion window: The start address is made up of 3 parts so that the first base, separator and bit number can be entered separately. For instance: I103 . 0 can be entered as a start address. Only the numerical fields are mandatory (i.e. the byte and bit numbers). The others can be left empty. In this case only decimal numbers are used. Always check the Bit Type before confirming, to make sure that the bits that are being created are actually inputs or outputs. 13 Plc • 339 The remaining fields can be used to enter common bit data: panel and terminal block, CPU, rack and slot. These are all optional. The function checks existing bits in the table to prevent the creation of duplicates or overlapping of data. Delete Bit Right-click to delete selected bits from the table (multiple selection is enabled). Bit Duplication This function is used to copy data contained in a selected bit into other bits. Proceed as follows: − Select the row from which you wish to take data (click on the column that separates the address from the address of the board). − Right-click and select the "Copy data" option. − Select the destination row or rows. − Right-click and select the "Paste data" option. All source data are written over destination data without any further prompts. Bit Change There are two ways to change bit data: 1) Select the row to be changed (to select a row, click on the column that separates the address from the board address), right-click and select the "Details..." option. 2) Double-click on the column that separates the address field and the I/O board address. In either case the following screen page is displayed: All fields can be used to enter full details of the I/O bit. No fields are compulsory. The most delicate part of this operation consists in associating the relative usage style. Use the "Usage styles management" command to select the style from the Usage list. All default information for the specific style is associated with the bit that is being edited. This information can be changed from the "Usage details" menu. 340 • Spac Automazione 2011 Multiple value application This function is enabled when a drop-down menu appears at the side of a field selected from the table. The drop-down menu shows all the values that have already been used. This facilitates data insertion because it allows values to be changed without having to access the "Change bit" function. To apply a value from the drop-down menu to other bits: - Select all the rows into which the values are to be placed (to select multiple rows hold down the SHIFT key). - Use the right mouse button to select the "Apply multiple values" command. - Double-click on the data to be applied in the drop-down menu. Update data from drawing Update Bits selected from DWG Use this function to update the data in a table by extracting them from a drawing. The Input/Output name constitutes the link between data in the drawing and those in the table. Select From DWG > Selected Bits from the "Update" drop-down menu. The program moves to program CAD and asks you to select the bits on the drawing. When this has been done, press Enter to include data contained in the symbols (see Sect. 13.1) in the table. There are two possible scenarios: 1) The bit that has been selected in the drawing is not in the table. In this case, add a new row with values taken from the attributes of the bit symbol. The new row is displayed in green, to show clearly that this data was only in the drawing. 2) The bit that was selected on the drawing is already in the table. If that is the case, the data from the drawing will be placed over that already in the table. Update all DWG bits Select the "from DWG > All bits" command from the "Update" drop-down menu. This function differs from the previous one in that the bits do not have to be selected because all the bits on the multisheet are taken into consideration. Update data in a drawing Update selected bits This function is used to update data in a drawing by extracting them from the table. The Input/Output name constitutes the link between data in the table and those in the drawing. Select the " Selected Bits" command from the "Update" drop-down menu. The program moves to program CAD and asks you to select the bits on the drawing to be updated. When this has been done, press Enter to include the data contained in the table in the symbol attributes (see Sect. 13.1). Update all Bits Select the "All Bits" command from the “Update" drop-down menu. This function differs from the previous one in that the bits do not have to be selected because all the bits on the multisheet are taken into consideration. 13 Plc • 341 Update selected summaries This function is used to update the “Summaries” that are in the drawing. These must first be inserted using the specific command (see Sect. 13.4). Select the "PLC Summaries > Update selected summaries" command from the “Update" drop-down menu. The program moves to program CAD and asks you to select the “summary” symbol to be updated. When this has been done, press Enter to include the data that have been selected in the symbol attributes. There are two possible scenarios: 1) The summary is already complete with the address names. In this case the program will only complete the attributes of the selected block in the addresses that have been selected. 2) The summary is empty. If that is the case, the program will complete all the attributes of the summary block. The data used to complete the attributes correspond to those in the selected rows of the table. If no row is selected the command will not update anything. Update all summaries Select the "PLC Summaries > Update all summaries" command from the "Update" drop-down menu. This function differs from the previous one in that the bits do not have to be selected because all the bits on the multi-sheet are taken into consideration. Update all bits summaries This function executes two commands at once: "Update all bits" and "Update all summaries". Drawing This part of the program manages the drawing of the I/O bits in a table. Drawing is based on usage configuration and the relative graphic macroblocks (see “Usage style management”). If the usage is not associated with a bit in the table, no drawing will be executed. Drawing selected bits To draw a bit on the diagram you must: 1) Have the desired sheet positioned on the screen. 2) Select one or more bits from the Input/Output table. 3) Select the command from the "Draw > Usage" drop-down menu. 4) The program moves to CAD and requests the Bit insertion point. The component in the macroblock that has a NAME attribute containing the word USAGE is automatically referenced by the program according to the name that was assigned during customization of usage details. If no name has been assigned the component is referenced automatically and the I/O bit number is automatically added to the component prefix. If all components are to be referenced automatically, irrespective of usage setup, set the "Automatic referencing of all usages" parameter in the “Tools > Options > Reference directory" command. 342 • Spac Automazione 2011 Automatic drawing of selected Bits This function is called up from the "Drawing > Automatic" menu. This command executes the same function as the previous one, but it is based on the "Tools > Options > Directory Sheet" configuration In practice, with reference to the settings shown in the example, if multiple bits are selected from the input/output table, the program will draw 8 per sheet, starting from sheet 360, using the insertion points shown. Importing data from file The following formats can be imported: • Files from Siemens S5 (Seq) • Files from Siemens S7 (Sdf) • Files from Excel (Csv) Exporting data to file The following formats can be exported: • Files exported for Siemens S5 (Seq) • Files exported for Siemens S7 (Sdf) • Files exported for Excel (Csv) Usage style management The program can store Usage Styles. By usage style we mean the information that characterizes an element connected to an input or output. The following data characterize a usage: Usage name This appears in the list of usage choices when compiling an I/O. Input/Output This flag specifies whether the usage is an input or output type (*). Type Material code (*). Manufacturer Manufacturer of the material (*). Description Description of the material (*). Reference code Registration reference code for cross-referencing (see Sect. 7.1) (*). Macroblock Macrosymbol that graphically displays the component complete with connection to the input or output block. (*) = optional. Only the Usage name and the Macroblock are mandatory. The others may be left empty. 13 Plc • 343 Insertion of a new Usage From the Usage menu select the Usage Management command to display the styles that have already been defined. Press New to open the window from which to insert data concerning the new usage. Enter the Name that you intend to give to the new usage style in the first box, specifying whether input or output. The name can have up to 50 characters. The Type, Manufacturer and Description fields refer to the material to be assigned to the usage in question. If values are entered manually (up to a maximum of 200 characters) and you intend to specify a number of codes (to create a macro), use the character ";" to separate one code from the next (see Sect. 8.2). Use the Open materials database button to select codes directly from the database (see Sect. 8.1). Drag the material code that has been selected into the window. The program uses the code (Registration reference symbol) to deal with contacts during cross-referencing (see Sect. 7.1.). Click on the Reference Selection button to search in the Aus (auxiliaries), Cnt (contactors) and Tsa (additional heads) directories. Also in this case multiple codes can be entered provided these are separated by means of a “;”. The Macroblock box is used to specify the graphic block that represents the usage and the related connection to the input/output bit. These symbols are stored in the Libraries\PLC directory, and are sorted in two sub-files: Input (this contains the macroblocks connected to input bits), and Output (this contains the macroblocks connected to output bits). To create a macroblock, please see the following sections. 344 • Spac Automazione 2011 Change Usage Press the Change... button to open the Change Usage Style window. Style contents can be changed in exactly the same way as that described for their creation. Delete Usage Press the Delete button to delete a Usage Style. The deleted usage cannot be recovered. Usage macroblocks When bits are drawn, the program automatically inserts the following fields into the macroblock, divided into the relative individual blocks, and writes the attributes: I/O Block Field Attribute Tag Address INPUT or OUTPUT I/O Board QUADRO CPU CPU Rack RACK Slot SLOT Pin PIN Comment 1 COMMENTO1 Comment 2 COMMENTO2 Comment 3 COMMENTO3 Comment 4 COMMENTO4 Usage ELEMENTO I/O terminal block Field Attribute Tag I/O Board QUADRO I/O Terminal block MORSETTIERA Usage terminal block Field Attribute Tag Content Usage Board QUADRO Usage Terminal MORSETTIERA UTENZA Field Attribute Tag Content Usage NOME UTENZA Usage Board QUADRO Comment 1 FUNZIONE1 Comment 2 FUNZIONE2 UTENZA Usage block In order to allow the program to identify the usage blocks and relative terminals, when you define the macroblock you must write the "UTENZA" content in the attributes mentioned above. 13 Plc • 345 Below is an example of a graphic illustration of a usage macro block, showing the blocks that make it up. The information coming from the program replaces that in the block. The attributes that are not replaced retain the values that were defined when the macroblock was created. The macroblock can be saved under any name. It must, however, be saved in the Librerie\Utenze\Input directory if it is an input macrosymbol, and in the Output directory if it is an output macrosymbol. A macroblock (or macrosymbol) is a symbol that contains other symbols. Macros are useful for storing parts of the circuit that are already complete with connections (see Sect. 16.2). When creating a new macrosymbol, bear in mind the following rules: • The macro must be created on LAYER 0. • The connections must be drawn in BYLAYER logic color. This is the color the program uses to draw wires (see “4.1 Setup”). • Macrosymbols must be snap-drawn (2.5 mm) and consistent with wire sizes (7.5 or 10 mm). • Macrosymbols should be stored as neutrally as possible, i.e. with no references, wire numbers or associations with material codes. The macrosymbol should preferably be pre-equipped with any connection points. Filters A series of filters are available to display a selection of the bits in the table, according to their specific characteristics: • Duplicate bit display: only displays the duplicates in the table. • Missing blocks in DWG: this is used after updating bits from the DWG. It only displays the bits that have not yet been drawn. • Rows added to table: only displays the bits that have been added manually. • Components to draw: this is used after drawing the bits from the table. It only displays the bits that have not yet been drawn. "Cancel Filter" takes you back to the full display. 346 • Spac Automazione 2011 13.4 PLC Configuration Pop-menu > Util This command opens the PLC Configuration toolbox permitting to build a complete PLC structure with no actions on the drawing. Once you built the structure, you can run the command “13.5 PLC“ and drag and drop its elements on the drawing 'transforming' them in the graphics you specified in “Associated blocks“ (see “Plc“ Sect. 13.2). When you build a PLC structure, choose first Manufacturer and product series, then set a "CPU Name" that will identify the structure, pressing the appropriate button. Following operations (choosing Racks or Boards) depend on the chosen PLC type, e.g. if this series requires a Rack, you have to choose it prior to other modules (see CPU1.2 , left figure). On the other hand, if the series is for modular PLC you can insert every module in the sequence you prefer (see CPU1.1 , left figure). Positional naming is “MOD. n°” in case of modular PLC with no rack (see CPU1.1), and “SLOT n°” in case of PLC with Rack (see CPU1.2). SLOT positions may start with a negative number, e.g. a PLC with two fixed position (CPU and power supply) may start from -2, thus SLOT 0 will be the third on tree. In case of PLC with Rack you may add one or more expansion racks depending on CPU capabilities. Note: Plc Draw interfaces with Schneider Unity Pro PLC programming suite. 13.5 PLC Modules are added to the tree by Drag & Drop from the component list to an empty position of the tree. In case of PLC with Rack, the module position will correspond to the slot it is dropped; in case of PLC without Rack, will be the order it was dropped. You can insert new modules by Copy & Paste of other modules present on the tree, too. In case Modules contain Input or Output Bits, button “I/O” is enabled, and pressing it you display “Bit declaration” dialogue box. Premendo su questi pulsanti si può importare o esportare una configurazione completa. La struttura viene memorizzata in un file con estensione fplc. By clicking on these buttons you can import or export a full configuration. The structure is stored in a file with FPLC extension. 13 Plc • 347 I/O Bit can be numbered manually (one by one), or semi–automatic selecting from the list all Bits to be numbered, the pressing button “Generate address ”. See “Bit numbering” In the “I/O Bit declaration” dialogue box you can insert comments and mnemonics, too. These comments can be imported from (or exported to) many different file formats using the appropriate buttons (located on the “PLC Configuration” toolbar). WARNING : Before importing you must declare Bit addresses. Buttons Import and Export are active only if the CPU name on the main tree is selected. Accessories Modules, such as PMCIA cards, SRAM cards, etc. can be added only to a module already present on the tree, creating a new level (see left figure, nodes named acc.). Accessories have no associated graphics, but take part to the Bill of Materials. Accessories Right–clicking a CPU name you can verify both undeclared and homonymous (by address) Bits Inconsequences and duplications are listed in the file PLC_OmonimiaBit_nome.Csv. With the “Nodes” insertion, it is consented the management of the remote modules and the join of codes from different series in the same CPU. Unity Pro interface This button launches the interface with Schneider Unity Pro programming suite. See “Unity Pro”. 348 • Spac Automazione 2011 Unity Pro interface This interface permits to exchange PLC hardware configuration and variables (mnemonics, addresses and comments) from the program and Schneider Unity Pro XL programming suite. Hardware configuration and variables (mnemonics, addresses and comments) can be imported/exported using XML files, and if Unity Pro is installed in the same Spac environment (workstation or LAN), using a STU project file (Unity native binary data format). COM interface has to be set up according to Schneider specifications in order to exchange data dynamically. Unity Pro XL is a Schneider Electric product: it is not supplied. 13 Plc • 349 13.5 PLC drawing Pop-menu > Util This command shows the PLC Draw dialogue box, used to “convert” in graphics the PLC whose structure has been built using command “13.4 PLC“. Available graphics are Synoptic, Electric, Summary and Layout, depending on the choice made in “Associated blocks“. The four drawing modes are set changing the drop-down list in the toolbar: Synoptic: 2D symbols used to draw the plc layout with Rack, Power supply, CPU, I/O modules, etc. These are 'element–symbols', so they are referenced automatically, considered in the Bill of Materials and other processings. Electric: draws the electric scheme with “Board“ blocks or “Individual bits” (having enabled ? BIT). Summary: in case you draw in “Individual bits” mode. Summaries usually are tables reporting information to locate single Bit positions in the drawing, with their comments. Layout : 3D symbols suitable to draw the cabinet topography (see Sect. “15.3 Topographic”). See “Plc“ Sect. 13.2. For all the 4 drawing modes, symbols have to be Drag & Dropped on the multisheet from the tree or the Bit list. You can begin the insertion from any level, inserting a single module or (for Racks) the node and all its 'childs' at a time. Enable insertion mode “Individual bits” (“Electric” symbols). Run command “13.4 PLC“. Update the Plc tree after modifications done using PLC Configuration, or directly on the drawing (e.g. changing I/O attribute values using command DDATTE). Deletes an entire PLC structure whose CPU is selected. Synchronize information from the Plc to symbols in the drawing, such as comments, addresses, etc. 350 • Spac Automazione 2011 The following icons describe the different scenarios you can find in the PLC tree: Indicates an element not yet dropped on the drawing. If the node has childs, this means none of their modules has been drawn yet. The element, or all its childs, has been drawn and updated. Not all the child-modules have been drawn, but the ones drawn are updated. The element (or all its childs) is drawn, but some information has to be updated (pressing toolbar button “Update”) with the ones set in PLC Configuration dialogue box (see “13.4 PLC“) or imported from Unity-Pro. As previous command, but not all the elements have to be updated (someone is still to draw). The element, drawn, is not consistent with the Plc structure, so it has to be deleted. Some of the child elements are not consistent with the Plc structure, and have to be deleted. Something's wrong. There is an inconsistency between the drawing and the Plc structure, but there is not enough information to determine the error. This inconsistency may appear when importing a module not present in database (see “Plc“). All information related to “Associated blocks“ is stored in file CatalogoPlc.Mdb. You can have information on single Bits from the cell color : White Bit to draw. Green Bit drawn. Red Bit to delete from the drawing. Yellow Bit to update in the drawing. 13 Plc • 351 13.6 PLC utility • Same name • Assign element • Summaries • Prepare summaries • I-O Bit legend • I-O Import/Export • Pop-menu > Util > Plc Utility Same name This command is used to make sure that no PLC bits with the same name have been inserted into a drawing (or into the multisheets selected for processing). It is a good idea to run this check before effecting the automatic running of "Prepare summaries" and before exporting any data. "Use Last List" can then be used to access the list of duplicates without having to scan the multisheet again. Assign element This command can be used to write the contents of the "Element" attribute contained in some input or output bit symbols. The following prompts are displayed: Select I/O bit: Select connected block: Element FC1.1 assigned to bit A0.5 This information can also be entered using the "Ddatte" command. 352 • Spac Automazione 2011 Summaries Summaries are tables used to condense data that have been fed into the I/O bits used in the drawing. This function is run automatically by means of the "Prepare Tables" command. As a general rule this table is used when the bits have been drawn individually. The names of the bits to be condensed (E0.0, E0.1, etc) can either be inserted manually or more quickly using the “Bit” (see Sect.. 13.1). The summaries available for Allen-Bradley and Siemens serve as examples, as it would be impossible to have blocks to cover the complete range of PLCs. These models can be customized while leaving the attributes in the specimen blocks unchanged. Prepare summaries This command is used to prepare the PLC "Summaries" tables automatically. In order to run this function, the block to be prepared must already be inserted into the drawing and contain the bit names to be summarized. If any changes are made, a new summary must be prepared. All data will be updated automatically. I-O Import/Export This command can be used to export to file all the data that have been entered into PLC bit symbols. It is good practice to run a "bit ID" check before extracting data, to avoid the risk of duplicates on the drawing. Data can be exported in CSV or SEQ format. CSV is compatible with Microsoft Excel and SEQ is compatible with Siemens direct data exchange controllers. Importing data is useful for automatic completion of comments relating to bits in the diagram. Even in this case either file format can be used. Use Last List. This command enables data to be exported in both formats without having to repeat scanning. In order to facilitate the process of entering comments onto PLC symbols, data should be exported in CSV format. Missing data can then be entered under Microsoft Excel and then the same file can be imported so that the values can automatically be entered onto the symbols. Example of CSV file opened using Microsoft Excel®: Bit A0.0 A0.1 A0.2 A0.3 A0.4 A0.5 A0.6 A0.7 Comment 1 MACHINE IN MANUAL MAIN PANEL START READY LEFT UNIT FINISHED RIGHT UNIT FINISHED HYDRAULIC UNIT COOLANT GENERAL ALARM Com. 2 Com. 3 Com. 4 Signal RUNNING INSERTED Pin Panel Slot 1 2 3 4 5 6 7 8 SLOT1 SLOT1 SLOT1 SLOT1 SLOT1 SLOT1 SLOT1 SLOT1 QG QG QG QG QG QG QG QG Data are imported into the attributes of the fields indicated. 13 Plc • 353 Example of an SEQ file opened using Windows Notepad A0.0 MACHINE IN MANUAL 2 3 A0.1 MAIN PANEL A0.2 START READY A0.3 LEFT UNIT FINISHED A0.4 RIGHT UNIT FINISHED A0.5 HYDRAULIC UNIT RUNNING A0.6 COOLANT INSERTED A0.7 GENERAL ALARM The comments in the 2 (or 4) attributes on the bit symbols must be exported to form one single description. While an SEQ file is being imported into the drawing, the entire description is shown on the first comment of the bit symbol. To avoid this, enter the | (pipe) symbol in subsequent comments at the points where you wish to split the description, for example: A0.5 HYDRAULIC |UNIT |RUNNING In this example 3 “pipe” characters have been inserted while importing the SEQ file. The result is shown in the figure on the right. SEQ files contain precise tabulations to divide data columns. Make sure that the text editor does not change this spacing. The recommended editor is Windows Notepad. See ”14.8 Edit CSV”. 354 • Spac Automazione 2011 I-O Bit legend The bit legend function should only be used when all the input/output boards have been drawn. Whenever any changes are made to bits on existing boards, the corresponding legend is updated automatically. When the multisheets have been processed, the list of I/O bits is displayed. Press “Drawing” to make the check before proceeding with the legend. The CSV file command is used to write a file, called Plc-List.Csv, in the job order directory. This file contains the data that has been displayed. See ”14.8 Edit CSV”. NOTE: the color of the text to be inserted, as selected in setup (see Sect. 4.2) has a bearing on translation into foreign languages (see “Color text processing” Sect. 12.4). The Drawing option is used to insert all the INPn and OUTn symbols into the table, as illustrated below. The comments for each bit are also displayed. The table and the position of the data it contains can be customized by means of the specific setup function (see “Legend Bit I-O Plc” Sect. 4.2). The pages needed to complete the legend follow on consecutively from that shown as the first sheet. First sheet number for PLC legend: If the destination sheet is being used, you will be asked whether you wish to carry on with the operation or whether you would rather interrupt the procedure to choose a new sheet number. Confirmation will be requested for each subsequent sheet. If the “Empty current sheet” function is enabled, all the entities it contained prior to drawing will be deleted. If the destination sheet is new the function proceeds without any further prompts. Subsequent sheets are created automatically and consecutively. The default table symbol is LegendaP.dwg. This symbol is stored in the symbols directory. Customized tables can be used, provided they are stored in the same directory. 13 Plc • 355 356 • Spac Automazione 2011 14 Utilities 14.1 Legends • Function legend • Symbol legend Function legend Pop-menu > Modify Simbol > Legends Parent and element symbols contain the Function1 and Function2 attributes, which are useful for describing component function in the electric diagram. These comments are compiled using the “Edit” or XS (see Sect. 17.4) or the Ddatte command. Each time an existing function is changed, the legend is updated. Press “scan multisheets” to process the panels selected on all the multisheets that are displayed. Data can be ordered according to reference, panel or sheet. When all the multisheets have been scanned, the list is displayed. The result of this list can then be inserted onto the “Drawing” graphic or exported to a CSV file. “Functions near contacts” (see Sect. 4.2). Change This is used to change Function 1 and Function 2 data on items in the list. Press “ Change ” to confirm. Use the function to insert the changes effected in the list into the symbols in the drawing. Update The “Update” function inserts the changes to Functions 1 and 2 into the symbols on the drawing. WARNING: All symbols contained in list “14.7 Ignore symbols” will be discarded. 14 Utilities • 357 Drawing This function is used to draw the function summary table (for functions1 and 2). The table block and relative position of data can be customized by means of the specific setup function (see “Function legend” Sect. 4.2). Example of function legend. The sheets needed to complete the legend follow on consecutively from the first sheet: If the destination sheet is already in use (Status: contains entity) the function asks whether to continue regardless or stop and select a new sheet number. When “ Clear current sheet” is enabled the function removes all entities from the sheet prior to drawing. Confirmation is requested for each subsequent sheet. If the destination sheet is new, the function proceeds without any further prompts. Subsequent sheets are created automatically and consecutively. New sheets are numbered automatically. The default table symbol is LegendaF.dwg. This symbol is contained in the symbols directory. Customized tables can be used, provided they are stored in the same directory. The color selected in settings for inserted text (see Sect. 4.2) has a bearing on translation into foreign languages (see: “Color text processing” Sect. 12.4). CSV file This function is used to write a file called UseType-List.Csv containing the data shown in the list in the job order directory. See ”14.8 Edit CSV”. 358 • Spac Automazione 2011 Symbol legend Pop-menu > Modify Simbol > Legends The parent and element symbols used in the job order are drawn in a table and sorted according to the block file name. Symbol descriptions are set in “Symbol Configuration” (see Sect. 4.2) and stored in file DescriptionLib.Mdb. In case nothing was set, the program uses the description of the default symbol (not the one in the drawing, but the one stored in the block). Symbols with an empty or missing description attribute are nevertheless included in the legend. Press “Scan multisheets” to process the multisheets that have been selected. If new symbols are inserted into the drawing the legend must be updated. The table and positioning of the data within it can be customized under settings (see “Symbol” Sect. 4.2). The default table symbol is LegendaS.dwg. This symbol is contained in the Simboli directory. Customized tables can be used, provided they are stored in the same directory. 44 symbols are drawn on each sheet. The sheets needed to complete the legend follow on consecutively from the first sheet. Example of symbol legend. First sheet number for symbol legend : If the destination sheet is already in use, the function asks whether to continue regardless or stop and select a new sheet number. Confirmation is requested each time for subsequent sheets. Enable “ Clear current sheet” to remove all entities contained prior to drawing. If the destination sheet selected is new, the function proceeds without further ado. Subsequent sheets are created automatically and consecutively. The color selected in settings for inserted text (see Sect. 4.2) has a bearing on translation into foreign languages (see “Color text processing” Sect. 12.4). WARNING: Symbols contained in list “14.7 Ignore symbols” are discarded. 14 Utilities • 359 14.2 Attribute changes • Graphic changes • Attributes visibility • Force value • Fast Attedit • Copy attributes • Fit width (T+ and T-) • Import attributes • Export attributes Pop-menu > Modify Simbol Graphic changes This command is used to change the height, color, position, angle of rotation and text style of the selected attributes. “Symbol attribute features” must be set to change attributes directly when inserting symbols into the drawing (see Sect. 4.2). In Attribute enter the name of the attributes to be changed, then press “Add” to insert them in the list. Press “Modify” to change the features of an attribute in the list, “Delete” to delete it.The names of the most commonly used tags can be viewed in the “Attributes List” (this list cannot be changed). Only selected block: only the attribute of the selected block is changed. Same as selected: all blocks (in the sheet, multisheet or job order) identical to that selected are changed. All blocks: all blocks (in the sheet, multisheet or job order) that contain the selected attribute are changed. In this example, Nome, Quadro and Taglia all assume a height of 3.5 mm and color 4. While Position (x,y), Rotation, Style and width fields in the text are not considered (***). The wild card character * can also be used as a suffix to the attribute name. For example, to change the attributes Reg1, Reg2, Reg3, etc. together, simply type reg*. Press “Default” and the current configuration is stored “locally” for subsequent uses of this command (See Sect. 4.2). If you confirm without pressing Default the configuration is considered temporary and used just once. 360 • Spac Automazione 2011 Height Enter height of desired text. Color Enter the number (code) of color wanted (click on the colored rectangle and go into the available colors window directly). Offset Offset is used to set the new position by entering the relative polar coordinates for the shift. For example, to lower attributes by 10 mm enter “0” and “-10” (x,y). Angle of rotation Attributes are rotated with the angle of inclination expressed in degrees. Width factor 1 equals the width factor for the original font, with minimum values of 1 you get text compression, above 1 dilation. Changed do not affect symbols contained in list “14.7 Ignore symbols”. Attributes visibility This command changes the visibility status of attributes. When a component in the drawing is selected, a list is displayed with the condition of all the relative attributes. In the “Attribute Choice” list you must choose the attributes to be modified, then press “Add” to place them in the “Attributes to be modified” list. By Pressing “Add” the function automatically changes the visibility state, however, you can set the state manually. Press “Modify” to change the feature of an attribute included in the list of those to be modified, press “Delete” to delete it. Only selected block: only the attribute of the selected block is changed. Same as selected: all blocks (in the sheet, multisheet or job order) identical to that selected are changed. All blocks: all blocks (in the sheet, multisheet or job order) that contain the selected attribute are changed. By pressing “Default” the current configuration is stored “locally” (see Sect. 4.2) for subsequent same command use. If you confirm without pressing Default, the configuration is considered temporary and used just once. 14 Utilities • 361 Value substitution This command is used to replace characters within attribute strings. Enter the information to be changed in the Search in attribute field. The most common tag name can be selected from the Attributes list (this list cannot be implemented by the user). In the example “*CR” has been entered in the Find field and “KA*” in the Replace field, giving the following result: Save stores the combination locally for future use in the file Spac_cfg.ini (see Sect. 2.5). Delete removes a previously stored combination. NOTE: the numeric prefix or suffix of the character “*” remains unchanged. When only part of the string is to be replaced, deselect Attribute whole value: In the example, “A” has been entered in the Find field and “M*” in the Replace field, giving the result shown on the right. Upper/lower case affects the search. In the example, “KA*” has been entered in the Find field and “KM*” in the Replace field. Deselect Upper/lower case to carry out replacement. Example of application: The use of inverted commas “ “in attributes such as size, Function1 or 2, description, etc. is sometimes the cause of processing errors. The figure shows how to set the command to replace inverted commas with a hyphen. When only part of the string is to be replaced, deselect Attribute whole value. WARNING: Replacement of the NOME attribute in parent symbols is only transferred to the various child symbols when “All symbols” is selected in the “Job order”. 362 • Spac Automazione 2011 Force value This command is useful for carrying out the same changes on a large number of symbols at the same time. The command can be used, for instance, to change the brand or model of a group of components quickly. Fast Attedit With this command, the position and angle of rotation of an attribute selected from those within a block can be changed quickly. The default setting for this command is the NAME attribute. Copy attributes This tool copies the content of attributes from one symbol to another. Select the reference symbol and the destination symbol. A list is displayed containing all the attributes contained in the two blocks. Select the attributes required to transfer these to the destination block. Fit width (T+ and T-) Double utility to widen (T+) o reduce (T-) text and attributes width. This function asks to select (single or multiple) Text or Attribute you wan to modify (increase or reduce) the width. You can quickly run commands ”Increase Width” and “Reduce Width“ typing “T+” and “T-”. 14 Utilities • 363 Import attributes This is used to re-import the file (Attributi.Csv) containing information modified outside the program, and exported with command “Export Attributes”. See ”Export attributes”. WARNING : It's important to check for the consistency between imported data and drawing data (and abort the command if there is no consistency). This command is not recommended to beginners. Export attributes This is used to export a file (Attributi.Csv) containing information stored in symbol attributes, collecting directly from symbols in selected drawings. This information is extracted from multisheet added to the list pressing button “Add”. Pressing “All the Job Order ” all the multisheet of the job order are put in list. The list may be modified removing a multisheet at a time (Remove sheet) or completely (Clear list). Information may be extracted only from “Selected blocks” in the drawing, or from all the blocks contained in the listed multisheets. When “All blocks” is set, it's better to filter the ones you're really interested in: press button “Change” and input the symbol type list. Information is extracted basing on the “List of Tag to extract” (press button “Change” to build the attribute list). See ”Import attributes”. 364 • Spac Automazione 2011 14.3 Substitution of a block • Single block • List • Exchange files Pop-menu > Modif. SIMB Single block This function is used to replace an old symbol with a new one. The following messages are displayed: Select block to replace: Select new block: The new block must already be in the drawing. Replacement may be extended to include all the old symbols on the multisheet, or limited to the selection. A message alerts to the presence of inconsistent attributes. In this case confirmation is requested before proceeding with the replacement. List This function is used to replace the symbols in the drawing with others from another (standard) library with similar characteristics. To do this, select a file with extension .CHG from the settings directory containing the list of matching symbols. Replacement may affect only selected symbols or all those that are same as selected on the current multisheet. Select All Symbols on multisheet to replace all the symbols with the corresponding ones in the .Chg exchange file. See ”Exchange files”. The following message may appear: File SostBlk.ERR created in TEMP directory. The .ERR file contains any errors that occurred during replacement. A check using text editor is therefore recommended. 14 Utilities • 365 Exchange files Exchange files can be customized or new ones created using normal text editors, provided record structures are not changed. Symbols can be exchanged between libraries with equivalent characteristics: For this reason, IEC, CEI25 or FIAT25 cannot be exchanged with other libraries. CHG files contain precise tabs to divide data columns. Care should therefore be taken to use a text editor that does not change this type of spacing. The recommended editor is Windows Notepad. • Single block • List Example of .CHG exchange file. The first line of the file specifies the directory containing the new symbols: C:/Program/LIBRERIE/VDE15/ C1001 V1001 C1002 V1002 C1003 V1003 OLD NEW Each subsequent record must contain two names: the first is the symbol on the drawing that will be replaced by the second (the .DWG extension is implied). The name structure of the new symbol (the 2nd name), which starts from the 10th character, must remain unchanged. Data from the old block are only transferred to the new one when attributes coincide. 366 • Spac Automazione 2011 14.4 Markin g Pop-menu > Util This function allows you to insert the conductor identifier with the features described by standard CEI161, IEC391 re Marking Standards. Through marking you insert 2 identifiers for each connection wire, unlike wire numbering which inserts 1 identifier (same for the whole connection). For example, this system is useful when you have to connect a device after a replacement. On conductors, you will find all information on the terminal to be connected with no risk of mistakes. To facilitate singling out conductor identifiers, in the example figure at left, text has been manually bordered by a rectangle: The marking used in this example is “Standard 5”, which identifies References and Pins of components connected inversely. You can configure different types of “Standards” and all marking features, from the Settings group (see Sect. 4.2) regarding ”Wire and Terminal numbers” and the “Wires Labels”. Besides the data exporting command “14.5 Labels” (for the interface with systems producing labels and tags) other commands also consider any markings found, including: - 5.4 Internal panel wiring - 5.9 Loop Diagram - 6.3 Terminals and connectors Marking (inserting conductor identifier) is by selecting the component pins or terminals on the diagram manually, or automatically for all sheets contained in the multisheets selected. Marking “Standard 5” • Manual • Automatic • Show\hide Wire Numbers Connection marking is a different operation to wire numbering, hence wires do not necessarily have to be numbered first before marking, while it is normally necessary to have connection Pins (see “7.2 Pin reference”). 14 Utilities • 367 Manual Marking The manual Marking command starts with the request to select the multisheet to be processed. You must select all multisheets with connections between components. Each new scan generates or updates the file Mcables-Data.Mdb. In the job order folder With Use Save you can access previously processed data rapidly without doing a new scan. You can only use save if no important modifications have been made to connections on the diagram connections. At the end of the scan this request appears: Select a Pin Element or Terminal: By Selecting a Pin an identifier is inserted for each direct, serial or parallel connection to the component. Pin Element selection Selection of a Pin with 2 connections By selecting a Terminal an identifier is inserted for each direct, serial or parallel connection in (NumI) or out (NumO). Terminal selection See “Wires Labels” (Sect. 4.2). Update Updating Marking occurs automatically in all sheets contained in the multisheets selected for processing. Each new scan generates or updates the file Mcables-Data.Mdb. in the job order folder. With Use Save you can access previously processed data rapidly without doing a new scan. WARNING: We do not advise using “Use Save“ during marking updating. Delete This function allows you to remove conductor identifiers from the diagram, canceling the effect of the command “14.4 Marking”. The command acts on items chosen, or by choice for all identifiers present on the sheet or multisheet. 368 • Spac Automazione 2011 Automatic Marking The automatic marking command starts by requesting selection of the multisheet to be processed. Each new scan generates or updates the file Mcables-Data.Mdb. in the job order folder. With Use Save you can access previously processed data rapidly without doing a new scan. You can only use save if no important modifications have been made to connections on the diagram connections. At the end of the scan, for all connections present in the multisheet (of the multisheets selected) conductor identifiers are inserted with the same features described above for “Manual”. See “ Wires Labels” (Sect. 4.2). Update Updating Marking occurs automatically in all sheets contained in the multisheets selected for processing. Each new scan generates or updates the file Mcables-Data.Mdb. in the job order folder. With Use Save you can access previously processed data rapidly without doing a new scan. WARNING: We do not advise using “Use Save“ during marking updating. Delete This function allows you to remove conductor identifiers from the diagram, canceling the effect of the command “14.4 Marking”. The command acts on items chosen, or by choice for all identifiers present on the sheet or multisheet. Show\hide Wire Numbers This function allows you to hide wire numbers present on the various connections. The need to hide this figure comes from the need to simplify reading the diagram, especially following “14.4 Marking” which introduces a lot of information. The same command allows you to recover the initial visibility state. In the case of wire numbering with an “invisible” number, visibility must be restored. 14 Utilities • 369 14.5 Labels This command extrapolates information used by cable referencing and identification software systems to produce labels and signs (used number counter), from the diagram. The program interfaces with the following proprietary products: • Modernotecnica (A.C.S) • Phoenix Contact (Clip Project) • Cembre (Genius) • Cabur (MarKing Pro) • Weidmuller (M-Print) • Grafoplast (Simplo, Simplo 2000 e 2004) • Partex (WinSign) Wire numbers processes the number of wire (or cable) labels required on the basis of the used number counter. Terminal numbers processes the number of labels required for the terminals in the terminal block. Component references processes the data necessary for component ID labels (appliance referencing). Component Functions processes the content of Function1 and Function2 attributes in the symbols in the drawing, to create label text for commands (especially on pushbutton panels). Wire extraction Wires are extracted on the selected panels on the basis of “wire number” or “panel and wire number”. The former is used to obtain the absolute number of labels for each number (total), the latter to obtain the exact number of labels required for each panel. Calculation criteria Wire numbers in the diagram are extrapolated and counted on the basis of the end points of the wire itself. This means that the way in which a connection and its relative branches are drawn will affect the count. The method used to calculate wires that are not connected to terminals is very simple. There are two possible options: “End point” calculation: wire No. 100 counts for 4 labels. “(End point – 1) x 2” calculation: wire No. 100 counts for 6 labels. The first case saves considerably on label production. 370 • Spac Automazione 2011 Jumpers This factor affects counting of wires connected to terminals. In practice there are two distinct scenarios. In the first, specific accessories are used to mount a jumper directly on the terminal block. This can only be done when terminals are set up next to each other. In the second, a wire is used as a jumper between two terminals that are not next to each other. The former, using “jumpered terminals”, saves considerably on label production. Example of repetitions counted : No. of repetitions counted Criteria 3 5 7 9 11 4 6 8 10 12 3 5 7 9 9 4 6 8 10 10 For each extraction the user must select a Support code and .CAD file name to save extracted data. Wire extraction by panel When wires are extracted for each individual panel it is possible to define the relative priorities. This parameter is useful for calculating where to assign labels that apply to two panels. It is particularly useful for labels that refer to output terminals (NumO), which could either belong to the local terminal panel or to the panel connected as a usage. 14 Utilities • 371 Terminal extraction Extraction can take place from NumI, NumO or NumM. All terminals belonging to the panels selected (list of panels to process) are included. For each extraction the user must select a Support code and .CAD file name to save extracted data. Reference extraction Extraction can take place from all components belonging to the panels selected (list of panels to process). For each extraction the user must select a Support code and .CAD file name to save extracted data. Function extraction Extraction can take place from all components belonging to the panels selected (list of panels to process). For each extraction the user must select a Support code and .CAD file name to save extracted data. Simplo The interface with Simplo add the opportunity of input the Group name and 2 Headlines. Part numbers are chosen in the specific database, containing items for cables, terminals and nameplates grouped by family. 372 • Spac Automazione 2011 14.6 Navigator Pop-menu > Modify Simbol The command allows the user to quickly find the position of a component on the display; the search is performed on all multi-sheets selected in the list by pressing Scan Multi-sheets. The function requires: Select an object <Enter to search >: Object selection Selecting any object on the electrical diagram, the navigator “searches” for linked components or components that are part of the object group selected. Selecting for example a Mother Symbol, the navigator opens a list with the position found for all relative Child Symbols and their position (if any) on the electrical panel layout. Selecting a terminal, the navigator opens a complete list with the position of all other terminals of the same terminal board, the position of the terminal board and the layout of the electrical panel (if any). Selecting a Plc Bit, a list of all positions of the other bits making up the same card is shown, together with the position of the synoptic block of the card itself. Element Navigator. View On controls a complete list ordered by S-E (start and end) is shown for the signal selected. The object is highlighted for the position selected in the list, When the object being displayed is drawn on a different multi-sheet and not on the current sheet, a warning message is displayed to “Save when changing the multisheet”: Replying “Yes” the current drawing is saved before the file, containing the multi-sheet where the object being displayed and resides, is loaded. Double clicking on the position to be highlighted also activates the function. Zoom + Zooms in on the area to be displayed (centres around the object for the position chosen in the list). Zoom - Zooms out from the area being displayed. Change To change the information contained in the object, use the “Edit symbol” or “XS” command in an appropriate form based on the object category. The function is only active for the objects belonging to the current multi-sheet. Details Pressing “>>”, the dialogue window is zoomed, to display more information. The window is reset by pressing “<<”. Cross Errors Displays the list of errors produced by the Cross Reference command. This list is contained in the Cross Reference.Nav file; the button is placed on hold when the file is not present in the folder. 14 Utilities • 373 Search Pressing “Enter” on the keyboard, it is possible to indicate directly the name of to object to be found. When the component is found, a list displays all the linked components (e.g. Mother and child) or components are part of the group of the selected object (e.g. terminals). With a double click or pressing View, the object is highlighted on the drawing. Navigator, search function. If the component is not found, the function displays “No object found”. The search function acts on the bits of the Plc, Controls, Terminals and connectors. The function is similar to the previous description for the “Select objects” function. Cross Errors Displays a list of errors produced by the Cross Reference command. This list is contained in the Cross Reference.Nav file; the button is placed on hold when the file is not present in the folder. WARNING: Wildcard characters are not allowed (*) to extend the search mode. 374 • Spac Automazione 2011 14.7 Ignore symbols This command can be used to exclude certain symbols from some processing routines. In practice, when a symbol is inserted into a drawing (see “17.3 Symbol insertion”), the user defines whether this must be ignored by subsequent automatic processing functions: Bill of materials The component is not calculated for the “8.3 Internal bill of materials“ and “8.5 Extraction by external module“, which also means it is not included in the external Bill of materials (see Sect. 8.4) of the Topographic manager (see Sect. 15.3). Function legend The component is not counted in the Function legend. Symbol legend The component is not counted in the Symbol. Graphic changes The component is not considered by Graphic (see Sect. 14.2). Cross Reference The component is not included in the “7.1 Cross-referencing” when the parent symbol is “ignored”. It is also possible to exclude only some child symbols. Component references The “4.7 Component” commands are ineffective, both for automatic and manual re-referencing. The system never updates or changes the component references concerned. When inserting a parent or element symbol, several “ignore variables” can be associated with these at the same time. Conversely, when inserting a child symbol, only two “ignore variables” are available. There is no need to repeat the exclusion from cross-reference for a child symbol when the ”ignore variable” has already been set for the parent symbol. Use the “Edit” symbol command or XS to change variable status for an individual component (see Sect. 17.4). The “Ignore Symbols” command can be used to display a complete list of all the symbols in the drawing that have at least one “ignore variable” setting and to change the related status. Press Scan multisheet to search in all the multisheets selected in the list. Select one component in the list to highlight the “variables” associated with that component. The status of the variables associated with a number of components can be changed together provided they belong to the same category. When multiple components are selected that do not belong to the same category, the system automatically freezes the ignore variables list. Use the “Ctrl” key to effect multiple selections. The list also contains the symbols “ignored” by earlier versions, in which “I” or “IGNORE” was defined in the “Type” or “Pres” attribute. 14 Utilities • 375 Filter This is used to display only those components in the list with the variables selected. Child symbols can also be removed from the list of symbols to be displayed as can those ignored by earlier versions, where “I” or “IGNORE” was defined in the “Type” or “Pres” attribute. No changes are allowed for these two categories. Use the “Ctrl” key to effect multiple selections. The system uses the letter “F” to highlight active filters in the “Ignore-sensitive commands” list. Add and Remove Use these commands to change the settings of all the components selected. Press “Update” to transfer changes to the drawing. Update Transfers any changes that have been made to the symbols into the drawing. Update is essential in order to make changed data coincide with data obtained from a new scan. Select Adds new components to the list by selecting these directly on the drawing. This function cancels all active filters. View Press View to highlight the object in the drawing using the “14.6 Navigator” unction (only if present on the current multisheet). CSV file Press CSV file to enable the configuration to create the IgnoredSymbol-List.Csv data extraction file. Standard is the basic configuration for output fields (if enabled). Each item in the “Fields available” list is an item of information contained in the list. Those that are transferred to the “Output fields” by pressing Add are shown in a column in the output file. Press Default to save the current configuration for future use. If customized configuration is confirmed without pressing Default, this will be perceived as temporary. See ”14.8 Edit CSV”. 376 • Spac Automazione 2011 14.8 Edit CSV document Many command export processed information into an Ascii Csv file. In the data extraction dialogue, where you can configure the fields to export, you can choose to have a preview of the generated file. This option is toggled by default depending on the value of “Preview CSV“ in general settings (see Sect. 4.2). Csv file is written to disk and the automatically opened and ready for consult; Microsoft® Excel is not required for this operation. Csv file is written to disk but not opened for preview. The preview opens program Edit Csv document that, differently from all other lists, permits to keep the document always in foreground. This figure shows an example of file generated using command Function legend. To edit a text double click the cell containing it. A right–click on a cell pops up a menu with the following commands to edit document rows. Add: inserts an empty row before the one selected. Queue: add a row at the documents bottom (last position). Delete: removes the selected row. Csv file preview The Options menu provides the command print, that prints the document with automatic and uneditable paging. The logo displayed is ViewCsv.wmf, and can be replaced with your own logo. Logo positions are set in configuration file ViewCsv.ini: [PRINT] xlogo = horizontal offset ylogo = vertical offset slogo = aspect ratio (100) Print report SpacCsv.exe (document editor), SpacCsv.wmf (logo for prints) and SpacCsv.ini (configuration) are located in program folder Program\Lisp. 14 Utilities • 377 14.9 Machinery options Pop-menu > Util The “Machinery Options Configurator “ is the name given to a function group permitting a “block” management of project schemes and documentation. The “block” management permits to process an existing project extracting a new machinery based on parts already drawn and configured in a master drawing. A master drawing is a user-drawn scheme, created with all the possible "blocks" composing the most complete machinery available. Starting from the master drawing basic scheme, you choose which block to add or remove building a new machinery, an Option derived from the complete one. Options are managed by the external application “14.10 Configuration“, where you define the consistency conditions, or boundaries in order to avoid mounting incoherent parts. Once conditions are set, you can use program “14.11 Machinery configurator“ to assembly the final machinery, applying Options to the master drawing. Finally the new electrical scheme (or project) is generated with command “14.12 Scheme generator“. Here a summary of the steps to follow: 1 – Create a master drawing, with a 'full-optionals' machinery. Example: a machinery can be built in different ways, and sold with more or less Options. The master drawing must contain all the parts that can be used to build the most complete machinery, with all possible motors, operators, commands, panels etc. 2 – Split the master drawing in “blocks”, associating them to the Options using command “Option“. Note: backup the master drawing (e.g. in Librerie\Configuratore) before extracting a new machinery from it, because unused options will be deleted. 3 – Export information concerning Options, saved in a file with extension.Cm (machinery configuration) with command “Export Data“. Note: save or copy the *.cm file to folder Librerie\Configuratore. 4 – Run program “14.10 Configuration“ (you are not required to close the program in the meantime), open the Cm file (of the master drawing, 'full optionals') and define the conditions. Then update the Cm file. Note: you can save the .Cm file with a different name to keep the original version. 5 – Run program “14.11 Machinery configurator“ and open the Cm file you just got from “Configurator Generator”, you can now begin to assemble the new project of a machinery derived from the master drawing, with desired Options. Each configuration (with more or less options or accessories) have to be registered in a different .Cm file (basic scheme+ Options). Note: each Cm file must have a name different from the one derived from the complete master. 6 – Open the master drawing and import the desired Machinery Configuration (Cm file) with command “14.12 Scheme generator“. WARNING : backup the full master drawing (e.g. in Librerie\Configuratore) before extracting a new machinery from it, because unused options will be deleted 378 • Spac Automazione 2011 Options marking This command applies to a master drawing created with all possible parts that, combined, build the 'full optionals' machinery and its electrical scheme. To create a new option fill in fields Id and Description, the press “Insert” and select on the drawing the objects related to the option. “Delete” removes graphical objects from an existing Option: you can select and remove from the single object to the entire sheet or multisheet. Machinery Options list "Insert" adds new objects to an existing Option, so you can add objects drawn on different sheets to a single option, grouping power supplies, auxiliaries, buttons, etc. So, disabling an Option, all associated objects will be removed from the scheme and related documents. Options example: Option Id : P1 (Motor 1) marked at page 3, 6 and 12 (motors, auxiliaries and panel). Option Id : P2 (Motor 2) marked at page 3, 6 and 12 (motors, auxiliaries and panel). Page 3 Options P1 and P2 (Motors scheme). Page 3 Option P1 only. Page 6 Option P1 and P2 (Auxiliaries scheme). Page 6 Option P1 only. 14 Utilities • 379 Page 12 Option P1 and P2 (Panel). Page 12 Option P1 only. This sample shows the importance of a detailed marking of all sheets. Information concerning Options is saved in a file with .Cm extension (machine configuration) with command “Export Data“. Highlight marks This is used to highlight in the drawing objects relates to a specific mark; the list reports marks existing on the current sheet only. To change these values (add or remove objects) use command “Option“. Remove marks This is used to remove all the marks existing in the current multisheet. To remove mark one by one (or in groups) use command “Option“. Export Data This command applies to a final master drawing only, created with all the possible "blocks" composing the most complete machinery available. Information concerning Options, are exported in a.Cm file (machinery configuration), used by program “14.10 Configuration“ to define the conditions to derive a new machinery drawing from the master one. You are advised to backup the full master drawing (e.g. in Librerie\Configuratore) before extracting a new machinery from it, because unused options will be deleted. 380 • Spac Automazione 2011 14.10 Configuration generator This tool manages Options and data exported from the ultimate master drawing (see “Export Data“ Sect. 14.9), defining the consistency conditions for the Options that were generated. Program “Configuration generator” can be launched from the program group, clicking on the icon shown at left. To open the .Cm file Cm exported from the drawing, select Open from the File menu (or press button “Open existing configuration”): List of Machinery Options in the “Configuration Generator”. When opening a Cm file, the Options list is shown with its descriptions and Id (identificative). Now you have to : 1 – Sort Options (moving rows upward or downward) in order to have a more readable and intuitive list. 2 – Insert all pages common to each Option combination into field “Sheet containing part common to all machinery configurations”. This page list must contain sheets with markers, too, excluding only pages where all entities are marked. 3 – Set Options that can’t coexist in column “Exclude option”. In the previous image you can see Option 1 (380V power supply) excludes Option 2 (220V power supply), because the scheme can contain only a supply circuit (two are not allowed). Each option can exclude one or more other options. 4 – Set Option not strictly required for the machinery to work in column “Accessory”. These options are marked with a different color, set with command “Preferences”. 5 – Save the .Cm file exported from the drawing with the new settings. You can save the .Cm file with a new name, too, if you want to keep the original one. Now you can run program “14.11 Machinery configurator“ and open the newly generated Cm file, and start assembling a project of a machinery with desired Options. 14 Utilities • 381 14.11 Machinery configurator This is used to assembly a Machinery project with desired Options, beginning from data previously saved in the .Cm file by “14.10 Configuration“. Program “Machinery Configurator” can be launched from the program group, clicking on the icon shown at left. To open the .Cm file Cm exported from the drawing, select Open from the File menu (or press button “Open existing configuration”): List of Options in the “Machinery configurator”. When opening a Cm file, the Options list is shown with its descriptions and the “selection” field. Now you have to: 1 – Select required Options for the machinery to work; enabled options are marked in green (or another color set using command “Preferences”), excluded ones are marked in red. Options are enabled clicking cells in column “Select.”. 2 – Select “Accessory” Options, not required for the machinery to work. “Accessory” options are marked with the color set in “Preferences”. 3 – Verify your choices: pressing button “Verify choices” you check if all parts (options) essentials for the machinery to work have been set. 4 – If the project is “Invalid”, a report (message list) shows which Options caused the error, for example: Configuration invalid for the following reasons: Option 7 – Piece counter – is essential for the machinery to work. 5 – If the project is “Validated”, you can save the machinery project. Each possible machinery combination (among accessories and Options) has to be saved in different .Cm files. Now you can open the master drawing (containing all the possible machinery parts) and import a Machinery Configuration (.Cm file) using command “14.12 Scheme generator“. Save the .Cm file with a different name, both from full master and original one. 382 • Spac Automazione 2011 14.12 Scheme generator Pop-menu > Util This is used to import a Machinery Configuration (from a validated .Cm file) previously got from program “14.11 Machinery configurator“. Ensure the master drawing (or equivalent, duplicated) complete of all possible parts of the machinery before running command “Scheme generator”. Complete “master drawing” example. Then you obtain the machinery previously configured. All multisheet pages (master drawing) containing parts common to selected Options of this machinery (see Sect. 14.10), are kept, and so all graphical entities concerning enabled “Option“ . Objects related to disabled Options are removed. Project with some Options disabled. When the process has come to end, you can compact the multisheet removing sheets that have been completely emptied (see “3.7 Shift sheet”). WARNING : You are advised to keep a copy of the master drawing always (e.g. storing it in the Librerie\Configuratore folder). 14 Utilities • 383 14.13 Scada Pop-menu > Layout > Applications This function allows you to interact with the software GraphWorX32 of Iconics. Iconics Genesis-32 is a group of programs allowing software solutions to view HMI/SCADA. The three main programs are: Graphworx32, Trendworx32, Alarmworx32. The software suites will be used in the Scada projects to manage graphics interface, alarms, historical database and reports (data collection and reporting). 1 – Export data Information regarding the drawing is saved in the job order folder Wmf with the specific command “Export for Scada”. 2 – Convert data. Activate the program “Cad2Genesis” (even without closing the drawing) and select the Wmf folder containing the exported drawing data then press the green symbol ?. Now the gdf-GraphWorX32 compatible files are created in the Wmf folder. NOTE: Cad2Genesis can be activated from the folder Program\Lisp of SPAC by double clicking on the file Cad2Genesis.exe. Iconics Genesis-32 is optional software not supplied. 384 • Spac Automazione 2011 15 Layout 15.1 Cabinet exterior Pop-menu > Layout This command allows the user to draw external electrical panel topographic layouts quickly. Use the insertion button to save the most commonly used dimensions in actual millimeters. The various functions operate on a default scale of 1:10, so that drawings are usually suitable for A3 size paper. Scale values can be changed using the “Cabinet layout scale” command. If a front view is selected, the number of doors must be defined (from 1 to 3). Height and width do not take into consideration the base. The symbols used for this view reside in the Quadri directory under the names FQ1DOOR, FQ2DOOR and FQ3DOOR.dwg. In side view drawings the height and depth are considered (without base) for the insertion of the FQLATER .dwg block. Blocks may be customized. To draw both views the commands must be repeated twice. The following prompt is displayed: Cabinet insertion point: (bottom left) The dimensions are stored in the Armadi.ini file in the Librerie\Archivi directory. Cabinet layout scale This is used to set the scale factor to be used to draw the cabinet internal or external topographic layout. This value also affects the “accessori” symbols library, to make sure that all proportions are maintained. The default scale is 10. 15 Layout • 385 Accessories This library contains symbols that are useful for completing the panel front topographic layout. All symbols are duplicated so they can be used on both front and side view drawings. The symbols reside in the Quadri directory. Base This command, which must follow the “Cabinet” command, is used to draw the cabinet base. Cabinet base height 100/<200>: 100 Select cabinet: If the cabinet front view is selected the command is complete when the base is inserted. If the side view is selected, the following request is displayed: Which side is cabinet front: (right or left point) The system inserts the Fqzocco.dwg block from the Quadri directory. The block is scaled according to the size of the panel selected. Transparent Doors This command is used to effect the parametric insertion of a block called Fqantat.dwg (which can be customized by the user). The following are requested: Transparent door insertion point: (bottom left) Transparent door width (cm): (type or 1st point) Transparent door height (cm): (type or 2nd point) If the door size is typed in, all values must be expressed in actual centimeters. With the Cabinet, Base and Accessories commands, drawings like the one shown in the example can be drawn quickly and easily: Example of composition using the “Cabinet accessories” library (measurements expressed in centimeters). The example shows a two-door cabinet (front and side views) complete with base and accessories. Dimensions must be inserted manually. 386 • Spac Automazione 2011 15.2 Cabinet interior Pop-menu > Layout This command is used to enable quick drawing of the electric panel internal layout. The dimensions (in actual centimeters) that are used the most can be stored separately for each Plate, Raceway, Component and Terminal Block. The default scale for the various functions is 1:10, so that the drawing is generally compatible with A3 format. Use the “Cabinet layout scale” command to change the scale. Dimensions are stored in the Armadi.ini file in the Librerie\Archive directory. Press Ins to store new measurements in the database. Press Delete to remove. The “...” button is used to define a distance between two points in the drawing. Plate This is used to draw the overall dimensions of the plate inside the panel. After setting or selecting the dimensions (base x height), press “Draw”. The following request is displayed: Plate bottom left point: It is now possible to draw the relative raceways and components. Raceway This command is used to draw raceways on the plate inside the panel. First select the home panel (useful for calculating raceways in the Bill of Materials) and then define the dimensions (width x depth). Measurements can either be typed into the specific fields or taken from two different databases, either that shared by the Armadi.ini file or the specific raceway database, Canaline.Dat. The drawing is based on the points defined on the axis. Press “Draw” to display the following request: Raceway start point: Raceway end point: Raceway reference <40x60>: (type value) The program then draws the raceway and centers it on the axis. It then asks the user whether the raceway is to be aligned to the right or left using a point: Point for alignment orientation <Enter for none>: (right or left) The raceway is moved in the direction specified by the user. When Enter is pressed, it remains centrally aligned to the axis. The default raceway reference corresponds to its dimensions. 15 Layout • 387 Database The “width x depth” of raceways can be shown in the specific fields and stored, by pressing the Ins button, in the database (Armadi.ini file) with all the Plate, Component and Terminal block measurements. This database does not contain any information used to create bills of materials. Press Database to access a specific raceway database (Canaline.Dat file) that, besides containing dimension data, can also be used to store information used to create bills of materials. Armadi.ini Contains dimensions. Managed via the Ins, Delete and “…” buttons. Canaline.Dat Contains dimensions as well as the manufacturer, type and description (for bill of materials). Managed via the “Select raceway” and “Database” buttons. Besides dimensions, each raceway also contains the manufacturer’s name, item catalogue code and description: Only press Add to enter new items into the list after completing all fields requested. Press Change to change data relating to an existing raceway. Press Delete to remove an item from the list. Component Use this command to draw the overall dimensions of a (standard) component on the plate inside the panel. Set or select the dimensions (height x width x depth) and then press Draw. The following information is requested: Component insertion point: Component reference: KM1 (type value) The component insertion point is the mean height on the left of the rectangle. This point has been chosen to facilitate insertion in line with the axis (on the guide) of components with different dimensions. The program asks whether you want to continue with another component (having the same dimensions) and automatically suggests the next insertion point (using Enter). <ENTER>: Current point The Offset between components defines the insertion point for the next component. If this value is set to 0 the next component is placed alongside the one drawn previously. The component reference is inserted manually. 388 • Spac Automazione 2011 Terminal block This function is used to draw the overall dimensions of the terminal block on the plate inside the panel. Set or select the dimensions (width x depth) and then press Draw. The following information is requested: Terminal block start: Terminal block end point: Terminal block reference: XM1 (type value) The terminal block reference is inserted manually. Options Before using any of these functions you must first select the drawing group to be changed (raceway, component or terminal block). Move Copy Guide Text ht. Use this function to move a raceway, component or terminal block by the value defined in “Offset distance”. This value is expressed in actual millimeters and is then changed according to the scale setting. Copies a raceway, component or terminal block. This function has the same characteristics as Move. “Guideline” recalls the function for drawing component insertion axes. The line is automatically drawn in red as an Axis line (section point). This function helps the draftsman to identify the mid-point between the two raceways and define displacement. This is used to alter the height of all raceway, component or terminal block reference texts. Size table This command creates the Raceway size table, which contains a summary of all data concerning the raceways that are drawn for each panel or for specifically requested raceways. Each piece of information (Tag) contained in the “Available fields” can be added to “Output fields” by pressing Add and thus represent a column of the table. Each Tag has two variables, the width and column heading. These can both be changed by pressing Change. Cut table Standard is the basic configuration for output fields (where applicable). Press Default to store the current configuration “locally” (see Sect. 4.2) for future use. If confirmed without pressing Default, the configuration is perceived as temporary and is only used once. 15 Layout • 389 15.3 Topographic manager Pop-menu > Layout The Topographic Management program allows you to draw component layout inside a cabinet quickly. The command starts by asking for files to open (files generated by the Bill of Materials). The command “Open Bill of Materials” allows you to open DMW files generated by both the External and Internal Bills at any time. (see “8.3 Internal bill of materials”). If there are several panels present in the dmw file processed, you can select the one you want to work on. This choice allows you to view the components (codes and macrocodes) that are part of it using the typical tree structure, as in the figure below: Topographic Manager, details of a component. This Function is really simple, after selecting one or more components (multiple selection is by pressing the Shift [ ⇑ ] button on the keyboard) you just drag the components with the mouse (Drag&Drop) from the Topographic Manager window to the desired position on the drawing. As an alternative to Drag&Drop you can double click on the component. In this case insertion is automatic in the position following the last component (the insertion coincides with an average point to the left of the symbol). Components are drawn considering the step and scale set (Cabinet layout scale). NOTE: The Shift [ ⇑ ] key must be pressed before starting multiple selection, and must be kept pressed till the end of selection. 390 • Spac Automazione 2011 As soon as the components have been dragged to the drawing, the icon commutes into the green sign “tick”. If the component is deleted the starting icon is restored automatically. Example of drag&drop of 4 components (step = 0) The result of the previous figure can be achieved by a multiple selection but also by repeatedly double clicking on the 4 components. The command “Save Bill of Materials” allows you to save the DMW file after changes. The command “Save with name” stores a new DMW file with a new name chosen. The new file is opened automatically. Update from Database: allows you to select an amw (Materials database) file from which to get dimensions and symbols to associate to, or update, existing codes. Update database: allows you to select an amw (Materials database) file to be integrated with the data (dimensions and symbols) associated with codes existing in the dmw file. Update from Drawing: allows you to synchronize the Topographic Manager with the drawing. Data alignment occurs by controlling the components on the current Sheet. Hide components already drawn: when the button is pressed (on), you do not see the components drawn (with a green “tick”). Cabinet layout scale: is to set the scale factor of the Topographic drawing (default 1:10). Text Height: is to set the Name height (contained in the symbol Reference attribute). The Step is the distance between 2 components. If you see the error message “The element cannot be drawn” when dragging a component onto the drawing, the component has normally not got the dimensions and/or associated block. Selecting any component from the list, in the “Dimensions and Block choice” the relative data is visible (and modifiable). If there are no dimensions (X=0, Y=0, Z=0) and no block has been chosen ”The element cannot be drawn”. The icons allow you to recognize the component state straight away: those ready to be drawn, those already drawn and those with no data. 15 Layout • 391 Icons Viewing codes ready to be drawn is made easier by the following icons: Identifies components made up of a single material code (or no code). Identifies components made up of several material codes (macrocodes). Identifies a group of components made up of a single code. Viewing codes that have already been drawn is made easier by the following icons: The green “tick” highlights a drawn component. The green “tick” highlights a drawn macro-component. The green “tick” highlights a drawn group. Hide drawn components: when the button is switched (on), already drawn components are not seen (with the green “tick”). Viewing codes that cannot be drawn at present (as they have no dimensions or associated symbol) is made easier by the following icons: The component has no dimensions (or symbol) and cannot be drawn. The component is associated with a “generic” symbol (measuring 1x1x1), only valid if combined with component dimensions. It cannot be drawn. The macro has no dimensions (or symbol) and cannot be drawn. The group has no dimensions (or symbol) and cannot be drawn. To set the state of a component or modify its conditions you have to go to the “Dimensions and block Choice” (see “Component Management”). Icons allow you to recognize component state straight away: those ready to be drawn, those already drawn and those with no data. 392 • Spac Automazione 2011 Component Management Component with single code If there are no dimensions (X=0, Y=0, Z=0) and no block has been chosen ”The element cannot be drawn”. Data changes made to “Dimensions and block Choice” must be confirmed by pressing “Update”. “Dimensions and block Choice” Just Dimensions: a neutral rectangle is drawn with the dimensions given (using the symbol Ly_Default), if value Z (height) is different to 0 a three dimensional polygon is drawn. Just Block: the block chosen is drawn The choice is made by pressing “…”. You must be careful over the block choice as there are 2 symbol types: - “Real”, symbols drawn actual size just like the component. - “Generic”, symbols measuring 1x1x1. If there are no sizes (X=0, Y=0, Z=0) and the associated block is generic (size 1x1x1) ”The element cannot be drawn”. Dimensions and Block: priority depends on block type. - With “real” symbols priority is given to the block, dimensions are ignored. - With “generic”, symbols the symbol is drawn with the dimensions set. There is no rule to distinguish between “real” and “generic” symbols in advance. (Symbols installed with the program can be distinguished by name, those with prefix LY_ are generic, while LY- ones are real). Macrocode If there are no dimensions (X=0, Y=0, Z=0) and no block has been chosen the macro as treated as group of single codes. If just one of the single codes can be “drawn” the whole macro can be drawn. Only Dimensions : a neutral rectangle is drawn with the dimensions given (using the symbol Ly_Default), if value Z (height) is different to 0 a three dimensional polygon is drawn. The single code condition is ignored. Only Block : the block chosen is drawn (just “real” symbols). The single code condition is ignored. Dimensions and Block : priority depends on block type. The single code condition is ignored. No size and no Block (X=0, Y=0, Z=0): depends on single codes in the macro. Practically, it depends on the following 3 cases. 15 Layout • 393 1) If no element can be “drawn”, the macro has no information at all so cannot be drawn. 2) If the macro has just one element that can be “drawn”, it is drawn with data and features (dimensions and/or block) of the only valid code. 3) If the macro has two or more elements that can be “drawn”, the graphic result depends on “Assembly” settings. “Assembly” is set by right clicking on the macrocode. “Assembling a Macrocode” Assembly flanked along x-axis Symbols are inserted in the mean point along axis X one after the other. Assembly flanked along y-axis The first symbol is inserted in the mean point along axis X, the next are inserted one above the other along axis Y (aligned to the left). Assembly flanked along z-axis The first symbol is inserted in the mean point along axis X, the next are inserted one above the other along axis Z (aligned to the left). By activating “Maximum dimensions” you get the drawing of a single symbol summing up the total dimensions of all “drawable” codes (using the symbol Ly_Default). Practically, “assembly” allows you to choose between 6 different ways of drawing a macrocode. Terminals and connectors are automatically handled as a macrocode. If dimensions and/or block are set directly on the macro item, the single code condition is ignored as are the “assembly” settings. 394 • Spac Automazione 2011 Group (grouping of single codes) A group is created by a user to handle a group of codes in the same way as a macrocode. By selecting several codes and right clicking you activate the command “Group together”. You are requested to choose a name for the group. Code grouping To cancel a group, right click and activate the item “Explode Group” Explode Group If there are no dimensions (X=0, Y=0, Z=0) and no block has been chosen the group is handled like a group of single codes. If just one of the single codes can be “drawn”, the whole group can be drawn. The Group functions in the same way as a Macrocode. The rules are the same described above including the case history re “assembly”. 15 Layout • 395 Dimensions and Block Choice Dimensions To modify dimensions, you must select one or more components (multiple selection by holding down the Shift [ ⇑ ] button from the keyboard), insert actual sizes (in mm) and press “Update”. Dimensions must be in actual mm using a point character to separate decimals (e.g.: 30.5). “Dimensions” are shown by the topographical layout drawing simply using a parallelepiped, if nothing is specified the Ly_Default. Symbol is used. If you mean to specify, you must give a “generic” symbol, measuring 1x1x1. “Generic” symbol The insertion point must correspond to the lower left-hand corner. Graphic insertion is centered automatically by calculating the mean point on Y axis (height). WARNING: dimensions are ignored if an “actual” block is specified (created with the actual sizes of the components represented). Block To insert or modify the block Choice, you must select one or more components (multiple selection by holding down the Shift [ ⇑ ] keyboard button), press the search button search “…” to facilitate your search and then press “Update” to confirm the operation. Symbols can be found in the folders Quadri\GestTop. Symbols created using actual component sizes have priority if dimensions are also set. The Topographic Manager program distinguishes “generic” symbols from those with “actual” dimensions during the application. The insertion point must correspond to the lower left-hand corner. Graphic insertion is centered automatically by calculating the mean point on Y axis (height). “Actual” symbol There is no rule to distinguish “real” symbols from “generic” ones in advance. Symbols installed with the program can only be distinguished by name, those with the LY_ prefix are generic, while the LY- ones are real). 396 • Spac Automazione 2011 Block Specifications An n-block layout Is considered a symbol if it features the following attributes internally : Label Default Type Refercence Description Component reference Type IP Contains the catalogue codes of associated material Manufacturer IP Contains the brand of the associated material. Panel IP Electrical panel reference Description IP Generic component description. Sheet IP Component page number. Note: data with an (*) are examples. Type P=Preassign Type I=Invisible Blocks are normally stored in the folder Librerie\Quadri\GestTop. To distinguish “real” from “generic” layout symbols, the initial part of the file name is usually different, using LY_ for generic and LY- for real dimension symbols. 15 Layout • 397 15.4 Pushbutton panel Pop-menu > Layout These commands are used for automatic drawings of external layout (front) and internal layout (rear) of the pushbutton panel, pulpits, panels, etc., complete with wire connections, wiring pins and componentrelated functions. Before executing the “Panel wiring“ function, check the relative “Configuration”. Configuration For each symbols library (Iec, Cei, Vde etc.) there is a “Pref” used to create the association between each symbol in the library and a block for the front panel and another for the rear panel. All symbols you can use to generate this configuration are stored in folder Librerie\Pannello ; the name prefix of each symbol is fundamental to distinguish the block type: Lyplnt_ : is the panel front symbol (without label). Lyplt_ : is the panel front symbol (with label sized 45x67.5). Lypls_ : is the panel front measuring tool symbol. Lyplp_ : is the plate symbol. Rppl_p: pushbutton symbol (or similar) for the panel rear. Rppl_s: switch symbol (or similar) for the panel rear. Rppl_l: lamp symbol (or light indicator) for the panel rear. Rppl_v: measuring instrument symbol (or various others) for the panel rear. “Symbol Configuration” (see Sect. 4.2). In previous program version, for each new configuration was generated a PFR file; you can recover your customizations importing these files. 398 • Spac Automazione 2011 Panel wiring This command automatically draws the external layout (front) and internal layout (rear) of the pushbutton panel, pulpits, panels, etc., complete with wire connections, wiring pins and componentrelated functions. First of all, specify the name of the panel to be processed and then the type of drawing (front or rear). The Front or Rear selection can also be used to recover a layout that has already been drawn in another drawing in order to change this or create the related mirror image (i.e. front to rear or vice versa). This will be processed on the multisheets that have been selected from the list using Scan multisheets. The Use Last Scan function gives immediate access to processed data. This is useful when drawing a new panel or changing type of drawing without repeating the scan function. After processing, the system produces a list of the components that make up the specific panel. The original list contains components set out in alphabetical sequence. The first symbol in the list is at the top on the left and these are automatically listed from top to bottom and from left to right. A number of tools are available to change the final drawing. These can be customized as required. The diagram in the example shows the P1 pushbutton panel that has been changed by adding <Space>, Blanking Plugs and <Row Change>. The arrows to the side of the window can be used to move the components up or down one position at a time Example: making a pushbutton panel. 15 Layout • 399 Plug Use to insert a blanking plug between the components in a list. The plug is handled by inserting a symbol of the same name. Take care not to remove or rename this block. Space Use to insert an available space between the components in the list by inserting a symbol of the same name. Take care not to remove or rename this block. Row Change Use to jump to the next row. This is essential in order to prevent the drawing of the pushbutton panel from occurring along the same row. Move Use the arrows at the side of the window to move the selected component up or down in the list. Components can be moved by one position at a time. Delete Use to delete a component, space, plug or “row change”. Details Useful for accessing all available information related to components. Panel layout must comply with the following parameters: Column pitch This is the distance (in mm) between one component and the next on the same row (also valid for “plug” and “space”). Row pitch This is the distance (in mm) between one row of components and the next. To set this value correctly always consider “Child table” settings and the relative offset value. Child table The layout also contains the connections for additional component contacts (only for panel rear). This information is set out in a table: the first row of the table is drawn under the component at the distance defined in the table offset. Child offset table This is the distance between the layout component and the table that describes the connections of the related contacts (only for panel rear). Diagram blocks For symbols with no panel block configuration the same diagram symbol is used on the layout instead. Order according to already drawn blocks When the drawing scan is repeated, the list is shown in its original form without the changes to plugs, spaces and row jumps. If the current sheet contains the panel layout, this option can be used to get the configuration. This is of prime importance, especially if you require to run an Update function or obtain a mirror drawing (i.e. front to rear or vice versa). Hide blocks This is particularly useful when drawing in step-by-step mode, as components are gradually removed from the list as they are inserted into the drawing (to produce the layout). Conversely the word “Yes” is displayed in the relative “inserted” column when symbols have already been drawn. Hide row change The <change row> display in the list is frozen. When the list has been customized (with plugs, spaces and row jumps) and after checking correct pitch settings (horizontal and vertical) press Drawing to proceed to the graphic drawing stage. The same procedure is used to draw front and rear of panel. 400 • Spac Automazione 2011 Drawing Complete The complete layout draws all the symbols in the list - you only need to indicate the start point. Select first point in top left: The “step-by-step drawing” variable must be disabled before the complete layout can be drawn. If the destination sheet is in use (Status: contains entity) you will be asked whether you wish to continue or whether you wish to select a new sheet number. When “Clear current sheet” is enabled, all entities contained prior to drawing are deleted. Confirmation is requested for each subsequent sheet. Step-by-Step Symbols are drawn one at a time (symbol selected): Select block insertion point: When using this system it is advisable to activate the “Hide Blocks” function. This facilitates the operation by eliminating components from the list as they are inserted into the drawing. Mirror Image This function can be used to obtain the mirror image of a layout. If the panel front has been drawn, the panel rear can be obtained immediately (or vice versa). N.B.: the drawing of the rear panel is the mirror image of the front panel. The Update button is used to transfer drawing changes to the symbols in the layout. This avoids having to completely re-create the layout sheet. Update This function is used when changes on the electrical diagram must also be shown on the panel layout. Even when simple operations are carried out, such as changing wire numbers (see Sect. 5.1), assigning wiring pins (see Sect. 7.2) or changing the contents of “Functions” (see “Function legend” Sect. 14.1) layout data must be updated. The Update function enables this to be done without having to do the drawing again. When Update is pressed, the function updates all the components in the list or on the current drawing sheet. When Force data is pressed, the user is asked to touch a symbol on the drawing. The data for this symbol are replaced with the values of the component highlighted in the list, without any further requests. WARNING: Inconsistent data, such as duplicate references, are marked in the list with a ? next to the name of the component. 15 Layout • 401 Panel front The description on the component label is obtained from the comments contained in the “Function1” and “Function2” attributes (see “Function legend” Sect. 14.1). Example of ”panel front” layout. The Update button is used to transfer drawing changes to the symbols on the layout. This avoids having to completely re-create the layout sheet. Panel rear The description on the component label is obtained from the comments contained in the “Function1” and “Function2” attributes (see “Function legend” par. 14.1). Note: the drawing of the panel rear is a mirror image of the panel front. Example of “panel rear” layout. The presence of the pin reference depends on the methods used for cross-referencing (see Sect. 7.2). The mirror drawing option can be used to create the front and then immediately create the rear of the panel (or vice versa), maintaining the same configuration. 402 • Spac Automazione 2011 15.5 Panel symbols Pop-menu > Layout This function is used to access a library of symbols that are useful for manual drawing of the pushbutton panel layout. These symbols are complete with attributes, which are setup manually during insertion into the drawing. These symbols are used for drawing the pushbutton panel layout (front or rear) manually or automatically “15.4 Pushbutton panel”. Symbols – Pushbutton panel front This function accesses a library of symbols that are useful for drawing the layout of the front of the pushbutton panel. The blocks are stored in the Panel directory. For each DWG symbol there is a corresponding .SLD image (slide) with the same name, displayed in the dialogue window. New symbols can be customized and stored in the same directory as existing ones (Librerie\Quadri). The name of the block must follow on consecutively from existing blocks (Lyplnt_18, Lyplnt_19, etc.), with up to a maximum of 20 (the dialogue box can display a maximum of 20 windows). The default insertion scale is 1:1. New or different scale factors can only be defined by customizing the menu (see Sect. 16.3). If one symbol is deleted this may prevent those with successive numbers from being displayed. Symbols – Pushbutton panel rear This function accesses a library of symbols that are useful for drawing the layout of the rear of the pushbutton panel. These symbols are complete with attributes, which are setup manually using the “Ddatte” command during insertion into the drawing. These symbols are used for drawing the pushbutton panel layout manually or automatically. 15 Layout • 403 15.6 Panel utilities • Modular cabinets • Modular panels This symbol library can be used to draw cabinet and standard panel structures quickly, using the symbols for glass or steel doors, double doors or ventilated front base plates, etc. The various panels can be made up manually or by using a library of ready-made panels for most standard requirements. A series of symbols that represent overall dimensions for switches and relays (and other components) are also available for a wide range of layouts. These commands can be used to obtain a structural drawing like the one shown in the following example: Example of layout using the “modular panels” library. The default setting for these functions is 1:10, so that the drawing is suitable for A3 sheets. The final dimensions must always be expressed in the same scale factor by using the “Change variables” function to set the DIMLFAC variable to 10. To insert panels accurately, the cabinet drawing includes reference notches. Use these as insertion points for the various panels using the Osnap INTersection method. To make sure that the component references on the panels are automatically requested, use the “Change variables” function to set the ATTDIA variable to 1. Otherwise these must be completed later using the “Ddatte” command. 404 • Spac Automazione 2011 15.7 TeSys U Pop-menu > Layout The program “TeSys model U” configurator was created in collaboration with Schneider Electric, a simple tool aiding to configure (and draw) motor starters for power up to 15 KW, using Schneider series TeSys U products. Once the motor starter is configured, both electrical and topographic scheme can be traced with a simple ‘drag-and-drop’. To create a new motor starter use the following commands: - TeSys U – Configuration - TeSys U – Draw “TeSys model U” is the starter for alternating-current threephased motors revolutioning motor starts: further than the traditional functions (sectionalize, command and protect) it can communicate with automation systems using the most popular communication buses. High reliability (breaking power of 50 KAIC, standard version; up to 130 KAIC with additional limiter), thanks to its manufacturing system (compact starter) that grants full coordination. Choice among two power bases (12 and 32A), 6 magnetothermal protection modules (standard, advanced and multifunction). These two components only replace the traditional motor starter up to 15 KW. Additional communication modules (no more room needed) transform the motor starter in an automatic peripheral. Electrical features: • 2 power bases: from 0,15 to 12 A and/or from 0,15 to 32 A. • Voltage rating: up to 690 Vac. • Standard breaking power: 50 kA/400 V, upgraded to 130 kA with an additional limiter. • Control unit: 6 size from 0,15 to 32 A. • Control voltage: lower consumption, AC or DC depending on the control unit. • Standard width 45 mm. • Reversing module mounted at the bottom, not increasing the module width. Control units features: • Standard module: protection against shorts and overloads class 10. • Advanced module: protection against shorts and overloads class 10 and 20, and can be upgraded with auxiliary modules to manage manual or automatic restarts and overload managements. • Multifunction module: the smartest version, magnetic and thermal protection in all classes (from 5 to 30), equipped with a LCD display reporting in real time information such as thermal state, events history and operation. An integrated keyboard set the electrical parameters of the unhooker. 15 Layout • 405 TeSys U – Configuration This command starts the configuration wizard: the motor starter is defined through few choices depending on your needs. At first choose among: • Create a new motor starter • Use a pre-defined model • Modify an existing one Then specify the peculiarities of the motor (see the following figure). While choices are made, modules, control units, contacts and accessories are filtered, and the final components are chosen. Before saving the new configuration, check the “status lights” and prompt: in case of incoherencies a warning is displayed. See “TeSys U – Draw”. 406 • Spac Automazione 2011 TeSys U – Draw This command transfers the configuration of the motor starter to the drawing. You can draw either the Electrical scheme or the topographic Layout. First, select the motor starter you are going to draw from the upper list; second, select the symbol to insert. Electrical scheme Pressing button “Draw” the symbol is inserted in the drawing and all the automatic procedures associated to its category are run (see “17.1 Categories of symbols”). Repeat this operation for each component, until all “To insert” labels disappear from the “Status” column. Topographic Layout Pressing button “Draw”, all (3d) symbols related to the motor starter are combined and drawn with this single operation. Press “Update” to refresh the list status in case the drawing has been modified: missing symbols can be inserted again following the procedure above. See “TeSys U – Configuration”. 15 Layout • 407 15.8 Unravel Panel Wires Pop-menù > Layout The program for unravel the panel wires designs automatically the connections between components and raceways passed inside the electrical panel. The command starts with the request of the multisheets to be processed. The processing is performed on the multi-sheets selected from the list pressing Scan Multi-Sheets. With Use Savings it is possible to access quickly the data processed previously, to design or make changes without repeat the scanning. (“Use Savings” does not consider the modification made on the electrical schemes after the data and hour indicated). The “Unravel Panel Wires” window is opened at the end of the scanning; this window contains all the list of components divided by electrical panel. Unravel Panel Wires, details of a component cabling. (see “15.3 Topographic”). Selecting a component from the list, the panel wiring is immediately visualized (along with the passage on the raceways for the connection between components and terminals). All the calculations are done automatically considering the rules set by the user. By selecting a panel, all the components wiring is visualized. The way for establish automatically the best wires track/path follows some important considerations. First of all, the power single-feed wires have priority on the raceways, then the common cables and finally the connections. The priority table for wires is defined as: 1° Power : Connections with a minimum cables’ section of 6mm² are considered as power cables. 2° Common : Common cables with at least 10 connections has priority (equal or greater than 10). 3° Connections (It is possible to modify the “Cable Section” and the ”Commons Quantity” on the Unravel Settings). 408 • Spac Automazione 2011 The power cables and the commons have in general a higher probability to pass on the raceways with the shortest track than a normal connection. An alternative track is evaluated in case one of the raceways is saturated, equivalent to the 70% of the volume occupation (a warning message is displayed once the 50% of the raceway volume is occupied). (It is possible to set different saturation percentages on the Unravel Settings). The definition of the track inside each group (power single-feed cables, commons and connections) considers the following variables: 1° Shortest track. 2° Uniform distribution on the raceways. 3° Maximum percentage of the raceway volume occupied: 50% by default. 4° Minimum number of curves: for cables with a big cross-section. 5° Cables with a big cross-section. It is possible to modify the unravel obtained automatically, by forcing different tracks manually or disabling the pass of a cable in a raceway according to its color: • See Wiring • Edit Wiring The icons Component with wiring OK. Component with wiring incomplete. Component with wiring modified manually (forced). Component not found on the current topographical drawing. Terminal Block with wiring OK. Terminal Block with wiring incomplete. Terminal Block with wiring modified manually (forced). Connection OK. Connection OK (Commons type). Connection OK (Multi-Polar cable type). Connection not found. This is the main cause for a Component or Terminal Block with incomplete wiring. Connection modified manually (forced). The topographical drawing of the panel must be designed using the adequate commands: boards and raceways with “15.2 ”, components and terminal blocks with “15.3 Topographic”. WARNING: The raceways must be designed with Spac 2009 or a higher version (the attribute “Sigla_Sbroglio” must be present on the symbol LY_Canalina). 15 Layout • 409 See Wiring The result obtained automatically with the “Unravel Panel Wires” could be consulted and printed in several ways; let’s see some examples: Selecting a component (from the list) you can highlight the complete wiring on the drawing. Selecting one of the pins you can highlight only the track of the selected connection in the drawing (pin to pin). (Example on 1° pin in figure) Selecting one of the pins it is possible to highlight only the track of the connection selected on the drawing (pin to pin). (Example on 2° pin in figure) Selecting one raceway it is possible to highlight all the connections passing. Pressing the right button of the mouse it is possible to open the contextual commands menu. Pressing “View \ Hide Filling” the space occupied inside the raceway is simulated. The color establishes the space occupied. Filling with color green = OK, the space occupied is less than 50% Filling with color yellow = warning, the space occupied is between the 50% and the 70%, Filling with color red = alarm, the space occupied is higher than 70% (It is possible to set different filling percentage on the Unravel Settings). To free the raceways with a filling higher than 70%, it is required to modify the required connections selecting different tracks (see “Edit Wiring”). 410 • Spac Automazione 2011 Edit Wiring To modify the wiring tracks obtained automatically, it is necessary to click on the right button of the mouse over the component name (or on the single connection) to be modified. From the contextual menu, it is possible to select the command most suitable for the modification: • Modify Track • Force Tracks • Set Forbidden Raceways Selecting one component all the connection tracks from the selected component are modified simultaneously. Selecting one pin of the component the track associated to the selected pin is modified (the other connections remain without variations). Modify Track Modify the track of one or more connections is very easy; it is enough to select a different raceway on the drawing and the program re-calculates a track passing by the raceway selected. Example : Pressing the right button of the mouse over the –QF8 component, it is possible to visualize its current wiring. Then you can select “Modify Track” (see figure). The function requires: Select raceway: (select the raceway on the left) This figure illustrates all the connections of –QF8 addressed to the selected raceway. It is also possible to select several raceways in case you want to define a more specific track. The modification could have no effect in case there is a forbidden raceway (see “Set Forbidden Raceways”): Using the “Force manually the tracks” command, it is possible to modify the tracks without considering the prohibitions (see “Force Tracks”). Pressing this button the Unravel is re-calculated completely keeping the tracks modified and forced manually (“Update keeping the manual Forcing”). On the other hand, pressing the option “Update deleting manual Forcing” all the Unravel is re-calculated from the beginning and the eventual changes or modifications are lost. 15 Layout • 411 Force Tracks The command works in the same way that “Modify Track”, it consents to make a change on the track ignoring the forbidden tracks (if any) in the raceways (see “Set Forbidden Raceways”). The command “Cancel Forcing” is used to recalculate the track to restore the original one. Pressing this button the Unravel is re-calculated completely keeping the modified and manually forced tracks (“Update keeping the manual forcing”). On the other hand, by pressing the option “Update deleting the manual forcing” all the Unravel is recalculated from the beginning and the eventual changes or modifications are lost. Set Forbidden Raceways Selecting a raceway and pressing the right button of the mouse, the contextual menu is activated. Select the “color wire management” command. This is a simple filter that establishes the selection of the wires colors to be forbidden. With “All except” option the wires colors in the list not could be placed in the raceway selected. With “Only the colors” option the wires colors in the list could not be placed in the raceway selected. The activation of “Set Forbidden Raceway” applies the filters of all the raceways. The command “Force manually the tracks” consents to modify the tracks ignoring the prohibitions to pass in a raceway (if any) Export Wiring Data Pressing the “Output CSV” button the Unravel data is exported to an ASCII file (compatible also with Microsoft Excel® from Windows). The “Unravel Panel Wires” data contains the length calculated for each connection, according to the track selected for the wiring and is memorized on the file with an approximation of 50 mm. (It is possible to set different offsets on the Unravel Settings). The file exported from the “Panel Unscrambling” is used as a base for the interface with automatic wires cutting machines. Unravel Settings Pressing this button, the Unravel Settings will be opened. The operation of the different settings and options is described directly on the program's windows. 412 • Spac Automazione 2011 15.9 Installation Layout Pop-menù > Layout This command is used to design the placement of the component in the installation. This type of design is called “Installation Layout” and considers all the Panels configured (see section “4.3 Panel setting”) with the associated Components, Connectors and Terminal-Blocks. The command opens the installation structure in a window similar to the one illustrated in the figure: Example of an installation structure for the design of the layout. To design the “Installation Layout” it is required to select from the installation structure tree the different elements (that is Panels, Connectors or Terminal Blocks) and press “Insert” button on the figure of the desired symbol (pressing “<” and “>” buttons you can browse through the different figures available). To design the Components it is required to select first the associated Panel and press the “Other” button to load the list of all those designed. Once the load is executed, it is necessary to select from the list the names of the components and press “Insert” button on the figure of the desired symbol, as done for Panels, Connectors and Terminal-Blocks. The “Other” button is active only when a panel from the structure tree is selected. The “control traffic-light” highlights in red the components designed. 15 Layout • 413 After the insertion of the Panels, Connectors, Terminal Blocks and other components in the drawing, it is required to connect them using wires to highlight their links (tracks). After that we obtain a drawing as the one indicated as an example in the figure: Example of a structure designed with the Installation Layout. The tracks could be then “specialized” with further information (details regarding the length and the type of wire for example). You can refer to commands “Tracks length” and “Cable labels”. The tracks must be designed with lines (not poly-lines, splines etc.). Installation Layouts Symbols Each figure corresponds to a symbol memorized on the folder Librerie\ Layout_Impianto: • The prefix PANEL_ corresponds to Panels symbols • The prefix TERMINAL_ corresponds to Terminals and Connectors symbols • The prefix COMPONENT_ corresponds to Components symbols It is possible to personalize new symbols memorizing them in the same folder of those already present in the system; the block name must be consecutive to the existing names (Panel_040, Panel_041, Terminal_009, Terminal_010, Component_013, Component_014, etc.). Symbol Panel_020.dwg 414 • Spac Automazione 2011 Each .dwg block has an .sld image associated (slide) with the same name for the visualization on the dialogue box. Tracks length This command is used to insert the track/path length (in meters). It is enough to select a single segment of the line (from those composing the track). It is possible to design a list (legend) of all the tracks with command “Installation Layout Report”. See “15.9 Installation Layout”. Cable labels This command is used to assign the name of a cable to a specific track. The cable’s labels could be assigned after insert the “Tracks length”, it is enough to select a single line segment (from those that compose the track). A table is designed on the place indicated by the user; the graphical characteristics of the table could be modified with the entering in its configuration (pressing the right button of the mouse). Example of a track with length and table “Cable Label”. It is possible to design a list of all the tracks with command “Installation Layout Report”. See “15.9 Installation Layout”. Installation Layout Report It is possible to make a legend of the “Installation Layout” only if the tracks were “specialized” (with the details related to the length and wire type) using the “Tracks length” and “Cable labels”. A summary table (legend) is designed in the place indicated by the user; the graphical characteristics of the table could be modified with the entering in its configuration (pressing the right button of the mouse). See “15.9 Installation Layout”. 15 Layout • 415 416 • Spac Automazione 2011 16 Customization 16.1 Blk symbols New symbols can be customized by means of the BLK library. This empty library can be used to implement the library by adding any symbols that are not included in standard symbol libraries. When creating a new symbol the following rules apply: • The graphic part of a block must always be drawn on LAYER 0; there are no restrictions as regards the use of colors and line types, although to ensure consistency, reference should be made to those that have already been used. • Avoid using the logical color BYLAYER, which can be confused with color 7 white. The program uses Bylayer to draw wires (see “4.1 Setup”) and it is important to distinguish between these two entities (wire and symbol) when drawing. • Symbols must be designed to snap (2.5 mm) and proportional to wire pitch (7.5 or 10 mm). (See “17.9 Custom Blk Suite”) (See “17.10 Black Box”) The symbol name must be chosen in relation to the name of the free cell to which it is to be associated (from BLK1 to BLK400). Each symbol must be associated with an image (slide) to be displayed in the dialogue window. The slide must be stored using the same name as the symbol to be shown. The BLK symbols and relative slides must be stored in the specific Librerie\Blk directory. (See “17.1 Categories of symbols”). The specific rules regarding parent, child, element, etc. symbol categories must be observed in the construction stage to make sure that new Blk symbols are compatible with the program functions. Any type of symbol can be created even if it does not belong to the categories referred to above. Thus if a Blk symbol contains the correct attributes, it is treated to all effects as a normal symbol from the other libraries: the “Pref” must be implemented each time to configure both referencing parameters and descriptions; for symbols not configured you are asked to input a reference each time they are used. “Symbol Configuration” (See Sect. 4.2). In previous program versions, prefixes and descriptions were stored into Ascii files with extension PRE and DES; you can import these files with the appropriated function. 16 Customization • 417 To make sure that Blk symbols are able to break wires when these are inserted into the drawing, proceed as follows. Automatic wire breaking is based on the Break line references. In the following example the symbol on the left has no reference lines, while the same one on the right has been drawn correctly and can thus break the wires automatically: Example of symbol with break wire reference lines. The lines serve to indicate the overall dimensions of the symbol, In this example the wire pitch (10 mm) and symbol width (15 mm) are shown. To ensure uniformity, the symbol insertion point must coincide with the top left “Break line” (last external point). Symbols without “reference lines” are inserted into the drawing in the traditional manner. “Break lines” can be used to create special configurations as is illustrated in the adjacent figure. These must always take into account the correct insertion point position. Always check that all “Break lines” have the same horizontal or vertical orientation. In the example, the Blk 3 symbol cannot break the wires, as it does not conform to this rule. A symbol with reference lines but with no attributes is always inserted in the traditional manner, without breaking the wires. The following message highlights this condition: The inserted block does not have attributes. Always check the symbol insertion point using the “Base” command. This is essential to “break wires” during insertion. 418 • Spac Automazione 2011 16.2 Mblk macrosymbols A macrosymbol is a symbol that contains other symbols. Creating macros is useful for storing already completed circuit segments. A similar result can be obtained using the “3.8 Store sheet” function. The difference consists in their use: with macrosymbols, references can immediately be assigned to the components they contain. The following rules must be observed when creating a new macrosymbol: • Macros must always be created on LAYER 0. • Connections must be drawn in logical color BYLAYER. The program uses this color to draw wires (see “4.1 Setup”). • Macrosymbols must be drawn to snap (2.5 mm) and proportional to wire pitch (7.5 or 10 mm). • Save macrosymbols in the most neutral form possible, i.e., without references, wire numbers and material code associations, to allow greater flexibility. • Macrosymbols should preferably be provided with all necessary connection points. Select the name of the macrosymbol in relation to the name of the free cell to which it is to be associated (from MBLK1 to MBLK60). An image (slide) must be associated with each macrosymbol to be displayed in the dialogue box. This must be stored using the same name as the macrosymbol it represents. Store MBLK symbols and related slides in the specific Librerie\Blk directory. Macroblocks and slides are created using “Wblock” and “Mslide” commands. Please refer to the specific user manual for operating details. Click on an Mblk symbol box to display its description. Descriptions can be added or changed using Pref. “Symbol Configuration” (see Sect. 4.2). In previous program versions, prefixes and descriptions were stored into Ascii files with extension PRE and DES; you can import these files with the appropriated function. 16 Customization • 419 16.3 Blk Library Pop-menu > Blk This command allows you to insert BLK symbols built by the user and use them in groups (see “16.1 Blk symbols”). The command allows you to dynamically page all symbols contained in the folder Librerie\Blk, including those in any sub-folders, unlike the direct command which only views the ones set. Unlike the direct command (example 1-20 …) this also considers symbols with a name that is not BLK. An error message appears when symbols with the same name are found, even if stored in different folders. (see “17.9 Custom Blk Suite”) The folder Librerie\Blk is generated during the program installation stage, any sub-folders must be generated by the user using normal Windows tools. Symbols with a name that is not BLK contained in the different sub-folders (of Librerie\Blk) are not protected automatically during the software updating stages. 420 • Spac Automazione 2011 16.4 Menu customization Menu customization is performed through the CUI command. The menu file name depends on the program version: - Spac2011.cuix (for the AutoCAD applicative version) located in folder Utente. - Scad2011.cuix (for the Oem version) located in folder Cad\Support. The menu file (cuix or cui) is the command container, there are cases (e.g. symbols) where you are required to change the command details: apply these changes in the menu support file Scad.mnz (the same for all versions, located in folder Utente). Example: The figure shows the command contained in the menu file used to insert the Blk from 1 to 20 : [ 1 - 20 ...]^c^c^pSP_MENU P13BLK_1;SP_EXE_MENU The function executed from this command is described in the menu support file (mnz): ("P13BLK _1" "C:IC_MN" "1" "blk" "" "" ("BLK1" "BLK2"… Highlighted text shows the link between the Mnu and Mnz files. Such modifications are not suggested to beginners; remember that symbols can be customized without modifying the menu using the user BLK symbol library (see Sect. 16.1). Anyway, we suggest to backup the original menu before modifying it. To simplify and accelerate such modifications, we suggest not to change existing commands, but to create new ones. In this case you avoid the need to update he SLB files (slide libraries) in order to fit your modifications. There are 5 different insertion commands, each one specialized on specific needs. WARNING : menus customizations are not replicated or kept when the software is updated. 16 Customization • 421 Normal direct insert This is used to insert a standard symbol that does not belong to any of the parent, child, element, etc. categories. The insertion takes place without calling up a dialogue window. Command line contained in the menu file (cui) : [Earth ]^c^c^pSP_MENU P11CEI15_93;SP_EXE_MENU The text in brackets […] is the command item displayed in the pop-up menu. Command line contained in the menu support file (mnz) : ("P11CEI15_93" "C:IC_UNO" "cei15" "C1100") or (to rotate the variable symbol): ("P11CEI15_93" "C:IC_UNO_ROT" "cei15" "C1100") “P11CEI15_93” (variable) is the link between the menu file and Mnz files. C:IC_UNO and C:IC_UNO_ROT are the functions for the direct insertion; ”Cei15” is the name of the folder where to search the symbol (you can specify whatever folder name existing in the folder Librerie ) while C1100 is the name of the symbol to be inserted. Compliance with the syntax specified in the example above is essential. RFSS direct insert This is used for the insertion of a symbol in a dialogue box. RFSS stands for “Automatic Symbol Family Search”. This function, amongst others, handles wire breaks whenever a symbol with the necessary characteristics is drawn (see “Reference lines” Sect. 16.1): Command line contained in the menu file (cui) : [NO contact ]^c^c^pSP_MENU P11CEI15_1;SP_EXE_MENU The text in brackets […] is the command item displayed in the pop-up menu. Command line contained in the menu support file (mnz) : ("P11CEI15_1" "C:IC_UNO" "cei15" "C2001") “P11CEI15_1” (variable) is the link between the menu file and Mnz files. C:IC_UNO is the function for inserting symbols from the dialogue window using the RFSS system; “Cei15” is the name of the directory in which to search for the symbols (the name of any directory in the Libraries path specified during software installation can be used). “C2001” is the name of the symbol to be inserted. Compliance with the syntax specified in the example above is essential. 422 • Spac Automazione 2011 Normal insert via a window This is used to insert a standard symbol that does not belong to any of the parent, child, element, etc. categories. The insertion takes place by calling up a dialogue window. Command line contained in the menu support file (mnz) : "C:IC" nil "cei15" "Return on components" "CEI15A" "_insert" ("C1075" "C1076" "C1077" "C1078") ("pause" "" "" "") C:IC is the function for the insertion via window; nil (or number) an internal parameter (indicates the section used in the file SpacMenu.ini), “CEI15” is the name of the directory in which to search for the symbol (the name of any directory in the Libraries path specified during software installation can be used). Returns on components is the user-definable name of the dialogue window. “CEI15A” is the name of the slide library file (.SLB) that contains the slide images to be displayed in the dialogue window (.SLB files must be stored in the User directory). Whenever free slides (.SLD files) are to be used, it suffices to remove the text in inverted commas (“”). The first list contains the sequence of symbols that belong to the dialogue window. Each symbol must be associated with an image (having the same name) contained in slidelib (SLB) or among the free slides (SLD). The second list contains the block insertion parameters. Pause can be used to select the symbol insertion point. Pause may be replaced by an x,y co-ordinate to insert a symbol directly into a precise point of the drawing; the sequence of three "" groups corresponds to three <Enter>. A maximum of 20 blocks can be displayed per dialogue box. Compliance with the syntax specified in the example above is essential. Inser RFSS via a window This is used for the insertion of a symbol in a dialogue box. RFSS stands for “Automatic Symbol Family Search”. This function, amongst others, handles wire breaks whenever a symbol with the necessary characteristics is drawn (see “Reference lines” Sect. 16.1): Command line contained in the menu support file (mnz) : "C:IC_MN" nil "IEC" "Transfer contacts" "IECA" ("SC1" "SC1O" "SC1A" "SC1OA") C:IC_MN is the function for inserting symbols from the dialogue window using the RFSS system; nil (or number) an internal parameter (indicates the section used in the file SpacMenu.ini), “IEC” is the name of the directory in which to search for the symbols (the name of any directory in the Libraries path specified during software installation can be used). Transfer Contacts is the user-definable name of the dialogue box. IECA is the name of the slide library file (.SLB) that contains the slide images to be displayed in the dialogue window (.SLB files must be stored in the Utente directory). Whenever free slides (.SLB files) are to be used, it suffices to remove the text in inverted commas (“”). The first list contains the sequence of symbols that belong to the dialogue box. Each symbol must be associated with an image (having the same name) contained in slidelib (SLB) or among the free slides (SLD). A maximum of 20 blocks can be displayed per panel. Compliance with the syntax specified in the example above is essential. 16 Customization • 423 Inser automatic by dialogue This is used to insert a symbol by means of a dialogue window that automatically “sees” the symbols to be loaded (insertion occurs without breaks in the wires). This system is used to insert title blocks, sheet title symbols, revision symbols, etc. Command line contained in the menu support file (mnz) : "C:IC" nil "SIMBOLI" "Sheet Title Symbol" "" "_insert" "TITOLO" ("0,0" "" "" "") C:IC is the function for inserting symbols from the dialogue window; nil (or number) an internal parameter (indicates the section used in the file SpacMenu.ini), “SIMBOLI” is the name of the directory in which to search for the symbols (the name of any directory in the Libraries path specified during software installation can be used). “Sheet title symbol” is the user-definable name of the dialogue window. “” means that the image is contained in an .SLD file (free slide). The name of the slidelib (.SLB file) containing the slide images can be inserted in any case (.SLB files must be stored in the Utente directory). “TITOLO” is the prefix of the blocks to be loaded automatically. All the symbols that are called TITOLO0 TITOLO1 TITOLO2, etc. will therefore be searched for in the specific directory in sequence. As a rule, the first symbol must be 0. If names do not follow on in sequence, symbols cannot be displayed. In practice, if TITOLO1 is removed, TITOLO2, 3, etc. will not be displayed in the dialogue window. The list contains the block insertion parameters. 0,0 is the x,y co-ordinate for inserting a symbol directly into a precise point of the drawing. If the co-ordinate is replaced by pause, the insertion point must be selected. The sequence of three "" groups corresponds to three <Enter> commands. A maximum of 20 blocks can be displayed per dialogue box. Compliance with the syntax specified in the example above is essential. 424 • Spac Automazione 2011 17 Symbols 17.1 Categories of symbols This section describes how a series of attributes must be organized in order to make a symbol compatible. The various symbols are divided into categories and the attributes in each category have different characteristics and requirements. During the insertion of a symbol there are no visual differences between blocks belonging to different families, and it is therefore very important that such differences are correctly attributed when the block is created. The symbol categories are: • Parent symbol • Registration reference symbol • Child symbol • Element symbol • Return symbol • Accessory symbols • Terminal symbol • Plug symbol • Terminal block symbol (See “17.9 Custom Blk Suite”) (See “17.10 Black Box”) For all these categories the block must always be drawn entirely on layer 0. There are no restrictions as regards color or line type. However, to ensure consistency, reference should be made to those that have already been drawn. WARNING: Take care not to confuse the BYLAYER logic color with color white no. 7. The program uses Bylayer to draw wires and it is important to distinguish these two entities (wire and symbol) in terms of color when drawing the diagram 17 Symbols • 425 Parent symbol The parent symbol is essential for all operations, including cross-referencing (see Sect. 7.1). During this operation, the program lists on the parent symbol all the records (sheet and segment position) of the “Child symbol“ with the same name and vice versa. Coil relays, switches, thermal devices, pushbuttons, selector blocks, etc. that have the Pres=M attribute are therefore parent symbols. Use the “Ddatte” command to check the attributes contained in the symbols to identify the related family. Example of a parent symbol A block that includes the following set of attributes is considered a parent symbol: Label Nome PinA1 PinB1 PinN Pres Tipo Costruttore Quadro Descrizione Codice Offset Funzione1 Funzione2 Supporto Default M Switch* REF2* @15,@-5,0* Type P P P IP IP IP IP IP IP IP IP IP IP Description Component reference First input wiring pin number First output wiring pin number Following wiring pin numbers This is the main parent symbol ID. Contains catalogue codes of associated materials Contains the brand of the associated materials Reference of home electrical panel General description of the component Registration reference block name (for cross-reference) Registration reference block position (for cross-reference) Component function row 1 Component function row 2 Optional for data extraction (Overtemperature) N.B.: data marked with (*) are examples. Type P=Preset Nome Pin Type I=Invisible During block insertion the drawing will hold the element REFERENCE as a value. This attribute is essential for the block to be recognized by the program during processing (see Sect. 4.7). These attributes contain the component’s wiring reference numbers (see Sect. 4.2 and Sect. 7.2). We have designated as a standard the PinA (top) attributes as input points to the block, and PinB (bottom) as output points. The number indicates whether it is the first, second, etc. pin pair. We have drawn all pin attributes using a specific font of the same name. They are green color no. 3 to distinguish them by thickness when printed and to make them easier to locate in the diagram on the screen. 426 • Spac Automazione 2011 Pres The PRES attribute is essential as it assigns the parent symbol definition to a block. Symbols that belong to this family must also have two other attributes, Codice and Offset. This is essential in order to carry out cross-reference operations and to obtain automatic insertion of registration reference blocks Tipo The Tipo attribute hosts the Catalogue code of the material that is to be associated with the component during the drawing phase. It is therefore important to allow the bill of materials to recognize the block (see Sect. 8.1). To insert more material codes (macrocodes) separate codes using the “;” character. Costruttore The COSTRUTTORE attribute hosts the material brand that is to be associated with the component during the drawing phase. This data is important for management of the bill of materials (see Sect. 8.1). Quadro The QUADRO attribute contains the reference of the electrical panel to which the component is physically connected in the diagram (see Sect. 4.3). The presence of this attribute makes it possible to differentiate between the various processing actions, on the basis of the specific electrical panel. It is indeed possible to create the bill of materials, terminal blocks, etc. for one panel at a time. Descrizione The DESCRIZIONE attribute contains a general comment about the component. The various component calibrations are not defined. It is used by the symbols legend (see Sect. 14.1). Codice The value of the CODICE attribute is the name of the “Registration reference symbol” (in the Riferim directory) that must be associated with the parent element after crossreferencing to contain the child component position registration (see Sect. 7.1). On some components the code value is already set. For example, the default value for relay coil blocks is REF1, that for switches (all types) is REF2. These values can, of course, be changed from Symbol Configuration (see Sect. 4.2). A few parent blocks do not have codes because the REGn attributes are directly included for registration of child blocks (Parents with fixed reference). Offset This is the attribute that is used to indicate the (x, y) position for the insertion of the registration reference block described in the code attribute. The standard value for this attribute (e.g. @0,@-10.0) indicates where this attribute will be positioned (considering the insertion point of the parent block). The three values to be expressed are separated by a comma and indicate, respectively: X co-ordinate increment from parent block insertion point Y co-ordinate increment from parent block insertion point rotation of registration reference symbol. Funzione1 This is used to insert the data regarding internal operation of the plant. This value is used to create the Function Legends (the value shown in the tables is the sum of Funzione1 and Funzione2). Funzione2 This is the second row of Funzione1. Supporto Optional (for “9.1 Overtemperature” or “14.5 Labels”). 17 Symbols • 427 Registration reference symbol The Registration Ref. Symbol (or registration "X") is essential for cross-reference operations. The program associates this symbol with the “Parent symbol“ that must receive the position list (sheet-segment) for the various “Child symbol“. The criterion by which references are associated is very simple: The parent symbol contains a code attribute, the value of which is the name of the reference to be received, and an offset attribute, the value of which describes the position (using co-ordinates in relation to the parent symbol insertion point). All blocks are saved in the Riferim directory: 1. Cnt contains the references used for all coil types. 2. Aus contains the references for switches, pushbuttons, selectors, etc. 3. Tsa contains the titles to be added. The X registration blocks and the titles to be added have the Pres=R attribute (and are therefore references). These symbols are automatically placed onto the drawing by the cross-reference function. Use the “Ddatte” command to check the attributes in the symbols in order to identify the related family. Example of a reference symbol Parents with a fixed registration reference (with no code or offset attributes) form a single block with a registration reference (this must be devoid of parent and Pres attributes). A block that contains the following attributes is considered to be a reference symbol: Label Default Madre Type Description IP Associated parent reference PinA0 13* P First input pin wiring number PinB0 14* P First output pin wiring number P Following wiring pin numbers PinN Reg0 FA* P Records the open child position Reg1 FC* P Records the closed child position P Records the child symbol position Offset @0,-18* IP Additional block reference position (for cross-reference) Pres R IP Registration reference identification Regn Note: Data marked with (*) are examples. Type P=Preset Type I=Invisible (See “17.9 Custom Blk Suite”) (See “17.10 Black Box”) 428 • Spac Automazione 2011 Madre The MADRE attribute hosts the name of the “Parent symbol“ to which the reference is associated. This is the only link between blocks that are separated graphically but are linked conceptually. Parent values are completed automatically. Pin These attributes contain the reference numbers for wiring. Every pair of pin attributes (PinA and PinB) must be pre-set using the values indicated on the child symbol. Pin labels have the same number as the associated record, i.e. Reg3 is associated with PinA3 and PinB3 wiring numbers. Reg A REG attribute must be created for every contact symbol that is to be recorded. This attribute is used to accept the registration of the “Child symbol“ position corresponding to the parent with which the reference is associated. REG is pre-set with the child PRES type. E.g.: if REG=FA an open (contact) child will be recorded, if REG=FC a closed one will be recorded. With standard settings even-numbered Reg items are associated with open contacts, and odd-numbered Reg items with closed and transfer contacts Pres Offset The PRES=R attribute assigns the definition of Registration reference symbol to this block. This is the attribute indicating the (x,y) position where to insert an additional registration reference block (described in the Codice attribute), such as “Additional Headings” (Tsa): The default value of this attribute (E.g. @0,@-10,0) indicate where the additional reference symbol will be placed (relatively to the parent symbol insertion point); the tree values, comma-separated mean: Horizontal offset (X axis) from the parent symbol insertion abscissa Vertical offset (T axis) from the parent symbol insertion ordinate Rotation in degrees. 17 Symbols • 429 Child symbol During cross-referencing, child symbols are recorded with their position (sheet and segment) in the “Parent symbol“ with the same name, and vice versa. Contact blocks, auxiliary switch elements, additional pushbutton elements, selectors, etc. that have the Pres=F* attribute are therefore child symbols. Use the “Ddatte” command to check the attributes in the symbols so as to identify the related family. Example of a child symbol A block that has the following set of attributes is considered a child symbol: Label Default Type Nome Description Component reference (as a parent reference) PinA1 P First input pin wiring number PinB1 P First output pin wiring number Funzione1 IP Function of the parent symbol, row 1. Funzione2 IP Function of the parent symbol, row 2. IP This is the main child symbol ID P Records the position of the parent symbol Pres FA* Reg Note: data marked with (*) are examples. Type P=Preset Type I=Invisible Nome During the insertion of a block into a drawing the NOME hosts the reference of the corresponding “Parent symbol” as a value. This is essential to ensure that the block can be recognized by all program processing. Pin These attributes contain the component wiring reference numbers (see Sect. 4.2 and Sect. 7.2). We have established as a standard, block input PinA attributes (high) and block output PinB attributes (low). These are automatically completed (during cross-referencing) with the values written in the “Registration reference symbol”. Pres The PRES attribute is essential in that it assigns the Child symbol definition to the block. Reg The presence of this REG attribute is essential to accept the position of the corresponding parent block (completed automatically during cross-referencing). Funzione1 This is used to insert, in the symbol, data concerning its function inside the project. This value is extracted automatically from the related “Parent Symbol”; the visibility status is valued according to the setting of “Functions near contacts “(see Sect. 4.2). Funzione2 It’s the second row of Funzione 1. Besides the letter F, the standard value of the PRES attribute also requires additional characters to specify the child type, as shown in the “Pres identification for child symbols table”. 430 • Spac Automazione 2011 Pres identification for child symbols The following table shows all the possible combinations for describing the Pres attribute for a child symbol. PRES Description FA Make contact FC Break contact FAP Open power contact FCP Closed power contact FT Triple (power) contact FS Transfer contact FL Lamp FA2 Double make contact FC2 Double break contact FA+n N make contacts FC+n N break Contacts FAP2 Double open power contact FCP2 Double closed power contact FAP+n N open power contacts FCP+n N closed power contacts F*_RE Open/closed/transfer contact or triple delayed pick-up contact (on D) F*P_RE Open/closed/ delayed pick-up power contact (on D) F*+n_RE N open/closed/ delayed pick-up power contact (on D) F*P+n_RE N open/closed/ delayed pick-up power contact (on D) F*_RD Open/closed/transfer contact or triple delayed drop-off contact (off D) F*P_RD Open/closed/ delayed drop-off power contact (off D) F*+n_RD N open/closed/ delayed drop-off contacts (off D) F*P+n_RD N open/closed/ delayed drop-off power contacts (off D) F*_RED Open/closed/transfer contact or triple delayed pick-up-drop-off contact (on-off D) F*P_RED Open/closed/ delayed pick-up-drop-off power contact (on-off D) F*+n_RED N open/closed/ delayed pick-up-drop-off contacts (on-off D) F*P+n_RED N open/closed/ delayed pick-up-drop-off power contacts (on-off D) FM+n Module + N (position). For special uses (see “15.7 TeSys U”). F (child) + A (open) + P (if power) + n (number of contacts) + _RE (pick-up delay) F (child) + C (closed) + P (if power) + n (number of contacts) + _RD (drop-off delay.) F (child) + T (triple) F (child) + S (transfer) F (child) + L (lamp) + _RED (pick-up/drop-off delay) WARNING: some conditions can be obtained by using different combinations: e.g. Ft (Triple power child) is equivalent to FAP3. 17 Symbols • 431 Element symbol A block that does NOT include an attribute with a PRES label is considered to be an element symbol (and consequently does not have Reg attributes). Blocks such as lamps, fuses, resistors, transformers, capacitors, valves, etc., that do not have a Pres attribute are therefore element symbols. Example of element symbols Use the “Ddatte” command to check the attributes in the symbols to identify the related family. A block that has the following attributes is considered to be an element symbol: Label Default Type Nome Description Component reference PinA1 P First input wiring pin number PinB1 P First output wiring pin number PinN P Following wiring pin numbers Tipo IP Contains catalogue codes of associated material Costruttore IP Contains the brand of the material type IP Home electrical panel reference IP General component description Codice IP Optional (for compatibility with previous 7/8 release) Funzione1 IP Component function row 1. Funzione2 IP Component function row 2. Supporto IP Optional for data extraction Quadro Descrizione Lamp* Note: data marked with (*) are examples. Type P=Preset Type I=Invisible The characteristics of element symbol attributes are the same as those described for parent symbols. 432 • Spac Automazione 2011 Return symbol The Return symbol is essential for cross-reference operations. During this procedure stores the position (sheet-segment) of power feed returns and/or connection returns with the same number as the signal. The connection takes place between the start and destination symbols. The start returns have the PRES=P attribute, while destination symbols have the PRES=A attribute. The name of the return symbol must have the prefix _ALIM (Power returns) or _SIGN (Connection returns). Blocks of arrows for interrupted mechanical links are also return symbols. A block that includes the following set of attributes is considered a return symbol: Example of returns at the start point Label Default Type Segnale Pres Description Name of the wire or power feed that is subject of a return. P or A IP Identifies whether it is a start or destination return. #Linea I Reference associated with return branch. Reg P Records the connection position Note: data marked (*) are examples. Type P=Preset Type I=Invisible Segnale During the insertion of a block onto a drawing the SEGNALE attribute requires the wire or power feed number. During the cross-reference procedure the start returns that have the same attribute value are recorded with the destination returns and vice versa. Pres The PRES attribute is essential as it assigns the definition of the start (P) or destination (D) return symbol to the block. #Linea The #LINEA symbol is specific to the category of return symbols. It is used to separate the path of two power feeds (or wires) that have the same number or to distinguish two or more start returns that have the same signal value. For example: power feed number 100 must serve four usages and so four start returns with the same signal value of 100 are drawn. However, they must be distinguished by #LINEA in order to avoid registration errors during crossreferencing. For this reason, #linea A is associated with the first 100 signal, #linea B with the second, and so on. The same process must be carried out on the four destination returns: #line A is associated with the first 100 destination signal, “B” to the second, and so on. #LINEA is invisible and must therefore be setup during block insertion (such as branch). During normal use, #Line is ignored during symbol insertion via the “Enter” key. Reg The REG attribute accepts the registration of the corresponding concatenated return position (carried out automatically during cross-referencing). 17 Symbols • 433 Accessory symbols • Terminal symbol • Plug symbol • Terminal block symbol. Terminal symbol The terminal symbol is used by the “6.1 Insert terminals“ command. This function automatically completes the data contained in these attributes. This category of symbols is characterized by the presence of attributes that are all in “preset” mode. Visibility status can be customized and does not affect performance. Use the “Ddatte” command to check the attributes in the symbol in order to identify the related family. Example of a terminal symbol A block that includes the following set of attributes is considered a terminal symbol (with the following standards: invisible attributes are defined as being 1 mm high, all others are green (color no. 3) and 2 mm high). Label Type Description Quadro P Home panel of the terminal block. Morsettiera P Home terminal block of the terminal. Sezione P Terminal diameter in mm². Numi P Number or name of input wire. Numm P Number or name of terminal. Numo P Number or name of output wire. Livello (**) P Indicates the level of a multiple terminal. Notem IP Available for the list of components connected upstream. Notev IP Available for the list of components connected downstream. Utenza IP Main usage component (see Sect. 6.4). Rip IP Number of repetitions in terminal block. IP Wire breaking parameter. If radius = 1 wire is broken at 2 mm. IP Optional for data extraction. Raggio Supporto Default 1* Note: data marked with (*) are examples. Type P=Preset Type I=Invisible (**): This attribute is only in symbols that represent multiple terminals. Quadro The Quadro attribute contains the electrical panel (reference) to which the terminal block of the terminal is physically connected in the diagram. The presence of this attribute makes it possible to differentiate processing depending on the electrical panel. Morsettiera This is the reference of the terminal home terminal block (green with height of 2). Sezione The SEZIONE attribute contains the size of the terminal. This data is essential as the terminal blocks can be sorted by this value (see Sect. 6.3). Numi The value of the NUMI attribute (green with height of 2 if visible) is the number of the wire entering the terminal. The data is automatically obtained during the insertion of the terminal if the wire has already been numbered. 434 • Spac Automazione 2011 Numm The value of the NUMM attribute (green with height of 2 if visible) is a number (or name) to identify the terminal. This data can be managed automatically by the program, which assigns an incremented numerical value each time Numo The value of the NUMO attribute (green with height of 2 if visible) is the number of the wire leaving the terminal. The data is automatically obtained during the insertion of the terminal if the wire has already been numbered. NumO has the same value as NumI when “Input = Output” is set. Livello Symbol-only attribute that represents multiple terminals in order to distinguish between the various levels for a terminal. Notem The contents are user-definable. The description of the components that are connected upstream (or to the left) of the terminal can be entered manually. Notev Like Notem but for components that are connected downstream (or to the right of) the terminal. Utenza Completion is optional. It is handled by using specific commands (see Sect. 6.4), and indicates the reference element of the terminal. If there is a connection between two terminals (from different terminal blocks), the first will have the second as a usage. Terminals can be sorted according to this value. Rip RIP (repetition) contains the number of any repeats of the terminal in the terminal block (shared with the jumper). If RIP is empty it corresponds to 1 Raggio This contains the measurement for breaking the wire into which the terminal is inserted. 17 Symbols • 435 Plug symbol The plug symbol is used by the “6.2 Insert connectors” command. This function automatically completes the data in the attributes. This category of symbols is characterized by the presence of attributes that are all in “preset” mode. Visibility status is userdefinable and does not affect performance. Use the “Ddatte” command to check the attributes in the symbol and identify the related family. Example of a connector or plug A block that includes the following attributes is considered a plug symbol: Label Type Description Quadro IP Home panel of the plug or the connector. Morsettiera P Connector reference (visible). Sezione IP Not used. Numi IP Input wire number or name. Numm P Number of the connector or plug pin (visible). Numo IP Output wire number or name. Notem IP Available for the list of components connected upstream. Notev IP Available for the list of components connected downstream. Utenza IP Main usage component (see Sect. 6.4). Rip IP Not used. IP Wire break value. If REP=2.5 the wire is broken by 5 mm. IP Optional for data extraction. Raggio Supporto Default 2.5* Note: data marked with (*) are examples. Type P=Preset Type I=Invisible For ease of use, the plug symbol has the same attributes as the terminal, but they are used differently. Descriptions in italics indicate the differences between plug symbols and terminal symbols. 436 • Spac Automazione 2011 Terminal block symbol This category of symbols is related to the “6.3 Terminals and connectors” function, which automatically draws the terminal blocks according to the number and type of terminal symbols in the electrical diagram. The terminal block symbol (more commonly known as Terminal Return) is usually stored with a precise sequence of attributes to ensure uniformity and facilitate data access (in earlier versions attribute sequence was mandatory in order for the program to run properly). The various terminal symbol models available in the library only differ graphically and in the position and state of visibility of the attributes. Example of symbols in a terminal block. The sequence in a terminal block is the same as that with which they are selected (one at a time) when being created. If the block is saved with a single selection (window) the attributes will be saved inversely in relation to the sequence in which they were created. A block that includes the following set of attributes is considered to be a terminal block symbol (or terminal return): Label Default Type Description R_Morsettiera IP Terminal home terminal block. R_Sezione IP Terminal diameter in mm². R_Numi IP Input wire number or name. R_Numm IP Terminal number or identification. R_Numo IP Output wire number or name. R_Fgcat IP Sheet and terminal segment position in the drawing. R_Note-Mo IP Name of the component connected upstream. R_Note-Va IP Name of the component connected downstream. R_Quadro IP Home panel of the terminal block. R_Utenza IP Main usage component name. Crs_Conn_Point IP Reference position for external jumpers. Symbols with no “point” cannot be drawn with a “traditional” jumper. While those without the “Crs_Conn_Point” attribute are not compatible with external jumpers. By “traditional” jumper we mean ones drawn between terminals with the same NumI value placed consecutively. During the automatic drafting of the terminal block a jumper is drawn between the terminals that require it (multi-line, 0.5 mm thick). The insertion point is determined by a point (drawn by the Point command) in the symbol. WARNING: In terminal block symbols with multiple terminals it is necessary to associate an entire group of attributes (except R_Morsettiera block and R_Sezione, which are single items). E.g. For Level 1: R_Numi1, R_Numm1, R_Numo 1, etc. For Level 2: R_Numi 2, R_Numm 2, R_Numo 2, etc. 17 Symbols • 437 17.2 Symbol creation Creating a block means storing part of a drawing that may be used repetitively in other drawings. The creation of a library of blocks is based on the assumption that the groups of blocks are created before actually being used. In any case, the graphic part must be drawn, using the normal program CAD commands and observing a few rules, including any specific standards requirements. New symbols can be created in 2 ways : 1 – Using the specific wizard Custom Blk Suite (see “17.9 Custom Blk Suite”). 2 – Using the traditional CAD commands Use of traditional CAD commands. After completing the graphics the attributes must be associated using the “Ddattdef” command. Their position is governed by the fact that some will be visible on the drawing. The graphic part of a file that is associated with the attributes is saved using the “Mblock” command. Once the file has been created, the selected objects are deleted from the drawing. These can be restored by means of the OOPS function. Use the “Ddinsert” command to insert blocks into a drawing. Blocks are files with the .DWG extension and can therefore be managed like normal drawings as regards any changes/updates. The use of these commands is described in the CAD program user’s manual. Graphics For the program run properly, block graphics must be drawn on Layer 0 (including the attributes). There are no restrictions as regards the use of colors and line types, although to ensure uniformity it is preferable to use existing colors and line types. Do not mix the BYLAYER logic color with (color 7) white, as the program uses the Bylayer to draw wires and it is important to distinguish in terms of color between the two entities (wire and symbol) when drawing the diagram. Attributes Attributes are entities made up of text. To use attributes you must first define them using the Ddattdef command. These become like parts that must be included when storing a block. Only by means of attributes can information be picked up and transferred to external databases. A block without attributes is therefore to be considered as only a purely graphic element. Different attributes can be associated with a block, provided that every attribute has a different label. In the case of a block with more than one attribute, the program will request the value of each attribute. A constant attribute maintains the same value every time the block is inserted. Attributes may be invisible (their value is not displayed in the drawing), checked or preset. (See “17.9 Custom Blk Suite”) (See “17.10 Black Box”) The use of these commands is described in the CAD program user’s manual. 438 • Spac Automazione 2011 Attribute modes The 4 modes, (I) Invisible, (C) Constant, (Ch) Check and (P) Preset, can be defined from the “Attribute modes” dialogue window of the “Ddattedef” command. Invisible Constant Check Preset When invisible mode is selected the information concerning the attribute is not displayed in the drawing when the block is inserted. This is useful if you do not want to see an attribute on the screen or if there are so many attributes that they would over fill the drawing if displayed. Constant mode gives a fixed value to the attribute whenever this is inserted into the block. As opposed to other modes, the value of a constant attribute cannot be changed. When Constant mode is active you cannot associate Check and Preset modes. The program does not use Constant mode for symbols in the library, so that data in attributes can be changed at any time using the Ddatte command. If an attribute is defined using this mode you can check the accuracy of the value when inserting the related bock (in practice the same prompt appears twice to confirm insertion). The program does not make use of blocks with an attribute in Check mode. This mode allows the creation of attributes that are variable but which are not requested during the insertion of a block. When a block that includes a preset attribute is inserted the value of the attribute is not requested and the default value is automatically assigned to it (or, if there is no previously chosen standard value, no value will be set). The symbol libraries often use the Preset mode, so that the least information possible is requested while drawing. These variables are described in the details of the CAD program user’s manual. Slide A slide file is a raster image of the current window on which you are working. Only a current window slide file is created. A slide file of the print display is created, which includes the windows and their contents. Parts of the drawing that are not within the screen, and deactivated or frozen layers, are not included in the slide file. The slide is the image that is displayed in the symbol insertion drop-down menus. Slides are files with SLD extensions and they must be saved using the “Mslide” command in the same directory in which the symbol to be represented is resident. In order to comply with the proportions of the rectangular symbol insertion box (see Sect. 17.3) the image must be proportioned with a breadth:height ratio of 1:0.75 (aspect_ratio = 0.75). Many symbol slides are grouped together in libraries (Slidelib), files with the extension .SLB. These images cannot be changed without re-creating the entire image library. 17 Symbols • 439 17.3 Symbol insertion You can insert symbols choosing them from the drop-down menu related to the library set as default for the project (see Sect. 4.1); the ones with a great number of symbols (Iec and Unif) have two insertion menus (Symbols and Breakers). Clicking on a group name (e.g. Relay Coils) you open the desired dialogue box: Click once on the symbol to display the description, twice to insert the symbol (or select it with one click and then press Ok). Symbol insertion panel Press this button to activate the “Symbol Configuration” (see Sect. 4.2) related to the type of the selected block (click once). In case of generic symbols the dialogue to edit or insert descriptions is displayed. Press this button to display the next group of symbols (if existing). Press this button to display the previous group of symbols (if existing). The selected symbol is added to the favorites group. This group contains the most frequently used symbols (see “17.6 Favorites symbols”). For the fast insertion of the symbols, is possible to use the new program "8.11 LibCenter", tree-view structure and other search functions. During the insertion of a symbol into a drawing, a different dialogue window appears depending on the symbol home category: • Parent symbol • Child symbol • Element (See “17.1 Categories of symbols”). 440 • Spac Automazione 2011 Parent symbol The program recognizes “Parent symbol” because the block contains the Pres=M attribute. Coils, switches, pushbuttons and selectors, etc. are regarded as parent symbols. By way of example we shall consider the insertion of the IEC standard KM1 relay coil. Click once on the symbol to display the description. Double-click to insert the symbol. KM1 Symbol - Insertion point: • If the insertion point is above a wire, this is automatically broken by the exact size of the symbol. • If the insertion point is above a symbol, an automatic connection is drawn till a new, real insertion point (only for orthogonal insertions). • If the insertion point is in space (not on wire) the program proceeds according to the configuration defined in Preferences (see Sect. 4.2). If the symbol is a parent, the following dialogue window appears: The name is based on what has been entered in the appropriate configuration in “Symbol referencing” (see Sect. 4.2). It is, however, possible to enter any name. The panel is that entered as the default panel in “4.3 Panel setting”. At this stage it is also possible to select a different panel from the references in the list pressing “…”. Parent Symbol insertion. Press these buttons to increase or decrease the name of one unit. The brand can be entered manually (materials database in the Costruttore, Tipo and Descrizione fields) or by pressing the “Database”: from the new window “Associate materials”. You can enter data manually or get the codes from the materials database (see Sect. 8.2). 17 Symbols • 441 The code represents the name of the “Registration reference symbol” that is automatically inserted by the program during cross-referencing (see Sect. 7.1). The default code is set in “Symbol Configuration” (see Sect. 4.2) and saved in the prefix file that is currently in use. Pressing button “M.s.”, the material codes already associated may be marked with an additional label to specify the supply type (Warehouse, In-process etc.). For each material code you can associate many “Supply codes” (e.g. WM and S, to indicate “Warehouse material” and “Spare part”). Marking materials with supply codes simplify the process of the Material List (see “8.3 Internal bill of materials“), permitting to filter materials by supply type. The “Schneider” button acts in the same way as “DB”, in that it associates data from the “10.1 Single feed Draw”. “Clear” empties the contents of the Costruttore, Tipo and Descrizione fields. “Empty” deletes all data contained in the fields Manufacturer, Type and Description. Various combinations can be obtained by pressing Contactors, Auxiliaries and Heads: Contactors Press this button to display all the available contactor codes (which are present in the Riferim\Cnt directory). These are the references to be used for all coil types. Auxiliaries Press this button to display all the auxiliary and additional contact codes available (which are present in the Riferim\Aus directory). These are the references to be used for switches, buttons, selectors, etc. Heads Press this button to display all the additional head codes to be associated with contactors or auxiliaries (present in the Riferim\Tsa directory). Insert reference When “Insert reference” is deactivated, the contact reference symbol is not drawn. The reference symbol is stored in the attribute to allow the cross reference to insert the reference symbol at a later date and only if necessary. This option is only available when the contact Real-time cross-reference is enabled (see Sect. 4.2 “Cross Reference”). The following additional information can also be inserted as required: Function1 Used to compile the attributes required by “Function legend” (see Sect. 14.1). Pressing this button opens the function list used in the job order. You can also access phrases from the translator dictionary directly. Function2 This is the second row of Function1. Support Available (optionally) for the dissipated power factor, which is useful for calculating overtemperature. The ”Ignore in commands” list can be used to exclude the specific component from the main processes, such as the bill of materials, legends, graphic changes, cross-referencing and labeling either automatically or manually (see “14.7 Ignore symbols”). 442 • Spac Automazione 2011 Entering blocks with fence This only works for inserting a symbol in space (not on a wire). Example: “fence” insertion on 3 wires On Use this to insert a second point to create a fence for multiple symbol insertion (on all lines intersected by the fence). Press Enter to confirm the first point in space. Off The first point in space is automatically confirmed without pressing Enter. This configuration can be changed in Preferences “Insert blocks with fence“(see Sect. 4.2). Snap–to–segment block insertion This works exclusively when inserting a symbol in space (not on a wire). Example of automatic “centering” in segment 2. On In relation to point (x) selected on the drawing, the symbol is moved to the centre of the segment closest to that point. In practice, this consists in the automatic alignment of symbols in relation to segments. This function is particularly useful for functional single-feed drawings, or in any case, those that use single-feed symbols. Off The symbol is inserted on the point indicated on the drawing, irrespective of the shape and division of the segments. WARNING: The exact reading of the segment number is ensured by the correct Dimensioning“(see Sect. 4.2). “Sheet This configuration can be changed in Preferences “Snap-to-segment block insertion“(see Sect. 4.2). 17 Symbols • 443 Child symbol The program recognizes the “Child symbol” because the block contains the Pres=F* attribute. Contacts, transfer contacts, auxiliaries and additional elements are considered to be child symbols. By way of example, we shall consider the insertion of a standard IEC NO22 make contact. Click once on the symbol to display the description. Double-click to insert the symbol. NA22 Symbol - Insertion point: • If the insertion point is above a wire, this is automatically broken by the exact size of the symbol. • If the insertion point is above a symbol, an automatic connection is drawn till a new, real insertion point (only for orthogonal insertions). • If the insertion point is in space (not on wire) the program proceeds according to the configuration defined in Preferences (see Sect. 4.2). By selecting a prefix (in the list of those used in the drawing) the list of “Available references” displays the filtered list of the related parent symbols from which to select the name to associate with the contact. If the parent name (to which you wish to associate a child symbol) is not in the list, enter the reference manually in the Parent name space. If the symbol belongs to the child category, a dialogue window then appears depending on settings as defined in the Real time “Cross Reference”. Real–time cross–reference OFF Simple dialogue window. Proceed as usual: the function displays the list of all the references of the parent symbols that have been drawn. The position occupied by the contact (with the pin values) will be associated by cross-reference according to the processing sequence (see Sects. 7.1 and 7.2). When one of the available references is selected, the Panel and the contents of Functions (1 and 2) are also displayed. The “Ignore symbols” list can be used to exclude the specific symbol from cross-referencing and graphic changes (see “14.7 Ignore symbols”). There is no need to repeat the exclusion from cross-referencing for a child symbol, as the “ignore variable” has already been defined on the related parent symbol. Inserting a Child Symbol. WARNING: If the setting “Same component” is on (see “Preferences” par. 4.2), you are not allowed to input a free name during the child insertion. 444 • Spac Automazione 2011 Real–time cross–reference ON While a child symbol (contact) is being inserted into the drawing, this can be directly associated with the position on the coil (parent symbol) according to its availability, which is defined by the code (registration reference). This mode can be enabled from settings (see Sect. 4.2). Detailed dialogue window. Choose the coil reference and then (at the bottom of the dialogue window) the position of the contact with the respective pin values. Real-time cross-reference is usually used to check coil availability immediately without waiting for the general crossreference processing. When an “Available reference” is selected the program displays all the information concerning the parent symbol. On–line cross-reference of a Child symbol. WARNING: If the setting “Same component” is on (see “Preferences” par. 4.2), you are not allowed to input a free name during the child insertion. Functions near contacts Depending on the configuration set in “Preferences” (see Sect. 4.2), attributes Funzione1 and Funzione2 are displayed or hidden on Child symbols. On Off The function associated to the Parent symbol is displayed on contacts. Command “Update“ executed in Function Legend synchronizes modifications. Attributes Funzione1 and Funzione2 are invisible. “Function legend” (see Sect. 14.1). 17 Symbols • 445 Element symbol The program recognizes an “Element symbol” because there is no Pres attribute in the block. Lamps, motors, fuses, capacitors, etc. are considered to be elements. By way of example, we shall consider the insertion of a standard IEC H5 lamp. Click once on the symbol to display the description. Click twice to insert the symbol. H5 Symbol - Insertion point: • If the insertion point is above a wire, this is automatically broken by the exact size of the symbol. • If the insertion point is above a symbol, an automatic connection is drawn till a new, real insertion point (only for orthogonal insertions). • If the insertion point is in space (not on wire) the program proceeds according to the configuration defined in Preferences (see Sect. 4.2). If the symbol belongs to the element category, the program displays the same dialogue window as that presented for parent symbols, with the difference that it is not possible to handle references (codes) for “contactors”, “auxiliaries” and “additional heads”. The name is composed depending on “Symbol referencing” configuration settings (see Sect. 4.2). Anyway, it’s possible to type a free name. The panel name is the default one set in command “4.3 Panel setting”. At this stage it is also possible to select a different panel from the references in the list pressing “…”. Inserting an Element symbol. Press these buttons to increase or decrease the name of one unit. The list ”Ignore in commands” permits to exclude this component from the main processes such Bill of Materials, Legends, Graphical Changes, Cross–Reference and Referencing, both manual and automatic. “Insert blocks with fence“ (see Sect. 4.2). 446 • Spac Automazione 2011 17.4 Change symbols • Delete These functions act on symbols already in the drawing. • Copy and Clone They replace standard commands: Delete, Copy, Ddatte, Move and Stretch with other specific functions., • Edit • Move and Stretch Pop-menu > Modify Symbol Delete This function is used to delete a component symbol from the drawing and automatically restore connections between wires. The following prompt is displayed: Select block to be deleted or wire to be patched: Supposing we wish to delete switch QF7: the connecting wires upstream of the component are power-feed signals, and those downstream (R6, S6, T6) are automatically removed and replaced with the signal values. Values on signals have priority over existing numbers on wires (irrespective of whether these are upstream or downstream). This function can also be used if the symbol has been deleted by means of the traditional “Delete” command. If both upstream and downstream there are wire numbers that are not related to return signals (power feeds), the function prompts the user to define the wire to be kept. If “Intelligent delete“ is enabled, the parent symbol cannot be deleted if the related child symbols are on the drawing (see “Preferences” Sect. 4.2). The program requests the wire number to be kept for each individual connection to allow an overall view of all characteristics. By default the upstream wire is kept (wire at top) and the downstream wire is deleted (wire at bottom). This operation also replaces data on any terminals that are connected to the wire, which loses its original value. “Delete symbol” is particularly useful for deleting terminals and connectors. This function only deletes parent, child, element symbols from terminals or connectors, and returns (see “17.1 Categories of symbols”). The function acts in the same way as the “Patch” command (see Sect. 4.5) which is useful when joining wires that are not numbered. This function also controls wire numbers. 17 Symbols • 447 Copy This function is used to copy symbols without accessing the symbol menu (see Sect. 17.3). Last The function automatically requests the insertion point for a new symbol that is the same as that inserted previously. Type the “XX” command from the keyboard. Selection The function requests the user to select a symbol and then the new insertion point. Type the “X” from the keyboard. Unlike the traditional Copy function these functions allow the user to obtain all the automatic functions depending on the symbol category. X and XX can also be entered by pressing the centre mouse button (3-button mouse), or by right-clicking and pressing Shift [⇑] from the keyboard (2-button mouse). Clone This function is used to copy a selection of symbols in the drawing, in the same form of “Copy Symbols” with selection (X). “Clone Symbol” differs from “Copy” because all information of the original symbol to be copied (such as materials, Functions 1 and 2, Registration and Reference codes, “Ignore Symbol” list settings) is kept (see “14.7 Ignore symbols”). The keyboard hotkeys for this command are “XC”. Edit This function is used to change data entered into the symbol during insertion into the drawing. In practice it replaces the “Ddatte” command and facilitates the display and change to data contained in attributes. Enter the “XS” command on the keyboard to speed up the use of this function. The keyboard hotkeys for this command are “XS”. 448 • Spac Automazione 2011 Move This function is used to move a component symbol from one wire to another, and automatically restoring the connections. Suppose we wish to move switch QF7 from the first branch level to the second: The connecting wires upstream of the component are power feed signals, those downstream (R6, S6, T6) are automatically removed and replaced with the signal values. Values on signals have priority over existing numbers on wires (irrespective of whether these are upstream or downstream). If both upstream and downstream there are wire numbers that are not related to return signals (power feeds), the function requests the user to define the wire to be kept. Since the new position of the component is indicated on a group of signals (with priority), the function only requests the new wire numbers to be associated downstream of the component (100, 101, 102). If the new component position is indicated on wires that are not connected to return signals (power feeds), the function first requests which wires must be kept and then requests the new wire numbers. If the new position is indicated in space, no further prompts are issued. See “Stretch“ This operation also replaces data on any terminals that are connected to the wires that loose their original value. WARNING: This function only acts on parent, child and element symbols and on terminals/connectors (see “17.1 Categories of symbols”). 17 Symbols • 449 Stretch This function is used to move a component by keeping the connection (stretching) between the starting wires. To execute the command, it is only required to select the symbol to be moved (direct selection of a single component), then specify the first movement point and finally the destination point. Example of “Stretch” symbol See “Move“ The wires' numbering is not modified. WARNING : This function acts only on symbols with categories, Parent, Child and Element (see “17.1 Categories of symbols”) . For Terminals and Connectors only the movements that are parallel to the connection wire are valid.. 450 • Spac Automazione 2011 17.5 Location labels Pop-menu > Modify Symbol This command permits to modify the visibility state of location labels. Location labels are composed of one, two or three text lines (in Mtext format), and are activated automatically when in Preferences (see Sect. 4.2) are set “Location Manager” or “Same component“. The labels are used to distinguish on the drawing the exact component location; they are inserted automatically on parent, Element, Child, Terminal and Connector symbols. Labels corresponding to the default set for the symbol are set invisible automatically on sheets having a “Location Symbol” (see Sect. 3.18). This to relieve the drawing from repetitive information. “Location managing” - Off “Location managing” - On When “Location Managing” is on, the hierarchical structure defining the location levels (or Panel structure) is set to three levels: the label displays Location, Panel and Function Group. “Same component references” - Off “Same component references” - On When “Same component references” is on, each Panel (or location) has its own reference index; the label is used to distinguish components with the same name, but belonging to different Panels. See “4.3 Panel setting“. See “17.3 Symbol insertion”. 17 Symbols • 451 17.6 Favorites symbols Pop-menu > Modify Symbol In most of the symbols insertion dialogues (see “17.3 Symbol insertion”) you can find the button “Favorites”. Pressing this button the selected symbol is stored in the list of the favorites, the ones more frequently used. The “favorites” group can contain up to 20 symbols for each graphical symbolism. The button “Delete” removes the selected symbol from the group; to remove all symbols at a time, press “Empty”. The list of favorites symbols is stored in Favorites.mdb, in folder Program\Utente\Settaggi (for the local user). You are suggested to record the most frequently used symbols; this command can be quickly launched typing “BP” on the command line. ”BP “can be launched pressing the mouse central button (for three button mice, or wheel mice), or pressing keyboard Shift [ ⇑ ] plus right click (for two button mice). 452 • Spac Automazione 2011 17.7 Last used symbols Pop-menu > Modify Symbol This command opens the last used symbols (see “17.3 Symbol insertion”) dialogue. The “last used” group can contain up to 20 symbols for each graphical symbolism. The button “Delete” removes the selected symbol from the group; to remove all symbols at a time, press “Empty”. The list of favorites symbols is stored in Favorites.mdb, in folder Program\Utente\Settaggi (for the local user). This command can be quickly launched typing “XG” on the command line. ”XG “can be launched pressing the mouse central button (for three button mice, or wheel mice), or pressing keyboard Shift [ ⇑ ] plus right click (for two button mice). 17 Symbols • 453 17.8 Catalogue Symbol Libraries This command allows for the insertion of symbols created based on the catalogue specification from the manufacturer. For programming needs this Library is split into two different catalogue groups : 1 – PLC Symbol Library (see “13.2 Symbols library”). Symbols in the folder Librerie\Schede. 2 – Inverter & Modules Library etc.. Symbols in the folder Librerie\Comuni. Inverter & Modules Library Pop-menu > Util There are customized symbols based on product series and families for each manufacturer. The library includes symbols suited to electrical diagrams (while for the PLC Symbol Library there are also symbols for Summaries, Synoptics and Layouts). The command is opened by viewing the current database: Select Manufacturer, Series and Family, to get the list of models in the database and related associated graphic blocks. Press “Insert” to continue with inserting the drawing block. Selecy image for Zoom Click on preview image to magnify and enable the display check function. Use – and + to reduce and increase the magnification factor. The Reset button restores the default values. You can customize the symbol library by using the “DataBase Management“ command. 454 • Spac Automazione 2011 DataBase Management This command opens the Symbol library configuration suite – Inverter & Modules etc. (see “Inverter & Modules Library“) to change or add new articles to the library. Customization takes place in the database file Common_Block.Mdb found in the folder Librerie\archivi. See “17.8 Catalogue Symbol Libraries”. Series available Allows you to manage manufacturers’ and related product families. You can import and export manufacturer databases. Modules Set codes for the product families. Associated Blocks Allows you to associate a graphic symbol to each code that is used during drawing. 17 Symbols • 455 Series available Allows you to manage manufacturers’ and related product families. You can also import or export a manufacturer with related associated symbols. Add Press to insert a new Manufacturer and/or a new product series in the database. The description of the new product series is added by pressing “Multilanguage Description”. Modify Used to modify information introduced with “Add”. Import Useful for importing library databases from other installations, or from files (Mdb format) from the current version. Export Exports symbol library data in Mdb format. A command option is to automatically generate a .zip file (compressed file) containing all correlated symbols and files (dwg and sld) for the series you are exporting. Delete To cancel the Manufacturer selected for the “available Series” list or an individual Series. 456 • Spac Automazione 2011 Modules After choosing a Manufacturer or one of its available Series, continue by inserting material codes (from a catalogue) of the various models. Add Insert a new Model code (identifier), complete with all its features (family, description, type etc…). Modify Used to modify features associated with a Model identifying code. To modify the “family” you must enter the new name even if it already exists, as the choice acts as a list filter. Delete To delete a code. To insert a new Module you must consider the following parameters: Identifying Code Catalogue code for the Module. Family The family the Module belongs to can be selected from the list. You must enter a value when you create a new manufacturer family or category. The family selection cell allows you to select a family or enter the name. Automatic Insertion If enabled during insertion of blocks for an electrical diagram, you are not asked for the insertion point. Multi-language The description can be edited directly from the list by double clicking on the line chosen (or by pressing “Multi-language Description” or F2). Preferencing Prefix Prefix to be used during component referencing. Associated Blocks Access the configuration window to associate graphic symbols to the different codes to be used during drawing. Unlike the PLC library, there is only one “Electrical Diagram”, type. You can, however, assign several symbols to the same code. From the “Available Files” list you must choose the right one and press “Add” to associate. (see “Inverter & Modules Library“) 17 Symbols • 457 17.9 Custom Blk Suite Pop-menu > Blk This program is extremely useful for rapidly creating a customized symbol compatible. The command opens showing the symbol category tree, and the attributes are visible for each category. (See “17.1 Categories of symbols”). The “Edit” command (activated by right button clicking on any attribute) allows you to modify the default features of the chosen attribute. The symbol creation procedure is easy. Follow these 3 steps in sequence: 1 – Draw the graphics part 2 – Drag the attributes 3 – Create the Block Draw the graphics part Draw the symbol on the current sheet. Maintain the graphic rules based on the “Break line” reference lines so that the symbols (those needing it) can break the wires automatically during use (insertion on the drawing). ”Break line” example (see Sect. 16.1) The symbol graphics must be snap drawn (2.5mm), while the “break lines” must be laid out at a distance corresponding to the wire step (7.5 or 10mm). Simplified symbol creation. Some categories like Revision Symbols, Sheet Title or Location Symbols can be without a graphic part. If you want to customize a new block “Registration reference symbol” you do not need to draw the graphic part (drawing is automatic). WARNING: The Registration Reference requires a specific setup called #Structure (see “Registration Reference Structure”). 458 • Spac Automazione 2011 Drag the Attributes Based on the type of symbol required, select the item from the category tree then drag (Drag&Drop) the category item with all its attributes onto the drawing. Alternatively, you can drag just one attribute at a time. You can drag the same attribute more than once, but only those with the “?”.character. This way, you increment the tag name by one unit each time. Example: by dragging PIN? 3 times you get PIN1, PIN2 and PIN3. You can drag the whole category more than once. This way you drag all attributes with the “?” character, thereby duplicating and incrementing the tag by one unit each time. Category Drag&Drop. After dragging all attributes, arrange them (with the “Move” command) and place them in the best positions. The symbol in the figure gives an example of having to drag (the category) another 2 times to get PinA2-PinB2 and PinA3-PinB3. Double click on the Description attribute (if it exists) to insert the default value. Double click on the Offset attribute (if it exists) to check default information. As for the graphics part, attributes can be dragged onto the current worksheet. you do not first have to transfer it to Layer 0. Information on attribute features (default values) is stored by the SPAC_Blk.ini file in the program Librerie\Archivi folder. In the case of “Registration reference symbol”, aside from attributes you also drag the graphic part (generated automatically), called #Structure. WARNING: Do not drag attributes belonging to different categories onto the drawing. You should also avoid modifying the features of the most important ones manually. 17 Symbols • 459 Create the Block Only press “Create Block” after having drawn the graphic part, dragged and organized all attributes and saved the items definitively in a file. This command simulates the operating principle of the “Wblock“ command. The block storing procedure is easy. Just follow these 3 steps in sequence: 1 – Basic point 2 – Select items 3 – Choose destination Basic point : Specify a basic point for the block and used to insert the symbol on the drawing. Press “Select point” to select it directly on the drawing. The default coordinates are 0,0,0. For uniformity, the symbol insertion point must coincide with the “Break line” above left (final external point). Select items: Close the dialogue window temporarily to select the items to be saved in the file. The safest way is to enclose all the drawn graphic part and dragged attributes in a window. Choose destination: Based on symbol category (automatic recognition is based on attributes selected), the most suitable folder to hold the new symbol is recommended (part of the libraries). You can modify the suggested path by pressing “search “…”. Based on the destination chosen the most suitable symbol name is suggested or is numerically consecutive to those present in the chosen folder. You can modify the name by typing in a different name. Pressing OK stores your choices. In some cases the window opens automatically for immediate use (based on symbol category). (See “17.10 Black Box”) The slide to view the block image in the symbol insertion window is generated automatically. WARNING: Items chosen (graphics and attributes) are automatically transferred onto Layer 0 during the “Create Block” procedure. 460 • Spac Automazione 2011 First use block The window opens for immediate use (depending on symbol category) in some cases after creating a block. Press “…” from this window and access Symbol Configuration (see Sect. 4.2), to set the referencing prefix and the description of the symbol to be viewed in the lower part of the window. For some symbol categories you only get the description in the lower part of the window. Un-configured symbols (without prefix) require a temporary reference during drawing insertion. Some symbol categories like Returns, Registration Ref, Terminals and Connectors do not open an immediate-use window. See “17.3 Symbol insertion” Registration Reference Structure Registration Reference is the only symbol category where the graphic part (structure) is drawn automatically using the program “17.9 Custom Blk Suite”. Pressing “#Structure” configuration window. activates the From the “structure” window, right clicking opens the command menu Press Insert to add an element to the structure, a modifiable default value is inserted into the pin contacts. Press Delete to delete a structure element. Delete all deletes the whole structure. Just select the “Registration Reference” item from the category tree (as per the figure) and drag it onto the drawing (Drag&Drop) to automatically set the graphic structure and its attributes. During the “Create Block” operation the suggested destination route is not complete. Press search “…” and specify one of the folders by choosing between Cnt (contactors coils), Aus (ancillaries for switches, buttons etc..) or Tsa (additional heads). Registration References stored in the Aus folder are normally drawn vertically. Unlike for other categories, no name is suggested for Reg. Ref. 17 Symbols • 461 17.10 Black Box Pop-menu > Blk This is a new command useful for the fast and easy creation of standard symbols compatible with the operation of SPAC Automazione. It consents the creation of Blocks with Parent and Element categories; it is consented to change both the symbol name and the path proposed by default. Parent symbol It is enabled the selection of the “Registration reference symbol” (auxiliaries or contactors), the insertion point and the eventual rotation. By default, the Rif2 generic registration reference is proposed. Element symbol The selection of the “Registration Reference Symbol” is frozen. (See “17.1 Categories of symbols”). Black Box differentiates from program “Custom Blk Suite” because it creates the symbols in a standard way so they are not customizable graphically. The advantage of this command is the fact that the symbol creation is very easy and straightforward. It is suggested to create new Black Boxes directly on the connection wires (do not create the symbol on an empty space), in this way the associated pins are created automatically. A Black Box symbol that is created in an empty space will not have the graphical reference lines (break lines), then it will not be able to cut the wires automatically. (See “16.1 Blk symbols”) (See “17.9 Custom Blk Suite”) To make it possible that Blk symbols cut the wires during their insertion on the drawing (system based on the reference lines “Break lines”) it is required to create new Black Boxes directly on the connection wires (do not create the symbol on an empty space). 462 • Spac Automazione 2011 The procedure to create a symbol is very fast, the command requires only 2 points for the construction of a rectangle (box) as indicated in the figure below: Example of the creation of a standard symbol “Black Box” For uniformity, the symbol insertion point is set to coincide with the “Break line” on the upper left (external final point). Wire cutting system based on “Break line”. Immediately after the rectangle construction (box), the window for the new symbol configuration is opened. The symbols created with Black Box and the slides associated are memorized on the folder Spac\Libraries\Blk\Black-Box. It is possible to modify the suggested path pressing the browse button “Modify Path”. Black-Box+n is proposed as the symbol name. The "n" is a consecutive number from those already present on the selected folder. It is possible to modify the suggested value by typing a different name with the keyboard. After confirm with the OK button, the new symbol is inserted and memorized. It is possible to re-use the symbol selecting it with the command “16.3 Blk Library”. The slide to see the block's image on the symbol insertion box (see “16.3 Blk Library”), is created automatically. 17 Symbols • 463 464 • Spac Automazione 2011 18 Caneco 18.1 Caneco CANECO is a calculation program (OPTIONAL) for electrical networks built to European standards. It is used to dimension and check all low-voltage installations. The modular structure of the program enables the simultaneous management of general graphics, single-feed diagrams, calculations, information regarding the calculation of protection, and raceway, cable and circuit network dimensioning. CANECO incorporates a complete calculation function for defining protection and cables for all circuitrelated requirements. It is useful for engineers and saves time spent in changing absorption, cable lengths, etc. Phase loads, either in individual panels or in the entire installation, can be optimized automatically or manually. For each circuit, the program revises and displays the power available in the panels. CANECO also calculates absorption levels for all panels or busbars up to power feeds starting from terminal circuits, according to specific utilization coefficients for each circuit and distribution and to simultaneity coefficients amongst users within the same circuit. All data and the main results of calculations are displayed in a single window. Other information is available giving details of all calculation aspects, protection, ICCs, selectivity… CANECO’s main purpose is for the design of cables and circuit protection. These data can also be pushed allow the software to be used as test software. CANECO is an independent program. It performs all calculations independently and automatically constructs single-feed graphic representations without the use of any other graphics software. It is also possible to interact with CANECO: data extracted from planimetric diagrams created using SPAC Impianti are processed by the calculation software. The results can be imported into single-feed diagrams created. The flow chart gives a schematic illustration of the complete combination of the 3 steps. This means that the user only produces the documents that are required, i.e. “Planimetric diagram” and “Calculation” only or “Calculation” and “Single-feed” only. SPAC Impianti is also capable of managing the direct flow from “Planimetric diagram” to “Single-feed diagram”. This does not, of course, include the results of calculations, and it must always be remembered that the values shown in the tables are not checked by the software. CANECO and SPAC Impianti are optional software packages not supplied. 18 Caneco • 465 Export data from planimetric This function exports data from a planimetric drawing created using SPAC Impianti to CANECO. The function asks the user to select the power feed from which to extrapolate data concerning the connected circuits. The Export data function creates .IMP files in the current job order directory. In the previous versions of SPAC Impianti, data were stored in the Linee.txt and Utilizz.txt files. Caneco is compatible in terms of importing these files. Import data to Caneco Enter Caneco and open a new job: select New from the Caneco File menu (Ctrl+N). The program displays the following window in which the user must enter the basic settings, to be redefined when the next set of data are imported (.IMP file). Press Calculate and then confirm by pressing OK to proceed to the QGBT panel table, which is completely empty. It is important to save the CANECO design as soon as this is started - in the job order directory containing the .IMP files to be imported. Please refer to the specific user’s manual supplied with the product. To import data that have been exported from the planimetric diagram into the .IMP files, select “Import/Export” and then “Text…” from the File drop-down menu. From the dialogue box shown in the example, select “Import SPAC”. To import data contained in the Linee.txt and Utilizz.txt files from previous versions of SPAC Impianti 4.x, select “Import/Export” and then “SPAC” from the File drop-down menu. WARNING: Using this function, CANECO imports .IMP files into the directory used to store the design. It is therefore essential to store the CANECO design in the current job order directory before importing data. 466 • Spac Automazione 2011 Export data from Caneco This function is used to export the results of calculations and checks carried out by CANECO to program in order to create the “single-feed” diagram. Within CANECO select “Import/Export” and then “Text…” from the File drop-down menu. From the dialogue window shown at right, select “Export SPAC”. A large number of export and import configurations can be defined from this dialogue box (please refer to the specific user’s manual). The program is already configured to export and import data to and from SPAC Automazione. Simply press Execute to complete the operation. It is possible to define which parts of the project are to be extracted: Enabling All the export is complete. This operation creates seven new .IMP files in the job order directory (Alim, Blindo, Circuiti, Infogen, Param, Percorsi and Qt.imp). Use “Import single-feed diagram” to create the single-feed diagram and complete the table automatically. 18.2 Import single -feed diagram This command is used to draw the functional single-feed diagram automatically, complete with graphics and “data table”. The Import single-feed diagram function uses the .IMP files in the current job order directory. To enable automatic creation of the “data tables” including calculation results obtained by CANECO, first run the “Export data from CANECO" command. Always save the CANECO design in the job order directory that contains the .IMP files to be imported. 18 Caneco • 467 The “Coordinate Y” configuration corresponds to the component position as shown in the example figures: The single-feed diagram must be imported automatically in association with the use of “Single-feed title blocks” suitable for 10-circuit data tables“ (use “Select table” to access those that are available Return order The drawing is created starting with the current sheet and continuing on subsequent sheets as required. There are two types of priority for circuit layout. From Caneco The various circuits are drawn using the layout as seen in CANECO. Alphanumerical Circuits are drawn in alphabetical sequence on the basis of reference codes. NOTE: When data are imported, this does not exclude the possibility of making subsequent changes and customizing using normal drawing tools. Import directly from planimetric drawing The Import single-feed diagram function uses the .IMP files in the current job order directory. If you do not have the CANECO calculation software, or only need to effect the graphic part of the drawing (without calculations), the .IMP files created by the SPAC Impianti “Export data (IMP)” can be imported directly. Run “Export data from CANECO” to complete “data tables” automatically, including the results of calculations obtained by CANECO. CANECO and SPAC Impianti are optional software packages that are not supplied with. 468 • Spac Automazione 2011 19 Catalogues 19.1 Schneider Electric Catalogue Pop-menu > Util > List Utility This function reads directly from the Schneider Electric General Catalogue CD-ROM and can be used to associate material codes or macrocodes with one or more components on the diagram. The Schneider products CD-ROM must first be loaded into the CD-ROM drive in your computer (or the catalogue installed), then the function displays the following message: Select symbols to associate Schneider products to: After having chosen the symbols to code onto the drawing (e.g. a relay, reference KM1), the program begins the search: Please wait... The SCHNEIDER catalogue has been called for prefix: KM The catalogue then opens directly at the list of relays and of other components belonging to the KM group. If the prefix is not recognized, the catalogue opens at the general search window. The component name prefix is not taken from the drawing but from within the prefix configuration file (.PRE) currently in use (see Sect. 4.2), in order to also ensure connection to re-named symbols. The reference prefix is essential for direct access to the desired family of codes and to shorten searches. The connection is based on the information in the following table. The function imports the following data into the attributes of the selected block: • the material MANUFACTURER (Schneider) is imported into the MANUFACTURER attribute; • the material Catalogue CODE is imported into the TYPE attribute; • a generic component description containing a DESCRIPTION of the material is substituted in the DESCRIPTION attribute (if present). The same attributes are compiled as in function “8.2 Associate materials”. 19 Catalogues • 469 The first column "Code" contains the symbol prefix. The associated product family is in the second (Description). Code B F H K P Q S U X Description Transducers from non-electrical to electrical quantity or vice versa BP Pressure sensor BQ Locator, position encoder Protective devices FA Overcurrent protective device, instantaneous FR Overcurrent protective device, time delayed FS Overcurrent protective device, instantaneous and time delayed FU Fuse Signaling devices HA Audible signal device HL Optical signal device, indicator light Relay, contactors KA Instantaneous all-or-nothing or contactor relay KL Bistable contactor relay KM Contactor KT Time delay relays Measuring or testing equipment PA Ammeter PC Pulse counter PT Clock, elapsed-hour meter Switching devices for power circuits QF Circuit-breaker QM Motor circuit breaker QS Disconnector Switching devices for control circuits SA Selector switch or control switch SB Push button SQ Position or displacement sensor, proximity switch Modulators, changers Terminals, plugs, sockets Table source: Schneider Electric The operation of the material association command and the table described here refer to the initial release. As this system is under constant development, there may be future variations with respect to the current descriptions. The Schneider Electric Catalogue is optional software not supplied. The Schneider Electric catalogue is supplied directly by the manufacturer. WARNING: the catalogue is updated continually and as a consequence necessary additions and improvements are added to the function. This is a description of the state of the product at the time of publication. 470 • Spac Automazione 2011 20 Cable module 20.1 Cable module Cable Module is a cable processing program (OPTIONAL). It can be used in conjunction with SPAC Automazione, to ensure improved management functions compared to the standard “11.1 Cables” function. CM (Cable Module) provides additional information (not supplied with standard functions) but does not alter the characteristics of SPAC Automazione screen pages. The program uses specific graphic markers (labels) to insert information into connections in the drawing to specify the cable to which they belong and the relative wires (or conductors). Cables can be laid while drawing and this can be done under any condition: connections between components and terminal blocks inside or outside the panel, with or without supporting terminals. Cable Module commands can be accessed from the specific “Cable Module” toolbar. Spac Automazione 2011 can work with versions MC 3.0 and 4.0 . The Cable’s Module version 4.0 requires Spac Automazione 2010 / 2011. 20 Cable module • 471 20.2 Lay cables The “Lay Cables” command can be used to select and lay multi-wire cables directly on the diagram drawing. This operation is necessary in order to define “internal panel” connections between terminal blocks (or connectors) and components, either on other panels or on the same panel. • Enable New Cable • Enable Existent Cable The command opens a window with the list of all existing wires. Activating the “Show all cables” option it is possible to filter the list of “complete” cables (or completed by “Spares”), those items are identified with a “C” character. Pressing the ”Definition“ button it is possible to prepare all the cables required before the laying: even if new cables will be placed in the “Existing Cables” list, ready to be associated in the drawing. “Select cable >” activates the cable selected on the scheme; it is required to select an ID in a wire already laid (see “Cable Label block”). During a cable laying, the wires selected are identified with an ID Block (see “Cable Label block”) and with the Cable’s Indications (see “Cable Data Info”). This feature consents the customization of the characteristics related to the “Cable’s Indications” (pressing “Settings”), and the selection (or modification) of the ID type (pressing “…”). The IDs and the indications are removed automatically pressing the “Disassociate” button while laying a cable. When the ID is present it is suggested to use a “neutral” ID type (only graphical). 472 • Spac Automazione 2011 Enable New Cable Executes the “20.2 Lay cables” on the drawing of a new cable (not contained in the list). It is possible to select one wire at a time, or click on an empty space to activate the “fence” selection. The point at which the wire with the “fence” is selected is used as the “Cable Label block” insertion point. The selection, from left to right or vice versa, defines the sequence in which wires are assigned. In the example the available conductors are displayed in a dialogue window from which a request is sent to assign wires U1, V1, W1 and PE in that sequence to the cable conductors. After the “fence” compare the window to set the cable type: The cable ID is incremented automatically according to the prefix set and the format. It is possible to select the characteristics of the new cable from the database (pressing “…”) or from those of the cables already defined (contained in the list on the bottom). The operation is equivalent to the one on the Definition Cable command, used often for the preparation of the required cables before the laying. The “Number Conductors” indicates the quantity of wires selected with the “fence” and works as a filter to facilitate the selection of the cable type. 20 Cable module • 473 The selection of the Departure and Arrival Panels is not mandatory, however, this information is useful to add more details to a cable and their indication facilitates the “Cables Processing” phase (see par. 20.5). Automatic Laying The association of wires U1, V1, W1 and PE to the cable’s conductors (threads) is done automatically, according to the selection order when designing the “fence” (from SX to DX or vice versa). Manual Laying The association is executed manually wire by wire, in the same way as in the “Enable Existent Cable” command. The Automatic laying is the approach suggested to save time and to avoid the confirmation for each single wire selected with the “fence”. The indentifications (one for each wire) and the indications (one for each laying) are inserted automatically. In case of a wrong operation, it is required to delete the laying using the “Disassociate” command, and then execute the laying command again (the identifications and the indications are removed automatically). The wire’s conductors (threads) that were not assigned during the automatic laying, could be reused with the “Enable Existent Cable” command. Automatic cable laying –W01 If the wire’s conductors that were not assigned must remain free, then the “Complete with Spares“ button must be pressed (cables identified with “C” letter). 2/4 Example of a cable with 2 wires still available. 2/4 C Example of a complete cable (con 2 spare wires). 4/4 C Example of a complete cable (without spare wires). The cables laid with this command are ready to be designed using “20.5 Cable processing” command. The “Cables Processing” feature consents the visualization, in a general and a global way, of the laying executed, and eventually to make changes. Example of an automatic laying: For this example we have use the Cable Label block “_DatiCavo_4” (neutral) associating the Cable Data Info (Cable Name + Composition) set with the Arial font. 474 • Spac Automazione 2011 Enable Existent Cable This function enables the “20.2 Lay cables” command on the drawing. It is possible to select one wire at a time or insert a point in space, which automatically enables selection in “fence” mode. It is possible to make several “fences” after the confirmation. The point at which the wire with the “fence” is selected is used as the “Cable Label block” insertion point. The selection, from left to right or vice versa, defines the sequence in which wires are assigned. In the example the available conductors are displayed in a dialogue window from which a request is sent to assign wires U1, V1, W1 and PE in that sequence to the cable conductors. Cable Laying – W01 with 4G4 composition After the “assigning” of the wire’s conductors (threads) to the selected wires, the identifications and the indications are inserted automatically. Note: Even though several fences are selected, these refer to the laying of conductors that belong to the same cable. The selection is only allowed if wires are already numbered. The next time the command is activated, the program displays the conductors that have already been used. When all available conductors have been used, the program displays a letter “C” to indicate that the cable is complete. Complete cables are hidden in the list. To view these, select “View all cables”. Cables completed manually using “Spares” are also displayed. Cable Details This is used to view details about cable function, manufacturer, type, make-up, etc. entered during ”Definition“ of the cable. 20 Cable module • 475 In some cases “assign” is not carried out. There are two possible reasons for this. 1 - The wire selected is linked to a “Power returns“ (or connections). If the function does not “assign” the cable conductor the following message is displayed in the command line: POWER FEED <NO.>: label cannot be placed in the requested position Let us analyze the selections that have been made in Figure A, and the result obtained in Figure B: Figure A Figure B Point 1 The point that has been selected is not valid as two wires pass through it. Point 2 The first wire selected is assigned. The second is not valid as two wires pass through it Point 3 The selected point is not valid as the wire is linked to a power feed or signal start return. Sections of the branch after the circuit cannot therefore be analyzed. Point 4 The selected point is valid as the wire is linked to one power feed (or connection) destination return and the branch can therefore be analyzed. 2 - More than one wire has been selected. If the function does not “assign” the cable conductor the following message is displayed: WIRE <No.>: label cannot be placed in the requested position Let us analyze the selections that have been made in Figure C, and the result obtained in Figure D: Figure D Figure C Point 1 The selected point is not valid as two wires pass through it. Point 2 The selected point is valid as only one wire passes through it. Point 3 The selected point is not valid as two wires pass through it. Point 4 The selected point is valid as only one wire passes through it. In presence of a single wire, it is better to use only the identification with data (without the indication). 476 • Spac Automazione 2011 Definition The cables needed to run the “20.2 Lay cables” command can be defined at two different stages: 1. While drawing: using the specific command to record the necessary cable types and related information each time. 2. During “Select cable” in the make-up stage: suitable for changing cables recorded in stage (1) or creating cables that were not planned. The cable ID is proposed automatically, and is incremented according to the prefix and the format; it is possible to type a different name from the one proposed (max. 12 characters). It is possible to select the characteristics of the new cable type from the database (pressing “…”) “Cable database” (see 4.2) or from the cables already defined (contained in the list on the top). It is necessary to insert the Descriptions, Functions, Interference and Length (optional data). The selection of the Departure and Arrival Panels is not mandatory and the two values are useful to add further details to the cable. Their presence facilitate the work on the “Cables’ Processing” phase (see 20.5). Pressing Add the new cable will be registered in the list of those already defined. To modify the cables already defined (or deleted) it is required top use the “Change” and “Delete” functions. The Clear button empty all these fields (see “Rebuild cable file”). The Cable’s index is contained on the file DbSpac.mdb that is contained on each Job Order folder. The Cable Definition is recalled automatically during the “Enable New Cable” command. 20 Cable module • 477 Cable Label block The Label block affects the graphics of the block inserted during the “Lay Cables” (see 20.2 Lay cables). The wires selection point using the “fence” is used as the position for the insertion. The block has two functions: visual, by immediately indicating that a cable has been laid, informative, in that it “contains” data relating to the cable, conductor, make-up, type, etc. Example of label “_Daticavo_0” and “_Daticavo_3”. Labels are stored in the Librarie\Simboli directory. Each .DWG block corresponds to an .SLD image (slide) with the same name that is displayed in the dialogue window. New labels can be customized and saved in the same directory as existing labels. The name of the block must follow on consecutively from those already there (_Daticavo_5, _Daticavo6, etc.), with a maximum of 20 labels (the dialogue box can display a maximum of 20 windows). A block with the name _DATICAVO__n° that contains the following set of attributes is considered to be a Cable label symbol: Label Description Cavo (Cable) Cable reference (“C2” in the example). Vena (Thread) Wire assigned to a cable (“BU” in the example). TipoCavo (CableType) Type of cable (FROR 450/750V” in the example). Formazione (Composition) Make-up of the cable (“4Gx4” in the example). Costruttore (Manufacturer) Manufacturer (“General Cavi” in the example). Note (Notes) Additional remarks added by the user. When the “Cable Data Info“ is present, it is suggested to use a “neutral” identification type (only graphical for example _DatiCavo_4.dwg). (See Sect. 20.3 “Wire Label block”, “20.6 Hide labels”). WARNING: The graphic content of label symbols (for example “<” or “/”) is important as this makes it possible to select attributes that are completely invisible. 478 • Spac Automazione 2011 Cable Data Info The cables data indications is inserted automatically during the “Cable Laying” (see 20.2 Lay cables). The wires selection point using the “fence” is used as the position for the insertion. The indication is optional, given that it could be contained in the same way inside the block Cable Label block (mandatory). It is possible to customize the “Cable’s Indications” pressing the “Settings” button. The information that is intended to be visible (Name, Type, Composition and Manufacturer) must be added on the “Output Sequence” list. Pressing Default the configuration is memorized “locally” for the next usage (seei “4.2 Settings”). If the action is confirmed without pressing Default, the configuration will be considered occasional and used a single time. Application Example: In this example a neutral identification block is associated to the indication (_DatiCavo_4.dwg). This configuration with 2 visible data (Name Composition) is suggested by default (common use). and Cable Indication Example As in the previous example, but with all the data visible: Name, Composition, Typo and Manufacturer. In this example an identification block with visible attributes is associated to the indication (_DatiCavo_1.dwg). This configuration is suggested only when the conductors color visualization is required. There are no indications in this example. The visible information are the identification block’s attributes (_DatiCavo_3.dwg). This configuration is suggested when a single wire is selected. To insert an “Indication” manually it is necessary to use the command “11.4 Cable information”. (See “Cable Label block”). It is possible to modify the graphical representation of the “Indications” that are already present on the scheme using the command “11.4 Cable information”. 20 Cable module • 479 Disassociate Deletes the operation related to the “association” of the cable’s conductors (threads) to the wires selected on the drawing by means of the “20.2 Lay cables” command. Consents the disassociation of the threads associated to a cable by the selection of a wire or by using the “fence”. The identifications and the Cable’s indications (if present) are removed automatically. Twist This command is used to design the cable twisting. It is enough to insert the first point (1) in an empty space and the “fence” selection mode is activated automatically. The wires selection line using the “fence” is used as the position for the twist design. The twist design is executed only for the pairs of conductors that are effectively twisted on the “Cable database” (see 4.2). Example of a Twist design Spares A certain number of conductors in cables are usually kept free so that they are available for subsequent changes to the installation. Complete cable with spares Completes the cable leaving some “spare” conductors free. Cable conductors that are not “assigned” are made unavailable for later associations. Cables with spares are marked by the letter “C” to indicate that the cable is complete. Clear cable of spares Makes “spare” cable conductors available again. This function cancels the “Complete with spares” command. Rebuild cable file This command is used to update Cable indices that have been used in the job order (or to create a new one if this does not exist). The cable index is contained in the DbSpac.mdb file 480 • Spac Automazione 2011 20.3 Customize wires To customize a wire means to manage wires that belong to the same branch but have different characteristics. For instance, single-pole cables can be created and connections can be made between wires with different diameters. Different colored wires and wires of different types can be used on the same branch (same wire number). It is possible to select one wire at a time or insert a point in space to enable selection in “fence” mode. The program uses the point on which “fence” mode is selected as the “Wire Label block” insertion point and to define which wires are to be customized. This connection (or branch) serves to illustrate the various wire customization options obtained according to the insertion point. The branch drawn this way connects: • A to B • A to C • C to D Selection 1: The two wires connecting A to B and A to C are changed. Selection 2: Only the wire connecting A to B is changed. Selection 3: Only the wire connecting A to C is changed. Selection 4: The two wires connecting A to C and C to D are changed. Selection 5: Only the wire connecting C to D is changed. The above is not valid if the example is drawn with standard connections (not serial or parallel). 20 Cable module • 481 The same branch used in the example with standard connections (not serial or parallel), is considered as a connection that starts from the top and leads down. Unlike the one in the example above, the branch connected this way connects A to B, A to C and A to D. In this case (standard connection), “selection 3” of the previous example (serial-parallel) changes the two wires connecting A to C and A to D. Use the “Connection” and “Automatic Connection” commands to change the type of connection (see Sect. 4.6). The “customization” function opens the following dialogue window, which is divided into two parts that are active according to whether a wire or a power feed is selected. Press “…” to change cable characteristics from the “Cable database”. The color can be changed from the specific drop-down menu. The “Wire Label block“ block is inserted into the drawing to highlight wires that have been “customized”. The “Always insert labels” command forces label insertion even when these are not necessary (for instance, on the same branch). Example of “Customize wires”: Connection number 3.02 is made up of 3 wires: st 1 wire: color BK and diameter 1x2.5 (connects the switch to lamp HL3). nd 2 wire: color BK and diameter 1x2.5 connects the switch to socket XS1). rd 3 wire: color BK and diameter 1x1.5 (connects socket XS1 with socket XS2. (See Sect. 20.8 “Wire customization errors”). 482 • Spac Automazione 2011 Wire Label block The choice of label affects the graphics of the block inserted by the “20.3 Customize wires” command. The label has two functions: visual, by immediately indicating that a change has been carried out, informative, in that it “contains” data relating to make-up, type, etc. Example of label “_Datunip_0” and “_Datiunip_3”. Labels are stored in the Librarie\Simboli directory. Each .DWG block corresponds to an .SLD image (slide) with the same name that is displayed in the dialogue window. New labels can be customized and saved in the same directory as existing labels. The name of the block must follow on consecutively from those already present (_Datiunip_4, _Datiunip_5, etc.), with a maximum of 20 labels (the dialogue box can display a maximum of 20 windows). A block with the name _DATIUNIP_no that contains the following set of attributes is considered to be a Wire label symbol: Label Description Formazione (Composition) Make-up of the wire. Colore (Color) Color of the wire. Costruttore (Manufacturer) Manufacturer. Codice (Code) Type of wire. Note Notes) Additional remarks added by the user. (See Sects. 20.2 “Cable Label block”, “20.6 Hide labels”). WARNING: The graphic content of label symbols (for example “<” or “/”) is important as this makes it possible to select attributes that are completely invisible. 20 Cable module • 483 20.4 DDattef wire data This command is used to change wire data (type, color, diameter, etc.), in relation to a single wire, a branch, or all the wires drawn on the sheet. Either select one wire at a time, or enter a point in space to enable selection in “fence” mode. The program used the “fence” selection as the “Tick label” insertion point. This mnemonic symbol indicates that the wire has been checked. The “Ddattef” command displays the following dialogue window, which is divided into two parts that are enabled according to whether a wire or a power feed is selected. Press “…” to change wire characteristics from the “Cable database”. The color can be changed from the specific drop-down menu. The “Tick label” block is inserted into the drawing to highlight wires that have been changed (or checked). Example of “Tick labels”. This command enables “Tick labels”. These are useful for highlighting changes to or checks on wires. This symbol is only mnemonic. All wires on the sheet are changed. Previous wire selections are not taken into account. In case of wires or branches that have already been changed using the “20.3 Customize wires” command, this function allows the user to remove previous labels and standardize cable type on the entire branch. (See Sect. “20.6 Hide labels”, see Sect. 20.8 “Ddattef wire data errors”). 484 • Spac Automazione 2011 20.5 Cable processing During cable processing the program extracts from the drawing all the numbered and valid wires that are needed to connect the components, irrespective of the panel to which they belong. The “20.1 Cable module” program offers greater cable processing potential over “11.1 Cables” while the philosophy of operation remains unchanged. When enabled, the function presents this dialogue box from which to select the data to be processed: • Panel exterior (all connections that link components, terminals and connectors belonging to different panels). • Panel interior (all connections that link components, terminals and connectors belonging to the same panel). • Panel exterior and interior (all connections that link components, terminals and connectors). Press Scan multisheets to process all the multisheets selected from the list. Use Save grants immediate access to previously stored cable data (stored using Save) in the “MCables-Data.MDB” database without having to repeat the scan. By way of example, the two circuits drawn in the following figures 1 and 2 show the “Panel exterior” connections, with reference to panel =QG (MAIN PANEL). Figure 1 20 Cable module • 485 The elements in Figure 1 are arranged in the following home panels: Panel =QG is connected to panel =BM (machine-mounted) by the following wires: Main panel =QG terminal block XG FR1, FR2 and KM4 Machine-mounted=BM terminal block XM2 and XM3 M1, M2 and M3 • U1, V1, W1, PE for motor M1. • U2, V2, W2, PE for motor M2. • U3, V3, W3, PE for motor M3. Figure 1 shows multi-core cables that have been laid by means of the “20.2 Lay cables”, command, whereas in the second circuit (Figure 2 below) the cables have not yet been laid. In this case we shall define these during the cable processing stage. Figure 2 The elements in figure 2 are arranged in the following home panels: Main panel =QG terminal block XG Input board from E0.0 to E0.7 Panel =QG is connected to panel =BM (machine-mounted) by the following wires: 24VPLC, 0VPLC, E0.2, E0.3, E0.4, E0.5 and E0.7. Machine-mounted =BM terminal block XB1 S6, S7, SQ1, SQ2 and BF1 After scanning, the following dialogue box is displayed: it contains the connecting wires shown in figure 2, between the terminals belonging to terminal block XG on panel =QG and the terminals belonging to terminal block XBM of panel =BM . 486 • Spac Automazione 2011 Click on the column headings in “CONNECTIONS”, to select the order in which to display data: Term/Comp Starting terminal block or components (in relation to the START area). NMP/Pin The NumM value (terminal or pin number) on the start terminal or connector (in relation to the selection in the START area). Wire number Number of the conductor or wire NMA/Pin The NumM value (terminal or pin number) on the destination terminal or connector (in relation to the selection in the DESTINATIONS area). Term/Comp Destination terminal block or components (in relation to the DESTINATIONS area). Panel Destination panel, if more than one has been selected. Usage The content of the usage attribute (optional) is shown on the destination terminal. If the usage data already exists this must indicate which component the downstream terminal is connected to (see “6.4 ”). Cable Reference of the cable used for the connection. Conductor Conductor or wire of the cable used for the connection. Bundle Bundle of which the conductor or the cable belongs to. Multiple selections can also be made from the DESTINATION area list. In this case, the groups of connections relating to each destination terminal block, connector or component that have been selected are displayed, in that sequence, in the CONNECTIONS area. This sequence always applies to within individual groups of connections. (See Sect. 20.8 “Errors during cable scanning”). The Cables Module manage also the cables with an end that is not connected to any component, for example the connections to the screen (see “20.8 Unconnected Cables”). 20 Cable module • 487 Cable choice The “Definition function executed by the “20.2 Lay cables” command (or pressing button “…”) was used to store a number of cables, which are now available. If no predefined cables are available, use the “Cable management” function. Ref. Description Manufacturer Type Make-up C1 Connection =BM -XBM General Cavi FROR 300/500V 10G1.5 C2 Connection =BM Motor1 General Cavi FROR 450/750V 4Gx4 C3 Connection =BM Motor2 General Cavi FROR 450/750V 4Gx6 C4 Connection =BM Motor3 General Cavi FROR 450/750V 4Gx4 C5 Connection =P1 -CN1 General Cavi FROR 300/500V 19G1.5 C6 Connection =P1 -CN2 General Cavi FROR 300/500V 7G1.5 C7 Connection =P1 -CN3 General Cavi FROR 300/500V 7G1.5 Examples of associations: 1. Select start panel and terminal block =QG (Main Panel) TERMINAL BLOCK XG and destination =BM XBM. 2. Select C1 from the current cable list to view conductor make-up. 3. Click on wire 0VPLC and select, for example, conductor 1. Associations may be made in three ways: By pressing the Associate button. By using the right mouse key to enable the command menu and select the “Associate” command. Drag & Drop, select the wire and drag it onto the conductor required. The following result is obtained: in the connections window, wire 0VPLC is associated with “Cable C1” “Conductor 1”. In the cable window, “Conductor” 1 is now Associated and not Free. Conductors marked in green with “F” are Free. Those shown in red with “A” are Associated. Under normal operating conditions, multiple wires are selected (using the Shift + Ctrl keys) to speed up the “Wire-conductor association” process. 488 • Spac Automazione 2011 Multiple wires are often selected to streamline operation. Below are two examples of when this function should be used: Select 3 wires and 1 conductor: These are associated automatically starting from the selected conductor (conductor 2). There must be a sufficient number of free conductors available to perform the associations. Select 3 wires and 3 conductors: These are associated automatically starting from the selected conductor (conductor 2) on wires after the first. The number of wires selected must correspond with the number of free conductors selected. An “association” can be removed in three ways: By pressing the Disassociate key (even on multiple selections). By using the right mouse key to enable the command menu and select the “Disassociate” command (even on multiple selections). By right-clicking on the conductor and selecting the “Disassociate” command (even on multiple selections). 4. Now select the remaining wires (from 24VPLC to E0.7) using the multiple selection function and associate these with cable C1 starting from conductor 2, to complete the connections between =QG XG and =BM XBM. Cable C1 is used by 7 out of the 10 available conductors. Cable list The example shows cables C2, C3 and C4 as being complete as they were associated during drawing using the “20.2 Lay cables” command. In this case it is possible to proceed with a check or to make any necessary changes. A cable may be used for connections on multiple terminal blocks, connectors or components. (See Sect. 20.8 “Cable processing errors”). Cable processing is contained in the MCables-Data.MDB database. 20 Cable module • 489 Wire detail This command is used to display all data concerning one wire, including the sheet number on which it is drawn and the multi-sheet that contains that sheet. Right-click to enable. View conductor This is used to display the wire (connection) with which a conductor is associated. In case of multiple selections on conductors, the command automatically displays the overall status (all the conductors that have been selected must start from the same panel and terminal block). Right-click to enable. View cable This is used to display all the wires that are associated with the complete cable. The command automatically displays the overall status (all the conductors that have been selected must start from the same panel and terminal block). Right-click to enable. Update After associating cable wires and conductors the drawing must be updated with the information produced as a result of cable processing and related changes. Press “Update” to perform the following operations: • Introduce into the drawing the labels relating to the associations that have been made. • Remove from the drawing the labels relating to associations that have been removed. • Change labels relating to connections that have been changed. • Change labels relating to conductors and cables changed using the “Cable management” function. This drawing shows the results obtained for cable C1 associations. Labels are only inserted into drawings where possible. If the program cannot define a section of the connection in which to insert the label, this is omitted. 490 • Spac Automazione 2011 Cable bundle choice Press button “…” to display the dialogue where to define the Cable bundle you are going to associate to the links. A cable bundle is made of conductors and mono or multipolar cables grouped in a unique path. Its definition requires a description and a path length. Reference, a Once defined, you can assign a conductor or a cable to the bundle right-clicking on it with the mouse. Right clicking with the mouse to pop-up the command menu, then select “Associate to cable bundle”. Monopole cables can be assigned with multiple selections while for multipole cables is sufficient to select a single conductor to assign the entire cable to the bundle. The same menu contains the command to disassociate cables from a bundle (“Disassociate from cable bundle”). In the example figure monopole conductors U3, V3, W3, PE and cable C2 are associated to the bundle WF1. 20 Cable module • 491 CSV file Select the “CSV file” output to export cable data to an ASCII file (also compatible with Microsoft Excel). When creating this file, it is possible to select the fields required. The file is saved in the job order directory and called Cables-List.Csv. See ”14.8 Edit CSV”. In the make-up window, each piece of information from the “Available fields” list that is placed into the “fields in output sequence” through the use of Add, represents a column in the file. Standard Represents the factory settings in the output fields (where present). Default Press Default to store configuration in “local” mode for future use (see “4.2 Settings”). When confirmed without pressing Default, the configuration is perceived as temporary and used only once. Use the Output function to select cables to be exported (by default all cables are selected). The cables in the list are linked to the start terminal block. View all cables that start from the panel When enabled, this option displays all the cables linked to the panel (for example =QG), irrespectively of the start terminal block, connector or component. Also export connections that are not associated with cable conductors When enabled, this option exports all single-pole cables used for the connection as well as the multi-pole cables. The option for exporting single-pole cables is especially useful for processing “Panel interior” where many connections are usually handled this way. 492 • Spac Automazione 2011 Table The output is specific to start terminal blocks and connectors. When “Table” is selected, the program automatically draws all the cables starting from the specific panel and terminal block, according to the previous make-up. The table is re-created each time the cable make-up is changed (it is not updated automatically). Example of cable table. The table symbol to use can be chosen among the 4 available (Listatcv0, 1, 2 and 3.dwg) in the Simboli folder (for customizations or changes). (See “Table Customization”). The command asks the user to define the terminal sequence parameters for creating the terminal block. This sequence is not requested in the case of connectors and terminal blocks with multiple terminals. You are not allowed to make new sorting on the terminals modified with command “Edit terminal block“ (see Sect. 6.3). In this case the dialogue where to choose sorting doesn’t appear. The following sequence parameters can be used: Diameter This is the diameter of the terminal, in mm. This type of sequence has top priority. All terminals with the same diameter are grouped together and in each group the sequence is dictated by other variables. This sequence does not affect connectors. Term. order By default the program sequences terminals according to the wire number. (NumI/NumO). Sequence according to NumM (terminal number) can only be used when this data has been used correctly when inserting terminals into the drawing. Sequence according to usage is only feasible after assigning the necessary information to all terminals in the drawing (see “6.4 Usage”). The NumI, NumM etc. sequence is the priority sequence when the diameter variable has been set as “Not considered”. Type Logic gives priority to items in the list according to characters, numbers, then numbers associated with characters. Alphabetic gives priority to items in the list according to numbers, then numbers associated with characters and then characters (ASCII character set sequence). Ascending and descending affect both characters and numbers. 20 Cable module • 493 Bi-directional Table Same features as a normal table (not bi-directional), the difference is just the position of data: specific for cables feeding into or leaving Terminals and Connectors. Every cable change means consequent table regeneration (it is not updated automatically). The table symbol is chosen from 3 options: (Table_Cable_Terminal0, 1, and 2.dwg), which are found in the Symbol folder (for any Customization). (See “Table Customization”). Example of bi-directional table. The command asks you to indicate the Origin and Destination Panels: Set the drawing “side” to be used for each panel by using the “<” and “>” buttons. 494 • Spac Automazione 2011 Table Customization You can customize new blocks by storing them in the same folder as other blocks. The block name must be consecutive to existing names (Listatcv0, Listatcv1, etc.. for normal tables and Table_Cable_Terminal0, Table_Cable_Terminal1 etc.. for bi-directional ones), with a maximum of 20 blocks (the dialogue window can view max. 20 windows). 1 - Data fields contained in the table Information contained in these symbols can be parameterized. Set the data that should be viewed by following the fields in the following tables: + Tag \ Label Information related to Terminals and Usage R_QUADRO Panel the terminal belongs to (attribute Panel) R_MORSETTIERA Terminal reference (attribute Terminal) R_NUMI Input wire number (attribute NumI of terminal) R_NUMM Terminal number (attribute NumM of terminal) R_NUMO Output Wire Number (attribute NumO of Terminal) R_FG Terminal Sheet Number R_FGCAT Sheet Number and position in terminal segments R_LIVELLO Level number for multiple terminals (attribute terminal Level) R_TIPO Terminal type (material code) R_UTENZA Terminal usage (Panel and name, extracted from Usage attribute) R_PU Terminal Usage (No. Pin, extracted from Usage attribute) R_FU Usage Description (Functions1and 2 or terminal board description) R_NOTEM Notes upstream of terminal (Panel and name, extracted from NoteM attribute) R_PNM Notes upstream of terminal (No. Pin, extracted from NoteM attribute) R_FNM Description of Notes Upstream of terminal (Functions 1 and 2 or terminal board description) The “Notes upstream” of terminal are considered as opposite side of usage (see Sect. 6.4). Tag \ Label Information related to Cables R_NOMEC Cable Reference (or connection wire) R_NOMEC+ Destination Cable Reference (only for Bi-directional Table) R_SZ Section Cable R_SZ+ Destination Section Cable (only for Bi-directional Table) R_NF Number Wire R_NF+ Destination Number Wire (only for Bi-directional Table) R_TIPOC Cable Type (or connection wire) R_TIPOC+ Destination Cable Type (only for Bi-directional Table) R_LC Cable length R_LC+ Destination cable Length (only for Bi-directional Table) R_DC Cable Disturbance Value R_DC+ Destination Cable Disturbance Value (only for Bi-directional Table) R_FC Cable Function R_FC+ Destination Cable Function (only for Bi-directional Table) R_ID Cable Conductor Identifier (or color with connection wires) R_ID+ Destination cable conductor identifier (only for Bi-directional Table) Attributes must be Invisible or Pre-assigned. The pre-assigned default value corresponds to maximum width (in mm) for each field (set in the default value for each attribute). 20 Cable module • 495 Listatcv and Table_Cable_Terminal symbol attributes (Tag\Label of fields) are drawn just once, at the top or left of each information column. The distance (step) for repetition of attributes (based on height of each cell) is defined by distance and position of dimension points. A further dimension point gives the max. repetition limit. The “dimension points” are placed on the drawing using the “Point” command. Exploded Table Symbol. 2 – Data separation character In order to enable separator management, you must (manually) insert the following section in the local job order configuration file SPAC_Cfg.ini or in the starting configuration file associated with the customer. [SEPARATORE_STR_UTENZA] Carattere_Separatore=/ Indicates the separation character (e.g. / o -) Spazio_Prima_e_Dopo=0 “1” a space is inserted before and after the separators. “0” no spaces inserted. 3 – Table dimension points To define the distance for the attribute step (Tag\Label of fields) and repetition limit (end of table). The figure shows 3 vertical and 3 horizontal points. The 2 points nearest to each other give the distance (step) for attribute repetition, while the third gives the max. repetition limit. If the dimension points are not visible, use the command “Point Style”, to check their status. Exploded Table Symbol.. “Dimension points” are drawn using the “Point” command. The “Point Style” (Ddptype) command sets the graphic form and visibility of dimension points. 496 • Spac Automazione 2011 Drawing Select “Drawing” to execute the graphic layout of the cable make-up defined previously. The Output function enables the user to select which cables are to be exported (by default all cables are selected). The cables shown in the list are linked to the start terminal block. By enabling the item “View all cables that start from the panel”, it is possible to view all the cables linked to the panel, (example =QG (Main Panel)) irrespective of the start terminal block or connector. Toggling “Export links not associated to cable wires”, all links to monopole conductors are drawn, too. The table is updated each time cable make-up is changed (it is not updated automatically). Example of cable drawing. The table symbol is selected from 2 options available (TBL_Wire0 and 1 .dwg); those tables are contained in the folder librerie\Simboli and it is possible to make customizations (see “Customization of the Cable Drawing block”). The pages required to complete the composition are consecutive to the first one indicated as the starting number. 20 Cable module • 497 In the cable drawing the connection type is indicate dgraphically: Symbol Description Cable connected to terminal. The value is the terminal NumM. Cable connected to multiple terminal. The value identifies two data items: terminal NumM and Level (NumM_Liv). Cable connected to connector. The value identifies the connecting Pin (NumM) on the connector. Cable connected directly to the component (direct connection). The value identifies the connecting Pin on the component. Cables Module version 3.0 In the previous versions of the Cables Module (until Release 3.0), the table symbol used was Listacav.dwg on the “Simboli” folder. Customizations of this parametrical symbol that are not properly executed are identified with the message: *** Error: Incorrect LISTACAV block. The TBL_Wire0.dwg table symbol (present on recent versions - after 3.0) reproduce the table symbol Listacav.dwg. Customization of the Cable Drawing block It is possible to customize new blocks memorizing them in the same folder of those already present. The block’s name must be consecutive to the existent names (TBL_Wire0, TBL_Wire 1, etc..), for a maximum of 20 blocks (the dialog box can visualize a maximum of 20 windows at a time). 1 – Attributes on block table The information contained in these symbols are parametric, so it is possible to set the data to be visualized according to the fields listed in the next tables: Tag \ Label %Q1% %N1% %P1% %SH1% %MC1% %FC1% %BT1% %AREA1% Tag \ Label %Q2% %N2% %P2% %SH2% %MC2% %FC2% %BT2% %AREA2% Starting (Source) component data Starting Group Panel Starting Group ID Starting Group Pole Starting Component Sheet-Coordinates Starting Marking Starting Component Function Starting Graphical Symbol Graphical line SX creation point Destination component data Destination Group Panel Destination Group ID Destination Group Pole Destination Component Sheet-Coordinates Destination Marking Destination Component Function Destination Graphical Symbol Graphical line DX creation point 498 • Spac Automazione 2011 Tag \ Label %NC% %CC% %CM% %C% %FC% %T% %CF% %I% %S% %L% %EC% %LC% %NL% Tag \ Label %NF% %AREA% %STEP% %ROWS% %SP% Cable Data Multi-polar Cable ID Wire or Cable Manufacturer Wire or Cable Material Code Wire or Cable internal code Composition Wire or Cable Type Multi-polar Cable Function Wire or Cable ID Anima Color / Number Wire or Cable Section Wire or Cable length Extended Color Multi-polar Cable Length Interference General Data Wire or Cable ID Design area Lines Increment Step Maximum number of rows Space Character 2 – Attributes position on the table The attributes are used to define the position of the information required, the maximum field length or the line extension is indicated on each attribute default value. Exploded Table Symbol. On the example, the attribute %SH1 is shown (Sheet – Starting component Coordinates), The text align (center, right or left), the character font, the color and the text height will be the same as those used for the creation of the attribute. The maximum length of the text is indicated on the attribute “Default” field (15mm); usually this value corresponds with the value on the column where it is located (see quote on the drawing). The attribute %SH1 (during the design) is repeated at the distance indicated on %STEP% for the maximum of repetitions indicated in %ROWS%. (%STEP% and %ROWS% are invisible attributes with Magenta color 6). The attributes %AREA% (1 and 2) define the starting point and the lines’ color. The line length is indicated on the “Default” (%AREA% are invisible attributes with Red color - 1). 20 Cable module • 499 Cables Select “Cables” to draw each cable in table form. The Output function enables the user to select which cables are to be exported (by default they can all be selected). The cables shown in the list are linked to the start terminal box. By enabling the item “View all cables that start from the panel”, it is possible to display all the cables connected to the panel (example =QG (Main Panel)) irrespective of the start terminal block or connector. After confirming the cables, the program proceeds to configure the parameters for drawing the table. Cable table The cable is usually described with the “heading” fields and Conductor and Wire data (as shown in the example), which are selected from those available. 500 • Spac Automazione 2011 Each piece of information (Tag) in “Fields available” can be entered into the “Output fields” by pressing Add. This information represents a column in the table. Each Tag has two variables, the width and heading of the column. Press Change to change these. Number of rows This value is used to split the table into several parts, even on different sheets, as (after filling in the maximum number of lines) the program requests a new insertion point or whether it should continue on the next sheet. Text height This is the height of all text in the table. This parameter proportionally affects the height of each line and thus the overall height of the table. Height headings of This is the height of column headings. This parameter affects the calculation of the overall height of the table. Width of table This is the sum of all the widths assigned to each output field. It is expressed in millimeters. This value must never exceed the Sheet width, otherwise the table would exceed the title block margins. Height of table On the basis of the number of lines and text height, the overall height of the table can be calculated. This value must never exceed that of Sheet height, otherwise the table would exceed the title block margins. Standard Represents the standard configuration of the output fields (where present). Press Default to store the configuration in “local” mode for future use (see “4.2 Settings”). If confirmed without pressing Default, the configuration is perceived as temporary and used only once. The following cable tables show the cable returns used in the various examples. Cable table C1 Cable table C2 Cable table C3 Cable table C4 The table is updated each time the cable make-up is changed (it is not updated automatically). 20 Cable module • 501 Draw bundles Select “Draw bundles” to lay the cable bundles previously built. Pressing the Output button you are asked which bundles export (they are all selected by default). Example of cable bundle drawing. The table symbol used is Listacav.dwg in the symbols directory. If this parametric symbol is customized incorrectly the following message is displayed: *** Error: Incorrect LISTAFASCI block. The sheets needed to complete make-up follow on consecutively from the first, which is the starting sheet. Bundles Select “Bundles” to draw each bundle in tabular representation. Pressing the Output button you are asked which bundles export (they are all selected by default). After having selected the bundles to draw, you have to configure the parameters for drawing the table. Press Default to set the configuration as job order default for the next operations (see “4.2 Settings”). If you confirm the command without pressing Default, this configuration is not saved, and used only once. Cable bundle table. 502 • Spac Automazione 2011 20.6 Hide labels This function makes label symbols visible or invisible. This function satisfies the need to print drawings with or without the information concerning customization of wires, cable laying or connection checks. The visible or invisible label status can be changed on all three categories or according to the selection: • Cable Label block (symbol “_Daticavo_n” ). • Wire Label block (symbol “_Datiunip_n” ). • Tick (used by “20.4 DDattef wire data”) 20.7 Convert ABB file This command is used to import cable associations defined using the standard functions of “11.1 Cables”. Data are imported by converting .ABB files contained in the job order directory (Cables-Data.Abb). Cable Module is an (OPTIONAL) cable-processing program that improves and enhances the standard “11.1 Cables” command. 20.8 Unconnected Cables The Cables Module manage the cables with an end not connected to any component An application example is the connection to the screen as illustrated in the figure. The conductor is connected to the first end with terminal Sch – XG, while the second end is not connected. Cable with a not connected end 20 Cable module • 503 20.8 Error messages • Errors during cable scanning • Ddattef wire data errors • Cable processing errors • Wire customization errors Errors during cable scanning List of the error messages that may occur while scanning information, useful for the “20.5 Cable processing” function. N Message 1 Multisheet: <DWGname> Sheet: <sheet no.> Return at (<x> <y>) and return at (<x> <y>) connected to the same branch but with different signal attribute. The branch is not processed. Description Message generated while searching for the branch when the system discovers a connection that starts and ends with two returns with different signal values. In this case no name can be assigned to the connection. 2 Multisheet: <DWGname> Sheet: <sheet no.> Return at (<x> <y>) and return at (<x> <y>) connected to the same branch but with incorrect PRES attributes. The branch is not processed. 3 Multisheet: <DWGname> Sheet: <sheet no.> Return at (<x> <y>) with incorrect PRES attribute. The branch is not processed. Message generated while searching for the branch when the system discovers a connection that starts and ends with two returns that are two starts or two destinations or the PRES attribute is different from P and A. Message generated while searching for the branch when the system discovers a connection that starts or ends with a return that has a PRES attribute that is different to "P" and "A". 4 Multisheet: <DWGname> Sheet: <sheet no.> Equipotential network with more than 1 branch connected to the return at (<x> <y>) with attribute PRES = P. The branch is not processed. Message generated while searching for the branch when the system discovers an equipotential network with branches drawn so that a start return is connected to multiple destination branches. Change branches and draw correctly. 5 ProgramNetwork:insertBranch Branch cannot be inserted: branch name is not consistent with network name. Message generated when a branch is connected to an equipotential network but the branch name is not the same as that of the network. Ddattef wire data errors List of the error messages that may occur with the “20.4 DDattef wire data” command. N Message 1 no.<num networks discarded> networks discarded because they contain returns. 504 • Spac Automazione 2011 Description The “Ddattef wire data” command cannot be run on equipotential networks that contain returns. Cable processing errors List of the error messages that may occur with the “20.5 Cable processing” command. N Message 1 Cannot open <name cable database>. 2 Error in reading library path. 3 Selection contains associated connections. 4 Cannot associate: The conductor selected is not available. Description "Use last save" has been selected but there is no wiring database. Library path not found. This message appears during “Associate” (or drag & drop) operations on the list of connections when one or more of the connections selected have already been associated.. This message appears during “Associate” operations when a conductor selected from the list has already been associated. 5 Cannot associate: Current cable complete. This message appears during “Associate” operations when the current or selected cable is complete. 6 Cannot associate: Not enough free conductors in current cable. When executing “Associate” on a free conductor selected from the list, the program checks how many free conductors there are in the cable, starting with the one that has been selected. If there are fewer free conductors than connections to be associated this error message is generated. 7 Cannot associate: With “Associate” several conductors (multiple The number of connections and conductors that selection), the program associates the connections have been selected do not correspond. with the conductors that have been selected. When the number of conductors does not match the number of connectors, this error message is generated. 8 Cannot associate: As in point (7), in this case the conductors that have Selected conductors are not all free. been selected are not all free. 9 Cannot delete label. During “Update”, for some reason the program cannot delete a label from the connections to be disassociated. 10 Cannot change label. During “Update”, for some reason the program cannot change a label on the connections to be updated. 11 Definition of CABLEDATA label not found. Cannot insert new labels. During “Update” there are some labels to be inserted into the drawing and the label block is missing. 12 Cannot find a suitable position for automatic label insertion. Insert manually. During “Update” there are some labels to be inserted into the drawing and the symbol insertion point search function cannot find a valid point. 13 Cannot find multisheet On which to insert label. Label not inserted. As in point (12), the symbol insertion point search function found the valid point but when “Update” is run the multisheet no longer exists. 14 "Error saving wiring database." Problems in connection with writing the Mdb file. 20 Cable module • 505 15 Conductor <Conductor-name> of cable <Cablename> is associated with a connection belonging to multisheet <Dwg-name> that was not included in the last scan. To obtain the information requested a new multisheet scan is necessary. This message appears with “View connector”. While scanning to search for associated conductors search _DatiCavo_n symbols) in the job order labels may be found on drawings that were discarded by subsequent searches for connections. The cable conductor found in the label appears to be “associated” but the connection is not displayed. 16 Cannot find connection associated with conductor <Conductor-name> of cable <Cable-name> This message appears with “View connector” when the wiring database and connection associated with the conductor does not correspond. 17 Conductor <Conductor-name> of cable <Cablename> is associated with a connection inside panel Panel-name>. To obtain the information requested, re-run the command selecting the <panel interior> option. This message appears with “View connector” when information is requested about conductors associated with “panel interior” connections when processing “panel exterior”. 18 Conductor <Conductor-name> of cable <Cablename> is associated with a connection outside panel <Panel-name>. To obtain the information requested, re-run the command selecting the <panel exterior> option. 19 Conductor <Conductor-name> starts from a different panel to the first conductor that was selected. Cannot display start and destination. This is the opposite of point (17). It appears when information is requested about conductors associated with “panel exterior” connections when processing “panel interior”. 20 Conductor <Conductor-name> starts from a different terminal block (components) to the first conductor that was selected. Cannot display start and destination. 21 Cannot open multisheet <Dwg-name> in read. 22 Cannot open multisheet <Dwg-name> in write. 506 • Spac Automazione 2011 This message appears with “View connector” when more than one conductor is selected (from the list of conductors). All must be associated with connections that start from the same panel as the first conductor that was selected. Like in point (19), all the conductors that are selected must be associated with the same start terminal block (or components). Problems encountered in opening the drawing. Check dwg file status (during data reading stage). Problems encountered in opening the drawing. Check dwg file status (during data reading stage). Wire customization errors List of the error messages that may occur when using the “20.3 Customize wires” command. The “_DATIUNIP_n” labels used to customize individual wires are “bands” that group together all the wires that pass through the point in which they are inserted, attributing to those wires the characteristics contained in the label. When the user selects the point on a section of equipotential network, all the wires of the network that pass through that point are highlighted. N Message 1 The selection point (<x> <y> <z>) has been discarded because the changes requested for the wires that have been selected are not consistent with data contained in existing labels and cannot be changed. Description This error is only generated when some of the selected wires have labels that also affect other wires not included in the current selection In this case the existing labels cannot be changed. If the data to be inserted into the new labels are not the same as those in existing labels, the error is generated Example: In the selection in the example the error is generated because two wires pass through point C, the first connects “A to C” and the other connects “C to D”: Label 1x1.5 concerns these two wires, while the selection that has been made also affects the wires that connect “A to B” and “A to C”. The change to data in the label is not therefore allowed and only the “A to B” connection is updated. The correct selection, using two “fences”, to change all wires is shown below. 2 Definition of label <name Label-block> not found. This message is generated if there are labels to be inserted into the drawing and the label symbol block is missing. 20 Cable module • 507 508 • Spac Automazione 2011 Index A ABB file .................................................................... 65; 503 Absolute incremental Prefix - Sheet referencing.............156 Absolute incremental Sheet - Prefix referencing.............155 Absolute Prefix...............................................................101 Add sheet.........................................................................65 Aggiorna Liste e Tabelle..................................................149 AMW file................................................................ 231; 270 Apply filter ............................................................. 241; 274 Assign element...............................................................352 Assign Pens ......................................................................73 Assign usage...................................................................208 Associate Materials ................................................ 245; 270 Attribute changes...........................................................360 Attribute features ..........................................................110 Attributes.......................................................................438 Automatic numbering.....................................................118 Automatic wire numbering.............................................163 Auxiliaries.......................................................................140 B Bill of materials filter......................................................241 Bill sorted by panel abd reference ..................................254 Bill sorted by panel and type ..........................................256 Bill sorted by reference ..................................................254 Bill sorted by type ..........................................................255 Bill table................................................................. 257; 265 Bit numbering ................................................................329 Black Box........................................................................462 Blk...........................................................238; 417; 458; 462 Boom ...............................................................................66 Branch............................................................................143 Bundles (CM)..................................................................502 C CAB file ..........................................................................168 Cabinet...........................................................................385 Cabinet exterior .............................................................385 Cabinet interior ..............................................................387 Cable bundle ..................................................................491 Cable database....................................................... 119; 303 Cable definition..............................................................301 Cable label .....................................................................478 Cable labels ....................................................................415 Cable module .................................................................471 Cable processing ............................................................485 Cable table ..................................................... 300; 301; 302 Cables ............................................................ 120; 295; 303 Cables (CM) ............................................................ 471; 500 CAD file ..........................................................................370 Calculations....................................................................465 Caneco ...........................................................................465 Categories of symbols.....................................................425 CAV file .......................................................... 301; 472; 480 Change sheet................................................................... 57 Change symbols..............................................................447 Check Usage not Assigned ..............................................208 CHG file ..........................................................................366 Child symbol................................................... 214; 430; 444 Clear sheet ...................................................................... 69 CM file............................................................................378 Colour codes ..................................................................122 Colours........................................................... 112; 122; 311 Compact database..........................................................243 Compact view................................................. 255; 256; 262 Component ....................................................................388 Component reference ............................................ 109; 152 Component referencing................................................... 98 Configuration wires numbers..........................................105 Connection..................................................... 143; 144; 147 Connection returns................................................. 103; 145 Connector drawing .........................................................194 Connector table..............................................................194 Connectors .....................................................................244 Constant phrase .............................................................315 Contactor .......................................................................218 Copy between sheets ...................................................... 68 Copy dictionary ..............................................................319 Copy symbol...................................................................448 Create multisheet............................................................ 51 CRF file ...........................................................................295 Cross legend...................................................................136 Cross Reference configuration......................................... 92 Cross Reference example........................................ 215; 216 Cross referencing............................................................213 Cross-reference legend...................................................229 Cross-referencing editing................................................218 Cross-referencing errors .................................................223 CRP file...........................................................................217 CSV file................44; 171; 195; 259; 265; 267; 300; 338; 377 CTB file............................................................................ 73 Custom Blk Suite ............................................................458 Customer Fields............................................................... 47 Customer management ................................................... 46 Customers.mdb ............................................................... 46 Customise wires .............................................................481 Index • 509 D Function legend...................................................... 135; 357 DAT file ............................................................ 63; 131; 387 Data indications .............................................................180 Data migration and customization utility ..........................24 Database informations ...................................................232 Database print................................................................233 Database utilities............................................................243 DbCenter........................................................................270 Ddattef................................................................... 173; 210 DDattef wire data...........................................................484 Define a filter .................................................................240 Delete Cross Reference ..................................................230 Delete numbers..............................................................172 Delete Revisions...............................................................75 Delete sheet.....................................................................59 Delete symbol ................................................................447 Delete translation...........................................................323 Dictionary.......................................................................306 Disassociate materials ....................................................267 DMW file........................................................ 260; 261; 390 DOC file..........................................................................253 Draw bundles (CM).........................................................502 Draw cables....................................................................299 Drawing cables (CM).......................................................497 DSS file ........................................................... 261; 266; 390 Duplicated references ....................................................153 DWF file ...........................................................................71 DXF file.............................................................................66 G E Edit code ........................................................................234 Edit connectors ..............................................................202 Edit list...........................................................................252 Edit macro......................................................................243 Edit symbol ....................................................................448 Edit terminal block .........................................................197 Edit translation...............................................................325 Edtt ................................................................................325 Element symbol...................................................... 432; 446 Entering blocks with fence .............................................443 ERR file...........................................................................253 Estimate list ...................................................................107 Estimated Bill of material codes .....................................250 Exchange files.................................................................366 Export Bill.......................................................................261 Export database .............................................................232 Export Plc I-O .................................................................353 Export Settings .................................................................89 Extensive view................................................................262 External bill of materials.................................................261 Extraction by external module........................................266 F Fence ..................................................................... 104; 160 Fence mode....................................................................480 Fence terminals..............................................................484 File _SP.............................................................................37 File ABB..........................................................................503 File DAT..........................................................................242 File MDB.........................................................................177 Filter materials database ................................................267 Find codes ......................................................................242 Free referencing .............................................................100 510 • Spac Automazione 2011 General Marking.............................................................370 Grafoplast ......................................................................370 H Hardlock.......................................................................... 21 Hardware protection key ................................................. 21 Head ..............................................................................218 HH Quick Wire................................................................146 Hidden component management ...................................242 Hide information ............................................................242 Hide labels .....................................................................503 I Ignore symbols ...............................................................375 IMP File ..........................................................................466 Import Bill ......................................................................261 Import CSV file ...............................................................267 Import database .............................................................232 Import Settings................................................................ 90 Import Single feed ..........................................................294 Import single-feed diagram ............................................467 Importing by external module ........................................266 Importing phrases ..........................................................321 Incremental....................................................................155 INI file .........................................................48; 88; 267; 387 In-Line cross–reference OFF ...........................................444 In-process.......................................................................249 Inserimento simboli........................................................269 Insert Connectors ................................................... 131; 186 Insert phrases.................................................................306 Insert RFSS ............................................................. 420; 421 Insert stored sheets......................................................... 64 Insert Terminal configuration .........................................111 Insert Terminals ..................................................... 131; 181 Inserting a code..............................................................234 Installation ...................................................................... 17 Installation Layout.................................................. 413; 415 Installation Layout Report ..............................................415 Internal bill of materials .................................................251 Internal panel wiring ......................................................168 Inverter ..........................................................................454 I-O Bit legend .................................................................355 I-O Import/Export...........................................................353 J Job Order ...................................................................35; 37 Job Order copy ................................................................ 48 Job Order management ................................................... 37 Job Order sharing ............................................................ 49 JPG file ............................................................................ 71 L Labels.............................................................................370 Language extensions ......................................................324 Last sheet........................................................................ 58 Last used symbols...........................................................453 Lay cables.......................................................................472 Layout ............................................................................237 Layout scale ...................................................................385 Legenda Bit Plc...............................................................136 LibCenter........................................................................269 Local configuration...........................................................88 Location ........................................................... 84; 108; 138 Location labels ...............................................................451 Location Manager...........................................................108 Location Marks.................................................................84 Location setting..............................................................138 Location Symbol ...............................................................84 Loop Diagram ......................................................... 131; 177 Loop Diagram returns.....................................................131 LST file ...........................................................................233 M Machinery options .........................................................378 Management....................................................................74 Marking..........................................................................367 Master title blocks............................................................85 Material supply ..............................................................249 Materials................................................................ 231; 270 Materials archive............................................................231 Materials Database................................................. 231; 270 Materials database filters ...............................................274 Mblk macrosymbols .......................................................419 MDB file ...................................119; 148; 306; 316; 481; 485 Menu customisation............................................... 420; 421 Metel .............................................................................232 MNU file................................................................. 420; 421 MNZ file ................................................................. 420; 421 Modernotecnica .............................................................370 Move between sheets ......................................................69 Multiple terminals..........................................................184 Multisheet..................................................................36; 37 Multisheet Scan..............................................................148 N Navigator .......................................................................373 Network hardlock.............................................................21 Network hardware protection key ....................................21 Network port protection ..................................................21 New .................................................................................27 New dictionary ...............................................................319 New phrases ..................................................................317 Next sheet........................................................................58 Node ..............................................................................144 Number Sheets.................................................................70 Number Summary ..........................................................172 Number wires......................................................... 105; 159 Number with Returns .....................................................162 Number with terminals ..................................................162 NumI ...................................................................... 182; 212 NumI and NumO settings ...............................................212 NumM.....................................................182; 198; 201; 211 NumM = NumI................................................................211 NumO .................................................................... 182; 212 O Offset......................................................214; 312; 427; 429 Options .................................................................. 242; 389 Original configuration.......................................................88 OUT file..........................................................................287 Overtemperature ................................................... 253; 277 Overtemperature calculation..........................................277 Overtemperature table...................................................287 P Panel front .....................................................................402 Panel rear.......................................................................402 Panel setting ..................................................................137 Panel symbols ................................................................403 Panel wiring ...................................................................399 Parallel ................................................................... 141; 147 Parent and return cross-referencing ...............................217 Parent symbol ................................................ 214; 426; 441 Patch..............................................................................144 PDF file.....................................................................71; 253 Phrase database .............................................................316 Phrases...........................................................................317 Pin................................................................................... 95 Pin reference..................................................................220 Plate...............................................................................387 Plc ..................................................................................454 Plc bits ...........................................................................327 Plc bits with same name .................................................352 Plc board ........................................................................328 Plc board terminals.........................................................328 PLC Configuration...........................................................347 PLC database ..................................................................333 PLC drawing....................................................................350 Plc I/O bits......................................................................327 PLC manager ..................................................................338 Plc summaries ................................................................353 Plc symbols.....................................................................331 Plug symbol....................................................................436 PLW file..........................................................................338 Positional ............................................................... 157; 166 Positional identification..................................................100 Positional numbering .....................................................111 Power feeds ...................................................................140 Power returns ........................................................ 102; 142 Preferences ....................................................................104 Prefix – Sheet in Absolute incremental identification....... 99 Prefix – Sheet in Relative incremental identification........ 99 Prefix archive...................................................... 95; 96; 153 Prepare summaries.........................................................353 Preview CSVf file ............................................................105 Previous sheet................................................................. 58 Print Bill .........................................................................264 Print sheets ..................................................................... 71 Processed blocks ............................................................312 Protection port................................................................ 21 PRQ file ..........................................................................277 Pushbutton panel ...........................................................398 Q Quick Wire .....................................................................146 R Raceway .........................................................................387 RailDesigner 2 ................................................................195 Real-time cross-reference...............................................228 Rebuild cable file............................................................480 Recover database ...........................................................243 Reference symbol...........................................................461 Index • 511 Registration reference symbol........................................428 Relative incremental Prefix - Sheet referencing ..............157 Relative incremental Sheet - Prefix referencing ..............156 Remove installation..........................................................26 Rename panel ........................................................ 137; 206 Rename terminal block...................................................206 Renumbering..................................................................161 Return Cross-Referencing...............................................216 Return signal ..................................................................216 Return symbol........................................................ 102; 433 Revision legend ..............................................................134 Revision Legend ...............................................................77 Revision Symbol ...............................................................76 Substitution of a block....................................................365 Summary ......................................................................... 56 Syimbols insertion ..........................................................104 Symbol attributes ...........................................................110 Symbol Configuration ...................................................... 93 Symbol insertion.............................................................440 Symbol legend........................................................ 135; 359 Symbol referencing.......................................................... 98 Symbols....................................................................87; 440 Symbols – Pushbutton panel front..................................403 Symbols – Pushbutton panel rear ...................................403 S Table cables (CM) ...........................................................493 Table of job orders .......................................................... 43 Terminal and Connectors database.................................131 Terminal block........................................................ 132; 389 Terminal block drawing ..................................................190 Terminal block List..........................................................196 Terminal block return .....................................................132 Terminal block symbol....................................................437 Terminal block table .......................................................191 Terminal box ..................................................................118 Terminal Box ..................................................................183 Terminal fence ...............................................................183 Terminal settings............................................................112 Terminal symbol.............................................................434 Terminals block ..............................................................188 TeSys U...........................................................................405 Topographic manager.....................................................390 Translation ............................................................. 308; 312 Translator blocks ............................................................305 Translator settings..........................................................310 TXT file ...........................................................................321 Save Pin..........................................................................222 Save wires ......................................................................165 Schneider Electric........................................... 253; 405; 469 Schneider Electric Catalogue ..........................................469 SDF file ...........................................................................338 Search Connettor ..................................................................373 Terminal.....................................................................373 Search Element .....................................................................373 Return........................................................................373 Selection Preview ...........................................................106 SEQ file .................................................................. 338; 353 Serial ..............................................................................147 Settings ............................................................................88 Setup..........................................................................18; 87 Sheet................................................................................36 Sheet – Prefix Absolute incremental identification ...........99 Sheet – Prefix in Relative incremental identification.........99 Sheet 0.............................................................................57 Sheet back........................................................................61 Sheet classification...........................................................63 Sheet Dimensioning..........................................................91 Sheet Forwards ................................................................60 Sheet legend ....................................................................80 Sheet review ....................................................................74 Sheet slides ......................................................................85 Sheet title ..................................................................56; 79 Sheet title legend ...........................................................134 Shield .............................................................................148 Shift sheet........................................................................60 Shift symbol ........................................................... 449; 450 Signal data......................................................................119 Simboli ...........................................................................269 Simboli Blk .....................................................................417 Single feed Data tables ...................................................292 Single feed draw..................................................... 289; 442 Single feed Number wires...............................................291 Single-feed .....................................................................467 Single-feed diagram........................................................467 Size table........................................................................389 SLB file ...........................................................................439 SLD file ..................................................................... 85; 439 Slide ...............................................................................439 Snap–to–segment block insertion...................................443 Spac_cfg.ini ................................................................48; 88 Split multisheet ................................................................66 Start + Destination returns .............................................103 Start settings ....................................................................48 Store sheet.......................................................................62 STU file...........................................................................349 512 • Spac Automazione 2011 T U Unicode 16 .....................................................................324 Uninstall.......................................................................... 26 Unity Pro ........................................................................349 Unravel Panel Wires .......................................................408 Unravel Settings .............................................................412 Unravelling .....................................................................239 Unsplit............................................................................. 67 Update from a file ..........................................................264 Update phrases ..............................................................317 Update terminals............................................................205 Usage ............................................................. 193; 200; 207 Used numbers list...........................................................167 V VV Quick Wire ................................................................146 W Weidmuller ....................................................................370 Wild card symbol............................................................318 Wire ...............................................................................143 Wire data .......................................................................119 Wire label............................................................... 370; 483 Wire numbering configuration........................................111 Wires already numbered ................................................165 Wires Labels ...................................................................116 Wizard............................................................................. 65 X X Copy symbol................................................................448 XG Last used symbols .....................................................453 XML file .................................................................. 338; 349 XS Edit symbol................................................................448 XX last symbol ................................................................448 Index • 513