1
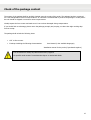
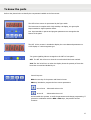
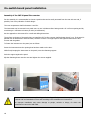
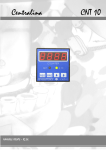
Central unit
CNT 10
USER MANUAL – R2.06
1
2
Litre-counter
CNT 10
User manual
Product name:
Manual revision:
Issue date:
CNT 10 litre-counter central unit
2.06
January 2005
3
Have you got …
… any technical problem or request?
Please contact:
Your competent licensee
Your retailer
You will find further information in the “Safety and Warranty” manual.
You can find up-to-date information about our products on our site.
On pursuing the purpose of improving the quality of its own products and a constant technological
development, Termoelettronica Spa, reserves the right to modify the data included in this handbook
without any prior notice.
Termoelettronica Spa
Via Petrarca 10
24052 – Azzano San Paolo – Bergamo
Tel. +39.035.596511 – Fax +39.035.596510
– [email protected]
www.termoelettronica.it
4
5
Table of contents
Table of contents.............................................................................................................................................. 6
Instructions for safety ..................................................................................................................................... 9
Notes on this manual .................................................................................................................................... 10
Conventions and icons........................................................................................................................................ 10
Precautions ................................................................................................................................................... 11
Notes for the installation and disassembly of the CNT10 litre-counter ..................................................................... 12
Manufacturer’s instructions ................................................................................................................................. 13
Disposal and recycle........................................................................................................................................... 13
Intended use of the CNT10 litre-counter....................................................................................................... 14
Check of the package content........................................................................................................................ 15
To know the parts ........................................................................................................................................ 17
Assembly of the CNT10 panel litre-counter ........................................................................................................... 18
Electrical connections .................................................................................................................................... 19
CNT10 litre-counter terminal board...................................................................................................................... 19
Terminals 1 and 2 - CNT10 litre-counter power supply .......................................................................................... 19
Terminals 2 / 3 / 4 - Connection with the CTR100 probe and compatible .............................................................. 20
Terminals 2 / 5 / 6 - Connection with the MK515 probe and compatible................................................................ 20
Terminals 8 / 9 –RLK2 end-of-count relay ............................................................................................................ 20
Terminals 10 / 11 –RLK1 pulse count relay........................................................................................................... 20
Terminals 12 / 13 – External reset....................................................................................................................... 20
CNT10 litre-counter connection diagrams ..................................................................................................... 21
CNT10 connection with the FIP DF100 / CTR100 probe – relay contact................................................................... 22
CNT10 connection with the MK515 probe – relay contact....................................................................................... 23
CNT10 connection with the FIP DF100 / CTR100 probe – FET output (transistor) .................................................... 24
CNT10 connection with the MK515 probe – FET output (transistor) ........................................................................ 25
Powering on the CNT10 litre-counter ............................................................................................................ 26
Powering off the CNT10...................................................................................................................................... 26
Main display mode ......................................................................................................................................... 27
Reset of the counted quantity ............................................................................................................................. 27
Historical count.................................................................................................................................................. 28
Probe type selection........................................................................................................................................... 30
Count measurement unit .................................................................................................................................... 30
Summary of the CNT10 litre-counter operation modes ................................................................................ 33
Main display mode ............................................................................................................................................. 33
Parameter programming mode............................................................................................................................ 33
SET POINT programming mode (end-of-count threshold) ...................................................................................... 33
Historical count display mode (total litres counted since the latest reset) ................................................................ 33
Stored parameters (default) ......................................................................................................................... 35
Rapid parameter programming..................................................................................................................... 36
Guide to the solution of problems.................................................................................................................. 38
Appendix “A” – Weights and dimensions....................................................................................................... 39
Appendix “B” – Opening for panel drilling ..................................................................................................... 40
Appendix “C”– JP1 Jumper set-up ................................................................................................................ 41
6
Appendix “D”– Connections and Probe Pinout .............................................................................................. 42
CTR100 FIP probe pinout.................................................................................................................................... 42
MK 515 George Fisher probe pinout..................................................................................................................... 42
7
8
Instructions for safety
The handbook represents an integral and essential part of the product and it shall be delivered to the user. The CNT 10
litre-counter is complete with a CE mark and comply with the essential requirements imposed by European community
standards:
89/392 EEC – 91/368 EEC – 93/44 EEC – 96/68 EEC
(Assimilated with DPR 459/96)
89/336 EEC – 92/31 EEC – 93/68 EEC – 93/97 EEC
(Assimilated with DL 615/96)
73/23 – 93/68 EEC
(Assimilated with DL 626/96)
Refer to the plate at the back of the litre-counter for the data relative to CE certifications CE,.
The installation shall be accomplished by professionally qualified personnel in compliance with the national and local
standards in force and according to the manufacturer’s instructions since an improper installation may cause damage to
people, animals or things, for which the manufacturer can not be held liable.
In particular, the following standards shall be observed:
Law 46/90 and following amendments
Law 186/1968 and the CEI standards about electrical plant engineering
And any other standard in force about the installation of electrical / electronic devices in industrial environments.
The personnel shall be understood as professionally qualified when having a specific technical competence in the field of
pneumatic and hydraulic plants as well as industrial automation.
This product shall be only intended for the use for which it has been expressly conceived, i.e. all control operations for
plants and/or machines in an industrial environment in compliance with its operation conditions.
Any other use shall be considered as improper and therefore dangerous. It is recommended to protect the product
against any improper use that may represent a danger.
The manufacturer will disclaim all contractual and extra contractual responsibility for any damage caused by improper
installation and utilisation as well as any non-observance of the manufacturer’s instructions.
Package elements shall never be left unattended since they may represent a danger for the environment and for people.
In case of failure and/or malfunction of the front panel, power it off. The personnel without required
permission and competence shall never be allowed to make any attempt at repair or direct action.
If necessary, the litre-counter may be only repaired by a customer care centre authorised by Termoelettronica Spa. Only
original spare parts may be used.
The non-observance of the above may compromise the electrical plant safety.
If the litre-counter should be dismantled, directly contact Termoelettronica Spa to provide for its correct disposal. If the
litre-counter should be either sold or transferred to another owner, always make sure that the handbook for operation
and maintenance will be delivered together with the plant in order to enable the new owner and/or installer to refer to it
for information.
9
Notes on this manual
Conventions and icons
This manual has been created by using the most modern layout programmes. This guide has used some bold face notes
and warnings that should help the user to complete some processes in a safe and complete manner. The following
importance degrees of the notes are described here below.
ATTENTION! Information to prevent any damage to
people, peripheral units or components as well as the loss
of stored data.
WARNING! Information about actions that shall not be
performed in order to avoid any damage to data,
components or people.
NOTE: Tricks and information that shall be accomplished to
complete a process.
INFORMATION: general and additional, serving the
purpose of integration for the user.
10
Precautions
The following safety precautions will extend the CNT10 litre-counter life Follow all instructions and precautions.
Never use damaged power supply cables and accessories. Never use strong solvents, such as diluents, gasolines or any
other chemical product in order to clean the litre-counter panel.
Detach power supply sources before cleaning. Use a clean cloth to clean plastic parts after having dipped it into a non
abrasive detergent solution. Use a clean cloth to dry wet parts.
Only a specialised technician is allowed to clean the internal part of the litre-counter. Prevent liquid and gaseous chemical
agents from penetrating inside the litre-counter since they might corrode electronic circuits and peripheral units.
ATTENTION!
The control panel surface is covered with a thin plastic touch-sensitive film. Never use aggressive
chemical products to clean it. In case of need, contact Termoelettronica Spa or an authorised
customer care centre.
The plastic case must be cleaned by means of a neutral, non solvent detergent.
The panel of the display and the keys must be cleaned by means of a neutral, non solvent detergent.
Never
Never
Never
Never
Never
Never
arrange or drop any object on the litre-counter, above all on the sensitive panel area.
expose the litre-counter to rain, humidity or any jet of liquid products.
expose the litre-counter to dust or dirt.
use the device in the proximity of any leak of explosive gases.
expose the litre-counter to any strong magnetic or electrical field.
expose the litre-counter to extreme temperatures (below 0° and above 50°) and to the direct sunlight.
11
Notes for the installation and disassembly of the CNT10 litre-counter
The device can be only repaired by specialised technicians. If the CNT10 litre-counter is opened
without authorisation or if it is improperly repaired, this may involve considerable risks and
dangers for the user (electrical shock, danger of fire, etc.).
Some components of the litre-counter are sensitive to electrostatic electrical discharges. Act as follows to avoid damaging
the peripheral units of the litre-counter:
12
•
Discharge any electrostatic discharge to the earth before touching the electrical terminals of the litre-counter.
•
All instruments, devices and objects used for maintenance shall be protected against electrostatic discharges.
•
Detach the electrical power supply before installing or removing the probes and electrical loads from the litrecounter.
•
Never touch the electronic components arranged on electronic circuits.
Manufacturer’s instructions
This product includes technology (hardware and software) protected by copyrights that are protected by the
corresponding owners as a result of the procedural rights of well-defined international patents and other intellectual
property rights.
Disposal and recycle
This device has been widely manufactured by making use of materials that can be disposed of with a limited
environmental impact. The device shall be disposed of according to the local regulations in force at the end of its useful
life.
The
disposal
shall
occur
in
a
centre
specialised
for
collection.
Removal of the package and check of the content
Remove all package components.
Make sure that the items of the package have not suffered any visible damage during transportation.
Make sure that the items of the supply correspond to the data specified by the delivery note.
If you should find out a damage to the litre-counter or any incongruity between the content of the package and
transportation documents, you are kindly required to contact a Termoelettronica Spa authorised dealer or local agent
immediately.
It is recommended to avoid throwing away the original package of the devices. Keep it for any
further shipment.
13
Intended use of the CNT10 litre-counter
The litre-counter has been expressly designed and realised for use as a pulse counting unit. The litre-counter function is
only performed in combination with specific probes intended to transform a liquid flow into a series of electrical pulses
having well-defined features.
The CNT10liter-counter can take no measurement, if not combined with specific sensors.
The CNT10 litre-counter has been specifically designed and built for use in industrial environments in order to measure
the flows of liquid products inside pipelines.
The accuracy degree of the CNT10 litre-counter essentially depends upon the accuracy degree of the measuring probe in
use and upon the set-up of parameters.
The CNT10 litre-counter will not discriminate the flow direction of the liquid inside the pipeline (negative flow rate).
Any use other than the one mentioned above can be considered as improper and therefore dangerous for the operator,
for the machines on which it is installed and for the environment.
If it is necessary to use the CNT10 litre-counter for purposes other than those provided for by engineering, the user shall
require Termoelettronica Spa to check the conditions for installation and utilisation.
Termoelettronica Spa is not liable for the damages of any kind, entity and nature that may be caused to things, people
and animals for an improper use of the litre-counter.
14
Check of the package content
The content of the package shall be carefully checked upon the receipt of the goods. The package has been conceived
for a safe transportation under normal conditions. It is therefore recommended to preserve the package in a safe place if
the unit should be shipped or moved for various requirements
Visually inspect the litre-counter and make sure it has not been damaged during transportation.
If you should find out a damage, please return the package promptly and, anyway, not later than eight working days
from its receipt.
The package shall include the following items:
•
CNT 10 litre-counter
•
Envelope including the following documentation:
User Manual (in the available languages)
Installation manual for the probe (if purchased together)
It is not allowed to modify any cable and accessory supplied.
For specific needs contact Termoelettronica Spa or an authorised dealer.
15
Technical data & features
Case
Polycarbonate, black, V-0 self-extinguishing degree
Associated probes
CTR 100 / DF 100 probe
MK 515 – George Fisher probe
Display
4 Display LED’s Red 7 segments
Electrical supply
24Vdc / 24Vac ( 50-60Hz) – 100mA
Operating temperature
Storage temperature
Relative humidity
from 0° to 50° Celsius
from -15° to 70° Celsius
80% maximum – without condensate
Installation:
On-switch board panel or maximum thickness 10 mm.
Back terminal board
14 M3 screw terminals
For cables from 0.25 - 2.5 sq.mm. AWG 22 - 14
Sizes:
DIN 43700 – 48x48mm, depth 100mm
Installation category
II
Inputs:
MK515 probe – 4 blades – two wires Red – Black + Braid
CTR/100 probe – 5 blades – three wires
Outputs:
Output 1 - litre count relay -- NO contact
Output 2 - end-of-count relay -- NC/NO contact **
5 A 30 Vdc/250Vac ***
5 A 30 Vdc/250Vac ***
Output 3 – FET OPEN COLLECTOR PNP type
100 mA 30 Vdc
Reference certificates:
Designed and manufactured according to 2000 quality
assurance
Certificate of compliance with EMC Community standards
** Settable by means of JP1 – see the instructions given by
the appendix
*** Flow rate values shall be referred to RESISTIVE loads
In the constant attempt at improving and pursuing the technological development of its own products,
Termoelettronica Spa reserves the right to modify the features of its own products without giving any
prior notice to its users.
16
To know the parts
Refer to the photos below to identify the components installed on the litre-counter.
The CNT10 litre-counter is represented by the figure aside.
The instrument is complete with a high-visibility red display, two green pilot
lamps intended to signal operation states.
Four keys intended to operate and program parameters are arranged at the
bottom of the panel.
The CNT 10 litre-counter is intended to display the count data and parameters on
a LED display of a seven-segment type.
Two green signalling leds are arranged on the CNT 10 front panel:
SET The SET led will turn on when the count threshold has been reached.
X 10 The X10 led will turn on when the display shows the quantity of litres that
have been counted and divided by 10.
Control keys are:
RES the reset key of the present and historical count
PRG key intended to program the litre-counter parameters
Arrow Down - Shortened as Arrow Dw
Arrow UP
- Shortened as Arrow UP
Arrows enable the operator to scroll the parameters and change programming. If
pressed in combination with the RES or PRG keys, they activate second
functions.
17
On-switch board panel installation
Assembly of the CNT10 panel litre-counter
For the assembly it is recommended to choose a position that can be easily accessed from the rear side too and, if
possible, free of any vibration of shock danger.
The room temperature shall lie between 0 and 50°.
The instrument can be mounted on a panel max. 10 mm in thickness after having made a 45 x 45 mm opening and by
considering a 1 millimetre tolerance per side (46 millimetres).
See the appendix to this manual for overall and drilling dimensions.
The surface roughness of the panel where to install the CNT 10 litre-counter shall be better than 6.3 um. If the panel is
painted with an embossed or textured finish, sand the surface. This might improve the tightness between the litrecounter and the gasket.
To fasten the instrument to the panel, act as follows:
Insert the instrument into the opening that has been made on the door.
While firmly keeping the instrument on the panel, insert the fastening support.
Push the support against the panel.
Slip the fastening brace onto the case and tighten the screws supplied.
The installation shall be accomplished by professionally qualified personnel in compliance with the
national and local standards in force and according to the manufacturer’s instructions.
An improper installation may cause damage to people, animals or things, for which the
manufacturer cannot be held liable.
18
Electrical connections
CNT10 litre-counter terminal board
Electrical connections may be only executed after the instrument has been regularly installed on the panel
Terminal
Function
1
2
Power supply
Power supply
3
4
Signal input for DF100 probe or compatible
Vdc power supply for DF100 probe or compatible
5
6
Frequency input + for MK515 probe (red wire)
Frequency input - for MK515 probe (black wire)
7
Ground (check the instructions for connection)
8
9
NO/NC contact end-of-count relay **
C contact end-of-count relay
10
11
Pulse count relay contact
C contact pulse count relay
12
FET output PNP OUT rapid pulses
13
14
CNT10 external reset input (24Vac / +24Vdc) (50-60Hz)
CNT10 external reset input (0 Vac / 0 Vdc)
24Vac / +24Vdc (50-60Hz)
0 Vac /
0Vdc
(** settable through Jumper JP1 – check in the appendix)
Terminals 1 and 2 - CNT10 litre-counter power supply
The CNT10 litre-counter shall be supplied by applying terminals 1 and 2 a 24V direct and alternate voltage value.
If the power supply should be alternate, the 0V wire shall be connected with terminal 2. If the litre-counter is supplied by
a direct source, the positive will be applied to terminal 1 whereas the negative to terminal 2.
Before connecting the litre-counter with the power supply source, make sure that the electrical
lines are not live, i.e. that the electrical circuits are not supplied.
Before connecting the CNT10 litre-counter, make sure that the power supply sources are
compatible with those required by the instrument.
19
Terminals 2 / 3 / 4 - Connection with the CTR100 probe and compatible
Terminals 2, 3 and 4 are suitable for the connection of signals requiring no amplification. All the probes generating pulses
through blade, reed or HALL effect contacts are suitable.
Terminal 2 is the ground reference. It is also called 0V. A direct voltage value set to 8.2V is available on terminal 4 to
supply the probe.
Terminal 3 is the input for the pulse signal used to count litres. The frequency range accepted at the input is lying
between one single pulse and 500 Hz.
If the measuring probe is connected with these terminals, *Probe nA* shall be selected as a parameter.
Terminals 2 / 5 / 6 - Connection with the MK515 probe and compatible
The probes generating weak signals and, therefore, requiring amplification shall be connected with terminals 2, 5 and 6.
Terminal 2 is the ground reference. It is also called 0V. Terminals 5 and 6 are the inputs at the amplification circuit,
respectively for the positive terminal (5 – Red wire) and the negative terminal (6 – Black wire).
The frequency range accepted at the input is lying between one single pulse and 500 Hz.
If the measuring probe is connected with these terminals, *Probe A* shall be selected as a parameter.
Terminals 8 / 9 –RLK2 end-of-count relay
Terminals 8 and 9 are connected with the contact of the relay that will drop out after the end-of-count threshold has
been reached. The relay contact can be of a NO (normally open) or NC (normally closed) type according to the JP1 setup. (Check the set-up in the appendix).
RLK2 contacts have a 5 Ampere capacity at 250 V ac on a resistive load.
Note: the RLK2 relay is working in safety conditions. This means that the NO contact is in such a
condition only when the CNT10 litre-counter is supplied.
Terminals 10 / 11 –RLK1 pulse count relay
Terminals 10 and 11 are connected with the contact of the relay that will be excited whenever a litre / decalitre of liquid
is counted. The contact of the relay is of a NO type (normally open).
RLK1 contacts have a 5 Ampere capacity at 30VDC or 250VAC on a resistive load.
Terminals 12 / 13 – External reset
if you should reset the litre-counter remotely, you can apply a 24 V alternate and direct voltage value to terminals 12 and
13.
20
CNT10 litre-counter connection diagrams
The following pages show some examples for the correct connection of the CNT10 litre-counter with the logics or control
programmers by means of the MK515 or CTR100/DF100 probes.
Many other connections are possible, also depending upon specific applications not provided for by this manual.
However, we recommend you to evaluate the examples in order to understand the features of this instrument
thoroughly.
External components (e.g. zener barriers or condensers) connected between the measuring probe
and the input terminals of the instrument may cause measurement errors due to an impedance
value that is too high or unbalanced or to the presence of leak currents.
In order to avoid any interference and disturbance on signals, we recommend you to act as
follows:
Never arrange signal cables in parallel with or in the proximity of power cables or noise sources.
For the connection between the (measuring) probes and the litre-counter it is desirable to use a
shielded cable having an adequate cross section.
When you use a shielded cable, the metal braid of the shield shall be earth-connected with one
single end.
Pay attention to line resistance. If the line resistance is too high (over 20ohm wire), it may cause
some problems in reading the pulses of the probes.
All signal / power supply wires shall have the same cross section.
21
CNT10 connection with the FIP DF100 / CTR100 probe – relay contact.
FIP 100 probe (or compatible)
Probe connections
Power supply:
from 5 to 24Vdc
Current consumption: from 12 to 30 mA
Output signal: square wave from 5V to 24Vdc
CL1
CL2
CL3
SCH
22
Probe power supply
(PIN 1)
Probe pulse output
(PIN 2)
Probe power supply ground
(PIN 3)
Cable shield
CNT10 connection with the MK515 probe – relay contact
MK515 probe (George Fisher)
Power supply:
from 3 to 24Vdc
Current consumption: < 1.5mA @ 3.3 at 6Vdc
Output signal: Open collector output, 10 mA Max
Connections
CL1
CL2
CL3
SCH
Frequency signal +
Frequency signal 0V reference
Cable shield
Red CABLE
Black CABLE
Metal BRAID
23
CNT10 connection with the FIP DF100 / CTR100 probe – FET output (transistor)
If you use the rapid pulse output, (FET) connect terminal 11 with the +24 VDC power supply.
The connection diagrams on these pages are only shown by way of example. They might require
some changes on the basis of every single specific utilisation.
24
CNT10 connection with the MK515 probe – FET output (transistor)
If you use the FET signal output (terminal 12), the CNT10 litre-counter shall be only supplied by
+24Vdc.
The connection diagrams on these pages are only shown by way of example. They might require
some changes on the basis of every single specific utilisation.
25
Powering on the CNT10 litre-counter
Before powering on the CNT10 litre-counter, make sure that the wiring has been properly
executed. Make sure that the residuals of previous working cycles (small copper wires, iron chips,
etc.) will cause no short-circuit.
When you power on the litre-counter, the firmware release of the instrument will
appear on the display. An example is shown by the figure aside.
Your litre-counter might have a firmware release other than the one given by this
manual. This shall not worry the user. Termoelettronica Spa or your usual local
agent can be directly required to update the firmware.
The display will reset after only a few seconds. The litre-counter is ready for using
or setting the parameters.
Powering off the CNT10 litre-counter
To power off the litre-counter, just disconnect it. All the parameters set and counts totalled are automatically saved and
stored.
The litres counted and displayed in the basic mode are not saved.
Attention! If you power off the litre-counter, the information about the count that has not been totalled
yet will get lost.
the litres that have been counted but not added to the historical count will get lost. Press RES to add
the litres you have counted to the historical memory.
26
Main display mode
This is the basic display mode, i.e. the one by default. When the litre-counter is on,
0000 will appear on the display.
When the flow sensor is sending the litre-counter the count pulses, the display will
show the quantity of litres (x10) that have been conveyed into the pipeline. If led
X10 is on, the quantity on the display shall be multiplied X10 to get the actual
quantity.
Example:
0010 = 0010 x 10 = 100 litres
0055 = 0055 x 10 = 550 litres
0367 = 0367 x 10 = 3670 litres
If LED X10 is on, the display will show the quantity that has been counted and
expressed in DECALITRES instead of in LITRES.
To display LITRES
To display DECALITRES
Reset of the counted quantity
Press the RES button in the main display mode to reset the display indication.
Whenever you press RESet (or set to zero), the quantity shown before is added to
the memory of the historical count.
NOTE: You can also reset the present count by applying a 24 Vdc/Vca voltage value
to terminals 13/14.
27
Historical count
The “historical” count is the total amount of all the litres that have been counted
since the latest reset of the same counter.
The historical count is permanently stored by the CNT10 litre-counter.
Unlike the counts displayed in the main mode, whenever you power off the device,
quantities are not deleted, but stored.
To reset this memory, follow a definite procedure described later on.
To have access to the historical count mode, press the PRG and Arrow Dw keys at
the same time.
+
The decimal points at the bottom of the digits will indicate that the data item on the
display is the historical count.
Since the historical count is the total amount of several counts, it has been made
possible to display the data with more than four digits.
To display the digits of a greater order, just press
.
Example:
The litre-counter has totalled 802780 litres (decalitres) in the historical count.
Press PRG + Dw to have access to the
display mode of the historical count. In
doing so, the display will show 2780.
Press UP.
+
Now, the display will show E080.
80 shall be placed before the 4 digits
that have been displayed before.
The total historical count is hence 802780 decalitres or litres, depending
upon the measurement unit you have selected.
To reset the historical count, press the RES key and hold it down for
5 seconds.
28
Parameter programming mode
To have access to the parameter programming mode, press the PRG key and hold
it down for 5 seconds.
Whenever you press the PRG key, the register of settable parameters is scrolled
according to the scheme on this page.
In this menu you can select the type
of probe in use:
Probe Amplified: MK 515
Inputs 5, 6
Probe selection
Probe Not Amplified: DF 100
Inputs 2, 3, 4
The selection will occur by pressing
the arrow up or down.
In this menu you can select the
count measurement unit:
Count measurement unit
Litres
Decalitres
The selection will occur by pressing
the arrow up or down.
Division ratio
In this menu you can set up the ratio
between counted pulses and
displayed Litres (K-factor).
For further instructions see the
section - “K Factor Calibration”
The selection will occur by pressing
the arrow up or down.
Contact closure time
This parameter is intended to define
the closure time of the pulse count
relay contact (in milliseconds).
Tmin. 20msec. Tmax 150msec.
Set up by using the arrows Up or
Down
29
Probe type selection
This parameter is intended to select the type of probe:
Probe amplified of the MK515 type, two wires: red and black (and shield).
Probe not amplified of the DF100 type or compatible, three wires: +Vdc, input
signal, 0V
The two probes have different inputs. Check the connections according to the connection
diagrams in this manual and the symbols on the litre-counter terminals.
Count measurement unit
This parameter is intended to configure the measurement unit of the CNT10 litrecounter. Two measurement units are available:
Litres and Decalitres
The measurement unit can be selected at the user’s discretion. The choice of
LITRES instead of DECALITRES (1 Decalitre = 10 Litres) will depend upon the
liquid quantity to be measured.
If the average liquid quantity is lying within 9999 litres, it is advisable to select L.
If the quantity is much larger, it is advisable to switch into the display mode in
DECALITRES.
A green pilot lamp will turn on on the panel next to the X10 indication to confirm
that the display mode in DECALITRES has been selected.
If the CNT10 litre-counter should directly interface with Termoelettronica devices and
programmers, the measurement units shall be set up in Decalitres, i.e.
1 pulse = 10 litres.
This parameter can only be changed from the firmware release 1.0.6 without resetting the
present count and the historical one (check the release of your litre-counter at the time of the
power on).
30
Counted pulses / litres division ratio - K FACTOR
This parameter is intended to define the ratio between the pulses supplied by the
probe and the litres displayed.
The blades probes, such as those used on the litre-counter (MK515 or DF100),
supply a number of pulses that will vary according to several factors:
Type of probe: 4 or 5 blades
Internal diameter of the pipeline
Material of the pipeline
Probe manufacturers release the K-factor values in the documentation in order to determine the number of pulses
supplied by probes according to the number of litres that have been conveyed into the pipeline.
Pipeline Diameter
40
50
65
80
100
125
150
200
Inner Diameter
DF100 / CTR100 Probe
MK 515 Probe
45mm.
57mm.
73mm.
86mm.
111mm.
137mm.
165mm.
216mm.
327
214
129
89
50
31
21
12
239
149
91
65
39
26
18
10
The K-factor is a parameter intended to convert the frequency signal coming from the sensor into
a flow rate value. The K-factor is related to the type of sensor, the material of the pipeline and its
dimension.
Count relay closure time
The CNT10 litre-counter will enable you to vary the closure time of the pulse
count relay within well-defined limits.
This option will enable you to optimise the application of the litre-counter and the
interfacing with some electronic devices that might have slow inputs.
In other words, some PLC’s or programmers may require special times to excite the inputs.
Depending upon this, you can vary the time required to excite the relay from min. 20 milliseconds (see 2) to max. 150
milliseconds (see 15). To change the value, press the Arrow Up or Arrow Dw Keys.
If the PLC or interfacing programmer should require a rapid pulse output free of any bounce
instead of the relay output, it is advisable to use the FET output of the litre-counter.
31
SET POINT programming mode
The SET POINT programming mode will enable you to set up the end-of-count threshold of the litre-counter or after how
many litres (decalitres) of water the filling process shall stop.
To have access to the SET POINT mode, press PRG + UP.
The display will show the previous SET POINT value and start flashing on and off.
Press the
keys to reach the value you wish.
When you set up the SET POINT, you shall consider the measurement unit (x
10), Litres or Decalitres.
The valid range for the SET POINT will lie between 0 and 9999 litres or decalitres
(99999).
The end-of-count threshold value can be only set up if the present count has been reset.
If the present count is not zero (0 0 0 0), press RES to reset the count. Set up the new end-of-count
threshold.
If no key is pressed within 5 seconds, the CNT 10 litre-counter will automatically go back to the basic
display mode.
32
Summary of the CNT10 litre-counter operation modes
Main display mode
Keys
PRG
PRG + UP
PRG + DOWN
PRG + RESET
RESET (5 Sec)
Function
Press the PRG key for five seconds to have access to the Parameter
programming mode
To have access to the SET POINT programming mode
To display the total count (since the latest reset)
To restore the default data
To reset the present count and update the total count
Parameter
programming mode
Display
S_ nA
S_ _A
C_ _d
C_ _l
PXXX
O_XX
Description
To select the probe of a non amplified type (terminals 2, 3, 4)
To select the probe of an amplified type (terminals 2, 6, 5)
To display the litre-counter in Decalitres (green led X10 on)
To display the litre-counter in Litres (green led X10 off)
Numeric value of the pulse divider LITRES = (Number of Pulses) / PXXX
Count relay closure time LITRES ( 20 – 150 mS)
SET POINT programming mode (end-of-count threshold)
Display
XXXX
display flashing on
and off
Keys
PRG
UP
DOWN
Description
To display the set-point (i.e. the end-of-count threshold)
Function
Main
To increase the end-of-count threshold value
To decrease the end-of-count threshold value
Historical count display mode (total litres counted since the latest reset)
33
Display
X.X.X.X
Keys
PRG + Arrow
UP
PRG + Arrow
Dw
RES
34
Description
To display the total litres that have been counted since the latest reset
Function
Main
If pressed for at least 5 seconds, it will reset the data item (only if the present
count = 0)
Stored parameters (default)
The CNT10litre-counter is set up by default with the following parameters:
Basic menu
Sub-menu
Parameter description
0000
S
na
C
d
Type of probe not amplified
Decalitres
P 100
K-Factor set-up: 100
O 60
Relay switchover time: 60 milliseconds
35
Rapid parameter programming
This page is intended to supply a programming example of the CNT10 litre-counter:
Programming data example:
Probe Model:
Pipeline diameter:
K-factor:
CTR100 / DF100 – 5 blades
45mm.(inner)
239
Display:
Relay switchover time:
decalitres
60 milliseconds
End-of-count threshold:
15000 litres
Basic menu
Key
0000
PRG 5s
Sub-menu
Description – Variation: Arrow UP / Down
S
a
Type of probe: Amplified / Not amplified
C
d
Display: Litres / Decalitres **
PRG
PRG
P 239
K-Factor set-up: 65
O 15
Relay switchover time: 60 milliseconds
PRG
PRG
0000
PRG + DW
1.7.0.8
Historical count (example data item)
0.0.0.0
To reset the historical count data
0000
To display the end-of-count threshold (flashing on and
off)
1500
To set the threshold to 1500 Decalitres
RES 5s
PRG
0000
PRG + UP
UP
PRG
0000
If you hold down the arrow keys (up or down) for over one second, the scroll speed of the digits
will automatically increase.
36
Maintenance
The CNT10 litre-counter will require no special maintenance. However, this page is intended to give you some
instructions for cleaning.
Power off the device.
Extract the instrument from the panel where it is installed by loosening the fastening brace.
Extract the litre-counter from the plastic case.
Use a compressed air aspirator or jet (max. 2 bar) to remove any dust and dirt build-up from ventilation slits and circuits.
Avoid damaging electronic components. While performing the operation, make sure that the compressed air in use is
dried, i.e. free of any condensate.
Clean the external plastic or rubber parts by using a clean piece of cloth dampened with:
-
(pure or denaturated) ethyl alcohol
(pure or denaturated) isopropylic alcohol
water
Make sure that no terminal is loosened inside the device and that no component is either burnt or showing signs of
corrosion. If signs of corrosion should be visible inside the instrument, contact Termoelettronica Spa for any repair.
Before reinserting the instrument into its case, make sure that the device is completely dry.
Reinsert the CNT10 programmer into the panel and reconnect as required.
The device may be only repaired by specialised technicians. Improper repairs may cause
considerable hazards and dangers for the user (electrical shock, fire hazard, etc.).
37
Guide to the solution of problems
If a failure should occur, try to remove it by following the procedures described here below. If you can not remove it,
contact a Termoelettronica Spa authorised customer care centre.
Take note of the operations you have performed and of the state of the system when the error occurred. Take
note of any error message too.
Power off the CNT 10 litre-counter.
Contact your dealer or customer care centre authorised by Termoelettronica Spa.
The device may be only repaired by specialised technicians. Improper repairs may cause
considerable hazards and dangers for the user (electrical shock, fire hazard, etc.).
38
Appendix “A” – Weights and dimensions
CNT 10 side view
Mechanical sizes
Unit of
Measurement
Panel front view
CNT10 Model
Height
Width
Depth
mm.
mm.
mm.
48
48
100
Litre-counter weight
gr
200
Opening sizes
Diameter of fastening holes
mm.
mm.
49
49
Notes
39
Appendix “B” – Opening for panel drilling
The drawing for panel drilling is shown here below if you wish to install the CNT10 litre-counter on the door of a control
pulpit or electric board.
The external template reproduces the overall dimensions of the plastic case (of the CNT10 litre-counter), whereas the
internal frame is the profile of the opening to be executed on the panel.
The minimum thickness of the iron (or stainless steel) sheet is 15/10. The ideal thickness is given by the solidity and
structure of the door on which you wish to install the CNT10 litre-counter.
40
Appendix “C”– JP1 Jumper set-up
Detach the device from its supply of electricity.
Extract the instrument from the panel where it is installed by loosening the fastening brace.
Extract the litre-counter from the plastic case.
Use a pair of tweezers to move the Jumper from position 1-2 to position 2-3.
Pin
Description of the end-of-count relay state
1-2
2-3
Contact normally OPEN
Contact normally CLOSED
Replace the instrument into the plastic case
Reassemble the litre-counter as it has been installed before.
41
Appendix “D”– Connections and Probe Pinout
CTR100 FIP probe pinout
Pin
Description
1
2
3
Probe power supply – Voltage from 5 to 24 Vdc
Probe pulse output – Signal amplitude from 5 to 24Vpp
Probe power supply – 0V (GND)
MK 515 George Fisher probe pinout
Pin
Red wire
Black wire
Metal braid
42
Description
Frequency +
Frequency Cable shield
Appendix “E” –
43
Termoelettronica Spa
Via Petrarca 10
24052 – Azzano San Paolo – Bergamo
Tel. +39.035.596511 – Fax +39.035.596510
– [email protected]
www.termoelettronica.it
44