1
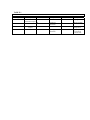
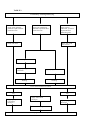
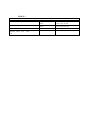
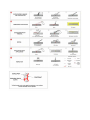
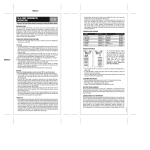
LIQUID PENETRANTS USER’S MANUAL in accordance to specifications: EN
571, ASTME 1417, AMS 2644, MIL, ASME, DIN, UNI, BS, AFNOR, etc..
The liquid penetrant examination method is an effective means for detecting and
locating quickly, economically and accurately, surface flaws such as cracks, porosities
and laps.
The dyes in penetrants are either red, visible under white light or fluorescent visible
under ultra-violet light.
In order to understand the method correctly three terms which are fundamental have to
be defined:
1. Signal: it evidences discontinuities in the materials. Some signals could be irrelevant
or false
2. Flaw: a break in the normal physical structure or configuration of a part, like, for
instance, a crack, a forging lap, a drawing groove, an inclusion or a porosity. The
existence of a discontinuity does not necessarily prevent the use of the part
3. Defect: it is a flaw which is deemed unacceptable according to the specifications
followed, because it interferes with the use of the piece
PROCEDURE
In order to make the inspection reliable and of high quality, ensuring homogenous and
reproducible results, a personalised procedure has to be drawn up.
To this purpose, please make use of the information hereinafter provided and take into
consideration Tab. 1 “Products Classification”, Tab. 2 “Procedures” and Tab. 3
“Minimum Dwell Time”. For each group of products Technical Cards (available upon
request) showing the characteristics of each product as well a “Sample “ of the
Examination Certificate have been prepared
1. SURFACE PRE-CLEANING AND PREPARATION
A proper cleaning is essential to obtain reliable indications. To detect defects the
penetrant has to leach even in a microscopic crack. It’s clear that imbedded foreign
materials such as oil, dirt, water, paint, oxide and residual matters can seal off voids
from the penetrant. The cleaning technique to be used depends on the type of the
residue.
1.1 Cold cleaning with fast evaporating solvents
ELITE BC1
Products are flammable so proper fire precautions have to be observed when
operating next to flames or other sources of ignition.
The solvent has to be sprayed over the dirty surface to such an extent that the
area to be examined is covered completely. 10/30 seconds must elapse before
cleaning the area with a cloth prior to complete evaporation of the solvent.
1.2 Hot cleaning with aqueous detergents
ELITE 20 Protective Detergent
This products works on the basis of electronic affinity so it can remove oily
residues not only from the surface but also from the inside of the cracks.
It is a neutral product suitable for every type of metals, to be used at a
temperature of 50-60 °C .
Rinsing with cold water allowing the self-drying of parts can be avoided because
eventual residues of products are compatible with penetrant liquids because it
allows the penetration and does not cause false indications.
1.3 Mechanical cleaning
To remove paint, oxidation, deposits or similar foreign matters from the surface
the use of the sandblasting, aluminium or stainless steel wire brush or grinding
could be needed. This cleaning process tends to mask discontinuities limiting the
efficacy of the penetrant.
Sandblasting through special abrasive plastic substances (Plastic Media) is a
process now approved in the aeronautical field as well because it does not alter
the finish, the surface hardness and it does not seal off possible cracks. NDT
Italiana provides different units, permanent as well as mobile, designed in view
of users’ and abrasive Plastic Media specific needs.
2. PENETRANT APPLICATION
The penetrant has to be applied to the entire surface to be inspected by adopting
whatever method assuring a complete coverage of the area under examination such
as dipping, spraying or brushing. All surfaces must be completely wet with
penetrant in order to have it drained back into discontinuities by capillary effect.
Dwell time needed to have an optimal penetration can be determined through Tab. 3
or by adopting applicable specifications.
If penetrant is applied by dipping, the piece has to be removed from the tank and left
dripping during penetration time; if necessary because the presence of blind holes or
the geometry cause the liquid to be stagnant, the piece must be dipped again in the
tank.
Liquids and surfaces temperatures must be in a range between +10°C and + 38°C.
The method with penetrants can be adopted even at a temperature out of this range if
specific procedures and/or products are used (see our relevant cards).
3. EXCESS PENETRANT REMOVAL
During checking process, a too intense washing of pieces removes the penetrant
from the discontinuities; conversely a scarcely accurate washing or a penetrant
scarcely washable leaves an excessive residue which could mask indications.
Commonly the suitability of washing is determined by visual inspection during the
operation.
When using red penetrant the removal of the visible colorant indicates the
completion of the washing phase.
When using fluorescent penetrant, the rinse has to be performed under ultra-violet
light, stopping the washing phase as soon as the basic fluorescence has been
removed.
Washing waters have to be properly conditioned before being discharged (see
relevant cards).
3.1 Water Washable Penetrants
Generally excess penetrant is removed by flushing with low-pressure water (no
more than 280 kPa) at a temperature ranging from + 10°C to + 38 °C.
3.2 Solvent Removable Penetrants
Excess solvent removable penetrants shall be removed by wiping the surface under
examination with a dry cloth or absorbent paper. Remaining traces shall be
removed with another cloth slightly moistened with a quick evaporating solvent
remover ELITE BC1.
3.3 Emulsifiers Removable Penetrants
Commonly excess post-emulsifying penetrant is removed by dipping the piece
into an emulsifier for a determined period of time and subsequently by spray
washing the area under examination or dipping it in a tank of water.
Emulsifiers recommendable to make penetrants water-soluble are classified into
two categories:
1. Lipophylic or oily products
2. Hydrophylic or aqueous products
Emulsifying time is critical; normally it ranges from 30 sec to 3 min; not only
washing time but also pressure and temperature of the water affect the
emulsifying process.
Parameters vary according to the chemical formulation of the emulsifier and in
accordance with its emulsifying characteristics.
Before applying the hydrophylic emulsifier, a pre-cleaning by dipping into water
or spraying is useful to remove most of the excess penetrant.
Final cleaning, with both emulsifying products, is to be performed by flushing
with clean water at a pressure not higher than 280 kPa and at a temperature
ranging from + 10°C to + 38°C.
4. DRYING
Surfaces have to be accurately dried before applying the developer. Drying can be
accomplished by natural evaporation in free air or accelerated by filtered forced air,
with clean and dry cloths or by warm air stream, also inside recirculation type ovens
if necessary.
In the latter case air must not exceed 71°C and the temperature of the piece has to
reach no more than 38°C.
5. WHITE DEVELOPER APPLICATION
White developer serves the function of bringing out to surface the penetrant
entrapped in the cracks after washing and spreading it over the surface to enlarge
also indications regarding the smallest discontinuities.
It evidences red indications in contrast with a white background as well as the
yellow-green ones under ultra-violet light for fluorescent penetrant.
A too long developing time could broaden too much the indication provided by the
penetrant resulting in a lack of definition. Developing time should range from 10 to
30 min. however, for some specific applications, developing time could vary. In this
case it must be defined in advance.
Developing time starts:
• After drying if a liquid developer is being used;
• After application if a dry developer is being used.
5.1 Quick evaporating developer
The white powder of the developer is suspended into a quick evaporating
solvent. Said solvent serves the function of bringing out the entrapped penetrant
from the discontinuity and speeding up drying time so that a further drying is
unnecessary. The application of two thin layers of liquid is recommended,
allowing drying time between the two applications.
Spray can or gun are the most advisable methods to create this thin layers. To
make it work properly the spray can has to be stored at a temperature not lower
than + 15°C. At lower temperature the result is a not uniform coating, a
lengthened evaporating time, dripping or entrapment risks. Shake properly the
Developer before using and, once the process has terminated, turn the spray can
up side down and continue spraying till only gas exists.
5.2 Aqueous Wet Developer
Two types of Aqueous Wet Developer are commonly in use: in one of them the
powder is suspended in water in the other one it is completely soluble in water.
Aqueous Wet Developer can be applied by dipping, brushing or spraying. Heavy
quantity of developer must be avoided because it might mask indications. Before
use, the Developer has to be shaken vigorously to restore full suspension of the
particles.
Commonly Aqueous Wet Developer is applied to the surface when it is still wet
after excess penetrant has been rinsed off. When using these types of products
dipping instead of spraying is recommendable in order to avoid a not uniform
distribution of the Developer due to residual drops of washing water.
With respect to the drying of the Developer hot air is preferable or alternatively
the pieces can be put into recirculation type ovens as previously indicated under
point 4. “Drying”.
5.3 Dry Developer
Dry Developer differentiates from Aqueous Wet Developer because of the
softness of the powder and the very low weight in spite of its great volume.
Dry Developer is blown over the surface after penetrant removal and drying. The
excess is removed by not compressed air or by shaking the piece.
Dried parts may be also dipped in a tank filled in with powder and the powder
may be applied by a soft brush.
By adhering to the surface the small particles of the Developer tend to absorb the
penetrant bringing it out from the discontinuity. Following the application
indications appear within few minutes while penetrant is absorbed by the
Developer.
6 INSPECTION
When scheduled developing time has terminated, the surface is ready to be
inspected and evaluated. The type of light used depends on the type of penetrant
used.
• White light: minimum 1000 lux intensity if a method with red penetrants is
adopted;
• Ultraviolet light with fluorescent penetrants: minimum light intensity 1000
microWatt/cm2 on the surface of the part being examined, with whiteambient light not exceeding 20 lux.
Should a new inspection of pieces already treated with penetrant liquids be
required, the Developer has to be removed first and oil must be wiped off from
the piece. The process shouldn’t be repeated more than two times. Applying
fluorescent penetrant over pieces already treated with the red ones is prohibited.
TABLE 1
1/I
2/II
PRODUCT CLASSIFICATION
Penetrant Liquid
Penetrant Removal
Type
Description
Method
Description
Fluorescent
A
Water
Penetrant Liquid
B
Lipophylic
Emulsifier
Red Penetrant
C
Solvent
Liquid
D
Hydrophylic
Emulsifier
Form
a
Developer
Description
Dry type
b
Water Soluble
c
Water
Suspension
Quickly
evaporating
solvent base
d/e
TABLE 2
Preliminary cleaning and drying
METHOD A
Apply water washable
penetrant liquid and allow
penetration time
METHOD B/D
Apply post-emulsifying
penetrant liquid and allow
penetration time
METHOD C
Apply solvent
removable penetrant
liquid and allow
penetration time
Wipe with cloth
and solvent
Wash with water
Pre-washing with water
Apply hydrophylic
emulsifier
Apply lipophylic emulsifier
Washing
Washing
Excess Penetrant Removal Check
Dry
Apply quickly
evaporating
developer
Dry
Apply water based
developer
Apply dry type
developer
Drying
Developing Time + Final Inspection
TABLE 3
Recommended Penetration Times
Form
Casting
Others
Casting
Others
All
Steel,
All
alloy
Material
Aluminium and Magnesium
Carbon Steel
Brass and bronze
Titanium,
Stainless
Austenitic alloys, Low
Steel
Penetration Time
From 5 up to 15 min.
From 5 up to 15 min.
From 5 up to 15 min.
From 10 up to 20 min.
From 5 up to 15 min.
From 10 up to 30 min.