1
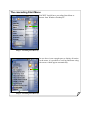
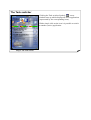
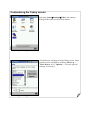
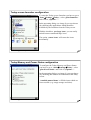
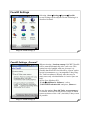
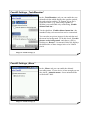
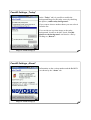
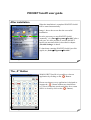
POCKET facelift user guide
After installation
When the installation is completed POCKET facelift
will be started automatically.
Image 1 shows the screen after the successful
installation.
It can be necessary to start POCKET facelift
“manually” via „StartÆProgramsÆFacelift” after a
soft reset. It is also possible to activate POCKET
facelift via autostart which is described in chapter
„Facelift Settings“ in detail.
To shut down (running) POCKET facelift just click
(again) on „StartÆProgramsÆFacelift“.
Image 1: After installation
The „X“ Button
With POCKET facelift it is possible to close an
application by clicking on the „ “ Button.
Please note that not every application is designed to
support the „ “ Button without any interference
(e.g. Excel sometimes needs much time for a restart
after it is closed by click on the „ “ Button).
Image 2: The “X” Button
The cascading Start Menu
POCKET facelift has a cascading Start Menu as
known from Windows Desktop PC.
Image 3: Cascading Start Menu (1)
In case there is not enough space to display all entries
in the menu, it is possible to scroll up and down using
the arrows which appear automatically.
Image 4: Cascading Start Menu (2)
The Task switcher
Clicking the Task switcher Symbol „ “ a new
window turns up which displays all active applications
(represented by the corresponding icons)
With a simple click on the icon it is possible to switch
to another (active) application.
Image 5: The Task switcher
Customizing the Today screen
Selecting „StartÆSettingsÆToday“ the settings
dialog for the today screen will be started.
Image 6: Settings (1)
Checked items will appear on the Today screen. Their
position can be changed by clicking „Move Up“ /
„Move Down“ or by „Options…“ for more specific
settings, if necessary.
Image 7: Settings (2)
Today screen Launcher configuration
To setup the Today screen Launcher you have to go to
„StartÆSettingsÆToday“, select „pfaceLauncher“
and click on „Options…“.
In the upcoming dialog (see image 8) you can choose
(by checking) the applications which should be
available by the Launcher from the Today screen.
With the checkbox „use large icons“ you can easily
switch between small and large icons.
The option „center icons“ will center the icons
horizontally.
Image 8: Today screen Launcher
Today Memory and Power Status configuration
To configure the Today Memory and Power Status
you have to go to „StartÆSettingsÆToday“, select
„pfacePowerStatus“ and click on „Options…“
In the upcoming dialog (see image 9) you can choose
(by checking) the status to be monitored at the today
screen.
„Autohide unused items“ will hide items which are
not accessible (e.g. empty storage card slots).
Image 9: Power status
Facelift Settings
Selecting „StartÆSettingsÆSystemÆFacelift“
several settings can be adjusted. In the following it is
described in detail.
Image 10: Facelift settings (1)
Facelift Settings „General“
When activating „Load on startup“ POCKET facelift
will be started automatically after a soft reset. This
option has to be handled with care, because it is
possible that POCKET facelift will be “frozen” under
special circumstances (e.g. incompatible Today Plugins, Task bar enhancer) directly after the start. In
many cases only a deinstallation via Active Sync can
help:
Active Sync (Desktop PC),
„ToolsÆAdd/Remove Software“, select
„NOVOSECPocketfacelift“ and press „Remove“.
In case the option „Free old Today screen memory“
is selected, POCKET facelift tries to release as much
system resources of the “old” (invisible) Today screen
as possible.
Image 11: Facelift settings (2)
Facelift Settings „Task/Menubar“
In the „Task/Menubar“ tab you can enable the new
skinned task bar which displays the speaker symbol,
the task switcher and the „X“ button. If you don’t
want this feature (e.g. when using GigaBar or
WisBar) you can disable it by unchecking „Enable
skinned task bar“.
Via the checkbox „Enable skinned menu bar“ the
standard Today screen menu bar can be customized.
You can also use private images for the task bar and
the menu bar background. To do this check „Use this
picture as the background“ and choose a file by
clicking on „Browse“. On normal (240x320) displays
the dimensions of these images have to be 240x26
pixels.
Image 12: Facelift settings (3)
Facelift Settings „Menu“
In the „Menu“ tab you can enable the skinned
cascading menu. If your device is fast enough you can
also check „Animate menus“ for an animation like
on PocketPC 2002.
Image 13: Facelift settings (4)
Facelift Settings „Today“
In the “Today” tab it is possible to enable the
background image for the today screen by checking
the option „enable today background“.
If you want to choose another theme you can select it
from the list.
You can also use a private image as the today
background. In order to do this, check „Use this
picture as the background“ and choose a file by
clicking on „Browse“.
Image 14: Facelift settings (5)
Facelift Settings „About“
Information on the version number and the Build ID
are shown by the “About” tab.
Image 15: Facelift settings (6)