1
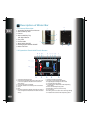
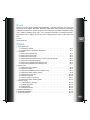
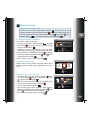
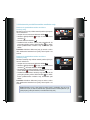
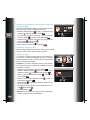
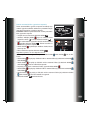
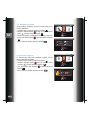
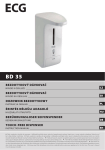
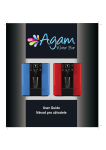
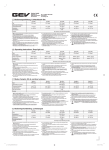
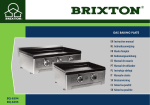
User Guide
Návod na používanie
EN User Guide . . . . . . . . . . . . . . . . . . . . . . . . . EN-1
SK Návod na používanie . . . . . . . . . . . . . . . . . SK-1
Introduction
Thank you for purchasing Agam Water Bar, the advanced home and small-office water bar.
Agam Water Bar is an innovative, user-friendly water purification solution that was designed
and developed by experts to provide you with pure, ice cold to boiling hot water with maximum
ease at all times.
We congratulate you on joining and hope you will enjoy all the features of your new, pure water
bar.
Sincerely,
Agam Water Bar
EN
Table of Contents
1. Description of Water Bar
1.1 General Overview . . . . . . . . . . . . . . . . . . . . . . . . . . . . . . . . . . . . . . . . . . . . . . . . EN-2
1.2 Operation Panel with Touch Screen. . . . . . . . . . . . . . . . . . . . . . . . . . . . . . . . . . . EN-2
2. Operation
2.1 Cold Water Dispensing . . . . . . . . . . . . . . . . . . . . . . . . . . . . . . . . . . . . . . . . . . . . EN-3
2.2 Hot Water Dispensing . . . . . . . . . . . . . . . . . . . . . . . . . . . . . . . . . . . . . . . . . . . . . EN-3
2.3 Boiling Hot Water Dispensing . . . . . . . . . . . . . . . . . . . . . . . . . . . . . . . . . . . . . . . EN-3
2.4 Hot/Boiling Water Dispensing with “Child Lock” Mode. . . . . . . . . . . . . . . . . . . . . EN-4
2.5 Room Temperature Water Dispensing. . . . . . . . . . . . . . . . . . . . . . . . . . . . . . . . . EN-4
2.6 Predefined Cold Water Dispensing . . . . . . . . . . . . . . . . . . . . . . . . . . . . . . . . . . . EN-4
2.7 Predefined Hot Water Dispensing . . . . . . . . . . . . . . . . . . . . . . . . . . . . . . . . . . . . EN-4
3. Main Menu – Settings
3.1 Setting the Clock and Date . . . . . . . . . . . . . . . . . . . . . . . . . . . . . . . . . . . . . . . . . EN-5
3.2 Setting Temperature. . . . . . . . . . . . . . . . . . . . . . . . . . . . . . . . . . . . . . . . . . . . . . . EN-5
3.3 Setting Predefined Water Quantity . . . . . . . . . . . . . . . . . . . . . . . . . . . . . . . . . . . .EN-7
3.4 Setting the Power Saving Mode. . . . . . . . . . . . . . . . . . . . . . . . . . . . . . . . . . . . . . EN-8
3.5 Setting Menu Language. . . . . . . . . . . . . . . . . . . . . . . . . . . . . . . . . . . . . . . . . . . EN-10
3.6 Ring/Beep setting. . . . . . . . . . . . . . . . . . . . . . . . . . . . . . . . . . . . . . . . . . . . . . . . EN-10
3.7 Restoring to Factory Settings. . . . . . . . . . . . . . . . . . . . . . . . . . . . . . . . . . . . . . . EN-11
3.8 Setting the Child Lock Mode . . . . . . . . . . . . . . . . . . . . . . . . . . . . . . . . . . . . . . . EN-12
4. Maintenance and Service
4.1 Replacement of Filter and UV Lamp . . . . . . . . . . . . . . . . . . . . . . . . . . . . . . . . . EN-12
4.2 Cleaning the Unit . . . . . . . . . . . . . . . . . . . . . . . . . . . . . . . . . . . . . . . . . . . . . . . . EN-13
4.3 Flushing . . . . . . . . . . . . . . . . . . . . . . . . . . . . . . . . . . . . . . . . . . . . . . . . . . . . . . . EN-13
4.4 Weekends / Vacations . . . . . . . . . . . . . . . . . . . . . . . . . . . . . . . . . . . . . . . . . . . . EN-13
5. Safety Instructions . . . . . . . . . . . . . . . . . . . . . . . . . . . . . . . . . . . . . . . . . . . . . . . . . . . EN-14
6. Technical Specification . . . . . . . . . . . . . . . . . . . . . . . . . . . . . . . . . . . . . . . . . . . . . . . . EN-16
7. Troubleshooting . . . . . . . . . . . . . . . . . . . . . . . . . . . . . . . . . . . . . . . . . . . . . . . . . . . . . EN-17
EN-1
1 Description of Water Bar
1.1 General Overview
EN
2
1
1. Operation Panel with Touch Screen
2. Removable Top Pad
3. Faucet
4. Removable Drip Tray
with Drip Collector
5. Tray Grid
6. Power Cable
4
7. Main Switch ON/OFF
8. Heating System Switch ON/OFF
9. Water Inlet Port
3
5
9
8 7
6
1.2 Operation Panel with Touch Screen
10 9
8 7
6
5
2
4 3
1
11
13
Cold water dispensing
Press any button to stop
12
14
1. Cold water dispensing button
2. Cold water temperature display (the higher the mark
is on the temperature indication bar the colder the
water will be).
3. Power saving mode is activated
4. Automatic shutdown and wake-up timer is activated
5. Clock
6. Date
7. Hot water temperature display (the higher the mark is
on the temperature indication bar the hotter the water
will be).
EN-2
15
16
17
8. “Child Lock” mode is activated
9. UV lamp is ON (flickering light display)
10. Digital display indicating the unit’s mode
11. Hot water dispensing button
12. Predefined room temperature water dispensing
button (MIX)
13. Extra hot water dispensing button
14. Back button (return to previous menu)
15. Touch screen
16. Entering main menu button and confirming settings
17. Predetermined cold/hot water dispensing button
2 Operation
2.1 Cold Water Dispensing
Place an empty cup below the water spout. To dispense
cold water, press the
button briefly. The “Cold Water
Cup” icon will appear during water dispensing. To stop water
dispensing, press any button.
Note: To set cold water quantity, please see section 3.3.
To fill bottles, pull out the tray.
2.2 Hot Water Dispensing
Place an empty cup below the water spout. To dispense hot
button briefly and then press the
water, press the
button briefly. The “Hot Water Cup” icon will appear during
water dispensing. To stop water dispensing, press any
button.
Note: To set hot water quantity, please see section 3.3.
04-04-2012 (WED) 09:15
EN
Cold water dispensing
Press any button to stop
04-04-2012 (WED) 09:15
Hot water dispensing
Press any button to stop
To meet a high level of safety and the most stringent standards, we incorporated
a safety mechanism for hot water in the water bar even when the „Child Lock”
mode is not activated –for the safety of your children. To enable hot/boiling water
dispensing, please press two buttons briefly.
2.3 Boiling Water Dispensing
Place an empty cup below the water spout. To dispense hot
water, press the
button briefly. The “Boiling. Please
wait…” notice will be displayed.
After the water temperature reaches near boiling temperature,
the “End of boiling” notice will appear on the display.
To dispense boiling water, press the
button briefly and
then press the
button. To stop water dispensing, press
any button.
Notice: the boiling limit of Agam Water Bar is up to 97 ºC
- 98 ºC.
04-04-2012 (WED) 09:15
Boiling
Please wait...
04-04-2012 (WED) 09:15
End of boiling
EN-3
2.4 Dispensing Hot/Boiling Water When „Child
Lock” Mode Is Activated
EN
When „Child Lock” mode is activated, pressing the
button
will display the „Child Lock” notice. To dispense hot/boiling
water, press the
button briefly and then hold (for about
3 seconds) the
button. To stop water dispensing, press
any button.
Notice: to set „Child Lock” mode, please see section 3.8.
2.5 Room Temperature Water Dispensing
A mix of hot water and cold water that underwent purification
by UV. Place an empty cup below the water spout. To
dispense room temperature water at predefined quantity and
temperature, press the
button briefly and the predefined
temperature and quantity will be displayed. To stop water
dispensing, press any button.
Notice: To set the quantity and temperature of room
temperature water, please see section 3.3.
2.6 Predefined Cold Water Dispensing
Place an empty cup below the water spout. To dispense
predefined quantity of cold water, press the
button briefly
and the cold water button . To stop water dispensing,
press any button.
Notice: To set the quantity of hot water, please see section
3.3.
04-04-2012 (WED) 09:15
Child Lock
Press
and then press
04-04-2012 (WED) 09:15
45 °C
Mix water
150 ml
04-04-2012 (WED) 09:15
Cup of cold water
2.7 Predefined Hot Water Dispensing
Place an empty cup below the water spout. To dispense
predefined quantity of hot water, press the
button briefly
and the hot water button . To stop water dispensing, press
any button.
Notice: To set the quantity of hot water, please see
paragraph 3.3.
EN-4
04-04-2012 (WED) 09:15
Cup of hot water
3 The Main Menu
Entering Settings Menu
To enter the settings menu press the
button. To scroll between different functions
press the
button alternately until the desired option is displayed. To set the desired
values, press the button or the
button. To confirm, press the
button. To exit
the settings menu, press the
button.
3.1 Setting Time and Date
To set the date and the time, perform the following:
• Enter the setting menu by pressing the
button. Press
the
button alternately until the calendar icon
is
displayed. To confirm, press the
button.
• The date and time setting menu will be displayed. To scroll
between data regarding date, hour, or time display format
(24 Hours - AM/PM), press the
button. To set the desired
values, press the
button or the
button. To confirm,
press the
button.
• To exit the settings menu, press the
button.
Set time and date
Date 2010 – 01 – 01
Time 08 : 00
Time Format 24 H
to choose
Use
Use
3.2 Setting Temperature
You can set the temperature for boiling, hot, cold or room
temperature water according to your preferences, as
follows:
or
to adjust
Temp
Restore
QTY
Use
to choose
Use
Setting the boiling water temperature
• Enter the settings menu by pressing the
button. Press
the
button alternately until the temperature icon
is
displayed. To confirm, press the
button.
• The temperature settings menu will be displayed. To scroll
to boiling water temperature settings, press the
button.
• To confirm, press the
button.
• To adjust the preferred temperature of boiling water
(between 85 ºC -98 ºC), press the
button or the
button. To confirm, press the
button.
• To exit the settings menu, press the
button.
EN
to confirm
Temp
98 °C
to choose
Use
Use
or
to set temp
EN-5
EN
Setting the hot water temperature
• Enter the settings menu by pressing the
button. Press
the
button alternately until the temperature icon
is
displayed. To confirm, press the
button.
• The temperature settings menu will be displayed. To scroll
button.
to hot water temperature settings, press the
• To confirm, press the
button.
• To adjust the preferred temperature of hot water (between
70ºC -96ºC), press the
button or the
button. To
confirm, press the
button.
• To exit the settings menu, press the
button.
Setting the cold water temperature
• Enter the settings menu by pressing the
button. Press
the
button alternately until the temperature icon
is
displayed. To confirm, press the
button.
• The temperature settings menu will be displayed. To scroll
to cold water temperature settings, press the
button.
• To confirm, press the
button.
• To adjust the preferred temperature of cold water (between
5 ºC -16 ºC), press the
button or the
button. To
confirm, press the
button.
• To exit the settings menu, press the
button.
Setting the mixed water temperature
(room temperature)
• Enter the settings menu by pressing the
button. Press
the
button alternately until the temperature icon
is
displayed. To confirm, press the
button.
• The temperature settings menu will be displayed. To scroll
to mixed-water settings, press the
button.
• To confirm, press the
button.
• To adjust the preferred temperature of mixed water (between
30 ºC -60 ºC), press the
button or the
button. To
confirm, press the
button.
• To exit the settings menu, press the
button.
Notice: measurement accuracy is plus/minus 1%.
EN-6
Temp
96 °C
Use
Use
to choose
or
to set temp
Temp
5 °C
to choose
Use
Use
or
to set temp
Temp
45 °C
Use
Use
to choose
or
to set temp
3.3 Setting Predefined Water Quantity
Setting predefined hot water quantity
You can set the quantity of hot water according to your
preferences, as follows:
• Enter the settings menu by pressing the
button.
• Press the
button alternately until the quantity icon
is displayed.
• To confirm, press the
button.
• To set the predefined hot water quantity, place a cup below
the water spout and press the
button. Once the desired
quantity of water is dispensed, press this button again.
Notice: Dispensed water quantity is measured in seconds of
dispensing. The default: a 200 ml cup = 10 seconds.
Setting predefined cold water quantity
You can set the quantity of cold water according to your
preferences, as follows:
• Enter the settings menu by pressing the
button.
• Press the
button alternately until the quantity icon
is
displayed. To confirm, press the
button.
• To scroll to cold water quantity settings press the
button.
To confirm, press the
button.
• To set the predefined cold water quantity, place a cup below
the water spout and press the
button. Once the desired
quantity of water is dispensed, press this button again.
Notice: Dispensed water quantity is measured in seconds of
dispensing. The default: a 200 ml cup = 10 seconds.
Qty
EN
10 S
Use
to set Qty
Qty
10 S
Use
to set Qty
Notice! The water quantity in this function may change. It is important to verify after
water dispensing that the desired quantity was dispensed (especially with regard to
food preparation for toddlers, medicine, etc.)
EN-7
EN
Setting predefined room temperature water
quantity (MIX)
The dispensed mixed water quantity will be displayed at a
quantity starting from 60 ml to 300 ml (in gaps of 20 ml).
• Press the
button alternately until the quantity icon
is
button.
displayed. To confirm, press the
• To scroll to mixed water quantity settings press the
button. To confirm, press the
button.
• To set the predefined mixed water quantity, press the
button or the
button.
• To confirm, press the
button.
• To exit the settings menu, press the
button.
Qty
150 ml
Use
or
Use
to set Qty
to confirm
3.4 Power Saving Modes
You can choose between two energy-saving modes of Agam Water Bar: The “Power-Saving”
Mode and the „Automatic Power-Down” Mode.
The “Power Saving” Mode
In the “Power Saving” mode, hot water is kept at a
temperature of 60Cº and the display light is dimmed following
a predetermined interval of 1-4 hours. To cancel the power
saving mode, press any button.
Notice: after canceling the power-saving mode, you must wait
until the hot-water temperature reaches the predetermined
temperature (an estimated time of up to 2 minutes).
• Enter the settings menu by pressing the
button.
• Press the
button alternately until the power-saving icon
is displayed. To confirm, press the
button.
• To select the power-saving mode, press the
button, and
to confirm press the
button.
• To select the activated mode ON, press the
button, and
to confirm press the
button.
• Press the
button and continue to the next line that
determines the interval.
• To select the desired interval between 1-4 hours, press the
button or the
button.
• To confirm, press the
button.
*For example: if you choose the digit 1, the unit will enter
the power-saving mode following 1 hour of its last activity.
EN-8
Power
Calendar
Replacement
to choose
Use
Use
to confirm
Power
OFF
1 hour
to choose
Use
Use
or
to adjust
Automatic Shutdown and Wake-Up Mode
The automatic shutdown and wake-up mode allows automatic
shutting down and activation of the water bar at predefined
intervals by a shutdown and wake-up timer.
Notice: Up to 3 automatic shutdown and wake-up modes
can be configured simultaneously in advance.
button.
• Enter the settings menu by pressing the
• Press the
button alternately until the power-saving icon
is displayed. To confirm, press the
button.
• To select the automatic shutdown wake-up mode, press
the
button, and to confirm press the
button. The
automatic shutdown wake-up mode will be displayed.
• Press the
button and continue to the next line that
determines the period of time.
• To exit the settings menu, press the
button.
EN
Sleeping...
Power on/off
OFF
00 : 00
00 : 00
OFF
00 : 00
00 : 00
00 : 00
00 : 00
OFF
to choose
Use
Use
or
to adjust
For example: shutdown at 21:05 and wake-up at 07:10.
After you have entered the shutdown and wake-up mode, press the
button or the
to select ON.
• Press the
button to scroll and set the hour digits (07) by pressing either the
button.
• Press the
button to scroll and set the minutes’ digits (10) by pressing either the
button. Now you have concluded setting the wake-up time.
• To scroll and set the shutdown hour, press the
button.
• Press the
button to scroll and set the hour digits (21) by pressing either the
button.
• Press the
button to scroll and set the minutes’ digits (05) by pressing either the
button. Now you have concluded setting the shutdown time.
• To conclude, press the
button.
button
or
or
or
or
EN-9
3.5 Setting the Menu Language
EN
The menu language (English, Hungarian, Slovak and Czech)
is set as follows:
• Enter the settings menu by pressing the
button.
• Press the
button alternately until the language icon
is displayed. To confirm, press the
button.
• To select English, Hungarian, Slovak or Czech, press the
button, and to confirm press the
button.
• To exit the settings menu, press the
button.
Language
Replacement
Ring
Use
to choose
Use
to confirm
English
Slovak
Hungarian
Czech
Use
to choose
Use
3.6 Ring/Beep Setting
When this option is activated, the unit will play a sound when
any button is pressed.
• Enter the settings menu by pressing the
button.
• Press the
button alternately until the ring-setting icon
is displayed. To confirm, press the
button.
• To select ON or OFF, press the
button, and to confirm
press the
button.
• To exit the settings menu, press the
button.
to confirm
Ring
Language
Use
Restore
to choose
to confirm
Use
Ring
ON
Use
Use
EN-10
OFF
to choose
to confirm
3.7 Restoring to Factory Settings
Restore Settings
The unit enables you to restore settings to default factory
settings. Restoring to factory settings will cancel all the
settings and adjustments you made. To set factory settings:
• Enter the settings menu by pressing the
button.
• Press the
button alternately until the restore-settings
icon
is displayed. To confirm, press the
button.
• To select ON, press the
button (to restore unit to default
factory settings), and press the
button.
• To exit the settings menu, press the
button.
Default factory settings:
ON
OFF
EN
Use
Use
to choose
to confirm
Function
Value
Topic
Function
Value
Temperature Hot water
96 ° C
Power-saving
modes
Power-saving
mode
Automatic shutdown & wake-up
Child-lock
Off
Off
Filter
UV lamp
Language
Key sounds
Restoring settings
Hour
Format
180 days
360 days
Hebrew
Off
Off
08:00
24 h
Topic
Predefined
quantity
Date and
hour
Boiling
98 ºC
Cold water
5 ºC
Room temp. water
60 ºC
Hot water
10 seconds
Cold water
10 seconds
Room temp. water
180 ml
Date
01/01/2010
Hour
08:00
Format
24 h
Child-lock
mode
UV/Filter
replacement
Language
Sounds
Restoring
factory
settings
Off
EN-11
3.8 Child Lock Mode
EN
Child-lock mode is designed to prevent undesired dispensing
of hot or boiling water. To dispense hot or boiling water when
child-lock mode is activated, press the
button briefly
and then hold the
button (for about 3 seconds).
To activate child-lock mode:
• Enter the settings menu by pressing the
button.
• Press the
button alternately until the child-lock icon
is displayed. To confirm, press the
button.
• To select ON (to activate the child-lock mode) or OFF
(child-lock mode is canceled), press the
button, and
then press the
button.
• To exit the settings menu, press the
button.
Child-lock
ON
Use
Use
OFF
to choose
to confirm
Child Lock
Press
and then press
4 Maintenance and Service
4.1 UV Lamp and Filter Replacement
To ensure a high quality of water it is very important to make sure
Replace to new
the filter is replaced every 6 months or 2000 liters (according to
the earliest) and to replace the UV lamp every 12 months.
10 days to replacement
• The replace filter/UV lamp notice will appear on the display 10
days prior to the required replacement date.
Use
to confirm
• Following replacement of the filter/UV lamp, the counter must Filter replacement notice
be reset.
To reset the counter:
• Enter the settings menu by pressing the
button.
Replace to new
To select parts replacement, press the
button alternately.
To confirm, press the
button.
10 days to replacement
• To select filter/UV, press the
button, and then press the
Use
to confirm
button.
UV lamp replacement notice
• To set the new filter and reset the counter, press the
Replace
button.
button.
• To exit the settings menu, press the
Filter
UV
Note: If the UV lamp is inserted incorrectly or is not in order,
water cannot be dispensed.
Note: instructions on how to replace the filter and the UV lamp
Use
to choose
are enclosed in the packaging of the products upon replacement
to confirm
Use
or in our website: www.agamwater.com.
EN-12
4.2 Cleaning the Water Bar
To clean the unit and the upper pad, use only a damp cloth dipped in lukewarm water. To clean
the touch screen, use a dry cloth.
Do not clean the water bar with detergents, solvents or devices which may damage the surface
of the unit (i.e. steel brushes, scourers).
PLEASE NOTE!
The unit is connected to the electric power supply. Do not spill water or wet the back of the unit
with water or any other liquid.
Emptying the water container every couple of days is recommended.
EN
4.3 Flushing the unit
Our products were delivered to your homes after having undergone rigorous quality tests. In the
first few days following installation of the unit, the water may taste like „new” water. The more
the unit dispenses water, the faster the flavor will disappear.
Flushing the hot water container:
Place a container with minimum capacity of 3 liters below the water spout. Press the
button briefly and then the
button. Wait until the hot-water dispensing is completed (about
one minute). Repeat this action.
Flushing the cold water container:
Place a container with minimum capacity of 3 liters below the water spout. Press the
button briefly and then the
button. Wait until the cold-water dispensing is completed (about
one minute). Repeat this action.
4.4 Weekends / Vacations
For safety reasons, if you do not intend to use the water bar for one day or more, the unit must
be disconnected from power supply by removing the power plug from the socket and closing
the water supply tap for the water bar. After you have reactivated the water bar, you must wash
the containers as specified in section 4.
EN-13
5 Safety Instructions
• Installation of the appliance must be performed by company service personnel.
EN
• Prior to plugging the water bar to the electrical grid, please check and verify that the operating
voltage imprinted on the water dispenser matches the national grid voltage: 230V~50Hz.
• Connect the water bar only to a standard grounded electrical socket with a 10 ampere fuse.
• It is recommended not to connect the water bar to the electrical grid via an extension cord or
socket splitter (heating up and fire hazard).
• For increased safety, it is recommended to connect the water bar to a power line that is
protected against electrocution by an earth leakage current breaker (circuit breaker) with a
leakage current of 30mA.
• Do not use the water bar if the plug or the water bar is flawed or if the water bar fell or leaks.
• Check the power cable regularly to ensure it is not damaged.
• In the event of damage to the power cable/feeding fuse, it must be replaced to prevent a
hazard. Its replacement must be performed by certified company service personnel.
• The water bar is not designed for use by individuals (including children) with physical, mental,
or cognitive disabilities, or by people without experience and knowledge, unless they are
supervised by an adult who is responsible for their safety.
• Please supervise children to ensure they do not play or handle the water bar.
• According to Ministry of Health guidelines, water given to babies under one-year-old must be
boiled (100 ºC).
• Please note! Water is dispensed by the water bar from two different spouts. To dispense water
to a bottle with a narrow spout, please use a funnel or dispense the water first to a jar with a
wide spout.
• This water bar dispenses hot water at a very high temperature, which may cause severe
burns. Therefore, it is recommended to activate the „Child Lock” mode to prevent children
from using it without adult supervision.
• In the event of publication of guidelines of the Ministry of Health or the water authorities in the
media regarding the boiling of drinking water, the water dispensed from the water bar must
be boiled.
• After the health hazard has been resolved, it is recommended to replace the filter.
• To avoid flooding hazard and water damages, do not move the water bar from its position
without closing the water-supply faucet and emptying the water container first.
• Water may drip from the surplus water pipe to release pressure. Therefore, this pipe must be
open to the air.
EN-14
• Maintenance and service of the water bar must be performed by certified company service
personnel.
• To ensure the quality of the dispensed water, maintenance of the unit requires use of the
company’s original spare parts/disposable parts only.
EN
• The company disclaims any liability for failure and/or fault and/or damages that result from use
of non-original spare parts.
• It is recommended that people with health problems consult a physician before they use the
unit.
• This unit is designed for treatment of drinking water that is supplied from the water-supply
network only.
• Please note! As in any electrical appliance, it is important to keep a gap of approximately 10
cm between the back of the appliance and the wall in order to enable ventilation and cooling of
the unit. If the unit is installed in a built-in space, please make sure that the following minimum
dimensions are maintained: height – 37 cm; depth – 50 cm; and width – 36 cm.
EN-15
6 Technical Specification
Electricity
EN
• Voltage
• Frequency
• Cooling Power
Consumption
• Heating Power
Consumption
• Current Consumption
Purification
230V
50 Hz
138 watts
• UV Lamp
11 watts
• Activated Carbon Filter 2 micron
• Chlorine reduction
(group 1, 75%)
1500 watts
Water Supply
7.5 A
Heating System
• Tank Volume
• Hot Water Output*
• Frequency of cup
dispensing
1.4 liters
80 cups/hour,
16 liters, heating
temperature range of
92 ºC - 96 ºC
40 seconds
Cooling System
• Tank Volume
• Cold Water Output**
• Frequency of cup
dispensing
1.7 liters
40 cups/hour, 8 liters,
at a temperature
range of 5 ºC- 16 ºC
80 seconds
• Minimum water inlet
pressure
• Maximum water inlet
pressure
• Ratio of inlet and
dispensed water
1.5 bar
6 bar
1:1
Unit Sizes
• Width
• Depth
• Height
• Weight
30 cm
37 cm
34 cm
14 kg
* Water output capacity is measured with the temperature of the water in the water system being no less than 16 ºC.
** Water output capacity is measured at a room temperature that is no greater than 25 ºC with the temperature of the
water in the water system being no greater than 22 ºC.
The unit’s performance was tested under controlled laboratory conditions. Under ordinary conditions of use, performance
of the unit may change in accordance with ambient conditions. The unit reduces the following substances: chlorine
group 1,75% minimum, bacterial purifier 2 micron filtration. The unit reduces the bacterial load in water. Maximum
operation temperature: 32 ºC.
EN-16
7 Troubleshooting
Our products were delivered to your home after undergoing stringent quality tests.
Before you schedule a visit by a technician, please consult the following table to ensure that you
are experiencing a system fault, and not a problem with electricity or water supply.
Fault
Possible Cause
Solution
No water flow
Water bar is not plugged to the electric
power
Verify the water bar is plugged to the
electric power
Water bar is not connected to the main
water supply
Check the connection to your watersupply systems
There is a water stoppage
Check other taps for water flow
Faulty electrical socket
Plug another appliance to the socket to
check whether it is operating properly
Filter is missing/installed incorrectly
Verify correct installation of filter
Water Leakage
UV lamp is missing/installed incorrectly
Verify correct installation of UV lamp
Faulty connection of main pipe
Verify correct connection
Leakage inside the water bar
Close the water inlet port, disconnect the
water bar from the power supply, and
schedule a visit by a technician
Drip collector is full
Empty the drip collector
Water dispensed upon
pressing the „Hot Water”
button is not hot
Heating switch is not turned on
Verify the heating switch at the back of the
water bar is turned on
Excessive hot-water use
Wait approx. 3 minutes and try again
Water is not dispensed
when pressing the „Hot
Water” button
Filter is missing/installed incorrectly
Verify correct installation of filter
UV lamp is missing/installed incorrectly
Verify correct installation of UV lamp
Water bar is in „Hot Water Safety” mode
Please see hot water dispensing mode on
section 2.2
Water bar is in „Child Lock” mode
Please see „Child Lock” mode on section
3.8
The water bar is in power saving Mode
Wait approx. 2 minutes until unit reaches
operating temperature
Water dispensed upon
pressing the „Cold Water”
button is not cold
Cold water temperature setting is too
high
Please see cold water temperature setting
Excessive cold-water use
Wait approx. 10 minutes and try again
Water is not dispensed
when pressing the „Cold
Water” button
UV lamp is missing/installed incorrectly
Verify correct installation of UV lamp
Filter is missing/installed incorrectly
Verify correct installation of filter
„New” flavor
New water bar
Run flushing to the cold and hot water
tanks section 4.3)
Water bar has not been used for a long
time
Replace the filter and run flushing
The filter was not replaced on schedule
Replace the filter and run flushing
EN
EN-17
EN
Dear Customer,
Congratulations on joining our family. From today onwards, you are in store for a treat – the new
water experience of Agam Water Bar. It is our pleasure to offer you not only perfect water quality
but perfect service with various service offerings for your convenience.
Agam Water Baroffers the following benefits:
• Agam Water Bar includes a UV (Ultra Violet) lamp that purifies water by exterminating
pathogenic bacteria following filtration. The UV lamp must be replaced once a year due to
reduced intensity of exterminating bacteria.
• Agam Water Bar includes a filter that contains active charcoal, which absorbs chlorine and
organic substances, while preventing odors and aftertastes, thereby ensuring the ongoing
high-quality of water dispensed by Agam Water Bar. The lifecycle of the filter is 6 months.
Afterwards, its use may impair the water quality. Therefore, it must be replaced every six
months or 2000 liters (according to the earliest) from the date of its installation.
We are certain you have selected us to provide your family with the best experience. For this
reason, it is important to replace the lamp and the filter on time thereby ensuring limitless
healthy and tasty water.
For your convenience, please choose one of our service and warranty packages – we will
remind you of upcoming replacements and send you the products. All service packages include
unique discounts, warranty and VIP service.
To join one of our service packages or ask any question you might have, please visit our
website: www.agamwater.com.
Agam Water Bar
www.agamwater.com
EN-18
Úvod
Ďakujeme, že ste si kúpili zariadenie Agam Water Bar – pokrokový dávkovač vody určený pre
domácnosti alebo menšie kancelárie. Dávkovač Agam Water Bar je inovatívne, jednoducho
ovládateľné zariadenie na čistenie vody, ktoré bolo navrhnuté a vyvinuté na dodávanie čistej
vody s teplotou od ľadovej až po vriacu, a to s maximálnou ľahkosťou a za každých okolností.
Blahoželáme Vám a dúfame, že si budete užívať všetky prednosti svojho nového dávkovača
vody.
S úctou,
Agam Water Bar
SK
Obsah
1. Popis dávkovača
1.1 Všeobecný náhľad . . . . . . . . . . . . . . . . . . . . . . . . . . . . . . . . . . . . . . . . . . . . . . . . SK-2
1.2 Ovládací panel s dotykovou obrazovkou . . . . . . . . . . . . . . . . . . . . . . . . . . . . . . . SK-2
2. Prevádzka
2.1 Dávkovanie studenej vody. . . . . . . . . . . . . . . . . . . . . . . . . . . . . . . . . . . . . . . . . . SK-3
2.2 Dávkovanie horúcej vody. . . . . . . . . . . . . . . . . . . . . . . . . . . . . . . . . . . . . . . . . . . SK-3
2.3 Dávkovanie vriacej vody . . . . . . . . . . . . . . . . . . . . . . . . . . . . . . . . . . . . . . . . . . . SK-3
2.4 Dávkovanie horúcej/vriacej vody s režimom „detskej poistky“. . . . . . . . . . . . . . . SK-4
2.5 Dávkovanie vody izbovej teploty . . . . . . . . . . . . . . . . . . . . . . . . . . . . . . . . . . . . . SK-4
2.6 Dávkovanie preddefinovanej studenej vody . . . . . . . . . . . . . . . . . . . . . . . . . . . . SK-4
2.7 Dávkovanie preddefinovanej horúcej vody . . . . . . . . . . . . . . . . . . . . . . . . . . . . . SK-4
3. Hlavné menu
3.1 Nastavenie času a dátumu . . . . . . . . . . . . . . . . . . . . . . . . . . . . . . . . . . . . . . . . . SK-5
3.2 Nastavenie teploty . . . . . . . . . . . . . . . . . . . . . . . . . . . . . . . . . . . . . . . . . . . . . . . . SK-5
3.3 Nastavenie preddefinovaného množstva vody . . . . . . . . . . . . . . . . . . . . . . . . . . .SK-7
3.4 Nastavenie režimu úspory energie . . . . . . . . . . . . . . . . . . . . . . . . . . . . . . . . . . . SK-8
3.5 Nastavenie jazyka menu . . . . . . . . . . . . . . . . . . . . . . . . . . . . . . . . . . . . . . . . . . SK-10
3.6 Nastavenie pípania . . . . . . . . . . . . . . . . . . . . . . . . . . . . . . . . . . . . . . . . . . . . . . SK-10
3.7 Obnova nastavení zo závodu . . . . . . . . . . . . . . . . . . . . . . . . . . . . . . . . . . . . . . SK-11
3.8 Nastavenie režimu detskej poistky . . . . . . . . . . . . . . . . . . . . . . . . . . . . . . . . . . SK-12
4. Údržba a servis
4.1 Výmena filtra a UV lampy . . . . . . . . . . . . . . . . . . . . . . . . . . . . . . . . . . . . . . . . . SK-12
4.2 Čistenie zariadenia . . . . . . . . . . . . . . . . . . . . . . . . . . . . . . . . . . . . . . . . . . . . . . SK-13
4.3 Prepláchnutie. . . . . . . . . . . . . . . . . . . . . . . . . . . . . . . . . . . . . . . . . . . . . . . . . . . SK-13
4.4 Víkendy/Dovolenky . . . . . . . . . . . . . . . . . . . . . . . . . . . . . . . . . . . . . . . . . . . . . . SK-13
5. Bezpečnostné pokyny . . . . . . . . . . . . . . . . . . . . . . . . . . . . . . . . . . . . . . . . . . . . . . . . SK-14
6. Technická špecifikácia . . . . . . . . . . . . . . . . . . . . . . . . . . . . . . . . . . . . . . . . . . . . . . . . SK-16
7. Riešenie problémov . . . . . . . . . . . . . . . . . . . . . . . . . . . . . . . . . . . . . . . . . . . . . . . . . . SK-17
SK-1
1 Popis dávkovača vody
1.1 Všeobecný náhľad
SK
2
1
1. Riadiaci panel s dotykovou
obrazovkou
2. Vyberateľná horná podložka
3. Tryska
4. Sklápacia odkvapová miska
s vaničkou
5. Tácka
4
6. Silový kábel
7. Dvojpolohový hlavný vypínač
8. Dvojpolohový vypínač systému ohrevu
9. Port na prívod vody
3
5
9
8 7
6
1.2 Ovládací panel s dotykovou obrazovkou
10 9
8 7
6
5
2
4 3
1
11
13
Dávkujem studenú vodu
Na zastavenie stlačte
akékoľvek tlačidlo
12
14
1. Tlačidlo na dávkovanie studenej vody
2. Zobrazenie teploty studenej vody (čím bude indikátor na stĺpci snímača teploty vyššie, tým bude voda
studenšia).
3. Režim úspory energie je aktivovaný
4. Časovač automatického vypnutia a zapnutia je
aktivovaný
5. Čas
6. Dátum
7. Zobrazenie teploty horúcej vody (čím bude indikátor na
stĺpci snímača teploty vyššie, tým bude voda teplejšia).
8. „Detská poistka“ je aktivovaná
SK-2
15
16
17
9. UV lampa je ZAPNUTÁ (blikajúce svetlo)
10. Digitálne zobrazenie uvádzajúce režim jednotky
11. Tlačidlo na dávkovanie horúcej vody
12. Tlačidlo na dávkovanie vody s preddefinovanou
izbovou teplotou (MIX)
13. Tlačidlo na dávkovanie extra horúcej vody
14. Späť (tlačidlo na návrat do predchádzajúceho menu)
15. Dotyková obrazovka
16. Tlačidlo na vstup do hlavného menu a potvrdenie
nastavení
17. Tlačidlo na dávkovanie prednastavenej studenej/
horúcej vody
2 Prevádzka
2.1 Dávkovanie studenej vody
Pod trysku položte prázdny pohár. Dávkovanie vody spustíte
krátkym stlačením tlačidla . Počas dávkovania sa zobrazí
ikona „Pohára so studenou vodou“. Ak chcete dávkovanie
vody zastaviť, stlačte akékoľvek tlačidlo.
Poznámka: Nastavenie množstva studenej vody je popísané
v kapitole 3.3.
Ak chcete naplniť fľašu, vyberte tácku.
2.2 Dávkovanie horúcej vody
Pod trysku položte prázdny pohár. Dávkovanie vody spustíte
krátkym stlačením tlačidla
a potom krátkym stlačením tlačidla . Počas dávkovania sa zobrazí ikona „Pohára
s teplou vodou“. Ak chcete dávkovanie vody zastaviť, stlačte
akékoľvek tlačidlo.
Poznámka: Nastavenie množstva studenej vody je popísané
v kapitole 3.3.
04-04-2012 (PIA) 09:15
Dávkujem studenú vodu
Na zastavenie stlačte
akékoľvek tlačidlo
SK
04-04-2012 (PIA) 09:15
Dávkujem horúcu vodu
Na zastavenie stlačte
akékoľvek tlačidlo
Aby sme zabezpečili vysokú bezpečnosť a dodržali tie najprísnejšie normy,
zabudovali sme do dávkovača v prípade horúcej vody bezpečnostný mechanizmus, aj keď nie je aktivovaná „Detská poistka“ – pre bezpečnosť vašich detí. Aby
ste umožnili dávkovanie horúcej/vriacej vody, krátko stlačte dve tlačidlá.
2.3 Dávkovanie vriacej vody
Pod trysku položte prázdny pohár. Dávkovanie horúcej
vody spustíte krátkym stlačením tlačidla
. Zobrazí sa
oznam „Zohrievam. Čakajte prosím...“.
Keď teplota vody dosiahne takmer teplotu varu, na displeji
sa zobrazí správa „Koniec zohrievania“.
Na dávkovanie vriacej vody krátko stlačte tlačidlo
a potom stlačte tlačidlo . Na zastavenie dávkovania vody
stlačte akékoľvek tlačidlo.
Poznámka: hranica varu dávkovača Agam WAter Bar dosahuje teplotu až 97 ºC - 98 ºC.
04-04-2012 (PIA) 09:15
Zohrievam
Čakajte prosím...
04-04-2012 (PIA) 09:15
Koniec zohrievania
SK-3
2.4 Dávkovanie horúcej/vriacej vody, keď je
aktivovaný režim „Detskej poistky“
SK
Ak je aktivovaná „Detská poistka“, po stlačení tlačidla
sa zobrazí správa „Detská poistka“. Na dávkovanie horúcej/
vriacej vody krátko stlačte tlačidlo
a potom podržte
. Na zastavenie dávkovania vody
(asi 3 sekundy) tlačidlo
stlačte akékoľvek tlačidlo.
Poznámka: Nastavenie režimu „Detskej poistky“ je popísané v kapitole 3.8.
04-04-2012 (PIA) 09:15
Detská poistka
Stlačte
a potom stlačte
04-04-2012 (PIA) 09:15
2.5 Dávkovanie vody izbovej teploty
Zmes horúcej a studenej vody, ktorá prešla čistením UV žiarením. Pod trysku položte prázdny pohár. Dávkovanie vody
izbovej teploty v preddefinovanom množstve a s preddefinovanou teplotou spustíte krátkym stlačením tlačidla
;
zobrazí sa preddefinovaná teplota a množstvo. Dávkovanie
vody zastavíte stlačením akékoľvek tlačidla
Poznámka: Nastavenie množstva a teploty vody izbovej
teploty je popísané v kapitole 3.3.
45 °C
Zmiešaná voda
150 ml
04-04-2012 (PIA) 09:15
2.6 Dávkovanie prednastavenej studenej vody
Pod trysku položte prázdny pohár. Dávkovanie prednastaveného množstva studenej vody spustíte krátkym stlačením
tlačidla
a tlačidla studenej vody . Dávkovanie vody zastavíte stlačením akéhokoľvek tlačidla.
Poznámka: Nastavenie množstva horúcej vody je popísané
v kapitole 3.3.
2.7 Dávkovanie prednastavenej horúcej vody
Pod trysku položte prázdny pohár. Dávkovanie prednastaveného množstva horúcej vody spustíte krátkym stlačením
tlačidla
a tlačidla horúcej vody . Dávkovanie vody zastavíte stlačením akéhokoľvek tlačidla.
Poznámka: Nastavenie množstva horúcej vody je popísané
v kapitole 3.3.
SK-4
Pohár studenej vody
04-04-2012 (PIA) 09:15
Pohár horúcej vody
3 Hlavné menu
Vstup do hlavného menu
Do hlavného menu môžete vstúpiť stlačením tlačidla
. Medzi rôznymi funkciami
môžete prechádzať striedavým tlačením tlačidla
až kým sa nezobrazí požadovaná
možnosť. Požadované hodnoty nastavíte stlačením tlačidla alebo tlačidla . Voľbu
potvrdíte tlačidlom
. Menu nastavení opustíte stlačením tlačidla
.
3.1 Nastavenie času a dátumu
Čas a dátum nastavíte nasledovne:
• Otvorte menu nastavení stlačením tlačidla
. Striedavo
tlačte tlačidlo
až kým sa nezobrazí ikona kalendára .
Voľbu potvrďte tlačidlom
.
• Zobrazí sa menu nastavenia dátumu a času. Na pohyb
medzi údajmi o dátume, hodine alebo formáte zobrazenia
času (24-hodinový - AM/PM) stlačte tlačidlo . Požadované hodnoty nastavíte stlačením tlačidla alebo . Voľbu
potvrdíte stlačením tlačidla
.
• Menu nastavení opustíte stlačením tlačidla
.
Nastaviť čas a dátum
Dátum 2010 – 01 – 01
Čas
08 : 00
Formát času 24 H
vybrať
alebo
nastaviť hodnoty
Teplota
3.2 Nastavenie teploty
Teplotu vriacej, horúcej, studenej vody alebo izbovú teplotu
môžete nastavovať podľa svojich požiadaviek, a to nasledovne:
SK
Obnoviť
MNOŽSTVO
vybrať
potvrdiť
Nastavenie teploty vriacej vody
• Vstúpte do menu nastavení stlačením tlačidla
. Striedavo tlačte tlačidlo
až kým sa nezobrazí ikona teploty
. Potvrďte stlačením tlačidla
.
• Zobrazí sa menu nastavenia teploty. Na nastavenie teploty
vriacej vody sa dostanete pomocou tlačidla .
• Potvrďte voľbu stlačením tlačidla
.
• Teplotu vriacej vody môžete upravovať podľa vlastných
preferencií (medzi 85 ºC -98 ºC) stlačením tlačidla
alebo
tlačidla . Voľbu potvrdíte stlačením tlačidla
.
• Menu nastavení opustíte stlačením tlačidla
.
Teplota
98 °C
vybrať
alebo
nastaviť teplotu
SK-5
SK
Nastavenie teploty horúcej vody
• Vstúpte do menu nastavení stlačením tlačidla
. Striedavo tlačte tlačidlo
až kým sa nezobrazí ikona teploty
. Potvrďte stlačením tlačidla
.
• Zobrazí sa menu nastavenia teploty. Na nastavenie teploty
horúcej vody sa dostanete pomocou tlačidla .
• Potvrďte voľbu stlačením tlačidla
.
• Teplotu horúcej vody môžete upravovať podľa vlastných
preferencií (medzi 70 ºC -96 ºC) stlačením tlačidla alebo
tlačidla . Voľbu potvrdíte stlačením tlačidla
.
• Menu nastavení opustíte stlačením tlačidla
.
Nastavenie teploty studenej vody
• Vstúpte do menu nastavení stlačením tlačidla
. Striedavo tlačte tlačidlo
až kým sa nezobrazí ikona teploty
. Potvrďte stlačením tlačidla
.
• Zobrazí sa menu nastavenia teploty. Na nastavenie teploty
studenej vody sa dostanete pomocou tlačidla .
• Potvrďte voľbu stlačením tlačidla
.
• Teplotu studenej vody môžete upravovať podľa vlastných
preferencií (medzi 5 ºC -16 ºC) stlačením tlačidla
alebo
tlačidla . Voľbu potvrdíte stlačením tlačidla
.
• Menu nastavení opustíte stlačením tlačidla
.
Nastavenie teploty zmiešanej vody
(izbová teplota)
• Vstúpte do menu nastavení stlačením tlačidla
. Striedavo tlačte tlačidlo
až kým sa nezobrazí ikona teploty
. Potvrďte stlačením tlačidla
.
• Zobrazí sa menu nastavenia teploty. Na nastavenie teploty
zmiešanej vody sa dostanete pomocou tlačidla .
• Potvrďte voľbu stlačením tlačidla
.
• Teplotu zmiešanej vody môžete upravovať podľa vlastných
preferencií (medzi 30 ºC -60 ºC) stlačením tlačidla alebo
tlačidla . Voľbu potvrdíte stlačením tlačidla
.
• Menu nastavení opustíte stlačením tlačidla
.
Poznámka: presnosť merania je plus/mínus 1%.
SK-6
Teplota
96 °C
vybrať
alebo
nastaviť teplotu
Teplota
5 °C
vybrať
alebo
nastaviť teplotu
Teplota
45 °C
vybrať
alebo
nastaviť teplotu
3.3 Nastavenie preddefinovaného množstva vody
Nastavenie preddefinovaného množstva
horúcej vody
Množstvo horúcej vody môžete nastaviť podľa svojich preferencií nasledovne:
.
• Vstúpte do menu nastavení stlačením tlačidla
• Striedavo stláčajte tlačidlo
až kým sa nezobrazí ikona
množstva .
• Potvrďte stlačením tlačidla
.
• Preddefinované množstvo horúcej vody nastavíte tak, že
pod trysku položíte pohár a stlačíte tlačidlo . Po nadávkovaní požadovaného množstva vody toto tlačidlo opäť
stlačte.
Poznámka: Množstvo dávkovanej vody je merané v sekundách dávkovania. Nastavenie od výroby: 200 ml pohár = 10
sekúnd.
Nastavenie preddefinovaného množstva
studenej vody
Množstvo studenej vody môžete nastaviť podľa svojich preferencií nasledovne:
• Vstúpte do menu nastavení stlačením tlačidla
.
• Striedavo stláčajte tlačidlo
až kým sa nezobrazí ikona
množstva . Potvrďte stlačením tlačidla
.
• Na nastavenia množstva studenej vody sa dostanete stlačením tlačidla . Potvrďte stlačením tlačidla
.
• Preddefinované množstvo studenej vody nastavíte tak, že
pod trysku položíte pohár a stlačíte tlačidlo . Po nadávkovaní požadovaného množstva vody toto tlačidlo opäť
stlačte.
Poznámka: Množstvo dávkovanej vody sa meria v sekundách dávkovania. Nastavenie od výroby: 200 ml pohár = 10
sekúnd.
Množstvo
10 S
SK
nastaviť množstvo
Množstvo
10 S
nastaviť množstvo
Pozor! Množstvo vody v tejto funkcii sa môže zmeniť. Je dôležité, aby ste po nadávkovaní overili, či došlo k nadávkovaniu požadovaného množstva (hlavne v prípade prípravy jedla pre batoľatá, na medicínske účely atď.)
SK-7
SK
Nastavenie preddefinovaného množstva vody izbovej teploty (MIX)
Množstvo nadávkovanej zmiešanej vody sa zobrazí v množstve od 60 ml do 300 ml (v odstupoch po 20 ml).
• Striedavo stláčajte tlačidlo
až kým sa nezobrazí ikona
.
množstva . Potvrďte stlačením tlačidla
• Na nastavenia množstva zmiešanej vody sa dostanete
stlačením tlačidla . Potvrďte stlačením tlačidla
.
• Preddefinované množstvo zmiešanej vody nastavíte stlačením tlačidla
alebo tlačidla .
• Potvrďte stlačením tlačidla
.
• Menu nastavení opustíte stlačením tlačidla
.
Množstvo
150 ml
alebo
nastaviť množstvo
potvrdiť
3.4 Režimy úspory energie
Dávkovač Agam Water Bar ponúka dva režimy úspory energie:
„Úsporný“ režim a režim „Automatického vypnutia“.
„Úsporný“ režim
V „Úspornom“ režime sa teplota horúcej vody udržiava na
úrovni 60°C a podsvietenie displeja stmavne po uplynutí
prednastaveného intervalu 1-4 hodín. Úsporný režim zrušíte
stlačením akéhokoľvek tlačidla.
Poznámka: po zrušení úsporného režimu musíte počkať,
kým teplota horúcej vody nedosiahne preddefinovanú teplotu (približne 2 minúty).
• Vstúpte do menu nastavení stlačením tlačidla
.
• Striedavo stláčajte tlačidlo
, kým sa nezobrazí ikona
úsporného režimu
. Potvrďte stlačením tlačidla
.
• Úsporný režim zvolíte stlačením tlačidla ; potvrďte stlačením tlačidla
.
• Aktiváciu režimu zvolíte stlačením tlačidla
a voľbu potvrďte stlačením tlačidla
.
• Stlačte tlačidlo
a pokračujte k ďalšiemu riadku, kde sa
stanovuje interval.
• Požadovaný interval od 1 do 4 hodín zvolíte stlačením tlačidla
alebo tlačidla .
• Potvrďte tlačidlom
.
*Napríklad: ak zvolíte číslicu 1, úsporný režim sa aktivuje po
1 hodine od poslednej činnosti zariadenia.
SK-8
Napájanie
Kalendár
Výmena
vybrať
potvrdiť
Napájanie
VYP
1 hodina
vybrať
alebo
nastaviť
Režim automatického vypnutia a zapnutia
Režim automatického vypnutia a zapnutia umožňuje automatické vypnutie a aktiváciu dávkovača v preddefinovaných
intervaloch časovačom vypnutia a zapnutia.
Poznámka: Môžete vopred nastaviť až 3 režimy automatického vypnutia a zapnutia.
.
• Vstúpte do menu nastavení stlačením tlačidla
• Striedavo stláčajte tlačidlo
, kým sa nezobrazí ikona
úsporného režimu
. Potvrďte stlačením tlačidla
.
• Režim automatického vypnutia a zapnutia zvolíte tlačidlom
; potvrďte stlačením tlačidla
. Zobrazí sa režim automatického vypnutia a zapnutia.
• Stlačte tlačidlo
a pokračujte k ďalšiemu riadku, kde sa
stanovuje čas.
• Menu nastavenia opustíte stlačením tlačidla
.
SK
Spím...
Napájanie zap/vyp
VYP
00 : 00
00 : 00
VYP
00 : 00
00 : 00
00 : 00
00 : 00
VYP
vybrať
alebo
nastaviť
Napríklad: vypnutie o 21:05 a zapnutie o 07:10.
Keď vstúpite do režimu vypnutia a zapnutia, stlačte tlačidlo
alebo tlačidlo , čím ho ZAPnete.
• Stlačte tlačidlo
na pohyb po čísliciach hodín a nastavte číslice (07) stlačením buď tlačidla
alebo tlačidla .
• Stlačte tlačidlo
na pohyb po čísliciach minút a nastavte číslice (10) stlačením tlačidla
alebo tlačidla . Teraz ste nastavili čas zapnutia.
• Na pohyb po čísliciach a nastavenie hodiny vypnutia stlačte tlačidlo .
na pohyb po čísliciach hodín a nastavte číslice (21) stlačením buď tlačidla
• Stlačte tlačidlo
alebo tlačidla .
• Stlačte tlačidlo
na pohyb po čísliciach minút a nastavte číslice (05) stlačením tlačidla
alebo tlačidla . Teraz ste nastavili čas vypnutia.
• Stlačením tlačidla
operáciu ukončíte.
SK-9
3.5 Nastavenie jazyka
SK
Jazyk (anglický, maďarský, slovenský a český jazyk) sa nastavuje nasledovne:
• Vstúpte to menu nastavení stlačením tlačidla
.
• Striedavo stláčajte tlačidlo
až kým sa nezobrazí ikona
.
jazyka . Potvrďte stlačením tlačidla
• Na výber anglického, maďarského, slovenského alebo českého jazyka stlačte tlačidlo
a potvrďte stlačením tlačidla
.
• Menu nastavení opustíte stlačením tlačidla
.
Jazyk
Výmena
Pípanie
vybrať
potvrdiť
Jazyk
English
Slovak
Hungarian
Czech
vybrať
potvrdiť
3.6 Nastavenie pípania
Po aktivácii tejto voľby bude zariadenie vydávať zvuk pri
stlačení akéhokoľvek tlačidla.
• Vstúpte to menu nastavení stlačením tlačidla
.
• Striedavo stláčajte tlačidlo
, kým sa nezobrazí ikona
zvončeka . Potvrďte stlačením tlačidla
.
• VYP alebo ZAP zvolíte tlačidlom
a potvrďte stlačením
tlačidla
.
• Menu nastavení opustíte stlačením tlačidla
.
Pípanie
Jazyk
Obnoviť
vybrať
potvrdiť
Pípanie
ZAP
vybrať
potvrdiť
SK-10
VYP
3.7 Obnova nastavení zo závodu
Obnoviť nastavenia
Zariadenie umožňuje obnovu nastavení zo závodu. Obnovením nastavení zo závodu zrušíte všetky vami vykonané
nastavenia a zmeny. Nastavenia zo závodu nastavíte nasledovne:
.
• Vstúpte to menu nastavení stlačením tlačidla
• Striedavo stláčajte tlačidlo , kým sa nezobrazí ikona obnovy nastavení . Potvrďte stlačením tlačidla
.
• ZAP zvolíte tlačidlom
(obnova nastavení zo závodu)
a stlačte tlačidlo
.
• Menu nastavení opustíte stlačením tlačidla
.
Obnova nastavení zo závodu:
Téma
Teplota
Preddefinované
množstvo
Dátum a čas
ZAP
VYP
vybrať
SK
potvrdiť
Funkcia
Hodnota
Téma
Funkcia
Úsporné
režimy
Úsporný režim
Vyp
Automatické
vypnutie
a zapnutie
Vyp
Režim detskej
poistky
Detská poistka
Vyp
Výmena UV
lampy/filtra
Filter
180 dní
UV lampa
360 dní
Jazyk
Jazyk
Hebrejčina
Zvuky
Zvuky tlačidiel
Vyp
Obnova
nastavení zo
závodu:
Obnova
nastavení
Vyp
Čas
08:00
Formát
24 h
Horúca voda
96 ° C
Vriaca
98 ºC
Studená voda
5 ºC
Voda izbovej
teploty
60 ºC
Horúca voda
10 sekúnd
Studená voda
10 sekúnd
Voda izbovej
teploty
180 ml
Dátum
01/01/2010
Čas
08:00
Formát
24 h
Hodnota
SK-11
3.8 Režim detskej poistky
SK
Úlohou režimu detskej poistky je ochrana pred neželaným
dávkovaním horúcej alebo vriacej vody. Horúcu alebo
vriacu vodu pri aktivovanom režime detskej poistky nadávkujete krátkym stlačením tlačidla
a podržaním
tlačidla
(po dobu asi 3 sekúnd).
Režim detskej poistky aktivujete nasledovne:
• Vstúpte do menu nastavení stlačením tlačidla
.
• Striedavo stláčajte tlačidlo , až kým sa nezobrazí ikona
detskej poistky
. Potvrďte stlačením tlačidla
.
• ZAP (aktivácia režimu detskej poistky) alebo VYP (deaktivácia režimu detskej poistky) sa volí stlačením tlačidla .
Voľbu potvrďte stlačením tlačidla
.
• Menu nastavení opustíte stlačením tlačidla
.
4 Údržba a servis
Detská poistka
ZAP
VYP
vybrať
potvrdiť
Detská poistka
Stlačte
a potom stlačte
Vymeniť
4.1 Výmena UV lampy a filtra
Pre zaistenie vysokej kvality vody je dôležité filter vymieňať
každých 6 mesiacov alebo po 2000 litroch (podľa toho, čo nastane skôr) a vymieňať UV lampu každých 12 mesiacov.
• 10 dní pred požadovaným dátumom výmeny sa na displeji
zobrazí správa o potrebe výmeny filtra/UV lampy.
• Po výmene filtra/UV lampy je potrebné resetovať počítadlo.
Počítadlo sa resetuje nasledovne:
• Vstúpte do menu nastavení stlačením tlačidla
.
Pre voľbu výmeny dielov striedavo stláčajte tlačidlo . Potvrďte stlačením tlačidla
.
• Filter/UV lampu zvolíte stlačením tlačidla , potom stlačte tlačidlo
.
• Na nastavenie nového filtra a resetovanie počítadla stlačte tlačidlo
.
• Menu nastavení opustíte stlačením tlačidla
.
Poznámka: Ak sa UV lampa vloží nesprávne alebo nie je v poriadku, vodu nebude možné nadávkovať.
Poznámka: pokyny na výmenu filtra a UV lampy sú pripojené
k baleniu produktov na výmenu alebo na našej stránke:
www.agam.sk.
SK-12
Vymeniť za nový
10 dní do výmeny
potvrdiť
Správa o potrebe výmeny filtra
Vymeniť
Vymeniť za nový
10 dní do výmeny
potvrdiť
Správa o potrebe výmeny UV lampy
Vymeniť
Filtra
UV
vybrať
potvrdiť
4.2 Čistenie dávkovača vody
Zariadenie a hornú podložku umývajte len vlhkou tkaninou namočenou vo vlažnej vode.
Dotykovú obrazovku čistite suchou utierkou.
Dávkovač nečistite umývacími prostriedkami, rozpúšťadlami alebo zariadeniami, ktoré môžu
poškodiť povrch zariadenia (t.j. oceľovými kefami, čističmi).
POZOR!
Zariadenie je pripojené na prívod elektrickej energie. Chráňte zadnú časť zariadenia pred
vodou alebo akoukoľvek inou tekutinou.
Odporúčame pravidelné vyprázdňovanie zásobníka vody po pár dňoch.
SK
4.3 Prepláchnutie zariadenia
Naše produkty boli dodané do Vašich domovov až keď prešli prísnymi kvalitatívnymi skúškami.
Počas prvých pár dní po nainštalovaní zariadenia môže voda chutiť ako „nová“ voda. Čím viac
vody zariadenie nadávkuje, tým rýchlejšie táto pachuť zmizne.
Prepláchnutie zásobníka horúcej vody:
Pod trysku umiestnite zásobník s minimálnou kapacitou 3 litrov. Krátko stlačte tlačidlo
a potom tlačidlo
. Počkajte až do ukončenia dávkovania horúcej vody (približne jednu
minútu). Zopakujte túto operáciu.
Prepláchnutie zásobníka studenej vody:
Pod trysku umiestnite zásobník s minimálnou kapacitou 3 litrov. Krátko stlačte tlačidlo
a potom tlačidlo
. Počkajte až do ukončenia dávkovania studenej vody (približne jednu
minútu). Zopakujte túto operáciu.
4.4 Víkendy/Dovolenky
Ak dávkovač neplánujete používať jeden alebo viac dní, z bezpečnostných dôvodov ho vypojte
z prívodu elektrickej energie vytiahnutím zástrčky zo zásuvky a zatvorením prívodu vody. Po
reaktivácii dávkovača umyte zásobníky tak, ako je to popísané v kapitole 4.
SK-13
5 Bezpečnostné pokyny
• Zariadenie môže inštalovať len servisný personál spoločnosti.
• Pred zapojením dávkovača do elektrickej siete skontrolujte a overte, či je prevádzkové napätie
uvedené na dávkovači vody zhodné s národnou napäťovou sústavou: 230V~50Hz.
SK
• Dávkovač zapojte len do štandardne uzemnenej elektrickej zásuvky s 10 ampérovou
poistkou.
• Odporúčame nezapájať dávkovač do elektrickej siete cez predlžovací kábel alebo rozdvojku
(prehriatie a nebezpečenstvo požiaru).
• Z dôvodov zvýšenej bezpečnosti odporúčame zapojiť dávkovač do vedenia, ktoré je chránené
proti smrti elektrickým prúdom ochranným ističom (poistkou) so zvodovým prúdom 30mA.
• Nepoužívajte dávkovač, ak je na zástrčke alebo dávkovači vada alebo ak dávkovač spadol
alebo má netesnosti.
• Pravidelne kontrolujte silový kábel a ubezpečte sa, že nie je poškodený.
• V prípade poškodenia silového kábla/poistky napájania sa tento musí vymeniť, aby sa predišlo
nebezpečenstvu. Kábel môže vymeniť len oprávnený servisný personál spoločnosti.
• Dávkovač nie je určený na použitie osobami (vrátane detí) s telesným, mentálnym alebo
kognitívnym postihnutím alebo osobami bez skúseností a vedomostí bez dozoru dospelej
osoby, ktorá je zodpovedná za ich bezpečnosť.
• Dávajte pozor, aby sa s dávkovačom nehrali deti a aby ním nemanipulovali.
• Podľa odporúčaní Ministerstva zdravotníctva musí voda servírovaná deťom pod jeden rok
prejsť varom (100°C).
• Pozor! Voda sa z dávkovača dávkuje z dvoch rôznych trysiek. Na dávkovanie vody do fľaše
úzkou tryskou použite lievik alebo vodu nadávkujte najprv do pohára širokou tryskou.
• Tento dávkovač vody dávkuje horúcu vodu pri veľmi vysokej teplote, čo môže spôsobiť
vážne popáleniny. Preto odporúčame aktivovať režim „Detskej poistky“, čím zabránite deťom
používať dávkovač bez dozoru dospelou osobou.
• V prípade publikácie usmernenia Ministerstva zdravotníctva alebo vodární v médiách ohľadne
prevárania pitnej vody bude nutné vodu nadávkovanú z dávkovača prevariť.
• Po vyriešení zdravotného rizika odporúčame výmenu filtra.
• Aby ste sa vyhli nebezpečenstvu vytopenia a škôd spôsobených vodou, nepresúvajte
dávkovač bez toho, aby ste najprv zatvorili prívod vody a vyprázdnili zásobník na vodu.
• Z trubky na prebytočnú vodu môže kvôli uvoľneniu tlaku kvapkať voda. Táto trubka musí byť
preto vyvedená na vzduch.
SK-14
• Údržbu a servis dávkovača môže vykonávať len oprávnený servisný personál spoločnosti.
• Za účelom zaistenia kvality dávkovanej vody si údržba zariadenia vyžaduje používanie
originálnych náhradných dielov/jednorazových dielov.
• Spoločnosť nebude niesť žiadnu zodpovednosť za poruchu, chybu alebo škody, vyplývajúce
z použitia neoriginálnych náhradných dielov.
• Osobám so zdravotnými problémami odporúčame pred použitím zariadenia konzultáciu
s lekárom.
SK
• Toto zariadenie je určené na úpravu pitnej vody dodávanej len z vodovodnej siete.
• Pozor! Tak ako v prípade akéhokoľvek elektrického zariadenia je dôležité, aby ste medzi
zadnou časťou zariadenia a stenou zachovali približne 10 cm medzeru, čím umožníte
ventiláciu a chladenie zariadenia. Ak sa zariadenie nainštaluje v zabudovanom priestore,
zabezpečte dodržanie nasledovných minimálnych rozmerov: výška – 37 cm; hĺbka – 50 cm;
a šírka – 36 cm.
SK-15
6 Technická špecifikácia
Elektrina
SK
• Napätie
• Frekvencia
• Spotreba energie
pri chladení
• Spotreba energie pri
ohrievaní
• Spotreba prúdu
Čistenie
230V
50 Hz
138 watt
1500 watt
7,5 A
Ohrev
• Objem zásobníka
• Produkcia horúcej
vody*
• Frekvencia
dávkovania
1,4 litrov
80 pohárov/hodina,
16 litrov pri rozpätí
teplôt 92 ºC - 96 ºC
40 sekúnd
Chladenie
• Objem zásobníka
• Produkcia studenej
vody**
1,7 litrov
40 pohárov/hodina, 8
litrov pri rozpätí teplôt
5 ºC- 16 ºC
• Frekvencia
dávkovania
80 sekúnd
• UV Lampa
• Filter s aktívnym
uhlíkom
• Redukcia chlóru
11 watt
2 mikrón
(skupina 1, 75%)
Dodávka vody
• Minimálny vstupný tlak 1,5 bar
vody
• Maximálny vstupný
6 bar
tlak vody
• Pomer vstupnej
1:1
a dávkovanej vody
Rozmery zariadenia
• Šírka
• Hĺbka
• Výška
• Hmotnosť
30 cm
37 cm
34 cm
14 kg
* Výkonnosť sa meria pri teplote vody v systéme dosahujúcej minimálne 16 ºC.
** Výkonnosť sa meria pri izbovej teplote dosahujúcej maximálne 25 ºC s teplotou vody v systéme dosahujúcou
maximálne 22 ºC.
Výkon zariadenia sa testoval v kontrolovaných laboratórnych podmienkach. V bežných podmienkach používania sa
môže výkon zariadenia meniť v súlade s podmienkami prostredia. Zariadenie znižuje obsah nasledovných látok: chlór
skupiny 1,75% minimum, bakteriálne čistenie 2 mikrónová filtrácia. Zariadenie znižuje bakteriálne zaťaženie vo vode.
Maximálna prevádzková teplota: 32 ºC.
SK-16
7 Riešenie problémov
Naše produkty boli dodané do vašich domácností po tom, ako prešli prísnymi kvalitatívnymi
testami. Pred zavolaním technika nahliadnite do nasledovnej tabuľky, aby ste sa ubezpečili, že
čelíte systémovej chybe a nie problému s elektrickou energiou alebo dodávkou vody.
Vada
Možná príčina
Riešenie
Voda nepriteká
Dávkovač nie je zapojený do elektrickej siete
Skontrolujte, či je dávkovač zapojený do
elektrickej siete
SK
Dávkovač nie je zapojený do hlavného prívodu Skontrolujte pripojenie na vodovodný
vody
systém
Únik vody
Došlo k výpadku dodávky vody
Skontrolujte, či z ostatných kohútikov tečie
voda
Chybná elektrická zásuvka
Zapojte do zásuvky iné zariadenie, aby ste
skontrolovali, či funguje riadne
Chýba filter/Filter je nainštalovaný nesprávne
Skontrolujte, či je filter inštalovaný správne
Chýba UV lampa/UV lampa je nainštalovaná
nesprávne
Skontrolujte, či je UV lampa inštalovaná
správne
Nesprávne zapojenie hlavného potrubia
Skontrolujte správne zapojenie
Únik vo vnútri dávkovača
Zatvorte prívodný port, odpojte dávkovač
z elektrickej siete a zavolajte technika
Odkvapová miska je plná
Voda nadávkovaná Spínač ohrevu nie je zapnutý
po stlačení tlačidla
„Horúca voda“ nie je Nadmerné používanie horúcej vody
horúca
Po stlačení tlačidla
„Horúca voda“ nedošlo k nadávkovaniu vody
Vyprázdnite odkvapovú misku
Skontrolujte, či je spínač ohrevu v zadnej
časti zariadenia zapnutý
Počkajte približne 3 minúty a skúste znovu
Chýba filter/Filter je nainštalovaný nesprávne
Skontrolujte, či je filter inštalovaný správne
Chýba UV lampa/UV lampa je nainštalovaná
nesprávne
Skontrolujte, či je UV lampa inštalovaná
správne
Dávkovač je v režime „Bezpečnosť horúcej
vody“
Pozri režim dávkovania horúcej vody v
kapitole 2.2
Dávkovač je v režime „Detskej poistky“
Pozri režim „Detskej poistky“ v kapitole 3.8
Dávkovač je v úspornom režime
Počkajte približne 2 minúty, kým zariadenie
nedosiahne prevádzkovú teplotu
Voda nadávkovaná
po stlačení tlačidla
„Studená voda“ nie
je studená
Nastavenie teploty studenej vody je príliš
vysoké
Pozri nastavenie teploty studenej vody
Nadmerné používanie studenej vody
Počkajte približne 10 minút a skúste znova
Po stlačení tlačidla
„Studená voda“
nedošlo k nadávkovaniu vody
Chýba UV lampa/UV lampa je nainštalovaná
nesprávne
Skontrolujte, či je UV lampa inštalovaná
správne
Chýba filter/Filter je nainštalovaný nesprávne
Skontrolujte, či je filter inštalovaný správne
„Nová“ pachuť
Nový dávkovač
Prepláchnite zásobníky studenej a horúcej
vody – kapitola 4.3)
Dávkovač sa dlho nepoužíval
Vymeňte filter a prepláchnite zásobníky
Filter nebol vymenený včas
Vymeňte filter a prepláchnite zásobníky
SK-17
Vážený zákazník,
blahoželáme, že ste sa pripojili k našej rodine. Od dnešného dňa máte novú radosť – nový
zážitok z vody so zariadením Agam Water Bar. Je pre nás potešením, že Vám môžeme
ponúknuť nielen perfektnú kvalitu vody, ale aj perfektný servis s rôznymi ponukami služieb
podľa vašich preferencií.
SK
Zariadenie Agam Water Bar Vám prináša nasledovné výhody:
• Zariadenie Agam Water Bar obsahuje UV (ultrafialovú) lampu, ktorá čistí vodu vyhubením
patogénnych baktérií po filtrácii. UV lampu je nutné vymieňať raz za rok kvôli zníženej intenzite
hubenia baktérií.
• Zariadenie Agam Water Bar obsahuje filter, ktorý obsahuje aktívny uhlík, ktorý absorbuje
chlór a organické látky a zamedzuje pachom a pachutiam, čím zabezpečuje trvalo vysokú
kvalitu vody dávkovanej zariadením Agam Water Bar. Životnosť filtra je 6 mesiacov. Po tomto
období môže jeho pretrvávajúce používanie znižovať kvalitu vody. Z toho dôvodu je nutné ho
vymieňať každých šesť mesiacov alebo po nadávkovaní 2000 litrov (podľa toho, čo nastane
skôr) od dátumu jeho inštalácie.
Vieme, že ste si naše zariadenie vybrali preto, aby ste svojej rodine dali len to najlepšie. Z toho
dôvodu je dôležité, aby ste lampu a filter vymieňali včas, čím zabezpečíte trvalo zdravú a chutnú
vodu.
Pre svoje pohodlie si môžete zvoliť jeden z našich servisných a záručných balíkov – my Vám
budeme pripomínať blížiace sa termíny výmeny dielov a odošleme vám potrebné produkty.
Všetky servisné balíky zahrnujú jedinečné zľavy, záruku a VIP služby.
Ak si chcete vybrať jeden z našich servisných balíkov alebo máte nejaké otázky navštívte našu
www stránku: www.agam.sk
Agam Water Bar
www.agam.sk
SK-18
www.agamwater.com
www.agam.sk