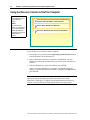
1
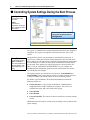
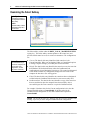
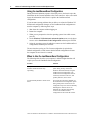
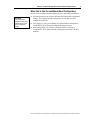
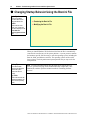
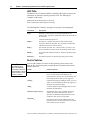
Contents Module 4: Troubleshooting the Boot Process and Other System Issues Overview 1 Multimedia: Examining the Windows XP Professional Boot Process 2 Controlling System Settings During the Boot Process 4 Changing Startup Behavior Using the Boot.ini File 10 Using Advanced Boot Options to Troubleshoot Startup Problems 16 Using the Recovery Console to Start the Computer 19 Lab 4A: Troubleshooting The Boot Process 24 Restoring the Computer to a Previous State 25 Review 30 Information in this document, including URL and other Internet Web site references, is subject to change without notice. Unless otherwise noted, the example companies, organizations, products, domain names, e-mail addresses, logos, people, places, and events depicted herein are fictitious, and no association with any real company, organization, product, domain name, e-mail address, logo, person, places or events is intended or should be inferred. Complying with all applicable copyright laws is the responsibility of the user. Without limiting the rights under copyright, no part of this document may be reproduced, stored in or introduced into a retrieval system, or transmitted in any form or by any means (electronic, mechanical, photocopying, recording, or otherwise), or for any purpose, without the express written permission of Microsoft Corporation. Microsoft may have patents, patent applications, trademarks, copyrights, or other intellectual property rights covering subject matter in this document. Except as expressly provided in any written license agreement from Microsoft, the furnishing of this document does not give you any license to these patents, trademarks, copyrights, or other intellectual property. 2001 Microsoft Corporation. All rights reserved. Microsoft, BackOffice, MS-DOS, Windows, Windows NT, Active Directory, ActiveX, BackOffice, DirectX are either registered trademarks or trademarks of Microsoft Corporation in the U.S.A. and/or other countries. The names of actual companies and products mentioned herein may be the trademarks of their respective owners. BETA MATERIALS FOR MICROSOFT CERTIFIED TRAINER PREPARATION PURPOSES ONLY Module 4: Troubleshooting the Boot Process and Other System Issues iii Instructor Notes Presentation: 60 Minutes Labs: 45 Minutes This module provides students with the knowledge and skills necessary to diagnose problems with the Microsoft® Windows® XP Professional boot process, and correct those problems. It also provides them with the skills to return the computer to a previous state by using the System Restore tool or Automated System Recovery (ASR). After completing this module, students will be able to: !" Describe a normal boot process. !" Control system settings during the boot process. !" Change the boot sequence by modifying the Boot.ini file. !" Use advanced boot options. !" Use the recovery console to start a computer. !" Restore the computer to a previous state by using System Restore or ASR. BETA MATERIALS FOR MICROSOFT CERTIFIED TRAINER PREPARATION PURPOSES ONLY iv Module 4: Troubleshooting the Boot Process and Other System Issues Materials and Preparation This section provides the materials and preparation tasks that you need to teach this module. Required Materials To teach this module, you need the following materials: !" Microsoft PowerPoint® file 2272A_04.ppt !" Multimedia file entitled “Examining the Windows XP Professional Boot Process” Preparation Tasks To prepare for this module, you should: !" Read all of the materials for this module. !" Complete the labs. !" View the multimedia file, anticipate student questions, and prepare answers. !" Prepare a few questions for students to answer while viewing the multimedia. !" Prepare for Automated System Recovery, and create ASR disks so that you can demonstrate the recovery process. BETA MATERIALS FOR MICROSOFT CERTIFIED TRAINER PREPARATION PURPOSES ONLY Module 4: Troubleshooting the Boot Process and Other System Issues v Multimedia Presentation This section provides multimedia presentation procedures that do not fit in the margin notes or are not appropriate for the student notes. Examining the Windows XP Professional Boot Process !" To prepare for the multimedia presentation 1. Watch the multimedia presentation several times, anticipate student questions, and prepare answers. 2. Prepare a few questions for students to answer while watching the video. 3. Review the module content carefully, and note any information in the video that is prerequisite information. BETA MATERIALS FOR MICROSOFT CERTIFIED TRAINER PREPARATION PURPOSES ONLY vi Module 4: Troubleshooting the Boot Process and Other System Issues Module Strategy Use the following strategy to present this module: !" Examining the Windows XP Professional Boot Process This section consists of a multimedia presentation. Prepare for the multimedia as directed. Have students view the multimedia, and let them know that the information in the video contains foundational knowledge that the students must understand to complete the rest of the module. !" Controlling System Settings During the Boot Process In this section, open the registry and explain the control sets. Next, display the Select subkey, and explain how the configuration in the key points to specific control sets. Finally, thoroughly explain when the LastKnownGood configuration is updated and when it is used. Provide students with several startup scenarios, and ask them to explain how each scenario would affect the LastKnownGood configuration. Next, demonstrate how to use the LastKnownGood configuration on the instructor’s computer. Finally, discuss when to use, and when not to use, the LastKnownGood configuration. !" Changing Startup Behavior Using the Boot.ini File Some of the information in this section is also presented in the multimedia presentation. However, do not omit information in this section before ensuring that students understand all of the material. First, present the slide and explain that the graphics on the slide represent the Advance RISC Computing (ARC) paths. Next, ask the students to explain the relationship between the Boot.ini file and the ARC paths in the slide. If the students can explain the relationship and the components of the Boot.ini file, then move on to the next topic. Next, teach in detail the information on the Boot.ini file switches, because this information was not included in the multimedia presentation. Finally, demonstrate how to modify settings in the Boot.ini file by using options in Control Panel. !" Using Advanced Boot Options to Troubleshoot Startup Problems First, present the information on starting the computer in safe mode. Explain the differences between the three safe mode options. Next, restart the instructor computer, and demonstrate how to find the Advanced Boot Options. Use the table on the page to describe the function of each option, and the circumstances under which to each option. BETA MATERIALS FOR MICROSOFT CERTIFIED TRAINER PREPARATION PURPOSES ONLY Module 4: Troubleshooting the Boot Process and Other System Issues !" vii Using the Recovery Console to Start the Computer First, emphasize that the Recovery Console is a powerful tool that can help recover a failed operating system, but if used incorrectly it can also damage the operating system. Explain that Advanced Boot Options and the LastKnownGood configuration are options that should be tried before using the Recovery Console. Next, explain the tasks that can be accomplished by using the Recovery Console, and that the Recovery Console can be installed for later use, or run from the product CD when needed. Next, if you have not already installed it, you can demonstrate how to install the Recovery Console, or how to run it from the product CD. Start the Recovery Console; demonstrate how to enter the administrator’s password, and how to run a command. Using the tip in the student materials have students find the Recovery Console commands in Help, describe the functions of commands, and share an example of when a particular command might be used. Finally, discuss the common reasons for using the Recovery Console, and relate the reasons to the students’ examples, if possible. !" Lab A: Troubleshooting the Boot Process In this lab, students will install and use the Recovery Console, and use Advanced Boot Options to solve startup problems. !" Restoring the Computer to a Previous State This section presents System Restore and Automated System Recovery (ASR) as two ways to restore the computer to a previous state, and describes these options in detail. This section also mentions the LastKnownGood configuration and Driver Rollback as additional ways to return the computer to a previous state, and refers students to the modules in the course where information about these options is discussed in detail. Ensure that students understand that all four methods return the computer to a previous state. Next, demonstrate the System Restore process by creating a restore point, making a configuration change, and then reverting to the restore point. Next, discuss how to use the ASR process to restore the computer to a previous point. Emphasize that System Restore will keep changes to user data and system settings, while the ASR process will not. Finally, present the best practices on which restoration tool to use under particular circumstances. BETA MATERIALS FOR MICROSOFT CERTIFIED TRAINER PREPARATION PURPOSES ONLY viii Module 4: Troubleshooting the Boot Process and Other System Issues Customization Information This section identifies the lab setup requirements for a module and the configuration changes that occur on student computers during the labs. This information is provided to assist you in replicating or customizing Training and Certification courseware. Lab Setup There are no lab setup requirements that affect replication or customization. Lab Results There are no configuration changes on student computers that affect replication or customization. BETA MATERIALS FOR MICROSOFT CERTIFIED TRAINER PREPARATION PURPOSES ONLY Module 4: Troubleshooting the Boot Process and Other System Issues 1 Overview Topic Objective To provide an overview of the module topics and objectives. Lead-in In this module, you will learn about troubleshooting the boot process, and resolving other startup problems. ! Examining the Windows XP Professional Boot Process ! Controlling System Settings During the Boot Process ! Changing Startup Behavior Using the Boot.ini File ! Using Advanced Boot Options to Troubleshoot Startup Problems ! Using the Recovery Console to Start the Computer ! Restoring the Computer to a Previous State When a computer is turned on, it performs a very complex startup process in the background, which is commonly known as the boot process. It is possible for the boot process to fail. To overcome such failures, it is essential that you understand the components of the boot process for Microsoft® Windows® XP Professional. This understanding will enable you to address problems when the computer will not start properly. Other problems, such as bad or missing drivers, can also cause startup problems. System restoration tools such as Driver Rollback, System Restore, and Automated System Recovery (ASR) help you to solve these problems quickly and easily. The techniques presented in this module can help you to address a degradation in computer performance, as well as help to start an unresponsive computer After completing this module, you will be able to: !" Describe a normal boot process. !" Control system settings during the boot process. !" Change startup behavior by modifying the Boot.ini file. !" Use advanced boot options. !" Use the recovery console to start a computer. !" Restore the computer to a previous state by using System Restore or Automated System Recovery. BETA MATERIALS FOR MICROSOFT CERTIFIED TRAINER PREPARATION PURPOSES ONLY 2 Module 4: Troubleshooting the Boot Process and Other System Issues Multimedia: Examining the Windows XP Professional Boot Process Topic Objective To introduce the animation. Lead-in This animation contains detailed information about the Windows XP Professional boot process. This information will is crucial to the other topics in this module. The Microsoft Windows XP Professional Boot Process: 1. The Pre-Boot Sequence 2. The Boot Sequence a. Initial Boot Loader Phase b. Operating System Selection Phase c. Hardware Detection Phase d. Configuration Selection Phase 3. Kernel Load Sequence 4. Kernel Initiation Sequence a. Hardware Key Is Created b. Clone Control Set Is Created c. Device Drivers Are Loaded and Initialized d. Services Are Started 5. Logon Sequence BETA MATERIALS FOR MICROSOFT CERTIFIED TRAINER PREPARATION PURPOSES ONLY Module 4: Troubleshooting the Boot Process and Other System Issues 3 The following files are used during the boot process. File name Location Boot sequence used Ntldr.exe System partition root directory Preboot and Boot Boot.ini System partition root directory Boot Bootsect.dos System partition root directory Boot (optional) Ntdetect.com System partition root directory Boot Ntoskrnl.exe Systemroot\System32 Kernel Load Ntbootdd.sys* System partition root directory Preboot (used only when using a small computer system interface (SCSI) controller) Hal.dll Systemroot\System32 Kernel Load System Systemroot\System32\Config Kernel Initialization Device Drivers (*.sys) Systemroot\System32\Drivers Kernel Initialization The string systemroot (typed as %systemroot%) is a placeholder for the folder in the boot partition that contains the Windows XP Professional system files. * Ntbootdd.sys is the first SCSI driver file, renamed and copied to the system partition BETA MATERIALS FOR MICROSOFT CERTIFIED TRAINER PREPARATION PURPOSES ONLY 4 Module 4: Troubleshooting the Boot Process and Other System Issues # Controlling System Settings During the Boot Process Topic Objective To describe how control sets function. Lead-in Control sets and configurations can help you start a computer that cannot otherwise start. !!Examining Examining the the Select Select Subkey Subkey the LastKnownGood !!Using Using the LastKnownGood Configuration Configuration The registry is a database that contains information about how your computer is configured. The registry is arranged in a hierarchical structure of keys and subkeys. Delivery Tip Open the registry by using regedit, and display the control sets. Explain that if a folder (key) appears under another folder (key), it is a subkey. During the boot process, system settings are determined by control sets. A control set is a subkey that contains system information, such as which device drivers and services to load and start, and defines the dependencies among those services and devices. Pointers to each control set determine when the control sets are used. These pointers are called configurations, and are stored in the HKEY_LOCAL_MACHINE\SYSTEM\SELECT key. For example, the LastKnownGood configuration points to the last control set that was used to successfully start the computer. The registry contains, at a minimum, two control sets: ControlSet001 and ControlSet002. There is more than one control set so that a backup control set is always available if the default control set does not function properly. By default, a typical Windows XP Professional installation contains the following control sets: !" CloneControlSet. A copy of either the Default or LastKnownGood configuration that is used to initialize the computer. The clone is not available after logon, and is not visible in the registry. !" ControlSet001. !" ControlSet002. !" CurrentControlSet. The control set that was used for the currently running session. Additional control sets may be created when you change or have problems with system settings. BETA MATERIALS FOR MICROSOFT CERTIFIED TRAINER PREPARATION PURPOSES ONLY Module 4: Troubleshooting the Boot Process and Other System Issues 5 To edit registry keys, you can use the Registry Editor. To gain access to the Registry Editor, click Start, click Run, and then type regedit. Caution You should not edit the registry unless necessary. If you edit the registry incorrectly, your computer may not function properly. BETA MATERIALS FOR MICROSOFT CERTIFIED TRAINER PREPARATION PURPOSES ONLY 6 Module 4: Troubleshooting the Boot Process and Other System Issues Examining the Select Subkey Topic Objective To explain the functions of the configurations within the Select subkey. Lead-in The Select subkey contains configurations that point to the control sets. The Select subkey resides under the HKEY_LOCAL_MACHINE\SYSTEM registry key. The Select subkey contains pointers to the control sets, and specifies which control set to use in various circumstances. The configurations are: Delivery Tip Move to the Select key on the instructor computer, and point out each of the configurations, and how they point to control sets. !" Current. The data for this entry identifies which control set is the CurrentControlSet. When you use Registry Editor or Control Panel options to change computer settings, you modify the CurrentControlSet. !" Default. The data for this entry identifies the control set to use the next time that Windows XP Professional starts, unless the LastKnownGood configuration is selected during the boot process. The control set designated as the default contains any configuration changes that were made to the computer the last time a user was logged on. !" Failed. The data for this entry identifies the control set that was designated as failed when the LastKnownGood control set was most recently used. !" LastKnownGood. The data for this entry identifies a copy of the control set that was used the last time the computer started successfully. After a successful logon, the Clone control set is copied to LastKnownGood. For example, if the data value for the Current configuration is 0x1, then the CurrentControlSet points to ControlSet001. If the data value for the LastKnownGood configuration is 0x2, then LastKnownGood points to ControlSet002. Caution Do not edit the Select key. Doing so may prevent your computer from starting, or prevent you from using the LastKnownGood configuration. BETA MATERIALS FOR MICROSOFT CERTIFIED TRAINER PREPARATION PURPOSES ONLY Module 4: Troubleshooting the Boot Process and Other System Issues 7 Using the LastKnownGood Configuration Topic Objective To illustrate how the LastKnownGood configuration is updated and used. Making Configuration Changes Log Log on on to to Windows Windows XP XP Professional Professional using using Default Default configuration configuration Lead-in The LastKnownGood configuration is automatically updated after each successful logon. It is used to as a safe boot option when the default configuration does not work. Modify Modify configuration configuration Changes Changes saved saved in in CurrentControlSet CurrentControlSet Change Change information information copied copied to to Default Default configuration configuration Shutdown Shutdown Using the LastKnownGood Configuration Log Log on on to to Windows Windows XP XP Professional Professional using using Default Default configuration configuration Successful Start? Yes No Shutdown Shutdown Restart Restart Successful Logon? Yes Current Current configuration configuration copied copied to to LastKnownGood LastKnownGood by by way way of of Clone Clone Use Use LastKnownGood LastKnownGood configuration configuration Windows XP Professional provides two configurations for starting a computer: Default and LastKnownGood. You will usually use the Default configuration, unless the Default configuration is not operating correctly, in which case the LastKnownGood configuration is used. Making Configuration Changes You usually start a computer by using the Default configuration. Each time you make a configuration change on a computer, the change is immediately stored in the CurrentContolSet. When the computer is shut down or restarted, those changes are copied to the Default configuration, which is used the next time that the computer is started. If you make a configuration change, such as adding a new device driver, and then encounter problems restarting the computer, it may be because your configuration changes damaged the Default configuration. In this case, you can use the LastKnownGood configuration to safely restart the computer. BETA MATERIALS FOR MICROSOFT CERTIFIED TRAINER PREPARATION PURPOSES ONLY 8 Module 4: Troubleshooting the Boot Process and Other System Issues Using the LastKnownGood Configuration During the kernel initiation sequence of the boot process, the kernel copies the information in the CurrentControlSet to the Clone control set. After a successful logon, the information in the Clone is copied to the LastKnownGood configuration. If you encounter startup problems that you believe are related to Windows XP Professional configuration changes, use the LastKnownGood configuration to start the computer by following these steps: 1. Shut down the computer without logging on. 2. Restart the computer. 3. When you are prompted to select the operating system from which to start, press F8. 4. On the Windows XP Professional Advanced Options menu, use the down arrow to select Last Known Good Configuration, and then press ENTER. 5. Select the operating system for which you want to use the LastKnownGood configuration, and then press ENTER. The next time that you log on, The Current configuration is copied to the Default configuration, which ensures that the Default configuration will start the computer the next time it is restarted. When to Use the LastKnownGood Configuration The following table describes your computer’s default configuration that will require you to use the LastKnownGood configuration. Problem Solution After you install a new device driver, Windows XP Professional stops responding. Use the LastKnownGood configuration option during startup, which starts Windows XP Professional by using the LastKnownGood configuration. The LastKnownGood configuration will not contain any reference to the new, and possibly defective, device driver. You accidentally disable a critical device driver. If a critical driver becomes disabled, use the LastKnownGood configuration option during startup Some critical drivers are configured to keep users from accidentally disabling them. If these drivers are damaged, the computer automatically reverts to the LastKnownGood configuration the next time that it starts. BETA MATERIALS FOR MICROSOFT CERTIFIED TRAINER PREPARATION PURPOSES ONLY Module 4: Troubleshooting the Boot Process and Other System Issues 9 When Not to Use the LastKnownGood Configuration Do not use the LastKnownGood configuration in the following circumstances: Key Points The LastKnownGood configuration cannot solve problems that are not the result of configuration changes. !" When the problem is not related to Windows XP Professional configuration changes. The LastKnownGood configuration can only help you solve configuration problems. !" After logging on. The system updates the LastKnownGood configuration with Windows XP Professional configuration changes at logon. !" When startup failures are caused by hardware failures or missing or corrupted files. The LastKnownGood configuration cannot help with these problems. BETA MATERIALS FOR MICROSOFT CERTIFIED TRAINER PREPARATION PURPOSES ONLY 10 Module 4: Troubleshooting the Boot Process and Other System Issues # Changing Startup Behavior Using the Boot.ini File Topic Objective To introduce detailed information about how to change the Boot.ini file. Lead-in The Boot.ini file, at the system root, contains the information displayed on the Please Select an Operating System to Start menu. ! Examining the Boot.ini File ! Modifying the Boot.ini File When you install Windows XP Professional, the Boot.ini file is automatically created in the root directory of the system partition. A system partition contains the hardware-specific files necessary to start the operating system, including the Boot.ini, Ntldr, and Ntdetect.com files. The operating system resides on the boot partition. The boot partition and system partition may or may not be the same partition. Delivery Tip Ensure that students understand the difference between the system partition and the boot partition. Note For more information about how the Boot.ini file affects the boot process, open the Web page on the Student Materials compact disc, click Multimedia, and then open the animation entitled “Examining the Boot Process.” Key Points The Boot.ini file works with the Ntldr and Ntdetect.com files to start the operating system. BETA MATERIALS FOR MICROSOFT CERTIFIED TRAINER PREPARATION PURPOSES ONLY Module 4: Troubleshooting the Boot Process and Other System Issues 11 Examining the Boot.ini File Topic Objective [boot [boot loader] loader] timeout=30 timeout=30 To describe the parts of the Boot.ini file and their functions. default=multi(0)disk(0)rdisk(1)partition(2)\WINDOWS default=multi(0)disk(0)rdisk(1)partition(2)\WINDOWS [operating [operating systems] systems] Lead-in multi(0)disk(0)partition(2)\WINDOWS=Microsoft multi(0)disk(0)partition(2)\WINDOWS=Microsoft Windows Windows XP XP The Boot.ini file controls the sequence in which operating systems boot, and whether the user has a choice of operating systems. SCSI(0)disk(1)rdisk(0)partition(1)\WINDOWS=Microsoft SCSI(0)disk(1)rdisk(0)partition(1)\WINDOWS=Microsoft Windows Windows 2000 2000 multi(0) rdisk(1) 0 rdisk rdisk 1 partition(2) 0 1 1 F: Controllers Controllers Physical Physical Disks Disks 2 Disk Disk Partitions Partitions You should understand the function of each part of the Boot.ini file before you modify it. Understanding the components of the file and their functions will enable you to safely edit the file. Delivery Tip This information appeared in the “Examining the Boot Process” multimedia. Make sure that the students understand the components of the Boot.ini file, and ARC paths. If they comprehend the information, you do not need to cover the first two topics on this page. Components of the Boot.ini File The Boot.ini file is comprised of two sections: !" The [boot loader] section, which contains the timeout setting and the path to the default operating system. !" The [operating systems] section, which contains paths to each operating system that is installed on the computer. If you perform a new installation of, or upgrade to, Windows XP Professional, and there are no other operating systems on the computer, the Boot.ini file will contain only an entry for the Windows XP Professional operating system. If you install Windows XP Professional in a dual-boot configuration, there will be an entry for each operating system. The Ntldr file uses the information in the Boot.ini file to display the options on the Please Select An Operation System To Start menu. BETA MATERIALS FOR MICROSOFT CERTIFIED TRAINER PREPARATION PURPOSES ONLY 12 Module 4: Troubleshooting the Boot Process and Other System Issues ARC Paths The Boot.ini file uses Advanced RISC Computing (ARC) paths to point to the partition(s) on which the operating system(s) reside. The following are examples of ARC paths: SCSI(0)disk(1)rdisk(0)partition(1) multi(0)disk(0)rdisk(1)partition(2) The following table contains a description of each part of the naming path. Convention Description Scsi(x) Specifies a SCSI controller on which the SCSI BIOS is not enabled. The x represents a number that indicates the load order of the controller. Controller numbering begins at 0. Multi(x) Specifies any controller other than one that uses the SCSI(x) convention, defined in this table. The x represents a number that indicates the load order of the controller. Disk(y) The SCSI ID. For multi, the y value for Disk (y) is always 0. For SCSI, it identifies the disk on which the operating system resides. Rdisk(z) The number that identifies the disk on which the operating system resides. Partition(a) Specifies the partition on which the operating system resides. Boot.ini Switches Delivery Tip This information did not appear in the multimedia, and should be covered here. Provide examples of specific instances in which you have used Boot.ini switches. You can add a number of switches to the [operating system] entries in the Boot.ini file. The following table contains the most commonly used switches and their functions. Switch Function and uses /basevideo Boots the computer by using the standard VGA video driver. Use this switch to start Windows XP Professional if a video driver is not functioning, and then change the driver while you are logged on. /bootlog Enables boot logging to Ntbtlog.txt in the systemroot folder. For more information about boot logging, see Windows XP Professional Help. /debug Loads the Windows kernel debugger when you start Windows XP Professional. /fastdetect=[com |comx,y,z] Included with every entry by default, this switch disables serial mouse detection when a port is specified, and disables peripheral detection on all COM ports when a port is not specified. /maxmem:n Specifies the amount of RAM that Windows XP Professional uses. Use this switch when you suspect that a memory chip is corrupted. BETA MATERIALS FOR MICROSOFT CERTIFIED TRAINER PREPARATION PURPOSES ONLY Module 4: Troubleshooting the Boot Process and Other System Issues 13 (continued) Switch Function and uses /noguiboot Boots the computer without displaying the graphical boot status. /safeboot:parameter /sos Forces the computer to start in safe mode by using the specified parameters. These startup options are also available by pressing the F8 key when prompted at startup. Displays device drivers as they are being loaded. Use this switch if you suspect that a startup problem is caused by a corrupted driver. BETA MATERIALS FOR MICROSOFT CERTIFIED TRAINER PREPARATION PURPOSES ONLY 14 Module 4: Troubleshooting the Boot Process and Other System Issues Modifying the Boot.ini File Topic Objective To describe the process for modifying the Boot.ini file. Lead-in You can modify the Boot.ini file in Control Panel, or by editing it directly. The safest way to modify the Boot.ini file is in Control Panel. By using Control Panel rather than editing the file directly, you are less likely to damage the file. To manually edit the Boot.ini file, you must first enable protected system files to show, which makes all system files more vulnerable to corruption. Modifying the Timeout and Default Settings You can modify the timeout and default values of the Boot.ini file by using System Properties in Control Panel. To modify these settings, perform the following steps: 1. Click Start, click Control Panel, click Performance and Maintenance Tools, and then click System. 2. On the Advanced tab, under Startup and Recovery, click Settings, and then perform any or all of the following tasks: • To change the default operating system, under System Startup choose a Default operating system from the drop-down list. • To change the timeout duration, alter the number in the Display a list of operating systems for xx seconds box. • To display a list of operating systems, select the check box under System Startup. This setting is enabled by default. • To disable the display of operating systems, clear the check box under System Startup. 3. Click OK twice. BETA MATERIALS FOR MICROSOFT CERTIFIED TRAINER PREPARATION PURPOSES ONLY Module 4: Troubleshooting the Boot Process and Other System Issues 15 Modifying Display Names and Switches You can alter the display names of operating systems that appear on the Please Select an Operating System to Start menu. For example, if you have two operating systems on a computer with a dual-boot configuration, you can change the display names of the operating systems to reflect their purposes; for example, “Windows XP Workgroup” and “Windows 2000 Domain.” You can also add switches to the entries under the [operating systems] portion of the Boot.ini file. For example, you may want to disable the /fastdetect switch. You must make these changes to the file manually. You can do so by performing the following steps: 1. Click Start, right-click My Computer, click Properties. 2. On the Advanced tab, under Startup and Recovery, click Settings. 3. Under Default operating system, click Edit, and then perform one or both of the following tasks: • To change the display name of an operating system, locate the name of the operating system in quotes in the [operating systems] section of the Boot.ini file. It appears as \WINDOWS= “operating system name.” Change the name within the quotes. • To modify switches, which appear after the “operating system name,” delete any unwanted switches, and add any needed switches. 4. On the File menu, click Save, close the window, and then click OK twice. BETA MATERIALS FOR MICROSOFT CERTIFIED TRAINER PREPARATION PURPOSES ONLY 16 Module 4: Troubleshooting the Boot Process and Other System Issues # Using Advanced Boot Options to Troubleshoot Startup Problems Topic Objective To introduce Advanced Boot Options. Lead-in Windows XP Professional provides several advanced boot options that can help you troubleshoot startup problems. ! Using Safe Mode to Start the Computer ! Using Other Advanced Boot Options The advanced boot options in Windows XP Professional enable you to start the computer when you might otherwise not be able to. Safe mode is the advanced boot option that is most often used, but other options are also very useful for troubleshooting the boot process. BETA MATERIALS FOR MICROSOFT CERTIFIED TRAINER PREPARATION PURPOSES ONLY Module 4: Troubleshooting the Boot Process and Other System Issues 17 Using Safe Mode to Start the Computer Topic Objective To describe the different safe mode options and their functions. Lead-in Safe mode starts the computer by using only the default, and most basic, settings. Safe mode is a method of starting Windows XP Professional by using only default settings, which include a VGA video driver, a Microsoft mouse driver, and the minimum device drivers necessary to start the computer. When your computer will not start normally, you may be able to start it in safe mode. For example, if the computer will not start after you install new software, you may be able to start it in safe mode with minimal services running, and then change your computer settings or remove the newly installed software that is causing the problem. Tip If a symptom does not recur when you are using safe mode, this means that the default settings and minimum device drivers are not causing the problem. You can gain access to safe mode by pressing F8 when prompted during the startup process. The first three options on the Advanced Boot Options page are variations of safe mode. These options are: Delivery Tip Demonstrate gaining access to Safe Mode. Explain that when the computer is running in Safe Mode, that it has a black screen with the words “safe mode” in all four corners. !" Safe Mode Starts the computer by using only the basic drivers and files needed. If the computer does not successfully start by using safe mode, you may need to use the Recovery Console feature to repair the system, or start the computer by using the LastKnownGood configuration. !" Safe Mode with Networking Starts the computer by using only the basic files and drivers, plus network connections. !" Safe Mode with Command Prompt Starts the computer by using only basic files and drivers. After logging on, the command prompt is displayed instead of the Windows XP Professional desktop, Start menu, and Taskbar. BETA MATERIALS FOR MICROSOFT CERTIFIED TRAINER PREPARATION PURPOSES ONLY 18 Module 4: Troubleshooting the Boot Process and Other System Issues Using Other Advanced Boot Options Topic Objective To describe the other advanced boot options. ! Enable Boot Logging Lead-in ! Enable VGA Mode ! LastKnownGood Configuration ! Debugging Mode ! Boot Normally ! Reboot ! Return to OS Choices Menu Each advanced boot option has a specific use. The following table describes the options other than Safe Mode that appear on the Advanced Boot Options page. Option Function Use to Enable Boot Logging Logs all of the drivers and services that are loaded at startup to a file named Ntbtlog.txt. Ntbtlog.txt resides in the %windir% directory. All of the safe mode options automatically log information to this file. Determine the exact cause of system problems by determining which services and files did or did not load. Enable VGA Mode Loads the basic VGA driver, instead of any other video driver. All of the safe mode options automatically use VGA mode. Start the computer when you have installed a new video driver that is causing Windows XP Professional to not function properly. LastKnownGood Configuration Starts the computer by using the configuration that was saved the last time the computer started properly. Start the computer when there is a configuration problem that needs to be corrected. All configuration changes that were made since the last successful startup will be lost. Debugging Mode Sends debugging information through a serial cable to another computer. Gather debugging information about the startup process when you cannot read debugging information on the damaged computer. Boot Normally Exits Advanced Boot Options and continues the boot process. Continue the boot process. Reboot Restarts the boot process. Restart the boot process. Return to OS Choices Menu Returns you to the operating system choices menu. To return to the operating system choices menu and select an operating system. BETA MATERIALS FOR MICROSOFT CERTIFIED TRAINER PREPARATION PURPOSES ONLY Module 4: Troubleshooting the Boot Process and Other System Issues 19 # Using the Recovery Console to Start the Computer Topic Objective To introduce the Recovery Console and its function. Lead-in The Recovery Console enables you to start a computer and perform certain administrative tasks. ! Installing and Starting the Recovery Console ! Using the Recovery Console to Start the Computer ! Common Causes for Using the Recovery Console The Recovery Console feature in Windows XP Professional can be used to start the computer, if safe mode and other startup options do not work. For Your Information Users of early versions of Microsoft Windows NT® and Microsoft Windows configured their computers by using a dual boot between Windows and Microsoft MS-DOS®. This dual boot enabled those users to gain access to files and folders and perform repairs if the Windows operating system stopped working. The Recovery Console eliminates the need for this type of dual-boot configuration. Important To use the Recovery Console, you must have the skills to locate and identify problem files by using basic commands. You must also know the administrator’s password to use the Recovery Console. You can accomplish the following tasks by using the Recovery Console: !" Start and stop services. !" Reconfigure services that are preventing the computer from starting properly. !" Format drives on a hard disk. !" Read and write data on a local drive formatted with the FAT or NTFS file systems. !" Repair the system by copying a file from a floppy disk or compact disc (CD). !" Other administrative tasks. BETA MATERIALS FOR MICROSOFT CERTIFIED TRAINER PREPARATION PURPOSES ONLY 20 Module 4: Troubleshooting the Boot Process and Other System Issues Installing and Starting the Recovery Console Topic Objective To describe the process for installing and starting the Recovery Console. Lead-in You can choose to install the Recovery Console for later use, or start it from the product CD. ! Installing the Recovery Console as a Startup Option ! Running the Recovery Console From the CD You can run the Recovery Console from the Windows XP Professional compact disc, or install it on the computer so that it is available when Windows XP Professional is unable to start. Installing the Recovery Console enables you to choose it as an option on the operating system selection menu. Installing the Recovery Console as a Startup Option If you want to install the Recovery Console as a startup option, you must do so while Windows XP Professional is functioning properly. To install the Recovery Console as a startup option: 1. With Windows XP Professional running, insert the Windows XP Professional compact disc into your CD-ROM drive. 2. Click Start, click Run, and then type cmd 3. Switch to your CD-ROM drive. 4. Type \i386\winnt32.exe /cmdcons if you are using a 32-bit computer, or type \ia64\winnt32.exe /cmdcons if you are using a 64-bit computer, and then press ENTER. 5. Click Yes to install the Recovery Console, and then follow the directions on the screen. BETA MATERIALS FOR MICROSOFT CERTIFIED TRAINER PREPARATION PURPOSES ONLY Module 4: Troubleshooting the Boot Process and Other System Issues 21 Running the Recovery Console from the CD If you have not installed the Recovery Console as a startup option, and your installation of Windows XP Professional ceases to function, start the Recovery Console from the CD-ROM: 1. Insert the Windows XP Professional compact disc into your CD-ROM drive, and then restart the computer. 2. When the Press any key to boot from CD message appears, press ENTER. 3. Allow all of the files to load. 4. On the Setup Notification screen, press ENTER. 5. On the Welcome to Setup screen, type r for recovery. 6. Select an installation to repair, and then type the password for the Administrator account. Tip Windows XP Professional Help contains information about each Recovery Console command. You can read and print the function and full syntax for each command. Examine this information thoroughly before using the Recovery Console. BETA MATERIALS FOR MICROSOFT CERTIFIED TRAINER PREPARATION PURPOSES ONLY 22 Module 4: Troubleshooting the Boot Process and Other System Issues Using the Recovery Console to Start the Computer Topic Objective To describe the process for using the Recovery Console. Start the Recovery Console from the Operating System Selection Menu or from the CD Lead-in To use the Recovery Console, you must have the skills to locate and identify problems by using basic commands, and must know the administrator’s password. Select the Installation to Recover Enter the Administrator Account’s Password To use the Recovery Console to start the computer: 1. Start the Recovery Console from the Operating System Selection menu or from the Windows XP Professional CD. 2. If the computer has a dual-boot or multi-boot configuration, select the number representing the installation that you want to repair, and then press ENTER. 3. Enter the administrator’s password, and then press ENTER. After you enter the administrator’s password, a command prompt will display. For information about the available commands, type help and then press ENTER. Important The Recovery Console is a powerful tool that can, if used improperly, damage the operating system. Only advanced users and Information Technology (IT) support professionals should use the Recovery Console, and only if advanced startup options cannot solve the problem. BETA MATERIALS FOR MICROSOFT CERTIFIED TRAINER PREPARATION PURPOSES ONLY Module 4: Troubleshooting the Boot Process and Other System Issues 23 Common Causes for Using the Recovery Console Topic Objective To present the solutions to problems that the Recovery Console can help solve. Lead-in Disable, extract, copy, fixboot, and fixmbr are the commands most often used in the Recovery Console. ! Problem with a Service ! Problem with a Device Driver ! Missing Files ! Damaged Boot Sector ! Damaged Master Boot Record You can use the Recovery Console to fix a variety of startup problems. Some of the most common startup problems and their Recovery Console solutions are defined in the following table. Problem Recovery Console solution A service or device driver is starting, but preventing the computer from starting properly. Use the disable command to disable the service or driver, restart the computer without the service or driver functioning, and then determine the problem. A missing file is preventing the computer from starting properly. Use the extract command to repair the computer by uncompressing a compressed file and copying it from a floppy disk or CD to the appropriate folder. A missing file is preventing the computer from starting properly. Use the copy command to repair the computer by copying an uncompressed file from a floppy disk or CD to the appropriate folder. The boot sector is damaged. Use the fixboot command to write a new partition boot sector on the system partition. The master boot record is damaged. Use the fixmbr command to repair the master boot record on the partition boot sector. BETA MATERIALS FOR MICROSOFT CERTIFIED TRAINER PREPARATION PURPOSES ONLY 24 Module 4: Troubleshooting the Boot Process and Other System Issues Lab 4A: Troubleshooting The Boot Process Topic Objective To introduce the lab. Lead-in In this lab, you will troubleshoot the boot process by using the Recovery Console and other tools. Objectives After completing this lab, you will be able to: !" Install the Recovery Console. !" Modify the Operating System Selection screen options. !" Use the Recovery Console to resolve boot process problems. !" Use the advanced boot options to resolve boot process problems. Prerequisites Before working on this lab, you must have completed Lab 1C Upgrading Windows 98 to Windows XP Professional. Estimated time to complete this lab: 45 minutes BETA MATERIALS FOR MICROSOFT CERTIFIED TRAINER PREPARATION PURPOSES ONLY Module 4: Troubleshooting the Boot Process and Other System Issues 25 # Restoring the Computer to a Previous State Topic Objective To describe the options for restoring the computer to a previous state. Lead-in Driver Rollback and System Restore are two options for restoring the computer to a previous state, but they are used in different circumstances. ! Using System Restore ! Using Automated System Recovery ! Best Practices for Restoring the Computer to a Previous State There are several ways to return a computer running Windows XP Professional to a previous state. System Restore, and Automated System Recovery are two tools that enable you to do so. The LastKnownGood configuration and Driver Rollback are also system restoration tools. Each tool has different capabilities, and should be used in specific circumstances. Note For more information about preparing for Automated System Recovery, see Module 1, “Installing Windows XP Professional,” and for more information about using Driver Rollback, see Module 3, “Configuring Hardware on a Computer Running Windows XP Professional.” These modules are part of Course 2272A, Implementing and Supporting Windows XP Professional (Course Beta). BETA MATERIALS FOR MICROSOFT CERTIFIED TRAINER PREPARATION PURPOSES ONLY 26 Module 4: Troubleshooting the Boot Process and Other System Issues Using System Restore Topic Objective To introduce the purpose and function of the System Restore tool. Lead-in System Restore is a new tool that enables you to restore the operating system to a previous point without losing user data. ! Creating Restore Points ! Reverting to a Restore Point System Restore is a system tool that is new to Windows XP Professional. It enables you to roll back the operating system to a previous point, without losing changes to the user’s personal data, such as Microsoft Word documents, e-mail messages, and Microsoft Internet Explorer Favorites and History lists. You can use System Restore to undo harmful changes to your operating system, and restore its settings and performance. System Restore returns your computer to an earlier working configuration, called a restore point. Note Any change that is made to your computer by using System Restore is completely reversible. Creating Restore Points System Restore monitors system and some application file changes, and records and stores previous versions before changes occur. Restore points are automatically created when significant events occur, such as when an application or driver is installed. Additionally, System Restore creates daily restore points. You can also create and name a restore point at any time. For example, before upgrading an operating system, or altering the Boot.ini file. Creating a restore point guarantees that you can restore the operating system to a particular point in time. Tip Manually create a restore point before making any major configuration change to the computer. BETA MATERIALS FOR MICROSOFT CERTIFIED TRAINER PREPARATION PURPOSES ONLY Module 4: Troubleshooting the Boot Process and Other System Issues 27 To create a restore point: 1. Click Start, point to All Programs, point to Accessories, point to System Tools, and then click System Restore. 2. Select Create a restore point, and then click Next. 3. Type a descriptive restore point description, such as “pre-video-driverinstallation.” The date and time the restore point is created are automatically appended to the description. 4. Click Create, and then click Close. Reverting to a Restore Point To revert the computer to a restore point without losing changes to the user’s personal data, perform these steps: 1. Click Start, point to All Programs, point to Accessories, point to System Tools, and then click System Restore. 2. Select Restore my computer to an earlier time, and then click Next. 3. On the calendar, select the day that contains the restore point that you want to revert to, select the specific restore point, and then click Next twice. Windows XP Professional will then restart using the settings from the selected restore point. User data that has been created or modified since the restore point was created will not be affected. BETA MATERIALS FOR MICROSOFT CERTIFIED TRAINER PREPARATION PURPOSES ONLY 28 Module 4: Troubleshooting the Boot Process and Other System Issues Using Automated System Recovery Topic Objective To introduce the ASR recovery process. Lead-in If you have previously prepared for the ASR recovery process, you can use the ASR disks to restore an operating system to its original state. ! The Automated System Recovery (ASR) Process: $ $ The ASR Preparation Wizard is used to create a backup of the partition, and an ASR disk that points to the partition If the operating system stops functioning, the computer is booted from the ASR disk, which points to the backup, which is then restored The Automated System Recovery (ASR) process enables you to restore an installation of Windows XP Professional to the condition the operating system was in at the time you created the ASR disks. Typically, after an installation of or upgrade to Windows XP Professional, a set of ASR disks is created. For Your Information The ASR process has replaced the Emergency Repair Disk (ERD) process that was available in earlier versions of Windows. While the ERD process backed up only system settings, the ASR process includes a full backup. Note For more information about creating ASR disks, see Preparing for Automated System Recovery in Module 1, “Installing Microsoft Windows XP Professional” in Course 2272A, Implementing and Supporting Windows XP Professional (Course Beta). The ASR disks contain the files needed to start the operating system if it should stop functioning. The ASR Preparation Wizard is used to create a system backup on a high-capacity media, such as a writeable compact disc, tape drive, or hard disk. In addition to this backup, an ASR disk is created. The disk files necessary to gain access to the backup and return the system to the state that it was in when the ASR disks were created. To restore a system by using the ASR disks, start the computer from the disk, and follow the directions on your screen. Important When you restore the computer by using the ASR process state, you will lose any data and configuration settings that have been changed since the ASR backup was completed. Because the ASR process is the only way to start the computer when the operating system has stopped functioning, it is recommended that you prepare for the ASR process by creating disks on a regular schedule. BETA MATERIALS FOR MICROSOFT CERTIFIED TRAINER PREPARATION PURPOSES ONLY Module 4: Troubleshooting the Boot Process and Other System Issues 29 Best Practices for Restoring the Computer to a Previous State Topic Objective To describe the best practices for restoring a computer to a previous state. Create Create Restore Restore Points Points Often Often Lead-in For For Critical Critical Systems, Systems, Create Create ASR ASR Backups Backups and and ASR ASR Disks Disks on on aa Regular Regular Schedule Schedule When you need to restore a computer to a previous state, make sure you are choosing the right tool. Use Use the the Tool Tool that that Least Least Affects Affects the the System, System, While While Solving Solving Your Your Problem Problem When you need to restore the computer to a previous state, use the following best practices: For Your Information !" Create restore points often. The remedies in the table are presented in an order of least system impact to most system impact. !" For critical systems, create ASR backups and ASR disks on a regular schedule. !" Use the restore tool that solves your problem with the least effect on the system. The following table contains suggestions for the best tool to use for specific problems. Problem Remedy After installing or updating a driver, the operating system stops responding. Use the LastKnownGood configuration to start the computer. Disable the changed driver, and then restart the computer and use Driver Rollback. After making configuration changes, the operating system either stops responding or experiences significant problems. Use the LastKnownGood configuration to undo the configuration changes. After installing or updating a device driver, the device stops functioning or experiences problems. Use Driver Rollback to reinstall the previous driver. You need to restore the operating system to a previous point without losing user data. Use System Restore. The operating system, including the LastKnownGood configuration, will not start. Use Automated System Recovery. BETA MATERIALS FOR MICROSOFT CERTIFIED TRAINER PREPARATION PURPOSES ONLY 30 Module 4: Troubleshooting the Boot Process and Other System Issues Review Topic Objective To reinforce module objectives by reviewing key points. Lead-in The review questions cover some of the key concepts taught in the module. ! Examining the Windows XP Professional Boot Process ! Controlling System Settings During the Boot Process ! Changing the Boot Sequence Using the Boot.ini File ! Using Advanced Boot Options to Troubleshoot Startup Problems ! Using the Recovery Console to Start the Computer ! Restoring the Computer to a Previous State 1. Your computer has two operating systems installed in a dual-boot configuration, but you are not getting a chance to choose an operating system when you start the computer. What are the possible causes and solutions? Either the Boot.ini file is not configured to show both operating systems, or the timeout is set to “0” so that the default operating system automatically loads. Modify the Boot.ini file to offer a choice during the Operating System Selection phase. 2. Your computer has two numbered control sets, one of which recently failed. How can you determine which control set failed? Examine the failed value in the HKEY_LOCAL_MACHINE\SYSTEM\select registry key. 3. You log on to Windows XP Professional, make configuration changes, and then log off. What has happened to the changes stored in the CurrentControlSet? Nothing. If the computer is restarted, the changes in the current control set are copied to the default control set. BETA MATERIALS FOR MICROSOFT CERTIFIED TRAINER PREPARATION PURPOSES ONLY Module 4: Troubleshooting the Boot Process and Other System Issues 31 4. You experience performance problems with your operating system, but these problems do not recur when you boot into safe mode. What assumptions can you make about the source(s) of the performance problems? Because safe mode uses only basic drivers and files, you can assume that these basic settings are not the source of the problem. 5. The computer you are working on is hanging during the boot sequence. How can you determine what service or device driver is causing the computer to hang? Use the Enable Boot Logging option under Advanced Boot Options. After logging on, examine the Ntbtlog.txt file in the %windir% directory. The file will list each service and device driver that loaded up to the point of the failure. 6. A user explains that after installing a program, he noticed degradation in computer performance. He continued working on important documents for the rest of the day. Today, the operating system is performing so poorly that it has interfered with his work. Someone has suggested that he reinstall the operating system. Is there a better solution? Yes, use System Restore to restore the operating system to the point before the program was installed while preserving his data. BETA MATERIALS FOR MICROSOFT CERTIFIED TRAINER PREPARATION PURPOSES ONLY THIS PAGE INTENTIONALLY LEFT BLANK