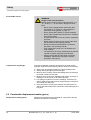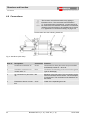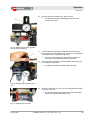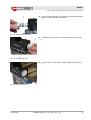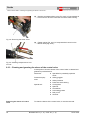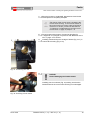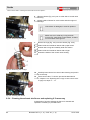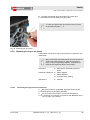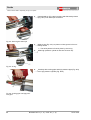
1
Operating instructions Boosters DLE 2 (-1, -2) – DLE 75 (-1, -2) Read the instructions prior to performing any task! Maximator GmbH Lange Straße 6 D-99734 Nordhausen Telephone: +49 (0) 3631/9533-0 Fax: +49 (0) 3631/9533-5065 email: [email protected] Internet: www.maximator.de Translation of the original operating instructions Maxi-14315-DE, 1, en_GB This operating manual was created by: Kothes! Technische Kommunikation GmbH & Co. KG Internet: www.kothes.de © Maximator GmbH 2010 2 Boosters DLE 2 (-1, -2) – DLE 75 (-1, -2) 26.01.2012 Table of contents Table of contents 26.01.2012 1 General................................................................................. 1.1 Information about this manual...................................... 1.2 Explanation of symbols................................................. 1.3 Copyright...................................................................... 1.4 Customer service.......................................................... 2 Safety................................................................................. 2.1 Intended use............................................................... 2.2 Permissible displacement media (gases)................... 2.3 Basic dangers............................................................. 2.3.1 General dangers at the workplace........................... 2.3.2 Dangers due to gases under pressure.................... 2.3.3 Dangers due to low temperatures............................ 2.3.4 Dangers due to fire.................................................. 2.3.5 Dangers due to explosion........................................ 2.3.6 Dangers due to chemical substances...................... 2.4 Responsibility of the owner......................................... 2.5 Personnel requirements.............................................. 2.5.1 Qualifications........................................................... 2.5.2 Instruction................................................................ 2.6 Personal protective equipment................................... 2.7 Safety devices............................................................ 2.8 Signage....................................................................... 2.9 Behaviour in case of fire or accidents......................... 2.10 Spare parts............................................................... 2.11 Environmental protection.......................................... 11 11 12 14 15 15 16 17 17 18 18 21 21 22 22 23 23 24 25 25 3 Technical data................................................................... 3.1 Dimensions and weights............................................. 3.2 Connected loads......................................................... 3.3 Performance characteristics....................................... 3.4 Operating conditions................................................... 3.5 Operating materials.................................................... 3.6 Emissions................................................................... 3.7 Ex marking.................................................................. 3.8 Type plate................................................................... 3.9 Type key..................................................................... 27 27 28 31 32 33 33 34 35 35 4 Structure and function..................................................... 4.1 Overview..................................................................... 4.2 Brief description.......................................................... 4.3 Assembly description.................................................. 4.3.1 Booster head with inlet and outlet valve.................. 4.3.2 High pressure component........................................ 4.3.3 Pilot valve................................................................ 4.3.4 Control valve............................................................ 37 37 37 38 38 38 38 38 Boosters DLE 2 (-1, -2) – DLE 75 (-1, -2) 7 7 7 9 9 3 Table of contents 4 4.3.5 Drive component...................................................... 4.3.6 Exhaust air silencer................................................. 4.3.7 Cooling cylinder....................................................... 4.3.8 Compressed air control unit..................................... 4.4 Mode of operation of the boosters.............................. 4.5 Versions...................................................................... 4.6 Connections................................................................ 4.7 Working areas and danger zones............................... 4.8 Scope of delivery........................................................ 4.9 Accessories................................................................ 38 39 39 39 39 41 44 46 46 46 5 Transport, packaging, and storage................................. 5.1 Safety instructions for transport.................................. 5.2 Transport inspection................................................... 5.3 Packaging................................................................... 5.4 Storage....................................................................... 49 49 49 49 50 6 Installation and initial commissioning............................ 6.1 Safety instructions for installation and initial commissioning........................................................................ 6.2 Prerequisites for installation ....................................... 6.3 Mounting the booster.................................................. 6.4 Installing the connecting lines..................................... 6.4.1 Connecting the drive air........................................... 6.4.2 Connecting the inlet line for admission pressure and outlet line for operating pressure...................... 6.4.3 Installing a separate leakage line............................ 6.5 Installing exhaust air silencer...................................... 6.6 Initial commissioning................................................... 51 7 Operation........................................................................... 7.1 Safety instructions for operation................................. 7.2 Daily inspections......................................................... 7.3 Calculating the operating pressure............................. 7.4 Switching on............................................................... 7.5 Draining the condensate at the water separator......... 7.6 Switching off............................................................... 7.7 Shutdown in an emergency situation.......................... 61 61 61 62 63 66 67 68 8 Faults................................................................................. 8.1 Safety instructions for fault correction......................... 8.2 Fault table................................................................... 8.3 Fault correction tasks.................................................. 8.3.1 Purging the high pressure component with nitrogen.................................................................... 8.3.2 Replacing the O-rings on the control valve.............. 8.3.3 Cleaning and greasing the sleeve of the control valve........................................................................ 69 69 71 73 Boosters DLE 2 (-1, -2) – DLE 75 (-1, -2) 51 51 53 53 55 56 56 57 58 73 74 78 26.01.2012 Table of contents 8.3.4 Cleaning the exhaust air silencer and replacing it if necessary................................................................ 80 8.3.5 Cleaning and greasing the pilot valve...................... 82 8.3.6 Replacing O-ring on air piston................................. 85 8.3.7 Cleaning the inlet and outlet valve of the booster head......................................................................... 98 8.3.8 Replacing the high pressure cylinder with high pressure piston as a complete component.............. 99 8.3.9 Checking high pressure seals and high pressure cylinder for signs of damage.................................. 100 8.4 Start up after a corrected fault.................................. 102 9 Maintenance.................................................................... 103 10 Dismantling and disposal.............................................. 10.1 Safety instructions for dismantling and disposal..... 10.2 Dismantling............................................................. 10.3 Disposal.................................................................. 10.4 Tightening torques.................................................. 11 Index................................................................................. 109 105 105 106 106 106 Appendix.......................................................................... 111 26.01.2012 Boosters DLE 2 (-1, -2) – DLE 75 (-1, -2) 5 6 Boosters DLE 2 (-1, -2) – DLE 75 (-1, -2) 26.01.2012 General Explanation of symbols 1 General 1.1 Information about this manual This manual enables safe and efficient handling of the booster. The operating manual is a component of the booster and must be kept in the immediate vicinity of the booster where it is available to personnel at all times. Personnel must have carefully read and understood this manual before performing any tasks. The basic prerequisite for safe work is compliance with all safety instructions and handling instructions specified in this manual. In addition, the applicable local occupational health and safety regulations and general safety regulations for the booster’s area of implementation must be complied with. The illustrations in this manual are provided for purposes of basic understanding and can be different from the actual version. In addition to this manual, the manuals for the installed components provided in the Appendix also apply. 1.2 Explanation of symbols Safety instructions Safety instructions are marked with symbols in these instructions. The safety instructions are always introduced by signal words which express the extent of the danger. DANGER! This combination of symbol and signal word indicates an immediately-dangerous situation which will cause death or severe injuries if not avoided. WARNING! This combination of symbol and signal word indicates a possibly-dangerous situation which could cause death or severe injuries if it is not avoided. CAUTION! This combination of symbol and signal word indicates a possibly-dangerous situation which could cause slight injuries if it is not avoided. 26.01.2012 Boosters DLE 2 (-1, -2) – DLE 75 (-1, -2) 7 General Explanation of symbols NOTICE! This combination of symbol and signal word indicates a possibly-dangerous situation which could cause property and environmental damage if it is not avoided. Special safety instructions The following symbols are used in the safety instructions to draw attention to specific dangers: WARNING! This combination of symbol and signal word indicates content and instructions for the intended use of the booster in potentially explosive areas. If an instruction marked in this manner is not observed, there is an increased danger of explosion and severe or fatal injuries can be the consequence. Safety instructions in operating instructions Safety instructions can refer to specific, individual instructions. Such safety instructions are incorporated into the instructions so that they do not interrupt the flow of reading when carrying out the action. The signal words described above are used. Example: 1. Loosen screw. 2. CAUTION! Risk of pinching at the lid. Carefully close the lid. 3. Tighten screw. Tips and recommendations This symbol highlights useful tips and recommendations as well as information designed to ensure efficient and smooth operation. Additional designations 8 The following designations are used in this manual to indicate instructions, results, listings, references, and other elements: Boosters DLE 2 (-1, -2) – DLE 75 (-1, -2) 26.01.2012 General Customer service Designation Explanation Step-by-step handling instructions ð Results of handling instructions References to sections of this manual and to other applicable documents Listings without specified sequence 1.3 Copyright The contents of this manual are protected by copyright. They are permitted to be used in the context of utilisation of the booster. Any use beyond this without the written permission of the manufacturer is not authorised. 1.4 Customer service Our customer service organisation is available for technical information and repairs: Address Maximator GmbH Ullrichstraße 3 99734 Nordhausen Telephone - customer service +49 (0) 3631 9533-5026 Mon - Fri: 07:00 - 17:00 CET (Service Manager) Telephone - customer hotline +49 (0) 1805 629 462 867 Mon - Fri: 08:00 - 22:00 CET Sat - Sun and public holidays: 08:00 - 20:00 CET Fax +49 03631 9533-5065 email [email protected] website www.maximator.de In addition, we are always interested in new information and experiences associated with the application which could prove valuable in improving our products. 26.01.2012 Boosters DLE 2 (-1, -2) – DLE 75 (-1, -2) 9 Customer service 10 Boosters DLE 2 (-1, -2) – DLE 75 (-1, -2) 26.01.2012 Safety Intended use 2 Safety This section provides an overview of all safety aspects that are essential to the best possible protection of the personnel and the safe and trouble-free operation of the machine. Additional safety instructions for specific work tasks are contained in the sections regarding the individual life stages of the machine. 2.1 Intended use The compressed air driven boosters of the model series DLE 2 (-1, -2) – DLE 75 (-1, -2) are incomplete machines and designed to be installed in plants or systems. The boosters are used exclusively for the oil-free compression of combustible, toxic and nontoxic gases and compressed air. Only displacement media that are permitted for use in boosters may be compressed (Ä Chapter 2.2 ‘Permissible displacement media (gases)’ on page 12). The boosters are driven by compressed air with a maximum drive pressure of 10 bar. The boosters can be used, if they are marked accordingly, in explosion-protected areas. Intended use also includes compliance with all the instructions in this manual. Any use that extends beyond the intended use, or any other use of the system is considered to be misuse. 26.01.2012 Boosters DLE 2 (-1, -2) – DLE 75 (-1, -2) 11 Safety Permissible displacement media (gases) Foreseeable misuse WARNING! Danger in the event of misuse! Misuse of the boosters of the model series DLE 2 (-1, -2) – DLE 75 (-1, -2) can result in dangerous situations. – – – – – – – – – Compression of hydrogen Never use any displacement media other than those listed in Ä Chapter 2.2 ‘Permissible displacement media (gases)’ on page 12. Never operate the boosters in closed containers. Never make unauthorised conversions or modifications to the booster. Compressed air must never be used for respiration purposes. Never use the boosters in any manner other than that described in this operating manual. Never exceed the technical limits or pressures specified in this operating manual. Only operate the booster if it is in faultless technical condition. The boosters must not be used directly for pharmaceutical or sanitary purposes involving food. Always comply with all instructions concerning installation, maintenance and fault correction specified in this manual. To prevent potentially explosive atmospheres in areas around hydrogen systems from developing, always observe the following: n Always set up hydrogen systems in a well ventilated room. n Always keep hydrogen systems leak-tight. n Blow-out lines of safety valves and leakage lines must always be routed outside into the open. n Blow-out lines must not be installed under eaves, openings in buildings or in the vicinity of air intake openings. n For hydrogen systems in rooms or buildings, it must be possible to safely and quickly shut off the gas supply coming from the outside at a safe point. n Pipe connections on hydrogen systems must always be created so that these ensure the connection will be leak tight for a long time. 2.2 Permissible displacement media (gases) Displacement media (gases) 12 Displacement media that are permitted for compression with the boosters are listed in the following. Boosters DLE 2 (-1, -2) – DLE 75 (-1, -2) 26.01.2012 Safety Permissible displacement media (gases) WARNING! Risk of accident if the permissible displacement media are not observed! If the permissible displacement media and the special instructions are not observed, this can result in severe accidents. – – Only compress displacement media which are permissible for the particular booster models. For this purpose, compare the type information on the type plate with that in the following table. Always observe the special instructions for the particular displacement media. Displacement medium (gases) Symbol Booster types Argon Ar All models N-butane C4H10 All models Compressed air Special instructions for the compression of the displacement media Lay pipes and rinse SFP (special flushing port) and leak bores; high pressure seal not 100% gas-tight. All models Carbon monoxide CO DLE xxx-C Carbon dioxide CO2 DLE xxx-C Ethane C 2H 6 All models Lay pipes and rinse SFP (special flushing port) and leak bores; high pressure seal not 100% gas-tight. Ethylene C 2H 4 All models Lay pipes and rinse SFP (special flushing port) and leak bores; high pressure seal not 100% gas-tight. Freon (F-12) CCL2F2 DLE xx-CR Lay pipes and rinse SFP (special flushing port) and leak bores; high pressure seal not 100% gas-tight. Helium He All models Hydrogen H2 DLExxx-(H2) Lay pipes and rinse SFP (special flushing port) and leak bores; high pressure seal not 100% gas-tight. Methane CH4 All models Lay pipes and rinse SFP (special flushing port) and leak bores; high pressure seal not 100% gas-tight. DLE xxx-NACE Lay pipes and rinse SFP (special flushing port) and leak bores; high pressure seal not 100% gas-tight. Acid gas (natural gas with portions of hydrogen sulphide) 26.01.2012 Lay pipes and rinse SFP (special flushing port) and leak bores; high pressure seal not 100% gas-tight. Boosters DLE 2 (-1, -2) – DLE 75 (-1, -2) 13 Safety Basic dangers Displacement medium (gases) Symbol Booster types Special instructions for the compression of the displacement media Propane C 3H 8 All models Lay pipes and rinse SFP (special flushing port) and leak bores; high pressure seal not 100% gas-tight. Nitrogen N2 All models Laughing gas N 2O All models Oxygen O2 DLE xxx-S Lay pipes for leak bores, lubrication with halocarbon grease (oxygen cleaning), max. compression ratio 1:6 Max. pressure 350 bar Sulphur hexafluoride SF6 DLExxx-CR Xenon XE All models Lay pipes and rinse SFP (special flushing port) and leak bores; high pressure seal not 100% gas-tight. Contact the manufacturer for special instructions for the use of other media. See the contact information on Page 2 of this operating manual. Remove plug on SFP (special flushing port) for hazardous gases and lay pipes. See Ä Appendix A ‘Hydrogen compression with Maximator boosters’ on page 113 in this operating manual for this. 2.3 Basic dangers The following section lists residual risks from boosters that exist even if they are used as intended. To reduce the risk of personal injury and property damage and to avoid dangerous situations, observe the safety instructions listed here as well as the safety instructions in the other sections of this operating manual. 14 Boosters DLE 2 (-1, -2) – DLE 75 (-1, -2) 26.01.2012 Safety Basic dangers > Dangers due to gases under pressure 2.3.1 General dangers at the workplace Noise WARNING! Risk of injury caused by noise! The noise level that occurs in the work area can cause severe hearing loss depending on the type of installation and expanding air. – – Always wear personal protective equipment when working on running boosters. Only stay in the danger zone to the extent required. 2.3.2 Dangers due to gases under pressure Pressurised components WARNING! Danger of injury due to pressurised components! Compressed air or gas can escape from compressed air lines, threaded unions, or pressurised components if these components are not handled properly. This compressed air or gases can harm the eyes, whirl up dust, cause uncontrolled movements of the lines and result in severe injuries. Defective pressurised components can also cause uncontrolled movements that can result in severe injuries. – – – 26.01.2012 Always establish depressurised status before mounting or removing hoses, lines, threaded unions or quick-release couplings. Completely depressurise the pressure accumulator. Always wear personal protective equipment. Have defective components that are pressurised in operation replaced immediately by qualified personnel (mechanical and plant engineer). Boosters DLE 2 (-1, -2) – DLE 75 (-1, -2) 15 Safety Basic dangers > Dangers due to low temperatures 2.3.3 Dangers due to low temperatures Cold surfaces CAUTION! Risk of injury due to cold and iced up surfaces! Components such as the exhaust air silencer can cool down severely and ice up due to expanding air or gas. Skin contact with cold surfaces can cause skin irritations. – – Flying ice crystals and accumulated liquids WARNING! Risk of injury caused by flying ice crystals and accumulated liquids! Icing can develop on the exhaust air silencer of the booster during operation that is freed up by expanding exhaust air and tossed around. The pushed off ice crystals can result in eye injuries and accumulated liquids on the floor. – – – – 16 Always wear protective clothing and protective gloves during all work in the vicinity of cold or iced up surfaces. Ensure that all surfaces have warmed up to ambient temperature before all work. Always wear protective goggles during all work. Immediately pick up any accumulated liquid using appropriate means. Always wear non-slip safety footwear. Place warnings and mandatory action signs on or near the area where liquids can collect on the floor or where there can be flying ice crystals. Boosters DLE 2 (-1, -2) – DLE 75 (-1, -2) 26.01.2012 Safety Basic dangers > Dangers due to explosion 2.3.4 Dangers due to fire Fire prevention and protection WARNING! Danger of injury due to limited or improper firefighting! In the event of fire, if the fire extinguisher is not operational, or is unsuited to the specific fire class, serious injuries or death, together with significant damage to property may result. – – – – – – Ensure that the only fire extinguishers available are those suited to the fire class in question. Check functionality of fire extinguishers every two years. Refill fire extinguishers after each activation. Only use extinguisher propellants and spare parts which conform to the recognised models specified on the fire extinguisher. In the event of use, observe the safety and operation instructions on the fire extinguisher. In the event of use, observe the function temperature range. 2.3.5 Dangers due to explosion Explosion protection WARNING! Risk of explosion! Bringing in ignition sources such as sparks, open flames and hot surfaces can result in explosion in the Ex-zone. – – – – – Obtain written work approval before starting work in the Ex-zone. Only perform tasks when a potentially explosive atmosphere can be ruled out. Before all fault elimination work, flush booster with nitrogen to prevent oxyhydrogen gas from developing from previously compressed toxic or combustible gases. Only use those tools that are authorised for use in the Ex-zone. Never smoke in the potentially explosive area. Non-compliance with these instructions will result in loss of explosion protection. 26.01.2012 Boosters DLE 2 (-1, -2) – DLE 75 (-1, -2) 17 Safety Responsibility of the owner 2.3.6 Dangers due to chemical substances Displacement media WARNING! Risk of injury due to improper handling of displacement media! Improper handling of displacement media can result in severe poisoning or even death by suffocation. – – – – – Always observe the manufacturer's safety data sheet. When working with gases, always ensure adequate ventilation. Do not smoke within the danger zone and in the immediate vicinity. Do not use open flames, fire and ignition sources of any kind. Keep a self-contained breathing apparatus ready for emergencies. If there are signs of suffocation, immediately provide the affected person with the breathing apparatus that does not depend on circulating air, move to fresh air into recovery position and keep warm. If no longer breathing, provide first aid measures and start artificial respiration. Seek medical attention immediately. Occurring vapours WARNING! Risk of injury due to occurring vapours! During the work process, exhaust gas of the drive air can develop on the drive component of the booster that can result in poisoning when inhaled or on contact with skin. – – – Do not stay in the immediate vicinity while the boosters are operated. Do not eat or drink in the vicinity of the boosters. In case of doubt, wear light respiratory protection. 2.4 Responsibility of the owner Owner The owner is the person who is operating the boosters for industrial or commercial purposes or who entrusts the use/application to a third party and who has the legal product responsibility during the operation for the protection of the user, the personnel or third parties. Owner’s obligations The boosters are used commercially. The owner of the boosters is therefore subject to legal occupational health and safety obligations. 18 Boosters DLE 2 (-1, -2) – DLE 75 (-1, -2) 26.01.2012 Safety Responsibility of the owner In addition to the safety instructions in this operating manual, applicable occupational health and safety, accident prevention and environmental protection regulations must be complied with for the area of implementation of the boosters. In this regard the following particularly applies: n The owner must inform himself about applicable occupational health and safety regulations, and in a hazard analysis identify additional hazards that may exist at the operating site of the boosters due to special work conditions. The owner must convert this information into operating instructions for operation of the boosters. n The owner must ensure during the entire operating time of the boosters that the operating instructions drawn up by the owner correspond to the current state of legislation, and if necessary the owner must adapt these operating instructions. n The owner must clearly regulate and specify responsibilities for installation, operation, fault correction, maintenance and cleaning. n The owner must ensure that all personnel who handle the boosters have read and understood this operating manual. In addition, the owner must train personnel and inform them about the hazards at regular intervals. n The owner must provide the required protective equipment for personnel and instruct personnel that the wearing of the required protective equipment is a binding obligation. The owner is also responsible for keeping the boosters in faultless technical condition at all times. The following therefore applies: n The owner must ensure that the boosters are integrated in the emergency stop devices or in the safety chain of the system in which the boosters are installed. n When aggressive displacement media and/or toxic gases are used, the owner must ensure that lines will be installed that will capture the leaking aggressive media and/or toxic gases in corresponding containers and that the aggressive and toxic media will be disposed of properly. n When aggressive, combustible, dangerous or toxic gases are compressed, the owner must ensure that the boosters are flushed with nitrogen before any fault elimination work is performed. n The owner must ensure that only permissible displacement media (Ä Chapter 2.2 ‘Permissible displacement media (gases)’ on page 12) will be compressed with the booster. n The owner must ensure that the operating media (compressed air, gases) are pre-installed and stored as prescribed. n The owner must ensure that all pressure hoses, pressure lines, couplings and threaded unions are configured and dimensioned for the pressure ranges of the boosters. n The owner must ensure that suitable media connections are present and that these connections can be safeguarded via a separate shut-off valve. n The owner must ensure that the connections of the operating media (compressed air, gases) function properly. 26.01.2012 Boosters DLE 2 (-1, -2) – DLE 75 (-1, -2) 19 Safety Responsibility of the owner n The owner must ensure that the boosters are kept and operated exclusively in technically faultless condition. n The owner must ensure adequate lighting is always provided in the work area of the boosters. n The owner must ensure that all fault correction and repair tasks are executed exclusively by specialised personnel, who have the qualifications cited in the fault table. n The owner must ensure that all warnings, instruction and safety signs attached on the boosters are always complete and maintained in legible condition. n The owner must ensure that the boosters are checked for damage and proper condition before each start up. Obligations of the mechanical engineer and plant engineer The mechanical engineer and plant engineer have additional obligations resulting from the installation of the booster into a plant or system: n The mechanical engineer and system engineer must ensure that, when installing the boosters in a plant or in a system, that an overall risk assessment is produced and that required steps to minimise hazards are initiated. n The mechanical engineer and plant engineer must ensure that the boosters are integrated in the emergency stop concept of the plant/system. n The mechanical engineer and plant engineer must ensure that all pressure hoses, pressure lines, couplings and threaded unions are configured and dimensioned for the pressure ranges of the boosters. Additional responsibilities of the owner regarding explosion prevention Additional obligations arise for the owner from the EC directive for improving the safety and health protection of workers potentially at risk from explosive atmospheres. These include the following organisational measures: n n n n 20 Identification of areas with potentially explosive atmosphere Clear prohibition signs Creating explosion prevention documents for each zone Preventing unauthorised personnel from accessing areas with potentially explosive atmosphere Boosters DLE 2 (-1, -2) – DLE 75 (-1, -2) 26.01.2012 Safety Personnel requirements > Qualifications 2.5 Personnel requirements 2.5.1 Qualifications WARNING! Risk of injury in the event of inadequate qualification of the personnel! If unqualified personnel perform work on the booster or stay in the danger zone of the boosters, dangers arise that can cause severe injuries and considerable property damage. – – Always have all work performed only by personnel qualified for the particular work. Keep unqualified personnel away from the danger zones. In this operating manual, the qualifications of the personnel for the various areas of activity are listed below: Mechanical and plant engineers Mechanical and plant engineers are personnel, who due to their specialised training, skills and experience, as well as knowledge of the applicable regulations, are capable of performing the tasks assigned to them. In addition, mechanical and plant engineers are familiar with the installation, assembly and the bringing together of machines and are capable of recognising and avoiding possible hazards on their own. Operator Operator has received instructions by the owner about his or her responsibilities as well as any possible danger arising from improper behaviour. The operator may not perform any tasks that exceed the scope of normal operation unless specified in this manual and unless the owner has expressly entrusted the operator with these tasks. Specialist for potentially explosive areas The specialists for potentially explosive areas, due to their specialized training, skills, and experience, as well as knowledge of the applicable standards and regulations, are able to perform tasks on systems or sub-components in potentially explosive areas. The specialists for potentially explosive areas can independently recognize potential hazards and prevent dangers. Only persons who can be expected to perform their work reliably are authorised as personnel. Persons whose capacity to react is impaired, e.g. due to drugs, alcohol or medication are not approved as personnel. When selecting personnel, observe the age and job specific regulations that apply to the operating site. 26.01.2012 Boosters DLE 2 (-1, -2) – DLE 75 (-1, -2) 21 Safety Personal protective equipment 2.5.2 Instruction The owner must train personnel on a regular basis. Execution of the training must be logged for better traceability. n n n n n Date of training Name of the trained person Content of the training Name of the instructor Signatures of the trained person and of the instructor 2.6 Personal protective equipment Personal protective equipment is used to protect personnel from impairments to occupational health and safety. During the various tasks performed on and with the boosters, personnel must wear personal protective equipment, to which special reference is made in the individual sections of this manual. Description of the personal protective equipment The personal protective equipment is explained below: Protective gloves Protective gloves protect hands from friction, abrasion, puncture wounds, or deeper injuries, as well as from contact with hot surfaces. Protective work clothing Protective work clothing is tight-fitting work clothing with low resistance to tearing, with tight sleeves, and without projecting parts. Safety footwear Safety footwear protects the feet from crushing injuries, falling parts and slipping on a slippery substrate. Safety goggles The protective goggles protect the eyes from flying parts and liquid splashes. 22 Boosters DLE 2 (-1, -2) – DLE 75 (-1, -2) 26.01.2012 Safety Signage 2.7 Safety devices Integration into an emergency stop concept is required The boosters are incomplete machines and do not have their own controller and do not have an autonomous emergency stop function. Before the boosters are put into operation, emergency stop equipment for the machine must be installed and integrated into the plant control safety chain. Connect the emergency stop equipment so that dangerous situations for persons and property are ruled out when the power supply is interrupted or restored after an interruption. The emergency stop equipment must always be freely accessible. 2.8 Signage The following symbols and information signs can be found in the work area. They refer to the immediate surroundings in which they are applied. WARNING! Danger in the case of illegible signage! Stickers and signs can become dirty or otherwise obscured over time so that dangers cannot be recognised and necessary operating instructions cannot be followed. This causes a risk of injury. – – Signage at the booster Always keep all safety notices, warnings and operating instructions in a clearly legible condition. Replace damaged signs or stickers immediately. The signs attached on the booster are presented and explained in the following illustration. Depending on the version of the booster, the information on the signs can vary. 26.01.2012 Boosters DLE 2 (-1, -2) – DLE 75 (-1, -2) 23 Safety Behaviour in case of fire or accidents Illustration Description Attention! Not suitable for oxygen. Attention! Keep grease-free, suitable for OPERATION WITH OXYGEN. Fig. 1: Signage 2.9 Behaviour in case of fire or accidents Preventive measures n Be prepared for fire and accidents at all times! n Keep first-aid equipment (first-aid kit, blankets, etc.) and fire extinguishing devices operational and readily available. n Make your personnel familiar with accident reporting equipment as well as first-aid and rescue equipment. n Keep access paths clear for rescue vehicles. Steps in case of fire and accidents n Immediately trigger an Emergency Stop using EMERGENCYSTOP devices. n Provided your own health is not in danger, rescue all personnel from the danger area. n If necessary, initiate first aid measures. n Alert the fire department and/or emergency medical services. n In case of fire: provided your own health is not in danger, extinguish the fire using fire extinguishing equipment and continue to do so until the fire department arrives. n Notify the person in charge at the machine's place of installation. n Clear access paths for rescue vehicles. n Wave rescue vehicles into position. 24 Boosters DLE 2 (-1, -2) – DLE 75 (-1, -2) 26.01.2012 Safety Environmental protection 2.10 Spare parts Explosion protection WARNING! Explosion hazard due to the use of incorrect spare parts! The use of incorrect or defective spare parts may result in explosions in the ex-zone. This, in turn, may result in serious injuries or death as well as significant damage to property. – – Only use original spare parts produced by the manufacturer or spare parts explicitly authorised by the manufacturer. Always contact the manufacturer if in doubt. Non-observance of these instructions results in the loss of explosion protection. 2.11 Environmental protection NOTICE! Danger to the environment due to incorrect handling of materials which can harm the environment! In case of incorrect handling of materials which can harm the environment, especially improper disposal, there can be significant damage to the environment. – – Always heed the notes below about the handling of materials which can harm the environment and their disposal. If materials which can harm the environment accidentally escape into the environment, take suitable measures immediately. In case of doubt, inform the responsible local authority about the damage and ask what suitable measures to take might be. The following materials which might harm the environment are used: Cleaning liquids Cleaning liquids incorporating solvents contain toxic substances. They must not be allowed to escape into the environment. Disposal must be carried out by a specialist disposal company. Lubricants Lubricants such as greases and oils contain toxic substances. They must not be allowed to escape into the environment. Disposal must be carried out by a specialised disposal company. 26.01.2012 Boosters DLE 2 (-1, -2) – DLE 75 (-1, -2) 25 Safety Environmental protection Displacement media 26 Displacement media such as gases can contain toxic substances. They must not be released into the environment. Potentially leaking displacement media must be disposed of by a specialist company. Boosters DLE 2 (-1, -2) – DLE 75 (-1, -2) 26.01.2012 Technical data Dimensions and weights 3 Technical data 3.1 Dimensions and weights The dimensions and weights of all booster types are listed below. The values listed below are approximate values and can vary slightly. Type Width Height Depth Weight mm mm mm kg DLE 2–1 440 275 180 15 DLE 5–1 440 275 180 15 DLE 15–1 450 275 180 13 DLE 30–1 450 275 180 13 DLE 75–1 450 275 180 13 DLE 2 600 275 180 20 DLE 5 600 235 180 20 DLE 15 620 235 180 18 DLE 30 620 235 180 18 DLE 75 620 235 180 18 DLE 2–5 600 235 180 20 DLE 5–15 610 235 180 19 DLE 5–30 610 235 180 19 DLE 15–30 620 235 180 19 DLE 15–75 620 235 180 19 DLE 30–75 620 235 180 19 DLE 2–1–2 610 275 180 22 DLE 5–1–2 610 235 180 22 DLE 15–1–2 615 235 180 20 DLE 30–1–2 615 235 180 20 DLE 75–1–2 615 235 180 20 DLE 2–2 780 275 180 25 DLE 5–2 780 235 180 25 DLE 15–2 800 235 180 23 26.01.2012 Boosters DLE 2 (-1, -2) – DLE 75 (-1, -2) 27 Technical data Connected loads Type Width Height Depth Weight mm mm mm kg DLE 30–2 800 235 180 23 DLE 75–2 800 235 180 23 DLE 2–5–2 780 235 180 25 DLE 5–15–2 790 235 180 24 DLE 5–30–2 790 235 180 24 DLE 15–30–2 800 235 180 24 DLE 15–75–2 800 235 180 24 DLE 30–75–2 800 235 180 24 8 DLE 3 990 350 220 55 8 DLE 6 990 350 220 55 8 DLE 1.65 810 350 220 40 3.2 Connected loads Pneumatic Data Value Unit *Oil-free possible Compressed air quality Solids, max. particle size 5 µm Solids, max. particle concentration 5 mg/m3 Dew point up to + 10 ℃ water content 9.4 g/m3 Dew point up to + 2 ℃ water content 5.6 g/m3 * if an oiler has been used, the air must always be oiled as oil in air will wash out the pneumatic grease. Connected loads, mechanical Type Inlet connection* Outlet connection ** Recommended internal tube diameter in mm Drive air Admission pressure Operating pressure DLE 2–1 G 1/2 G 1/2 19 13 13 DLE 5–1 G 1/2 G 1/2 19 13 13 DLE 15–1 G 1/4 G 1/4 19 6 4 DLE 30–1 G 1/4 G 1/4 19 6 4 DLE 75–1 G 1/4 G 1/4 19 6 4 28 Boosters DLE 2 (-1, -2) – DLE 75 (-1, -2) 26.01.2012 Technical data Connected loads Type Inlet connection* Outlet connection ** Recommended internal tube diameter in mm Drive air Admission pressure Operating pressure DLE 2 G 1/2 G 1/2 19 13 13 DLE 5 G 1/2 G 1/2 19 13 13 DLE 15 G 1/4 G 1/4 19 6 4 DLE 30 G 1/4 G 1/4 19 6 4 DLE 75 G 1/4 G 1/4 19 6 4 DLE 2–5 G 1/2 G 1/2 19 13 13 DLE 5–15 G 1/2 G 1/4 19 13 4 DLE 5–30 G 1/2 G 1/4 19 13 4 DLE 15–30 G 1/4 G 1/4 19 6 4 DLE 15–75 G 1/4 G 1/4 19 6 4 DLE 30–75 G 1/4 G 1/4 19 6 4 DLE 2–1–2 G 1/2 G 1/2 19 13 13 DLE 5–1–2 G 1/2 G 1/2 19 13 13 DLE 15–1–2 G 1/4 G 1/4 19 6 4 DLE 30–1–2 G 1/4 G 1/4 19 6 4 DLE 75–1–2 G 1/4 G 1/4 19 6 4 DLE 2–2 G 1/2 G 1/2 19 13 13 DLE 5–2 G 1/2 G 1/2 19 13 13 DLE 15–2 G 1/4 G 1/4 19 6 4 DLE 30–2 G 1/4 G 1/4 19 6 4 DLE 75–2 G 1/4 G 1/4 19 6 4 DLE 2–5–2 G 1/2 G 1/2 19 13 13 DLE 5–15–2 G 1/2 G 1/4 19 13 4 DLE 5–30–2 G 1/2 G 1/4 19 13 4 DLE 15–30–2 G 1/4 G 1/4 19 6 4 DLE 15–75–2 G 1/4 G 1/4 19 6 4 DLE 30–75–2 G 1/4 G 1/4 19 6 4 8 DLE 3 G1/2 G 1/2 19 13 13 8 DLE 6 G1/2 G1/2 19 13 13 8 DLE 1.65 G1/2 G1/2 19 13 13 26.01.2012 Boosters DLE 2 (-1, -2) – DLE 75 (-1, -2) 29 Technical data Connected loads When the recommended internal tube diameters are observed, the boosters reach the maximum delivery output. Additional connections The above inlet and outlet connections are standard connections. Additional connection options for inlet and outlet are provided below. These additional connection options must correspond to the type key information on the type plate. See Ä Chapter 3.9 ‘Type key’ on page 35 in this operating manual for this. * Inlet connection (Table "Connected loads, mechanical") Connection designation of inlet connection Dimension Booster types N NPT G1/2" DLE 2, DLE 5 NPT G1/4" DLE 15 – 75 9/16 – 18 UNF for G1/4" high pressure pipe, connection H4 downstream of Maximator DLE 15 – 75 U ** Outlet connection (Table "Connected loads, mechanical") Connection designation of outlet connection Dimension Booster types N NPT G1/2" DLE 2, DLE 5 NPT G1/4" DLE 15 – 75 U 9/16 – 18 UNF for DLE 15 – 75 G1/4" high pressure pipe, connection H4 downstream of Maximator The following combinations of threaded inlet and outlet unions are possible GG, GU, UU, NU and NN. 30 Boosters DLE 2 (-1, -2) – DLE 75 (-1, -2) 26.01.2012 Technical data Performance characteristics 3.3 Performance characteristics Type Displacement in cm3 Max. Max. Transmisoperating compres- sion ratio pressure sion ratio (i1/i2) pB (static) bar Max. operating temperature in °C Admission pressure DLE 2–1 922 20 1:10 1:2 60 0 20 DLE 5–1 373 50 1:15 1:5 60 2 50 DLE 15–1 122 150 1:20 1:15 100 7 150 DLE 30–1 60 300 1:20 1:30 100 15 300 DLE 75–1 25 750 1:20 1:75 100 35 750 DLE 2 1844 40 1:10 1:2 60 0 40 DLE 5 746 100 1:15 1:5 60 2 100 DLE 15 244 300 1:20 1:15 100 7 300 DLE 30 120 600 1:20 1:30 100 15 600 DLE 75 50 1500 1:20 1:75 100 35 1500 DLE 2–5 922 100 1:25 1:2/1:5 60 0 0.8 *PL DLE 5–15 373 300 1:45 1:5/1:15 100 2 6 *PL DLE 5–30 373 600 1:90 1:5/1:30 100 2 2 *PL DLE 15–30 122 600 1:40 1:15/1:30 100 7 15 *PL DLE 15–75 122 1500 1:100 1:15/1:75 100 7 3.5 *PL DLE 30–75 60 1050 1:50 1:30/1:75 100 15 20 *PL DLE 2–1–2 922 40 1:10 1:4 60 0 40 DLE 5–1–2 373 100 1:15 1:10 60 4 100 DLE 15–1–2 122 300 1:20 1:30 100 10 300 DLE 30–1–2 60 600 1:20 1:60 100 20 600 DLE 75–1–2 25 1500 1:20 1:150 100 45 1500 DLE 2–2 1844 40 1:10 1:4 60 0 40 DLE 5–2 746 100 1:15 1:10 60 4 100 DLE 15–2 244 300 1:20 1:30 100 10 300 DLE 30–2 120 600 1:20 1:60 100 20 600 DLE 75–2 50 1500 1:20 1:150 100 45 1500 DLE 2–5–2 922 100 1:25 1:4/1:10 60 0 1.6 *PL DLE 5–15–2 373 300 1:45 1:10/1:30 100 2 12 *PL DLE 5–30–2 373 600 1:90 1:10/1:60 100 2 4 *PL 26.01.2012 Boosters DLE 2 (-1, -2) – DLE 75 (-1, -2) min. Pa max. Pa * 31 Technical data Operating conditions Type Displacement in cm3 Max. Max. Transmisoperating compres- sion ratio pressure sion ratio (i1/i2) pB (static) bar Max. operating temperature in °C Admission pressure DLE 15–30–2 122 600 1:40 1:30/1:60 100 7 30 *PL DLE 15–75–2 122 1500 1:100 1:30/1:150 100 7 7 *PL DLE 30–75–2 60 1500 1:50 1:60/1:150 100 15 40 *PL min. Pa max. Pa * * = Maximum permissible pressure load that may be used for the high pressure component of the booster. Compression ratio = operating pressure/admission pressure 3.4 Operating conditions Environment Data Temperature range Relative humidity, maximum Ambient pressure range Altitude, max. Duration 32 Data Value Unit - 20 – + 60 °C 60 % min. 1 bar less than drive pressure, max. 10 bar unlimited m above sea level Value Switch-on time Switch-on time 50% with stroke frequency > 60 strokes per minute Switch-on time Switch-on time 100% with stroke frequency < 30 strokes per minute Boosters DLE 2 (-1, -2) – DLE 75 (-1, -2) 26.01.2012 Technical data Emissions 3.5 Operating materials Lubricant Operating material Manufacturer Designation Lubricating grease Klüber Lubrication ISOFLEX TOPAS NB 52 3.6 Emissions The noise emission measurement was made at a height of 1.5 metres and at a distance of 1 metre to the tester. The determined noise emission was measured during full-load operation with a counterpressure of 10 bar. Data Noise emission 26.01.2012 Boosters DLE 2 (-1, -2) – DLE 75 (-1, -2) Value Unit 81 dB(A) 33 Technical data Ex marking 3.7 Ex marking The Ex marking is located on the drive component of the booster in the immediate vicinity of the type plate. Fig. 2: Ex marking explosion group IIB Marki Designang tion Fig. 3: Ex marking explosion group IIC 34 Meaning CE marking Conformity marking in accordance with Appendix X of Directive 94/9/EC. The manufacturer attaches it before the device is put into circulation. II Device group The booster can be used in potentially explosive areas with the exception of mining. 2GD Device category For device category 2GD, a potentially explosive atmosphere may develop occasionally involving gases (G) and dusts (D). The device ensures a high level of safety and can be used in zone 1 and zone 2. IIB Explosion group Can be used for substances with a Maximum Experimental Safe Gap of 0.5 mm £ MESG £ 0.9 mm (IEC 60079-1). IIC Explosion group Can be used for substances with a Maximum Experimental Safe Gap < 0.5 mm (IEC 60079-1). c Ignition protection type Design safety for non-electronic devices in potentially explosive areas as per DIN EN 13463-5. X Additional marking Indicates the necessity for compliance with special operating conditions, here ambient temperatures (Ä Chapter 3.4 ‘Operating conditions’ on page 32). Boosters DLE 2 (-1, -2) – DLE 75 (-1, -2) 26.01.2012 Technical data Type key 3.8 Type plate The type place is centrally located on the drive component of the booster and contains the following information: Fig. 4: Type plate n n n n n n n n Manufacturer Type (information from type key) Year of manufacture Gas pressure, min. inlet Gas pressure, max. outlet Maximum air drive Transmission ratio Max. compression ratio 3.9 Type key The type key for the corresponding booster models is structured as follows: 1 2 3 4 Version for C = CO2, S = oxygen Thread of gas inlet and outlet G = pipe thread (standard), U = high pressure connection , N = NPT 1 = 1 high pressure piston, 2 = 2 drive pistons Design (e.g. DEL 15–75) Fig. 5: Type key 26.01.2012 Boosters DLE 2 (-1, -2) – DLE 75 (-1, -2) 35 Type key 36 Boosters DLE 2 (-1, -2) – DLE 75 (-1, -2) 26.01.2012 Structure and function Brief description 4 Structure and function 4.1 Overview Fig. 6: Overview 1 2 3 4 Pilot valve 1 Control valve (4/2 directional control valve) Air cylinder Pilot valve 2 5 6 7 8 Exhaust air silencer Booster head with suction and pressure valve Pressure cylinder Cooling cylinder 4.2 Brief description The boosters work on the principle of a pressure intensifier. They are used to compress gas and compressed air to a higher pressure; they are operated with a pneumatic admission pressure of a maximum of 10 bar compressed air. This admission pressure is required to compress the particular delivery medium to a higher operating pressure. In the process, large areas are driven by means of low pressure by the air piston thus generating a high pressure level on small areas of the booster via the high pressure piston. The following are fields of application for the boosters: n Pressure test with gas n Transferring gases from transport containers with a low pressure level to a high pressure level n Filling hydraulic accumulators with nitrogen n Gas recovery n Nitrogen reservoir filling n Supply of seal gas plants n Gas assisted injection moulding 26.01.2012 Boosters DLE 2 (-1, -2) – DLE 75 (-1, -2) 37 Structure and function Assembly description > Drive component n CO2 foaming n Filling clean air cylinders n Leakage tests 4.3 Assembly description 4.3.1 Booster head with inlet and outlet valve The booster head closes the compression chamber and separates it spatially from the surrounding pressure. The booster head contains the inlet and outlet valves. The displacement medium to be compressed flows into the compression chamber and back out again through these inlet and outlet valves. 4.3.2 High pressure component The high pressure component is used to compress the particular displacement medium. The high pressure component consists of the pressure cylinder, booster head with inlet and outlet valves, and the high pressure piston with the sealing and guide elements. 4.3.3 Pilot valve The pilot valves are used by the air piston as a limit switch. The pilot valves are actuated by the air piston in the end positions; they forward air pulses to the control valve. As a result, the pilot valves ventilate the actuation chamber of the control valve. This moves the control valve from one end position to the other. 4.3.4 Control valve The control valve is used to alternately apply compressed air to the upper and lower side of the air piston. The control valve is actuated via the pilot valves; it ensures that the drive air is directed to the left and/or right side of the air piston. 4.3.5 Drive component The drive component is used to accommodate the drive air (compressed air); it actuates the high pressure component of the booster via a piston rod thus compressing the particular displacement medium to a higher pressure. 38 Boosters DLE 2 (-1, -2) – DLE 75 (-1, -2) 26.01.2012 Structure and function Mode of operation of the boosters 4.3.6 Exhaust air silencer The exhaust air silencer is used to discharge expanding air from the booster with reduced noise. The drive air escapes from the booster after the operation has been performed via the exhaust air silencer. The exhaust air silencer is made of plastic or aluminium depending on the booster model. 4.3.7 Cooling cylinder The cooling cylinder is used for insulating and cooling the high pressure component of the booster. The cooling cylinder encloses the high pressure cylinder. The expanding (very cold) drive air is directed into the space between the two cylinders in order to cool the high pressure cylinder during operation. 4.3.8 Compressed air control unit The compressed air control unit (Fig. 7) is a frequently installed sub-assembly; however, it is not part of the standard equipment. The manufacturer recommends the use of a compressed air control unit. Fig. 7: Compressed air control unit The compressed air control unit is used to manually adjust and control the operating pressure directly at the booster. It is preassembled at the drive air connection of the control valve (Fig. 7/1). Using the pressure regulator (Fig. 7/4), the particular operating pressure can be adjusted and controlled on the pressure gauge (Fig. 7/5). Furthermore, the drive air can be dehydrated via the water trap (Fig. 7/6) and the bleeder valve (Fig. 7/7). The ball valve (Fig. 7/3) manually shuts off the drive air from the compressed air network to the booster. The control line (Fig. 7/2) supplies the pilot valve air connection with direct pilot valve air. 4.4 Mode of operation of the boosters The piping and instrumentation (P + I) flow chart of the boosters is illustrated in the graphic below. 26.01.2012 Boosters DLE 2 (-1, -2) – DLE 75 (-1, -2) 39 Structure and function Mode of operation of the boosters Fig. 8: P + I flow chart of the boosters 1 2 3 4 5 6 7 8 9 10 11 12 13 Explanation of the mode of operation 40 Pilot valve lower cap Inlet valve High pressure piston Outlet valve Pilot valve air connection (X) Exhaust air silencer Air connection (PL) Control valve Air piston Outlet valve (B) High pressure piston Inlet valve (A) Pilot valve upper cap The drive air flows from the air connection (Fig. 8/7) through the control valve (Fig. 8/8) to the underside of the air piston (Fig. 8/9). The air piston moves to the right in the drive component thus performing a suction stroke on the left side of the high pressure component. The inlet valve (Fig. 8/2) opens and the gas to be compressed flows through the connection (Fig. 8/A) into the compression chamber of the high pressure component. A pressure stroke is performed on the right side of the high pressure component. Boosters DLE 2 (-1, -2) – DLE 75 (-1, -2) 26.01.2012 Structure and function Versions The inlet valve (Fig. 8/12) closes, the outlet valve (Fig. 8/10) opens and the compressed gas flows out of the connection (Fig. 8/B). When the air piston (Fig. 8/9) has moved to the right end position of the drive component, it opens the pilot valve (Fig. 8/13). The control air flows from the connection through the open pilot valve (Fig. 8/13) to the large control valve side of the booster. The control valve (Fig. 8/8) switches to the other switch position and the drive air flows to the right side of the air piston (Fig. 8/9). The air piston moves to the left side of the drive component. As a result, a pressure stroke is generated on the left side of the high pressure component and a suction stroke on the right side. The now expanding drive air escapes from the working chamber via the exhaust air silencer (Fig. 8/6). In the booster variants with a transmission ratio > 5, the air is directed through the cooling cylinder and therefore used to cool down the high pressure components. 4.5 Versions The individual booster type versions are listed below. 26.01.2012 Boosters DLE 2 (-1, -2) – DLE 75 (-1, -2) 41 Structure and function Versions Boosters with one drive piston Legend: PL = Air drive PA = Gas admission pressure PB = Operating pressure = Exhaust air Version Graphic representation Single-stage, single-acting Types: n n n n n DLE 2–1 DLE 5–1 DLE 15–1 DLE 30–1 DLE 75–1 Single-stage, dual-acting Types: n n n n n DLE 2 DLE 5 DLE15 DLE 30 DLE 75 Dual-stage, dual-acting Types: n n n n n n 42 DLE 2–5 DLE 5–15 DLE 5–30 DLE 15–30 DLE 15–75 DLE 30–75 Boosters DLE 2 (-1, -2) – DLE 75 (-1, -2) 26.01.2012 Structure and function Versions Boosters with two drive pistons Version Graphic representation Single-stage, single-acting with two air pistons Types: n n n n n DLE 2–1–2 DLE 5–1–2 DLE 15–1–2 DLE 30–1–2 DLE 75–1–2 Single-stage, dual-acting with two air pistons Types: n n n n n DLE 2–2 DLE 5–2 DLE 15–2 DLE 30–2 DLE 75–2 Dual-stage, dual-acting with two air pistons Types: n n n n n n 26.01.2012 DLE 2–5–2 DLE 5–15–2 DLE 5–30–2 DLE 15–30–2 DLE 15–75–2 DLE 30–75–2 Boosters DLE 2 (-1, -2) – DLE 75 (-1, -2) 43 Structure and function Connections 4.6 Connections The boosters are delivered without any piping or threaded unions. The connected load information (Ä ‘Connected loads, mechanical’ on page 28) must be observed for all interface connections. A connection drawing of all connections to be installed can be found in Ä Appendix B ‘Connection drawing’ on page 123. The boosters have the following interfaces: Fig. 9: Interfaces (side view) Item no. Designation Connection Function 1 Control air connection "X" G 1/8" Connection for direct pilot valve air (uncontrolled and filtered) control air ³ drive air 2 Ventilation connection for control valve "Y" Bore Ventilation and bleeding of the control valve (pulsetype air discharge) 3 Air connection for pilot valve M5 "X" Bleeding of the pilot valve. This connection can be used to connect a stroke counter. The air escapes in pulses here. The connection must therefore not be closed. 4 Exhaust air silencer connec- G1/2" tion Outlet of the expanding drive air 44 Boosters DLE 2 (-1, -2) – DLE 75 (-1, -2) 26.01.2012 Structure and function Connections Fig. 10: Interfaces (top view) Item no. Designation Connection Function 5 Outlet connection "B" Depends on Outlet for operating pressure model 6 Leakage connection for high G 1/8" pressure sides "Z1" and "Z3" Ventilation of the high pressure cylinder behind the piston. Alternate admission and expulsion (alternately fitted with silencer). 7 Operation connection "PL" Inlet for the compressed drive air 8 Leakage connection for high G 1/8" pressure sides "Z1" and "Z3" 9 Inlet connection "A" Depends on Inlet for the admission pressure model 10 Leakage connection for air sides "Z2" and "Z4" G 1/8" Discharge of the leakage at the drive component 11 Leakage connection for air sides "Z2" and "Z4" G 1/8" Discharge of the leakage at the drive component 26.01.2012 G 1/8" Ventilation of the high pressure cylinder behind the piston. Alternate admission and expulsion (alternately fitted with silencer). Boosters DLE 2 (-1, -2) – DLE 75 (-1, -2) 45 Structure and function Accessories 4.7 Working areas and danger zones The danger zone (Fig. 11/marked in red) is the entire zone surrounding the entire booster. If the booster has an optional compressed air control unit (Fig. 11/1), the working area is located within the danger zone. Fig. 11: Working areas and danger zones 4.8 Scope of delivery The booster is delivered without piping or threaded unions. The following components are part of the scope of delivery: Designation Quantity Booster 1 Retaining bracket for mounting 2 Operating instructions for boosters DLE 2 (-1, -2) – DLE 75 (-1, -2) 1 Installation explanation 1 Conformity declaration according to ATEX Category IIB and/or IIC 1 4.9 Accessories The following accessories are available for the boosters. Compressed air control unit 46 The compressed air control unit is used to manually adjust the drive air directly at the booster. The compressed air control unit consists of a pressure filter, a water separator, a shut-off valve, a pressure regulator, a hose line and a manometer. A safety valve for the compressed air control unit is also available. Boosters DLE 2 (-1, -2) – DLE 75 (-1, -2) 26.01.2012 Structure and function Accessories Air lubricator The air lubricator is used to increase the oil content in the drive air. The manufacturer recommends the use of an air lubricator if the drive air is extremely dry. Gasket sets The individual gasket sets of the booster components are available from the manufacturer as complete sealing kits. These sealing kits are used during all fault correction work. See Ä Appendix D ‘Cross-sectional drawings and bills of materials’ on page 127. 26.01.2012 Boosters DLE 2 (-1, -2) – DLE 75 (-1, -2) 47 Accessories 48 Boosters DLE 2 (-1, -2) – DLE 75 (-1, -2) 26.01.2012 Transport, packaging, and storage Packaging 5 Transport, packaging, and storage 5.1 Safety instructions for transport Improper transport NOTICE! Material damage due to improper transport! Transport items can fall or tip over if transported improperly. This can cause considerable material damage. – – When unloading transport items at delivery, as well as for internal transport, proceed carefully and pay attention to the symbols and instructions on the packaging. Only remove the packaging just before installation. 5.2 Transport inspection On receipt, immediately inspect the delivery for completeness and transport damage. Proceed as follows in the event of externally apparent transport damage: n Do not accept the delivery, or only accept it subject to reservation. n Note the extent of the damage on the transport documentation or the shipper's delivery note. n Initiate complaint procedures. Issue a complaint in respect of each defect immediately following detection. Damage compensation claims can only be asserted within the applicable complaint deadlines. 5.3 Packaging About packaging The individual packages are packaged in accordance with anticipated transport conditions. Only environmentally-friendly materials have been used in the packaging. The packaging is intended to protect the individual components from transport damage, corrosion and other damage prior to assembly. Therefore do not destroy the packaging and only remove it shortly before assembly. Handling packaging materials 26.01.2012 Dispose of packaging material in accordance with the relevant applicable legal requirements and local regulations. Boosters DLE 2 (-1, -2) – DLE 75 (-1, -2) 49 Transport, packaging, and storage Storage NOTICE! Danger to the environment due to incorrect disposal! Packaging materials are valuable raw materials and in many cases can continue to be used or can be properly processed and recycled. Incorrect disposal of packaging materials may pose risks to the environment. – – Dispose of packaging materials in accordance with the environmental regulations. Observe locally applicable waste disposal regulations. If necessary, outsource the disposal to a specialist company. 5.4 Storage Storage of packages Only store packages under the following conditions: n n n n n n n n Do not store outdoors. Store in a dry and dust-free environment. Do not expose to any aggressive media. Protect from direct sunlight. Avoid mechanical vibration. Storage temperature: - 20 to 60 ℃. Relative humidity: max. 60%. When storing for longer than three months, check the general condition of all parts and the packaging on a regular basis. Touch up or reapply anti-corrosion agents as needed. It may be the case that storage instructions are affixed to the packages that extend beyond the requirements cited here. Comply with these instructions accordingly. 50 Boosters DLE 2 (-1, -2) – DLE 75 (-1, -2) 26.01.2012 Installation and initial commissioning Prerequisites for installation 6 Installation and initial commissioning 6.1 Safety instructions for installation and initial commissioning Improper installation and initial commissioning WARNING! There is an injury hazard if the device is not installed and commissioned properly! Improper installation and commissioning can cause severe injuries and significant material damage. – – – – – Only allow mechanical engineers and plant engineers to perform installation and initial commissioning. Ensure order and cleanliness at the installation location! Parts and tools that are lying loose or on top of each other are accident hazards. Properly mount lines and hoses. Maintain the prescribed bolt-tightening torque. Only remove sealing plugs immediately before mounting the connecting lines. Comply with the following before initial commissioning: – Ensure that all installation tasks have been properly executed and concluded in accordance with the instructions in this manual. – Ensure that a leak test of all line connections has been performed. – Ensure that no persons are in the danger zone. Explosion protection WARNING! Danger of explosion during installation! Bringing in ignition sources such as sparks, open flames and hot surfaces can result in explosions in the Ex-zone. – – – Obtain written work approval before starting installation. Only perform installation when a potentially explosive atmosphere can be ruled out. Only use those tools that are authorised for use in the Ex-zone. Non-compliance with these instructions will result in loss of explosion protection. 6.2 Prerequisites for installation The prerequisites that must be in place for installation of the booster are described below. 26.01.2012 Boosters DLE 2 (-1, -2) – DLE 75 (-1, -2) 51 Installation and initial commissioning Prerequisites for installation The booster is an incomplete machine and is designed to be installed in a plant or system. Set up the booster in such a manner that the following conditions are satisfied: n The installation site must be level. n The booster must be stable and secure, or firmly and securely seated. n The booster must not be exposed to any vibration or oscillation. n The booster must be easily accessible from all sides. n The booster must be installed in such a manner that it is not exposed to any external heat sources. n The booster must be installed in a dust-free environment. Installation instructions WARNING! Danger of explosion if the installation instructions are not observed! If the installation instructions for boosters designed for the compression of toxic and combustible gases are not observed, this can result in the development of a potentially explosive atmosphere. – – – – – – 52 Always set up boosters in a well ventilated room. Always keep hydrogen systems leak-tight. Blow-out lines of safety valves and leakage lines must always be routed outside into the open. Blow-out lines must not be installed under eaves, openings in buildings or in the vicinity of air intake openings. For hydrogen systems in rooms or buildings, it must be possible to safely and quickly shut off the gas supply coming from the outside at a safe point. Pipe connections on hydrogen systems must always be created so that these ensure the connection will be leak tight for a long time. Boosters DLE 2 (-1, -2) – DLE 75 (-1, -2) 26.01.2012 Installation and initial commissioning Installing the connecting lines 6.3 Mounting the booster CAUTION! Danger of material damage! Dirt or drilling dust that gets into the connections of the booster during installation can result in booster damage. – – Personnel: Keep all connections sealed with sealing plugs during installation. Only remove the sealing plugs directly prior to mounting the connection piping. n Mechanical and plant engineers Protective equipment: n Protective work clothing n Safety goggles n Safety footwear Special tool: 1. n Power drill n Vacuum cleaner Set up booster with pre-assembled angle brackets at installation site. To do this, observe the installation plan Ä Appendix C ‘Installation plan’ on page 125. 2. Place booster, mark bore holes and remove booster again. 3. Drill installation holes. 4. Remove drilling dust using vacuum cleaner. 5. Set up booster and use fixing bolts and spring washers with a torque of 85 Nm to fasten to foundation. 6.4 Installing the connecting lines A description of how the booster is connected to the compressed air network and to a transport gas container is provided below. The booster is delivered without any threaded unions or piping. Observe the information in Ä ‘Connected loads, mechanical’ on page 28 and Ä Appendix B ‘Connection drawing’ on page 123. 26.01.2012 Boosters DLE 2 (-1, -2) – DLE 75 (-1, -2) 53 Installation and initial commissioning Installing the connecting lines Personnel: n Mechanical and plant engineers Protective equipment: n Protective work clothing n Safety footwear n Safety goggles Special tool: n Spanner Unforeseeable movements WARNING! Danger of injury due to unforeseeable movements of compressed air lines! Lines of the in-house compressed air network can move in an unforeseeable manner and can cause injuries if there is a load change. – – – – Depressurise the connecting line before all mounting tasks. All piping must be securely anchored to the floor or to walls. All piping must be routed in such a manner that it will not cause any tripping hazard. Always wear personal protective equipment. Use of incorrect connecting lines CAUTION! Danger of material damage if the wrong connecting lines are used! The use of incorrectly dimensioned piping or threaded unions can cause malfunctions and material damage to the booster. – – – The piping and lines must be matched to the maximum output pressure of the booster. The tightening torque of the respective threaded unions must be complied with. The cross section of the high-pressure pipes and lines must not be smaller than the cross section of the connections. The prerequisites that must be in place for proper installation are the presence of a professionally planned, installed and maintained compressed air network and a shut-off valve additionally installed at the inlet of the compressed air network. 54 Boosters DLE 2 (-1, -2) – DLE 75 (-1, -2) 26.01.2012 Installation and initial commissioning Installing the connecting lines > Connecting the drive air 6.4.1 Connecting the drive air Depending on the version, the connection of the drive air on the booster must be either installed on the air drive connection (PL) of the control valve housing or, if a compressed air control unit is available, at the air drive connection of the compressed air control unit. Observe the information in Ä ‘Connected loads, mechanical’ on page 28 and Ä Appendix B ‘Connection drawing’ on page 123 for how to use drive air lines, hose connections or threaded unions. A description of how the drive air is installed on the compressed air control unit is provided below. 1. Unscrew sealing plug from drive air connection (Fig. 12/1) of the control valve housing or from compressed air control unit (Fig. 12/2). 2. Insert connecting piece or pipe (G 3/4 ") (Fig. 13/1) into drive air connection (PL) of compressed air control unit (Fig. 13/2) together with seal and tighten using a torque of 50 Nm. Fig. 12: Unscrewing sealing plug Fig. 13: Drive air connection (compressed air control unit) 26.01.2012 Boosters DLE 2 (-1, -2) – DLE 75 (-1, -2) 55 Installation and initial commissioning Installing the connecting lines > Installing a separate leakage line 6.4.2 Connecting the inlet line for admission pressure and outlet line for operating pressure Observe the information in Ä ‘Connected loads, mechanical’ on page 28 and Ä Appendix B ‘Connection drawing’ on page 123 for how to use drive air lines, hose connections or threaded unions. 1. Detach sealing plugs from inlet and outlet connections (Fig. 14/1 and 2). 2. Install piping for inlet and outlet lines according to Ä Appendix B ‘Connection drawing’ on page 123. Fig. 14: Connecting inlet and outlet connections 6.4.3 Installing a separate leakage line When compressing combustible or toxic gases, an additional leakage line must be installed on the booster. 1. Unscrew the breather silencer (Fig. 15/1) from the leakage connections Z1 and Z3. 2. Connect leakage piping (Fig. 16/1) to leakage connections Z1 (Fig. 16/2) and Z3 (Fig. 16/3). 3. Install separate leakage line according to (Ä Appendix B ‘Connection drawing’ on page 123) on leakage piping. Fig. 15: Removing breather silencer Fig. 16: Piping for leakage line 56 Boosters DLE 2 (-1, -2) – DLE 75 (-1, -2) 26.01.2012 Installation and initial commissioning Installing exhaust air silencer 6.5 Installing exhaust air silencer A description of how the exhaust air silencer is installed is provided below. Depending on the booster version, the exhaust air silencer can be made of plastic or aluminium. The installation of the exhaust air silencer is always identical. Personnel: n Mechanical and plant engineers Protective equipment: n Protective work clothing n Safety footwear n Safety goggles 1. Have exhaust air silencer ready. 2. Unscrew sealing plug from exhaust air connection. 3. Position exhaust air silencer (Fig. 19/1) at exhaust air connection (Fig. 19/2) and tighten hand-tight. Fig. 17: Exhaust air silencer Fig. 18: Sealing plug Fig. 19: Installing exhaust air silencer 26.01.2012 Boosters DLE 2 (-1, -2) – DLE 75 (-1, -2) 57 Installation and initial commissioning Initial commissioning 6.6 Initial commissioning A description of how the booster is commissioned is provided below. Personnel: n Mechanical and plant engineers Protective equipment: n Protective work clothing n Safety goggles n Safety footwear Special tool: n Leak detector spray Checks before initial commissioning 1. Check all media connections for correct installation. 2. Check all piping and threaded unions for mechanical damage. 3. Open displacement medium (gases) on transport gas container. ð The displacement medium flows in. 4. Open compressed air line of compressed air network to booster. ð The booster starts delivering. When a compressed air control unit is used, the drive air is connected to the manometer of the compressed air control unit when the compressed air network is opened. In this case, the manometer must also be checked for function (Ä ‘Checking the manometer for function’ on page 58). 5. Checking the manometer for function 58 Perform a leak test with leak detector spray on all connections. During the initial commissioning, the manometer of the compressed air control unit must be checked for function. Proceed as follows to do this: Boosters DLE 2 (-1, -2) – DLE 75 (-1, -2) 26.01.2012 Installation and initial commissioning Initial commissioning 1. Keep the ball valve of the compressed air control unit (Fig. 20/1) closed. The ball valve is closed if its position is perpendicular (Fig. 20/1) to the centre axis. 2. Fig. 20: Compressed air control unit Pull the pressure regulator (Fig. 20/2) of the manometer upward. ð The pressure regulator will audibly detach from the locking mechanism. 3. Open the pressure regulator (Fig. 21/1) by turning it to the right. ð The drive air is applied. 4. On the manometer (Fig. 21/2), check whether the applied pressure is displayed. Fig. 21: Opening pressure regulator 26.01.2012 Boosters DLE 2 (-1, -2) – DLE 75 (-1, -2) 59 Installation and initial commissioning Initial commissioning 5. Open the vent screw (Fig. 22/1) of the water separator (Fig. 22/2) and dissipate the pressure. ð Pressure escapes from the vent valve and the pressure drop is displayed on the manometer. 6. Close the vent screw (Fig. 22/1). 7. Close the pressure regulator by turning anticlockwise. 8. Press the pressure regulator downward. ð The pressure regulator audibly clicks into place. 9. Perform a leak test with leak detector spray on all connections. Fig. 22: Bleeding 60 Boosters DLE 2 (-1, -2) – DLE 75 (-1, -2) 26.01.2012 Operation Daily inspections 7 Operation 7.1 Safety instructions for operation Improper operation WARNING! Danger of injury due to improper operation! Improper operation can cause severe injuries and significant material damage. – – – Execute all operating steps in accordance with the information and instructions in this manual. Comply with the following before starting the work: – Ensure that all piping, threaded unions, displacement media and safety devices are installed correctly and that they function properly. – Ensure that no persons are in the danger zone. Never render safety devices inoperable during operation or bypass them. 7.2 Daily inspections The inspections listed below must be performed daily before and during operation. Personnel: n Operator Protective equipment: n Protective work clothing n Safety footwear n Safety goggles Perform the following inspections before operation: n Check all threaded unions and piping for damage. n If no compressed air control unit is used, check the quality of the compressed air Ä ‘Pneumatic’ on page 28. n If a compressed air control unit is used, check the function of the manometer Ä ‘Checking the manometer for function’ on page 58. Perform the following inspection before operation: n Drain condensation via the vent screw of the compressed air control unit (Ä Chapter 7.5 ‘Draining the condensate at the water separator’ on page 66). 26.01.2012 Boosters DLE 2 (-1, -2) – DLE 75 (-1, -2) 61 Operation Calculating the operating pressure 7.3 Calculating the operating pressure Before the booster is put into operation, the operating pressure must be calculated. The static end pressure of the booster is calculated for the particular booster type using the following formulas. A list of booster types can be found in Ä Chapter 4.5 ‘Versions’ on page 41. A legend for the calculation of the operating pressure can be found below the table. Booster type Calculation of the static operating pressure Single-stage, single-acting PB = PL * i Single-stage, dual-acting PB = i * PL + PA Dual-stage PB = i2 * PL + i2 / i1 * PA Single-stage, single-acting with two drive components PB = PL * i Single-stage, dual-acting with two drive components PB = i * PL + PA Dual-stage with two drive components PB = i2 * PL + i2 / i1 * PA Legend: PL = Drive pressure PB = Operating pressure PA = Gas admission pressure i = Transmission ratio i1 = Transmission ratio stage 1 i2 = Transmission ratio stage 2 62 Boosters DLE 2 (-1, -2) – DLE 75 (-1, -2) 26.01.2012 Operation Switching on 7.4 Switching on A description of how the booster is switched on is provided below. The boosters have no main switch. The booster starts to operate as soon as the displacement medium is present and the drive air is applied at the booster. The switch-on process using a compressed air control unit is different from the switch-on process without compressed air control unit. The two processes are described below. Personnel: n Operator Protective equipment: n Protective work clothing n Safety footwear n Safety goggles Switching the booster on In a booster without compressed air control unit, the booster starts delivering as soon as the displacement medium is present and the drive air of the in-house compressed air network is applied. 1. Calculate the required operating pressure (Ä Chapter 7.3 ‘Calculating the operating pressure’ on page 62). 2. Adjust drive pressure on pressure regulator of in-house compressed air network and check pressure on manometer. 3. Open displacement medium (gas) on transport gas container. ð The displacement medium flows in. 4. Open compressed air line of compressed air network to booster. ð The booster starts delivering as soon as the drive air pressure is applied. 26.01.2012 Boosters DLE 2 (-1, -2) – DLE 75 (-1, -2) 63 Operation Switching on Switching the booster on with a compressed air control unit present 1. Calculate the required operating pressure (Ä Chapter 7.3 ‘Calculating the operating pressure’ on page 62). 2. Make sure that the ball valve (Fig. 23/1) of the compressed air control unit is closed. 3. Make sure that the vent valve (Fig. 24/1) of the compressed air control unit is closed. 4. Open valve of displacement medium (gas) on transport gas container. Fig. 23: Ball valve of the compressed air control unit ð The displacement medium flows in. 5. Open compressed air line of compressed air network to booster. ð Drive air is applied to the compressed air control unit. Fig. 24: Vent valve 64 Boosters DLE 2 (-1, -2) – DLE 75 (-1, -2) 26.01.2012 Operation Switching on 6. Pull the pressure regulator (Fig. 25/1) upward. ð The pressure regulator will audibly detach from the locking mechanism. Fig. 25: Releasing pressure regulator from locking mechanism 7. Slowly adjust the previously calculated drive pressure by turning the pressure regulator (Fig. 26/1) and check required drive pressure on manometer (Fig. 26/2). ð Turning it to the right will increase the drive pressure; turning it to the left reduces the driver pressure. 8. Once the drive pressure has been adjusted, press the pressure regulator downward. ð The pressure regulator audibly clicks into place. Fig. 26: Adjusting the operating pressure 9. Open the ball valve (Fig. 27/1) of the compressed air control unit (Fig. 27/arrow). ð The booster starts delivering as soon as the operating pressure is released via the ball valve. Fig. 27: Opening the ball valve 26.01.2012 Boosters DLE 2 (-1, -2) – DLE 75 (-1, -2) 65 Operation Draining the condensate at the water separator 7.5 Draining the condensate at the water separator A description of how the condensation is drained at the vent valve of the water separator is provided below. The booster must be checked daily during operation for the presence of condensation. If condensate is present in the water separator, it must be drained. Personnel: n Operator Protective equipment: n Protective work clothing n Safety footwear n Safety goggles Special tool: 1. n Collection container Check water separator of compressed air control unit (Fig. 28/2) for the presence of condensate. ð If condensate is present, it must be drained. 2. Position collecting container under vent screw. 3. CAUTION! Danger from condensate splashing out! Slowly open vent screw (Fig. 28/1) and let condensate drain. 4. Close the vent screw (Fig. 28/1). Fig. 28: Checking the water separator 66 Boosters DLE 2 (-1, -2) – DLE 75 (-1, -2) 26.01.2012 Operation Switching off 7.6 Switching off A description of how the booster is switched off is provided below. The boosters have no main switch. The booster stops operating as soon as the drive air is shut off. The switch-off process using the compressed air control unit is different from the switch-off process without compressed air control unit. The two processes are described below. Personnel: n Operator Protective equipment: n Protective work clothing n Safety footwear n Safety goggles Switching the booster off In a booster without compressed air control unit, the booster stops as soon as the drive air from the in-house compressed air network is shut off. 1. Shut off compressed air line of in-house compressed air network. 2. Shut off displacement medium at valve of gas transport container. ð The booster stops delivering. For this, see the operating instructions for the in-house compressed air network. Switching the booster off with a compressed air control unit present 1. Close the ball valve (Fig. 29/1) of the compressed air control unit (Fig. 29/arrow). 2. Shut off displacement medium at valve of gas transport container. 3. Shut off compressed air line of in-house compressed air network. ð The booster stops delivering. Fig. 29: Close ball valve 26.01.2012 Boosters DLE 2 (-1, -2) – DLE 75 (-1, -2) 67 Operation Shutdown in an emergency situation 7.7 Shutdown in an emergency situation In dangerous situations, movements of components must be stopped as quickly as possible and the energy supply must be switched off. Shutdown in an emergency situation 68 Proceed as follows in an emergency: 1. Immediately trigger an emergency stop with the emergency stop device. 2. Immediately shut off the displacement medium and compressed air lines. 3. If there is no danger for your own health, get people out of the danger zone. 4. If required, initiate first-aid measures. 5. Alert the fire brigade and/or rescue service. 6. Inform the responsible persons at the operating site. 7. Switch off the booster and safeguard it from being switched on again. Boosters DLE 2 (-1, -2) – DLE 75 (-1, -2) 26.01.2012 Faults Safety instructions for fault correction 8 Faults Possible causes for faults and fault correction tasks are described in the following chapter. In the events of faults that cannot be corrected with the help of the notes below, contact the manufacturer; see contact information in Chapter 1.4 of this operating manual. 8.1 Safety instructions for fault correction Nitrogen WARNING! Danger of suffocation due to improper handling of nitrogen! Improper handling of nitrogen while purging the booster can result in poisoning or even death by suffocation. – – – – Always observe the manufacturer's safety data sheet. Always ensure adequate ventilation. Keep a self-contained breathing apparatus ready for emergencies. If there are signs of suffocation, immediately provide the affected person with the breathing apparatus that does not depend on circulating air, move to fresh air into recovery position and keep warm. If no longer breathing, provide first aid measures and start artificial respiration. Seek medical attention immediately. Safeguarding against restart WARNING! Life-threatening danger due to unauthorised restart! Due to unauthorised restart or opening of the compressed air supply or the displacement media during troubleshooting and fault correction, there is danger of severe or fatal injuries for persons in the danger zone. – 26.01.2012 Before starting work, shut off all media, depressurise the booster and safeguard it from being switched on again. Boosters DLE 2 (-1, -2) – DLE 75 (-1, -2) 69 Faults Safety instructions for fault correction Improperly executed fault correction tasks WARNING! Danger of injury due to improper fault correction! Improperly executed fault correction tasks can cause severe injuries and significant material damage. – – – – Before starting work, purge the booster with nitrogen. Ensure order and cleanliness at the installation location! Parts and tools that are lying loose or on top of each other are accident hazards. If components have been removed, ensure that they are properly reinstalled, that all fastening elements are reinstalled and that all threaded connections are tightened with the specified bolt-tightening torque. Comply with the following before restarting: – Ensure that all fault correction tasks have been properly executed and concluded in accordance with the instructions in this manual. – Ensure that no persons are in the danger zone. Compressed air and gases WARNING! Danger of injury due to compressed air and gases! In the event of a fault or a defect, compressed air or gas can escape from compressed air lines, hoses or pressurised components of the booster. This compressed air or gases can whirl up dust, cause uncontrolled movements of the lines and result in severe injuries. – – – 70 Always establish depressurised status before mounting or removing hoses, lines, threaded unions or quick-release couplings. Completely depressurise the pressure accumulator. Always wear personal protective equipment. Have defective components that are pressurised in operation replaced immediately by qualified personnel (mechanical and plant engineer). Boosters DLE 2 (-1, -2) – DLE 75 (-1, -2) 26.01.2012 Faults Fault table Cold surfaces CAUTION! Risk of injury due to cold and iced up surfaces! Components such as the exhaust air silencer can cool down severely and ice up due to expanding air or gas. Skin contact with cold surfaces can cause skin irritations. – – Always wear protective clothing and protective gloves during all work in the vicinity of cold or iced up surfaces. Ensure that all surfaces have warmed up to ambient temperature before all work. Behaviour in the event of faults The following always applies: 1. For faults that pose an imminent danger to personnel or material assets, immediately trigger the emergency stop function, shut off all lines and depressurise the booster. 2. Determine the cause of the fault. 3. If correction of the fault requires work in the danger zone, switch off the booster and safeguard it against being restarted. Immediately inform the responsible persons at the operating site about the fault. 4. Depending on the type of fault, have it corrected by the required personnel specified below. The fault table provided below lists personnel who are authorised to correct the fault. 8.2 Fault table Fault description Cause Remedy Personnel Booster does not work at low air pressure. Excessive friction on the control valve. Replace and relubricate the O-rings on the control valve (Ä Chapter 8.3.2 ‘Replacing the Orings on the control valve’ on page 74). Specialist for potentially explosive areas 26.01.2012 Boosters DLE 2 (-1, -2) – DLE 75 (-1, -2) 71 Faults Fault table Fault description Booster does not work or it works too slowly. Booster does not work. Air escapes via the exhaust air silencer. Cause Remedy Personnel O-rings of the control valve swell when the wrong oil or lubricating grease is used. Replace O-rings and use acid-free and siliconefree lubricant (Ä Chapter 8.3.2 ‘Replacing the O-rings on the control valve’ on page 74). Specialist for potentially explosive areas Exhaust or control Dewater compressed air using water separator valve iced up. (Ä Chapter 7.5 ‘Draining the condensate at the water separator’ on page 66). Operator Formation of a residue in the exhaust air silencer . Operator Clean silencer; replace if necessary (Ä Chapter 8.3.4 ‘Cleaning the exhaust air silencer and replacing it if necessary’ on page 80). O-ring on control Replace and regrease O-rings on control valve valve is defective. (Ä Chapter 8.3.2 ‘Replacing the O-rings on the control valve’ on page 74). Specialist for potentially explosive areas O-ring on the air Replace and regrease O-ring on air piston Specialist for piston is defective (Ä Chapter 8.3.6 ‘Replacing O-ring on air piston’ potentially or worn. explosive on page 85). areas Booster does not work. Air escapes via a small bore on the control valve housing. Control valve is blocked. Clean sleeve of control valve (Ä Chapter 8.3.3 ‘Cleaning and greasing the sleeve of the control valve’ on page 78). Specialist for potentially explosive areas Control valve is blocked. Check O-rings on control valve and sleeve and replace and grease if necessary (Ä Chapter 8.3.3 ‘Cleaning and greasing the sleeve of the control valve’ on page 78 and Ä Chapter 8.3.2 ‘Replacing the O-rings on the control valve’ on page 74). Specialist for potentially explosive areas Booster does not work. Air escapes via small bore in the lower cap. Pilot valve in the upper cap or lower cap is blocked. Clean and grease the pilot valve (Ä Chapter 8.3.5 ‘Cleaning and greasing the pilot valve’ on page 82). Specialist for potentially explosive areas Pilot valve in the upper cap or lower cap is blocked. Check pilot valve for wear and replace if necessary (Ä Chapter 8.3.5 ‘Cleaning and greasing the pilot valve’ on page 82). Specialist for potentially explosive areas Booster operates at Pilot valve in the high frequency and upper cap or with short strokes. lower cap is defective. Clean and grease the pilot valve or replace if necessary (Ä Chapter 8.3.5 ‘Cleaning and greasing the pilot valve’ on page 82). Specialist for potentially explosive areas Leaks on silencers High pressure of bores Z1 and Z3. seal or high pressure cylinder is worn. Check high pressure seal or high pressure cylinder for wear and replace if necessary (Ä Chapter 8.3.9 ‘Checking high pressure seals and high pressure cylinder for signs of damage’ on page 100). Specialist for potentially explosive areas 72 Boosters DLE 2 (-1, -2) – DLE 75 (-1, -2) 26.01.2012 Faults Fault correction tasks > Purging the high pressure component with nitro... Fault description Cause Remedy Personnel Leaks on silencers of bores Z1 and Z3 (only for DLE 15, 30, and 75). High pressure piston with pressure cylinder is worn. Replace high pressure piston with pressure cylinder as a complete component (Ä Chapter 8.3.8 ‘Replacing the high pressure cylinder with high pressure piston as a complete component’ on page 99). Specialist for potentially explosive areas Booster does not work, but exhaust air silencer blows out air. O-ring on the air piston is worn. Check O-ring on air piston for wear and replace if necessary (Ä Chapter 8.3.6 ‘Replacing O-ring on air piston’ on page 85). Specialist for potentially explosive areas Leaks on inlet and/ or outlet valve of booster head/ booster does not reach operating pressure. Inlet and/or outlet valve soiled or defective. Check inlet and/or outlet valve of booster head; clean or replace if necessary (Ä Chapter 8.3.7 ‘Cleaning the inlet and outlet valve of the booster head’ on page 98). Specialist for potentially explosive areas 8.3 Fault correction tasks 8.3.1 Purging the high pressure component with nitrogen Boosters that are used to compress combustible or toxic gases must be purged with nitrogen prior to starting the tasks for fault correction purposes in order to purge any remaining combustible or toxic gases and to thus prevent the development of oxyhydrogen gas and toxic gas mixtures. In the following chapters for fault correction, references are made to Supplement "Hydrogen compression with Maximator boosters" in the Appendix. To purge the booster, proceed as described in the supplement. DANGER! Danger of explosion caused by toxic and combustible gas residues on the inside of the booster! Failing to purge the booster with nitrogen following previously compressed toxic or combustible gases prior to starting fault correction tasks can result in an explosion caused by the development of oxyhydrogen gas and to severe injuries or even death. – 26.01.2012 Purge the high pressure component of the booster with nitrogen before any fault correction task. Boosters DLE 2 (-1, -2) – DLE 75 (-1, -2) 73 Faults Fault correction tasks > Replacing the O-rings on the control valve Personnel: n Specialist for potentially explosive areas Protective equipment: n Safety footwear n Safety goggles 1. Bring the booster to a standstill, depressurise and let the stored pressure completely dissipate. 2. Purge the booster. Proceed as described in Appendix A "Hydrogen compression with Maximator boosters" to do this. 8.3.2 Replacing the O-rings on the control valve A description of how the O-rings on the control valve are replaced is provided below. Personnel: n Specialist for potentially explosive areas Protective equipment: n Safety goggles n Protective work clothing n Safety footwear Special tool: n n n n Circlip pliers Spanner Lubricating grease Screwdriver The fault correction tasks below are described on a booster with an optionally installed compressed air control unit. The fault correction tasks for boosters without compressed air control unit are identical. In this case, only the steps 3 – 4 are eliminated. This is pointed out at the appropriate place. 1. Bring the booster to a standstill, depressurise it and let the stored pressure completely dissipate. Only carry out steps 3 – 4 and 14 – 15 if a compressed air control unit is present. If no compressed air control unit is installed, the drive air line must be removed from the control valve housing instead of the elbow union. 74 Boosters DLE 2 (-1, -2) – DLE 75 (-1, -2) 26.01.2012 Faults Fault correction tasks > Replacing the O-rings on the control valve 2. Purge booster with nitrogen. Proceed as described in Ä Appendix A ‘Hydrogen compression with Maximator boosters’ on page 113 to do this. 3. Undo threaded union (Fig. 30/1) of compressed air control unit on control valve housing (Fig. 30/2). 4. Undo and remove elbow union (Fig. 31/1) of compressed air control unit or on drive air connection of control valve housing (Fig. 31/2). 5. Position circlip pliers (Fig. 32/1) on circlip of control valve housing (Fig. 32/2) and carefully remove circlip and secure to prevent it from getting lost. Fig. 30: Undoing the threaded union Fig. 31: Undoing the elbow union Fig. 32: Removing the circlip 26.01.2012 Boosters DLE 2 (-1, -2) – DLE 75 (-1, -2) 75 Faults Fault correction tasks > Replacing the O-rings on the control valve 6. Insert screwdriver into drive air connection (Fig. 33/arrow) of control valve housing (Fig. 33/1) and carefully press out cap (Fig. 33/2) and control valve (Fig. 33/3). 7. Remove all O-rings from control valve and caps. 8. Grease new O-rings (Fig. 34). 9. Slide new O-rings (Fig. 35/1) onto control valve and cap. 10. Lightly lubricate control valve and cap with grease. Fig. 33: Removing control valve and cap Fig. 34: Greasing O-rings Fig. 35: Sliding on new O-rings 76 Boosters DLE 2 (-1, -2) – DLE 75 (-1, -2) 26.01.2012 Faults Fault correction tasks > Replacing the O-rings on the control valve 11. Insert control valve (Fig. 36/1) into control valve housing and push in up to the stop (Fig. 36/arrow). 12. Insert cap (Fig. 37/1) into control valve housing (Fig. 37/2). 13. Secure cap in control valve housing using circlip (Fig. 38/1). Fig. 36: Inserting control valve Fig. 37: Inserting the cap Fig. 38: Securing the cap 26.01.2012 Boosters DLE 2 (-1, -2) – DLE 75 (-1, -2) 77 Faults Fault correction tasks > Cleaning and greasing the sleeve of the contro... 14. Position and fasten elbow union (Fig. 39/1) of compressed air control unit to drive air connection of control valve housing. 15. Fasten piping (Fig. 40/1) of compressed air control unit to elbow union (Fig. 40/2). Fig. 39: Removing the elbow union Fig. 40: Installing compressed air control unit 8.3.3 Cleaning and greasing the sleeve of the control valve A description of how the sleeve of the control valve is cleaned and greased is provided below. Removing the sleeve of control valve 78 Personnel: n Specialist for potentially explosive areas Protective equipment: n Safety goggles n Safety footwear n Protective work clothing Special tool: n n n n n n Circlip pliers Spanner Screwdriver Lubricating grease Drift punch Hammer To clean the sleeve of the control valve, it must be removed. Boosters DLE 2 (-1, -2) – DLE 75 (-1, -2) 26.01.2012 Faults Fault correction tasks > Cleaning and greasing the sleeve of the contro... 1. Bring the booster to a standstill, depressurise it and let the stored pressure completely dissipate. The sleeve of the control valve is located in the control valve housing. To remove the sleeve of the control valve, the control valve must first be removed. To do this, proceed as described in Ä Chapter 8.3.2 ‘Replacing the O-rings on the control valve’ on page 74, steps 3 – 6. 2. Purge booster with nitrogen. Proceed as described in Ä Appendix A ‘Hydrogen compression with Maximator boosters’ on page 113 to do this. 3. Carefully position drift punch at edge of sleeve (Fig. 41/1) in control valve housing (Fig. 41/2). Fig. 41: Positioning the drift 4. NOTICE! Risk of damaging the female thread! Carefully punch out sleeve (Fig. 42) making sure that the female thread in the control valve housing is not damaged. Fig. 42: Punching out the sleeve 26.01.2012 Boosters DLE 2 (-1, -2) – DLE 75 (-1, -2) 79 Faults Fault correction tasks > Cleaning the exhaust air silencer and replacin... 5. Remove sleeve (Fig. 43/1) out on other side of control valve housing. 6. Check inside of sleeve for score marks and other signs of damage. If the sleeve is damaged, it must be replaced. Make sure not to slide any O-ring onto the groove (Fig. 44/3) of the control sleeve, as there is a cross bore in this groove. Fig. 43: Removing the sleeve 7. Remove O-rings (Fig. 44/1) from the sleeve (Fig. 44/2). 8. Clean inside and outside of sleeve with a paper towel. 9. Grease new O-rings and carefully slide onto sleeve. 10. Clean inside and outside of sleeve with a finger. 11. Grease the inside of the control valve housing. 12. Carefully insert sleeve into control valve housing and push in up to the stop. 13. Insert control valve. To do this, proceed as described in Ä Chapter 8.3.2 ‘Replacing the O-rings on the control valve’ on page 74, steps 11 – 14. Fig. 44: Detaching the O-rings Fig. 45: Inserting the sleeve 8.3.4 Cleaning the exhaust air silencer and replacing it if necessary A description of how the exhaust air silencer is cleaned and replaced if necessary is provided below. 80 Boosters DLE 2 (-1, -2) – DLE 75 (-1, -2) 26.01.2012 Faults Fault correction tasks > Cleaning the exhaust air silencer and replacin... Cold components CAUTION! Danger of injury due to cold components! The exhaust air silencer cools down severely during operation and ices up. – – Personnel: Prior to starting the tasks, let the exhaust air silencer thaw adequately. Wipe off any dew that might be present. n Operator Protective equipment: n n n n Safety goggles Protective work clothing Safety footwear Protective gloves Depending on the version, the exhaust air silencers of the individual booster models can be different. However, the tasks described below are always identical. 1. Bring the booster to a standstill, depressurise and let the stored pressure completely dissipate. 2. Let the iced up exhaust air silencer thaw adequately; wipe off any water that might have thawed. 3. Unscrew silencer (Fig. 46/1) from exhaust air connection (Fig. 46/2). 4. Adequately purge exhaust air residues in the exhaust air silencer with water and detergent. 5. Blow out exhaust air silencer with a compressed air gun in the opposite direction of the exhaust air (Fig. 47/arrow). Fig. 46: Exhaust air silencer If the deposits cannot be removed or if the booster does not reach the required stroke frequency or power after it has been cleaned, the exhaust air silencer must be replaced. Fig. 47: Blowing out the exhaust air silencer 6. 26.01.2012 Screw exhaust air silencer into exhaust air connection and tighten hand-tight. Boosters DLE 2 (-1, -2) – DLE 75 (-1, -2) 81 Faults Fault correction tasks > Cleaning and greasing the pilot valve 8.3.5 Cleaning and greasing the pilot valve A description of how the pilot valves are cleaned and greased or if necessary - replaced is provided below. Personnel: n Specialist for potentially explosive areas Protective equipment: n Safety goggles n Safety footwear n Protective work clothing Special tool: n Spanner, width across flats 13 mm / 0.51 inch n Long nose pliers n Lubricating grease It is always necessary to clean, grease, or - if necessary - replace both pilot valves. 1. Bring the booster to a standstill, depressurise and let the stored pressure completely dissipate. 2. Purge booster with nitrogen. Proceed as described in Ä Appendix A ‘Hydrogen compression with Maximator boosters’ on page 113 to do this. 3. Position spanner (Fig. 48/1) at threaded union of pilot valve (Fig. 48/2). Fig. 48: Pilot valve 82 Boosters DLE 2 (-1, -2) – DLE 75 (-1, -2) 26.01.2012 Faults Fault correction tasks > Cleaning and greasing the pilot valve 4. Remove threaded union with sealing ring (Fig. 49/1) and pilot valve spring (Fig. 49/2) and secure to prevent it from getting lost. Fig. 49: Removing the threaded union ð The pilot valve tappet (Fig. 50/1) is located in the pilot valve opening. Fig. 50: Pilot valve tappet 26.01.2012 Boosters DLE 2 (-1, -2) – DLE 75 (-1, -2) 83 Faults Fault correction tasks > Cleaning and greasing the pilot valve 5. Carefully insert long nose pliers (Fig. 51/1) into pilot valve opening and pull out pilot valve tappet (Fig. 51/2). 6. Check pilot valve tappet and O-ring for signs of damage. A damaged pilot valve tappet must be replaced. Fig. 51: Removing the pilot tappet 7. Clean and grease pilot valve tappet with a paper towel. 8. Carefully insert pilot valve tappet (Fig. 53/2) with the long nose pliers (Fig. 53/1). Fig. 52: Pilot valve tappet Fig. 53: Inserting the pilot valve tappet 84 Boosters DLE 2 (-1, -2) – DLE 75 (-1, -2) 26.01.2012 Faults Fault correction tasks > Replacing O-ring on air piston 9. Position and tighten pilot valve spring (Fig. 54/2) and threaded union with sealing ring (Fig. 54/1). To clean and grease the second pilot valve, proceed as described in steps 1 – 9. Fig. 54: Fastening the pilot valve 8.3.6 Replacing O-ring on air piston A description of how the O-ring on the air piston is replaced is provided below. Many of the steps described below must be carried out in the exact same manner for other fault correction tasks. In the corresponding chapters, references are made to the respective steps in this chapter. Personnel: n Specialist for potentially explosive areas Protective equipment: n Safety goggles n Safety footwear n Protective work clothing Special tool: 8.3.6.1 n Spanner Removing the high pressure component 26.01.2012 1. Bring the booster to a standstill, depressurise and let the stored pressure completely dissipate. 2. Purge booster with nitrogen. Proceed as described in Ä Appendix A ‘Hydrogen compression with Maximator boosters’ on page 113 to do this. Boosters DLE 2 (-1, -2) – DLE 75 (-1, -2) 85 Faults Fault correction tasks > Replacing O-ring on air piston 3. Unscrew inlet and outlet line (Fig. 55/1) from inlet and outlet connection of booster head. 4. Close openings of removed inlet and outlet line with sealing plug to protect these against soiling. 5. Undo fixing bolts of booster from foundation and secure to prevent them from getting lost. 6. Remove line from drive air connection. Depending on the version, drive air connection PL is connected to the compressed air control unit or to the control valve housing. Fig. 55: Inlet and outlet line In a dual-acting booster, the cooling pipe must be removed from the high pressure components and the inlet connections. 7. Undo threaded union of cooling pipe from both high pressure components (Fig. 56/2) and from inlet connections (Fig. 56/1) and remove cooling pipe. 8. Undo the four nuts of the stay bolts on the booster head (Fig. 57/marked in red) with a spanner. Secure nuts and square taper washer for U-sections to prevent them from getting lost. Fig. 56: Removing the cooling pipe Fig. 57: Undoing the booster head 86 Boosters DLE 2 (-1, -2) – DLE 75 (-1, -2) 26.01.2012 Faults Fault correction tasks > Replacing O-ring on air piston 9. Carefully detach booster head (Fig. 58/1) from stay bolts. 10. Undo threaded union of cooling pipe from control valve housing (Fig. 59/1). 11. Carefully pull off cooling pipe and cooling cylinder (Fig. 60/1) from pressure cylinder (Fig. 60/2). Fig. 58: Detaching the booster head Fig. 59: Removing the cooling pipe Fig. 60: Removing the cooling pipe 26.01.2012 Boosters DLE 2 (-1, -2) – DLE 75 (-1, -2) 87 Faults Fault correction tasks > Replacing O-ring on air piston 12. NOTICE! Danger of material damage! Carefully pry off high pressure cylinder (Fig. 61/1) with a screwdriver (Fig. 61/2) from lower cap of drive component (Fig. 61/3). 13. Slowly pull back high pressure cylinder on piston rod. 14. Release O-ring (Fig. 62/1) from groove of piston rod and slide in direction of drive component (Fig. 62/arrow). 15. Slide safety sleeve (Fig. 63/1) of piston rod in direction of drive component (Fig. 63/arrow). Fig. 61: Prying off the high pressure cylinder Fig. 62: O-ring ð A dowel pin (Fig. 63/2) is located below the safety sleeve, which connects the piston rod to the high pressure piston. 16. Push out dowel pin (Fig. 63/2) with a screwdriver and secure to prevent it from getting lost. Fig. 63: Safety sleeve 88 Boosters DLE 2 (-1, -2) – DLE 75 (-1, -2) 26.01.2012 Faults Fault correction tasks > Replacing O-ring on air piston 17. Detach high pressure cylinder (Fig. 64/1) from piston rod (Fig. 64/2). Fig. 64: Detaching the high pressure cylinder 8.3.6.2 Removing drive component and replacing O-ring of air piston 1. Undo threaded union of 4 stay bolts (Fig. 65/marked in red) and secure to prevent from getting lost. The upper stay bolts are mounted with a nut, a spring washer and a square taper washer for Usections. The lower stay bolts are only mounted with a nut and a spring washer. 2. Pull out stay bolt. 3. Remove mounting bracket (Fig. 65/1). 4. Push lower cap (Fig. 66/1) of drive component from air cylinder (Fig. 66/2). Fig. 65: Stay bolt ð The 2 air pipes are now hanging free. Fig. 66: Lower cap 26.01.2012 Boosters DLE 2 (-1, -2) – DLE 75 (-1, -2) 89 Faults Fault correction tasks > Replacing O-ring on air piston 5. Detach air pipes (Fig. 67/1). 6. Remove control tube (Fig. 68/1). 7. Remove cotter pin (Fig. 69/1) of socket pin from piston mount (Fig. 69/2). Fig. 67: Air pipes Fig. 68: Control tube Fig. 69: Cotter pin 90 Boosters DLE 2 (-1, -2) – DLE 75 (-1, -2) 26.01.2012 Faults Fault correction tasks > Replacing O-ring on air piston 8. Pull out socket pin (Fig. 70/1) with pliers from the piston mount. 9. Detach lower cap of drive component and piston rod. 10. Push air piston (Fig. 71/1) in direction of upper cap (Fig. 71/2) of drive component. Fig. 70: Pulling out the socket pin Fig. 71: Air piston 26.01.2012 Boosters DLE 2 (-1, -2) – DLE 75 (-1, -2) 91 Faults Fault correction tasks > Replacing O-ring on air piston 11. Carefully detach air cylinder (Fig. 72/1) from air piston (Fig. 72/2). 12. Check seal of upper cap (Fig. 72/3) and replace if necessary. 13. Detach seal from air piston (Fig. 73). 14. Grease new seal and slide onto air piston. Fig. 72: Detaching the air cylinder The seal on the air piston is a floating seal and appears to be too big for the air piston. However, that is done on purpose. 15. Push back air piston in direction of lower cap (Fig. 73/arrow). Fig. 73: Detaching the seal 16. NOTICE! Risk of damaging the piston seal! Position air cylinder (Fig. 74/1) at an incline to the air piston (Fig. 74/2) and carefully slide over air piston. Fig. 74: Putting on the air cylinder 92 Boosters DLE 2 (-1, -2) – DLE 75 (-1, -2) 26.01.2012 Faults Fault correction tasks > Replacing O-ring on air piston 17. Check seals of lower cap (Fig. 75/1) and replace if necessary. 18. Position lower cap with piston rod (Fig. 76/1) on piston mount (Fig. 76/2) and make sure that holes are aligned. Fig. 75: Seal of lower cap Fig. 76: Position piston rod 26.01.2012 Boosters DLE 2 (-1, -2) – DLE 75 (-1, -2) 93 Faults Fault correction tasks > Replacing O-ring on air piston 19. Insert socket pin (Fig. 77/1) into piston mount (Fig. 77/2) and secure with cotter pin. 20. Detach O-rings (Fig. 78/1) from air pipes. 21. Grease new O-rings and slide onto air pipes. 22. Remove O-rings (Fig. 79/1) from control bore (Fig. 79/2) of upper and lower cap with a pointed object (scriber). Fig. 77: Inserting the socket pin Fig. 78: Air pipe Fig. 79: O-rings of control tube 94 Boosters DLE 2 (-1, -2) – DLE 75 (-1, -2) 26.01.2012 Faults Fault correction tasks > Replacing O-ring on air piston 23. Place new greased O-rings onto ends of control tube (Fig. 80/1) and insert control tube into control bore (Fig. 80/2) of upper cap. ð Because of the grease on the O-ring, the seal adheres to the control tube (Fig. 80). 24. Insert stay bolt through upper cap. 25. Insert two air pipes (Fig. 81/1) with new and greased O-rings into air pipe bores of upper cap. 26. Position lower cap (Fig. 81/2) on air cylinder and thread in air pipes (Fig. 81/1) and control tube. Fig. 80: Inserting the control tube 27. The upper stay bolts must be mounted with a nut, a spring washer and a square taper washer for U-sections. The lower stay bolts must only be mounted with a nut, a spring washer and the assembly brackets. Position stay bolts with nuts, spring washers and square taper washers for U-sections and tighten with a torque of 55 Nm. Fig. 81: Installing air pipes and lower cap 8.3.6.3 Installing the high pressure component 1. Position high pressure cylinder with high pressure piston (Fig. 82/1) on piston rod (Fig. 82/2) and make sure that holes are aligned. Fig. 82: Installing the high pressure cylinder 26.01.2012 Boosters DLE 2 (-1, -2) – DLE 75 (-1, -2) 95 Faults Fault correction tasks > Replacing O-ring on air piston 2. Insert dowel pin (Fig. 83/2) into bore and slide safety sleeve (Fig. 83/1) over dowel pin connection. 3. Slide O-ring (Fig. 84/1) on piston rod into groove in front of safety sleeve. Fig. 83: Securing the dowel pin ð The safety sleeve is fixed in place by the O-ring. 4. Slide high pressure cylinder in direction of lower cap. 5. Carefully slide cooling pipe and high pressure pipe (Fig. 85/1) over high pressure cylinder (Fig. 85/2). Fig. 84: O-ring Fig. 85: Cooling pipe and high pressure pipe 96 Boosters DLE 2 (-1, -2) – DLE 75 (-1, -2) 26.01.2012 Faults Fault correction tasks > Replacing O-ring on air piston 6. Fasten cooling pipe (Fig. 86/1) to threaded piece of control valve housing. 7. Detach seal from booster head (Fig. 87/1). 8. Grease new seal and carefully slide onto booster head. 9. Carefully attach booster head (Fig. 88/1) on the stay bolts. 10. Fasten booster head with nuts and square taper washer for U-sections and tighten with a torque of 40 Nm. 11. Install booster at installation location and tighten foundation bolts with a torque of 85 Nm. Fig. 86: Fastening the cooling pipe Fig. 87: Booster head seal Fig. 88: Attaching booster head 26.01.2012 Boosters DLE 2 (-1, -2) – DLE 75 (-1, -2) 97 Faults Fault correction tasks > Cleaning the inlet and outlet valve of the boo... 8.3.7 Cleaning the inlet and outlet valve of the booster head A description of how the inlet and outlet valve of the booster head is checked for soiling and cleaned is provided below. Personnel: n Specialist for potentially explosive areas Protective equipment: n Protective work clothing n Safety footwear n Safety goggles Special tool: n Spanner n Torque wrench In single-stage, dual-acting and two-stage boosters, inlet and outlet valves must be removed and cleaned on both booster heads. The inlet and outlet valves of booster models DLE 2 and DLE 5 differ in design from those described below. However, the fault correction procedure is identical. 1. Bring the booster to a standstill, depressurise it and let the stored pressure completely dissipate. 2. Purge booster with nitrogen. Proceed as described in Ä Appendix A ‘Hydrogen compression with Maximator boosters’ on page 113 to do this. 3. Remove inlet and outlet valves on the booster head and protect the open lines from soiling. 4. Undo inlet and outlet connections (Fig. 89/1) on booster head with a spanner (Fig. 89/2). Fig. 89: Releasing the valves 98 Boosters DLE 2 (-1, -2) – DLE 75 (-1, -2) 26.01.2012 Faults Fault correction tasks > Replacing the high pressure cylinder with high... 5. Remove inlet and outlet valve from booster head. 6. Carefully dismantle valve on a clean working surface. Fig. 90: Removing the valve The valves consist of two O-rings (Fig. 91/1), valve seat (Fig. 91/2), ball (Fig. 91/3), compression spring (Fig. 91/4) and valve body (Fig. 91/5). Fig. 91: Dismantled valve 7. Clean all components of the valve, check for signs of damage and replace if necessary. 8. NOTICE! Danger of material damage due to incorrect installation! Install valve in identical sequence. 9. Make sure when installing the valves that the conical valve seat (Fig. 92/1) of the valve is always inserted in the flow direction (Fig. 92/arrows) into the booster head (Fig. 92/2). 10. Fasten inlet and outlet connections and tighten with a torque of 120 Nm. 11. Install piping of inlet and outlet lines according to Ä Appendix B ‘Connection drawing’ on page 123. Fig. 92: Installation direction 8.3.8 Replacing the high pressure cylinder with high pressure piston as a complete component A description of how the high pressure cylinder with the high pressure piston is replaced as a complete component is provided below. The high pressure piston is located on the inside of the high pressure cylinder. These fault correction tasks only apply to booster models DLE 15, 30, and 75. 26.01.2012 Boosters DLE 2 (-1, -2) – DLE 75 (-1, -2) 99 Faults Fault correction tasks > Checking high pressure seals and high pressure... Personnel: n Specialist for potentially explosive areas Protective equipment: n Protective work clothing n Safety footwear n Safety goggles Special tool: 8.3.8.1 n Spanner Removing the high pressure cylinder with high pressure piston To remove the high pressure cylinder with high pressure piston, proceed as described in Ä Chapter 8.3.6.1 ‘Removing the high pressure component’ on page 85. 8.3.8.2 Installing a new high pressure cylinder with high pressure piston To install a new high pressure cylinder with high pressure piston, proceed as described in Ä Chapter 8.3.6.3 ‘Installing the high pressure component’ on page 95. 8.3.9 Checking high pressure seals and high pressure cylinder for signs of damage An explanation of how the high pressure seal and the high pressure cylinder are checked for signs of damage and replaced if necessary is provided below. Personnel: n Specialist for potentially explosive areas Protective equipment: n Protective work clothing n Safety footwear n Safety goggles Special tool: Checking the high pressure seals and replacing them if necessary 100 n Spanner To check the high pressure seals for signs of damage, the high pressure component must be removed. Proceed as described in Ä Chapter 8.3.6.1 ‘Removing the high pressure component’ on page 85 to do this. Boosters DLE 2 (-1, -2) – DLE 75 (-1, -2) 26.01.2012 Faults Fault correction tasks > Checking high pressure seals and high pressure... 1. Check high pressure seal (Fig. 93/1) on booster head (Fig. 93/2) for signs of wear and replace if necessary. 2. Check high pressure seal (Fig. 94/1) on lower cap of drive component (Fig. 94/2) for signs of wear and replace if necessary. Fig. 93: High pressure seal (on high pressure side) Fig. 94: High pressure seal (on air side) 26.01.2012 Boosters DLE 2 (-1, -2) – DLE 75 (-1, -2) 101 Faults Start up after a corrected fault 3. Check inside of removed high pressure cylinder (Fig. 95) for score marks and other signs of damage. If the high pressure cylinder is damaged, it must be replaced as a complete component. In booster model DLE 15–30–75, the high pressure piston is located in the high pressure cylinder. In the event of damage, the high pressure cylinder with the integrated high pressure piston must be replaced as a complete component. Fig. 95: High pressure cylinder Reinstalling the high pressure component To reinstall the high pressure components, proceed as described in Ä Chapter 8.3.6.3 ‘Installing the high pressure component’ on page 95. 8.4 Start up after a corrected fault After correcting the fault, execute the following steps to start up again: 102 1. Properly reconnect all high pressure lines. 2. Check connections for signs of leaks with a leak detection spray. 3. Ensure that no persons are in the danger zone. 4. Start in accordance with the notes in Chapter "Operation". Boosters DLE 2 (-1, -2) – DLE 75 (-1, -2) 26.01.2012 Maintenance 9 Maintenance No maintenance work is planned for the boosters. 26.01.2012 Boosters DLE 2 (-1, -2) – DLE 75 (-1, -2) 103 104 Boosters DLE 2 (-1, -2) – DLE 75 (-1, -2) 26.01.2012 Dismantling and disposal Safety instructions for dismantling and disposal 10 Dismantling and disposal After the end of the useful life has been reached, the booster must be dismantled and disposed of in an environmentally responsible manner. 10.1 Safety instructions for dismantling and disposal Explosion protection WARNING! Danger of explosion during dismantling! Bringing in ignition sources such as sparks, open flames and hot surfaces can result in explosions in the Ex-zone. – – – – Prior to dismantling, obtain a written work approval. Prior to dismantling, purge the booster with nitrogen to flush any remaining toxic and combustible gases out of the booster. Only perform dismantling work when a potentially explosive atmosphere can be ruled out. Only use those tools that are authorised for use in the Ex-zone. Non-compliance with these instructions will result in loss of explosion protection. Improper dismantling WARNING! Danger of injury due to improper dismantling! Stored residual energy, sharp-edged components, points and corners on or in the booster or on the required tools can cause injuries. – – – – 26.01.2012 Prior to starting the tasks, ensure that there is adequate free space. Shut off all operating media to the booster. Ensure order and cleanliness at the workplace! Parts and tools that are lying loose or on top of each other are accident hazards. Consult with the manufacturer if there are questions. Boosters DLE 2 (-1, -2) – DLE 75 (-1, -2) 105 Dismantling and disposal Tightening torques 10.2 Dismantling Personnel: n Specialist for potentially explosive areas Protective equipment: n Protective work clothing n Safety footwear n Safety goggles 1. Bring the booster to a standstill, depressurise and let the stored pressure completely dissipate. 2. Purge booster with nitrogen. Proceed as described in Ä Appendix A ‘Hydrogen compression with Maximator boosters’ on page 113 to do this. 3. Remove all piping and threaded unions. 4. Undo foundation bolts. Then properly clean assemblies and components and take them apart in compliance with the applicable occupational health and safety and environmental protection regulations. 10.3 Disposal If no return or disposal agreement has been made, send the dismantled components for recycling. n Scrap metals. n Send plastic elements for recycling. n Sort and dispose of other components in accordance with their material composition. NOTICE! Danger to the environment due to incorrect disposal! Incorrect disposal may pose risks to the environment. – – 10.4 106 Electrical scrap, electronic components, lubricants and other auxiliary materials must be disposed of by authorised specialist companies. If in doubt, obtain information about disposal in accordance with the environmental regulations from the local municipal authorities or specialised waste disposal companies. Tightening torques Boosters DLE 2 (-1, -2) – DLE 75 (-1, -2) 26.01.2012 Dismantling and disposal Tightening torques 26.01.2012 Boosters DLE 2 (-1, -2) – DLE 75 (-1, -2) 107 Tightening torques 108 Boosters DLE 2 (-1, -2) – DLE 75 (-1, -2) 26.01.2012 Index 11 Index A Accident............................................................... B Behaviour in the event of faults............................ Booster head........................................................ Brief description................................................... C Calculating the operating pressure...................... Checking the manometer for function.................. Checks before initial commissioning.................... Cleaning and greasing the pilot valve.................. Cleaning and greasing the sleeve of the control valve............................................................... Cleaning the exhaust air silencer and replacing it if necessary........................................ 24 71 38 37 62 58 58 82 78 80 Cold surfaces....................................................... 16 Compressed air control unit................................. 39 Connected loads.................................................. 28 Connecting inlet and outlet connections.............. 56 Connecting the drive air....................................... 55 Connections......................................................... 44 Contact information................................................ 9 Contacts................................................................. 9 Control valve........................................................ 38 Cooling cylinder.................................................... 39 Copyright................................................................ 9 Customer service................................................... 9 D Daily inspections.................................................. 61 Dangers................................................................ 14 Danger zones....................................................... 46 Dismantling........................................................ 106 Disposal............................................................. 106 Drive component.................................................. 38 E Emergency situation............................................. 68 Emergency stop................................................... 68 Emissions............................................................. 33 Environmental protection Cleaning liquids............................................... 25 Lubricants....................................................... 25 26.01.2012 Exhaust air silencer.............................................. Ex marking........................................................... F Fault table............................................................ Fire....................................................................... First aid................................................................ G General information.............................................. H High pressure component.................................... I Initial commissioning............................................ Inspection at delivery........................................... Installing a separate leakage line......................... Installing exhaust air silencer............................... Installing the connecting lines.............................. Intended use........................................................ M Misuse.................................................................. Mode of operation................................................ Mounting the booster........................................... N Noise emission..................................................... O Operating conditions............................................ Operating materials.............................................. Overview.............................................................. Owner................................................................... P Packaging............................................................ Performance characteristics................................. Permissible displacement media.......................... Personnel............................................................. Pilot valve............................................................. Prerequisites for installation................................. Pressurised components...................................... Protective equipment........................................... R Replacing the O-rings on the control valve.......... Rescue measures................................................ Residual risks....................................................... Boosters DLE 2 (-1, -2) – DLE 75 (-1, -2) 39 34 71 24 24 27 38 58 49 56 57 53 11 11 39 53 33 32 33 37 18 49 31 12 21 38 51 15 22 74 68 14 109 Index S Service................................................................... 9 Signs.................................................................... 23 Storage................................................................. 50 Switching off......................................................... 67 Switching on......................................................... 63 Symbols in the instructions.............................................. 7 T Type key............................................................... 35 Type plate............................................................ 35 110 U Use....................................................................... 11 V Versions............................................................... 41 W Working areas...................................................... 46 Boosters DLE 2 (-1, -2) – DLE 75 (-1, -2) 26.01.2012 Appendix Appendix 26.01.2012 Boosters DLE 2 (-1, -2) – DLE 75 (-1, -2) 111 112 Boosters DLE 2 (-1, -2) – DLE 75 (-1, -2) 26.01.2012 Hydrogen compression with Maximator boosters A Hydrogen compression with Maximator boosters 26.01.2012 Boosters DLE 2 (-1, -2) – DLE 75 (-1, -2) 113 114 Boosters DLE 2 (-1, -2) – DLE 75 (-1, -2) 26.01.2012 Achtung! Wichtige Informationen für die MAXIMATOR Kompressoren der DLE Baureihe. Werden die Kompressoren zur Verdichtung von aggressiven, brennbaren, gefährlichen oder giftigen Gasen eingesetzt, sind die Hinweise, wie im Fallbeispiel „Wasserstoff“ unbedingt zu beachten. Weiterhin müssen natürlich die dem entsprechenden Gas geltenden Vorschriften und Richtlinien eingehallten werden. Für den sicheren Betrieb der Kompressoren, ist der Betreiber verantwortlich. Caution! Important information for MAXIMATOR DLE Series Booster: If the boosters are used to compress aggressive, flammable, hazardous or toxic gases, the instructions as mentioned in the document: “Best Practice Hydrogen Compression” need to be observed. Furthermore the current regulations and directives for the specific gas need to be complied. The operator is responsible for the safe operation of the booster. GLOBAL PRESSURE SOLUTIONS Best Practice Hydrogen compression H Safety, explosion protection, systems engineering What you need to know Safety during compression of hydrogen Hydrogen is a colourless, odourless and flavourless gas and therefore cannot be detected with our human sensory organs. Avoiding explosive atmospheres in confined spaces and outdoors Hydrogen burns with invisible flame and radiates only little heat in this process. When mixing with air in a ratio of 4 to 76 percent by volume (vol. %) of hydrogen a detonating gas develops that already can be brought to explosion by a low-energy spark. Oxygen-hydrogen mixtures with a fraction of below 10.5 percent by volume are heavier than air and sink to the floor. Physical and chemical properties Appearance: Odour: Molar mass: Melting point: Boiling point: Critical temperature: Ignition temperature: Explosion limits (vol. % in air): Relative density, gaseous (air=1): Solubility in water (mg/1): The formation of an explosive atmosphere in adjacent areas near the hydrogen equipment is prevented by observing the following requirements: • Hydrogen equipment shall be installed in well-ventilated areas (if possible, outdoors). • Hydrogen equipment has to be leak-proof and remain so. • Venting lines from safety valves, leakage lines and similar lines shall be directed into the open. • Discharge units must not terminate below eaves, openings in buildings or placed near air intake ports. • In case hydrogen equipment is installed in confined spaces,the gas supply coming from the outside must be provided with a reliable shut-off device placed at a safe point. • Pipe connections on hydrogen equipment shall be fitted such that they ensure a long-term tightness of the joint. colourless gas odourless 2 g/mol -259 °C -253 °C -240 °C 560 °C 4 %(V) - 75 %(V) 0,07 1,6 mg/l -1- GLOBAL PRESSURE SOLUTIONS Explosive mixture Avoiding explosive mixtures in hydrogen equipment These modifications are available for the following highpressure sections: Explosive mixtures cannot be tolerated in hydrogen equipment with regard to safety aspects. Such mixtures are easily ignited by e.g. the friction heat generated in activating a valve or by the friction generated by rust particles dragged through. Even the heating of the gas caused by a pressure surge during rapid inflow of hydrogen into a equipment component filled with air can induce ignition. • DLE 2 • DLE 5 • DLE 15 • DLE 30 • DLE 75 MAXIMATOR hydrogen boosters are marked with the suffix H2-ExIIC and are generally suited for applications in explosion class IIC. Materials Prior to commissioning, the air has to be removed from the hydrogen equipment, e.g. by evacuation or flushing. The safest method is by flushing with hydrogen, when an oxygen content of below 1 percent by volume is achieved inside the plant. When decommissioning hydrogen equipment it is necessary to render the equipment free of gas by evacuation or flushing. To achieve this, the hydrogen content must be below 1 percent by volume, before the equipment can be opened. Please observe in all flushing procedures that flush gas always takes the path of lowest resistance. Therefore, the flush gas flow must be directed such that „dead pockets“ are avoided. Hydrogen embrittlement describes the change in the ductility of metals. Atomic hydrogen penetrates the microstructure of metallic material. At voids or grain boundaries, the atomic hydrogen recombines to form molecular hydrogen, thus increasing the pressure inside the structure. This process causes internal stresses and leads to material embrittlement. Material failure becomes apparent in cracks that spread outside (hydrogen-induced crack formation). In practical tests, austenitic steel has proven to be especially successful. After high performance tests, the MAXIMATOR hydrogen booster showed no sign of hydrogen embrittlement. Piston compressors with dynamically loaded seals are not absolutely gas-tight. To increase the performance of the piston seal for hydrogen compression purposes, both sealing geometry and material were adapted to the special requirements. Hydrogen compression with MAXIMATOR booster MAXIMATOR hydrogen booster design MAXIMATOR booster are especially modified for the compression of hydrogen in the following areas: • Material suited for pressurised components • Sealing geometry • Flushing Connection • Air drive section suitable for Atex Hydrogen places significant demand on material choice. In this area, the phenomenon of hydrogen embrittlement must be especially mentioned. Flushing Connection From a technical point of view, the most important part in the compression of hydrogen is to avoid the formation of explosive atmospheres. As gas leakages cannot be ruled out, MAXIMATOR hydrogen boosters have to be flushed with inert gas (preferably nitrogen) prior, during and after use. An explosive mixture can form inside the compressor chamber, but also in the rear piston chamber due to a little leakage at the high-pressure seals. -2- GLOBAL PRESSURE SOLUTIONS To also provide for safe flushing of these areas, the MAXIMATOR hydrogen boosters are also fitted with an additional flushing connection. In accordance with the boosters operating principle, different flushing processes shall be carried out to ensure safe operation. If no flushing is carried out, these areas are characterised by zone zero. In this case, MAXIMATOR boosters would belong in category 1 (which requires type approval test). In the current version, the boosters do not meet the requirements of category 1. Therefore, operation without flushing is expressly prohibited. 4. Afterwards, the inlet pressure line (PA) can be connected to the hydrogen supply. During hydrogen compression, the flushing connection shall be continuously flushed with nitrogen. 5.After completion of hydrogen compression, the booster chamber shall again be flushed as described under item 2. Flushing plan for single-stage, double-acting boosters: (With SFP flushing connection and Z1 and Z3 leakage connection on the high-pressure side) Flushing plans for MAXIMATOR hydrogen boosters SFP To be able to effectively flush the rear piston chamber of the booster, please observe the following installation scheme when fitting the flushing line. It is important that there is a continuous flow of flushing gas through the flushing lines during the complete duty cycle. Make sure in particular that flushing lines are not pressurised. Otherwise this might result in damage of the high-pressure section. Prior and after operation of the booster or equipment, the booster chamber and associated lines shall be flushed with copious amounts of nitrogen (or another inert gas). Through the flushing process it must be ensured that the oxygen content inside the booster or equipment falls below 1 percent by volume. Flushing plan for single-stage, single-acting booster: (With SFP flushing connection and Z1 leakage connection on the high-pressure side). SFP SFP Flushing procedure: 1. Prior to booster start-up, connect the nitrogen supply to the inlet pressure port (PA) and to the flushing connections (SFP). 2. Switch on the booster for approx. 1 min. (depending on the volume to be flushed). 3. Switch off the booster after completion of the flushing process. 4. Afterwards, the inlet pressure line (PA) can be connected to the hydrogen supply. During hydrogen compression, the flushing connection do not neet to be continuously flushed with nitrogen, because in single-stage, doubleacting compressors no ambient air is sucked in via the leakage ports. 5. After completion of hydrogen compression, the booster chamber shall again be flushed as described under item 2. Flushing procedure: 1. Prior to booster start-up, connect the nitrogen supply to the inlet pressure connection (PA) and to the flushing connection (SFP). 2. Switch on the booster for approx. 1 min. (depending on the volume to be flushed). 3. Switch off the booster after completion of the flushing process. -3- GLOBAL PRESSURE SOLUTIONS Flushing plan for two-stage booster: Type (With SFP flushing connections and Z1 and Z3 leakage connections on the high-pressure side) SFP DLE 2-1 DLE 5-1 DLE 15-1 DLE 30-1 DLE 75-1 DLE 2 DLE 5 DLE 15 DLE 30 DLE 75 DLE 2-5 DLE 5-15 DLE 5-30 DLE 15-30 DLE 15-75 DLE 30-75 DLE 2-1-2 DLE 5-1-2 DLE 15-1-2 DLE 30-1-2 DLE 75-1-2 DLE 2-2 DLE 5-2 DLE 15-2 DLE 30-2 DLE 75-2 DLE 2-5-2 DLE 5-15-2 DLE 5-30-2 DLE 15-30-2 DLE 15-75-2 DLE 30-75-2 SFP Flushing procedure: 1. Prior to booster start-up, connect the nitrogen supply to the inlet-pressure port (PA) and to the flushing connection (SFP). 2. Switch on the booster for approx. 1 min. (depending on the volume to be flushed). 3. Switch off the booster after completion of the flushing process. 4. Afterwards, the inlet pressure line (PA) can be connected to the hydrogen supply. During hydrogen compression, the flushing connection shall be continuously flushed with nitrogen. 5. After completion of hydrogen compression, the booster chamber shall again be flushed as described under item 2. Volume flow for gas flushing Depending on the type of booster, different volume flows must be ensured to provide for sufficient flushing performance. The table below shows the minimum required volume flow. Boosters marked in red only require volume flow during startup and decommissioning, whereas no volume flow is required during operation. Apart from flushing gas volume flow, the cross sections of flushing lines are also significant. We recommend not to fall below an inner diameter of 4 mm. If the diameter is smaller, this involves the hazard of gas pressure accumulating inside the flushing line. Under certain circumstances, the high-pressure component of the booster might be damaged. Also make sure the flushing line exit remains unobstructed. Volumenstrom lN/min 190 90 40 20 10 170 90 30 20 10 110 60 70 20 30 10 190 90 30 20 10 170 80 30 20 10 100 60 70 20 20 10 Temperature Booster temperature is dependent of the medium temperature, the degree of compression and other operating conditions. A prerequisite for safe operation is that the booster is correctly connected to earth potential. For ideal gases, the temperature to be expected can be calculated by the following formula: -4- GLOBAL PRESSURE SOLUTIONS P T2 = 2 P1 c −1 c As a rule, the following criteria should be met: • Stainless steel • no potential source of ignition • Ventilation ports on top and at the bottom ⋅ T1 with = Temperature after compression (in K) T2 T1 = Temperature prior to compression (in K) = Pressure after compression (in bar) P2 = Pressure prior to compression (in bar) P1 c = Isentropic exponent The isentropic exponent for hydrogen is 1.41. All accessory parts have to be electrically conductive. Varnished surfaces or sight glasses normally do not meet these requirements. Due to the fact that compression cannot take place without a heat exchange with the environment, the actual temperature will always remain below the calculated temperature. If the temperature of the compressed gas exceeds the maximum admissible temperature, compression has to be performed in several steps, with a cooling phase in between the individual compression steps. If the temperature of the compressed gas lies below the maximum admissible temperature, you have to ensure that - in dependence with the respective explosion zone - that operating conditions do not change. A slightly less inlet pressure would result in a higher temperature! High-pressure screw connections and hydrogen As a rule, high-pressure screw connections (cone and thread) are suitable for hydrogen operation. The operator of hydrogen equipment with high-pressure screw connections has to be advised that there might be possible leakage from leakage bores in fittings (t-pieces, elbows, crosspieces etc.). In case this is required, the availability of such components (with the corresponding manufacturer‘s confirmation) must be checked. Due to the material‘s non-conductive properties, noise insulation of the housing is also inadmissible. ATEX for power packs The standard MAXIMATOR power packs are not admissible for ATEX IIC. The reason here is the labelling foil. The foil with a printed flow diagram on instrumentation is approximately 1 mm thick. However, the ATEX 94/9/EC Directive limits maximum thickness of foil suitable for category IIC to 0.2 mm. In case ATEX IIC is required, the stations are also available with plates as an alternative to foil. The frame itself remains unchanged. Special features in project planning of hydrogen stations Generally, the compression of hydrogen does not place special demands on safety installations. For example, the installation of additional temperature and pressure monitoring devices is normally not necessary. In the selection of the various components (regulators, valves, filters etc.) special emphasis must be placed on their suitability for hydrogen. Leakage bore If required, suitable monitoring measures shall ensure that equipment using this type of screw connection is only used when tightness of the connection is assured. The requirements are stipulated by the classification into explosion zones. In general it must be ensured that only such components are used, which do not have a potential source of ignition. The material also has to be resistant against hydrogen embrittlement. Therefore, medium-carrying lines should be of stainless steel grade 1.4404, 1.4571 or similar. MAXIMATOR hydrogen stations Hose lines are unsuitable for hydrogen stations according to ATEX IIC because of their lack of conductivity. ATEX for housing and electrical cabinets Suitability of the housing or electrical cabinets for ATEX IIC shall be separately examined for the relevant application. -5- Connection drawing B Connection drawing 26.01.2012 Boosters DLE 2 (-1, -2) – DLE 75 (-1, -2) 123 124 Boosters DLE 2 (-1, -2) – DLE 75 (-1, -2) 26.01.2012 Installation plan C Installation plan 26.01.2012 Boosters DLE 2 (-1, -2) – DLE 75 (-1, -2) 125 126 Boosters DLE 2 (-1, -2) – DLE 75 (-1, -2) 26.01.2012 Cross-sectional drawings and bills of materials D Cross-sectional drawings and bills of materials 26.01.2012 Boosters DLE 2 (-1, -2) – DLE 75 (-1, -2) 127 128 Boosters DLE 2 (-1, -2) – DLE 75 (-1, -2) 26.01.2012 Safety data sheet for lubricating grease E Safety data sheet for lubricating grease 26.01.2012 Boosters DLE 2 (-1, -2) – DLE 75 (-1, -2) 129 130 Boosters DLE 2 (-1, -2) – DLE 75 (-1, -2) 26.01.2012 ISOFLEX TOPAS NB 52 MATERIAL SAFETY DATA SHEET Print date: 14-Dec-2010 Revision Numb er: 2 Revision date: 14-Dec-2010 1. IDENTIFICATION OF THE SUBSTANCE/PREPARATION AND THE COMPANY/UNDERTAKING Product Name: ISOFLEX TOPAS NB 52 Article Code: Synonyms: Chemical characterisation: 004131 No information available Not applicable.. Supplier: Klüber Lubrication North America L.P. 32 Industrial Drive Londonderry, NH 03053 (603) 647-4104 Fax (603) 647-4106 Emergency telephone number CHEMTREC: 1-800-424-9300 International: (703) 527-3887 2. COMPOSITION/INFORMATION ON INGREDIENTS Components Synthetic hydrocarbon oil Barium complex soap CAS-No ACGIH (TWA mg/m 3 ): None None OSHA (TWA mg/m 3 ): None None 3. HAZARDS IDENTIFICATION Properties affecting health: Harmful if swallowed Principle routes of exposure: Skin. Skin contact: Substance may cause slight skin irritation. Eye contact: Contact with eyes may cause irritation. Inhalation: Vapors and/or aerosols which may be formed at elevated temperatures may be irritating to eyes and respiratory tract. Ingestion: Harmful if swallowed. Ingestion may cause gastrointestinal irritation, nausea, vomiting and diarrhoea 4. FIRST AID MEASURES General advice: If symptoms persist, call a physician. Skin contact: Rinse with plenty of water. If skin irritation persists, call a physician. Inhalation: Move to fresh air in case of accidental inhalation of fumes from overheating or combustion. If symptoms persist, call a physician. Product nam e: ISOFLEX TOPAS NB 52 1 of 4 Eye contact: Flush eye with water for 15 minutes. If symptoms persist, call a physician. Ingestion: Do not induce vomiting. Consult a physician. Notes to physician: Treat symptomatically. 5. FIRE-FIGHTING MEASURES Suitable extinguishing media: Carbon dioxide (CO2), Dry chemical, Dry sand, Water spray mist or foam Extinguishing media which must not be used for safety reasons: Do not use a solid water stream as it may scatter and spread fire. Special protective equipment for firefighters: In the event of fire and/or explosion do not breathe fumes. In the event of fire, wear self-contained breathing apparatus. Standard procedure for chemical fires. Specific hazards: Unusual hazards: Specific methods: Burning produces irritant fumes In the event of fire and/or explosion do not breathe fumes No hazards resulting from the material as supplied Water mist may be used to cool closed containers. Standard procedure for chemical fires. Flash point: Not applicable. Autoignition temperature: Not determined.. Flammability Limits in Air: Lower Upper No information available No information available 6. ACCIDENTAL RELEASE MEASURES Personal precautions: Contaminated surfaces will be extremely slippery. Avoid contact with skin, eyes and clothing. Wear personal protective equipment. Environmental precautions: Prevent further leakage or spillage if safe to do so. Do not allow material to contaminate ground water system. Prevent product from entering drains. Methods for cleaning up: Scrape-up. Pick up and transfer to properly labelled containers. Clean contaminated surface thoroughly. 7. HANDLING AND STORAGE Handling Technical measures/precautions: Safe handling advice: Storage Technical measures/storage conditions: Incompatible products: No special technical protective measures required. Spilling onto the container`s outside will make container slippery. Avoid contact with skin, eyes and clothing. Handle in accordance with good industrial hygiene and safety practice. Keep containers tightly closed in a dry, cool and wellventilated place. Keep away from open flames, hot surfaces and sources of ignition. Keep in properly labelled containers. Keep out of reach of children. Oxidising and spontaneously flammable products. 8. EXPOSURE CONTROLS / PERSONAL PROTECTION 2 of 4 8. EXPOSURE CONTROLS / PERSONAL PROTECTION Engineering measures to reduce exposure: Ensure adequate ventilation, especially in confined areas.. Personal Protective Equipment Respiratory protection: Hand protection: Skin and body protection: Eye protection: Hygiene measures: No personal respiratory protective equipment normally required. Preventive skin protection Usual safety precautions while handling the product will provide adequate protection against this potential effect.. Avoid contact with eyes.. Avoid contact with skin, eyes and clothing. 9. PHYSICAL AND CHEMICAL PROPERTIES Physical State: Color: Specific gravity: Evaporation rate: Vapor pressure: Grease Beige ~ 0.96 Not determined Not determined Appearance: Odor: Boiling point/range Vapor density: Solubility: Paste Not significant No information available Not determined Insoluble. 10. STABILITY AND REACTIVITY Stability: Polymerization: Hazardous decomposition products: Materials to avoid: Conditions to avoid: No hazards to be especially mentioned Hazardous polymerisation does not occur. None under normal use Strong oxidising agents. Heat, flames and sparks.. 11. TOXICOLOGICAL INFORMATION Acute toxicity: No data available 12. ECOLOGICAL INFORMATION Mobility: No information available. Bioaccumulative potential: No information available. Ecotoxicity effects: No data available. Aquatic toxicity: No information available 13. DISPOSAL CONSIDERATIONS Waste from residues / unused products: In accordance with local and national regulations. Contaminated packaging: Empty containers should be taken for local recycling, recovery or waste disposal 14. TRANSPORT INFORMATION DOT Proper shipping name: Not regulated by DOT TDG (Canada) 3 of 4 14. TRANSPORT INFORMATION IMO / IMDG ICAO IATA 15. REGULATORY INFORMATION TSCA TSCA: Listed in TSCA U.S. Regulations: Barium complex soap SARA 313 Threshold: Barium compound (25 - 35%) Sara (311, 312) hazard class: Canada WHMIS hazard class: Non-controlled 16. OTHER INFORMATION NFPA Health: 1 Flammability: 1 Instability: HMIS Health: 1 Flammability: 1 Physical Hazard: Reason for revision: Prepared by: 0 0 Not applicable Health & Safety The information and recommendations contained herein are based upon tests believed to be reliable. However, Klüber does not guarantee their accuracy or completeness NOR SHALL ANY OF THIS INFORMATION CONSTITUTE A WARRANTY, WHETHER EXPRESSED OR IMPLIED, AS TO THE SAFETY OF THE GOODS, THE MERCHANTABILITY OF THE GOODS, OR THE FITNESS OF THE GOODS FOR A PARTICULAR PURPOSE. Adjustment to conform to actual conditions of usage maybe required. Klüber assumes no responsibility for results obtained or for incidental or consequential damages, including lost profits arising from the use of these data. No warranty against infringement of any patent, copyright or trademark is made or implied. 4 of 4