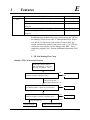
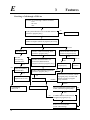
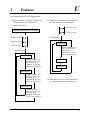
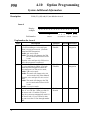
1
Digital Super Hybrid System
KX-TD816CE
KX-TD1232CE
Added and Changed Features for
Installation Manual and Programming Tables
Vol. 3
Please read this manual first and then the Installation Manual.
In this manual, the last letter “CE” of each model number is omitted.
ROM Version : KX-TD816CE — P341A; KX-TD1232CE — P241B; and later versions
Table of Contents
Additions to KX-TD816/1232
Section 1, System Outline
1.4 Options
E&M (TIE) Line Unit ................................................................................................................................. 4
Section 2, Installation
2.4 Installation of Optional Cards and Units
E&M (TIE) Line Unit Connection.............................................................................................................. 5
Installing Expansion Unit (KX-TD184)..................................................................................................... 6
Section 3, Features
Automatic Configuration ............................................................................................................................10
E&M (TIE) Line Service ............................................................................................................................11
Live Call Screening (LCS)..........................................................................................................................20
Log-In / Log-Out ........................................................................................................................................22
Phantom Extension......................................................................................................................................23
Two-Way Recording into the Voice Mail...................................................................................................24
Uniform Call Distribution (UCD)...............................................................................................................24
Voice Mail Integration for Digital Proprietary Telephones........................................................................28
Section 4, System Programming
[117] Voice Mail Number Assignment......................................................................................................29
[118] Voice Mail Extension Number Assignment.....................................................................................31
[119] Voice Mail Extension Group Assignment........................................................................................33
[126] UCD Overflow .................................................................................................................................34
[127] UCD Time Table ..............................................................................................................................35
[128] PBX Code.........................................................................................................................................36
[129] E&M Signal Assignment..................................................................................................................37
[130] Phantom Extension Number Assignment.........................................................................................38
[131] ISDN DDI Number / Phantom Extension Number Transformation ................................................39
[220] TIE First / Inter Digit Time ..............................................................................................................40
[340] TIE Line Routing Table....................................................................................................................41
[341] TIE Modify Removed Digit / Added Dial........................................................................................42
[431] TIE Table Number Assignment........................................................................................................43
[432] TIE Incoming Assignment ...............................................................................................................44
[433] TIE Outgoing Assignment................................................................................................................45
[434] TIE Subscriber Number Removed Digit ..........................................................................................46
[435] TIE Added Number ..........................................................................................................................47
[436] TIE Wink Time Out Assignment .....................................................................................................48
[437] CO-to-TIE Transfer ..........................................................................................................................49
[438] TIE-to-CO Transfer ..........................................................................................................................50
[439] TIE-to-TIE Transfer .........................................................................................................................51
[440] TIE Security Type ............................................................................................................................52
[441] Line Hunting Sequence ....................................................................................................................53
[442] Voice Path Type ...............................................................................................................................54
[443] Voice Level (Transmit) ....................................................................................................................55
[444] Voice Level (Receive)......................................................................................................................56
[445] TIE Receive Dial ..............................................................................................................................57
[616] Live Call Screening Recording Mode Assignment ..........................................................................58
Changes
Section 3, Features
Station Message Detail Recording (SMDR) ...............................................................................................60, 61
Section 4, System Programming
[005] Flexible CO Button Assignment ......................................................................................................60, 65
[100] Flexible Numbering..........................................................................................................................60, 66
[106] Station Hunting Type .......................................................................................................................60, 67
[109] Expansion Unit Type........................................................................................................................60, 69
[611] ISDN DDI Number / Floating Number Transformation ..................................................................60
[811] DISA / TIE User Codes....................................................................................................................60, 71
[813] Floating Number Assignment...........................................................................................................60, 72
[990] System Additional Information, Fields (39) through (41)................................................................60, 74
Programming Tables for Added and Changed Features ...............................................77
2
Additions to KX-TD816/1232
1.4
Options
E&M (TIE) Line Unit (KX-TD184)
This unit can be used for E&M Line Service and has four ports.
D1232
DIGITAL SUPER HYBRID SYSTEM
D816
DIGITAL SUPER HYBRID SYSTEM
Panasonic
Panasonic
Four ports for E&M Line Service
can be added.
Specifications
(1) E&M (TIE) Line Types................................. Type 5 only
(2) Transmission ................................................. 2-wire or 4-wire voice path (Programmable)
(Note) Maximum cabling distance of the E&M line cord (twisted cable):
22 AWG: Under 9.6 km
(3) Transmission levels
2-wire voice path........................................... -3 db (transmit/receive)
4-wire voice path........................................... -3 db normal (transmit/receive)
Programmable (-6 db, -3 db, 0 db, +3 db)
(4) Signaling
DTMF or Pulse
(5) E lead
Battery
-48 VDC, 20 mA to ground (max.)
Sensitivity
5 mA or 2000 Ω to ground (max.)
(min.)
(6) M lead
Available current : 30mA (max.)
Available voltage: ±100V (max.)
4
2.4
Installation of Optional Cards and Units
E&M (TIE) Line Unit Connection
Installing one unit to the system allows four E&M (TIE) lines to be
connected to CO lines 05 through 08 for the KX-TD816, or CO
lines 09 through 12 or 21 through 24 for the KX-TD1232. This
unit can be installed to any of the expansion areas provided on the
front of the system.
For unit installation, refer to the procedure “Section 2.4.4 Installing
Expansion Unit (KX-TD170/KX-TD180)” in the main Installation
Manual. Steps 1 through 5 and 7 through 10 of the installation
procedure are the same as other expansion units. Step 6 is different
for each unit. Please note the following instructions below instead
of step 6 (Installation Manual) for this unit.
Note
• System Programming [109] Expansion Unit Type is required for
expansion unit location identification.
Step 6
■ If the KX-TD184 is installed, use an Amphenol Connector to connect the E&M (TIE) lines.
Insert the connector into the jack.
4
Connector type
50-pin (Amphenol 57JE
series or the equivalent)
E
&
M
D
IG
IT
A
L
S
U
P
E
R
H
Y
B
R
ID
S
Y
S
T
E
M
25
1
50
26
P
an
as
on
ic
To terminal Board from the
E&M (TIE) Line.
Note:
• Be sure to secure the inside screw, or the unit may not work properly.
• To fix the connector, refer to “Section 2.4.4 Installing Expansion Unit (KX-TD170/KX-TD180),
Amphenol 57 Type (screw-attach-type 50-pin connector) Connection for KX-TD170” in the main
Installation Manual.
• For jack connection, please see “Cable Pin Numbers to Be Connected” on the next page.
• The KX-TD1232 is illustrated above.
5
Installing Expansion Unit (KX-TD184)
■ Cable Pins to be Connected (E&M Line)
Connect
Pin
Cable Color
Clip No.
Number
of Dots
1
26
2
27
3
28
4
29
5
30
ORN-RED
ORN-BLK
YEL-RED
YEL-BLK
GRY-RED
GRY-BLK
WHY-RED
WHY-BLK
ORN-RED
ORN-BLK
1
2
3
4
5
6
7
8
9
10
1
1
1
1
1
1
1
1
1
1
6
31
7
32
8
33
9
34
10
35
YEL-RED
YEL-BLK
GRY-RED
GRY-BLK
WHY-RED
WHY-BLK
ORN-RED
ORN-BLK
YEL-RED
YEL-BLK
11
12
13
14
15
16
17
18
19
20
2
2
2
2
2
2
2
2
2
2
11
36
12
37
13
38
14
39
15
40
GRY-RED
GRY-BLK
WHY-RED
WHY-BLK
ORN-RED
ORN-BLK
YEL-RED
YEL-BLK
GRY-RED
GRY-BLK
21
22
23
24
25
26
27
28
29
30
3
3
3
3
3
3
3
3
3
3
16
41
17
42
18
43
19
44
20
45
WHY-RED
WHY-BLK
ORN-RED
ORN-BLK
YEL-RED
YEL-BLK
GRY-RED
GRY-BLK
WHY-RED
WHY-BLK
31
32
33
34
35
36
37
38
39
40
4
4
4
4
4
4
4
4
4
4
Note:
21-25, 46-50: Cannot be connected
6
E&M Line
}
}
NO.1
T
2-wire or 4-wire - send
R
T1
4-wire - receive
R1
E Lead
SG Lead
SB Lead
M1 Lead
SG0
M Lead only for Type 5
NO.2
T
2-wire or 4-wire - send
R
T1
4-wire - receive
R1
E Lead
SG Lead
SB Lead
M1 Lead
SG0
M Lead only for Type 5
NO.3
T
2-wire or 4-wire - send
R
T1
4-wire - receive
R1
E Lead
SG Lead
SB Lead
M1 Lead
SG0
M Lead only for Type 5
NO.4
T
2-wire or 4-wire - send
R
T1
4-wire - receive
R1
E Lead
SG Lead
SB Lead
M1 Lead
SG0
M Lead only for Type 5
}
}
}
}
}
}
Installing Expansion Unit (KX-TD184)
■ Cable Pins to be Connected (E&M Line)
• E&M Line Wiring
50-pin
Connector
Block Terminal
26
1
1
1
2
2
27
3
3
2
4
4
28
5
5
3
6
6
29
7
7
4
8
8
30
9
9
31
11
11
6
12
12
E&M Line 1
5
Bridging Clips
■ Connecting to another KX-TD816/KX-TD1232 system (KX-TD184)
(1) 2-wire voice path
KX-TD184
Another KX-TD184
T
R
E
SG
M1
SB
T
R
E
SG
M1
SB
(2) 4-wire voice path
KX-TD184
Another KX-TD184
T
R
T1
R1
E
SG
M1
SB
T
R
T1
R1
E
SG
M1
SB
7
Installing Expansion Unit (KX-TD184)
■ Connecting to the E&M Central Office
(1) 2-wire voice path
KX-TD184
E&M Central Office
T
R
-48V
E
M
GROUND
-48V
GROUND
(2) 4-wire voice path
KX-TD184
Another KX-TD184
Voice
Transmit
T
R
Voice
Receive
T1
R1
-48V
Voice
Transmit
E
M
GROUND
8
Voice
Receive
-48V
GROUND
Installing Expansion Unit (KX-TD184)
■ E&M Sequences
You can choose one of the following E&M sequences by System Programming [129] “E&M
Signal Assignment”.
(1) Continuous E&M
Seize
Answer
Dial
Disconnect
E-Wire
Wink
M-Wire
If you select “Immediate”, this signal will not appear.
(2) Pulsed E&M with Answer signal
Seize
Dial
Answer
Disconnect
E-Wire
ACK
M-Wire
(Answer signal)
❈ If you select this sequence, then you must select “Wink” as the start type.
(3) Pulsed E&M without Answer signal
Seize
Dial
Answer
Disconnect
E-Wire
ACK
M-Wire
❈ If you select this sequence, then you must select “Wink” as the start type.
9
A
3
Features
Automatic Configuration†
Description
The system sends the VPS data which contains the extension
number configuration information and the VPS automatically
creates mailboxes with this data (Quick Setup).
Conditions
• The data is transmitted to the VPS on the lowest jack port.
Programming References
No programming required.
Feature References
None
Operation References
Not applicable.
10
†: Available when the Digital Super Hybrid System is connected to a Digital
Proprietary Telephone capable Panasonic Voice Processing System (one
that supports digital proprietary telephone integration; e.g. KX-TVP200).
3
E
Features
E&M (TIE) Line Service
Description
An E&M (TIE) line is a privately leased communication line
between two or more PBXs, which provides cost effective
communications between company members at different locations.
The TIE lines can be used to call through your system to reach
another switching system (PBX or CO). By utilizing TIE lines,
your system can support not only communications with the public
network but with other company locations in the private network
where your system is included.
System Explanation
1. Making a TIE Call
One of the following two methods can be used to make a TIE call.
1.1 Extension Number method
Dial the [Extension Number] only to make a TIE call.
<Example>
KX-TD816/1232
Other PBX
TIE Line
E&M
E&M
2011
Ext. 1011
Ext. 2011
Explanation
To use this method, it is necessary to change the first one or two
digits of extension numbers of either PBX to avoid having the
same extension number.
1. Extension 1011 dials extension number “2011”.
2. Extension 1011 is connected to extension “2011” of the other
PBX.
11
E
3
Features
1.2 PBX Code method
Dial the [TIE Line Access Code] [PBX Code] [Extension
Number] to make a TIE call.
<Example>
KX-TD816/1232
Other PBX
TIE Line
E&M
PBX Code 951
E&M
7-952-1011
Ext. 1011
PBX Code 952
Ext. 1011
Explanation
To use this method, it is necessary to have each PBX code in order
to identify the location of an extension.
1. Extension 1011 dials TIE line access code “7”, PBX code “952”
and extension number “1011”.
2. Extension 1011 is connected to extension 1011 of the other PBX
which has PBX code “952”.
2. TIE Line and CO Line Connection
To connect the TIE line with the CO line, the following patterns are
available.
2.1 CO-to-TIE Transfer
The system transfers incoming outside calls to the other PBX
through the TIE line. The following patterns are available.
■ TIE call using DISA
<Example>
@@@@@@@@e?
@@@@@@@@e?@@@@@@@@?e@@@@@@@@e?@@@@@@@@?e@@@@@@@@e?@@@@@@@@?e@@@@@@@@e?@@@@@@@@?e@@@@@@@@e?@@@@@@@@?e@@@@@@@@e?@@@@@@@@?e@@@@@@@@e?@@@@@@@@?e@@@@@@@@e?@@@@@@@@?e@@@@@@@@e?@@@@@@@@?e@@@@@@@@e?@@@@@@@@?e@@@@@@@@e?@@@@@@@@?e@@@@@@@@e?@@@@@@@@?e@@@@@@@@e?@@@@@@@@?e@@@@@@@@e?@@@@@@@@?e@@@@@@@@e?@@@@@@@@?e@@@@@@@@e?@@@@@@@@?e@@@@@@@@e?@@@@@@@@?e@@@@@@@@e?@@@@@@@@?e@@@@@@@@e?@@@@@@@@?e@@@@@@@@e?@@@@@@@@?e@@@@@@@@e?@@@@@@@@?e@@@@@@@@e?@@@@@@@@?e@@@@@@@@e?@@@@@@@@?e@@@@@@@@e?@@@@@@@@?e@@@@@@@@e?@@@@@@@@?e@@@@@@@@e?@@@@@@@@?e@@@@@@@@e?@@@@@@@@?e@@@@@@@@e?@@@@@@@@?e@@@@@@@@e?@@@@@@@@?e@@@@@@@@e?@@@@@@@@?e@@@@@@@@e?@@@@@@@@?e@@@@@@@@e?@@@@@@@@?e@@@@@@@@e?@@@@@@@@?e@@@@@@@@e?@@@@@@@@?e@@@@@@@@e?@@@@@@@@?e@@@@@@@@e?@@@@@@@@?e@@@@@@@@e?@@@@@@@@?e@@@@@@@@e?@@@@@@@@?
@@h?
@@h?
@@h?
@@h?
@@h?
@@h?
@@@@@@@@e?@@@@@@@@?e@@@@@@@@e?@@@@@@@@?e@@@@@@@@e?@@@@@@@@?e@@@@@@@@e?@@@@@@@@?e@@@@@@@@e?@@@@@@@@?e@@@@@@@@e?@@@@@@@@?e@@@@@@@@e?@@@@@@@@?e@@@@@@@@e?@@@@@@@@
@@@@@@@@e?@@@@@@@@?e@@@@@@@@e?@@@@@@@@?e@@@@@@@@e?@@@@@@@@?e@@@@@@@@e?@@@@@@@@?e@@@@@@@@e?@@@@@@@@?e@@@@@@@@e?@@@@@@@@?e@@@@@@@@e?@@@@@@@@?e@@@@@@@@e?@@@@@@@@
@@
@@
@@
@@
@@
@@
@@
@@
@@
@@
@@
@@
@@
@@
@@
@@
@@
@@
@@
@@
@@
@@
@@
@@
@@
@@
@@
@@
@@
@@
@@
@@
@@
@@
@@
@@
@@
@@
@@
@@
@@
@@
@@
@@
@@
@@
@@
@@
@@
@@
@@
@@
@@
@@
@@
@@
@@
@@
@@
@@
@@
@@
@@
@@
@@
@@
@@
@@
@@
@@
@@
@@
@@
@@
@@
@@
@@
@@
@@
@@
@@
@@
@@
@@
@@
@@
KX-TD816/1232
Other PBX
@@
@@
@@
@@
@@
@@
@@
@@
@@
@@
@@
@@
@@
@@
@@
@@
@@
@@
@@
@@
@@
@@
@@
@@
@@
@@
@@
@@
@@
@@
@@
@@
@@
@@
@@
@@
@@
@@
@@
@@
@@
@@
@@
@@
@@
@@
@@
@@
TIE Line
@@
@@
@@
@@
@@
@@
@@
@@
@@
@@
@@
@@
@@
@@
@@
@@
@@
@@
@@
@@
@@
@@
@@
@@
@@
@@
@@
@@
@@
@@
@@
@@
@@
@@
@@
@@
@@
@@
@@
@@
@@
@@
@@
@@
@@
@@
@@
@@
DISA
E&M
@@
@@
@@
@@
@@
@@
@@
@@
@@
@@
@@
@@
@@
@@
@@
@@
@@
@@
@@
@@
@@
@@
@@
@@
@@
@@
@@
@@
@@
@@
@@
@@
@@
@@
@@
@@
@@
@@
@@
@@
E&M
@@
@@
@@
@@
@@
@@
@@
@@
@@
@@
@@
@@
@@
@@
@@
@@
@@
@@
@@
@@
@@
@@
@@
@@
@@
@@
@@
@@
@@
@@
@@
@@
@@
@@
@@
@@
@@
@@
@@
@@
@@
@@
@@
@@
@@
@@
@@
@@
@@
@@
@@
@@
@@
@@
@@
@@
@@
@@
@@
@@
@@
@@
@@
@@
@@
@@
@@
@@
@@
@@
@@
@@
@@
@@
@@
@@
@@
@@
@@
@@
@@
@@
@@
@@
@@
@@
@@
@@
@@
@@
@@
@@
@@
@@
@@
@@
@@
@@
@@
@@
@@
@@
@@
@@
@@
@@
@@
@@
@@
@@
@@
@@
PBX Code 951
7-(DISA/TIE User Code)
-952-1011
@@
@@
@@
@@
@@
@@
@@
@@
@@
@@
@@
@@
@@
@@
@@
@@
@@
@@
@@
@@
@@
@@
@@
@@
PBX Code 952
@@
@@
@@
@@
@@
@@
@@
@@
@@
@@
@@
@@
@@
@@
@@
@@
@@
@@
@@
@@
@@
@@
@@
@@
@@
@@
@@
@@
@@
@@
@@
@@
@@
@@
@@
@@
@@
@@
@@
@@
@@
@@
@@
@@
@@
@@
@@
@@
@@
@@
@@
@@
@@
@@
@@
@@
@@
@@
@@
@@
@@
@@
@@
@@
@@
@@
@@
@@
@@
@@
@@
@@
@@
@@
@@
@@
@@
@@
@@
@@
@@
@@
@@
@@
@@
@@
@@
@@
@@
@@
@@
@@
@@
@@
@@
@@
@@
@@
@@
@@
@@
@@
@@
@@
@@
@@
@@
@@
@@
@@
@@
@@
@@
@@
@@
@@
@@
@@
@@
@@
@@
@@
@@
@@
@@
@@
@@
@@
@@
@@
@@
@@
@@
@@
@@
@@
@@
@@
@@
@@
@@
@@
@@
@@
@@
@@
@@
@@
@@
@@
@@
@@
@@
@@
@@
@@
@@
@@
@@
@@
@@
@@
@@
@@
@@
@@
@@
@@
@@
@@
@@
@@
@@
@@
@@
@@
@@
@@
@@
@@
@@
@@
@@
@@
@@
@@
@@
@@
@@
@@
@@
@@
@@
@@
@@
@@
@@
@@
@@
@@
@@
@@
@@
@@
@@
@@
@@
@@
@@
@@
@@
@@
@@
@@
@@
@@
@@
@@
@@
@@
@@
@@
@@
@@
@@
@@
@@
@@
@@
@@
@@
@@
@@
@@
@@
@@
@@
@@
@@
@@
@@
@@
@@
@@
@@
@@
@@
@@
@@
@@
@@
@@
@@
@@
@@
@@
@@
@@
@@
@@
@@
@@
@@
@@
@@
@@
@@
@@
@@
@@
@@
@@
@@
@@
@@
@@
@@
@@
@@
@@
TIE Line Network
Ext. 1011
@@
@@
@@
@@
@@
@@
@@
@@
@@
@@
@@
@@
@@
@@
@@
@@
@@
@@
@@
@@
@@
@@
@@
@@
@@
@@
@@
@@
@@
@@
@@
@@
@@
@@
@@
@@
@@
@@
@@
@@
@@g
@@g
@@g
@@g
@@g
@@g
@@@@@@@@
@@@@@@@@ ?@@@@@@@@?e@@@@@@@@e?@@@@@@@@?e@@@@@@@@e?@@@@@@@@?e@@@@@@@@e?@@@@@@@@?e@@@@@@@@e?@@@@@@@@?e@@@@@@@@e?@@@@@@@@?e@@@@@@@@e?@@@@@@@@?e@@@@@@@@e?@@@@@@@@?e@@@@@@@@e?@@@@@@@@?e@@@@@@@@e?@@@@@@@@?e@@@@@@@@e?@@@@@@@@?e@@@@@@@@e?@@@@@@@@?e@@@@@@@@e?@@@@@@@@?e@@@@@@@@e?@@@@@@@@?e@@@@@@@@e?@@@@@@@@?e@@@@@@@@e?@@@@@@@@?e@@@@@@@@e?@@@@@@@@?e@@@@@@@@e?@@@@@@@@?e@@@@@@@@e?@@@@@@@@?e@@@@@@@@e?@@@@@@@@?e@@@@@@@@e?@@@@@@@@?e@@@@@@@@e?@@@@@@@@?e@@@@@@@@e?@@@@@@@@?e@@@@@@@@e?@@@@@@@@?e@@@@@@@@e?@@@@@@@@?e@@@@@@@@e?@@@@@@@@?e@@@@@@@@e?@@@@@@@@?e@@@@@@@@e?@@@@@@@@?e@@@@@@@@e?@@@@@@@@?e@@@@@@@@e?@@@@@@@@?e@@@@@@@@e?@@@@@@@@?e@@@@@@@@e?@@@@@@@@?e@@@@@@@@e?@@@@@@@@?e@@@@@@@@e?@@@@@@@@?e@@@@@@@@e?@@@@@@@@?e@@@@@@@@e?@@@@@@@@?e@@@@@@@@e?@@@@@@@@?e@@@@@@@@e?@@@@@@@@?e@@@@@@@@
?@@@@@@@@?e@@@@@@@@e?@@@@@@@@?e@@@@@@@@e?@@@@@@@@?e@@@@@@@@e?@@@@@@@@?e@@@@@@@@e?@@@@@@@@?e@@@@@@@@e?@@@@@@@@?e@@@@@@@@e?@@@@@@@@?e@@@@@@@@e?@@@@@@@@?e@@@@@@@@e?@@@@@@@@?e@@@@@@@@e?@@@@@@@@?e@@@@@@@@e?@@@@@@@@?e@@@@@@@@e?@@@@@@@@?e@@@@@@@@e?@@@@@@@@?e@@@@@@@@e?@@@@@@@@?e@@@@@@@@e?@@@@@@@@?e@@@@@@@@e?@@@@@@@@?e@@@@@@@@e?@@@@@@@@?e@@@@@@@@e?@@@@@@@@?e@@@@@@@@e?@@@@@@@@?e@@@@@@@@e?@@@@@@@@?e@@@@@@@@e?@@@@@@@@?e@@@@@@@@e?@@@@@@@@?e@@@@@@@@e?@@@@@@@@?e@@@@@@@@e?@@@@@@@@?e@@@@@@@@e?@@@@@@@@?e@@@@@@@@e?@@@@@@@@?e@@@@@@@@e?@@@@@@@@?e@@@@@@@@e?@@@@@@@@?e@@@@@@@@e?@@@@@@@@?e@@@@@@@@e?@@@@@@@@?e@@@@@@@@e?@@@@@@@@?e@@@@@@@@e?@@@@@@@@?e@@@@@@@@e?@@@@@@@@?e@@@@@@@@e?@@@@@@@@?e@@@@@@@@e?@@@@@@@@?e@@@@@@@@e?@@@@@@@@?e@@@@@@@@e?@@@@@@@@?e@@@@@@@@e?@@@@@@@@?e@@@@@@@@
@@
@@
@@
@@
@@
@@
@@
@@
@@
@@
@@
@@
@@
@@
@@
@@
@@
@@
@@
@@
@@
@@
@@
@@
12
@@
@@
@@
@@
@@
@@
@@
@@
@@
@@
@@
@@
@@
@@
@@
@@
@@
@@
@@
@@
@@
@@
@@
@@
Outside party
@@
@@
@@
@@
@@
@@
@@
@@
@@
@@
@@
@@
@@
@@
@@
@@
@@
@@
@@
@@
@@
@@
@@
@@
DISA
phone no.
@@
@@
@@
@@
@@
@@
@@
@@
@@
@@
@@
@@
@@
@@
@@
@@
@@
@@
@@
@@
@@
@@
@@
@@
CO
@@
@@
@@
@@
@@
@@
@@
@@
@@
@@
@@
@@
@@
@@
@@
@@
@@
@@
@@
@@
@@
@@
@@
@@
CO Line
@@
@@
@@
@@
@@
@@
@@
@@
@@
@@
@@
@@
@@
@@
@@
@@
?@@@@@@@@?e@@@@@@@@e?@@@@@@@@?e@@@@@@@@e?@@@@@@@@?e@@@@@@@@e?@@@@@@@@?e@@@@@@@@e?@@@@@@@@?e@@@@@@@@e?@@@@@@@@?e@@@@@@@@e?@@@@@@@@?e@@@@@@@@e?@@@@@@@@
?@@@@@@@@?e@@@@@@@@e?@@@@@@@@?e@@@@@@@@e?@@@@@@@@?e@@@@@@@@e?@@@@@@@@?e@@@@@@@@e?@@@@@@@@?e@@@@@@@@e?@@@@@@@@?e@@@@@@@@e?@@@@@@@@?e@@@@@@@@e?@@@@@@@@
@@
@@
@@
@@
@@
@@
@@
@@
?@@
?@@
?@@
?@@
?@@
?@@
?@@@@@@@@
?@@@@@@@@
3
E
Features
Explanation
The outside caller dials as follows:
1. The DISA phone number, and the DISA-OGM is sent.
2. TIE line access code “7”, and a dial tone is heard.
3. The DISA/TIE user code (if required), PBX code “952” and
extension number “1011”.
The outside caller is connected to extension 1011 of the other PBX
which has PBX code “952”.
■ Call Forwarding / Call Transfer to the TIE line
<Example>
@@@@@@@@e?
@@@@@@@@e?@@@@@@@@?e@@@@@@@@e?@@@@@@@@?e@@@@@@@@e?@@@@@@@@?e@@@@@@@@e?@@@@@@@@?e@@@@@@@@e?@@@@@@@@?e@@@@@@@@e?@@@@@@@@?e@@@@@@@@e?@@@@@@@@?e@@@@@@@@e?@@@@@@@@?e@@@@@@@@e?@@@@@@@@?e@@@@@@@@e?@@@@@@@@?e@@@@@@@@e?@@@@@@@@?e@@@@@@@@e?@@@@@@@@?e@@@@@@@@e?@@@@@@@@?e@@@@@@@@e?@@@@@@@@?e@@@@@@@@e?@@@@@@@@?e@@@@@@@@e?@@@@@@@@?e@@@@@@@@e?@@@@@@@@?e@@@@@@@@e?@@@@@@@@?e@@@@@@@@e?@@@@@@@@?e@@@@@@@@e?@@@@@@@@?e@@@@@@@@e?@@@@@@@@?e@@@@@@@@e?@@@@@@@@?e@@@@@@@@e?@@@@@@@@?e@@@@@@@@e?@@@@@@@@?e@@@@@@@@e?@@@@@@@@?e@@@@@@@@e?@@@@@@@@?e@@@@@@@@e?@@@@@@@@?e@@@@@@@@e?@@@@@@@@?e@@@@@@@@e?@@@@@@@@?e@@@@@@@@e?@@@@@@@@?e@@@@@@@@e?@@@@@@@@?e@@@@@@@@e?@@@@@@@@?e@@@@@@@@e?@@@@@@@@?e@@@@@@@@e?@@@@@@@@?e@@@@@@@@e?@@@@@@@@?e@@@@@@@@e?@@@@@@@@?e@@@@@@@@e?@@@@@@@@?e@@@@@@@@e?@@@@@@@@?
@@@@@@@@e?
@@@@@@@@e?@@@@@@@@?e@@@@@@@@e?@@@@@@@@?e@@@@@@@@e?@@@@@@@@?e@@@@@@@@e?@@@@@@@@?e@@@@@@@@e?@@@@@@@@?e@@@@@@@@e?@@@@@@@@?e@@@@@@@@e?@@@@@@@@?e@@@@@@@@e?@@@@@@@@?e@@@@@@@@e?@@@@@@@@?e@@@@@@@@e?@@@@@@@@?e@@@@@@@@e?@@@@@@@@?e@@@@@@@@e?@@@@@@@@?e@@@@@@@@e?@@@@@@@@?e@@@@@@@@e?@@@@@@@@?e@@@@@@@@e?@@@@@@@@?e@@@@@@@@e?@@@@@@@@?e@@@@@@@@e?@@@@@@@@?e@@@@@@@@e?@@@@@@@@?e@@@@@@@@e?@@@@@@@@?e@@@@@@@@e?@@@@@@@@?e@@@@@@@@e?@@@@@@@@?e@@@@@@@@e?@@@@@@@@?e@@@@@@@@e?@@@@@@@@?e@@@@@@@@e?@@@@@@@@?e@@@@@@@@e?@@@@@@@@?e@@@@@@@@e?@@@@@@@@?e@@@@@@@@e?@@@@@@@@?e@@@@@@@@e?@@@@@@@@?e@@@@@@@@e?@@@@@@@@?e@@@@@@@@e?@@@@@@@@?e@@@@@@@@e?@@@@@@@@?e@@@@@@@@e?@@@@@@@@?e@@@@@@@@e?@@@@@@@@?e@@@@@@@@e?@@@@@@@@?e@@@@@@@@e?@@@@@@@@?e@@@@@@@@e?@@@@@@@@?e@@@@@@@@e?@@@@@@@@?e@@@@@@@@e?@@@@@@@@?
@@h?
@@h?
@@h?
@@h?
@@h?
@@h?
@@@@@@@@e?@@@@@@@@?e@@@@@@@@e?@@@@@@@@?e@@@@@@@@e?@@@@@@@@?e@@@@@@@@e?@@@@@@@@?e@@@@@@@@e?@@@@@@@@?e@@@@@@@@e?@@@@@@@@?e@@@@@@@@e?@@@@@@@@?e@@@@@@@@e?@@@@@@@@
@@@@@@@@e?@@@@@@@@?e@@@@@@@@e?@@@@@@@@?e@@@@@@@@e?@@@@@@@@?e@@@@@@@@e?@@@@@@@@?e@@@@@@@@e?@@@@@@@@?e@@@@@@@@e?@@@@@@@@?e@@@@@@@@e?@@@@@@@@?e@@@@@@@@e?@@@@@@@@
@@
@@
@@
@@
@@
@@
@@
@@
@@
@@
@@
@@
@@
@@
@@
@@
@@
@@
@@
@@
@@
@@
@@
@@
@@
@@
@@
@@
@@
@@
@@
@@
@@
@@
@@
@@
@@
@@
@@
@@
@@
@@
@@
@@
@@
@@
@@
@@
@@
@@
@@
@@
@@
@@
@@
@@
@@
@@
@@
@@
@@
@@
@@
@@
@@
@@
@@
@@
@@
@@
@@
@@
@@
@@
@@
@@
@@
@@
@@
@@
@@
@@
@@
@@
@@
@@
KX-TD816/1232
@@
@@
@@
@@
@@
@@
@@
@@
Other PBX
@@
@@
@@
@@
@@
@@
@@
@@
@@
@@
@@
@@
@@
@@
@@
@@
@@
@@
@@
@@
@@
@@
@@
@@
@@
@@
@@
@@
@@
@@
@@
@@
@@
@@
@@
@@
@@
@@
@@
@@
@@
@@
@@
@@
@@
@@
@@
@@
@@
@@
@@
@@
@@
@@
@@
@@
@@
@@
@@
@@
@@
@@
@@
@@
@@
@@
@@
@@
@@
@@
@@
@@
@@
@@
@@
@@
@@
@@
@@
@@
@@
@@
@@
@@
@@
@@
@@
@@
@@
@@
@@
@@
@@
@@
@@
@@
@@
@@
@@
@@
@@
@@
@@
@@
@@
@@
@@
@@
@@
@@
@@
@@
CO Line
@@
@@
@@
@@
@@
@@
@@
@@
TIE Line
@@
@@
@@
@@
@@
@@
@@
@@
@@
@@
@@
@@
@@
@@
@@
@@
@@
@@
@@
@@
@@
@@
@@
@@
@@
@@
@@
@@
@@
@@
@@
@@
@@
@@
@@
@@
@@
@@
@@
@@
CO
DISA
@@
@@
@@
@@
@@
@@
@@
@@
@@
@@
@@
@@
@@
@@
@@
@@
E&M
@@
@@
@@
@@
@@
@@
@@
@@
@@
@@
@@
@@
@@
@@
@@
@@
@@
@@
@@
@@
@@
@@
@@
@@
@@
@@
@@
@@
@@
@@
@@
@@
@@
@@
@@
@@
@@
@@
@@
@@
E&M
@@
@@
@@
@@
@@
@@
@@
@@
@@
@@
@@
@@
@@
@@
@@
@@
@@
@@
@@
@@
@@
@@
@@
@@
@@
@@
@@
@@
@@
@@
@@
@@
@@
@@
@@
@@
@@
@@
@@
@@
@@
@@
@@
@@
@@
@@
@@
@@
@@
@@
@@
@@
@@
@@
@@
@@
@@
@@
@@
@@
@@
@@
@@
@@
PBX Code 951
@@
@@
@@
@@
@@
@@
@@
@@
@@
@@
@@
@@
@@
@@
@@
@@
@@
@@
@@
@@
@@
@@
@@
@@
phone no.
@@
@@
@@
@@
@@
@@
@@
@@
@@
@@
@@
@@
@@
@@
@@
@@
Forwarded / Transferred
to 952-1011
@@
@@
@@
@@
@@
@@
@@
@@
@@
@@
@@
@@
@@
@@
@@
@@
@@
@@
@@
@@
@@
@@
@@
@@
@@
@@
@@
@@
@@
@@
@@
@@
PBX Code 952
@@
@@
@@
@@
@@
@@
@@
@@
@@
@@
@@
@@
@@
@@
@@
@@
@@
@@
@@
@@
@@
@@
@@
@@
@@
@@
@@
@@
@@
@@
@@
@@
@@
@@
@@
@@
@@
@@
@@
@@
@@
@@
@@
@@
@@
@@
@@
@@
@@
@@
@@
@@
@@
@@
@@
@@
@@
@@
@@
@@
@@
@@
@@
@@
@@
@@
@@
@@
@@
@@
@@
@@
@@
@@
@@
@@
@@
@@
@@
@@
@@
@@
@@
@@
@@
@@
@@
@@
@@
@@
@@
@@
@@
@@
@@
@@
@@
@@
@@
@@
@@
@@
@@
@@
@@
@@
@@
@@
@@
@@
@@
@@
@@
@@
@@
@@
@@
@@
@@
@@
@@
@@
@@
@@
@@
@@
@@
@@
@@
@@
@@
@@
@@
@@
@@
@@
@@
@@
@@
@@
@@
@@
@@
@@
@@
@@
@@
@@
@@
@@
@@
@@
@@
@@
@@
@@
@@
@@
@@
@@
@@
@@
@@
@@
@@
@@
@@
@@
@@
@@
@@
@@
@@
@@
@@
@@
@@
@@
@@
@@
@@
@@
@@
@@
@@
@@
@@
@@
@@
@@
@@
@@
@@
@@
@@
@@
@@
@@
@@
@@
@@
@@
@@
@@
@@
@@
@@
@@
@@
@@
@@
@@
@@
@@
@@
@@
@@
@@
@@
@@
@@
@@
@@
@@
@@
@@
@@
@@
@@
@@
@@
@@
@@
@@
@@
@@
@@
@@
@@
@@
@@
@@
@@
@@
@@
@@
@@
@@
@@
@@
@@
@@
@@
@@
@@
@@
Outside party
@@
@@
@@
@@
@@
@@
@@
@@
@@
@@
@@
@@
@@
@@
@@
@@
Ext. 1011
@@
@@
@@
@@
@@
@@
@@
@@
@@
@@
@@
@@
@@
@@
@@
@@
@@
@@
@@
@@
@@
@@
@@
@@
@@
@@
@@
@@
@@
@@
@@
@@
Ext. 1011
@@
@@
@@
@@
@@
@@
@@
@@
@@
@@
@@
@@
@@
@@
@@
@@
@@
@@
@@
@@
@@
@@
@@
@@
@@
@@
@@
@@
@@
@@
@@
@@
@@
@@
@@
@@
@@
@@
@@
@@
@@
@@
@@
@@
@@
@@
@@
@@
@@
@@
@@
@@
@@
@@
@@
@@
@@
@@
@@
@@
@@
@@
@@
@@
@@
@@
@@
@@
@@
@@
@@
@@
TIE Line Network
@@
@@
@@
@@
@@
@@
@@
@@
@@
@@
@@
@@
@@
@@
@@
@@
@@
@@
@@
@@
@@
@@
@@
@@
@@
@@
@@
@@
@@
@@
@@
@@
@@g
@@g
@@g
@@g
@@g
@@g
@@@@@@@@
@@@@@@@@
?@@@@@@@@?e@@@@@@@@e?@@@@@@@@?e@@@@@@@@e?@@@@@@@@?e@@@@@@@@e?@@@@@@@@?e@@@@@@@@e?@@@@@@@@?e@@@@@@@@e?@@@@@@@@?e@@@@@@@@e?@@@@@@@@?e@@@@@@@@e?@@@@@@@@?e@@@@@@@@e?@@@@@@@@?e@@@@@@@@e?@@@@@@@@?e@@@@@@@@e?@@@@@@@@?e@@@@@@@@e?@@@@@@@@?e@@@@@@@@e?@@@@@@@@?e@@@@@@@@e?@@@@@@@@?e@@@@@@@@e?@@@@@@@@?e@@@@@@@@e?@@@@@@@@?e@@@@@@@@e?@@@@@@@@?e@@@@@@@@e?@@@@@@@@?e@@@@@@@@e?@@@@@@@@?e@@@@@@@@e?@@@@@@@@?e@@@@@@@@e?@@@@@@@@?e@@@@@@@@e?@@@@@@@@?e@@@@@@@@e?@@@@@@@@?e@@@@@@@@e?@@@@@@@@?e@@@@@@@@e?@@@@@@@@?e@@@@@@@@e?@@@@@@@@?e@@@@@@@@e?@@@@@@@@?e@@@@@@@@e?@@@@@@@@?e@@@@@@@@e?@@@@@@@@?e@@@@@@@@e?@@@@@@@@?e@@@@@@@@e?@@@@@@@@?e@@@@@@@@e?@@@@@@@@?e@@@@@@@@e?@@@@@@@@?e@@@@@@@@e?@@@@@@@@?e@@@@@@@@e?@@@@@@@@?e@@@@@@@@e?@@@@@@@@?e@@@@@@@@e?@@@@@@@@?e@@@@@@@@e?@@@@@@@@?e@@@@@@@@
?@@@@@@@@?e@@@@@@@@e?@@@@@@@@?e@@@@@@@@e?@@@@@@@@?e@@@@@@@@e?@@@@@@@@?e@@@@@@@@e?@@@@@@@@?e@@@@@@@@e?@@@@@@@@?e@@@@@@@@e?@@@@@@@@?e@@@@@@@@e?@@@@@@@@?e@@@@@@@@e?@@@@@@@@?e@@@@@@@@e?@@@@@@@@?e@@@@@@@@e?@@@@@@@@?e@@@@@@@@e?@@@@@@@@?e@@@@@@@@e?@@@@@@@@?e@@@@@@@@e?@@@@@@@@?e@@@@@@@@e?@@@@@@@@?e@@@@@@@@e?@@@@@@@@?e@@@@@@@@e?@@@@@@@@?e@@@@@@@@e?@@@@@@@@?e@@@@@@@@e?@@@@@@@@?e@@@@@@@@e?@@@@@@@@?e@@@@@@@@e?@@@@@@@@?e@@@@@@@@e?@@@@@@@@?e@@@@@@@@e?@@@@@@@@?e@@@@@@@@e?@@@@@@@@?e@@@@@@@@e?@@@@@@@@?e@@@@@@@@e?@@@@@@@@?e@@@@@@@@e?@@@@@@@@?e@@@@@@@@e?@@@@@@@@?e@@@@@@@@e?@@@@@@@@?e@@@@@@@@e?@@@@@@@@?e@@@@@@@@e?@@@@@@@@?e@@@@@@@@e?@@@@@@@@?e@@@@@@@@e?@@@@@@@@?e@@@@@@@@e?@@@@@@@@?e@@@@@@@@e?@@@@@@@@?e@@@@@@@@e?@@@@@@@@?e@@@@@@@@e?@@@@@@@@?e@@@@@@@@e?@@@@@@@@?e@@@@@@@@
@@
@@
@@
@@
@@
@@
@@
@@
@@
@@
@@
@@
@@
@@
@@
@@
@@
@@
@@
@@
@@
@@
@@
@@
@@
@@
@@
@@
@@
@@
@@
@@
?@@@@@@@@?e@@@@@@@@e?@@@@@@@@?e@@@@@@@@e?@@@@@@@@?e@@@@@@@@e?@@@@@@@@?e@@@@@@@@e?@@@@@@@@?e@@@@@@@@e?@@@@@@@@?e@@@@@@@@e?@@@@@@@@?e@@@@@@@@e?@@@@@@@@
?@@@@@@@@?e@@@@@@@@e?@@@@@@@@?e@@@@@@@@e?@@@@@@@@?e@@@@@@@@e?@@@@@@@@?e@@@@@@@@e?@@@@@@@@?e@@@@@@@@e?@@@@@@@@?e@@@@@@@@e?@@@@@@@@?e@@@@@@@@e?@@@@@@@@
?@@
?@@
?@@
?@@
?@@
?@@
?@@@@@@@@
?@@@@@@@@
Explanation
The outside caller dials the phone number, and the call is
forwarded or transferred to extension 1011 of the other PBX which
has PBX code “952”.
Note: Setting the destination of Call Forwarding to the TIE line is
the same as Call Forwarding to a CO Line.
Transferring a call to the TIE line is the same as a Call
Transfer to a CO Line.
13
E
3
Features
2.2 TIE-to-CO Transfer
The system transfers TIE calls to the CO line of the other PBX
through the TIE line. The following patterns are available.
■ Outside call through the other PBX
<Example>
@@@@@@@@e?
@@@@@@@@e?@@@@@@@@?e@@@@@@@@e?@@@@@@@@?e@@@@@@@@e?@@@@@@@@?e@@@@@@@@e?@@@@@@@@?e@@@@@@@@e?@@@@@@@@?e@@@@@@@@e?@@@@@@@@?e@@@@@@@@e?@@@@@@@@?e@@@@@@@@e?@@@@@@@@?e@@@@@@@@e?@@@@@@@@?e@@@@@@@@e?@@@@@@@@?e@@@@@@@@e?@@@@@@@@?e@@@@@@@@e?@@@@@@@@?e@@@@@@@@e?@@@@@@@@?e@@@@@@@@e?@@@@@@@@?e@@@@@@@@e?@@@@@@@@?e@@@@@@@@e?@@@@@@@@?e@@@@@@@@e?@@@@@@@@?e@@@@@@@@e?@@@@@@@@?e@@@@@@@@e?@@@@@@@@?e@@@@@@@@e?@@@@@@@@?e@@@@@@@@e?@@@@@@@@?e@@@@@@@@e?@@@@@@@@?e@@@@@@@@e?@@@@@@@@?e@@@@@@@@e?@@@@@@@@?e@@@@@@@@e?@@@@@@@@?e@@@@@@@@e?@@@@@@@@?e@@@@@@@@e?@@@@@@@@?e@@@@@@@@e?@@@@@@@@?e@@@@@@@@e?@@@@@@@@?e@@@@@@@@e?@@@@@@@@?e@@@@@@@@e?@@@@@@@@?e@@@@@@@@e?@@@@@@@@?e@@@@@@@@e?@@@@@@@@?e@@@@@@@@e?@@@@@@@@?e@@@@@@@@e?@@@@@@@@?e@@@@@@@@e?@@@@@@@@?e@@@@@@@@e?@@@@@@@@?e@@@@@@@@e?@@@@@@@@?
@@@@@@@@e?
@@@@@@@@e?@@@@@@@@?e@@@@@@@@e?@@@@@@@@?e@@@@@@@@e?@@@@@@@@?e@@@@@@@@e?@@@@@@@@?e@@@@@@@@e?@@@@@@@@?e@@@@@@@@e?@@@@@@@@?e@@@@@@@@e?@@@@@@@@?e@@@@@@@@e?@@@@@@@@?e@@@@@@@@e?@@@@@@@@?e@@@@@@@@e?@@@@@@@@?e@@@@@@@@e?@@@@@@@@?e@@@@@@@@e?@@@@@@@@?e@@@@@@@@e?@@@@@@@@?e@@@@@@@@e?@@@@@@@@?e@@@@@@@@e?@@@@@@@@?e@@@@@@@@e?@@@@@@@@?e@@@@@@@@e?@@@@@@@@?e@@@@@@@@e?@@@@@@@@?e@@@@@@@@e?@@@@@@@@?e@@@@@@@@e?@@@@@@@@?e@@@@@@@@e?@@@@@@@@?e@@@@@@@@e?@@@@@@@@?e@@@@@@@@e?@@@@@@@@?e@@@@@@@@e?@@@@@@@@?e@@@@@@@@e?@@@@@@@@?e@@@@@@@@e?@@@@@@@@?e@@@@@@@@e?@@@@@@@@?e@@@@@@@@e?@@@@@@@@?e@@@@@@@@e?@@@@@@@@?e@@@@@@@@e?@@@@@@@@?e@@@@@@@@e?@@@@@@@@?e@@@@@@@@e?@@@@@@@@?e@@@@@@@@e?@@@@@@@@?e@@@@@@@@e?@@@@@@@@?e@@@@@@@@e?@@@@@@@@?e@@@@@@@@e?@@@@@@@@?e@@@@@@@@e?@@@@@@@@?e@@@@@@@@e?@@@@@@@@?
@@h?
@@h?
@@h?
@@h?
@@h?
@@h?
@@@@@@@@e?@@@@@@@@?e@@@@@@@@e?@@@@@@@@?e@@@@@@@@e?@@@@@@@@?e@@@@@@@@e?@@@@@@@@?e@@@@@@@@e?@@@@@@@@?e@@@@@@@@e?@@@@@@@@?e@@@@@@@@e?@@@@@@@@?e@@@@@@@@e?@@@@@@@@
@@@@@@@@e?@@@@@@@@?e@@@@@@@@e?@@@@@@@@?e@@@@@@@@e?@@@@@@@@?e@@@@@@@@e?@@@@@@@@?e@@@@@@@@e?@@@@@@@@?e@@@@@@@@e?@@@@@@@@?e@@@@@@@@e?@@@@@@@@?e@@@@@@@@e?@@@@@@@@
@@
@@
@@
@@
@@
@@
@@
@@
@@
@@
@@
@@
@@
@@
@@
@@
@@
@@
@@
@@
@@
@@
@@
@@
@@
@@
@@
@@
@@
@@
@@
@@
@@
@@
@@
@@
@@
@@
@@
@@
@@
@@
@@
@@
@@
@@
@@
@@
@@
@@
@@
@@
@@
@@
@@
@@
@@
@@
@@
@@
@@
@@
@@
@@
@@
@@
@@
@@
@@
@@
@@
@@
@@
@@
@@
@@
@@
@@
@@
@@
@@
@@
@@
@@
@@
@@
KX-TD816/1232
@@
@@
@@
@@
@@
@@
@@
@@
Other PBX
@@
@@
@@
@@
@@
@@
@@
@@
@@
@@
@@
@@
@@
@@
@@
@@
@@
@@
@@
@@
@@
@@
@@
@@
@@
@@
@@
@@
@@
@@
@@
@@
@@
@@
@@
@@
@@
@@
@@
@@
@@
@@
@@
@@
@@
@@
@@
@@
@@
@@
@@
@@
@@
@@
@@
@@
@@
@@
@@
@@
@@
@@
@@
@@
@@
@@
@@
@@
@@
@@
@@
@@
@@
@@
@@
@@
@@
@@
@@
@@
@@
@@
@@
@@
@@
@@
@@
@@
@@
@@
@@
@@
@@
@@
@@
@@
@@
@@
@@
@@
@@
@@
@@
@@
@@
@@
@@
@@
@@
@@
@@
@@
@@
@@
@@
@@
@@
@@
@@
@@
TIE Line
@@
@@
@@
@@
@@
@@
@@
@@
@@
@@
@@
@@
@@
@@
@@
@@
@@
@@
@@
@@
@@
@@
@@
@@
@@
@@
@@
@@
@@
@@
@@
@@
@@
@@
@@
@@
@@
@@
@@
@@
@@
@@
@@
@@
@@
@@
@@
@@
@@
@@
@@
@@
@@
@@
@@
@@
DISA
@@
@@
@@
@@
@@
@@
@@
@@
@@
@@
@@
@@
@@
@@
@@
@@
@@
@@
@@
@@
@@
@@
@@
@@
@@
@@
@@
@@
@@
@@
@@
@@
E&M
@@
@@
@@
@@
@@
@@
@@
@@
@@
@@
@@
@@
@@
@@
@@
@@
@@
@@
@@
@@
@@
@@
@@
@@
@@
@@
@@
@@
@@
@@
@@
@@
@@
@@
@@
@@
@@
@@
@@
@@
7-952
@@
@@
@@
@@
@@
@@
@@
@@
@@
@@
@@
@@
@@
@@
@@
@@
PBX Code 951
9-(DISA/TIE User Code)
-phone no.
@@
@@
@@
@@
@@
@@
@@
@@
@@
@@
@@
@@
@@
@@
@@
@@
PBX Code 952
@@
@@
@@
@@
@@
@@
@@
@@
@@
@@
@@
@@
@@
@@
@@
@@
@@
@@
@@
@@
@@
@@
@@
@@
@@
@@
@@
@@
@@
@@
@@
@@
@@
@@
@@
@@
@@
@@
@@
@@
@@
@@
@@
@@
@@
@@
@@
@@
@@
@@
@@
@@
@@
@@
@@
@@
@@
@@
@@
@@
@@
@@
@@
@@
@@
@@
@@
@@
@@
@@
@@
@@
@@
@@
@@
@@
@@
@@
@@
@@
@@
@@
@@
@@
@@
@@
@@
@@
@@
@@
@@
@@
@@
@@
@@
@@
@@
@@
@@
@@
@@
@@
@@
@@
@@
@@
@@
@@
@@
@@
@@
@@
@@
@@
@@
@@
@@
@@
@@
@@
@@
@@
@@
@@
@@
@@
@@
@@
@@
@@
@@
@@
@@
@@
@@
@@
@@
@@
@@
@@
@@
@@
@@
@@
@@
@@
@@
@@
@@
@@
@@
@@
@@
@@
@@
@@
@@
@@
@@
@@
@@
@@
@@
@@
@@
@@
@@
@@
@@
@@
@@
@@
@@
@@
@@
@@
@@
@@
@@
@@
@@
@@
@@
@@
@@
@@
@@
@@
@@
@@
@@
@@
@@
@@
@@
@@
@@
@@
@@
@@
@@
@@
@@
@@
@@
@@
@@
@@
@@
@@
@@
@@
@@
@@
@@
@@
@@
@@
@@
@@
@@
@@
@@
@@
@@
@@
@@
@@
@@
@@
@@
@@
@@
@@
@@
@@
@@
@@
@@
@@
@@
@@
@@
@@
@@
@@
@@
@@
@@
@@
@@
@@
@@
@@
@@
@@
@@
@@
@@
@@
@@
@@
@@
@@
@@
@@
@@
@@
@@
@@
@@
@@
@@
@@
@@
@@
@@
@@
@@
@@
@@
@@
@@
@@
@@
@@
@@
@@
@@
@@
@@
@@
@@
@@
@@
@@
@@
@@
@@
@@
@@
@@
@@
@@
@@
@@
@@
@@
@@
@@
@@
@@
@@
@@
@@
@@
@@
@@
@@
@@
Outside party
@@
@@
@@
@@
@@
@@
@@
@@
Ext. 1011
@@
@@
@@
@@
@@
@@
@@
@@
TIE Line Network
@@
@@
@@
@@
@@
@@
@@
@@
@@
@@
@@
@@
@@
@@
@@
@@
@@
@@
@@
@@
@@
@@
@@
@@
@@
@@
@@
@@
@@
@@
@@
@@
@@
@@
@@
@@
@@
@@
@@
@@
@@
@@
@@
@@
@@
@@
@@
@@
@@
@@
@@
@@
@@
@@
@@
@@
@@
@@
@@
@@
@@
@@
@@
@@
@@g
@@g
@@g
@@g
@@g
@@g
@@@@@@@@
@@@@@@@@
CO
@@
@@
@@
@@
@@
@@
@@
@@
@@
@@
@@
@@
@@
@@
@@
@@
@@
@@
@@
@@
@@
@@
@@
@@
@@
@@
@@
@@
@@
@@
@@
@@
CO Line
@@
@@
@@
@@
@@
@@
@@
@@
E&M
@@
@@
@@
@@
@@
@@
@@
@@
?@@@@@@@@?e@@@@@@@@e?@@@@@@@@?e@@@@@@@@e?@@@@@@@@?e@@@@@@@@e?@@@@@@@@?e@@@@@@@@e?@@@@@@@@?e@@@@@@@@e?@@@@@@@@?e@@@@@@@@e?@@@@@@@@?e@@@@@@@@e?@@@@@@@@?e@@@@@@@@e?@@@@@@@@?e@@@@@@@@e?@@@@@@@@?e@@@@@@@@e?@@@@@@@@?e@@@@@@@@e?@@@@@@@@?e@@@@@@@@e?@@@@@@@@?e@@@@@@@@e?@@@@@@@@?e@@@@@@@@e?@@@@@@@@?e@@@@@@@@e?@@@@@@@@?e@@@@@@@@e?@@@@@@@@?e@@@@@@@@e?@@@@@@@@?e@@@@@@@@e?@@@@@@@@?e@@@@@@@@e?@@@@@@@@?e@@@@@@@@e?@@@@@@@@?e@@@@@@@@e?@@@@@@@@?e@@@@@@@@e?@@@@@@@@?e@@@@@@@@e?@@@@@@@@?e@@@@@@@@e?@@@@@@@@?e@@@@@@@@e?@@@@@@@@?e@@@@@@@@e?@@@@@@@@?e@@@@@@@@e?@@@@@@@@?e@@@@@@@@e?@@@@@@@@?e@@@@@@@@e?@@@@@@@@?e@@@@@@@@e?@@@@@@@@?e@@@@@@@@e?@@@@@@@@?e@@@@@@@@e?@@@@@@@@?e@@@@@@@@e?@@@@@@@@?e@@@@@@@@e?@@@@@@@@?e@@@@@@@@e?@@@@@@@@?e@@@@@@@@e?@@@@@@@@?e@@@@@@@@e?@@@@@@@@?e@@@@@@@@
?@@@@@@@@?e@@@@@@@@e?@@@@@@@@?e@@@@@@@@e?@@@@@@@@?e@@@@@@@@e?@@@@@@@@?e@@@@@@@@e?@@@@@@@@?e@@@@@@@@e?@@@@@@@@?e@@@@@@@@e?@@@@@@@@?e@@@@@@@@e?@@@@@@@@?e@@@@@@@@e?@@@@@@@@?e@@@@@@@@e?@@@@@@@@?e@@@@@@@@e?@@@@@@@@?e@@@@@@@@e?@@@@@@@@?e@@@@@@@@e?@@@@@@@@?e@@@@@@@@e?@@@@@@@@?e@@@@@@@@e?@@@@@@@@?e@@@@@@@@e?@@@@@@@@?e@@@@@@@@e?@@@@@@@@?e@@@@@@@@e?@@@@@@@@?e@@@@@@@@e?@@@@@@@@?e@@@@@@@@e?@@@@@@@@?e@@@@@@@@e?@@@@@@@@?e@@@@@@@@e?@@@@@@@@?e@@@@@@@@e?@@@@@@@@?e@@@@@@@@e?@@@@@@@@?e@@@@@@@@e?@@@@@@@@?e@@@@@@@@e?@@@@@@@@?e@@@@@@@@e?@@@@@@@@?e@@@@@@@@e?@@@@@@@@?e@@@@@@@@e?@@@@@@@@?e@@@@@@@@e?@@@@@@@@?e@@@@@@@@e?@@@@@@@@?e@@@@@@@@e?@@@@@@@@?e@@@@@@@@e?@@@@@@@@?e@@@@@@@@e?@@@@@@@@?e@@@@@@@@e?@@@@@@@@?e@@@@@@@@e?@@@@@@@@?e@@@@@@@@e?@@@@@@@@?e@@@@@@@@e?@@@@@@@@?e@@@@@@@@
?@@@@@@@@?e@@@@@@@@e?@@@@@@@@?e@@@@@@@@e?@@@@@@@@?e@@@@@@@@e?@@@@@@@@?e@@@@@@@@e?@@@@@@@@?e@@@@@@@@e?@@@@@@@@?e@@@@@@@@e?@@@@@@@@?e@@@@@@@@e?@@@@@@@@
?@@@@@@@@?e@@@@@@@@e?@@@@@@@@?e@@@@@@@@e?@@@@@@@@?e@@@@@@@@e?@@@@@@@@?e@@@@@@@@e?@@@@@@@@?e@@@@@@@@e?@@@@@@@@?e@@@@@@@@e?@@@@@@@@?e@@@@@@@@e?@@@@@@@@
?@@
?@@
?@@
?@@
?@@
?@@
?@@@@@@@@
?@@@@@@@@
Explanation
Extension 1011 dials as follows:
1. TIE line access code “7”, PBX code “952” and CO line access
code “9”, and a special dial tone is heard.
2. The DISA/TIE user code (if required) and desired phone
number.
Extension 1011 is connected to the desired outside party through
the other PBX which has PBX code “952”.
Note: The DISA/TIE user code (assigned in program [811]) is
required when the CO line security mode is selected in
program [439].
■ Call Forwarding / Call Transfer to CO line
<Example>
@@@@@@@@e?
@@@@@@@@e?@@@@@@@@?e@@@@@@@@e?@@@@@@@@?e@@@@@@@@e?@@@@@@@@?e@@@@@@@@e?@@@@@@@@?e@@@@@@@@e?@@@@@@@@?e@@@@@@@@e?@@@@@@@@?e@@@@@@@@e?@@@@@@@@?e@@@@@@@@e?@@@@@@@@?e@@@@@@@@e?@@@@@@@@?e@@@@@@@@e?@@@@@@@@?e@@@@@@@@e?@@@@@@@@?e@@@@@@@@e?@@@@@@@@?e@@@@@@@@e?@@@@@@@@?e@@@@@@@@e?@@@@@@@@?e@@@@@@@@e?@@@@@@@@?e@@@@@@@@e?@@@@@@@@?e@@@@@@@@e?@@@@@@@@?e@@@@@@@@e?@@@@@@@@?e@@@@@@@@e?@@@@@@@@?e@@@@@@@@e?@@@@@@@@?e@@@@@@@@e?@@@@@@@@?e@@@@@@@@e?@@@@@@@@?e@@@@@@@@e?@@@@@@@@?e@@@@@@@@e?@@@@@@@@?e@@@@@@@@e?@@@@@@@@?e@@@@@@@@e?@@@@@@@@?e@@@@@@@@e?@@@@@@@@?e@@@@@@@@e?@@@@@@@@?e@@@@@@@@e?@@@@@@@@?e@@@@@@@@e?@@@@@@@@?e@@@@@@@@e?@@@@@@@@?e@@@@@@@@e?@@@@@@@@?e@@@@@@@@e?@@@@@@@@?e@@@@@@@@e?@@@@@@@@?e@@@@@@@@e?@@@@@@@@?e@@@@@@@@e?@@@@@@@@?e@@@@@@@@e?@@@@@@@@?e@@@@@@@@e?@@@@@@@@?
@@@@@@@@e?
@@@@@@@@e?@@@@@@@@?e@@@@@@@@e?@@@@@@@@?e@@@@@@@@e?@@@@@@@@?e@@@@@@@@e?@@@@@@@@?e@@@@@@@@e?@@@@@@@@?e@@@@@@@@e?@@@@@@@@?e@@@@@@@@e?@@@@@@@@?e@@@@@@@@e?@@@@@@@@?e@@@@@@@@e?@@@@@@@@?e@@@@@@@@e?@@@@@@@@?e@@@@@@@@e?@@@@@@@@?e@@@@@@@@e?@@@@@@@@?e@@@@@@@@e?@@@@@@@@?e@@@@@@@@e?@@@@@@@@?e@@@@@@@@e?@@@@@@@@?e@@@@@@@@e?@@@@@@@@?e@@@@@@@@e?@@@@@@@@?e@@@@@@@@e?@@@@@@@@?e@@@@@@@@e?@@@@@@@@?e@@@@@@@@e?@@@@@@@@?e@@@@@@@@e?@@@@@@@@?e@@@@@@@@e?@@@@@@@@?e@@@@@@@@e?@@@@@@@@?e@@@@@@@@e?@@@@@@@@?e@@@@@@@@e?@@@@@@@@?e@@@@@@@@e?@@@@@@@@?e@@@@@@@@e?@@@@@@@@?e@@@@@@@@e?@@@@@@@@?e@@@@@@@@e?@@@@@@@@?e@@@@@@@@e?@@@@@@@@?e@@@@@@@@e?@@@@@@@@?e@@@@@@@@e?@@@@@@@@?e@@@@@@@@e?@@@@@@@@?e@@@@@@@@e?@@@@@@@@?e@@@@@@@@e?@@@@@@@@?e@@@@@@@@e?@@@@@@@@?e@@@@@@@@e?@@@@@@@@?e@@@@@@@@e?@@@@@@@@?
@@h?
@@h?
@@h?
@@h?
@@h?
@@h?
@@@@@@@@e?@@@@@@@@?e@@@@@@@@e?@@@@@@@@?e@@@@@@@@e?@@@@@@@@?e@@@@@@@@e?@@@@@@@@?e@@@@@@@@e?@@@@@@@@?e@@@@@@@@e?@@@@@@@@?e@@@@@@@@e?@@@@@@@@?e@@@@@@@@e?@@@@@@@@
@@@@@@@@e?@@@@@@@@?e@@@@@@@@e?@@@@@@@@?e@@@@@@@@e?@@@@@@@@?e@@@@@@@@e?@@@@@@@@?e@@@@@@@@e?@@@@@@@@?e@@@@@@@@e?@@@@@@@@?e@@@@@@@@e?@@@@@@@@?e@@@@@@@@e?@@@@@@@@
@@
@@
@@
@@
@@
@@
@@
@@
@@
@@
@@
@@
@@
@@
@@
@@
@@
@@
@@
@@
@@
@@
@@
@@
@@
@@
@@
@@
@@
@@
@@
@@
@@
@@
@@
@@
@@
@@
@@
@@
@@
@@
@@
@@
@@
@@
@@
@@
@@
@@
@@
@@
@@
@@
@@
@@
@@
@@
@@
@@
@@
@@
@@
@@
@@
@@
@@
@@
@@
@@
@@
@@
@@
@@
@@
@@
@@
@@
@@
@@
@@
@@
@@
@@
@@
@@
KX-TD816/1232
@@
@@
@@
@@
@@
@@
@@
@@
Other PBX
@@
@@
@@
@@
@@
@@
@@
@@
@@
@@
@@
@@
@@
@@
@@
@@
@@
@@
@@
@@
@@
@@
@@
@@
@@
@@
@@
@@
@@
@@
@@
@@
@@
@@
@@
@@
@@
@@
@@
@@
@@
@@
@@
@@
@@
@@
@@
@@
@@
@@
@@
@@
@@
@@
@@
@@
@@
@@
@@
@@
@@
@@
@@
@@
@@
@@
@@
@@
@@
@@
@@
@@
@@
@@
@@
@@
@@
@@
@@
@@
@@
@@
@@
@@
@@
@@
@@
@@
@@
@@
@@
@@
@@
@@
@@
@@
@@
@@
@@
@@
@@
@@
@@
@@
@@
@@
@@
@@
@@
@@
@@
@@
@@
@@
@@
@@
@@
@@
@@
@@
TIE Line
@@
@@
@@
@@
@@
@@
@@
@@
@@
@@
@@
@@
@@
@@
@@
@@
@@
@@
@@
@@
@@
@@
@@
@@
@@
@@
@@
@@
@@
@@
@@
@@
@@
@@
@@
@@
@@
@@
@@
@@
@@
@@
@@
@@
@@
@@
@@
@@
@@
@@
@@
@@
@@
@@
@@
@@
DISA
E&M
@@
@@
@@
@@
@@
@@
@@
@@
@@
@@
@@
@@
@@
@@
@@
@@
@@
@@
@@
@@
@@
@@
@@
@@
@@
@@
@@
@@
@@
@@
@@
@@
@@
@@
@@
@@
@@
@@
@@
@@
@@
@@
@@
@@
@@
@@
@@
@@
@@
@@
@@
@@
@@
@@
@@
@@
@@
@@
@@
@@
@@
@@
@@
@@
@@
@@
@@
@@
@@
@@
@@
@@
@@
@@
@@
@@
@@
@@
@@
@@
PBX Code 951
7-952-1011
@@
@@
@@
@@
@@
@@
@@
@@
Forwarded / Transferred
to CO line
@@
@@
@@
@@
@@
@@
@@
@@
@@
@@
@@
@@
@@
@@
@@
@@
PBX Code 952
@@
@@
@@
@@
@@
@@
@@
@@
@@
@@
@@
@@
@@
@@
@@
@@
@@
@@
@@
@@
@@
@@
@@
@@
@@
@@
@@
@@
@@
@@
@@
@@
@@
@@
@@
@@
@@
@@
@@
@@
@@
@@
@@
@@
@@
@@
@@
@@
@@
@@
@@
@@
@@
@@
@@
@@
@@
@@
@@
@@
@@
@@
@@
@@
@@
@@
@@
@@
@@
@@
@@
@@
@@
@@
@@
@@
@@
@@
@@
@@
@@
@@
@@
@@
@@
@@
@@
@@
@@
@@
@@
@@
@@
@@
@@
@@
@@
@@
@@
@@
@@
@@
@@
@@
@@
@@
@@
@@
@@
@@
@@
@@
@@
@@
@@
@@
@@
@@
@@
@@
@@
@@
@@
@@
@@
@@
@@
@@
@@
@@
@@
@@
@@
@@
@@
@@
@@
@@
@@
@@
@@
@@
@@
@@
@@
@@
@@
@@
@@
@@
@@
@@
@@
@@
@@
@@
@@
@@
@@
@@
@@
@@
@@
@@
@@
@@
@@
@@
@@
@@
@@
@@
@@
@@
@@
@@
@@
@@
@@
@@
@@
@@
@@
@@
@@
@@
@@
@@
@@
@@
@@
@@
@@
@@
@@
@@
@@
@@
@@
@@
@@
@@
@@
@@
@@
@@
@@
@@
@@
@@
@@
@@
@@
@@
@@
@@
@@
@@
@@
@@
@@
@@
@@
@@
@@
@@
@@
@@
@@
@@
@@
@@
@@
@@
@@
@@
@@
@@
@@
@@
@@
@@
@@
@@
@@
@@
@@
@@
@@
@@
@@
@@
@@
@@
@@
@@
@@
@@
@@
@@
@@
@@
@@
@@
@@
@@
@@
@@
@@
@@
@@
@@
@@
@@
@@
@@
@@
@@
@@
@@
@@
@@
@@
@@
@@
@@
@@
@@
Ext. 1011
Ext. 1011
@@
@@
@@
@@
@@
@@
@@
@@
@@
@@
@@
@@
@@
@@
@@
@@
@@
@@
@@
@@
@@
@@
@@
@@
@@
@@
@@
@@
@@
@@
@@
@@
@@
@@
@@
@@
@@
@@
@@
@@
@@
@@
@@
@@
@@
@@
@@
@@
@@
@@
@@
@@
@@
@@
@@
@@
@@
@@
@@
@@
@@
@@
@@
@@
@@
@@
@@
@@
@@
@@
@@
@@
@@
@@
@@
@@
@@
@@
@@
@@
@@
@@
@@
@@
@@
@@
@@
@@
@@
@@
@@
@@
@@
@@
@@
@@
@@
@@
@@
@@
@@
@@
@@
@@
@@
@@
@@
@@
@@
@@
@@
@@
@@g
@@g
@@g
@@g
@@g
@@g
@@@@@@@@
@@@@@@@@
14
@@
@@
@@
@@
@@
@@
@@
@@
@@
@@
@@
@@
@@
@@
@@
@@
@@
@@
@@
@@
@@
@@
@@
@@
@@
@@
@@
@@
@@
@@
@@
@@
CO
@@
@@
@@
@@
@@
@@
@@
@@
@@
@@
@@
@@
@@
@@
@@
@@
@@
@@
@@
@@
@@
@@
@@
@@
@@
@@
@@
@@
@@
@@
@@
@@
CO Line
@@
@@
@@
@@
@@
@@
@@
@@
E&M
@@
@@
@@
@@
@@
@@
@@
@@
TIE Line Network
?@@@@@@@@?e@@@@@@@@e?@@@@@@@@?e@@@@@@@@e?@@@@@@@@?e@@@@@@@@e?@@@@@@@@?e@@@@@@@@e?@@@@@@@@?e@@@@@@@@e?@@@@@@@@?e@@@@@@@@e?@@@@@@@@?e@@@@@@@@e?@@@@@@@@?e@@@@@@@@e?@@@@@@@@?e@@@@@@@@e?@@@@@@@@?e@@@@@@@@e?@@@@@@@@?e@@@@@@@@e?@@@@@@@@?e@@@@@@@@e?@@@@@@@@?e@@@@@@@@e?@@@@@@@@?e@@@@@@@@e?@@@@@@@@?e@@@@@@@@e?@@@@@@@@?e@@@@@@@@e?@@@@@@@@?e@@@@@@@@e?@@@@@@@@?e@@@@@@@@e?@@@@@@@@?e@@@@@@@@e?@@@@@@@@?e@@@@@@@@e?@@@@@@@@?e@@@@@@@@e?@@@@@@@@?e@@@@@@@@e?@@@@@@@@?e@@@@@@@@e?@@@@@@@@?e@@@@@@@@e?@@@@@@@@?e@@@@@@@@e?@@@@@@@@?e@@@@@@@@e?@@@@@@@@?e@@@@@@@@e?@@@@@@@@?e@@@@@@@@e?@@@@@@@@?e@@@@@@@@e?@@@@@@@@?e@@@@@@@@e?@@@@@@@@?e@@@@@@@@e?@@@@@@@@?e@@@@@@@@e?@@@@@@@@?e@@@@@@@@e?@@@@@@@@?e@@@@@@@@e?@@@@@@@@?e@@@@@@@@e?@@@@@@@@?e@@@@@@@@e?@@@@@@@@?e@@@@@@@@e?@@@@@@@@?e@@@@@@@@
?@@@@@@@@?e@@@@@@@@e?@@@@@@@@?e@@@@@@@@e?@@@@@@@@?e@@@@@@@@e?@@@@@@@@?e@@@@@@@@e?@@@@@@@@?e@@@@@@@@e?@@@@@@@@?e@@@@@@@@e?@@@@@@@@?e@@@@@@@@e?@@@@@@@@?e@@@@@@@@e?@@@@@@@@?e@@@@@@@@e?@@@@@@@@?e@@@@@@@@e?@@@@@@@@?e@@@@@@@@e?@@@@@@@@?e@@@@@@@@e?@@@@@@@@?e@@@@@@@@e?@@@@@@@@?e@@@@@@@@e?@@@@@@@@?e@@@@@@@@e?@@@@@@@@?e@@@@@@@@e?@@@@@@@@?e@@@@@@@@e?@@@@@@@@?e@@@@@@@@e?@@@@@@@@?e@@@@@@@@e?@@@@@@@@?e@@@@@@@@e?@@@@@@@@?e@@@@@@@@e?@@@@@@@@?e@@@@@@@@e?@@@@@@@@?e@@@@@@@@e?@@@@@@@@?e@@@@@@@@e?@@@@@@@@?e@@@@@@@@e?@@@@@@@@?e@@@@@@@@e?@@@@@@@@?e@@@@@@@@e?@@@@@@@@?e@@@@@@@@e?@@@@@@@@?e@@@@@@@@e?@@@@@@@@?e@@@@@@@@e?@@@@@@@@?e@@@@@@@@e?@@@@@@@@?e@@@@@@@@e?@@@@@@@@?e@@@@@@@@e?@@@@@@@@?e@@@@@@@@e?@@@@@@@@?e@@@@@@@@e?@@@@@@@@?e@@@@@@@@e?@@@@@@@@?e@@@@@@@@e?@@@@@@@@?e@@@@@@@@
@@
@@
@@
@@
@@
@@
@@
@@
@@
@@
@@
@@
@@
@@
@@
@@
@@
@@
@@
@@
@@
@@
@@
@@
@@
@@
@@
@@
@@
@@
@@
@@
?@@@@@@@@?e@@@@@@@@e?@@@@@@@@?e@@@@@@@@e?@@@@@@@@?e@@@@@@@@e?@@@@@@@@?e@@@@@@@@e?@@@@@@@@?e@@@@@@@@e?@@@@@@@@?e@@@@@@@@e?@@@@@@@@?e@@@@@@@@e?@@@@@@@@
?@@@@@@@@?e@@@@@@@@e?@@@@@@@@?e@@@@@@@@e?@@@@@@@@?e@@@@@@@@e?@@@@@@@@?e@@@@@@@@e?@@@@@@@@?e@@@@@@@@e?@@@@@@@@?e@@@@@@@@e?@@@@@@@@?e@@@@@@@@e?@@@@@@@@
?@@
?@@
?@@
?@@
?@@
?@@
?@@@@@@@@
?@@@@@@@@
Outside party
3
E
Features
Explanation
Extension 1011 dials as follows:
1. TIE line access code “7”, PBX code “952” and extension
number “1011”.
2. The call is forwarded or transferred by extension 1011 of the
other PBX which has PBX code “952” to the designated CO
line.
3. TIE Line Routing Table
The TIE Line Routing Table is referenced by the system to identify
the CO line route, when an extension user makes a TIE call.
It is necessary to make unified routing tables with each PBX in
your TIE line network.
A routing pattern appropriate for each call is decided by the first
three digits (except the TIE line access code) of the dialed number.
There are two system programs for the tables:
[340] TIE Line Routing Table: used to assign the access number
(PBX code or extension number) and CO line group hunt sequence.
[341] TIE Modify Removed / Added Digit: used to assign
removed and added digits of the dialed digits of the TIE call.
Programming Example
<Example>
Your system is PBX-1 and there are four PBXs in your TIE line
network. To identify the CO line route as illustrated below, you
should make the following routing table.
@@@@@@@@e?
@@@@@@@@e?@@@@@@@@?e@@@@@@@@e?@@@@@@@@?e@@@@@@@@e?@@@@@@@@?e@@@@@@@@e?@@@@@@@@?e@@@@@@@@e?@@@@@@@@?e@@@@@@@@e?@@@@@@@@?e@@@@@@@@e?@@@@@@@@?e@@@@@@@@e?@@@@@@@@?e@@@@@@@@e?@@@@@@@@?e@@@@@@@@e?@@@@@@@@?e@@@@@@@@e?@@@@@@@@?e@@@@@@@@e?@@@@@@@@?e@@@@@@@@e?@@@@@@@@?e@@@@@@@@e?@@@@@@@@?e@@@@@@@@e?@@@@@@@@?e@@@@@@@@e?@@@@@@@@?e@@@@@@@@e?@@@@@@@@?e@@@@@@@@e?@@@@@@@@?e@@@@@@@@e?@@@@@@@@?e@@@@@@@@e?@@@@@@@@?e@@@@@@@@e?@@@@@@@@?e@@@@@@@@e?@@@@@@@@?e@@@@@@@@e?@@@@@@@@?e@@@@@@@@e?@@@@@@@@?e@@@@@@@@e?@@@@@@@@?e@@@@@@@@e?@@@@@@@@?e@@@@@@@@e?@@@@@@@@?e@@@@@@@@e?@@@@@@@@?e@@@@@@@@e?@@@@@@@@?e@@@@@@@@e?@@@@@@@@?e@@@@@@@@e?@@@@@@@@?e@@@@@@@@e?@@@@@@@@?e@@@@@@@@e?@@@@@@@@?e@@@@@@@@e?@@@@@@@@?e@@@@@@@@e?@@@@@@@@?e@@@@@@@@e?@@@@@@@@?e@@@@@@@@e?@@@@@@@@?e@@@@@@@@e?@@@@@@@@? @@@@@@@@e?@@@@@@@@?e@@@@@@@@e?@@@@@@@@?e@@@@@@@@e?@@@@@@@@?e@@@@@@@@e?@@@@@@@@?e@@@@@@@@e?@@@@@@@@?e@@@@@@@@e?@@@@@@@@?e@@@@@@@@e?@@@@@@@@?e@@@@@@@@e?@@@@@@@@?e@@@@@@@@e?@@@@@@@@?e@@@@@@@@e?@@@@@@@@?e@@@@@@@@e?@@@@@@@@?e@@@@@@@@e?@@@@@@@@?e@@@@@@@@e?@@@@@@@@?e@@@@@@@@e?@@@@@@@@?e@@@@@@@@e?@@@@@@@@?e@@@@@@@@e?@@@@@@@@?e@@@@@@@@e?@@@@@@@@?e@@@@@@@@e?@@@@@@@@?e@@@@@@@@e?@@@@@@@@?e@@@@@@@@e?@@@@@@@@?e@@@@@@@@e?@@@@@@@@?e@@@@@@@@e?@@@@@@@@?e@@@@@@@@e?@@@@@@@@?e@@@@@@@@e?@@@@@@@@?e@@@@@@@@e?@@@@@@@@?e@@@@@@@@e?@@@@@@@@?e@@@@@@@@e?@@@@@@@@?e@@@@@@@@e?@@@@@@@@?e@@@@@@@@e?@@@@@@@@?e@@@@@@@@e?@@@@@@@@
@@@@@@@@e?@@@@@@@@?e@@@@@@@@e?@@@@@@@@?e@@@@@@@@e?@@@@@@@@?e@@@@@@@@e?@@@@@@@@?e@@@@@@@@e?@@@@@@@@?e@@@@@@@@e?@@@@@@@@?e@@@@@@@@e?@@@@@@@@?e@@@@@@@@e?@@@@@@@@?e@@@@@@@@e?@@@@@@@@?e@@@@@@@@e?@@@@@@@@?e@@@@@@@@e?@@@@@@@@?e@@@@@@@@e?@@@@@@@@?e@@@@@@@@e?@@@@@@@@?e@@@@@@@@e?@@@@@@@@?e@@@@@@@@e?@@@@@@@@?e@@@@@@@@e?@@@@@@@@?e@@@@@@@@e?@@@@@@@@?e@@@@@@@@e?@@@@@@@@?e@@@@@@@@e?@@@@@@@@?e@@@@@@@@e?@@@@@@@@?e@@@@@@@@e?@@@@@@@@?e@@@@@@@@e?@@@@@@@@?e@@@@@@@@e?@@@@@@@@?e@@@@@@@@e?@@@@@@@@?e@@@@@@@@e?@@@@@@@@?e@@@@@@@@e?@@@@@@@@?e@@@@@@@@e?@@@@@@@@?e@@@@@@@@e?@@@@@@@@?e@@@@@@@@e?@@@@@@@@?e@@@@@@@@e?@@@@@@@@
@@@@@@@@e?
@@@@@@@@e?@@@@@@@@?e@@@@@@@@e?@@@@@@@@?e@@@@@@@@e?@@@@@@@@?e@@@@@@@@e?@@@@@@@@?e@@@@@@@@e?@@@@@@@@?e@@@@@@@@e?@@@@@@@@?e@@@@@@@@e?@@@@@@@@?e@@@@@@@@e?@@@@@@@@?e@@@@@@@@e?@@@@@@@@?e@@@@@@@@e?@@@@@@@@?e@@@@@@@@e?@@@@@@@@?e@@@@@@@@e?@@@@@@@@?e@@@@@@@@e?@@@@@@@@?e@@@@@@@@e?@@@@@@@@?e@@@@@@@@e?@@@@@@@@?e@@@@@@@@e?@@@@@@@@?e@@@@@@@@e?@@@@@@@@?e@@@@@@@@e?@@@@@@@@?e@@@@@@@@e?@@@@@@@@?e@@@@@@@@e?@@@@@@@@?e@@@@@@@@e?@@@@@@@@?e@@@@@@@@e?@@@@@@@@?e@@@@@@@@e?@@@@@@@@?e@@@@@@@@e?@@@@@@@@?e@@@@@@@@e?@@@@@@@@?e@@@@@@@@e?@@@@@@@@?e@@@@@@@@e?@@@@@@@@?e@@@@@@@@e?@@@@@@@@?e@@@@@@@@e?@@@@@@@@?e@@@@@@@@e?@@@@@@@@?e@@@@@@@@e?@@@@@@@@?e@@@@@@@@e?@@@@@@@@?e@@@@@@@@e?@@@@@@@@?e@@@@@@@@e?@@@@@@@@?e@@@@@@@@e?@@@@@@@@?e@@@@@@@@e?@@@@@@@@?e@@@@@@@@e?@@@@@@@@?e@@@@@@@@e?@@@@@@@@?
@@h?
@@
@@h?
@@
@@h?
@@
@@h?
@@
@@h?
@@
@@h?
@@
@@
@@
@@
@@
@@
@@
@@
@@
@@
@@
@@
@@
@@
@@
@@
@@
@@
@@
@@
@@
@@
@@
@@
@@
@@
@@
@@
@@
@@
@@
@@
@@
@@
@@
@@
@@
@@
@@
@@
@@
PBX-4
@@
@@
@@
@@
@@
@@
@@
@@
@@
@@
@@
@@
@@
@@
@@
@@
@@
@@
@@
@@
@@
@@
@@
@@
TIE Line Network
@@
@@
@@
@@
@@
@@
@@
@@
@@
@@
@@
@@
@@
@@
@@
@@
@@
@@
@@
@@
@@
@@
@@
@@
PBX-2
@@
@@
@@
@@
@@
@@
@@
@@
@@
@@
@@
@@
@@
@@
@@
@@
@@
@@
@@
@@
@@
@@
@@
@@
@@
@@
@@
@@
@@
@@
@@
@@
@@
@@
@@
@@
@@
@@
@@
@@
@@
@@
@@
@@
@@
@@
@@
@@
@@
@@
@@
@@
@@
@@
@@
@@
@@
@@
@@
@@
@@
@@
@@
@@
@@
@@
@@
@@
@@
@@
@@
@@
@@
@@
@@
@@
@@
@@
@@
@@
@@
@@
@@
@@
@@
@@
@@
@@
@@
@@
@@
@@
@@
@@
@@
@@
@@
@@
@@
@@
@@
@@
@@
@@
@@
@@
@@
@@
@@
@@
@@
@@
@@
@@
@@
@@
@@
@@
@@
@@
@@
@@
@@
@@
@@
@@
@@
@@
@@
@@
@@
@@
@@
@@
@@
@@
@@
@@
@@
@@
@@
@@
@@
@@
@@
@@
@@
@@
@@
@@
@@
@@
@@
@@
@@
@@
@@
@@
@@
@@
@@
@@
@@
@@
@@
@@
@@
@@
@@
@@
@@
@@
@@
@@
@@
@@
@@
@@
@@
@@
@@
@@
@@
@@
@@
@@
@@
@@
@@
@@
@@
@@
@@
@@
@@
@@
@@
@@
@@
@@
@@
@@
@@
@@
@@
@@
@@
@@
@@
@@
@@
@@
@@
@@
@@
@@
@@
@@
@@
@@
@@
@@
@@
@@
@@
@@
@@
@@
@@
@@
@@
@@
@@
@@
@@
@@
@@
@@
@@
@@
@@
@@
@@
@@
@@
@@
@@
@@
@@
@@
@@
@@
@@
@@
@@
@@
@@
@@
@@
@@
@@
@@
@@
@@
@@
@@
@@
@@
@@
@@
@@
@@
@@
@@
@@
@@
@@
@@
@@
@@
@@
@@
@@
@@
@@
@@
@@
@@
@@
@@
@@
@@
@@
@@
@@
@@
@@
@@
@@
@@
@@
@@
@@
@@
Ext. 2xx
PBX Code 953
@@
@@
@@
@@
@@
@@
@@
@@
@@
@@
@@
@@
@@
@@
@@
@@
Ext. xxxx
@@
@@
@@
@@
@@
@@
@@
@@
@@
@@
@@
@@
@@
@@
@@
@@
@@
@@
@@
@@
@@
@@
@@
@@
@@
@@
@@
@@
@@
@@
@@
@@
@@
@@
@@
@@
@@
@@
@@
@@
@@
@@
@@
@@
@@
@@
@@
@@
@@
@@
@@
@@
@@
@@
@@
@@
@@
@@
@@
@@
@@
@@
@@
@@
@@
@@
@@
@@
@@
@@
@@
@@
@@
@@
@@
@@
@@
@@
@@
@@
@@
@@
@@
@@
@@
@@
@@
@@
@@
@@
@@
@@
@@
@@
@@
@@
@@
@@
@@
@@
@@
@@
@@
@@
@@
@@
@@
@@
@@
@@
@@
@@
@@
@@
@@
@@
@@
@@
@@
@@
@@
@@
@@
@@
@@
@@
@@
@@
→
@@
@@
@@
@@
@@
@@
@@
@@
@@
@@
@@
@@
@@
@@
@@
@@
@@
@@
@@
@@
@@
@@
@@
@@
@@
@@
@@
@@
@@
@@
@@
@@
@@
@@
@@
@@
@@
@@
@@
@@
@@
@@
@@
@@
@@
@@
@@
@@
@@
@@
@@
@@
@@
@@
@@
@@
TRG 7
@@
@@
@@
@@
@@
@@
@@
@@
@@
@@
@@
@@
@@
@@
@@
@@
@@
@@
@@
@@
@@
@@
@@
@@
@@
@@
@@
@@
@@
@@
@@
@@
@@
@@
@@
@@
@@
@@
@@
@@
@@
@@
@@
@@
@@
@@
@@
@@
@@
@@
@@
@@
@@
@@
@@
@@
@@
@@
@@
@@
@@
@@
@@
@@
If you dial:
a) 7-952-xxxx
b) 7-953-xxxx
c) 2xx
(7: TIE line access code)
@@
@@
@@
@@
@@
@@
@@
@@
c)2xx
@@
@@
@@
@@
@@
@@
@@
@@
@@
@@
@@
@@
@@
@@
@@
@@
@@
@@
@@
@@
@@
@@
@@
@@
@@
@@
@@
@@
@@
@@
@@
@@
@@
@@
@@
@@
@@
@@
@@
@@
@@
@@
@@
@@
@@
@@
@@
@@
TRG 6 →
b) 953-xxxx
@@
@@
@@
@@
@@
@@
@@
@@
@@
@@
@@
@@
@@
@@
@@
@@
@@
@@
@@
@@
@@
@@
@@
@@
@@
@@
@@
@@
@@
@@
@@
@@
@@
@@
@@
@@
@@
@@
@@
@@
@@
@@
@@
@@
@@
@@
@@
@@
@@
@@
@@
@@
@@
@@
@@
@@
@@
@@
@@
@@
@@
@@
@@
@@
@@
@@
@@
@@
@@
@@
@@
@@
@@
@@
@@
@@
@@
@@
@@
@@
@@
@@
@@
@@
@@
@@
@@
@@
@@
@@
@@
@@
@@
@@
@@
@@
@@
@@
@@
@@
@@
@@
@@
@@
@@
@@
@@
@@
@@
@@
@@
@@
@@
@@
@@
@@
@@
@@
@@
@@
@@
@@
@@
@@
@@
@@
@@
@@
@@
@@
@@
@@
@@
@@
@@
@@
TRG 5 →
@@
@@
@@
@@
@@
@@
@@
@@
@@
@@
@@
@@
@@
@@
@@
@@
@@
@@
@@
@@
@@
@@
@@
@@
@@
@@
@@
@@
@@
@@
@@
@@
@@
@@
@@
@@
@@
@@
@@
@@
@@
@@
@@
@@
@@
@@
@@
@@
@@
@@
@@
@@
@@
@@
@@
@@
@@
@@
@@
@@
@@
@@
@@
@@
@@
@@
@@
@@
@@
@@
@@
@@
@@
@@
@@
@@
@@
@@
@@
@@
@@
@@
@@
@@
@@
@@
@@
@@
@@
@@
@@
@@
@@
@@
@@
@@
@@
@@
@@
@@
@@
@@
@@
@@
@@
@@
@@
@@
@@
@@
@@
@@
@@
@@
@@
@@
@@
@@
@@
@@
@@
@@
@@
@@
@@
@@
@@
@@
@@
@@
@@
@@
@@
@@
@@
@@
@@
@@
@@
@@
@@
@@
@@
@@
@@
@@
@@
@@
@@
@@
@@
@@
@@
@@
@@
@@
@@
@@
@@
@@
@@
@@
@@
@@
@@
@@
@@
@@
@@
@@
@@
@@
@@
@@
@@
@@
@@
@@
@@
@@
@@
@@
@@
@@
Ext. 1xxx
PBX Code 951
a) 952-xxxx
@@
@@
@@
@@
@@
@@
@@
@@
PBX Code 952
@@
@@
@@
@@
@@
@@
@@
@@
Ext. xxxx
@@
@@
@@
@@
@@
@@
@@
@@
@@
@@
@@
@@
@@
@@
@@
@@
@@
@@
@@
@@
@@
@@
@@
@@
@@
@@
@@
@@
@@
@@
@@
@@
@@
@@
@@
@@
@@
@@
@@
@@
@@
@@
@@
@@
@@
@@
@@
@@
@@
@@
@@
@@
@@
@@
@@
@@
@@
@@
@@
@@
@@
@@
@@
@@
@@
@@
@@
@@
@@
@@
@@
@@
@@
@@
@@
@@
@@
@@
@@
@@
@@
@@
@@
@@
@@
@@
@@
@@
@@
@@
@@
@@
@@
@@
@@
@@
@@
@@
@@
@@
@@
@@
@@
@@
PBX-1
@@
@@
@@
@@
@@
@@
@@
@@
PBX-3
@@
@@
@@
@@
@@
@@
@@
@@
@@
@@
@@
@@
@@
@@
@@
@@
@@
@@
@@
@@
@@
@@
@@
@@
@@
@@
@@
@@
@@
@@
@@
@@
@@
@@
@@
@@
@@
@@
@@
@@
@@
@@
@@
@@
@@
@@
@@
@@
@@
@@
@@
@@
@@
@@
@@
@@
@@g
@@g
@@g
@@g
@@g
@@g
@@@@@@@@
?@@@@@@@@?e@@@@@@@@e?@@@@@@@@?e@@@@@@@@e?@@@@@@@@?e@@@@@@@@e?@@@@@@@@?e@@@@@@@@e?@@@@@@@@?e@@@@@@@@e?@@@@@@@@?e@@@@@@@@e?@@@@@@@@?e@@@@@@@@e?@@@@@@@@?e@@@@@@@@e?@@@@@@@@?e@@@@@@@@e?@@@@@@@@?e@@@@@@@@e?@@@@@@@@?e@@@@@@@@e?@@@@@@@@?e@@@@@@@@e?@@@@@@@@?e@@@@@@@@e?@@@@@@@@?e@@@@@@@@e?@@@@@@@@?e@@@@@@@@e?@@@@@@@@?e@@@@@@@@e?@@@@@@@@?e@@@@@@@@e?@@@@@@@@?e@@@@@@@@e?@@@@@@@@?e@@@@@@@@e?@@@@@@@@?e@@@@@@@@e?@@@@@@@@?e@@@@@@@@e?@@@@@@@@?e@@@@@@@@e?@@@@@@@@?e@@@@@@@@e?@@@@@@@@?e@@@@@@@@e?@@@@@@@@?e@@@@@@@@e?@@@@@@@@?e@@@@@@@@e?@@@@@@@@?e@@@@@@@@e?@@@@@@@@?e@@@@@@@@e?@@@@@@@@?e@@@@@@@@e?@@@@@@@@?e@@@@@@@@e?@@@@@@@@?e@@@@@@@@e?@@@@@@@@?e@@@@@@@@e?@@@@@@@@?e@@@@@@@@e?@@@@@@@@?e@@@@@@@@e?@@@@@@@@?e@@@@@@@@e?@@@@@@@@?e@@@@@@@@e?@@@@@@@@?e@@@@@@@@e?@@@@@@@@?e@@@@@@@@ ?@@@@@@@@?e@@@@@@@@e?@@@@@@@@?e@@@@@@@@e?@@@@@@@@?e@@@@@@@@e?@@@@@@@@?e@@@@@@@@e?@@@@@@@@?e@@@@@@@@e?@@@@@@@@?e@@@@@@@@e?@@@@@@@@?e@@@@@@@@e?@@@@@@@@?e@@@@@@@@e?@@@@@@@@?e@@@@@@@@e?@@@@@@@@?e@@@@@@@@e?@@@@@@@@?e@@@@@@@@e?@@@@@@@@?e@@@@@@@@e?@@@@@@@@?e@@@@@@@@e?@@@@@@@@?e@@@@@@@@e?@@@@@@@@?e@@@@@@@@e?@@@@@@@@?e@@@@@@@@e?@@@@@@@@?e@@@@@@@@e?@@@@@@@@?e@@@@@@@@e?@@@@@@@@?e@@@@@@@@e?@@@@@@@@?e@@@@@@@@e?@@@@@@@@?e@@@@@@@@e?@@@@@@@@?e@@@@@@@@e?@@@@@@@@?e@@@@@@@@e?@@@@@@@@?e@@@@@@@@e?@@@@@@@@?e@@@@@@@@e?@@@@@@@@?e@@@@@@@@e?@@@@@@@@?e@@@@@@@@e?@@@@@@@@?e@@@@@@@@e?@@@@@@@@?e@@@@@@@@e?@@@@@@@@
?@@@@@@@@?e@@@@@@@@e?@@@@@@@@?e@@@@@@@@e?@@@@@@@@?e@@@@@@@@e?@@@@@@@@?e@@@@@@@@e?@@@@@@@@?e@@@@@@@@e?@@@@@@@@?e@@@@@@@@e?@@@@@@@@?e@@@@@@@@e?@@@@@@@@?e@@@@@@@@e?@@@@@@@@?e@@@@@@@@e?@@@@@@@@?e@@@@@@@@e?@@@@@@@@?e@@@@@@@@e?@@@@@@@@?e@@@@@@@@e?@@@@@@@@?e@@@@@@@@e?@@@@@@@@?e@@@@@@@@e?@@@@@@@@?e@@@@@@@@e?@@@@@@@@?e@@@@@@@@e?@@@@@@@@?e@@@@@@@@e?@@@@@@@@?e@@@@@@@@e?@@@@@@@@?e@@@@@@@@e?@@@@@@@@?e@@@@@@@@e?@@@@@@@@?e@@@@@@@@e?@@@@@@@@?e@@@@@@@@e?@@@@@@@@?e@@@@@@@@e?@@@@@@@@?e@@@@@@@@e?@@@@@@@@?e@@@@@@@@e?@@@@@@@@?e@@@@@@@@e?@@@@@@@@?e@@@@@@@@e?@@@@@@@@?e@@@@@@@@e?@@@@@@@@?e@@@@@@@@e?@@@@@@@@
@@@@@@@@ ?@@@@@@@@?e@@@@@@@@e?@@@@@@@@?e@@@@@@@@e?@@@@@@@@?e@@@@@@@@e?@@@@@@@@?e@@@@@@@@e?@@@@@@@@?e@@@@@@@@e?@@@@@@@@?e@@@@@@@@e?@@@@@@@@?e@@@@@@@@e?@@@@@@@@?e@@@@@@@@e?@@@@@@@@?e@@@@@@@@e?@@@@@@@@?e@@@@@@@@e?@@@@@@@@?e@@@@@@@@e?@@@@@@@@?e@@@@@@@@e?@@@@@@@@?e@@@@@@@@e?@@@@@@@@?e@@@@@@@@e?@@@@@@@@?e@@@@@@@@e?@@@@@@@@?e@@@@@@@@e?@@@@@@@@?e@@@@@@@@e?@@@@@@@@?e@@@@@@@@e?@@@@@@@@?e@@@@@@@@e?@@@@@@@@?e@@@@@@@@e?@@@@@@@@?e@@@@@@@@e?@@@@@@@@?e@@@@@@@@e?@@@@@@@@?e@@@@@@@@e?@@@@@@@@?e@@@@@@@@e?@@@@@@@@?e@@@@@@@@e?@@@@@@@@?e@@@@@@@@e?@@@@@@@@?e@@@@@@@@e?@@@@@@@@?e@@@@@@@@e?@@@@@@@@?e@@@@@@@@e?@@@@@@@@?e@@@@@@@@e?@@@@@@@@?e@@@@@@@@e?@@@@@@@@?e@@@@@@@@e?@@@@@@@@?e@@@@@@@@e?@@@@@@@@?e@@@@@@@@e?@@@@@@@@?e@@@@@@@@e?@@@@@@@@?e@@@@@@@@e?@@@@@@@@?e@@@@@@@@e?@@@@@@@@?e@@@@@@@@
?@@
?@@
?@@
?@@
?@@
?@@
?@@@@@@@@
?@@@@@@@@
15
E
3
Features
TIE Line Routing Table of PBX-1
Location PBX Code
No.
/ Ext. No.
Removed
Digit
Added
Digit
CO Line Group Hunt Sequence
01
02
01
952
0
5
6
02
953
0
6
5
03
2xx
0
7
03
04
05
Explanation
Location 01: The hunt sequence by dialing [7+PBX Code 952]:
The 1st route — CO line group (TRG) 5
The 2nd route — CO line group (TRG) 6
Location 02: The hunt sequence by dialing [7+PBX Code 953]:
The 1st route — CO line group (TRG) 6
The 2nd route — CO line group (TRG) 5
Location 03: The hunt sequence by dialing [Ext.no. 2xx]:
The 1st route — CO line group (TRG) 7
If the received number does not match the PBX Code, the system
checks the number in the routing table. If it is found, the system
automatically sends the number to the corresponding PBX.
For example, if PBX-1 receives the number “952-xxxx” from PBX4, PBX-1 automatically sends the number through CO line group 5.
4. TIE Call Dialing Method
The following patterns are TIE call dialing methods. The dial
number modification depends on the dialing method.
Your telephone
Dialing Method
Extension no.
APT / DPT
CO button + (PBX code) + Extension no.
TIE line access code + (PBX code) + Extension no.
CO button + PBX code (+ TIE user code) + Phone no.
TIE line access code + PBX code (+ TIE user code) +
Phone no.
Select CO line group + (PBX code) + Extension no.
Select CO line group + PBX code (+ TIE user code) +
Phone no.
16
Dial Modification
Enable
Disable
Enable
Disable
Enable
Disable
Disable
3
E
Features
Your telephone
Dialing Method
Extension
no.
SLT
TIE line access code + (PBX code) + Extension no.
TIE line access code + PBX code (+ TIE user code) +
Phone no.
Select CO line group + (PBX code) + Extension no.
Select CO line group + PBX code (+ TIE user code) +
Phone no.
Dial Modification
Enable
Enable
Enable
Disable
Disable
In addition to the methods above, the system can use the TIE line
for sending CO line access code “9” through other PBX. When
you dial the CO line access code and the CO line is busy, the
system automatically sends CO line access code “9” to a TIE line
so that you can access the CO line through other PBX. This is
enabled by program [990] “System Additional Information, Field
(41)”.
5. TIE Line Routing Flow Chart
Making a TIE Call from an Extension
A TIE call is made as follows.
PBX Code Method – 7-abc-xxxx
Extension No. Method – dexx
Is the dialed number identified with the stored
numbers? (Checks in program [100].)
No
Not treated as a TIE
call.
Yes:
TIE line access code – 7
Other PBX extension no – de
Are the accessed digits (abc or de) found in a TIE
Line Routing Table? (Checks in program [340].)
No
Reorder tone
Yes
Modifies the dialed number if a removed or added
number is assigned. (Checks in program [341].)
Your extension no.
Calls an extension.
NG
Reorder tone
TIE or CO call no.
Routes to the TIE or CO line.
17
E
3
Features
Receiving a Call through a TIE Line
A call is received through a TIE line as follows.
xxxx
abc-xxxx
dexx
No
Is the system allowed to receive TIE dial numbers?
(Checks in program [445].)
DIL 1:1 or DIL 1:N
Yes
Modifies the dialed number if a removed or added
number is assigned. (Checks in programs [431–436].)
xxxx
dexx
Extension no.
Does the
corresponding
extension exist?
abcxxxx
xxxx
No
Modifies the dialed number if a
removed or added number is
assigned. (Checks in program [341].)
Yes
No
Is the corresponding
extension idle?
Is there a hunt sequence assignment?
(Checks in program [340].)
Yes
No
Calls an extension. (A
ringback tone is sent.)
Checks the PBX code “abc”.
(Checks in program [128].)
Found in a TIE Line Routing Table.
(Checks in program [340].)
Calls an extension.
Disable
Line access
code
Checks the code in
program [100].
Ext. no.
Calls an
extension.
Yes
Is the TIE-to-CO Transfer (Checks
in program [438].) or TIE-to-TIE
Transfer (Checks in program
[439].) enabled?
Enable
• Call Waiting
• Busy tone
Reorder tone
Did you employ the CO line security
mode? (Checks in program [440].)
Yes
No
Is a DISA/TIE user code received?
(Programs in program [811].)
Yes
Routes to a CO or TIE line.
(Local / TRG routing)
18
No
3
Conditions
Features
E
• It is possible to program the E&M signal, voice path type and voice
level (transmit / receive) of the E&M Line Unit by system
programming. For details about the E&M signal, voice path type and
voice level, refer to “Installation” in this manual.
• The FLASH button does not function as the disconnection key.
• The ability to perform Call Forwarding/Call Transfer to TIE line is
determined on a Class of Service basis. See programs [503] and [504].
Programming References
Section 4, System Programming
[100] Flexible Numbering
[109] Expansion Unit Type
[128] PBX Code
[129] E&M Signal Assignment
[220] TIE First / Inter Digit Time
[340] TIE Line Routing Table
[341] TIE Modify Removed / Added Digit
[431] TIE Table Number Assignment
[432] TIE Incoming Assignment
[433] TIE Outgoing Assignment
[434] TIE Subscriber Number Removed Digit
[435] TIE Added Number
[436] TIE Wink Time Out Assignment
[437] CO-to-TIE Transfer
[438] TIE-to-CO Transfer
[439] TIE-to-TIE Transfer
[440] TIE Security Type
[441] Line Hunt Sequence
[442] Voice Path Type
[443] Voice Level (Transmit)
[444] Voice Level (Receive)
[445] TIE Receive Dial
[503] Call Transfer to CO Line
[504] Call Forwarding to CO Line
[811] DISA / TIE User Codes
[990] System Additional Information, Field (41)
19
L
3
Features
Live Call Screening (LCS)†
Description
Allows a digital proprietary telephone user to monitor his/her voice
mailbox while an incoming caller is leaving a message and, if
desired, intercept the call. The voice mailbox can be monitored in
one of two ways — Hands-free or Private.
Hands-free Mode
The voice mailbox is monitored through the built-in speaker
of the proprietary telephone.
Private Mode
When callers are connected to a voice mailbox, a proprietary
telephone user will hear an alert tone . To monitor the call,
the user goes off hook on the handset or speakerphone.
Alert Tone
1s
To intercept the call in either Hands-Free or Private mode, press the
LCS button.
A single line telephone, which is connected with a proprietary
telephone in parallel, can be also used to monitor a recording
message. Be sure that the Live Call Screening on the connected
proprietary telephone has been activated.
This feature is useful when you are out with a portable handset of a
cordless telephone (SLT). The handset emits an alert tone to let
you know that a message is being recorded. To intercept the call,
flash the hookswitch.
Conditions
20
• If the extension user is having a conversation, a call waiting tone is
sent. The user can put an existing call on hold before accessing LCS.
• A flexible CO and DSS button can be assigned as a Live Call Screening
button.
• To prevent unauthorized monitoring, a three-digit password must be set
by the LCS user. If the user forgets his password, it can be cleared by
the operator or manager.
• Each extension can be programmed to either close the mailbox or
continue recording the conversation after the call is intercepted.
†: Available when the Digital Super Hybrid System is connected to a Digital
Proprietary Telephone capable Panasonic Voice Processing System (one
that supports digital proprietary telephone integration; e.g. KX-TVP200).
3
Features
L
Programming References
Section 4, System Programming — in this manual
[005] Flexible CO Button Assignment
[616] Live Call Screening Recording Mode Assignment
Station Programming......Added and Changed Features for User Manual Vol. 4
Flexible Button Assignment – Live Call Screening Button
Live Call Screening Cancel Button
Live Call Screening Mode Set
Feature References
None
Operation References DPTœ Features
—Added and Changed Live Call Screening (LCS)
Features for
Operator Service Features
User Manual Vol. 4 Live Call Screening Password Control
21
L
3
Features
Log-In / Log-Out
Description
Assigns an extension to join (log-in) or leave (log-out) a hunting or
UCD group. Extensions in log-out status receive no calls by
Station Hunting but can receive other calls, unlike the DND feature.
Conditions
• There should be at least one extension that is in log-in status.
• The lighting patterns of Log-In/Log-Out button and the status are
shown below.
lighting
pattern
Red on
Red flash
off
CO Line Status
UCD
Station Hunting
Log-Out
Log-Out
Log-In (waiting calls)
Log-In (no calls)
Log-In (no calls)
Programming References
Section 4, System Programming — in this manual
[100] Flexible Numbering, UCD log-in / log-out
Station Programming......Added and Changed Features for User Manual Vol. 4
Flexible Button Assignment – Log-In / Log-Out Button
Feature References
Section 3, Features
Station Hunting
Uniform Call Distribution (UCD) — in this manual
Operation References DPT Features, SLT Features
—Added and Changed Log-In / Log-Out
Features for
User Manual Vol. 4
22
3
P
Features
Phantom Extension
Description
Allows the system to route the calls to a phantom extension. A call
to a phantom extension arrives at an extension who has the
corresponding Phantom button. A phantom button can be assigned
by Station Programming.
Conditions
• Types of calls whose destination can be the phantom extension are:
Outside calls – DIL 1:1; DDI; IRNA; UCD-Overflow
Intercom calls – Extension; Transfer
• You can call the phantom extension by pressing the Phantom button or
by dialing the phantom extension number. If several extensions have
the same phantom extension number, they will ring simultaneously.
• A phantom number must be assigned by System Programming before
assigning the Phantom button by Station Programming.
• There is a maximum of 128 phantom numbers. Each number has two to
four digits, consisting of numbers 0 through 9.
• The phantom number cannot be used for feature settings such as Call
Forwarding.
• The lighting patterns and status of the Phantom button are shown below.
Lighting pattern
Off
Red on
Green rapid flash
Phantom Extension Status
Idle
Calling a phantom extension
Incoming call
• A DSS button can be assigned as the Phantom button so that the
operator can use the button for transferring a call.
Programming References
Section 4, System Programming — in this manual
[130] Phantom Extension Number Assignment
Station Programming......Added and Changed Features for User Manual Vol. 4
Flexible Button Assignment – Phantom Button
Feature References
None
Operation References DPT Features
—Added and Changed Phantom Extension
Features for
User Manual Vol. 4
23
T/U
3
Features
Two-Way Recording into the Voice Mail†
Description
Allows a proprietary telephone user to record the conversation into
one’s mailbox or another mailbox, while talking on the phone.
Note:
When you record Two-Way telephone conversations, you should
inform the other party that the conversation is being recorded.
Conditions
• A flexible CO and DSS button can be assigned as a Two-Way Record
button or a Two-Way Transfer button.
• When all the voice mail ports are busy, pressing the Two-Way Record
button sends an alarm tone.
• When all the voice mail ports are busy, pressing the Two-Way Transfer
button followed by an extension number sends an alarm tone.
Programming References
Section 4, System Programming — in this manual
[005] Flexible CO Button Assignment
Station Programming......Added and Changed Features for User Manual Vol. 4
Flexible Button Assignment — Two-Way Record Button, Two-Way
Transfer Button
Feature References
None
Operation References DPT Features
—Added and Changed Two-Way Recording into the Voice Mail
Features for
User Manual Vol. 4
Uniform Call Distribution (UCD)
Description
24
Allows incoming calls (CO line, extension) to be distributed
uniformly to a specific group of extensions called UCD group.
Calls to a UCD group hunt for an idle station in a circular way,
starting at the extension following the last one called. This UCD
feature is particularly helpful when a certain extension receives a
high volume of calls compared with other extensions.
If all extensions in a UCD group are busy or not available, the
incoming outside call will be handled by the UCD Time Table.
†: Available when the Digital Super Hybrid System is connected to a Digital
Proprietary Telephone capable Panasonic Voice Processing System (one
that supports digital proprietary telephone integration; e.g. KX-TVP200).
3
U
Features
An outline sketch of UCD is shown below.
(1) When a number of calls have arrived at a
UCD group, the 1st call arrives at
extension A first.
(2) When the 1st call arrives at extension A,
the 2nd call arrives at extension B.
3rd call in queue
Calls have arrived at a UCD group
2nd call in queue
3rd call in queue
UCD group
2nd call in queue
Extension B
1st call in queue
(When extension B is
busy or UCD log out
has been set to
extension B, the call
arrives at extension C.)
UCD group
Extension A
(When extension A is
busy or UCD log out
has been set in
extension A, the call
arrives at extension B.)
Extension C
Extension A
Extension B
(When extension B is
busy or UCD log out
has been set in
extension B, the call
arrives at extension C.)
(3) When the 2nd call arrives at extension C,
the 3rd call will arrive at extension A.
Extension C
(When extension C is
busy or UCD log out
has been set in
extension C, the call
arrives at extension A.)
25
U
3
Features
(4) When all extensions in a UCD group are busy or not available, the incoming outside call will
be handled by the UCD Time Table.
An example is shown below.
UCD Time Table Assignment
UCD
1
2
3
4
5
6
7
8
UCD
FN
OFN
TT
FN
191
192
193
194
291
292
293
294
OFN
101
291
TT
1
2
: UCD Group Number (1 – 8)
: Floating Number of the UCD Group
: Overflow Extension Number
: Time Table Number (1 – 4)
Sequence Assignment
TT
1
2
3
4
S1
S2
S3
S4
TR
RT
Blank
1T
2T
3T
4T
SEQUENCE
S1 → 4T → 4T → TR →
S1 → 2T →
→
→
S4 → RT → →
→
TR → →
→
→
: Send OGM 1
: Send OGM 2
: Send OGM 3
: Send OGM 4
: Transfer to overflow extension
: Return to top
: Disconnect the line
: Timer – 16 seconds
: Timer – 32 seconds
: Timer – 48 seconds
: Timer – 64 seconds
Sequence Activation Examples
❒ S4 →
→
→
→
: Sends OGM 4 and then disconnects the line.
❒ S4 → TR → n/a → n/a → n/a : Sends OGM 4 and then transfers to an overflow extension.
❒ S4 → 1T →
→
→
: Sends OGM 4, Music on Hold for 16 seconds and then
disconnects the line.
❒ S1 → S2 → S3 →
→
: Sends OGM 1, OGM 2, OGM 3 and then disconnects the line.
❒ S4 → 1T → S1 →
→
: Sends OGM 4, Music on Hold for 16 seconds, OGM 1 and then
disconnects the line.
❒ S4 → 1T → 4T → RT → n/a : Sends OGM 4, Music on Hold for 16 + 64 seconds and then
OGM 4 again.
❒ S4 → RT → n/a → n/a → n/a : Sends OGM 4 repeatedly.
❒ TR → n/a → n/a → n/a →
: Directly transfers to an overflow extension.
❒ RT → n/a → n/a → n/a →
: Waits for an idle extension. The caller hears a ringback tone.
(IRNA works.)
❒
→ n/a → n/a → n/a →
: Waits for an idle extension. The caller hears a ringback tone.
(IRNA works.)
❒ 1T →
→
→
→
: Waits for an idle extension. The caller hears a ringback tone.
(IRNA does not work.)
❒ 1T → RT → n/a → n/a →
: Waits for an idle extension. The caller hears a ringback tone.
(IRNA does not work.)
❒ 1T → TR → n/a → n/a →
: Waits for an idle extension for 16 seconds and then transfers to
an overflow extension.
* n/a: not available for assignment.
26
3
Features
U
Note:
• The UCD Time Table is not available for incoming extensions or transferred calls.
• If the overflow extension or Time Table number is not assigned, the system does not answer the call and
waits for any extension to be idle. In this case, IRNA will be employed.
• If the system sends the OGM after queuing, the OGM answering time is subject to the time assigned in
program [213] “DISA Delayed Answer Time.”
• Dialing is disregarded during an OGM.
• In sequence assignment, “Sx” can be assigned in a space other than the first only when another “Sx” is
assigned in the first space.
• In sequence assignment, an assignment after “TR,” “RT” or “Blank” is not available.
• An OGM is only available for KX-TD1232.
• If a timer is the first item in a Time Table sequence, it will delay answering according to the Timer’s
time setting. The caller will hear a ringback tone.
• Music on Hold after an OGM can be changed to a ringback tone by program [990] “System Additional
Information, Field (1).”
Conditions
• UCD can be used in the following cases:
a) The floating number of UCD is assigned as the DIL 1:1 destination.
b) The floating number of UCD is assigned as the Intercept Routing
destination.
c) The floating number of UCD is dialed from an extension.
d) The floating number of UCD is dialed from DISA.
e) The floating number of UCD is assigned as the UCD Overflow
destination.
f) The floating number of UCD is assigned as the Direct Dialing In
destination.
• This feature requires assignment of a UCD group in System
Programming. An extension cannot belong to two or more UCD
groups.
• The floating number can be assigned on a UCD group basis. The UCD
group is based on the extension group.
• It is possible to set the log-in or log-out status on an extension basis.
A UCD call can arrive at an extension in log-in status within the UCD
group, but cannot arrive at extensions in log-out status. If the extension
would like to leave the group temporarily, the extension sets the log-out
status by the feature number to prevent UCD calls being sent to their
extensions. When the extension re-joins the group, the extension sets
the log-in status.
• There should be at least one extension that is in log-in status.
Programming References
Section 4, System Programming — in this manual
[106] Station Hunting Type
[126] UCD Overflow
[127] UCD Time Table
[611] ISDN DDI Number / Floating Number Transformation
[813] Floating Number Assignment
27
UV
Feature Reference
3
Section 3, Features
Extension Group
Log-In / Log-Out — in this manual
Features
Station Hunting
Operation References DPT Features, SLT Features
—Added and Changed Uniform Call Distribution (UCD)
Features for
User Manual Vol. 4
Voice Mail Integration for Digital Proprietary Telephones†
Description
A Digital Proprietary Telephone capable Panasonic Voice
Processing System can be connected to a Digital Super Hybrid
System (DSHS) in a tightly integrated fashion.
The system sends the VPS data which contains the extension
number configuration information and the VPS automatically
creates mailboxes with this data (Automatic Configuration —
Quick Setup).
Conditions
• A maximum of one VPS can be connected to each DSHS cabinet.
• A maximum of four DSHS jacks can be connected to a digital
proprietary telephone capable VPS. Because a digital proprietary
telephone connection supports up to two simultaneous voice calls, only
one DSHS jack needs to be connected to two VPS ports.
• Connect the jacks and ports in ascending order. In other words, the
lowest number DSHS jack used for VPS connection must be connected
to the lowest number VPS port.
• The VPS data is transmitted to the VPS via the lowest jack port.
Programming References
Section 4, System Programming — in this manual
[117] Voice Mail Number Assignment
[118] Voice Mail Extension Number Assignment
[119] Voice Mail Extension Group Assignment
[616] Live Call Screening Recording Mode Assignment
Feature References
Section 3, Features
Voice Mail Integration
Operation References
28
Not applicable.
†: Available when the Digital Super Hybrid System is connected to a Digital
Proprietary Telephone capable Panasonic Voice Processing System (one
that supports digital proprietary telephone integration; e.g. KX-TVP200).
4.2
System Programming
117
Voice Mail Number Assignment †
Description
Assigns the jack number corresponding to the voice mail port for
data transmission to the Voice Processing System. The voice mail
port is expandable to four ports (8 ports during System Connection
for KX-TD1232).
Selection
KX-TD816
• Jack number: 02 through 16
KX-TD1232
• M (Master) / S (Slave)
• Jack number: 02 through 32 / Master; 33 through 64 / Slave
Default
Master and Slave — Blank
Programming
KX-TD816
1.
Enter 117.
Display: VMS Port Asn
2.
Press NEXT.
Display example:M:#
3.
#
#
#
Enter a jack number.
To delete the current entry, press CLEAR.
To change the current entry, press CLEAR and enter the new jack
number.
4.
Press
to enter another jack number.
5.
Repeat steps 3 through 4 to enter another jack number.
6.
Press STORE.
7.
Press END.
KX-TD1232
1.
Enter 117.
Display: VMS Port Asn
2.
Press NEXT to program the Master System.
To program “Slave,” press NEXT again.
Display example: M:#
†: Available when the Digital Super Hybrid System is connected to a Digital
Proprietary Telephone capable Panasonic Voice Processing System (one
that supports digital proprietary telephone integration; e.g. KX-TVP200).
#
#
#
29
4.3
117
System Programming
Voice Mail Number Assignment †
3.
Enter a jack number.
To delete the current entry, press CLEAR.
To change the current entry, press CLEAR and enter the new jack
number.
4.
Press
to enter another jack number.
5.
Repeat steps 3 through 4 to enter another jack number.
6.
Press STORE.
7.
Press NEXT to program the Slave System.
Display example: S:#
#
#
#
8.
Repeat steps 3 through 4 to enter another jack numbers.
9.
Press END.
Conditions
• Neither Jack number 01 nor the manager extension can be assigned as a
voice mail port jack. The voice mail port jack cannot be assigned to a
manager extension.
• The jack numbers correspond to the voice mail port in numerical order.
Example: Stored jack numbers: Jacks 02, 03, 05, 08
Jack 02=Voice mail numbers 01, 02; Jack 03= Voice mail numbers 03,
04; Jack 05=Voice mail numbers 05, 06; Jack 08=Voice mail numbers
07, 08
Feature References
None
30
†: Available when the Digital Super Hybrid System is connected to a Digital
Proprietary Telephone capable Panasonic Voice Processing System (one
that supports digital proprietary telephone integration; e.g. KX-TVP200).
4.2
System Programming
118
Voice Mail Extension Number Assignment †
Description
Assigns the extension number for the voice mail number. These
numbers can be used the same way extension numbers are used for
station access.
Selection
• Voice mail number (VM): KX-TD816 – 01 through 08
KX-TD1232 – 01 through 16
• Extension Number: 2 through 4 digits
Default
KX-TD816 – VM-01=165, VM-02=166, VM-03=167,
VM-04=168, VM-05=169, VM-06=170,
VM-07=177, VM-08=178
KX-TD1232 – VM-01=165, VM-02=166, VM-03=167,
VM-04=168, VM-05=169, VM-06=170,
VM-07=177, VM-08=178, VM-09=171,
VM-10=172, VM-11=173, VM-12=174,
VM-13=175, VM-14=176, VM-15=179,
VM-16=180
Programming
1.
Enter 118.
Display: VM EXT NO. Set
2.
Press NEXT.
Display: VM NO?→
3.
Enter a voice mail number.
To enter voice mail number 01, you can also press NEXT.
Display: VM-01:#02-1:165
4.
Enter an extension number.
To change the current entry, press CLEAR and enter the new number.
5.
Press STORE.
6.
To program another voice mail number, press NEXT or
PREV, or SELECT and the desired voice mail number.
7.
Repeat steps 4 through 6.
8.
Press END.
†: Available when the Digital Super Hybrid System is connected to a Digital
Proprietary Telephone capable Panasonic Voice Processing System (one
that supports digital proprietary telephone integration; e.g. KX-TVP200).
31
4.3
118
System Programming
Voice Mail Extension Number Assignment †
Conditions
• You cannot leave an entry empty.
• The first one or two digits of the voice mail extension numbers are
subject to program [100] “Flexible Numbering, (01) through (16) 1st
through 16th hundred extension blocks.”
• Double entries and incompatible entries for extension numbers are
invalid. Valid entry examples are: 10 and 11, 10 and 110; Invalid entry
examples are: 10 and 106, 210 and 21. In order not to make an invalid
entry, check the other extension numbers in programs [003] “Extension
Number Set,” [012] “ISDN Extension Number Set, [130] “Phantom
Extension Number Assignment” and [813] “Floating Number
Assignment.”
• The display shows “VM-XX:#YY-1:ZZZ” in step 3.
“XX” means the voice mail number.
“YY” means the jack number of the voice mail port programmed in
[117].
“-1” of YY-1 means the first part of jack number in digital line.
YY-2 means the second number of the jack number in digital line.
Feature References
Section 3, Features — in this manual
Voice Mail Integration for Digital Proprietary Telephones
32
†: Available when the Digital Super Hybrid System is connected to a Digital
Proprietary Telephone capable Panasonic Voice Processing System (one
that supports digital proprietary telephone integration; e.g. KX-TVP200).
4.2
System Programming
119
Voice Mail Extension Group Assignment †
Description
Assigns each voice mail number to a voice mail extension group
number.
Selection
• Voice mail number (VM): KX-TD816 – 01 through 08,
KX-TD1232 – 01 through 16,
( =all voice mail number)
• Voice mail extension group number (EXG) = 1 through 8
Default
All voice mail numbers = EXG 1
Programming
1.
Enter 119.
Display: VM EXT Group Asn
2.
Press NEXT.
Display: VM NO?→
3.
Enter a voice mail number.
To enter voice mail number 01, you can also press NEXT.
Display example: VM-01:#02-1:EXG1
4.
Enter the voice mail extension group number.
To delete the current entry, press CLEAR.
To change the current entry, enter the new number.
5.
Press STORE.
6.
To program another voice mail number, press NEXT or
PREV, or SELECT and the desired voice mail number.
7.
Repeat steps 4 through 6.
8.
Press END.
Conditions
• The display shows “VM-XX:#YY-1:EXG Z” in step 3.
“XX” means a voice mail number.
“YY” means the jack number of the voice mail port programmed in
[117]. “-1” of YY-1 means the first part of jack number in digital line.
“YY-2” means the second part of the jack number in digital line.
• To assign all voice mail numbers to the same selection, press the
key
in step 3. In this case, the display shows the contents programmed for
TIE table number 1.
Feature References
Section 3, Features — in this manual
Voice Mail Integration for Digital Proprietary Telephones
†: Available when the Digital Super Hybrid System is connected to a Digital
Proprietary Telephone capable Panasonic Voice Processing System (one
that supports digital proprietary telephone integration; e.g. KX-TVP200).
33
4.3
126
System Programming
UCD Overflow
Description
Assigns the destination where the call is transferred to when all
extensions in the UCD group are busy. The Time Table number of
the overflow extension must also be assigned.
Selection
• UCD group number: 1 through 8
• Overflow extension number: 2 through 4 digits
• Time table number: 1 through 4
Default
All UCD groups — Not stored
Programming
1.
Enter 126.
Display: UCD Overflow
2.
Press NEXT.
Display: UCD NO?→
3.
Enter an UCD group number.
To enter UCD group number 1, you can also press NEXT.
Display example: UCD1:
4.
,TT:
Enter an overflow extension number.
Display example: UCD1:102,TT:
5.
Press
.
4.
Enter a time table number.
Display example: UCD1:102,TT:1
4.
Press STORE.
5.
Press END.
Conditions
If the overflow extension or Time Table number is not assigned, the
system does not answer the call and waits for any extension to be idle. In
this case, IRNA will be employed.
Feature Reference
Section 3, Features — in this manual
Uniform Call Distribution (UCD)
34
4.3
System Programming
127
UCD Time Table
Description
Assigns the queuing sequence in the UCD time table. The queuing
sequences are as follows:
*S1
: Sends DISA outgoing message 1
*S2
: Sends DISA outgoing message 2
*S3
: Sends DISA outgoing message 3
*S4
: Sends DISA outgoing message 4
TR : Transfers to the overflow extension
RT : Returns to the top of the sequence
Blank : Disconnects
1T
: Timer — 16 seconds
2T
: Timer — 32 seconds
3T
: Timer — 48 seconds
4T
: Timer — 64 seconds
Selection
• Time table number: 1 through 4
• S1 / S2 / S3 / S4 / TR / RT / 1T / 2T / 3T / 4T / Blank
Default
All time tables — Not stored
Programming
1.
Enter 127.
Display: UCD Time Table
2.
Press NEXT.
Display: Table NO?→
3.
Enter a time table number.
To enter time table number 1, you can also press NEXT.
Display example: 1: → → → →
4.
Keep pressing SELECT until the desired selection is
displayed.
Display example: 1:S4→ → → →
5.
Press
.
6.
Repeat steps 4 and 5.
4.
Press STORE.
5.
Press END.
Conditions
• “Sx” can be assigned in a space other than in the first only when
another “Sx” is assigned in the first space.
• An assignment after “TR,” “RT” or “Blank” is not available.
Feature Reference
Section 3, Features — in this manual
Uniform Call Distribution (UCD)
*: Available for KX-TD1232 only.
35
4.3
128
System Programming
PBX Code
Description
Assigns the PBX Code as your location number if the “PBX Code
method” is employed for TIE Line Network calling.
Selection
PBX Code: 1 to 3 digits
Default
Not Stored
Programming
1.
Enter 128.
Display: PBX Code
2.
Press NEXT.
Display: Code:
3.
Enter a PBX Code.
To change the current entry, press CLEAR and enter the new code.
Conditions
36
4.
Press STORE.
5.
Press END.
• Valid numbers for the PBX Code are 0 through 9.
• The PBX Code method is: PBX Code + Extension number.
4.2
System Programming
129
E&M Signal Assignment
Description
Assigns the E&M signal. There are three signals available:
Continuous: Continuous E&M (Wink/Immediate)
Pulsed Ans: Pulsed E&M with Answer Signal (Wink only)
Pulsed No Ans: Pulsed E&M without Answer Signal (Wink only)
Selection
Continuous / Pulsed Ans / Pulsed No Ans
Default
Continuous
Programming
1.
Enter 129.
Display: E&M Signal
2.
Press NEXT.
Display example:Continuous
Conditions
3.
Keep pressing SELECT until the desired selection is
displayed.
4.
Press STORE.
5.
Press END.
• If you select “Pulsed Ans” or “Pulsed No Ans”, you must select “Wink”
as the start type.
37
4.3
130
System Programming
Phantom Extension Number Assignment
Description
Assigns the phantom numbers. Each number will be assigned to a
flexible CO or DSS button and used as a Phantom button.
Selection
• Location number: 001 through 128
• Phantom number: 2 through 4 digits
Default
All locations – Not stored
Programming
1.
Enter 130.
Display: Phantom NO.
2.
Press NEXT.
Display: Location NO?→
3.
Enter a location number.
To enter location number 001, you can also press NEXT.
Display example: 001: Not Stored
4.
Enter a phantom number.
To delete the current entry, press CLEAR.
To change the current entry, press CLEAR and enter the new number.
5.
Press STORE.
6.
To program another location, press NEXT or PREV, or
SELECT and the desired location number.
7.
Repeat steps 4 through 6.
8.
Press END.
Conditions
• There is a maximum of 128 phantom numbers. Each number has two to
four digits, consisting of numbers 0 through 9.
• The first one or two digits of the phantom extension numbers are
subject to program [100] “Flexible Numbering, (01) through (16) 1st
through 16th hundred extension blocks.”
• Phantom extension numbers and other extension numbers should be
unique. Double entry and incompatible entry for these numbers are
invalid. Valid entry examples are: 10 and 11, 10 and 110; Invalid entry
examples are: 10 and 106, 210 and 21.
In order not to make an invalid entry, check the other extension
numbers in programs [003] “Extension Number Set,” [012] “ISDN
Extension Number Set, [118] “Voice Mail Extension Number
Assignment” and [813] “Floating Number Assignment.”
Feature References
Section 3, Features — in this manual
Phantom Extension
38
4.3
System Programming
131
ISDN DDI Number / Phantom Extension Number Transformation
Description
Used to convert a DDI number to a phantom extension number in
order to put an incoming DDI call to a specific extension.
Selection
• Location number: 001 through 128
• DDI Number: 1 through 6 digits/ Blank (no number)
Default
All locations – Blank
Programming
1.
Enter 131.
Display: Phantom DDI NO.
2.
Press NEXT.
Display: Location NO?–>
3.
Enter a location number.
To enter location number 001, you can also press NEXT.
Display: 001:
4.
Enter a DDI number.
To delete the current entry, press CLEAR.
5.
Press STORE.
6.
To program another jack, press NEXT or PREV, or
SELECT and the desired location number.
7.
Repeat steps 4 through 6.
8.
Press END.
Conditions
• There is a maximum of 128 phantom DDI numbers. Each DDI number
can be one through six digits, consisting of 0 through 9.
Feature References
Section 3, Features — in this manual
Direct Dialing In (DDI)
39
System Programming
220
TIE First / Inter Digit Time
Description
Assigns the maximum time allowed between the start of the dial
tone and the first digit dialed (First Digit Time), and between digits
(Inter Digit Time) on an TIE call. If an extension user fails to dial
any digits during this time, the DTMF receiver is released. This
timer applies until the Toll Restriction check is completed.
Selection
Time (seconds): 3 to 30
Default
10 s
Programming
1.
Enter 220.
Display: TIE Timer
2.
Press NEXT.
Display example: Time:10 sec
3.
Enter the time.
To change the current entry, press CLEAR and enter the new time.
4.
Press STORE.
5.
Press END.
Conditions
• This timer is used for toll restriction checking.
• You cannot leave the entry empty.
Feature References
Section 3, Features
Toll Restriction
40
System Programming
340
TIE Line Routing Table
Description
The TIE line routing table can be programmed. This table is
referenced by the system to identify the CO line route, when an
extension user makes a TIE call.
A routing pattern appropriate for each call is decided by the first
three digits (except the TIE line access code) of the dialed
number. This program assigns the TIE line access code and CO
line group hunt sequence.
Selection
• Location number: 01 through 32
• TIE line access code: 1 to 3 digits
• CO line group hunt sequence number: 1 through 8 (5 entry max.)
Default
All locations – Not stored
Programming
1.
Enter 340.
Display example: TIE Route
2.
Press NEXT.
Display: Location NO?→
3.
Enter a location number.
To enter location number 01, you can also press NEXT.
Display example: 01:
,
4.
Enter a TIE line access code.
To delete the current entry, press CLEAR.
To change the current entry, press CLEAR and enter the new number.
5.
Press
to program the CO line group hunt sequence number.
6.
Enter a CO line group hunt sequence number.
To delete the current entry, press CLEAR.
To change the current entry, press CLEAR and enter the new number.
Conditions
7.
Press STORE.
8.
To program another location, press NEXT or PREV, or
SELECT and the desired location number.
9.
Repeat steps 4 through 8.
10.
Press END.
• Each TIE line access code has a maximum of three digits, consisting of
0 through 9 and . The character “ ” can be used as a wild card
character.
• Program [341] “TIE Removed Digit/ Added Dial” is used to modify the
TIE line access code.
41
System Programming
341
TIE Modify Removed Digit / Added Dial
Description
Assigns the removed digits and added numbers of a received TIE
call. Digits are removed and added from the beginning of the
dialed digits.
Selection
• Location number: 01 through 32
• Number of digits to be deleted: 0 to 4 (0=no deletion)
• Number to be added: 4 digits (max.)
Default
All locations – Deleted digit: 0, Added Dial: Blank
Programming
1.
Enter 341.
Display: TIE Remove/Add
2.
Press NEXT.
Display: Location NO?→
3.
Enter a location number.
To enter location number 01, you can also press NEXT.
Display example: 01:0,
4.
Enter the number of digits to be deleted.
To change the current entry, press CLEAR and enter the new number.
5.
Press
to program the number to be added.
6.
Enter the number to be added.
To change the current entry, press CLEAR and enter the new number.
Conditions
42
7.
Press STORE.
8.
To program another location, press NEXT or PREV, or
SELECT and the desired location number.
9.
Repeat steps 4 through 8.
10.
Press END.
Each added number has a maximum of 4 digits, consisting of 0 through
9.
System Programming
431
TIE Table Number Assignment
Description
Assigns a TIE table number to each CO line group.
Selection
• CO line group (TRG) number: 1 through 8,
( =all CO line groups)
• TIE table number: 1 to 4
Default
All CO line groups – Not stored
Programming
1.
Enter 431.
Display: TIE Table NO.
2.
Press NEXT.
Display: TRK GRP NO?→
3.
Enter a CO line group number.
To enter CO line group number 1, you can also press NEXT.
Display example: TRG1:Not Stored
4.
Enter a TIE table number.
To change the current entry, press CLEAR and the new number.
Conditions
5.
Press STORE.
6.
To program another CO line group, press NEXT or PREV, or
SELECT and the desired CO line group number.
7.
Repeat steps 4 through 6.
8.
Press END.
• This is the first and basic programming for the TIE features. If this
assignment is changed, it affects other programming ([432] through
[436]).
• To assign all CO line groups to the same selection, press the
key in
step 3. In this case, the display shows the contents programmed for CO
lind group number 1.
43
System Programming
432
TIE Incoming Assignment
Description
Assigns a TIE incoming method, immediate or wink, to each TIE
table according to your central office service.
Immediate: Incoming TIE calls can be received right after the
receiving signal arrives.
Wink: Incoming TIE calls can be received after the wink signal is
transmitted to the central office (after the receiving signal
arrives).
Selection
• TIE table number: 1 to 4,
• Immediate / Wink
Default
All DID / TIE tables – Wink
Programming
1.
( =all TIE tables)
Enter 432.
Display: TIE Signal In
2.
Press NEXT.
Display: Table NO?→
3.
Enter a TIE table number.
To enter TIE table number 1, you can also press NEXT.
Display example: 1:Wink
Conditions
44
4.
Keep pressing SELECT until the desired selection is
displayed.
5.
Press STORE.
6.
To program another TIE table, press NEXT or PREV, or
SELECT and the desired TIE table number.
7.
Repeat steps 4 through 6.
8.
Press END.
To assign all TIE tables to one selection, press the
key in step 3. In
this case, the display shows the contents programmed for TIE table
number 1.
System Programming
433
TIE Outgoing Assignment
Description
Assigns a TIE outgoing method, immediate or wink, to each TIE
table according to your central office service.
Immediate: Outgoing TIE numbers can be transmitted right after
seizing the CO line.
Wink: Outgoing TIE numbers can be transmitted after receiving
the wink signal from the central office after seizing the CO
line.
Selection
• TIE table number: 1 to 4,
• Immediate / Wink
Default
All TIE tables – Wink
Programming
1.
( =all TIE tables)
Enter 433.
Display: TIE Signal Out
2.
Press NEXT.
Display: Table NO?→
3.
Enter a TIE table number.
To enter TIE table number 1, you can also press NEXT.
Display example: 1:Wink
Conditions
4.
Keep pressing SELECT until the desired selection is
displayed.
5.
Press STORE.
6.
To program another TIE table, press NEXT or PREV, or
SELECT and the desired TIE table number.
7.
Repeat steps 4 through 6.
8.
Press END.
• The time the system waits for the confirmation wink signal can be
programmed in program [436] “TIE Wink Time Out Assignment”. The
system disconnects the CO line when the time-out time expires.
• To assign all TIE tables to one selection, press the
key in step 3. In
this case, the display shows the contents programmed for TIE table
number 1.
45
System Programming
434
TIE Subscriber Number Removed Digit
Description
Assigns the removed digits of the received TIE subscriber numbers
to each TIE table. Digits are removed from the beginning of the
received digits.
Selection
• TIE table number: 1 to 4
• Number of digits to be deleted: 0 through 6
(0=no deletion)
Default
All TIE tables – 0
Programming
1.
Enter 434.
Display: TIE Remove Digit
2.
Press NEXT.
Display: Table NO?→
3.
Enter a TIE table number.
To enter TIE table number 1, you can also press NEXT.
Display example: 1:1
4.
Enter the number of digits to be deleted.
To change the current entry, press CLEAR and the new number.
Conditions
46
5.
Press STORE.
6.
To program another TIE table, press NEXT or PREV, or
SELECT and the desired TIE table number.
7.
Repeat steps 4 through 6.
8.
Press END.
You cannot leave the entry empty.
System Programming
435
TIE Added Number
Description
Assigns the added number to the TIE subscriber number which is
determined in program [434] “TIE Subscriber Number Removed
Digit”. This makes the final number which serves as the extension
number. Note that digits are inserted at the beginning of the
number.
Selection
• TIE table number: 1 to 4
• Number to be added: 4 digits (max.)
Default
All DID / TIE tables – Not Stored
Programming
1.
Enter 435.
Display: TIE Add Dial
2.
Press NEXT.
Display: Table NO?→
3.
Enter a TIE table number.
To enter TIE table number 1, you can also press NEXT.
Display example: 1:2
4.
Enter the number to be added.
To change the current entry, press CLEAR and enter the new number.
Conditions
5.
Press STORE.
6.
To program another TIE table, press NEXT or PREV, or
SELECT and the desired TIE table number.
7.
Repeat steps 4 through 6.
8.
Press END.
Each added number has a maximum of 4 digits, consisting of 0 through
9.
47
System Programming
436
TIE Wink Time Out Assignment
Description
The TIE outgoing method can be set to the wink mode in program
[433] “TIE Outgoing Assignment”. This program sets the time the
system waits for the confirmation wink signal after a CO line is
seized according to your central office service. The system
disconnects the CO line when the time-out expires.
Selection
• TIE table number: 1 to 4, ( =all TIE tables)
• Time: 1 through 127 (✕ 64 milliseconds is the actual time)
Default
All TIE tables – 16
Programming
1.
Enter 436.
Display: TIE Wink Timeout
2.
Press NEXT.
Display: Table NO?→
3.
Enter a TIE table number.
To enter TIE table number 1, you can also press NEXT.
Display example: 1:16
4.
Enter the time.
To change the current entry, press CLEAR and enter the new number.
Conditions
48
5.
Press STORE.
6.
To program another TIE table, press NEXT or PREV, or
SELECT and the desired TIE table number.
7.
Repeat steps 4 through 6.
8.
Press END.
• You cannot leave the entry empty.
• To assign all TIE tables to one selection, press the
key in step 3. In
this case, the display shows the contents programmed for TIE table
number 1.
System Programming
437
CO-to-TIE Transfer
Description
Enables or disables transferring an incoming outside call to the TIE
line on a CO line group basis. This restriction applies to the
following: 1) A TIE call using DISA 2) Call Forwarding to a TIE
line 3) Call Transfer to a TIE line.
Selection
• CO line group (TRG) number: 1 through 8,
( =all CO line groups)
• Enable / Disable
Default
All CO line groups – Disable
Programming
1.
Enter 437.
Display : CO-TIE Transfer
2.
Press NEXT.
Display: TRK GRP NO?→
3.
Enter a CO line group number.
To enter CO line group number 1, you can also press NEXT.
Display example: TRG1:Disable
Conditions
4.
Keep pressing SELECT until the desired selection is
displayed.
5.
Press STORE.
6.
To program another CO line group, press NEXT or PREV, or
SELECT and the desired CO line group number.
7.
Repeat steps 4 through 6.
8.
Press END.
To assign all CO line groups to the same selection, press the
key in
step 3. In this case, the display shows the contents programmed for CO
line group number 1.
49
System Programming
438
TIE-to-CO Transfer
Description
Enables or disables transferring TIE calls to a CO line on a CO line
group basis. This restriction applies to the following: 1) An outside
call through another PBX 2) Call Forwarding to a CO line 3) Call
Transfer to a CO line.
Selection
• CO line group (TRG) number: 1 through 8,
( =all CO line groups)
• Enable / Disable
Default
All CO line groups – Disable
Programming
1.
Enter 438.
Display : TIE-CO Transfer
2.
Press NEXT.
Display: TRK GRP NO?→
3.
Enter a CO line group number.
To enter CO line group number 1, you can also press NEXT.
Display example: TRG1:Disable
Conditions
50
4.
Keep pressing SELECT until the desired selection is
displayed.
5.
Press STORE.
6.
To program another CO line group, press NEXT or PREV, or
SELECT and the desired CO line group number.
7.
Repeat steps 4 through 6.
8.
Press END.
To assign all CO line groups to the same selection, press the
key in
step 3. In this case, the display shows the contents programmed for CO
line group number 1.
System Programming
439
TIE-to-TIE Transfer
Description
Enables or disables transferring TIE calls to a TIE line on a CO line
group basis. This restriction applies to the following: 1) A TIE call
through another PBX 2) Call Forwarding to a TIE line 3) Call
Transfer to a TIE line.
Selection
• CO line group (TRG) number: 1 through 8,
( =all CO line groups)
• Enable / Disable
Default
All CO line groups – Enable
Programming
1.
Enter 439.
Display : TIE-TIE Transfer
2.
Press NEXT.
Display: TRK GRP NO?→
3.
Enter a CO line group number.
To enter CO line group number 1, you can also press NEXT.
Display example: TRG1:Enable
Conditions
4.
Keep pressing SELECT until the desired selection is
displayed.
5.
Press STORE.
6.
To program another CO line group, press NEXT or PREV, or
SELECT and the desired CO line group number.
7.
Repeat steps 4 through 6.
8.
Press END.
To assign all CO line groups to the same selection, press the
key in
step 3. In this case, the display shows the contents programmed for CO
line group number 1.
51
System Programming
440
TIE Security Type
Description
Assigns the security mode for TIE calls. There are two modes, Non
Security and Trunk Security (CO line security). Non Security
mode allows the caller to access a CO line without dialing a TIE
user code. Trunk Security mode requires the caller to enter a TIE
User Code assigned in program [811] “DISA / TIE User Codes”
before making a TIE call.
Selection
• CO line group (TRG) number: 1 through 8,
( =all CO line groups)
• Non (non security) / Trunk (trunk security)
Default
Non
Programming
1.
Enter 440
Display: TIE Security
2.
Press NEXT.
Display: TRK GRP NO?→
3.
Enter a CO line group number.
To enter CO line group number 1, you can also press NEXT.
Display example: TRG1:Non
Conditions
52
4.
Keep pressing SELECT until the desired selection is
displayed.
5.
Press STORE.
6.
Press END.
To assign all CO line groups to the same selection, press the
key in
step 3. In this case, the display shows the contents programmed for CO
line group number 1.
System Programming
441
Line Hunting Sequence
Description
Assigns the hunting sequence of idle lines, seizing from the
smallest to the largest line number or vice versa in a CO line group,
on a CO line group basis.
Selection
• CO line group (TRG) number: 1 through 8,
( =all CO line groups)
• Small → Large / Large → Small
Default
All CO line groups – Small → Large
Programming
1.
Enter 441.
Display : Line Hunting
2.
Press NEXT.
Display: TRK GRP NO?→
3.
Enter a CO line group number.
To enter CO line group number 1, you can also press NEXT.
Display example: TRG1:Large>Small
Conditions
4.
Keep pressing SELECT until the desired selection is
displayed.
5.
Press STORE.
6.
To program another CO line group, press NEXT or PREV, or
SELECT and the desired CO line group number.
7.
Repeat steps 4 through 6.
8.
Press END.
• The default setting (Small → Large) often may cause a busy situation
between two PBXs, as the same line may be seized by both sides
simultaneously. In this case, we recommend changing the setting of
either PBX to Large → Small.
• To assign all CO line groups to the same selection, press the
key in
step 3. In this case, the display shows the contents programmed for CO
line group number 1.
53
System Programming
442
Voice Path Type
Description
Assigns the voice path type on a CO line basis.
Selection
• CO line number:
KX-TD816 – 05 through 08, ( =all CO lines)
KX-TD1232 – 09 through 12 (Master), 21 through 24 (Slave),
( =all CO lines)
• 2 wire / 4 wire
Default
All CO lines – 2 wire
Programming
1.
Enter 442.
Display: Voice Path Type
2.
Press NEXT.
Display: CO Line NO?→
3.
Enter a CO line number.
To enter CO line number 09, you can also press NEXT.
Display example: CO09:2 Wire
Condition
54
4.
Keep pressing SELECT until the desired selection is
displayed.
5.
Press STORE.
6.
Press END.
To assign all CO lines to one selection, press the
key in step 3.
System Programming
443
Voice Level (Transmit)
Description
Assigns the transmitted voice level on a CO line port basis. This
program is valid only when the voice path type is set to “4 wire”.
Selection
• CO line number:
KX-TD816 – 05 through 08, ( =all CO lines)
KX-TD1232 – 09 through 12 (Master), 21 through 24 (Slave),
( =all CO lines)
• –6 db / –3 db / 0 db / +3 db
Default
All CO lines – –3db
Programming
1.
Enter 443.
Display: Voice Level (TX)
2.
Press NEXT.
Display: CO Line NO?→
3.
Enter a CO line number.
To enter CO line number 09, you can also press NEXT.
Display example: CO09:–3db
Conditions
4.
Keep pressing SELECT until the desired selection is
displayed.
5.
Press STORE.
6.
Press END.
To assign all CO lines to one selection, press the
key in step 3.
55
System Programming
444
Voice Level (Receive)
Description
Assigns the received voice level on a CO line basis. This program
is valid only when the voice path type is set to “4 wire”.
Selection
• CO line number:
KX-TD816 – 05 through 08, ( =all CO lines)
KX-TD1232 – 09 through 12 (Master), 21 through 24 (Slave),
( =all CO lines)
• –6 db / –3 db / 0 db / +3 db
Default
All CO lines – –3db
Programming
1.
Enter 444.
Display: Voice Level (RX)
2.
Press NEXT.
Display: CO Line NO?→
3.
Enter a CO line number.
To enter CO line number 09, you can also press NEXT.
Display example: CO09:–3db
Conditions
56
4.
Keep pressing SELECT until the desired selection is
displayed.
5.
Press STORE.
6.
Press END.
To assign all CO lines to one selection, press the
key in step 3.
System Programming
445
TIE Receive Dial
Description
Assigns whether the system receives TIE dial numbers on a CO
line basis. If “No” is selected, the dialed number is treated as a
local number and sent to DIL 1 : 1 or DIL 1 : N.
Selection
• CO line number:
KX-TD816 – 05 through 08, ( =all CO lines)
KX-TD1232 – 09 through 12 (Master), 21 through 24 (Slave),
( =all CO lines)
• Yes / No
Default
All CO line ports – Yes
Programming
1.
Enter 445.
Display: TIE Receive Dial
2.
Press NEXT.
Display: CO Line NO?→
3.
Enter a CO line number.
To enter CO line number 09, you can also press NEXT.
Display example: CO09:Yes
Conditions
4.
Keep pressing SELECT until the desired selection is
displayed.
5.
Press STORE.
6.
Press END.
To assign all CO lines to one selection, press the
key in step 3.
57
4.8
616
Extension Programming
Live Call Screening Recording Mode Assignment †
Description
Assigns whether to close the mailbox or to continue recording the
conversation after a call is intercepted.
Selection
• Jack number: KX-TD816 – 01 through 16,
KX-TD1232 – 01 through 64,
( =all jacks)
• Stop Record / Keep Record
Default
All jacks = Stop Record (Stop recording)
Programming
1.
Enter 616.
Display:
2.
Press NEXT.
Display:
3.
LCS Rec.Mode
Jack NO?→
Enter a jack number.
To enter jack number 01, you can also press NEXT.
Display example: #01:Stop Record
4.
Keep pressing SELECT until the desired selection is
displayed.
5.
Press STORE.
6.
To program another jack number, press NEXT or PREV, or
SELECT and desired jack number.
7.
Repeat steps 4 through 6.
8.
Press END.
Conditions
• For the KX-TD1232, jack numbers 01 through 32 are for the Master
System and 33 through 64 are for the Slave, if available.
• For an explanation of jack numbering, see “Rotation of jack number”
on page 4-7 in the main installation manual.
• To assign all jacks to the same selection, press the
key at step 3. In
this case, the display shows the contents programmed for jack 01.
Feature References
Section 3, Features — in this manual
Live Call Screening (LCS)
Voice Mail Integration for Digital Proprietary Telephones
58
†: Available when the Digital Super Hybrid System is connected to a Digital
Proprietary Telephone capable Panasonic Voice Processing System (one
that supports digital proprietary telephone integration; e.g. KX-TVP200).
Changes
FEATURE TITLE
Station Message
Detail Recording
(SMDR)
[005] Flexible CO
Button Assignment
[100]
Flexible Numbering
[106]
Station Hunting Type
[109]
Expansion Unit Type
[611]
ISDN DDI Number /
Floating Number
Transformation
[811]
DISA User Codes
[813]
Floating Number
Assignment
[990]
System Additional
Information
60
SECTION OF THE
MANUAL
(Installation Manual)
Section 3
(Installation Manual)
REVISION
This feature has been changed to the new one. See
pages 61 through 64.
The Selection section is changed as shown on page 65.
Section 4
(Installation Manual)
Section 4
(Installation Manual)
Section 4
(Installation Manual)
Section 4
The new features have been added. See page 66 for
details.
This program has been changed to the new one. See
pages 67 and 68.
This program has been changed to the new one. See
pages 69 and 70.
The Selection section has been changed as follows.
• Floating Station: Operator / Pager 1 / Pager 2 /
Pager 3 / Pager 4 / DISA 1 /
DISA 2 / MODEM / ISDN 01 /
ISDN 02 / ISDN 03 / ISDN 04/
ISDN 05 / ISDN 06 / ISDN 07/
ISDN 08 / ISDN 09/ ISDN 10
ISDN 11/ ISDN 12 / UCD Grp 1 /
UCD Grp 2 / UCD Grp 3 / UCD
Grp 4 / UCD Grp 5 / UCD Grp 6 /
UCD Grp 7 / UCD Grp 8
• DDI Number: 1 through 6 digits
(Installation Manual) This program has been changed to the new one. See
Section 4
page 71.
(Installation Manual)
Section 4
(Installation Manual)
Section 4
(Installation Manual)
Section 4
This program has been changed to the new one. See
pages 72 and 73.
The default of Field (24) has been changed from “0” to
“1: allow”.
Fields (39) (40) and (41) are added to Area 6.
See pages 74 and 75 for details.
3
S
Features
Station Message Detail Recording (SMDR)
Description
Station Message Detail Recording (SMDR) automatically records
detailed call information for outside calls. A printer connected to
the EIA (RS-232C) port can be used to print incoming and
outgoing outside calls as well as print a hard copy of the System
Programming. To print the call records, use the program [800]
“SMDR Incoming / Outgoing Call Log Printout,” which allows you
to print out the following records:
• Records of all outgoing outside calls or outgoing toll calls.
• Record of incoming outside calls.
There are three types of the call record, which are the regular call
record, the charge call record and the meter call record.
An example of a printed regular call record: When selected for the regular display by
Program [815] “SMDR Output Mode.”
Date
Time
Ext CO
Dial Number
Duration
Acc code
06/24/93
06/24/93
06/24/93
06/24/93
06/24/93
06/24/93
06/24/93
06/24/93
06/24/93
10:03AM
10:07AM
10:08AM
10:08AM
10:09AM
10:10AM
10:11AM
10:11AM
10:20AM
101
103
104
105
280
103
280
280
120
123456789012345678901234567890
<INCOMING>0123456789
<INCOMING>
<INCOMING>
10222P1-202-346-7890
<INCOMING>1234567890
<INCOMING>
0924312111
<INCOMING>
00:05'12
00:00'56
00:00'20
00:10'01
00:09'18
00:01'24
00:00'24
00:03'02
00:21'46
1234567890
•
•
•
(1)
•
•
•
(2)
•
•
•
(5)
•
•
•
(6)
•
•
•
(3)
01
20
10
10
14
20
12
22
13
•
•
•
(4)
431211
431211
001
CD
TR
FW
D1
RM
•
•
•
(7)
•
•
•
(8)
61
S
3
Features
An example of a printed charge call record: When selected for charge by Program
[815] “SMDR Output mode” and selected for charge display by program [120] “Charge
Display Selection.”
Date
Time
Ext CO
Dial Number
Duration
06/24/93
06/24/93
06/24/93
06/24/93
06/24/93
06/24/93
06/24/93
06/24/93
06/24/93
10:03AM
10:07AM
10:08AM
10:08AM
10:09AM
10:10AM
10:11AM
10:11AM
10:20AM
101
103
104
105
280
103
280
280
120
01
20
10
10
14
20
12
22
13
12345678901234567890
<I>0123456789
<I>
<I>
10222P1-202-346-7890
<I>1234567890
<I>
0924312111
<I>
00:05'12
00:00'56
00:00'20
00:10'01
00:09'18
00:01'24
00:00'24
00:03'02
00:21'46
•
•
•
(1)
•
•
•
(2)
•
•
•
(3)
•
•
•
(4)
•
•
•
(5)
•
•
•
(6)
Cost
Acc code
382.81KC
0.00KC
0.00KC
0.00KC
560.00KC
0.00KC
0.00KC
128.00KC
0.00KC
•
•
•
(9)
CD
1234567890
431211
431211
001
TR
FW
D1
RM
•
•
•
(8)
•
•
•
(7)
An example of a printed meter call record: When selected for charge by Program [815]
“SMDR Output Mode” and selected for meter display by Program [120] “Charge Display
Selection.”
62
Date
Time
Ext CO
Dial Number
Duration
06/24/93
06/24/93
06/24/93
06/24/93
06/24/93
06/24/93
06/24/93
06/24/93
06/24/93
10:03AM
10:07AM
10:08AM
10:08AM
10:09AM
10:10AM
10:11AM
10:11AM
10:20AM
101
103
104
105
280
103
280
280
120
01
20
10
10
14
20
12
22
13
12345678901234567890
<I>0123456789
<I>
<I>
10222P1-202-346-7890
<I>1234567890
<I>
0924312111
<I>
00:05'12
00:00'56
00:00'20
00:10'01
00:09'18
00:01'24
00:00'24
00:03'02
00:21'46
•
•
•
(1)
•
•
•
(2)
•
•
•
(3)
•
•
•
(4)
•
•
•
(5)
•
•
•
(6)
Cost
15
0
0
0
520
0
0
0
1040
•
•
•
(10)
Acc code
CD
1234567890
431211
431211
001
TR
FW
D1
RM
•
•
•
(7)
•
•
•
(8)
3
Features
S
Example of SMDR printout format:
Explanation
(1) Date : shows the date of the call as Month / Day / Year.
(2) Time : shows the start time of a call as Hour:Minute /
AM or PM.
(3) Ext : shows the extension number, floating number, etc.
that engaged in a call.
(4) CO : shows the CO line number used for the call.
(5) Dial Number
Outgoing call: shows the other party’s telephone
number (Regular call record : Max. 30
digits, Charge or Meter call record :
Max. 20 digits). Valid digits are 0
through 9, #, P (if PAUSE button is
pressed), or the mark “=” (if a host PBX
access code is entered).
Received call: shows <INCOMING> and <I>. If the
call is carried by an ISDN network, also
shows the telephone number of the
calling party.
(6) Duration : shows the duration of the call as Hours /
Minutes / Seconds.
(7) Acc Code (Account Code): shows the account code
appended to the call.
(8) CD (Condition Code): shows call handling type with the
following codes:
TR: Transfer
FW: Call Forwarding to CO Line
D0*: Non Security CO Line Access using DISA
D1* through D4: DISA User Codes 1 through 4
RM*: Remote access to a modem
To print out the record of System Programming items that
have been assigned, use the program [802] “System Data
Printout.”
(9) Cost : shows the charge.
(10) Cost : shows the meter.
Conditions
• Connect a printer provided with an EIA (RS-232C) interface to the EIA
(RS-232C) connector located on the main unit.
• When programmed for outgoing toll calls only, printing occurs only for
calls which start with the numbers stored in any Denied Code Table
from levels 2 to 6. If ARS is employed, not the user-dialed but
modified number is checked against these tables.
*: Available for KX-TD1232 only.
63
S
3
Features
• This system can store information on up to 100 calls. If more calls are
originated or received, previous records are deleted starting from the
oldest one.
• This data is not deleted when you reset the system.
• If the system clock is not set by System Programming or if the calendar
IC is out of order, the date and time is not printed out.
• If FLASH Signal is manually sent out during a conversation, the call
record is printed and a new record is started.
Connection References
Section 2, Installation
2.3.10 Printer Connection
Programming References
Section 4, System Programming,
[000] Date and Time Set
[120] Charge Display Selection – in this manual
[212] Call Duration Count Start Time
[800] SMDR Incoming / Outgoing Call Log Printout
[801] SMDR Format
[802] System Data Printout
[806]–[807] EIA (RS-232C) Parameters
[815] SMDR Out put Mode – in this manual
[990] System Additional Information, Field (38)
Feature References
None
Operation References
Not applicable.
64
4.2
Manager Programming
005
Flexible CO Button Assignment
Description
As the new features are added, the assignable flexible buttons are
changed as shown below.
Selection
• Jack number: KX-TD816 – 01 through 16
KX-TD1232 – 01 through 64
• Button Code (plus parameter, if required):
Button Code
0 (Single-CO)
1 (DSS)
2 (One-Touch)
3 (Message Waiting)
4 (FWD/DND)
5 (Save)
6 (Account)
7 (Conference)
80 (Log-In/Log-Out)
82 (Voice Mail Transfer)
83 (Two-Way Record)†
84(Two-Way Transfer)†
85 (Live Call Screening)†
86 (Live Call Screening Cancel)†
87 (Alert)
88 (Phantom)
(Loop-CO)
# (Group-CO)
CO (ringer frequency)
Parameter
KX-TD816: 01 through 08 (CO line number)
KX-TD1232: 01 through 24 (CO line number)
2 through 4 digits (Extension number)
16 digits max. (Telephone number)
None
None
None
None
None
None
2 through 4 digits (Extension number)
2 through 4 digits (Extension number)
2 through 4 digits (Extension number)
None
None
None
2 through 4 digits (Phantom extension number)
1 through 8 (CO line group number)
1 through 8 (ring tone type number)
For more information about this programming, refer to the program [005] “Flexible CO Button
Assignment” in the main Installation Manual.
†: Available when the Digital Super Hybrid System is connected to a Digital
Proprietary Telephone capable Panasonic Voice Processing System (one
that supports digital proprietary telephone integration; e.g. KX-TVP200).
65
100
4.2
Manager Programming
Flexible Numbering
The following new features have been added.
Selection
Default
• Selection number: 67 through 85
• Feature number: 1 to 3 digits (for selection number 67),
consisting of 0 through 9
1 or 2 digits (for selection numbers 68 through
83), consisting of 0 through 9
1 to 3 digits (for selection number 84 and 85),
consisting of 0 through 9, #,
Number
67
68
69
70
71
72
73
74
75
76
77
78
79
80
81
82
83
84
85
Feature
TIE line access code
Other PBX Extension 01
Other PBX Extension 02
Other PBX Extension 03
Other PBX Extension 04
Other PBX Extension 05
Other PBX Extension 06
Other PBX Extension 07
Other PBX Extension 08
Other PBX Extension 09
Other PBX Extension 10
Other PBX Extension 11
Other PBX Extension 12
Other PBX Extension 13
Other PBX Extension 14
Other PBX Extension 15
Other PBX Extension 16
LCS password set / cancel†
log-in / log-out
Default
None
None
None
None
None
None
None
None
None
None
None
None
None
None
None
None
None
799
45
For the programming sequence and more information, refer to the program [100] “Flexible
Numbering” in the main Installation Manual.
66
†: Available when the Digital Super Hybrid System is connected to a Digital
Proprietary Telephone capable Panasonic Voice Processing System (one
that supports digital proprietary telephone integration; e.g. KX-TVP200).
4.3
System Programming
106
Station Hunting Type
Description
Used to enable or disable hunting and set the Station Hunting type
for each extension group. There are six Station Hunting types
available: Circular, Termination, Voice Mail (VM), Automated
Attendant (AA), and Uniform Call Distribution (UCD). If circular
hunting is assigned for a group, all the extensions in the group are
hunted until an idle one is found. If termination hunting is
assigned, hunting stops at the extension which has the largest jack
number in the group. If VM hunting is assigned, all the VM ports
of an extension group are hunted until an idle one is found which
permits Voice Mail Service. If AA hunting is assigned, all the AA
ports of an extension group are hunted until an idle one is found
which permits AA Service. If UCD is assigned, group members
are hunted in a circular way.
Selection
• Extension group number: 1 through 8, ( =all extension
groups)
• Disable (no hunting) / Terminate (termination) / Circular / VM
(voice mail) / AA (automated attendant) / UCD
Default
All extension groups – Disable
Programming
1.
Enter 106.
Display: Call Hunting
2.
Press NEXT.
Display: EXT GRP NO?→
3.
Enter an extension group number.
To enter extension group number 1, you can also press NEXT.
Display example: Group1: Disable
4.
Keep pressing SELECT until the desired selection is
displayed.
5.
Press STORE.
6.
To program another extension group, press NEXT or PREV,
or SELECT and the desired extension group number.
7.
Repeat steps 4 through 6.
8.
Press END.
67
106
4.3
System Programming
Station Hunting Type
Conditions
• Program [602] “Extension Group Assignment” is used to assign the
extension group members.
• The system supports a maximum of eight jacks (16 jacks during System
Connection for KX-TD1232) for connection to a Voice Processing
System as VM or AA ports.
• To assign all extension groups to the same selection, press the
key at
step 3. In this case, the display shows the contents programmed for
extension group 1.
Feature References
Section 3, Features
Station Hunting
Uniform Call Distribution (UCD) — in this manual
Voice Mail Integration
68
4.3
System Programming
109
Expansion Unit Type
Description
Assigns the type of expansion units to be used in the system.
This allows the system to identify the unit in each expansion unit
location.
Selection
KX-TD816
• Areas 1; 2 = C (4 CO) / S1 (2 S0) / S2 (6 S0) / EM(4 E&M) /
E (EXT)/ A (16 SLT)
KX-TD1232
• Master / Slave
• Areas 1; 2; 3 = C (4 CO) / S1 (2 S0) / S2 (6 S0) / EM(4 E&M) /
E1 (EXT1)/ E2 (EXT2)/ A1 (16 SLT1) /
A2 (16 SLT2)
Default
KX-TD816: C;E
KX-TD1232: Master and Slave – C;E1;E2
Programming
KX-TD816
1.
Enter 109.
Display: Expansion Card
2.
Press NEXT.
Display example: Master:C ;E
3.
Keep pressing SELECT until the desired selection of Area 1
is displayed.
4.
Press
5.
Keep pressing SELECT until the desired selection of Area 2
is displayed.
6.
Press STORE.
7.
Press END.
to program Area 2, if required.
KX-TD1232
1.
Enter 109.
Display: Expansion Card
2.
Press NEXT to program the Master System.
To program the “Slave”, press NEXT again.
Display example: Master:C ;E1;E2
69
4.3
109
System Programming
Expansion Unit Type
3.
Keep pressing SELECT until the desired selection of Area 1
is displayed.
4.
Press
5.
Keep pressing SELECT until the desired selection of the
Area is displayed.
6.
Repeat steps 4 and 5 until all of the required entries are
completed, if required.
7.
Press STORE.
to program another Area, if required.
If only one system is in operation, go to step 10.
8.
Press NEXT to program the Slave System.
Display example: Slave :C ;E1;E2
Conditions
70
9.
Repeat steps 3 through 7, if required.
10.
Press END.
• Each parameter corresponds to an expansion unit as follows:
C=KX-TD180, S1=KX-TD280, S2=KX-TD286, E, E1 and
E2=KX-TD170, A, A1 and A2=KX-TD174, EM=KX-TD184
• There are two expansion areas in the KX-TD816, areas 1 and 2 from
bottom to top. Either one 8-Station Line Unit or 16-SLT Line Unit and
either one 4-CO Line Unit, 4-E&M Line Unit, 2-ISDN S0 Line Unit or
6-ISDN S0 Line Unit can be installed.
• There are three expansion areas in each system for the KX-TD1232,
areas 1, 2 and 3 from bottom to top. Either up to two 8-Station Line
Units or 16-SLT Line Units and either one 4-CO Line Unit, 4-E&M
Line Unit, 2-ISDN S0 Line Unit or 6-ISDN S0 Line Unit can be
installed in each system.
• An out-of-service system is unassignable. In this case, skip steps 8 and
9 for the KX-TD1232.
• For the KX-TD1232, if only the Slave System is in operation, the
display shows “Slave” in step 2.
• After changing the setting, turn the Power Switch off and on once.
Otherwise, the previous setting will remain.
4.9
Resource Programming
811
DISA / TIE User Codes
Description
Assigns the DISA and TIE User Codes and a Class of Service
(COS) to each code. The code COS determines the toll restriction
level of the DISA and TIE caller.
Selection
• DISA / TIE user code number: 01 through 32
• DISA / TIE user code: 4 to 10 digits
• COS number: 1 through 8
Default
Code 01=0001 – COS 1
Code 02=0002 – COS 1
Code 03=0003 – COS 1
:
Code 32=0032 – COS 1
Programming
1.
Enter 811.
Display: User Code
2.
Press NEXT.
Display: User Code NO?→
3.
Enter a DISA / TIE user code number.
To enter user code number 01, you can also press NEXT.
Display example: 01:0001
C:1
4.
Enter a DISA / TIE user code.
To change the current entry, enter the new code.
5.
Press
to program the COS.
6.
Enter a COS number.
To change the current entry, enter the new COS number.
Conditions
7.
Press STORE.
8.
To program another user code, press NEXT or PREV, or
SELECT and the desired DISA / TIE user code number.
9.
Repeat steps 4 through 8.
10.
Press END.
• This setting is required if the Trunk (CO line) Security mode is selected
in programs [440] “TIE Security Type” and [809] “DISA Security
Type”.
• Each user code should be unique and composed of eight numerical
digits, 0 through 9.
• You cannot leave an entry empty.
71
813
4.9
Resource Programming
Floating Number Assignment
Description
Assigns the floating numbers for External Pagers, DISA*
messages, modem* and UCD groups. These numbers can be used
the same way extension numbers are used for station access.
Selection
• Floating station: KX-TD816 – Pager1 / DTA /
UCD-Grp (group) 1 through 8
KX-TD1232 – Pager1 through 4 / DISA1 /
DISA2 / MODEM / DTA /
UCD-Grp (group) 1 through 8
• Floating number: 2 through 4 digits
Default
KX-TD816 – Pager 1=196; DTA=199; UCD-Grp 1=191;
UCD-Grp 2=192; UCD-Grp 3=193;
UCD-Grp 4=194; UCD-Grp 5=291;
UCD-Grp 6=292; UCD-Grp 7=293;
UCD-Grp 8=294;
KX-TD1232 – Pager 1=196; Pager 2=197; Pager 3=296;
Pager 4=297; DISA 1=198; DISA 2=298;
MODEM=299; DTA=199; UCD-Grp 1=191;
UCD-Grp 2=192; UCD-Grp 3=193;
UCD-Grp 4=194; UCD-Grp 5=291;
UCD-Grp 6=292; UCD-Grp 7=293;
UCD-Grp 8=294;
Programming
1.
Enter 813.
Display: FLT EXT NO.
2.
Press NEXT to program Pager 1.
Display example: Pager1:EXT196
To program another floating station for KX-TD1232, keep pressing
NEXT or PREV until the desired floating station is displayed.
3.
Enter a floating number.
To change the current entry, press CLEAR and enter the new floating
number.
72
4.
Press STORE.
5.
To program another floating station, keep pressing NEXT or
PREV until the desired floating station is displayed.
6.
Repeat steps 3 through 5.
*: Available for the KX-TD1232 only.
4.8
Resource Programming
813
Floating Number Assignment
7.
Conditions
Press END.
• A floating number is composed of two to four numerical digits, 0
through 9.
• The first one or two digits of the floating numbers are subject to
program [100] “Flexible Numbering, (01) through (16) 1st through 16th
hundred extension blocks.”
• Floating numbers and extension numbers should be unique. Double
entry and incompatible entry for these numbers are invalid. Valid entry
example: 10 and 11, 10 and 110; Invalid entry example: 10 and 106,
210 and 21.
In order not to make an invalid entry, check the other extension
numbers in programs [003] “Extension Number Set,” [012] “ISDN
Extension Number Set, [118] “VM Extension Number Assignment”
and [130] “Phantom Extension Number Assignment.” The default of
each extension number is as follows:
[003] Extension Number Set
KX-TD816 – 101 through 116, 201 through 216
KX-TD1232 – 101 through 164, 201 through 264
[012] ISDN Extension Number Set
Not stored
[118] VM Extension Number Assignment
165 through 180
[130] Phantom Extension Number Assignment
Not stored
• You cannot leave an entry empty.
Feature References
Section 3, Features
Floating Station
73
4.10
990
Option Programming
System Additional Information
Description
Field (39), (40) and (41) are added to Area 6.
Area 6
Display
example
1111111111111111
Field number
↓
↓ ↓ ↓
unused
(41)(40)(39)
↓
↓ ↓
unused (38) (35)
Explanation for Area 6
Field
Description
(39)
Selects the result when a CO call is routed
by Call Forwarding to a voice mail port
which is in AA service mode. (For both
Inband and DPT Integration)
disable: AA service mode
enable: The mode will change to the VM
service mode and a Follow-On ID
is sent.
When the voice mail port is in VM service
mode, this program is not affected.
Selects the result when a CO call is routed
to a voice mail port by IRNA. (For both
Inband and DPT Integration) When the
voice mail port is in VM service mode;
enable: VM service mode
disable: The mode will change to the AA
service mode (Only when Inband)
When the voice mail port is in AA service
mode;
enable: The mode will change to the VM
service mode and a Follow-On ID
is sent.
disable: AA service mode
Enables or disables sending CO line access
code “9” to a TIE line. When you dial CO
line access code “9” and the CO line is
busy, the system can automatically send CO
line access code “9” to a TIE line so that
you can access the CO line through another
PBX.
(40)
(41)
74
Selection
Default Reference
0 : Disable
1 : Enable
1
Voice Mail
Integration
0 : Enable
1 : Disable
1
Voice Mail
Integration
0 : Enable
1 : Disable
1
None
4.10
Optional Programming
990
System Additional Information
The Selection section is changed as follows.
Selection
• Area code: 01 (area 1) / 02 (area 2) / 03 (area 3) / 04 (area 4)
/ 05 (area 5) / 06 (area 6)1
• Field number : 1 through 22, 26 and 36 (for areas 1 and 2)
23 through 25 and 27 (for areas 3 and 4),
28 through 34, and 37 (for area 5),
35 and 38 through 41 (for area 6)
• Selection: See “Selection” shown in the lists for each area.
Default
See “Default” shown in the lists.
75
Programming Tables for
Added and Changed Features
100, 126 – 127
78
[100] Flexible Numbering
Item
Feature
Default
[126] UCD Overflow
Parameter
TIE line access code
None
67
Other PBX Extension 01
None
68
Other PBX Extension 02
None
69
Other PBX Extension 03
None
70
Other PBX Extension 04
None
71
Other PBX Extension 05
None
72
Other PBX Extension 06
None
73
None
Other PBX Extension 07
74
None
Other
PBX
Extension
08
75
None
Other PBX Extension 09
76
None
Other PBX Extension 10
77
None
Other
PBX
Extension
11
78
None
Other PBX Extension 12
79
None
Other PBX Extension 13
80
None
Other
PBX
Extension
14
81
None
Other PBX Extension 15
82
None
Other PBX Extension 16
83
799
LCS
password
set
/
cancel
84
45
UCD log-in / log-out
85
(Selection) No.67: 1 – 3 digits (Valid Entries) 0 – 9
No.68 – 83: 1 or 2 digits, (Valid Entries) 0 – 9
No.84 – 85: 1 – 3 digits (Valid Entries) 0 – 9, , #
Parameter
Item :
Overflow Extension Time Table
UCD Group No.
No. (2 – 4 digits)
No. (1 – 4)
Not Stored
Default : all
1
2
3
4
5
6
7
8
[127] UCD Time Table
Sequence
Table 1
→
→
→
→
Table 2
→
→
→
→
Table 3
→
→
→
→
Table 4
→
→
→
→
Selection : S1* / S2* / S3* / S4* / TR / RT / 1T /
2T / 3T / 4T / Blank
127
<Note> *: Available for KX-TD1232 only.
106, 109, 128 – 129, 220
[106] Station Hunting Type
Selection
Disable
Terminate
Circular
Voice Mail
Automated Attendant
UCD
[128] PBX Code
Default Item : Extension Group
all
1 2 3 4 5 6 7 8
✔
Default
[129] E&M Signal Assignment
Parameter :
1 – 3 digits, 0 – 9
Default Selection
Pulsed Ans
Pulsed No Ans
[220] TIE First / Inter
Digit Time
[109] Extension Card / Unit Type
TD816
Area No.
Selection
Default
Parameter
2
1
Area No.
Selection
Default
Parameter
Default
C S1 S2 EM E A C S1 S2 EM E A
✔
✔
TD1232
Area No.
Selection
Default
Parameter
✔
Continuous
Not stored
1
Master System
2
Parameter
Selection
3
C S1 S2 EM E1 E2 A1 A2 C S1 S2 EM E1 E2 A1 A2 C S1 S2 EM E1 E2 A1 A2
✔
✔
✔
1
Slave System
2
10 s
3
C S1 S2 EM E1 E2 A1 A2 C S1 S2 EM E1 E2 A1 A2 C S1 S2 EM E1 E2 A1 A2
✔
✔
✔
<Note>
TD816 – C:4CO, S1:2S0, S2:6S0, EM:4E&M, E:8EXT, A:16SLT
TD1232 – C:4CO, S1:2S0, S2:6S0, EM:4E&M, E1:8EXT-1, E2:8EXT-2, A1:16SLT-1, A2:16SLT-2
3 – 30
79
117 – 119
80
[117] Voice Mail Number Assignment
Parameter : Jack No. 02 – 16 (TD816) /
Jack No. 02 – 64 (TD1232)
Item
Default
Master
Not Stored
Slave
(TD1232 only)
Not Stored
[119] Voice Mail Extension Group
Assignment
[118] Voice Mail Extension
Number Assignment
Item :
VM No.
(01 – 16)
Jack No. :
-1
-2
Default
01
-1
165
02
-2
166
03
-1
167
04
-2
168
05
-1
169
06
-2
170
07
-1
177
08
-2
178
09
-1
171
10
-2
172
11
-1
173
12
-2
174
13
-1
175
14
-2
176
15
-1
179
16
-2
180
All VM No.
Parameter : Ext. Group No. (1 – 8)
Parameter :
Ext. No. (2 – 4 digits)
Default : all – 1
Change
Change
1
2
3
4
5
6
7
8
118 and 119
<Note> VM No.: TD816 (01 – 08),
TD1232 (01 – 16)
130
[130] Phantom Extension Number Assignment
Parameter : 2 – 4 digits, consisting of 0 – 9.
Default : all
81
Item: Location
001
002
003
004
005
006
007
008
009
010
011
012
013
014
015
016
017
018
019
020
021
022
023
024
025
026
027
028
029
030
031
032
Not Stored
Parameter
Item: Location
033
034
035
036
037
038
039
040
041
042
043
044
045
046
047
048
049
050
051
052
053
054
055
056
057
058
059
060
061
062
063
064
Parameter
Item: Location
065
066
067
068
069
070
071
072
073
074
075
076
077
078
079
080
081
082
083
084
085
086
087
088
089
090
091
092
093
094
095
096
Parameter
Item: Location Parameter
097
098
099
100
101
102
103
104
105
106
107
108
109
110
111
112
113
114
115
116
117
118
119
120
121
122
123
124
125
126
127
128
131
82
[131] ISDN DDI Number / Phantom Extension Number Transformation
Parameter : 1 – 6 digits, consisting of 0 – 9.
Default : all
Item: Location
001
002
003
004
005
006
007
008
009
010
011
012
013
014
015
016
017
018
019
020
021
022
023
024
025
026
027
028
029
030
031
032
Not Stored
Parameter
Item: Location
033
034
035
036
037
038
039
040
041
042
043
044
045
046
047
048
049
050
051
052
053
054
055
056
057
058
059
060
061
062
063
064
Parameter
Item: Location
065
066
067
068
069
070
071
072
073
074
075
076
077
078
079
080
081
082
083
084
085
086
087
088
089
090
091
092
093
094
095
096
Parameter
Item: Location Parameter
097
098
099
100
101
102
103
104
105
106
107
108
109
110
111
112
113
114
115
116
117
118
119
120
121
122
123
124
125
126
127
128
340
[340] TIE Line Routing Table
Item :
Location No.
Default: all
all locations
1
2
3
4
5
6
7
8
9
10
11
12
13
14
15
16
Parameter : TIE line access Parameter : CO line group hunt
Parameter : TIE line access Parameter : CO line group hunt
Item
:
code (3 digits max.),
sequence no. (1 – 8),
code (3 digits max.),
sequence no. (1 – 8),
Location No. consisting of 0 – 9, .
consisting of 0 – 9, .
5 entries max.
5 entries max.
Not Stored
Not Stored
Default: all
17
18
19
20
21
22
23
24
25
26
27
28
29
30
31
32
Not Stored
Not Stored
83
341
84
[341] TIE Modify Removed Digit/ Added Dial
Parameter :
Item :
No. of digits to be deleted
Location No.
(0 – 4)
Default: all
all locations
1
2
3
4
5
6
7
8
9
10
11
12
13
14
15
16
0
Parameter : No. to be added
Parameter :
Item
:
(4 digits max.), consisting of
No. of digits to be deleted
Location No.
0 – 9.
(0 – 4)
Not Stored
Default: all
17
18
19
20
21
22
23
24
25
26
27
28
29
30
31
32
0
Parameter : No. to be added
(4 digits max.), consisting of
0 – 9.
Not Stored
431 – 433, 437 – 441
Item : CO Line
Group No.
Default : all
all CO line groups
1
2
3
4
5
6
7
8
Item : CO Line
Group No.
Default : all
all CO line groups
1
2
3
4
5
6
7
8
[431] TIE Table Number
Assignment
[437] CO-to-TIE
Transfer
[438] TIE-to-CO
Transfer
[439] TIE-to-TIE
Transfer
Parameter: TIE Table No.
(1 – 4)
Selection
Enable
Disable
Selection
Enable
Disable
Selection
Enable
Disable
✔
Not Stored
[440] TIE Security
Type
[441] Line Hunting
Sequence
Selection
Non
Trunk
Selection
Small→Large Large→Small
✔
✔
✔
Item : TIE
Table No.
Default : all
all tables
1
2
3
4
✔
[432] TIE Incoming
Assignment
[433] TIE Outgoing
Assignment
Selection
Selection
Immediate
Wink
✔
Immediate
Wink
✔
85
434 – 436, 442 – 445
86
[434] TIE Subscriber
Number Removed Digit
[435]
TIE Added Number
[436] TIE Wink Time Out
Assignment
Item :
TIE Table No.
Parameter :
No. of digits to be
deleted (0 – 6)
Parameter :
No. to be added
(4 digits max.), consisting of 0 – 9.
Selection:
1 – 127 (✕ 64 msec)
Default: all
all tables
1
2
3
4
0
Not Stored
16
[442] Voice
Path Type
TD816
TD1232
Selection
Item :
CO Line No. 2 wire 4 wire
✔
Default : all
all lines
05
06
07
08
all lines
09
10
11
12
21
22
23
24
[443]
Voice Level (Transmit)
[444]
Voice Level (Receive)
Selection
Selection
-6 db -3 db 0 db +3 db -6 db -3 db 0 db +3 db
✔
✔
[445] TIE
Receive Dial
Selection
Yes
No
✔
611, 616
[611] ISDN DDI Number / Floating Number Transformation
Default: All–not stored
Default: All–not stored
Item:
Item:
Selection
Selection
Floating
Floating
Parameter: 1 through 6
Parameter: 1 through 6
Ext. No. digits, consisting of 0 - 9 Ext. No. digits, consisting of 0 - 9
Operator
UCD Grp 1
Pager 1
UCD Grp 2
Pager 2*
UCD Grp 3
Pager 3*
UCD Grp 4
Pager 4*
UCD Grp 5
DISA 1*
UCD Grp 6
DISA 2*
UCD Grp 7
MODEM*
UCD Grp 8
ISDN 1
ISDN 2
ISDN 3
<Note>
*: available for the KX-TD1232
only.
ISDN 4
ISDN 5
ISDN 6
ISDN 7*
ISDN 8*
ISDN 9*
ISDN 10*
ISDN 11*
ISDN 12*
616
87
<Note> Jack No.: TD816 (01 – 16),
TD1232 (01 – 32 for Master, 33 – 64 for Slave)
[616] Live Call Screening Recording Mode Assignment
Item :
Jack No.
(01 – 31)
Default : all
All jacks
01
02
03
04
05
06
07
08
09
10
11
12
13
14
15
16
17
18
19
20
21
22
23
24
25
26
27
28
29
30
31
Selection
Stop Rec
✔
Keep Rec
Item :
Jack No.
(32 – 64)
32
33
34
35
36
37
38
39
40
41
42
43
44
45
46
47
48
49
50
51
52
53
54
55
56
57
58
59
60
61
62
63
64
Selection
Stop Rec
Keep Rec
813, 990
88
[990] System Additional Information
[813]
Floating Number Assignment
Item:
Default
Pager 1
196
Pager 2*
197
Pager 3*
296
Pager 4*
297
DISA1*
198
DISA2*
298
MODEM*
299
DTA
199
UCD-Grp 01
191
UCD-Grp 02
192
UCD-Grp 03
193
UCD-Grp 04
194
UCD-Grp 05
291
UCD-Grp 06
292
UCD-Grp 07
293
UCD-Grp 08
294
AREA 06 [Fields 35 and 38 through 41]
Selection
Field
Unused
Parameter:
Floating No.
2 through 4 digits
Default
— — — — — — — —
813
<Note> *: Available for KX-TD1232 only.
41 40 39
Unused
1
— — —
1
1
Selection
<Selection>
Field
35
38
39
40
41
:
:
:
:
:
0 (0 sec.) / 1 (5 sec.)
0 (not printed out) / 1 (printed out)
0 (Disable) / 1 (Enable)
0 (Enable) / 1 (Disable)
0 (Enable) / 1 (Disable)
38 35
1
1
811
[811] DISA / TIE User Codes
Default
Parameter
Code
(4 to 10 digits) COS (1 – 8)
Default
Item
Code
COS
1
Code 17
0017
1
0002
1
Code 18
0018
1
Code 3
0003
1
Code 19
0019
1
Code 4
0004
1
Code 20
0020
1
Code 5
0005
1
Code 21
0021
1
Code 6
0006
1
Code 22
0022
1
Code 7
0007
1
Code 23
0023
1
Code 8
0008
1
Code 24
0024
1
Code 9
0009
1
Code 25
0025
1
Code 10
0010
1
Code 26
0026
1
Code 11
0011
1
Code 27
0027
1
Code 12
0012
1
Code 28
0028
1
Code 13
0013
1
Code 29
0029
1
Code 14
0014
1
Code 30
0030
1
Code 15
0015
1
Code 31
0031
1
Code 16
0016
1
Code 32
0032
1
Item
Code
COS
Code 1
0001
Code 2
Parameter
Code
(4 to 10 digits) COS (1 – 8)
89
PSQX1385ZA KW1297KM0