1
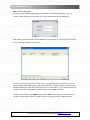
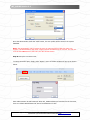
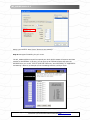
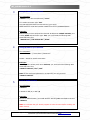
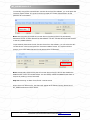
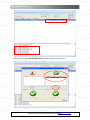
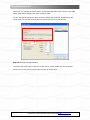
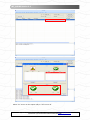
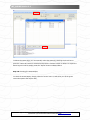
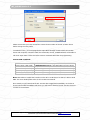
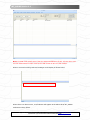
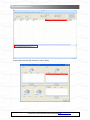
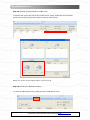
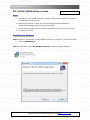
WT_AGPRS Version 2.2
WT-1011RC AGPRS Software Guide
Software Version 2.2
Note:
1. Information in this manual is subject to change without notice and does not represent
a commitment of manufacturer.
2. Manufacturer shall not be liable for errors contained herein and incidental or
consequential damages result from using this manual.
3. No part of the manual can be reproduced or publicized in any form or by any means.
4. All rights are reserved.
Installing the Software
Step 1: Insert the provided WT-1011RC Software CD into your computer. You will find a folder
named “AGPRS Setup”.
Step 2: Double click on the “WT_AGPRS V2.2 Setup” setup file to begin installation.
WT_AGPRS SOFTWARE GUIDE – Rev. 2.1 – Technical Support: [email protected]
COPYRIGHT ©2010 WITURA CORPORATION SDN BHD
1
WT_AGPRS Version 2.2
Step 3: Select Installation folder and press Next to continue
Step 4: Press Next to start installation.
WT_AGPRS SOFTWARE GUIDE – Rev. 2.1 – Technical Support: [email protected]
COPYRIGHT ©2010 WITURA CORPORATION SDN BHD
2
WT_AGPRS Version 2.2
WT_AGPRS software installed successfully.
WT_AGPRS SOFTWARE GUIDE – Rev. 2.1 – Technical Support: [email protected]
COPYRIGHT ©2010 WITURA CORPORATION SDN BHD
3
WT_AGPRS Version 2.2
Launch the WT_AGPRS Software
Step 5: Once finished setup, you will find the WT_AGPRS icon on your desktop. Double click
on it and launch the software. When WT_AGPRS is launched for the first time, there is a
default Administrator ID “witura” and Password “1234”.
Step 6: Once logged into the system, you can change the Administrator ID and Password
from the “Setting > Administrator > Reset Administrator” menu.
WT_AGPRS SOFTWARE GUIDE – Rev. 2.1 – Technical Support: [email protected]
COPYRIGHT ©2010 WITURA CORPORATION SDN BHD
4
WT_AGPRS Version 2.2
Step 7: Adding New Users
For the first step, add the organization user information by selecting “Setting > User”. A
smaller window will pop out to prompt you to enter Administrator ID and Password.
After entering the Administrator ID and Password, press Confirm to continue and you shall see
the User Setting window as shown below.
To add a new user, simply click on “Add” button. The Administrator may enter User ID, User
name, phone number (SIM number of WT-1011RC device), contacts, status, connection type
and other details here. Not all the users need to be in active status, i.e. for those inactive user
contacts, they will be automatically disabled from the WT_AGPRS software.
To select the connection type GPRS, simply select “TCP” from the Protocol as shown below.
The WT-1011RC device will then use GPRS mode to connect to the WT_AGPRS software.
WT_AGPRS SOFTWARE GUIDE – Rev. 2.1 – Technical Support: [email protected]
COPYRIGHT ©2010 WITURA CORPORATION SDN BHD
5
WT_AGPRS Version 2.2
Once the administrator clicks the “Add” button, the user profile will be saved in the system
database.
Note: The administrator may program the users as many as his/her HDD free space can
support. The administrator may enter 4 digits numeric numbers only for User ID. The User ID
must be the same with the User ID in the WT-1011RC device.
Step 8: Setup the Connection Port
To setup connection port, simply press “Option” menu. A smaller window will pop up as shown
below.
Enter Administrator ID and Password. When WT_AGPRS software is launched for the first time,
there is a default Administrator ID “witura” and Password “1234”.
WT_AGPRS SOFTWARE GUIDE – Rev. 2.1 – Technical Support: [email protected]
COPYRIGHT ©2010 WITURA CORPORATION SDN BHD
6
WT_AGPRS Version 2.2
Setup a port number. Press “Save” button to save settings.
Step 9: Setup port forwarding for your router.
The WT_AGPRS software requires an opened port which allows instant connections and data
transfer to the software. To do this, you can open up an internet browser and enter the
standard IP for your router. Look for a tab with name like, “Port Forwarding” or “Applications
and Gaming”. Below is an example of Port Forwarding tab from a Linksys router.
WT_AGPRS SOFTWARE GUIDE – Rev. 2.1 – Technical Support: [email protected]
COPYRIGHT ©2010 WITURA CORPORATION SDN BHD
7
WT_AGPRS Version 2.2
In the “IP Address” field enter the IP address of your computer (Local IP). If your router asks
you whether to ports for TCP or UDP select both. In the “Port” field enter the port number that
you have created in the software. Some routers offer a from port number to port number, in
this case enter the same number into both blanks.
Step 10: Connecting the WT-1011RC Device to the WT_AGPRS Software
To setup a communication between the WT_AGPRS software and the WT-1011RC unit, you
need a GPRS enabled SIM card installed into the WT-1011RC device and configure it as listed
below:
1
Programming the Administrator Number
Text Command:
*TEL[N]#XXXXXXXXXX
N stands for administrator number 1 - 8
XXXXXXXXXX stands for the phone number you want to program as administrator.
Example:
To program phone number 1111222233 as administrator into list number 1, you
would send the following SMS command to the unit.
*TEL1#1111222233
2
Programming the User ID
Text Command:
*USID#XXXX
XXXX stands for 4 digits numeric numbers
Example:
To program User ID 1111 into the device, you would send the following SMS
command to the unit.
*USID#1111
WT_AGPRS SOFTWARE GUIDE – Rev. 2.1 – Technical Support: [email protected]
COPYRIGHT ©2010 WITURA CORPORATION SDN BHD
8
WT_AGPRS Version 2.2
3
Setup the GPRS Communication
Text Command:
*GSIP#“TTT”,“XXX.XXX.XXX.XXX”,“NNNN”
TTT stands connection type “TCP”
XXX.XXX.XXX.XXX stands for External IP of your router
NNNN stands for Local Port number created from the WT_AGPRS Software
Example:
Assume that you have acquired the External IP address as 123.65.214.231, port
number 8765 and connection type: TCP, you would send the following SMS
command to the unit.
*GSIP#“TCP”,“123.65.214.231”,“8765”
4
Setup the APN of your SIM Card
Text Command:
*ANET#“XXXXX…”,“User Name”,“Password”
XXXXX… stands for Access Point Name
Example:
To configure the access point name Vodanet, you would send the following SMS
command to the unit.
*ANET#“Vodanet”,“abc”,“123”
Note: If User name and password is not required, you can just send
*ANET#“Vodanet”
5
Turn On GPRS Function
Text Command:
*GPRS#X
X stands for ON (1) or OFF (0)
Example:
To turn on GPRS function, you would send the following SMS command to the unit.
*GPRS#1
Note: It is advised that you should program all other functions before enabling the
GPRS function.
WT_AGPRS SOFTWARE GUIDE – Rev. 2.1 – Technical Support: [email protected]
COPYRIGHT ©2010 WITURA CORPORATION SDN BHD
9
WT_AGPRS Version 2.2
When the WT-1011RC device has connected to the WT_AGPRS software you shall see as below
When the WT-1011RC device disconnected from the WT_AGPRS software due to power down
or signal lost you shall see as below
WT_AGPRS SOFTWARE GUIDE – Rev. 2.1 – Technical Support: [email protected]
COPYRIGHT ©2010 WITURA CORPORATION SDN BHD
10
WT_AGPRS Version 2.2
To manually remove the connected WT-1011RC device from the software, you could press the
“Remove object” button. The system will then prompt you to enter Administrator ID and
password for confirmation.
Note: Removing the connected WT-1011RC device from the list does not permanently
disconnect the WT-1011RC device from the software. The WT-1011RC device will still connect
to the WT_AGPRS software.
To permanently disconnect the WT-1011RC device from the software, you can select the WT1011RC device in the list and press the “Disconnect GPRS” button. The system will then
prompt you to enter Administrator ID and password for confirmation.
Note: Permanently disconnecting the WT-1011RC device from the list will also disable the
GPRS function of the WT-1011RC device. You can always enable the GPRS function later or
anytime by sending it a text command.
Step 11: Receiving an Alarm from the WT-1011RC Device
When there is an alarm event, the status will appear at the below incoming status box of
WT_AGPRS software as shown below.
WT_AGPRS SOFTWARE GUIDE – Rev. 2.1 – Technical Support: [email protected]
COPYRIGHT ©2010 WITURA CORPORATION SDN BHD
11
WT_AGPRS Version 2.2
Simply double click the alarm information for alarm details as shown below.
WT_AGPRS SOFTWARE GUIDE – Rev. 2.1 – Technical Support: [email protected]
COPYRIGHT ©2010 WITURA CORPORATION SDN BHD
12
WT_AGPRS Version 2.2
For the example above, Input 2 has triggered. The icon will keep on blinking continuously until
it received a confirmation by clicking the Close Alarm button.
Step 12: Changing the Picture Icons of Alarm Status
It is possible to change the display icons of alarm status according to your desire. To change
the display icons you can go to the “Option” menu for Option setting. Double click on one of
the User ID and a smaller window will pop up as seen below.
Open
Close
Open
Close
Please note that there are 2 icons for each input, the first display icon represents the input
triggers at high pulse (Open) and the second display icon represents the input triggers at no
pulse (Close). You can also change the alarm description of the input open and close status by
WT_AGPRS SOFTWARE GUIDE – Rev. 2.1 – Technical Support: [email protected]
COPYRIGHT ©2010 WITURA CORPORATION SDN BHD
13
WT_AGPRS Version 2.2
entering a text message at the box below. These alarm description will be shown under SMS
Alarm. After setting simply press “Save” button to save.
You are also able to change the alarm sound by adding new media file. Audible alarm will
sound when you received incoming alarm events from the WT-1011RC devices.
Step 13: Activate the Output Relays
To activate the output relay of the WT-1011RC device, simply double click the connected
device from the list to bring up the status window as shown below
WT_AGPRS SOFTWARE GUIDE – Rev. 2.1 – Technical Support: [email protected]
COPYRIGHT ©2010 WITURA CORPORATION SDN BHD
14
WT_AGPRS Version 2.2
Select “on” to turn on the output relay or “off” to turn off
WT_AGPRS SOFTWARE GUIDE – Rev. 2.1 – Technical Support: [email protected]
COPYRIGHT ©2010 WITURA CORPORATION SDN BHD
15
WT_AGPRS Version 2.2
Step 14: Checking the Alarm History Report
To check the Alarm History Report, simply press the “TCP Alarm” menu.
Note: In GPRS mode, all the alarms will be stored under “TCP Alarm”
To delete the alarms, you can manually select the alarms by ticking the check box or press the
“Select all” button to select all the alarms and press the “Delete” button to delete. To export
the alarms to Excel file simply press the “Export” button indicated above
Step 15: Checking the Output Relay Report
To check the Output Relay Report, simply press the “Relay Status” menu.
WT_AGPRS SOFTWARE GUIDE – Rev. 2.1 – Technical Support: [email protected]
COPYRIGHT ©2010 WITURA CORPORATION SDN BHD
16
WT_AGPRS Version 2.2
To delete the status logs, you can manually select the status by checking the check box or
press the “Select all” button to select all and press the “Delete” button to delete. To export the
status logs to Excel file simply press the “Export” button indicated above
Step 16: Checking the Guest Report
To check the Guest Report, simply press the “Guest” menu. It will show you all the guest
users who operate the output relay.
WT_AGPRS SOFTWARE GUIDE – Rev. 2.1 – Technical Support: [email protected]
COPYRIGHT ©2010 WITURA CORPORATION SDN BHD
17
WT_AGPRS Version 2.2
To delete the reports, you can manually select the status by checking the check box or press
the “Select all” button to select all and press the “Delete” button to delete. To export the
reports to Excel file simply press the “Export” button indicated above
Step 17: Setup SMS Mode for WT-1011RC device
The WT_AGPRS software can be configured to receive alarms or operate the output relays of
the WT-1011RC devices by SMS. To do this you need to plug in a WT-211 SMS modem to
your computer and program the first administrator number as the SIM number of the WT-211
SMS modem into the WT-1011RC device.
WT-211 SMS Modem
Computer
WT_AGPRS SOFTWARE GUIDE – Rev. 2.1 – Technical Support: [email protected]
COPYRIGHT ©2010 WITURA CORPORATION SDN BHD
18
WT_AGPRS Version 2.2
Then go to “Option” menu
Select a COM port that the WT-211 SMS modem has connected to and press “Open”
WT_AGPRS SOFTWARE GUIDE – Rev. 2.1 – Technical Support: [email protected]
COPYRIGHT ©2010 WITURA CORPORATION SDN BHD
19
WT_AGPRS Version 2.2
When the port has connected successfully it shall look like the above
Next proceed to adding user list
Add a new user, click on “Add” button.
Select the connection type SMS, simply select “SMS” from the Protocol as shown below. The
software will then use SMS mode to receive alarms from the WT-1011RC device.
WT_AGPRS SOFTWARE GUIDE – Rev. 2.1 – Technical Support: [email protected]
COPYRIGHT ©2010 WITURA CORPORATION SDN BHD
20
WT_AGPRS Version 2.2
Please ensure that you have entered the correct Phone number of the WT-1011RC device
before saving the user profile.
To make this work, you must program the Input Alert Message content of the WT-1011RC
device with a specific command. With this commands, the WT_AGPRS software will be able to
tell which input alarm. Follow the below custom command table when do programming.
Custom SMS command:
State
SMS command to be programmed into WT-1011RC
Input 1 Open (High Pulse)
*STR1#Input1=1#[Any text description here for alarm]
Input 1 Close (No Pulse)
*STO1#Input1=0#[Any text description here for alarm]
Input 2 Open (High Pulse)
*STR2#Input2=1#[Any text description here for alarm]
Input 2 Close (No Pulse)
*STO2#Input2=0#[Any text description here for alarm]
Note: Remember to enable the functions on the WT-1011RC device so that it is able to send
SMS. For more details please refer to WT-1011RC User Manual.
Once saved you will notice that the WT-1011RC device appeared immediately on the list as
shown below unlike the GPRS mode where you will have to wait for the WT-1011RC device to
connect to the software.
WT_AGPRS SOFTWARE GUIDE – Rev. 2.1 – Technical Support: [email protected]
COPYRIGHT ©2010 WITURA CORPORATION SDN BHD
21
WT_AGPRS Version 2.2
Note: For SMS mode, please ensure that the GPRS is disabled on the WT-1011RC device and
the first Administrator number must be the SIM number of WT-211 SMS modem.
When it received incoming Unknown messages it will display as shown below
When there is an alarm event, a red indicator will appear at the Alarm tab of WT_AGPRS
software as shown below.
WT_AGPRS SOFTWARE GUIDE – Rev. 2.1 – Technical Support: [email protected]
COPYRIGHT ©2010 WITURA CORPORATION SDN BHD
22
WT_AGPRS Version 2.2
Simply double click the red indicator for alarm details.
WT_AGPRS SOFTWARE GUIDE – Rev. 2.1 – Technical Support: [email protected]
COPYRIGHT ©2010 WITURA CORPORATION SDN BHD
23
WT_AGPRS Version 2.2
Step 18: Activate the Output Relays on SMS mode
To activate the output relay of the WT-1011RC device, simply double click the connected
device from the list to bring up the status window as shown below
Select “on” to turn on the output relay or “off” to turn off
Step 19: Checking the SMS Alarm History
To check the SMS Alarm History, simply press the “SMS Alarm” menu.
WT_AGPRS SOFTWARE GUIDE – Rev. 2.1 – Technical Support: [email protected]
COPYRIGHT ©2010 WITURA CORPORATION SDN BHD
24
WT_AGPRS Version 2.2
To delete the alarms, you can manually select the alarms by ticking the check box or press the
“Select all” button to select all the alarms and press the “Delete” button to delete. To export
the alarms to Excel file simply press the “Export” button indicated above
Step 20: Logout the System
To logout the system, simply click the X button on the top right.
Notice: In this manual, we do not cover “SMS History” as this function is for another
application.
WT_AGPRS SOFTWARE GUIDE – Rev. 2.1 – Technical Support: [email protected]
COPYRIGHT ©2010 WITURA CORPORATION SDN BHD
25