1
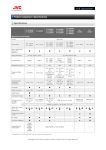
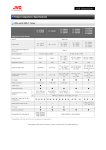
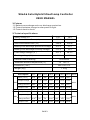
Wind & Solar Hybrid Street Lamp Controller
USER MANUAL
1/ Futures
1.1 Batteries overcharge and over-discharge protection.
1.2 Protect batteries charge to solar panel at night.
1.3 Protect electric shock
2/ Technical specifications.
24V
Rated Voltage (V)
12V
Wind Turbine Rated Power ( W )
200 W
300 W
Solar Panel Rated Power ( W )
200 W
300 W
Battery over discharge protection voltage
10.5 V
21 V
Battery over discharge recovery voltage
11.5 V
23 V
Final charge voltage ( V )
14.1 V
28.2 V
13 V
26 V
Floating voltage ( V )
30 minutes
Recover time of braking
Allowable ambient temperature( °C )
- 10
Dimension ( mm )
208 x 140 x 74
Weight ( Kg )
+40 °C
1.6 Kg
Wind Speed
3m/s
5m/s
7m/s
RPM ( r/min )
610
820
860
10m/s 12m/s 15m/s 18m/s 20m/s
1030
1130
12.4V 12.5V 12.6V 12.8V
1250
1350
13.2V 13.5V
Output Voltage
12.3V
Charge Current
0.8A
5A
7A
12A
17A
23A
25A
Output Power
10W
62W
88W
151W
218W
304W
337W
RPM ( r/min )
700
810
880
1030
1200
1300
1400
Output Voltage
24.8V
25V
Charge Current
0.4A
3A
Output Power
10W
75W
12V
25.1V 25.5V 26.2V 26.5V
27V
Brake
24V
4A
7.5A
100W 191W
PAGE 1
Brake
10A
14A
16A
262W
371W
432W
3/ Installing steps
3.1 Panels:
L1 L2 L3
W1 W2
W3
S+
S-
DC+ DC- DC-
F
ST
B-
B+
3.1.1 Terminals in accordance with the label:
W1、W2、W3:Input terminals of wind turbine generator (Regardless of
sequence)
S +: Solar Panel Positive
S -: Solar Panel Negative
B +:Batteries Positive
B -:Batteries Negative
DC +:Street Lamp Positive
DC -(1):Street Lamp Negative
DC -(2):Street Lamp Negative
CAUTION: DO NOT CONNECT B+ TO BATTERY NEGATIVE AND B- TO
BATTERY POSITIVE FOR EVEN A SECOND, OR ELSE WILL DAMAGE
THE CONTROLLER AND VOID YOUR WARRANTY.
3.2 Installing steps
3.2.1 Controller based on its protection level, housed in indoor and outdoor
drying, ventilation, the controller may not be around the inflammable and
explosive materials.
3.2.2 Controller should be mounted vertically, hanging solid.
3.2.3 Before wiring, to put the first wind turbine brakes manually switch to
the "I" position, when wiring to prevent electric shock accidents caused
by running generators.
3.2.4 Check the wiring correct, then put the wind turbine brakes manually
switch to the "O" position.
CAUTION: WHEN THE WIND TURBINE IS WORKING, NEVER
DISCONNECT THE BATTERY FOR EVEN A SECOND, OR ELSE WILL
DAMAGE THE CONTROLLER AND VOID YOUR WARRANTY.
Warning: Installation, disassembly, repair equipment, wind turbine
will be sure to manually switch the brake to the " | " position.
Note: The battery power loss in severe cases, the system will
automatically cut off the lamp output to power the next day will not
resume before dark.
PAGE 2
3.3 Running state indicator
LED Indication
State
Explanation
L1-L2-L3 (Green )
Lights
Full battery capacity
L1- L2
(Green )
Lights
Normal battery capacity
L1
(Green )
Lights
Low battery capacity
L1
( Green )
Blinks
Battery exhausted
F
( Green )
Lights
Wind turbine is working
( Red )
Lights
Wind turbine brake
( Green )
Lights
PV Module is working
( Green )
Lights
Street lamp working
3.4 load output mode setting
3.4.1 Setting conditions
3.4.1.1 Confirm the battery and the load the connect to the controller
correctly.
3.4.1.2 Confirm the battery is fully charged.
3.4.2 Setting method
3.4.2.1 Pressing the Settings button, the corresponding indicator light will
flash along, pressing a change in time, total of 8 states.
3.4.2.2 After the selected state must keep 5 seconds, the parameter
automatically saved and the light stops blinking.
3.4.2.3 Setting mode (display status and the corresponding indicator
function)
L1 L2 L3
Explanation
0
0
0
The street lamp always work
1
0
0
The street lamp work after dark
0
1
0
The street lamp work after dark and be closed 4h later
1
1
0
The street lamp work after dark and be closed 6h later
0
0
1
The street lamp work after dark and be closed 8h later
1
0
1
The street lamp work after dark and be closed 10h later
0
1
1
The street lamp work after dark and be closed 12h later
1
1
1
The street lamp work after dark and be closed 16h later
REMARK:
1/ "1" = Blink, "0" = OFF.
2/ " Dark ": When the Solar Panel output voltage drop to 10V, the
controller will think the time is night (Dark).
PAGE 3