1
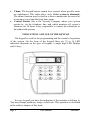
SIGMA "APOLLO"
“APOLLO" control panel manufactured, by SIGMA SECURITY is a
modern, state of the art, security system which can cover the security
needs of a household, or an office. It has been designed to combine
easiness of use and the best possible security.
In this manual is described in detail, the use and operation of this
unit, so that you understand and take full advantage of its capabilities.
For any further questions, please contact the technician who has carried
out the installation of the system.
In order to better understand the settings and the operation of the
system, read carefully the explanation of the main terms, which you will
find in this manual.
•
•
•
•
•
•
ZONE: it is a specific region of the protected area, which can be
protected by magnetic contacts, P.I.R. detectors, Glass Break detector
etc. Furthermore, smoke, gas or humidity detectors can be connected
in a single or various zones. Zones, depending on their mode of
operation, may be characterized as:
Internal: these zones are bypassed when you activate home arming.
(Arming the system, while, you stay in the house).
Perimeter: these zones are armed, if the panel is armed, regardless
the arming mode of the panel (HOME, or AWAY). These zones may
be bypassed.
24 hours: these zones are always armed, regardless the condition of
the panel (wether the panel is armed or disarmed).
BYPASS: is the operation by which you temporarily deactivate any
zone(s), while you arm the system.
Code: It is the 4-digit, 5-digit, or 6-digit number, which you must use
for arming, disarming and user programming of the system.
Automatic Arming and Disarming: is the capability of the system
to automatically arm and disarm at a specific time and day(s), of the
week.
Quick Arming: is the arming of the system by using only a single
digit number and [ENTER], instead of the entire code.
Partitions: is the capability of the system to operate at two different
partitions (fully independent subsystems).
APOLLO
User Manual
Page 1
•
•
Chime: The keypad buzzer sounds for a second, when specific zones
are unbalanced. This takes place, only, if the system is disarmed.
The chime function may be used in a store to annunciate the arrival of
a customer every time the front door opens.
Central Station: this is the Security Company where your system
reports to, via the telephone line, and which monitors all system’s
functions for 24 hours a day, responsible to contact the authorities or
the authorized persons.
INDICATIONS AND USE OF THE KEYPAD
The keypad is used for the programming and the control of operation
of the system. On the front of the keypad there are 12 or 16 LED
indicators (depends on the type of keypad), a single digit LED Display
and 16 keys.
In every keypad you have the indication of the partition it belongs to.
You may change partitions, using a valid code. This operation is described
in the relative chapter of this book.
Page 2
User Manual
APOLLO
INDICATION LED's
•
•
GREEN (ARM-DISARM): It turns on when the system is disarmed
and switched off when it is armed (this is a programmable function
and may change in the installer menu). During HOME arming it
will blink, if the entry zone(s) will operate as delay zone(s).
YELLOW (POWER): Turns on to indicate that the panel is supplied
normally by the 220V mains power and turns off to indicate Mains
Power Loss. When the voltage of the battery is low it blinks as
follows:
1. Three short flashes and a longer flash, when there is Mains Power
and the battery’s voltage is low.
2. Three short flashes and a pause, when there is Mains power Loss
and the battery’s voltage is low.
•
•
•
•
•
RED (TROUBLE): Turns on when there is a problem in the system
(alarm, power failure, drop of battery voltage, over-current, and time
loss).
BYPASS: It blinks if there are Bypassed Zones or when you
program which zones will be bypassed.
READY: It turns on if all zones of the system are balanced, and the
system is ready to arm.
ZONE 01 - ZONE 16: They indicate the zone(s) status. When they
are off the zones are balanced. When a LED is on the relative zone is
unbalanced or has a problem. If during arming one or more are
blinking along with the LED "BYPASS", then the relative zones
will be bypassed.
During programming, on the LED DISPLAY, you may see the
programmed values.
ATTENTION: At the end of exit delay, the keypad LED's turn
off. It turns on if a delay zone is unbalanced or if a key is pressed.
The illumination LED's also turn off if within 1 minute, no key is
pressed.
KEYS
•
0 - 9: Numeric keys. They are used to enter numbers, during arming,
APOLLO
User Manual
Page 3
•
•
•
•
•
•
disarming, or programming the system.
ΗΟΜΕ / TIME: Used to program or check the time related values of
the control panel. Also used during telephone programming to add a
pause between numbers dialing.
BYPASS / ZONE: Used to program, control or bypass zones.
CODE / MODE: Used to program or read codes [CODE] and to
program the function type of zones [MODE].
READ / CHIME: Used to read a programmed value or to activate –
deactivate CHIME.
PART / ADDRESS: Used to select partition or address during
programming.
ENTER: Used to accept programmed values or commands.
NOTICE: If any false action takes place, there is an ERROR
sound, from the keypad’s buzzer. The verification of a correct action
is indicated by four short ΒΕΕΡs.
PROGRAMMING THE SYSTEM
Use the system keypad to program, edit or delete several system
functions. In order to do so the system must be disarmed.
If the system is armed, or in downloading procedure, or you use
invalid code, or the digital communicator is in operation, you can not
program the system. In any of these cases the keypad buzzer will sound
continuously to indicate error.
In order, to arm or disarm, the system, for the first time, press [1] [7]
[7] [7] and [ΕΝΤΕR].
ENTER USER PROGRAMMING
Use the system keypad to program, edit or delete several system
functions. In order to do so the system must be disarmed.
In order to program the system, press: [ΕΝΤΕR] [MAIN USER
CODE] & [ENTER]. The dot on the LED Display will start blinking to
indicate the panel is in programming mode. The main user code is 1777.
This code must be changed using the CODE editing procedure.
Page 4
User Manual
APOLLO
NOTE: In this manual the symbol [ ], indicates the relative key
that is shown in.
CODES – ACCESS LEVELS
The system has 97 codes for arming and disarming the system, which
can be from 4 to 6 digits. These codes can also be used for the system’s
programming and the operation of the system.
By providing a different code to each person that uses the system, you
have the capability to be aware who disarmed the alarm and, depending on
the access level of the code, you can limit the access capabilities to the
operation of the system.
All codes may be programmed to one of the six access levels, except
code 01 that, can change access level. The abilities, of the various codes
are displayed in the following table:
CODES ACCESS LEVEL
PROGRAMMING
CODE
MAIN USER
PARTITION
MAIN CODE
AUXILIARY 2
AUXILIARY 3
AUXILIARY 4
TWO TIMES
DURESS
TIME-DATE/
AUTO ARM
ACCESS LEVELS
CODES
CHANGE
PARTITION
ZONE
BYPASS
YES/YES
YES
YES
YES
NO/YES
YES
YES
YES
NO
NO
NO
NO
NO
NO
NO
NO
NO
NO
YES
NO
NO
NO
NO
YES
YES
NO
NO
NO
MAIN CODE: Is code 01. It has the capability of arming and disarming
the partition (partitions) it has access to and it is the only one that may
program:
¾
¾
¾
¾
All codes and the quick arming digit
Current time and date
The time and days of automatic arming and disarming
The feature of arming and disarming via Download
PARTITION MAIN CODE: Arms and disarms the partition (partition)
to which it belongs and the partitions it has access to. It sets up or deletes the
codes, cards and remote controls that belong to its partition. Furthermore, it
APOLLO
User Manual
Page 5
sets up the display type on the screen, the thermostat and activates or
deactivates the Chime mode of its partition.
TWO-USE CODE: It can be used only two times, to arm and disarm
the alarm. After the two uses it is deleted and needs to be programmed again.
It is programmed, like all codes, from the main code or the partition main
code.
DURESS CODE: It is the code that you must use when you are
threatened to disarm the alarm, so that, along with the disarming of the panel,
a PANIC event will be reported to the central station indicating the
circumstances under which the disarming took place.
PROGRAMMING, EDITING, DELETING CODES
Initially, use the main user code (01) to program all other codes.
Then, you may use the main code of every partition to edit, program
or delete user codes on this partition.
To program, or edit a user code, press:
[CODE] [Χ] [Χ] [NEW USER CODE] [ENTER]
, [Χ] [X], is the increasing number of the code (01...97).
To read any of the user codes, press [READ] [CODE] [Χ] [Χ].
[Χ] [Χ], is the increasing number of the code (01...97).
To delete any user code, press [CODE] [Χ] [Χ] [ENTER].
[Χ] [Χ], is the increasing number of the code to be deleted (02...97).
The main user code can not be deleted.
PROGRAMMING THE QUICK ARMING NUMBER
The system can be armed using a single digit number (Quick Arm
Number), which is common for both partitions. If the quick arming
number is used to arm the system, it will arm only the partition in which
the keypad you use belongs to. The panel will report the quick arming to
the Central Station.
Press, [CODE] [9] [8] [Χ]. [Χ]=[0-9], is the quick arming number.
Only main user code can program the quick arming number. This function
is disabled in factory default programming.
Page 6
User Manual
APOLLO
To read, the quick arm number, press [READ] [CODE] [9] [8]. To
delete quick arming number, press [CODE] [9] [8] & [ENTER].
PROGRAMMING DATE AND TIME
Following is the time table the user may program in the system:
TIME TABLE
TIME 1
TIME 2
TIME 3
TIME 4
TIME 5
TIME 6
TIME 7
TIME 8
TIME 9
TIME
DAY
DATE
AUTO ARM TIME FOR PARTITION A
AUTO DISARM TIME FOR PARTITION A
AUTO DISARM WEEKLY PROGRAMMING FOR
PARTITION A
AUTO ARM TIME FOR PARTITION B
AUTO DISARM TIME FOR PARTITION B
AUTO DISARM WEEKLY PROGRAMMING FOR
PARTITION B
PROGRAMMING CURRENT TIME
To program, the system’s real time clock, press:
[TIME] [1] [H] [H] [M] [M].
[H] [H] is the current hour, and [M] [M] is the minutes.
EXAMPLE: Current time is 10:30. Enter: [TIME] [1] [1] [0] [3]
[0]. On the display, you will have the relative numbers you had entered,
pressing the keys.
To read the programmed time, press [READ] [TIME][1]. On the
DISPLAY you will have the current time.
PROGRAMMING THE DAY OF THE WEEK
In order to program, the current day of the week, press [TIME] [2] [D]
[ENTER]. [D] is the number corresponding to the current day of the week
(1-7). For Sunday press 1, for Monday press 2, for Tuesday press 3,
e.t.c. When you press the relative key the relative LED of the day will turn
APOLLO
User Manual
Page 7
on.
In order to read, the programmed day of the week, press: [READ]
[TIME] [2]. The LED corresponding to the programmed day of the week
will turn on.
PROGRAMMING THE DATE
To program, the date of the system, press [TIME] [3] [D] [D] [Μ] [Μ]
[Y] [Y].
¾ [D] [D], the numder of the day (01-31).
¾ [Μ] [Μ], the number of the month (01-12).
¾ [Y] [Y], the number corresponding to the year. For year 2005
press [0] [5].
To verify, the date programmed in the system, press [READ]
[TIME] [3]. On the DISPLAY you will have the date of the system and
also the LED corresponding to the programmed day of the week will turn
on.
PROGRAMMING AUTO ARM AND DISARM TIME
The control panel may be programmed to automaticaly arm and
disarm the same time every day of the week. The auto arming and
disarming time may be different for every partition. If the system
operates in a single partition programming for the second partition
are not nessecary.
Automatic arming operates independently from automatic disarming.
Thus, you may program the system to, only, automatically arm or disarm
the desired partition.
Automatic Arming:
To program the time the control panel will automatically arm, press:
¾ [TIME] [4] [H] [H] [M] [M], for partition A.
¾ [TIME] [7] [H] [H] [M] [M], for partition B.
To read auto arm time, press:
¾ [READ] [TIME] [4], for partition A.
¾ [READ] [TIME] [7], for partition B.
To cancel auto arm time, press:
Page 8
User Manual
APOLLO
¾ [TIME] [4] [ENTER], for partition A.
¾ [TIME] [7] [ENTER], for partition B.
[H] [H] the time and [M] [M] the minutes.
Automatic Disarming:
To program the time the control panel will automatically disarm,
press:
¾ [TIME] [5] [H] [H] [M] [M], for partition A’.
¾ [TIME] [8] [H] [H] [M] [M], for partition B’.
To read auto arming time, press:
¾ [READ] [TIME] [5], for partition A’.
¾ [READ] [TIME] [8], for partition B’.
To cancel auto arming time, press:
¾ [TIME] [5] [ENTER], for partition A’.
¾ [TIME] [8] [ENTER], for partition B’.
EXAMPLE: If you wish the partition A to arm every day on 21:30
and disarm every day on 07:45, press:
¾ [TIME] [4] [2] [1] [3] [0], for arming.
¾ [TIME] [5] [0] [7] [4] [5], for disarming.
WEEKLY ARMING OF THE AUTOMATIC DISARMING
User may select the days of the week the system will automatically
disarm at a specific time. The system may disarm automatically in all
days from Monday to Friday, and not in Saturday and Sunday. Automatic
arming is active all days of the week.
To program the days of the week the system will automatically
disarm, press:
¾ [TIME] [6] [D] [D].…[D] [ENTER], for partition A.
¾ [TIME] [9] [D] [D].…[D] [ENTER], for partition B.
[D] = 1-7, the keys that correspond to the days the system will
automatically disarm. On the LED DISPLAY you will have the letter d
(date) and also the LEDs of the days of the week that the system will
automatically disarm, will turn on. For Sunday the Led 1 will turn on, for
Monday the Led 2, for Tuesday the Led 3, e.t.c. Every time you press a
APOLLO
User Manual
Page 9
key that corresponds to the day you wish the system to auto disarm, the
relative LED turns on or off. If you wish to cancel one of these days press
again the relative key.
To read the days of weekly auto disarm, press:
¾ [READ] [TIME] [6], for partition A.
¾ [READ] [TIME] [9], for partition B.
On the LED DISPLAY you have the letter "d" and the LED’s
indicating the relative days turn on.
To delete the days of weekly auto disarm, press:
¾ [TIME] [6] [ENTER], for partition A.
¾ [TIME] [9] [ENTER], for partition B.
NOTE: The programming of time, date and auto arming or
disarming can be done only using the user main code (01).
ARMING-DISARMING VIA DOWNLOADING
Use the following procedure to activate arming and disarming via the
downloading software. In factory default programming this function is
activated. This function may be activated or deactivated only via the
keypad of the system using the main user code (01) and not via
download.
¾ [ADDRESS] [0] [0] [0], if you wish to disable arming-disarming
via Downloading Software.
¾ [ADDRESS] [0] [0] [1], if you wish to enable arming-disarming
via Downloading software.
To verify data programmed, in this memory location, press [READ]
[ADDRESS] [0] [0].
NOTE: This function may be programmed only by main user
code (01) using the system keypad, and not by the downloading
software.
PROGRAMMING THE "FOLLOW ME" TELEPHONE
NUMBER
The main user code may be used to program , edit or delete the
Page 10
User Manual
APOLLO
1st telephone number of the 1st channel of the voice dialler (follow
me), using the following procedure:
•
•
•
To program or edit the “follow me” telephone number,
press:[ADDRESS] [0][1] [TELEPHONE NUMBER] & [ENTER].
To delete the “follow me” telephone number, press [ADDRESS]
[0][1] & [ENTER].
To read the “follow me” telephone number, press: [READ]
[ADDRESS] [0] [1].
EXIT USER PROGRAMMING
After finishing user programming, press [USER CODE] &
[ENTER] to exit user programming menu. The system will exit
programming menu automatically if within two minutes, no key is
pressed.
OPERATING THE SYSTEM
The system may arm or disarm using 2 methods:
1. Fully arm the system including all zones.
2. Arm the systems using HOME arming (perimeter protection) or
arm the system with bypassed zones.
Arming and disarming of the system is done via the keypad by entering a
valid code.
Close all protected doors and windows before you try to arm the
system. When all zones are balanced, all zones LED’s will be off and
the LED “READY” will turn on. If there is one or more unbalanced
zones, the relative zones LED’s will be on and the LED “READY” will
turn off.
If you try to arm the system and the red LED "TROUBLE" is on,
check what might be, the trouble. If the yellow LED is off then, you have
Mains Power loss, if the yellow LED is blinking you have Battery low
voltage. Check the event list to see if the trouble will affect the system
during the arming cycle (telephone line failure, low battery voltage e.tc.).
The LED "TROUBLE" will turn off when the system is armed.
If there is a problem call the installer so he may perform
maintenance.
APOLLO
User Manual
Page 11
In case you have telephone line failure the keypad buzzer will sound
continuously, Press any key to silence it.
FULL ARMING OF THE SYSTEM
Use the following procedure to fully arm the system including all
zones.
If all the zones are balanced the LED “READY” will be on. Enter
[USER CODE] and press [ENTER]. The LED “ARM” will change
status (will turn on or off, according to the programming of display type)
and the buzzer will sound during the exit delay. During the last 10
seconds of the exit delay the buzzer sounds faster to remind you to
exit the protected area as the exit delay is about to end, while in the
LED Display you can see the countdown of exit delay.
If you wish to extend the exit delay, without disarming the system,
just press the key [BYPASS], to restart the exit delay countdown. This
function can be used up to 3 times.
If the buzzer sounds while arming the system then:
¾ Maybe there is Mains Power Failure. On the LED Display you
will have the indication [Ρ] and the LED “POWER” will be off.
¾ Maybe there is telephone line failure. On the LED Display you
will have the indication [Lt].
ARMING THE SYSTEM QUICKLY
To arm the system, quickly, enter the quick arm single digit number
and press [ENTER]. The partition, in which the keypad, you use, belongs
to, will arm.
ARMING THE SYSTEM WITH BYPASSED ZONES
Use the following procedure to arm the system bypassing one or
more zones:
Enter the [USER CODE]. Press the key [BYPASS]. The LED
“ΒΥPASS” will start blinking. Enter the numbers of the zones you wish
to bypass (e.g. 01, 03, 08, 12, e.t.c.) and then press [ENTER]. The system
will arm, while the bypassed zones LED’s will blink during the exit
Page 12
User Manual
APOLLO
delay, alogn with the LED “ΒΥPASS”.
Example: [USER CODE] [BYPASS][01][03][08][12] & [ENTER].
NOTES:
•
•
•
Arming with bypassed zones can only be carried out by users whose
codes have the permission for it. If you use a code that doesn’t have
the right access level, the system will not arm and you will have to
repeat the procedure from the beginning, using the right code. In this
case, the LED “ARM” will not change status and the keypad buzzer
will sound continuously indicating error.
If a zone you wish to bypass does not belong to the partition that you
arm, the system will not arm and you will have to repeat the
procedure from the beginning, without bypassing the specific zone.In
this case, the LED “ARM” will not change status and the keypad
buzzer will sound continuously indicating error.
If any zone is unbalanced and you arm the system without bypassing
them, the control panel will (regarding to the programming the
installer has done) act as follows:
1. The system will not arm.
2. The system will arm and at the end of exit delay will automatically
bypass all unbalanced zones. In this case the siren will sound 3
times indicating you had armed the system with bypassed zones.
3. The system will arm and at the end of exit delay will automatically
bypass all unbalanced zones. The siren will stay silent.
4. The system will arm and at the end of exit delay will automatically
bypass all unbalanced zones, without any indication. If during the
arming cycle the zones are balanced, they will be automatically
armed, and sound an alarm if triggered (FORCED ARM).
• To bypass certain zones, which are common in both partitions, you
must bypass them at each partition separately.
• The zones that will be bypassed, with the above mentioned
method, will automatically return to normal operation mode,
when the system disarms.
APOLLO
User Manual
Page 13
ATTENTION! You must be very careful when you are arming the
system with Bypassed zones, because these zones will not trigger an
alarm if they are unballanced.
GROUP BYPASS ARMING
Use the following method to bypass a group of zones that have been
determined by the installer using the procedure “Group Bypass”.
Press, [USER CODE] [BYPASS] & [ENTER].
The keypad buzzer will sound as a confirmation, and the bypassed
zones LED’s will start blinking along with the LED “BYPASS”, during
the exit delay.
TEMPORARILY BYPASS ZONES
If you wish to temporarily bypass zones without arming the system
enter the [USER CODE] and press [BYPASS]. The LED “ΒΥPASS”
will start blinking. Enter the zones numbers (e.g. 01, 03, 08, 12 e.t.c.).
The bypassed zones LED’s will start blinking. Press [BYPASS]. The
keypad buzzer will sound for confirmation, the LED “BYPASS” will start
blinking, and the bypassed zones LED’s will turn off.
Example: [USER CODE] [BYPASS] [01] [03] [05] [09] [12]
[BYPASS].
To verify which zones are bypassed press for 2 seconds the key
[BYPASS]. The bypassed zones LED’s will start blinking for 5seconds.
To activate any bypassed zones, enter the [USER CODE] and
press [BYPASS]. The bypassed zones LED’s will start blinking. Enter the
zones numbers (e.g. 01, 03, 08, 12 e.t.c.). Press [BYPASS].
To activate all bypassed zones, enter the [USER CODE] and press
[BYPASS] [BYPASS]. The keypad buzzer will sound for confirmation,
and the LED “BYPASS” will turn off.
The zones that have been bypassed using the above, mentioned
method, will automatically return to normal operation mode, when
the system disarms.
Page 14
User Manual
APOLLO
DISARMING THE SYSTEM
Enter the protected area through a delay zone entry. The buzzer will
start sounding. During the last 10 seconds of the entry delay the buzzer
sounds faster to remind you to disarm the system, as the entry delay
is about to end, while in the LED Display you can see the countdown of
entry delay.
Enter [USER CODE] and press [ENTER]. The green LED will change
status, and the system will disarm.
If the code you use to disarm the system is not correct, you can try
again. You can try 4 times to disarm the system. If all 4 times the code
you enter is wrong, then the keypad locks for 15 seconds. The system will
report the event to the Central Station.
If there was an event during the arming cycle, such as, Mains power
loos, alarm e.t.c., and you disarm the system the keypad buzzer will sound
and the LED “TROUBLE” will turn on. Press [READ] & [ENTER] to
see what the problem is.
The system can disarm, automatically, every day the same time if it
is programmed to perform auto arm or disarm. The automatic arming and
disarming function is described in previous section of this manual.
DURESS DISARMING
If you are being threaten at the time that you are entering your area
and they force you to disarm the alarm, enter the [DURESS CODE] &
[ENTER]. The unit will disarm and, it will report the Durress disarm to
the central.
HOME ARMING
This arming method is used for perimeter protection. This way you
activate all perimeter zones, while you can move freely in the protected
area. There are 3 methods of home (perimeter) arming:
1. Press [ΗΟME] & [ENTER]. All perimeter zones are activated. Entry
and exit delay are deactivated. All delay zones will operate as
instant, and all interior zones are bypassed.
2. The following arming method is active only if, the installer has
programmed the system to perform auto home arming.
APOLLO
User Manual
Page 15
Enter [USER CODE] and press [ENTER]. The panel will start the
exit delay countdown. If no delay zone “opens” during the exit delay,
the system will automatically HOME arm, bypassing all interior zones.
In this case, the entry delay will be active. If any of the users is out
of the premices, can enter from a delay zone and disarm the system,
during the entry delay, by using his code. This method can not be used
in the following cases:
i. When the zone DELAY is bypassed
ii. When the system is armed via a key-switch zone which has no exit
delay
3. In case you wish to HOME arm the system and also bypass some other
zones, enter [USER CODE], press [BYPASS] enter [ZONES TO BE
BYPASS] and then press [ΗΟME] & [ENTER].
If you had HOME armed the system, and wish to exit the
premices, without disarming the system, press the key [BYPASS]. The
exit delay will start countdown, and you may leave the area. After the
end of the delay time the system will be in HOME ARM status.
If you use this last method to exit your premices by pressing the key
[BYPASS], the entry delay will be active, regardless the method you used
to HOME arm the system.
CHANGING ARMING STATUS: If you had HOME armed the
system, you may activate or cancel the entry delay by pressing the key
[ΗΟΜΕ]. When the LED “ARM” is blinking the entry delay is active,
while when it is off the entry delay is de-activated.
DISARMING: To disarm the system, if you had armed it using
HOME arming, enter [USER CODE] and press [ENTER]. As a
confirmation the LED “ARM” will change status.
CANCEL AN ALARM
To cancel an alarm enter [USER CODE] and press [ENTER]. The
sirens of the system will be silenced, and the digital communicator will
report to the Centarl Station.
Page 16
User Manual
APOLLO
BURGLARY, FIRE OR MEDICAL ASSISTANCE
The unit has the capability to send a help signal to the central station,
in case that you are threatened or you need medical assistance or when
there is a fire at your area.
• In case you need medical assistance hold down at the same time keys
[1] and [3], for two seconds.
• In case of fire hold down at the same time keys [4] and [6], for two
seconds.
• In case of burglary hold down at the same time, keys [7] and [9], for
two seconds.
To cancel any of the above actions, type in your code and press
[ENTER].
AUTO ARMING AND DISARMING OF THE SYSTEM
When the system has been programmed to automatically arm or
disarm at a specific time, the keypad buzzer will start sounding at the auto
arm time for 4 minutes (exit delay for auto arm). On the display you will
be able to see the exit delay countdown. During the exit delay you may
leave the premices, transfer the auto arming time or cancel auto arm,
using the following methods:
¾ Enter [USER CODE] and press [ENTER]. This way you cancel
auto arming.
¾ To temporarily cancel auto arming, enter [USER CODE] and
press [ΗΟΜΕ]. On the Display you will have the indication: [t].
Enter the number of minutes (01-99) after which the system
should automatically arm and press [ENTER]. After this period
the system will automaticall arm and disarm again at the
preprogrammed time and day.
NOTE: During auto arming the system is fully armed. If after the
end of exit delay any zones are unbalanced they will be automatically
bypassed.
CHIME OPERATION
If you wish to be notified when a door or window in your premices
APOLLO
User Manual
Page 17
open, when the system is disarmed, you may activate the zone’s chime
operation. All the magnetic contacts connected to the relative zones must
be programmed as chime.Chime operation is activated the keypad buzzer
will sound for 1 second, whenever a zone programmed as chime will be
unballanced.
¾ To activate, press [CHIME] until on the LED DISPLAY you will
have the reading: [CH On].
¾ To de-activate, press [CHIME], until on the LED DISPLAY you
will have the reading: [CH OFF].
NOTE: This mode is set up independently in each partition, using the
partition main code. The chime operation is active only, when the panel is
disarmed. Furthermore, the chime zones must be programmed, by the
technician.
DISPLAYING THE CURRENT TIME
To read the Current time, press for 2 seconds, the key [TIME] or
press, [READ] [TIME].
POWER FAILURE (220V) REPORT
When there is an power failure of the 220 V voltage, for a time
period longer than the time programmed by the technician in the relative
setting, then the unit sends to the "FOLLOW ME" telephone number an
intermittent sound signal. This is useful in case it’s necessary for you
have knowledge of the power failure in order to prevent some undesirable
event, such as e.g. damage of food in refrigerators, low voltage of the
system’s battery, etc.
OPERATING IN TWO PARTITIONS
The system may be programmed to operate in two partitions. Each
partition may be armed or disarmed separately using different codes.
In case the system operates in two partitions, the operation of every
partition is the same as described in a simple installation. Following you
will find abilities and functions of the system while operating in two
partitions.
Page 18
User Manual
APOLLO
CHANGING PARTITION
In case the system operates in two partitions, you can use a code to
control both partitions from any keypad. The code you use must have the
ability to change partitions.
¾ Enter [USER CODE] press [PART] [01] when you are in partition 2
and wish to control partition 1.
¾ Enter [USER CODE] press [PART] [02] when you are in partition 1
and wish to control partition 2.
If the code you use does not have the ability to change partitions, the
keypad buzzer will sound and error message and you will not be able to
control the other partition. Repeat the above mentioned method using a
proper code.
By entering the other partition, on your keypad you will have all the
indications of the new partition, and you will be able to control it (i.e.
arm, disarm, check the events e.t.c.). You will not be able to perform
programming in this partition.
NOTES:
¾ You may return to your previous partition, by repeating the above
mentioned procedure. The keypad will return to its normal
partition after 1 minute if no key is pressed.
¾ To read, which, partition you are in , press the key [PART] for 2
seconds. If you are in Partition 1 the Led 1 will turn on, while if
you are in Partition 2, the Led 2 will turn on.
SELECTIVE ARMING AND DISARMING OF PARTITIONS
To arm or disarm only your partition enter [USER CODE] and press
[ENTER].
In case the system operates in 2 Partitions, you can arm or disarm
any of them or both, at the same time. This is done using the following
methods and a code that has the ability to arm or disarm both partitions.
APOLLO
User Manual
Page 19
ARMING:
Enter [USER CODE] and press [PART]. On the Display you will
see the letter [Α] (Arm). Press key [1] to arm the 1st partition, [2] to arm
the 2nd partition, or both [1] & [2] to arm both partitions. By pressing the
keys [1], [2] the LED’s 1 and 2 will turn on or off as an indication of the
partitions that will arm. Press [ENTER]. The LED “ARM” will change
status and the exit delay will start count down.
NOTE: Using the above mentioned method you can only fully
arm the system. You can not HOME arm both partitions, by this
method.
DISARMING:
Enter the premices via an entrance that belongs to a delay zone. The
buzzer will sound to indicate you must disarm the system. Enter [USER
CODE] and press [PART]. On the Display you will see the letter [d]
(disarm). Press key [1] to disarm the 1st partition, [2] to disarm the 2nd
partition, or both [1] & [2] to disarm both partitions. Press [ENTER]. The
LED “ARM” will change.
In both cases, you have the ability to change from arming to
disarming and the opposite, by pressing the key [PART].
CANCEL THE ALARM IN CASE OF 2 PARTITIONS
When the control panel operates in 2 partitions you may cancel an
alarm using the following methods:
1. From a keypad of the partition in alarm, enter [USER CODE]
and press [ENTER]. The system will be disarmed and the sirens
will silence. The digital communicator will report to the Central
Station.
2. From a keypad that belongs to the other partition, you may
silence the sirens without disarming the system entering [USER
CODE] and press [ENTER]. The digital communicator will
report to the Central Station.
If the alarm was triggered by a fire zone, the siren sounds
intermittently, and on the keypads the relative zone LED turns on. The
Page 20
User Manual
APOLLO
fire alarm may be cancelled only from a keypad that belongs to the same
partition with the, fire zone, entering [USER CODE] and pressing
[ENTER].
CHECKING THE EVENTS
The control panel stores the last 300 events, with date and time, such
as: arming, disarming, alarm, power failure, low battery e.t.c. All these
information you may see and print via the Download software.
When the red LED “Trouble” of the keypad is on, there is an event during
the arming cycle of the system. From the keypad you may see the main event,
pressing: [READ] & [ENTER]. On the DISPLAY you will have the following
readings:
A
CL
Ct
dL
F
Ft
Lt
Lb
P
Pt
St
TROUBLE TABLE
Alarm during the last arming cycle
Loss of time
Communication Failure (with the Central Station)
Downloading to the control panel
A fuse is blown.
Fire zone line fault
Telephone Line failure
Battery voltage is bellow 11V.
Mains Power failure 220V.
Keypad Failure.
Siren Power Line fault
NOTES:
¾
¾
¾
Press, [READ] [ΖΟΝΕ]], to see if there was an alarm during the last
arming cycle. On the LED Display you will have the letter Α
(Alarm) and also the LED’s of the zones that triggered the alarm.
When a fire zone has a line fault, the keypad buzzer sounds
intermittently. To silence the buzzer press any key.
In case of telephone line failure, the keypad buzzer sounds
continously. To silence the buzzer press any key.
APOLLO
User Manual
Page 21
INSTRUCTIONS FOR THE PROPER OPERATION OF THE
ALARM SYSTEM
The security provided by the system that is installed in your
premices, depends on the right selection and placement of the devices it
consists of and on the proper maintenance that you will carry out.
In order for the alarm system to operate properly and rise up to the
purpose it has been bought for, it should, like every electronic device, be
maintained properly and regularly. Furthermore, the user instructions
must be closely followed. We recommend that the test described below
be carried out, at least once every 15 days:
¾ To start with, contact the central station or the police department,
which is connected to the security system, in order to inform them
for the upcoming test.
¾ Arm the alarm system, the way we described in the relative
chapter and, when the exit time ends, open the entrance door.
Wait until the entrance time expires and the siren sounds. If the
siren sounds, enter the [USER CODE] and press [ENTER] to
disarm the system. With this test you confirm that the panel, the
sirens and the entrance contact operate properly.
¾ To test the proper operation of the detectors follow the same
procedure we described and, instead of opening the door, move
around the area protected by the detector, until you hear the siren.
Enter the [USER CODE] and [ENTER] to stop it. Repeat the
same procedure for the remaining detectors and for the doors and
windows, which are protected.
¾ Test, frequently, the operation of the sirens, pressing
simultaneously, for two seconds, the keys [CODE] and
[ENTER], so that you are certain that the sirens of the system
operate properly.
¾ Test the battery voltage of the system, by pressing the [0] key for
2 seconds. On the LED display you will have the battery voltage.
MAINTENANCE
Page 22
User Manual
APOLLO
To ensure the proper operation of the system and in order for the
system to comply with the safety specifications, you must follow the next
periodic procedure.
•
•
•
Every six months you must check and adjust, if necessary, the
charging voltage of the panel’s battery and the self-supplied siren.
Also, every six months, apart from the periodic tests of the operation
of the system that the system, you must check the proper operation of
all devices (PIR detectors, glass break detectors, magnetic contacts,
sirens etc.), the communication of the panel with the central station or
with the telephone numbers which have been programmed, the times
and all system’s parameters in general.
The replacement of the panel and siren’s batteries must take place
every three years.
APOLLO
User Manual
Page 23
WARRANTY
Sigma Security warrants its products hereinafter referred to as the “Product” or
“Products” to be in conformance with its own plans and specifications and to be free of defects in
materials and workmanship under normal use and service for a period of 24 months from the day of
purchase from the Manufacturer. The Manufacturer’s obligations shall be limited within the warranty
period, as its option, to repair or replace the product or any part thereof. The Manufacturer shall not
be responsible for dismantling and/or reinstallation charges. To exercise the warranty the product
must be returned to the Manufacturer freight prepaid and insured.
This Warranty does not apply in the following cases: improper installation, misuse, failure
to follow installation and operation instructions, alteration, abuse, accident or tampering, and repair
by anyone other than the manufacturer.
This Warranty is exclusive and expressly in lieu of all other warranties, obligations or
liabilities, whether written, oral, express or implied, including any warranty of merchantability or
fitness for a particular purpose, or otherwise. In no case shall the Manufacturer be liable to any
consequential or incidental damages for breach of this warranty or any other warranties whatsoever,
as aforesaid.
This warranty shall not be modified, varied or extended, and the Manufacturer does not
authorize any person to act on its behalf in the modification, variation or extension of this warranty.
This warranty shall apply to the product only. All products accessories or attachments of others used
in conjunction with the Product, including batteries, shall be covered solely by their own warranty, if
any. The Manufacturer shall not be liable for any damage or loss whatsoever, whether directly,
indirectly, incidentally, consequently or otherwise, caused by the malfunction of the product due to
products, accessories or attachments of others, including batteries, used in conjunction with the
Products.
The Manufacturer does not represent that its Product may not be compromised and/or
circumvented, or that the Product will prevent any death, personal and/or bodily injury and/or damage
to properly resulting from burglary, robbery, fire or otherwise, or that the Product will in all cases
provide adequate warning or protection. User understands that a properly installed and maintained
alarm may only reduce the risk of events such as burglary, robbery, and fire without warning, but it is
not insurance or a guarantee that such will not occur or that there will be no death, personal damage
and / or damage to property as a result.
The Manufacturer shall have no liability for any death, personal and /or bodily injury
and/or damage to property or other loss whether direct, indirect, incidental, consequential or
otherwise, based on a claim that the product failed to function.
However, if the Manufacturer is held liable, whether directly or indirectly, for any loss or
damage arising under this limited warranty or otherwise, regardless of cause or origin, the
Manufacturer’s maximum liability shall not in any case exceed the purchase price of the Product,
which shall be fixed as liquidated damages and not as penalty, and shall be the complete and
exclusive remedy against the Manufacturer.
Warning: The user should follow the installation and operation instructions and among other things
test the product and the whole system at least once a week. For various reasons, including, but not
limited to, changes in environmental conditions, electric or electronic disruptions and tampering, the
Product may not performed as expected. The user is advised to take all necessary precautions for
his/her safety and the protection of his / her property.
Page 24
User Manual
APOLLO