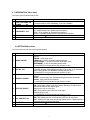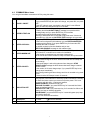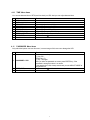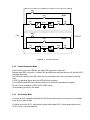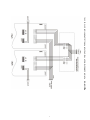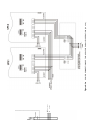
1
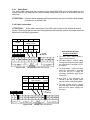
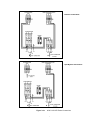
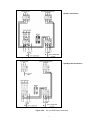
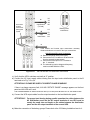
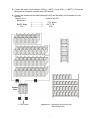
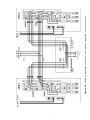
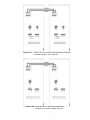
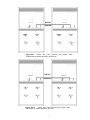
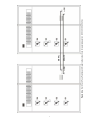
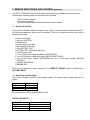
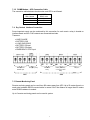
ADAMS RP 3_3 ONLINE SERIES
10-200kVA
USER MANUAL
Uninterruptible Power Systems
CONTENTS
1.
SAFETY……………….......................................................................................................2
2.
HANDLING………………. .................................................................................................4
3.
3.1
3.2
3.3
3.4
3.4.1
3.4.2
3.4.3
3.4.4
INSTALLATION ..............................................................................................................5
Introduction………………. .................................................................................................5
Unpacking…………… ……… ............................................................................................5
Equipment Positioning……………………...........................................................................5
Connection of Power Cables .............................................................................................6
Safety Earth……………………..........................................................................................7
Cable Connection……… ..................................................................................................7
Battery Installation……………….. .....................................................................................12
Communication (UPS-Server)………………......................................................................15
4.
4.1
4.2
4.3
4.4
4.5
4.6
4.7
4.8
4.9
4.10
4.11
FRONT PANEL……..........................................................................................................16
Introduction ………….. ......................................................................................................16
Alarms and Troubleshooting..............................................................................................17
Menu Description…….. .....................................................................................................20
Main Menu…………….......................................................................................................22
Measures Menu Items…………………….. .........................................................................22
Alarms Menu Items…… ....................................................................................................22
Information Menu Items.....................................................................................................23
Settings Menu Items……...................................................................................................23
Command Menu Items ......................................................................................................24
Time Menu Items………. ...................................................................................................25
Password Menu Items......................................................................................................25
5.
5.1
5.2
5.3
5.4
5.5
5.6
5.7
5.8
5.9
5.9.1
OPERATING INSTRUCTIONS..........................................................................................26
UPS Switch On Procedure 10 to 30kVA ............................................................................26
UPS Switch On Procedure 40 to 200kVA ..........................................................................26
Transfer to Maintenance By Pass Mode 10 to 30kVA ........................................................27
Transfer to Maintenance By Pass Mode 40 to 200kVA……………………… .......................27
Transfer from Maintenance By Pass to Inverter Mode 10 to 30kVA....................................28
Transfer from Maintenance By Pass to Inverter Mode 40 to 200kVA..................................28
Transfer from Static By Pass to Inverter Mode ................................................................... 29
UPS Shutdwon Procedure 10 to 30kVA…………………………………………………… ......29
UPS Shutdwon Procedure 40 to 200kVA…………………………………………………… ....30
Utility Interruption…………………………………………………… ........................................30
6. PARALLEL OPERATION ......................................................................................................31
6.1 Introduction……………......................................................................................................31
6.2 Parallel Operation Modes ..................................................................................................31
6.2.1 Symetric Parallel Mode…………………………… ...............................................................31
6.2.2 Parallel Redundant Mode………........................................................................................32
6.2.3 Hot Standby Mode………………........................................................................................32
6.3 Parallel Operation Mode Fault Codes ................................................................................33
6.4 Parallel System Accessories .............................................................................................33
6.5 UPS Switch On Procedures Parallel Mode ……………………………………………………..42
6.6 Transfer to Maintenance By Pass Mode ………………………………..................................43
6.7 Transfer from Maintenance By Pass to Inverter Mode…….................................................43
7.
REMOTE MONITORING AND CONTROL .........................................................................44
7.1 Serial Link Interface……….………………….......................................................................44
7.2 Serial Link Interface Cable ................................................................................................44
7.3 Modem Connection TELESERVICE .................................................................................45
7.3.1 Hardware Configuration……….. ........................................................................................45
7.3.2 Functioning Principle…………. ..........................................................................................45
7.3.3 SMART Modem Programming (PC modem) ......................................................................45
7.3.4 DUMB Modem Programming ………………………………………………………..................45
7.3.5 DUMB Modem – UPS Connection Cable...........................................................................46
7.4 Dry Contact Interface Connection......................................................................................46
7.5 Remote Monitoring Panel ..................................................................................................46
8.
8.1
8.2
END USER GUIDE ...........................................................................................................47
Maintenance……………… ................................................................................................47
Storage…………………….. ...............................................................................................47
9. LIMITED WARRANTY ...........................................................................................................48
1. SAFETY
Thank you for choosing SAVIOR UPS Systems. This document provides all the instructions
necessary for the instllation and the operation of the SAVIOR 3_3 ONLINE Uninterruptible Power
Supply.
For the staff and the equipment safety, it is necessary for the users to fully read and understand
this manual before working on this equipment.
DESCRIPTION OF THE SYMBOLS ON THE UPS:
DANGER DANGEROUS VOLTAGES (red-yellow)
READ THE OPERATING INSTRUCTIONS (black-yellow)
GROUNDING TERMINAL BLOCK (black-silver).
IMPORTANT NOTICES
1.
2.
3.
4.
5.
6.
7.
Please read and save the manual before operating the system.
Please do not remove the protection panels; internal voltage is dangerous.
Please follow all the instructions and warnings.
Please do not operate the unit without grounded source.
Power cord of the UPS should be routed carefully so that they are not to be walked on.
Please save or recycle the packaging materials.
The equipment should be always kept in vertical position.
8. This equipment is compliant with the European directives, which shall be applied to this product.
Hence it is marked:
WARNING!
· Do not insert any object into ventilation holes or other openings.
· Avoid the sudden temperature changes, which could cause condensation inside the UPS.
Otherwise, wait for at least two hours before switching on.
· To reduce the risk of fire or electric shock, install in temperature and humidity controlled indoor
area.
· This equipment complies with standards EN50091-2 for electromagnetic compatibility. In a
domestic environment, it can cause radio interference; accordingly, complementary measures
must be made.
· To reduce the risk of fire, replace fuses with the same type and rating when necessary.
2
CAUTION!
· Only authorized person has to make installation or maintenance of UPS and batteries.
· Risk of electric shock! Please do not remove cover. No user serviceable parts inside,
please contact to authorized service.
· The output may be energized when the unit is not connected to a mains supply.
· Risk of electric shock! Hazardous live parts inside the unit are activated by the battery
supply even when the input AC power is not connected.
· Switch the UPS OFF before connecting the computer interface signal cable. Reconnect the
power cord only after signaling interconnections have been made.
BATTERY WARNINGS
· Risk of electric shock! The following precautions have to be taken during the operation on
battery:
* Remove watches, rings or other metal objects.
* Use tools with insulated handles.
· Batteries in the UPS are recyclable. Batteries must be disposed of according to local
environmental laws. If not disposed of properly, batteries contain lead and may cause danger for
the environment and human health.
· Do not dispose the batteries in a fire. Batteries will explode. Do not open or mutilate the
batteries. They contain an electrolyte that is toxic and harmful to the skin and eyes. In any
contact with the electrolyte, please wash the zone immediately.
· Please do not discharge the battery.
3
2. HANDLING
NOTE: THE UPS CABINETS MUST ALWAYS BE HANDLED VERTICALLY DURING
TRANSPORT.
Do take care to the UPS balancing during handlings.
Handling :
You can either use a pallet truck or
a lift truck for side handling,
provided that the removable sidepanel is unscrewed.
SAVIOR 3_3 ONLINE
Battery cabinet
It is possible to use slings provided
they are at least 1.5 m long.
Suitable lifting eyes with nuts can be
supplied on request.
Remove the top panel to gain
access to the 4 holes designed
for the fixing of the lifting eye
screws.
If the height of the ceiling does not
make it possible to use slings, use a
lifting beam with shorter slings.
4
UPS cabinet
3. INSTALLATION
Non-compliance with the installation guidelines contained in the present manual could adversely
effect the working and/or reliability of the UPS.
3.1 Introduction
WARNING!!!
· Do not apply electrical power to the UPS equipment before the arrival of authorized service
personnel.
· Installation and maintenance has to be done by authorized service person only.
3.2 Unpacking
The UPS is packed and enclosed in a structural cardboard carton to protect it from damage.
1. Inspect for damage that may have occurred during the transport, if any damage is noted, please
call the forwarder or insurance company immediately and retain the shipping carton and the
UPS.
2. Carefully open the carton and take the UPS out.
3. Keep the carton and packing material for future re-use.
3.3 Equipment Positioning
1. The equipment’s installation place must be easy to service.
2. Install the UPS in a protected area with adequate airflow and free of excessive dust.
3. You must therefore allow for a minimum gap of 250 mm behind the unit to allow adequate air
flow (See Figure 3.1)
4. Select a suitable place (temperature is between 0°C and 40°C) and the relative humidity (%90
max)
5. It is recommended to use air-conditioned room (24°C)
6. Temperature is a major factor in determining the battery life and capacity. Battery manufacturers
quote figures for an operating temperature of 20°C. On a normal installation the battery
temperature is maintained between 15°C and 25°C. Keep batteries away from main heat sources
or main air inlets etc.
7. In case of UPS operation in a dusty environment, please clean the air with a suitable air filtration
system.
8. Keep out of your equipment from the explosive and flammable items.
9. Avoid direct sunlight, rain, and high humidity.
WARNING!!!
Check the capacity of the forklift if it is available for lifting.
DO NOT MOVE THE BATTERY CABINET WHILE THE BATTERIES ARE INSTALLED.
5
250 cm
Air inlet are designed at the bottom
and the rear of the UPS, whereas air
outlet are located on the top of the
unit : it is therefore useless to leave a
lateral clear-distance.
SAVIOR
Front face
Figure 3-1 Installation Diagram
3.4 Connection of Power Cables
CAUTION! Only authorized person has to install or maintain UPS / batteries.
The AC input of the UPS should be supplied by a separate line from the AC distribution board.
The input/output cables can be sized to suit the modules rating according to the table below.
The connections of the electric panel should be supplied by grounded outlet. Cables enter the UPS modules
via entry panels in the base of cabinet. All control cables should be screened and run in a separate trunking
to the power cables.
The input/output cables can be sized to suit the modules’ rating according to the table below.
BUS BAR CONNECTION
STUD SIZE
Battery Input/Output
Battery
Cable
at min.
Terminations
Battery Terminations
Voltage
NOMINAL CURRENT : Ampere / Recommended Cable Size (mm2)
UPS
POWER
(kVA)
Input Mains
With full battery Recharge
380V
A / mm
400V
2
A / mm
Bypass / output
At full load
415V
2
A / mm
380V
2
A / mm
400V
2
A / mm
415V
2
A / mm2
A / mm2
U-V-W-N
+&-
10
22A / 6
20A / 6
19A / 6
16A / 6
15A / 6
14A / 6
28A / 6
16mm2
Terminals
16mm2
Terminals
15
32A / 6
30A / 6
28A / 6
23A / 6
22A / 6
21A / 6
41A / 10
16mm2
Terminals
16mm2
Terminals
20
43A / 10
39A / 10
37A / 10
31A / 10
29A / 10
28A / 10
55A / 16
16mm2
Terminals
16mm2
Terminals
30
64A / 16
59A / 16
56A / 16
46A / 10
44A / 10
42A / 10
82A / 25
35mm2
Terminals
35mm2
Terminals
40
85A / 25
78A / 25
73A / 25
61A / 16
58A / 16
56A / 16
110A / 35
M6
M8
60
128A / 35
117A / 35
109A / 35
91A / 25
87A / 25
84A / 25
163A / 50
M6
M8
80
168A / 50
160A / 50
154A / 50
121A / 35
115A / 35
111A / 35 220A / 70
M6
M8
100-120 256A / 70
234A / 70
218A / 70
182A / 70
174A / 70
168A / 70 326A/100
M8
M8
312A / 95
301A / 95
230A / 70
218A / 70
160
329A / 95
210A / 70 430A/120
M8
M8
200
357A /185 339A /185 327A /185 243A /150 230A /150 223A /150 560 /185
M8
M10
NOTES: The neutral conductor should be sized for 1,5 times the output/bypass phase current.
The Earth conductor should be sized at 2 times the output/bypass conductor (this is
dependent on the fault rating, cable lengths, type of protection etc.) These
recommendations are for guideline purposes only and are superceded by local
regulations and codes of practice.
6
3.4.1 Safety Earth
The safety earth cable must be connected to the earth BUS BAR and to each cabinets in the
system and also the earthing and neutral bonding arrangements must be in accordance with the
local laws.
ATTENTION!!!
Failure to follow adequate earthing procedures can result in electric shock hazard
to personnel, or the risk of fire.
3.4.2 Cable Connections
ATTENTION!!!
All the cable connections of the UPS must be done by the authorized service
person. Once the equipment has been finally positioned and secured, connect the power cables as
described in the following procedure:
F1
+
BATTERY
FUSES
BATT (+)
F2
F3
RECTIFIER
INPUT FUSES
Split (External) By-Pass
Supply Connections
WHITE
CABLES
BATT (-)
a. The three white cables shown in
Figure 3-2 are removed.
b. The three phase + neutral cables
coming from the split by-pass supply
are connected to terminals U3-V3W3 and N3.
Figure 3-2-a
10-15-20 kVA Cable Connections
+
BATTERY
FUSE
BATT (+)
F1
F2
F3
RECTIFIER
INPUT FUSES
S1
d. Note that in this connection the
neutrals of the split by-pass supply
and the line are connected together.
INPUT
SUPPLY
WHITE
CABLES
BATT (-)
Figure 3-2-b
c. The three phase + neutral AC Input
cables are connected to terminals
U1-V1-W1 and N1, to supply the
necessary operational input power
of the UPS.
30 kVA Cable Connections
7
e. The split by-pass supply’s voltage
and frequency must be compatible
with the UPS output voltage and
frequency.
1. Verify that the UPS’s switches are totally at “0” position.
2. Connect the AC input supply cables between the mains distribution panel and the UPS “AC Input” (U1-V1W1-N1) terminals.
ATTENTION!!!
ENSURE CORRECT PHASE SEQUENCE
If there is a phase sequence fault, A21/A39 “ROTATE PHASE” message appears on
the front panel and the UPS can’t work.
3. Connect the UPS output cables between the UPS output “AC output” (U2-V2-W2-N2) and the load
distribution panel.
4. Make the connection of the battery groups. Please look at the Battery Installation item for it.
ATTENTION!!!
Remove the battery fuse before making the connection of the battery circuit
breaker during the battery installation. (Turn off into “0” (OFF) position)
5. The “BATT(+)” and “BATT(-)” cables, coming from the battery group terminals must be connected to the
lower ends of the BATTERY “+” and “-” respectively.
6. If a battery circuit breaker is going to be used, it should be connected in series with the “BATT(+)” and
“BATT(-)” cables.
8
Normal Connections
AC
AC
A
B
Split By-Pass Connections
AC
AC
A
B
Figure 3-2-c
40-60 kVA UPS Power Connections
9
Normal Connections
AC
AC
A
B
Split By-Pass Connections
AC
AC
B
A
Figure 3-2-d
80 kVA UPS Power Connections
10
S4
A
These links
must be
removed for
split bypass
system
S3
Output
connections
(To load)
B
S2
Input
connections
U2
V2
W2
N2
U3
V3
W3
N3
Battery power
connections
C
S1
UPS rectifier and inverter input connections. Normally
these terminals are not used for the input connections.
Split (External) By-pass Connection
a. Remove the shown links (in the figure)
b. Connect the R-S-T-N cables to the B terminals
from the external by-pass source.
c. Connect the mains input R-S-T-N cables to
the C terminals.
d. The external by-pass’s voltage and frequency
must be suitable With the UPS’s.
Figure 3-2-e
100-120-160-200 kVA UPS Power Connections
1) Verify that the UPS’s switches are totally at “0” position.
2) Connect the AC input supply cables coming from the input mains distribution panel to the B
terminals as in Fig. 3-2-c,d,e.
ATTENTION!!! PLEASE BE SURE OF CORRECT PHASE SEQUENCE.
If there is a phase sequence fault, A21/A39 “ROTATE PHASE” message appears on the front
panel and the UPS can’t work.
THE CORRESPONDING AC INPUTS OF BOTH UPS’s (U3-V3-W3) MUST BE EXACTLY OF THE SAME PHASE.
3) Connect the UPS output cables from the output terminals to the load distribution panel.
ATTENTION!!!
For proper load sharing during parallel operation the cables between the
AC distribution panel and the AC output terminals of one UPS must be
exactly the same size and length as the cables between the distribution
panel and the AC output terminals of the second UPS.
4) Make the connection of the battery groups. Please look at the 3.3 Battery Installation item for it.
11
ATTENTION!!!
Remove the battery fuses before making the connection of the battery circuit
breaker during the battery installation. (Turn off into “0” (OFF) position)
5) Connect the copper earth bus, which is under the safety earth and the cables power connection.
Note: The earth and the neutral connections must be done according to national rules.
If the REMOTE STOP option is going to be used, you should connect the remote stop button
(normally open), to the pins 4 and 5 of the remote stop connector (CN3) on the PCB ITF3.
3.4.3
Battery Installation
ATTENTION!!!
Remove the battery fuse before making the connection of the battery circuit
breaker box during the battery installation.
The batteries of the UPS equipment are usually contained in a purpose-built battery cabinet, which
sits alongside the main UPS equipment. Sealed, maintenance-free batteries are normally used in
this type of installations.
Where battery racks are used, they should be positioned in accordance with the battery
manufacturer’s recommendations. In general, batteries require a well-ventilated, clean and dry
environment at reasonable temperatures to obtain efficient battery operation.
In general a minimum space of 10 mm must be left on all vertical sides of the battery block. A
minimum clearance of 20 mm should be allowed between the cell surface and any walls. A
clearance of minimum150 mm should be allowed between the top of the cells and the underside of
the shelf above (this is necessary for monitoring and servicing the cells). All metal racks and
cabinets must be earthed. All live cell connections must be shrouded.
The batteries are connected to the UPS through a circuit breaker (optional), which is manually
closed and electronically tripped via the UPS control circuitry. If the batteries are cabinet-mounted
this circuit breaker is fitted within the cabinet; however, if the batteries are rack-mounted or
otherwise located remote to the main UPS cabinet then the battery circuit breaker must be mounted
as near as possible to the batteries themselves, and the power and control cables connected to the
UPS using the most direct route possible.
1. Unpack each battery and check its terminal voltage. If any battery has terminal voltage less than
10,5 V it must be charged before.
2. Please check the battery connecting materials.
3. Please put 8 pieces of the batteries to each rack.
4. Start installing the batteries from top to the bottom on the racks.
5. Connect the cable between the battery circuit breaker’s positive port (BAT+) first then battery
tray (+) at the left topside as in the figure 3-3
6. Connect the cable between the battery circuit’s negative port (BAT-) first then battery tray (-) at
the right bottom side as in the figure 3-3
7. Please pay attention to the connections and the poles’s directions between the racks.
12
8. Connect the battery circuit breaker’s “UPS(+) Þ BATT(+)” and “UPS (-) Þ BATT(-)” Ports to the
battery group connection terminals at the UPS cabinet.
9. Connect the shielded control cable between the UPS and the battery circuit breaker as in the
following.
Battery circuit
Inside of the UPS
Breaker box
1.....................1
ITF3 Board
BAC60 Board
2.....................2
BATT. CB
CN1
3.....................3
CN3
Battery
Fuse
To UPS Cabinet
Figure 3-3-a
13
UPS Battery Group Connection
(With Battery Fuse)
3.4.4
Communication (UPS-Server)
Dry relay alarm contacts or RS232 communication port can be used for communication with UPS. Users can
get information about any possible alarm like “Battery Low” “Line Failure” “Load On By-pass”. The relay
interface AS400 and Windows NT is an special edition for the systems.
You should use ITF3 and RS330 board for the communication with the PC. For this connections there must
be a dedicated serial port.
ATTENTION!!!
The communication cables of this option must be shielded and must install away from the
voltage cables.
The RS232 port (at RS330 board and DB9 female) definition :
RS232 Signal Gnd (isolated)
RS232 Receive
RS232 Transmit
7
6
9
The settings for the Microsoft NT serverÒ , IBM AS400Ò connections will be done by the system’s operator in
accordance to the each user’s needs.
Battery Circuit
Breaker Input
Emergency Stop
Line Failure
Relay
Battery Low Relay
or Common Alarm
Relay
CN4
CN3
Figure 3.4
ITF3 Board Connection Details
14
By-Pass
Relay
4. FRONT PANEL
4.1 Introduction
The front panel of UPS, consisting of a 2 lines alphanumeric display, 6 status lamps, plus 4 function
keys, allows the complete monitoring of the UPS status. The mimic flow diagram helps to
comprehend the operating status of the UPS. By using the function keys operator can move on
menus and change some parameters.
Figure 4-1
Line
Battery
By-pass
Maint.Sw.
Inverter
O/P Sw.
If
If
If
If
If
If
Control and display panel
lamp is lit mains is okay
lamp is lit UPS is operating on batteries
lamp is lit static bypass is active and load is connected to mains voltage
lamp is lit mechanical bypass switch is on
lamp is lit inverter feeds the load
lamp is lit S4 power output switch “1” on position.
There are 4 function keys on front panel these are ENTER, DOWN, PLUS and MINUS.
DOWN key helps moving on menus, PLUS and MINUS keys select options , ENTER key means
the selected option or menu is valid.
15
4.2
Alarms and Troubleshooting
Totally 64 alarms and status messages (might be extended, please consult us) are used in UPS,
which helps the user. Messages are coded for easy dialog with service organization, all messages
contains numbers A1-A2-A3….An. Messages and events in UPS are recorded to a log file with
event time and date
ALARM
DESCRIPTION
A1 BYPASS FAILURE
Possible Causes:
A2 INVERTER FAILURE
Possible Causes:
A3 3 OVERTEMP
Possible Causes:
Bypass system failure
1) Maybe bypass parts are defective call service
Inverter digital start system is failed
Internal failure. Call service.
Overload in UPS repeated at 3 times in 30 min.
1) Overload
2) Fan failure or durty air inlets,outlets
3) Bad UPS settling
UPS output voltage is out of tolerance at 3 times in 30 min.
Internal failure. Call service.
Batteries empty at last of line out. Wait to return of electric.
Rectifier is not to produce DC bus voltage.
Batteries are low.
1) UPS wrought long time when line out
2) Charger system failure
Inverter output voltage is over than max. tolerance voltage value.
Inverter is stopped.
1) Inverter failure
UPS loaded over than max. %100 load level.
Load on the UPS output is over than max. Load capacity. This state is maybe
continous or short time. When this alarm is continous to check loads.
Line failure.
1) Maybe line out
2) There is a problem on the UPS ınput board. Please Check.
3) UPS input fuses are blowned.
Over temperature. (inverter or rectifier section)
1) Overload for inverter
2) Over temperature
3) Fan failure or durty air inlets
4) Bad UPS settling. There is not vantilation area.
Inverter output system failure.
1) Overload.
2) Short circuit.
3) UPS is out of order. Call service.
Inverter output voltage is under than min. tolerance voltage value.
Inverter is stopped.
Battery voltage is over than max. tolerance.
Fuse blowned. (not used at this power range)
During transfer to bypass, Voltage or frequency value of bypass source is
incorrect and the UPS turn off the load power.
During normal (inverter) operation some times you can see this message.
During bypass if the bypass protection option is on and if the bypass source is
tolerant out UPS switch off the static bypass for load protection.
Battery circuit breaker is off, batteries are not connected to UPS
At start up if the mains is okay you can start operation but this message is
A4 OUT FAILURE
A5 BATT AUT END
A6 CHARGER FAULT
A7 BATTERY LOW
Possible Causes:
A8 OUTPUT HIGH
Possible Causes:
A9 OVERLOAD
Possible Causes:
A10 LINE FAILURE
Possible Causes:
A11 HIGH TEMPER
Possible Causes:
A12 IGBT FAILURE
Possible Causes:
A13 OUTPUT LOW
A14 BATTERY HIGH
A15 FUSE FAILURE
A16 BYP INPUT BAD
A17 BATT CB OPEN
16
active
At start up during line failure UPS waits for turn on battery CB and then it starts
ALARM
DESCRIPTION
If the battery charge is low this message indicates that charge period is not
completed. If mains failure occurs during this message battery operating time is
A18 BATT.CAPA.LOW
not valid.
UPS will beep once every 15 sec.
Battery test aborted. And batteries are not normal
A19 BATT FAULT
UPS gives beep sound whitin 15 sec
You can clear this message by pressing 3 seconds to ENTER key
Possible Causes: 1) Rectifier fault
2) Battery cells damaged
3) PURE battery connection
Boost charge is active for 10 hours. At the end of this time UPS stops the boost
A20 BOOST CHARGE
charge.
UPS gives beep sound whitin 15 sec
A21 ROTATE PHASE
Phase sequence is changed on the UPS input. Please change.
A23 MODE FAILURE
In parallel system, the operation mode of 1 UPS is differenf from the other
A24 P.FAILURE 17
Parallel controller board failure
A25 P.FAILURE 18
Parallel controller board failure
A26 P.FAILURE 19
Parallel controller board failure
A27 P.FAILURE 20
Parallel controller board failure
A28 P.FAILURE 21
Parallel controller board failure
A29 P.TEST MODE
Paralel controller is in test mode
A30 P FAILURE 23
Parallel controller board failure
A31 DUBL UPS NR.
Same UPS number is used in parallel system.
Possible Causes: 1) Change from settings menu
Power supply is not functioning possibly because either of a wrong phase
A39 PSP FAILURE
sequence or rectifier fault.
One of parallel modes is selected but there is no parallel control board on UPS
A40 CANT FIND PR
Change mode from settings menu
A41 P.BAL.FAILURE
In parallel operation current sharing is not okay
A42 BATTERY TEST
Performing battery test
A43 P.SYNC.FAIL
In parallel system SLAVE UPS is not synchronized to MASTER UPS
A44 BT.OPERATION
UPS is operating from batteries
Possible Causes: 1) Central system is black-out
2) Distribution problems upfront of the UPS
After mains failure, mains voltage restored again. This message appears on
A45 MAINS OK
screen for 15 seconds after mains restored.
A46 BOOST CH.END
Boost charge mode is finished, normal charge is valid.
A47 CANNOT START
Analog start system in UPS is failed.
Status messages:
This message group simply shows the UPS STATUS at the upper line of LCD PANEL.
RECTIFIER START !
INVERTER START !
MAINT SWITCH ON !
MANUEL BYPASS !
STATUS ALARM !
STATUS NORMAL !
EMERGENCY STOP !
WAITING SYNC !
STATUS FAULT !
:
:
:
:
:
:
:
:
:
UPS started the rectifier
UPS started the inverter
Maintenance bypass switch is on
Load is transferred to mains manually
Alarm status
UPS is operating
External emergency signal is detected.
Inverter started waiting for syncronization
Fault status
17
CLOSE BATT.CB !
: UPS is waiting for battery CB close
STATUS WARNING ! : Warning message is valid on LCD panel
RECTIFIER START :
At start up the UPS controller board check for input voltage, frequency, battery voltage, for starting,
if these parameters are normal then UPS starts.
INVERTER START :
If the inverter stops controller board tries to start again, during inverter start this message appears
on first line of LCD PANEL.
MAINT SWITCH ON:
Maintenance bypass switch is connected from input to the output of UPS directly, controller stops
inverter for accidental short circuits between mains voltage and inverter output. If the user turn off
the maintenance switch then the inverter starts again.
EMERGENCY STOP :
If an external EPO switch is installed to system (connected to interface board) ,to stop all UPS parts
(rectifier ,static bypass ,inverter ,etc….) is possible . After pressing EPO switch all parts of the UPS
stops,for restart turn off S1 (inverter input) switch and turn on again.
FAULT STATUS :
In some cases controller checks events but can not find solutions, in this case controller decide to
stop system ,for restart user must be turn off S1 (inverter input) switch and turn on again.
WARNING STATUS :
Some events recorded to log event file stays on LCD PANEL but UPS continues to work, these
messages named as warning messages, user can clear this messages by pressing ENTER key for
3 seconds.
These are:
· A20 Boost charge alert
· A6 Charger fault
· A18 Batt capacity low
Shutdown Messages :
UPS is communicating with operating system, by using softwares that you can send commands to
UPS from operating system .UPS takes these commands and produces some messages. These
are:
Shutdown command is performed from operating system and UPS is
waiting for a certain delay for shutdown.
UPS SHUTDOWN
: UPS is in shutdown status
WAITING RESTART
: UPS is shutdown but it is waiting for a certain delay to restart
PAR.SHUTDOWN
: In parallel system the other UPS send shutdown command and UPS is in
shutdown status.
CANCEL SHUTDOWN : Shutdown command is canceled.
WAITING SHUTDOWN :
Only operating system or a PC computer can send this commands.
If the shutdown command is performed during line failure UPS shutdown and if the mains is normal
UPS starts again automaticaly.
18
4.3 Menu Description
By using DOWN function key on front panel you can move on main menu functions, when main
menu appears on LCD panel if you press ENTER key you can go to submenu item.
In submenu you can move by DOWN key, if there is option on submenu item, you can change
options by pressing PLUS and MINUS keys. If you press ENTER key the option is valid.
MEASURES submenu
LD% (output load percentage)
OPV (output voltages)
FREQU (output frequency)
IPV (input voltages)
BYP (bypass source voltages)
BATT (battery voltage and current)
...... etc
SAMPLE menu selection:
If you want to go measures menu use UPS and DOWN keys find MEASURES MENU, press ENTER key,
now you can move on measures menu sub items by DOWN key.
At the end of sub menus ENTER EXIT is located, during this message if you press ENTER key you can go
back main menu.
At ALARMS MENU you can see LOG HISTORY, log events are recorded with event time and date.
PASSWORD Menu is located for service purposes. This menu is developed only for adjustment.
19
Menu and submenu items
MAIN MENU
MEASURES MENU
ALARMS MENU
INFORMATION MENU
PASSWORD MENU
SETTINGS MENU
COMMAND MENU
TIME MENU
SUBMENU
MEANING
LD%: 050 030 060
OPV: 220 221 219 V
FREQU: 50.0 Hz
IPV: 240 230 226 V
BYP: 225 221 219 V
IPI: 031 040 020 A
BATT: 405 V 06.7A
TEMP: 24 C
CHARGE LEVEL: 60%
ENTER EXIT
UPS STATUS
000>Date and alarm
ENTER CLEAR LOG
PARR.ERR.NR
ENTER EXIT
SYNC :OK COMM :OK
POWER: ……… VA
VERSION : MC1XX
FREQUENCY : PLL/XTAL
ENTER EXIT
(password required )
ENTER EXIT
MODE:
UPS No :
REMOTE :ENABLE
RESTART:ON/OFF
BYP.PROTECT ON
ENTER EXIT
SOUND : ON/OFF
ENTER B.TEST>432
ENTER <BYPASS>
ENTER:MODEM INIT
ENTER <BOOST>
SIMULATION OFF
ENTER EXIT
TIME : 23 :15
DATE : 11-10-2001
SET HOURS: 11
SET MINS : 38
SET DAY : 21
SET MONTH : 06
SET YEAR : 2001
ENTER <UPDATE>
ENTER EXIT
20
Output load
Output voltage
Output frequency
Input voltages
Bypass source voltages
G input currents
Battery voltage and charge current
Cabinet inside heat
Battery charge level
Exit from submenu
Valid alarm
Recorded log events
Clearing log records
Parallel control board error nr.
Exit from submenu
Syncronization and comminication
Output power of the UPS
Version of UPS
Frequency generation mode
Exit from submenu
System settings
Exit from submenu
Operation mode selection
UPS number selection
Remote access on/off
Mains restored setting
Bypass load protection
Exit from submenu
Sound alert on/off
Manuel battery test
Manuel bypass
Modem settings
Boost charge on/off
Simulation mode selection
Exit from submenu
time
date
Adjust hours
Adjust minutes
Adjust day
Adjust month
Adjust year
Write new time and date
Exit from submenu
4.4
MAIN Menu
The main menu items are given at the following table you can move on main menu items by using DOWN
key.
Main Menu item
STATUS MENU
MEASURES MENU
ALARMS
INFORMATION MENU
PASSWORD MENU
SETTINGS MENU
COMMAND MENU
TIME MENU
Go to STATUS MENU
Function
The status message which shows the UPS status
® Enter
"go to Meausures submenu"
® Enter
"go to Alarms submenu"
® Enter
"go to İnformation submenu"
® Enter
"go to password submenu"
® Enter
"go to Settings submenu"
® Enter
"go to Command submenu"
® Enter
"go to Time and date submenu"
4.5 MEASURES MENU Items
At this menu you can see all measured values, use DOWN key for moving on submenu items.
1
2
3
4
5
6
7
8
9
10
Submenu item
LD%: 060 074 080
OPV: 220 221 220
FREQU: 50.0 Hz
IPV: 240 235 220
BYP: 230 232 231
IPI: 022 010 030
BATT: 405 V 22.1 A
TEMP: 030 c
CHARGE LEVEL :%100
ENTER EXIT
Goto first submenu item
Function
Output load percentage (capacity %)
Output voltages
Output frequency
Input voltages
Bypass source voltages
Input currents (amperes)
Battery voltage and charge current
Cabinet inside temperature
Battery charge level
® Enter
(¿ ) exit from menu
4.6 ALARMS Menu Items
At this menu you can see recorded log events and valid alarms
1
Submenu item
UPS STATUS
2
000>311201 23:15
3
ENTER CLEAR LOG
4
PARR.ERR.NR : 017
5
ENTER EXIT
Goto first submenu item
Function
Valid alarm is on LCD PANEL
See recorded log events :
At the first line the first 3 numbers shows the event number. 000 numbered
event is the last event. Date ddmmyy time:hh:mm
At the second line of LCD PANEL you can see all recorded alarms.
Use PLUS and MINUS keys for moving on events.
® Enter
(¿ ) clear log event records
After you cleared events you see EMPTY LOG message at lines
Parallel control board fault number. (use if the parallel board is installed)
0 means that there is no error on parallel board
® Enter
(¿ ) exit from submenu
21
4.7 INFORMATION Menu Items
This menu gives information about UPS.
Submenu item
1
SYNC :OK COMM :OK
2
3
POWER: ……. VA
VERSION : MC1xx
4
FREQUENCY : PLL
5
ENTER EXIT
Goto first submenu item
Function
If the UPS is operating syncron to mains SYNC:OK ,if not syncron SYNC:-If communication is active COMM:OK ,if not active COMM:-The maximum power rating of the UPS
Shows the UPS version
Frequency generation mode
PLL :phase locked loop is generating the frequency
XTAL : XTAL oscillator is generating the frequency
SLAVE : in parallel system master is generating the frequency
® Enter
(¿ ) exit from submenu
4.8 SETTINGS Menu Items
From this menu user can set some important options.
Submenu item
1
MODE: ONLINE
2
UPS No : 001
3
REMOTE :ENABLE
4
RESTART:ON/OFF
5
BYP.PROTECT ON
6
ENTER EXIT
Goto first submenu item
Function
By using PLUS and MINUS keys you can move on 4 operation mode
options
ONLINE : stand alone mode
PARALLEL : 2 UPS in symmetric parallel operation
HOT STANDBY : 1 UPS main the other UPS spare mode
REDUNDANT : 2 UPS in redundant parallel mode.
® press ENTER for 3 seconds and the selection is valid
By using PLUS and MINUS keys you can change number 0 to 3.
In parallel operation select different number for each UPS. If you select the
same number DUBL UPS NUMBER message tells the fault.
® press ENTER for 3 seconds and the selection is valid
By using PLUS and MINUS keys you can change enable and disable
options.
enable : remote battery test, shutdown and bypass function is enabled
disable : these functions are disabled
® press ENTER for 3 seconds and the selection is valid
By using PLUS and MINUS keys you can change on and off options.
ON : during mains failure at the end of battery discharge UPS shutdowns,
after mains restored UPS startes again.
(battery trip out is on every time)
OFF: during mains restore UPS don’t start again.
(battery trip out is off)
® press ENTER for 3 seconds and the selection is valid
By using PLUS and MINUS keys you can change on and off options.
ON: if the bypass source is out of tolerance UPS turn off load power.
OFF : UPS turn off load power only during bypass moves. If bypass period is
completed UPS continues to feed load.
® Enter
(¿ ) exit from submenu
22
4.9 COMMAND Menu Items
You can give immediate commands to UPS by using this menu.
Submenu items
1
SOUND : ON/OFF
2
ENTER B.TEST>432
3
ENTER <BYPASS>
Function
Use for turn on/off beep alert sound.
If you press ENTER key the option will change ,one press ON ,one press
OFF.
If the OFF option is used, sound alert is turn off but if a new different
alarm is valid UPS changes de option to ON state.
If you press enter for 3 seconds battery test starts for 15 seconds.
If battery test failes A6 BATT FAULT message is on panel and this
message stays until you press ENTER key for 3 seconds.
Numbers at the right shows the battery voltage.
Starting of battery test time is recorded to log event menu if the test is
successful you can see only BATTERY TEST message on log records..
If you press ENTER key for 3 seconds UPS transfers load to bypass.
If the load is on bypass in this submenu you see ENTER<INVERTER>
message at this position if you press ENTER key for 3 seconds UPS
transfers the load on inverter.
In parallel modes this function disables and you see
BYP.FUNC.DISABLE message on this submenu item.
ENTER:MODEM INIT
If you press ENTER key the connected modem of RS232 port is installed
UPS sends AT command set to modem for installation.
If the function is completed you must hear a beep sound.
At the end of this function modem is ready to answer dial up connection.
ENTER <BOOST>
If you press ENTER key for 3 seconds boost charge starts. The given
time for boost charge is 10 hours. At the end of this time UPS stops the
boost charge.
If the boost charge is active this submenu item changes to STOP
BOOST> 005H message the 005H shows that boost charge is started
before 5 hours.
If the number is 10 boost charge stops. If you press ENTER key boost
charge stops immediately.
Boost charge starting and boost charge end time is recorded to log event
menu.
If boost is active UPS beeps in each 15 seconds
6
SIMULATION OFF
The purpose of this submenu to check dry contact connections. Normally
to check line failure contact you must turn off mains power. This is not
necessary with this utility. 3 options are avalible.
SIMULATION OFF simulaion mode is off
SIM:LINE FAILURE if you press ENTER key for 3 seconds line failure
lamp on interface board lits
SIM:LIN.F+BT.LOW if you press enter key for 3 seconds line failure and
battery low lamp on interface board lits
SIM:BYPASS if you press ENTER key for 3 seconds bypass (aux) lamp
on interface board lits.
So you can check the connections
7
ENTER EXIT
Goto first submenu item
4
5
® Enter
(¿ ) exit from submenu
23
4.10
TIME Menu Items
You can see date and time of RTC (real time clock) on UPS. And you can adjust date and time.
1
2
3
4
5
6
7
8
9
4.11
Submenu item
TIME : 23 :15
DATE : 11-10-2001
SET HOURS: 11
SET MINS : 38
SET DAY : 21
SET MONTH : 06
SET YEAR : 2001
ENTER <UPDATE>
ENTER EXIT
Goto first submenu item
Function
time
date
(+) and (-) adjust hours (0-23)
(+) and (-) adjust minutes (0-59)
(+) and (-) adjust day (1-31)
(+) and (-) adjust month(1-12)
(+) and (-) adjust year (2000-2099)
® Enter update new date and time
® Enter
(¿ ) exit from submenu
PASSWORD Menu Items
Only authorized person can use this menu, incorrect usage of this menu can damage the UPS.
Submenu item
1
PASSWORD : XXX
2
ENTER EXIT
Goto first submenu item
Function
Service password input
(-) key 100 ,
DOWN key 10,
(+) key 1 changes
after you write the password on screen press ENTER key ,if the
password is wrong than there is no action.
If the password is valid, a beep sounds and you see ADJUST MODE at
the second line.
® Enter
(¿ ) exit from submenu
24
5. OPERATING INSTRUCTIONS
5.1
UPS Switch on Procedures 10 to 30kVA
The following stages have to be carried out chronologically. If alarms are displayed on the mimicpanel, the problem has to be solved before going any further.
1. Open the UPS doors to gain access to the main power switches.
2. Make sure that the S3 switch (maintenance bypass) is in “0” (OFF) position.
3. Turn on the rectifier input fuses (F1-F2-F3) and inverter input switch S1 , by bringing them into
“1” (ON) position. (Upwards)
4. Turn on the static by-pass switch S2 into “1” (ON) position.
5. Turn on the S4 fuse/switch (UPS output), into ”1” (ON) position.
RECTIFIER START!
INVERTER START!
STATUS NORMAL!
: Rectifier is working and static bypass continues to feed the load.
: Inverter is working and static bypass continues to feed the load.
: The UPS is operating normally, its inverter supplying the outlet.
6. Turn on the BATT.(+) and BATT.(-) fuses into “1” (ON) position. By this way it is ensured to
connect the battery group to the UPS.
7. Your UPS system is ready to use. You can start up your load.
ATTENTION: At this stage, the load is supplied by the inverter.
5.2
UPS Switch on Procedures 40 to 200kVA
1) Make sure that all the switches and fuses (S1, S2, S3, S4 and S5) are in “OFF” position and S6
is in “NORMAL” position.
NOTE THAT S6 SHOULD ALWAYS BE IN “NORMAL” POSITION FOR ONLINE OPERATION
2) Turn S2 switch (static bypass) into “1” (ON) position.
3) Turn on S4 (output switch), now the load is connected to bypass supply.
4) Turn on the S1 switch (inverter input), into ”1” position. By turning on S1, all lights on the front
panel will be lit for 4 secs (lamp test) and then, the following messages will appear on LCD.
“RECTIFIER START” : Rectifier is operating and static bypass continues to supply the load.
“INVERTER START”: Inverter is operating and static bypass continues to supply the load.
“STATUS NORMAL” : The UPS is operating normally and the inverter is supplying the load.
ATTENTION : AC output voltage is applied to the load at this step.
25
5) Turn on the S5 (The battery circuit breaker) into “1” position or insert the battery fuse. By this
way, the battery group is connected to the UPS.
6) Once you see the green inverter led on the front panel then the UPS system is now ready for
use. You can start up your loads.
ATTENTION :
·
·
·
In a single unit application, the UPS must be operated in “ONLINE” mode.
And the mode selection should be followed up as follows :
Using the UP-DOWN buttons on the front panel, select “SETTINGS MENU” on LCD and press
“ENTER”. When you see “MODE” display, using “+” and “-“ buttons select “ONLINE” mode.
After selecting ONLINE mode press “ENTER” until the beep sound stops.
Turn S1 off and few seconds later, turn it on again. You will see “INVERTER START” and than
“STATUS NORMAL” messages on the LCD.
5.3 Transfer to Maintenance By Pass 10 to 30kVA
The manual by-pass enables direct supply of the load from mains without the control functions of
the UPS. It is used for the UPS maintenance.
1. Press on the DOWN button when there is “COMMAND MENU” message on the front panel of
the UPS. Then press “ENTER” button.
2. Press on the DOWN button when there is “ENTER <BYPASS>” message on the front panel of
the UPS. Then press “ENTER” button for 3 seconds. static by-pass led lit and inverter led off.
Now your load is feeding from the Static By-pass.
3. Take out the lock from the S3 (maintenance bypass) switch.
4. Turn on (into “1” position) the S3 (maintenance bypass) switch.
5. F1-F2-F3-S1 (rectifier input fuses-inverter input),
S4 (UPS output)
S2 (static by-pass),
BATT(+) and BATT(-) Open this fuses and the switches. Into “0” (OFF) position
WARNING!!!
Inside the UPS the following points will be on operation:
* By-pass AC input mains terminals
* Maintenance by-pass switch
* Static by-pass switch
* UPS output terminals
Now the load is completely supplied from the maintenance by-pass and the
UPS is closed.
WARNING!!!
During the maintenance or static by-pass the connected load at the UPS output
is not protected against the mains failure.
26
5.4 Transfer to Maintenance By Pass Mode 40 to 200kVA
This procedure should be followed when turning from normal operation to maintenance bypass.
This procedure can be used for supplying temporary mains voltage to the system during the
maintenance of the UPS or in case of failure.
1. Press on the DOWN button when there is “COMMAND MENU” message on the front panel of
the UPS. Then press “ENTER” button.
2. Press on the DOWN button when there is “ENTER <BYPASS>” message on the front panel of
the UPS. Then press “ENTER” button for 3 seconds. Static by-pass led lit and inverter led off.
Now your load is supplied via Static By-pass.
NOTE :
Using the procedure in 4.2.2.1 and 4.2.2.2 you can switch the load to by-pass
manually. (MANUAL BY-PASS)
3. Take out the lock from the S3 (maintenance bypass) switch.
4. Turn on (into “1” position) the S3 (maintenance bypass) switch.
5. Turn off all the following switches into “0” position.
S1 (inverter input)
S2 (static bypass)
S4 (UPS output)
S5 (Battery circuit breaker or battery fuse)
WARNING!!!
Inside the UPS the following points will be on operation:
* By-pass AC input mains terminals
* Maintenance by-pass switch
* UPS output terminals
Now your load is completely supplied via maintenance by-pass and the
UPS is not operating.
WARNING!!!
During the maintenance or static by-pass the connected loads at the UPS output
are not protected against the mains (by-pass source) failure.
5.5 Transfer from Maintenance By Pass to Inverter Mode 10 to 30kVA
1. While the S3 switch in closed position ”1” (ON) ;turn on (into “1” position) the F1-F2-F3-S1
(rectifier input fuses- inverter input), S2 (static bypass) and S4 (UPS output) Switch.
2. Turn on (into “1” position) the S1 (inverter input) switch.
3. When “MAINT SWITCH ON!” message appears on the front panel, turn off (into “0” position) the
S3 (maintenance by-pass) switch. By this way the load will be fed from the static by-pass.
4. See “STATUS NORMAL!” message on the front panel and the green inverter led lit.
5. Turn on the BATT.(+) and BATT.(-) fuses into “1” (ON) position. Now the UPS system is in
normal operation. You can start-up your load.
27
5.6 Transfer from Maintenance By Pass to Inverter Mode 40 to 200kVA
1. While the S3 switch in closed position”1” (ON) ;
turn on (into “1” position) the S2 (static bypass) and S4 UPS output) Switch.
2. Turn on (into “1” position) the S1 (inverter input) switch.
3. When “MAINT SWITCH ON!” message appears on the front panel, turn off (into “0” position)
the S3 (maintenance by-pass) switch. By this way the load will be fed from the static by-pass.
4. See “STATUS NORMAL!” message on the front panel and the green inverter led lit.
5. Turn on the battery circuit breaker into “1” (ON) position (or insert the battery fuse).
Now the UPS system is in normal operation. You can start-up your PC, printer etc.
5.7 Transfer from Static By Pass to Inverter Mode
1. Press on the DOWN button when there is “COMMAND MENU” message on the front panel of
the UPS. Then press “ENTER” button.
2. Press on the DOWN button when there is “ENTER <INVERTER>” message on the front panel of
the UPS. Then press “ENTER” button for 3 seconds, static by-pass led off and inverter led on.
Now your load is fed from the Static By-pass.
3. See “STATUS NORMAL!” message on the front panel. Now the UPS system is on normal
operation. You can start-up your PC, printer etc.
5.8 UPS Shutdown Procedures 10 to 30kVA
All the power switches, isolators and circuit breakers will on open position. (Turn into “0” (OFF)
position). There will be no voltage on the load.
WARNING!!! This procedure will leave the load without energy.
10-15-20 kVA : S1 (inverter input)
S4 open (UPS output) switch (Turn off into”0” position).
S2 (static by-pass)
F1-F2-F3 rectifier input fuses
BATT.(+) and BATT.(-) Open this fuses and the switches into “0” (OFF) position
30 kVA
: F1-F2-F3-S1 (rectifier input fuses-inverter input)
S4 open (UPS output) switch (Turn off into”0” position).
S2 (static by-pass)
BATT.(+) Open this fuses and the switches into “0” (OFF) position
28
5.9 UPS Shutdown Procedures 40 to 200kVA
All the power switches, isolators and circuit breakers should be turned off, with the following
sequence. (Turn off into “0” (OFF) position). There will be no voltage on the load.
WARNING!!! This procedure will cut the energy of all the equipments that are connected to UPS
output.
S4
S2
S1
S5
(UPS output)
(static by-pass)
(inverter input)
(Battery circuit breaker or battery fuse)
5.10 Utility Interruption
When there is a utility power interruption, the inverter led continuously lit also battery and on the
LCD
“A10 LINE FAILURE” message appears. Additionally an audible alarm sounds. Your UPS
continues to convert the battery voltage to AC voltage and protect against loss of data and failure.
The autonomy can be increased by disconnecting relatively unimportant loads. But do not connect
this load again before the end of autonomy time. When the utility power is restored the UPS will
return to normal operation and on the front panel of the UPS “A45 MAINS OK” mesage appears.
When there is “A7 BATTERY LOW” message appears and audible alarm sounds, shut down your
PC. If not, than all the batteries will be discharge in a few minutes.
After you shut down the critical load (computer system). Apply the completely powering down the
UPS.
Apply the normal operation procedure to start up the UPS again after a long time later.
NOTE:
Do not forget to turn on the battery circuit breaker into “1” (ON) position when
the mains voltage return. If not, in case of a second power cut there will be no voltage for
the critical load.
If you have a reserve generator, you can use it to feed the UPS’s input and the batteries
starts to charge. By using UPS and the generator at the same time ensures to charge the
batteries faster.
29
6. PARALLEL OPERATION (optional)
6.1 Introduction
The PARALLEL connection of SAVIOR 3_3 ONLINE UPS SYSTEMS allow high security by power
redundant operation.
6.2 Parallel Operation Modes
Parallel operation is in 3 modes:
· SYMETRIC PARALLEL operation
· REDUNDANT parallel operation
· HOT STANDBY operation
CAUTION!!! Do not set the operation modes of the parallel connected UPSs to ON-LINE,
otherwise serious damage may occur.
User can select one of the operation modes according to purpose if parallel control board is
installed on UPS.You can select operation mode from SETTINGS MENU, in this chapter you can
find parallel operation mode informations.
6.2.1 Symetric Parallel Mode
On UPS panel, shortly “PARALLEL MODE” word is used. This mode is useful for increasing power
capacity. Mains power is used as the spare energy supply. In case of an Inverter failure in one of
the UPS’s, the static bypass system of all UPS’s go to bypass together. If everything returns to
normal, than the inverters resume the load together. If current sharing is active, current is shared
50%-50% by two UPS’s. During bypass, the UPS’s also share the load.
If this mode is active, on the LCD panel of one UPS, you will see “PARALLEL MODE/SL”, and on
the LCD panel of the other UPS, you will see “PARALLEL MODE/MS” : (SL means SLAVE, MS
means MASTER)
The inputs of two UPS are connected to mains, outputs of two UPS are connected to each other,
there are two battery groups.
SB1 and SB3 static bypass switches work always together. They turn on/off together. If these static
switches are conducted,than the load is connected to mains directly.
SB2 and SB4 static switches work always together. If these static switchs are conducted,than the
load is connected to inverter. In this position current sharing is active.
If a failure occurs at one of the UPS, bypass system transfer load to by pass.
30
MB1
UPS1
SB1
CB1
SB2
BATT.1
AC/DC -1
CB2
INVERTER 1
MB2
LINE
OUTPUT
UPS2
SB3
CB3
AC/DC -2
Figure 6-1
6.2.2
SB4
BATT.2
CB4
INVERTER 2
Parallel connection
Parallel Redundant Mode
At this mode if one of the UPS fails, the other UPS continues to feed load.
Assume that UPS1 on figure 6-1 is failed, SB1 and SB2 static switches shall turn off and the UPS 1
is isolated from load.
The SB4 static switch of the UPS 2 shall stay in conducted position and it continues to feed the
load.
If UPS 1 is operating after a delay this UPS will join the system.
If two UPSs fail than SB3 static switches shall turn on and load is transferred to bypass
This is a 3 level redundancy UPS1+UPS2,UPS2 ,mains
Current sharing is active in this mode.
6.2.3
Hot Standby Mode
In this mode UPS 1 feeds the load and the UPS 2 waits spare, there is no current, it is in standby
mode but it is ready to work.
If a failure occurs on UPS 1, static switch system shall isolate UPS 1 from load and activate the
UPS 2, this is a very fast response.
31
Current sharing is not active in this mode.
6.3 Parallel Operation Mode Fault Codes
FAULT
DESCRIPTION
A23 MODE FAILURE
SLAVE ups search for the same operating mode with MASTER ups ,if they are
different this message locates on LCD panel.
Change the operation mode of SLAVE ups from SETTINGS MENU.
Don’t forget to press ENTER key for 3 seconds
Turn off the SLAVE ups and turn on again.
A24
A25
A26
A27
A28
Parallel
Parallel
Parallel
Parallel
Parallel
P.FAILURE 17
P.FAILURE 18
P.FAILURE 19
P.FAILURE 20
P.FAILURE 21
Controller Board Failure
Controller Board Failure
Controller Board Failure
Controller Board Failure
Controller Board Failure
A29 P.TEST MODE
Parallel control board is in test position
A30 P FAILURE 23
Parallel Controller Board Failure
A31 DUBL UPS NR.
A40 CANT FIND PR
The same UPS number is selected for SLAVE ups ,you must give separate ups
number to each ups in parallel system.
Go to SETTINGS MENU and change UPS number.
Don’t forget to press ENTER key for 3 seconds.
Turn off the SLAVE ups and turn on again.
Parallel mode is selected but main controller could not find parallel control board.
Select ONLINE mode from SETTING MENU.
Turn off the ups and turn on again.
A41 P.BAL.FAILURE
Current sharing failed in parallel operation, after a delay sharing will try again
A43 P.SYNC.FAIL
In parallel system SLAVE UPS is not synchronized to MASTER UPS
After a delay SLAVE ups will try to syncron again.
A48 STATIC BYP
In parallel system static bypass switch (S6) is in “ON” position.
6.4 Parallel System Accessories
For parallel operation the following parts need to be installed inside the UPS:
·
·
·
·
·
Parallel control board
Current transformers
Digital connection cable
Analog connection cable
Fully static bypass system
IMPORTANT NOTE: Parallel system installation is much more complex from standalone UPS
installation, it needs qualified service staff.
You have to keep 80 cm distance between two UPS for service purposes. The maximum length of
digital and analog cable is 2 meters.
Add %20 tolerance to cables, fuses and circuit breakers in parallel connection.
32
At figure 6-2 ,the connection of 2 parallel UPSs and load switch panel is shown.
U1 V1 W1 N1
U1 V1 W1 N1
AC INPUT
AC INPUT
UPS1
UPS2
AC OUTPUT
AC OUTPUT
U2 V2 W2 N2
U2 V2 W2 N2
Figure 6-2 Parallel UPS
Connection
33
34
35
Figure 6-3-a
POWER CONNECTIONS OF TWO UPS’s FOR PARALLEL OPERATION (10-15-20 kVA)
36
(+) BATTERY
(-) GROUP
Figure 6-3-a
POWER CONNECTIONS OF TWO UPS’s FOR PARALLEL OPERATION (30 kVA)
37
38
-
+
BATTERY GROUP
LOAD
U VWN
(To be supplied by
the customer)
-
+
BATTERY
GROUP
Figure 6-3-b POWER CONNECTIONS OF TWO UPS’s FOR PARALLEL OPERATION (100-120-160-200 kVA)
Neutral
Neutral
AC INPUT
3 PHASE + Neutral
Figure 6-4-a
Switch and Fuse Positions and Signal cable connections
for parallel operation (10-15-20 kVA)
Figure 6-4-b Switch and Fuse Positions and Signal cable
connections for parallel operation (30 kVA)
39
DIGITAL
ANALOG
Figure 6-4-c Switch and Fuse Positions
connections for parallel operation (40-60 kVA)
and
Signal
cable
DIGITAL
ANALOG
Figure 6-4-d
Switch and Fuse Positions and Signal cable
connections for parallel operation (80 kVA)
40
41
Figure 6-4-e Switch and Fuse Positions and Signal cable connections for parallel operation (100-120-160-200 kVA)
ANALOG
DIGITAL
6.5
UPS Switch on Procedure in Parallel Mode:
With all the switches and fuses (S1,S2, S3, S4 and S5) in “OFF” “0” position and with S6 in
“NORMAL” position.
Turn on the parallel connected UPS’s, UPS1 and UPS2 separately as follows:
1. Make sure that two UPS’s are properly connected for parallel operation in accordance with
the diagrams given in “INSTALLATION PROCEDURES” section.
2. Turn on the S1 switch (inverter input) into “1” position. By turning on S1 you will see the
following messages on the LCD panel,
a. “RECTIFIER START”
b. “INVERTER START”
c. “STATUS NORMAL”
After these messages the UPS will start running and the green INVERTER LED on the
front panel will be turned on.
3. Using the UP-DOWN buttons on the front panel select “SETTINGS MENU” on LCD and
press “ENTER”.
When you see “MODE” display, using “+” and “-“ buttons select either one of the
following operation modes which is suitable for your needs.
4. After selecting one of the modes, press “ENTER” until the beep sound stops.
5. Turn S1 off (inverter input) and few seconds later, turn it on again. Now the inverter is ready
to operate in the selected mode.
Perform the same procedure given above for both UPS’s (UPS1 and UPS2). Make sure
that you select the same mode for both UPS’s. If you select different modes, then a fault
signal will be generated.
After selecting the operation modes for both devices then perform the following
procedure:
6. Turn on the Battery Circuit Breaker S5 (Optional) or insert the battery fuse, to connect the
battery group to the UPS for uninterrupted operation.
7. Turn on S2 switches (static by-pass) of both UPS’s.
8. When you restart UPS’s again, make sure that the CB1 and CB2 switches on the AC
distribution panel are in “OFF” position. Then turn on S4 (output) switches of both inverters.
ATTENTION : VOLTAGE AT THE OUTPUT !!!
9. Before going any further, measure the voltage (using an AC voltmeter) between the
corresponding phase outputs of UPS’s at the CB1 and CB2 contacts on the distribution
panel. Only after you are sure that there is no voltage difference between the corresponding
contacts, turn on CB1 and CB2 on the AC distribution panel.
Now the outputs of the UPS’s are connected in parallel and the parallel system is ready for
use with AC loads.
42
6.6 Transfer to Maintenance By-Pass Mode
1) Bring S6 (static by-pass) into “STATIC BYPASS” position of either one of the UPS’s.
2) See that the red coloured by-pass leds on the front panels of both UPS’s are lit. (Static bypass
operation)
Turn on S3 switches (maintenance bypass) of both UPS’s.
Turn off S4 switches (AC output) of both UPS’s.
Turn off S1 switches of both UPS’s.
Turn off S2 switches (AC output) of both UPS’s.
Turn off S5 (optional battery circuit breaker ) or remove battery fuses of both UPS’s.
Now, the UPS’s are completely turned off but the load is supplied by the AC-input via the
Maintenance By-Pass switch.
3)
4)
5)
6)
7)
WARNING!!!
Inside the UPS’s the following points will be on operation:
* By-pass AC input mains terminals
* Maintenance by-pass switch
* UPS’s output terminals
Now your load is completely supplied by the maintenance by-pass supply and the UPS’s are not
operating.
WARNING!!!
During the maintenance or static by-pass the connected loads at the UPS output
are not protected against the mains (by-pass source) failure.
6.7 Transfer from Miantenance By Pass to Inverter Mode
With the S6 switches (static bypass) of the inverters (at least one of them) in “STATIC
BYPASS” position, turn on the parallel connected UPS’s UPS1 and UPS2 as follows:
1) Turn on the S2 switches (static bypass) of both UPS’s.
2) Turn on S4 switches (AC output) of both UPS’s.
3) Turn on S1 switches (inverter input) of both UPS’s.
4) Turn on the Battery Circuit Breakers S5 (optional) or insert the battery fuses of both UPS’s to
connect the battery groups to the UPS’s for uninterrupted operation.
5) When “MAINT SWITCH ON!” message appears on LCD, turn off S3 switches (maintenance
bypass) of both UPS’s.
6) Bring S6 switches (static bypass) of both UPS’s to “NORMAL” position.
43
7. REMOTE MONITORING AND CONTROL (optional)
SAVIOR 3_3 ONLINE UPS’s can be provided with boards that are designed as communication
interface with computer systems or remote monitoring panels.
-
The dry contacts interface
The serial link interface
The remote signalling/control panel and its connection interface
7.1 Serial Link Interface
Using serial link interface which is installed in your system, user can get all information about UPS .
All measured parameters, alarms can be monitored. This port is interactive and you may use the
following commands:
·
·
·
·
·
·
·
·
·
·
·
Switch to BYPASS
Switch to INVERTER
SOUND on/off
Adjust UPS time and date
Start SIMULATION mode
Short BATTERY TEST
BATTERY TEST until battery low alarm
CANCEL battery test
Turn off UPS output voltage immediately (SHUTDOWN)
Turn off UPS output voltage after delay (WAITING SHUTDOWN)
Turn off UPS output voltage (SHUTDOWN) and turn on UPS output voltage (WAITING
RESTART)
· CANCEL SHUTDOWN
· RENAME UPS
UPS will give response to these commands if the REMOTE: ENABLE opsion is selected from
SETTINGS MENU .
7.2 Serial Link Interface Cable
The maximum length for RS232 communication cable is 25 meters, cable connector pins are as
follows :
UPS side
9 Tx
7 Gnd
6 Rx
PC side
2 Rx
5 Gnd
3 Tx
For remote panel – UPS connection cable is okay.
SERIAL LINK SETUP
BAUD RATE
STOP BIT
DATABITS
PARITY
2400 baud
1
8 BIT
None
44
7.3 Modem Connection TELESERVICE
UPS can be controlled through a normal telephone line by means of a remote operator connected
through a PC with modem device, who performs a phone call to the UPS connected number. So
the operator can see all parameters and control the UPS (if permitted from SETTINGS MENU).
7.3.1 Hardware Configuration
All needs for modem connection is as follows :
· PC with modem
· WINDOWS 98
· Available UPS control software
· DUMP modem which is connected to UPS
In order to perform this function, a PC with UPS control software and an external or internal modem
device connected to telephone line are needed.
A standard modem device, configured according to DUMP and auto answer modes, will be installed
on the UPS and, once programmed, will following a telephone call of the PC-embedded modem
,connect the UPS to the telephone line.
7.3.2 Function Principle
The remote operator, by means of a PC and a modem device and using the remote connection
function of the control software, calls the UPS through the number to which this is connected.
The dumb modem device, connected to the UPS, will answer the call and convert the data coming
from UPS serial on the telephone line. This way all measures and controls allowed by the RS232
serial port can be carried out.
7.3.3 SMART Modem Programming (PC modem)
The connected modem to PC (smart modem) will be programmed from UPS control software
automaticly.
B0 E1 F1 M1 Q0 V1 X3
BAUD = 2400
PARITY = N
WORDLEN = 8
DIAL = TONE
&A3 &B1 &C1 &D0 &H1 &I0 &K1 &M4
&N0 &R2 &S0 &T5 &Y1
7.3.4 DUMB Modem Programming
The connected modem to UPS can be program from COMMAND MENU ,ENTER :MODEM INIT
automatically.
But the user can programme this modem from a PC by following options.
B0 E1 F1 M1 Q0 V1 X3
BAUD = 2400
PARITY = N
WORDLEN = 8
DIAL = TONE
&A3 &B1 &C1 &D0 &H1 &I0 &K1 &M4
&N0 &R2 &S0 &T5 &Y1
45
7.3.5 DUMB Modem – UPS Connection Cable
The connection cable between dumb modem and UPS is as followed:
UPS
DB9 female
6
7
9
MODEM
DB25 male
3
7
2
7.4 Dry Contact Interface Connection
Some important events can be monitored by this connection for each event a relay is located on
interface board and NC-C-NO contacts are connected terminals.
These are:
·
·
·
·
·
·
LINE FAILURE
BATTERY LOW
LOAD ON BYPASS
BATTERY CB input
BATTERY CB output
EMERGENCY STOP input
Battery Circuit
Breaker Input
Emergency Stop
Line Failure
Relay
Battery Low Relay
or Common Alarm
Relay
By-Pa
Relay
CN4
CN3
7.5 Remote Monitoring Panel
Remote mınitoring panel can be used from 400 meters away from UPS. Up to 25 meters there is no
need extra hardware RS232 communication is normal. But if the distance is longer than 25 meters
extra RS485 hardware is needed.
Up to 5 remote monitoring panels can be used in system.
46
8. END USER GUIDE
WARNING!
There are no customer serviceable components inside. DO NOT open the cover or attempt to
service the unit. High voltage may remain when the unit is shut down.
Unauthorized service will finish warranty and could cause serious damage.
8.1 Maintenance
The following operations are suggested to maximize the unit lifetime. The will help to ensure
trouble -free operation for several years:
1. Vacuum the dust from the ventilation intake on the front panel.
2. Wipe the cover with a dump cloth.
3. Check the batteries charge with the manual battery test procedure. See Automatic and
Manual Battery Test.
CAUTION!
It is recommended to test the battery discharging capability only after the software in use has
been saved and all files have been closed.
8.2 Storage
1. Check the batteries charge with the manual battery test before storage.
2. Connection’s uninstall operation will be done by the authorized service.
3. During the storage period the batteries should be charged once, per six months.
4. Keep the equipment and the batteries in a dry, cool place.
Best storage temperature for the UPS
Best storage temperature for the batteries
: Between 0°C and 40°C max.
: Between 10°C and 35°C max.
47
9. LIMITED WARRANTY
Certificate of Warranty
The warranty conditions are stipulated in the sales contract, if not the following
points shall apply.
The manufacturer exclusively guarantees his own products against any defect in
construction or operation arising from faulty design, materials or workmanship
according to the conditions set down below.
The manufacturer, at his discretion, is entitled to adapt his product in order to
comply with the warranty or replace the faulty parts. The manufacturer’s warranty
does not apply in the following cases:
-
Defects arising either from designs or parts imposed or supplied by the
Purchaser.
Failure due to fortuitous circumstances or force majeure.
Replacements or repairs resulting from normal wear of units and machinery,
damage or injuries caused by negligence, lack of inspection or maintenance, or
improper use of the products.
The period of validity of the warranty may never exceed 12 months after delivery.
Replacements, repairs or modifications of parts during the warranty period cannot
extend the duration of the warranty.
For these stipulations to be valid, the Purchaser must, within a maximum of 8 days
beyond which the warranty lapses expressly inform the Manufacturer of the faulty
design, or the material or manufacturing defect, stating in detail the grounds for his
complaint.
Defective parts replaced free of charge by the Manufacturer are to be put at his
disposal, so that he may become the sole owner.
The warranty legally ceases if the Purchaser has, of his own initiative, undertaken
modifications or repairs on the Manufacturer’s products without the written consent
of the latter.
The Manufacturer’s liability is limited to the obligations as defined herein (repair or
replacement), all other items of damage being formally excluded.
The Purchaser is liable for taxes or duties of any kind in compliance with either the
European regulations, or those of the country of import or transit.
48