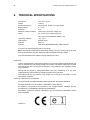
1
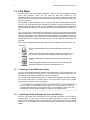
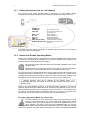
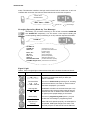
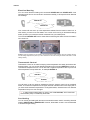
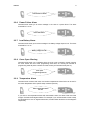
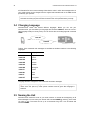
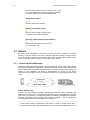
USER’S MANUAL
1.0
Read this manual carefully and keep it together with the unit.
Contents
1.
INTRODUCTION .............................................................................................................................................. 3
1.1
FIRST STEPS ............................................................................................................................................. 4
1.1.1
Deciding on the GSM Subscription ............................................................................................... 4
1.1.2
Switching PIN Code Prompt Off from the SIM Card ..................................................................... 4
1.1.3
Installing SIM Card in CaravanControl .......................................................................................... 5
1.1.4
First Text Message ........................................................................................................................ 5
1.2
OPERATING MODES AND OTHER BASIC CONCEPTS...................................................................................... 5
1.2.1
Asking Information from the Unit (Report)..................................................................................... 6
1.2.2
Normal and Disable Operating Modes .......................................................................................... 6
Changing Operating Mode by Phone Call ............................................................................... 6
Changing Operating Mode by Text Message .......................................................................... 7
Signal Light............................................................................................................................... 7
1.2.3
Sending Commands to CaravanControl........................................................................................ 8
1.2.4
Receiving Alarms from CaravanControl ........................................................................................ 8
2.
FEATURES..................................................................................................................................................... 10
2.1
REMOTE CONTROL .................................................................................................................................. 10
2.1.1
Heating......................................................................................................................................... 10
Electrical Heating ................................................................................................................... 11
Thermostatic Control.............................................................................................................. 11
Gas Heating ........................................................................................................................... 11
Controlling Heating Manually ................................................................................................. 12
2.1.2
Air-conditioning (or Outdoor Light) .............................................................................................. 12
2.1.3
Refrigerator .................................................................................................................................. 12
2.2
ALARMS .................................................................................................................................................. 13
2.2.1
Fire Alarm..................................................................................................................................... 14
2.2.2
Burglar Alarm ............................................................................................................................... 14
Monitoring the Front Tent....................................................................................................... 14
2.2.3
Gas Alarm .................................................................................................................................... 16
2.2.4
Location Alarm ............................................................................................................................. 16
2.2.5
Restart Notification....................................................................................................................... 16
2.2.6
Power Failure Alarm .................................................................................................................... 17
2.2.7
Low Battery Alarm........................................................................................................................ 17
2.2.8
Cover Open Warning ................................................................................................................... 17
2.2.9
Temperature Alarm ...................................................................................................................... 17
2.3
USER COMMAND SUMMARY ..................................................................................................................... 18
3.
SETTINGS ...................................................................................................................................................... 19
3.1
PROGRAMMING MODE ............................................................................................................................. 19
3.2
POWER SAVE MODE ................................................................................................................................ 19
3.3
ASKING SETTINGS ................................................................................................................................... 19
3.4
CHANGING LANGUAGE ............................................................................................................................. 20
3.5
NAMING THE UNIT.................................................................................................................................... 20
3.6
PHONE DIRECTORY ................................................................................................................................. 21
3.7
ALARMS .................................................................................................................................................. 22
3.7.1
Receiving Alarm Messages ......................................................................................................... 22
Alarm Phone Call ................................................................................................................... 22
Answering Machines and Services........................................................................................ 23
3.7.2
Scheduled Report ........................................................................................................................ 23
3.8
TEMPERATURE ALARM LIMITS................................................................................................................... 23
3.9
ACTIVATING REMOTE CONTROL IN ALDE 3010......................................................................................... 24
3.10
USING REMOTE CONTROL IN ALDE 3010................................................................................................. 25
4.
TROUBLE SHOOTING .................................................................................................................................. 26
5.
TECHNICAL SPECIFICATIONS.................................................................................................................... 28
6.
INDEX ............................................................................................................................................................. 29
Document version: CC2_Users_Manual_5_2_en_300.doc
3
INTRODUCTION
1.
INTRODUCTION
We are very pleased that you chose CaravanControl for keeping your motor caravan or
caravan safe and secure. Not only does CaravanControl protect your property, but it also
makes the use of your caravan so much more comfortable and fun. This manual describes in
detail all the features and commands needed in controlling and monitoring your caravan
remotely from your mobile phone. The CaravanControl Quick Guide delivered with the unit
serves as a good summary and as a quick cheat sheet for what will be discussed here.
CaravanControl makes the use of your caravan comfortable in many ways. For example, you
can control heating and air-conditioning remotely by using text messages stored in your
mobile phone’s memory. You do not need to memorize any commands yourself.
CaravanControl responds to a command by reporting the received command back to you,
which can be taken as verification that the command was received and run normally.
CaravanControl secures and protects your property by monitoring it and alarming you instantly
if something goes wrong. CaravanControl sends a text message and makes an alarm phone
call to selected phone numbers if your caravan is stolen, broken into, its inside temperature
drops too low, fire breaks loose, electricity is cut off, or liquid gas is detected in the air. In
addition to text messages and phone calls, alarm siren will also go on in the case of an alarm.
Phone call or text message
This manual uses the terms CaravanControl and unit in place of the more complete name of
the product: Telemic CaravanControl Remote Controlling and Monitoring Unit. In pictures
where interaction is depicted, balloons drawn with dotted lines represent text messages and
balloons drawn with solid lines represent phone calls. Contents and index pages can and
should be used to aid quick searches of information.
Not all equipment discussed in this manual is included in the basic package of
CaravanControl. These accessories are optional and can be purchased for additional cost.
The basic package contents and additional equipment are shown in the table below.
Table 1. CaravanControl basic package and additional equipment.
Basic package
Additional equipment
Indoor motion sensor
Smoke detector
Indoor temperature sensor
Motion sensor for the front tent
Outdoor temperature sensor
Door magnet
Cables for controlling Alde heater
Gas sensor
Installation material (screws etc.)
GPS receiver
Siren
Outdoor light
External antenna
Temperature sensor T3
4
CaravanControl User’s Manual Version 5.2
1.1 First Steps
CaravanControl needs a valid GSM subscription in order to send text messages and make
phone calls. However, before you can insert the SIM card provided by your
telecommunications operator into your CaravanControl, you have to switch off the PIN code
prompt from the card by inserting the card into your mobile phone and disabling it from your
phone’s setup menu.
After disabling the PIN code prompt, you can place the SIM card in CaravanControl and close
its cover. You should make sure the subscription is operable by making a test phone call to
CaravanControl right after the SIM card was installed. CaravanControl must be switched off
before installing the SIM card. You will hear three beeps when CaravanControl answers your
call.
Then it is time to tell CaravanControl your language. You can do this by sending a language
setup command (see 1.1.4) to CaravanControl. Upon receiving the command, CaravanControl
adds your phone number to its internal phone directory (marks you as a legal user of the unit)
and selects language for user commands and alarm messages. CaravanControl reports the
settings back to you in a response message from where you can verify that everything went as
expected.
After you have completed these first steps, the unit will be in disable mode and ready for use.
First steps:
1.
1.1.1
Buying a GSM subscription from a telecommunications operator (see
1.1.1).
2.
Switching the PIN code prompt off from the SIM card by placing the card
into your own mobile phone and navigating to setup menu (see 1.1.2).
3.
Installing the SIM card in CaravanControl and making a test call (see
1.1.3).
4.
Sending language selection to CaravanControl in a text message and
verifying the settings from response message (see 1.1.4).
Deciding on the GSM Subscription
You can use any GSM subscription available in the market today in your CaravanControl. The
expenses of GSM traffic are relatively low, which means that the most economical use is
achieved by using a GSM subscription that has a low monthly fee.
If you decide to use a prepaid subscription, you should check its balance periodically so that it
will not stop working when you least expect it. This is the reason why the use of prepaid
subscriptions in CaravanControl is discouraged.
) You should use an unlisted number in your CaravanControl. This ensures that the
phone number is not accessible to anyone. However, you should make sure that your
CaravanControl can send its own phone number to you alongside an alarm phone call.
Otherwise you will not be able to identify the caller as your CaravanControl.
1.1.2
Switching PIN Code Prompt Off from the SIM Card
The PIN code prompt must be switched off from the SIM card before it can be used in
CaravanControl. You can switch it off from your SIM card by placing the card in your mobile
phone and then disabling the prompt from setup menu. Consult the instructions of your mobile
phone for how to accomplish this. The PIN code prompt is enabled in all new SIM cards by
default.
5
INTRODUCTION
1.1.3
Installing SIM Card in CaravanControl
After you have switched off the PIN code prompt; make sure the power is switched off from
CaravanControl (power switch = OFF, see picture below). Now you can place the SIM card on
the sliding holder inside the unit. You can eject the SIM card holder by pressing the small
yellow button gently. Place the SIM card on the sliding holder carefully and make sure the
contact side is up and the card is seated correctly on the holder. Push the sliding SIM card
holder in and switch power on. It takes about 20 seconds for CaravanControl to start-up.
Power switch
Sliding SIM card
holder
ON
OFF
Press the yellow
button gently
Picture 1. The sliding SIM card holder is located at the bottom right corner of the central unit.
After the SIM card is installed, wait for 20 seconds until CaravanControl goes into
programming mode. You recognize this from the signal light that should be blinking rapidly. If
this is not the case, make sure the PIN code prompt is indeed disabled, the GSM subscription
is operable, the GSM signal strength is sufficient in the area, and that the SIM card was
placed properly on the holder.
1.1.4
First Text Message
Before you can start using CaravanControl, you must let it know what language you will be
using in text messages. You can do this by sending text message LANG xx to the unit (xx
being your language choice, see 3.4). This message initializes the unit, adds your phone
number in its internal phone directory, and selects language for user commands and alarm
messages. You can change the language setting afterwards if you want to use some other
language (see 3.4).
LANG EN
LANG EN
(Language: EN = English)
P1 +35844nnnn (Your phone number in directory
memory cell one)
Phone call
Text message
If you received the return message from CaravanControl as expected, the unit is now in
disable mode and ready for use. It is important to realize that now your CaravanControl can be
accessed only from your phone number unless it is switched to programming mode (see 3.1).
This prevents mischievous users from meddling with the unit’s settings. However, you can add
more phone numbers to the phone directory later on for your family members by using text
messages (see 3.6).
1.2 Operating Modes and Other Basic Concepts
Some of the basic concepts that you will run into in the course of reading this manual are
normal and disable modes of operation, remote controlling, and alarms. Understanding these
concepts is vital in the path to becoming an efficient and successful CaravanControl user.
6
1.2.1
CaravanControl User’s Manual Version 5.2
Asking Information from the Unit (Report)
You can find out the current operating mode (is monitoring on or off?), battery voltage,
temperatures, GSM signal strength, and active alarms by sending command ? to the unit.
?
TELEMIC CC
ALARM: ON
TENT: ON
(Is monitoring on or off?)
(Is the front tent included in the
monitored area?)
BATT: 13.0
(Battery voltage)
IN: +23.1
(Indoor temperature)
OUT: -11.2
(Outdoor temperature)
GSM: 19
(GSM signal strength 0-31)
N63.07600 E27.66000
(Location information, optional)
ALARMS: Burglar alarm (Active alarms at the time of the
question)
http://maps.google.com
The above report can also be scheduled for automatic sending (see 3.7.2). The report is
printed in the user’s own language.
1.2.2
Normal and Disable Operating Modes
There are two operating modes in CaravanControl: normal and disable modes. When the unit
is said to be in normal mode, all monitoring is on, whereas in disable mode, monitoring is off
except for the 24h monitored sensors (see Table 4).
24h monitoring means that some alarms are processed regardless of the current
operating mode.
CaravanControl can monitor the front tent of your caravan. Use a text message or
switch on the unit for including the tent in the monitored area (see 2.2.2).
You can switch from one operating mode to the other by making a phone call or sending a text
message command to CaravanControl. It is recommended that you use a phone call for
changing the operating mode because it is faster and more convenient than sending a text
message even if the command were to be stored in the memory of your mobile phone.
, Although operating mode can be changed by two different means, it is
recommended that only one method is used to avoid confusion about the current
operating mode.
There is one more operating mode yet to be discussed here, although it is much less
frequently used than the two modes learnt so far, and that is the programming mode. You can
switch programming mode on only by opening the unit’s cover (see 3.1). One occasion when
you need to set CaravanControl in programming mode is if you want to change the unit’s
settings from a phone number that does not exist in the unit’s phone directory.
Changing Operating Mode by Phone Call
To switch monitoring on or off, make a phone call to your CaravanControl. You will
hear one or two beeps that let you know in what mode CaravanControl will be
switched to when you close the phone. The sequence is repeated over and over
again; therefore, you need to close the phone immediately after you hear the
desired number of beeps. One beep means that monitoring is about to be switched on (normal
mode) and a series of two beeps means that monitoring is about to be switched off (disable
7
INTRODUCTION
mode). This behaviour is similar to the logic used in electric locks in modern cars. A car’s turn
indicators flash once when the locks are closed and twice when the locks are opened.
Phone call to
CaravanControl
“BEEP - BEEP” or “BEEP”
Phone call
Text message
Changing Operating Mode by Text Message
Alternatively you can switch monitoring on and off with commands ALARM ON
and ALARM OFF respectively. You will receive a short report indicating the
current operating mode (is monitoring on or off?) and other important information.
ALARM ON
TELEMIC CC
ALARM: ON
TENT: ON
(Is monitoring on or off?)
(Is the front tent included in the
monitored area?)
BATT: 13.0
(Battery voltage)
IN: +23.1
(Indoor temperature)
OUT: -11.2
(Outdoor temperature)
GSM: 19
(GSM signal strength 0-31)
N63.07600 E27.66000
(Location information, optional)
ALARMS: Burglar alarm (Active alarms at the moment)
Signal Light
Table 2. There is a signal light on CaravanControl that tells a lot about the status of the unit.
Light
Status of the unit
One short blink
The unit is in normal mode of operation (monitoring is
on). Switch to normal mode when you leave your
caravan unattended.
Two short blinks
The unit is in disable mode (monitoring is off, excluding
24h monitored sensors, see Table 4). Set this mode on
when there are people in your caravan.
One long blink
Front tent is included in the monitored area (see 2.2.2).
The outdoor motion sensor and door magnets are now
monitored 24h even in disable mode. Set this mode on
for night to protect people sleeping in the caravan.
Blinks rapidly
The unit is in programming mode (see 3.1). Anyone
can alter the unit’s settings in programming mode.
Light is on (no
blinking)
Error: SIM card is placed improperly, the subscription is
not operable, GSM signal strength is too weak, or the
PIN code prompt is not switched off from the SIM card.
8
1.2.3
CaravanControl User’s Manual Version 5.2
Sending Commands to CaravanControl
Your caravan can be controlled and monitored only from those phone numbers that are listed
in the unit’s phone directory. You can add and remove phone numbers from the directory
yourself (see 3.6). This guarantees that no one can access your CaravanControl without your
approval.
You will find often used user commands from this manual (see 2.3) or you can ask list of basic
commands directly from your CaravanControl by sending any text message that is not
recognized as a valid command. The list of basic commands is returned if the unit receives a
command it does not understand. If this happens to you, go over the command once more
and make sure there are no typing errors. Text message COMMANDS returns all commands.
For example, if you want to turn heating on in your caravan, send command HEATER ON to
the CaravanControl. You will receive the same command in response if the heater was
switched on successfully.
HEATER ON
HEATER ON
You can save the most often used commands in your mobile phone’s memory for easy access
later on. Most mobile phones prompt you to save text messages after typing them. You will
find saved messages from “My messages” or “Archive” folder as far as Nokia mobile phones
are concerned.
1.2.4
Receiving Alarms from CaravanControl
You will receive a text message if something goes wrong or something potentially threatening
happens in your caravan. The most important alarms that require immediate and urgent
attention are sent to the first five phone numbers in the unit’s phone directory to minimize the
possibility that the alarm might not be noticed at all. Less acute alarms are only sent to the
phone number in directory memory cell one.
The most important alarms are emphasised by an alarm phone call, which draws the user’s
attention to the received text message. CaravanControl resets the alarm automatically after
24 hours. If you want to stay inside the caravan, you can reset the alarm by sending
command ALARM OFF to your CaravanControl. If you want to reset the alarm and keep
monitoring on, you can use command ALARM ON. You will find the settings for each alarm
from Table 4.
Burglar alarm
Alarm phone call
“BEEP - BEEP - BEEP”
ALARM OFF or
ALARM ON
or
24h
Only the most important alarms set the alarm siren on. The siren is silenced automatically
after a few minutes. However, you can turn it off from the switch on the CaravanControl or by
sending text message ALARM OFF (this also switches the unit into disable mode). However,
it should be noted that if the unit was in normal mode at the time of the alarm, CaravanControl
will not cancel the sending of text messages.
INTRODUCTION
9
The unit’s operating mode influences the way alarms are handled. In disable mode, a text
message is sent and an alarm phone call is made only if the sensor is monitored 24 hours a
day (see Table 4). In normal mode, all alarms are sent.
10
2.
CaravanControl User’s Manual Version 5.2
FEATURES
This section delves much deeper into CaravanControl and how it is best used. The
CaravanControl Quick Guide delivered with the unit collects the most frequently used features
in one easily palatable format. The Quick Guide should be treated as an aid to your memory
and not as a replacement for the complete manual you are holding right now.
, Do not switch off the battery of your caravan because the unit does not have a
battery on its own. CaravanControl uses the battery of your caravan if there is no 230V
power supply.
2.1 Remote Control
You can control heating, air-conditioning, outdoor light, and refrigerator with simple text
message commands. Remote controls of air-conditioning and outdoor light are alternatives to
each other. Only one of them is available to you depending on the model of your airconditioner and how CaravanControl was installed in your caravan. You can also test the
alarm siren remotely.
Command OUTPUTS returns a list of devices that you can control with text messages. The
return message also contains information about which devices are on and which are off at the
moment.
OUTPUTS
HEATER ON
AIRCON OFF
FRIDGE OFF
SIREN OFF
Table 3. Devices that can be controlled remotely.
Device (also called an output)
Commands
Heater (either electrical or gas heating)
HEATER ON and HEATER OFF
Air-conditioning
(alternatively outdoor light)
AIRCON ON and AIRCON OFF
(LIGHT ON and LIGHT OFF)
Refrigerator
FRIDGE ON and FRIDGE OFF
Siren
SIREN ON and SIREN OFF
) Siren is not included in the basic package of CaravanControl.
2.1.1
Heating
You can switch heater on and off yourself or you can leave it to CaravanControl to keep the
temperature at a comfortable and steady level by using thermostatic control. Command
OUTPUTS will tell you whether the heater is on or off at the moment. To find out the current
temperature in your caravan and outdoor temperature, use command TEMP.
11
Features
Electrical Heating
You can control electrical heating with commands HEATER ON and HEATER OFF. Once
CaravanControl has run the command it received successfully, it will respond with an identical
text message.
HEATER ON
HEATER ON
Your caravan will now warm up to the temperature selected from the heater’s control unit. In
other words, you have to use the heater’s own control unit for turning on the desired settings
before you leave your caravan and send commands from your mobile phone.
The command HEATER OFF has the same effect as switching the heater off from the heater’s
own control unit.
Off
Backwater thermostat
Ext
Power
Picture 2. Adjust the settings from the heater’s control panel because these settings cannot be changed remotely.
Use the settings depicted in the picture if you have Alde 3000 or 3010 when leaving the caravan with intent to control
heating remotely.
Thermostatic Control
Thermostatic control can be used for keeping indoor temperature at a steady level above zero
degrees Celsius. You can set the desired temperature with command HEATER nn, where nn
is the desired temperature level. You can also use a negative temperature value if you want to
allow temperature to drop below zero, for example HEATER -5.
HEATER 7
HEATER 7
You still have to set the maximum temperature from the heater’s control unit as explained
earlier. The maximum temperature is the upper limit that CaravanControl must comply with. If
you have set the maximum temperature to 21 degrees Celsius, CaravanControl can make the
temperature rise up to 21 but not higher.
, In Alde Compact 3000 system you have to set i = normal mode, which means that
the backwater pump is controlled by thermostat.
Gas Heating
You can control gas heating with the same commands that were used for controlling electrical
heating: HEATER ON and HEATER OFF. However, thermostatic control is not recommended
to be used with gas heating.
12
CaravanControl User’s Manual Version 5.2
Controlling Heating Manually
You can turn heating on even if you do not have a mobile phone at hand by pressing the
manual temperature control switch. You might want to do this if GSM network coverage is
poor in the area or if you do not happen to have a mobile phone with access permissions to
your CaravanControl nearby that could be used for controlling heating.
If manual control is on, you cannot control heating from your mobile phone until you switch
manual control off from the switch.
Manual heating control on and off
Picture 3. Switching manual heating control on and off. Red light indicates that the manual heating control is on.
2.1.2
Air-conditioning (or Outdoor Light)
You can control air-conditioning with commands AIRCON ON and AIRCON OFF.
AIRCON ON
AIRCON ON
Use command OUTPUTS to find out whether air-conditioning is on or off.
You can control outdoor light if your air-conditioner model cannot be controlled remotely. In
other words, remote control of outdoor light is an alternative to air-conditioning control. You
cannot have them both. You can switch the outdoor light on and off with commands LIGHT
ON and LIGHT OFF.
LIGHT ON
LIGHT ON
) Cables for controlling air-conditioning (light) remotely are not included in the basic
package of CaravanControl.
2.1.3
Refrigerator
Refrigerator can be controlled with commands FRIDGE ON and FRIDGE OFF.
FRIDGE ON
FRIDGE ON
Command OUTPUTS can be used for asking whether the refrigerator is on or off at the
moment.
) Cables for remote control of refrigerator are not included in the basic package.
13
Features
2.2 Alarms
CaravanControl monitors and secures your motor caravan or caravan with motion, fire, gas,
and temperature sensors. In addition, there are door magnets on the door to protect your
property from break-in and entry and a GPS receiver to protect against caravan theft.
When one of the aforementioned sensors alarms or some internal abnormality in
CaravanControl calls for attention, it makes an alarm phone call and sends detailed
information about the cause that lead to the alarm in a concise text message to the users.
Outdoor
motion sensor
Fire alarm right
above the door
Door magnets
Indoor
motion sensor
Indoor
temperature
Gas sensor
GPS receiver
Outdoor temperature
sensor in the chassis
Picture 4. Recommended sensor locations in a caravan.
The following table contains all alarm and notification messages CaravanControl can send.
Column “Users” lists the directory memory cells containing the phone numbers where the
alarm is sent. Most alarm messages are sent to the first five phone numbers in the directory.
Columns “SMS” and “Call” are quite self-explanatory: they indicate whether the alarm is
forwarded as a text message or as a phone call or as both. The next column ”▲▼” contains
information about whether the alarm is two-way, meaning that a text message is sent (and
perhaps a phone call) on both activation and deactivation of the alarm. The three rightmost
columns indicate what alarms can be sent in the different modes of the unit.
Table 4. Alarms settings (see Table 2 for explanations of the symbols).
Alarm or notification
Users
SMS
Call
▲▼
Fire alarm
1-5
●
●
○
●
●
●
Burglar alarm (motion sensor inside)
1-5
●
○
○
●
○
○
Burglar alarm tent (motion sensor in
tent)
Burglar alarm door (door switch)
1-5
●
○
○
●
○
●
1-5
●
○
○
●
○
●
Gas alarm
1-5
●
●
○
●
●
●
Location alarm (GPS)
1-5
●
○
○
●
○
○
Restart notification
1
●
○
○
●
○
○
Power failure 230V alarm
1
●
○
●
●
○
○
Low battery alarm
1
●
○
●
●
●
●
Cover open warning/Progr. mode on
1
●
○
●
●
●
●
Scheduled report
1
●
○
○
●
●
○
Indoor temperature alarm
1
●
○
●
●
○
○
Outdoor temperature information
1
●
○
●
●
○
○
14
CaravanControl User’s Manual Version 5.2
Alarm messages contain following information: the optional name of the caravan (see 3.5), the
reason for the alarm, and some additional information about the alarm if available (e.g.
temperature value that triggered the alarm).
Some examples of alarm messages (the unit has been named “Caravan”):
Caravan Burglar alarm
Caravan Power 230V failure
Caravan Indoor Temperature alarm IN: +9.4
CaravanControl might send you a text message on deactivation of the alarm as well:
Caravan Power 230V OK
Caravan Indoor Temperature OK IN: +15.4
2.2.1
Fire Alarm
CaravanControl sends a text message and makes a phone call if fire breaks loose in the
caravan. Fire alarm turns the siren on, too.
Fire alarm
“BEEP - BEEP - BEEP”
) Smoke detector is not included in the basic package of CaravanControl.
2.2.2
Burglar Alarm
CaravanControl sends you a text message and makes an alarm phone call if it detects
movement inside the caravan or in the front tent or if someone opens or breaks the door to
your caravan. Burglar alarm turns the local alarm siren on as well.
Burglar alarm
“BEEP - BEEP - BEEP”
If the burglar breaks or opens the cover on CaravanControl, a notification message is sent but
siren is kept silent. Burglar alarm is active in the normal mode of the unit, which is why the unit
must be switched to disable mode before opening the cover. Otherwise opening the cover will
result in a notification message.
Monitoring the Front Tent
You can include the front tent in the monitored area with command TENT ON and remove it
with command TENT OFF. If someone enters the tent while monitoring is on or the monitoring
of tent has been switched on from inside the caravan, the siren lets out a couple of short
beeps as a warning to the trespasser and the outdoor light is switched on. If the intruder
ignores these warning signals and refuses to leave, the siren goes on and CaravanControl
sends alarm messages and calls the appropriate phone numbers. To find out whether the tent
has been included in the monitored area, ask a report from your CaravanControl.
15
Features
TENT ON
TENT ON
It is recommended that the monitoring of front tent is turned on from the switch on
CaravanControl for night. This causes the unit to remain in disable mode allowing
you and your family to stay and move around in the caravan while the front tent
and the entrance door to your caravan are being monitored and protected against
nightly intruders. In other words, the outdoor motion sensor and door magnets are now
monitored 24 hours a day, and alarm messages from these sensors are sent regardless of the
operating mode.
) Door magnets and motion sensor for the tent are not included in the basic package
of CaravanControl.
Switch for front tent monitoring
Picture 5. Switching front tent monitoring on and off.
You should remember to switch off the front tent monitoring before opening the door in the
next morning so that no alarm is caused by accident. You can silence the siren and cancel
alarm messages from the front tent monitoring switch if the alarm was an accident.
Front tent has been assembled
Include the tent in the monitored
area with command TENT ON
You leave the
caravan unattended
Night falls
Switch monitoring on from the
button on the bottom of the unit.
Switch monitoring on by phone call.
The caravan and front tent are now
monitored and protected.
In the morning
You return back to
your caravan
Switch monitoring off by pressing
the button before stepping out of
the caravan.
Switch monitoring off by phone call
before entering the front tent.
Still living in the caravan
Front tent is disassembled
Remove the tent from the
monitored area with TENT OFF
Picture 6. Recommended usage of operating modes.
16
2.2.3
CaravanControl User’s Manual Version 5.2
Gas Alarm
Caravan control makes a gas alarm if it detects liquid gas in the indoor air.
Gas alarm
“BEEP - BEEP - BEEP”
CaravanControl alarms you immediately if it detects gas in the air, giving you plenty of time
getting out of the caravan.
) Gas detector is not included in the basic package of CaravanControl.
2.2.4
Location Alarm
If your Caravan is furnished with a GPS receiver and the unit is in normal mode of operation
(monitoring is on), CaravanControl monitors the location of your caravan and sends you an
alarm message if your caravan is stolen.
Location alarm
N63.07600
E27.66000
SPD 12
TRK 183
UTC 14:22:23
You can set location monitoring on with command LOC nn, where nn is the maximum
distance in metres your caravan is allowed to be moved before an alarm is sent. For example,
LOC 50 does not allow your caravan to be moved more than 50 metres from its current
position.
LOC 50
LOC 50
However, you should not set the distance too short because it increases the risk of
unnecessary alarm messages due to limited precision. Therefore the minimum value for
location alarm is 20. Command LOC OFF sets the location monitoring off and LOC returns the
current setting.
) GPS receiver is not included in the basic package of CaravanControl.
2.2.5
Restart Notification
CaravanControl sends you a restart notification about half an hour from the moment it was
switched on. The notification is sent every time the unit is powered up.
17
Features
CaravanControl started
2.2.6
Power Failure Alarm
CaravanControl sends you an alarm message in the case of a power failure. The alarm
threshold for is 13.2V.
Power 230V failure
2.2.7
Low Battery Alarm
CaravanControl sends you an alarm message if the battery voltage drops too low. The alarm
threshold for is 11.5V
Battery voltage low 8.6V
2.2.8
Cover Open Warning
CaravanControl sends you a notification when the unit’s cover is opened or closed. Opening
the cover causes the unit to enter programming mode which is a security risk because in
programming mode all phone numbers can have access your CaravanControl (see 3.1).
Cover open:
Programming mode on
2.2.9
Temperature Alarm
CaravanControl monitors both indoor and outdoor temperatures. Alarm limits can be set for
the indoor temperature with a specific setup command (see 3.8).
Indoor Temperature alarm
IN: +9.4
If you wish to use temperature alarms with thermostatic control, the alarm limits must have
margins of at least three degrees Celsius. For example, if you use thermostatic control to keep
the temperature at 10 to 21 degrees above zero, the alarm limits should be 7 and 24 degrees
respectively.
18
CaravanControl User’s Manual Version 5.2
2.3 User Command Summary
You can send only one command in one text message. Commands are case-insensitive,
which means that any command can be given either in lower, upper, or mixed-case.
Commands heater on, HEATER ON, and Heater On are all acceptable.
Table 5. User commands. These commands have localized counterparts in different
languages.
Command
Explanation
?
Prints out a report (see 1.2.1)
COMMANDS
Prints a list of all available user commands
OUTPUTS
Asks the status of remote controllable devices (see 2.1)
ALARM ON
Sets the unit in normal mode (monitoring on, see 1.2.2)
ALARM OFF
Sets the unit in disable mode (monitoring off)
ALARM
Asks the current operating mode (monitoring on or off?)
TENT ON
Includes the front tent in monitored area (see 2.2.2)
TENT OFF
Removes the front tent from the monitored area
TENT
Asks the status of tent
AIRCON ON
Starts air-conditioning (see 2.1.2)
AIRCON OFF
Stops air-conditioning
AIRCON
Asks the status of air-conditioning
FRIDGE ON
Switches refrigerator on (see 2.1.3)
FRIDGE OFF
Switches refrigerator off
FRIDGE
Asks the status of fridge
HEATER ON
Switches heating on as selected from the heater’s control panel
HEATER OFF
Switches heating off
HEATER nn
Sets temperature to nn (thermostatic control)
HEATER
Asks the value set to heater
TEMP
Asks indoor and outdoor temperatures
LIGHT ON
Switches outdoor light on (see 2.1.2)
LIGHT OFF
Switches outdoor light off
LIGHT
Asks the status of light
LOC nn
Sets location monitoring (nn = distance in metres, see 2.2.4)
LOC OFF
Switches location monitoring off
LOC
Asks the setting of location monitoring
SIREN ON
Sets siren on
SIREN OFF
Sets siren off
SIREN
Asks the status of siren
19
SETTINGS
3.
SETTINGS
So far we have only been discussing how CaravanControl is used everyday, this section,
however, deals with the setup of the unit that does not require your attention on a daily basis.
That being said, some of the settings that you will most likely have to change at some point
are the users’ phone numbers and temperature alarm limits.
For example, if you want to add new users or remove old ones from your CaravanControl, you
will need to update the unit’s internal phone directory accordingly. Temperature alarm limits
may also need adjustment if you want to keep the indoor temperature at a lower lever than
what is allowed by default or if you want to stop heating altogether.
3.1 Programming Mode
CaravanControl must be switched to programming mode if you intend to change
its settings from a phone number not listed in the unit’s phone directory. You can
set CaravanControl into programming mode by opening its cover. The signal light
will start blinking rapidly when programming mode sets in. A notification message
is sent to phone number in directory memory cell one if the cover is opened while monitoring
is on.
It is paramount to realize that the unit is not protected against mischievous users when it is in
programming mode. Anyone with adequate knowledge of CaravanControl can send
commands and alter the unit’s settings if he or she knows your CaravanControl’s phone
number. This is why programming mode can be switched on only by opening the unit’s cover
in the caravan. CaravanControl enters this mode automatically when it is powered up for the
first time.
CaravanControl can be set back to normal or disable mode in any of the following three ways:
by closing the cover, by making a phone call, or by sending a command to CaravanControl
(see 1.2.2). Remember that CaravanControl must have your phone number in its phone
directory before you can call or send messages to it.
3.2 Power Save Mode
You can set your CaravanControl into power save mode with command SLEEP ON. When the
unit is in power save mode, it wakes up once in every hour for three minutes to check if there
are new alarms. This might be quite workable solution, for example, if you are using your
CaravanControl only for temperature alarms where it does not matter if you receive an alarm a
little late. To quit power save mode, just give command SLEEP OFF.
SLEEP ON
SLEEP ON
3.3 Asking Settings
You can ask the current value of a particular setting by appending a question mark at the end
of the command. For example, command P? gives you a full listing of the phone numbers in
the phone directory (see 3.6). CaravanControl will send you more than one text message if not
20
CaravanControl User’s Manual Version 5.2
all information fits into one text message. Note that the order in which the messages arrive in
your mobile phone can be changed from the original and intended order in the SMS Service
provided by your operator.
) If the unit fails to respond to your text message, check the syntax of the command
and make sure that your phone number is stored in the unit’s phone directory correctly.
3.4 Changing Language
CaravanControl comes with several different languages. Before you can use your
CaravanControl, you must select your language with command LANG xx, where xx is a twoletter language code (not country code). You can find out the current language with command
LANG
LANG EN
LANG EN
Table 6. User commands and messages are available as localized versions in the following
languages.
Command
Language
LANG EN
English
LANG FR
French
LANG ES
Spanish
LANG DE
German
LANG SV
Swedish
LANG NO
Norwegian
LANG FI
Finnish
LANG NL
Dutch
LANG IT
Italian
LANG PT
Portuguese
Language selection changes the user commands and alarm messages.
, Switching from one language to another clears the entire phone directory and the
name of the unit (see 3.5). Users’ phone numbers must be given after language is
selected.
3.5 Naming the Unit
CaravanControl inserts the name of your motor caravan or caravan at the beginning of all
alarm messages. You can name your caravan with command NAME yy, where yy is the name
you wish to give. The name can be up to 20 characters long and it can be asked with
command NAME.
21
SETTINGS
NAME Caravan
NAME Caravan
The name can be cleared by sending NAME to your CaravanControl (i.e. send the same
command without the name part).
3.6 Phone Directory
CaravanControl uses phone directory for receiving commands and sending alarm messages
to the listed numbers. CaravanControl can store up to 20 phone numbers in the directory. All
numbers must be stored in international format (beginning with +44 in the U.K.) because
otherwise they will not work because text messages always use international format in phone
numbers.
, Directory memory cell 0 is reserved for the GSM operator’s SMS Service number.
Normally you do not have to set the SMS Service number, but if your CaravanControl
does not send any text messages, you might need to program it manually to memory
cell 0.
The unit sends alarm messages to the phone numbers in memory cells 1 through 5.
Commands and questions messages can be sent from the phone numbers in memory cells 6
through 20, however, no alarm messages are sent to these numbers.
If you want to change the unit’s settings from a phone number not listed in the directory, you
must set the unit in programming mode (see 3.1).
A new phone number can be added to the directory with command Px nnnnnnn, where x is
the directory memory cell number (1-20, or 0 for the SMS Service number) and nnnnnnn is the
user’s phone number in international format
It is a good practice to check the contents of the directory before making any changes to it so
that no phone numbers are overwritten accidentally. In the following example, a new user is
being added in directory memory cell two.
P?
P0
P1 +441234567
P2
P3
…
P20
P2 +447654321
P2 +447654321
Use the following commands for editing phone numbers:
Adding a new phone number in the directory
P x
n n n n n n n
22
CaravanControl User’s Manual Version 5.2
Sets the phone number nnnnnnn in memory cell x (1 - 20).
x = 0 for the SMS Service number (normally not needed).
The phone number must be in international format.
Asking phone numbers
P ?
Prints the entire phone directory.
Asking a single phone number
P x ?
Prints the phone number in memory cell x.
x = Memory cell number 0 through 20.
Removing a phone number from the directory
P x
Clears the phone number in memory cell x.
x = Cell number 0 - 20.
3.7 Alarms
By default, alarm messages are sent only to the first five phone numbers in the phone
directory. If you want to add a new user in CaravanControl with the ability to receive alarms,
set his or her phone number in one of these memory cells. In some cases the alarm is sent
only to the phone number in directory memory cell one (see Table 4).
3.7.1
Receiving Alarm Messages
CaravanControl sends alarm information in a text message, but in some cases it also makes a
phone call to emphasize the importance of the alarm. What this means is that CaravanControl
makes a phone call to each and every phone number in directory memory cells 1 through 5 in
addition to text messages. The alarm is acknowledged by picking up the phone.
CaravanControl will keep on calling until someone answers or until the alarm expires in two
hours.
Burglar alarm
“BEEP - BEEP - BEEP”
Alarm Phone Call
If phone calls (see Table 4) are used, CaravanControl keeps on calling relentlessly until
someone picks up the phone. CaravanControl considers it as an acknowledgement when the
phone call is answered by your answering machine. Notification messages from operators
(such as “The number you are trying to call cannot be reached…”) are not regarded as
acknowledgements (see “Answering Machines and Services”).
) CaravanControl keeps on calling to the specified number even if it is not a valid or a
correct phone number. CaravanControl also keeps on calling to mobile phones until
someone answers even if their mobile phones are out of reach of the GSM network, and
23
SETTINGS
this might result in some delays in the operation of the unit. Alarms expire in two hours
by default, and this is when CaravanControl gives up and quits calling at the latest.
Answering Machines and Services
CaravanControl waits for your answer for 20 seconds. If you have an answering service
enabled in your GSM subscription, you have to make sure the alarm phone call does not go to
the answering machine in those 20 seconds so that no alarms get acknowledged by the
service. This is a potentially dangerous scenario and should be considered carefully when
using answering machines and services as you might not check the received message soon
enough.
When you pick up the phone, CaravanControl sends two signals to alert you that connection
has been established.
3.7.2
Scheduled Report
CaravanControl can be programmed for sending a report at certain intervals. To schedule a
report, use command REPORT d, where d is the interval in days (some examples: 0 = never,
1 = daily, 2 = every other day, 7 = weekly). The report is send weekly by default, and
maximum value is 30, which is about once a month. The scheduled report is the same report
that can be asked with command ? (see 1.2.1).
REPORT 7
REPORT 7
The first report is sent immediately after running the command and the next as soon as the
specified number of days has elapsed. You can ask this setting with command REPORT.
3.8 Temperature Alarm Limits
There are temperature sensors for measuring indoor and outdoor temperatures in
CaravanControl. They have a fixed hysteresis of two degrees which effectively prevents
redundant alarm messages from being sent when the temperature fluctuates around the set
alarm limit. What this means is that if the lower temperature alarm limit is set to +10 degrees
Celsius, the temperature must climb at least up to +12 before new temperature alarms are at
all possible.
Table 7. Sensors measuring temperature.
Sensor
Location
T1
Inside the motor caravan or caravan
T2
Outside (in the chassis of the caravan)
T3
Optional
) Temperature sensor T3 is not included in the basic package of CaravanControl.
You can ask the current temperatures and alarm limits with command T?.
Asking temperatures and limits
T ?
24
CaravanControl User’s Manual Version 5.2
An example response message for T? -command:
T1 +10 +45 IN
T2 -50 +50 OUT
T3 -50 +50 FREE (Optional)
The first value is the sensor id (See Table 7), the following two values are the
lower and upper alarm limits (i.e. the acceptable temperature range) and the
last one is the name of the sensor.
Settings alarm limits and name for the indoor temperature sensor
T 1
x
y
n n n
x = Lower alarm limit
y = Upper alarm limit
nnn = Name of the sensor
An example alarm limit and naming command:
T1 10 45 IN
An example response message for alarm limit and naming command:
T1 +14 +45 IN
The alarm limit values must be given in whole numbers or with one decimal if need be.
Negative values can be used as well. Temperature alarm is sent immediately when the indoor
temperature rises above or drops below the set limits.
) You can set the alarm limits and name for the outdoor and optional sensor in the
same manner, just remember to use T2 when referring to the outdoor sensor and T3
when referring to the optional temperature sensor.
3.9 Activating Remote Control in ALDE 3010
In ALDE 3010, you must first activate remote control before it is possible to control your
caravan’s heating with text messages. Go through the following steps:
If no menu is displayed, do the following:
1.
2.
Press the right arrow until the mark in the bottom left
corner starts blinking.
Activate the menu row by pressing the +/On button.
Picture 7. Activating menu row.
1.
2.
Picture 8. Activating remote control.
Press the right arrow until Ext starts blinking. Now
you can see whether remote control is activated or
not ON/OFF.
Activate remote control by pressing the +/On button.
The text should read now ON.
25
SETTINGS
3.10 Using Remote Control in ALDE 3010
You have two different ways for controlling ALDE 3010 heater. You can either use HEATER
ON / HEATER OFF commands or thermostatic control with command HEATER nn.
When using ON/OFF commands, you send HEATER OFF command to ALDE 3010 and
switch the heating system off when leaving the caravan.
When using thermostatic control, you set the desired temperature level with command
HEATER nn. Note: the heater might be on for one or two minutes after sending the command.
1.
2.
Send HEATER OFF command or set the temperature,
for example, to 7 degrees with HEATER 7.
Press the right arrow until On starts blinking.
Press the -/Off button.
Press the left arrow until the control panel goes into a
position of rest.
Now remote control is in use.
2.
3.
4.
5.
4.
Picture 9. Using remote control in Alde 3010.
5.
26
4.
CaravanControl User’s Manual Version 5.2
TROUBLE SHOOTING
If your CaravanControl fails to function properly, please go through the steps in the table
below.
Problem description:
What to check
Indicator light is off:
Switch power on and wait for 20 seconds.
Check the fuse on the power cord.
Correct operation
The light blinks.
The light blinks.
Verify that the unit’s own power switch is in position The light blinks.
ON.
The signal light is on (does not blink) and call does not get connected to the unit:
Check whether the PIN code prompt is on. Disable The call gets connected.
the prompt from the SIM card by using your own
mobile phone.
Make sure the GSM subscription is opened and test it The call gets connected.
in your mobile phone.
Make sure the SIM card is seated correctly on the
sliding SIM card holder.
The call gets connected.
Check GSM signal strength in the area. Move to area
with adequate coverage.
The call gets connected.
Check your CaravanControl’s GSM number.
The call gets connected.
The device answers with three beeps and closes the line, but operating mode does not
change:
Make sure the caller’s phone number is in the unit’s CaravanControl answers with one
phone directory. Exit programming mode.
(normal mode) or two beeps (disable
mode).
The device closes the call immediately without an answer:
Make sure the caller’s phone number is in the unit’s CaravanControl answers with one
phone directory.
(normal mode) or two beeps (disable
mode).
CaravanControl receives commands but does not reply to them:
Set the unit in programming mode and add the user’s CaravanControl responds with a text
phone number in the phone directory.
message.
SMS Service number might be missing from the SIM CaravanControl responds with a text
card. Insert your operator’s SMS service number in message.
the phone directory memory cell 0.
The maximum number of text messages per day CaravanControl responds with a text
TROUBLE SHOOTING
might have been consumed.
27
message.
The SIM card might have a limit for how many
messages can be sent.
Your mobile phone’s SMS memory could be full.
CaravanControl does not send alarm messages:
Check if the alarm is sent in normal mode only. Alarm message is sent.
Switch monitoring on if alarm is sent only in normal
mode.
Make sure the unit is not in programming mode. Alarm message is sent.
Switch it back to normal mode by by sending
command ON or by making a phone call to the unit.
Add the user’s phone number in the phone directory.
Alarm message is sent.
CaravanControl makes only a phone call when it should also send a text message:
Set your operator’s SMS Service phone number to Alarm message is sent.
directory memory cell 0.
Your mobile phone does not display CaravanControl’s phone number when it is calling:
CaravanControl cannot send its own phone number CaravanControl’s phone number is
to you because it is denied in the GSM subscription.
displayed when it calls.
Alarm is sent every time monitoring is switched on:
Check the wires of the alarming sensor.
Alarms field is empty in the report
(use command ?)
No state changes in outputs:
Add your number in the phone directory. CaravanControl responds with a text
CaravanControl must know your phone number messages.
before it can run any commands you send to it.
Check the syntax of the command.
Heating does not go on:
Check the settings on the control panel.
State of the output changes.
Heater goes on after sending the
command.
If you have Alde 3010, make sure remote control is Heater goes on after sending the
activated.
command.
Check the syntax of the command, for example, Heater goes on after sending the
HEATER ON
command.
You have run out of liquid gas.
Heater goes on after sending the
command.
Battery voltage has dropped below 11.5V.
Heater goes on after sending the
command.
28
5.
CaravanControl User’s Manual Version 5.2
TECHNICAL SPECIFICATIONS
Dimensions:
Weight:
Current consumption:
Supply voltage:
Serial port:
Maximum values for outputs:
Inputs:
146 x 211 x 52 mm
ca 420 g
unit at idle 1.5 - 20 mA / 12 V Max 100 mA
9 – 14.5 V
RJ-8
power 72 W, current 6 A, voltage 12 V
min. control circuit current 3,5mA/12V
max. control circuit resistance 30kohm / 12V
Operating conditions:
GSM module:
SIM card:
Antenna:
-30…+70 °C
Siemens TC65
small, 3V
Quad-band (850/900/1800/1900), SMA connector
The unit is not protected against water or any liquids.
Note! Even though CaravanControl uses supply voltage of 9-14.5V, please, keep in mind that
external devices (such as motion detectors) might not tolerate such high voltages.
Technical specifications are subject to change without prior notice.
GUARANTEE
Telemic guarantees this CaravanControl product for 24 months against material defects and
flaws in manufacturing this product starting from the date of purchase. Defects are corrected
with replacement parts, by fixing the old elements, or by providing a new equivalent product
for the customer.
Defects that are caused by natural deterioration over time, overloading, or by any other
inappropriate use of this product are outside the sphere of this guarantee.
Reclamations can be only accepted if the bought unit is returned to the retailer or to the
manufacturer unopened.
PROOF OF COMPLIANCE TO STANDARDS
The manufacturer guarantees that this product complies with the following standards:
EN 55022, EN 61000-3-2, EN 61000-3-3, EN61000-4-2, EN 61000-4-3,
EN 61000-4-4, EN 61000-4-5, EN 61000-4-6, Low Voltage Directive 73/23/EEC and the
Amendment to LVD 90/683/EEC EMC Directive 89/336/EEC
2004/108/EC Automotive Directive 72/245/EEC and the amendment 2005/83/EC R&TTE
Directive 99/5/EC
Telemic Oy
29
INDEX
6.
INDEX
A
Alarms .................................................................... 13
Alde 3010.........................................................10, 24
Alde 3010 control panel......................................... 24
Alde Compact 3000 ............................................... 11
Answering machines ............................................. 23
B
Battery.................................................................... 10
C
Canceling an alarm.................................................. 8
Control circuit current ............................................ 28
Control circuit resistance ....................................... 28
Controlling heating manually ................................. 12
D
N
Normal mode ........................................................... 6
O
Operating modes ..................................................... 6
P
Phone directory...................................................... 21
PIN code prompt...................................................... 4
PrePaid subscription................................................ 4
Programming mode ............................................... 19
R
Receiving alarms ............................................... 8, 22
Remote control ...................................................... 10
Report ................................................................ 6, 23
Restart notification ................................................. 16
Disable mode ........................................................... 6
S
F
First steps ................................................................ 4
First text message ................................................... 5
Front tent................................................................ 14
G
GPS........................................................................ 16
GSM module .......................................................... 28
H
Heating................................................................... 10
Hysteresis .............................................................. 23
Scheduled report ................................................... 23
Sending commands................................................. 8
Sensors.................................................................. 13
Signal light ............................................................... 7
SIM card............................................................. 5, 28
SMS Service number............................................. 21
Supply voltage ....................................................... 28
T
Technical specifications......................................... 28
Temperature alarm limits....................................... 23
Thermostatic control .............................................. 11
Trouble shooting .................................................... 26
Typing commands ................................................. 19
L
Language ............................................................... 20
Liquid gas............................................................... 16
U
Unit name .............................................................. 20
Unlisted number....................................................... 4
User commands..................................................... 18
30
CaravanControl User’s Manual Version 5.2
Isoharjantie 6
Tel. +358 20 7288 740
71800 Siilinjärvi Fax +358 17 462 1212
FINLAND
[email protected]
http://www.telemic.fi