1
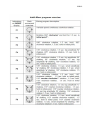
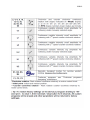
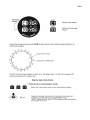
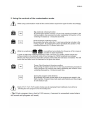
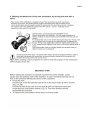
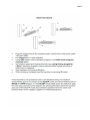
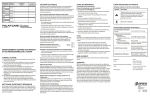
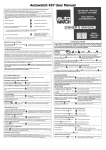
3/2012
Intelli-Mixer RM-2 USER MANUAL
Dear user!
The Intell-Mixer RM-Z Is a simple and reliable device. We ask you to consider
technical requirements of exploitation to insure pleasant and continuous usage of
machine.
General information
The Intelli-Mixer RM-2 15 designed to perform mixing of varnous laboratory liquid
samples in a wide range of test tubes from 0.smi up to 50ml volume.
Control system features 28 mixing programs and 3 extra custom programs for
manual programming by operator. This machine has proved its superior efficiency
In medicine, biology, analytical chemistry and many others.
Technical specifications
‘Variable rotation speed. rev./min.: from 1 to 99
Speed selection step. rev./min. 1
Environmental temperature, “C: from +2 to + 50
Relative moisture of the atmosphere
(at the temp. +20 C): not more than 80 %
Power adapter input: 110-220 Y: 50-650 Hz
Power adapter output: @—&—@® 12VDC, 1.5 A
Power consumption, VW: not more than 12
Models RM-25 RM-2M RM-2L
Dimensions L x W x H 316х125х166 | 344x125x168 | 420x125x16
8
Weight, kg 1.5 1.6 1.9
Ох Dx DXN
Applied racks 11x28 11x32 11x42
13x24 13x28 13x38
16x14 16x16 16x22
30x8 30x10 30x14
D — Diameter of applied test tubes.
N — Number of applied test tubes.
(!) It is also possible to combine different tubes types in one rack up to
customers’ desire and have mixed rack, blotting rack or rocking platform.
Delivery package
Item Quantity
Intelli-Mixer RM-2 a aaa aaa aaa 7
Power adapter 17VDC, 1, 0A aaa aaa aaa LE EL 1
Rack fixation Wrench. eran anne an nana na nena EL Л
User Manual. anna naaa anna raeaanenannenaneene Ш
EN 1
3/2012
3/2012
General description of Intelli-Mixer construction
Intell-Mixer consists of the control block, base platform and rack.
On the front side of control block the control panel is situated. Start/stop button Is on
the top of the control block. Power supply socket Is on the back side of the control
block. Rack-to-motor connector is on the right side of the control block.
Back holder
Rack
Control panel |
Start / stop bution ——
base platform
Rack-to-motor connector
Control block
Program selection display
Program selection buttons
RPM / vortexing frequency display
RPM / vortexing requency adjusmet
buttons
3/2012
Intelli-Mixer programs overview
Indications Rack Mixing program description.
on ‘MODE movement
display. overview
Vanable speed continuous clockwise rotation.
F1
Rotation 360° clockwise® and hold for 1.5 sec. in
Е? initial point”.
180° clockwise rotation, 1.5 sec. hold, 180°
F3 clockwise rotation, 1.5 sec. hold in initial point.
135° clockwise rotation, 1.5 sec. big amplitude U'
F4 shaking, 225° clockwise rotation, 1.5 sec. hold in
initial point.
135° clockwise rotation, 1.5 sec. big amplitude *U”
FS shaking, 90° clockwise rotation, 1.5 sec. big
amplitude 'U' shaking, 135° clockwise rotation, 1.5
sec. hold in initial point.
135° clockwise rotation, 1.5 sec. small amplitude
F6 'u’ shaking, 90° clockwise rotation, 1.5 sec. small
amplitude "'u’ shaking, 135° clockwise rotation, 1.5
sec. hold in initial point.
— 110“ clockwise rotation, 1.5 sec. hold, 110°
clockwise rotation , 1.5 sec. hold in initial point,
Fr В 110% counter clockwise™" rotation , 1.5 sec. hold,
110° clockwise rotation, 1.5 sec. hold in Initial
point.
110° clockwise rotation, 1.5 sec big amplitude U
shaking, 110° counter clockwise rotation, 1.5 sec.
F8 rar hold in initial point, 110° counter clockwise rotation,
1.5 sec big amplitude *U° shaking, 110° clockwise
rotation 1.5 sec. hold in initial point.
110° clockwise rotation, 1.5 sec. small amplitude
'u’ shaking, 110° counter clockwise rotation, 1.5
F9 E sec. hold in initial point, 110° counter clockwise
rotation, 1.5 sec. small amplitude "u’ shaking, 110°
clockwise rotation 1.5 sec. hold in initial point.
3/2012
2, 4, 6,8, 10, Clockwise and counter clockwise continuous
12 15, 30, т” rotation with angels indicated on ‘MODE’ display:
45, 60, 90, vv 2° 4° 6° 8° 10°, 12° 15°, 30°, 45°, 60° 90°, 99°,
99 On RPM display numbers mean shakes per minute.
Continuous vanable intensity small amplitude ‘у’
uu a vortexing under manually selected angle.
Continuous variable intensity small amplitude “u”
ui < vortexing with 1 speed counter clockwise rotation.
Continuous variable intensity small amplitude “u”
u? < vortexing with 7" speed counter clockwise rotation.
Continuous variable intensity big amplitude ‘U°
UU 7 vortexing under manually selected angle.
Continuous variable intensity big amplitude “U”
U1 ) vortexing with 1 speed counter clockwise rotation.
Continuous variable intensity big amplitude “U”
u? ) vortexing with 2™ speed counter clockwise rotation.
B1 B2 B3 Specially designed modes for running westem
BA Ves blotting. Requires the blotting rack.
C1, C2, C3 Customer programs see Customer programs
designing’ instructions.
"Clockwise rotation- Rack rotation clockwise relatively to motor control block.
“Initial point- Initial rack vertical position.
“**Counter clockwise rotation - Rack rotation counter clockwise relatively to
motor control block.
( Tip ! To restore factory settings on the device put angular shaking to “99”
and rpm's to value 1, then hold start / stop button for 8 seconds. All custom
programs will be erased and other parameters will be returned to factory
settings).
Using mixing programs
Rotation programs F1, F2, F3, FT.
These programs are used to perform mixing of laboratory samples by means
of rotation of the rack. Kotation speed Is Indicated on RPM display and could be
changed either during the operation or when the rack is stopped.
3/2012
( Tip I Once RPM has been set it will apply to all the programs in the MODE
menu including customer programs).
Vortexing programs ‘u’ & ‘U’ (Vortexing regimes).
These programs are used to perform intensive mixing of different size test
tubes by means of shaking and vortexing. Vortexing frequency Is indicated on
RPM display and could be changed either during the operation or when the rack
Is stopped.
During these regimes rack could be manually positioned under any angle by
hand to insure best performance and convenience.
( Tip ! Once vortexing frequency has been set it will apply to all the programs in
the MODE menu that feature shaking including customer programs).
( Tip ! In case of rack losing its present position while vortexing reduce the
vortexing frequency until operation becomes stable).
Angular shaking 2, 4, 6, 8, 10, 12, 15, 30, 45, 60, 90, 99.
These programs are performing defined angle and speed shakes from the
vertical initial position. This kind of shaking Is recommended for mixing samples in
tubes bigger than 5 ml volume.
Current angel settings are displayed on MODE display. Shakes per minute
are being set and shown on RPM display. All the parameters of angle and speed
can be changed either during operation or when the rack 1s stopped.
( Tip ! In case of rack losing its present position while shaking reduce the
shaking frequency until operation become stable).
( Tip I To restore factory settings on the device put it into angular shaking
“99” and RPM to value 1, then hold start / stop button for 8 seconds. All custom
programs will be erased and other parameters will be returned to factory
settings).
Combined programs F4, F5, F6, F8, F9
These programs are performing different combinations of rotation and
vortexing.
Current speed Is shown on RPM display and can be changed either during
operation or when the rack is stopped.
Vortexing frequency can be changed by selecting on MODE display either ‘u’ or
‘U’ function and set vortexing frequency accordingly. (see also Vortexing
programs ‘u’ and ‘U’)
Now vortexing frequency Is adjusted to the best performance within current
application.
( Tip ! Vortexing frequency settings that has been defined in ‘U’ or ‘U’ functions
and rotation speed settings are valid throughout all the programs including customer
programs).
3/2012
Creating customer programs C1, C2, C3
Introduction.
In addition to 28 preset programs of the mixer 3 custom made modes can be easily
created. The self learning algorithm of the mixer is designed to make this process
fun and simple.
Please read carefully the guidelines mentioned bellow and find a great way for
interaction with the mixer entertaining and useful.
Controls description.
Customization рее.
mode settings ' UY
Vibration function (big amplitude).
| | vu ! Vibration function (small amplitude).
== | i PP | Pause function.
frre]
| SAVE! Program save button.
Km!
Parameter MODE
adjustment
Mixing mode selector.
86
Rotation speed adjustment.
3/2012
Parameter
displays
pe UJ uu
fcitoo
RPM PP SAVE
Mixing mode display.
RPM and mixing speec
display.
Y =
UTTER 5
During the programming mode RPM display shows rack rotation angle relatively fo
initial (00) position.
Rack rotation angle.
Indication on RPM display.
The full circle of rack rotation 1s split in to 100 steps from 1 to 99. For example 20
steps are equal to /2 degree turn.
Step by step instructions.
1. Entering the customization mode.
MODE MODE MODE
5 1 Ce Select one of the custom modes on the mode selection display.
q Press and hold down the button for 4,5 seconds, Sound alarm will
(O) 4: sec. notify the successful entering to the customization mode.
"MODE" display will clean and the "RPM" display will start showing the
axial position of the rack.
3/2012
2. Using the controls of the customization mode.
Big amplitude vortexing function.
By pressing the button once the 1.5 sec long vortexing includes in the:
mixing program. By pressing the button repeatedly the duration of the
vortexing increases by 1.5 second each time.
A While using customization mode all the control buttons acquire the upper function accordingly.
MODE
ae rT Small amplitude vortexing function.
ты! By pressing the button once the 1.5 sec long vortexing includes in the
donnees + mixing program. By pressing the button repeatedly the duration of the
vortexing increases by 1.5 second each time.
possible to adjust separately.
In order to adjust the vortexing frequency of the” UU" and” uu" modes, please choose any
of these modes in the standard mode list and change the "RPM" parameter accordingly.
Please note that it is best to adjust the vortexing mode while the test tubes are loaded. This will
Insure the best effect could be matched for the given test tubes.
MODE MODE
A While the amplitude in 44 is predefined accordingly, the frequency of the mixing is
pe РО Pause. Rack freezing in the given position.
: PP By pressing the button once the 1.5 sec long rack freezing includes in th
amenas mixing program. By pressing the button repeatedly the duration of the
vortexing increases by 1.5 second each time.
a jar miei
PA Saving the program when finished.
‚SAVE By pressing this button all the steps of the program are saved in the
Meme. flash memory, Programming mode quits automatically and the program
is now ready to use.
rewriting the new program over the existing one,
A Each of "C1", "C2", "C3" custom modes can be reprogrammed endlessly at any time by
( Tip ! Each program has a limit of 160 moves, If amount Is exceeded sound alarm
will sound and program will reset).
3/2012
3. Defining the behaviour of the rack movement, by driving the rack with a
hand.
This version of the Intelli-Mixer is capable to "learn" the hand driven inputs for movement
behaviour of the rack. This means that the system memorizes every step of rotation of the
rack in all directions and will repeat it exactly the same when the mix-mode is saved. In between
The rotation of the rack additional functions like "PP - pause" , "uu/UU - vortexing" can be
inserted in to the cycle of a mix-mode.
Hold the rack in your hand and tum it back/forth in any
desired combination and repetition. This will create a sequence of
rotation, shaking of various frequency that will define how the rack will
behave.
For example the rack can be rotated 180 degrees then "LULU" mixing mode
can be applied then the rack can be rotated another 90 degrees and
+ the "uu" mixing mode applied then rotate 90 degrees backswords and
"a "PP" pause function applied. Press "save" and now the mixing mode is
saved,
The customization mode is incredibly flexible and endless variety of
different modes can be designed!
mare rapid movements the system can not insure precision reading of the movement and
therefore the mixing mode may contain errors.
Tip I When making custom programs it is best to end the program in the initial point
(RPM display shows 00).
Ñ During the hand driven input - the speed of the rotation should not exceed 25 RPM. In case of
Operation order
Before turning the machine on carefully examine the power adapter, power
supply wire and external look of the machine. In case of external damage do not
tum on the machine without permission of the specialist.
e Fixing the rack.
Put the rack 1 wath the cylinder type end in to the back holder 2 until it is fixed
(Fig. 54, 56)
Put the flat side of the rack in to the shaft 3 until it is fixed and fasten the
screw 4 by the rack fixation wrench (Fig. 5). Find rack fixation wrench
underneath the machine.
e Jo replace the rack perform all the steps In reverse order.
3/2012
View from above
# Plug the adapter first to the machine power socket then to the power outlet
110-220V 50Hz.
» Put closed tubes In rack adapters.
« Using EID buttons select operation program (see Intelli-mixer program
overview table).
+ Set rotation speed and shaking intensity (see using mixing programs).
( Note ! Operation programs can be selected either during operation or
while mixer 1s stopped).
e Start operation by pressing button.
« When mixing is complete stop the machine by pressing Y button.
If the machine is not operational and is not disturbed during 10 minutes it
automatically goes in to energy saving SLEEP mode and shows blinking dots on
MODE and RPM displays. To exit SLEEP mode either press any button or push
the rack with your hand a few degrees. By pressing @ button twice the machine
goes out of the SLEEP mode and continues operation from the same rack
position where It was stopped. (applies In vortexing programs).
3/2012
Disinfection and cleaning
Before you start disinfection or cleaning make sure the power adapter Is
unplugged. It is recommended to perform cleaning with water and universal washing
liquids. Afterwards the machine should be carefully dried.
Safety features
It Is prohibited to:
* Plug the machine in to a power outlet with configuration which differs from the
power adapters’ plug configuration.
« Plug the power adapter in to the outlet If the adapter is damaged.
e Lise the device with damadaged control block.
Transportation and storage
To insure safety during the transportation, transported eguipment should be
packed in the original manufacturers’ packaging or similar packaging substitute.
Equipment can be transported by any kind of closed transport so that equipment Is
tightly fixed and transportation runs accordingly to regulations applied to this way of
transport.
Equipment should be stored in original manufacturers packaging in dry room with
humidity not more than 80% and temperature range from +10 °C up to +40 °C.
It Is not recommended to store the equipment more than 36 month.
Warranty statements
e Warranty applies to 24 month period from the date of purchasing.
« Malfunctions arisen through the fault of producer in the course of this period,
are removed free of charge.
+ (Guaranty 1s not valid in the following cases:
- If the senal number label of the manufacturer 15 damaged.
- If damage appears as result of incorrect operation, transportation or storage.
e These documents are necessary If applying for warranty repair:
- User manual with serial number of the machine.
- Officially signed report, describing the reasons and conditions of equipment
malfunction.
« Warranty repair could be performed only if the equipment is delivered in
the original manufacturers packaging or equally safe packaging. Therefore
please keep the transportation packaging after unpacking the device.
e If the above warranty requirements are disturbed, repair charges are applied to
the consumer.
For all further questions concerning exploitation and maintenance please
Contact manufacturer or product vendor.
Certificate of approval
Intelli-Mixer RM-2 N has been inspected for the
technical conditions and it meets all regulations necessary for such class of
device.
Quality control
person
(name) (signature)
Date of manufacture
Place for stamp.
Certificate of sale
Organization
Address
Phone
Vendor
(name) (signature)
Date of sale
Manufacturer's address:
21-136 Alzkraukles Str., Riga LV-1006
Tel: (+371) 6755 8743
Fax: (+371) 6755 1934
E-mail: [email protected]
WWW www. elmi-tech.com
3/2012