1
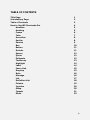
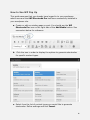
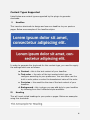
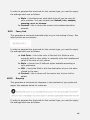
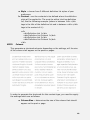
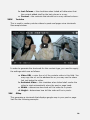
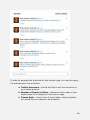
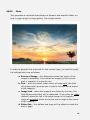
WP SHORTCODE PRO
USER’S GUIDE
1
WP Pop Up Documentation
WP Shortcode Pro is a wordpress plugin that enables the user to make use
of shortcodes to generate various content types to posts and pages. It is a
quick and easy tool to use in adding styles to your contents without any
need of in-depth programming knowledge or experience.
2
TABLE OF CONTENTS
Title Page
Introductory Page
Table of Contents
How to Use WP Shortcode Pro
Headline
Heading
Frame
Tabs
Accordian
Spoiler
Service
Box
Button
Devider
Spacer
Quote
Pullquote
Testimony
Highlight
Label
Fancy Link
Dropcap
Note
Message
List
Definition List
Column
Youtube
GMap
Tweets
Slider
1
2
3
4
5
5
6
7
8
8
9
10
11
11
12
12
12
13
14
14
15
15
16
16
17
18
19
20
20
21
23
3
How to Use WP Pop Up
This guide assumes that you already have logged in to your wordpress
admin area and that WP Shortcode Pro has been successfully installed in
your wordpress site.
a. Create or edit an existing page or post. You should see the WP
Shortcode Pro icon on the right side of the Add Media button. See
screenshot below for reference.
b. Click the icon in order to display the options to generate shortcodes
for specific content types.
c. Select from the list of content types you would like to generate
shortcodes. Define settings and click Insert.
4
Content Types Supported
Listed below are content types supported by the plugin to generate
shortcode.
I.
Headline
This inserts a shortcode to design and use as a headline to your posts or
pages. Below are examples of the headline styles:
In order to generate the shortcode for this content type, you need to supply
the settings which are as follows:
II.
a. Content – this is the text content of your headline.
b. Text-color – the color of the text content which you can
configure according to your preference. You can either use the
built-in color picker or enter the hexadecimal value of the color.
c. Font-size – this would be the size of the text content of your
headline.
d. Background – this is where you can add style to your headline
by choosing from the 6 different styles available.
Heading
This will insert styled headings to your posts or pages. Below are examples
using this shortcode:
5
In order to generate the shortcode for this content type, you need to supply
the settings which are as follows:
III.
a. Title – this is the title or the content of the heading to be
displayed on the post or page.
b. Style – choose from 4 different styles to design your headings
c. HTML tag – choose what type of heading it will be (h1, h2, h3,
h4, h5 or h6)
d. Text Align – the alignment of text contents on your heading.
Frame
This content type generates a shortcode which renders frame to your page
or post image. Below is an example of a framed image:
6
In order to generate the shortcode for this content type, you need to supply
the settings which are as follows:
IV.
a. Image Tag – this tag is <img src=”yourimage.jpg” />. Replace
yourimage.jpg with the actual image url. The easiest way to do
this is upload your image using the Add Media button and copy
the image url without inserting the image on the page or post
editor.
b. Frame Align – this determines the image alignment.
c. Style – 3 different frame styles you can choose from to apply to
your image.
Tabs
This will insert a styled tab to any post or page. Below is an example of an
inserted tab shortcode:
In order to generate the shortcode for this content type, you need to supply
the settings which are as follows:
a. Style – choose from 6 different tab styles according to your
preference.
b. Content - For the contents of the tabs you must specify within
html tag definition list, like the following example (where in
between <dt></dt> tags is the title of the tab menu and in
between <dd></dd> tags is the content of the tab) :
<dl>
<dt>Tab Menu 1</dt>
<dd>Tab Content 1</dd>
<dt>Tab Menu 2</dt>
<dd>Tab Content 2</dd>
</dl>
7
V.
Accordian
This will insert a styled accordion tab menu in your post or page. See
example below:
In order to generate the shortcode for this content type, you need to supply
the settings which are as follows:
a. Style – choose from 3 different accordion styles according to
your preference.
b. Content - For the contents of the accordion, you must specify
within html tag definition list, like the following example (where
in between <dt></dt> tags is the title of the accordian menu
and in between <dd></dd> tags is the content of the accordian)
:
VI.
<dl>
<dt>Accordian Menu 1</dt>
<dd>Accordian Content 1</dd>
<dt>Accordian Menu 2</dt>
<dd>Accordian Content 2</dd>
</dl>
Spoiler
This will insert a dynamic spoiler section on your post or page which you can
set to be open or close. See examples below (the first one is show to be
open) :
8
In order to generate the shortcode for this content type, you need to supply
the settings which are as follows:
VII.
a. Title – the title/heading of your spoiler content.
b. Content – the content below the title which contains the spoiler.
c. Is Spoiler Open - option to determine whether the content of a
spoiler is displayed by default.
d. Style – choose from 3 different spoiler styles according to your
preference.
Service
This will insert a content containing the list of services that you have to offer
to your clients or customers. Please see example below:
9
VIII.
a. Title – the title or heading of your service
b. Icon URL – the location of your icon that should start with
(http://)
c. Content – this is the section where you can list down and
describe your services
Box
This inserts a styled box to your post or page. See below sample for this
content type:
In order to generate the shortcode for this content type, you need to supply
the settings which are as follows:
a. Box Color – this will be the theme color of the box. You can
choose from the built in color picker or you can manually enter
the hexadecimal value of the color.
b. Title – this will be the title or the heading of the box content
10
IX.
c. Content – this field will be where you should be adding in the
content inside the box.
Button
This inserts different buttons coming in with different styles to be used on
whatever it will serve best in your posts or pages. See example below:
In order to generate the shortcode for this content type, you need to supply
the settings which are as follows:
X.
a. Button Label – this is the text value of your button.
b. Button URL – this is the url destination of the link when clicked
c. Style – choose from the 7 different buttons styles according to
your preference.
d. Button Size – determines the size of your button. You can
either set it to be mini, small, medium, large or very large.
e. Text Color – the color of the text content or the label of your
button. You can choose the color using the built-in color picker
or manually enter the hexadecimal value of your choice.
f. Corner Radius – this determines how round will be the corners
of your button in pixels.
g. Button Icon – this dropdown contains various pre-made button
icons ready for use in your button.
h. Icon Position – this determines the position of your icon which
can either be before the text or after the text.
i. Link Target – determines how the link should be opened. Select
self if you would like it to be opened on the same window or
blank if you want it to be opened in a new tab or window.
Devider
This generates a shortcode for a divider that adds a division in between
contents in posts or pages. See example below:
11
In order to generate the shortcode for this content type, you need to supply
the settings which are as follows:
XI.
a. Show Top Link – choose whether to show or hide the top link
which when clicked takes the user to the top of the page.
b. Style – choose from the 4 devider styles available according to
your preference.
Spacer
This creates an empty space with adjustable height. There is only one
setting to configure for this content type which is spacer height in pixels. The
value should be an integer.
XII.
Quote
This creates a quote which is an alternative to the blockquote built-in feature
of the wordpress editor. See example below:
In order to generate the shortcode for this content type, you need to supply
the Content which is the text content of your quote.
XIII.
Pullquote
This works if you would like to insert citations which can be positioned
according to your preferences. Below is an example of a pullquote.
12
In order to generate the shortcode for this content type, you need to supply
the settings which are as follows:
XIV.
a. Content – this would be the content inside the pullquote.
b. Pullquote Alignment – setting which would allow you to decide
how you would like your pullquote to be positioned.
Testimony
This creates a shortcode that renders content for a testimonial. See image
below:
In order to generate the shortcode for this content type, you need to supply
the settings which are as follows:
a. Author – this is the name of author or writer of the testimonial.
b. Content – this is where the testimonial content should go.
c. Style – choose from 4 styles according to your preference to
style your testimonials.
13
XV.
Highlight
This generates a shortcode that highlights contents setup. See example
below:
In order to generate the shortcode for this content type, you need to supply
the settings which are as follows:
XVI.
a. Background Color – this will be the color of the highlight to
your text. You can choose the colors using the built-in color
picker or you may also manually enter the hexadecimal value of
the color.
b. Text Color – this is the color of your text. You can choose the
colors using the built-in color picker or you may also manually
enter the hexadecimal value of the color. Always take note not
to use the same color as with your background color else the
text would just blend in to the highlight.
c. Content – this is where you will enter the text contents to be
highlighted.
Label
This generates a shortcode that creates labels to your posts or pages. Refer
to the example below:
14
In order to generate the shortcode for this content type, you need to supply
the settings which are as follows:
XVII.
a. Style – this determines what label style will you be using for
your contents. You may choose from default, info, success,
warning, error or inverse.
b. Content – this is where the content to be labeled should be
entered.
Fancy Link
This generates a shortcode that adds style to your link making it fancy. See
below picture as an example:
In order to generate the shortcode for this content type, you need to supply
the settings which are as follows:
XVIII.
a. Link Color – this is the color of the text link. Select a color
using the built-in color picker or manually enter the hexadecimal
value of the color of your choice.
b. Style – choose from 3 different styles available according to
your preference.
c. URL – should be filled in with the destination of your link when
clicked by the user.
d. Content – this is where will the anchor text of your link be
added.
Dropcap
This generates a shortcode for dropcaps in text contents of your posts and
pages. See example below for reference:
In order to generate the shortcode for this content type, you need to supply
the settings which are as follows:
15
XIX.
a. Dropcap Size – choose from the 3 available sizes of the
dropcap: small, medium or large.
b. Dropcap Style – choose from the 3 dropcap styles of your
choosing.
c. Content – should be the first letter of the product where you
would like to apply dropcaps.
Note
This shorcode generates note styling to contents. Basically, it is applicable to
emphasize important reminders or instructions on your posts or pages. See
sample below:
In order to generate the shortcode for this content type, you need to supply
the settings which are as follows:
XX.
a. Color – select a color from the built-in color picker or manually
enter the hexadecimal value of the color of your choice to be
used as the background.
b. Content – this is where you will be placing the contents as
notes.
Message
This shortcode is quite similar to note except that it is intended to show 4
types of messages in your site which is info, success, warning or error.
See examples below:
16
In order to generate the shortcode for this content type, you need to supply
the settings which are as follows:
XXI.
a. Style – choose from the list what type of message will the
content be displayed on your post or page.
b. Content – this is where the contents or the message should be
entered.
List
This generates a shortcode that displays fancy looking lists in your posts or
pages. See example below:
Note: This is only applicable to unordered lists.
17
In order to generate the shortcode for this content type, you need to supply
the settings which are as follows:
a. Icon – choose from the different icons in the dropdown the style
you prefer using for your list items.
b. Content - you must specify within html tag unordered list, as
the following example (where in between <ul></ul> tags are
the list items enclosed between <li></li>:
XXII.
<ul>
<li>Item 1</li>
<li>Item 1</li>
</ul>
Definition List
This shortcode is used to generate a definition list or to define certain terms
inside a post or page. See example below:
In order to generate the shortcode for this content type, you need to supply
the settings which are as follows:
18
a. Style – choose from 3 different definition list styles of your
preference.
b. Content – are the contents to be defined where the definition
style will be applied to. The must be within html tag definition
list, like the following example (where in between <dt></dt>
tags is the title of the definition list and in between <dd></dd>
tags is the content of it) :
XXIII.
<dl>
<dt>Definition List 1</dt>
<dd>Definition List Content 1</dd>
<dt>Definition List 2</dt>
<dd>Definition List Content 2</dd>
</dl>
Column
This generates a shortcode wherein depending on the settings, will the size
of the column shall appear on the posts or pages.
In order to generate the shortcode for this content type, you need to supply
the settings which are as follows:
a. Column Size – determines the size of the column that should
appear on the post or page.
19
XXIV.
b. Last Column – this checkbox when ticked will determine that
the content added shall be the last column in a row.
c. Content – the contents that should be in every defined column.
Youtube
This is used to render youtube videos to posts and pages via a shortcode.
See sample below:
In order to generate the shortcode for this content type, you need to supply
the settings which are as follows:
XXV.
a. Video URL – enter the url of the youtube video in this field. You
may copy the url on the address bar or you may use the share
link just below the video.
b. Autostart Video – this checkbox when ticked shall render the
video to start automatically when the post or page loads.
c. Width – determines how wide will the video be in pixels.
d. Height – determines how tall the video will be in pixels.
GMap
This generates a shortcode that displays google map in your post or page.
Just like the following example:
20
In order to generate the shortcode for this content type, you need to supply
the settings which are as follows:
XXVI.
a. Map Latitude – should be filled in with a numerical value that is
the exact latitude of the location in the map.
b. Map Longitude – should be filled in with a numerical value that
is the exact longitude of the location in the map.
c. Width – the width of the map in pixels
d. Height – the height of the map in pixels.
Tweets
This generates a shortcode that displays a specific number of tweets in a
post or page. See example below:
21
In order to generate the shortcode for this content type, you need to supply
the settings which are as follows:
a. Twitter Username – should be filled in with the username of
your twitter account.
b. Number of Tweets to Show – determines how many of your
latest tweets to be displayed in the post or page.
c. Tweets Style – choose from 2 styles (light or dark) available
you would like your tweets to be showed in.
22
XXVII.
Slider
This generates a shortcode that displays a dynamic and beautiful slider in a
post or page using the image gallery. See sample below:
In order to generate the shortcode for this content type, you need to supply
the settings which are as follows:
a. Source of Image – this determines where the source of the
images is accessible. It can either be image(s) of the current
post or image(s) of a specific post.
b. Post – when you select under source of image post, this field
will appear which prompts you to specify the post as the source
of the image(s).
c. Image Link – when the image(s) are clicked by the user, this
field defines where they will be redirected. It can either be image
(default) where the link is the actual image url of a specific
image or permalink which can be the post or page as the source
of the image(s).
d. Slider Size – this defines how large will the slider be inside the
post or page.
23
e. Number of Slides - defines how many slides or images are to
be displayed in the slider.
f. Animation speed (1000 = 1 second) – determines how fast
the animation is applied after every slider.
g. Animation delay (1000 = 1 second) – determines the
interval the slider changes or shifts to another image.
24